

Page 1
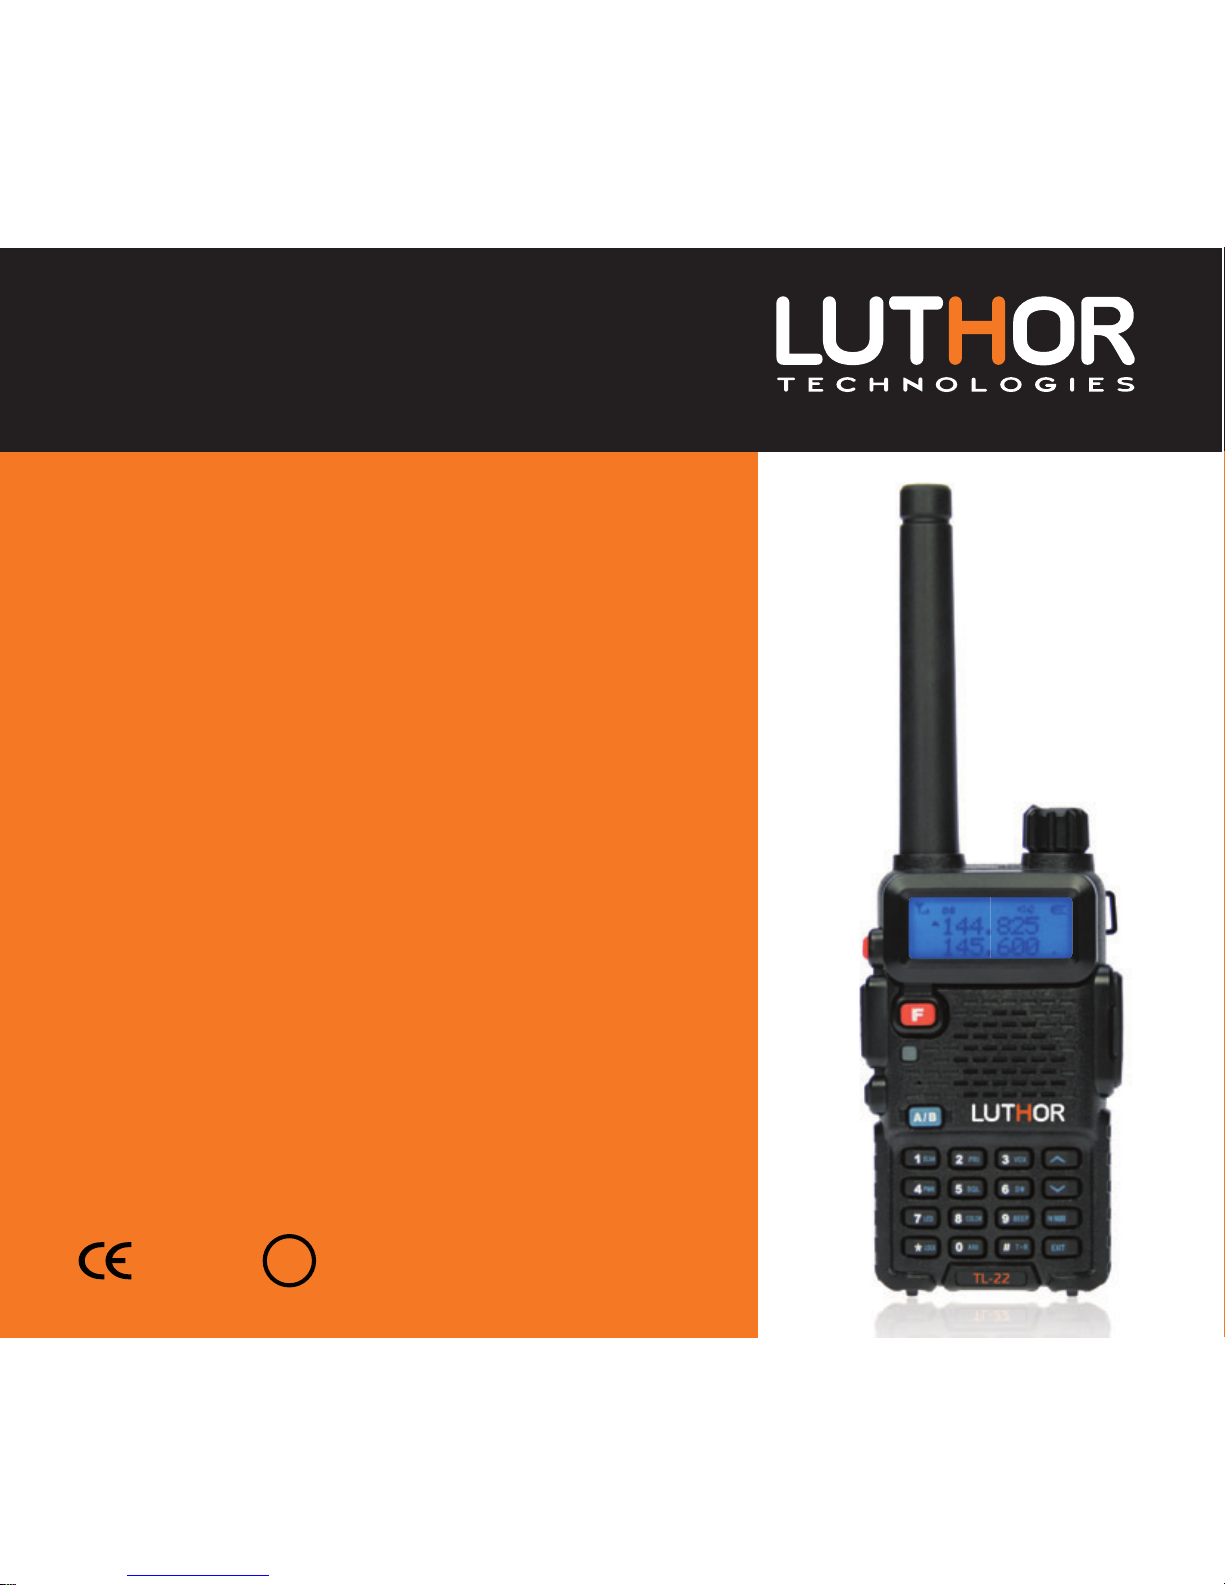
TL 22
MONOBAND VHF TRANSCEIVER
VHF
144 - 146 Mhz
TL 88
USER MANUAL
1177 !
Page 2
www.luthor.es
We have done everything possible to obtain the maximum of detail in this manual, but we are not
responsible for any possible omission as well as printing errors or translation. All the
specifications are subject to change without previous notice.
Note on environmental protection:
This symbol on the product or its packaging indicates that at the end of the useful life of this product the user
is legally obligated to fulfil the European directive 2002/96/EU in the legislative national system (RD 208/2005),
which applies the following: The electrical and electronic equipment, as well as batteries and rechargeable
batteries, can not be treated as normal household waste, but must be delivered to the corresponding collection
point. By ensuring that this product is rejected correctly, you help with this action to prevent
negative consequences for the environment and human health which could be caused by its
inappropriate management. The recycling of materials helps to preserve natural resources. To
receive detailed information about the recycling of this product, please contact the city office, the
most nearby waste disposal service or the establishment where you purchased the product.
Page 3
www.luthor.es
EN
1
We want to appreciate the confidence shown by purchasing this LUTHOR TECHNOLOGIES
model TL-22. This transceiver offers an innovative design in terms of technology and
multi-functionality. Its high quality and extensive features make it one of the best
equipments in its field, we trust in your total satisfaction with your expectations and
communication needs.
Please read carefully the following manual before using the transceiver in order to
guarantee the maximum performances.
The use of the symbol shows that this equipment its under use restrictions in
certain countries.
Countries where the use of this equipment is permitted, under requirement from the
corresponding authorization or license of the different administrations from the
countries listed below:
AT BE DK FI FR DE GR IS
IE IT LI LU NL NO PT ES
SE CH GB CY CZ EE HU LV
BG RO
LT MT PL SK SI
Page 4
www.luthor.es
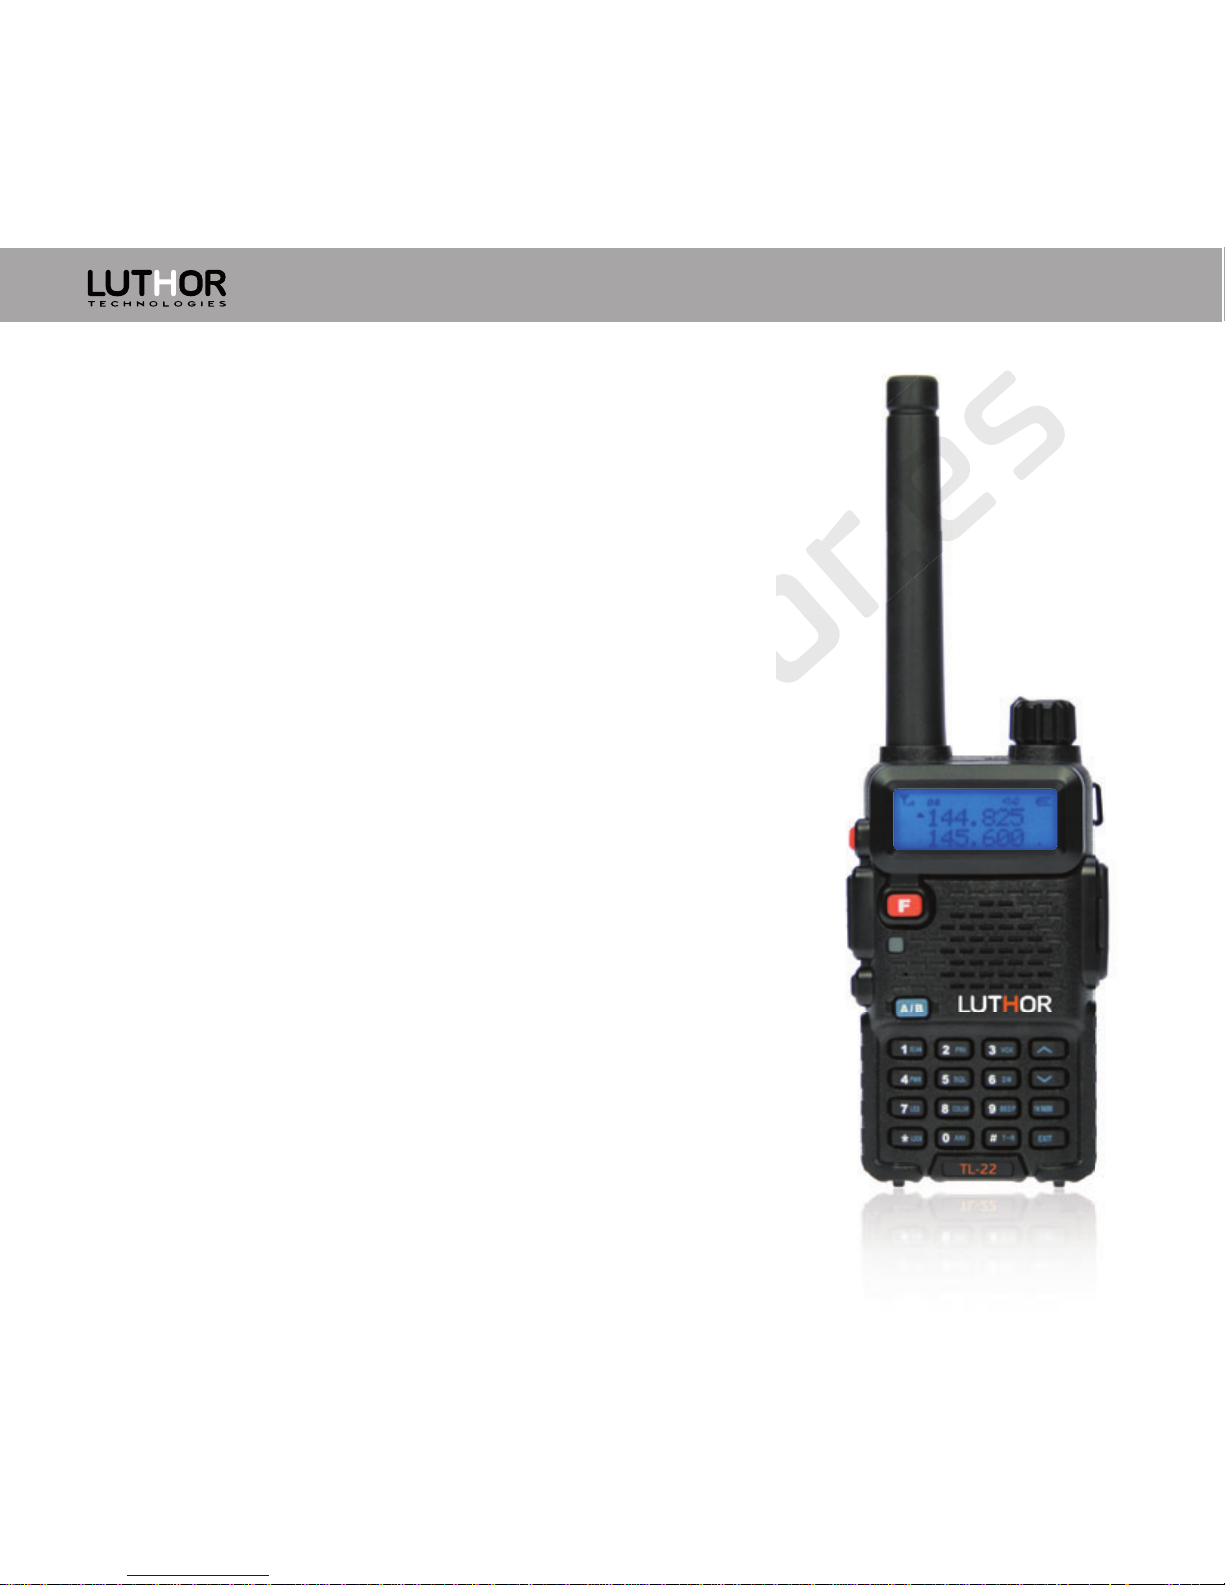
General Transceiver Functions:
· Monoband VHF, dual display, dual standby
· A/B bands with independent use
· 128 memory channels
· FM radio receiver, 25 radio memories
· VOX or hands free function, with adjustable sensibility
· Voice guide in English
· Analogical CTCSS and digital DCS tones
· 1750Hz tone
· ANI code
· DTMF / 2 tones / 5 tones
· 8 encryption levels
2
Page 5

www.luthor.es
EN
3
Contents index:
Cautions and practical advices
Unpacking of the equipment and content
Supplied accessories
Battery charge
Accessories installation
Transceiver’s description
Introduction to display’s icons
Keys functions
Working modes
Menu’s table
Menu’s configuration
Detailed descriptions
Advanced functions
Technical specifications
Cautions and practical advices
4 - 6
7
8 - 10
11 - 13
14, 15
16, 17
18, 19
20, 21
22 - 24
25 - 28
29 - 41
42 - 47
48, 49
50
Page 6
www.luthor.es
Cautions and practical advices
Please read carefully the following manual before using the transceiver in order to
guarantee the maximum performances. This manual has important using and safety
instructions, therefore, we recommend you to keep it for future consulting.
Any repair must be realized only by qualified personnel.
Do not use this transceiver nor recharge it anywhere susceptible flammable
environment (gas presence, smoke ...).
Turn off the equipment when being in a gas station.
Do not manipulate or attempt to modify the transceiver or the battery.
If you want to store the equipment during a long period of time, you have
to extract the battery.
When the equipment is in functioning, avoid that the antenna is close or
touching your face or eyes.
The equipment will give its maximum performance if the antenna is in vertical
position with the microphone at a distance of 5-10 cm from your mouth.
Ear Damages! If the receipt is done with headphones ... the volume should be
low. Prolonged use at high volume may damage the ear. If a¬er using the
equipment, you hear a constant sound of a buzzing, reduce the volume or
!
!
!
!
!
!
!
!
4
Page 7
EN
www.luthor.es
or abandon the use of headphones.
DO NOT turn on the equipment with a voltage other than indicated: risk
of damages.
DO NOT use the PTT button if is not necessary.
DO NOT use the transceiver if you are driving a vehicle. To prevent accidents,
focus only on driving.
Avoid exposing the transceiver to the sun for long periods or in Extreme
temperatures below 0 º or above 55 degrees.
The excessive overheating can provoke the explosion of the battery.
Be careful with the equipment and the battery, a blow might damage them
or even in the worst case, it can do that the battery exploits.
Under no concept short-circuit or cross the battery terminals, it could
irreversibly damage the battery and in the worst case could lead to an
explosion that could lead to potential physical harm to the user. It is is
recommended:
- Transport the equipment of suitable form in order that the terminals
could not cross unintentionally.
- Do not carry it in your pocket with metallic objects like keys, coins, etc.
!
!
!
!
!
!
!
5
Page 8

www.luthor.es
- Do not place the equipment with terminals making contact in a metal
surface.
- Avoid contact of the equipment and battery to water or conductive liquids.
- As the transceiver as the elements that comes with it aren’t toys, keep
them always out of reach of children or pets.
6
Page 9
www.luthor.es
7
EN
Unpacking of the equipment and content
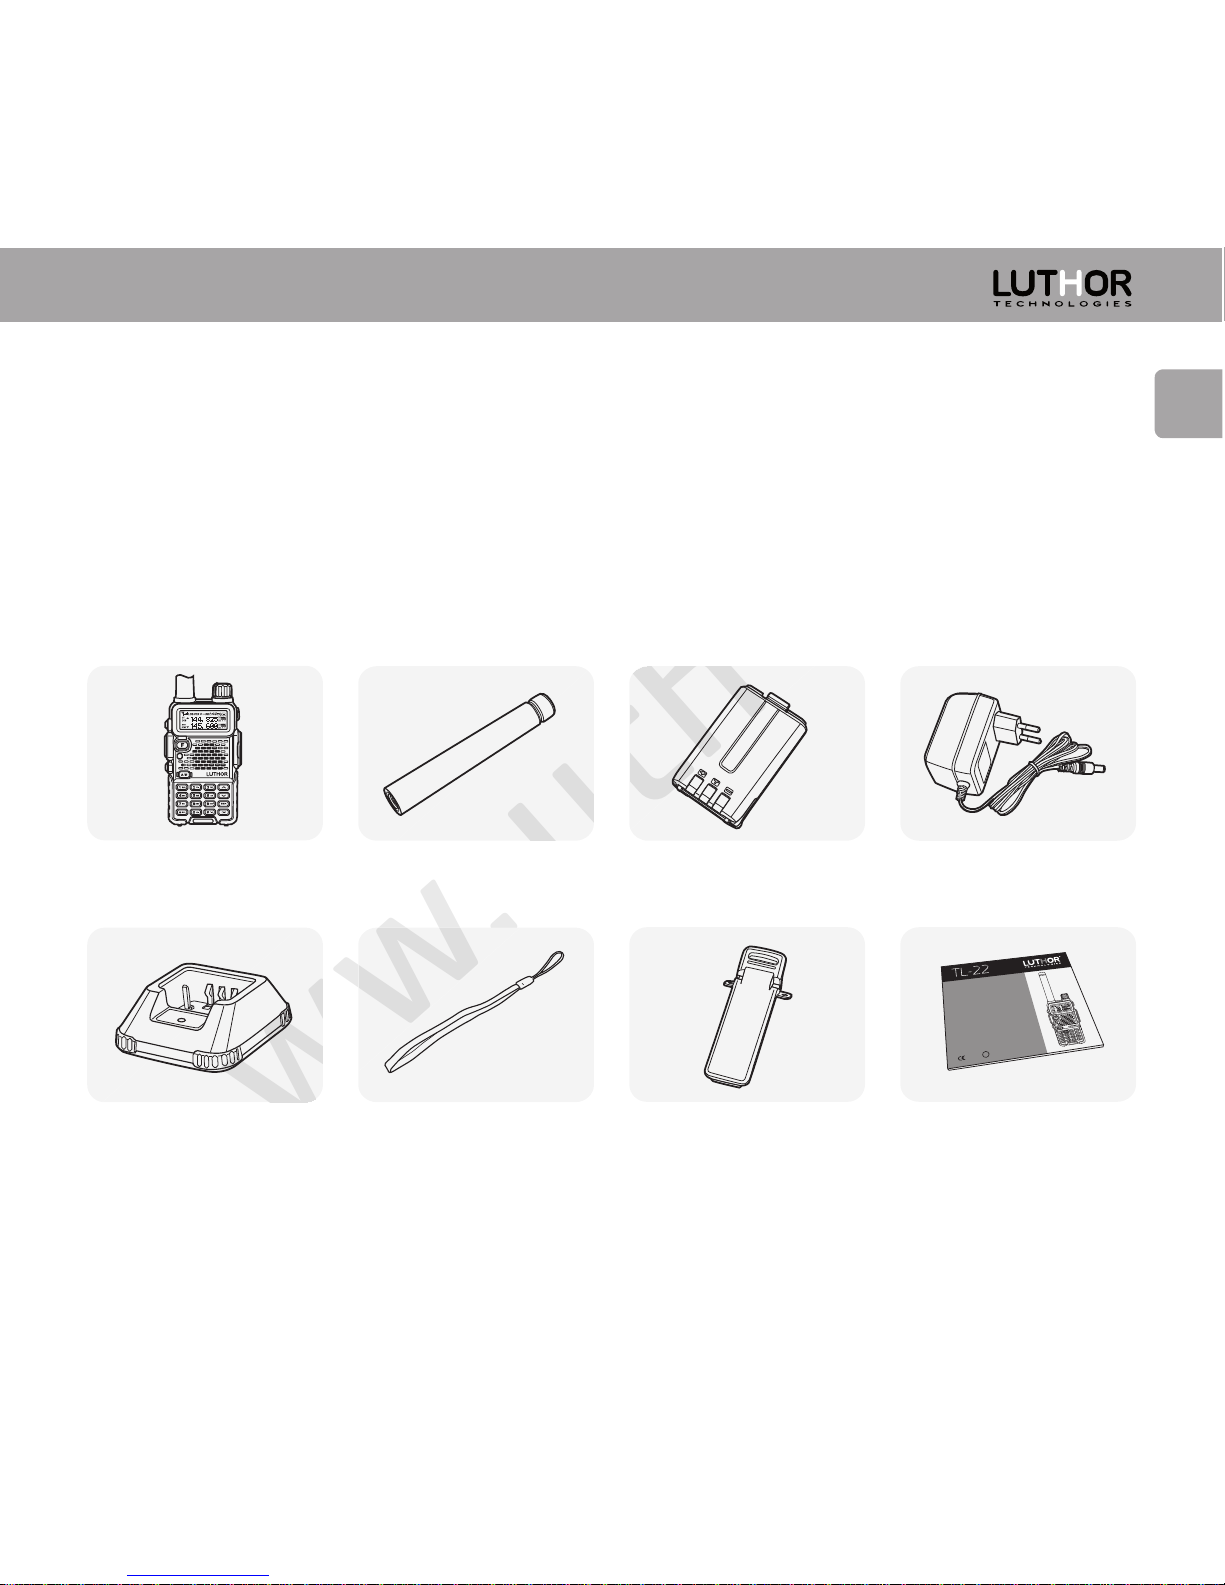
TL-88 handheld
Desktop charger
TLC-440
Antenna
Wrist strap
Li-Ion battery
TLB-402
Battery charger TLC-435/1
Belt clip TLP-422 User’s manual
Unpack carefully the content of the box of your transceiver. We recommend you to
verify the elements listed in the following table before discarding the package. If some
element is missing or it had been damaged due to the shipping, please contact your
dealer as soon as possible.
Accesorios Suministrados
TL-22
TL-22
TRANSCEPTOR
VHF
144 - 146 Mhz
MANUAL DE USUARIO
1177 !
Page 10

www.luthor.es
Battery charge
The TL-22 is equipped with a Lithium Ion battery (also known as Li-Ion or simply Lithium
battery). The main characteristics of these batteries are lightness, no memory effect
and a high energetic capacity in a reduced size. The majority of the lithium batteries
have more advantages than Ni-Mh batteries or the older and obsolete ones of Ni-Cad
(the cadmium is a very pollutant element), thought it is necessary to take some
cautions with the Lithium batteries, therefore we recommend you to read carefully the
warnings indicated on the subject of Lithium batteries in the paragraph located in the
pages 4, 5 and 6 of the Cautions and practical advices.
To carry out the charge of the batteries, the equipment is supplied with the LUTHOR
TL-440 charger, it is an intelligent one that identifies the battery charge to recharge it
only during the necessary time to complete its full capacity. In the case that the
battery is totally flat, the full capacity will be reached in about 5 hours. WARNING: it is
not at all advisable to recharge the battery with another charger than the original
TL-440 and not try to charge another battery different than the ones provided by
the brand for this charger.
8
Page 11
www.luthor.es
EN
9
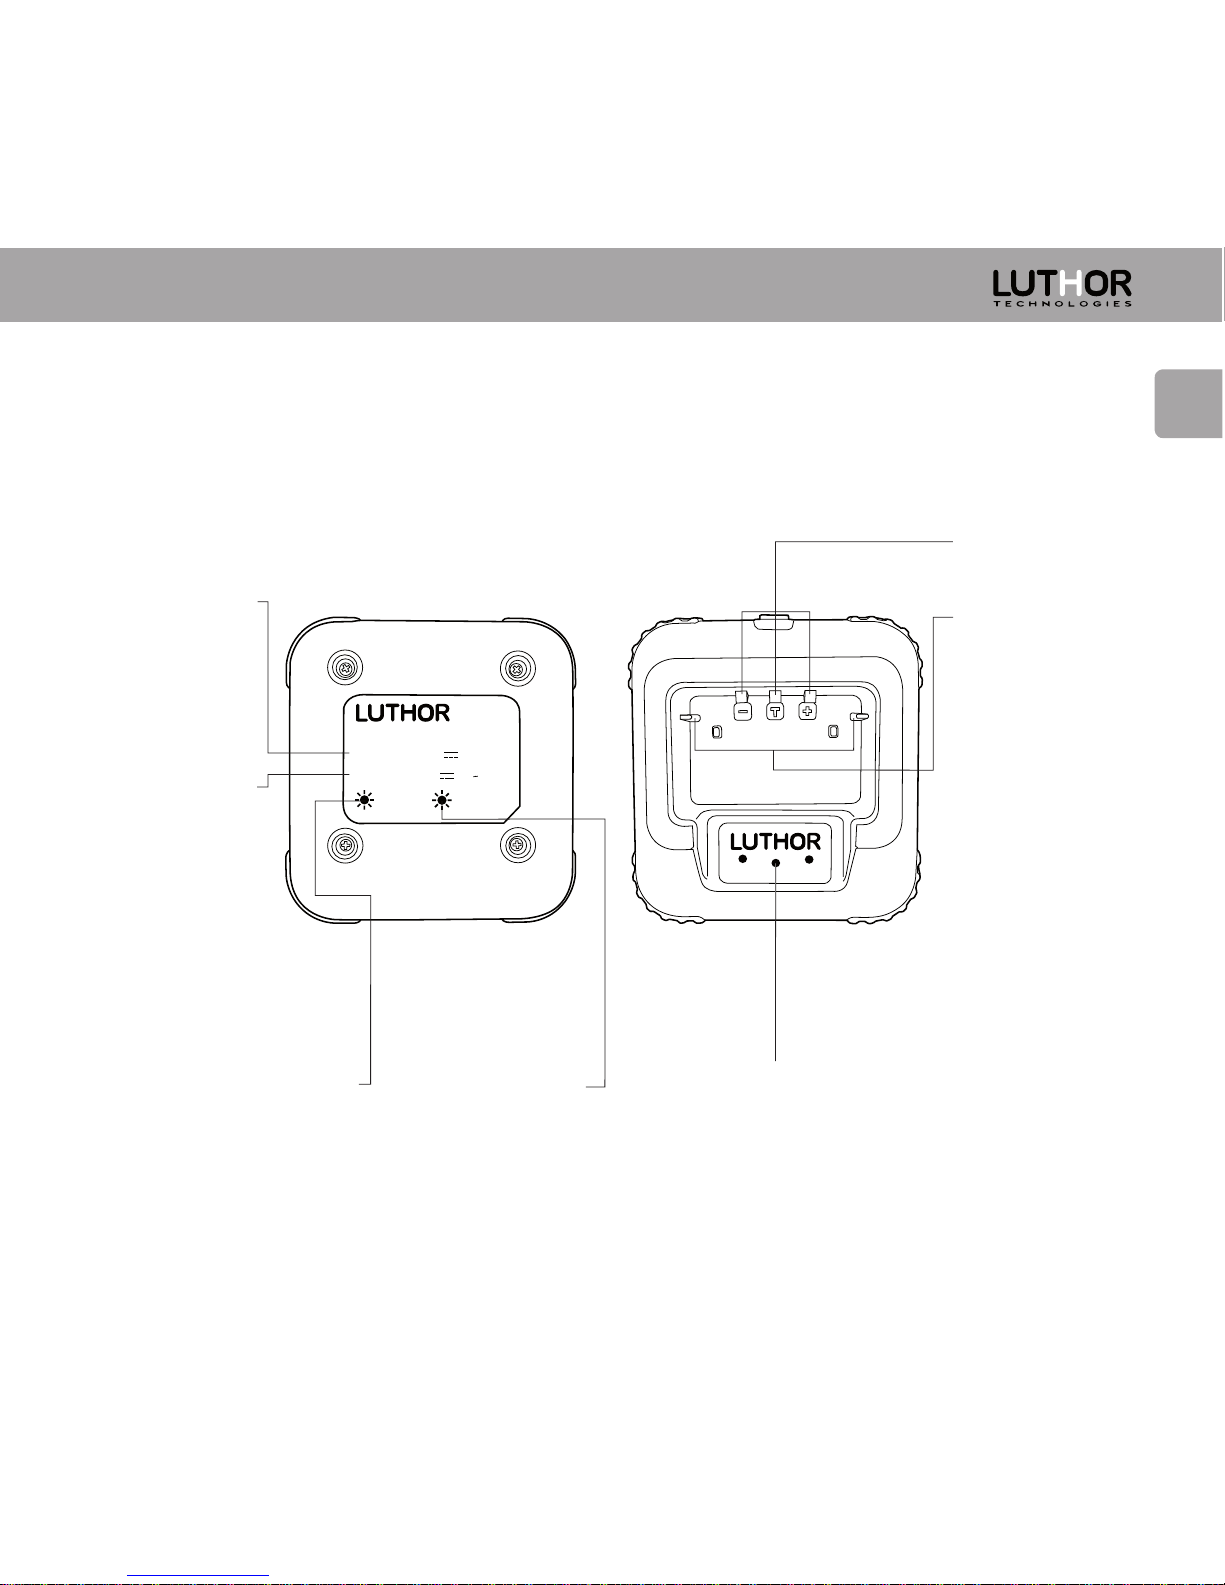
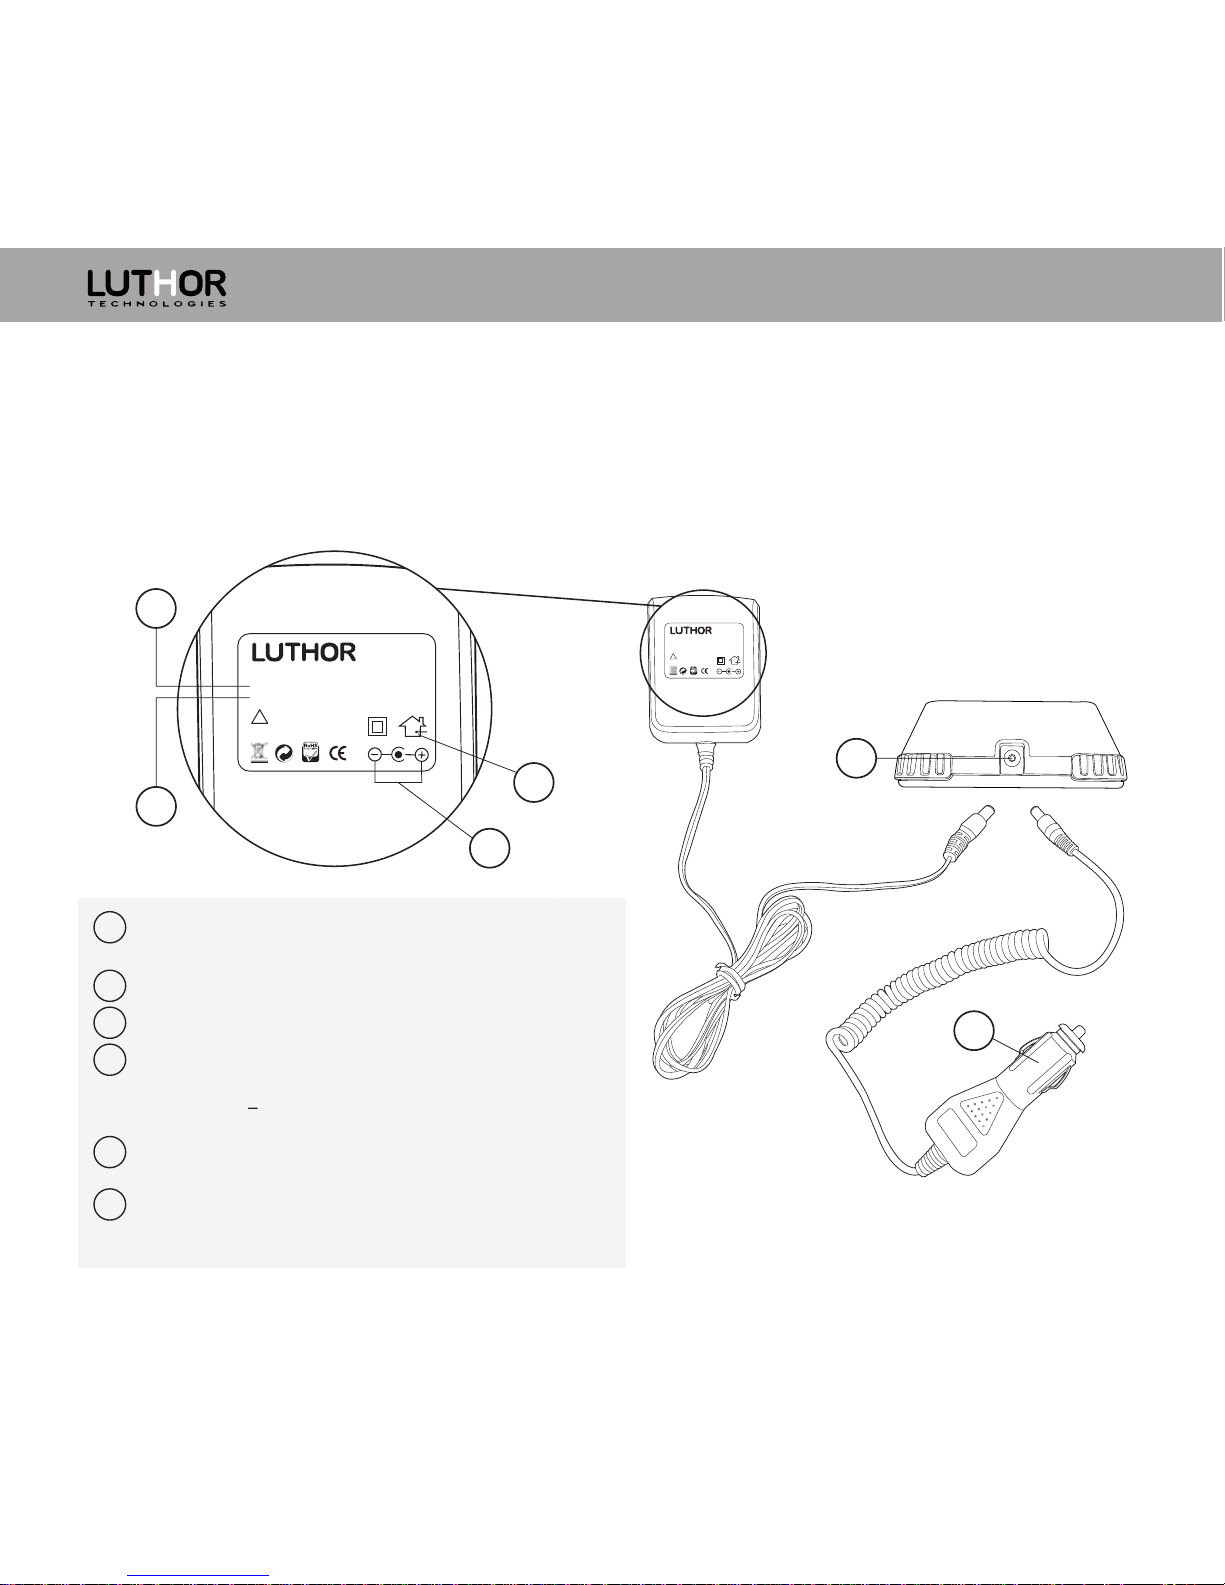
Under the charger, you will observe on the labelling its characteristics and some icons
that indicate the state of the battery, next we show you its meaning:
INPUT: It
indicates that
the voltage
entry for this
charger is
about 13,8
volts of
continuous
tension.
OUTPUT: It
indicates that
the voltage
exit and the
battery charge
is about 8,6
continuous
volts with a
current of
between 400
and 450 mAh.
RED SYMBOL: Top Led
turned on in red colour
indicates that the
battery is charging.
GREEN SYMBOL:
Top Led turned
on in green colour
indicates that the
battery has
completed its
charge.
Indicator LED of
operation and charge
status.
Charge
contacts.
Guide slots for
introducing the
battery.They
allow charging
only the
battery alone
or with the
transceiver.
Note: in case of
charging the
battery with
the transceiver
is advisable to
do it with the
handheld
switched off.
CHARGING
COMPLETED
Charger
INPUT DC13.8V
OUTPUT:DC 8.6V
Charging
Completed
400 450mAh
Page 12
www.luthor.es
The supply of the charger can be made from its own transformer which reference is
LUTHOR TLC-435/1 supplied with the equipment or through the connection known as
"cigarette-lighter" of the vehicle, which optional reference is LUTHOR TLB-50.
!
INDOOR ONLY
AC ADAPTOP
INPUT. 220V 50Hz
OUTPUT. 12V-300mA
Made in China
TLC-435/1
!
INDOOR ONLY
AC ADAPTOR
INPUT. 220V 50Hz
OUTPUT. 12V
Made in China
TLC-435/1
Battery charger
TLC-435/1
Desktop charger
TLC-440
Charger
TLB-50
The battery charger must be connected to
220v/50Hz.
Output: 12 volt. 300mA DC
Only for inner use.
Connections:
Positive interior contact
Negative exterior contact
"Cigarette-lighter" connection, from 12 to 13,8
volts.
Back connection, from 12 to 13,8 volts input
max.
1
1
2
3
4
5
6
2
3
4
5
6
+
Page 13

www.luthor.es
EN
Accessories installation
Battery installation
1. Fit the Lithium battery on the guide and slide it towards the upper transceiver’s part
– in the arrow’s direction – to fix it completely. (Figure 1)
2. To remove the battery, press the subjection button and slide the battery towards
the lower transceiver’s part – in the arrow’s direction – to remove it completely.
(Figure 2)
Figure 1 Figure 2
11
battery subjection
button
Page 14
www.luthor.es
Antenna installation
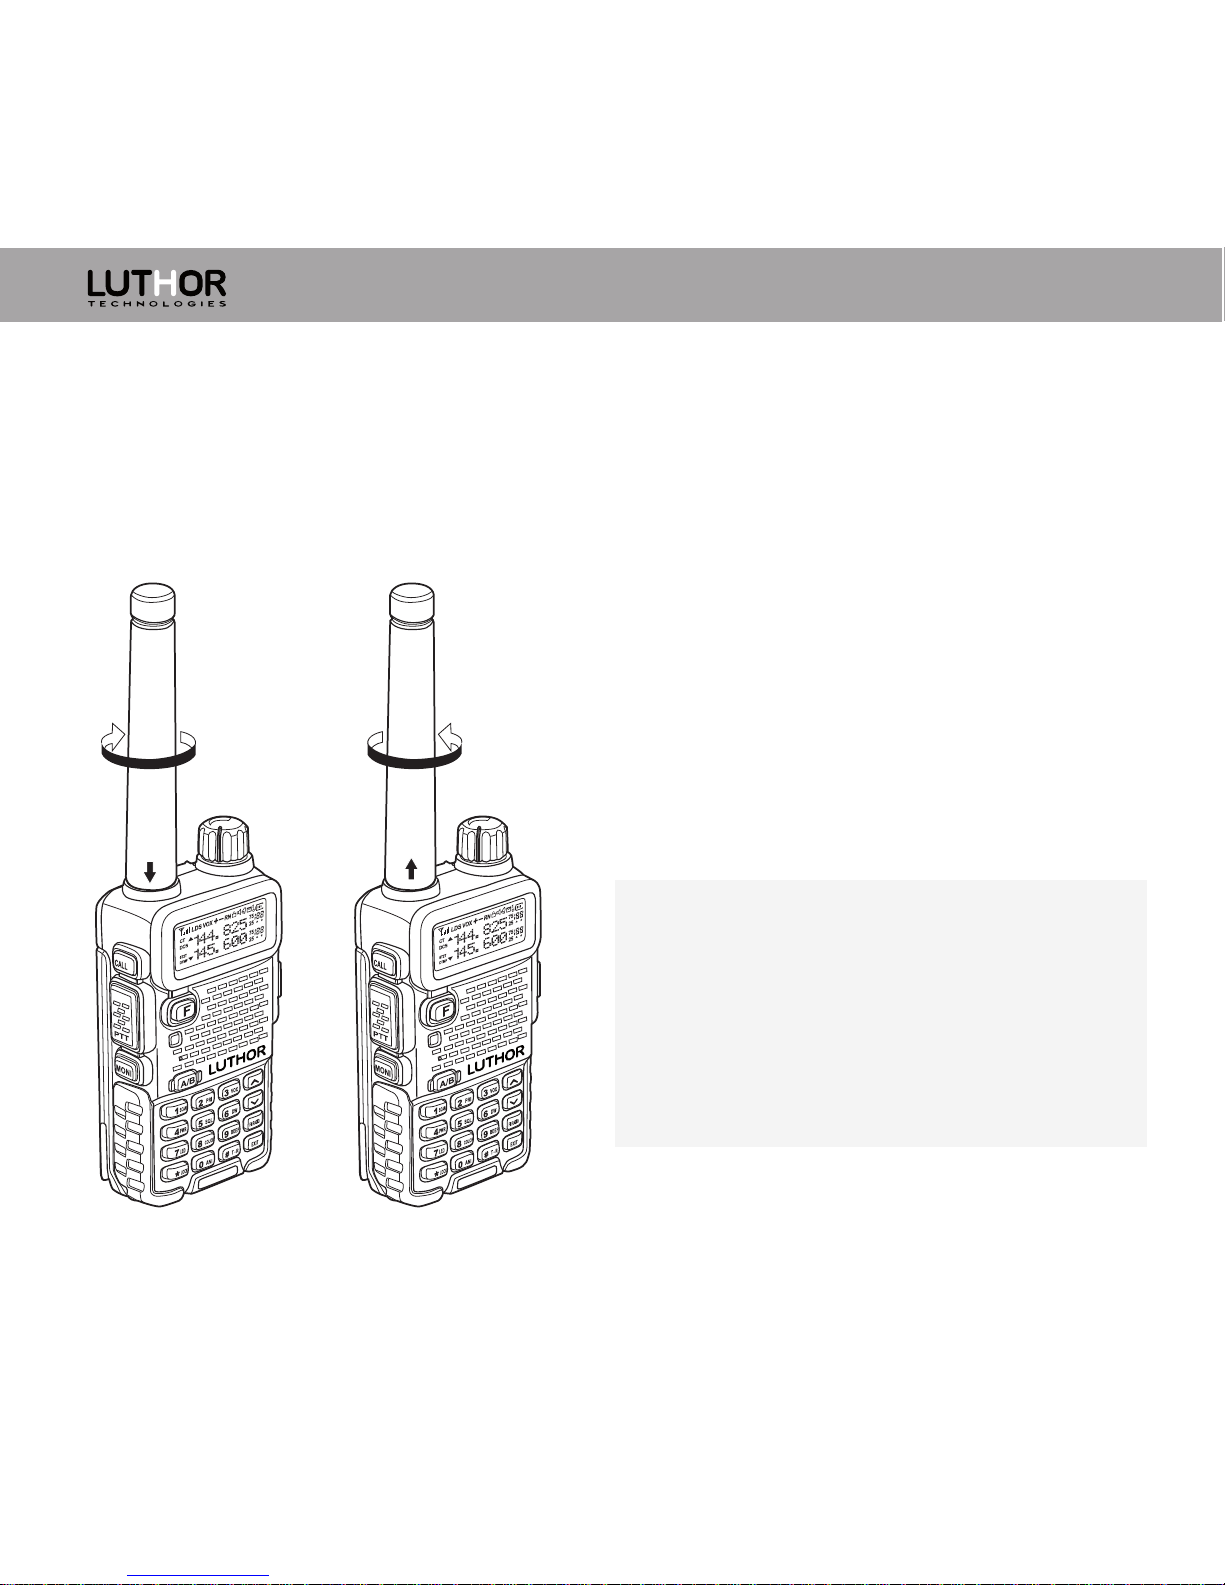
To install the supplied antenna, hold it on the base and make it turn clockwise into the
transceiver’s top connector until it will be totally fixed.
Don’t tighten it so strong. (Figure 3)
To uninstall the antenna, hold it on the base and
make it turn anticlockwise. (Figure 4)
Note: never transmit without having
installed the antenna.
When you install the supplied antenna,
never hold it on the upper side to screw it
on the transceiver’s top connector,
otherwise you could broke the antenna.
Figure 3 Figure 4
TL-22
TL-22
12
Page 15
www.luthor.es
EN
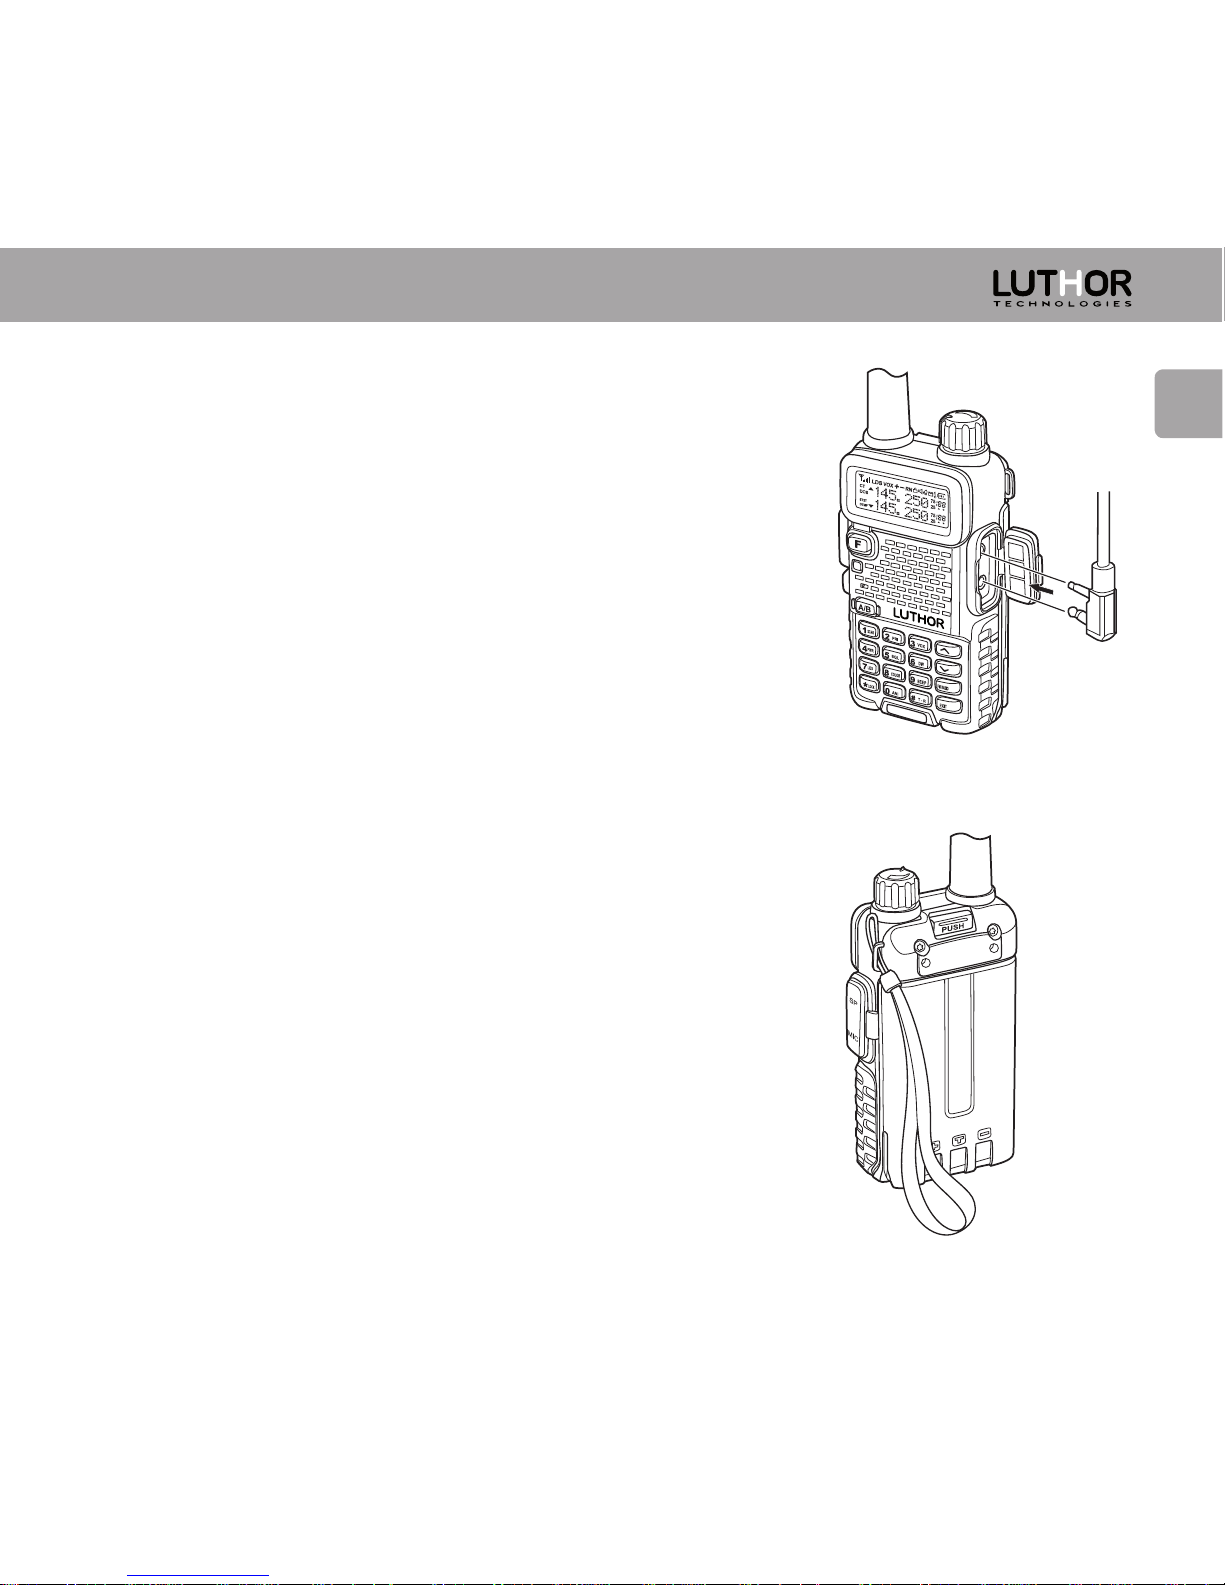
Installation of an external accessory:
earphone, microphone, PC cable, etc.
Open the connections cover placed on the right lateral
side, and insert the accessory connection: earphone,
microphone, programming cable, etc.
(Figure 5)
Installation of the wrist strap
Introduce the strap’s extreme through the transceiver’s
bolt and tie the wrist strap with itself extreme.
(Figure 6)
TL-22
13
Figure 5
Figure 6
Page 16
www.luthor.es
Transceiver’s description
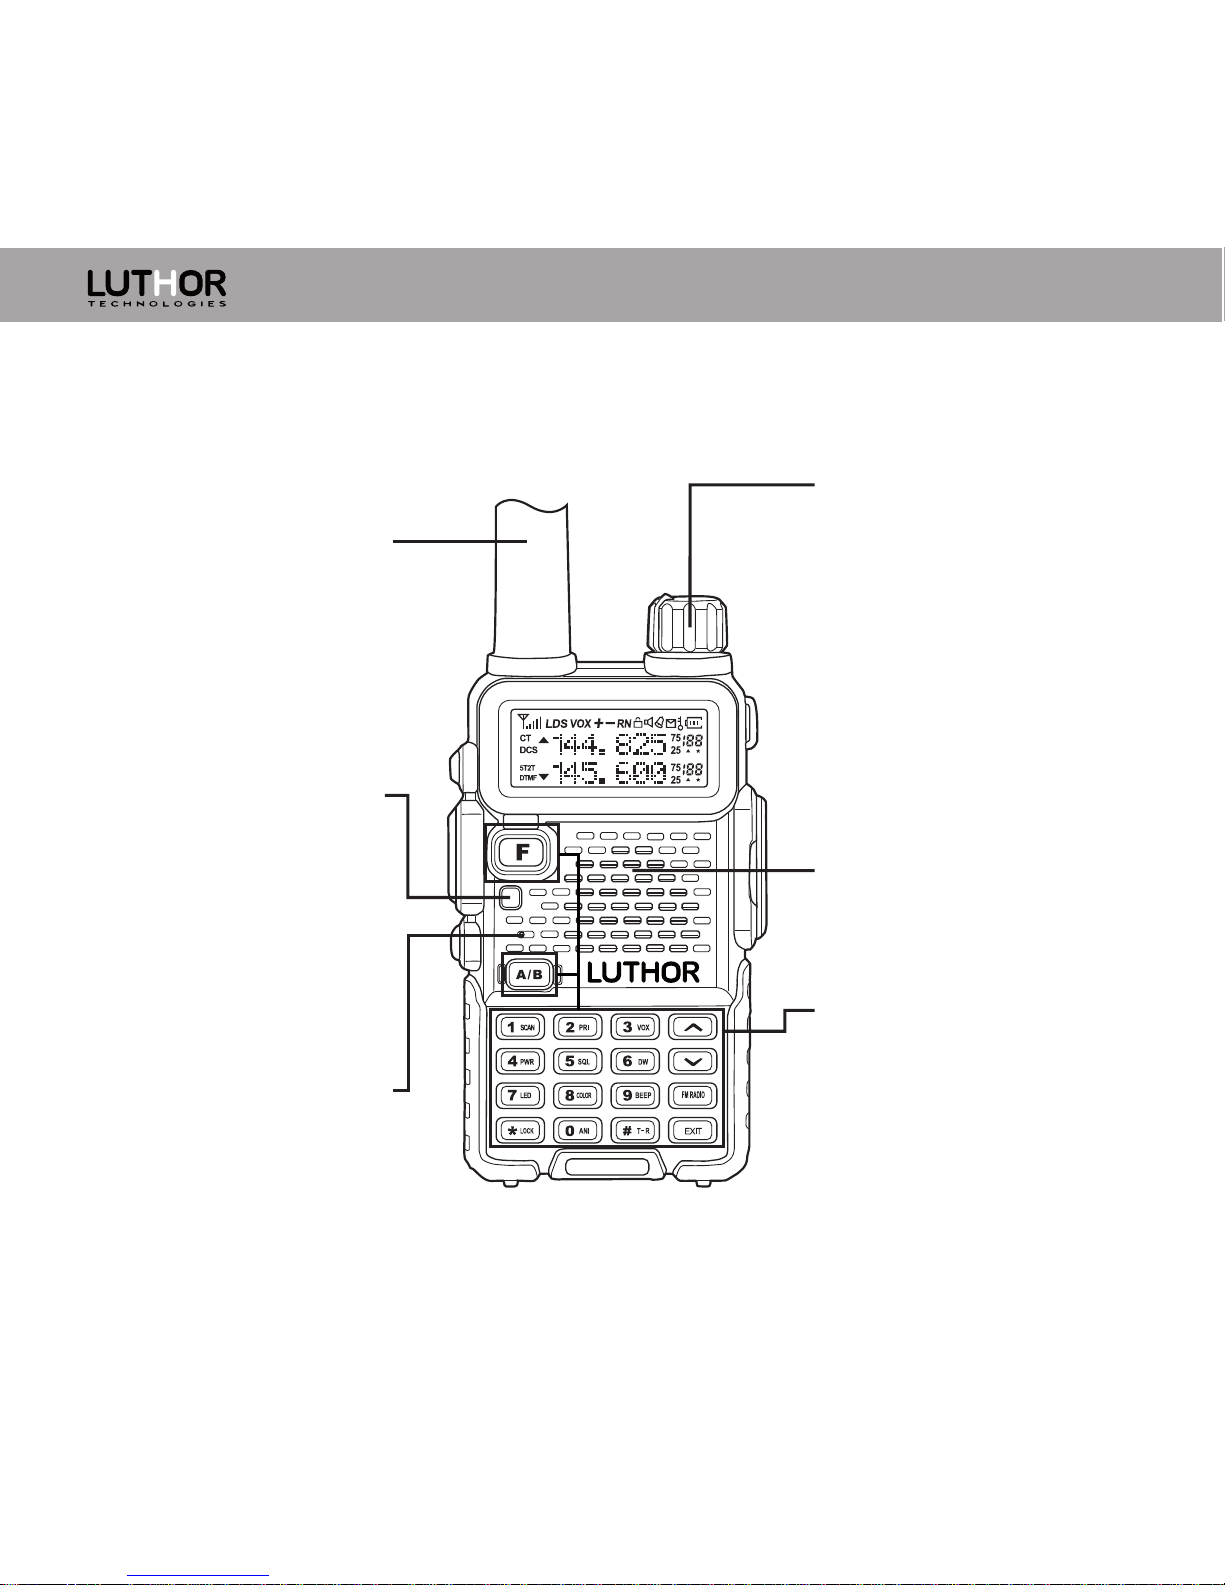
ON-OFF/VOLUME Controller
Use this control to turn on
/ off the transceiver and to
adjust volume level.
SPEAKER
The internal speaker is
installed here.
KEYBOARD
Use these 18 keys to
operate the TL-22
functions. The function of
each key is described on
the pages nnn and nnn.
VHF antenna
Connect here the
supplied antenna.
BUSY / TX
The led shines green
during the reception and
shines red during the
transmission and the
emergency call.
MIC
The internal microphone
is installed here.
14
TL-22
Page 17
www.luthor.es
15
EN
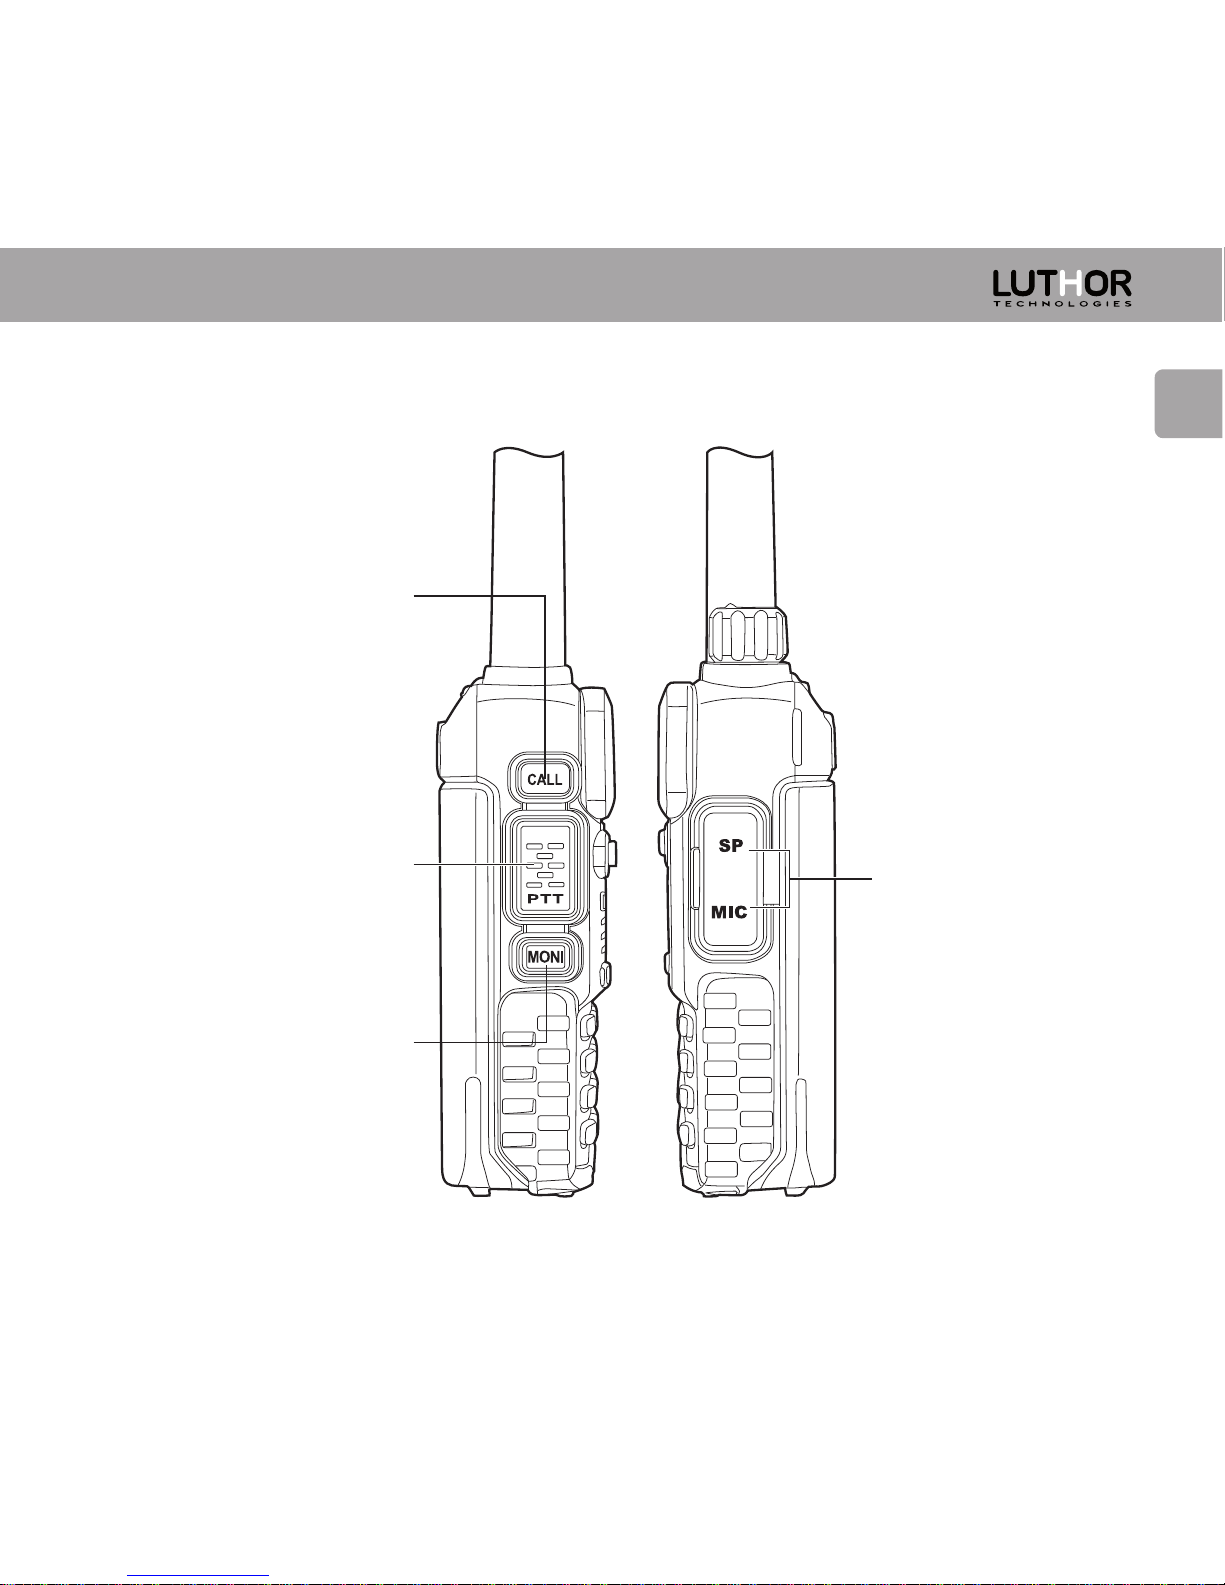
Transceiver’s description
CALL
This key activates the
emergency call (1750Hz)
to access the repeater,
and to transmit DTMF / 2
tones / 5 tones.
PTT
Press to transmit and
release to receive when
your transmission have
been finished.
MONI
Press this key to deactivate
the squelch, allowing you
to hear very weak signals
so close to the background
noise.
MIC/SP
This connector allows
connecting external
accessories such as:
earphone, microphone,
external speaker,
programming cable,
etc.
Page 18
www.luthor.es
16
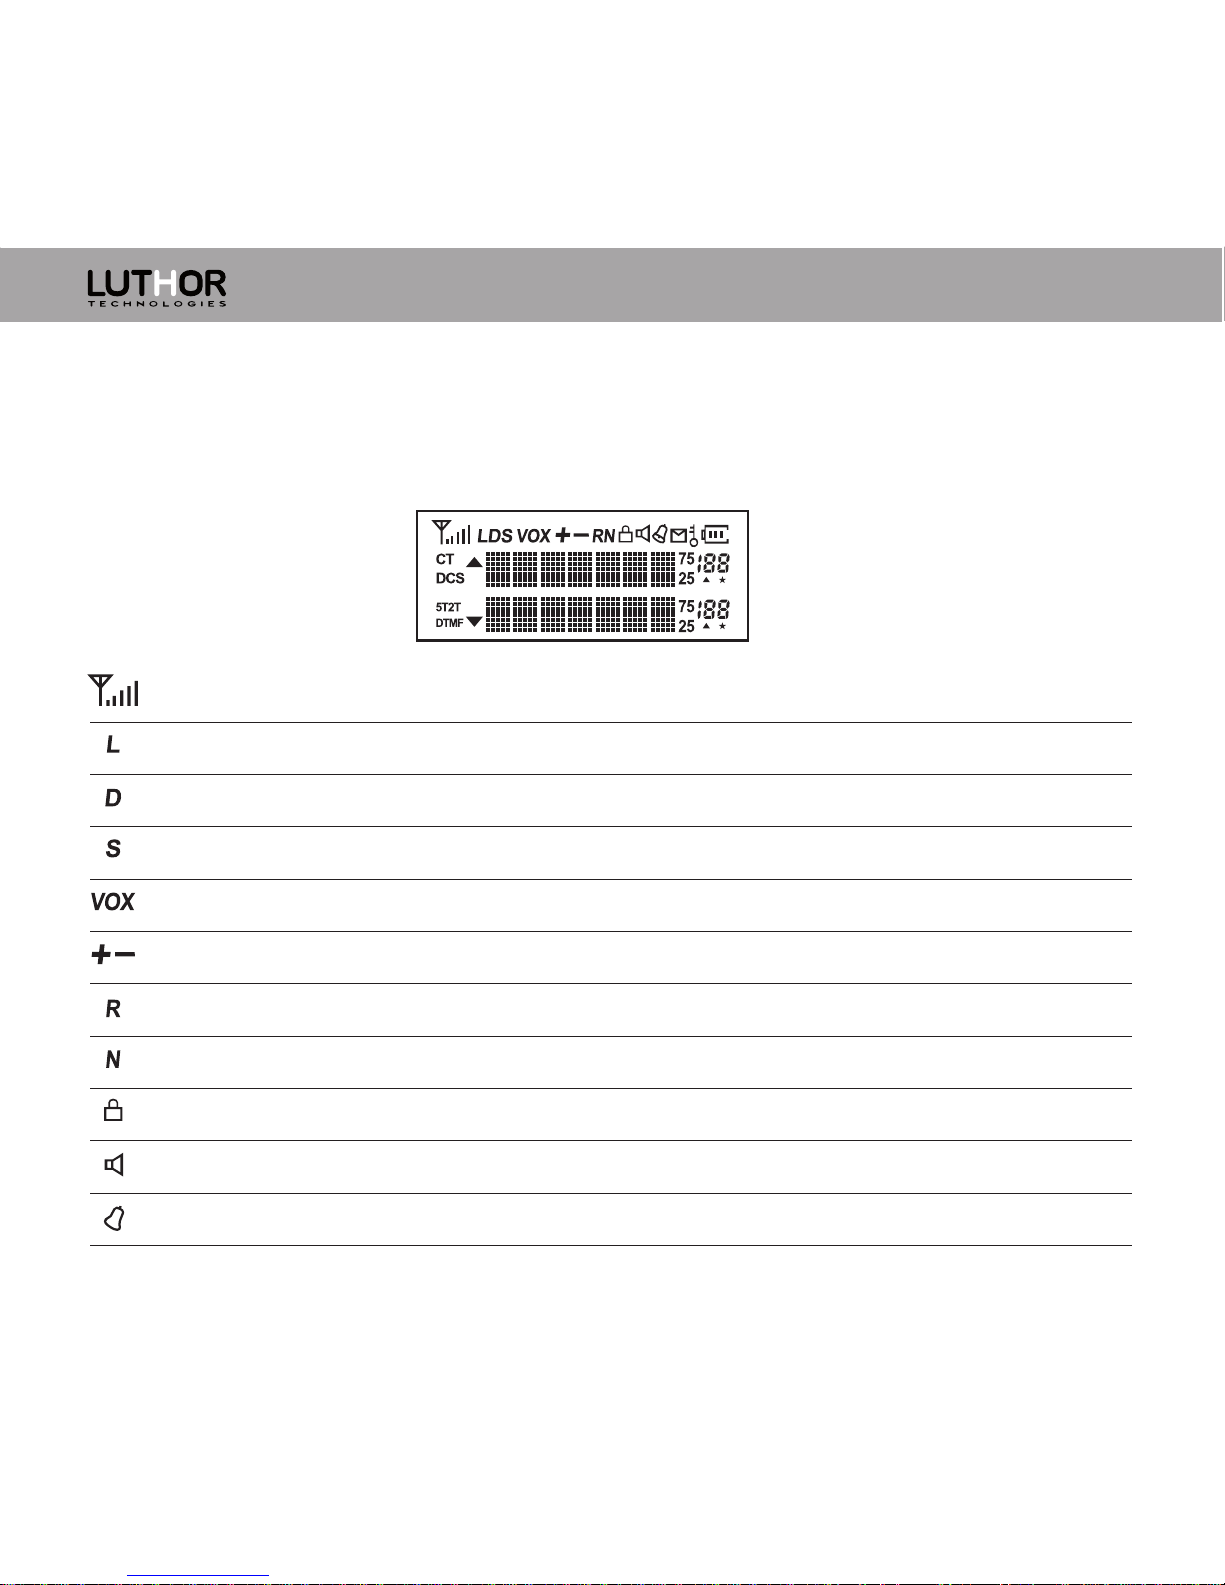
Introduction to display’s icons
Signal’s power level, power meter.
Low power.
Dual standby on.
Battery save function on.
VOX function on.
Frequency offset direction.
Reverse frequency on
Narrow band on
Keyboard blocked.
SQUELCH (SQ) Squelch function on.
Beep function on.
When the transceiver is turned on, you can see different icons on the screen. The next
table will help you to identify the meaning of the display’s icons.
Page 19
www.luthor.es
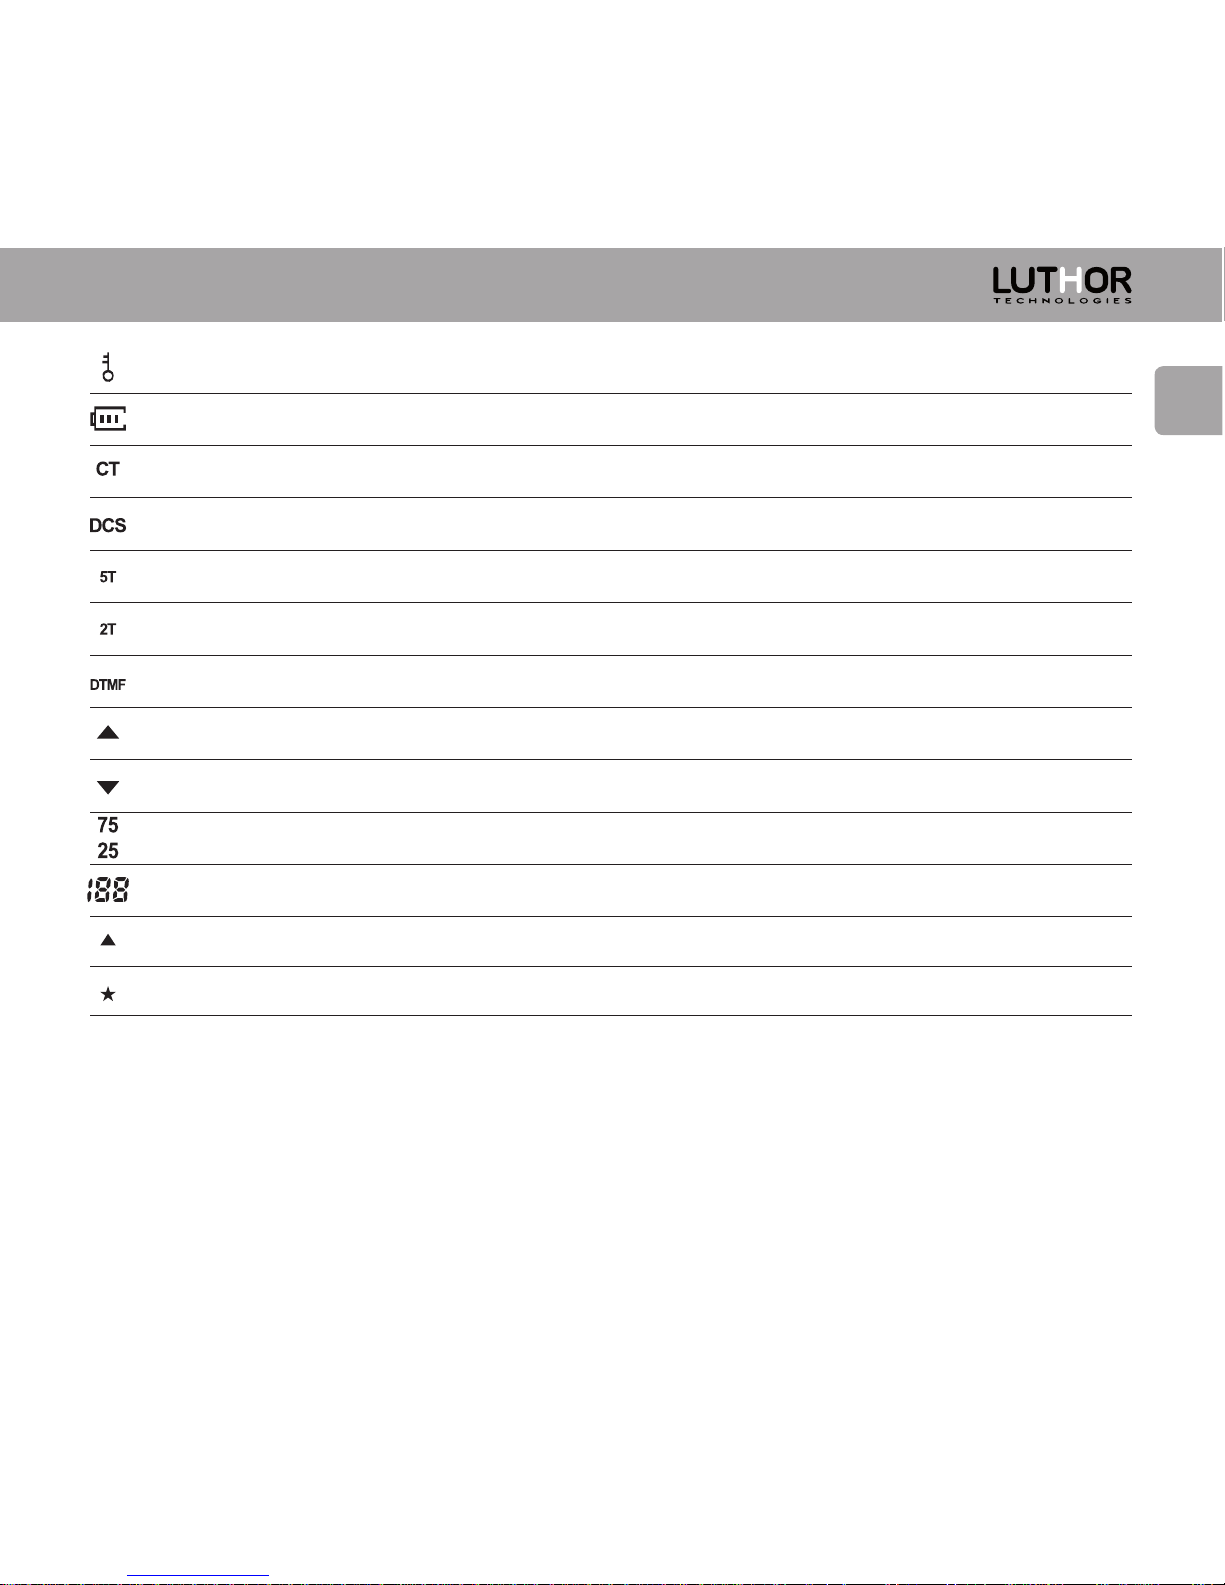
Voice encryption function on in the active channel or frequency.
Battery level indicator.
CTCSS on.
DCS on.
5 tone on.
2 tone on.
DTMF on.
Channel in use indicator
Channel in use indicator
Decimal frequency for the 5 / 6,25 / 10 / 12,5 / 25 / 37,5 / 50 / 100 KHz
Channel number / Menu’s number indicator.
Busy channel indicator.
Scan function available in channel mode.
17
EN
Page 20
www.luthor.es
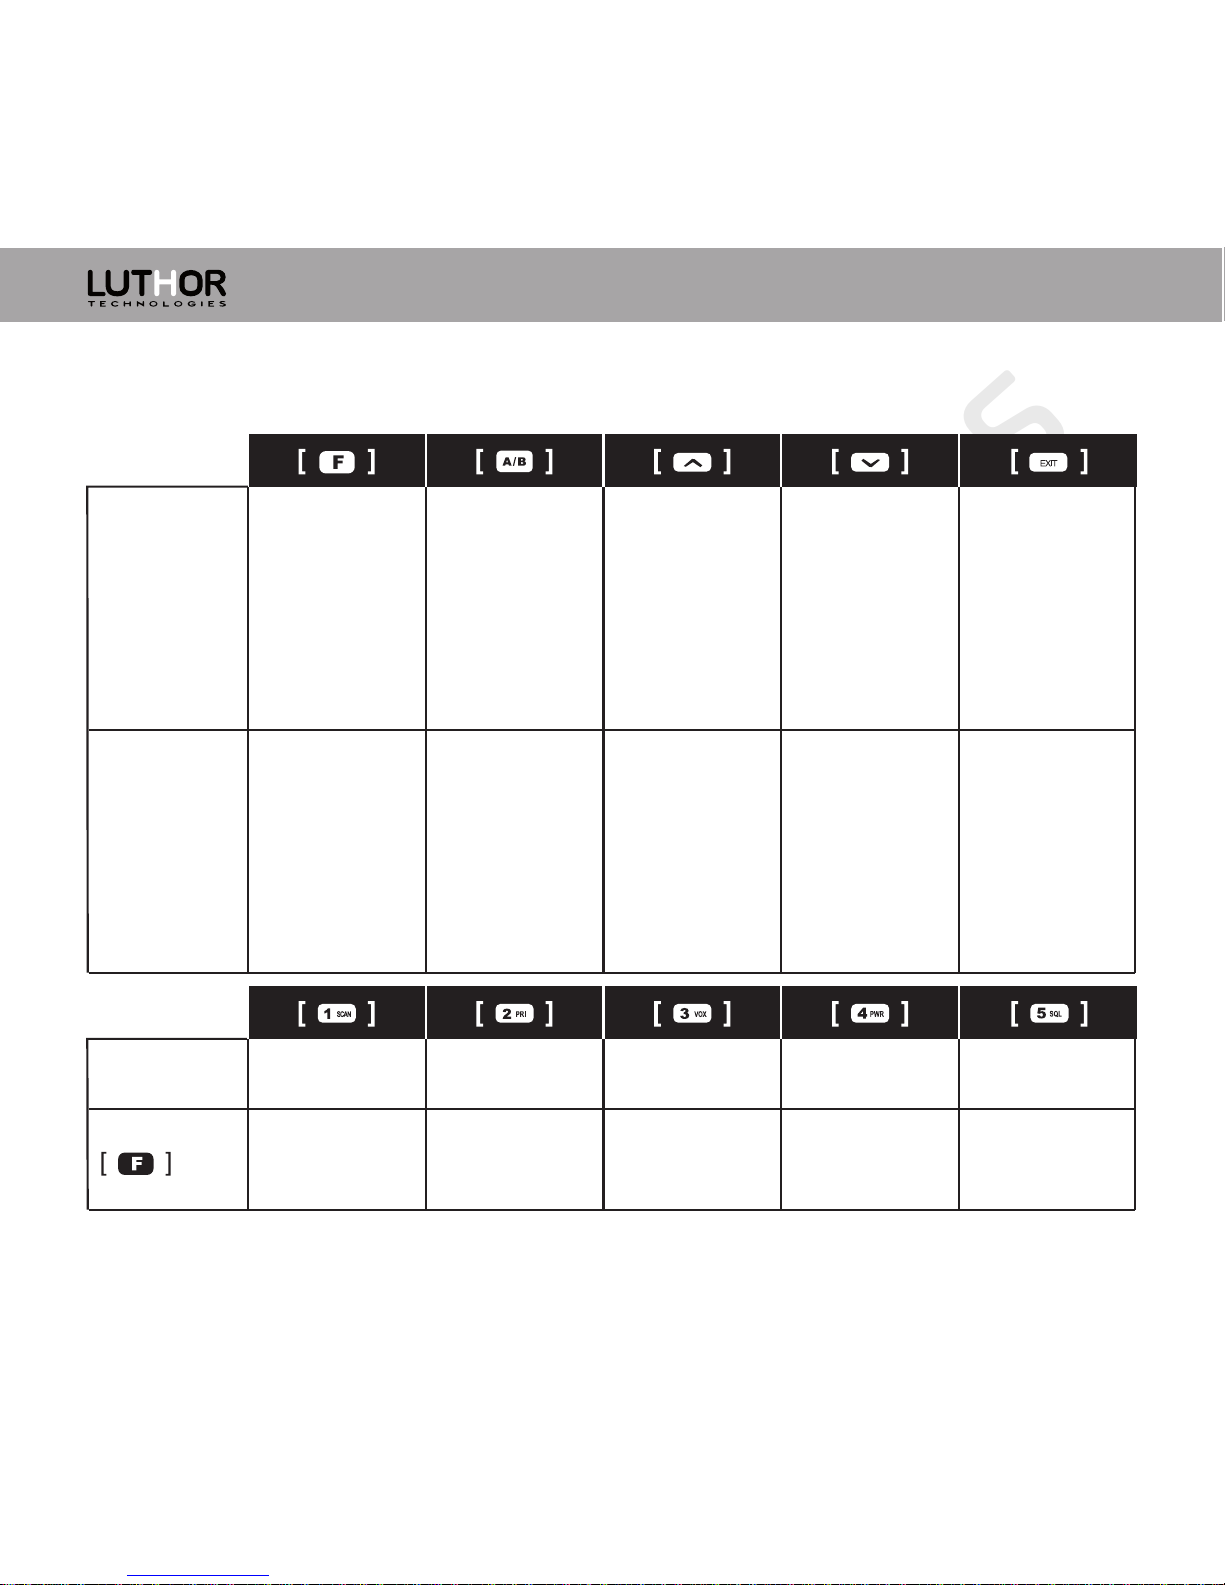
Keys functions:
Pressing the
key.
Enter the
menu mode/
confirm the
selection.
Change
between A or B
bands.
Select upper
item, channel
or frequency.
Select lower
item, channel
or frequency.
Change
between VFO
mode and MR
mode / exit the
adjust.
Enter reset
mode.
No action. Change
between
channel mode
and VFO mode.
No action. No action.
Pressing and
turning on
the
transceiver.
Frequency/
Channel 1
Frequency/
Channel 2
Frequency/
Channel 3
Frequency/
Channel 4
Frequency/
Channel 5
Pressing the
key
Enter scan
menu.
Enter priority
channel menu.
Enter VOX
menu.
Enter high/low
power menu.
Enter squelch
menu.
Pressing
+.
18
Page 21
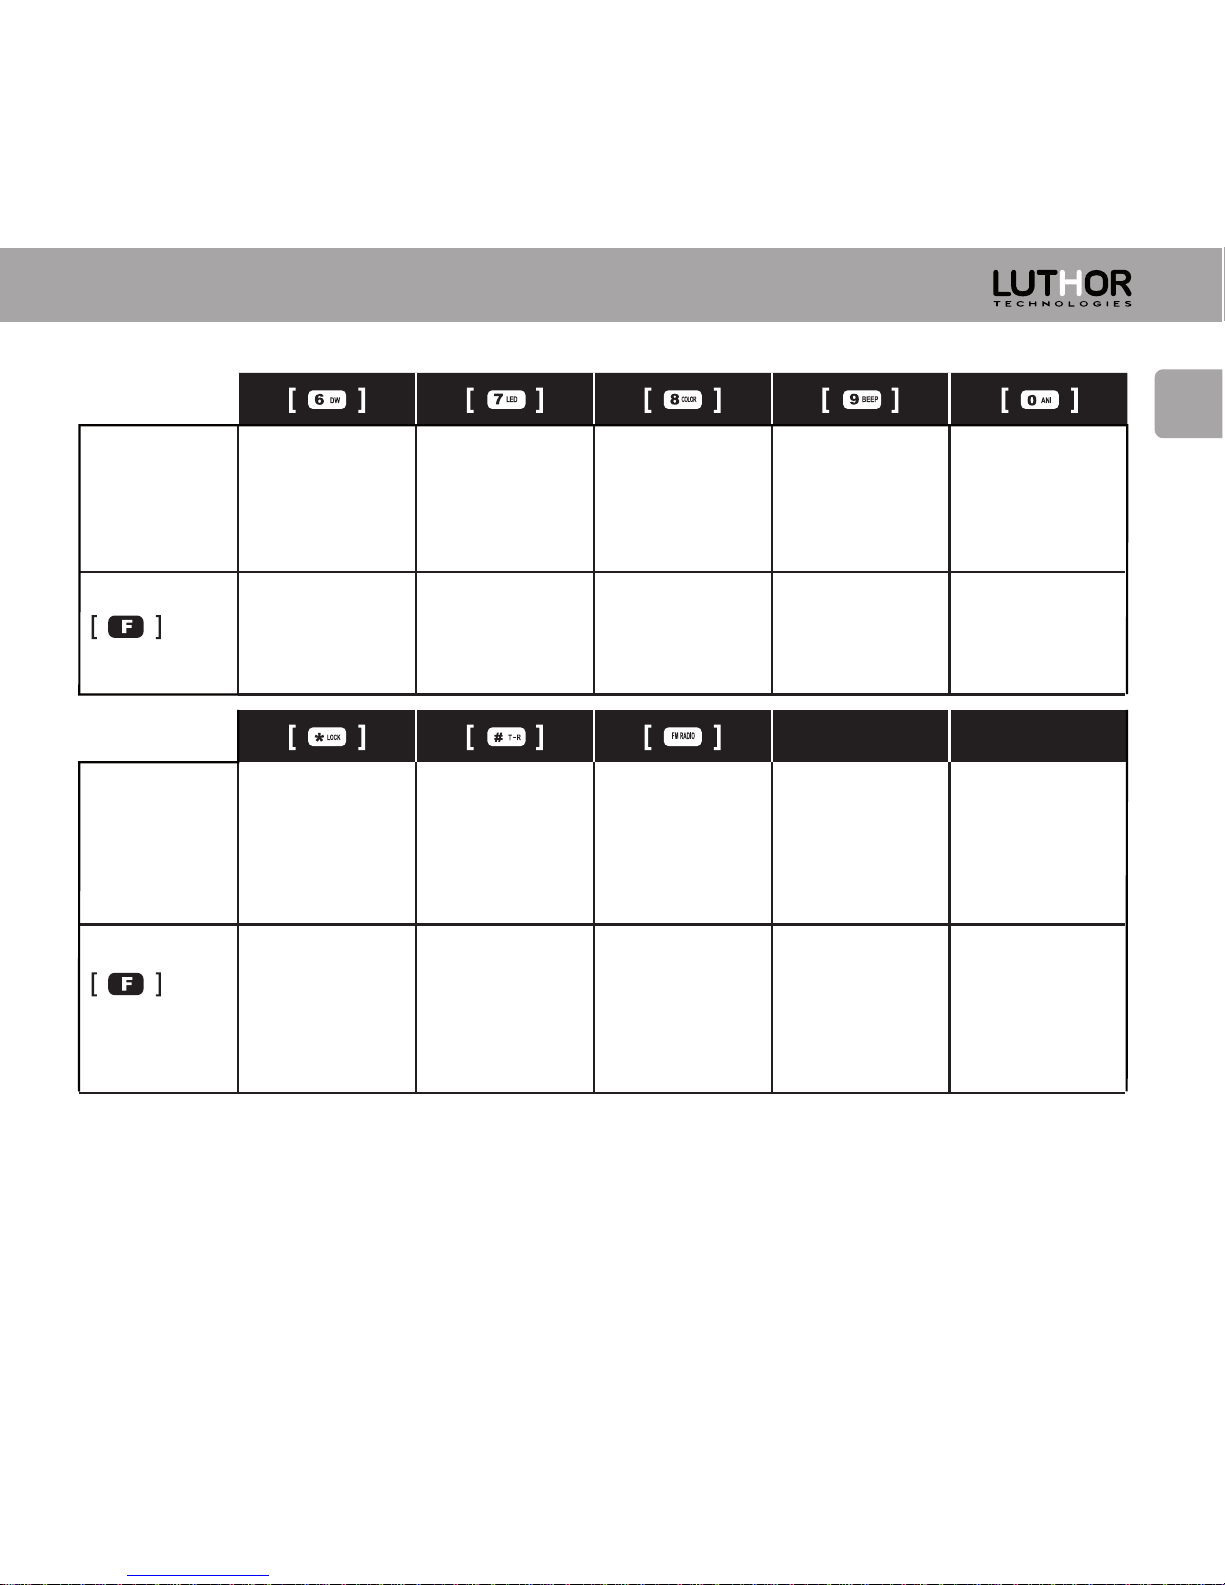
www.luthor.es
EN
19
Pressing the
key
Frequency/
Channel 6
Frequency/
Channel 7
Frequency/
Channel 8
Frequency/
Channel 9
Frequency/
Channel 10
Enter dual
standby
menu.
Enter LED
menu.
Enter display
colour menu.
Enter beep
menu.
Enter ANI
menu.
Pressing the
key.
Enter or leave
FM radio mode.
Pressing
+
Enter sub
tones menu.
Enter
frequency
offset direction
menu.
Press and
release the key
to activate the
reverse
frequency.
Activation of
emergency
call.
Pressing
+
Press and
release the key
to lock/unlock
the keyboard.
Page 22
www.luthor.es
Working modes
1. Frequency mode (VFO)
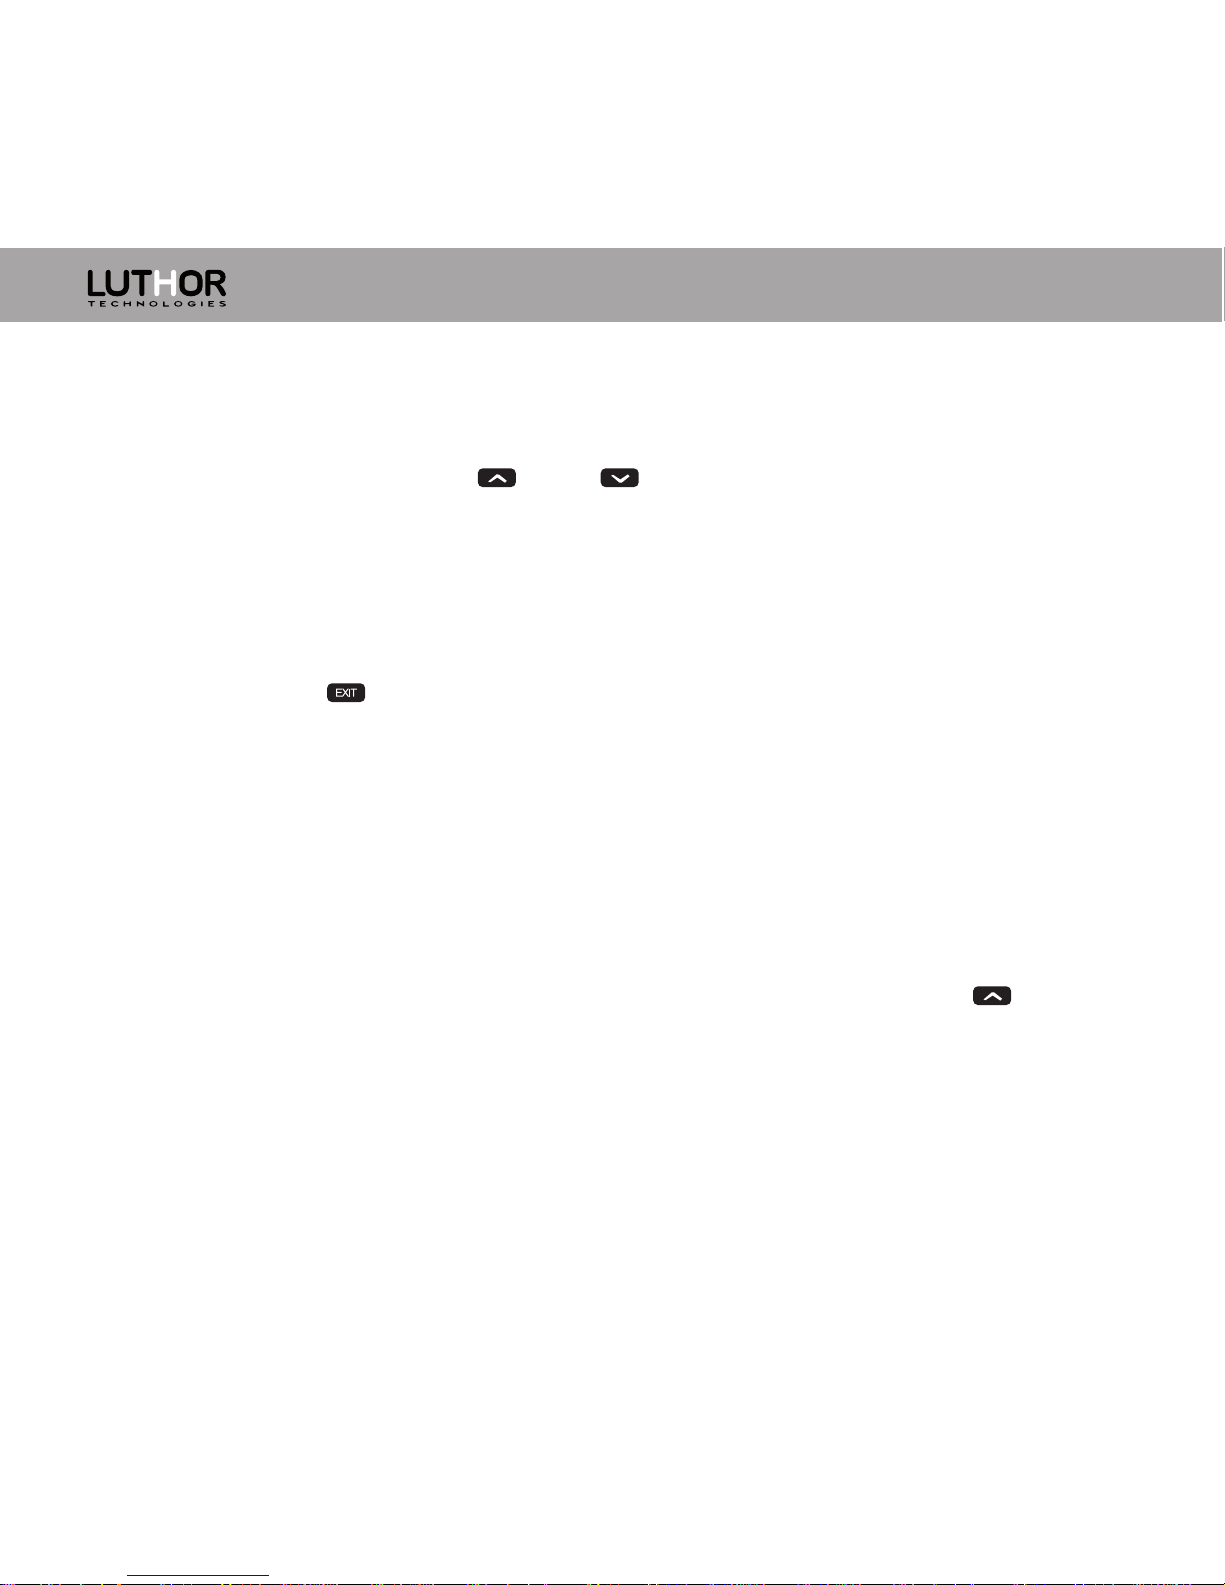
Using this mode, you can use [ ] or [ ] to change the frequency or introduce
directly through the numeric keyboard the wished frequency number.
2. Frequency-Channel mode (MR)
When there’s at least one memory channel memorized and staying in the frequency
mode (VFO), press [ ] to enter in the MR mode.
The frequency will be showed in the display and the corresponding channel number or
memory will be indicated on the right side. When the option of editing the channel
name is on and the channel name is edited, the name of the channel will be displayed.
Please, read the configuration of the 23B and 24 menus on pages 37 and 38.
3. Channel mode (CH)
When there’s at least one memory memorized, while keeping pressed [ ] turn on
the transceiver to enter in the channel mode. The channel number will be showed in
the display and when the option of editing the channel name is on and the channel
name is edited, the name of the channel will be displayed.
Please, read the configuration of the 23B and 24 menus on pages 37 and 38.
20
Page 23
www.luthor.es
EN
4. FM radio mode
The TL-22 has a FM radio with the 88.00 – 108.00MHz range. While staying in the FM
radio mode you can introduce the wished FM frequency number and memorize your
favourite radio stations. Press [ ] to enter or leave the FM radio mode.
5. Menu mode
Press [ ] to enter the menu mode, there’s a total of 34 menu operations. Please,
look up the menu’s table on pages 22 and 24.
6. Reset mode
While keeping pressed [ ] turn on the transceiver to enter in the reset mode, press
[ ] again to confirm.
1. Press [ ] or [ ] to select between VFO/FULL.
- VFO: reset all the frequency mode adjustments.
- FULL: reset all the frequency mode and channel mode adjustments.
2. Press [ ] to confirm. Warning: selecting this option you will delete all the
memorized channels and all the parameters selected by the user.
21
Page 24
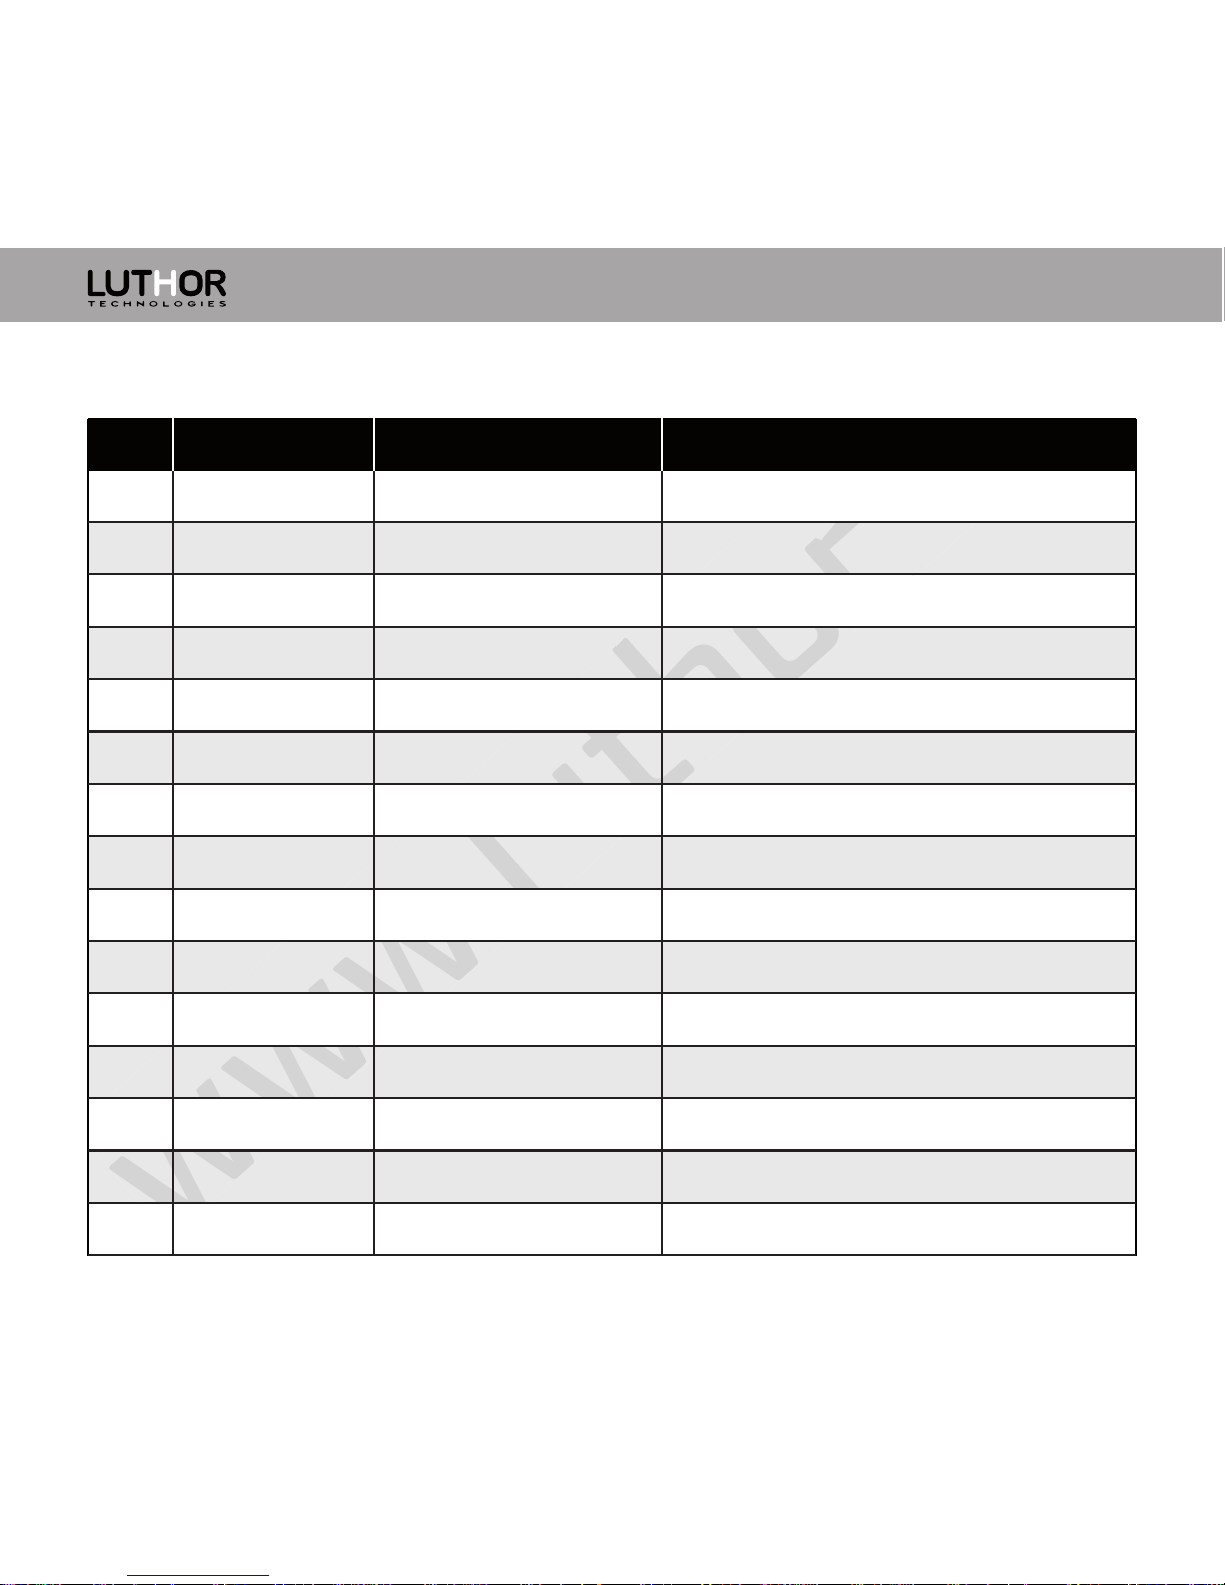
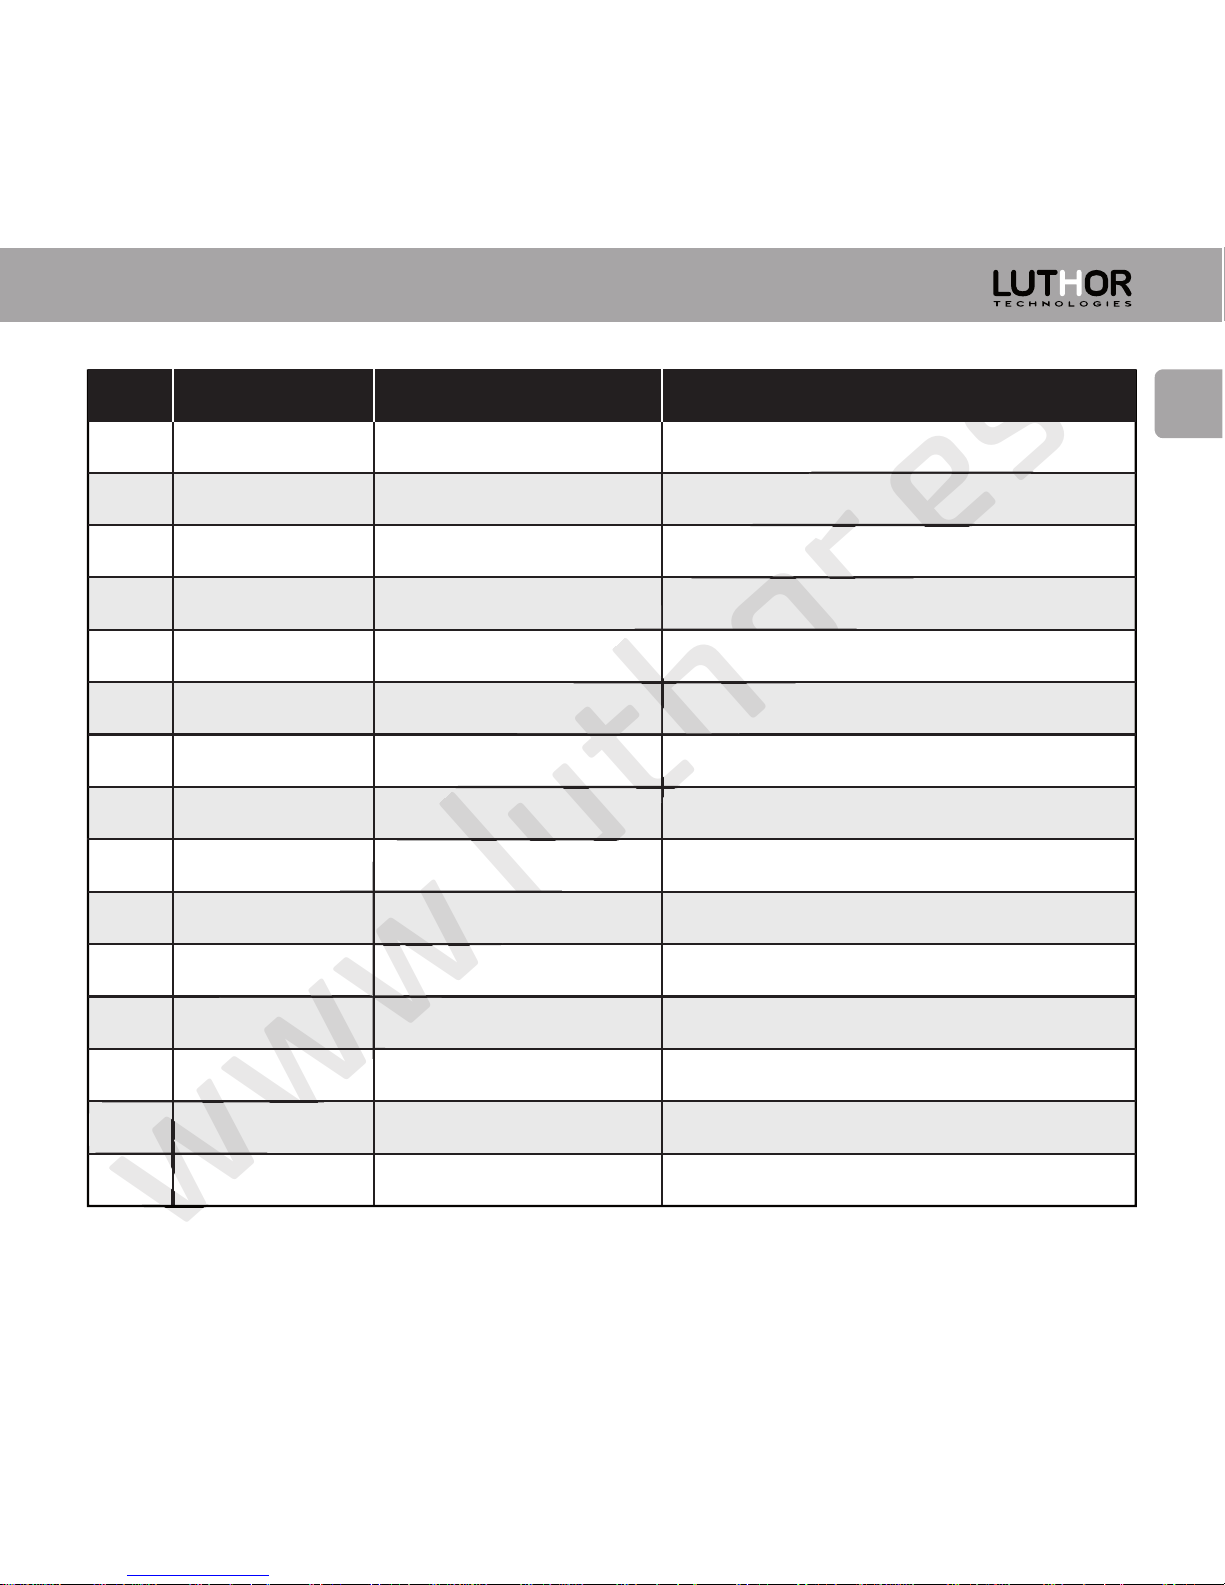
Menu’s table
Nº Display Select. parameters Function’s description
01
02
03
04
05
06
07
08
09
10
11
12
13
14
15
/
EDIT / BUSY
1 – 8
LOW / HIGH
0-9
ON /OFF
ON / AUTO / OFF
COLOR1/COLOR2/COLOR3
ON / OFF
ON / OFF
OFF / 30 / 60 / … / 270
OFF / WAVE / CALL
ON / OFF
ON / OFF
ON / OFF
Frequencies / channels scan.
Selection of priority channel in TX.
VOX (hands free) sensitivity level.
High or Low transmission power.
Squelch sensitivity level.
Turn on/off dual standby
Turn on/off display light.
Display’s colour selection.
Turn on/off keyboard’s sound.
Turn on/off ANI code.
Transmission time timer.
Busy channel lock.
Turn on/off VOX (hands free).
Transmission’s end notice.
Monitor option for FM radio.
SCAN
TX.SEL
VOX
POW
SQL
D.WAIT
LED
LIGHT
BEEP
ANI
TOT
BCLO
VOX.SW
ROGER
DW
22
Page 25
EN
23
Nº Display Select. parameters Function’s description
16
17
18
19
20
21
22
23A
23B
24
25
26
27
28
29
ON / OFF
TO / CO / SE
ON / OFF
ON / OFF
OFF / DC / MSG
/
Alphanumeric symbols
0.000 – 99.995MHz
ON / OFF
Alphanumeric symbols
OFF / 67.0 / D023N
OFF / 67.0 / D023N
OFF / 67.0 / D023N
+ / - / OFF
5K / 6.25K / … / 25K
Turn on/off reception’s energy save.
Selection of the scan mode.
Automatic keyboard lock.
Turn on/off the English voice guide.
Display information when turning on.
Shows the battery voltage.
Display message when turning on.
Frequency offset value (VFO mode).
Shows channel name (Channel mode).
Edition of the channel name.
CTCSS / DCS tones in TX / RX.
CTCSS / DCS tones in RX.
CTCSS / DCS tones in TX.
Frequency offset direction
Selection of frequency steps.
RX.SAV
SCANS
AUTOLK
VOICE
OPNSET
VLT
PON.MSG
OFFSET
DIS.NM
CHNAME
C-CDC
R-CDC
T-CDC
S-D
STEP
Page 26
www.luthor.es
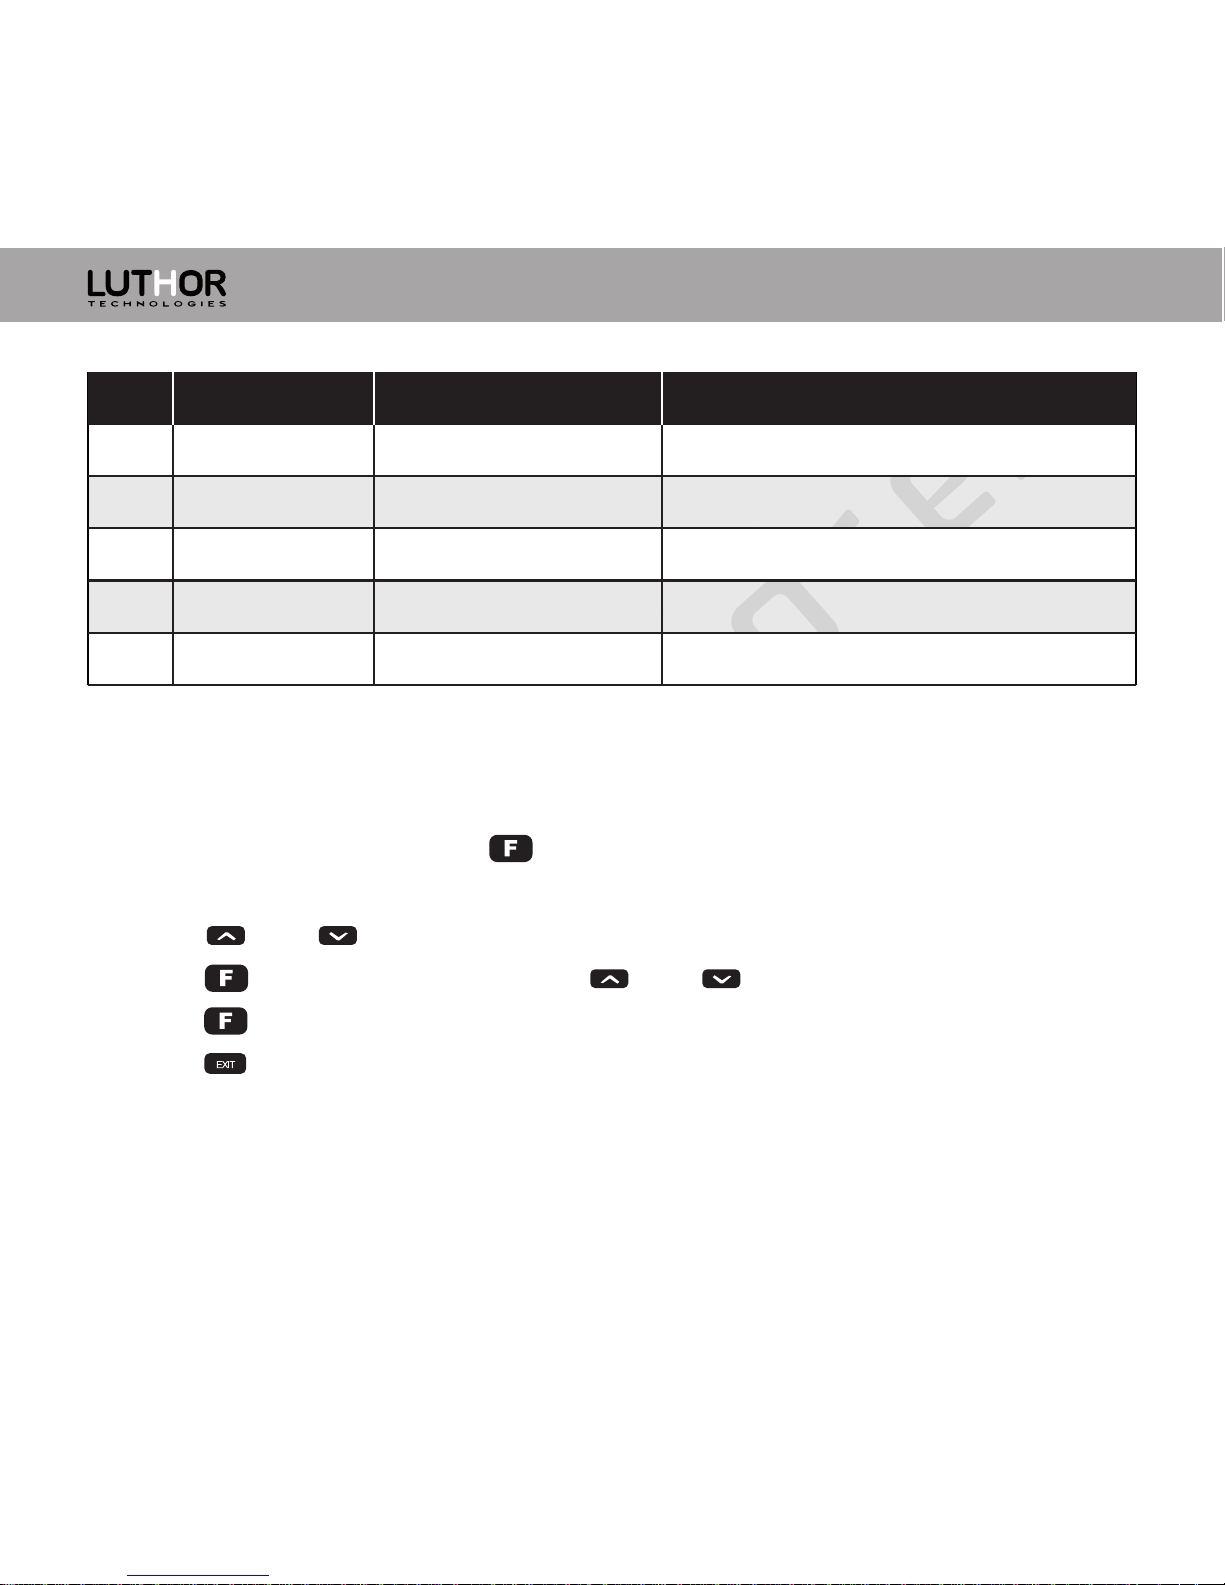
Menu’s operation
1. In the standby mode, press [ ] to enter into the menu, the display will show
“MENU”.
2. Press [ ] or [ ] to select the wished menu’s number.
3. Press [ ] to enter and then press [ ] or [ ] to select the wished adjustment.
4. Press [ ] to confirm.
5. Press [ ] twice to leave the menu and return to standby mode.
Nº Display Select. parameters Function’s description
30
31
32
33
34
WIDE / NARROW
/
/
1 – 8
OFF / COMP / SCRA
Bandwidth selection.
CTCSS tones scan.
DCS tones scan.
Selection of the encryption group.
Selection of the audio mode.
N/W
SEEK 67.0
SEEK D023N
SCR.NO
APRO
24
Page 27
Parameter description Confirm. Standby
mode
PageParameter
selection
Item
num.
Item
name
How to
enter
Display text
25
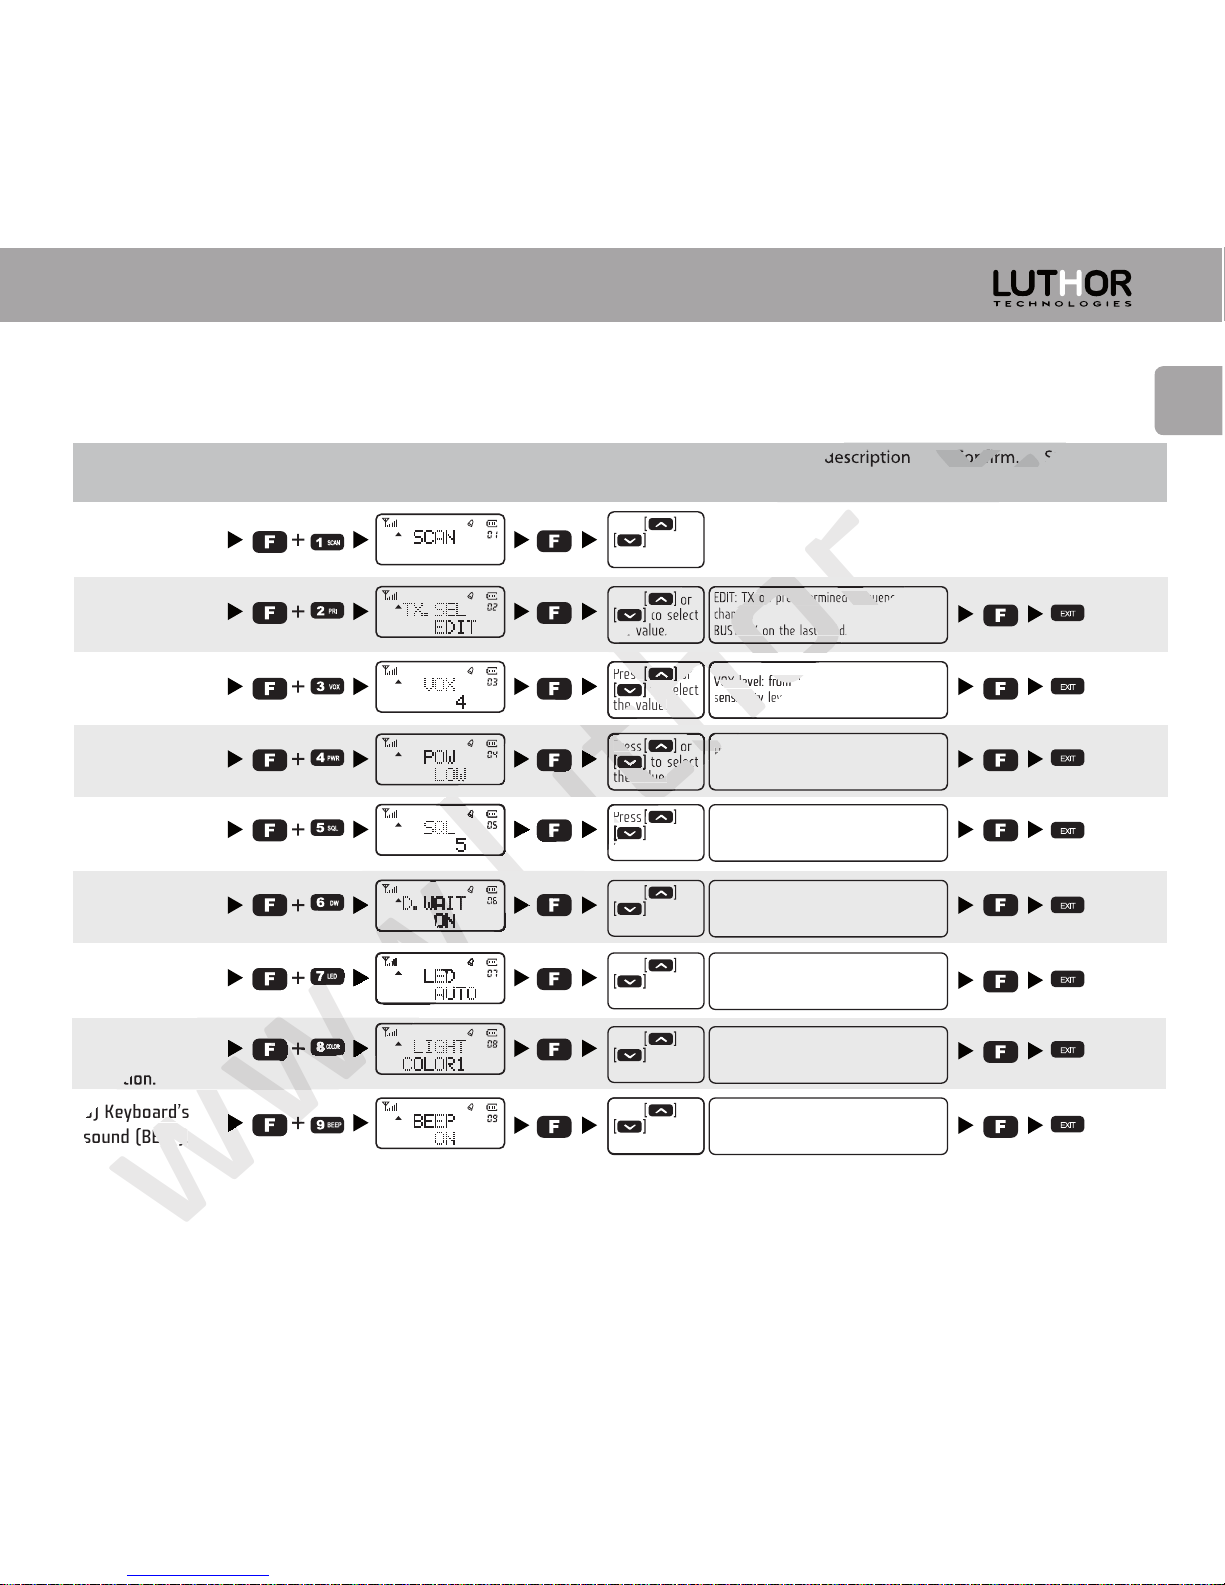
Menu’s configuration:
1. ) Frequency/
Channel Scanner.
2) Priority
channel
selection.
3) VOX
sensitivity level.
4) Transmission
power.
5) Squelch (SQL)
level.
6) Dual standby
system.
7) Display light.
8) Display’s
colour
selection.
9) Keyboard’s
sound (BEEP).
Press or
_____ to select
scan direction.
Press or
_____ to select
the value.
Press or
_____ to select
the value.
Press or
_____ to select
the value.
Press or
_____ to select
the value.
Press or
_____ to select
the value.
Press or
_____ to select
the value.
Press or
_____ to select
the value.
Press or
_____ to select
the value.
EDIT: TX on predetermined frequency or
channel.
BUSY: TX on the last used.
VOX level: from 1 to 8 (8 is the maximum
sensitivity level).
HIGH: high power: 5watt.
LOW: low power: 1watt.
Squelch level: from 0 to 9.
(0 is open squelch).
ON: activate dual standby.
OFF: deactivate dual standby.
AUTO: automatic light when operating.
ON: light always on.
OFF: light always off.
COLOR1: purple.
COLOR2: blue.
COLOR3: orange.
ON: activate “beep” sound.
OFF: deactivate “beep” sound.
EN
29/30
30
30/31
31
31/32
32
32
32/33
33
9) Keyboard’s
9) Keyboard’s
sound (BEEP).
sound (BEEP).
to select
to select
_____
_____
to select
to select
the value.
the value.
Press or
Press or
_____
_____
the value.
the value.
_____
_____
EDIT: TX on predetermined frequency or
EDIT: TX on predetermined frequency or
EDIT: TX on predetermined frequency or
EDIT: TX on predetermined frequency or
channel.
channel.
BUSY: TX on the last used.
BUSY: TX on the last used.
VOX level: from 1 to 8 (8 is the maximum
VOX level: from 1 to 8 (8 is the maximum
sensitivity level).
sensitivity level).
Page 28
Explicación del
parámetro
Confirmar Modo de
espera
Pag.Selección del
parámetro
Nº
Item
Nombre
Item
Como entrar Texto en
pantalla
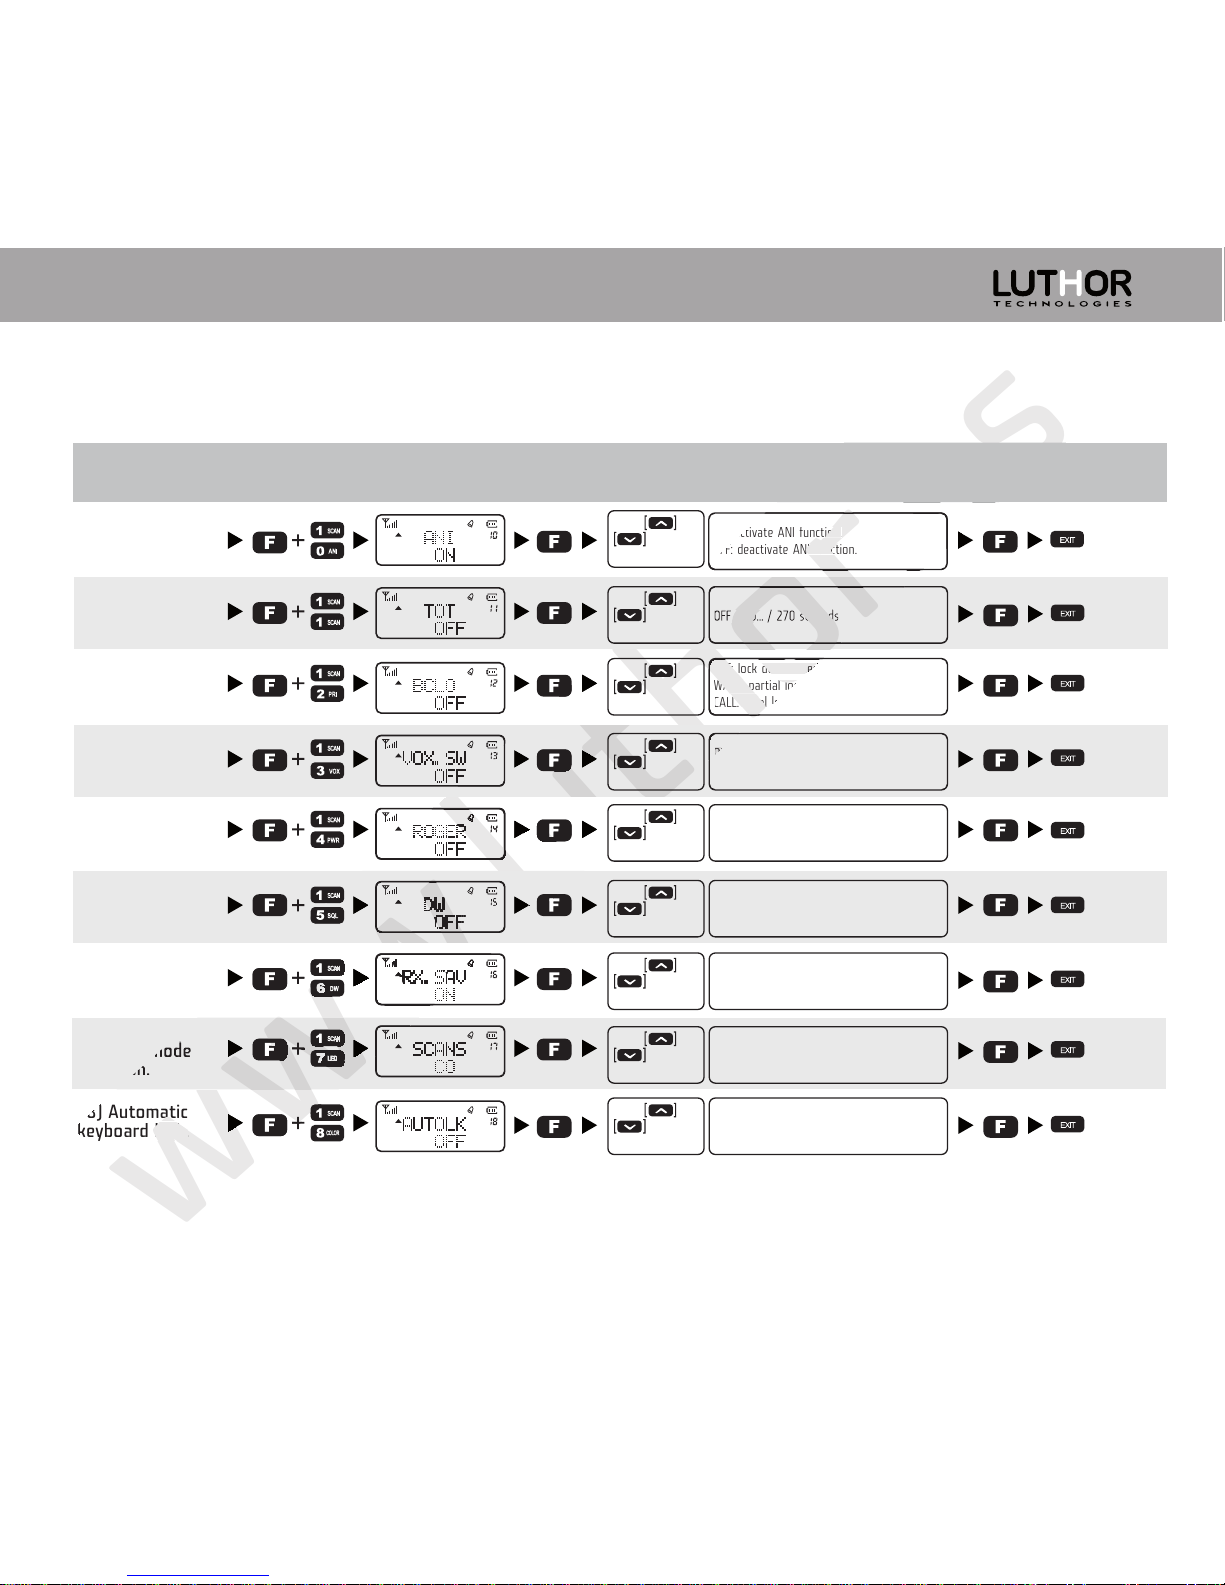
Menu’s configuration:
10) ANI code
activation.
11) Transmission
time timer.
12) Busy channel
lock.
13) VOX activate/
deactivate.
14)Transmission’s
end notice
15) FM radio
monitor.
16) Reception’s
energy save.
17) Scan mode
selection.
18) Automatic
keyboard lock.
OFF / 30... / 270 seconds
OFF: lock deactivated.
WAVE: partial lock activated.
CALL: total lock activated.
ON: activate VOX function.
OFF: deactivate VOX function.
ON: activate “roger beep” function.
OFF: deactivate “roger beep” funct.
ON: priority for transceiver.
OFF: priority for FM radio.
ON: activate energy save function.
OFF: deactivate energy save funct.
TO: Search-listen-continue scan.
CO: Search-listen-scan if signal stop.
SE: Search-listen-stop scan.
ON: activate auto lock function.
OFF: deactivate auto lock function.
ON: activate ANI function.
OFF: deactivate ANI function.
33
33
34
30/31
34/35
35
35
29/30
35/36
Confirmar Modo de
Confirmar Modo de
keyboard lock.
keyboard lock.
OFF / 30... / 270 seconds
OFF / 30... / 270 seconds
OFF: lock deactivated.
OFF: lock deactivated.
WAVE: partial lock activated.
WAVE: partial lock activated.
CALL: total lock activated.
CALL: total lock activated.
26
Parameter description Confirm. Standby
mode
PageParameter
selection
Item
num.
Item
name
How to
enter
Display text
Press or
_____ to select
the value.
Press or
_____ to select
the value.
Press or
_____ to select
the value.
Press or
_____ to select
the value.
Press or
_____ to select
the value.
Press or
_____ to select
the value.
Press or
_____ to select
the value.
Press or
_____ to select
the value.
Press or
_____ to select
the value.
Page 29
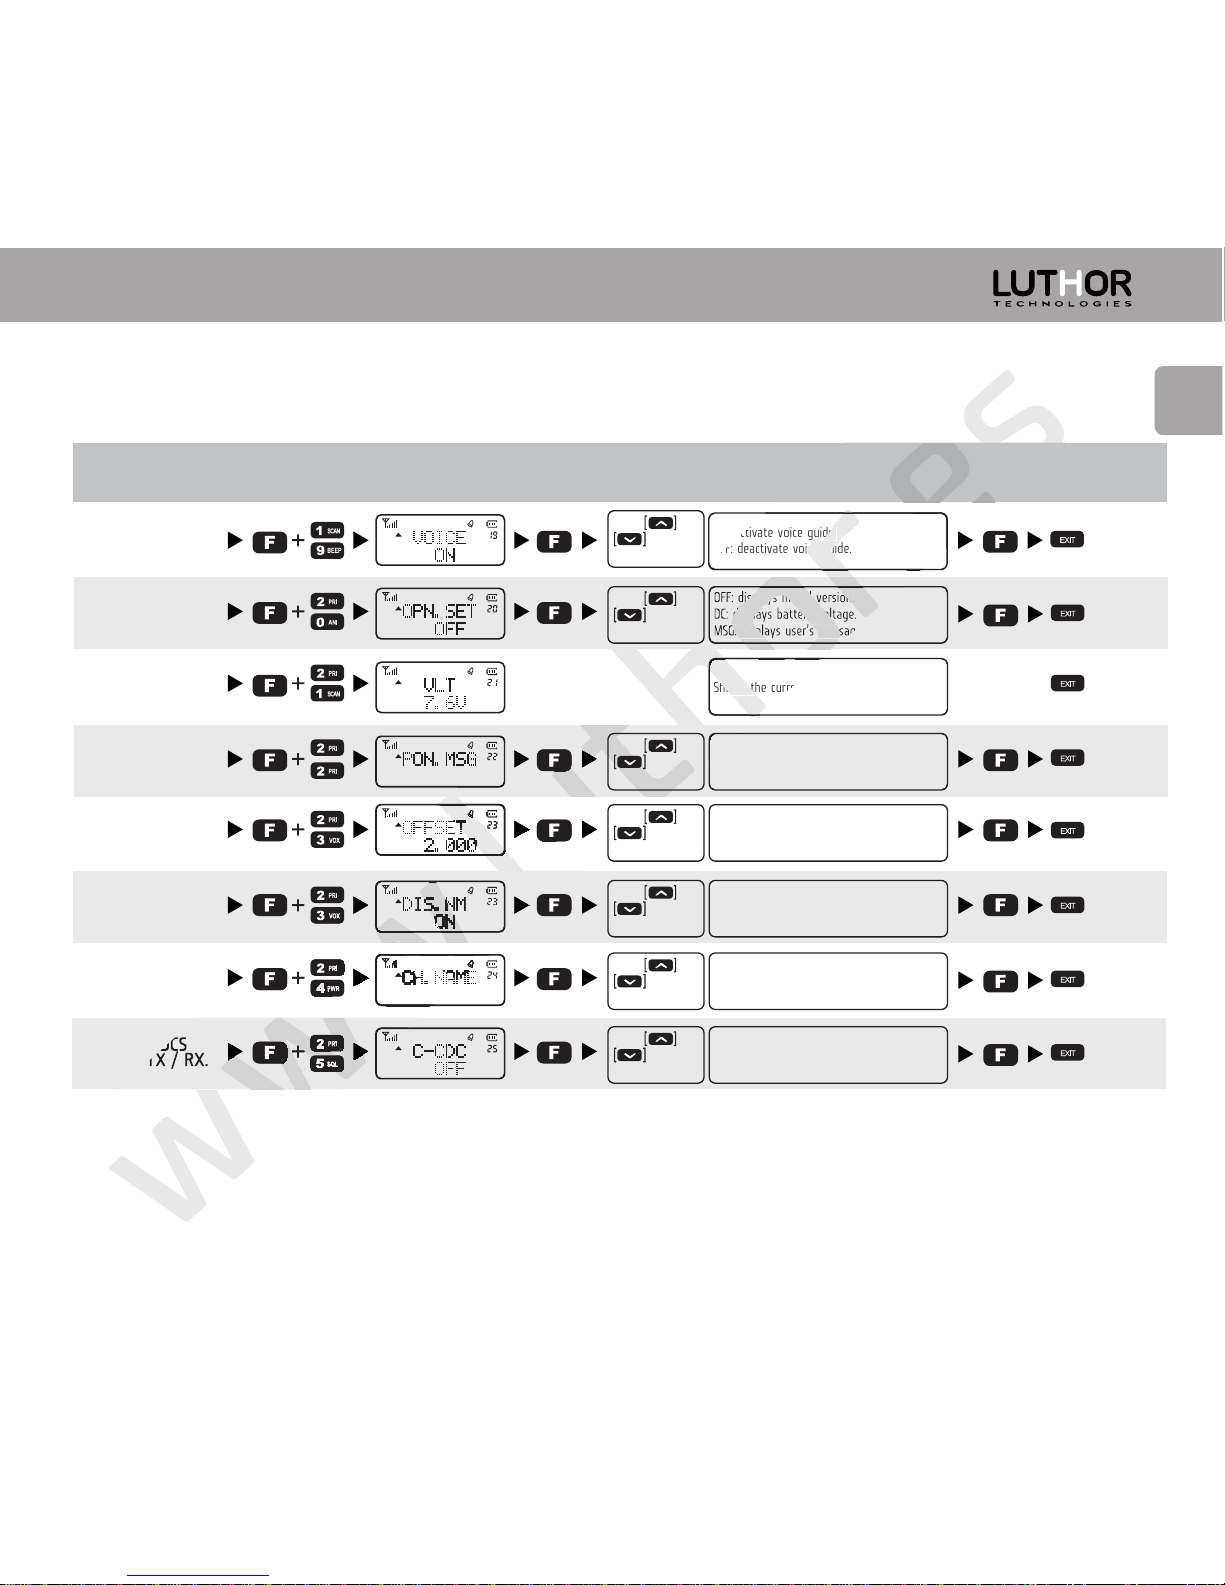
Explicación del
parámetro
Confirmar Modo de
espera
Pag.Selección del
parámetro
Nº
Item
Nombre
Item
Como entrar Texto en
pantalla
Menu’s configuration:
19) English voice
guide.
20) Display info
when turning
on.
21) Shows
battery voltage.
22) Display turn
on message.
23) A. Frequency
offset value.
23) B. Shows
channel name.
24) Channel
name edit.
25) CTCSS/DCS
tones in TX / RX.
OFF: displays model version.
DC: displays battery voltage.
MSG: displays user’s message.
Shows the current voltage.
Edit turning on message.
0.000 – 99.975MHz
ON: shows channel name.
OFF: hide channel name.
Introduce channel name.
OFF: deactivated tones.
67.0 ... 254.1: analogic tones.
D023(N/I) ... D754(N/I): digital tones.
ON: activate voice guide.
OFF: deactivate voice guide.
36
36
36
37
37
37
38
38
27
OFF: displays model version.
OFF: displays model version.
DC: displays battery voltage.
DC: displays battery voltage.
MSG: displays user’s message.
MSG: displays user’s message.
Shows the current voltage.
Shows the current voltage.
Parameter description Confirm. Standby
mode
PageParameter
selection
Item
num.
Item
name
How to
enter
Display text
EN
Press or
_____ to select
the value.
Press or
_____ to select
the value.
Press or
_____ to select
the value.
Press or
_____ to select
the value.
Press or
_____ to select
the value.
Press or
_____ to select
the value.
Press or
_____ to select
the value.
Page 30
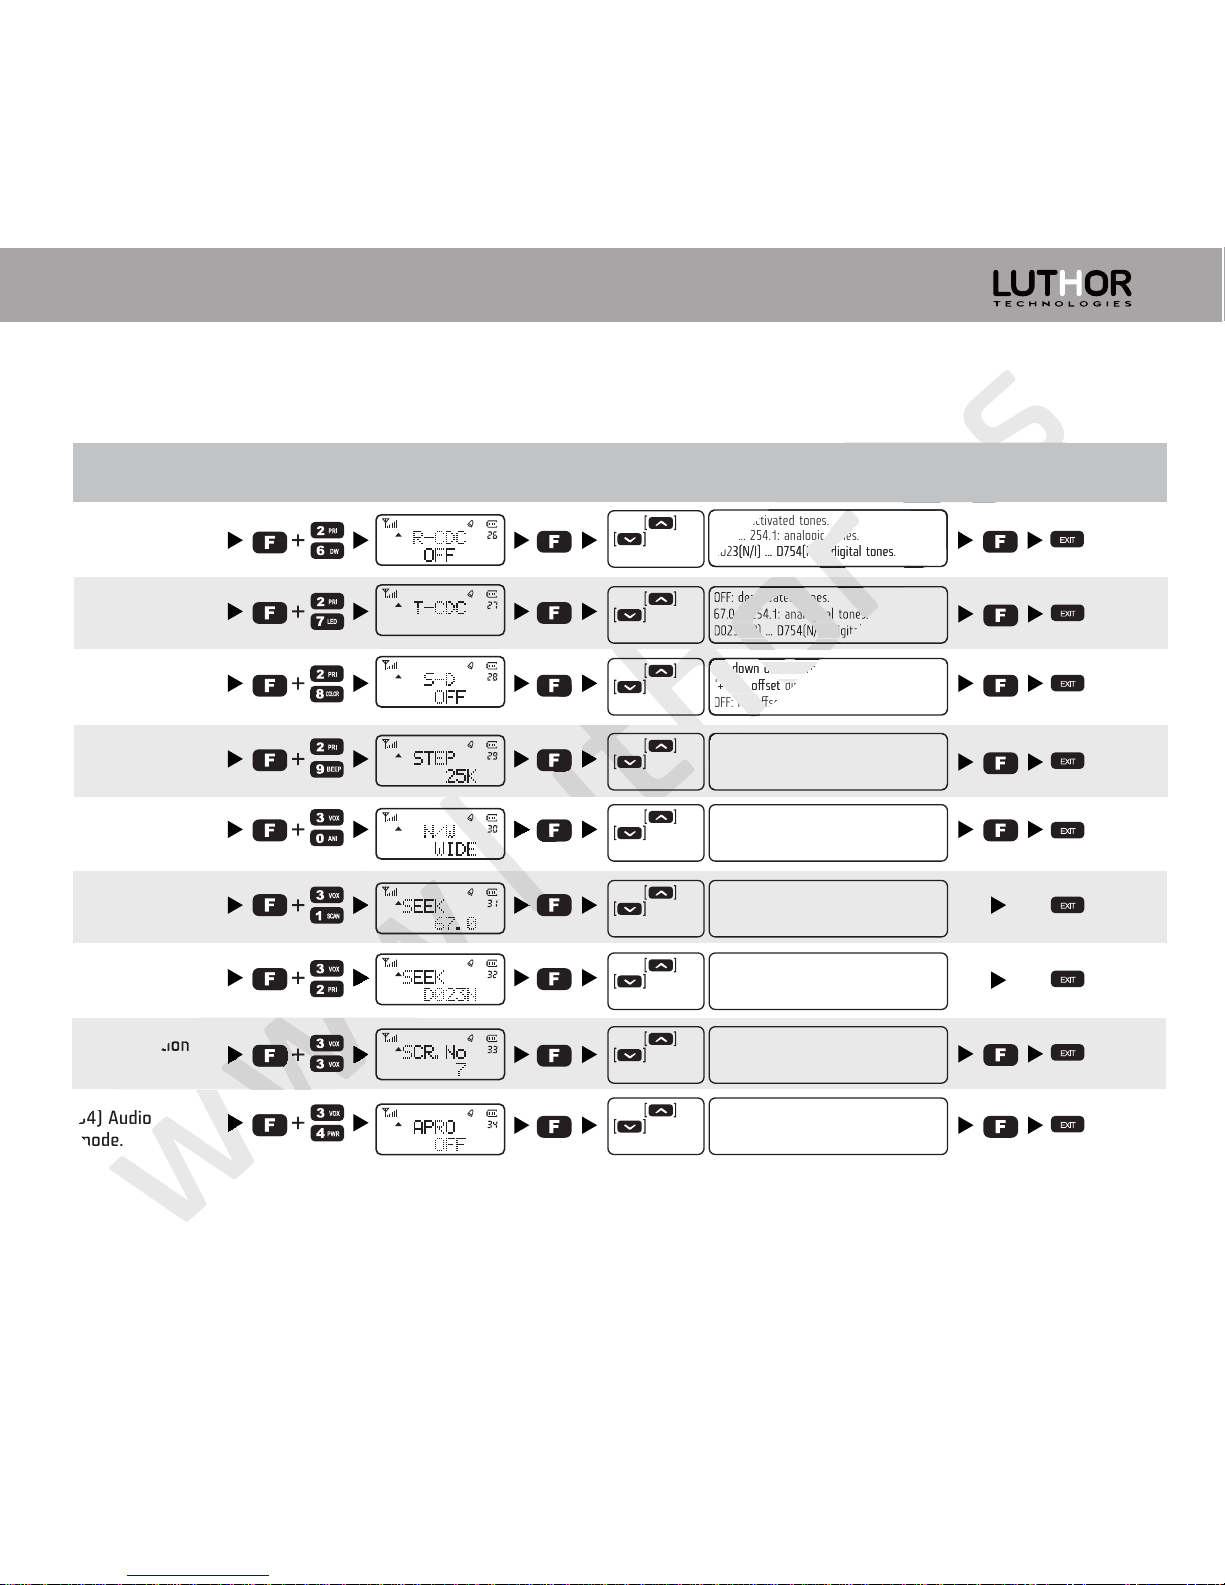
Explicación del
parámetro
Confirmar Modo de
espera
Pag.Selección del
parámetro
Nº
Item
Nombre
Item
Como entrar Texto en
pantalla
Menu’s configuration:
26) CTCSS/DCS
tones in RX.
27) CTCSS/DCS
tones in TX.
28) Frequency
offset direction.
29) Frequency
steps.
30) Bandwidth
selection.
31) CTCSS tones
scan.
32) DCS tones
scan.
33) Encryption
group.
34) Audio
mode.
OFF: deactivated tones.
67.0 ... 254.1: analogical tones.
D023(N/I) ... D754(N/I): digital tones.
“-“: down offset direction.
“+”: up offset direction.
OFF: no offset.
5K / 6.25K / 10K ... 100K
WIDE: 25KHz
NARROW: 12,5KHz
Analogical CTCSS tones scanner.
Digical DCS tones scanner.
1 – 8
OFF: normal audio.
SCR: encrypted audio.
COMP: high quality audio.
OFF: deactivated tones.
67.0 ... 254.1: analogic tones.
D023(N/I) ... D754(N/I): digital tones.
38
39
39
39
39
40
40
41
41
Confirmar Modo de
Confirmar Modo de
34) Audio
34) Audio
mode.
mode.
OFF: deactivated tones.
OFF: deactivated tones.
67.0 ... 254.1: analogical tones.
67.0 ... 254.1: analogical tones.
D023(N/I) ... D754(N/I): digital tones.
D023(N/I) ... D754(N/I): digital tones.
“-“: down offset direction.
“-“: down offset direction.
“+”: up offset direction.
“+”: up offset direction.
D023(N/I) ... D754(N/I): digital tones.
D023(N/I) ... D754(N/I): digital tones.
28
Parameter description Confirm. Standby
mode
PageParameter
selection
Item
num.
Item
name
How to
enter
Display text
Press or
_____ to select
the value.
Press or
_____ to select
the value.
Press or
_____ to select
the value.
Press or
_____ to select
the value.
Press or
_____ to select
the value.
Press or
_____ to select
scan direction.
Press or
_____ to select
scan direction.
Press or
_____ to select
the value.
Press or
_____ to select
the value.
Page 31
www.luthor.es
EN
Detailed descriptions
1) Scanning mode (SCAN – MENU 1 and SCANS – MENU 17)
Function: staying in the MR / VFO / CH modes, the transceiver allows the search into
the whole operative band or in the memorized channels.
Enter into the menu 1 and press [ ] to start the search.
Once the search has started, press [ ] or [ ] to change the search direction. The
search will stop when a signal has found, press the PTT button to stop the search;
press the MONI button to stop temporally the search; press [ ] to exit the scanning
mode.
The scanning function is the same for everyone of the different modes. Before starting
the search, take a moment to select the way you prefer the search to stop when
founding a signal.
Enter into the menu 17 to select the adjustment for the scanning mode. The
default value is TO.
There are three search options avaliable.
TO: in this mode, the search will stop in the signal found, and will stay in this signal for
a while. If you don’t make any action to cancel the search during this period of time,
the search will restart although the signal is still active.
29
Page 32

www.luthor.es
CO: in this mode, the search will stop in the signal found, and will stay in this signal until
it ends. Once the signal ends, the search will restart.
SE: in this mode, the search will stop in the signal found, and will not restart
automatically, you will have to restart the search if you want it to continue.
2) Selection of priority channel ( TX.SEL – MENU 2)
Function: allows transmitting in a concrete channel although you are receiving in
another different channel.
Enter into the menu 2 and press [ ] to select the priority channel. The default
value is: EDIT.
EDIT: you will transmit on the channel chosen as predetermined or priority.
BUSY: you will transmit on the last channel used for transmitting.
3) Configuration of VOX level and activation (VOX – MENU 3 and VOX.SW – MENU 13)
Function: allows the user to transmit without pressing the PTT button, when the
equipment hears a sound, it actives the transmission automatically. The equipment can
realize this function individually with its own microphone or can be used another
external element such an earphone with PTT/VOX switch.
Enter into the menu 13 to activate the VOX function. The default value is: OFF.
When this function is on, the “VOX” icon will appear on the display.
30
Page 33

www.luthor.es
EN
Enter into the menu 3 to select the VOX level. There are 8 levels.
The level 1 is the one with less sensitivity and the level 8 is the most sensitive.
The TL-22 has an adjustment via soware for reprogramming a VOX delay time (a
delay time for transmitting-receiving aer speaking). The default value is: 2 seconds.
4) Selection of High or Low transmission power (POW – MENU 4)
Function: allows selecting the High or Low transmission power depending on your
environment and your needs. When you store memories, you can save the High or Low
transmission power adjustment for each memory independent.
Enter into the menu 4 to adjust the transmission power.
High: 5W
Low: 1W, when you select the Low power, the “L” icon will appear on the display.
5) Configuration of Squelch level (SQL – MENU 5)
Function: allows silencing the background noise when no signal is received.
“0” is squelch opened and from 1 to 9 you will obtain the different levels of noise
reduction, where “9” is the highest level of reduction. If you set a too high level, the
signal that you will receive will be very clean of noise, but it will go to the detriment of
the communication, that is, in this case you will lose reception distance. On the contrary
if you set a too low level or deactivate the squelch, you will count with an increased
reception distance but the radio will be object to receive noises or worse quality
31
Page 34

www.luthor.es
signals (we recommend you the level “5”).
Enter into the menu 5 to adjust the Squelch level. The default value is: 5.
6) Activation of the dual standby system (D.WAIT – MENU 6)
Function: while you are operating in one channel, you can receive signals in other
channel.
Enter into the menu 6 to activate the dual standby. The default value is: ON.
7) Display light (LED – MENU 7)
Function: allows adjusting the way the display light works.
Enter into the menu 7 to adjust the display light. The default value is: AUTO.
ON: the display light will be always on.
AUTO: automatic light, the light turns on when any operation is done and turns off
automatically a few seconds aer the last operation.
OFF: the display light will be always off.
8) Display’s colour selection (LIGHT – MENU 8)
Function: allows selecting the display’s colour.
Enter into the menu 8 to adjust the display colour. The default value is: COLOR1.
COLOR1: purple.
COLOR2: blue.
32
Page 35

www.luthor.es
EN
COLOR3: orange.
9) Keyboard’s sound (BEEP – MENU 9)
Function: activate/deactivate the keyboard’s sound.
Enter into the menu 9 to adjust the keyboard’s sound. The default value is: ON.
10) ANI code activation (ANI – MENU 10)
Function: sending the ANI code when transmitting, the receiving radios can see it on
the display in case of having the ANI code function.
Enter into the menu 10 to adjust the ANI code. The default value is: OFF.
11) Transmission time timer (TOT – MENU 11)
Function: allows limiting the maximum transmission time. Very advisable when working
in a group, with this option you can limit the transmission time of transmitters and
avoid the transmission’s monopoly of one user. This option allows you to select
between 30, 60… (intervals of 30 s.) up to 270 seconds the maximum transmission
time.
Enter into the menu 11 to adjust the TOT function. The default value is: OFF.
33
Page 36

www.luthor.es
12) Busy channel lock (BCLO – MENU 12)
Function: prevents the user from transmitting if the radio is receiving a signal. This way
the radio will avoid to interfere another user that was previously talking. The radio will
allow you to transmit only at the moment when does not detect a sign or
conversation.
Enter into the menu 12 to adjust the BCLO function. The default value is: OFF.
OFF: turn off the transmission busy channel lock.
WAVE: if the radio receives a signal, won’t allow transmitting until that reception ends,
when pressing the PTT button the display will show “BCLO” but will allow transmitting
on the second standby frequency.
CALL: if the radio receives a signal, won’t allow transmitting until that reception ends,
even won’t allow transmitting on the second standby frequency while the reception is
on, pressing the PTT button the display will show “BCLO”.
13) Activation of VOX level (VOX.SW – MENU 13)
See menu 3, on pages 30 and 31.
14) Transmission’s end notice (ROGER – MENU 14)
Function: the radio will emit a “beep” sound when the transmission ends.
Enter into the menu 14 to activate the ROGER BEEP function. The default value is:
OFF.
34
Page 37

www.luthor.es
EN
15) Monitor option for FM radio (DW – MENU 15)
Function: allows that while listening to the FM radio, if a signal is received on the last
frequency used, the equipment changes immediately to that frequency or channel, and
when the reception of that signal ends, the equipment will return in a few seconds to
the FM radio station you were listening.
Enter into the menu 15 to activate the monitor function. The default value is: ON.
16) Reception’s energy save (RX.SAV – MENU 16)
Function: turns on and off the power of the receptor of your transceiver in an
imperceptible way with micro-cuts that produce a considerable energy saving.
Enter into the menu 16 to activate the RX.SAV function. The default value is: ON.
17) Scanning mode adjustment (SCANS – MENU 17)
See menu 1, on pages 29 and 30.
18) Automatic keyboard lock (AUTOLK – MENU 18)
Function: spent 5 seconds from the last transceiver’s operation, the keyboard will be
automatically locked to avoid accidentally operating the transceiver, only the PTT and
MONI buttons will be operative.
35
Page 38

www.luthor.es
Enter into the menu 18 to activate the AUTOLK function. The default value is: OFF.
If the equipment is locked, press [ ] during a few seconds to unlock it. If you want
to lock it press [ ] again during a few seconds.
19) English voice guide (VOICE – MENU 19)
Function: an English voice will tell you all the functions or movements made through
the keyboard.
Enter into the menu 19 to activate the VOICE function. The default value is: ON.
20) Display information when turning on (OPN.SET – MENU 20)
Function: when turning on the equipment the display will show a customizable
message.
Enter into the menu 20 to activate the OPN.SET function. The default value is: OFF.
OFF: when turning on the equipment the display will show the model’s version.
DC: when turning on the equipment the display will show the battery voltage.
MSG: when turning on the equipment the display will show a message. See menu 22 to
customize it.
21) Shows the battery voltage (VLT – MENU 21)
Enter into the menu 21 to check the battery voltage.
36
Page 39
www.luthor.es
22) Display message when turning on (PON.MSG – MENU 22)
Enter into the menu 22 to edit the message, you can do it too through the
programming soware. Press [ ]. Pressing [ ] and [ ] you can select the
desired letters, use [ ] and [ ] to move the cursor to the le and to the right
respectively.
23A) Frequency offset value (OFFSET – MENU 23A)
Only in the frequency mode (VFO).
Function: it’s important to work through a repeater where the transmission and
reception frequencies have to be displaced between them. Selecting the frequency
offset value in MHz, it will be automatically made, displacing the emission from the
reception in the direction wished by the user. See menu 28 to choose the frequency
offset direction.
Enter into the menu 23A to select the frequency offset value.
The range of values goes from 0.000 to 99.975 MHz.
23B) Shows channel name (DIS.NM – MENU 23B)
Only in the channel mode (CH) and the frequency-channel mode (MR).
Enter into the menu 23B to show or hide the channel name.
37
EN
Page 40
www.luthor.es
24) Channel name edit (CH.NAME – MENU 24)
Enter into the menu 24 to edit the channel name, you can do it too through the
programming soware.
Pressing [ ] and [ ] you can select the desired letters, use [ ] and [ ] to
move the cursor to the le and to the right respectively.
25) CTCSS / DCS tones in transmission TX and reception RX (C-CDC – MENU 25)
Function: to select the analogical CTCSS or digital DCS tones in both transmission and
reception, so that both will use the same tone.
Press [ ] to select between CTCSS / DCS / OFF. Once selected CTCSS or DCS,
press [ ] and [ ] to select the desired tone number. Press [ ] to select the
type of DCS tone (“N” or “I”).
26) CTCSS / DCS tones in reception RX (R-CDC – MENU 26)
Function: to select the analogical CTCSS or digital DCS tones only in reception.
Press [ ] to select between CTCSS / DCS / OFF. Once selected CTCSS or DCS,
press [ ] and [ ] to select the desired tone number. Press [ ] to select the
type of DCS tone (“N” or “I”).
38
Page 41
www.luthor.es
EN
27) CTCSS / DCS tones in transmission TX (T-CDC – MENU 27)
Function: to select the analogical CTCSS or digital DCS tones only in transmission.
Press [ ] to select between CTCSS / DCS / OFF. Once selected CTCSS or DCS,
press [ ] and [ ] to select the desired tone number. Press [ ] to select the
type of DCS tone (“N” or “I”).
28) Frequency offset direction (S-D – MENU 28)
To adjust the frequency offset direction. The default value is: OFF.
“+”: the frequency offset direction will be down.
“-“: the frequency offset direction will be up.
OFF: there are no frequency offset direction.
29) Selection of frequency steps (STEP – MENU 29)
Function: to adjust the frequency steps.
Available values: 5K / 6.25K / 10 / 12.5 / 25K / 37.5 / 50 / 100
30) Selection of bandwidth (N/W – MENU 30)
Available values: “WIDE” (25KHz) or “NARROW” (12,5KHz).
39
Page 42
www.luthor.es
31) Analogical CTCSS tones scan (SEEK 67.0 – MENU 31)
Function: allows that the transceiver hears the input signal and searches the
analogical CTCSS tone used by the other station or stations. It’s used in situations
where you don’t know which is the tone.
If the tones search doesn’t detect any tone, it will continue searching infinitely. When
this happens, it can be because the other station doesn’t be using any tone. You can
press PTT button, [ ] or [ ] to stop the search at any moment.
You can also press MONI button during the search to hear the signal (mute) from the
other station. When you release MONI button, the tones search will resume.
32) Digital DCS tones scan (SEEK D023N – MENU 32)
Function: allows that the transceiver hears the input signal and searches the digital
DCS tone used by the other station or stations. It’s used in situations where you don’t
know which is the tone.
If the tones search doesn’t detect any tone, it will continue searching infinitely. When
this happens, it can be because the other station doesn’t be using any tone. You can
press PTT button, [ ] or [ ] to stop the search at any moment.
You can also press MONI button during the search to hear the signal (mute) from the
other station. When you release MONI button, the tones search will resume.
40
Page 43

www.luthor.es
EN
33) Selection of the encryption group (SCR.NO – MENU 33)
You can use this function to obtain the maximum of privacy in your conversations, 8
different encryption groups make almost impossible to hear a conversation by a non
desired user. This function distorts the voice and it only can be understood by another
user with the same transceiver and the same encryption group, otherwise, the
conversation will be intelligible.
Enter into the menu 33 to adjust the encryption group.
To use the encryption, you should activate the “SCR” function in the menu 34.
34) Selection of the audio mode (APRO – MENU 34)
Available values:
“OFF”: normal audio.
“SCR”: voice encryption activated.
“COMP”: audio compressor enabled, gives the transceiver a greater audio quality.
41
Page 44
www.luthor.es
Advanced functions
1) Emergency call [ ] + [ ]
In standby mode, press [ ] to enter into the menu; press [ ] to
activate the emergency call function, the equipment will transmit an
emergency call during 20 seconds, passed this time turns automatically
to reception mode during 10 seconds and then returns to alarm mode. That cycle of:
alarm TX (20sec.), reception (10sec.), alarm TX (20sec.)... keeps on until the user
presses the PTT button to end the alarm mode.
2) Keyboard lock
To avoid operating the keyboard in an involuntary way, this transceiver comes with the
possibility of locking the keyboard. In standby mode, press [ ] during about 2 seconds to lock or unlock the keyboard, the icon will be showed in the upper side of
the display when the keyboard is locked. This equipment comes with the possibility of
automatic lock, for more details see the menu 18.
42
Page 45
www.luthor.es
3) Reverse frequency function
Pressing the [ ] key during almost 2 seconds the transceiver activate/deactivate the
reverse frequency function. When this function is on the icon “R” will be showed in the
upper side of the display, and it makes that the emission frequency turns into
reception frequency and reception frequency into emission frequency, in the cases
where both are different.
4) 1750Hz tone
To access to certain kind of repeaters using this tone, keep pressing [ ] button
during the time established by the repeater. The transmitter will be automatically
activated and a 1750Hz audio tone will get over the transmission. Once has obtained
the access to the repeater, you should release [ ] and press PTT button to activate
the transmission.
5) Storage and delete of memory channels
5.1.) Storage of memory channels.
In the VFO mode, introduce the wished frequency through the numeric keyboard or
select one pressing [ ] and [ ], next press [ ] followed by [ ], the digits
on the upper side of the screen will blink, introduce the desired number of channel
through the numeric keyboard or select one pressing [ ] and [ ], next press
[ ] to save it.
43
EN
Page 46
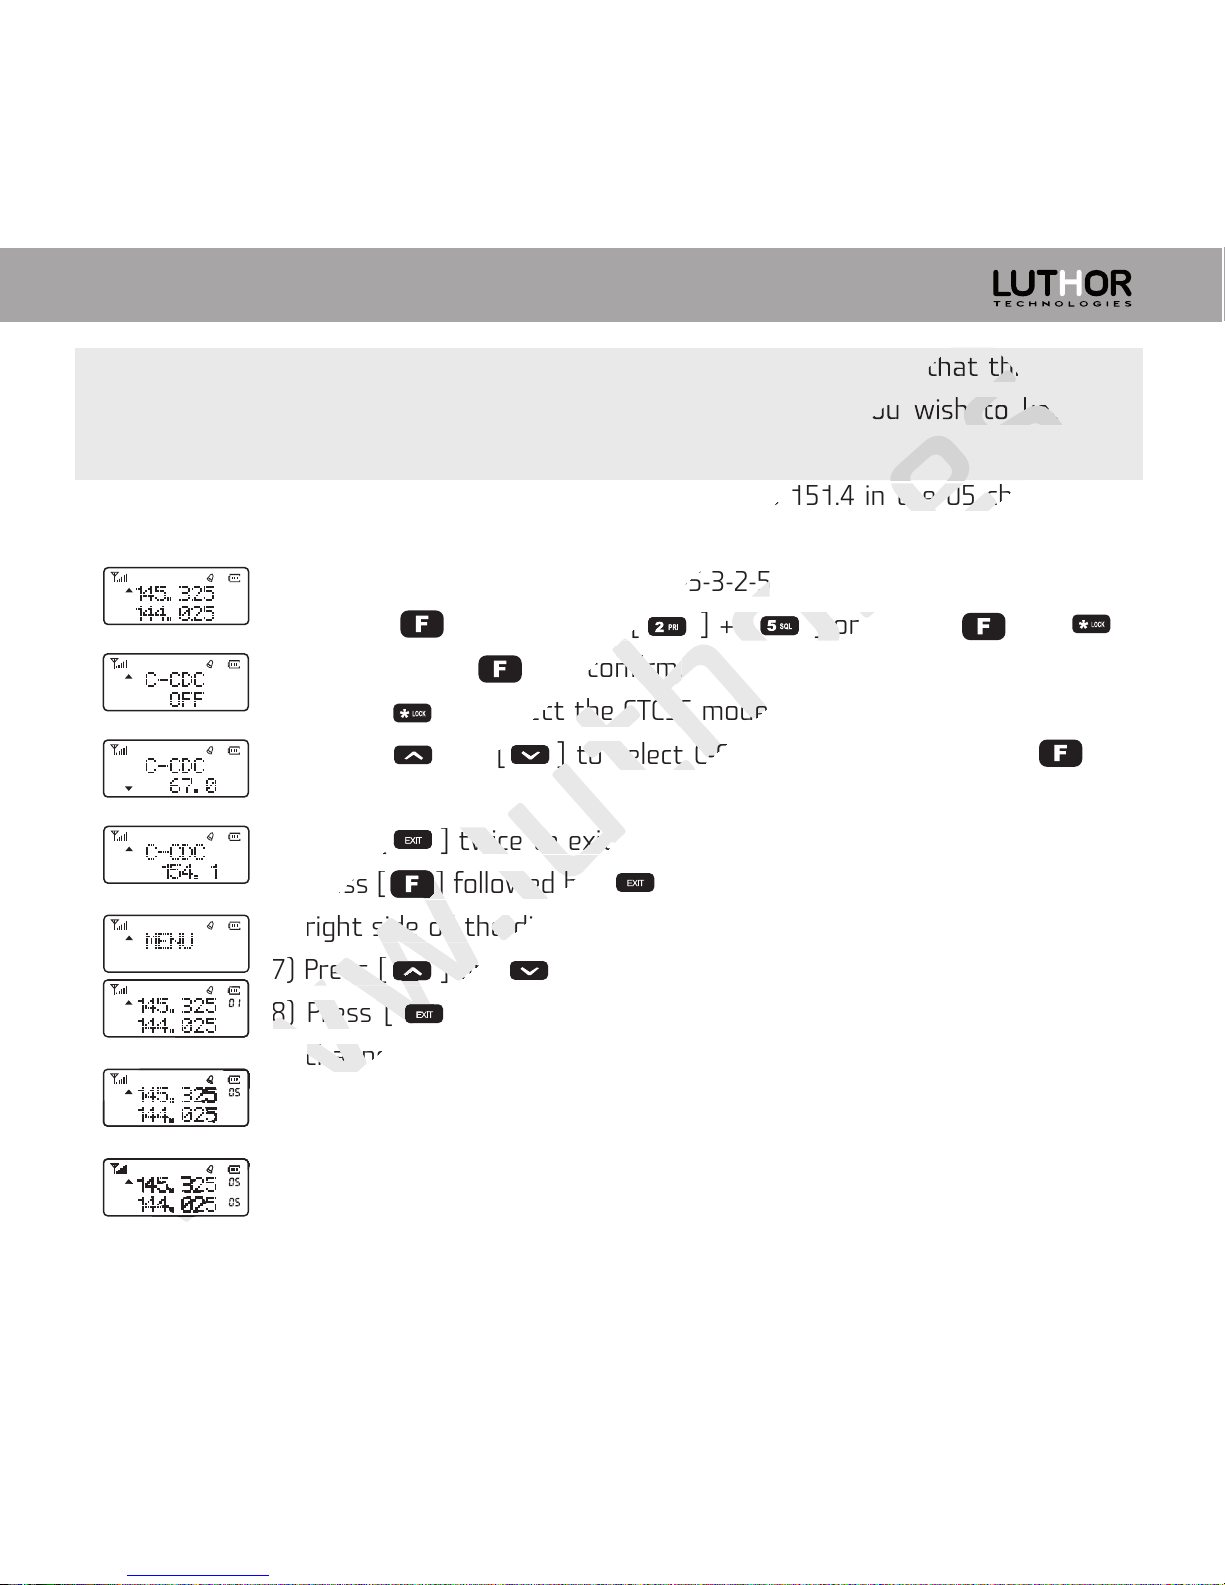
Note: aer inserting the channel number wished, if it blinks, means that this channel
is already occupied, you should choose another one in case you wish to keep the
information previously saved.
Example: to save the 145.325MHz frequency with CTCSS 151.4 in the 05 channel, the
steps to follow are the next ones:
1) In the VFO mode, introduce 1-4-5-3-2-5
2) Press [ ] followed by [ ] + [ ] or press [ ] + [ ],
followed by [ ] to confirm.
3) Press [ ] to select the CTCSS mode, the display shows C-CDC 67.0
4) Press [ ] or [ ] to select C-CDC 151.40, followed by [ ] to
confirm.
5) Press [ ] twice to exit.
6) Press [ ] followed by [ ], a small digits will appear in the upper
right side of the display.
7) Press [ ] or [ ] to select or introduce 005 directly.
8) Press [ ] to save, on the display, the mode MR and the saved
channel will be displayed.
44
Page 47
www.luthor.es
5.2.) Delete of memory channels.
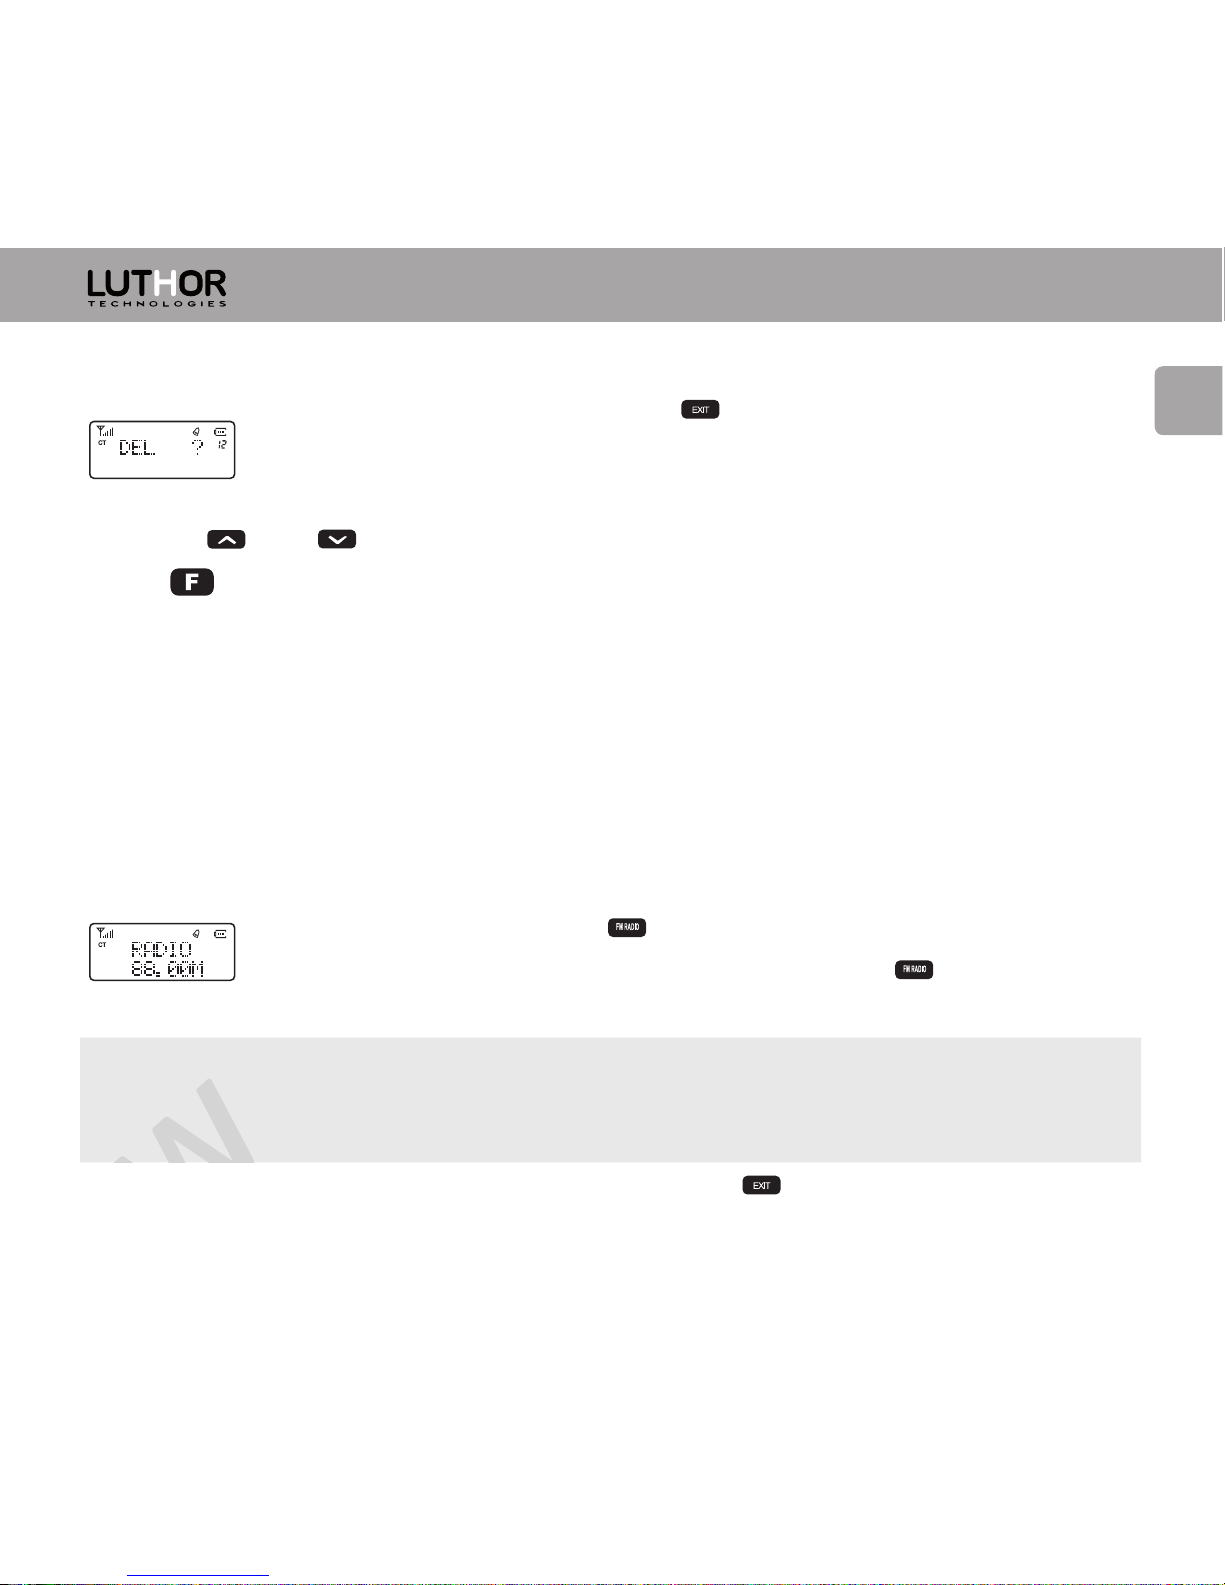
1) In the MR or CH modes, press [ ] to turn on the radio, the display
shows “DEL ?” and the channel number blinks in the upper right side
of the display.
2) Press [ ] or [ ] or introduce the channel number you want to delete, followed
by [ ] to confirm.
3) Aer deleting, it will change to the next occupied channel, if you wish to delete it,
repeat the instructions.
6) FM Radio function
This transceiver comes with an FM Radio to listen to commercial stations.
To use the transceiver as an FM Radio:
a) In standby mode, press [ ]to activate the FM Radio mode, on the
display “88.00M” will be showed, if you press [ ] again the FM
Radio mode will be deactivated.
Note: in the FM Radio mode, if you receive a signal, the transceiver exits the FM Radio
mode, and aer five seconds without receiving a signal, the FM Radio mode is activated
again.
b) Selecting the mode: in the FM Radio mode, press [ ] to change between the FM
memories mode and the FM frequencies mode (this function is not available when
45
EN
Page 48
www.luthor.es
c) Selecting the frequency: in the FM frequencies mode, introduce the desired
frequency through the numeric keyboard or select one pressing [ ] and [ ]. In
the FM memories mode, select the desired channel pressing [ ] and [ ].
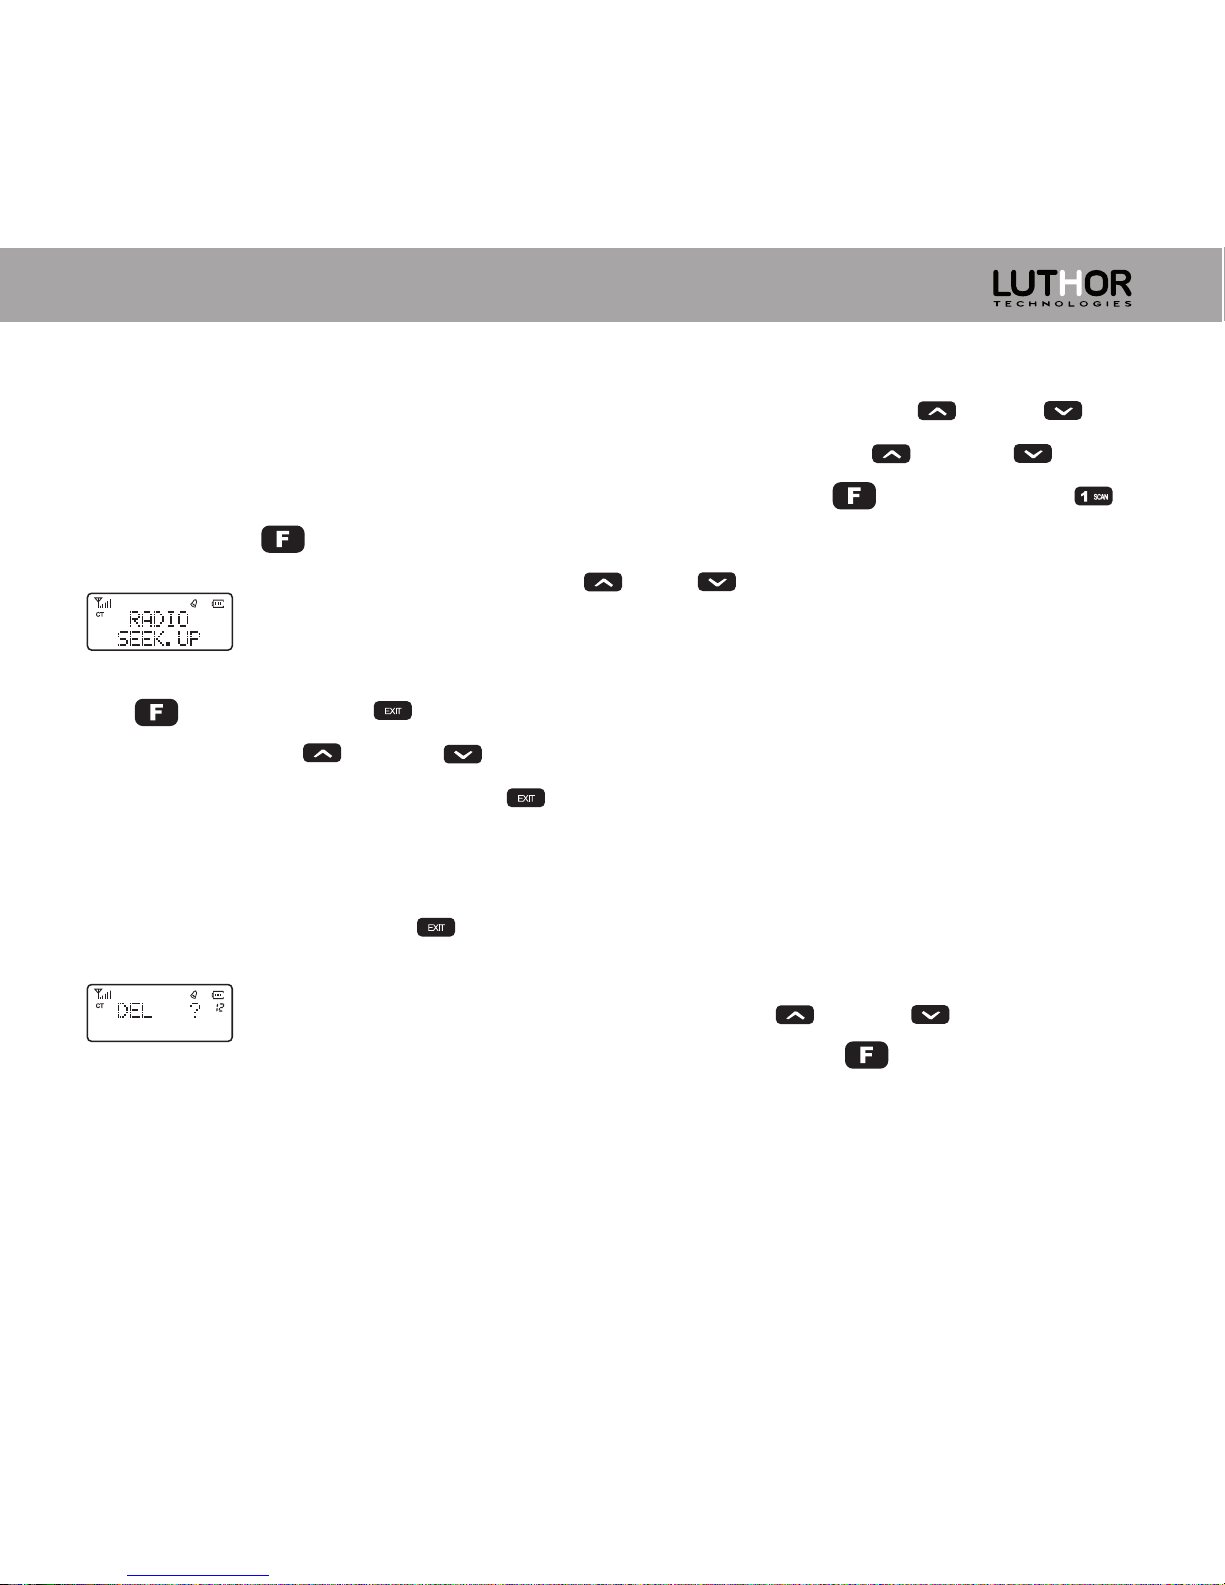
d) Automatic stations search: in the FM radio mode, press [ ] followed by [ ]
and press [ ] again to start the FM radio search, on the display “RADIO SEEK.UP”
will be showed, press [ ] or [ ] to change the search direction.
The search will stop in the first station found.
e) Storage of FM radio channels: in the FM frequencies mode, press
[____] followed by [ ], the number of memory will blink on the right side of the
screen, press [ ] and [ ] or introduce the memory number you wish through
the numeric keyboard, press [ ] to confirm and return to the FM radio mode.
You can store a maximum of 25 memories.
f) Delete of FM radio channels: in the FM memories mode, turn off the transceiver, and
while you are pressing [ ] turn on the transceiver, on the display “DEL ?” will be
showed and
the number of memory will blink, press [ ] and [ ] to select the
number of memory you want to delete, press [ ] to confirm. Repeat
the instructions if you want to delete another channel.
46
Page 49
www.luthor.es
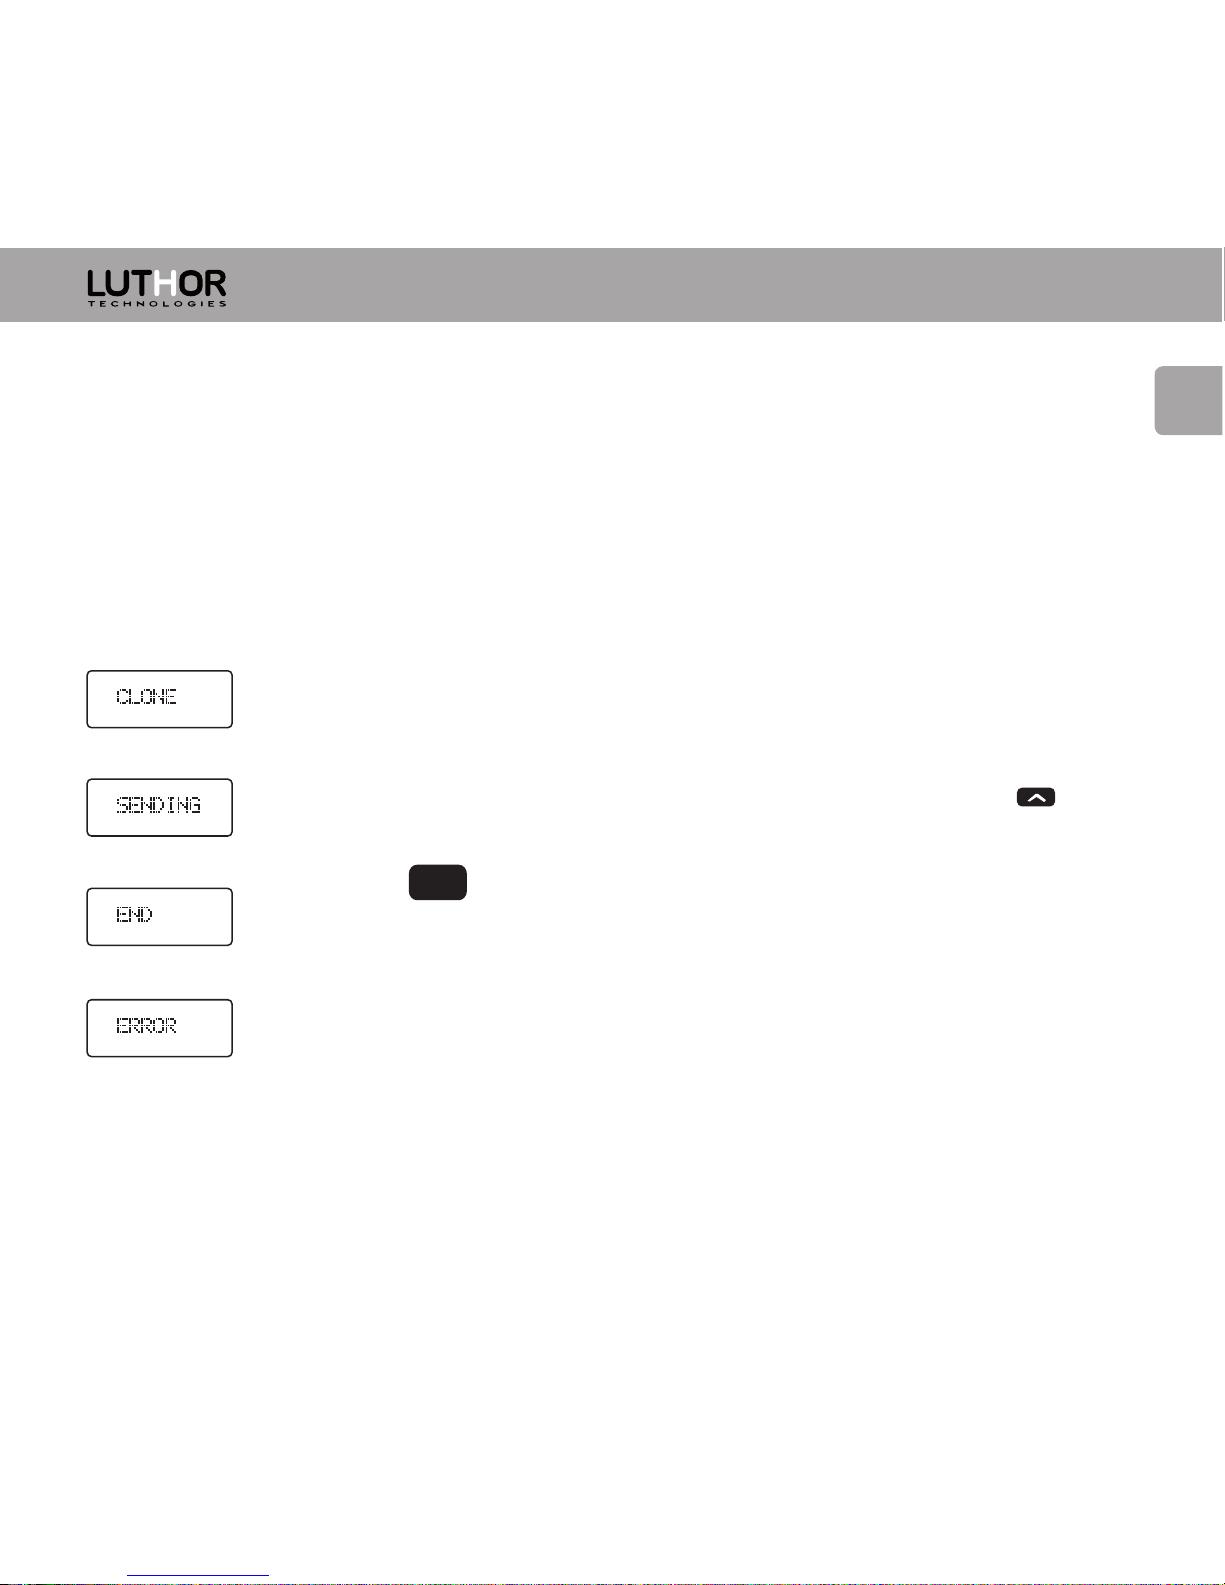
7) Cloning
This function allows sending the same information and configuration from one
equipment to another one.
Prepare two units of the TL-22 model and a cloning cable, the first unit will be the
“Master” one and it will have all the information we want to transmit to the other
equipment, the second equipment, the one called the “Receptor”, it will be the one in
which we want to store all the information contained in the first equipment.
1) The “Receptor” equipment will be turned on and the “Master”
equipment will be turned off.
2) Connect the cloning cable between the two equipments. In the
“Master” equipment, while pressing both PTT button and [ ] turn
it on, on the display “CLONE” will be showed.
3) Press [ ] button in the “Master” equipment to start cloning.
During the cloning on the display of the “Master” equipment
“SENDING” will be showed and its light will blink in red colour, in the
“Receptor” equipment its light will blink in green colour. When the
cloning ends in a successful way the display of the “Master”
equipment shows “END”. When the cloning fails the display of the “Master” equipment
shows “ERROR”.
MONI
47
EN
Page 50

www.luthor.es
Technical specifications
GENERAL
Equipment’s reference LUTHOR TECHNOLOGIES TL-22
Frequency range VHF 144 ~ 146 MHz
Memory channels 128 memories / channels
Frequency stability ± 2.5 ppm
Antenna VHF high gain
Antenna impedance 50 Ω
Voltage DC 7.4V (rechargeable lithium battery)
Mode Simplex or semi-duplex
Dimensions 100mm H. (185mm w/antenna) x 59mm W. x 32mm L.
Temperature range min -10ºC / max 55ºC
TRANSMITTER
Power output 5W high power / 1W low power
Modulation mode (wide
band / narrow band)
Max deviation (wide
band / narrow band)
48
16K ¢ F3E / 11K ¢ F3E
≤ 5 KHz / ≤ 2.5 KHz
Page 51
www.luthor.es
EN
Spurious radiation ≤ 7 µW
Adjacent channel power (wide
band / narrow band))
Pre-emphasis characteristics 6 dB
Current ≤ 1.6 A (5 W)
CTCSS / DCS deviation (wide
band / narrow band)
Distortion < 5 %
RECEPTOR
RF Sensitivity -122 dBm (12 dB SINAD)
Audio power > 0.5 W
Audio distortion < 10 %
Intermediation (wide
band / narrow band)
Selectivity (wide
band / narrow band)
Spurious reject ≥ 65 dB
Block ≥ 85 dB
ATTENTION: some of this specifications can be subject to modification without previous notice.
49
ATTENTION:
some of this specifications can be subject to modification without previous notice.
≤ -65 dB / ≤ -60 dB
0.5 KHz ± 0.1 KHz / 0.4 KHz ± 0.1 KHz
≥ 65 dB ≥ 60 dB
≥ 60 dB ≥ 55 dB
Page 52
www.luthor.es
Declaration of Conformity
La abajo firmante, en nombre y representación de:
Compañía: LOCURA DIGITAL S.L.
Dirección: Avda. Sant Juliá, 154, Nave 2
08403 Granollers – Barcelona (España)
Teléfono: 93 861 63 72
Fax: 93 846 89 87
Correo electrónico: [email protected]
Certifica y declara bajo nuestra responsabilidad que el siguiente equipo:
Tipo de equipo: Transceptor portátil Mono banda VHF o UHF FM para aficionado.
Marca: LUTHOR TECHNOLOGIES
Modelo: TL-22
Fabricante: Q.T.E. CO., LTD.
Lugar de fabricación: China
Es conforme con las siguientes normativas:
- EN 60950-1: 2001+A11:2004 Seguridad de los equipos de tecnología de la información. Requisitos generales.
- EN 301 489-1 V1.8.1:2008
- EN 301 489-5 V1.3.1:2002
- EN 300 086-1 V 1.3.1:2008/09
- EN 300 086-2 V 1.2.1:2008/09
Granollers 03 de Mayo de 2011
Locura Digital S.L.
Avda. Sant Juliá, 154, Nave 2
08403 Granollers – Barcelona (España) Telf: 93 861 63 72 / Fax: 93 846 89 87
C.I.F.: B-97151369
Josefa Paredes Martínez
Administradora
Compatibilidad electromagnética y cuestiones de espectro de radiofrecuencia (ERM); compatibilidad electromagnética (EMC)
estándar para equipos radio y servicios; parte 1: Requisitos técnicos comunes, parte 5: Condiciones específicas para radio
móvil privada terrestre (PMR) y equipos auxiliares (voz y no voz)
Compatibilidad electromagnética y cuestiones de espectro de radiofrecuencia (ERM); servicio móvil terrestre; características
técnicas y condiciones de prueba para equipos de radio con un conector de RF externo o interno, aplicables principalmente
para voz analógica; parte 2: En armonizada cubriendo los requisitos esenciales según el artículo 3.2 de la Directiva de R&
TTE
En cumplimiento con los requerimientos de la Directiva 99/05/EC del Parlamento Europeo y del consejo del 9 de Marzo de 1999 y transpuesta a la legislación
española según el Real Decreto 1890/2000 del 20 de Noviembre de 2000.
1177 !
50
Page 53

Importador/Imported by
Importé Par
L.D. SL.
CIF. ESB 97151369
 Loading...