

Page 1
www.lupine.de
OWNERS MANUAL Wilma TL
Wilma TL
Wilma TL Set
Page 2

2 Wilma TL 3Wilma TL
Carry a spare light with you at all times, as the product can potentially fail unexpectedly at any time.
Heat development:
Our Wilma TL is not a normal ashlight. With continuous operation at maximum power, the enclosure
may become hot; therefore, always ensure a safe distance to ammable materials.
Caution! When operating the lamp at maximum power, the light may be dimmed after several minutes
depending on the ambient temperature. This is normal and will reduce the lamp's temperature.
Water resistance:
All Wilma TL components are waterproof and can of course be used under extremely severe conditions.
However, the Wilma TL light is NOT a diving lamp and is NOT suitable for use under water.
Read this manual before using
1 2
Charging
Before seriously using your ashlight for the
rst time, the battery requires charging to
ensure maximum capacity. For this purpose,
please separate the battery tank from the
ashlight head.
The power jack is located on the top of
the battery tank.
Also refer to the Charger section on
p. 12 or, in case of a special version,
the separate charger manual.
Flashlight and charger are ready for use upon delivery,
however, the battery is merely partly charged.
Safety instructions:
Warning! Avoid looking directly into the light emitted by the light or shining the light
into your own eyes or the eyes of another person. If the light accidentally shines into your
eyes, close your eyes and move your head out of the light beam. Do not use any strongly
focusing optical device to look at the light beam.
In cases where the light is used in a public or commercial setting, users should be
provided with training concerning the safety measures for laser light.
Page 3
4 Wilma TL 5Wilma TL
A quick push of the button switches between power settings.
Switching on:
Switching/low beam:
Switching off:
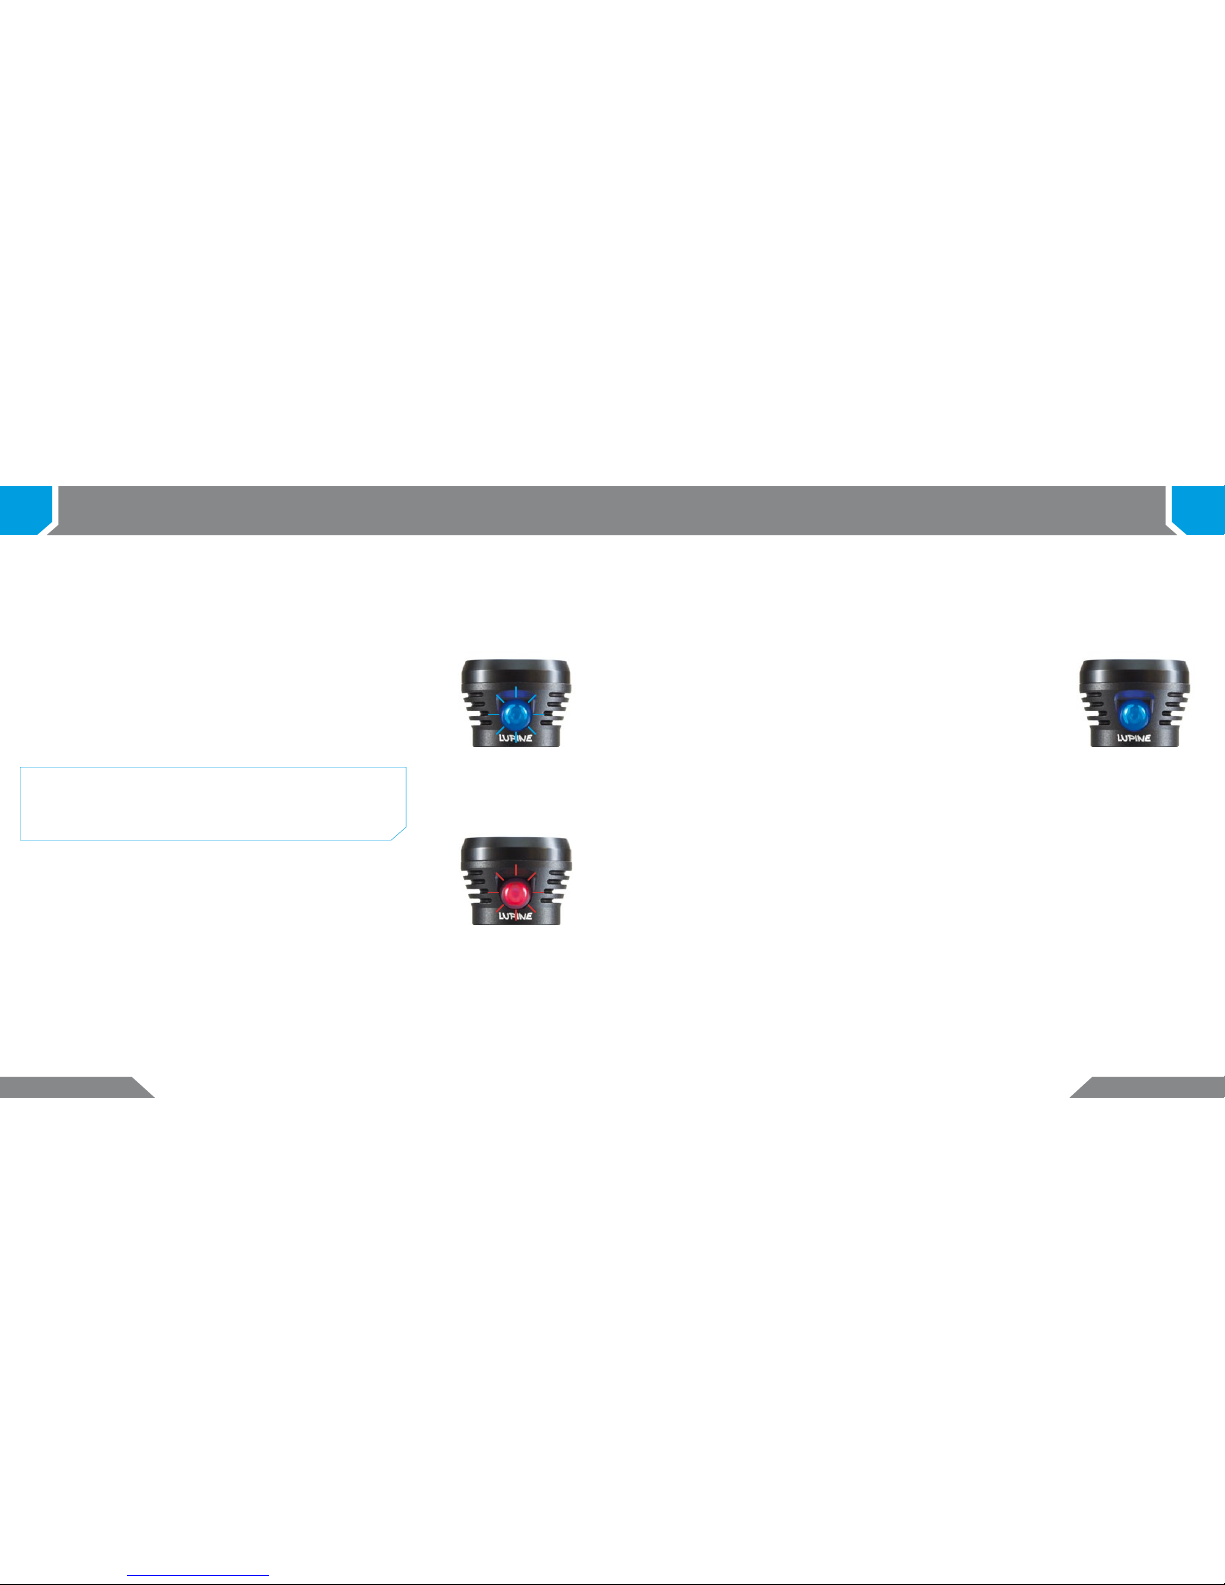
Pressing the button once will switch on the lamp at maximum
power. The blue LED is on.
Operation
3 3
When the lamp is connected to the battery, the software will run a self test.
The button will ash purple, red, blue and the lamp itself will ash once.
Initialization & voltage display:
Hold the button down (for more than one second) to switch o the lamp.
Note: When operating the lamp at maximum power, the
power may be reduced continuously depending on the
ambient temperature to avoid overheating of the LEDs
and the electronics.
Lamp on
Example: The blue LED ashes once and then the red LED ashes ve
times. This indicates that 1.5 Ah have been drawn from the battery.
Discharged battery capacity:
When you shut o the lamp, the discharged battery capacity is shown
via ashing of the blue LED and then the red LED. This information can
only be displayed once as it is deleted when you unplug the battery.
The blue LED blinks once for each Ah (ampere hour); and then
the red LED blinks once for each 1/10 of an Ah.
Note: The Wilma TL control electronics not only controls high and low
beam; it also protects the rechargeable battery against deep discharge
and includes a low battery indicator.
The battery voltage is then indicated by the blue and red LEDs, as follows:
The blue LED ashes once for each volt; and then
the red LED ashes once for each 1/10 of a volt.
To display the battery voltage again, unplug the light from the battery
and then plug it in again.
Interpreting the voltage display:
More than 7.9 V: the battery is fully charged. 7.1 to 7.8 V: the battery
needs charging or is old. 6.5 to 7 V: the battery is not ready for use.
Note: To deactivate this display, simply press the button. In other words,
you needn't let the display go through its whole cycle in order to use
the lamp.
The control electronics measures the voltage under load.
Thus, measurements using a voltmeter will not be comparable.
Example: The blue LED ashes seven times and the red LED then
ashes ve times; this means that the measured voltage under load
is 7.5 V. This display helps you assess the actual state of the battery
prior to use.
Battery voltage
(once per Volt)
Battery voltage
(once per 1/10 Volt)
Page 4
6 Wilma TL 7Wilma TL
Operation
3 3
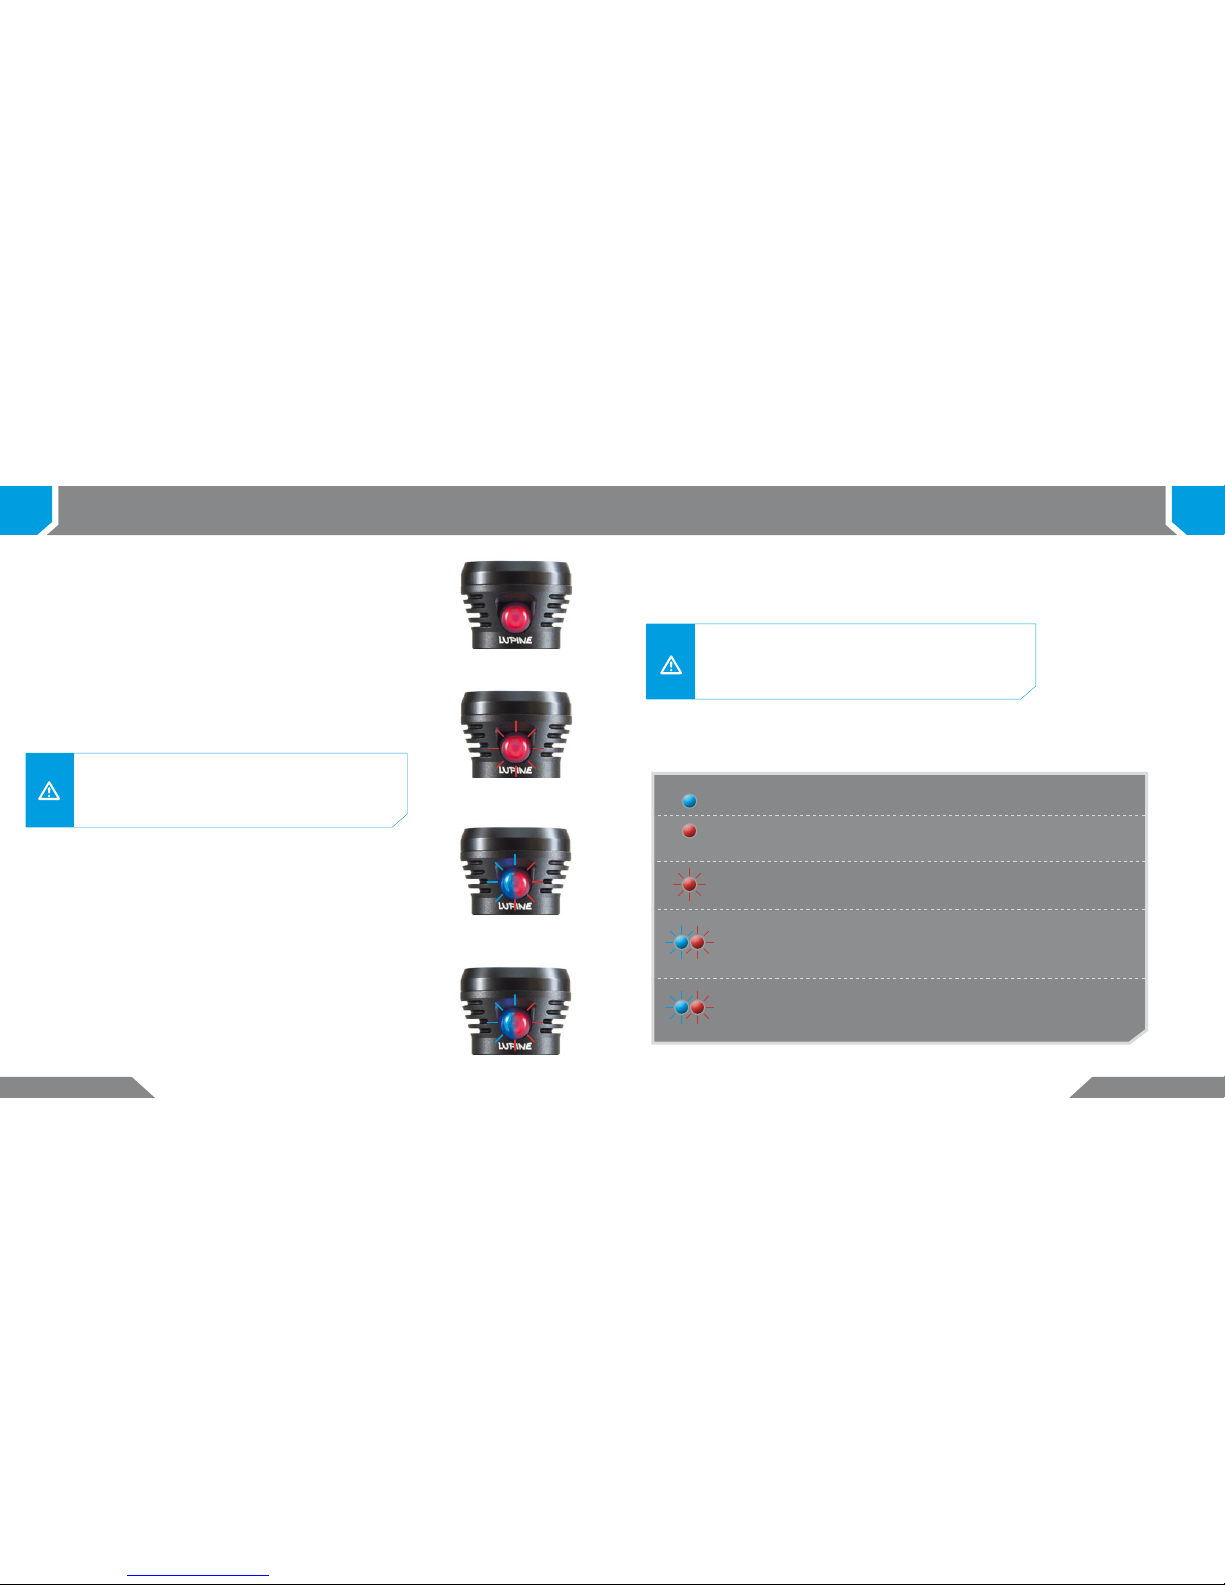
The blue LED is on: The lamp is on.
Explanation of LEDs:
Reserve power
Battery discharged
(lamp ashes)
Very low capacity
Reserve power:
Note: The battery life remaining after the red LED has come on is depen-
dent on the overall capacity, the temperature and the battery's age. As a
Li-Ion battery's voltage curve is not proportional to the remaining capacity,
you will have to learn to interpret the indicators in relation to your battery.
When the battery is discharged (the red LED has been ashing for some
minutes), the red and the blue LED will ash alternately; the lamp itself also
ashes. After switching the light on again (double click!), reserve power
will be available. Depending on the age of the battery, some more minutes
of light will be provided. To make reserve power last as long as possible,
only light below 2.0 W will be provided. To indicate that reserve power has
been activated, the red and the blue LED will ash in turn.
As soon as the battery is entirely discharged then, the lamp will be switched
o automatically. Therefore: Caution!
Warning! When the battery is almost entirely discharged
(the red LED has been ashing for some minutes), the lamp
will ash several times (the red and the blue LED ash) and
is then switched o. Caution!
The red LED indicates the state of the battery. If the battery voltage
decreases below a certain value, rst, the red LED will come on (the
lamp itself also ashes once) and then additionally, shortly before the
capacity is entirely exhausted, it will start ashing.
Note: When permanently operating the lamp at 17 W, the battery warnings
may be issued in very quick sequence.
Battery warning:
Battery partly discharged
Note: When operating the lamp at 0.5 W and 2.5 W exclusively, no reserve power
will be available.
Warning: Do not switch on the light when the battery is
discharged, as this will invariably damage the battery.
Recharge the battery as soon as possible to avoid a deep
discharged battery.
The red LED is on:
The lamp ashes once:
A considerable amount of the battery power
has been used; safe power immediately!
The red LED ashes,
the lamp ashes once:
The battery is almost discharged.
The blue and the red
LED ash in turn,
the lamp ashes:
The battery is discharged.
The blue and the red LED
ash in turn:
The lamp is running on reserve power.
Page 5

8 Wilma TL 9Wilma TL
Programming
4 4
You may easily select the Wilma's light levels. By default, the Wilma TL operates in the 2-step low
mode with stealth o, low start o, and double click o. Several other light programs are available.
They are very easy to select by simply keeping the button depressed until the button's red LED
(blue LED) ashes once, twice, etc. When taking your nger o the button accordingly, the setting
will be saved.
The lamp's electric power consumption amounts to (approximate values):
Light levels:
The “Power Control System“ provides the possibility for individual programming. By default, the
Wilma TL is set so that usually no changes are necessary.
3 % dimming 0.5 W 50 lumen
15 % dimming 2.5 W 230 lumen
30 % dimming 5 W 440 lumen
55 % dimming 9 W 650 lumen
100 % 17 W 1100 lumen
Default setting
2-step low mode (2 step low) 17 W + 0.5 W
2-step high mode (2 step high) 17 W + 2.5 W
2-step mode with disorientation ash (2 step Flash) 17 W + Flash (15 Hz )
3-step mode with SOS (3 step SOS) 17 W + 2.5 W + SOS
4-step mode (4 step) 17 W + 9 W + 5 W + 0.5 W
1-step mode (1 step) 17 W
3-step mode with RVLR (3 step RVLR) 17 W + 2.5 W + RVLR (3.7 Hz)
Stealth mode on (stealth on)
Stealth mode o (stealth o)
Low start on (low start on)
Low start o (low start o )
Double click on (dbl click on)
Double click o (dbl click o)
In stealth mode, initialization, voltage display, and battery warning usually indicated by
the button's LEDs are partly deactivated. Of course “stealth on“ does not mean that our
Wilma TL will no longer give light or will even become invisible, however, LED indications
will be reduced to a minimum.
This mode includes an additional slow ash mode.
This mode is extremely irritating and may by no means be misused.
This setting enables numerous variations as the lamp will not start at maximum
power as by default, but at the lowest stage.
Exception: The SOS program and the RVLR program.
If this function is activated, the lamp may only be switched on with a quick double
click. Useful for anybody who wants to avoid that the lamp is switched on accidentally in particular during transport (e. g. in a backpack).
Note: The SOS sign is an emergency signal! Use it carefully and only in case of a real
emergency. Due to the lamp's high light output, this signal is visible for several miles;
the operating time is several hours.
Misuse may be prosecuted!
Considering all possible combinations, 56 dierent setting options are provided.
Refer to Programming scheme on p. 10/11
Stealth mode (stealth on):
Low start (low start on):
Double click (dbl click on):
Disorientation Flash:
RVLR:
Page 6

10 Wilma T L 11Wilma TL
5 5
Programming scheme
PRESS
Hold the button down
for
2 sec
Note! The method of counting referred to below assumes that the lamp is switched on. When starting
with your lamp switched o, the lamp will ash once after approximately 2 seconds - lamp on/o.
until the button
flashes
once
until the button
flashes
once
until the button
flashes
5 times
until the button
flashes
twice
until the button
flashes
twice
until the button
flashes
6 times
until the button
flashes
4 times
until the button
flashes
4 times
2-step low
Stealth
on
4-step
2-step high
Stealth
off
1-step3-step (SOS)
Low start off
PRESS PRESSPRESS
PRESS
PRESSPRESS
PRESS
then release
then release
then release then release
then release
then release then release
then release
Hold the button down
for
9 sec
Hold the button down
for
6 sec
Hold the button down
for
3 sec
Hold the button down
for
10 sec
Hold the button down
for
7 sec
Hold the button down
for
5 sec
Hold the button down
for
12 sec
Blue LED
1 = stealth on
2 = stealth o
3 = low start on
4 = low start o
5 = dbl click on
6 = dbl click o
Red LED
1 = 2 step low
2 = 2 step high
3 = 2 step Flash
4 = 3 step SOS
5 = 4 step
6 = 1 step
7 = 3 step RVLR
until the button
flashes
3 times
until the button
flashes
3 times
until the button
flashes
7 times
2-step (Flash)
Low start on
3-step
PRESS
PRESS
PRESS
then release
then release
then release
Hold the button down
for
4 sec
Hold the button down
for
11 sec
Hold the button down
for
8 sec
(RVLR)
until the button
flashes
5 times
until the button
flashes
6 times
Double click on Double click off
PRESS PRESS
then release then release
Hold the button down
for
13 sec
Hold the button down
for
14 sec
3 % dimming 0.5 W 50 lumen
15 % dimming 2.5 W 230 lumen
30 % dimming 5 W 440 lumen
55 % dimming 9 W 650 lumen
100 % 17 W 1100 lumen
Default setting
Page 7

12 Wilma TL 13Wilma TL
6 7
Accessoires
Holster:
Opening the holster:
Attaching the holster:
The holster may be adjusted to three
dierent belt widths. Open the push
button and insert the strap into the
respective loop.
To open the holster, pull the magnetic
latch up (not to the side or away from
the body).
Leather holster with magnetic latch.
Wiesel charger and three plug adapters
(for continental Europe, UK, and the USA).
Plug the included Wiesel charger into an
outlet and connect it to the battery.
Charging starts automatically, the green LED is illuminated.
When the battery is fully charged and the charger switches to Full, the green LED goes o.
The battery can be left plugged into the charger for an indenite period. Although this will not
damage the battery, it is not advisable for Li-Ion batteries since they do not require conservation
charging. When kept in a cool place, the annual self-discharging rate for such batteries is 15 %.
Note: The green LED is only illuminated during the charging process and will not come on if a
fully charged battery is plugged into the device.
Components:
Connecting:
Charging:
Charger/Wiesel
Green LED on: battery being charged
Green LED o: battery is fully charged
LED display:
Warning! This charger is to be used to charge rechargeable Li-Ion batteries only.
It is NOT suitable for charging NiMH batteries!
Do NOT use non-rechargeable batteries. – Risk of explosion!
This charger may be opened ONLY by the manufacturer!
Page 8

14 Wilma TL 15Wilma TL
Accessoires
7 7
Handlebar mounting:
3
2
1
Use the exible rubber ring to quickly and easily mount
the lamp to all thinner handlebars or other similarly
shaped objects.
Simply use an Allen key to quickly attach the handlebar
mount to the ashlight.
Important: Always make sure to place the included
o-ring between ashlight and handlebar mount.
How to mount the lamp on a handlebar is also
demonstrated in a video provided on our website
in the support section!
Lateral adjustment:
To adjust the lamp to freeride or downhill handlebars, you may rotate the handlebar mount by 30°
to either side. Always ensure to loosen the handlebar mount screw if you want to rotate the lamp.
1 2
30° 30°
For particularly thick handlebars, it is
recommended to use the included
larger o-ring.
Note: Upon delivery, the ring for standard
handlebars is attached to the handlebar
mount. To be able to mount the lamp to
oversized handlebars, replace the o-ring
with the larger one.
Page 9

16 W ilma TL 17Wil ma TL
Product care and storage
8 9
Troubleshooting
Problem:
The light does not come on and
the button's LEDs do not ash
when the ashlight head is
connected to the battery.
The power LEDs do not come on,
the button's LEDs ash when the
ashlight head is connected to
the battery.
The battery life is too short.
Cause:
Deep discharged batter y.
Batter y not or not properly
connected to the light head.
Faulty LED unit.
Faulty LED unit.
Discharged batter y.
Old batter y.
Very low temperatures.
Faulty charger.
Solution:
Charge the batter y.
Properly screw on the ash
light head.
Replace the LED unit.
Charge the batter y.
Replace the batter y.
Keep the batter y warm.
Replace the charger.
Check to ensure that the o-ring on the rear of the housing is correctly positioned. The
housing will only be waterproof if its o-ring is intact. After completing this check, carefully
screw down the housing cover. Important! The thread must always run smoothly, other-
wise, screw o the cover again immediately and try again. The ne thread will not excuse
any mishandling - therefore, be extremely careful! Fully screw down the cover.
Cleaning:
Only clean the lamp when it is fully assembled. If required, use warm water and add some
mild dishwashing detergent.
Transport:
Caution! Always separate the battery from the lamp!
Otherwise, the small amount of power used by the electronics will discharge the battery.
Furthermore, the lamp may be switched on accidentally. The uncontrolled heat buildup
could cause a re or melt adjacent plastic material.
Storage:
When the lamp will not be used for a longer period of time, fully charge the battery and
leave it connected to the charger. Choose a cool, dry place for storage (basement etc.).
Note! The lamp housing may be opened for installing an upgrade kit or a lens.
Open the lamp housing's front screw-on cover. Hold the rear of the lamp with one hand
while rotating the front cover to the left (counterclockwise) with the other hand.
Once you have removed the cover, you will see the 4-array lens.
Please avoid touching the lenses directly.
Opening the lamp housing:
Closing the lamp housing:
Page 10

18 Wilma TL 19
Lens beam angle: Operating temperature:
Technical data
10
Wilma TL: 219 g incl. battery
15°
2.5 Ah/7.2 V Li-Ion
–25 °C bis +70 °C
17 W 100 %: 1100 lumen
9 W 55 %: 650 lumen
5 W 30 %: 440 lumen
2.5 W 15 %: 230 lumen
0.5 W 3 %: 50 lumen
Light output: Battery life:
1 hour
2 hours
3 hours 30 min.
7 hours
40 hours
Battery life may vary depending on battery age, condition, and temperature.
Miscellaneous
* Usually dierentiated in measured and
calculated values. Calculated values often
dier considerably from the actual light
output. Our lumen values are measured
in a calibrated integrating sphere.
Ah = Ampere-hours
lm (lumen) = lighting current unit *
Weight:
Charging time:
3 hours
Battery capacity/nominal voltage:
Default setting
Input voltage: 100 – 240 V~, 50 – 60 Hz
Charging current: up to 1.2 A
Compatible batteries: Li-Ion 7.2 V
Display: charging control via one LED
Plug adapters: D/Euro, GB, USA
Wiesel charger:
The laws governing the allowable application domain for this lighting system may vary from one
country to another. We recommend that you inform yourself about the relevant laws in this domain
in your country.
The product's two year warranty applies to all components, as well as any manufacturing defect.
The warranty does not include the battery, however. In addition, any modication or improper
use of the product will void the warranty.
Purchase date/Dealer stamp
Warranty:
Page 11

Lupine Lighting Systems GmbH
Winnberger Weg 11
92318 Neumarkt
Germany
Phone: +49 (0) 91 81 - 50 94 90
Fax: +49 (0) 91 81 - 50 94 915
E-Mail: info@lupine.de
www.lupine.de
Design: www.tocologo.de
 Loading...