

Page 1
1
www.lupine.de
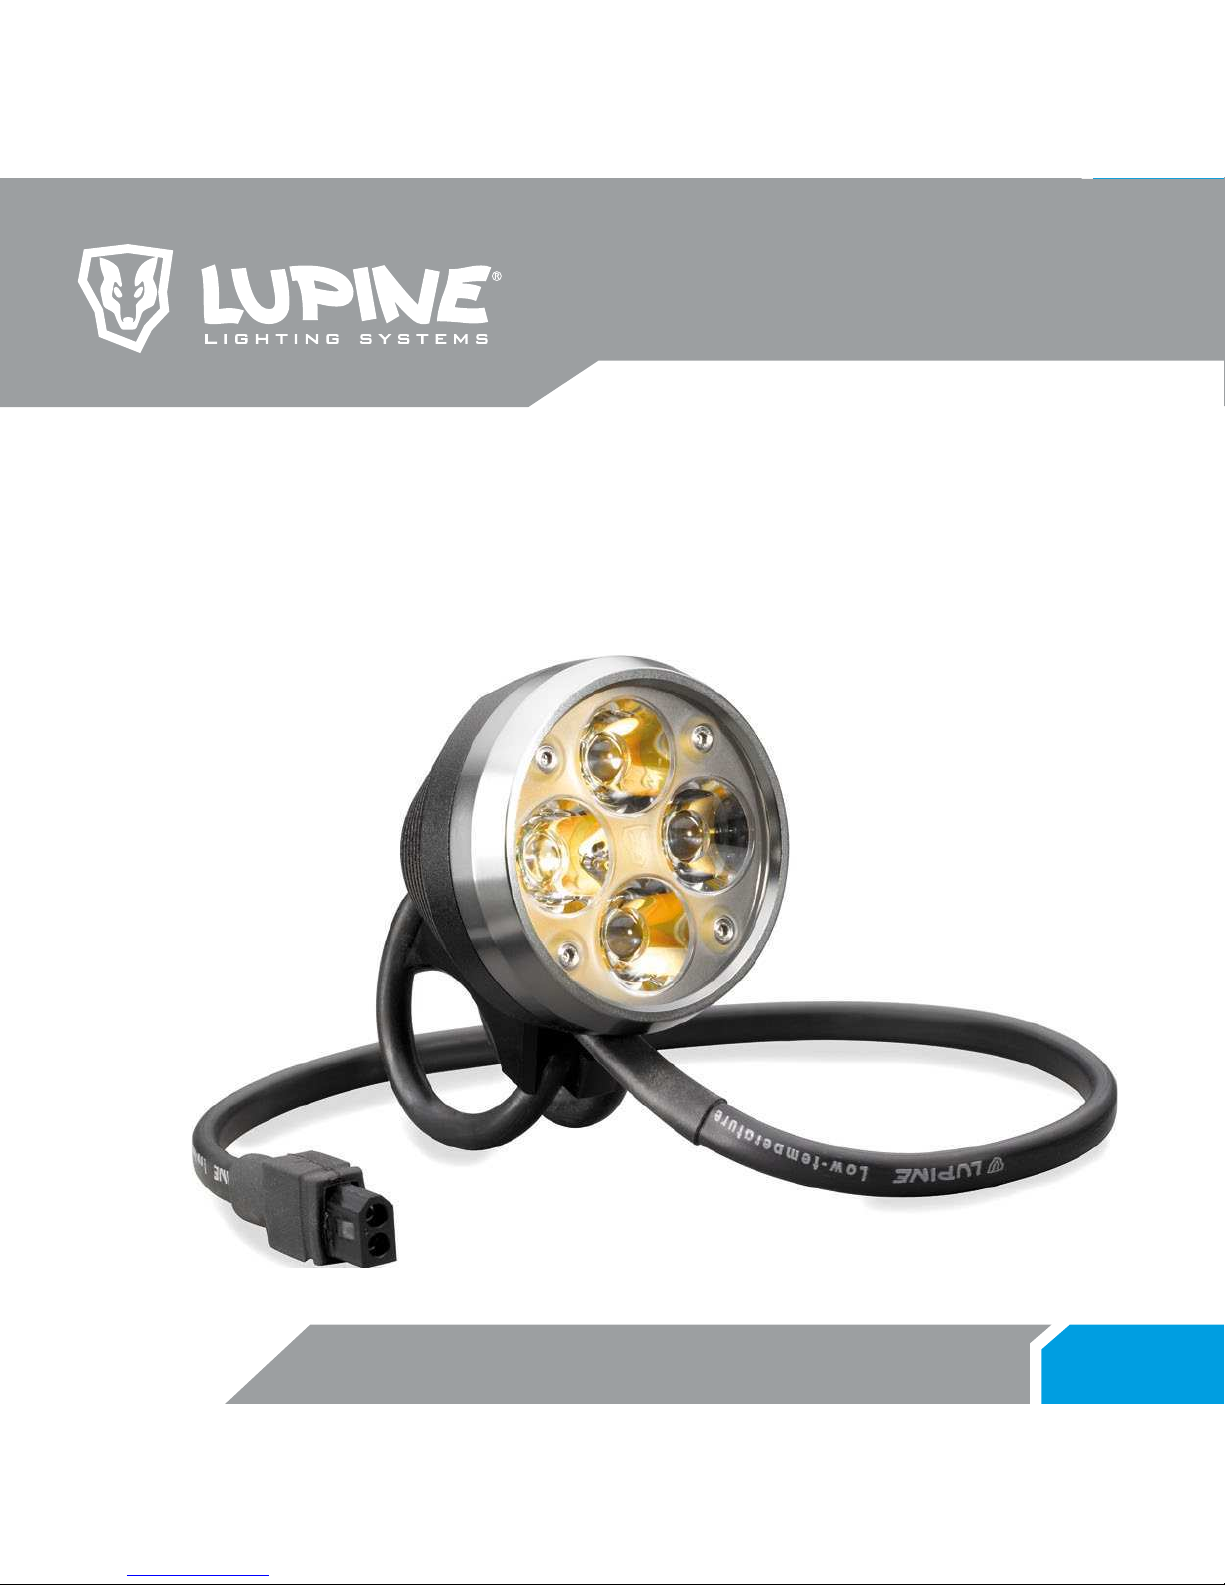
BEDIENUNGSANLEITUNG / OWNERS MANUAL Wilma
Wilma Lampenkopf/Head Unit
Wilma 6/9/12
Wilma X6/X9/X12
Page 2
26 Wilma 27Wilma
English
1
Read this manual before using
The light and charger are ready for use when delivered. All you have to do is charge the battery
before using the product. See charger manual
Safety advisories:
Carry a spare light with you at all times, as the product can potentially fail unexpectedly at any time.
Heat generation:
The light housing can heat up, despite the product’s passing resemblance to a ashlight. So make
sure that you always keep the light at a safe distance from any combustible or ammable materials.
However, quiescent operation (without cooling the light housing via airow or the like) can be
carried out at any time and will not damage the product.
Important: When the light is used in a stationary state, the light dims after a few minutes to reduce
the light's temperature. The light can only be used at 28 watts for long periods if air is owing over
the housing.
Water resistance:
All Wilma components are waterproof and can of course be used under extremely severe conditions.
The lamp complies with IP protection class 68 but is NOT a diving lamp and is NOT suitable for use
under water.
Safety advisory: Avoid looking directly into the light emitted by the light or shining
the light into your own eyes or the eyes of another person. If the light accidentally shines
into your eyes, close your eyes and move your head out of the light beam path. Do not
use any strongly focussing optical device to look at the light beam.
In cases where the light is used in a public or commercial setting, users should be
provided with training concerning the safety measures for laser light.
General:
Index
Read this manual before using 27
Mounting 28–32
Operation 33–37
Customizing brightness levels 38–41
Micro Charger 42
Charger Wiesel 43
Special Functions 42-45
Product care and storage 46
Troubleshooting 47
Technical data 48
Miscellaneous 49
English
Page 3
28 Wilma 29Wilma
English
2 2
Mounting
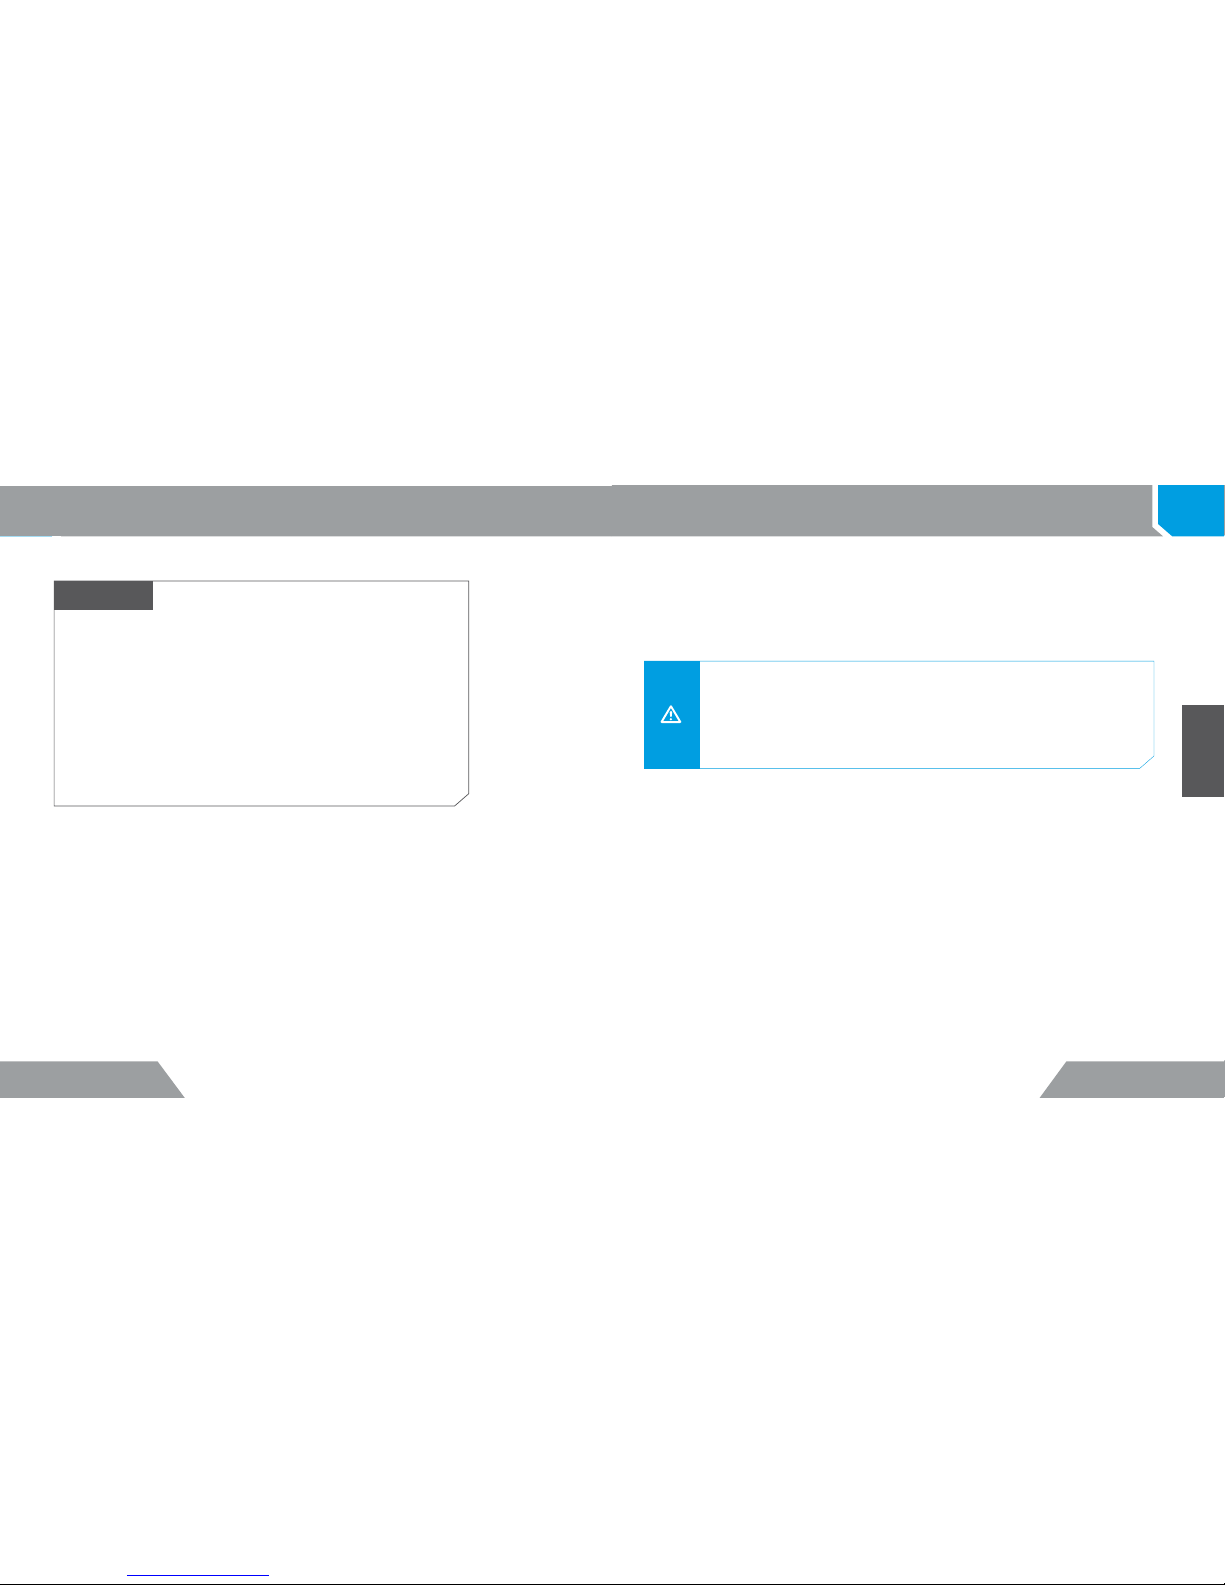
Uni Fit bracket:
Mounting the light on bicycle handlebars and
similarly shaped objects, or on Lupine bicycle
helmet brackets or headbands, is quick and
easy thanks to the exible rubber O-ring.
For a demonstration of how to mount the light
on handlebars, see the video on our Website
(click “Support”).
Use the included larger O-ring for oversized
handlebars.
Note: The product is supplied with the
O-ring for standard handlebars installed on
the bracket. To attach the light to oversized
handlebars, unscrew the bracket and replace the O-ring with the larger one.
Lateral adjustment:
To adjust the light for freeride or downhill
handlebars, you can rotate the bracket on
the lamp housing 4 degrees to either side.
To do this, loosen the screw on the bracket.
The Lupine helmet bracket can be attached to virtually
any helmet that has ventilation slits. The bracket is easy
to mount. For further information, see the text and
pictures on the pages that follow.
Pull both straps through the best situated ventilation slits.
Try out various options until you nd the optimal position.
Helpful hints: Since virtually all ventilation slits are raked
forward, its best to mount the bracket as far as possible
under the edge of the helmet, to prevent the bracket from
slipping.
In doing this, thread the two straps through the
slits as shown in the picture. When the straps are new they
are sti and therefore somewhat dicult to pull through the
slits, which is normal. However, with use the straps will
soften and become easier to use.
Make the straps as tight as possible by pulling hard on
them, and in such a way that the bracket is centered.
After pressing the two velcro elements (upper and
lower strap) together, tuck the trailing ends of the
velcro under your helmet to avoid unsightly “ears.”
Grasp the bracket and move it back and forth with
moderate force, to make sure that it is rmly in place.
Helpful hints: Normally the two straps are too long. However, only shorten them after
mounting and removing the bracket once, because once you’ve snipped o the extra length,
you can’t put it back on again.
Helmet bracket:
1
2
4 ° 4 °
Page 4
30 Wilma 3 1Wilma
English
2 2
Mounting
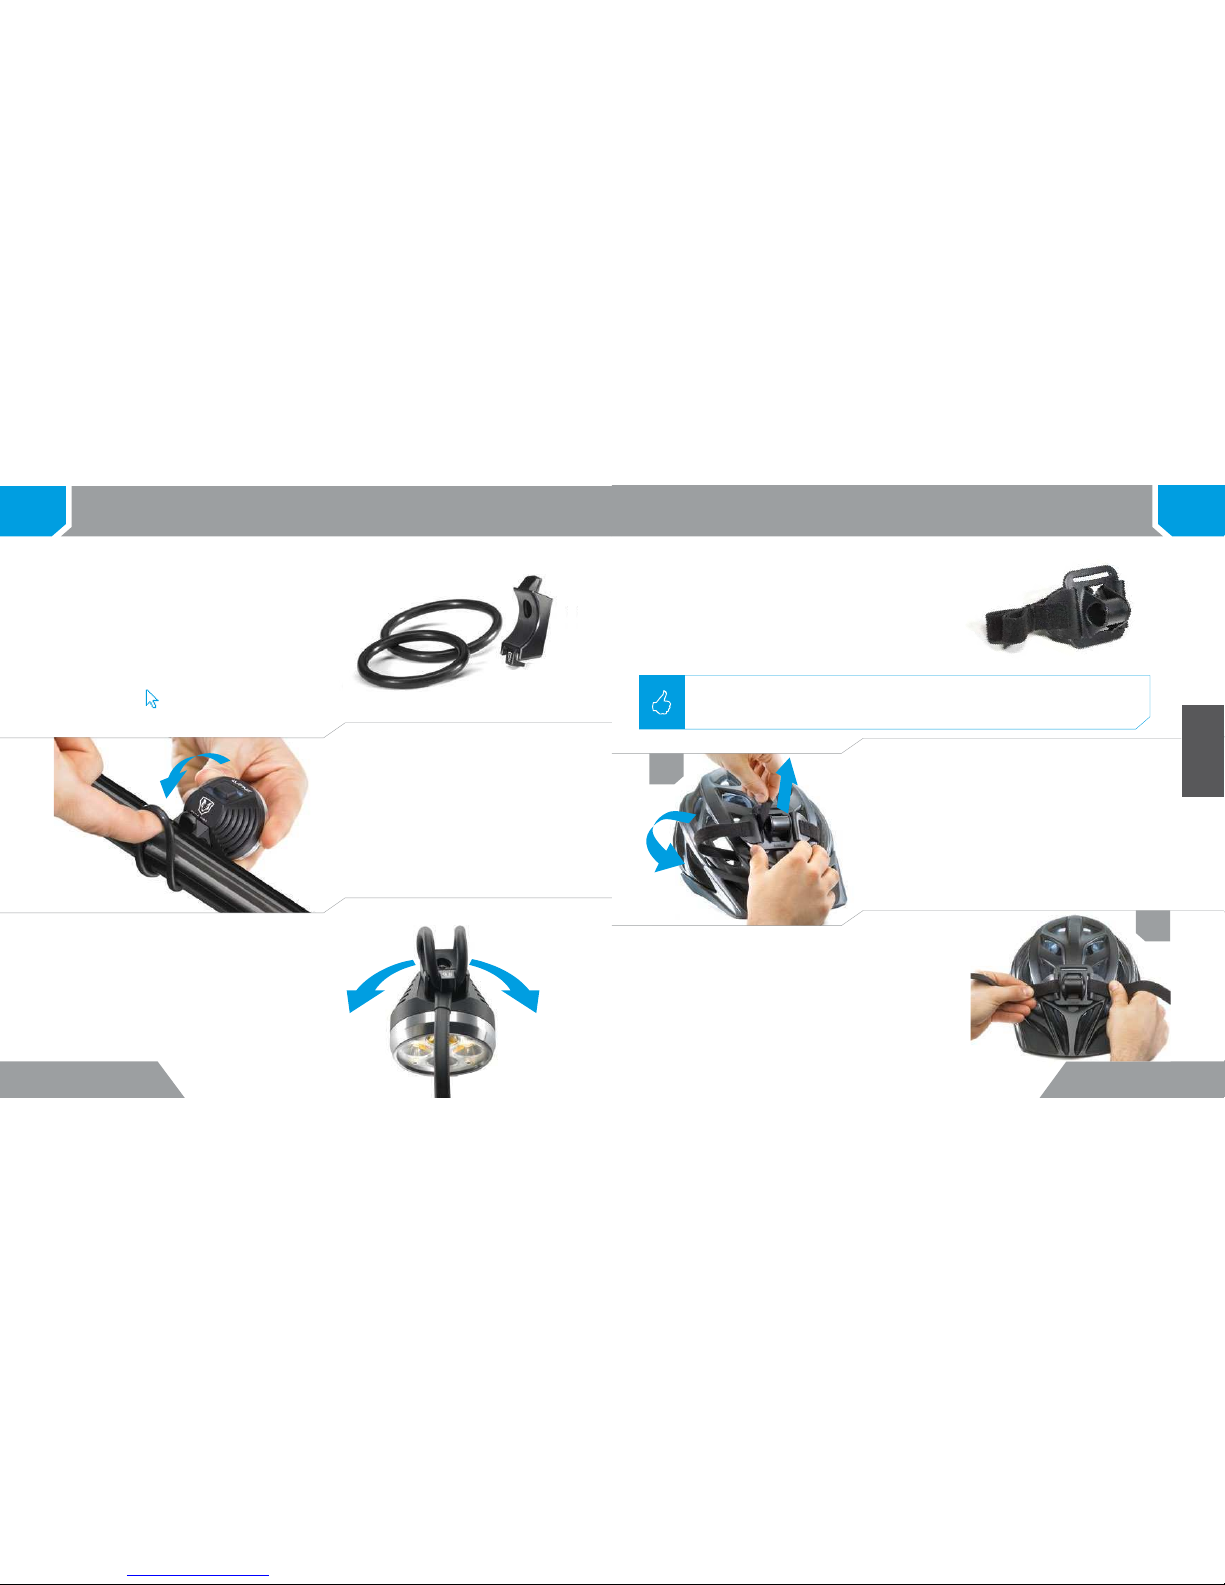
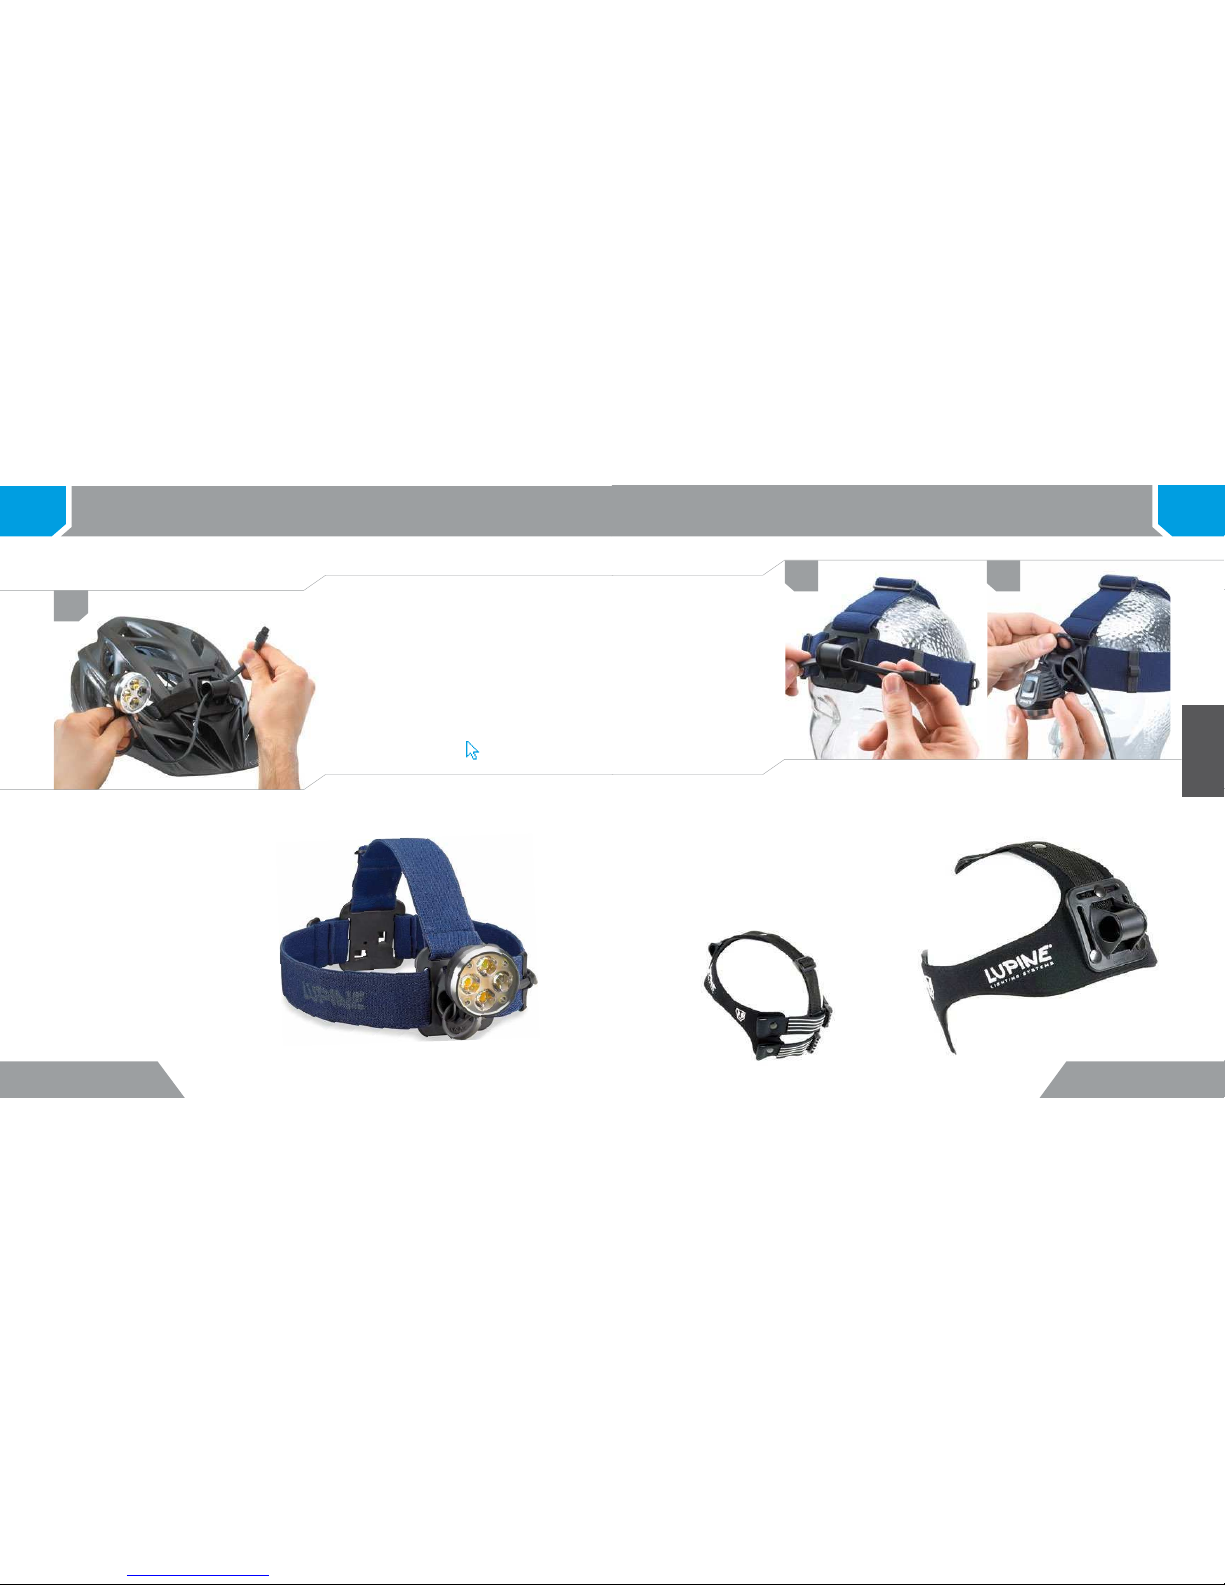
Mount the light on a helmet bracket using the
same
procedure as for handlebars. The Unit
bracket O-ring holds the lamp in place on the
helmet bracket.
For a demonstration of how to mount the
light on a helmet, see the video on our
Website (click “Support”).
Mount the light on a headband using
the same
procedure as for handlebars.
The Unit bracket O-ring holds the
lamp in place on the headband.
Headlight:
Headbelt HD:
The headbelt hd is the rst choice for
orienteering and other fast runners.
Have a look at
www.lupine.de
(Art. No. 188)
1 2
3
Page 5

32 Wilma 33Wilma
English
2
Mounting
1 2
3
Your battery is supplied with
both a short and a long Velcro
strap, coated with an anti-slip
material to ensure a secure
mount. Use the strap which
most closely matches your
tube size.
Hardcase-Batteries:
Operation
Audible:
To check the capacity, simply press the
touch-pad once. At rst an audible signal will sound, which is especially useful
while using the battery mounted on
a helmet or headband, to give a quick
reading in 20% steps.
Capacity Indicator:
Taillight
To run the taillight simply press the touch pad two times and the 5 LEDs will
operate continuously. To switch o the taillight, simply press the pad again.
Moving light:
Press the touch pad three times to activate the moving light. To switch it o
press the button another time.
Note: The capacity indicator will fade out within a few seconds. If it does not,
eventually the taillight was activated and the 5 glowing LEDs do by far not
mean the battery is fully charged.
Example: 3 LEDs steady glow (20 %, 40 %, 60 %)
1 LED blink ing (80 %)
Visible:
The visible indicator uses 5 red LEDs. The LEDs can operate in two dierent
operating states: blinking and continuous. LED meanings: A blinking LED
is indicating a 10% step and a continuously glowing LED a 20% step.
5 x = 100 %
4 x = 80%
3 x = 60%
2 x = 40%
1 x = 20%
For a demonstration of how to mount the
battery on a bicycle frame, see the video
on our Website (click “Support”).
= 70 % remaining capacity
Page 6

34 Wilma 3 5Wilma
English
Operation
3 3
When you connect the light to the battery, the software runs a self-test, during which all ve status LEDs
come on briey. The battery voltage is then shown via the blue and green LEDs, as follows:
The blue LED blinks once for each volt; and then
the green LED blinks once for each 1/10 of a volt.
To see the battery voltage again, unplug the light from the battery and then plug it in again.
Guidelines in this regard:
More than 7.9 V: the battery is fully charged. 7.1 to 7.8 V: the battery
needs charging or is old. 6.5 to 7 V: the battery is not ready for use.
Note: To deactivate this display, simply press the button. In other
words, you needn’t let the display go through its whole cycle in order
to use the lamp.
The Power Control System (PCS) measures the voltage under load.
Thus measurements using a voltmeter will not be comparable.
The battery level display
can also be seen in the
video on our Website
(click “Support”).
For example,
if the blue LED blinks seven times and the green LED
then blinks ve times, this means that the measured voltage under
load is 7.5 V.
This display helps you to assess the actual level of the
battery prior to use.
Initialization; voltage display:
To activate the SOS function, hold the button down for three seconds and then release it. If you don’t
press the button again, the lamp will continue to emit the international SOS signal until the battery is
completely discharged. To deactivate the SOS function, press the button again. You can then use the
lamp in a normal fashion.
Note: Use the SOS signal ONLY in an emergency. Thanks to the light’s high luminance, the signal is
visible for miles around and will continue ashing for hours if not shut o. Improper use of the SOS
signal is punishable by law.
To switch o the lamp,
hold the button down for more than two seconds.
Switching the lamp off:
SOS function:
Switching on/ Changing levels:
Press the power switch once to turn the light on; two blue LEDs will glow, indicating the
14W dimming level. Press the button rapidly to cycle through other power levels. Refer
to the chart on page 14-15 for the exact meaning of the ve (RGB) monitor LEDs, as well
as instructions for programming options additional to the factory-set 3-step mode.
The maximum lighting output can only be achieved with enough airow to cool the
lamp. High ambient temperature and low airow will signal the controller to reduce
power to the LEDs, thus reducing their brightness, to avoid overheating the LEDs and
other electronics. The actual reduction is indicated by the status LEDs: e.g., after a period
of low airow conditions, 4 of the 5 blue status LEDs will be lit, indicating that the power
has been reduced from 28W to 23W in order to protect the unit from heat damage.
Luminous performance:
Page 7

36 Wilma 37Wilma
English
Operation
3 3
Discharged battery capacity:
When you shut o the lamp, the discharged battery capacity is shown via ashing of the blue LED
and then the green LED. This information can only be displayed once as it is deleted when you
unplug the battery.
For example, if the blue LED blinks four times and then the green LED blinks six times, this means
that 4.6 Ah were discharged from the battery.
Safety advisory: When the battery is completely discharged ( all 5 red LEDs blink
with a red backlight on), the light will shut down after ashing a few times. In such
a case, you should stop riding your bicycle immediately.
Low battery warning via Backlight LED
The blue LED blinks once for each Ah (ampere hour); and then
the green LED blinks once for each 1/10 of an Ah.
Note: The battery time remaining after the green or red LED backlight turned on depends on total
battery capacity, the ambient temperature, the battery’s age, and which setting is used. Moreover,
since the voltage curve of a Li-Ion battery is not proportional to the power left in the battery, you
need to learn how to interpret the relevant displays for your specic battery.
Safety advisory: Do not switch on the light when the battery
is discharged, as this will invariably damage the battery.
Recharge the battery as soon as possible to avoid a deep
discharged battery.
Reserve power
Reserve power:
When the battery is completely discharged ( all 5 red LEDs blink with
a red backlight on), the light will shut down after ashing a few times.
To activate the battery’s reserve power, doubleclick the switch. This
will give you a few minutes more light, whose exact amount depends
on the age of your battery. The light emitted in reserve-power mode is
a very low beam so as to conserve power and keep the light going as
long as possible. The red 5 LEDs slowly ash when reservepower mode
is activated and the backlight will be red. When the reserve power has
been completely discharged, the light will shut down – which means
that you need to ride slower.
Note: If only 1.5 W is used, reserve power is not available.
The remaining capacity will be shown in detail on any Lupine Smartcore battery (see
page. 33). Additionally, the LEDs on the back of the lamp-head change color to indicate
decreasing voltage. When battery voltage drops below a certain level, the Backlight LED
changes from blue to green. Near the end of the battery’s charge, the light turns red.
battery full or partly
discharged
low capacity
remaining
very low capacity
remaining
red + red blinking:
battery empty -
stop immediately
Page 8

38 Wilma 3 9Wilma
English
Customizing the brightness levels
4 4
Press and hold the button (for approx. 4 seconds) until one green LED lights up.
release the button
The range of brightness levels you can select will
begin automatically to cycle, as shown below.
Press the button at the brightness level you want.
the rst power-on click is presented
You have the option to setup to 4 brightness levels, in any sequence
1 W brightness level
3 W brightness level
7 W brightness level
28 W brightness level
14 W brightness level
RVLR
1.5 W
brightness level
5 W brightness level
23 W brightness level
10 W brightness level
SOS
19 W
brightness level
alpine emergency
28 W
14 W
1.5 W
4.
3.
2.
1.
1.
Default setting
3. brightness level
1. brightness level
2. brightness level
Recover factory settings:
This mode includes an additional slow ash mode.
RVLR:
Upon releasing the button,
the sequence
of brightness levels automatically
restarts, allowing you to set a second
level in the same manner as the rst click
set-up. This process can be repeated up
to four times, but will stop when you quit
making further selections, thus allowing
your light to operate in 1-step, 2-step,
3-step,-or 4-step modes.
Default setting
Press and hold the button for 8 seconds, until
5
red LEDs turn on.
release the button
2.
Disconnect the battery, and all factory settings will be restored.
Page 9

40 Wi lma 4 1Wilma
English
5
Charger/Wiesel
Micro Charger
Li-IonMicro Charger Li-Ion
Plug the included power supply into an outlet and
connect the power supply to the Micro Charger.
Plug the battery into the charger when the orange
LED begins ashing.
Charging begins automatically, and the orange and blue LEDs
come on.
The brightness of the blue LED varies according to the
strength of the charging current, i.e. the higher the current the
brighter the LED.
When the battery is fully charged, and the charger switches to Full,
the green LED comes on.
Plugging in the device:
Charging:
Important! This charger is to be used to charge rechargeable Li-Ion batteries only and
is not to be used for NiMH batteries.
Do NOT use non-rechargeable batteries. – Risk of explosion!
Do NOT open the charger or power supply. Only the manufacturer is authorized to do this.
Orange/blue LED on: battery being charged
(The stronger the charging current, the brighter the blue LED)
Orange LED ashes: standby mode
Green LED on: battery fully charged
When a fully charged battery is disconnected from the charger, the battery’s charged capacity is
shown as follows via the charger’s green and orange LEDs, after the green LED ashes briey:
Green LED: each ash = 1 Ah
Orange LED: each ash = 1/10 of an Ah
LED display:
Charged-capacity display:
Charging starts automatically. Depanding on the version, the control-LED can go red or only green.
The battery can be left plugged into the charger for an indenite period. Although this will not damage the battery, it is not advisable for Li-Ion batteries since they do not require conservation charging.
When kept in a cool place, the annual self-discharging rate for such batteries is 15 %.
LED display:
Plug the included Wiesel charger into an outlet and connect it to the battery.
Connecting:
Charging:
Warning! This charger is to be used to charge rechargeable Li-Ion batteries only.
It is NOT suitable for charging NiMH batteries!
Do NOT use non-rechargeable batteries. – Risk of explosion!
This charger may be opened ONLY by the manufacturer!
Version 1:
LED red on: charging
LED green on: battery is fully charged
6
Version 2:
LED green on: charging
LED o: battery is fully charged
Page 10

42 Wilma 4 3Wilma
English
7 7
Special Functions
Press and hold the button (for approx. 6 seconds)
until 3 green LEDs light up.
release the button
Before activating the alternative capacity indicator,
your battery must be
fully charged.
The range of brightness levels you can select will
automatically begin to cycle, as shown.
The range of battery capacities you can choose
from will
start automatically.
Press the button when the brightness level you
want is presented.
You must approximate the correct range for your
battery; e.g., for an 11.2Ah you would select 11Ah
(5 blue LEDs)
Similair to our Smartcore batteries the red LEDs
on the lamphead will now approximatley show the
remaining capacity.
Depressing the button for 3 seconds will initiate
the ash mode selected, and the lamp will
continue ashing in that mode until the battery
is completely discharged.
2 Ah
4 Ah
6 Ah
11 Ah
8 Ah
13 Ah
15 Ah
3 Ah
5 Ah
10 Ah
7 Ah
12 Ah
9 Ah
14 Ah
3.
3.
2.
2.
1.
1.
Additional beams for special applications
Changing the factory-set SOS function
see page 35
Alternative Capacity Indicator (lamp-head)
Attention! When the lamp-head is disconnected
from a battery, the indicator settings are lost, and
must be reprogrammed for subsequent use with a
fully-charged battery.
1 W brightness level
3 W brightness level
7 W brightness level
28 W brightness level
14 W brightness level
RVLR
1.5 W
brightness level
5 W brightness level
23 W brightness level
10 W brightness level
SOS
19 W
brightness level
alpine emergency
Default setting
It is possible to change the factory-set SOS signal to
dierent brightness levels, or to special-purpose RVLR or
Alpine Emergency signals.
Press and hold the button (for approx. 5 seconds)
until 2
green
LEDs light up.
release the button
Disable indicator
Page 11

44 Wil ma 45Wil ma
English
Press and hold the button for 7 seconds, until 4 green LEDs light up.
release the button.
The threshold can be selected as shown below.
Use this program to adjust the onset of the low-battery warning.
2.
2.
1.
Adjusting the lamp-head's low-battery warning LEDs
Backlight:
Blue
red
green
Recover factory settings:
Press and hold the button for 8 seconds, until
5 red LEDs turn on.
release the button.
1.
Disconnect the battery, and all factory settings will be restored.
Default setting
6.0 V 5.6 V 5.2 V
6.2 V 5.8 V 5.3 V
6.4 V 6.0 V 5.4 V
6.6 V 6.2 V 5.5 V
6.8 V 6.4 V 5.6 V
7 7
Special Functions
Page 12

46 Wilma 4 7Wilma
English
Problem
The light does not come on
and the power LEDs do not
ash when the battery is
plugged into the lamp.
With the battery plugged in,
the power LEDs do not come
on, but the PCS LEDs ash.
The Power LEDs do not stay on
for as long as they should.
Battery cannot be charged:
Charger does not respond when
a battery is connected to
it and does not begin charging.
Cause
Extremely discharged battery.
Batter y not plugged into the
light or not plugged in
properly.
Faulty LED unit.
Discharged battery.
Old batter y.
Very low ambient
temperature.
Faulty charger.
Unsuitable batter y.
The battery ’s internal
electronics blocked fur ther
discharge by shutting down.
It will take the connec ted
Charger a few minutes
to initialize and begin
charging.
Solution
Charge the battery. Before
doing so be SURE to read
the “Battery cannot be
charged” section below.
Check all plug contacts.
Replace the LED unit.
Charge battery.
Replace batter y.
Keep batter y warm.
Replace charger.
Use original Lupine battery.
Leave the battery connected
to the charger and wait.
This process can take up to
an hour.
Normally the plug contacts are maintenance free. However, if you use your Wilma light in humid, saltair, environments, it’s advisable to apply a thin layer of Lupine Dutch Grease to the contacts every so
often to prevent oxidation.
Do NOT use terminal grease or contact spray.
Important: Always keep the battery separate from the Wilma light, because otherwise the small
amount of power used by the electronics will discharge the battery, and the lamp may switch on
accidently. Important! Moreover, the consequent uncontrolled heat buildup could cause a re or
melt the adjacent plastic material. Could cause re or death!
During lengthy periods of non-use, fully charge the battery and store it in a cool, dry place, basement
or the like. The battery can be kept plugged into the charger if desired.
Open the light housing’s front screw-on cover. Grasp the rear section of the lamp with one hand while
rotating the front section of the cover to the left (counterclockwise) with the other hand. Once you
have removed the cover, you will see the 4-array lens. Do not touch it.
Check to ensure that the O-ring on the rear section of the housing is correctly positioned.
The housing will only be waterproof if its O-ring is intact. After completing this inspection, carefully
screw down the housing cover.
Important note: if the thread runs smooth, the cap is in the right
position. Otherwise please stop and screw back the cover and try again, otherwise you might
damage the thread.
Plug contacts:
Transport:
Storage:
Opening the light housing:
Closing the lamp housing:
Product care and storage
Troubleshooting
8 9
Page 13

48 Wi lma 49Wilma
Battery life varies according to battery age and condition,
as well as ambient temperature.
Default setting
Technical data
10
Miscellaneous
Lens beam angle: Operating temperature:
Wilma lamp: 120 g
Wilma 6 with battery: 360 g
Wilma 9 with battery: 460 g
Wilma 12 with battery: 560 g
Wilma X6 with battery: 430 g
Wilma X9 with battery: 530 g
Wilma X12 with battery: 630 g
Wilma 6/X6: 4 h
Wilma 9/X9: 4 h
Wilma 12/X12: 5 h 30 min.
26°
Wilma 6/X6: 5.6 Ah 7.2 V Li-Ion
Wilma 9/X9: 8.4 Ah 7.2 V Li-Ion
Wilma 12/X12: 11.2 Ah 7.2 V Li-Ion
-25 °C – +70 °C
28 W
2400 lumen
23 W 2050 lumen
19 W 1700 lumen
14 W 1400 lumen
10 W 1100 lumen
7 W 850 lumen
5 W 570 lumen
3 W 350 lumen
1.5 W 180 lumen
1 W 130 lumen
Light output: Battery life:
Wilma 12/X12:
3 h
3 h 30 min.
4 h 40 min.
5 h 45 min.
8 h
11 h
16 h
26 h
52 h
80 h
Wilma 9/X9:
2 h 15 min.
2 h 40 min.
3 h 30 min.
4 h 15 min.
6 h
8 h 30 min.
12 h
19 h
38 h
60 h
Wilma 6/X6:
1 h 30 min.
1 h 45 min.
2 h 20 min.
2 h 50 min.
4 h
5 h 45 min.
8 h
13 h
26 h
40 h
Weight:
Charging time: Battery capacity; nominal voltage:
The laws governing the allowable application domain for this lighting system may vary from
one country to another. We recommend that you inform yourself about the relevant laws in
this domain in your country.
Input voltage: 100 – 240 V~, 50 – 60 Hz
Charging current: up to 1.2 A
Compatible batteries: Li-Ion 7.2 V
Charger Wiesel:
IP68
Protection class:
Input voltage: 12 – 14 V =,>= 2 A from power
supply or or 12 V charging cable
Charging current: up to 2 A
Compatible batteries: Li-Ion 7.2 V
Display: charging control via three LEDs
Terminals: polarity-protected input and
output terminals
Micro Charger:
Regulations:
The O-ring mounting technique, as well as the design of Wilma lamps and the Power
Control System (PCS) are protected by European and US patents.
The product's two year warranty applies to all components, as well as any manufacturing defect.
The warranty does not include the battery, however. In addition, any modication or improper
use of the product will void the warranty.
Rights for improvements and modications of our products reserved.
Changes:
Warranty:
 Loading...