

Page 1
TESLA 4
Instruction Manual
(Read before use!)
Content of package:
12 W High- Power-LED Lamp
Li-Ion battery bag 4.5 Ah / 7.2V
Lupine Charger Wiesel V 3
Helmet Mount with 1,2m extension cord
Instruction Manual (this document)
Helmet Mount Manual
NN
Page 2

TESLA 4
2
1.) READ BEFORE USE!
General:
Congratulations! You have just bought the brightest single LED Lamp – no other will give you
more light!
The light and charger are ready to use immediately. Please read this instruction manual
carefully and completely to familiarise yourself with all the functions. Before hitting the trails,
first try the system at home to prevent any surprises while riding.
As with any other electrical device, there is a slight chance of f ailure at any time. Please be
aware and use with caution.
Lupine accepts no liability for any injuries or other damages arising from the use of this
product.
Rechargeable Battery:
The battery is supplied with a very small amount of charge. Before use it must be fully
charged (see chapter 4 "Charging"). The rechargeable Li-Ion battery will reach it s full power
after 1 charge cycle.
It might become hot!
The Tesla 4 is not a simple torch. The lamp housing can become very hot if used without
airflow. Do not touch the lamp during or immediately after use.
If lamp is used without any airflow temperature control will reduce light power
stepless up to 3 W after some minutes automatically.
Dazzling:
The Tesla 4 is a powerful lighting system. Always use it with care and with respect for others
(especially when mounted to a helmet). Do not look directly int o the light.
Waterproof?
All components of the Tesla 4 are waterproof and will withstand even the most extreme
conditions. However, it is not a diving lamp and therefore not su itable for use under water.
Warranty:
The two year warranty covers defects in materials or workmanship only. Batteries are not
covered by this warranty. Modifications to the light or improper use also voids this warranty.
Page 3
2.) MOUNTING
Lamp:
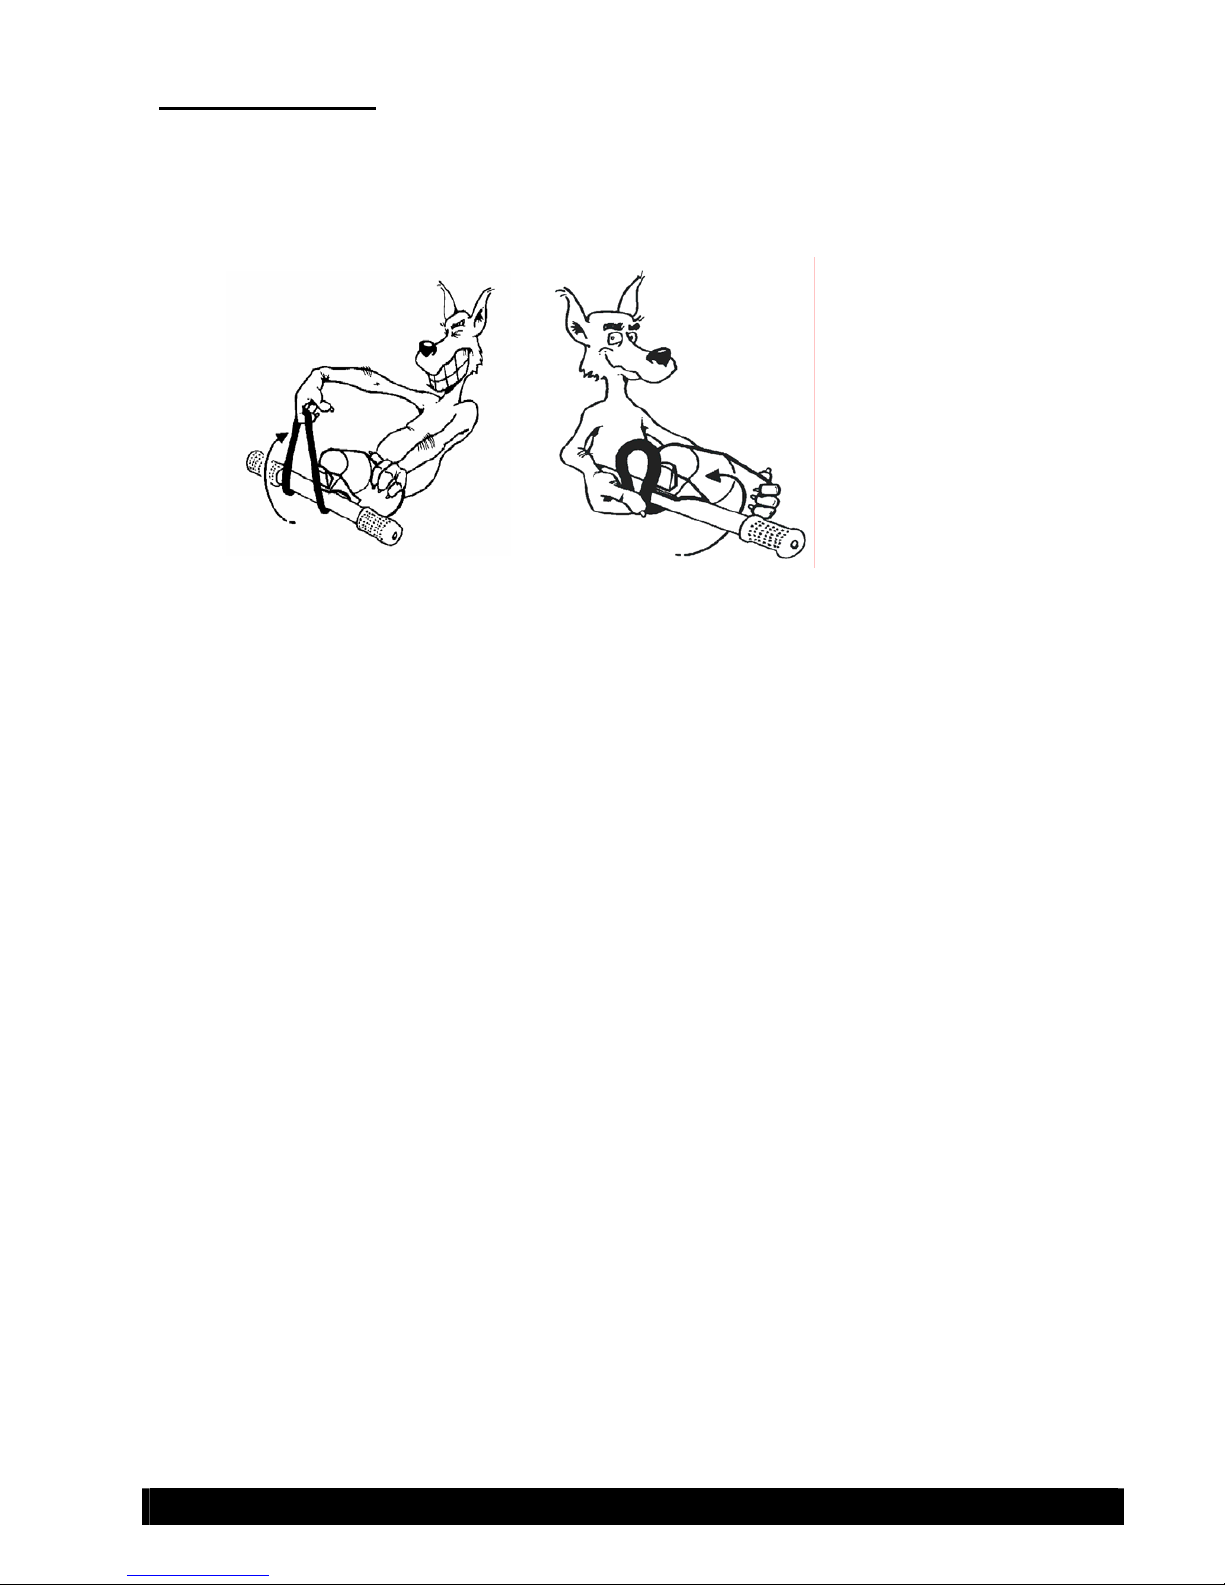
Mounting the lamp with the O - ring :
If you are feeling strong, use the finger hook method (see fig.1). For others, who prefer the
less strenuous method, hold the O-ring with one finger, and push the lamp back until the Oring can be secured on the hook of the lamp. (fig.2)
fig.1
fig.2
Lamp Left-Right adjustment:
The mount can be moved by 7° on each side. This helps to adjust the lamp to freeride
or downhill bars.
Note:
In order to make sure that the left-right adjustment is stil l possible while riding, please f ix the
screw only with a midrange torque.
Red Alert !
Please use only the short black Tesla screw, don’t use screws from other Lupine’s, they are
longer and will destroy electronic inside immediately.
Please also use the black Tesla screw with the optional oversized mount.
Battery:
Mount the rechargeable battery to the frame ( top tube ). Loop the Velcro strap around the top
tube and adjust it carefully.
Now plug the rechargeable battery to the lamp and your Tesla 4 is ready to go.
TESLA 4
3
Page 4

TESLA 4
4
3.) USING THE LIGHT
Initialising:
After connecting the lamp to the rechargeable battery, the software will be ready
immediately. The blue switch LED is glowing.
Switch on:
By pressing the switch for the first time, the beam starts running on maximum power. The red
LED flashs on time and the blue LED will glow.
Dimming:
Pressing the button once, after the light has stabilised, will switch the light to middle beam.
By pressing the button again the light will go down to low beam. After pressing the button
again, the light return to high beam mode.
3 steps: 12 W
4 W
1.5 W
Switch off:
You can switch off the Tesla 4 by pressing the button longer than 2 seconds.
After you have turned off the lamp ( but battery is still co nn ected ) blu e LED will glow f or som e
seconds.
Controlling the remaining light time:
The electronics not only control the high and low beam; they also protect the rechargeable
battery against over-discharge and include a low battery indicator.
Low battery is signalled by the red LED.
When the blue LED lights: Battery capacity is fine
Red LED lights: Significant amount of the capacity is gone!
Red LED flashes: Very low capacity, only some minutes
runtime !
Red and Blue LED flashes: Reserve tank activated
It is a matter of experience to interpret exactly how much time is left after the LEDs light u p.
Remaining burn time depends on the battery's age and capacity and the operating
temperature.
Hint: When the red LED light up you can increase the remain ing burn time with economical
use of the high beam.
Reserve tank:
When the battery is almost empty (red LED have flashed for several minutes already) the lamp
switches off automatically. By double clicking the sw itch the reserve tank is activated, which
provides some additonal time of emergency light. The flashing red and blue LED indicates
the reserve tank has been activated. The performance of the reserve tank also depends on
the battery condition.
When the reserve tank is empty, the light will switch off and must not be restarted.
Never store a discharged battery. Recharge your battery as soon as possible!
Superflash/ RVLR:
Press and hold the button for 3 seconds. Release the button and the lamp will flash until the
button is pressed again.
Page 5

TESLA 4
5
4.) Charging the rechargeable battery
Connection:
Plug the Wiesel V3 into the mains.
The charger will be now ready to charge.
Charging:
Plug the rechargeable battery into the Wiesel’s connector and charging will start
automatically. The green LED light.
Hint: if a fully charged battery will be connected with the Wiesel, no green LED lit at all
( battery is full ), this should be confusing.
If no green LED light up – battery is fully charged.
Keep the rechargeable battery plugged into the Wiesel until the green LED lights.
Charging is now complete; the battery is full and is now ready for use.
Caution!!
Wiesel is designed to charge only Li-Ion batteries!
You must not use this charger with Ni-MH batteries or unrechargeable batteries!!
They will explode!!
Wiesel should not be opened by the user as this will invalidate the warranty.
Explanation of the LEDs:
Green: charging
“no LED “ battery fully charged
Page 6

TESLA 4
6
5.) CARE AND STORAGE
Lamp:
All components should be cleaned with warm soapy water, but do not use a high pressure
spray or hose to clean the system. To get all water out of the housing etc. turn the light on for
a few minutes.
The battery is water resistant. Unlike other lighting systems, the bag is easy to open. If used
in very wet conditions, please open the bag over night, pull the battery out of the bag to
remove all water.
Opening the Screw Top - moisture inside the lamp:
Little moisture on the inner side of the front glass may occur. This is no serious problem and
easily to solve.
Open the casing. Please open the screw-on top on the front of the casing: Hold the back part of
the casing with one hand, with the other hand, turn the srew-on top counter-clockwise. Having
removed the top, you can see the reflector, the front glass and the sealing.
Please notice the right assembling :
Reflector – glass – silicone O-ring.
Please allow all parts some minutes to dry properly. Sometimes it’s also helpfu l cleaning the
glass with a soft small towel.
Then it’s time to re-assemble your Tesla.
First insert the O-ring silicone sealing properly in the top. Please insert the glass into the top.
Now you can close the top.
Important: The top must be screwed onto the thread in the correct position. If the
thread runs smooth, the top is in the right position. Otherwise, please stop, re-screw
the top and try again or you might damage the thread. Please be cautious!
Please make sure that the top is really closed completely, otherwise the casing will
not be waterproof.
Connectors:
In normal conditions, the connectors do not need special attention. However if you use the
light in very humid and/or corrosive conditions they should be greased with Dutch grease.
Do not use contact-sprays or contact-greases! They contain corrosive ingredients that will
damage the connectors.
Transport:
In case you transport your light in a bag or a box so that the button might accidentally be
pressed: Always unplug the battery from the lamp unit.
Storage:
For short periods of time, store the battery fully charged. Disconnect it from the lamp unit.
Before using the system again, re-charge the battery fully. If you intend not to use it for a
longer period (over 3 months), we strongly recommend to store the battery in a cold
place. This will prevent the battery from over-discharging.
Page 7

6.) TROUBLESHOOTING
Failure Caused by Solution
Over discharged battery. Charge!
Lamp does not light and the LEDs
on the Lamp do not
light during
initialisation.
Battery is not or not
correctly plugged into
the light.
Check all connections
.
Lamp does not light, LEDs of the
Lamp do
flash during
initialisation.
Power LED are faulty Replace LED insert
Battery was not in use
for a long time
Battery is new.
Please charge the battery
Battery is very old Replace with new battery
Cold temperatures Keep the battery warm
Burn times are too short.
Charger is defective Replace charger
7.)
TECHNICAL DATA
Lamp:
Weight complete with rechargeable battery: 320g
Capacity of rechargeable battery / Voltage: 4.5 Ah 7.2 V Li-Ion
Light output: 700 lumen
Burn time 12 W: 3 hours
Burn time 1,5 W: 24 hours
Temperature range: - 25°C - +70°C
Beam angle LED: 13°
Burn times may vary depending on battery's age, condition and temperature.
Charger:
Input: 100 – 240 V~, 50-60 Hz
Charging current: 1.2 A max.
Suitable batteries: Li-Ion 2 cells 7,2 V
Display: Control of charging by a green LED
Charge Time: 5 hr
TESLA 4
7
Page 8

TESLA 4
8
IMPORTANT NOTES:
Use of this lighting system might be limited differently from country to country depending on
the purpose you use it for. Please do inform yourself about possible restrictions in your
country.
The mounting device and the design of the Tesla 4 are protected by worldwide patents.
Lupine Lighting Systems GmbH
Winnberger Weg 11
D-92318 Neumarkt
Germany
Fon: 0049 91 81 509490
Fax: 0049 91 81 5094915
e-mail: info@lupine.de
net: www.lupine.de
 Loading...