

Page 1
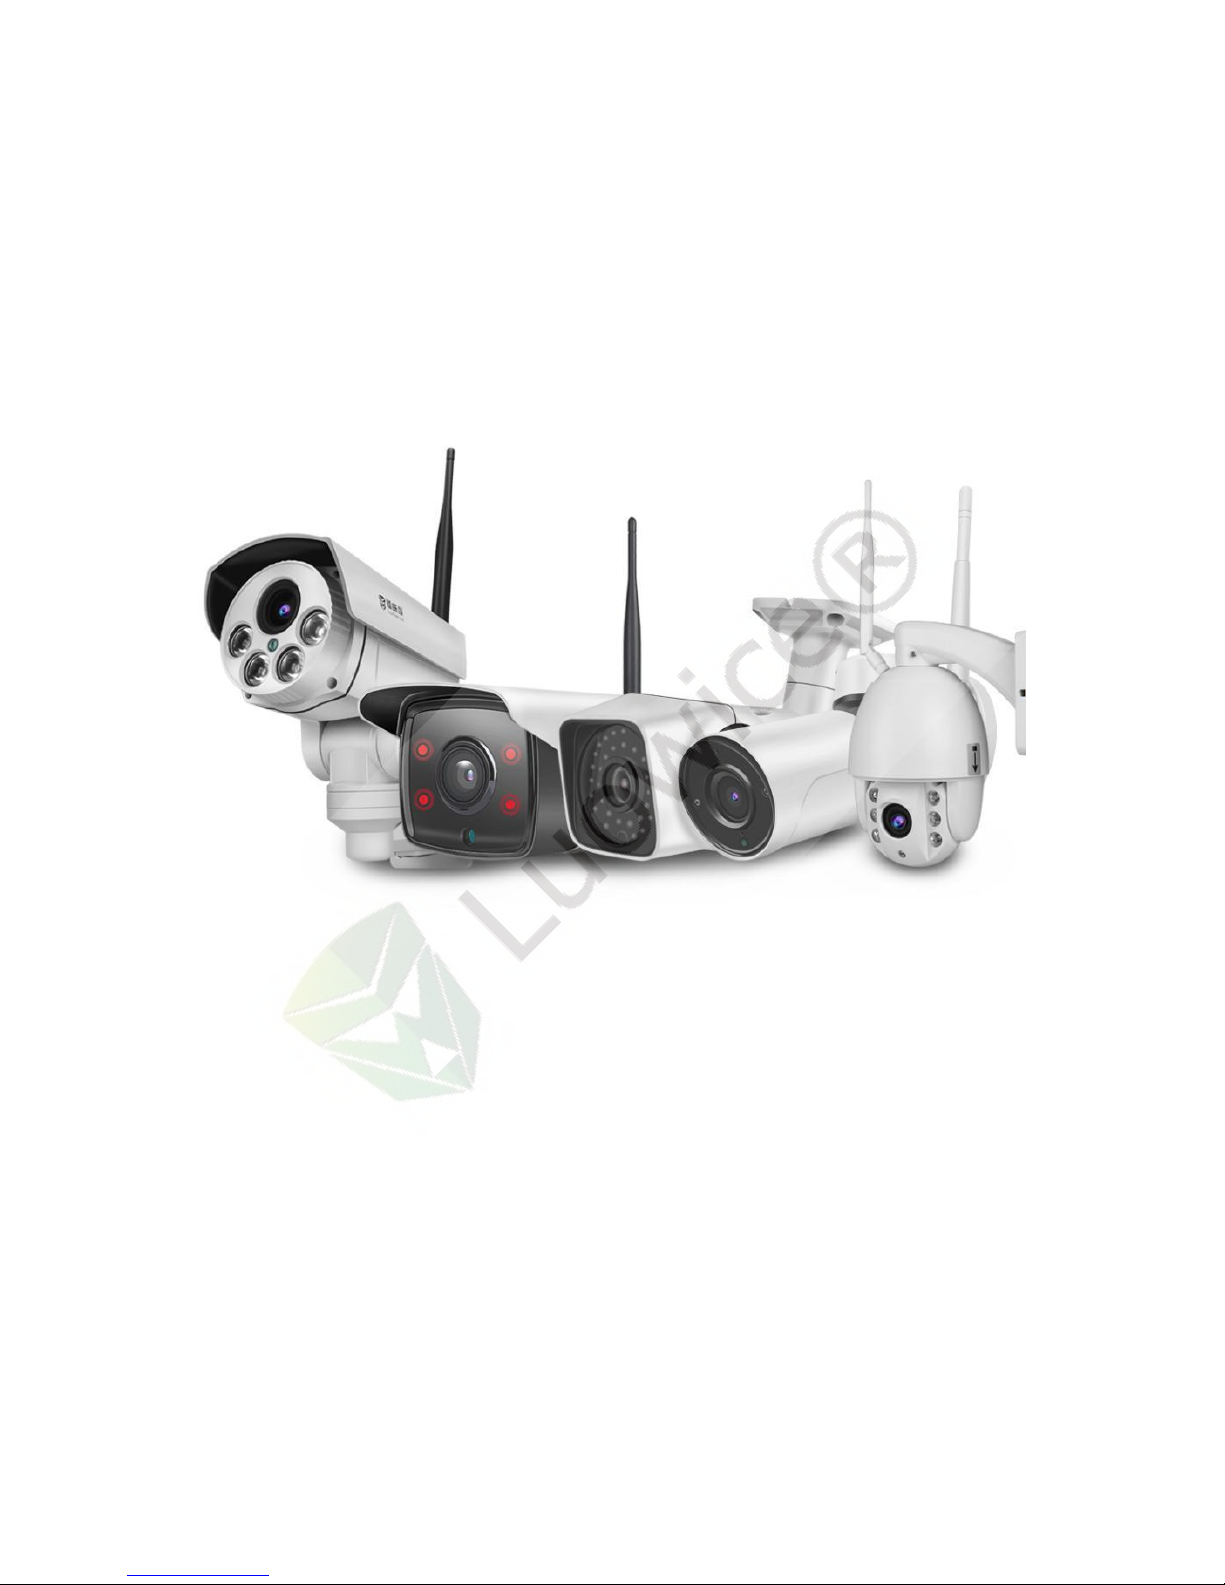
LWS Wireless Security Camera User Manual
Page 2
Preface................................................................................................................1
Default Setting................................................................................................... 1
1. Camera Installation........................................................................................ 2
1.1 Precautions....................................................................................................... 2
1.2 Preparation........................................................................................................2
1.3 Installation........................................................................................................ 3
1.3.1 Camera Panel.........................................................................................3
1.3.2 Screw the Antenna.................................................................................4
1.3.3 Assemble the Camera and the Bracket.................................................. 5
1.3.4 Pair the Camera with Your Phone......................................................... 6
1.3.5 Remote View Setup............................................................................. 13
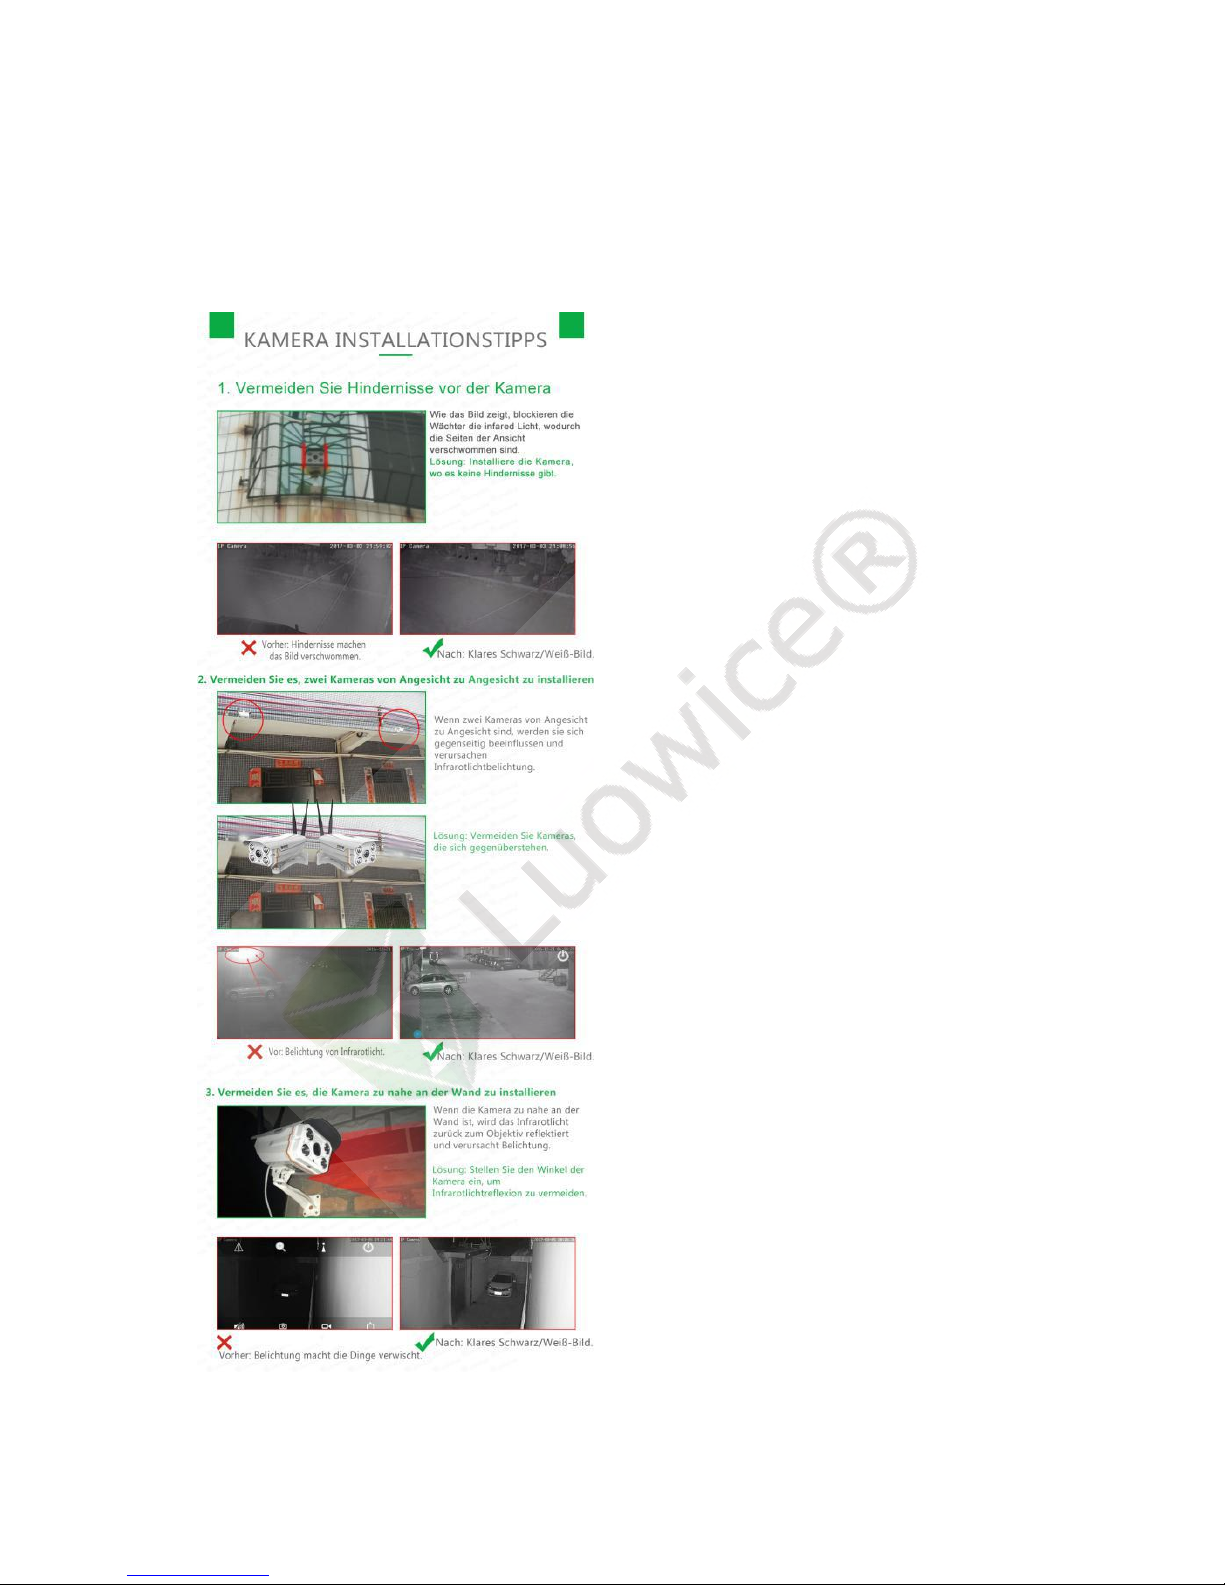
1.3.6 Camera Installation Tips......................................................................15
2. Instruction for Operation on Phone APP..................................................... 16
2.1 Phone APP Default Interface and Operation Instruction................................16
2.2 Phone APP Live View Interface and Operation Instruction........................... 17
2.3 Phone APP Camera Setting Interface and Operation Instruction...................25
2.3.1 Instruction on Entering the Main Menu.............................................. 25
2.3.2 Change Password................................................................................ 26
2.3.3 Alarm Setting.......................................................................................27
2.3.4 Action with Alarm............................................................................... 28
2.3.5 Timing Record.....................................................................................29
2.3.6 Audio Setting.......................................................................................30
2.3.7 Video Setting....................................................................................... 31
2.3.8 Wi-Fi Setting....................................................................................... 31
2.3.9 SD Card Setting...................................................................................32
2.3.10 Time Setting...................................................................................... 33
2.3.11 Email Setting: to set up email alert function..................................... 34
Page 3
2.3.12 FTP Setting........................................................................................ 36
2.3.13 System Setting...................................................................................37
2.3.14 Device Information............................................................................38
3. Instruction for Operation on PC Client........................................................38
3.1 Operation Environment.................................................................................. 38
3.2 Default Setting of PC Client...........................................................................39
3.3 PC Client Interface Instruction.......................................................................39
3.4 PC Client Operation Instruction..................................................................... 41
3.4.1 The Config Interface............................................................................41
3.4.1.1 Device Management.................................................................41
3.4.1.1.1 Methods to add cameras to the PC Client..................... 42
3.4.1.1.2 Delete Device................................................................ 46
3.4.1.1.3 Classify Cameras into Regions......................................47
3.4.1.1.4 Adjusting Image Quality (SD/HD)................................48
3.4.1.2 Parameter Settings....................................................................49
3.4.1.2.1 Video..............................................................................49
3.4.1.2.2 Image............................................................................. 50
3.4.1.2.3 Audio............................................................................. 51
3.4.1.2.4 Alarm Setting.................................................................52
3.4.1.2.5 Network.........................................................................53
3.4.1.2.6 SD Card......................................................................... 55
3.4.1.2.7 Timed capture................................................................ 56
3.4.1.2.8 PTZ................................................................................56
3.4.1.2.9 Login Info......................................................................57
3.4.1.2.10 System......................................................................... 58
3.4.1.2.11 Wi-Fi............................................................................58
3.4.1.3 Record Management.................................................................59
Page 4

3.4.1.4 User Management.....................................................................60
3.4.1.5 Other Settings...........................................................................61
3.4.2 The Preview Interface..........................................................................62
3.4.2.1 List............................................................................................62
3.4.2.2 PTZ...........................................................................................63
3.4.2.3 PRESET....................................................................................64
3.4.2.4 COLOR.................................................................................... 65
3.4.2.5 Real-Time Live View............................................................... 65
3.4.2.6 Alarm Info................................................................................ 67
3.4.3 The Automatically add devices interface............................................ 67
3.4.4 The Local Playback Interface..............................................................67
3.4.5 The Remote Playback Interface...........................................................68
3.4.6 The Logs Interface...............................................................................69
3.4.7 The Logout user Interface................................................................... 70
3.4.8 The Exit Interface................................................................................70
Page 5
1
Preface
Thanks for choosing Luowice.
LWS Wireless Security Camera is a user-friendly DIY security camera for
your home/shop/office.
Resources and support:
For further information, software downloads, please refer to:
www.luowice.com/en/downloadcenter
For FAQ and troubleshooting, please refer to: www.luowice.com/en/faq
For tech support, please kindly contact us via
Email: support@luowice.com or Skype: Luowice Tech Support, and there
will be response within 24 hours or sooner.
Video Instruction available on YouTube, please kindly search:
luowice on Youtube.com.
Default Setting
1. The name of the camera’s Wi-Fi Hotspot starts with IPC. And the
password of the Wi-Fi Hotspot is: 01234567. The Wi-Fi range of the
Hotspot is up to 15M.
2. The phone APP (LWSCAM) is available from Apple Store/Google Play
Store.
3. The address to download PC Client (HiP2P Client) for the camera:
cd.sxt123.com/k
Page 6
2
4. The default user name and the password of the camera are: admin. And
the user name cannot be modified, while the password can be modified.
5. The default setting of SD card is to overwrite the oldest recorded videos
when storage is full.
6. The camera can be paired to Luowice wireless NVR
1. Camera Installation
Note: Please kindly note that the camera cannot recognize Wi-Fi user name
or password that include special characters (e.g. &, #). Nor can the camera
connect to hidden Wi-Fi. The password of your local Wi-Fi shall be within 15
letters. The camera does not support 5G Wi-Fi.
1.1 Precautions
a) Please avoid using the device in water, under high temperature or dusty
environment.
b) Please use SD card, USB devices and hard drive devices purchased from
authentic sources only.
c) Please use only 12V power adapter to plug the camera in power.
d) Please avoid installing the camera in places where night vision can be
affected.
1.2 Preparation
Things you need to get the system works:
Page 7
3
a) Internet Connection
The camera can work without Internet. But if you want to have remote
view, which means viewing the camera when you are not within the
camera’s Wi-Fi Hotspot range, please kindly connect the camera to your
local Wi-Fi network to get the camera online for remote access.
1.3 Installation
1.3.1 Camera Panel
Page 8

4
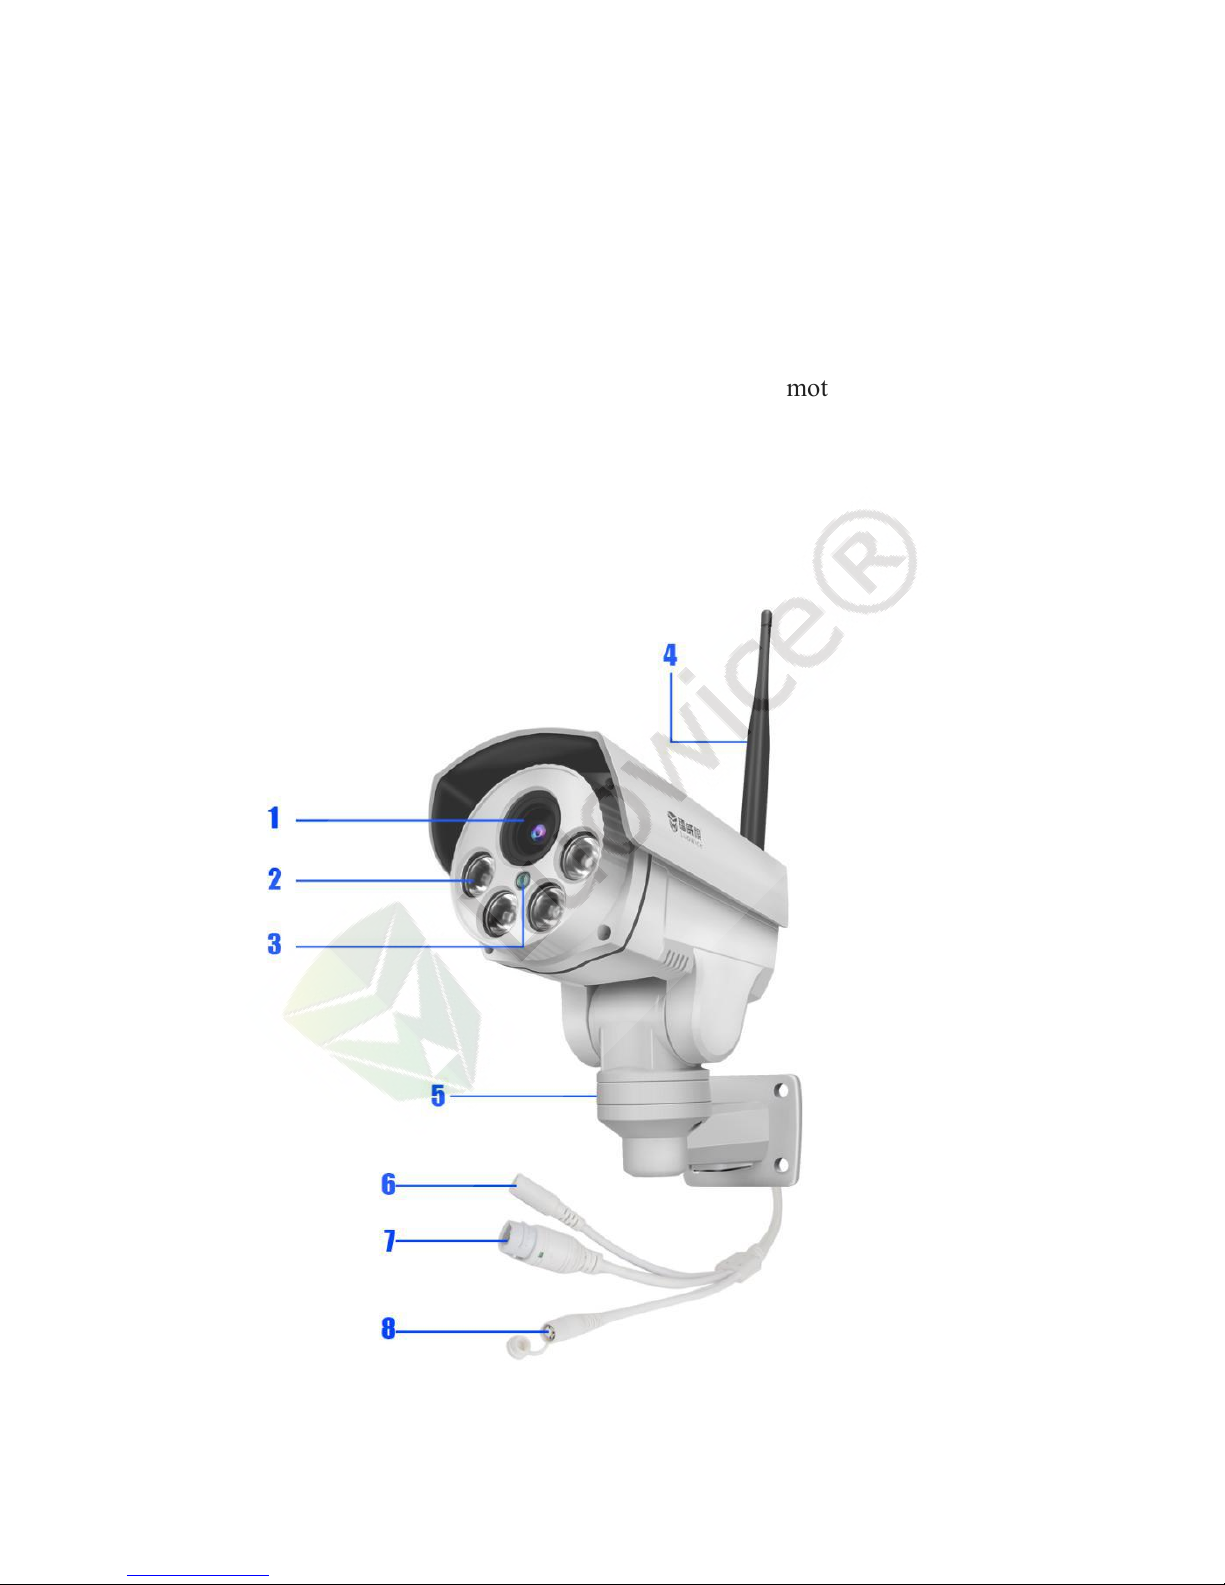
1. Lens
2. Led Light
3. Photosensitive Sensor
4. Antenna
5. PTZ Component (Please avoid adjusting the PTZ component manually
by hand. Adjusting it via phone APP or PC Client only.)
6. Power Interface
7. Network Cable Interface
8. Reboot Interface (Keep pressing the button for around 10 seconds and
the camera will reboot.)
1.3.2 Screw the Antenna
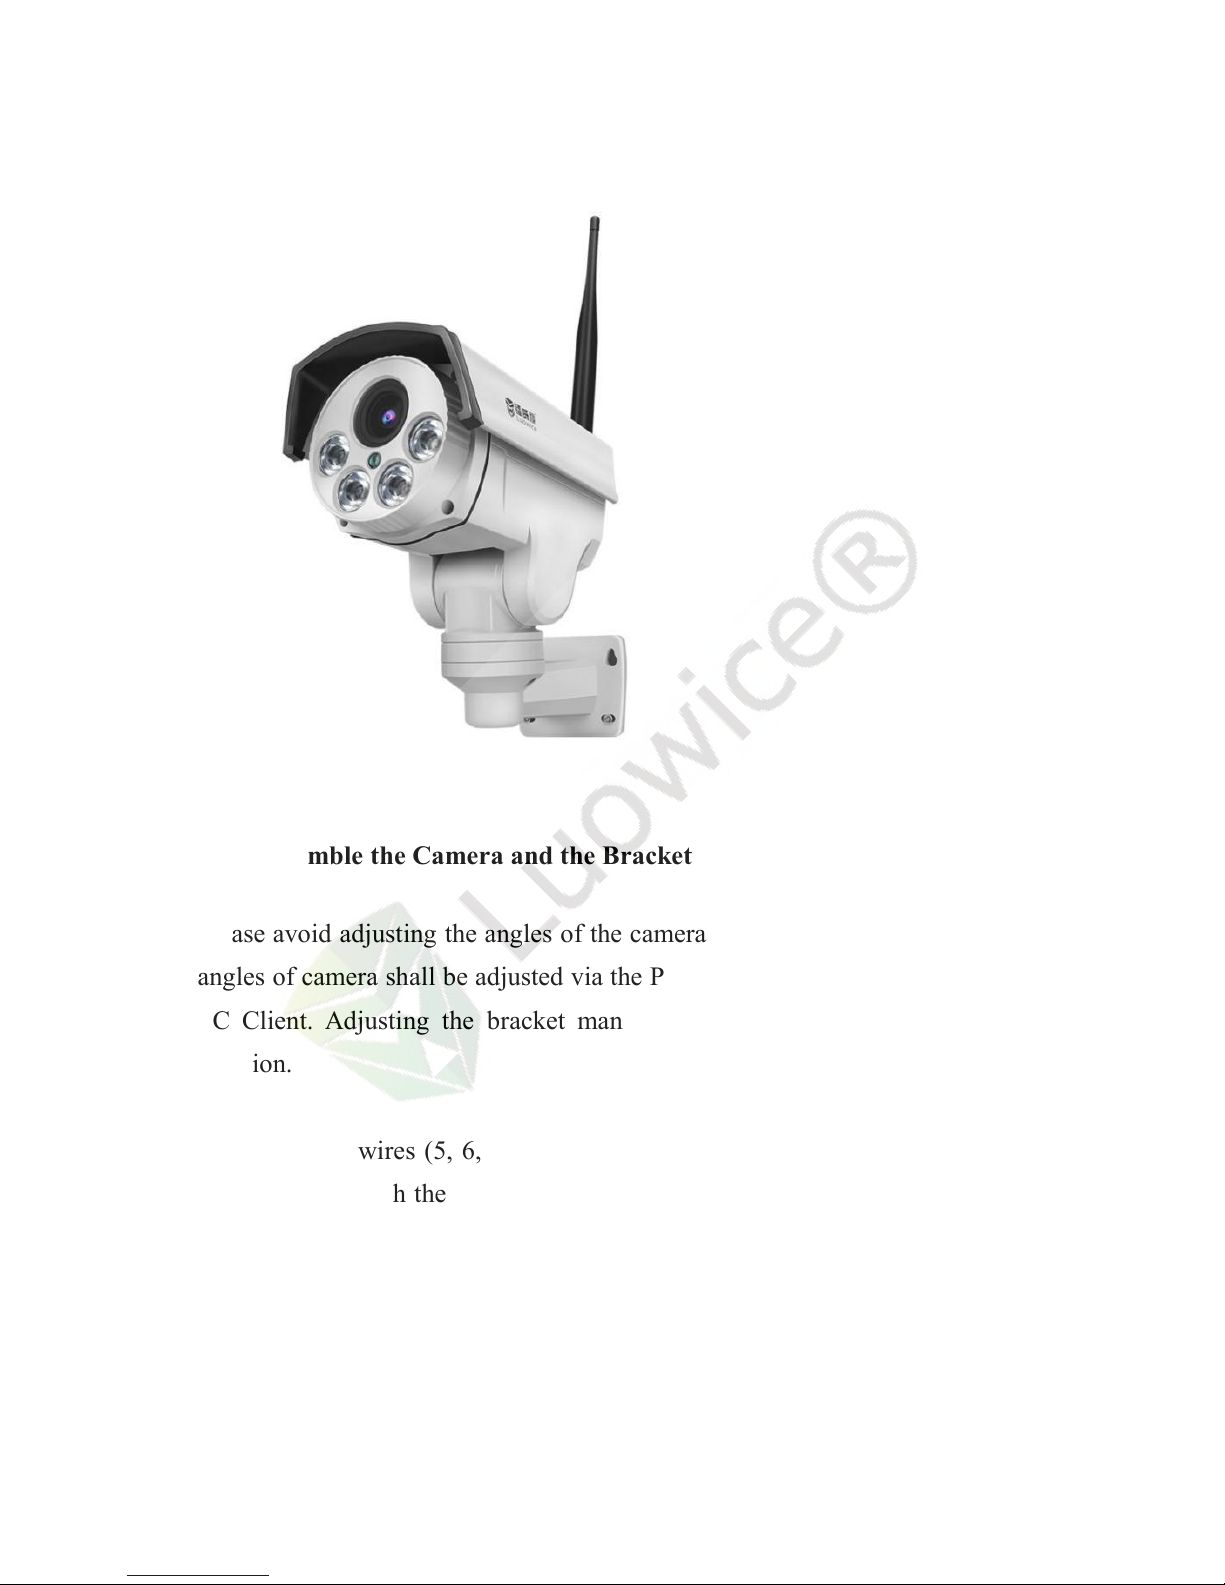
As the below images shown, please adjust the Antenna till it is at an angle of
90 degree to the camera. Please avoid the Antenna and the camera to be in a
straight line.
Page 9
5
1.3.3 Assemble the Camera and the Bracket
Please avoid adjusting the angles of the camera bracket directly by hand. The
angles of camera shall be adjusted via the PTZ function on the mobile APP or
PC Client. Adjusting the bracket manually can cause damage to the PTZ
function.
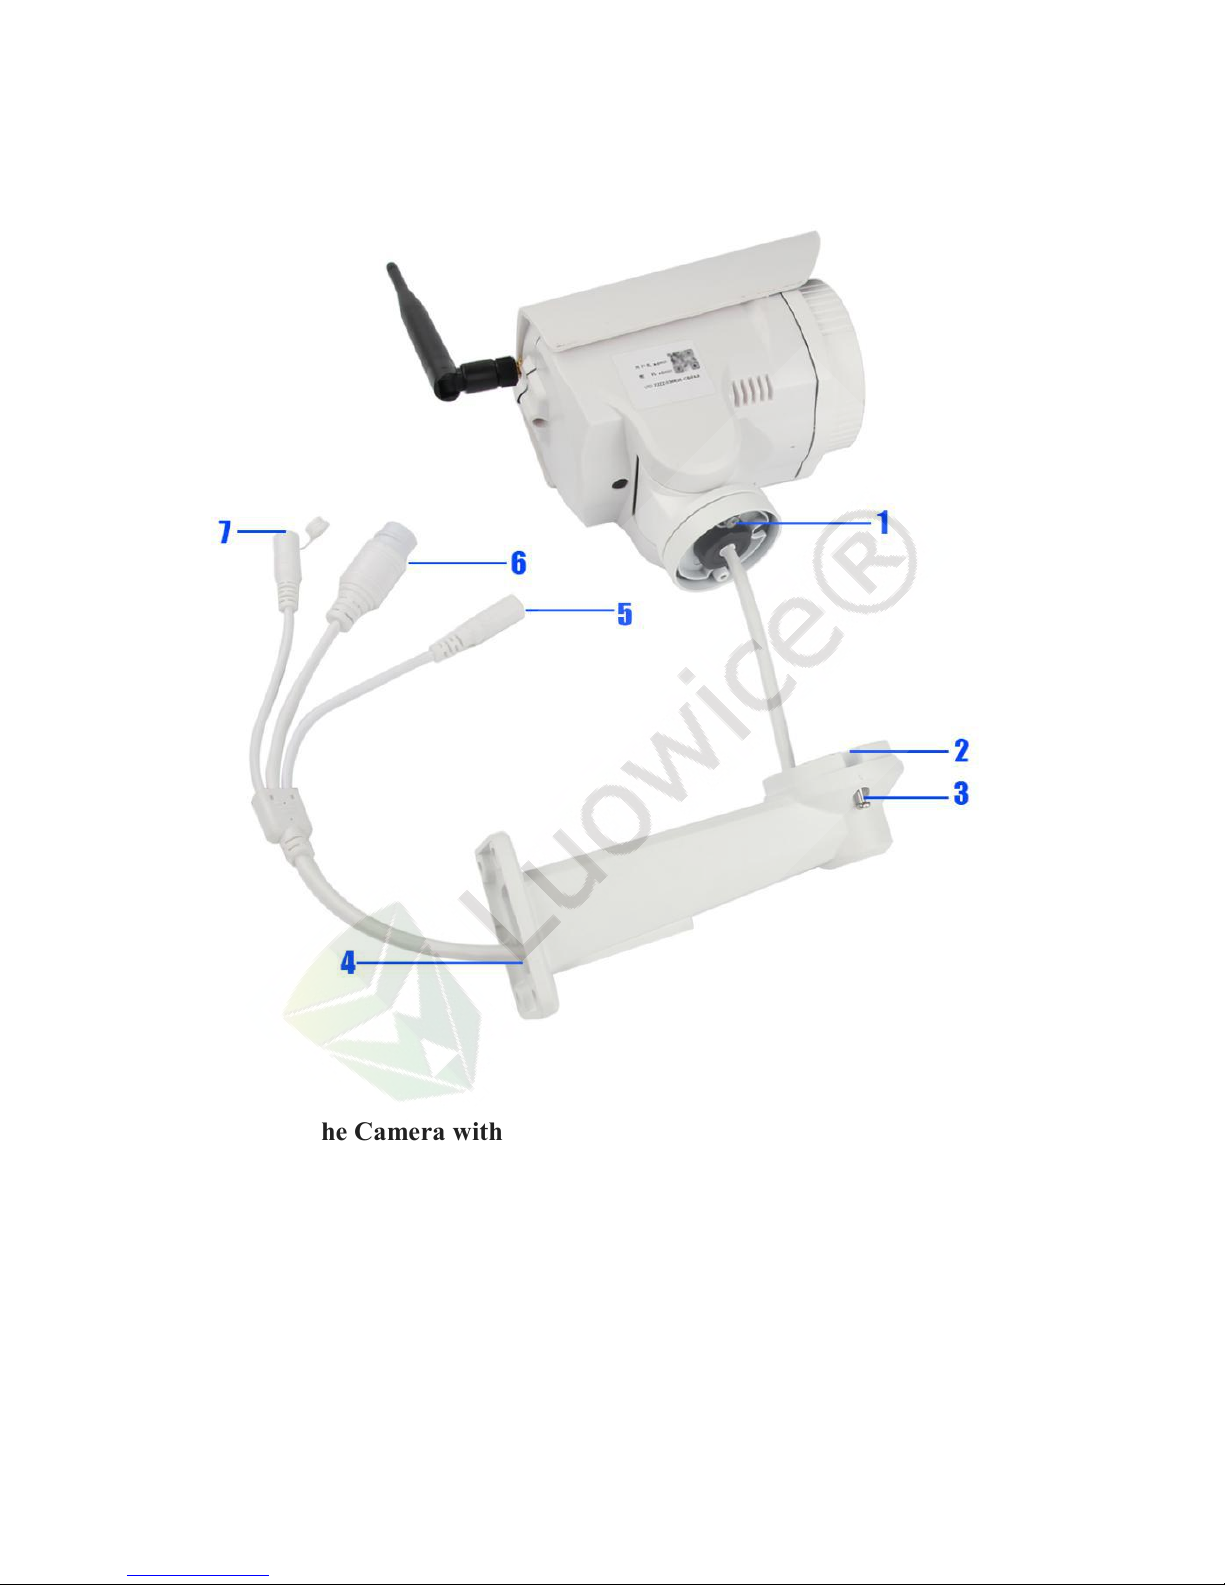
Please put the wires (5, 6, 7) through the bracket (4) one by one. Put all the
three wires through the bracket at the same time can make them be stuffed in
the middle and fail to get through.
Please place the screw(3) to the right interface (2, 1) to assemble the camera.
Page 10
6
1.3.4 Pair the Camera with Your Phone
Note: Please kindly keep the camera within your local Wi-Fi range.
After finish assemble the camera with the antenna and the bracket, please
kindly plug the camera in power.
Page 11
7
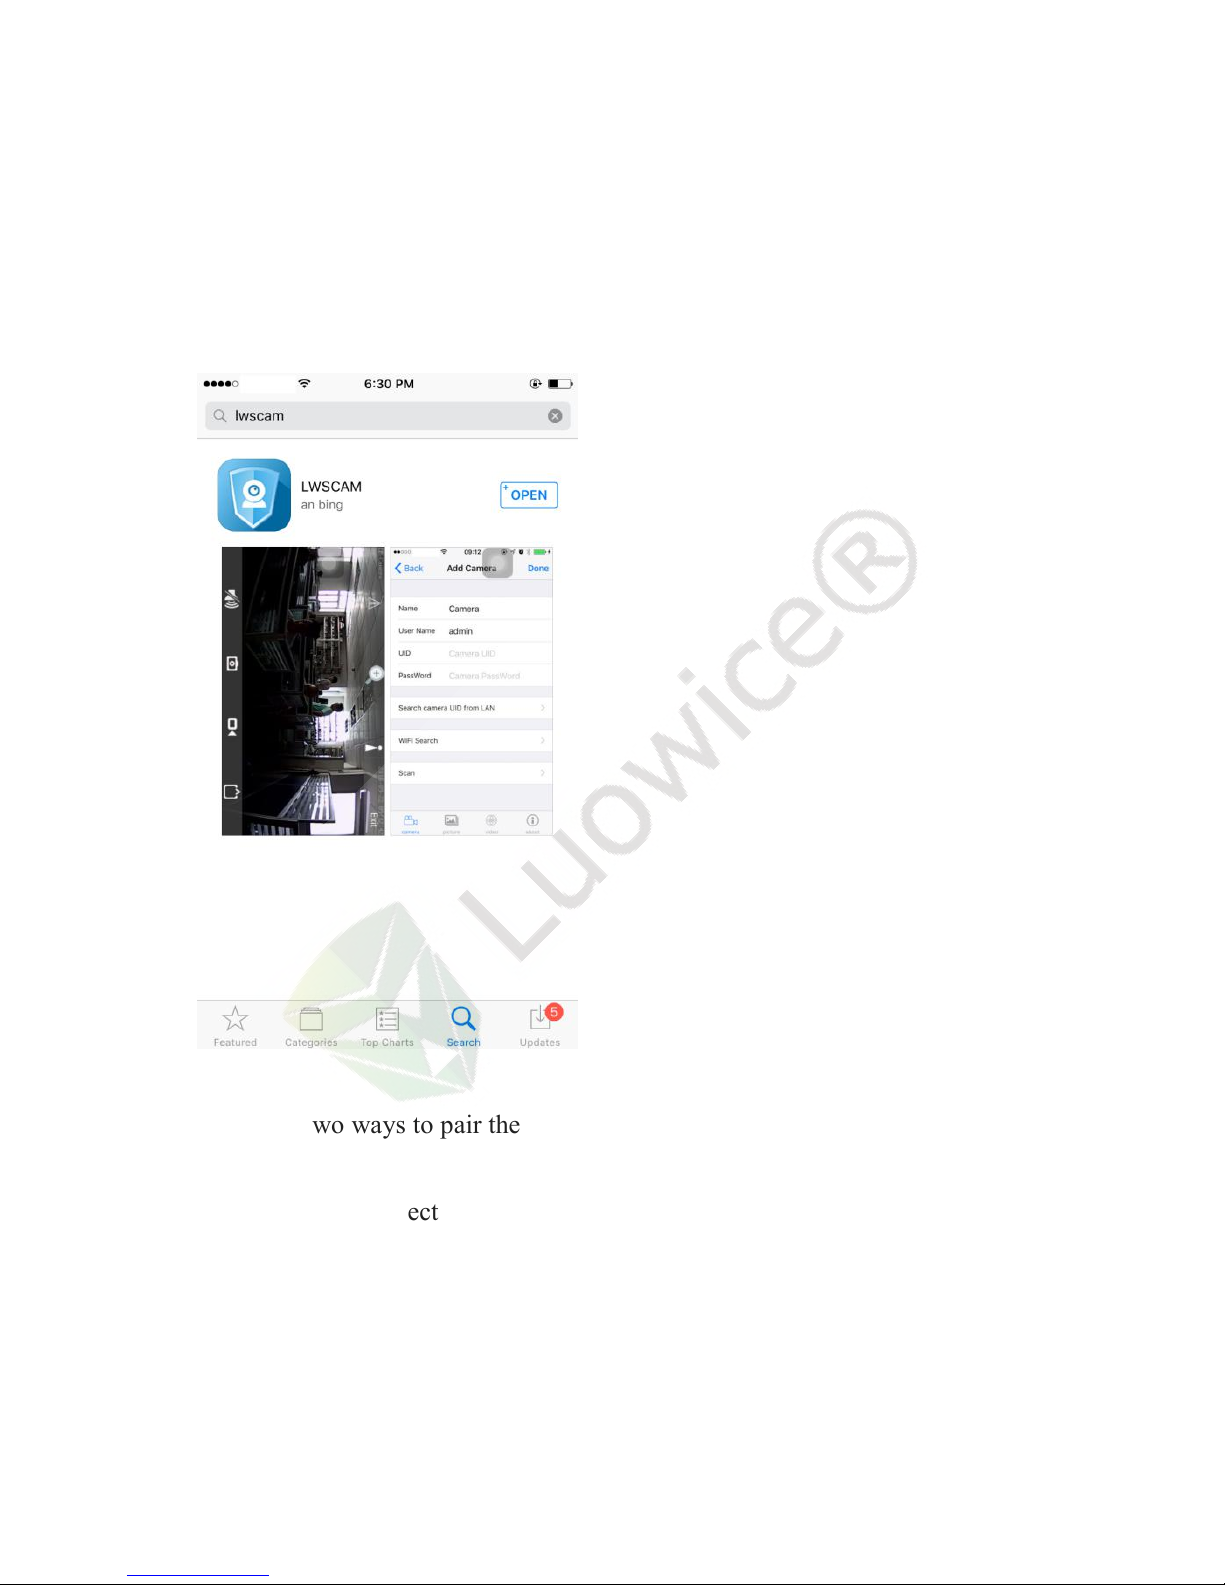
First of all, please kindly download the APP(LWSCAM) and install it to your
smartphone. You can search lwscam in Apple Store or Google Play Store.
And then download and install it.
There are two ways to pair the camera with your smartphone.
1) AP Mode: Connect the camera to your smartphone via the camera’s Wi-Fi
Hotspot
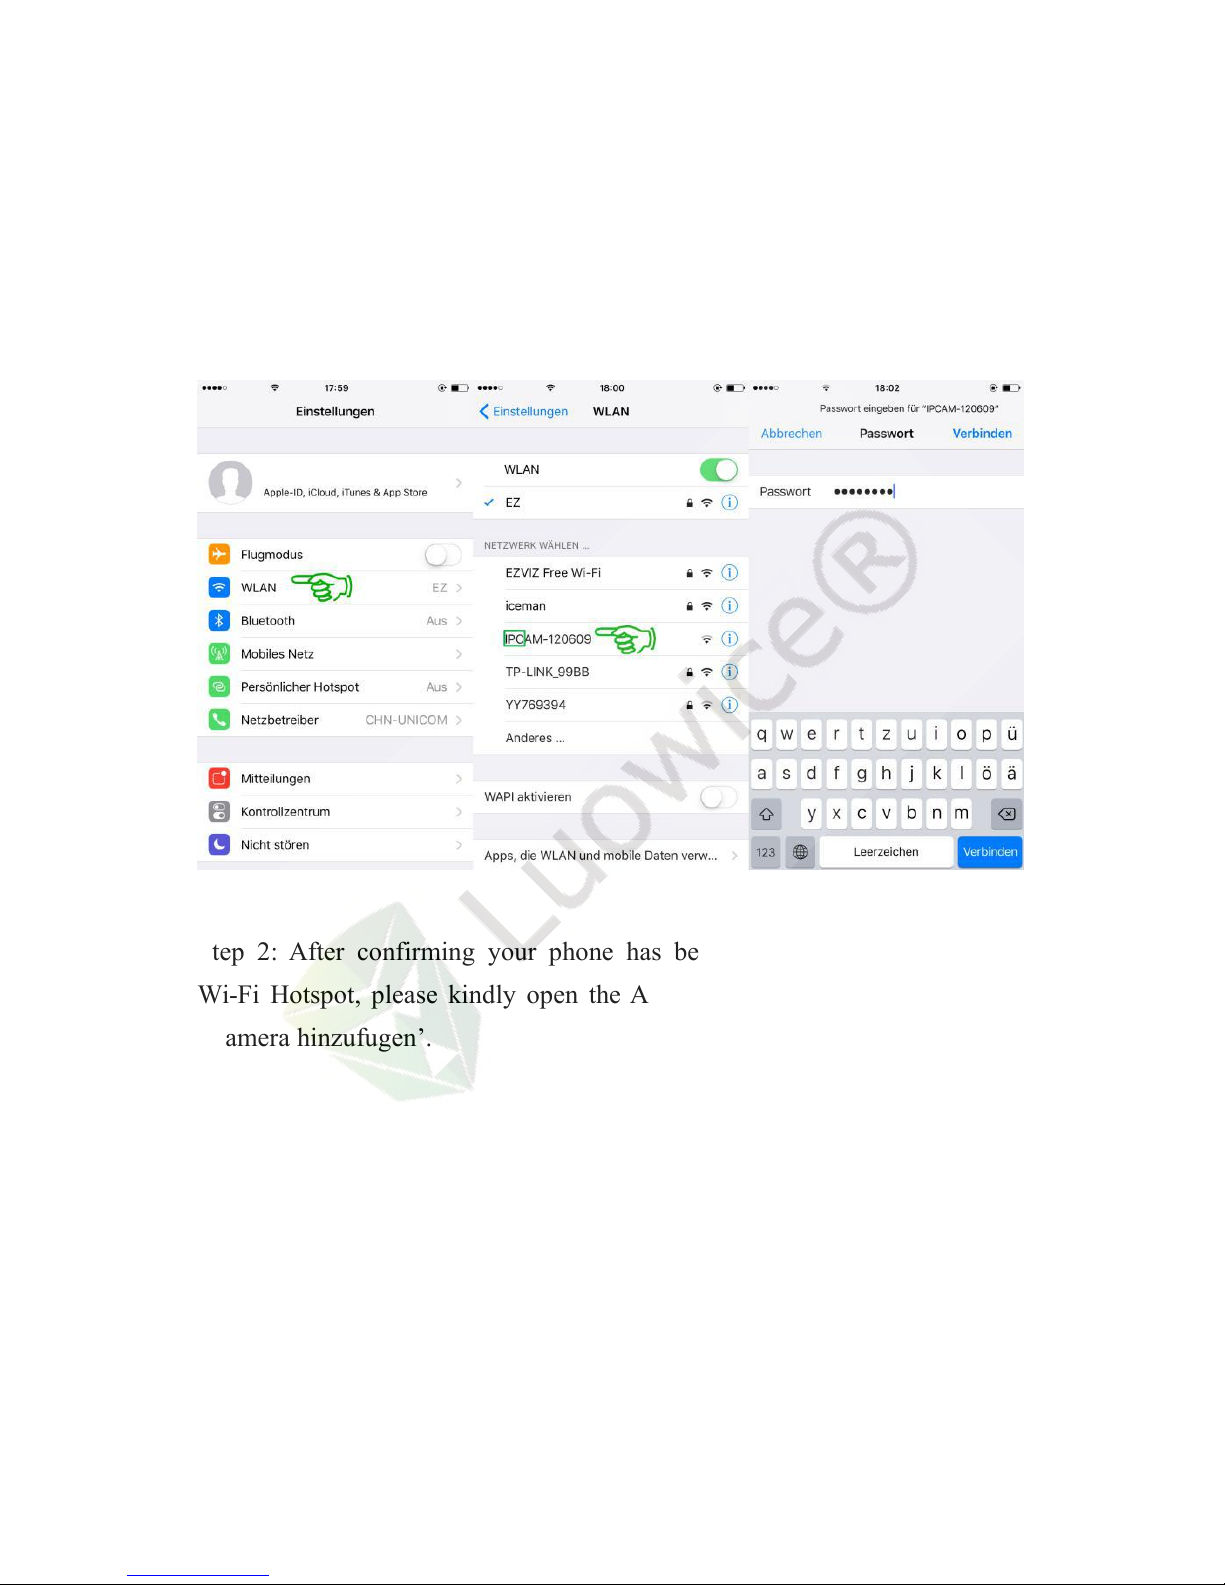
Step 1: Please kindly click ‘Einstellungen’ on your phone - Click ‘WLAN’ -
Page 12
8
Choose the WLAN with the name starts with ‘IPC’ - Insert the default
password ‘01234567’ - Click ‘Verbinden’. And your phone has been
connected the the camera’s Wi-Fi Hotspot now.
Step 2: After confirming your phone has been connected to the camera’s
Wi-Fi Hotspot, please kindly open the APP on your phone. And then click
‘Kamera hinzufugen’.
Page 13
9
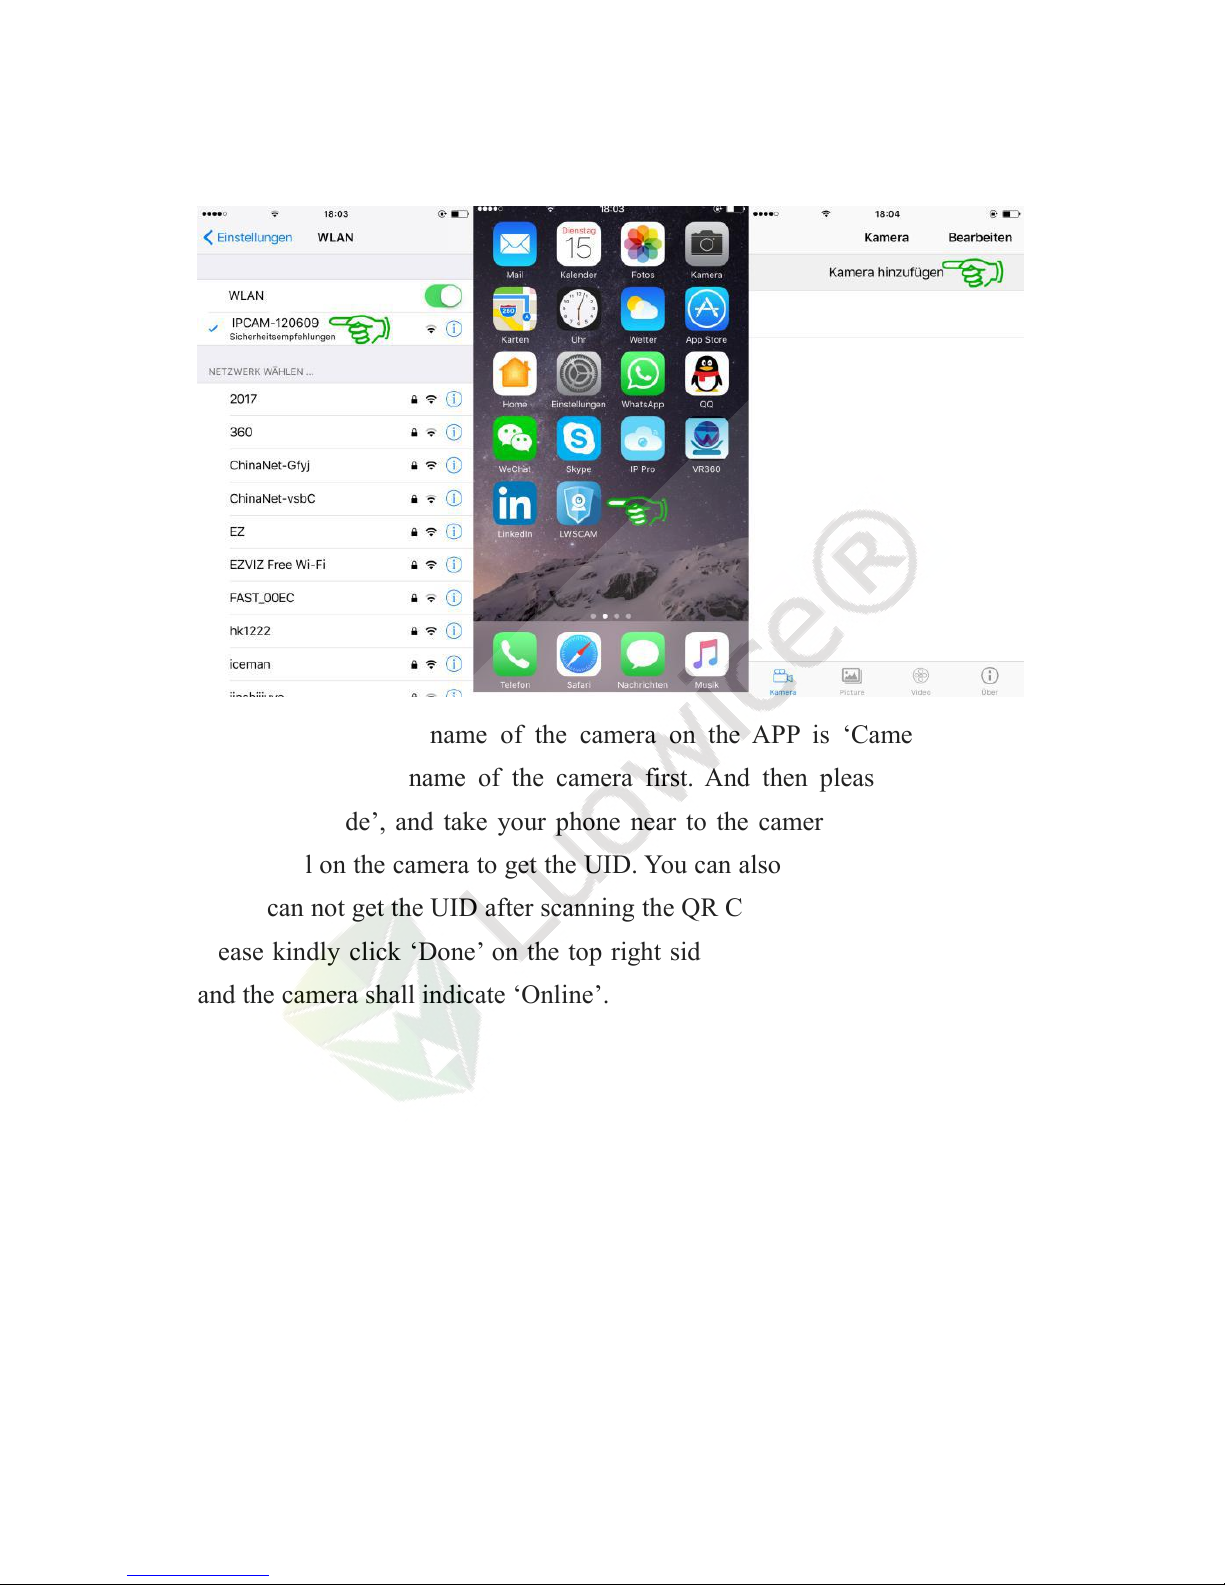
Step 3: The default name of the camera on the APP is ‘Camera’. Please
kindly change the name of the camera first. And then please kindly click
‘Scan QR Code’, and take your phone near to the camera and scan the QR
Code label on the camera to get the UID. You can also insert the UID directly
if you can not get the UID after scanning the QR Code. After you get the UID,
please kindly click ‘Done’ on the top right side. Wait for around one minute
and the camera shall indicate ‘Online’.
Page 14
10
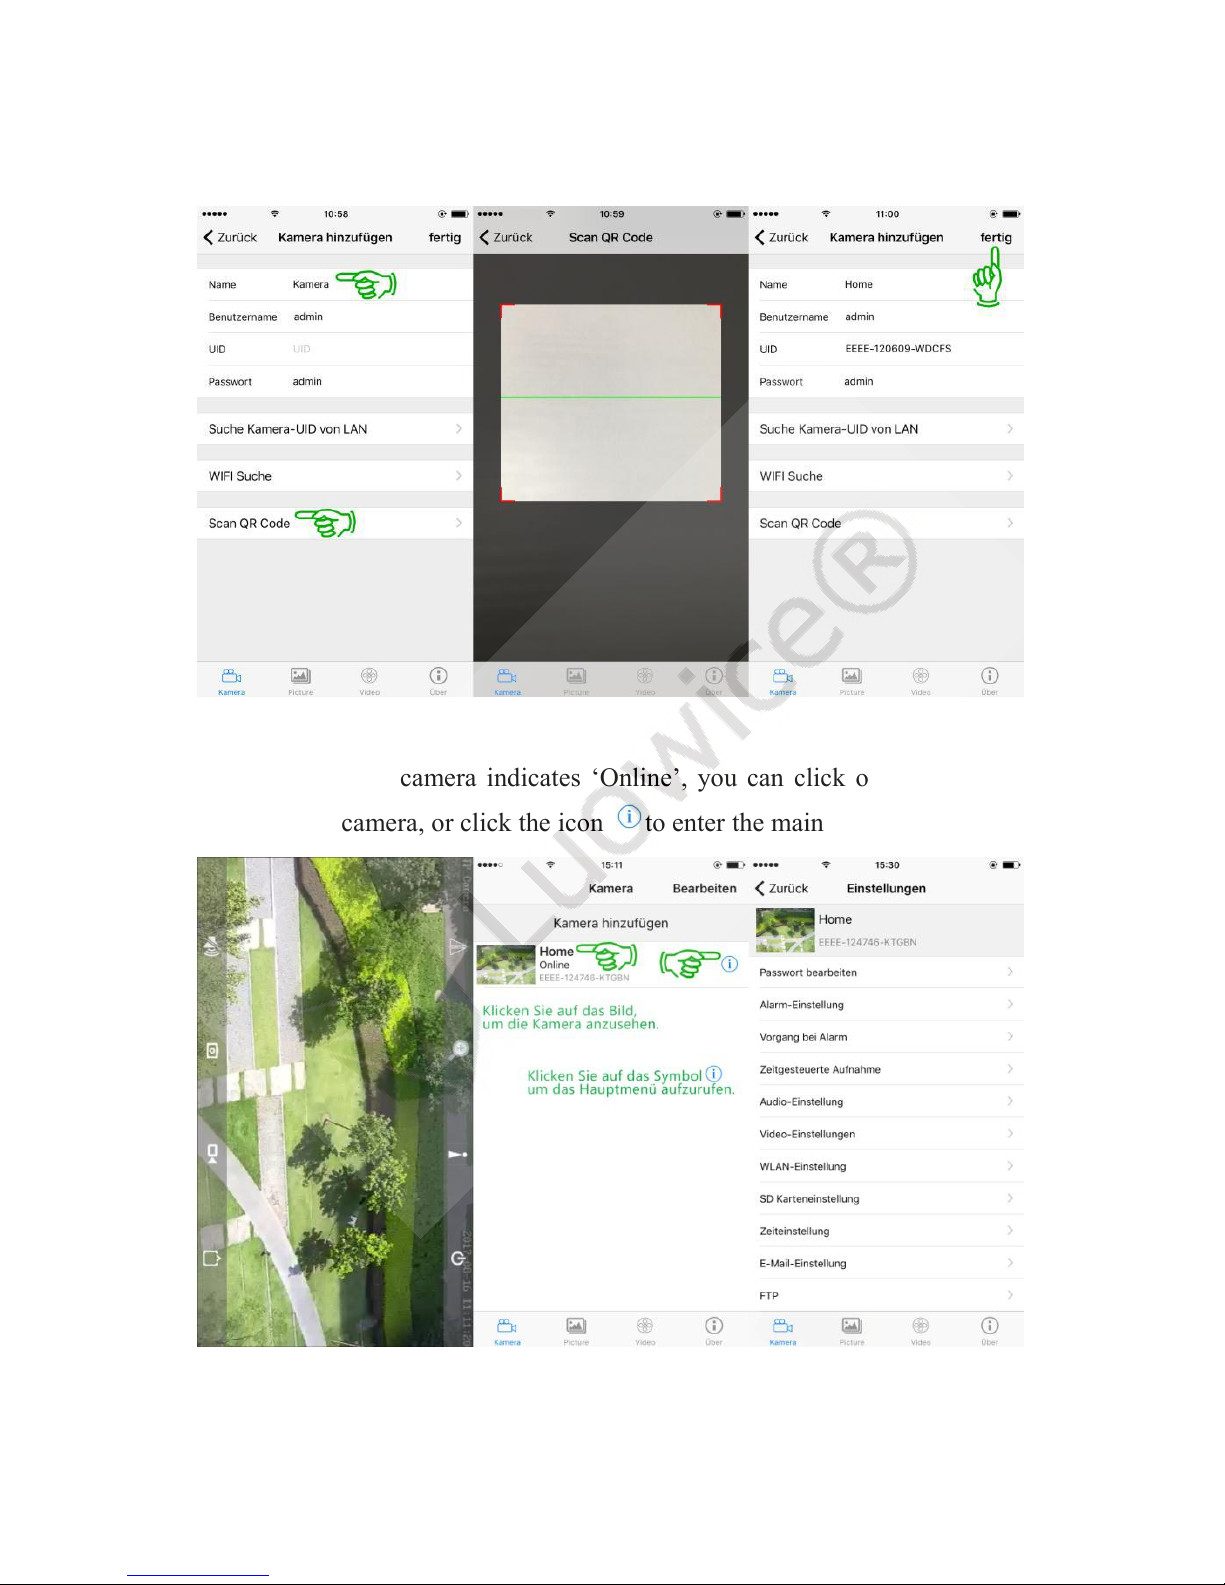
Step 4: When the camera indicates ‘Online’, you can click on the image to
live view the camera, or click the icon to enter the main menu.
Page 15
11
Note: Please kindly note that once the camera is connected to your local
Wi-Fi network, the camera’s Wi-Fi Hoptspot will disappear automatically.
2) LAN Mode: Connect the camera to your smartphone via your local LAN
network.
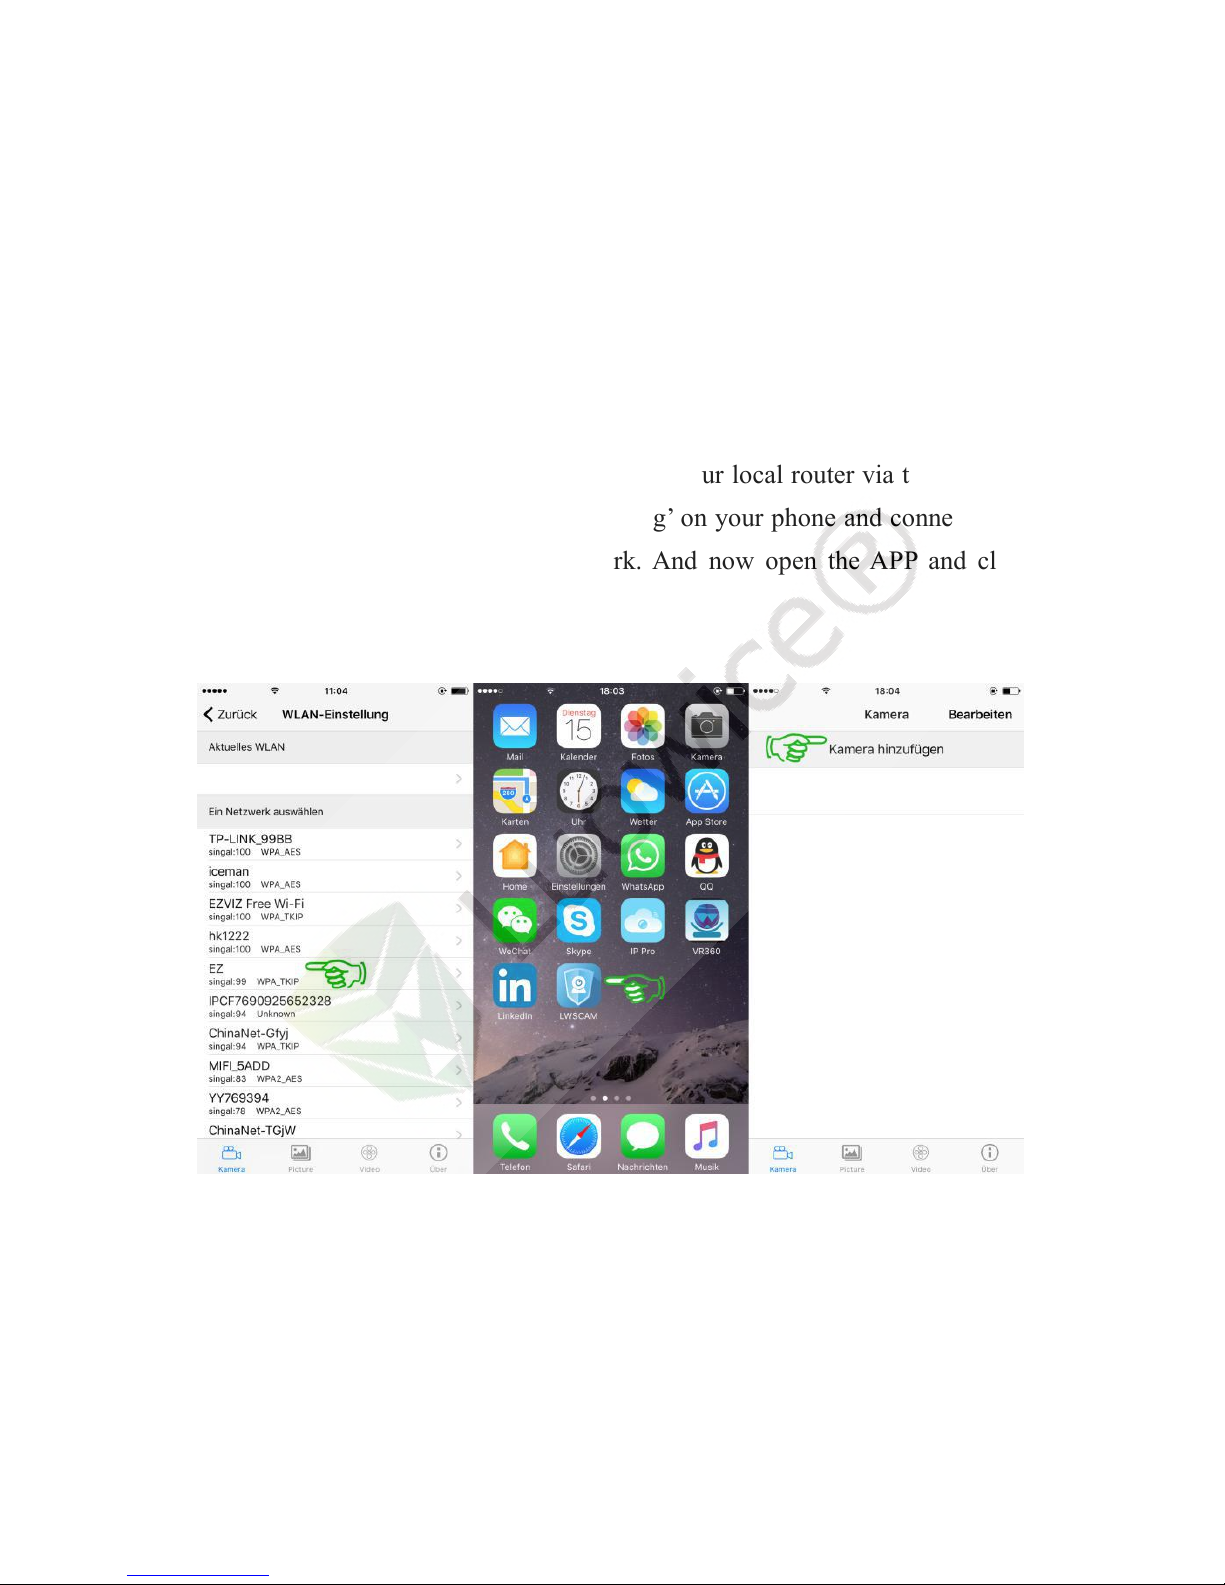
Step 1: Please kindly connect the camera to your local router via the network
cable. And then please kindly click ‘Setting’ on your phone and connect your
phone to the same local Wi-Fi network. And now open the APP and click
‘Add Camera’.
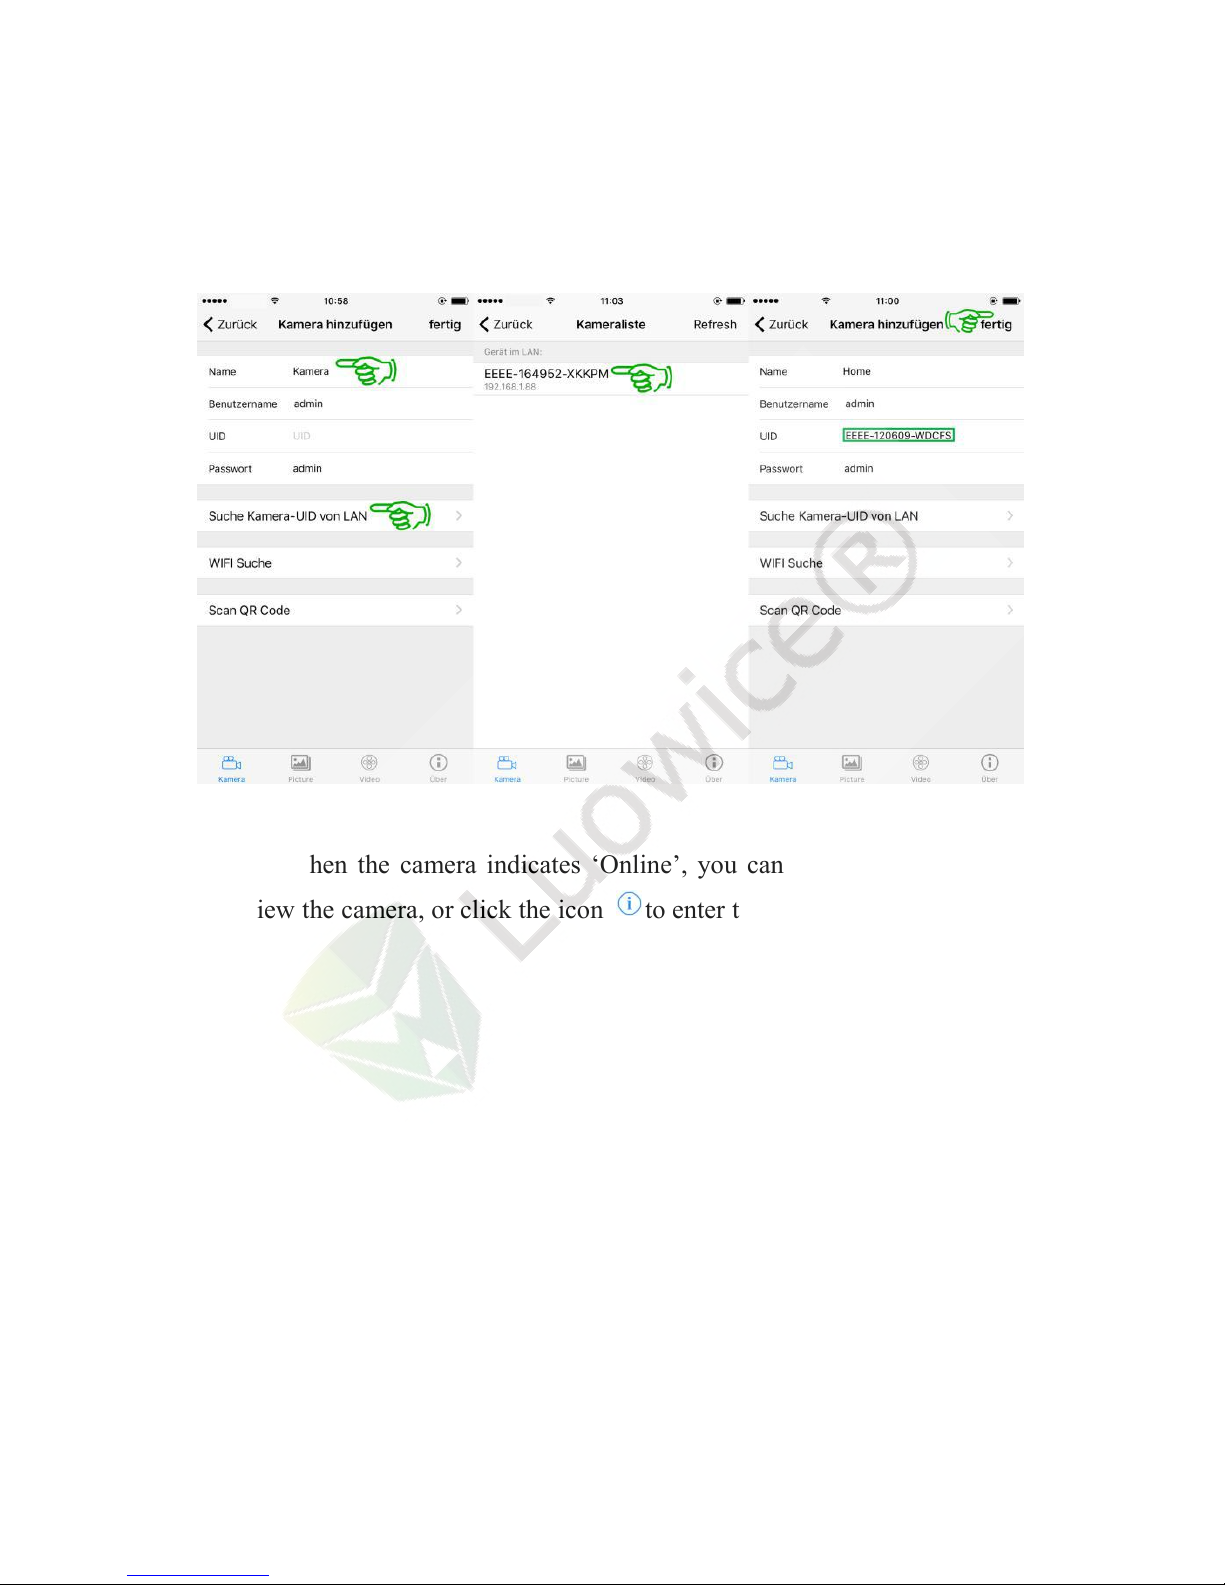
Step 2: The default name of the camera on the APP is ‘Camera’ and you can
change it to any name you like (e.g. Home). And then please kindly click
‘Search camera from LAN’ - Click the camera with the name starts with
Page 16
12
‘EEEE’ - Click ‘Done’. Wait for around one minute, and the camera shall
indicates ‘Online’.
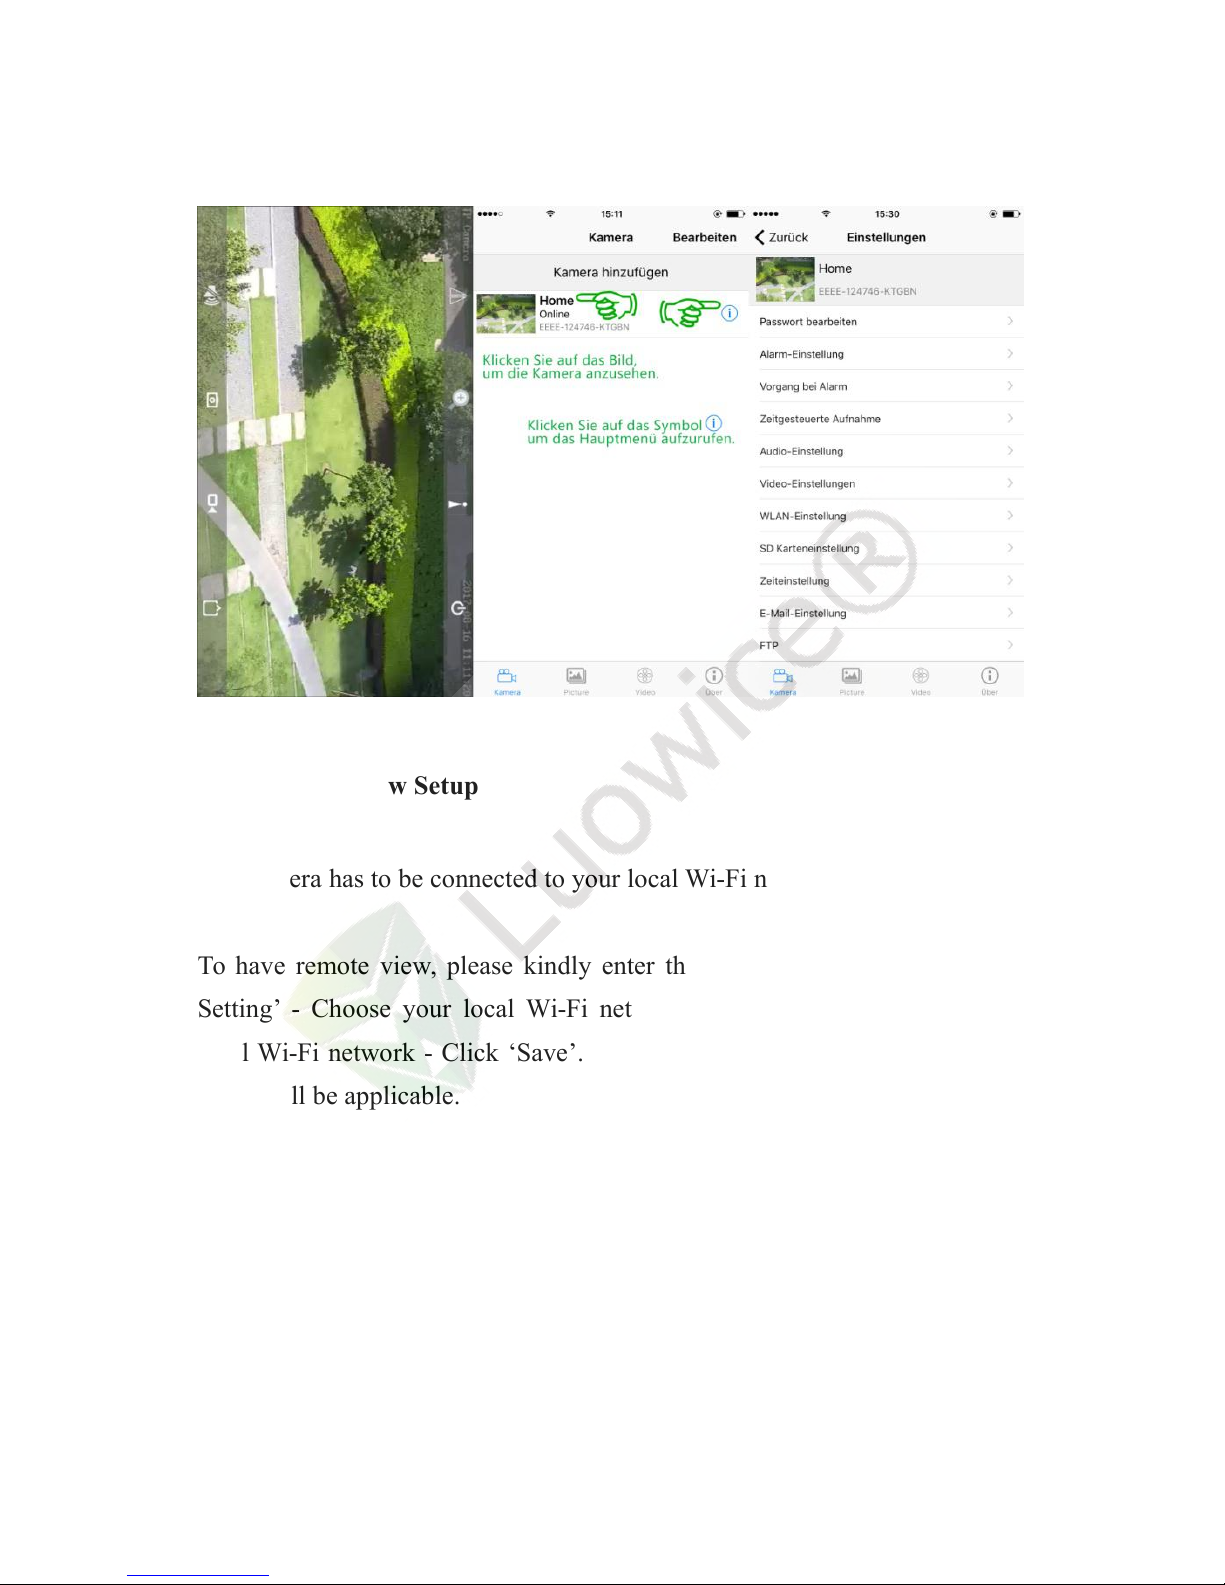
Step 3: When the camera indicates ‘Online’, you can click on the image to
live view the camera, or click the icon to enter the main menu.
Page 17
13
1.3.5 Remote View Setup
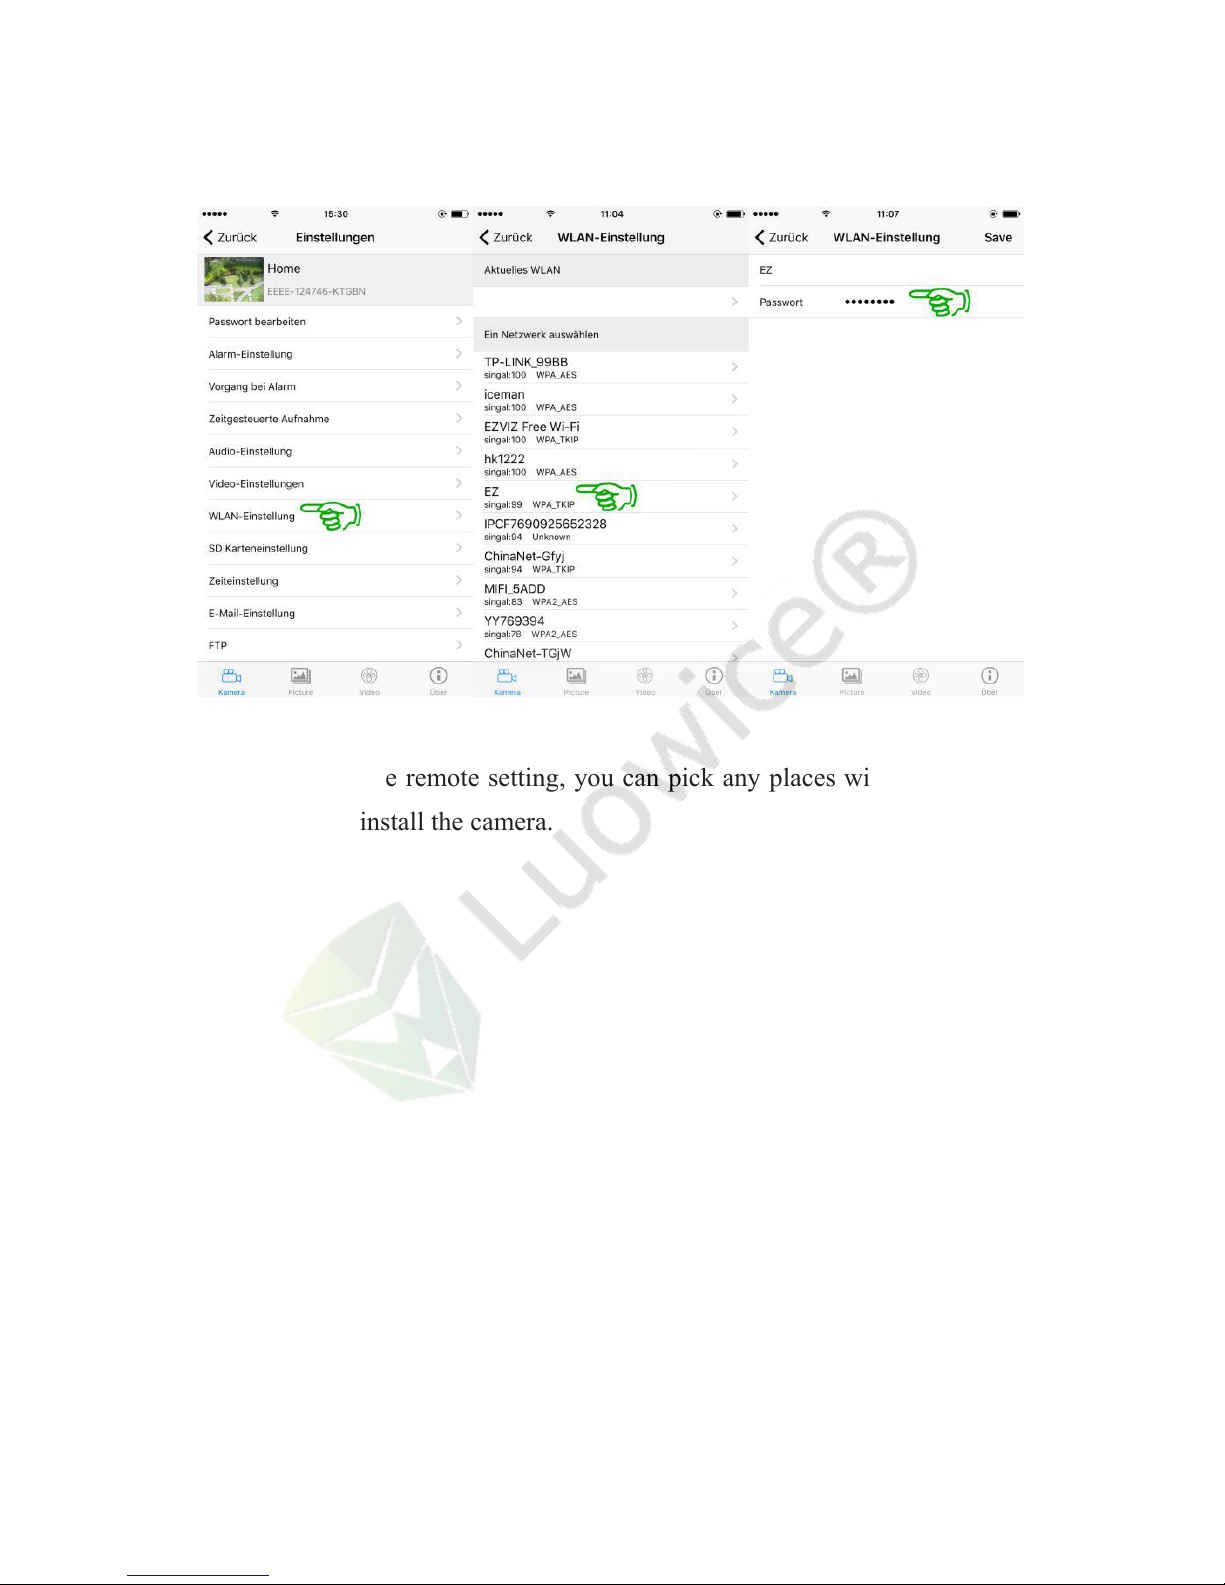
The camera has to be connected to your local Wi-Fi network for remote view.
To have remote view, please kindly enter the main menu, and click ‘Wi-Fi
Setting’ - Choose your local Wi-Fi network - Insert the password of your
local Wi-Fi network - Click ‘Save’. Wait for around one minute, and remote
view shall be applicable.
Page 18
14
After finishing the remote setting, you can pick any places within your local
Wi-Fi range to install the camera.
Page 19
15
1.3.6 Camera Installation Tips
Page 20
16
2. Instruction for Operation on Phone APP
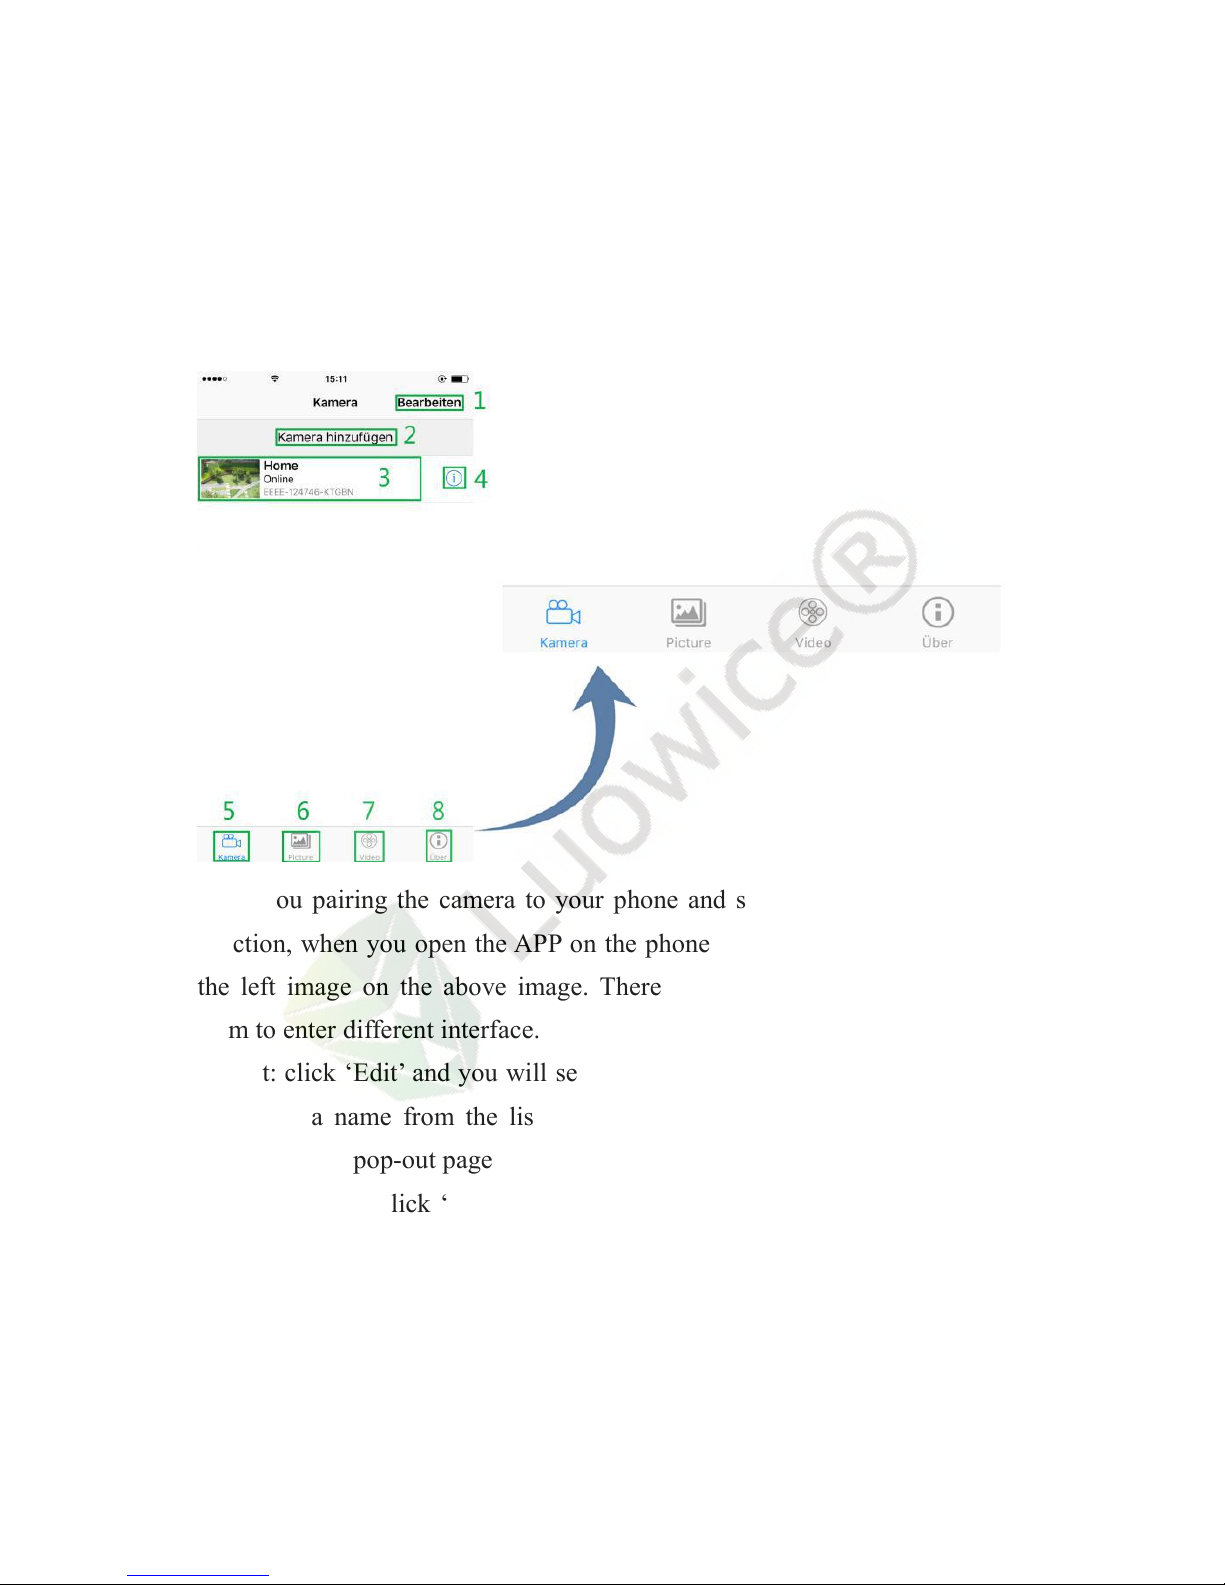
2.1 Phone APP Default Interface and Operation Instruction
After you pairing the camera to your phone and setting up the remote view
function, when you open the APP on the phone, you will see the interface as
the left image on the above image. There are 8 icons that you can choose
from to enter different interface.
1. Edit: click ‘Edit’ and you will see a camera list on the pop-out page. Click
any camera name from the list, and then you can modify the name of the
camera on the pop-out page.
2. Add Camera: click ‘Add Camera’, and then you can pair new cameras to
the phone.
3. Click the circled area of ‘3’, you can enter the live view interface of the
camera.
Page 21
17
4. Click the icon , and you can enter the main menu interface of the
camera.
5. Click ‘Camera’, and you can see a list of camera paired with the phone.
6. Click ‘Picture’, and you can check the snapshots you took while live
watching the camera.
7. Click ‘Video’, and you can check the video records you took while live
watching the camera stored on the phone via ‘Local’; and check the video
records stored on the preinstalled SD card via ‘Online’.
8. Click ‘About’, and you can get the information of the APP.
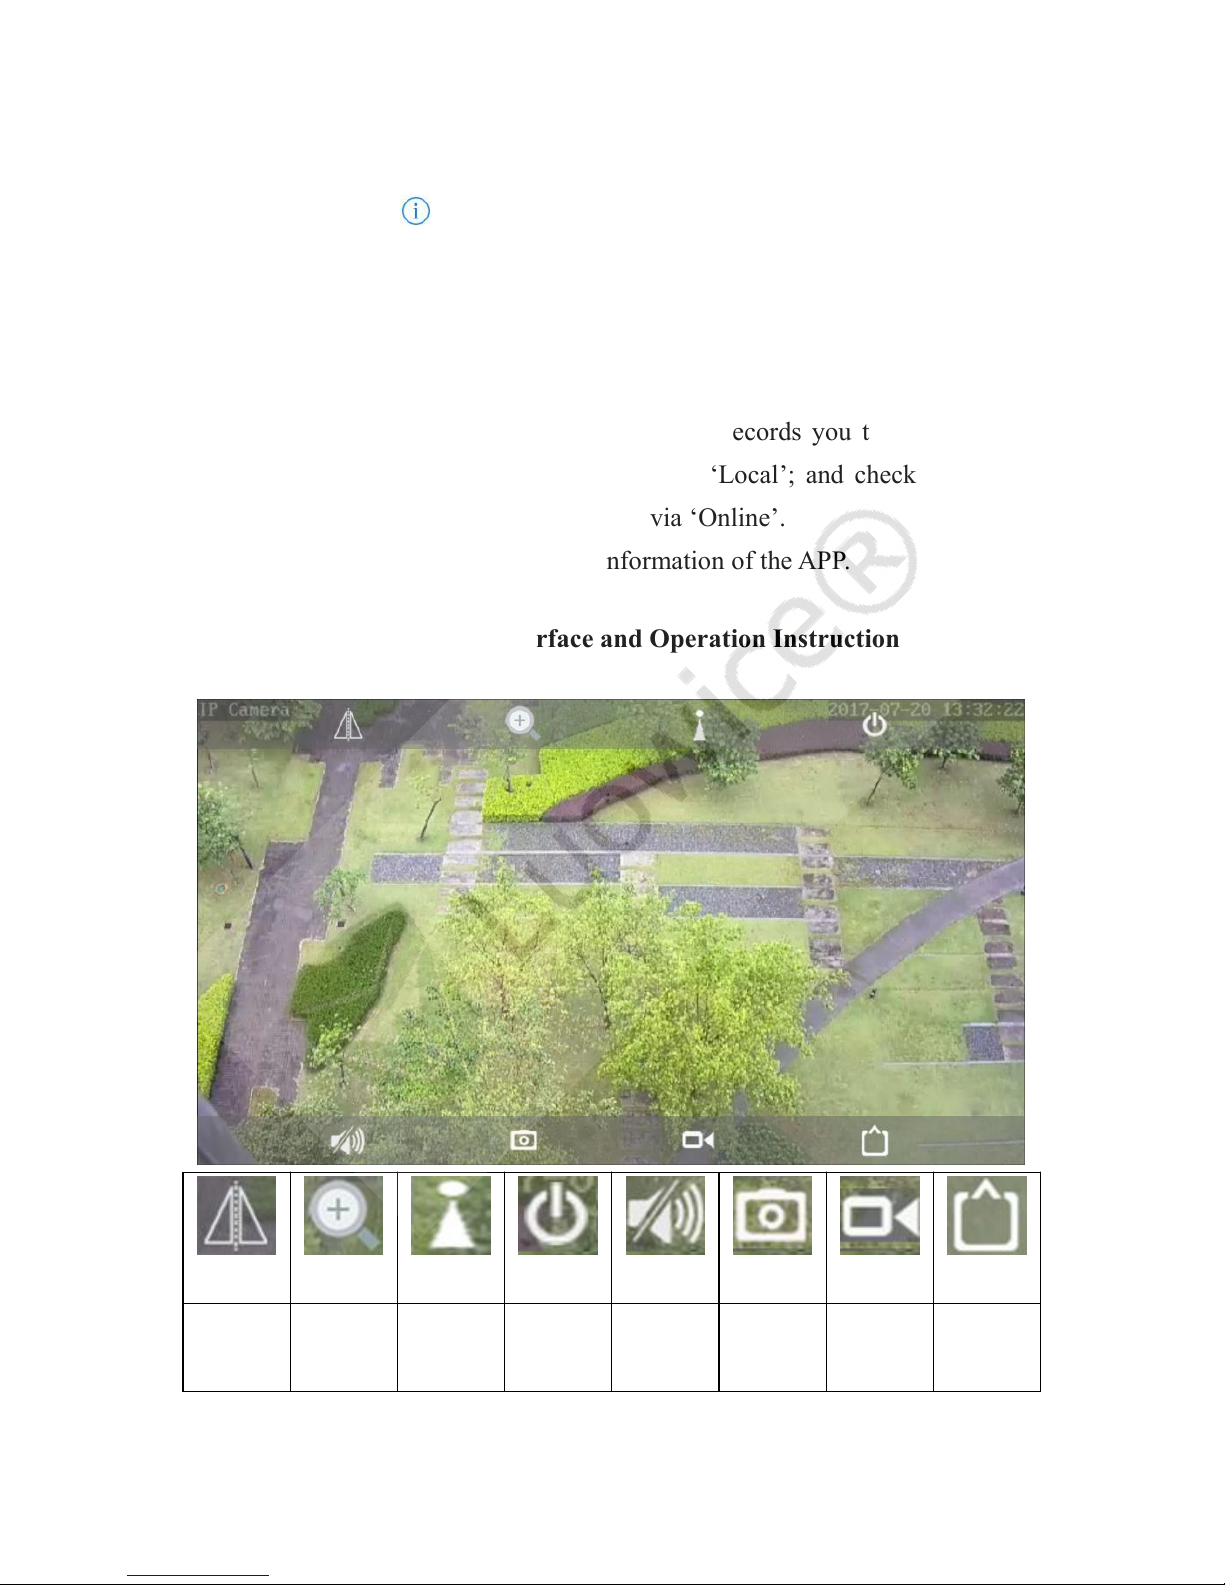
2.2 Phone APP Live View Interface and Operation Instruction
Lens
Adjusting
Zoom/
Focus
Position
Preset
Exit
Audio
Adjusting
Snapshot
Local
Record
Resolution
Adjusting
Page 22
18
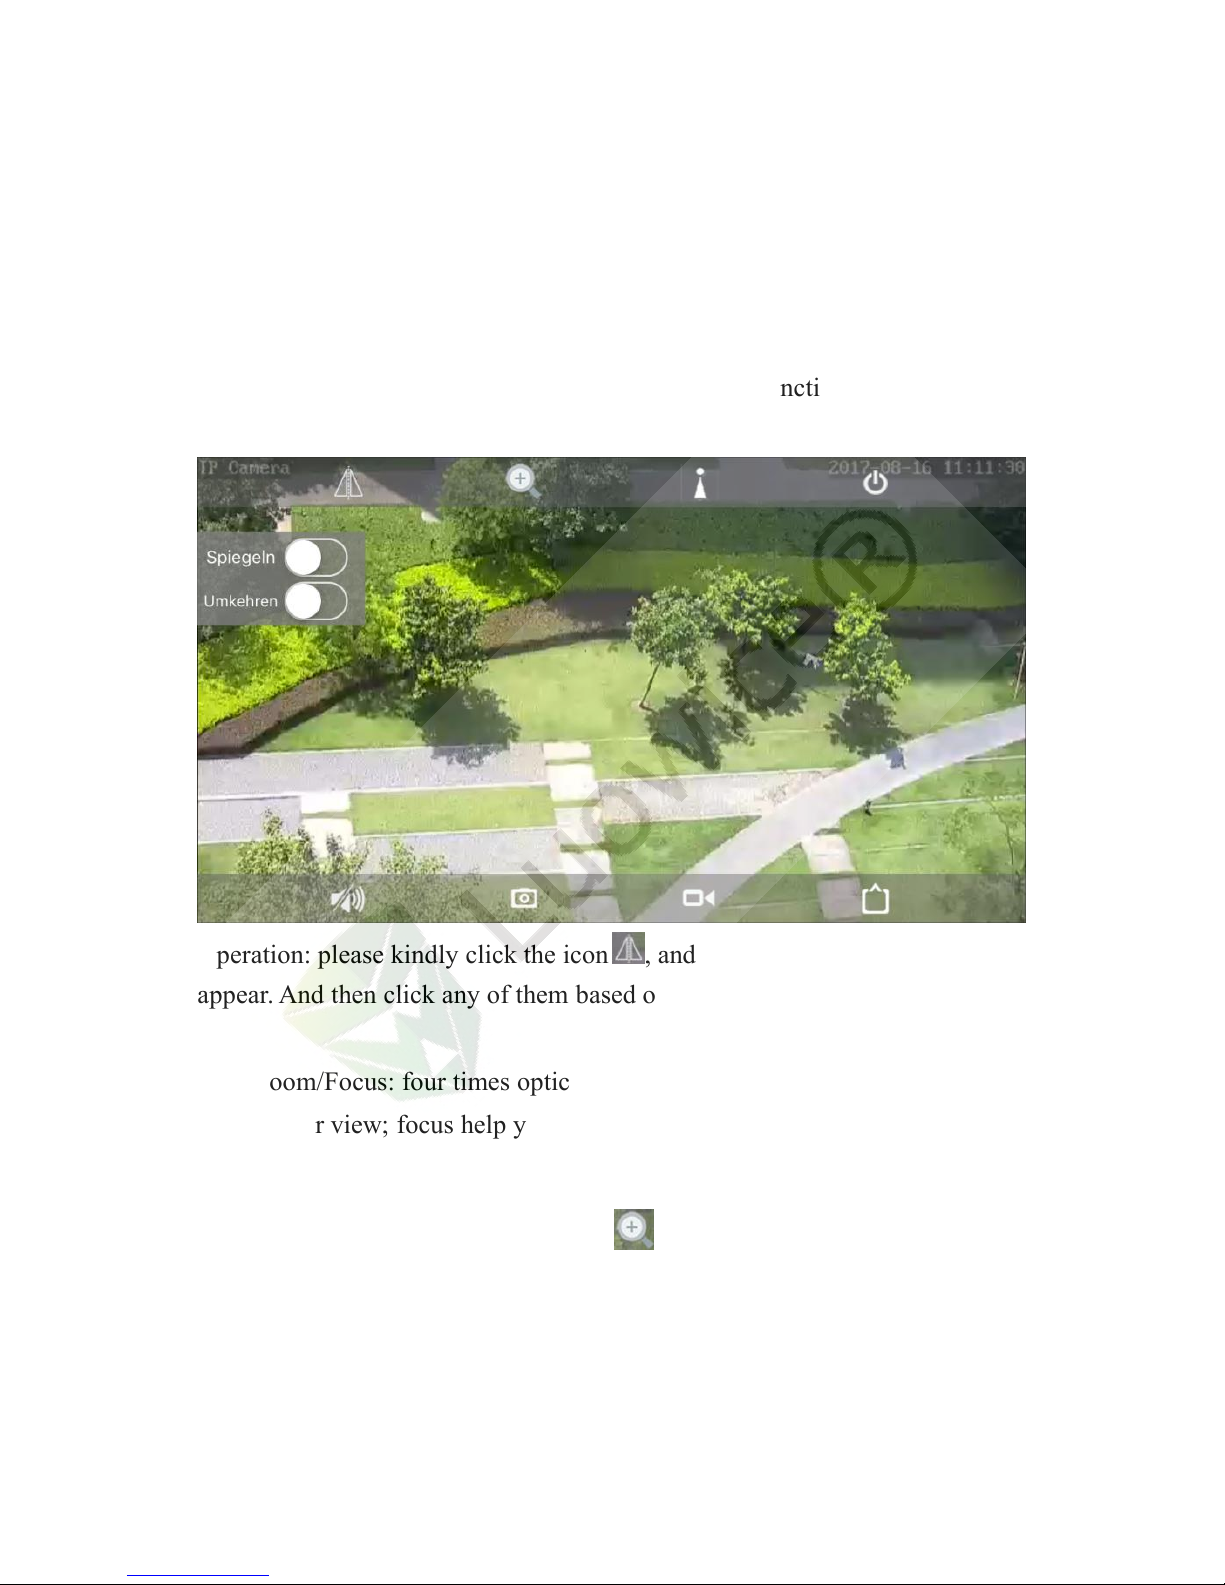
Lens Adjusting: Mirror/Flip. Mirror will make the view swap from left
to right and vise versa; Flip will make the view upside down and vise
versa. When you install the camera under a roof or on a wall where
there is restriction on space, you may need this function to get a right
view of the camera.
Operation: please kindly click the icon , and the Mirror/Flip interface will
appear. And then click any of them based on your need.
Zoom/Focus: four times optical zoom allows you to get closer details or
farther view; focus help you to get clear view on specific spot.
Operation: Please kindly click the icon , and the Zoom/Focus interface
will appear. And then press on Zoom in/Zoom out to get the view you like;
loosen Zoom in/Zoom out and wait for seconds. Then the camera shall adjust
Page 23
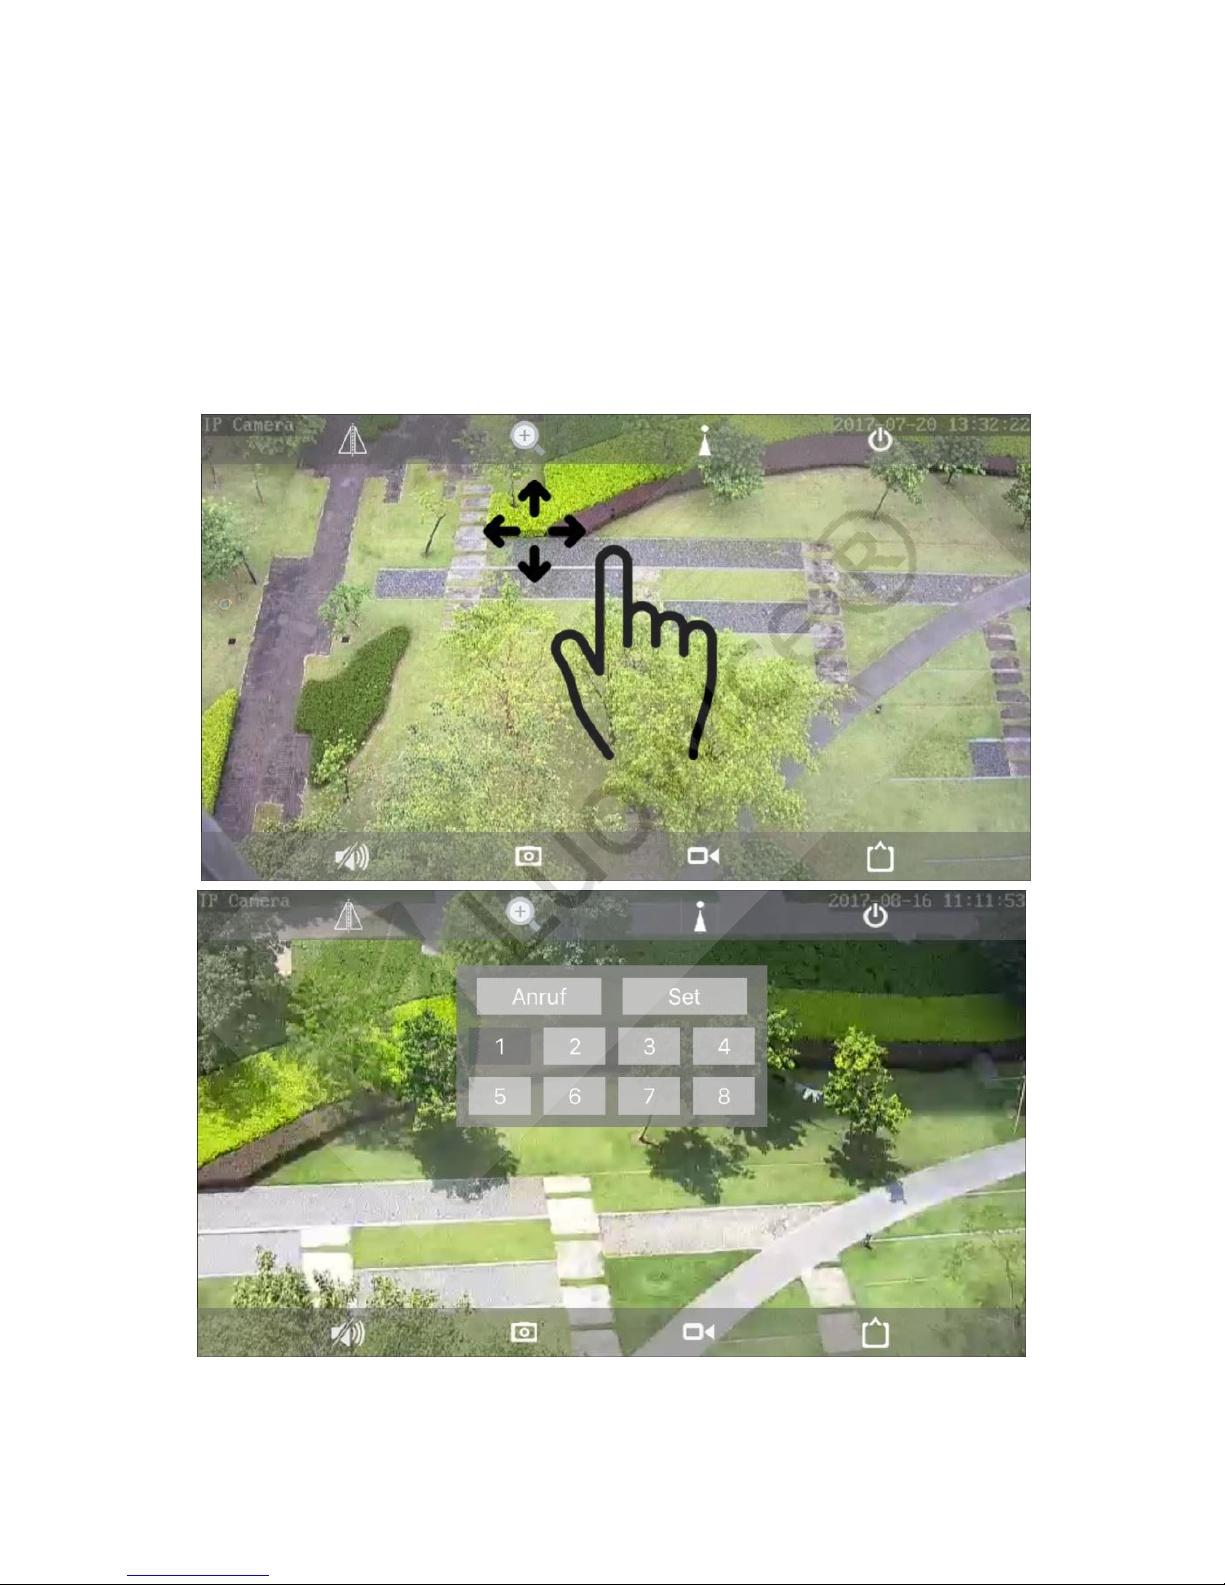
19
the view to be clear automatically after zooming. If the view is not clear
enough, then press on Focus in/Focus out to get clear view.
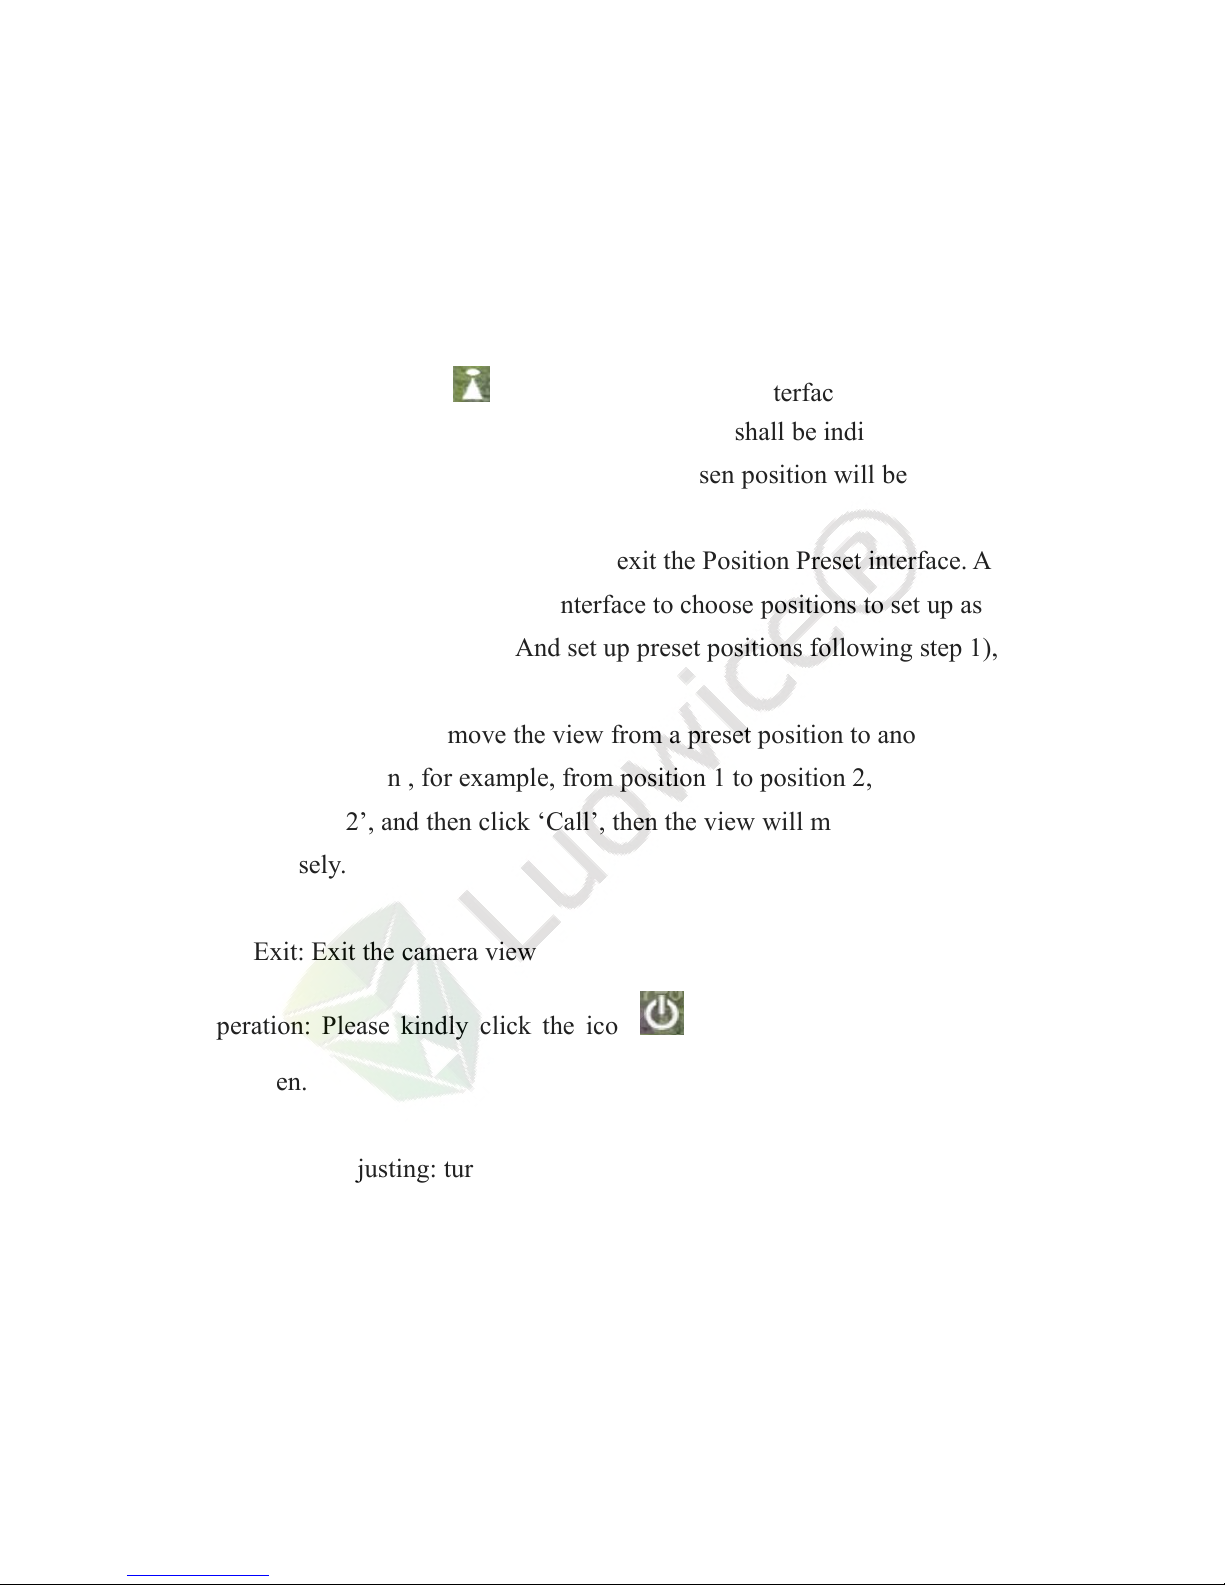
Position Preset: this function allows you to set up specific position to
adjust the lens precisely.
Page 24
20
Operation:
a) First, please kindly move your finger on the default interface from
left/right, up/down to choose a position that you want to set up as a
preset position.
b) Then click the icon , and the Position Preset interface will appear.
And then click ‘1’ – click ‘Setup’. Then there shall be indication shown
as ‘Default setting successes’. And the chosen position will be set up as
position 1 successfully.
c) Click any place on the interface to exit the Position Preset interface. And
then finger move the default interface to choose positions to set up as
position 2, position 3, … And set up preset positions following step 1),
step 2) above.
d) When you want to move the view from a preset position to another
preset position , for example, from position 1 to position 2, just simply
click on ‘2’, and then click ‘Call’, then the view will move to position 2
precisely.
Exit: Exit the camera view
Operation: Please kindly click the icon , and you will exit the camera
view then.
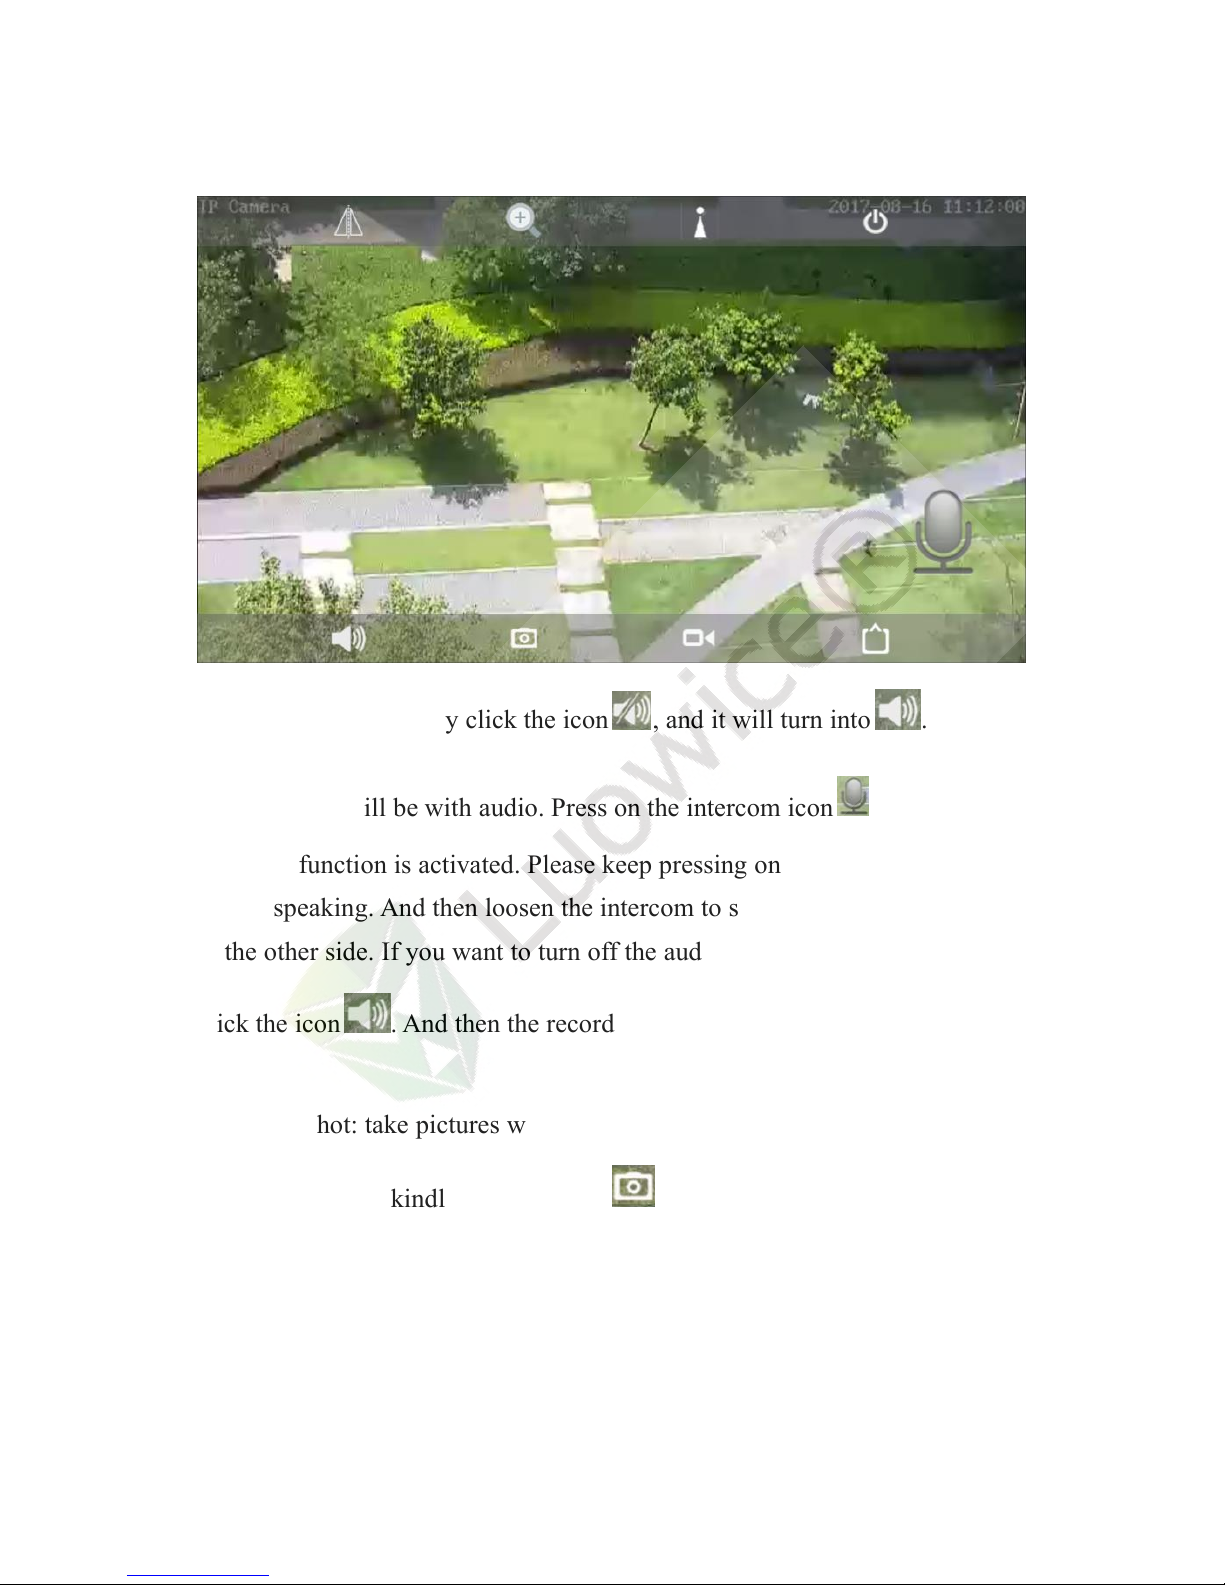
Audio Adjusting: turn on audio recording and intercom function.
Page 25
21
Operation: please kindly click the icon , and it will turn into . Then
the recording will be with audio. Press on the intercom icon , and the
intercom function is activated. Please keep pressing on the intercom icon
during speaking. And then loosen the intercom to send out the voice message
to the other side. If you want to turn off the audio recording function, please
click the icon . And then the record will be without audio.
Snapshot: take pictures while you are watching the live video.
Operation: please kindly click the icon . And there shall be indication
shown as ‘Snapshot Saved’. And then exit the default interface. Click
‘Picture’. And you will see the number of snapshot on the opening interface.
Click the camera you want to check the snapshots and the snapshots will
Page 26
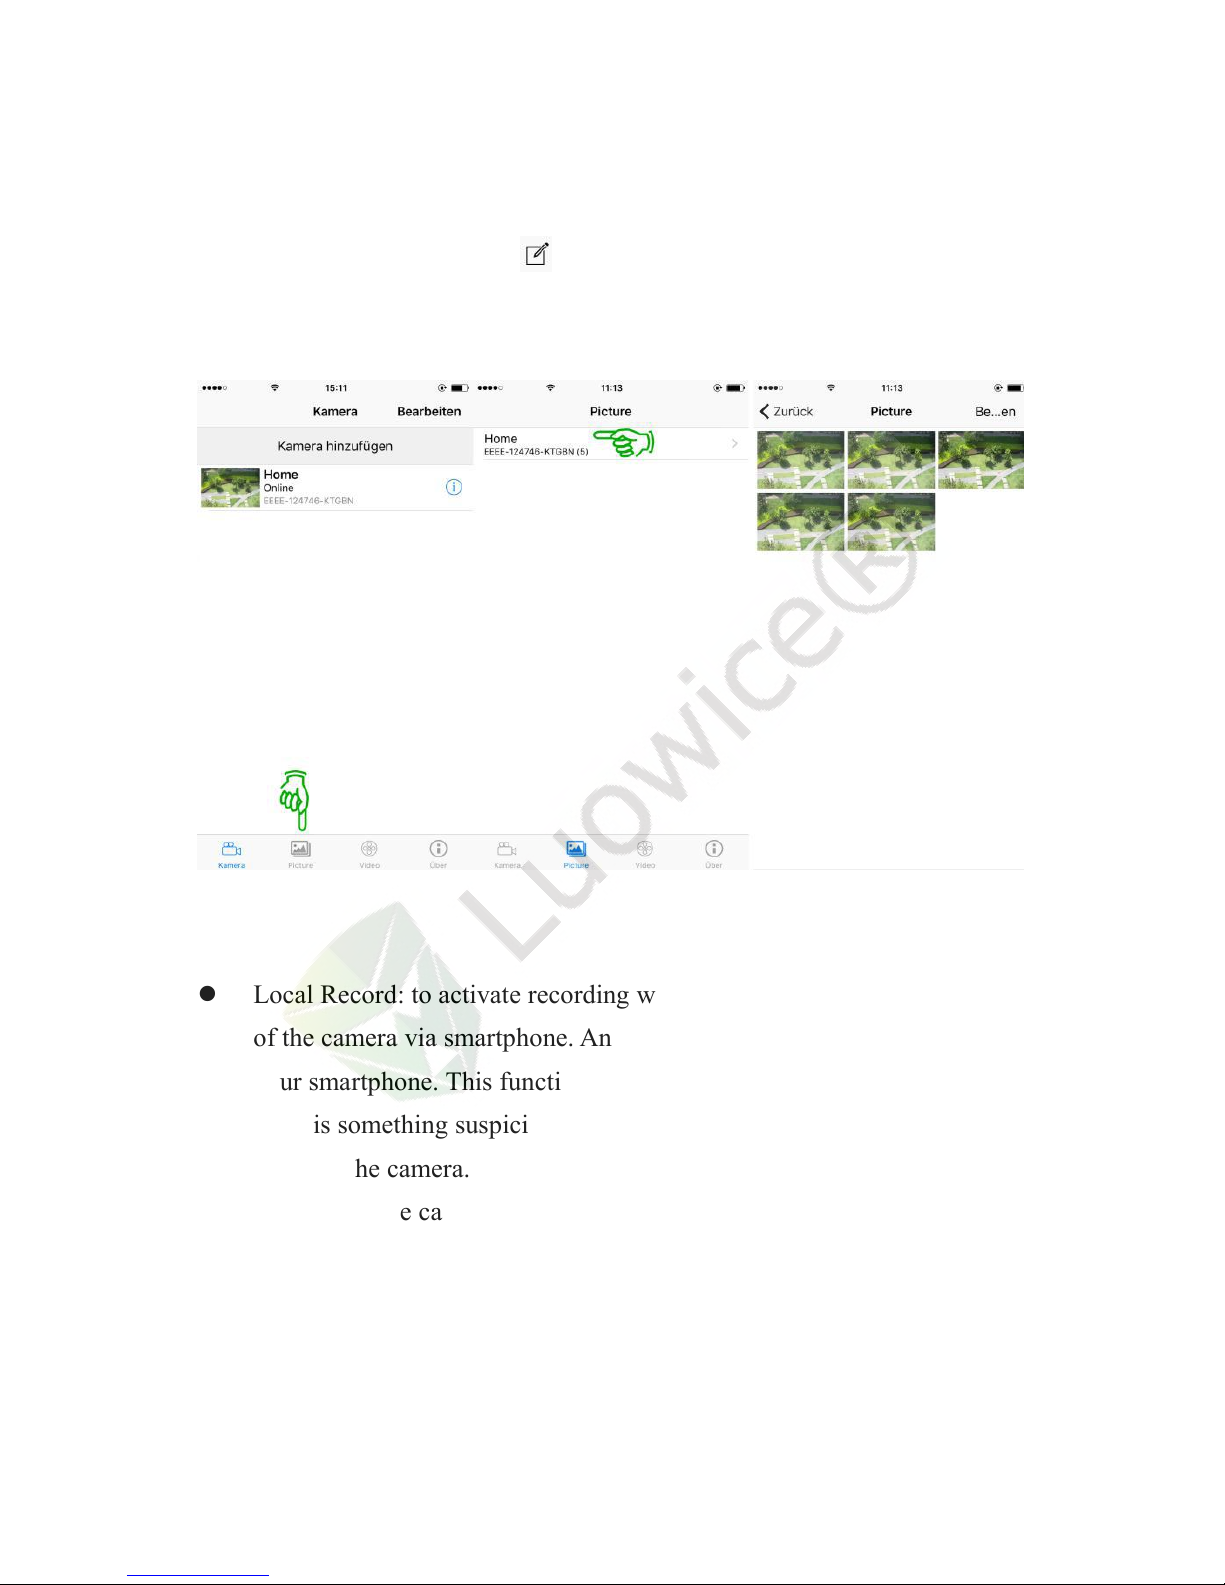
22
appear then. If you want to delete a snapshot, click the snapshot to open the
image, and then click the icon , and click on ‘Delete’ on the pop-out page.
You can also email the snapshot or save the snapshot to your phone album on
the pop-out page.
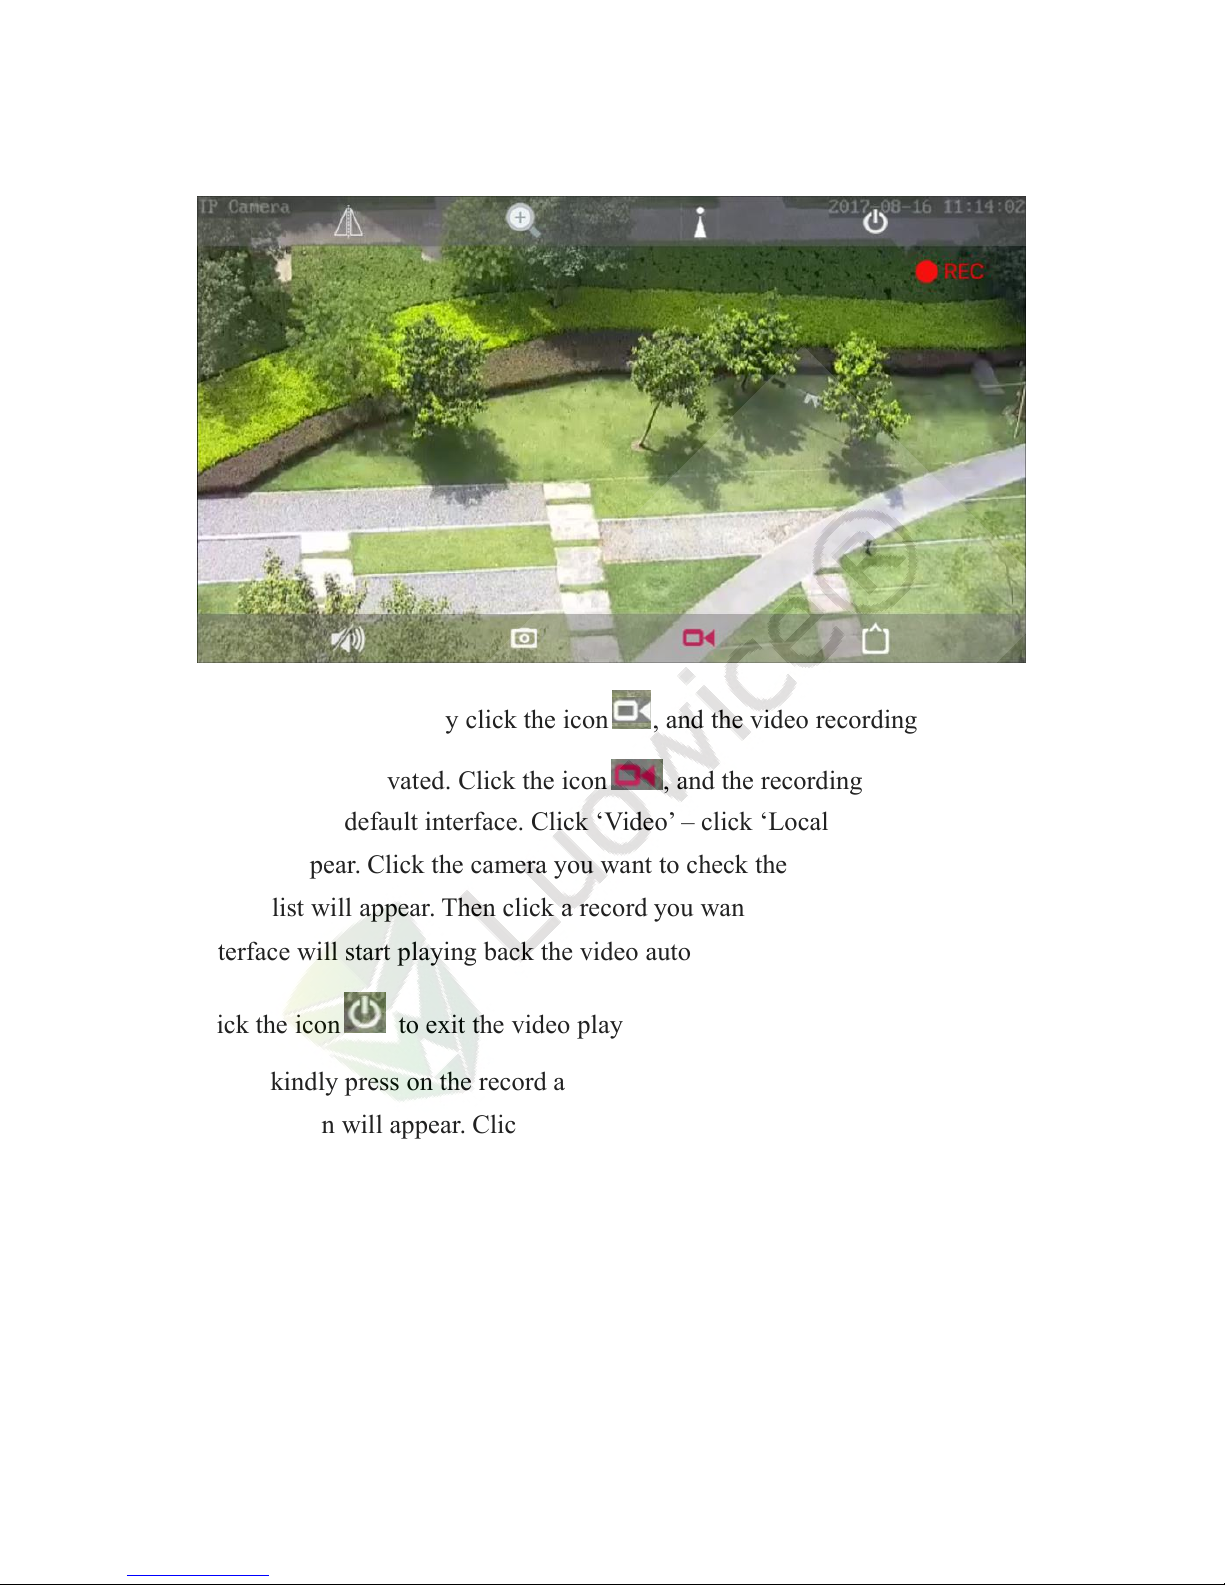
Local Record: to activate recording while you are watching live video
of the camera via smartphone. And then the recording will be stored in
your smartphone. This function helps you to save video record when
there is something suspicious happened while you are watching the live
video of the camera. And it will not affect the scheduled recording on
SD card on the camera.
Page 27
23
Operation: please kindly click the icon , and the video recording on the
phone will be activated. Click the icon , and the recording will stop.
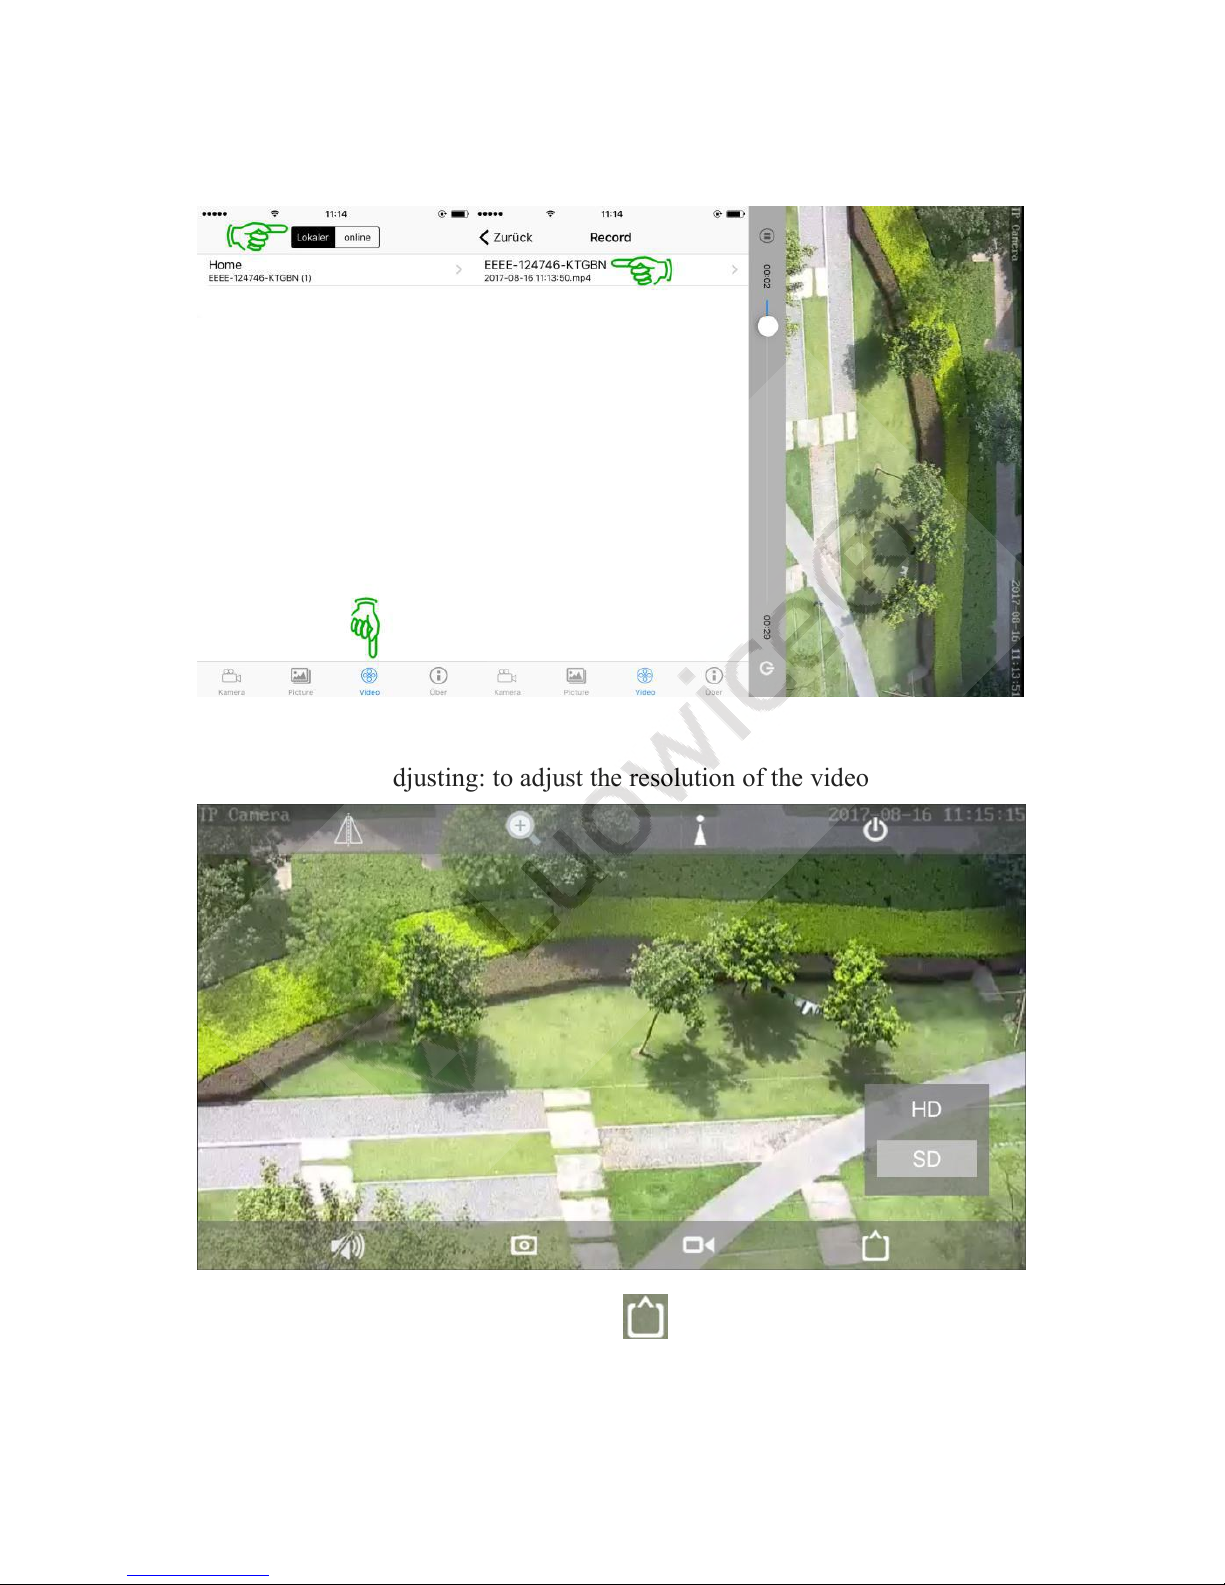
Then exit the default interface. Click ‘Video’ – click ‘Local’. And the camera
list will appear. Click the camera you want to check the local records and the
record list will appear. Then click a record you want to check and the opening
interface will start playing back the video automatically. And then you can
click the icon to exit the video playback. If you want to delete a record,
please kindly press on the record and move your finger to the left and the
‘Delete’ icon will appear. Click ‘Delete’ and the record will be deleted then.
Page 28
24
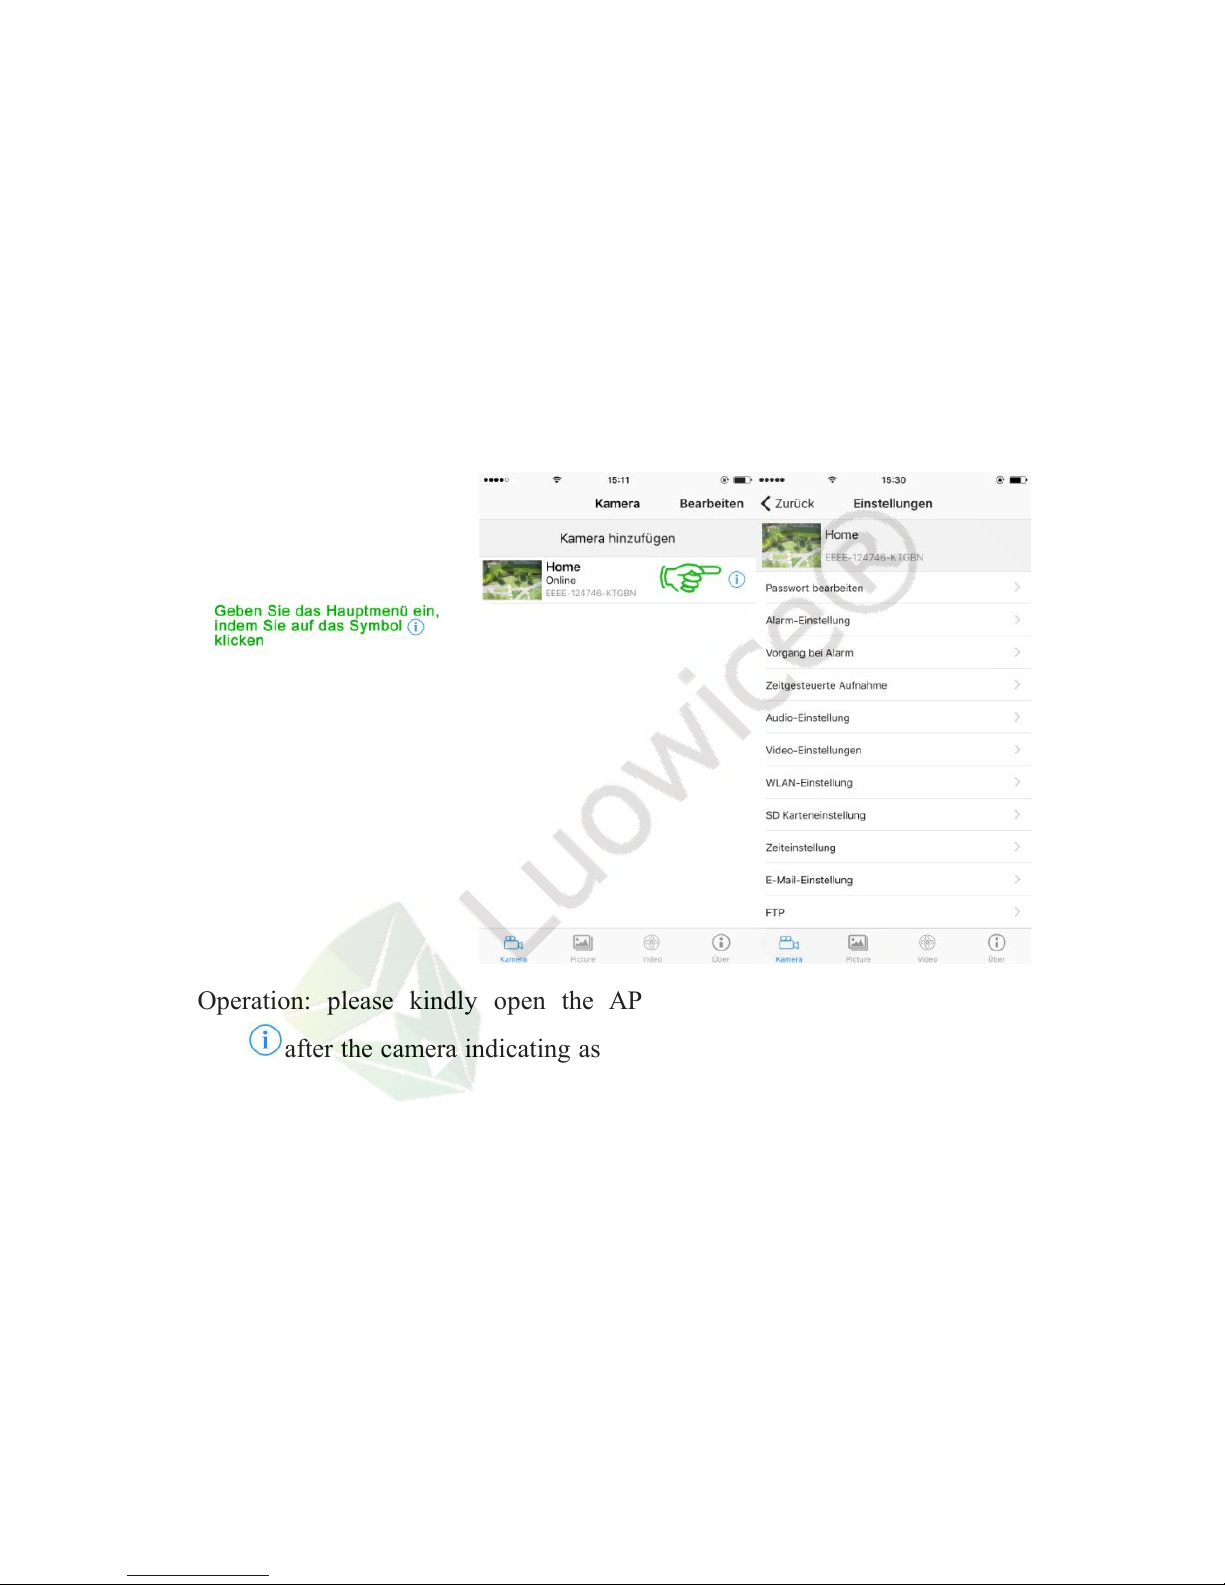
Resolution Adjusting: to adjust the resolution of the video.
Operation: please kindly click the icon , and the resolution interface will
Page 29
25
appear. Then click HD/SD based on your need.
2.3 Phone APP Camera Setting Interface and Operation Instruction
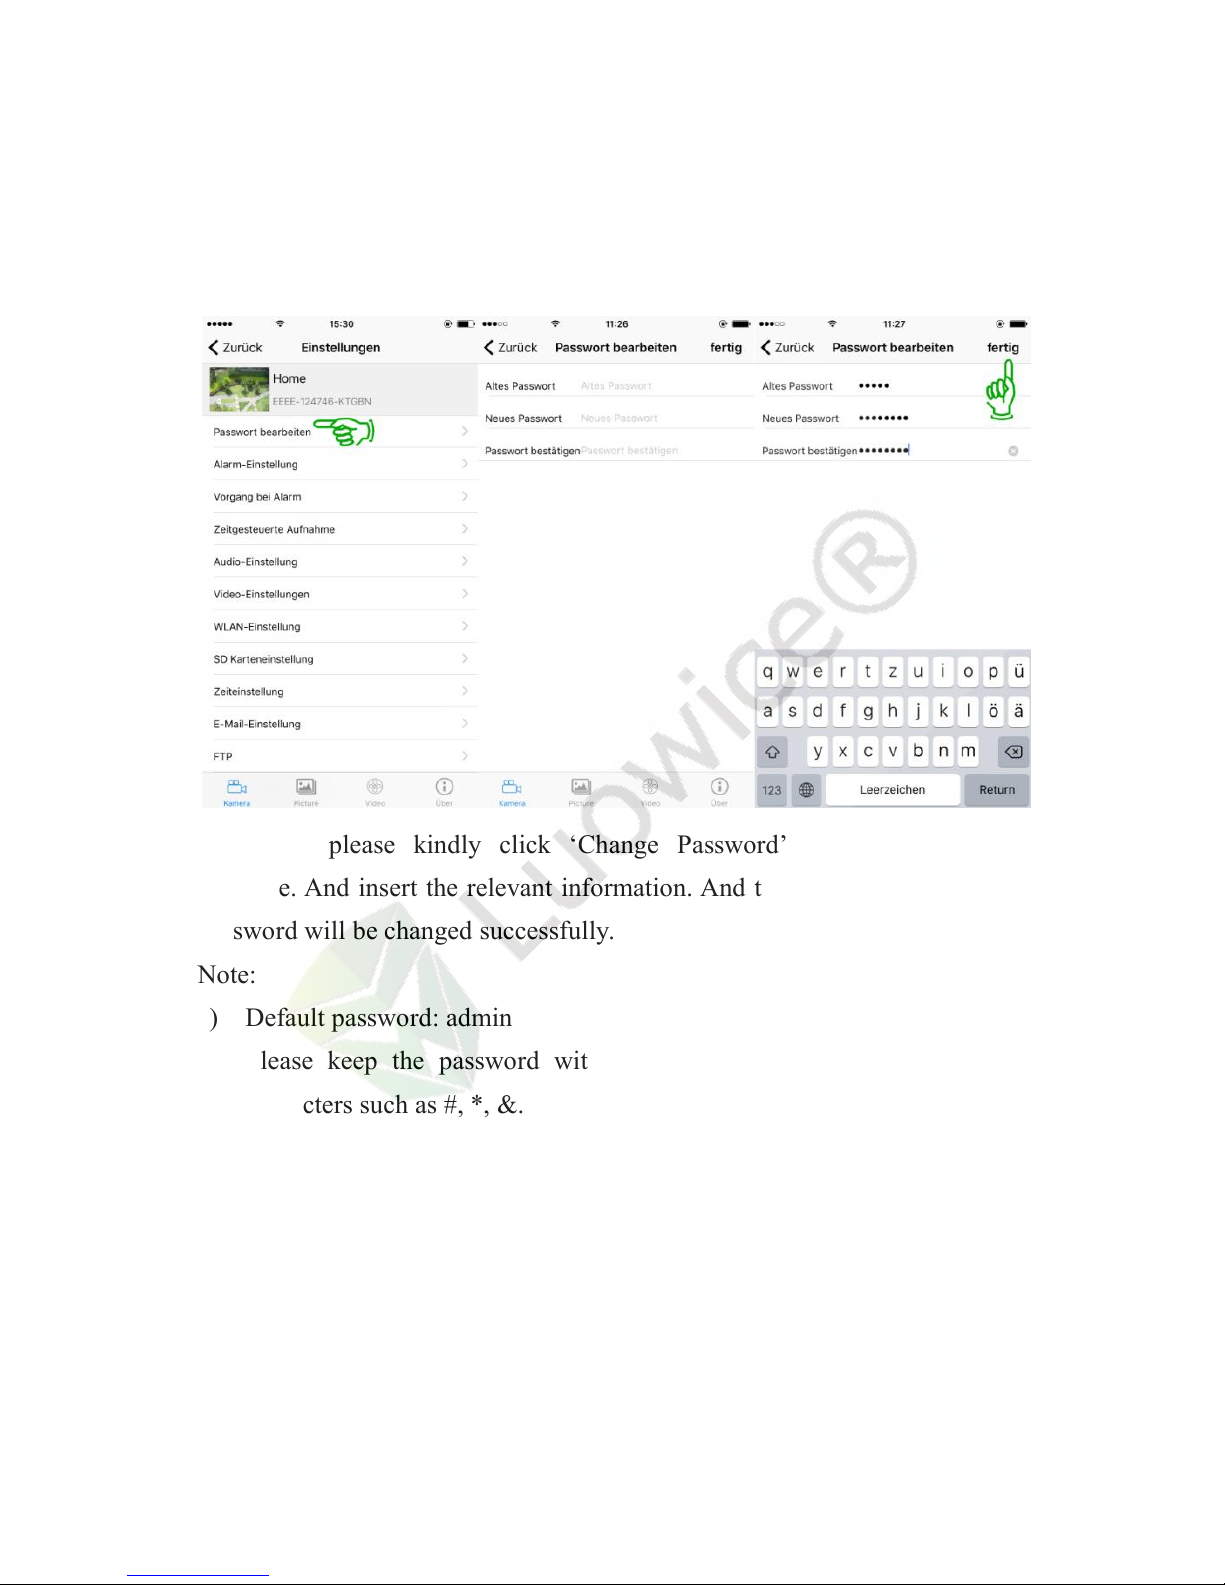
2.3.1 Instruction on Entering the Main Menu
Operation: please kindly open the APP on your phone. And click the
icon after the camera indicating as ‘Online’. And the main menu page will
appear.
Page 30
26
2.3.2 Change Password
Operation: please kindly click ‘Change Password’ on the main menu
interface. And insert the relevant information. And then click ‘Done’ and the
password will be changed successfully.
Note:
a) Default password: admin
b) Please keep the password within 15 letters and avoid using special
characters such as #, *, &.
Page 31
27
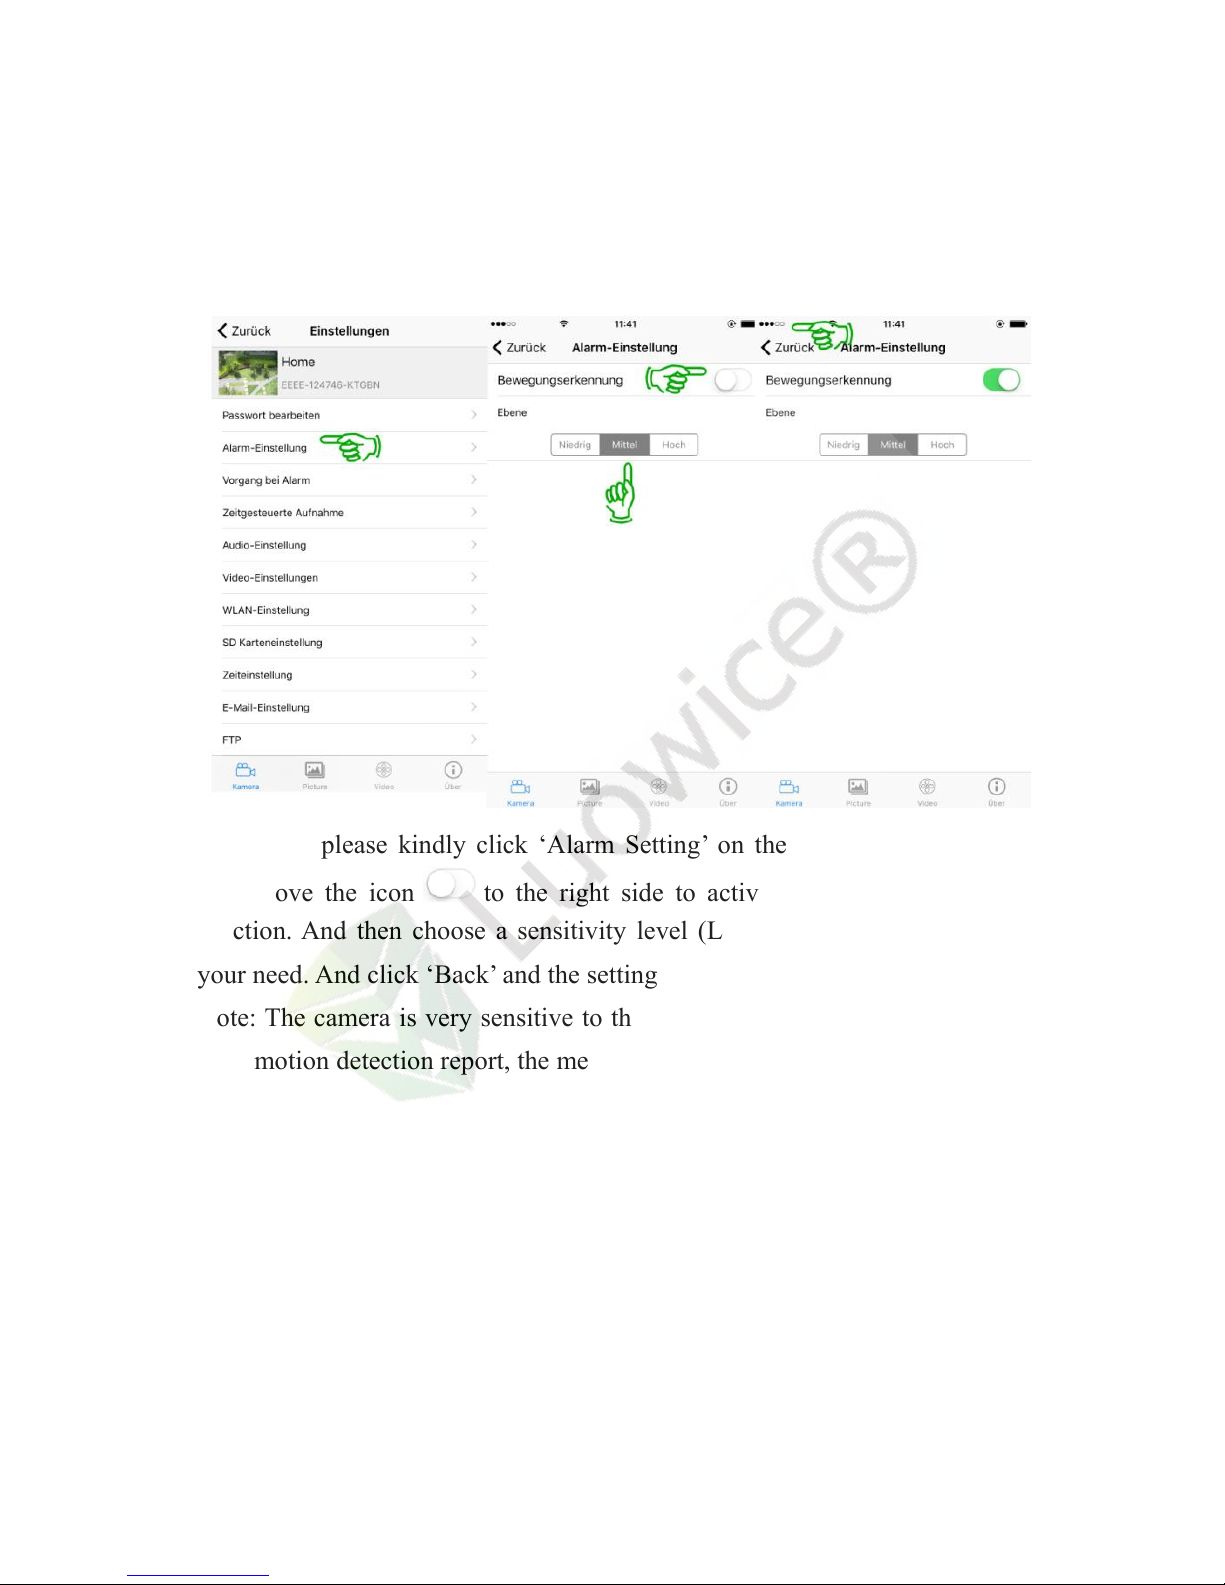
2.3.3 Alarm Setting
Operation: please kindly click ‘Alarm Setting’ on the main menu interface.
And move the icon to the right side to activate the motion detection
function. And then choose a sensitivity level (Low/Medium/High) based on
your need. And click ‘Back’ and the setting will be saved.
Note: The camera is very sensitive to the lightning change. In order to avoid
false motion detection report, the medium sensitivity level is recommended.
Page 32
28
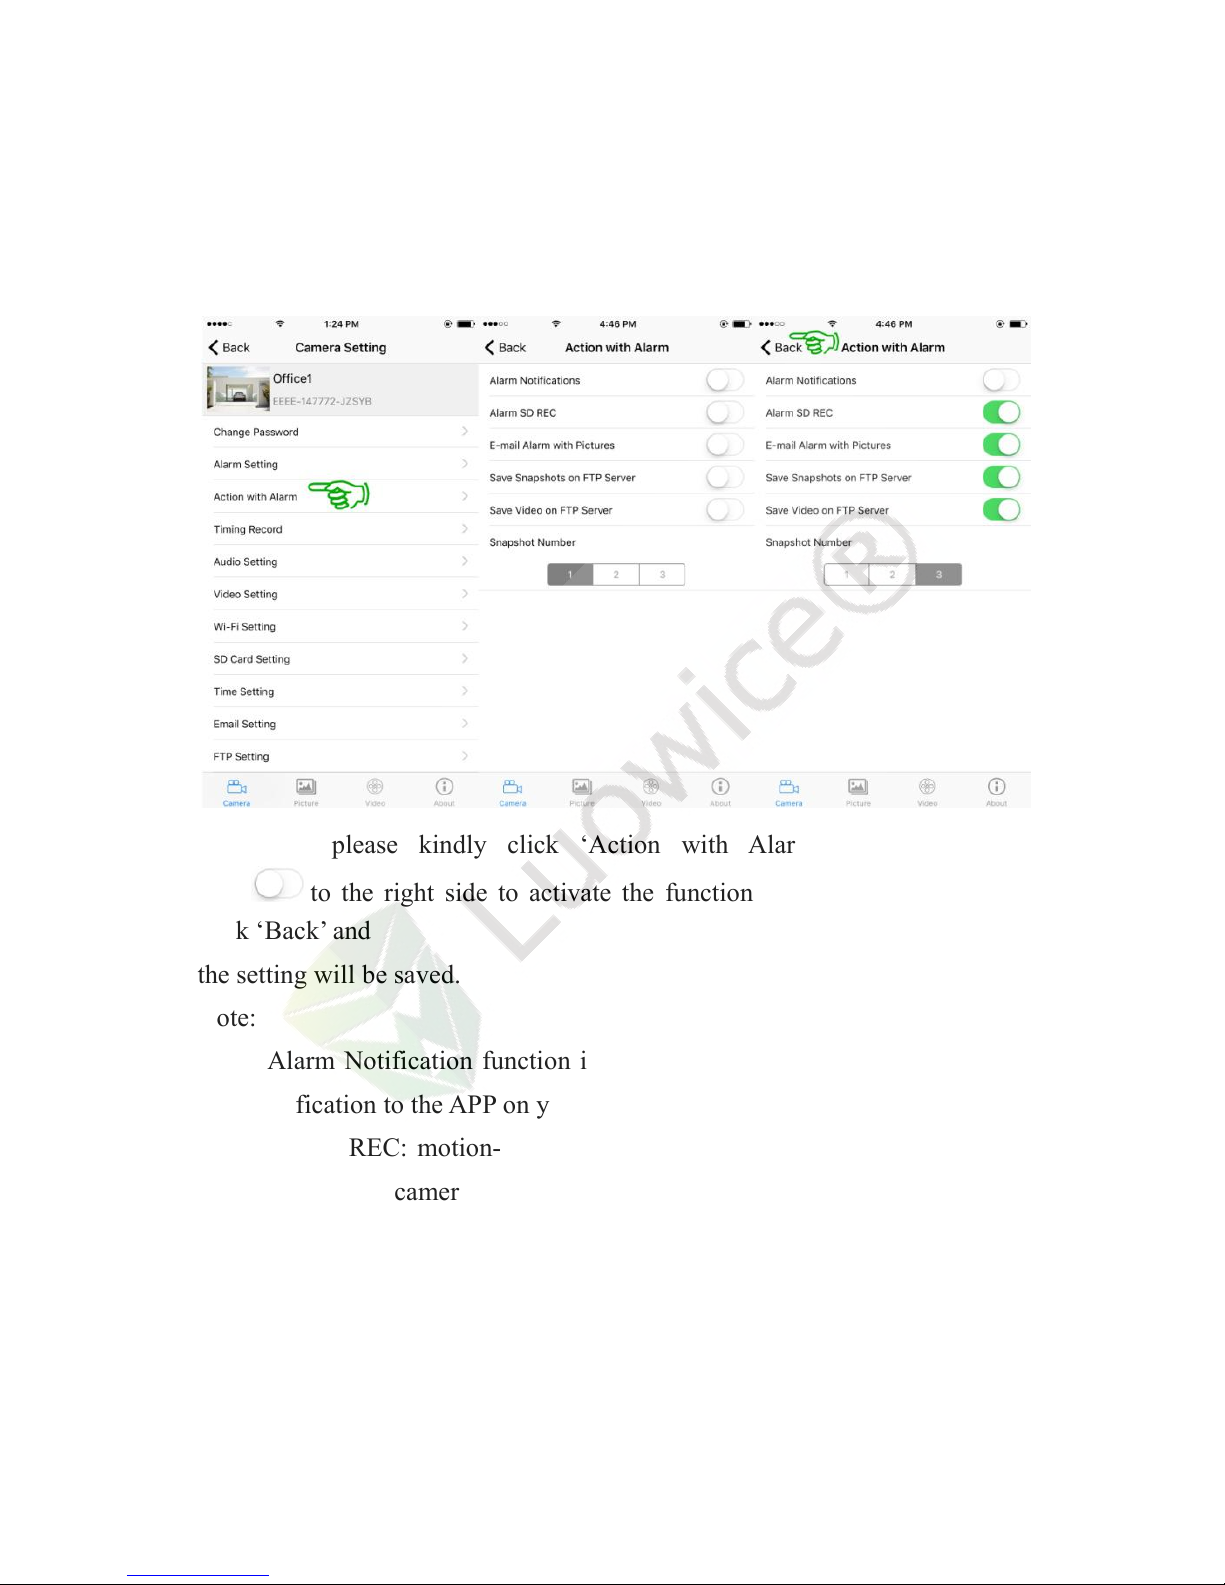
2.3.4 Action with Alarm
Operation: please kindly click ‘Action with Alarm’. And move the
icon to the right side to activate the functions you want to have. And
click ‘Back’ and
the setting will be saved.
Note:
a) the Alarm Notification function is not applicable, which means it can not
push notification to the APP on your phone.
b) Alarm SD REC: motion-triggered video recording stored on the SD card
preinstalled in the camera.
c) E-mail Alarm with Pictures: sending motion-triggered snapshot of moving
items to your email account.
d) Save Snapshots on FTP Server: saving motion-triggered snapshots on your
FTP Server.
Page 33
29
e) Save Video on FTP Server: saving motion-triggered video on your FTP
Server.
f) Snapshot Number: the default snapshot number is 1. You can choose from
1/2/3 based on your need.
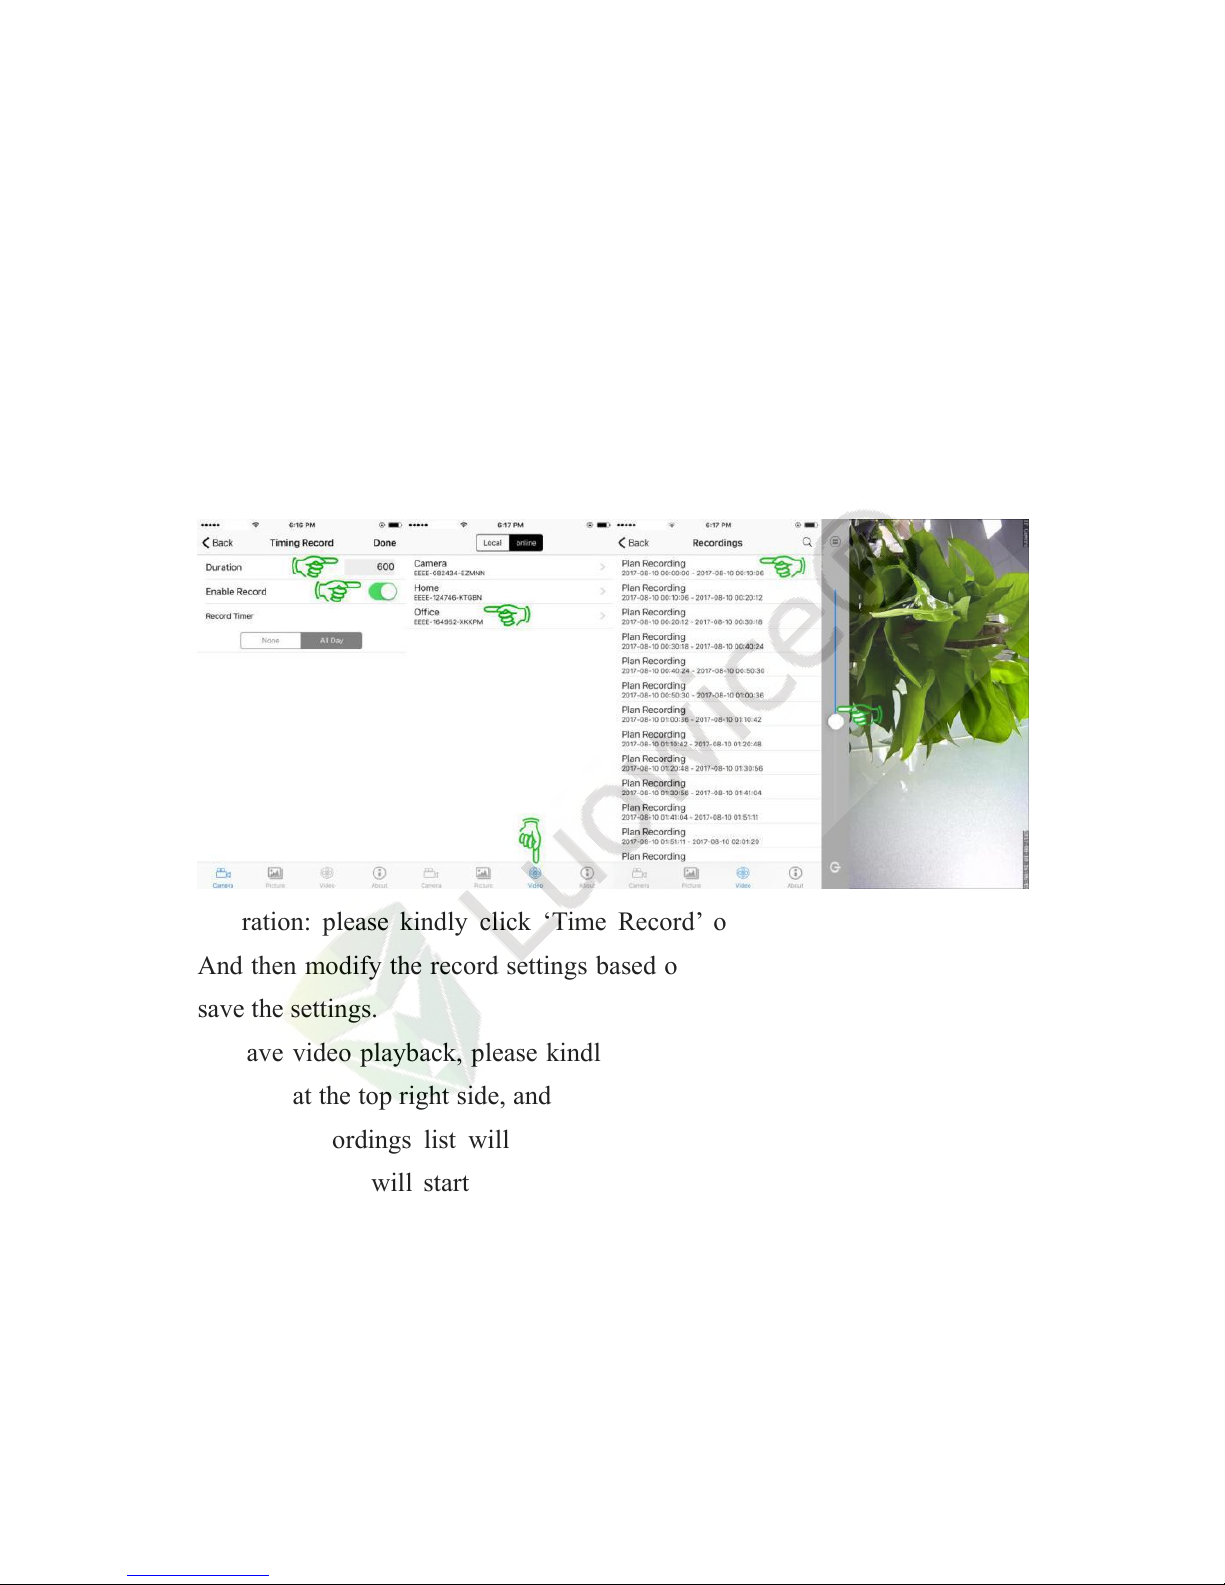
2.3.5 Timing Record
Operation: please kindly click ‘Time Record’ on the main menu interface.
And then modify the record settings based on your need, and click ‘Done’ to
save the settings.
To have video playback, please kindly click ‘Video’ at the bottom, and click
‘Online’ at the top right side, and then click the camera you want to playback.
And the recordings list will show. Choose a time period and click it, the
recorded video will start playback automatically. You can drag the playing
bar to get video playback at a specific time.
Page 34
30
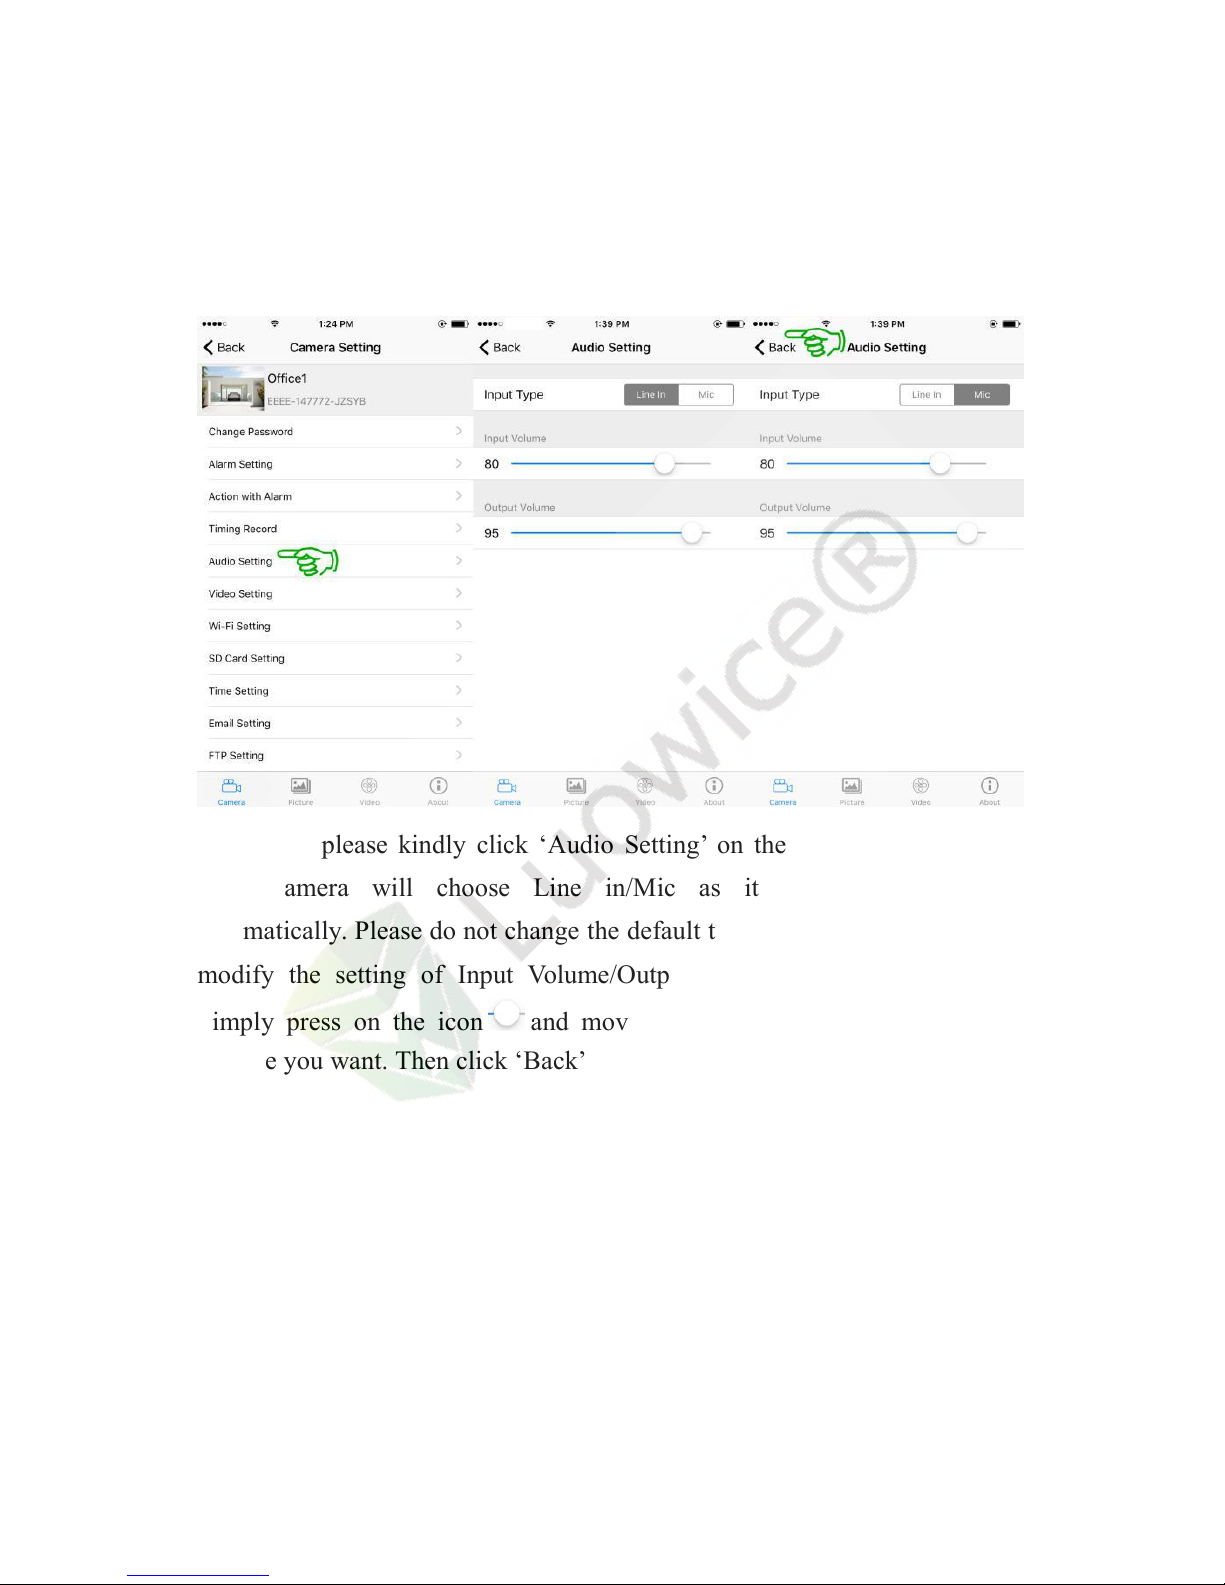
2.3.6 Audio Setting
Operation: please kindly click ‘Audio Setting’ on the main menu interface.
Your camera will choose Line in/Mic as its transmission method
automatically. Please do not change the default transmission method. You can
modify the setting of Input Volume/Output Volume based on you need.
Simply press on the icon and move it to the left/right side to get the
volume you want. Then click ‘Back’ and the setting will be saved.
Page 35
31
2.3.7 Video Setting
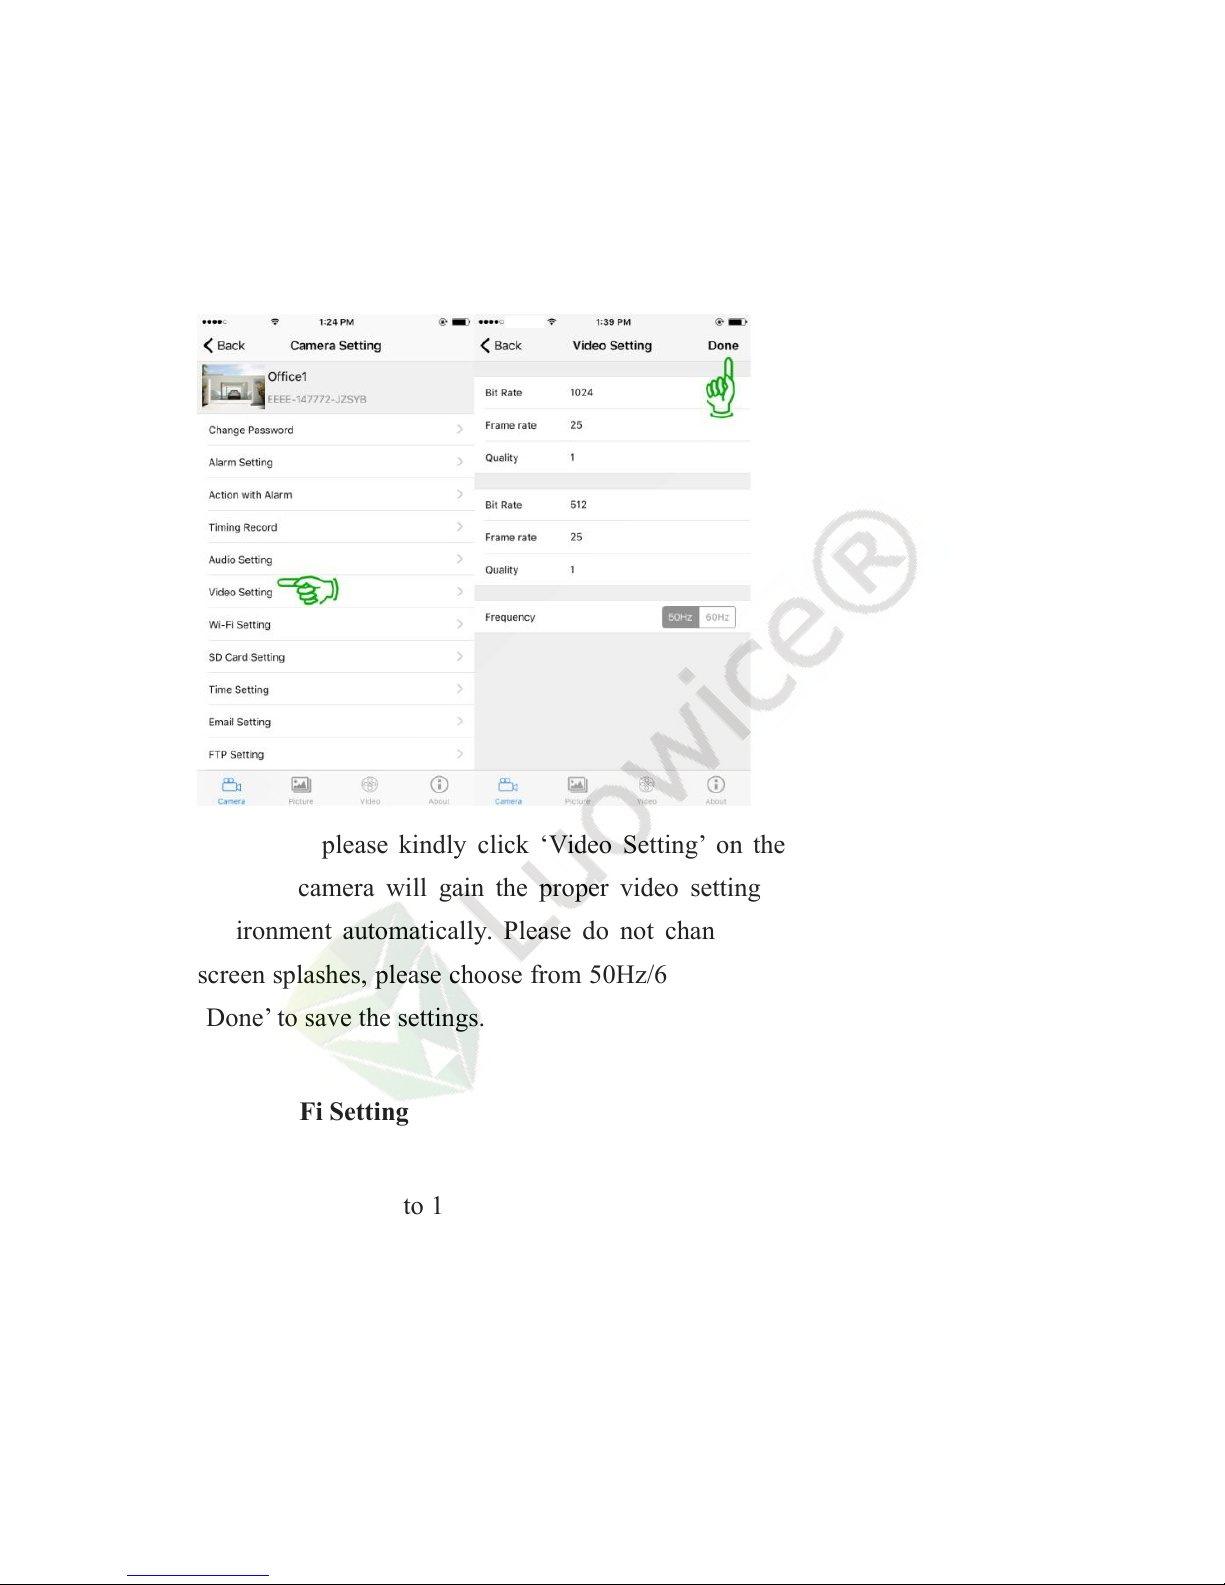
Operation: please kindly click ‘Video Setting’ on the main menu interface.
And the camera will gain the proper video setting based on your network
environment automatically. Please do not change the default setting. If the
screen splashes, please choose from 50Hz/60Hz to fix the problem. And click
‘Done’ to save the settings.
2.3.8 Wi-Fi Setting
Please kindly refer to 1.3.5 Remote View Setup.
Page 36
32
2.3.9 SD Card Setting
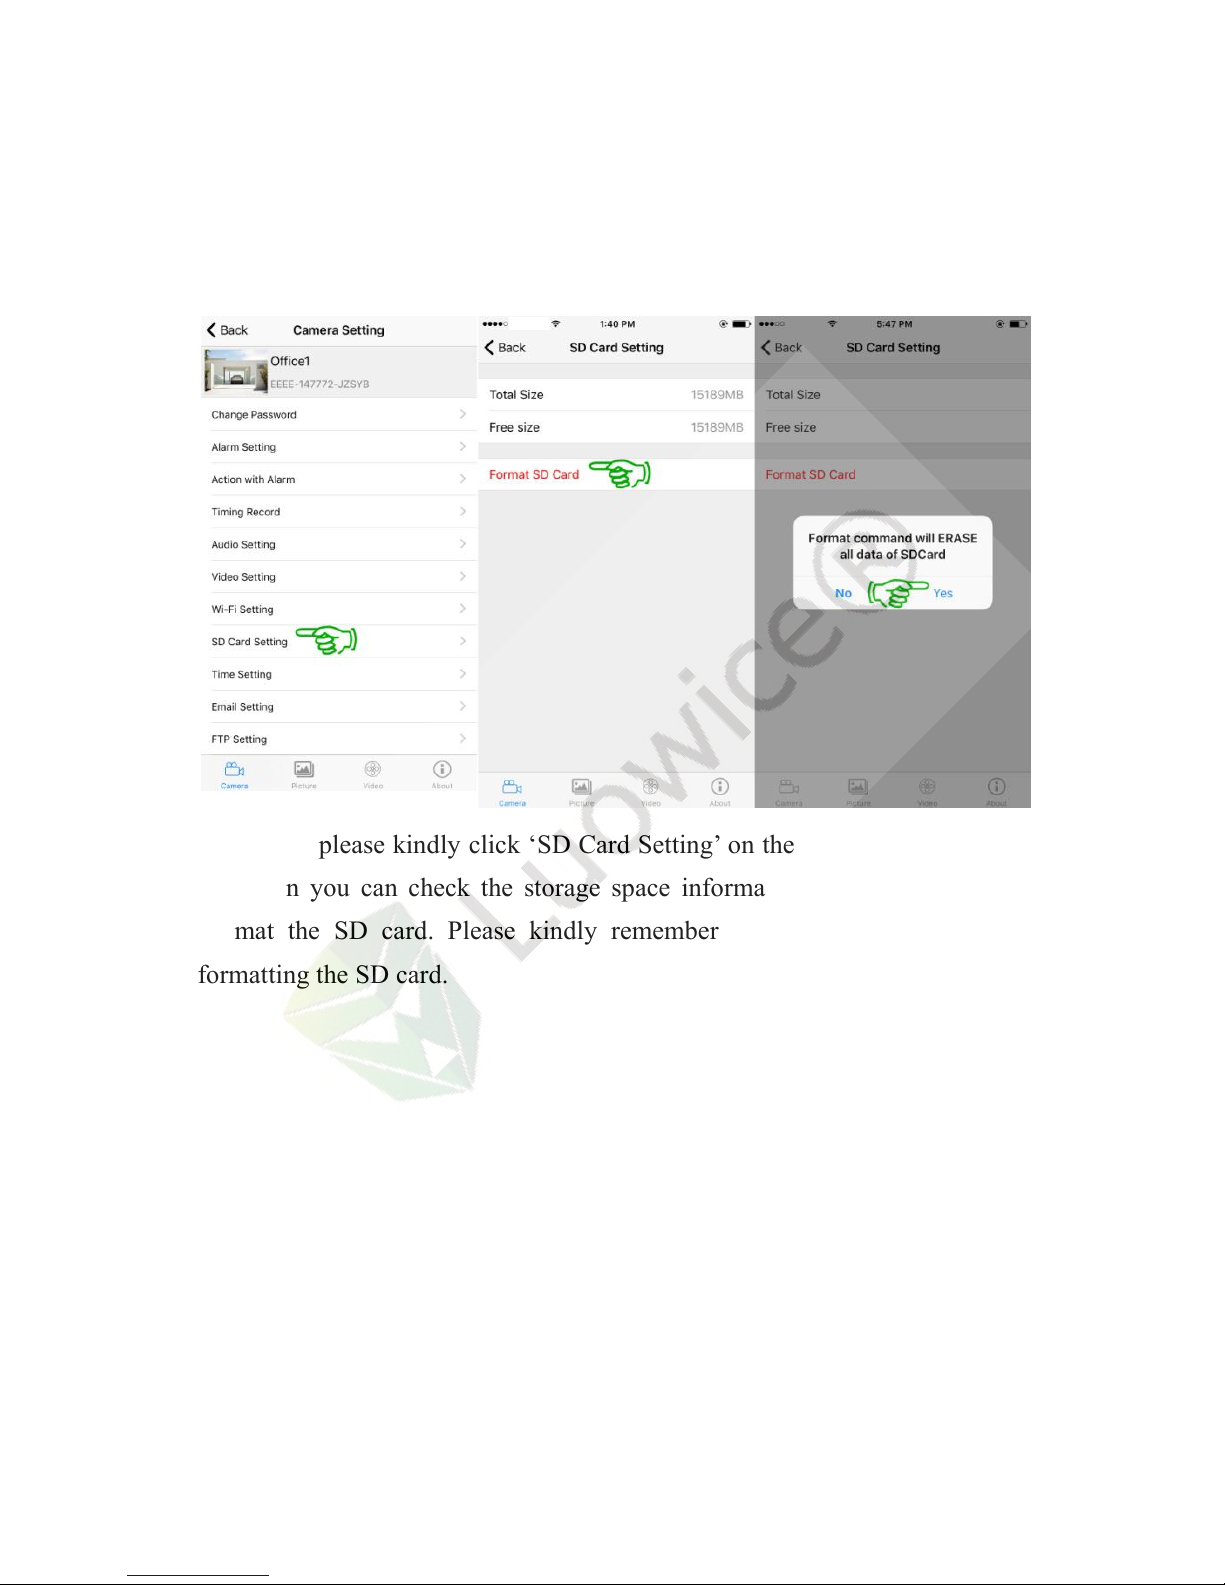
Operation: please kindly click ‘SD Card Setting’ on the main menu interface.
And then you can check the storage space information of the SD card. Or
Format the SD card. Please kindly remember to backup the data before
formatting the SD card.
Page 37
33
2.3.10 Time Setting
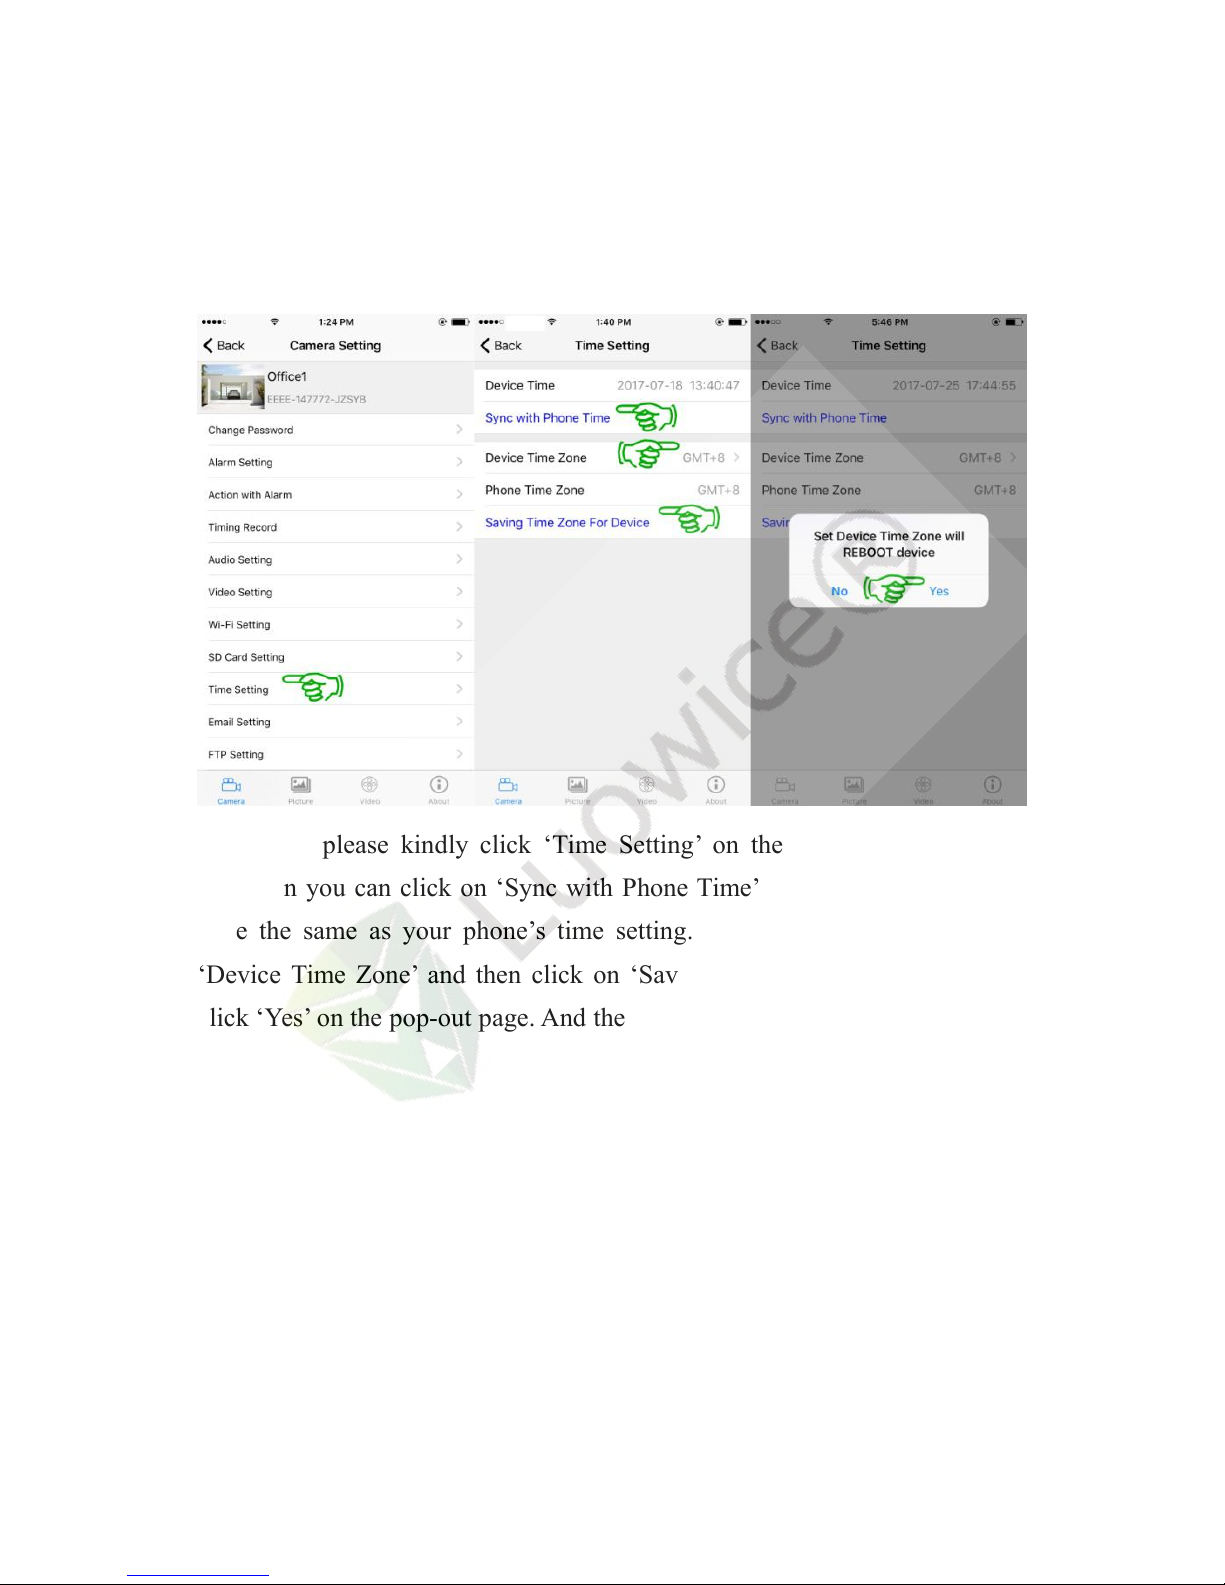
Operation: please kindly click ‘Time Setting’ on the main menu interface.
And then you can click on ‘Sync with Phone Time’ to make the device time
zone the same as your phone’s time setting. Or you can choose to set up
‘Device Time Zone’ and then click on ‘Saving Time Zone For Device’ and
click ‘Yes’ on the pop-out page. And then click ‘Back’ to save all the settings.
Page 38
34
2.3.11 Email Setting: to set up email alert function
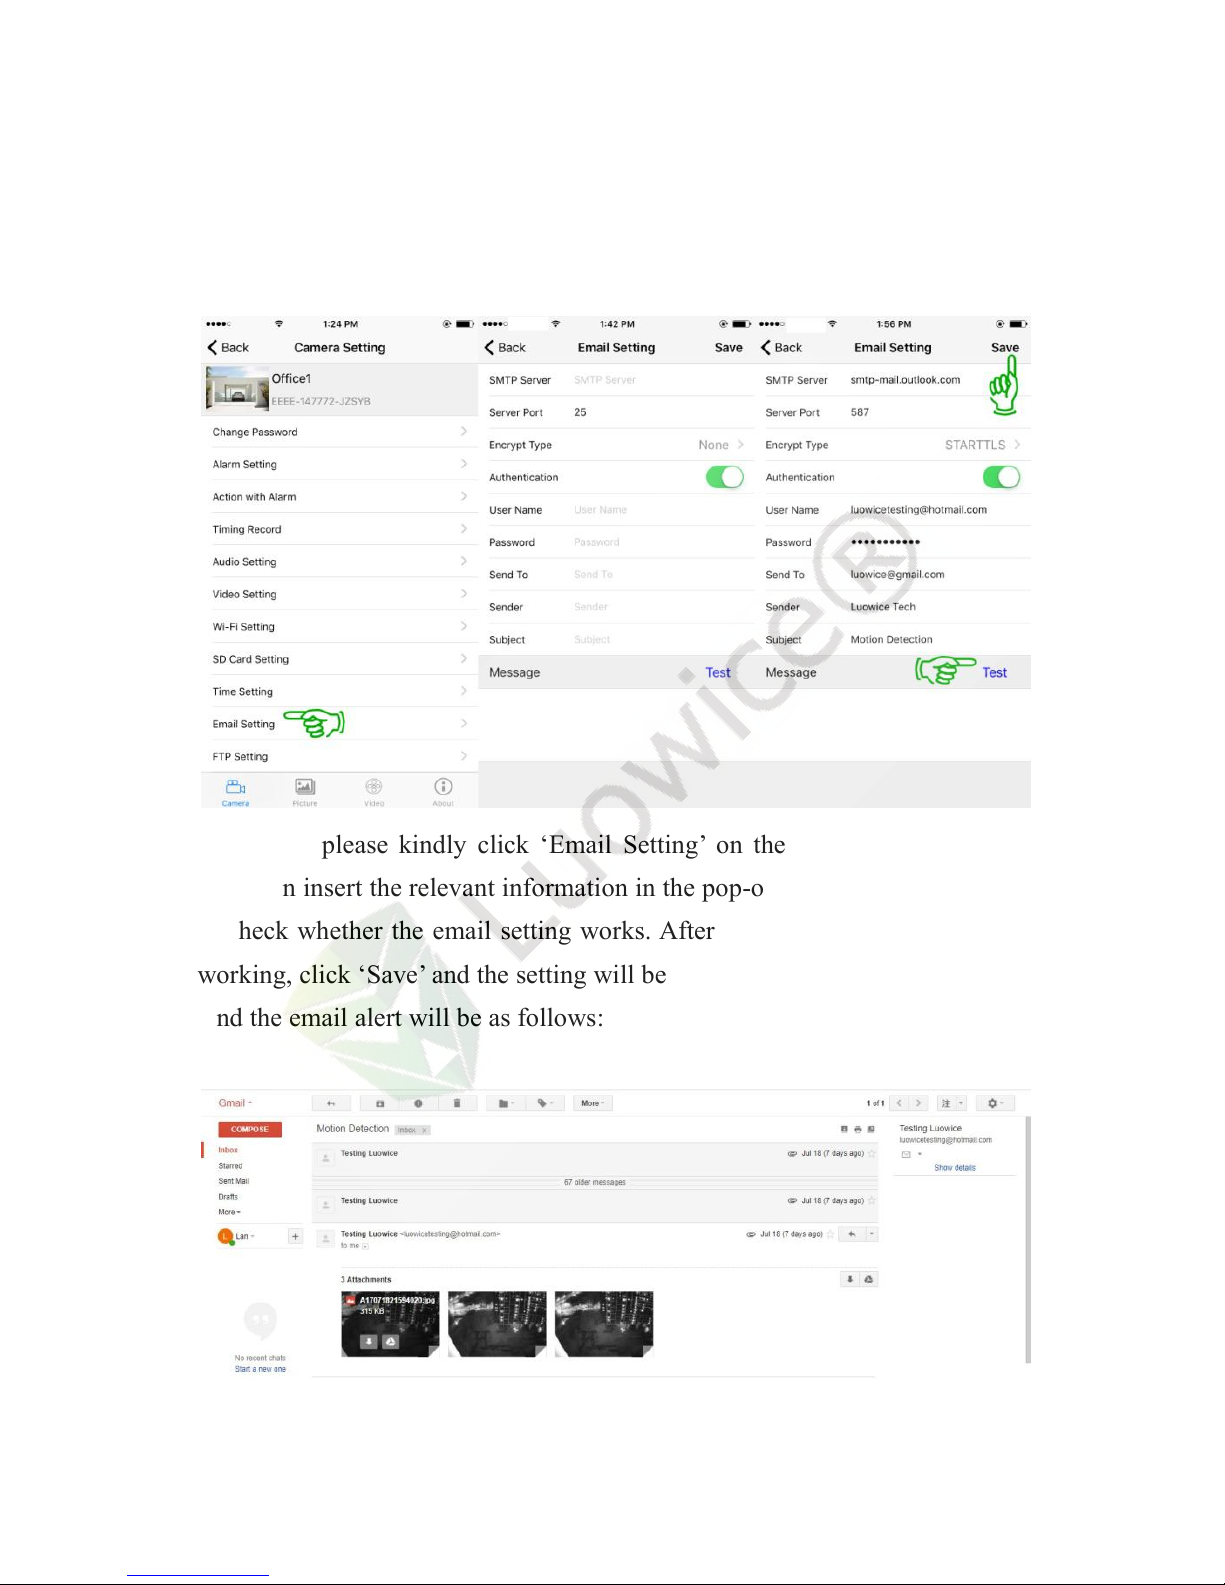
Operation: please kindly click ‘Email Setting’ on the main menu interface.
And then insert the relevant information in the pop-out page. Then click ‘Test’
to check whether the email setting works. After confirming the email setting
working, click ‘Save’ and the setting will be successful.
And the email alert will be as follows:
Page 39
35
Note:
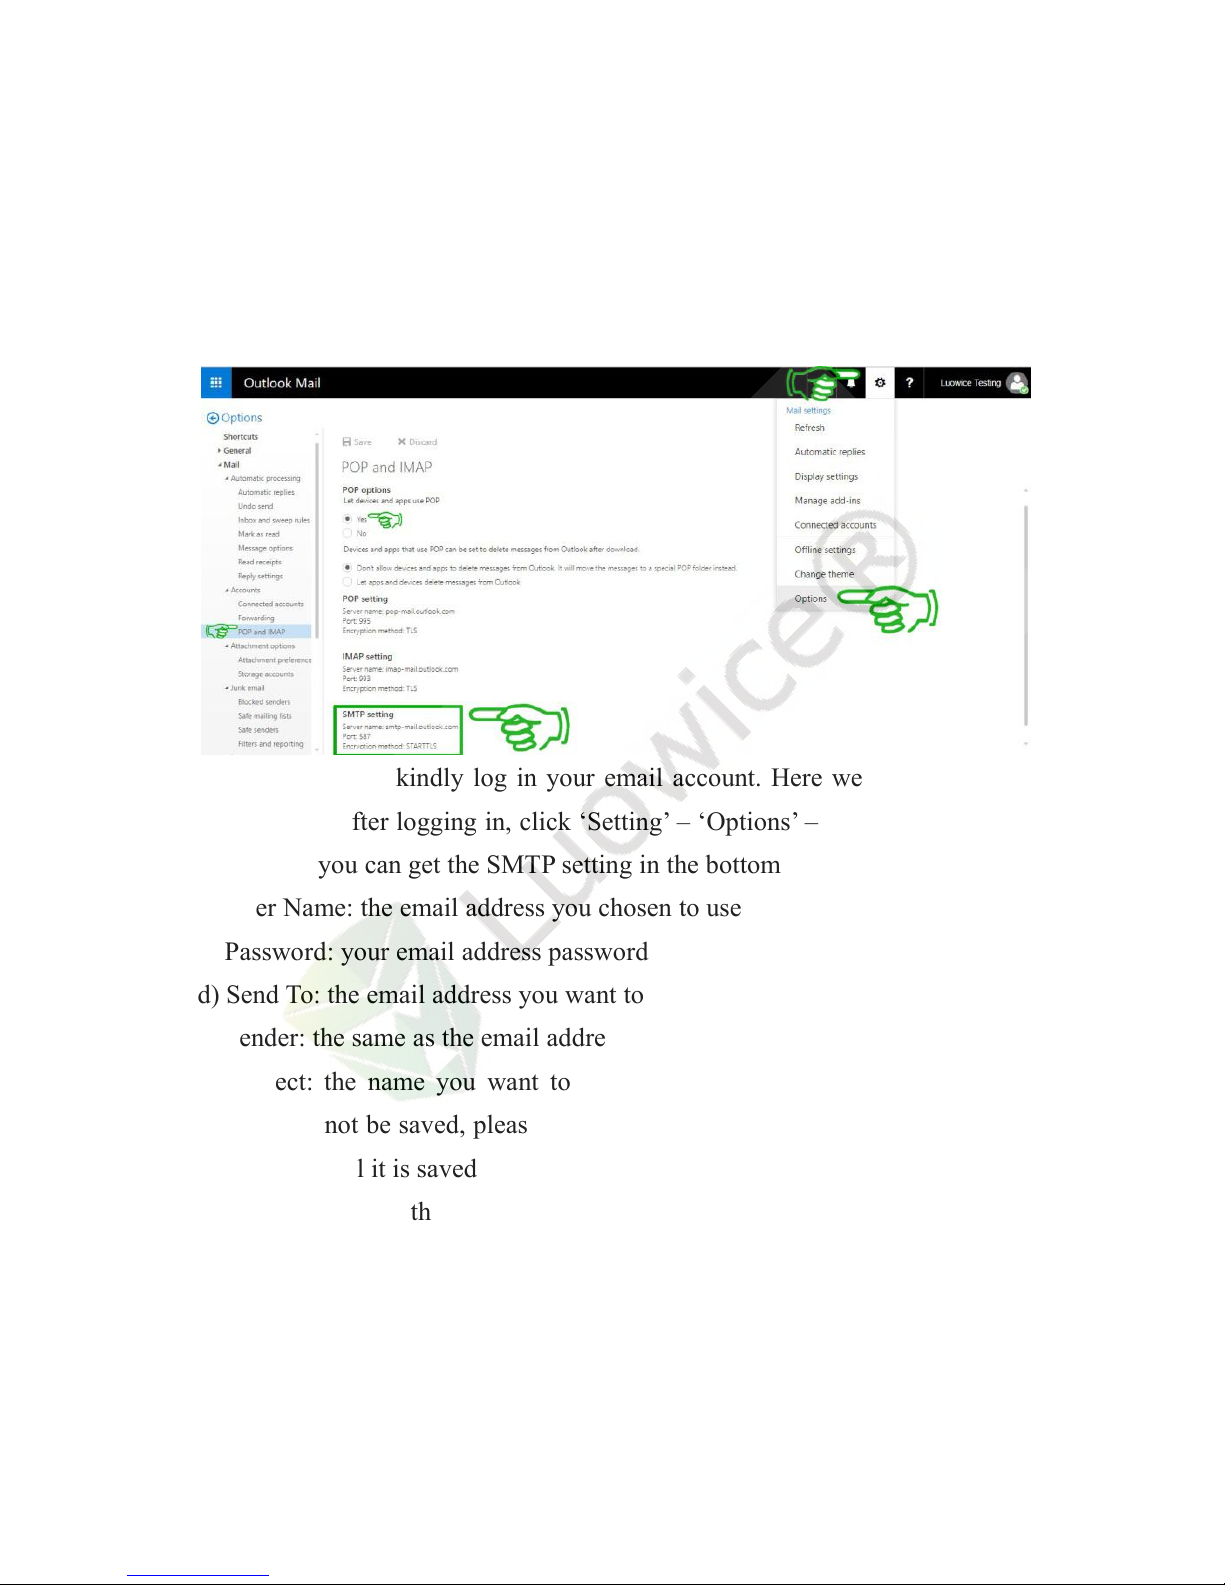
a) please get your SMTP Server information from the email account you
want to use as ‘Sender’.
Operation: please kindly log in your email account. Here we use hotmail as
an example. After logging in, click ‘Setting’ – ‘Options’ – ‘POP and IMAP’ –
‘Yes’. And you can get the SMTP setting in the bottom of the page.
b) User Name: the email address you chosen to use as ‘Sender’
c) Password: your email address password
d) Send To: the email address you want to use as receiver of the alert
e) Sender: the same as the email address you insert in ‘User Name’
f) Subject: the name you want to use as the title of the email alert. If the
subject can not be saved, please kindly change it to another subject and try to
save again until it is saved successfully.
g) Sometimes even the ‘Test’ result indicates as ‘Test Failed’, the setting is in
fact working. If you confirm that all the settings are correct, but still can not
get the test successful, please kindly check the ‘Sender’ email account to see
whether it sends out testing mail to the receiver email account. If yes, you
Page 40
36
can go directly to click on ‘Save’. And the Email Setting is successful then.
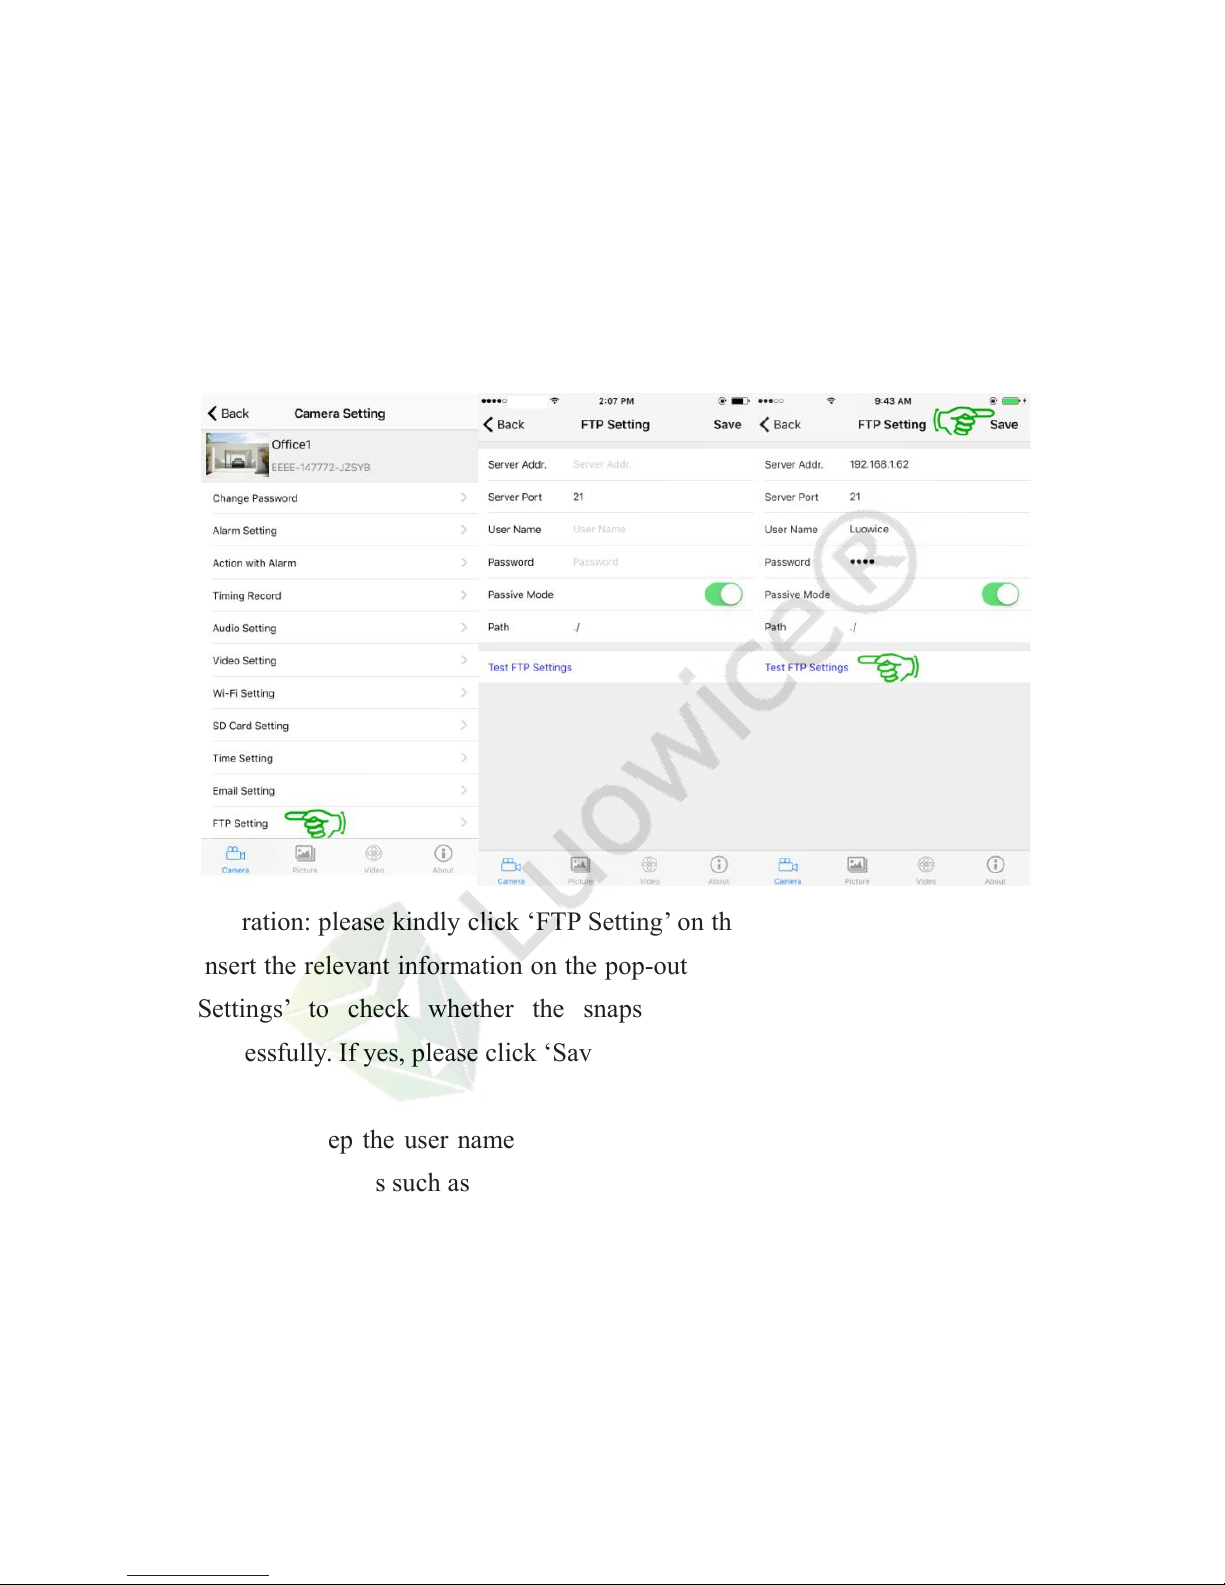
2.3.12 FTP Setting
Operation: please kindly click ‘FTP Setting’ on the main menu interface. And
insert the relevant information on the pop-out page. And then click ‘Test FTP
Settings’ to check whether the snapshots/videos are sent to the FTP
successfully. If yes, please click ‘Save’ and the setting is successful then.
Note:
a) please keep the user name and password within 8 letters and avoid using
special characters such as #, &.
b) if you confirm that all the information are correct, but the testing result
keeps indicating ‘Test failed’, please log in your FTP server to check whether
snapshots/videos are received successfully. If yes, go directly click on ‘Save’
and the setting is successful then.
Page 41
37
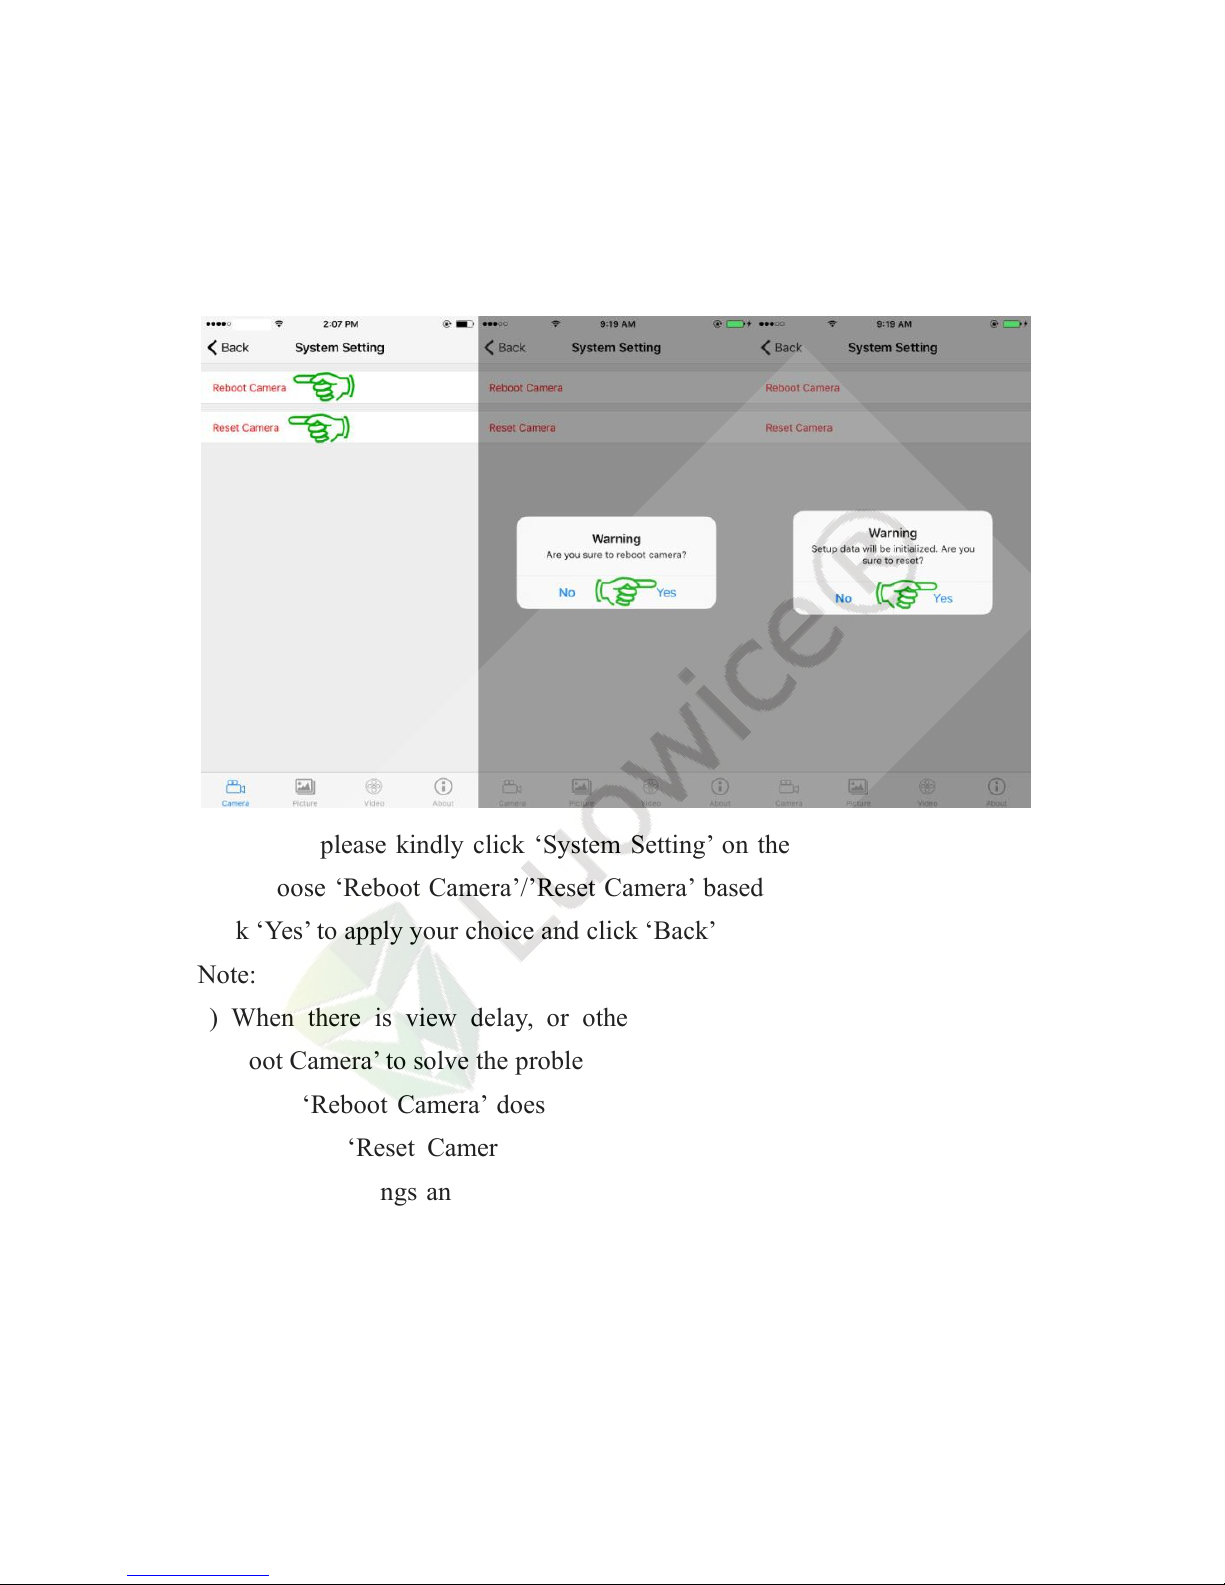
2.3.13 System Setting
Operation: please kindly click ‘System Setting’ on the main menu interface.
And choose ‘Reboot Camera’/’Reset Camera’ based on your need. And then
click ‘Yes’ to apply your choice and click ‘Back’ to save all the settings.
Note:
a) When there is view delay, or other abnormal situation, please choose
‘Reboot Camera’ to solve the problem.
b) When ‘Reboot Camera’ does not work, or the camera cannot be viewed,
please apply ‘Reset Camera’. Please kindly note that ‘Reset Camera’ will
erase all the settings and the camera needs to be paired to your phone again,
just like a new camera. But the video records are still stored in the SD card.
Page 42
38
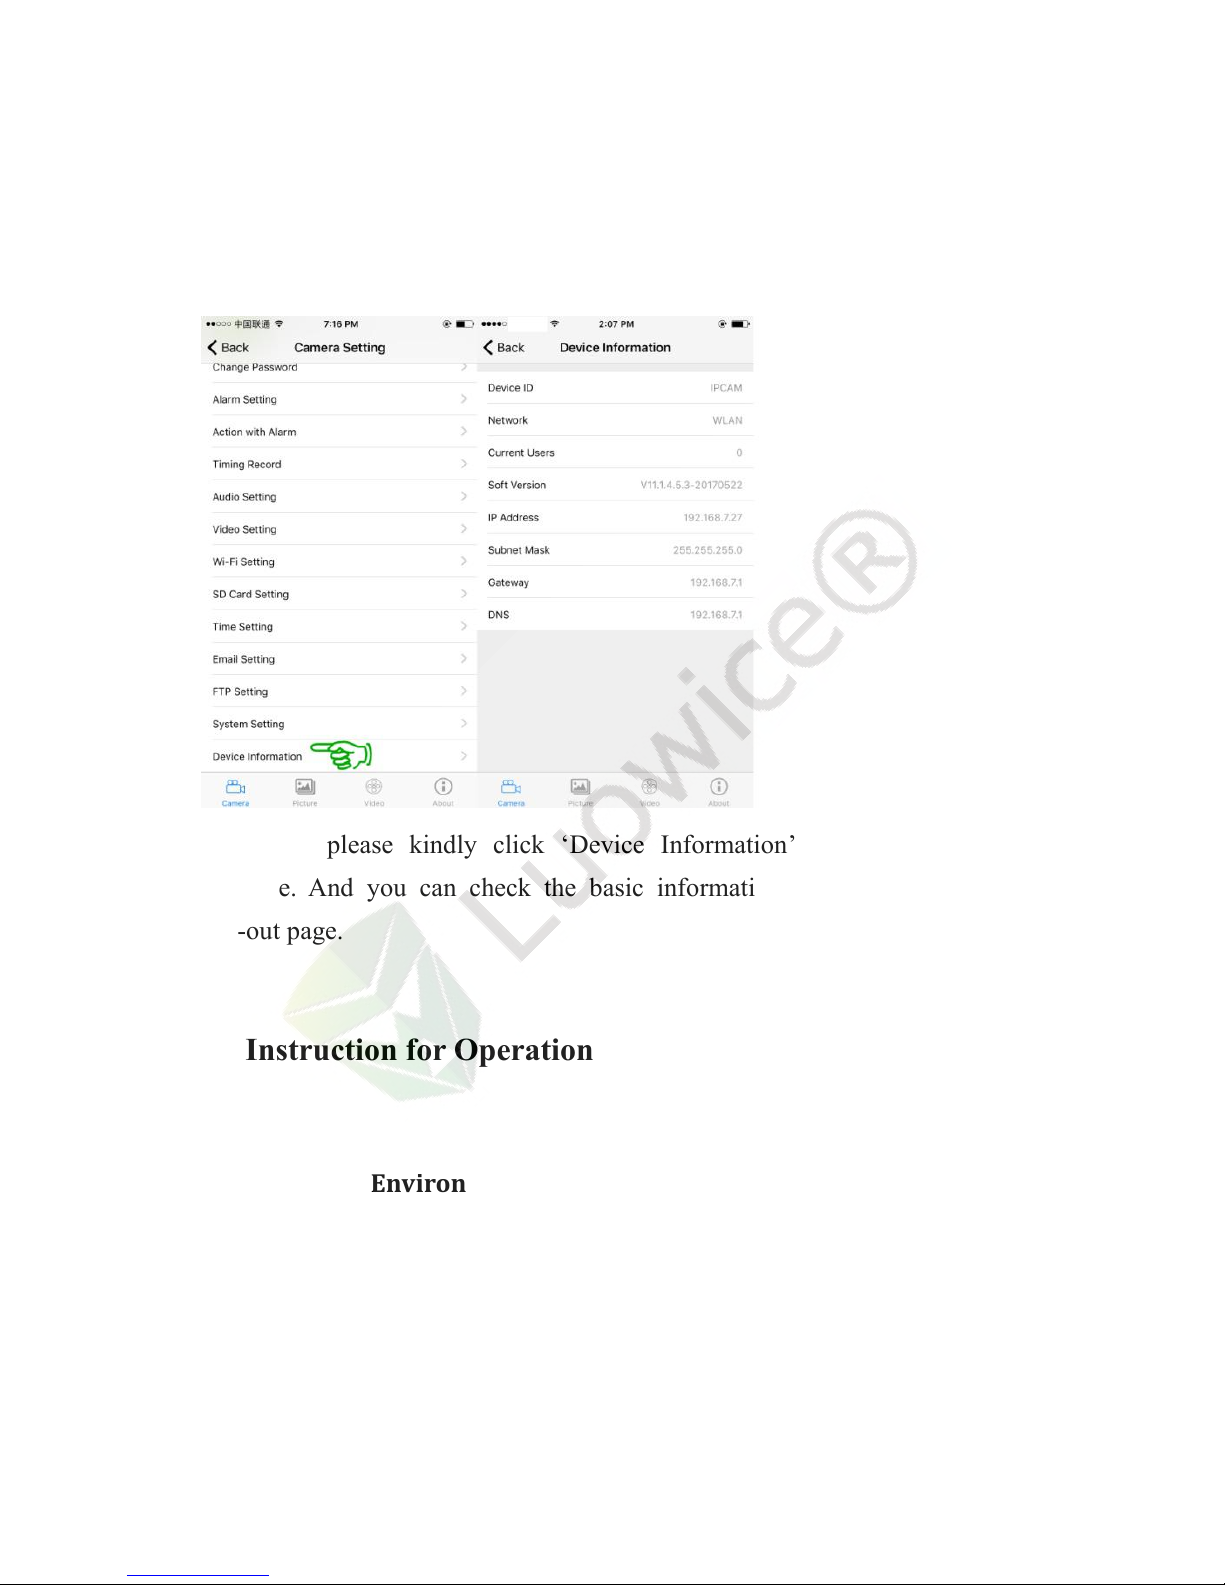
2.3.14 Device Information
Operation: please kindly click ‘Device Information’ on the main menu
interface. And you can check the basic information of the device on the
pop-out page.
3. Instruction for Operation on PC Client
3.1 Operation Environment
Hardware environment:
a) Pentium IV series, CPU basic frequency not smaller than 2.0G;
b) Memory not smaller than 2G;
Page 43
39
c) Hard disk not smaller than 120G;
d) Display resolution not smaller than 1024 x 768.
Software environment:
Windows2000/Windows XP/Windows2003/Windows Vista/Windows7/Windows8
3.2 Default Setting of PC Client
The address to download PC Client for the camera: cd.sxt123.com/k
Please kindly download the PC Client (HiP2P Client) and install it on your
PC.
The default User Name of the PC Client: admin (cannot be modified).
Password: none (means leaving it blank).
3.3 PC Client Interface Instruction
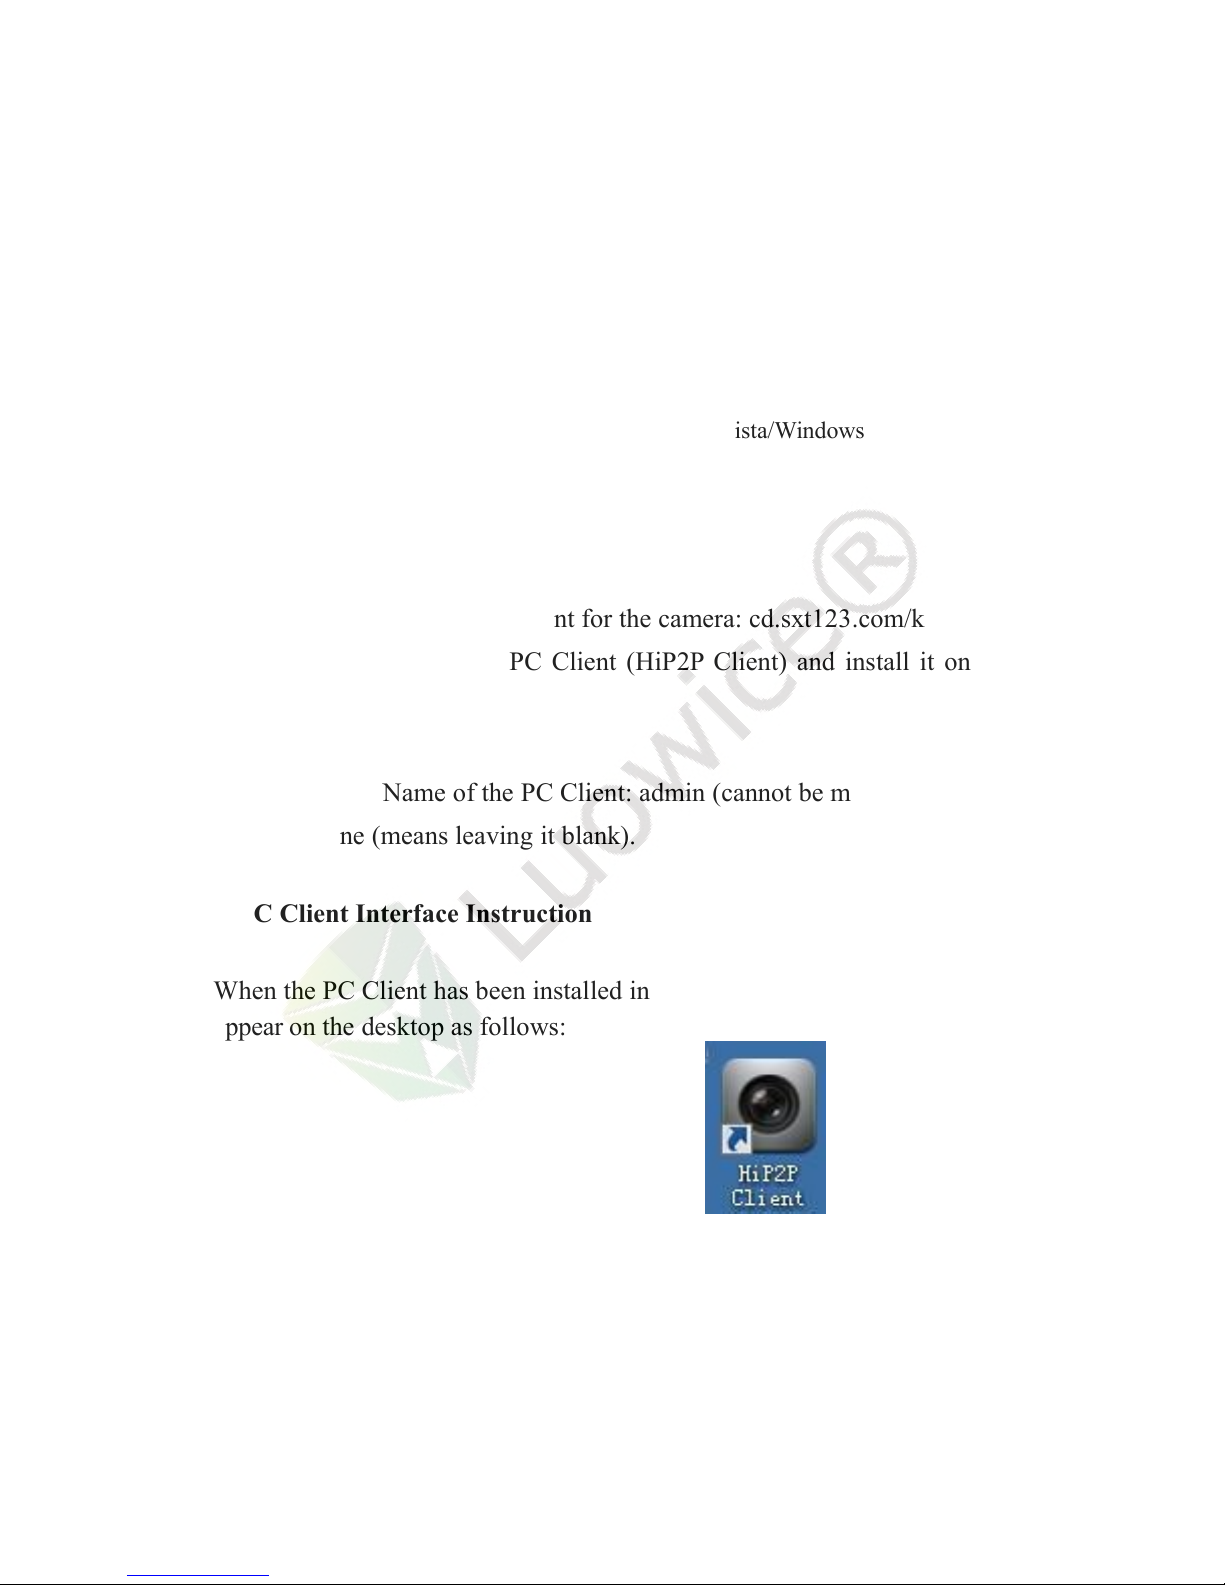
When the PC Client has been installed in your PC successfully, its icon will
appear on the desktop as follows:
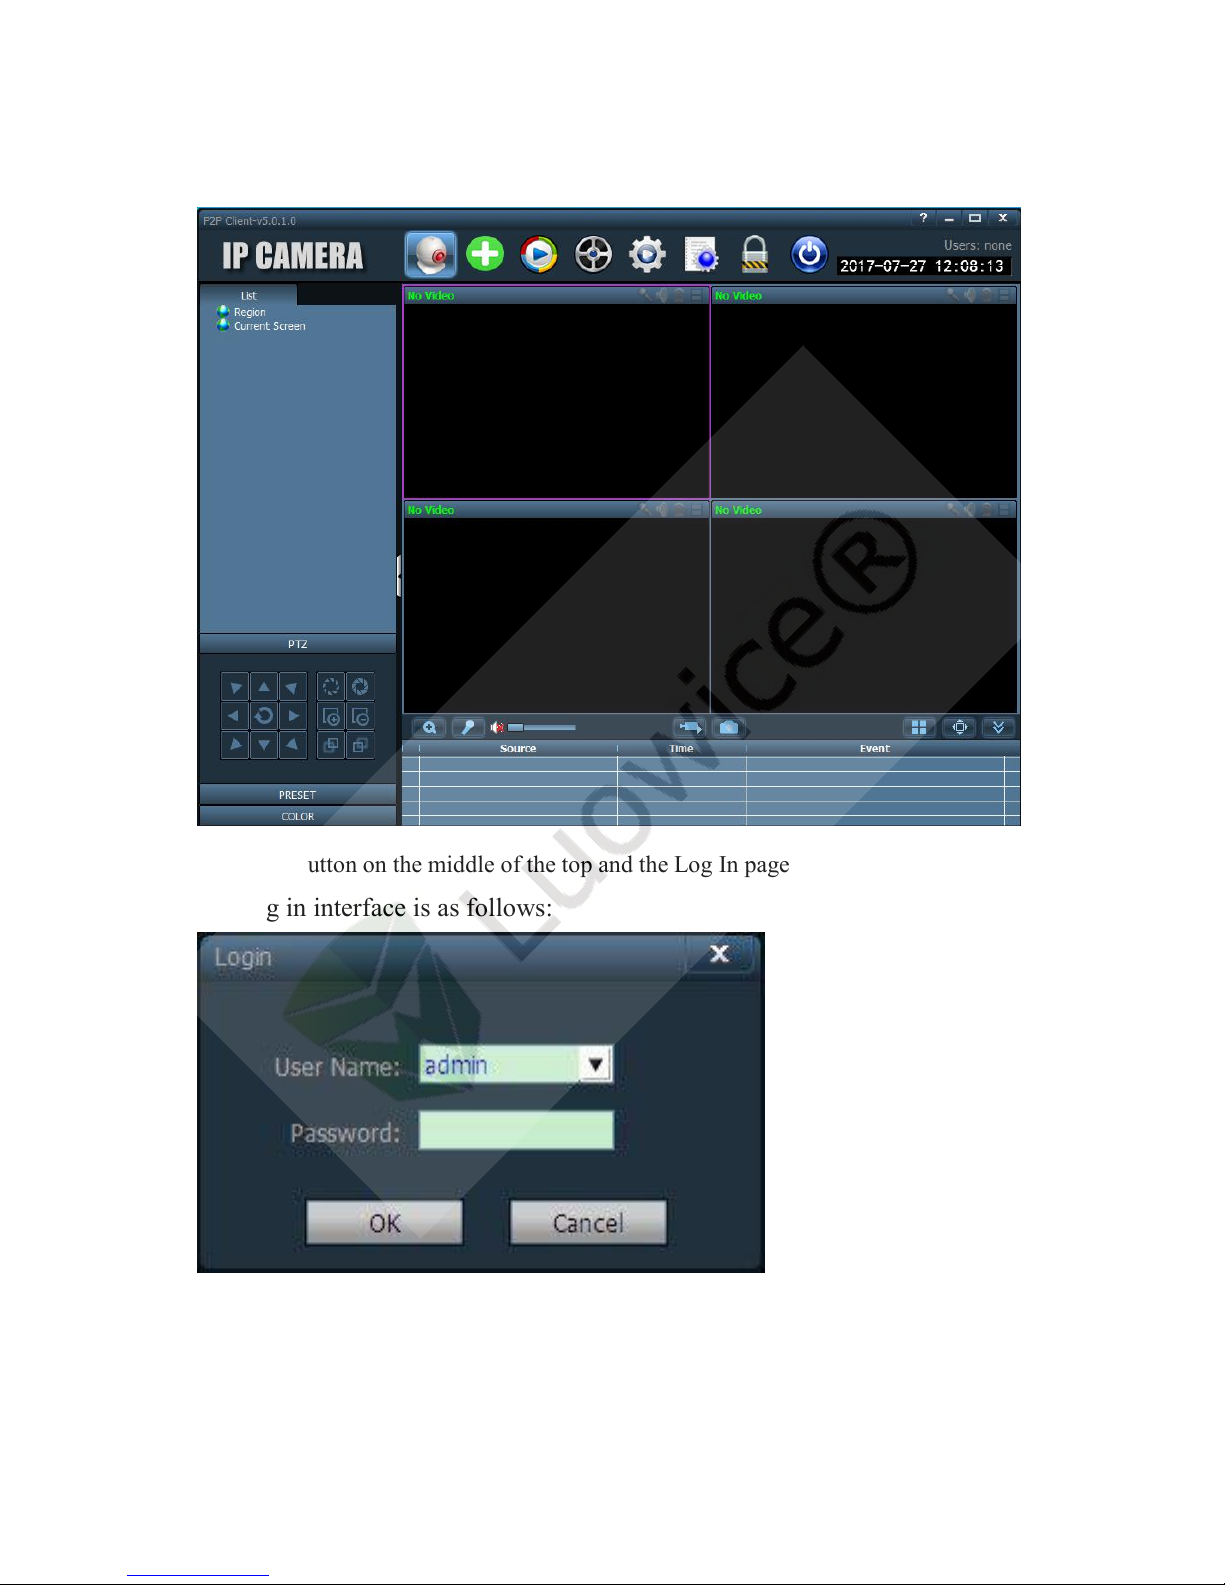
Double click the icon, and the default interface is as follows:
Page 44
40
Click any button on the middle of the top and the Log In page will pop out.
The log in interface is as follows:
Default user name: admin, and can not be modified.
Password: no password , just leave it blank and click ‘OK’ to log in.
Page 45
41
Note: please kindly note that only the users with admin permissions can exit
the PC client. Common user and guest can not exit the PC client.
3.4 PC Client Operation Instruction
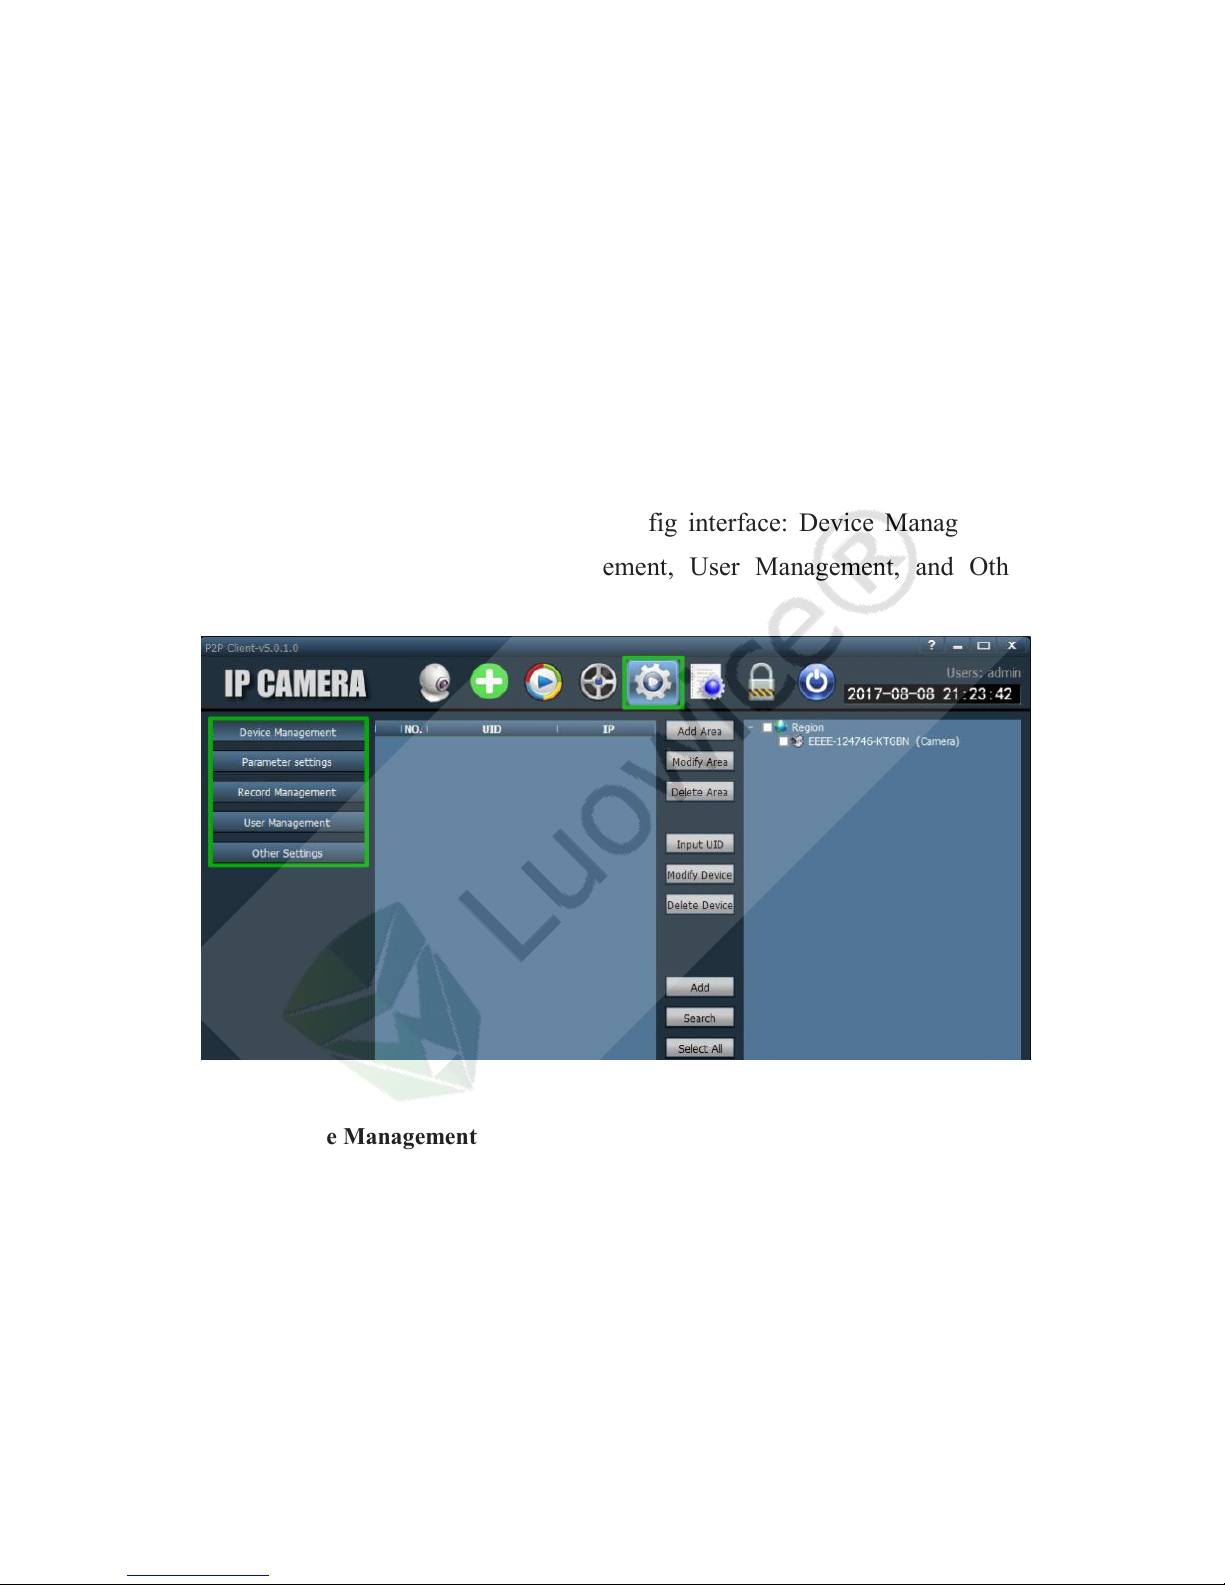
3.4.1 The Config Interface
There are five sub categories on the config interface: Device Management,
Parameter settings, Reocord Management, User Management, and Other
Settings.
3.4.1.1 Device Management
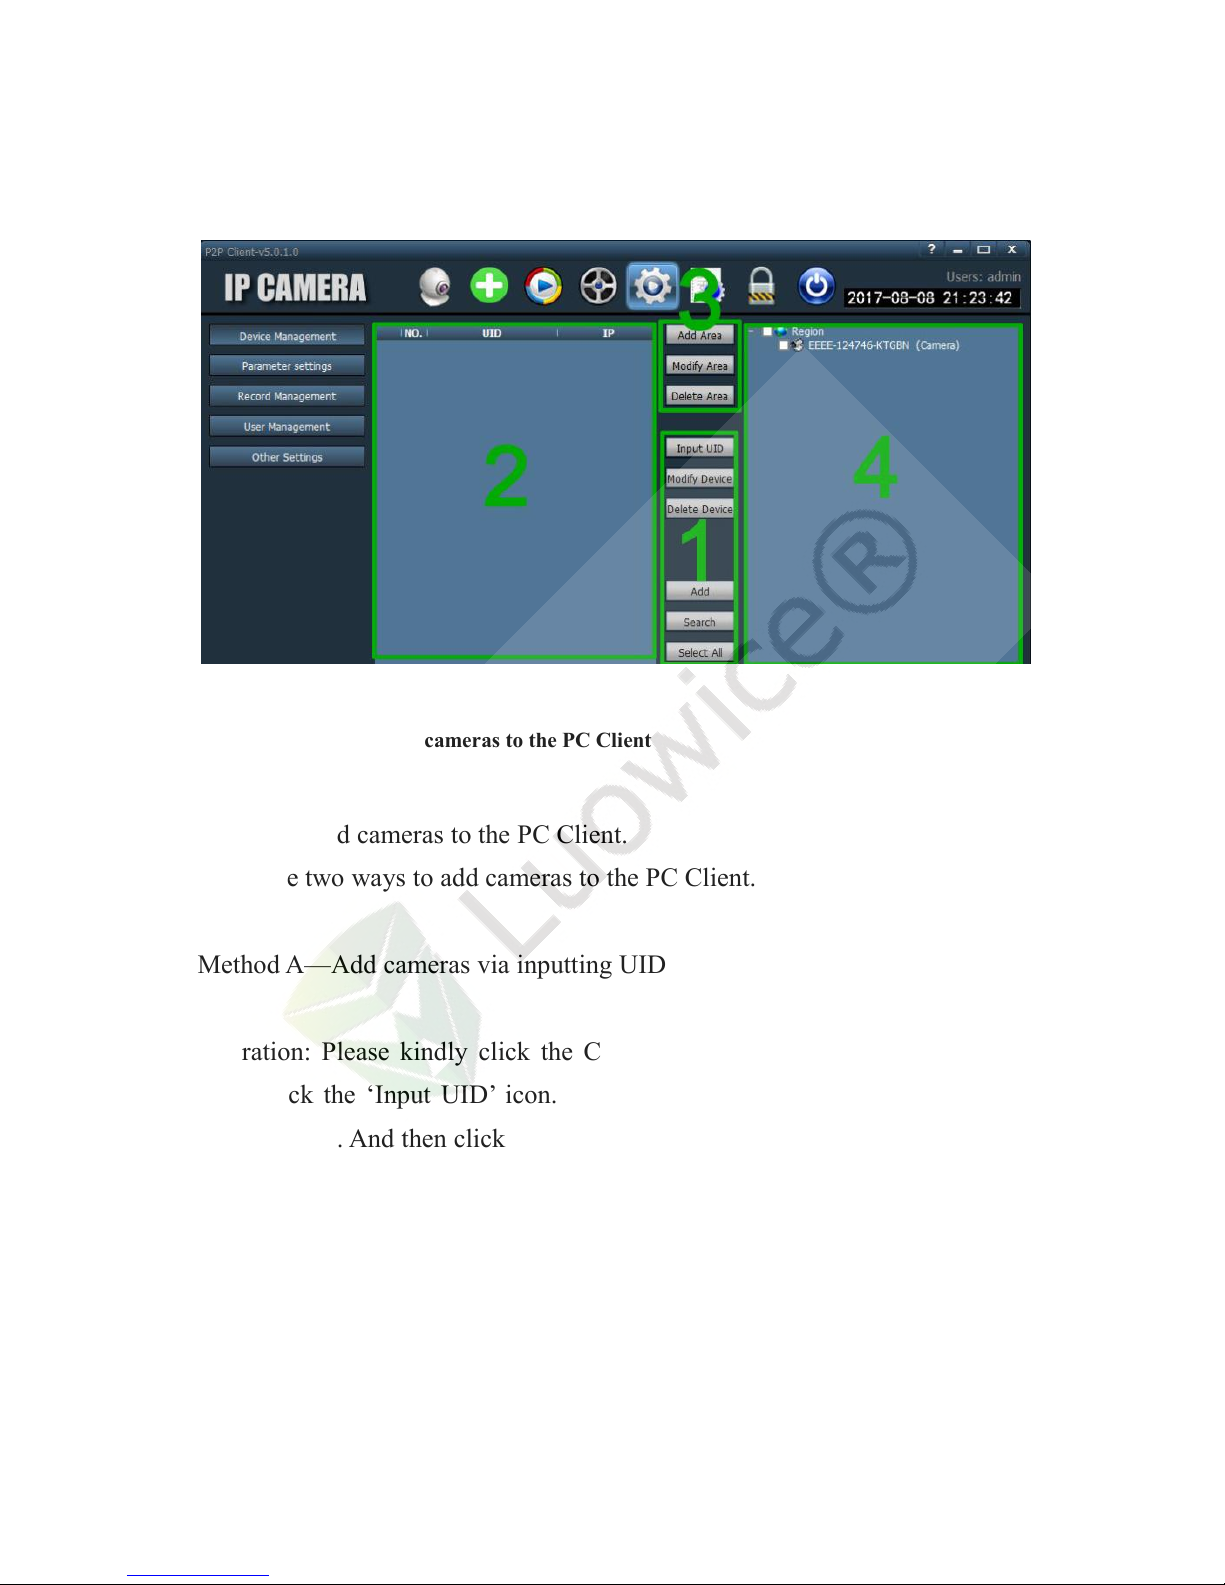
The device management interface can be divided into four zones.
Zone 1: Two methods to add cameras to the PC Client.
Zone 2: Online device list.
Zone 3: Classify cameras into different regions, such as garden, garage, etc.
Page 46
42
Zone 4: Region list.
3.4.1.1.1 Methods to add cameras to the PC Client
Function: Add cameras to the PC Client.
There are two ways to add cameras to the PC Client.
Method A—Add cameras via inputting UID
Operation: Please kindly click the Config button and log in the PC Client.
Then click the ‘Input UID’ icon. And input the relevant information on the
pop-out page. And then click ‘OK’.
Note:
a) UID: begins with ‘EEEE’ and you can find it from the label on the
camera or the phone APP after you pairing the camera with your
phone.
b) Name: the name you set up for the camera. Default is: Camera. It
Page 47
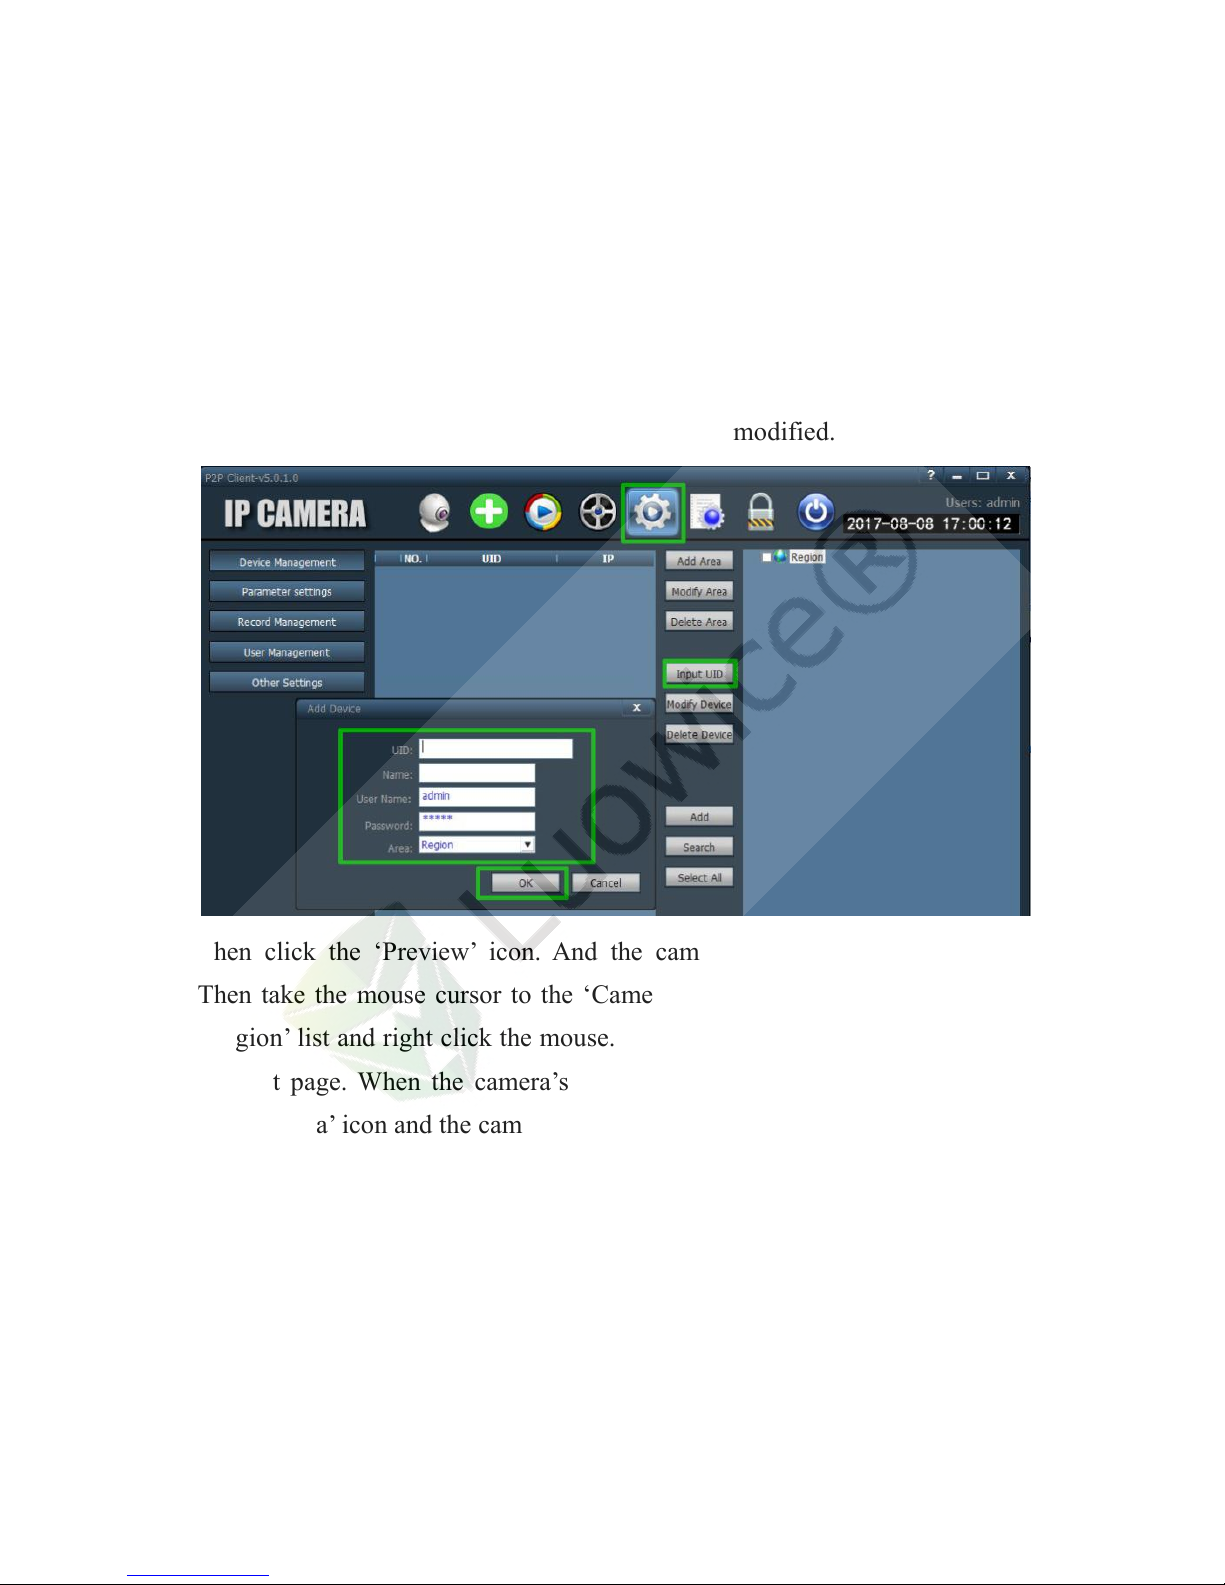
43
can be modified.
c) User Name: default is: admin, and cannot be modified.
d) Password: default is: admin, and can be modified. Please keep the
modified password within 15 letters and avoid using special
characters such as %, #.
e) Area: default is ‘Region’ and cannot be modified.
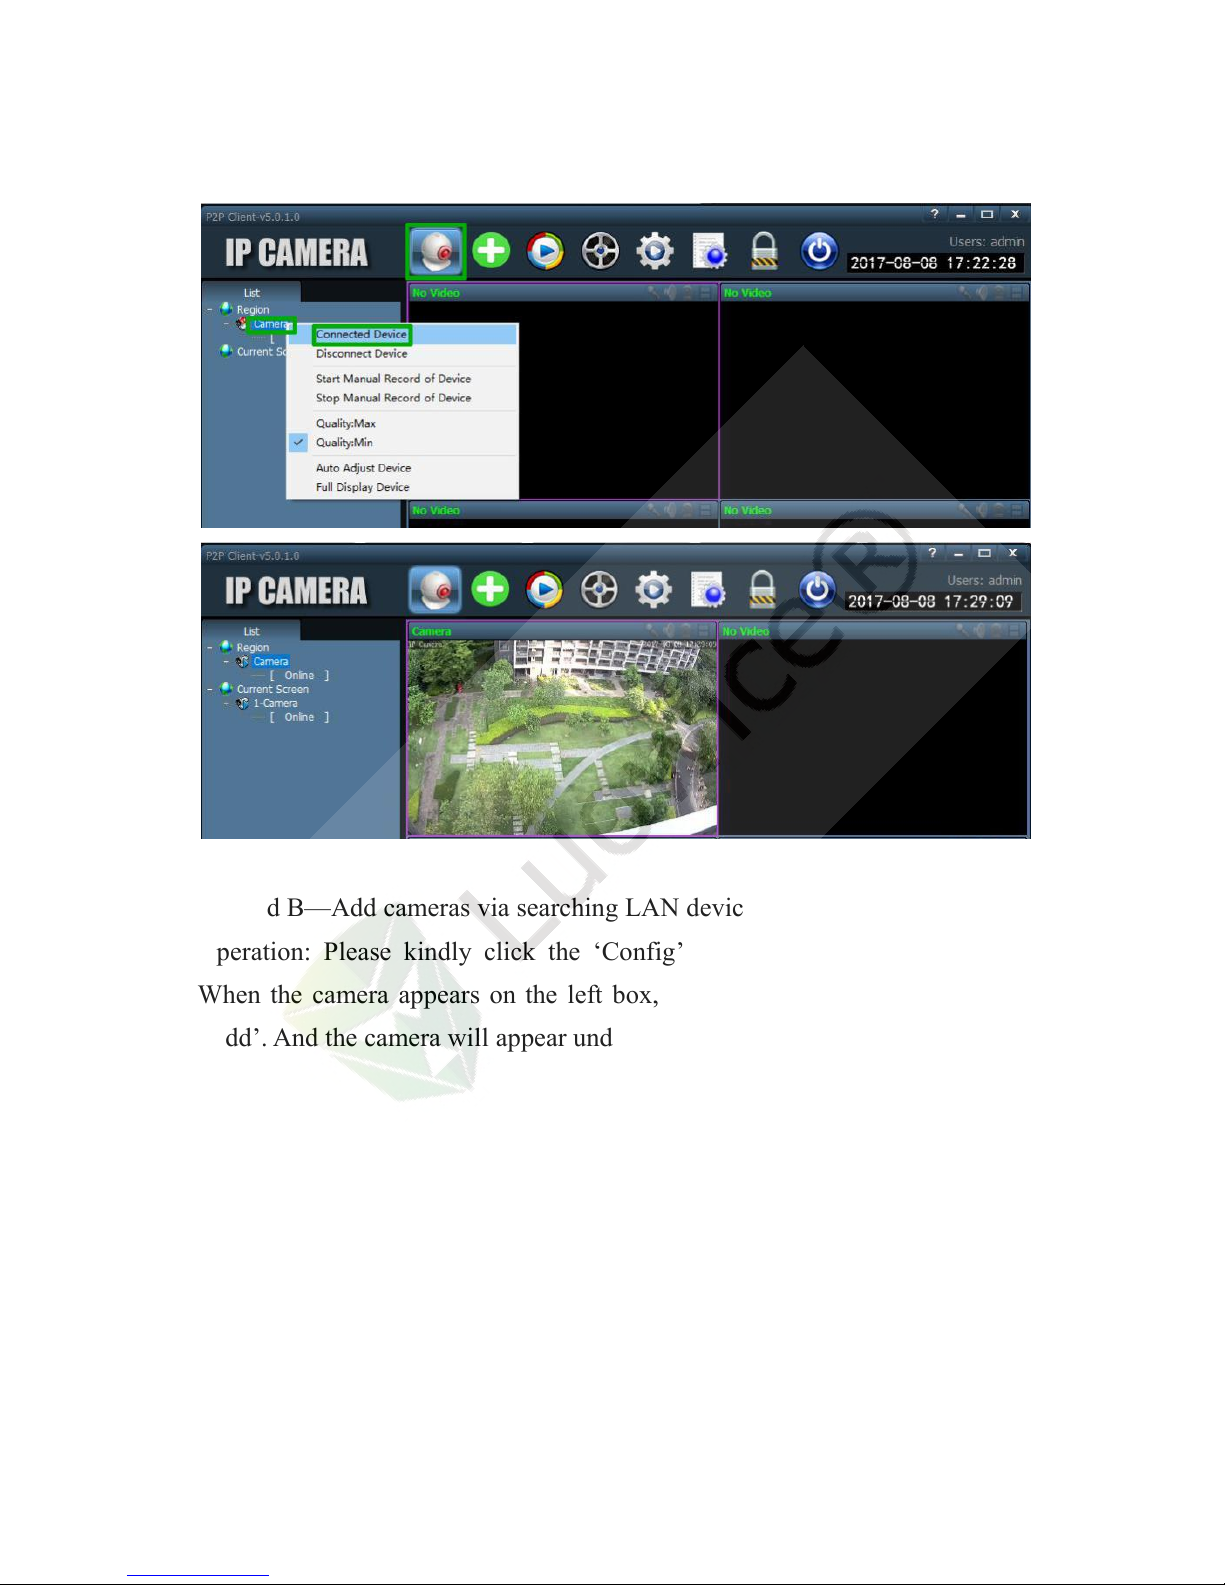
Then click the ‘Preview’ icon. And the camera will indicate as ‘Offline’.
Then take the mouse cursor to the ‘Camera’ icon the top left side under the
‘Region’ list and right click the mouse. Then click ‘Connected Device’ on the
pop-out page. When the camera’s status indicates as ‘Online’, double click
the ‘Camera’ icon and the camera will show live view on the screen.
Page 48
44
Method B—Add cameras via searching LAN device
Operation: Please kindly click the ‘Config’ icon, and then click ‘Search’.
When the camera appears on the left box, check the camera, and then click
‘Add’. And the camera will appear under the ‘Region’ list on the right box.
Page 49
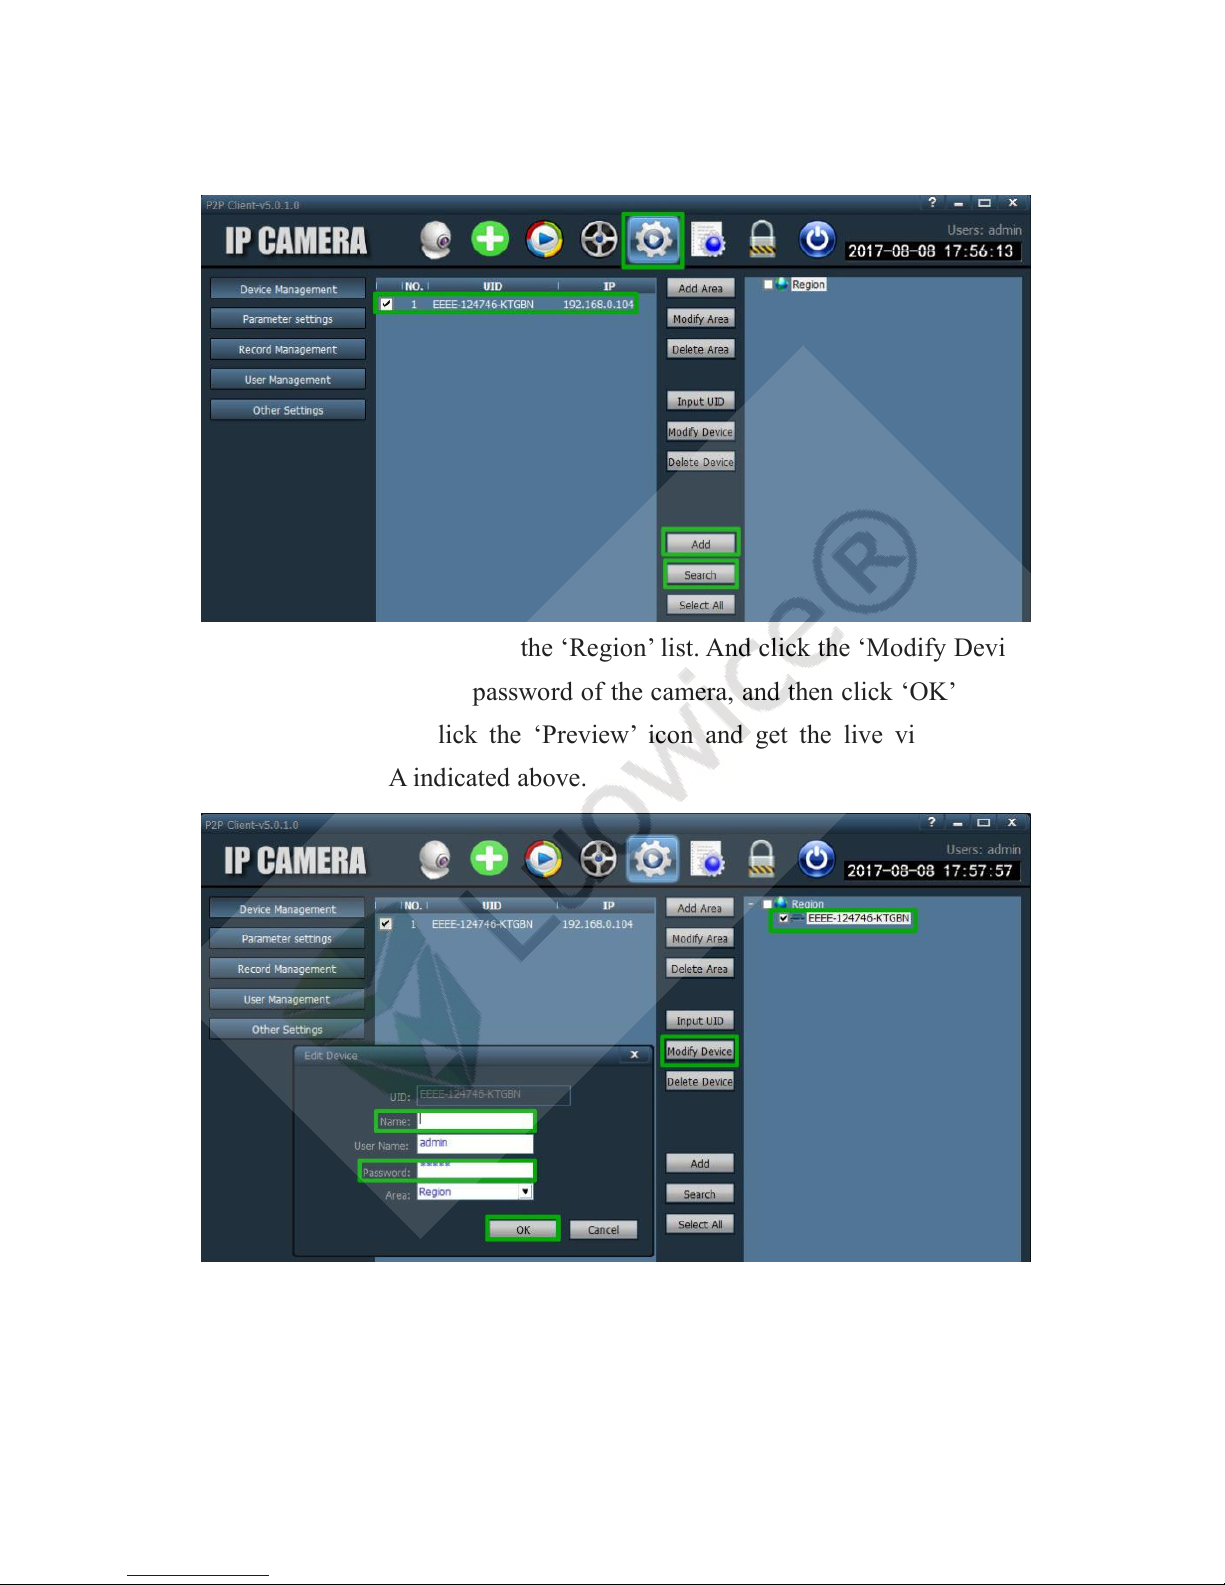
45
Then check the camera under the ‘Region’ list. And click the ‘Modify Device’
icon. Input the name and password of the camera, and then click ‘OK’ on the
pop-out page. Then click the ‘Preview’ icon and get the live view on the
screen as Method A indicated above.
Page 50
46
3.4.1.1.2 Delete Device
Function: delete cameras from the PC Client.
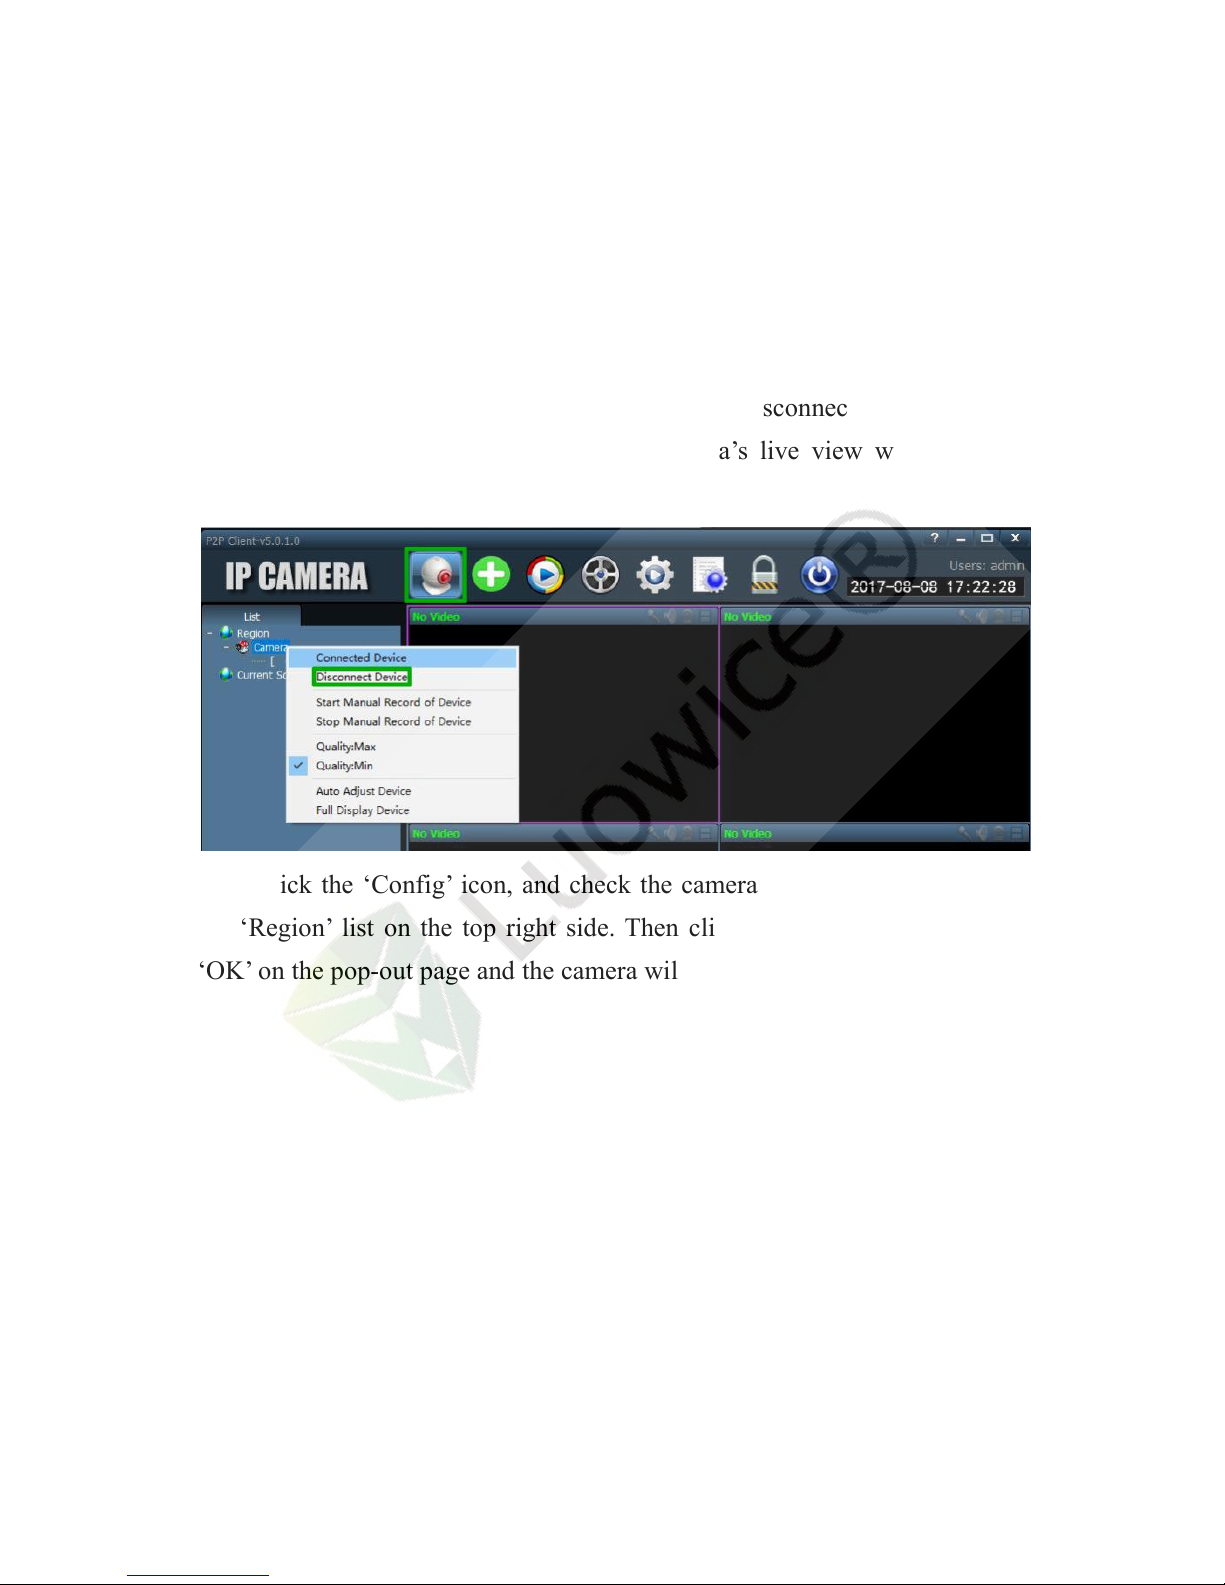
Operation: Click the ‘Preview’ icon, and then take the mouse cursor to
‘Camera’ and right click the mouse. And click ‘Disconnect Device’ on the
pop-out page. Wait for seconds and the camera’s live view will disappear
from the screen.
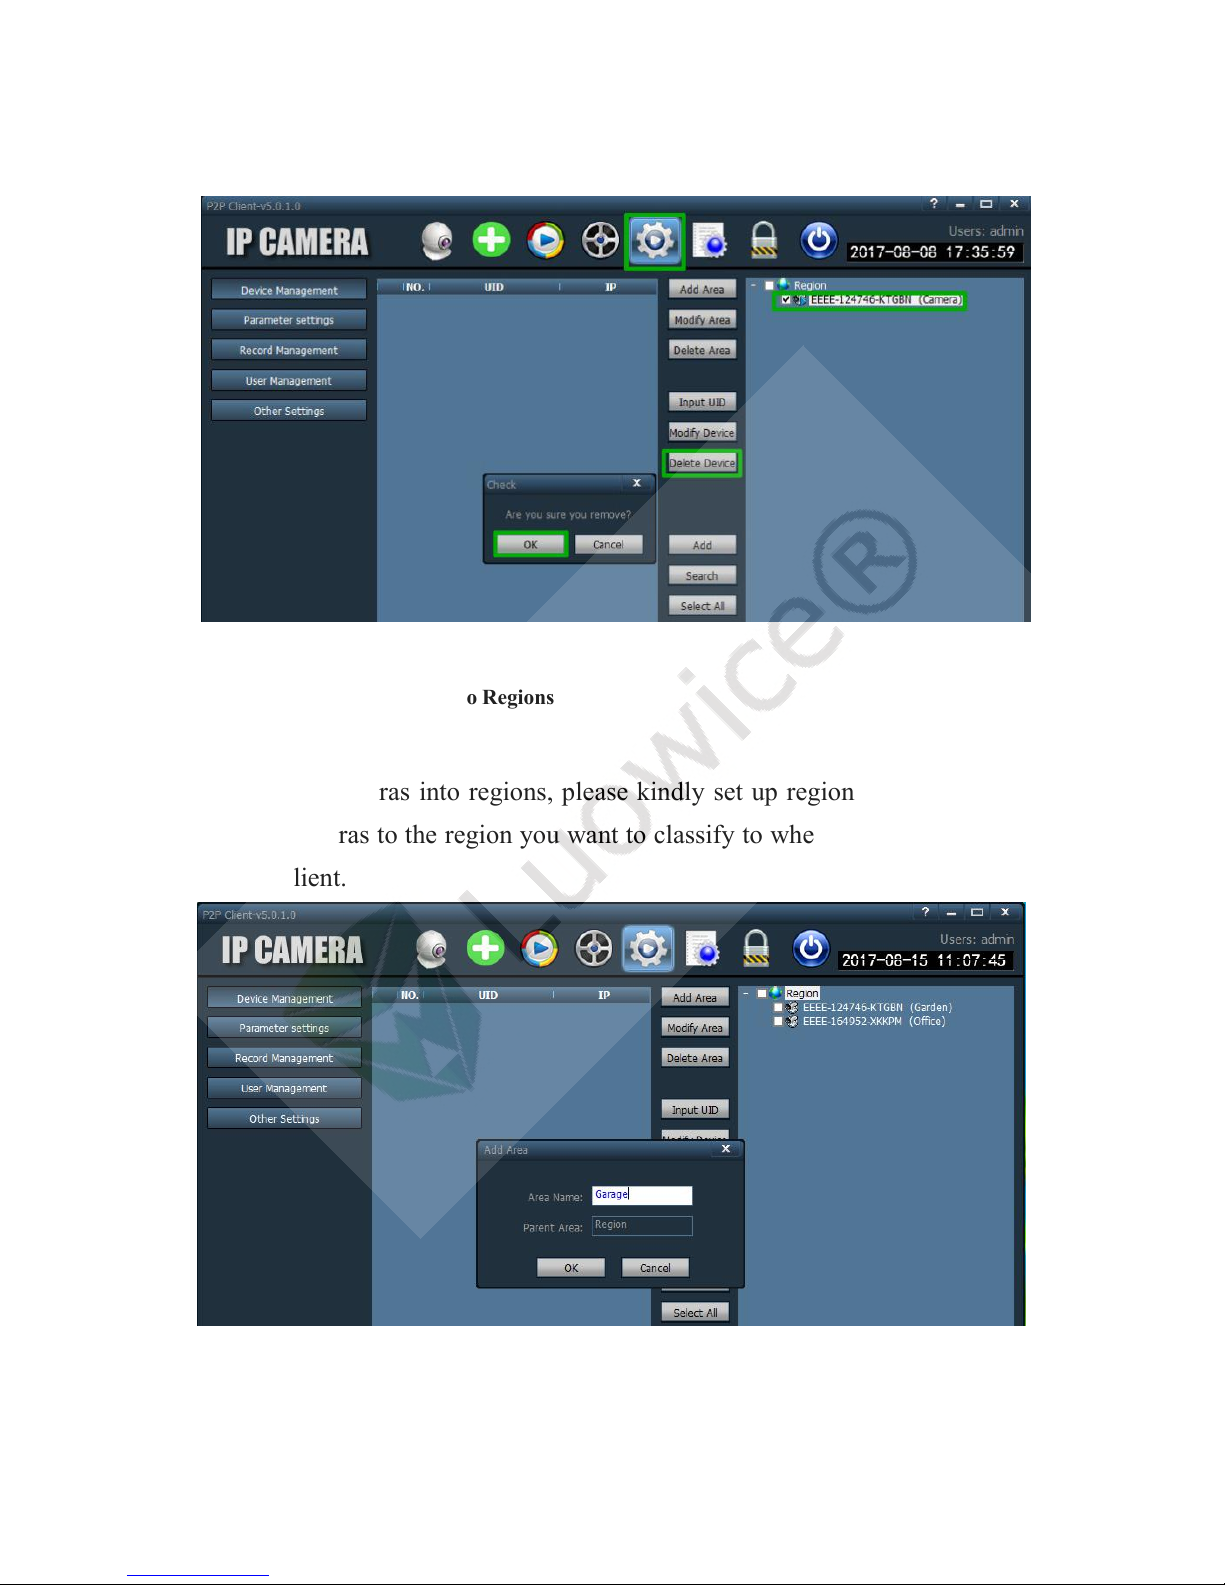
Then click the ‘Config’ icon, and check the camera you want to delete from
the ‘Region’ list on the top right side. Then click ‘Delete Device’ and click
‘OK’ on the pop-out page and the camera will be deleted successfully.
Page 51
47
3.4.1.1.3 Classify Cameras into Regions
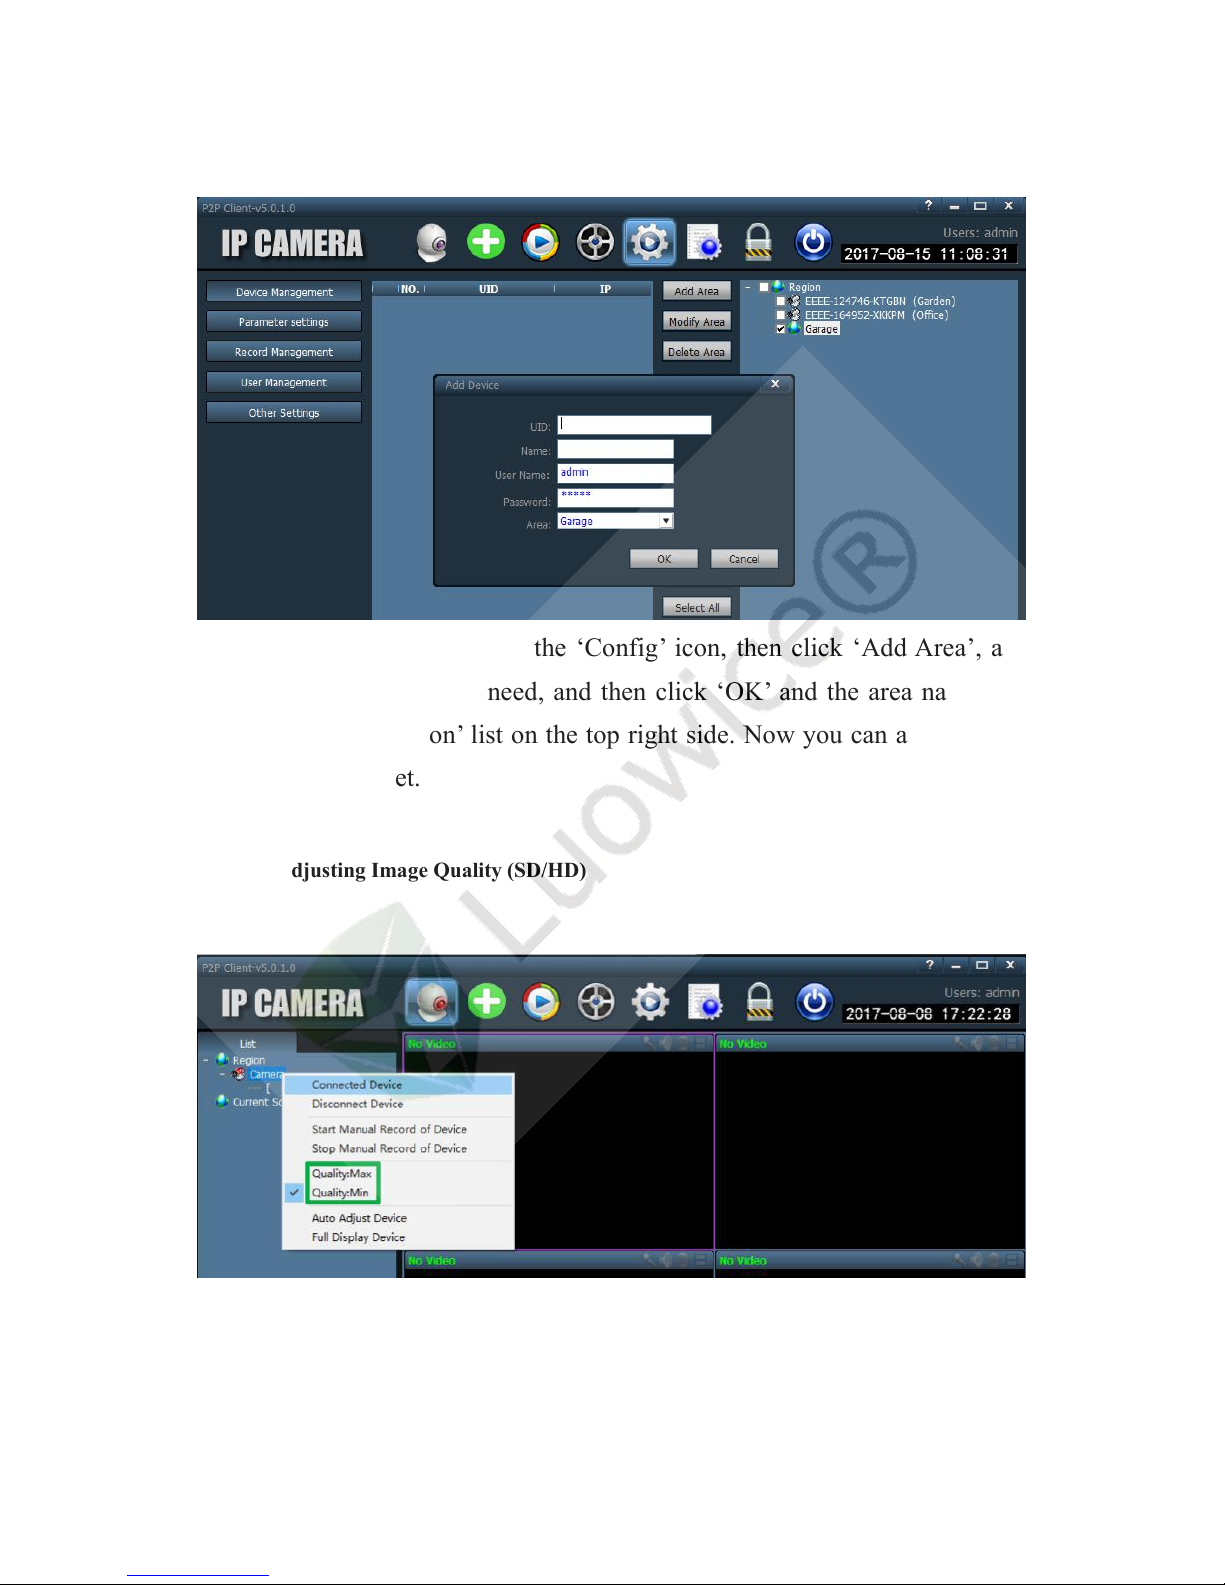
To classify cameras into regions, please kindly set up regions first. And then
add the cameras to the region you want to classify to when adding cameras to
the PC Client.
Page 52
48
Operation: please kindly click the ‘Config’ icon, then click ‘Add Area’, and
set up area based on your need, and then click ‘OK’ and the area name will
show under the ‘Region’ list on the top right side. Now you can add cameras
to the region you set.
3.4.1.1.4 Adjusting Image Quality (SD/HD)
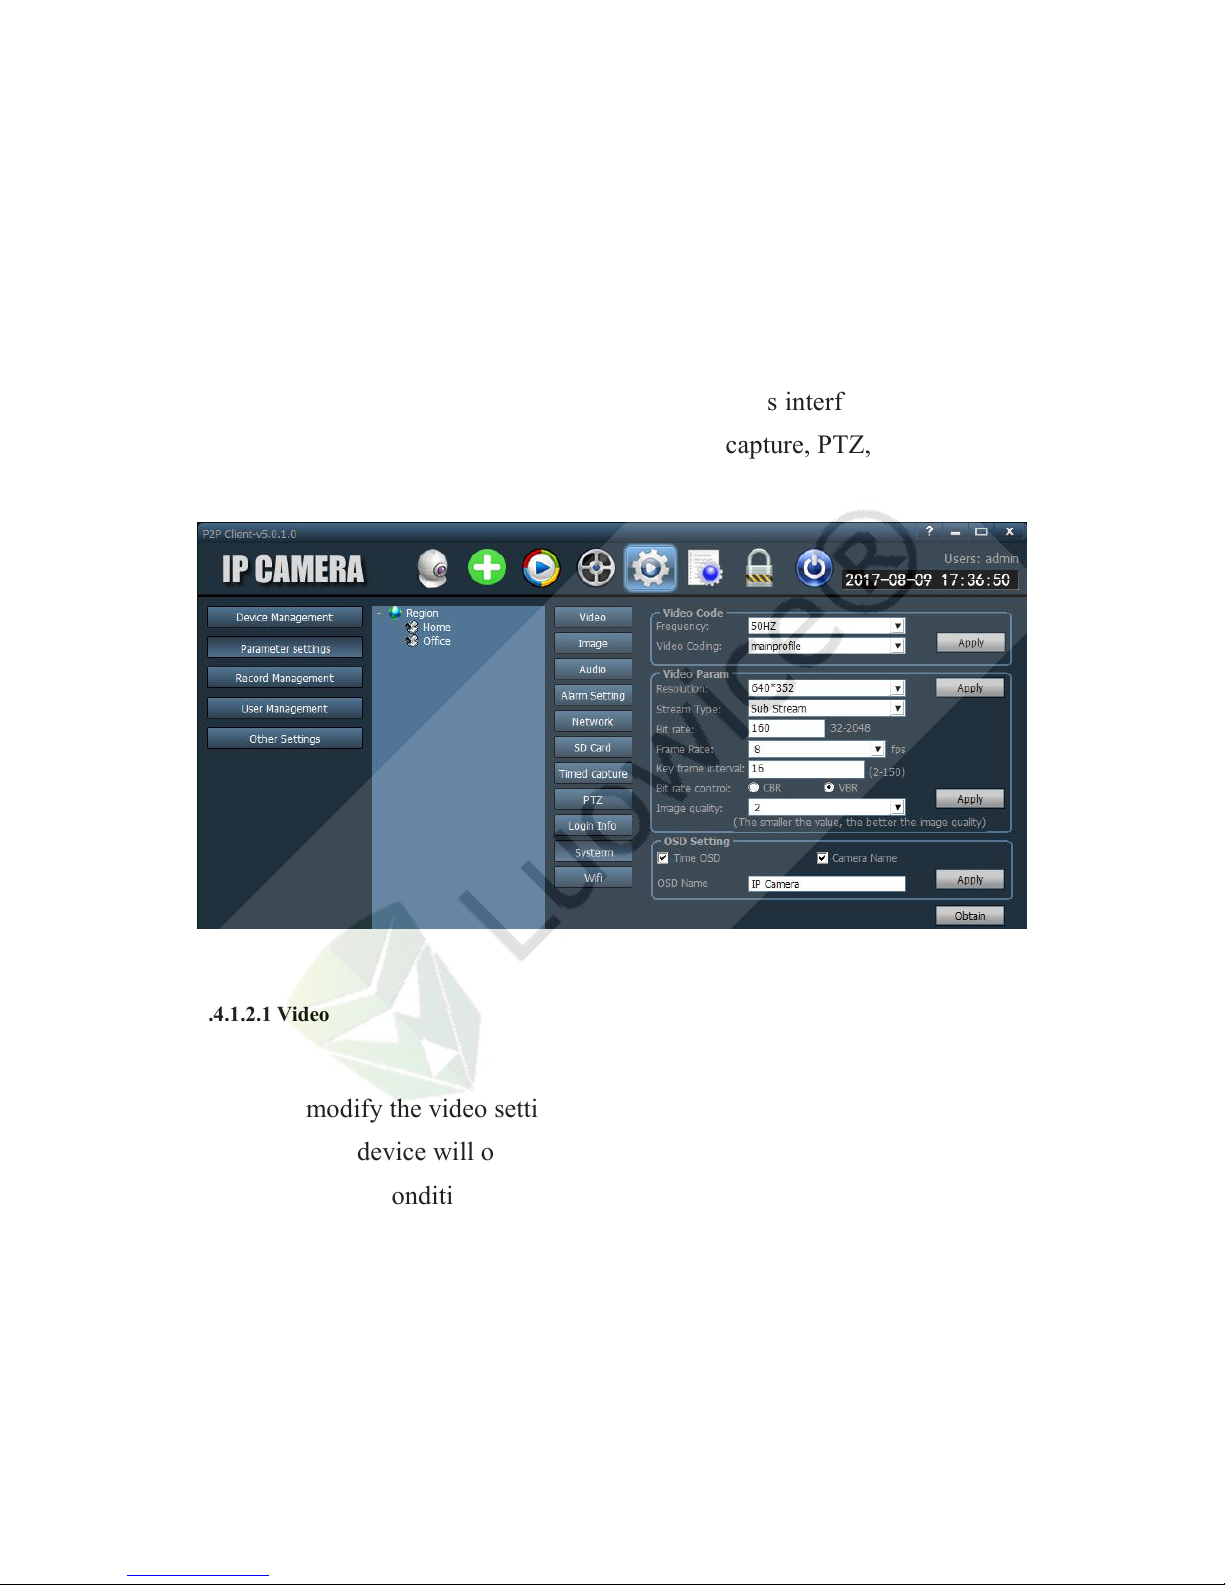
To adjust the image quality, please kindly click the ‘Preview’ icon, and move
the mouse cursor to ‘Camera’ under the Region list. Right click the mouse,
Page 53
49
and switch the image quality between Quality: Max/Quality: Min.
3.4.1.2 Parameter Settings
There are five sub categories in the parameter settings interface:Video, Image,
Audio, Alarm Setting, Network, SD Card, Timed capture, PTZ, Login Info,
System, Wi-Fi.
3.4.1.2.1 Video
Function: modify the video settings.
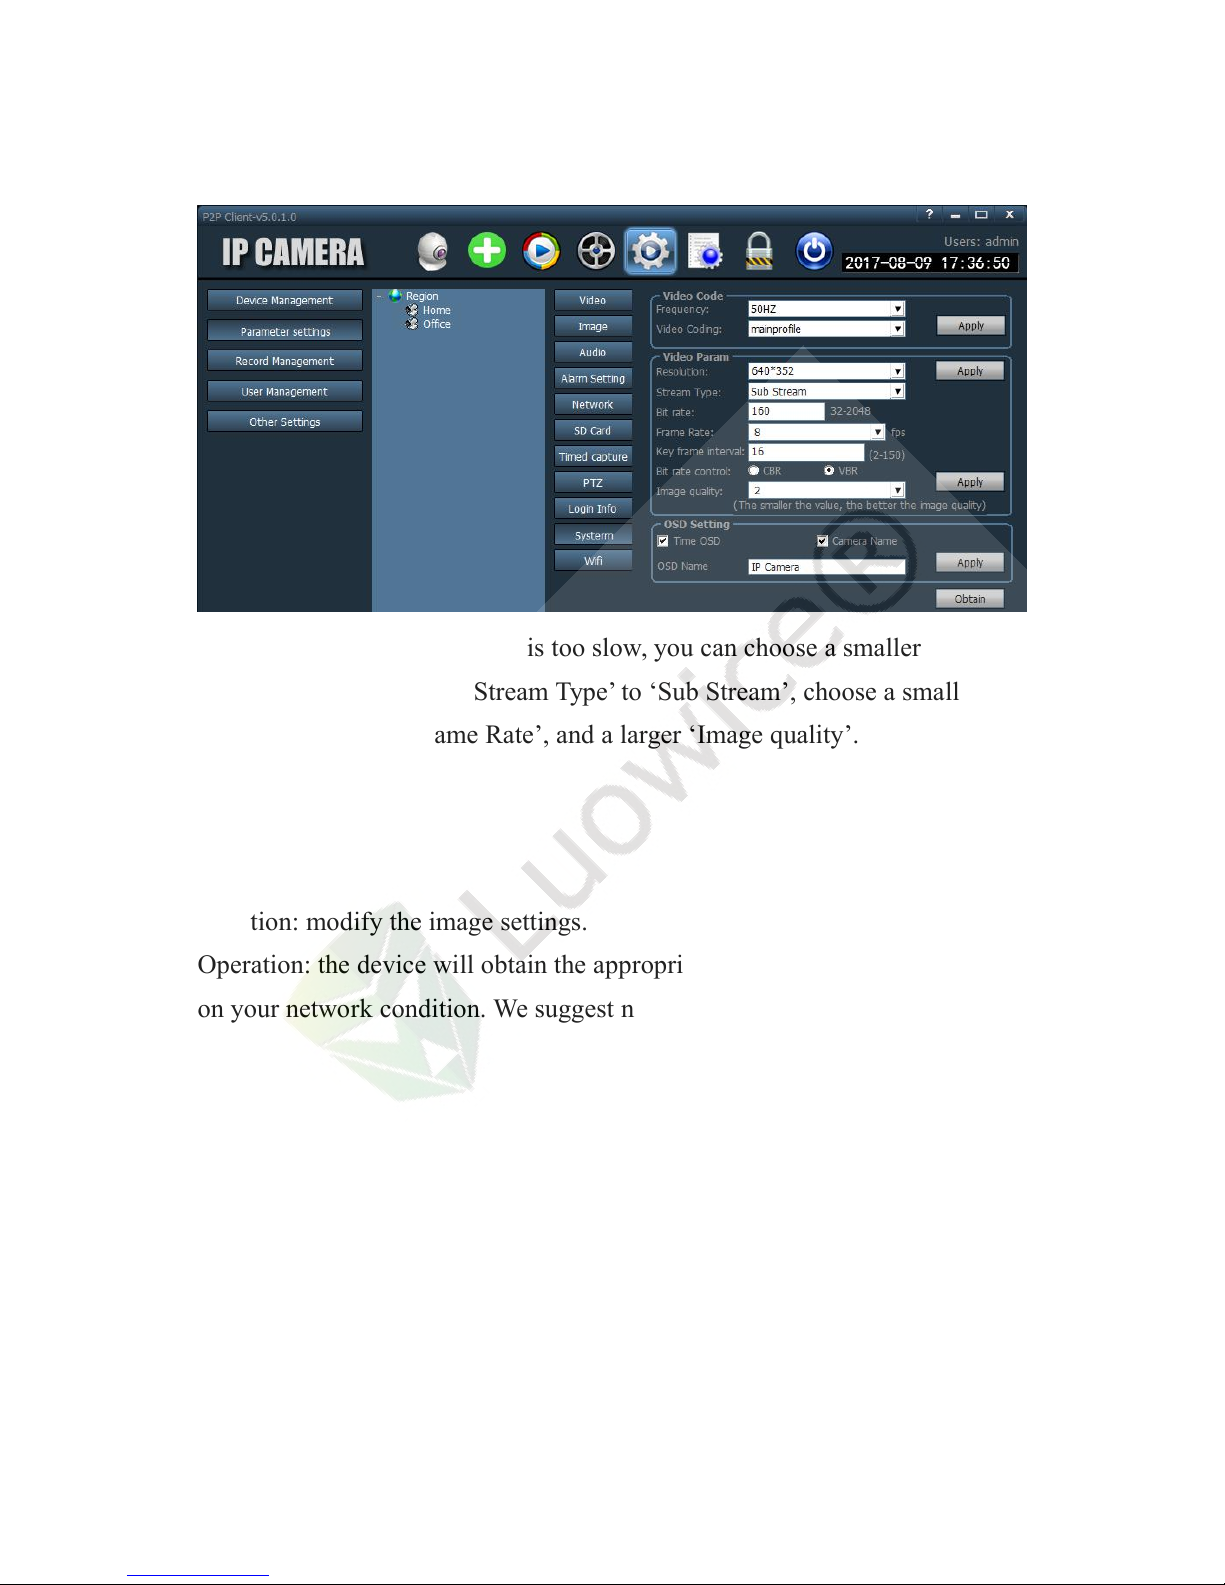
Operation: the device will obtain the appropriate settings automatically based
on your network condition. We suggest not to modify the settings manually.
Page 54
50
Note: When the internet speed is too slow, you can choose a smaller
‘Resolution’, change the ‘Stream Type’ to ‘Sub Stream’, choose a smaller
‘Bit rate, a smaller ‘Frame Rate’, and a larger ‘Image quality’.
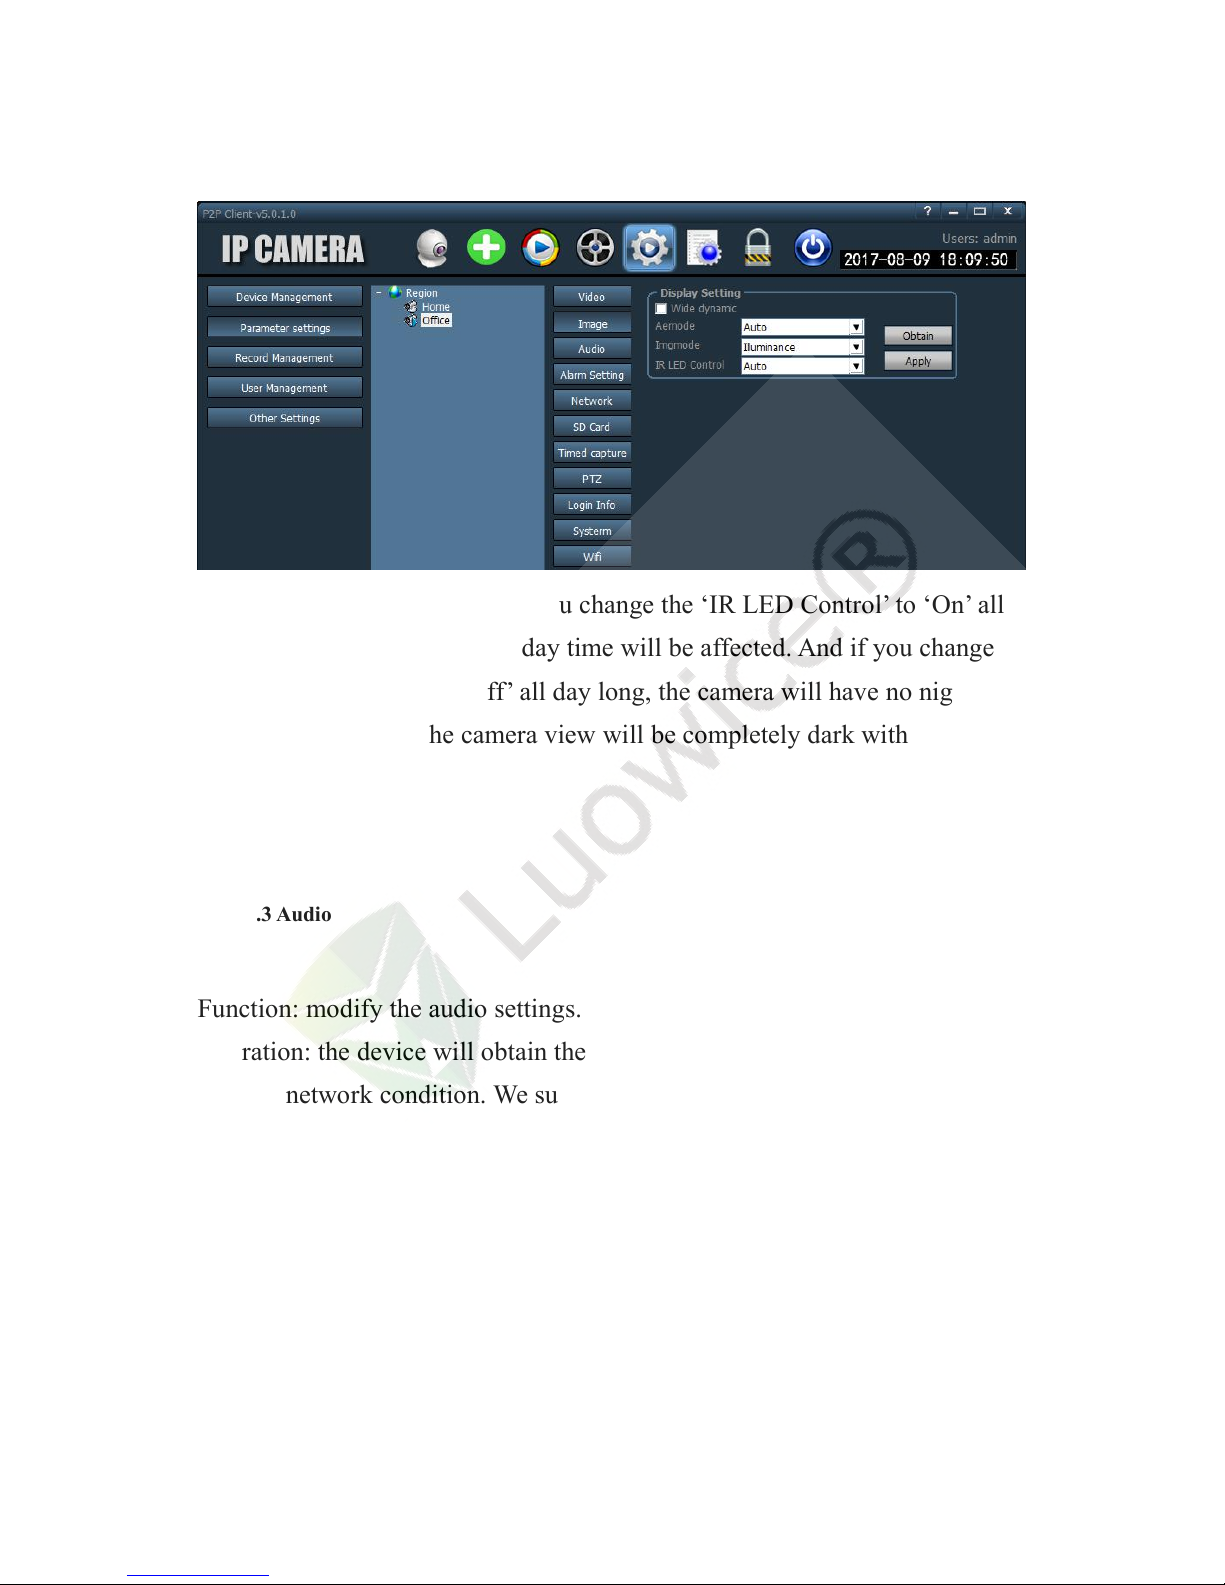
3.4.1.2.2 Image
Function: modify the image settings.
Operation: the device will obtain the appropriate settings automatically based
on your network condition. We suggest not to modify the settings manually.
Page 55
51
Note: please kindly note that if you change the ‘IR LED Control’ to ‘On’ all
day long, the image quality in day time will be affected. And if you change
the ‘IR LED Control’ to ‘Off’ all day long, the camera will have no night
vision, which means the camera view will be completely dark without
showing images.
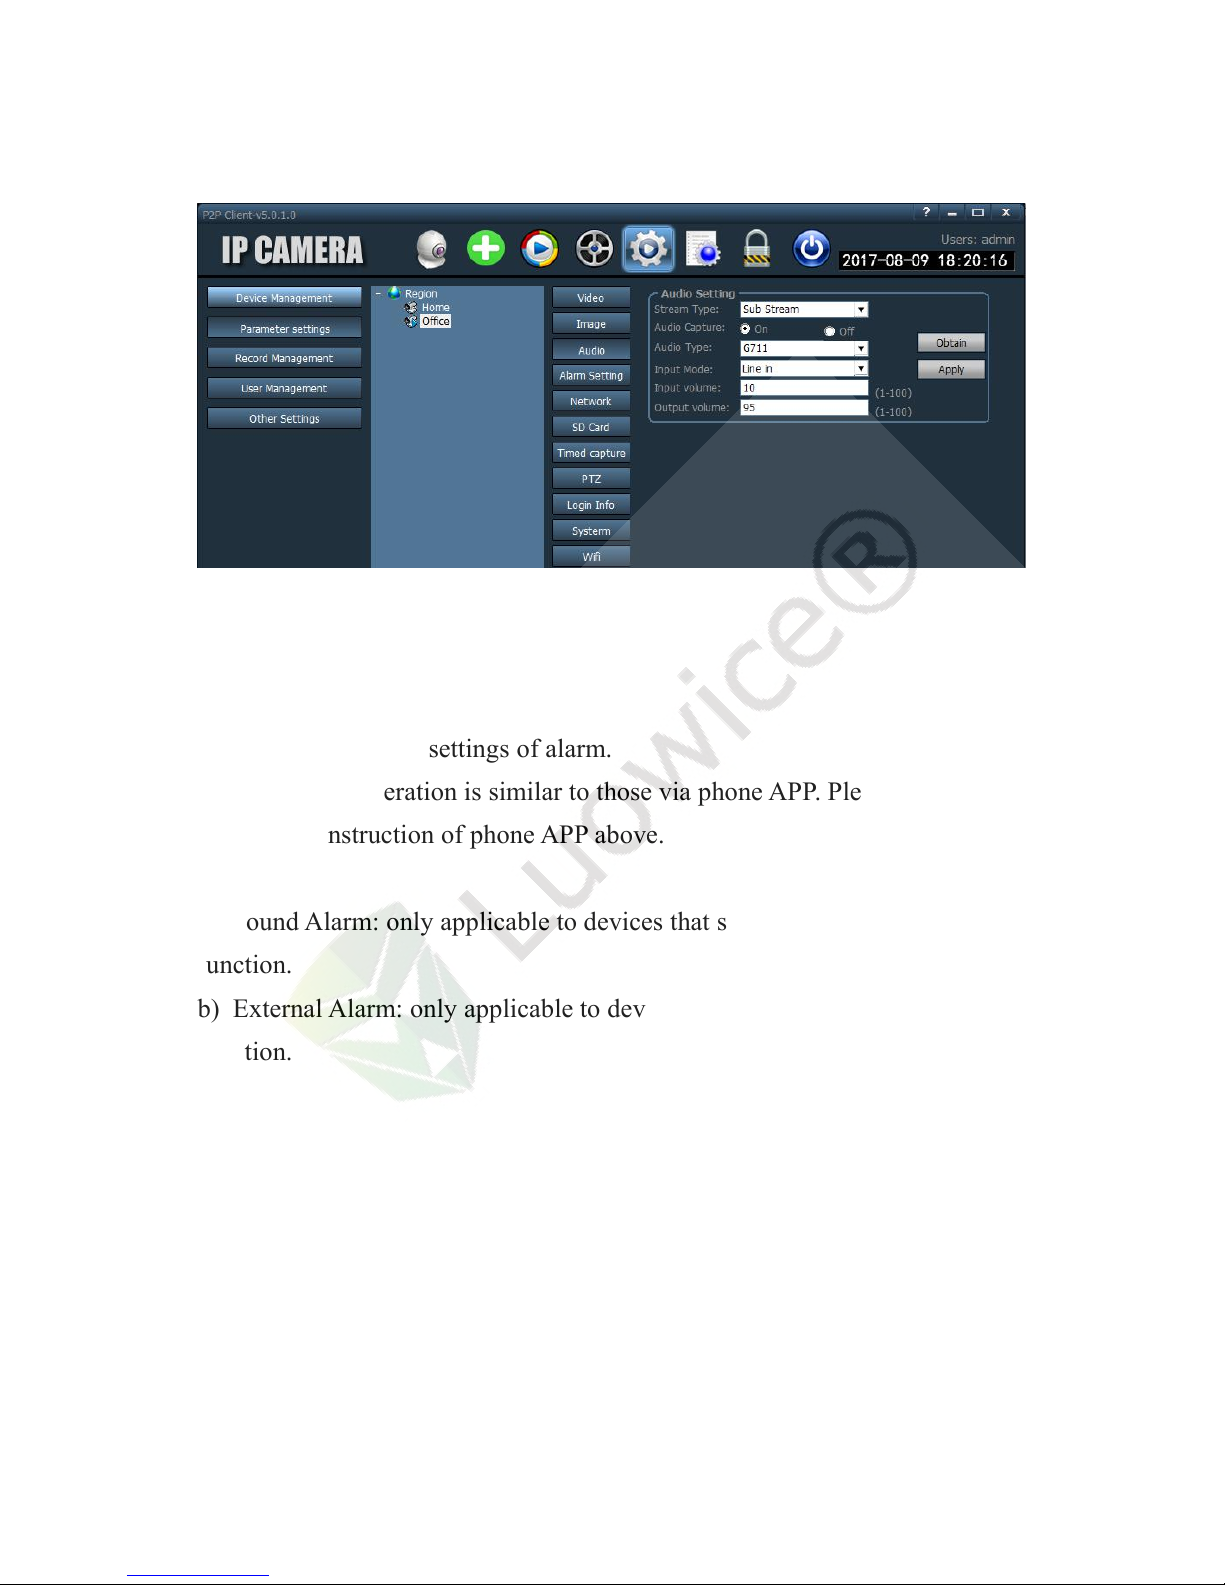
3.4.1.2.3 Audio
Function: modify the audio settings.
Operation: the device will obtain the appropriate settings automatically based
on your network condition. We suggest not to modify the settings manually.
Page 56
52
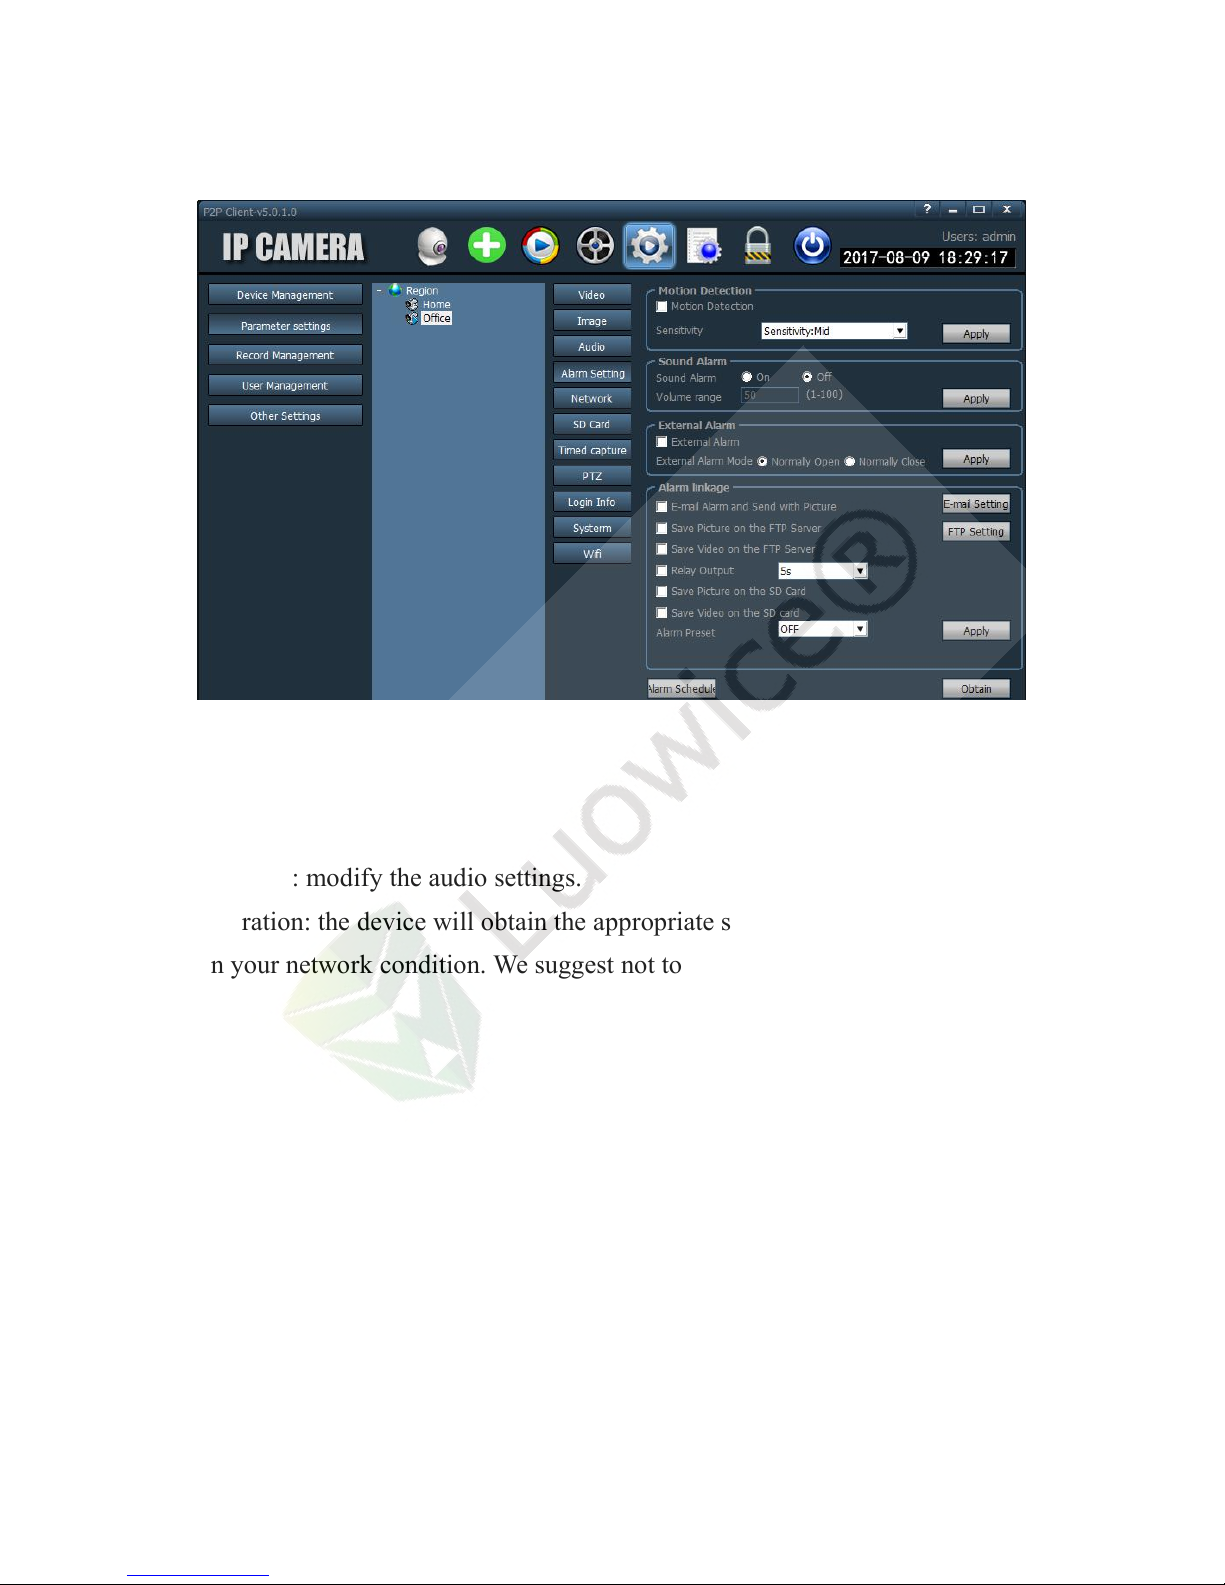
3.4.1.2.4 Alarm Setting
Function: modify the settings of alarm.
Operation: the operation is similar to those via phone APP. Please kindly
refer to the instruction of phone APP above.
Note:
a) Sound Alarm: only applicable to devices that support sound alarm
function.
b) External Alarm: only applicable to devices that support external alarm
function.
Page 57
53
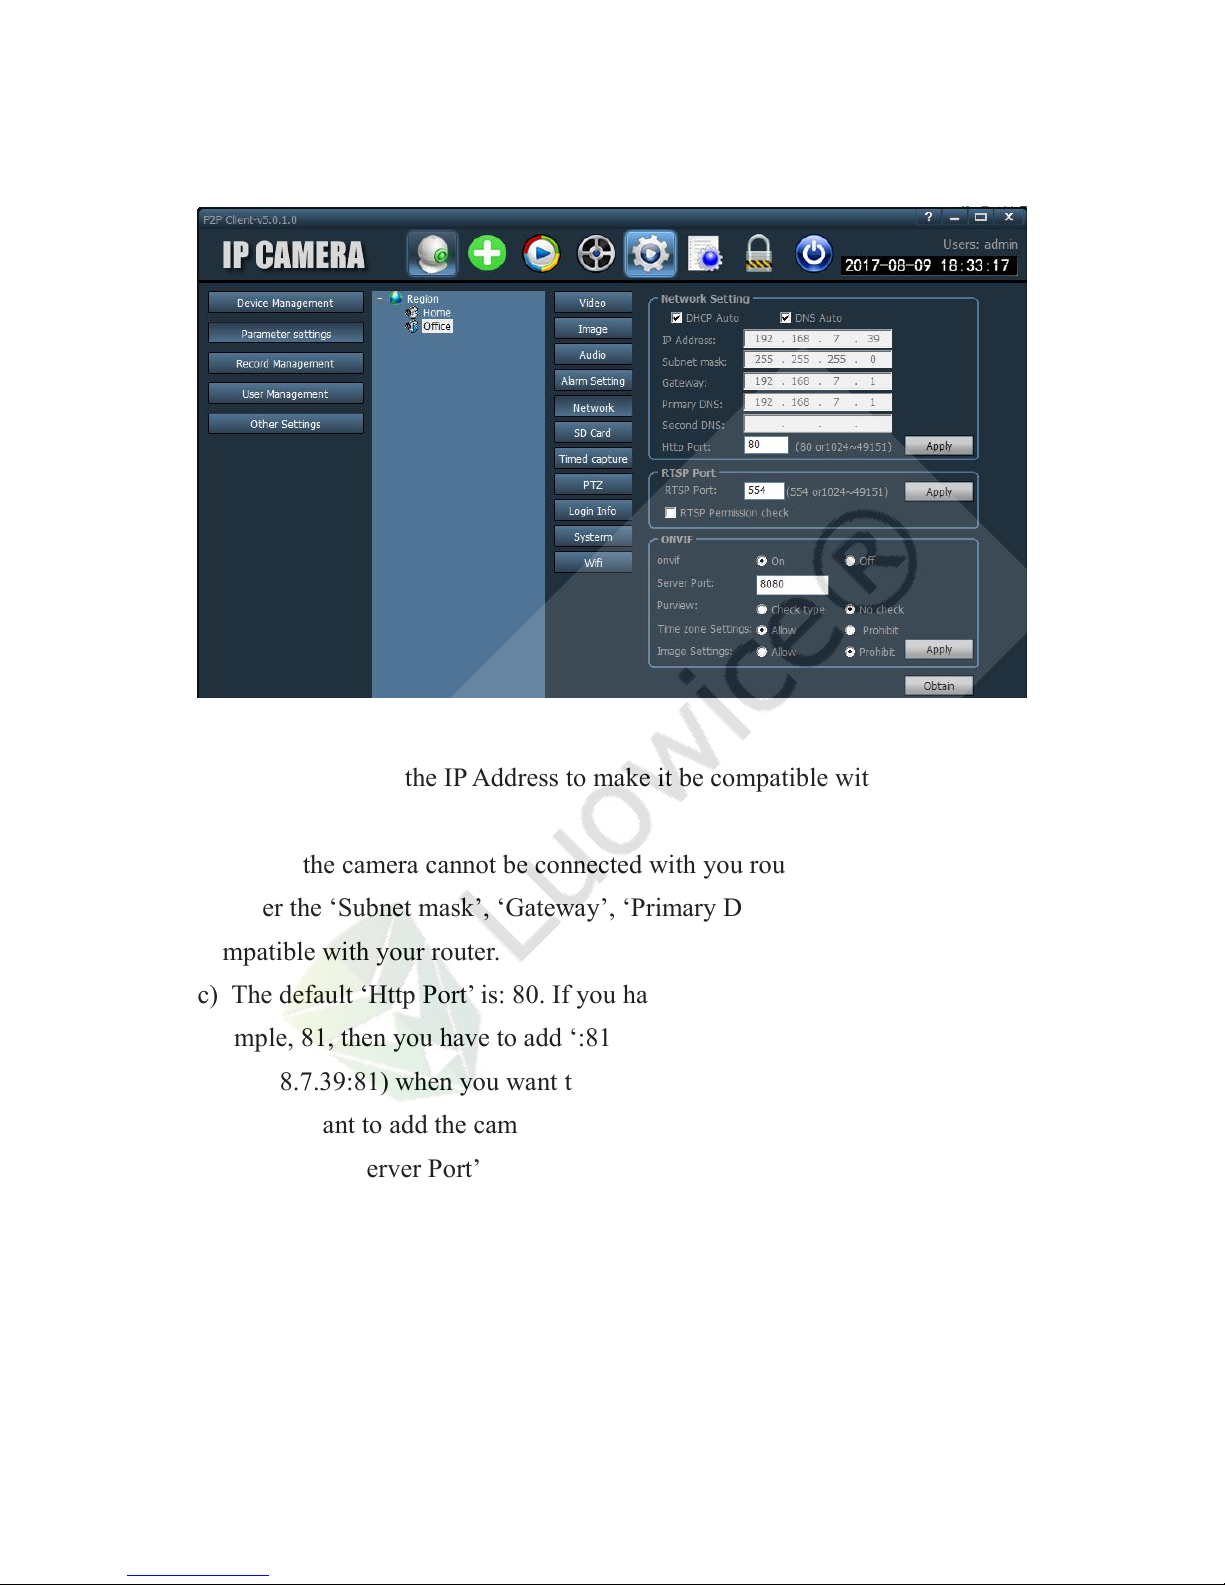
3.4.1.2.5 Network
Function: modify the audio settings.
Operation: the device will obtain the appropriate settings automatically based
on your network condition. We suggest not to modify the settings manually.
Page 58
54
Note:
a) you can modify the IP Address to make it be compatible with specific
router only.
b) When the camera cannot be connected with you router, please check
whether the ‘Subnet mask’, ‘Gateway’, ‘Primary DNS’ and Http Port’ is in
compatible with your router.
c) The default ‘Http Port’ is: 80. If you have modified the ‘Http Port’, for
example, 81, then you have to add ‘:81’ behind the IP address
(192.168.7.39:81) when you want to view the camera via browser.
d) If you want to add the camera to your NVR/DVR, please input the ‘IP
Address’ and ‘Server Port’ of the device to the NVR’s/DVR’s corresponding
interface.
Page 59
55
3.4.1.2.6 SD Card
Function: modify the audio settings.
Operation: the device will obtain the appropriate settings automatically based
on your network condition. We suggest not to modify the settings manually.
Note:
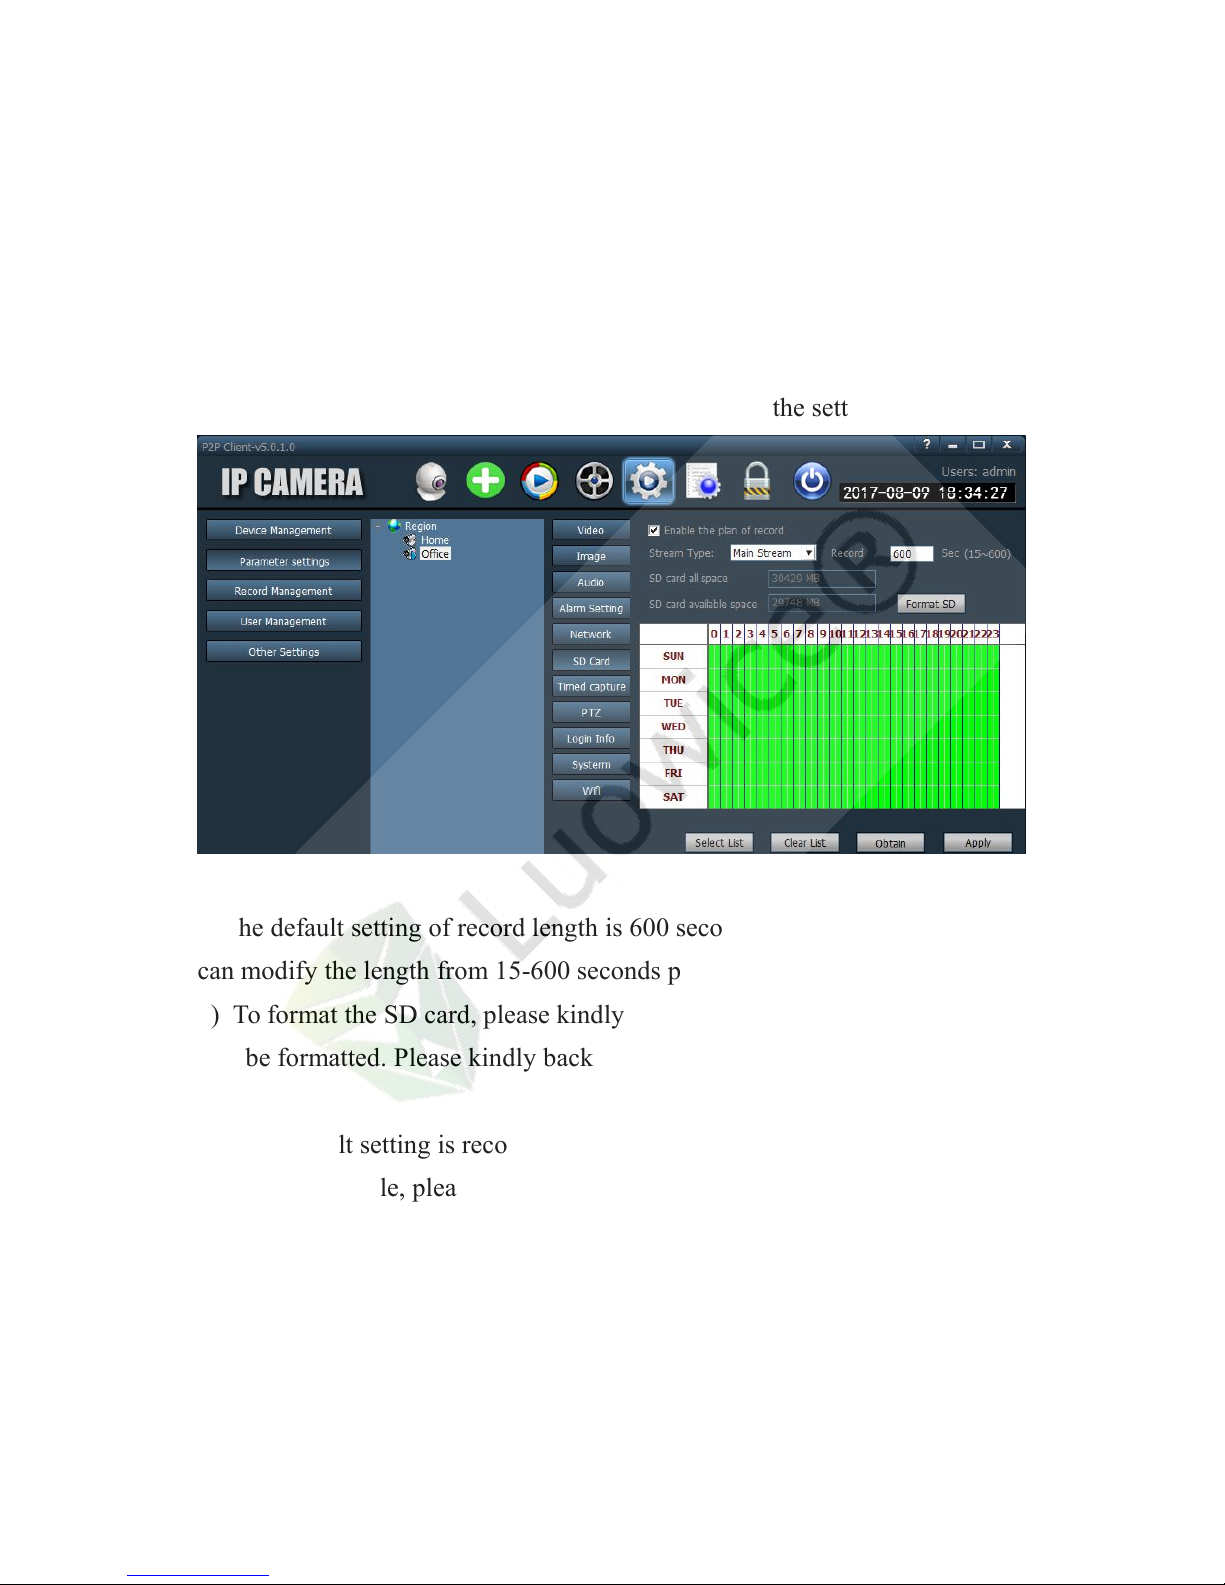
a) the default setting of record length is 600 seconds per video record. You
can modify the length from 15-600 seconds per record.
b) To format the SD card, please kindly click ‘Format SD’ and the SD card
will be formatted. Please kindly backup important files before formatting the
SD card.
c) The default setting is recording for 24 hours everyday. To modify the
recording schedule, please kindly take the mouse cursor to the hour bar, for
example, SUN ‘1’, then press the mouse and move the mouse slightly.
Loosen the mouse and then the area of SUN ‘1’ will turn into white color and
there will be no video recording during 1:00am-2:00am on Sunday. If you
want to set up record for SUN ‘1’ again, please kindly take the mouse cursor
Page 60
56
to SUN ‘1’. Then press the mouse and move it slightly. Loosen the mouse
and the area of SUN ‘1’ will turn into green color and there will be video
record during 1:00am-2:00am on Sunday then.
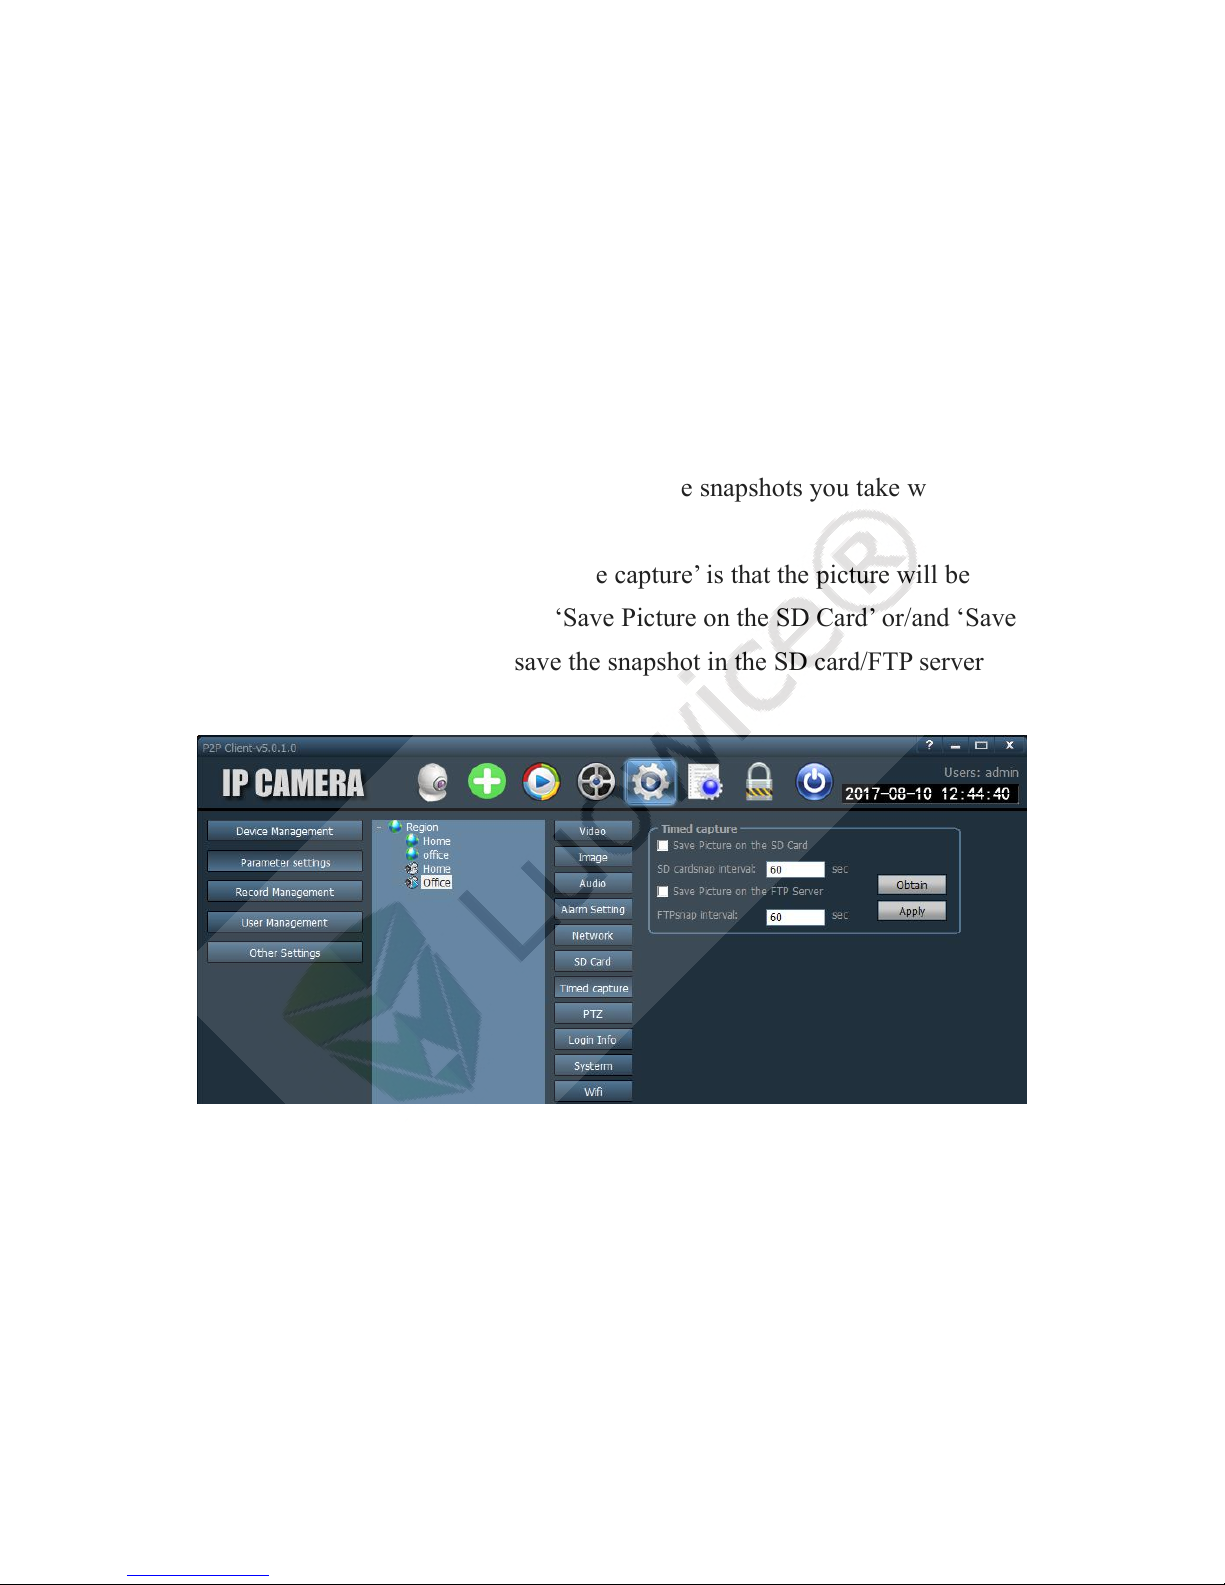
3.4.1.2.7 Timed capture
Function: to modify the storage location of the snapshots you take when live
view the camera on the PC Client.
Operation: the default setting of ‘Time capture’ is that the picture will be
saved in your PC. You can check ‘Save Picture on the SD Card’ or/and ‘Save
Picture on the FTP Server’ to save the snapshot in the SD card/FTP server as
well.
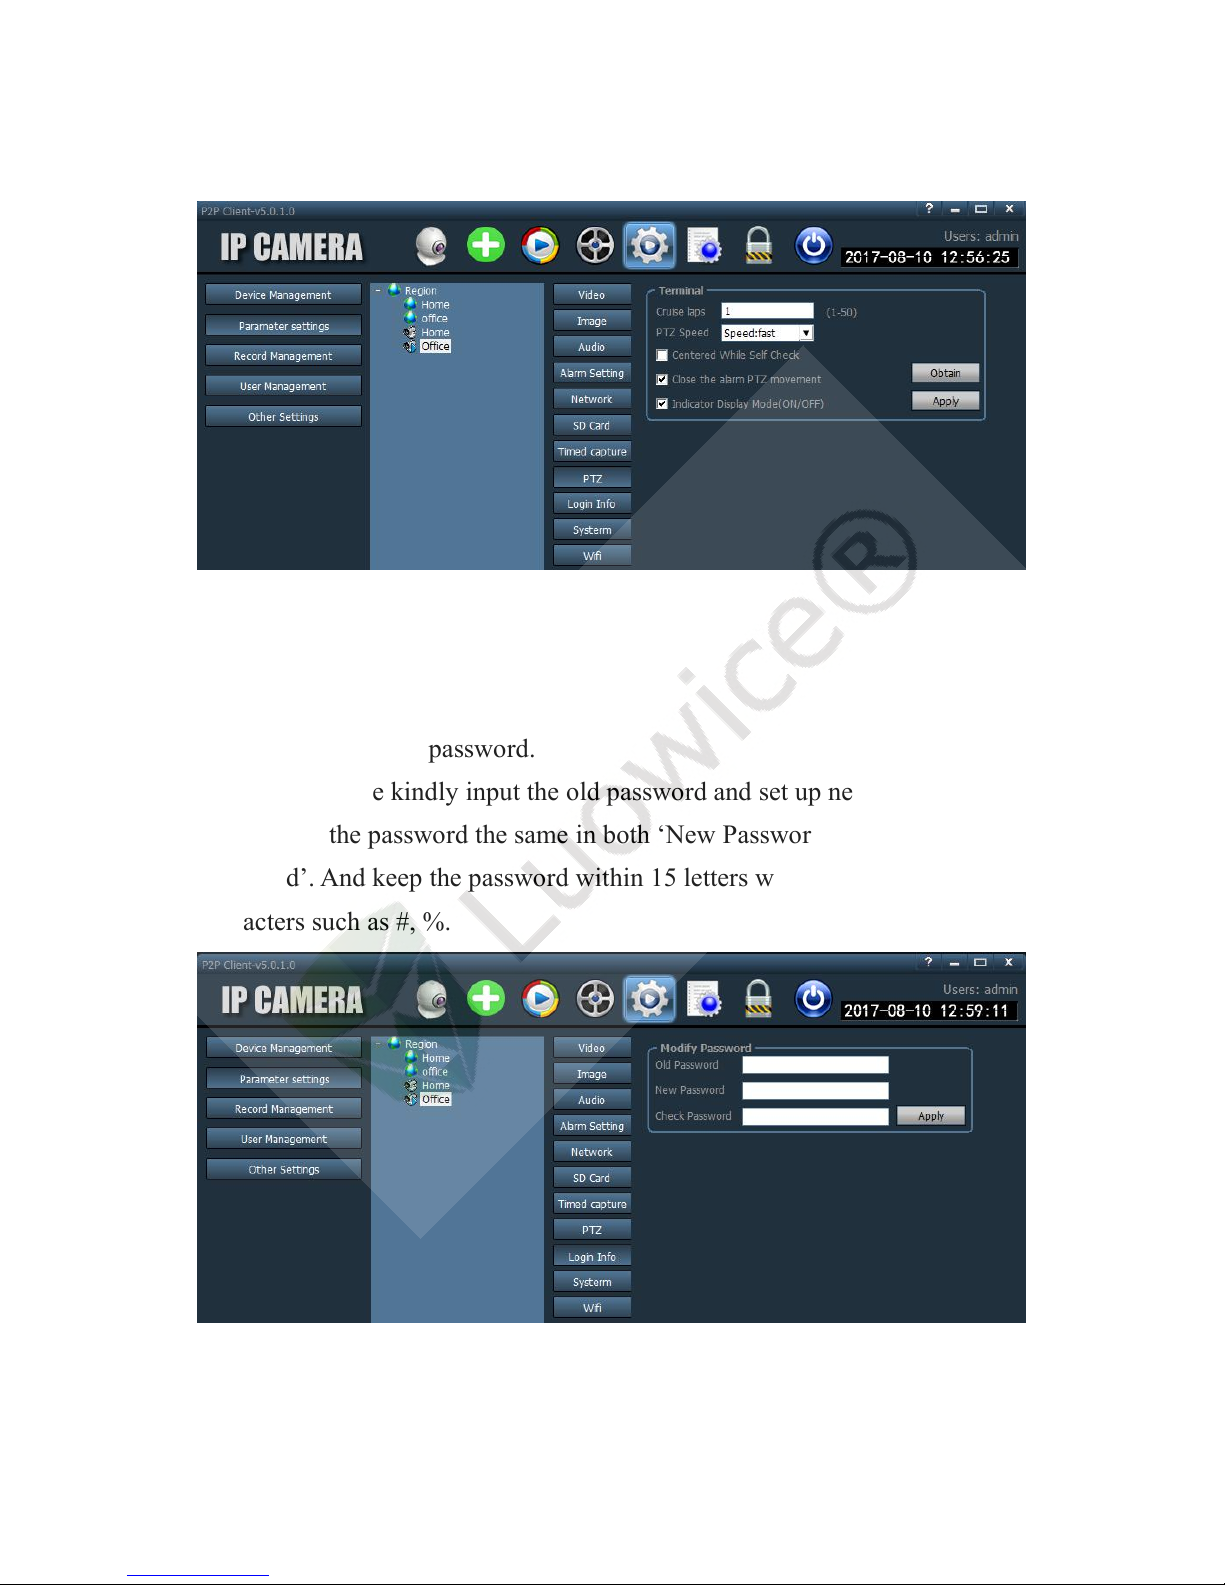
3.4.1.2.8 PTZ
Function: modify the PTZ settings.
Operation: the device will obtain the appropriate settings automatically based
on your network condition. We suggest not to modify the settings manually.
Page 61
57
3.4.1.2.9 Login Info
Function: modify the password.
Operation: please kindly input the old password and set up new password.
Please keep the password the same in both ‘New Password’ and ‘Check
Password’. And keep the password within 15 letters while avoid using special
characters such as #, %.
Page 62
58
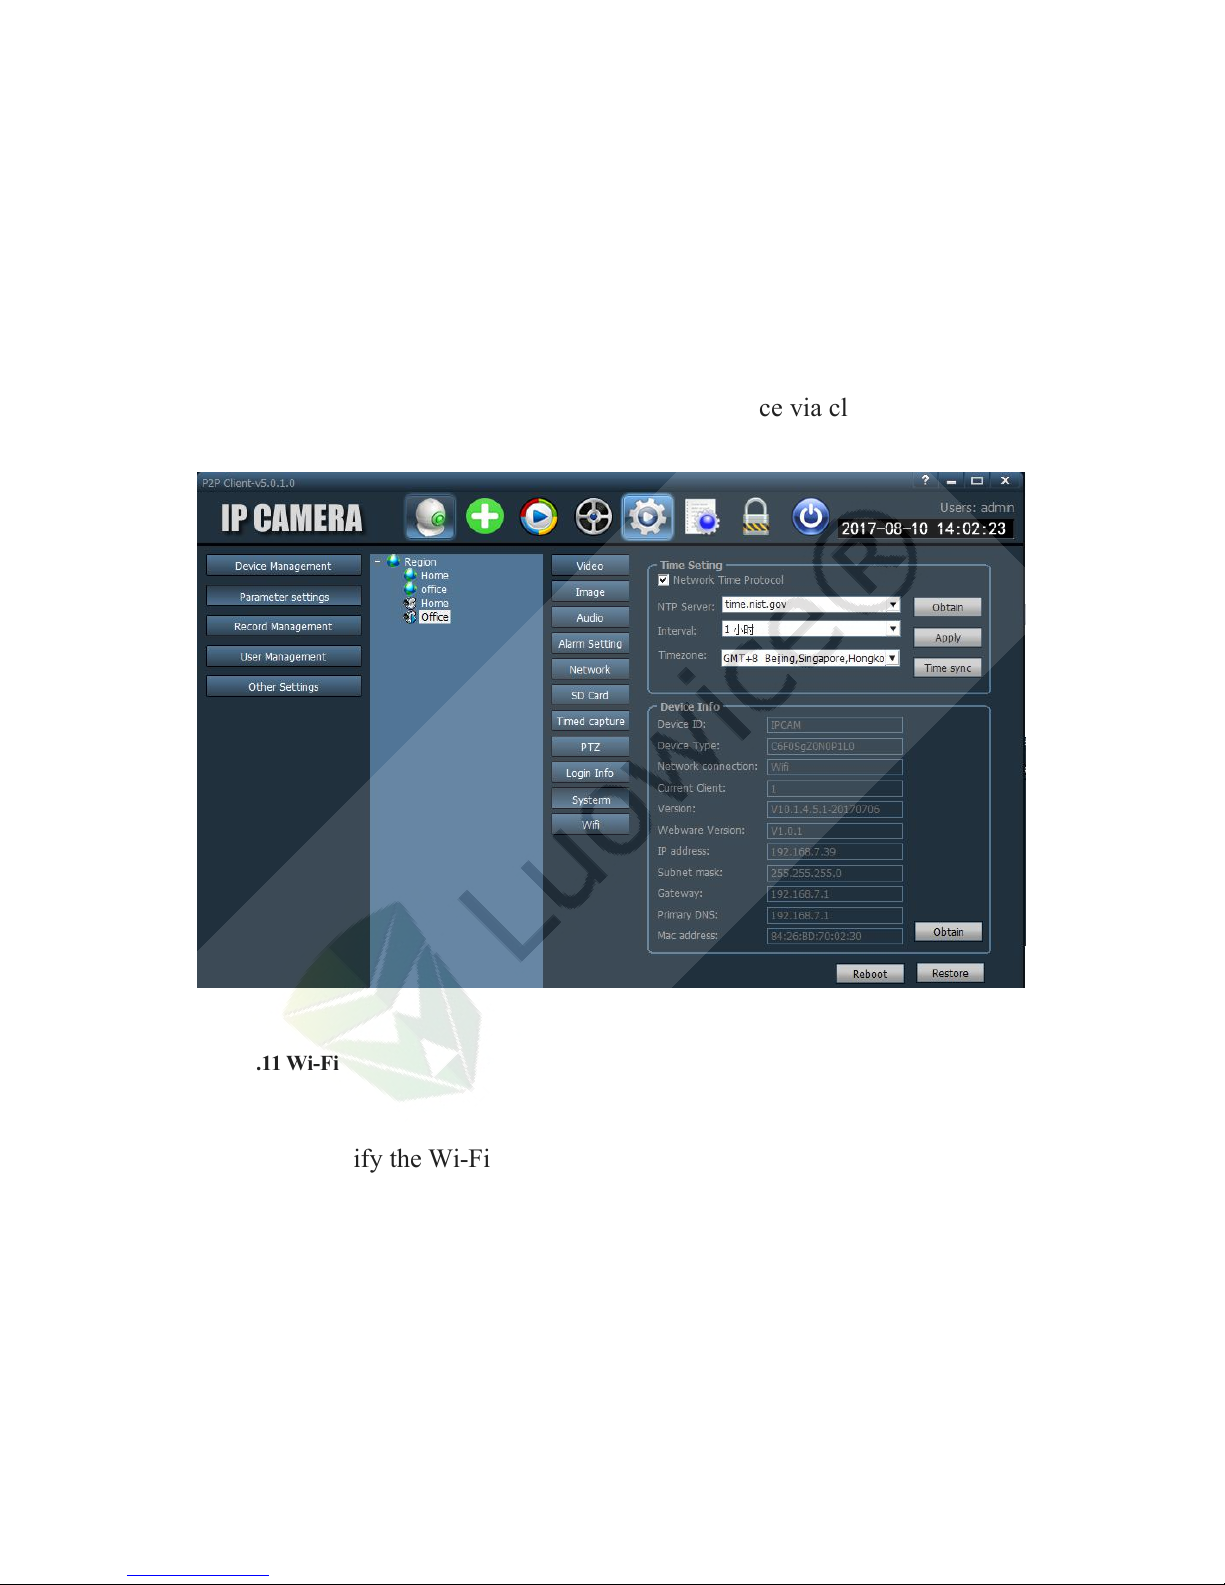
3.4.1.2.10 System
Function: check the system settings or reboot the settings back to factory
settings.
Note: please kindly note that you can reboot the device via clicking ‘Reboot’
or ‘Restore’. There is no difference.
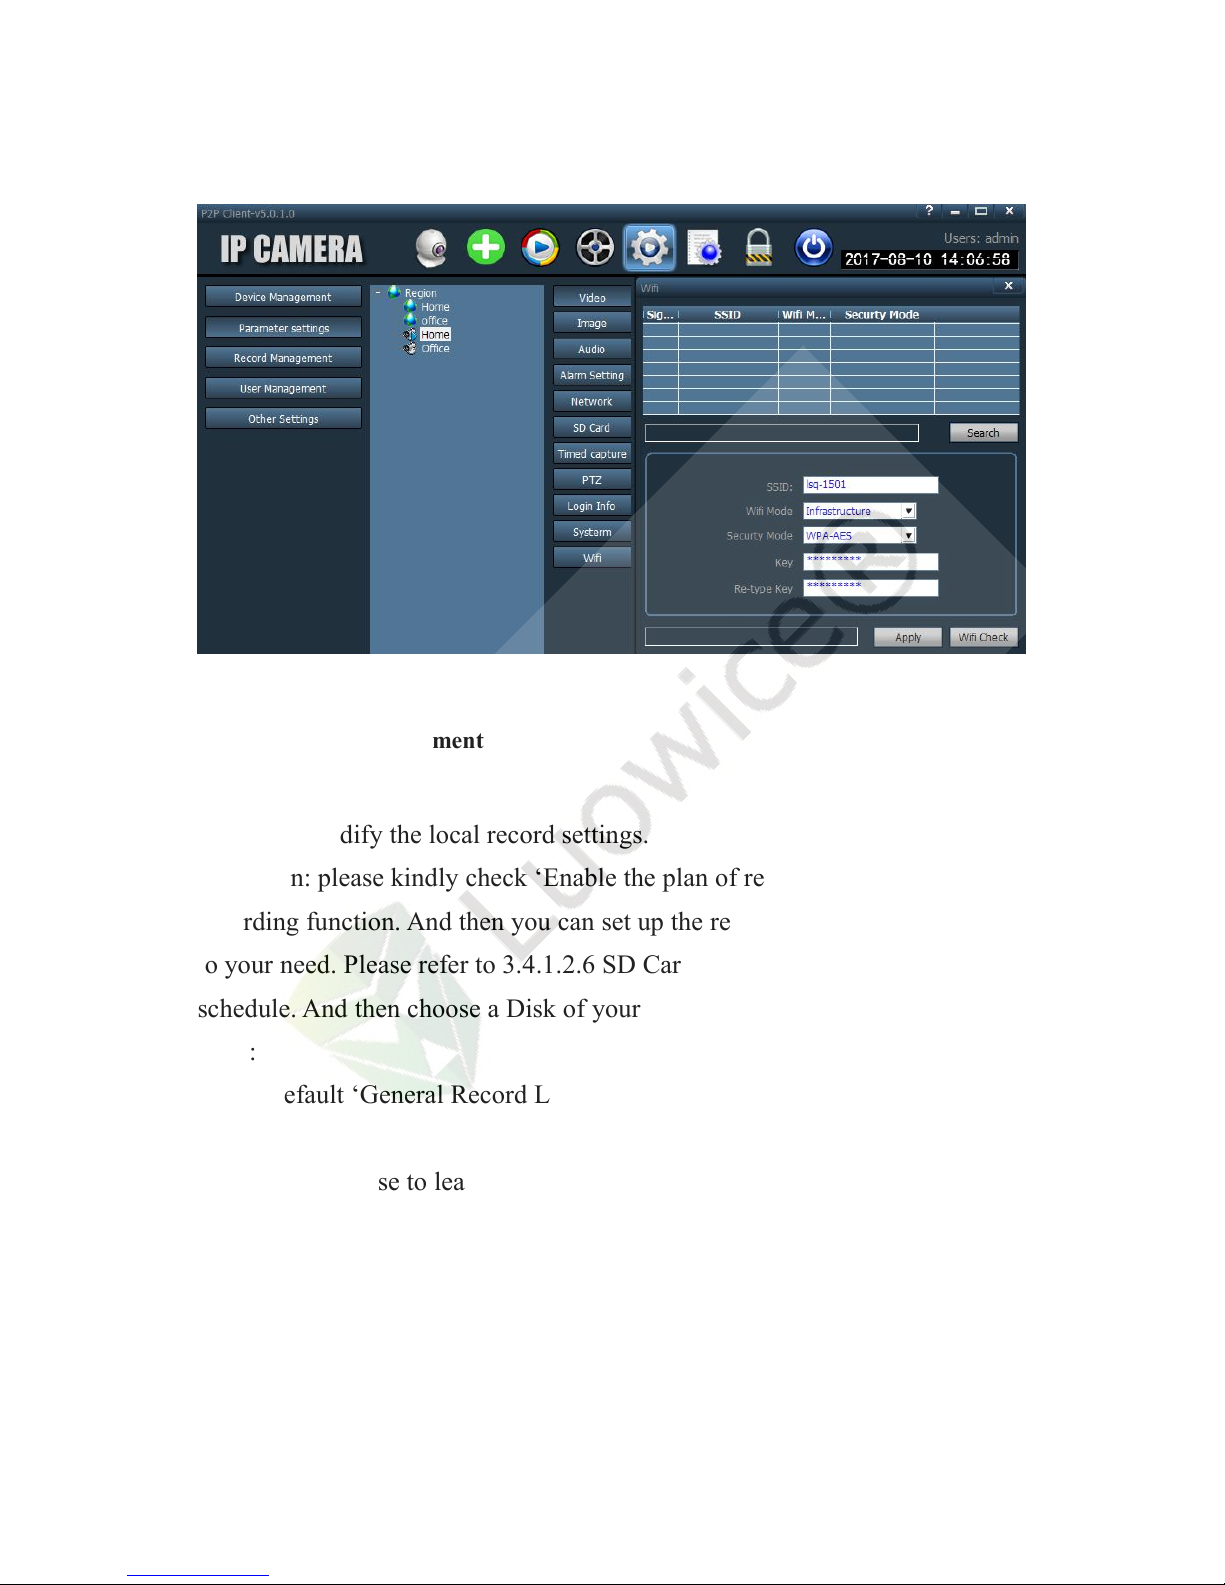
3.4.1.2.11 Wi-Fi
Function: modify the Wi-Fi settings of the camera.
Page 63
59
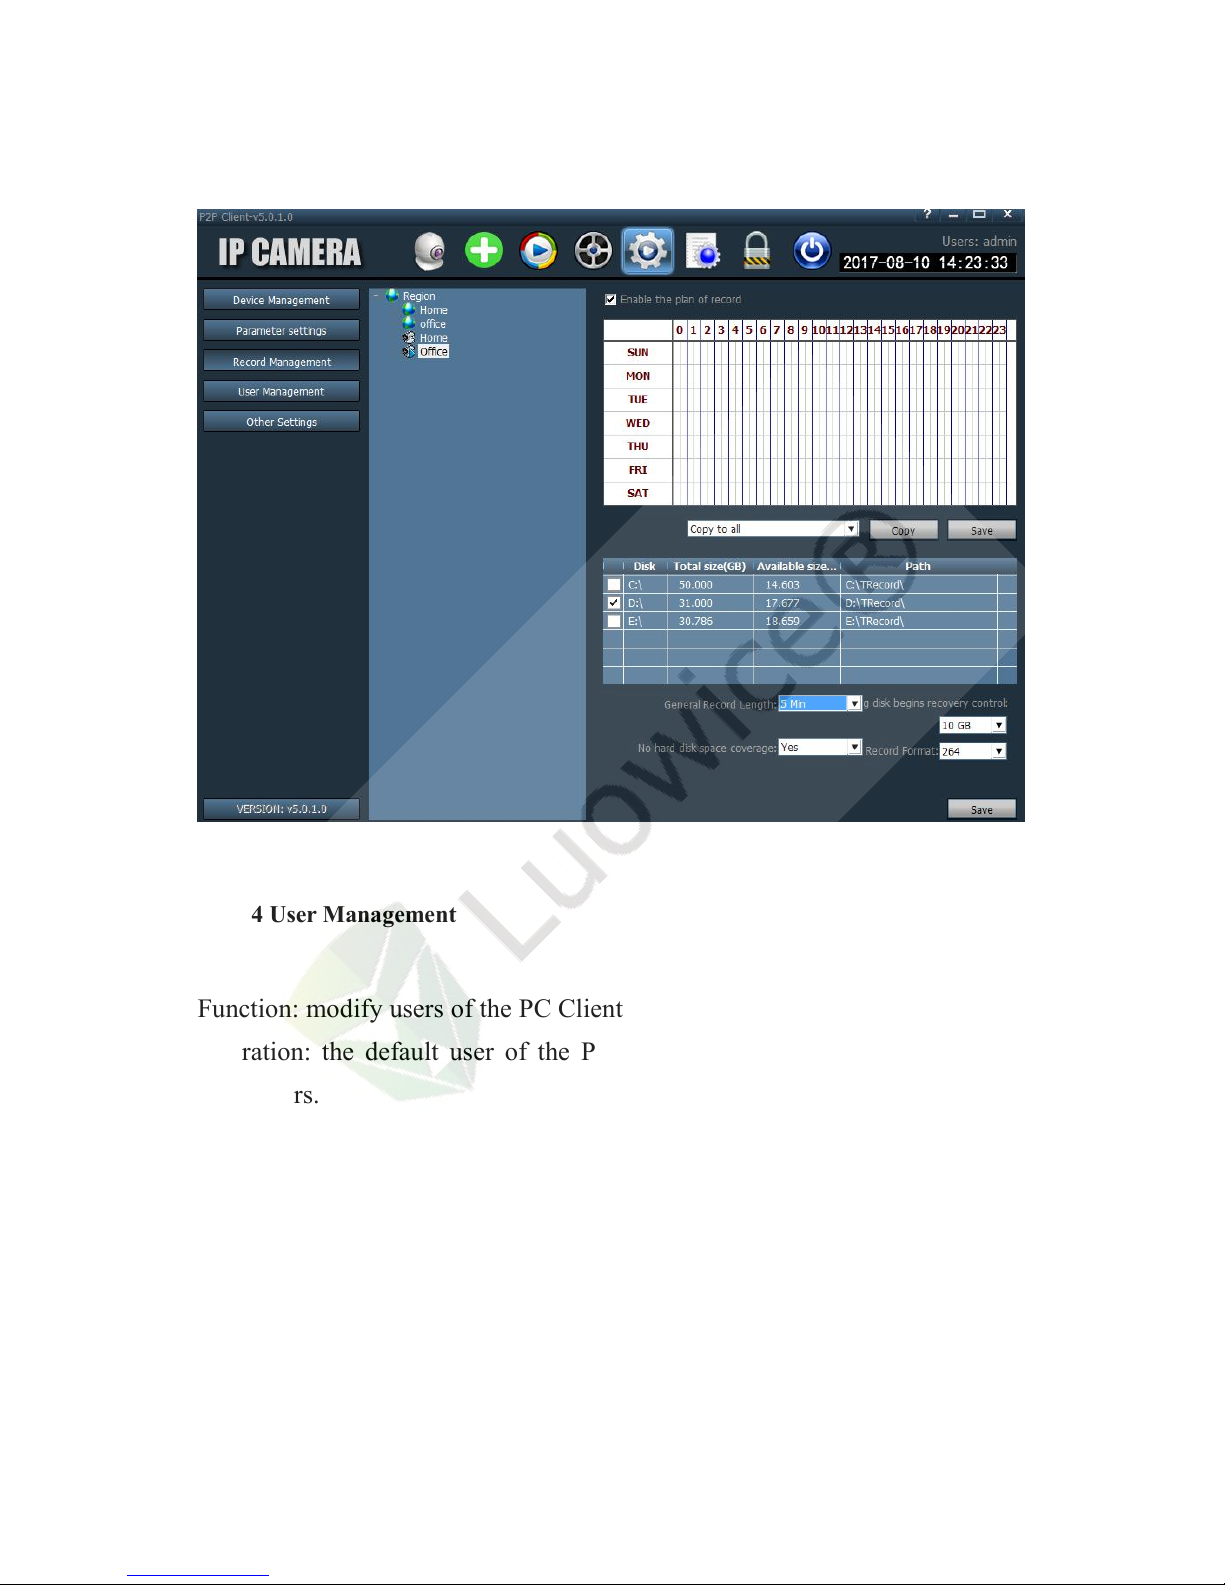
3.4.1.3 Record Management
Function: modify the local record settings.
Operation: please kindly check ‘Enable the plan of record’ to activate local
recording function. And then you can set up the recording schedule according
to your need. Please refer to 3.4.1.2.6 SD Card about how to set up the
schedule. And then choose a Disk of your PC to store the record.
Note:
a) the default ‘General Record Length’ is 5 Min. It can be modified from
1-30 Min.
b) You can choose to leave a specific storage space in the disk for the PC
that the camera cannot use. You can modify the leaving space from 1-50 GB.
c) The default record format is: 264. When you find the recorded videos
cannot be played via the player, please change it to AVI format.
Page 64
60
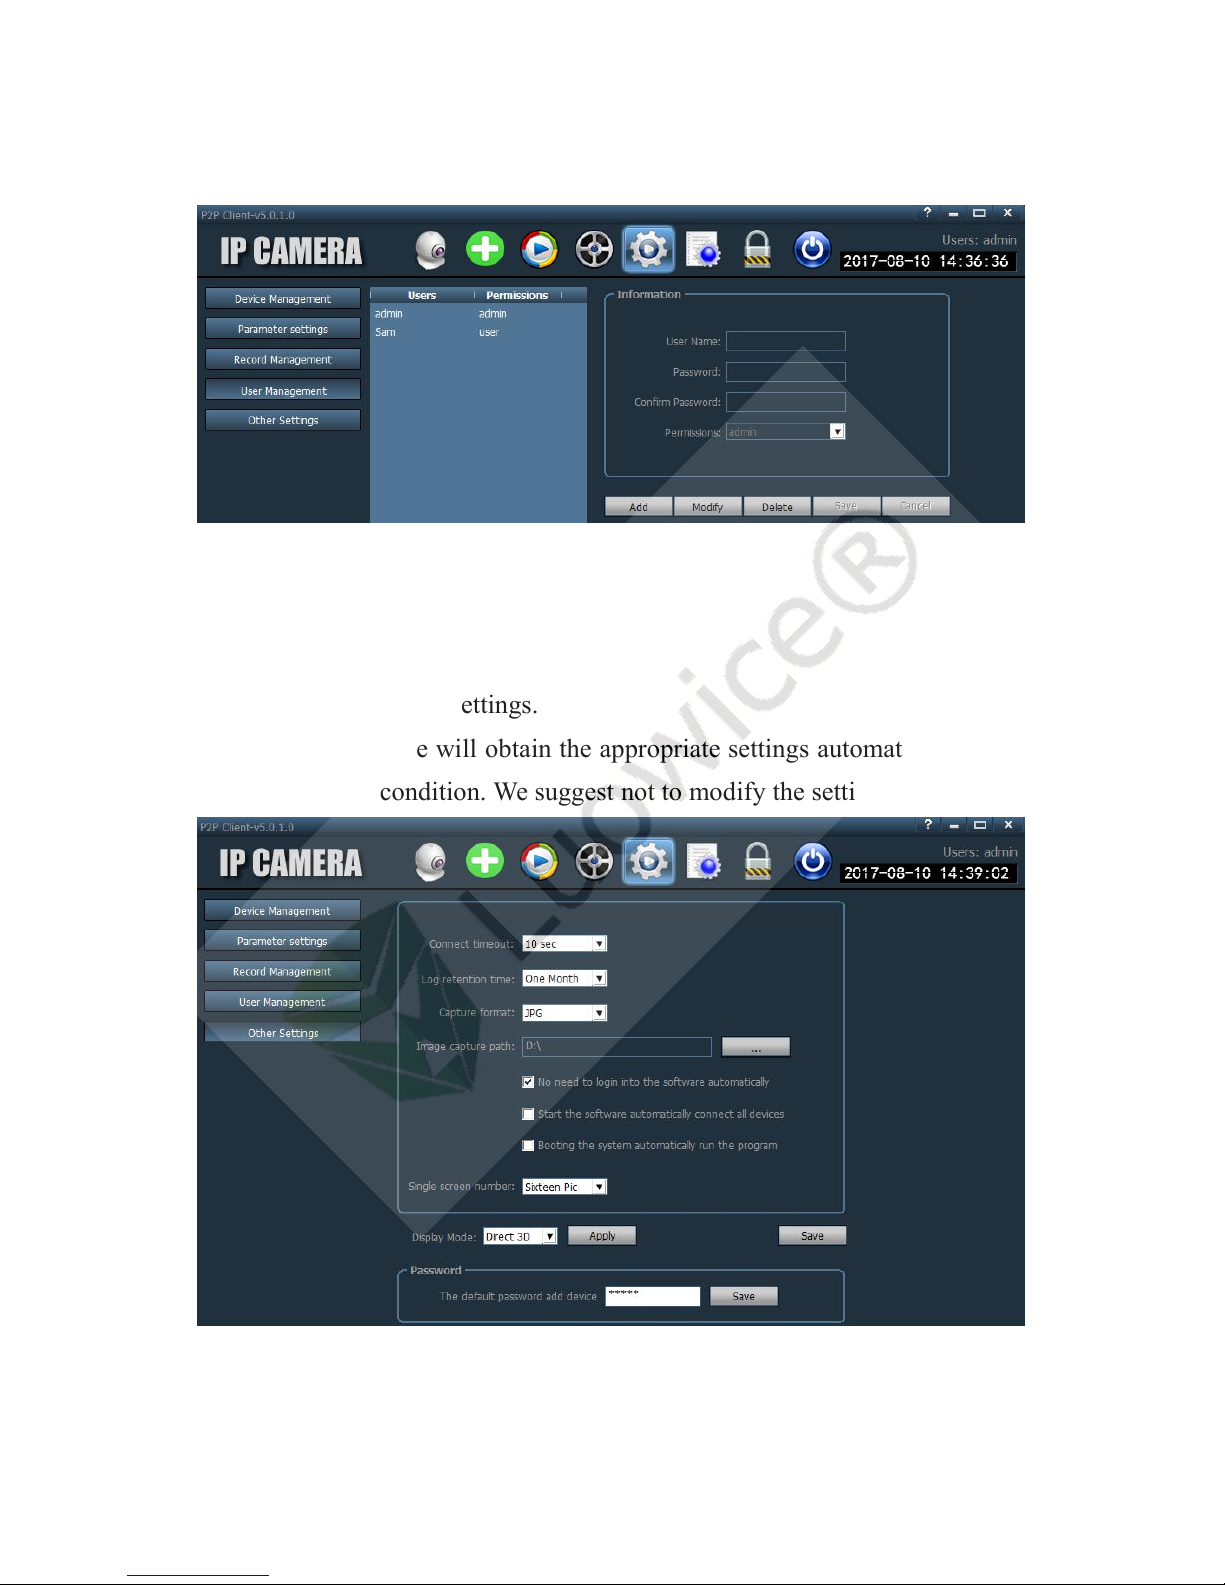
3.4.1.4 User Management
Function: modify users of the PC Client
Operation: the default user of the PC Client is: admin. You can add/delete
other users.
Page 65
61
3.4.1.5 Other Settings
Function: modify other settings.
Operation: the device will obtain the appropriate settings automatically based
on your network condition. We suggest not to modify the settings manually.
Page 66
62
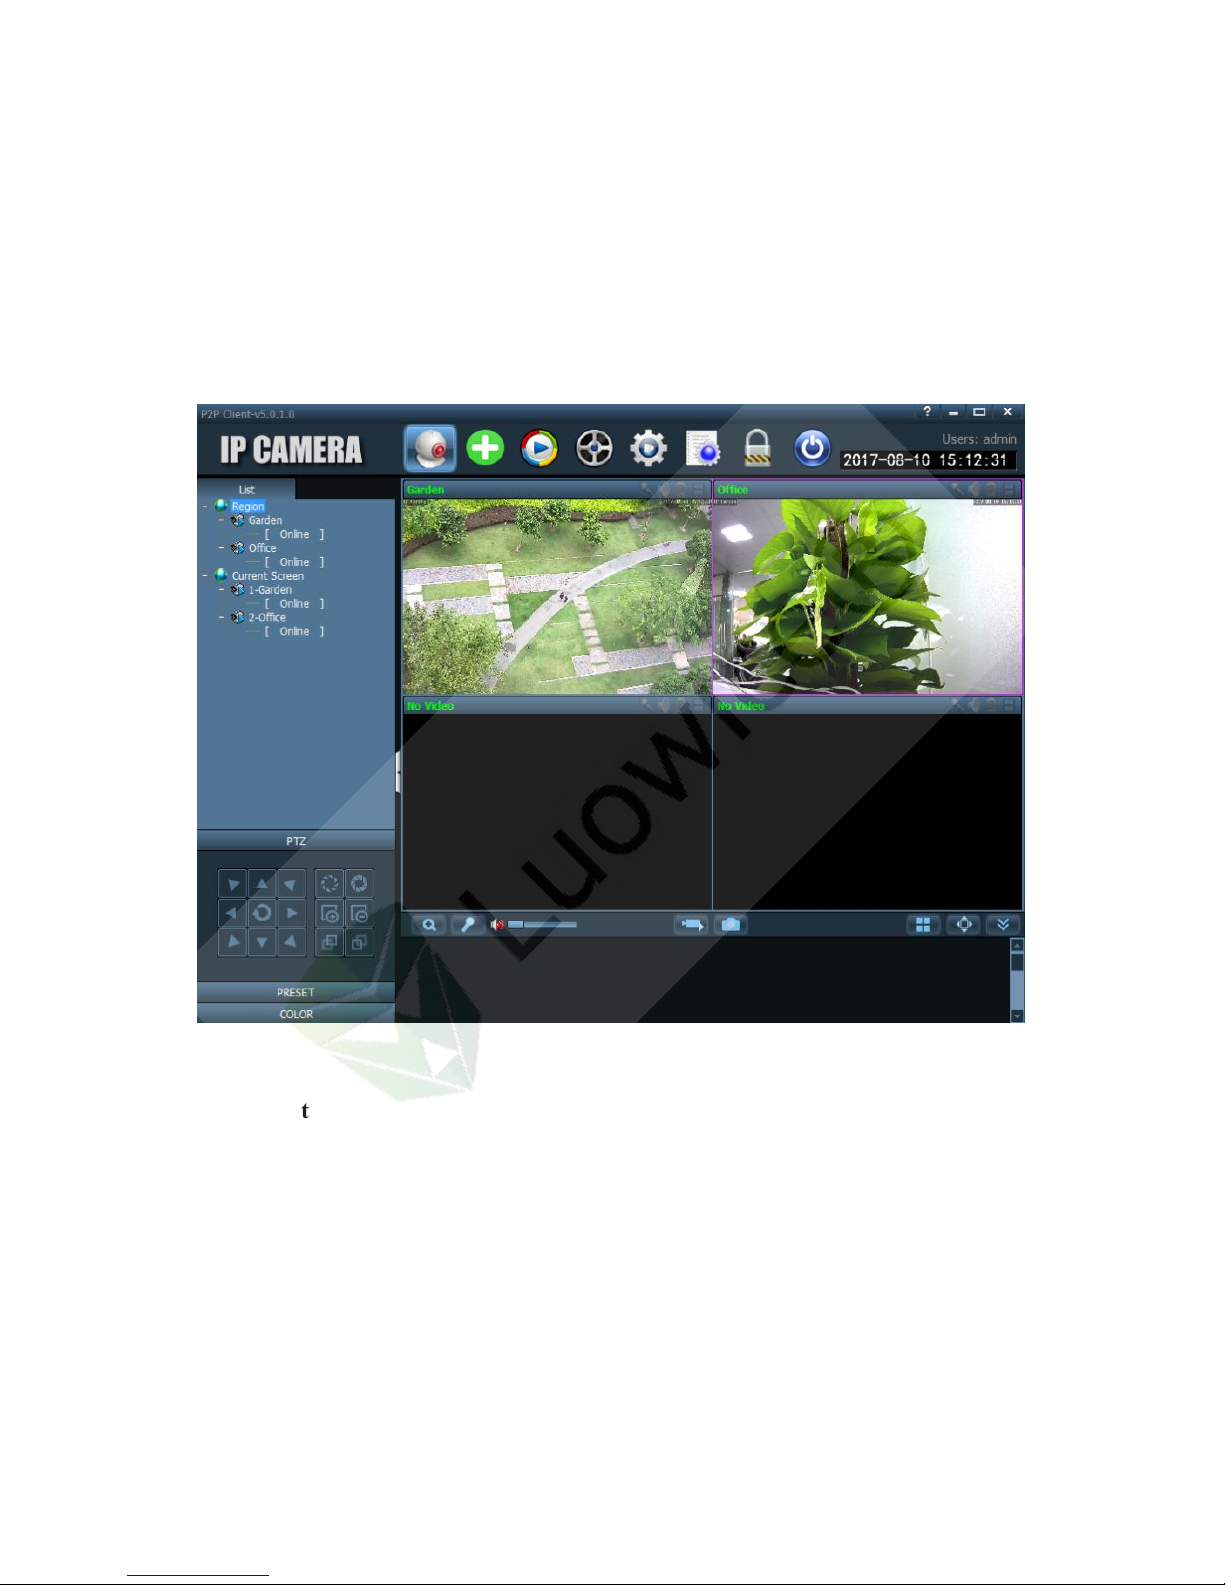
3.4.2 The Preview Interface
Function: modify the live view of the cameras.
3.4.2.1 List
Region: shows the cameras classifications.
Current Screen: shows the cameras with live views on the PC Client at the
moment.
Page 67
63
3.4.2.2 PTZ
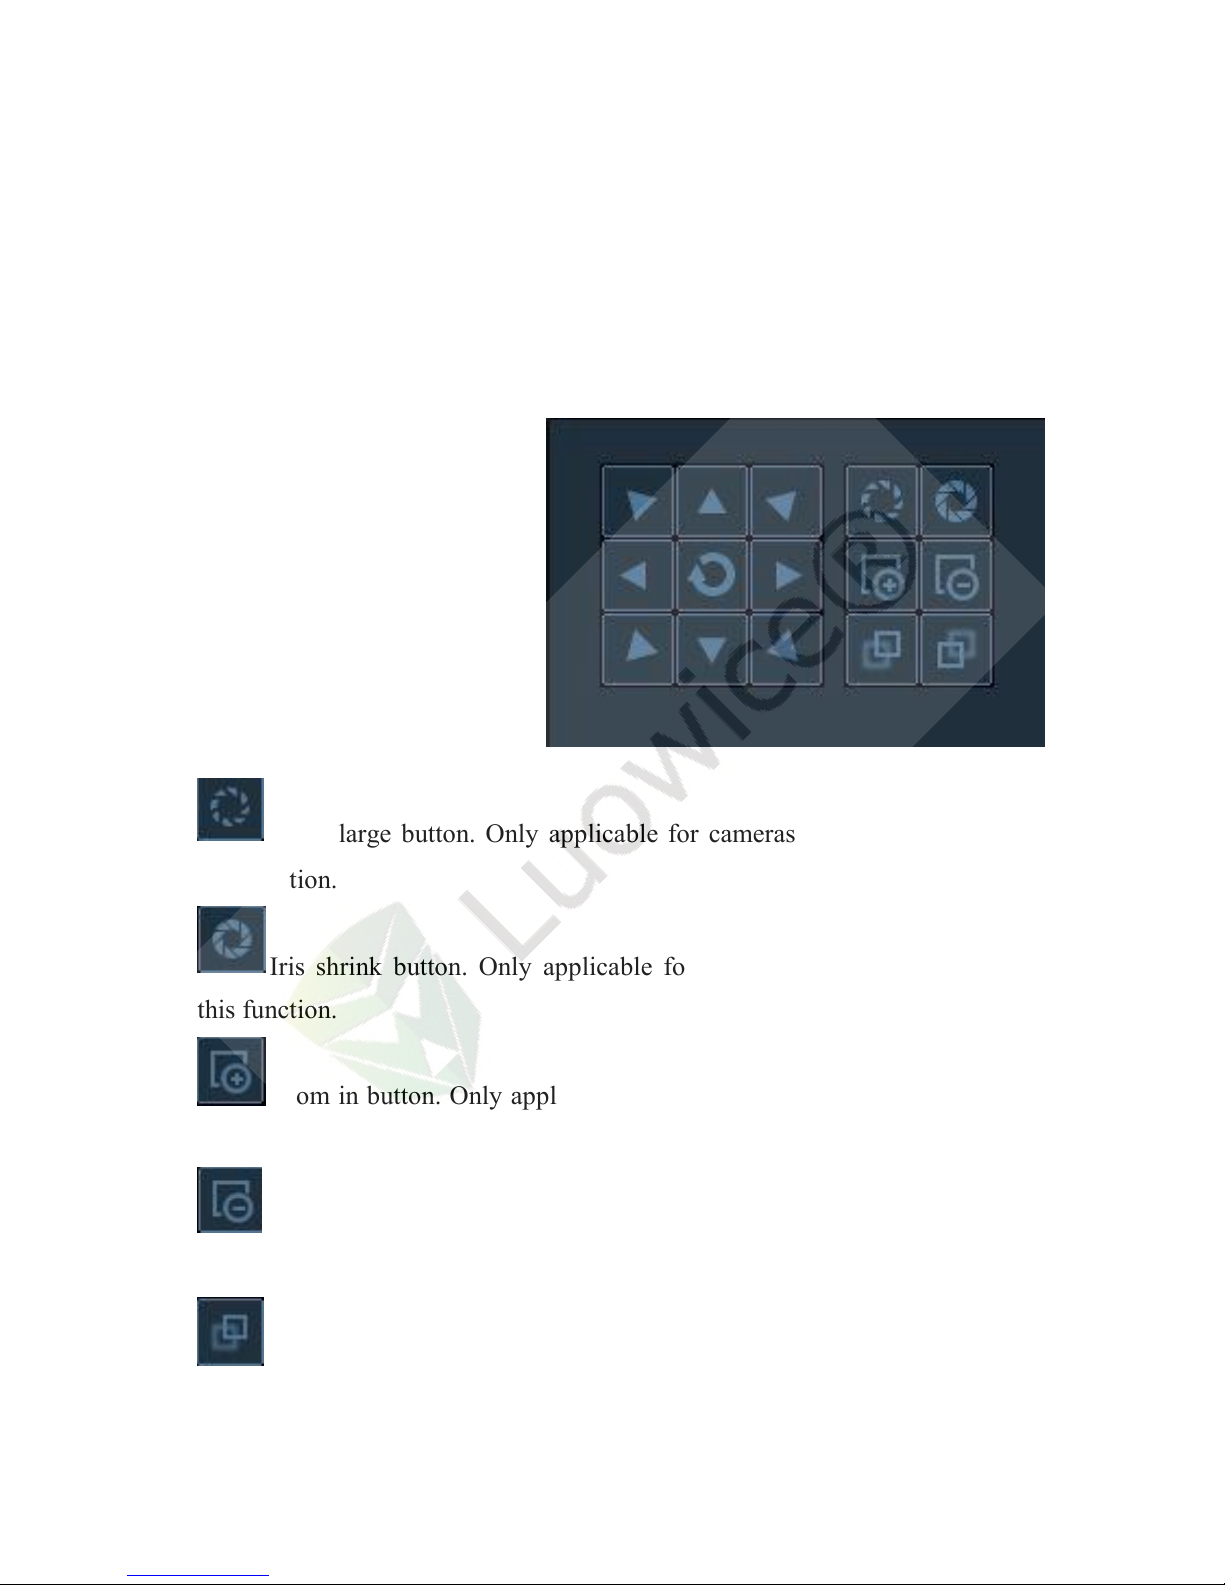
To control PTZ directions, please kindly click the any of the eight direction
icons.
Iris enlarge button. Only applicable for cameras with lens supporting
this function.
Iris shrink button. Only applicable for cameras with lens supporting
this function.
Zoom in button. Only applicable for cameras with lens supporting this
function.
Zoom out button. Only applicable for cameras with lens supporting this
function.
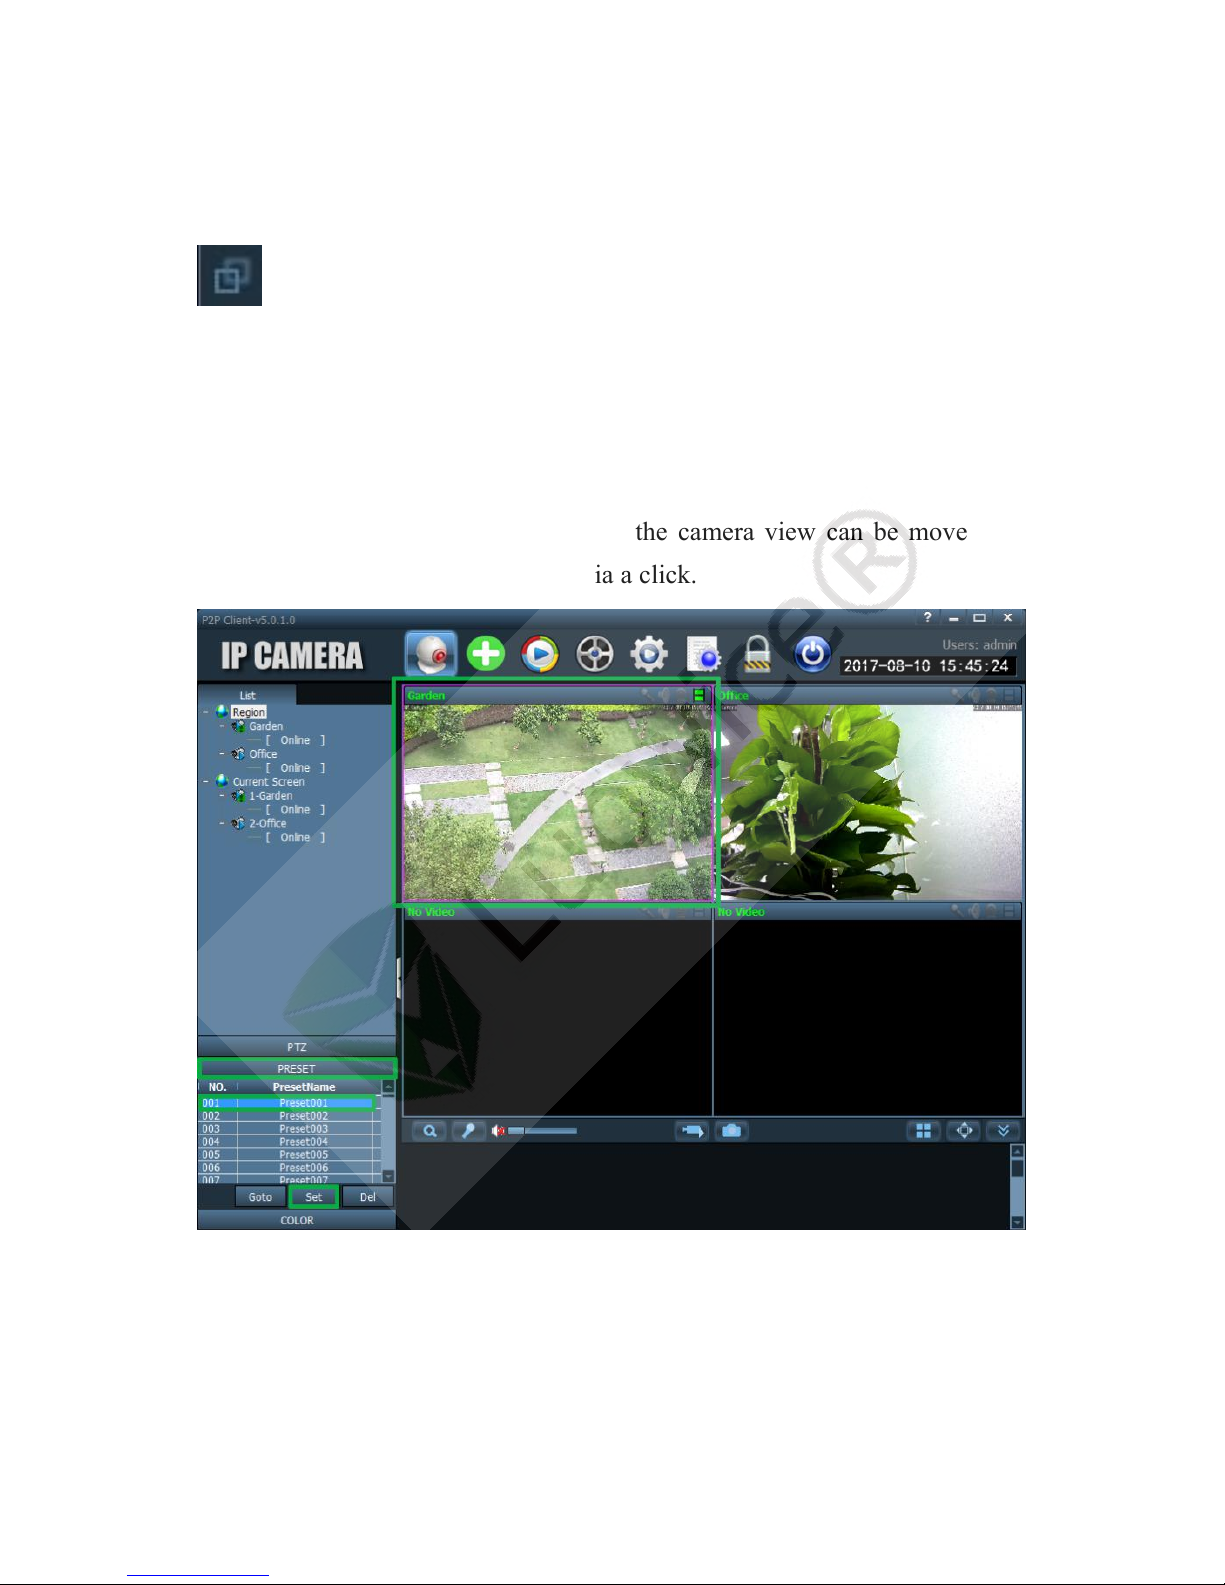
Focus in button. Only applicable for cameras with lens supporting
Page 68
64
this function.
Focus out button. Only applicable for cameras with lens supporting
this function.
3.4.2.3 PRESET
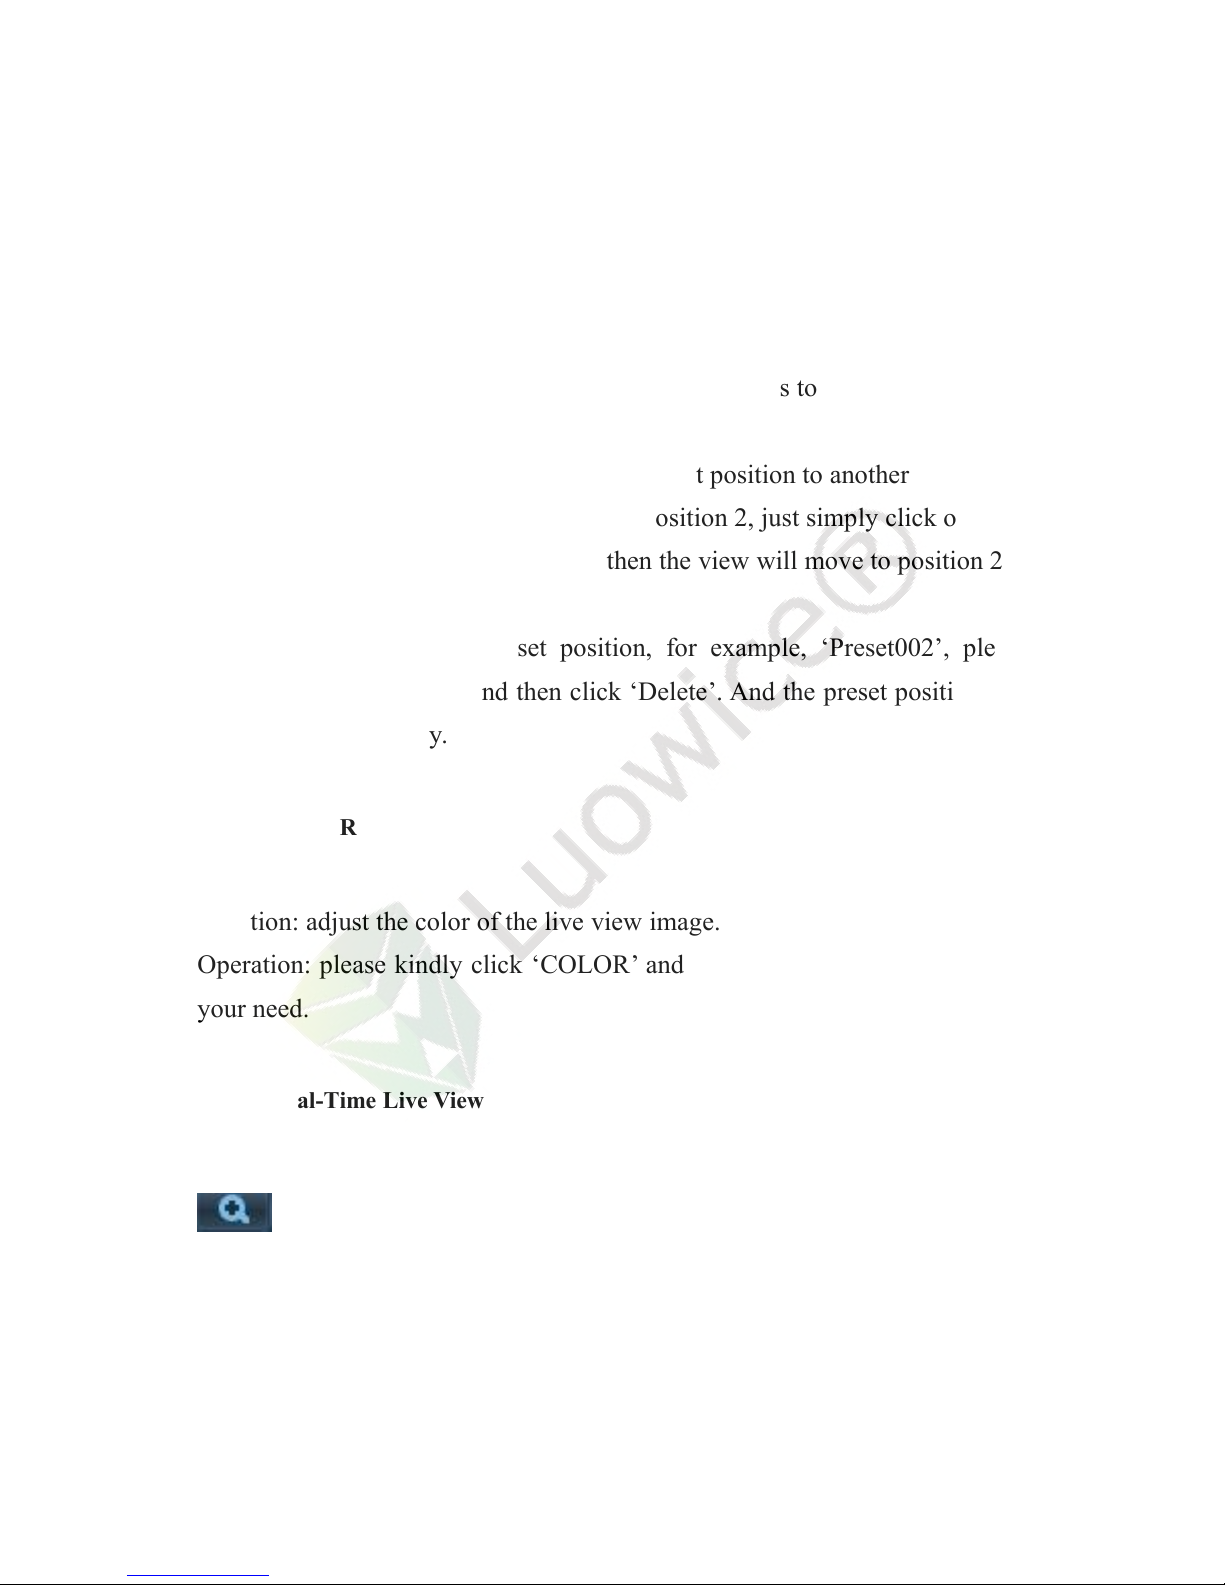
Function: to set up preset points. Then the camera view can be move from
one point to another point precisely via a click.
Operation:
First, please kindly click the live view of the camera you want to set up
preset function. Then click ‘PTZ’ to open the PTZ interface. Apply the PTZ
Page 69
65
function to move the camera view to a point you want to set up as a specific
position, such as the door.
Then click ‘Preset001’ and then click ‘Set’. And the chosen position will be
set up as position 1 successfully.
Now go back to the PTZ interface and choose positions to set up as position 2,
position 3, … And set up preset positions.
When you want to move the view from a preset position to another preset
position , for example, from position 1 to position 2, just simply click on
‘Preset002’, and then click on ‘Goto’, then the view will move to position 2
precisely.
If you want to delete a preset position, for example, ‘Preset002’, please
kindly click ‘Preset002’, and then click ‘Delete’. And the preset position will
be deleted successfully.
3.4.2.4 COLOR
Function: adjust the color of the live view image.
Operation: please kindly click ‘COLOR’ and adjust the settings according to
your need.
3.4.2.5 Real-Time Live View
Electronic zoom: click it and then move the mouse cursor to the live
view interface. And then keep left pressing the mouse to draw a specific area
you want to see details. Loosen the mouse and the selected area will be
enlarged.
Page 70
66
Intercom: choose the live view camera you want to apply intercom.
Then click the intercom icon. And when this icon appears on the live
view interface, intercom is applicable. Please kindly note that only one
camera applies intercom each time. This function only is only applicable to
devices that support intercom function.
Voice monitor: click it to enable audio monitoring. And when this icon
appears, audio monitoring is applicable. Click the voice monitor
button again and the audio monitoring function will be deactivated.
Record: choose the live view camera you want to enable local
recording function, and then click the recording button to apply recording.
When this icon appears on the top right side, video recording starts and
it will be stored in the PC. Click the record button to stop recording.
Photo: choose the live view camera you want to take snapshot. Then
click the photo button to take snapshots.
Select Pic: there are 6 screen display modes (1/4/6/8/9/16) for you to
choose from.
Full Screen: click it and then the live view interface will cover the
Page 71
67
entire screen.
Alarm message list shrink/extend: click it to display or hide the alarm
message list.
3.4.2.6 Alarm Info
Function: There will be alarm info at the bottom of the interface which shows
the status of the cameras, such as connect success, password error, etc.
3.4.3 The Automatically add devices interface
Function: to add those cameras in the same LAN with the PC via a simple
click.
Note: When the cameras have modified the password, the ‘Automatically add
devices’ function is not applicable.
3.4.4 The Local Playback Interface
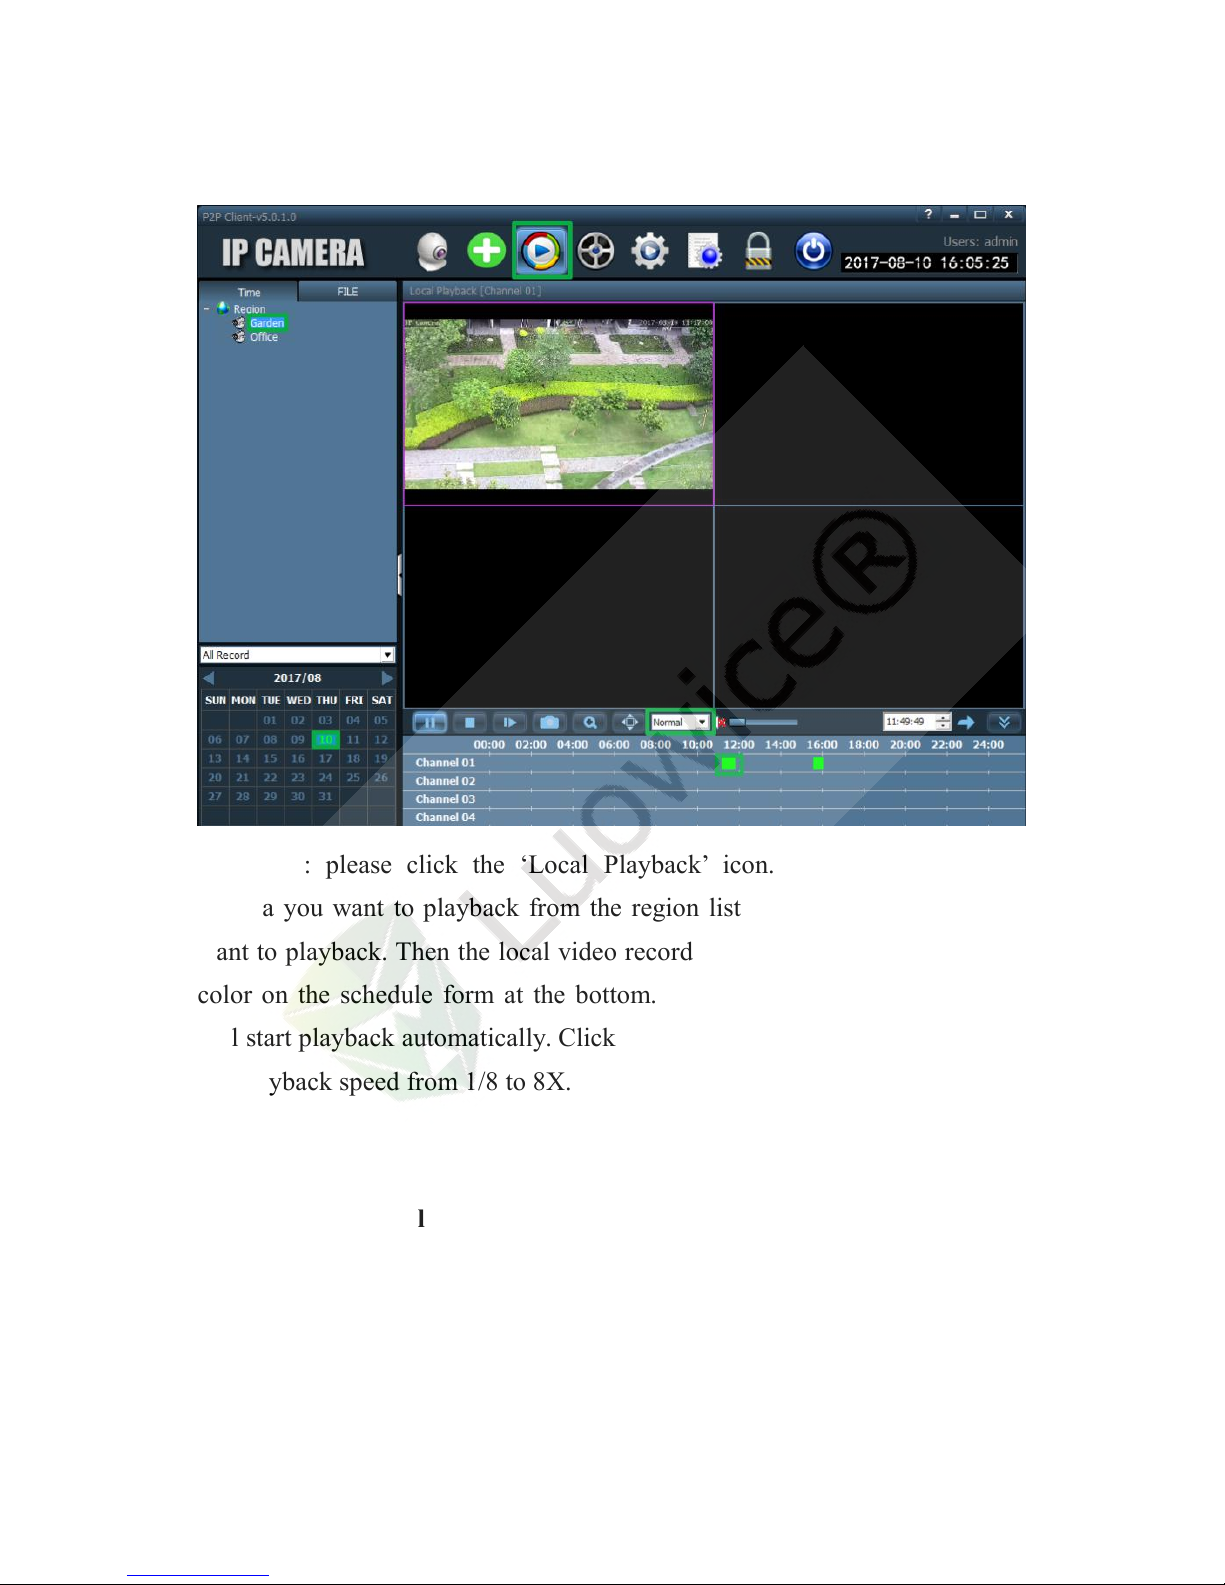
Function: to playback the local video records stored in the PC’s disk.
Page 72
68
Operation: please click the ‘Local Playback’ icon. And then choose the
camera you want to playback from the region list. And choose the date you
want to playback. Then the local video records will show record bar in green
color on the schedule form at the bottom. Click the green record bar and it
will start playback automatically. Click the ‘Normal’ icon and you can choose
the playback speed from 1/8 to 8X.
3.4.5 The Remote Playback Interface
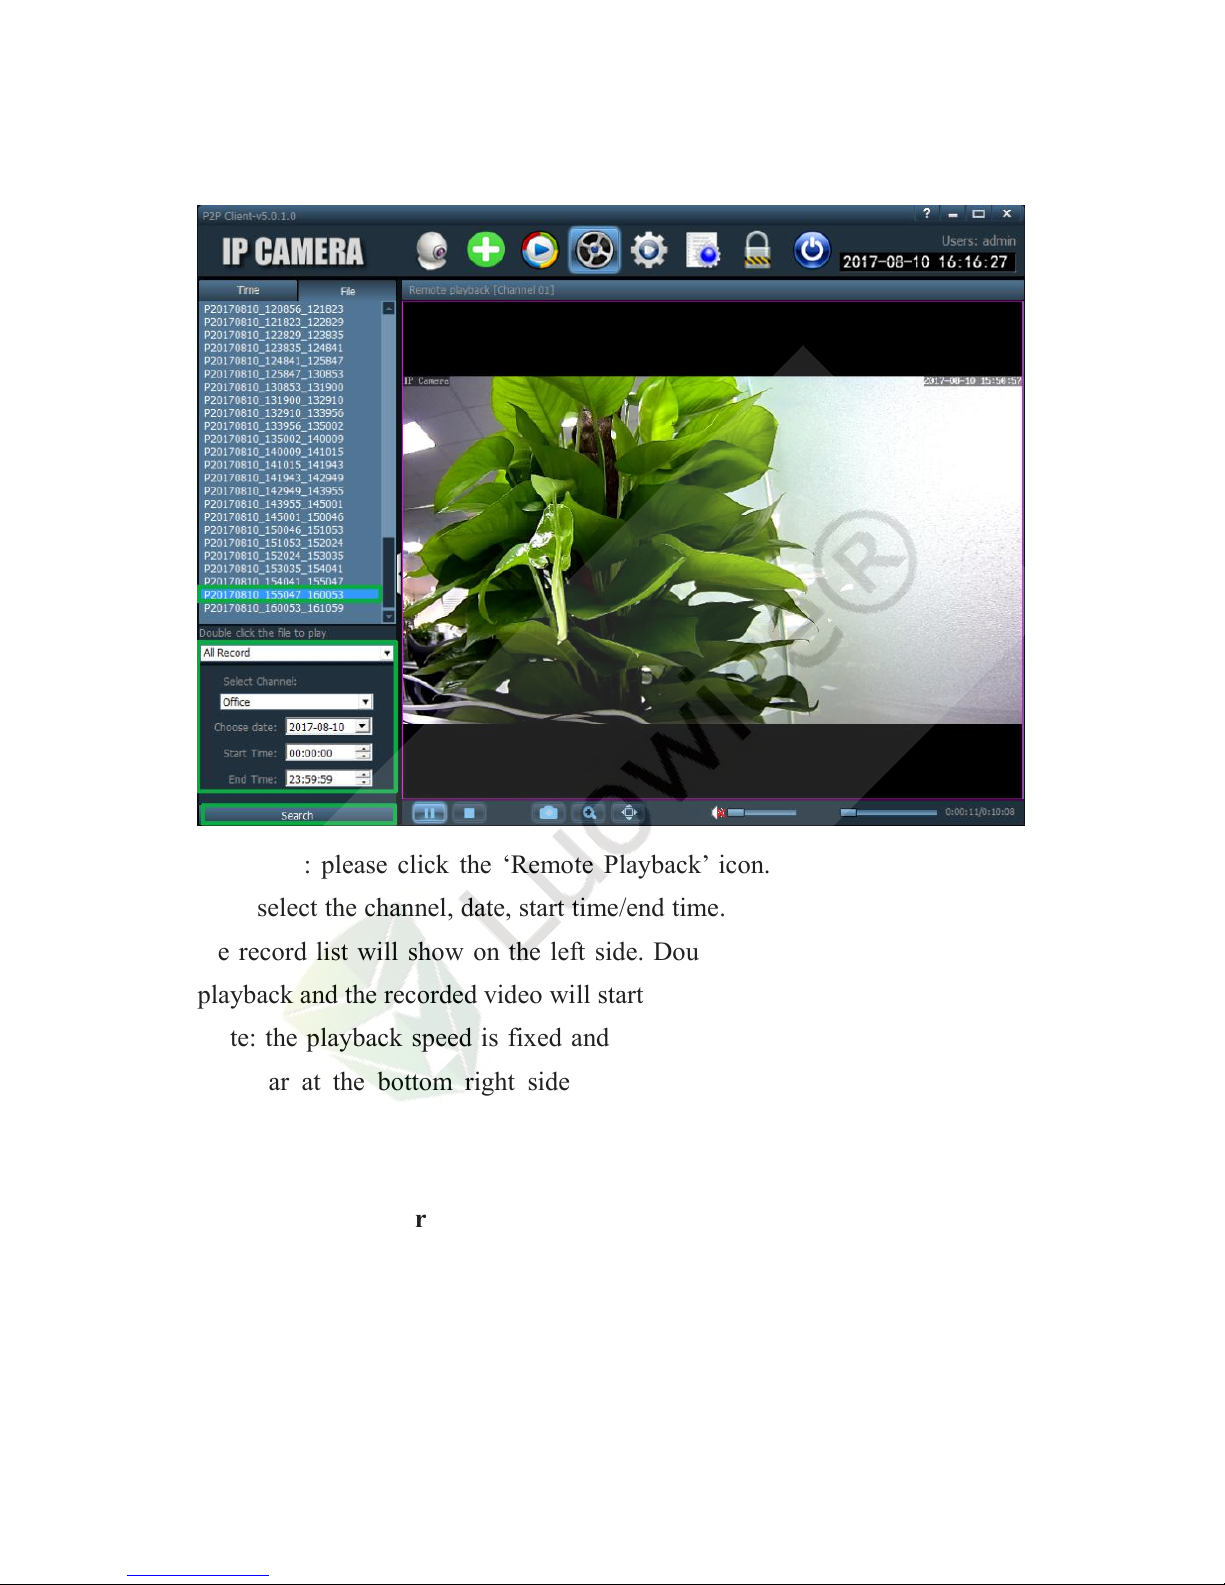
Function: to playback the video records stored in the SD card.
Page 73
69
Operation: please click the ‘Remote Playback’ icon. And choose the record
type, select the channel, date, start time/end time. And then click ‘Search’ and
the record list will show on the left side. Double click the time you want to
playback and the recorded video will start playback.
Note: the playback speed is fixed and cannot be modified. You can drag the
blue bar at the bottom right side to choose a specific time to start video
playback.
3.4.6 The Logs Interface
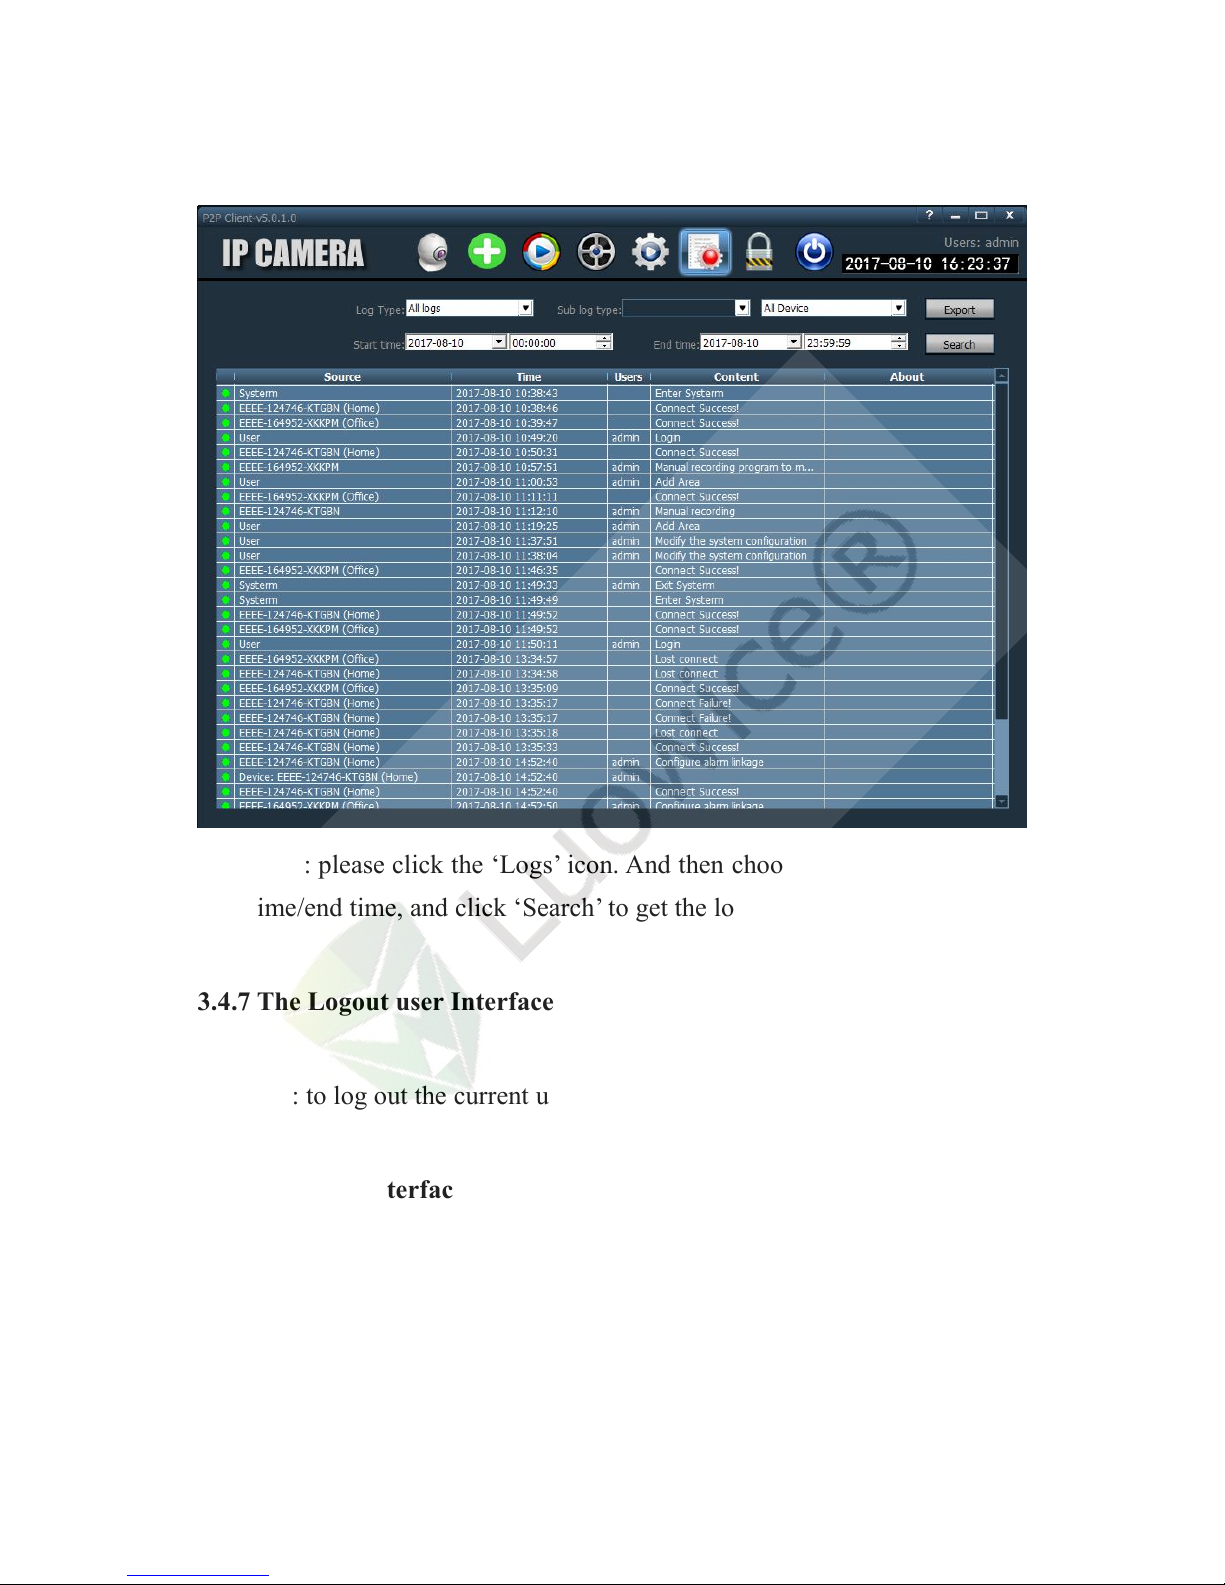
Function: to check main operation of the camera.
Page 74
70
Operation: please click the ‘Logs’ icon. And then choose the log type, device,
start time/end time, and click ‘Search’ to get the logs list.
3.4.7 The Logout user Interface
Function: to log out the current user and log in with another user.
3.4.8 The Exit Interface
Function: to exit the PC Client.
Page 75
71
Luowice
Manufacturer: Guangzhou Lieju Electronic Technology Co., Ltd.
Website: http://www.luowice.com/en
Skype: Luowice Tech Support
Address: Dongfeng Industry Park, Lingshan East Road, No.15, Zhucun,
Tianhe District, Guangzhou, China, 510665
 Loading...