

Page 1

门窗传感器T1说明书V3
尺寸:65*65mm
材质:105g太空梭哑粉
工艺:胶装
料号:3020211
PANTONE COOL GRAY 7C
PANTONE COOL GRAY 2C
PANTONE 299C
Page 2
Door and Window Sensor T1
Page 3

Page 4
Door and Window Sensor T1
Quick Start Guide
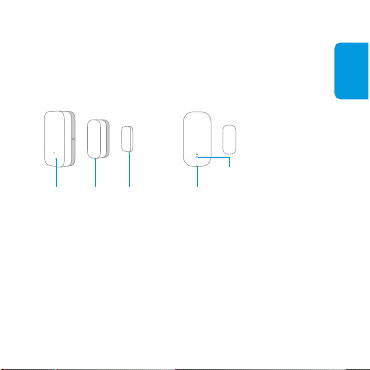
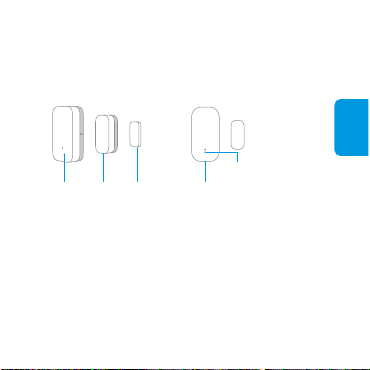
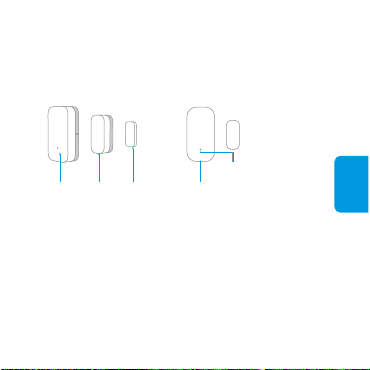
Product Introduction
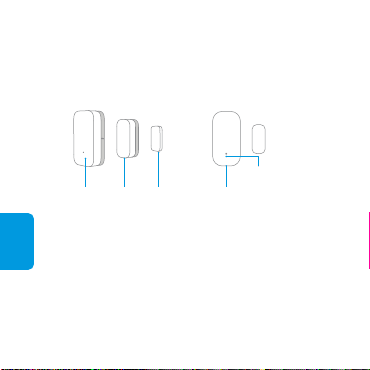
Indicator Light
Sensor Unit Magnet Reset Button
* Use it if there is not enough space to install the normal magnet.
* This device requires a compatible Zigbee 3.0 hub. Some features
require a specific hub. For a detailed list, visit www.aqara.com/support.
Thin Magnet
Long Press for 5s: Reset/Connect to Network
Single Press: Effective Range Test/Identify Device
English
Page 5

Quick Setup
1.
Please add the Hub to the app according to the Hub Quick
Start Guide.
English
2.
Please open the app, tap “Home” and then tap “+” at the
top right corner to enter “Add Device (Accessory)” page.
Select “Door and Window Sensor T1”, and add it
according to instructions.
3.
Need help? Visit www.aqara.com/support.
* If the connection fails, please move the device closer to the Hub and
try again.
Installation
Effective Range Test: Single press the reset button on the
device at your desired position. If the Hub makes voice
prompts, it indicates that the device can communicate
effectively with the Hub.
* Avoid metal surface to maximize signal strength.
Page 6
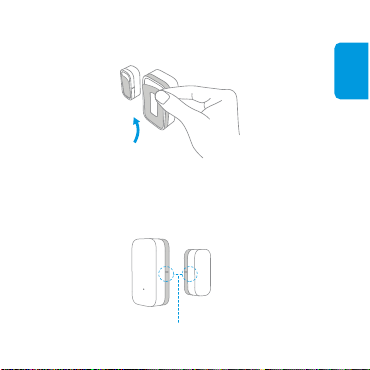
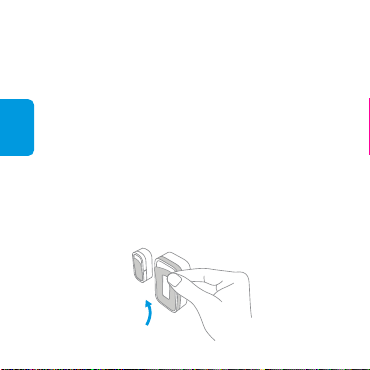
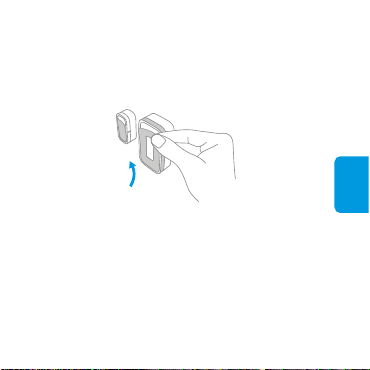
Step 1: Remove the protective film.
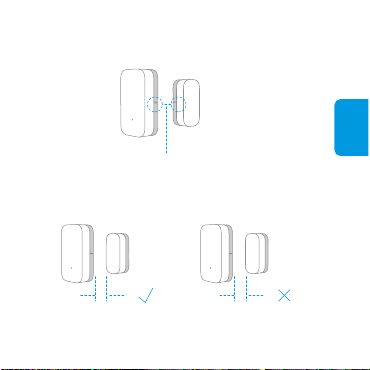
Step 2: During installation, try to align the marker line of the
sensor unit and the magnet.
English
Page 7
English
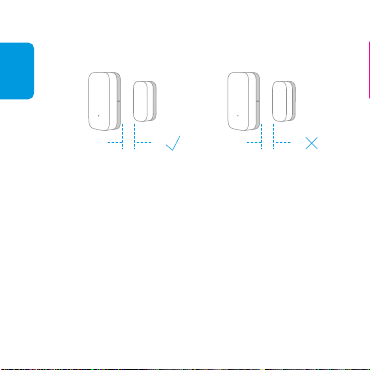
Step 3:
Stick to doors or windows, Installation gap less than
22 mm (0.87 in.).
≤22mm (0.87 in.)
* Keep the surface clean and dry.
≥22mm (0.87 in.)
Specifications
Model: DWS-S01
Dimensions: 41 × 22 × 11 mm (1.61 × 0.87 × 0.43 in.)
Wireless Protocol: Zigbee 3.0
Battery: CR1632
Maximum Detection Distance: 22 mm (0.87 in.)
Operating Temperature: -10° - +50℃ (14° - 122℉)
Operating Humidity: 0 - 95% RH, non-condensing
* Read this Quick Start Guide carefully before use and keep it for future reference.
Page 8
門窗感測器 T1使用說明書
產品介紹
指示燈
感測器主體磁鐵薄片磁鐵
*可用於代替磁鐵,如玻璃門等較狹窄安裝場景。
*本產品需要配合具備Zigbee 3.0閘道器功能的設備使用。部分功能需
要特定型號閘道器支援,詳情列表請查看:www.aqara.com/support。
重設鍵
長按5s:重置/入網
按一下:有效通訊距離驗證/設備查
找功能
繁體中文
Page 9
快速設定
1、
請依照閘道器說明書,將閘道器添加到app;
2、
開啓app,點選首頁右上角「+」,進入「添加設備(配
件)」頁面,選擇門窗感測器 T1,並依照提示進行操作;
3、
如需幫助請查詢:www.aqara.com/support。
*如添加失敗,請將設備移近閘道器後重試。
繁體中文
安裝方法
道器之間可以有效通訊。
*為了確保無線通訊穩定,須避免安裝在金屬表面。
①撕下膠貼保護膜;
Page 10
②安裝時儘量對齊主體與磁鐵側邊的安裝標記線;
③分別粘貼在所需開合區域,安裝間隙小於22公釐(0.87
英吋)。
繁體中文
繁體中文
≤22毫米 (0.87英吋)
*確保粘貼位置表面清潔乾燥。
≥22毫米 (0.87英吋)
Page 11

基本參數
產品型號:DWS-S01
產品尺寸:41×22×11公釐(1.61×0.87×0.43英吋)
無線連接:Zigbee 3.0
電池型號:CR1632
感測距離:最大22公釐(0.87英吋)
工作溫度:-10℃~+50℃(14°~122℉)
繁體中文
工作濕度:0~95% RH,無冷凝
*請仔細閱讀本說明書並妥善保管。
Page 12
Tür- und Fenstersensor T1 Schnellstar
tanleitung
Produktübersicht
Sensoreinheit Magnet Dünner Magnet Rücksetztaste
* Verwenden Sie diesen Magnet, wenn der Platz für die Montage des
normalen Magnet nicht ausreichend sein sollte.
* Für dieses Zubehör wird ein kompatibler Zigbee 3.0-hub benötigt. Für
einige Funktionen wird ein spezifischer hub benötigt. Die detaillierte
Liste dazu finden Sie hier: www.aqara.com/support.
Anzeigelampe
Langer Tastendruck 5 Sek: Netzwerk
zurücksetzen/verbinden
Einmal drücken: Test Empfangsbereich/Gerät
Deutsch
Page 13

Schnelleinrichtung
1.
Bitte fügen Sie den Hub entsprechend der Hub-Schnellstartanleitung zur App hinzu.
2.
Bitte öffnen Sie die App, tippen Sie auf „Home“ (Haus) und
dann auf „+“ in der oberen rechten Ecke, um die Seite „Add
Device (Accessory)“ (Gerät hinzufügen (Zubehör))
aufzurufen. Tippen Sie auf „Door and Window Sensor
Deutsch
T1“ (Tür- und Fenstersensor T1) und fügen Sie ihn
gemäß der Anleitung hinzu.
3.
Sie brauchen Hilfe? Besuchen Sie www.aqara.com/-
Deutsch
support.
* Wenn die Verbindung fehlschlägt, geben Sie bitte das Zubehör näher
an den Hub und versuchen Sie es erneut.
Montage
Test der wirksamen Reichweite: Drücken Sie einmal die
Rücksetztaste des Zubehörgeräts an dessen gewünschtem
Standort. Wenn der Hub Töne von sich gibt, bedeutet dies,
dass das Zubehör mit dem Hub korrekt kommunizieren kann.
Page 14
* Vermeiden Sie die Nähe von Metalloberflächen, um die Signalstärke
zu maximieren.
Schritt 1: Entfernen Sie die Schutzfolie.
Schritt 2: Richten Sie bei der Montage die Markierung-
slinien von Sensoreinheit und Magnet so gut wie
möglich aneinander aus.
Deutsch
Page 15

Schritt 3: Kleben Sie den Sensor an eine Tür oder ein Fenster,
Montageabstand kleiner als 22 mm (0.87 Zoll).
Deutsch
≤22mm (0.87 Zoll)
* Halten Sie die Oberflächen sauber und trocken.
≥22mm (0.87 Zoll)
Page 16

Spezifikationen
Modell: DWS-S01
Abmessungen: 41 × 22 × 11 mm (1,61 × 0,87 × 0,43Zoll)
Drahtloses Protokoll: Zigbee 3.0
Batterie: CR1632
Maximale Erfassungsreichweite: 22 mm (0.87 Zoll)
Betriebstemperatur: -10 ℃ bis +50 ℃ (14 ℉ bis 122 ℉)
Betriebsfeuchtigkeit: 0 - 95% RH, keine Kondensation
* Lesen Sie bitte die Schnellstartanleitung vor der erstmaligen Verwendung
und bewahren Sie sie auf.
Deutsch
Page 17
Guía rápida del sensor de puertas y
ventanas T1
Présentation du produit
Capteur Aimant Aimant mince Bouton de réinitialisation
Français
* À utiliser lorsque la place est insuffisante pour utiliser l'aimant normal.
* Cet accessoire nécessite d'un hub compatible Zigbee 3.0. Certaines
fonctions exigent un hub spécifique. Vous trouverez une liste détaillée
sur le site www.aqara.com/support.
Voyant indicateur
Appui prolongé (5 secondes):
Réinitialisation/Connexion au réseau
Un seul appui: Essai de portée
réelle/dentification de l'appareil
Page 18

Configuration rapide
1.
Ajoutez le concentrateur à l'application conformément au
guide de démarrage rapide du concentrateur.
2.
Ouvrez l'application, touchez «Home» (Maison) puis
touchez «+» au coin supérieur droit pour entrer à la page
«Add Device (Accessory)» (Ajouter un périphérique
(accessoire)). Sélectionnez «Door and Window Sensor
T1» (Capteur pour portes et fenêtres T1) et ajoutez-le
comme l'indiquent les instructions.
3.
Vous avez besoin d'aide? Visitez www.aqara.com/support.
* En cas d'échec de la connexion, rapprochez l'accessoire du concentrateur
et réessayez.
Français
Page 19

Installation
Test de portée efficace: Appuyez une fois sur le bouton de
réinitialisation de l'accessoire une fois placé à l'endroit
souhaité. Si le concentrateur émet des invites vocales, c'est
que l'accessoire peut effectivement communiquer avec le
concentrateur.
* Évitez les surfaces métalliques qui peuvent affaiblir le signal.
Étape 1: Enlevez le film de protection.
Français
Page 20

Étape 2: Lors de l'installation, cherchez à aligner la ligne de
marquage du capteur avec l'aimant.
Étape 3: Collez les éléments aux portes et fenêtres,
Écartement inférieur à 22 mm (0.87 in.).
≤22 mm (0.87 in.) ≥22 mm (0.87 in.)
Français
Page 21

* Maintenez la surface propre et sèche.
Caractéristiques
Modèle: DWS-S01
Dimensions: 41 × 22 × 11 mm (1,61 × 0,87 × 0,43 in)
Protocole sans fil: Zigbee 3.0
Pile: CR1632
Distance maximale de détection: 22 mm (0.87 in.)
Température de service: de -10 à +50 ℃ (de 14 à 122 ℉)
Humidité de service: de 0 à 95% HR, non condensante
* Lisez attentivement ce guide de démarrage rapide avant d'utiliser
l'appareil, et conservez-le pour pouvoir le consulter ultérieurement.
Français
Page 22

Guía rápida del sensor de puertas y
ventanas T1
Presentación del producto
Imán Imán fino Botón de restablecimiento
Unidad del
sensor
Luz indicadora
Pulsación larga durante 5 seg:
restablecer/conectarse a la red
Una pulsación: prueba de alcance
efectivo/identificación de dispositivos
* Utilícelo si no hay espacio suficiente para instalar el imán normal.
* Este accesorio requiere un Zigbee 3.0 hub compatible. Algunas
funciones requieren un hub específico. Consulte una lista detallada a
continuación: www.aqara.com/support.
Español
Page 23

Configuración rápida
1.
Siga las instrucciones en la Guía rápida del Hub para
añadir el Hub a la aplicación.
2.
Abra la aplicación, pulse “Home” (Casa) y luego “+” en
la parte superior derecha para acceder a la página “Add
Device (Accessory)” (Añadir dispositivo [Accesorio]).
Seleccione “Door and Window Sensor T1” (Sensor de
puertas y ventanas T1) y siga las instrucciones para
añadirlo.
3.
¿Necesita ayuda? Visite www.aqara.com/support.
* En caso de error de conexión, acerque más el accesorio al Hub y vuelva
a intentarlo.
Instalación
Prueba de alcance efectivo: Pulse el botón de restablecimiento
en el accesorio en la posición deseada. Si el Hub emite
indicaciones de voz, significa que el accesorio puede
Español
comunicarse eficazmente con el Hub.
Page 24

* Evite las superficies metálicas para maximizar la intensidad de la señal.
Paso 1: Retire el film protector.
Paso 2: Durante la instalación, intente alinear la línea de
marcado de la unidad del sensor y el imán.
Español
Page 25

Paso 3: Adherir a puertas o ventanas, Espacio de instalación
inferior a 22 mm (0.87 pulgadas).
≤22 mm (0.87 pulgadas)
Espacio de instalación inferior a 22 mm (0.87 pulgadas)
* Mantenga la superficie limpia y seca.
Español
≥22 mm (0.87 pulgadas)
Page 26

Especificaciones
Modelo: DWS-S01
Dimensiones: 41 × 22 × 11 mm (1,61 × 0,87 × 0,43 pulgadas)
Protocolo inalámbrico: Zigbee 3.0
Batería: CR2032
Distancia máxima de detección: 22 mm (0.87 pulgadas)
Temperatura de funcionamiento: -10° - +50℃ (14° - 122℉)
Humedad de funcionamiento: 0 - 95% HR, sin condensación
* Lea esta guía rápida detenidamente antes de utilizar el producto y
consérvela para futuras consultas.
Español
Page 27

Sensore porte e finestre T1 Guida di
avvio rapido
Product Introduction
Spia sensore
Magnete
Unità sensore
Italiano
* Usare qualora non vi sia spazio a sufficienza per installare il magnete
normale.
* Questo dispositivo richiede un hub compatibile con Zigbee 3.0. Alcune
funzioni richiedono un hub specifico. Per un elenco dettagliato invitiamo
a consultare il sito www.aqara.com/support.
Magnete sottile Tasto Reset (Ripristina)
Pressione lunga per 5s:
Resettare/Collegare alla rete
Singola pressione: Test della gamma
effettiva/Identificare dispositivo
Page 28

Configurazione rapida
1.
Si prega di aggiungere l’Hub all’app in linea con quanto
definito nella guida di avvio rapido dell’hub.
2.
Aprire l’app, toccare “Home” e poi toccare “+” sull’angolo
superiore destro per accedere alla pagina “Aggiungi
dispositivo (Accessorio)”. Selezionare “Sensore porte e
finestre T1”, e aggiungerlo seguendo le istruzioni.
3.
Serve aiuto? Visita il sito www.aqara.com/support.
* Qualora la connessione non vada a buon fine, avvicinare il dispositivo
all’Hub e riprovare.
Installazione
Test della gamma effettiva: Premere una volta il pulsante
reset sul dispositivo nella posizione desiderata. Se l’Hub
fornisce comandi vocali, indica che il dispositivo comunica
in modo efficace con l’Hub.
* Per ottimizzare la forza del segnale evitare le superfici in metallo.
Italiano
Page 29

Passaggio 1: Togliere la pellicola protettiva.
Passaggio 2: In fase di installazione provare ad allineare la
linea indicata dell’unità sensore e il magnete.
Italiano
Page 30

Passaggio 3: Fissare a porte o finestre, Lo spazio di
installazione è inferiore a 22 mm (0.87 pollici).
≤22mm (0.87 pollici)
* Mantenere la superficie pulita e asciutta.
≥22mm (0.87 pollici)
Italiano
Page 31

Specifiche
Modello: DWS-S01
Dimensioni: 41 × 22 × 11 mm (1.61 × 0.87 × 0.43 pollici.)
Protocollo Wireless: Zigbee 3.0
Batteria: CR1632
Distanza di rilevamento massima: 22 mm (0.87 in.)
Temperatura per un corretto funzionamento: -10° - +50℃
(14° - 122℉)
Umidità di funzionamento: Umidità relativa 0 - 95%,
non-condensata
* Leggere attentamente questa Guida rapida prima dell'uso e
conservarla per riferimenti futuri.
Italiano
Page 32

Краткое руководство по эксплуатации
датчик открывания двери и окна T1
Описание продукта
Световой индикатор
Кнопка сброса
Тонкий магнит
Магнит
Блок датчика
Длительное нажатие в течение 5 с:
Сброс/Подключение к сети
Однарное нажатие: Тест рабочего
диапазона/Определение устройств
* Используйте его, если у вас недостаточно места для установки
обычного магнита.
* Для работы данного аксессуара требуется совместимый Zigbee
3.0 контроллер. Для некоторых функций требуется специальный
контроллер. Подробнее см. на веб-сайте: www.aqara.com/support.
русский
Page 33

Быстрая настройка
1.
Добавьте хаб к приложению согласно краткому
руководству по эксплуатации хаба.
2.
Откройте приложение, коснитесь «Home» (дом), затем
коснитесь «+» в верхнем правом углу для перехода
на страницу «Add Device (Accessory)» (Добавить
устройство (принадлежность)). Выберите «Door and
Window Sensor T1» (Датчик двери и окна T1), и
добавьте его согласно инструкции.
3.
Нужна помощь? Посетите www.aqara.com/support.
русский
* В случае сбоя соединения принадлежность следует переместить
ближе к хабу и повторить попытку.
Монтаж
Проверка эффективной дальности действия:
Однократно нажмите кнопку сброса на принадлежности
в требуемом месте. Если хаб подает голосовые
инструкции, значит принадлежность эффективно
обменивается данными с хабами.
Page 34

* Для максимальной эффективности передачи сигналов избегайте
металлических поверхностей вблизи устройств.
Шаг 1: Снимите защитную пленку.
Шаг 2: Во время установки следует совместить линии
метки блока датчика и магнита.
русский
Page 35

Шаг 3: Приклейте к двери или окну,Установочный
зазор составляет менее 22 мм (0.87 дюймов).
≤22 мм (0.87 дюймов)
* Поверхность должна быть чистой и сухой.
русский
≥22 мм (0.87 дюймов)
Page 36

Спецификации
Модель: DWS-S01
Габариты: 41 × 22 × 11 мм (1,61 × 0,87 × 0,43 дюймов)
Протокол беспроводной связи: Zigbee 3.0
Батарея: CR1632
Максимальная дальность обнаружения: 22 мм (0.87
дюймов)
Температура эксплуатация: -10° - +50℃ (14° - 122℉)
Рабочая влажность: 0 - 95% RH, без конденсации
* Внимательно прочтите это краткое руководство перед началом
эксплуатации и сохраните его для дальнейшего использования.
русский
Page 37

ドア とウ ィンドウ セ ンサ ー T 1 クイッ クスタ ートガ イド
製品紹介
日本語
インジケー タライト
リセットボタン
薄型磁石
磁石
センサーユニット
*
通常の磁石を取り付けるだけの空間が不足している場合に使用してくだ
さい。
*
本アクセサリは 互換 のZigbee 3.0ハブを必要とします。一部の機能は特定
のハブが必要です。詳細はこちらをご覧ください:www.aqara.com/sup-
port。
5秒間押し続ける:リセット/ネットワークへ接続
一回押す:動作範囲試験/デバイスの検出
Page 38

クイック 設 定
1、
ハブ のクイックスタートガイドを参 照して、ハブ をアプ
リに加えてください。
2、
アプリを開き、「Home」(ホーム)をタップした後、上右
隅 の「 +」を タ ッ プ し て「 Add Device (Accessory)」( デ
バイス(アクセサリ)を追加)ページへ進みます。「Door
and Window Sensor T1」(ドアとウィンドウセンサー
T1)を選び、指示に従い追加します。
3、
ご質問がおありですか?www.aqara.com/supportをご
覧ください。
*接続がうまくいかない場合、アクセサリをハブに近づけて、再度お試しください。
インストール
検出範囲のテスト:所望の位置にて、アクセサリ上のリ
セットボタンを一回押します。ハブが音声プロンプトを
流せば、アクセサリがハブと通信可能であることを示し
ます。
*信号強度を最大限に保つため、金属面は避けてください。
日本語
Page 39

ステップ 1:保護フィルムを取り外します。
日本語
ステップ 2:インストール中、センサーユニットにマーキングさ
れた線と磁石の位置を合わせてください。
Page 40

ステップ 3:ドア や窓 へ貼 り付け ます、インストール 時 のギャッ
プは22mm未満。
日本語
≤22mm
*乾燥した清潔な配置面を選んでください。
≥22mm
Page 41

仕様
モデル:DWS-S01
寸法:41×22×11mm
ワイヤレス通信規格:Zigbee 3.0
バッテリー:CR1632
最大検出距離:22mm
動作温度:-10°~+50℃
日本語
動作湿度:0~95% RH、結露なきこと
* 使用前に本クイックスタートガイドを注意深く読み、将来の参考用に保管し
てくだ さい 。
Page 42

도어 및 윈도우 센서 T1 퀵 설치 가이드
제품 소개
지시등
얇은 마그넷
마그넷
센서장치
*
일반마그넷을설치하기에충분한공간이아닌경우사용합니다.
*
이액세서리에는호환가능한지그비3.0허브가필요합니다.일부기능에는
특정허브가필요합니다.세부목록에대해서는www.aqara.com/sup-
port를참조합니다.
리셋버튼
5초간 길게 누름: 재설정/네트워크로 연결
한번만누름:효력범위테스트/장치식별
한국어
Page 43

빠른설정
1.
허브 퀵 설치 가이드에 따라 허브를 앱에 추가해 주십시오.
2.
앱을 열고 “Home” (홈) 을 탭한 다음에 오른쪽 상단 구석의
한국어
“+” 를 탭하여 “Add Device (Accessory)” (장치 추가(액세서리))
페이지로 들어갑니다. “Door and Window Sensor T1”
(도어 및 윈도우 센서 T1) 를 선택하고, 지시에 따라
추가합니다.
3.
도움이 필요하신가요? www.aqara.com/support를 방문해
주세요.
* 연결이 되지 않는 경우, 액세서리를 허브에 더 가까이 이동시켜서 다시
시도해 주십시오.
설치
유효범위테스트:원하는위치에서액세서리의리셋버튼을
한차례누릅니다.허브에음성프롬프트가나타나는경우,
액세서리가허브와 유효하게 통신할수 있다는 것을
나타냅니다.
* 신호 강도를 극대화하려면 금속 표면에 놓지 마십시오.
Page 44

1단계: 보호 필름을 제거합니다.
2단계: 설치하는 동안, 센서 장치와 마그넷의 마커 라인을
정렬하도록 합니다.
한국어
Page 45

3단계: 문이나 창에 붙입니다, 22mm (0.87인치) 미만의 설치 갭.
한국어
≥22mm (0.87인치) ≤22mm (0.87인치)
* 표면을 깨끗하고 건조된 상태로 유지합니다.
사양
모델: DWS-S01
제원: 41 × 22 × 11mm (1.61 × 0.87 × 0.43인치)
무선 프로토콜: Zigbee 3.0
배터리: CR1632
최대 감지 거리: 22mm (0.87인치)
작동 온도: -10°~+50℃ (14°~122℉)
작동 습도: 0 ~ 95% RH, 응축 없음
* 사용 전에 주의하여 이 빠른 시작 안내서를 읽고 향후 참조를 위해 보관합니다.
Page 46

FCC ID: 2AKIT-AS012
Federal Communications Commission (FCC) compliance statement
1. This device complies with Part 15 of the FCC Rules. Operation is subject
to the following two conditions:
(1)
This device may not cause harmful interference.
(2)
This device must accept any interference received, including interference
that may cause undesired operation.
2. Changes or modifications not expressly approved by the party responsible
for compliance could void the user's authority to operate the equipment.
NOTE: This equipment has been tested and found to comply with the limits
for a Class B digital device, pursuant to Part 15 of the FCC Rules. These limits
are designed to provide reasonable protection against harmful interference in
a residential installation.
This equipment generates uses and can radiate radio frequency energy and,
if not installed and used in accordance with the instructions, may cause
harmful interference to radio communications.
However, there is no guarantee that interference will not occur in a particular
installation. If this equipment does cause harmful interference to radio or
television reception, which can be determined by turning the equipment off and
on, the user is encouraged to try to correct the interference by one or more
of the following measures:
Page 47

-Reorient or relocate the receiving antenna.
-Increase the separation between the equipment and receiver.
-Connect the equipment into an outlet on a circuit different from that to which
the receiver is connected.
-Consult the dealer or an experienced radio/TV technician for help.
FCC Radiation Exposure Statement
This equipment complies with FCC radiation exposure limits set forth for an
uncontrolled environment. This equipment should be installed and operated
with minimum distance 20cm between the radiator & your body.
IC: 22635-AS012
IC NOTICE TO CANADIAN USERS
This device complies with Industry Canada license‐exempt RSS standard(s).
Operation is subject to the following two conditions: (1) This device may not
cause interference, and (2) This device must accept any interference, including
interference that may cause undesired operation of the device. This device
complies with RSS‐247 of Industry Canada. Operation is subject to the condition
that this device does not cause harmful interference. This Class B digital
apparatus complies with Canadian ICES‐003 (Cet appareil numérique de la
Classe B conforme à la norme NMB‐003 du Canada).
Page 48

This equipment complies with IC radiation exposure limits set forth for an
uncontrolled environment. This equipment should be installed and operated
with minimum distance of 20 cm between the radiator and your body. This
transmitter must not be co-located or operating in conjunction with any other
antenna or transmitter.
Le présent appareil est conforme aux CNR d'Industrie Canada applicables
aux appareils radio exempts de licence. L'exploitation est autorisée aux deux
conditions suivantes: (1) l'appareil ne doit pas produire de brouillage, et (2)
l'utilisateur de l'appareil doit accepter tout brouillage radioélectrique subi, même
si le brouillage est susceptible d'en compromettre le fonctionnement.
Cet équipement est conforme aux limites IC d'exposition aux radiations
définies pour un environnement non contrôlé. Cet équipement doit être installé
et utilisé avec une distance minimale de 20 cm entre le radiateur et votre corps.
Cet émetteur ne doit pas être situé ou opérant en conjonction avec une autre
antenne ou émetteur.
Hereby, LUMI UNITED TECHNOLOGY CO., LTD declares
that the Radio Equipment type is in compliance with RED
2014/53/EU. The full text of the EU Declaration of
Conformity is available at the following internet address:
www.lumiunited.com/DoC.
This product can be used across EU member states.
Page 49

CAUTION: RISK OF EXPLOSION IF BATTERY IS REPLACED
BY AN INCORRECT TYPE.
DISPOSE OF USED BATTERIES ACCORDING TO THE
INSTRUCTIONS.
RECYCLING. This product bears the selective sorting symbol
for Waste electrical and electronic equipment (WEEE). This
means that this product must be handled pursuant to
European directive 2012/19/EU in order to be recycled or
dismantled to minimize its impact on the environment.
Symbol for “ENVIRONMENT PROTECTION – Waste electrical
products should not be disposed of with household waste.
Please recycle where facilities exist. Check with your local
Authority or retailer for recycling advice”.
Symbol on the product or on its packaging indicates that this
product may not be treated as household waste. Instead it
shall be handed over to the applicable collection point for the
recycling of electrical and electronic equipment.
Complies with the European Union’s Restriction of Hazardous
Substances Directive which protects the environment by
restricting specific hazardous materials and products.
Page 50

Warnings
1.
This product is NOT a toy. Please keep children away from this product.
2.
This product is designed for indoor use only. Do NOT use in humid
environments or outdoors.
3.
Beware of moisture, do NOT spill water or other liquids onto the product.
4.
Do NOT place this product near a heat source. Do NOT place it in an
enclosure unless there is normal ventilation.
5.
Do NOT attempt to repair this product by yourself. All repairs should be
performed by an authorized professional.
6.
This product is only suitable for improving the entertainment, convenience
of your home life and reminding you about the device status. It should
NOT be used as security equipment for home, building, warehouse or any
other places. If a user violates the product use instructions, the manufacturer
will NOT be liable for any risks and property losses.
Page 51

Avertissements
Ce produit N'EST PAS un jouet Maintenez-le hors de portée des
1.
enfants.
2.
Cet appareil ne doit être utilisé qu'à l'intérieur. Ne l'utilisez PAS à
l'extérieur ou dans des environnements humides.
3.
Méfiez-vous de l'humidité, et n'éclaboussez pas l'appareil d'eau ni d'autres
liquides.
4.
Ne placez PAS ce produit près d'une source de chaleur. Ne le mettez PAS
dans un lieu clos, à moins qu'il ne soit suffisamment ventilé.
5.
N'essayez PAS de réparer vous-même cet appareil. Toute réparation doit
être effectuée par un professionnel agréé.
6.
Ce produit n'est conçu que pour améliorer les divertissements et la praticité
dans votre vie à la maison, et pour vous rappeler le statut de l'appareil Il
ne doit PAS être utilisé comme équipement de sécurité domiciliaire,
d'immeubles, d'entrepôts, etc. Si un utilisateur enfreint les instructions
d'utilisation du produit, le fabricant ne sera responsable d'AUCUN risque
ni perte de biens.
Page 52

Advertencias
1.
Este producto NO es un juguete. Mantenga este producto fuera del alcance
de los niños.
2.
Este producto ha sido diseñado únicamente para uso en interiores NO lo
utilice en el exterior ni en entornos húmedos.
3.
Evite la humedad y NO vierta agua ni otro líquidos sobre el producto.
4.
NO instale el producto cerca de una fuente de calor. NO lo instale en
lugares confinados, a menos que haya ventilación suficiente.
5.
NO intente reparar este producto usted mismo. Las reparaciones deben
ser realizadas por un profesional autorizado.
6.
Este producto ha sido diseñado para mejorar la vida en el hogar. NO debe
utilizarse como un equipo de seguridad para el hogar, edificios, almacenes
u otros lugares. Si el usuario no sigue las instrucciones del producto, el
fabricante NO se hace responsable de los daños o pérdidas que puedan
originarse en consecuencia.
Page 53

Email: support@aqara.com
Manufacturer: Lumi United Technology Co., Ltd.
Address: 8th Floor, JinQi Wisdom Valley, No.1 Tangling Road, Liuxian Ave,
Taoyuan Residential District, Nanshan District, Shenzhen, China.
Courriel: support@aqara.com
Fabricant: Lumi United Technology Co., Ltd.
Adresse: 8th Floor, JinQi Wisdom Valley, No.1 Tangling Road, Liuxian Ave,
Taoyuan Residential District, Nanshan District, Shenzhen, China.
Correo electrónico: support@aqara.com
Fabricante: Lumi United Technology Co., Ltd.
Dirección: 8th Floor, JinQi Wisdom Valley, No.1 Tangling Road, Liuxian Ave,
Taoyuan Residential District, Nanshan District, Shenzhen, China.
Page 54

Page 55

 Loading...