


AC Triton
Input voltage range is 115 to 277 VAC, 50-60 Hz
Input current is 1.4 amps @ 115 VAC, 0.6 amps @ 277 VAC
12Volt DC Triton
Voltage is 12VDC ONLY
Current is 13.2A @12VDC
All Versions
Correlated Color Temperature: 5000
Color Rendering Index: 75
AC Triton
White: Neutral
Black: Line
Green: Safety Ground
The ground (green) conductor is not internally connected to either the neutral (white) or line (black) conductors. The
ground conductor must be connected to a suitable safety ground in compliance with applicable electrical codes. The
electrical supply must be externally protected by a fuse or circuit breaker suitable for the intended operating current.
DC Triton
White: + 12 or + 24 VDC (Positive)
Black: -12 or -24 VDC (Negative)
The positive (white) and negative (black) conductors are electrically isolated from the Triton housing. Due to the high
power of these lights extra attention should be paid to the selection of the wire size. A maximum voltage drop of 1 volt is
recommended. (As an example, a 12 volt light located 20 feet from the power source would require #12 AWG wire –
consult the ABYC voltage drop table or other reference for the correct distance / wire gauge combinations). The
electrical supply must be externally protected by a fuse or circuit breaker suitable for the intended operating current and
wire gauge.
Light Head Assembly
The Triton Light Head Assembly is designed for OEM use. This light requires an area of 14” x 5 ½” for mounting. Make sure
adequate space is available on the mounting surface before drilling holes. (see back) Drill a ½” through hole in the center
of the mounting position for the power wires to pass. This light arrives with 4 temporary plastic wings nuts on each of the
4 corner bolts. Remove the wing nuts and use the 4 remaining 10-24 machine screws with your choice of nuts. Or, replace
the 4 corner bolts with your choice of #10 tapping screw. (Stainless Steel hardware is recommended)
Pole Mount/Bracket Mount
Pole Mount - This light comes equipped with a ¾” NPT ange for easy adapting to many standard congurations.
Bracket Mount - This light comes equipped with a rotational mounting bracket intended for mounting to at surfaces.
Mounting hardware can be substituted but it is recomended that Stainless Steel hardware be used regardless of fastener
type.
24 Volt DC Triton
Voltage is 24DC ONLY
Current is 6.6A @ 24VDC
Pole Mount/Bracket Mount
Light Head Assembly
Mounting
Hardware
Surface Mount
Surface Mount
This light requires an area of 14” x 5 ½” for mounting. Make sure adequate space is available on the mounting surface
before drilling holes. (see back) Drill a ½” through hole in the center of the mounting position for the power wires to pass.
This light arrives with 4 temporary plastic wings nuts on each of the 4 corner bolts. Remove the wing nuts and use the 4
remaining 10-24 machine screws with your choice of nuts. Or, replace the 4 corner bolts with your choice of #10 tapping
screw. (Stainless Steel hardware is recommended)Apply a small ring of Silicone RTV around the wire exit hole on the rear
of the surface mount plate to ensure proper sealing.Make sure when the light is mounted that the Triton badge reads
normally. (not upside down) This will ensure proper airow for cooling.
Semi-Recess Mount
This light requires an area of 17 ½” x 9 ½” for mounting and requires a hole 15 ¼” wide by 7 ¼” tall by 1 ½” deep to be cut
into the mounting surface. (see back) Make sure adequate space is available on the mounting surface before drilling holes.
After the recess hole is cut, place and use the light assembly to mark the centers of each mounting screw position. Pre-Drill
holes appropriately sized for the mounting surface substrate to accommodate the #10 self-tapping screws. Apply a bead
of Silicone RTV around the entire rear ange of the recess mount and around mounting screw holes to ensure proper
sealing. Connect the power wires, position, and use the 8 - #10 screws provided to securely mount the xture in place.
Make sure when the light is mounted that the Triton badge reads normally. (not upside down) This will ensure proper
airow for cooling.
Limited Warranty
The product is warranted to be free from defects in workmanship and materials for a period of one year from the date of
original purchase. Lumitec is not responsible for product failure caused by abuse, neglect, improper installation, or failure
in applications other than those for which it was designed, intended, and marketed. Should your Lumitec product prove
defective during the warranty period, promptly notify Lumitec and return product with freight prepaid. Lumitec will, at its
option, repair or replace the product or defective portion without charge for parts or labor, or, at Lumitec’s option, refund
purchase price. Products repaired or replaced under this warranty shall be warranted for the unexpired portion of the
warranty applying to the original product(s). No warranty or armation of fact, express or implied, other than as set forth
in the limited warranty statement above is made or authorized by Lumitec, Inc. Any liability for consequential and
incidental damages is expressly disclaimed. Lumitec liability in all events is limited to, and shall not exceed, the purchase
price paid.
Lumitec, Inc. - 1405 Poinsettia Drive, Suite 10 - Delray Beach, FL 33444 - lumiteclighting.com
Mounting
Hardware
Semi-Recess Mount
8x
Mounting
Hardware
part # 600606
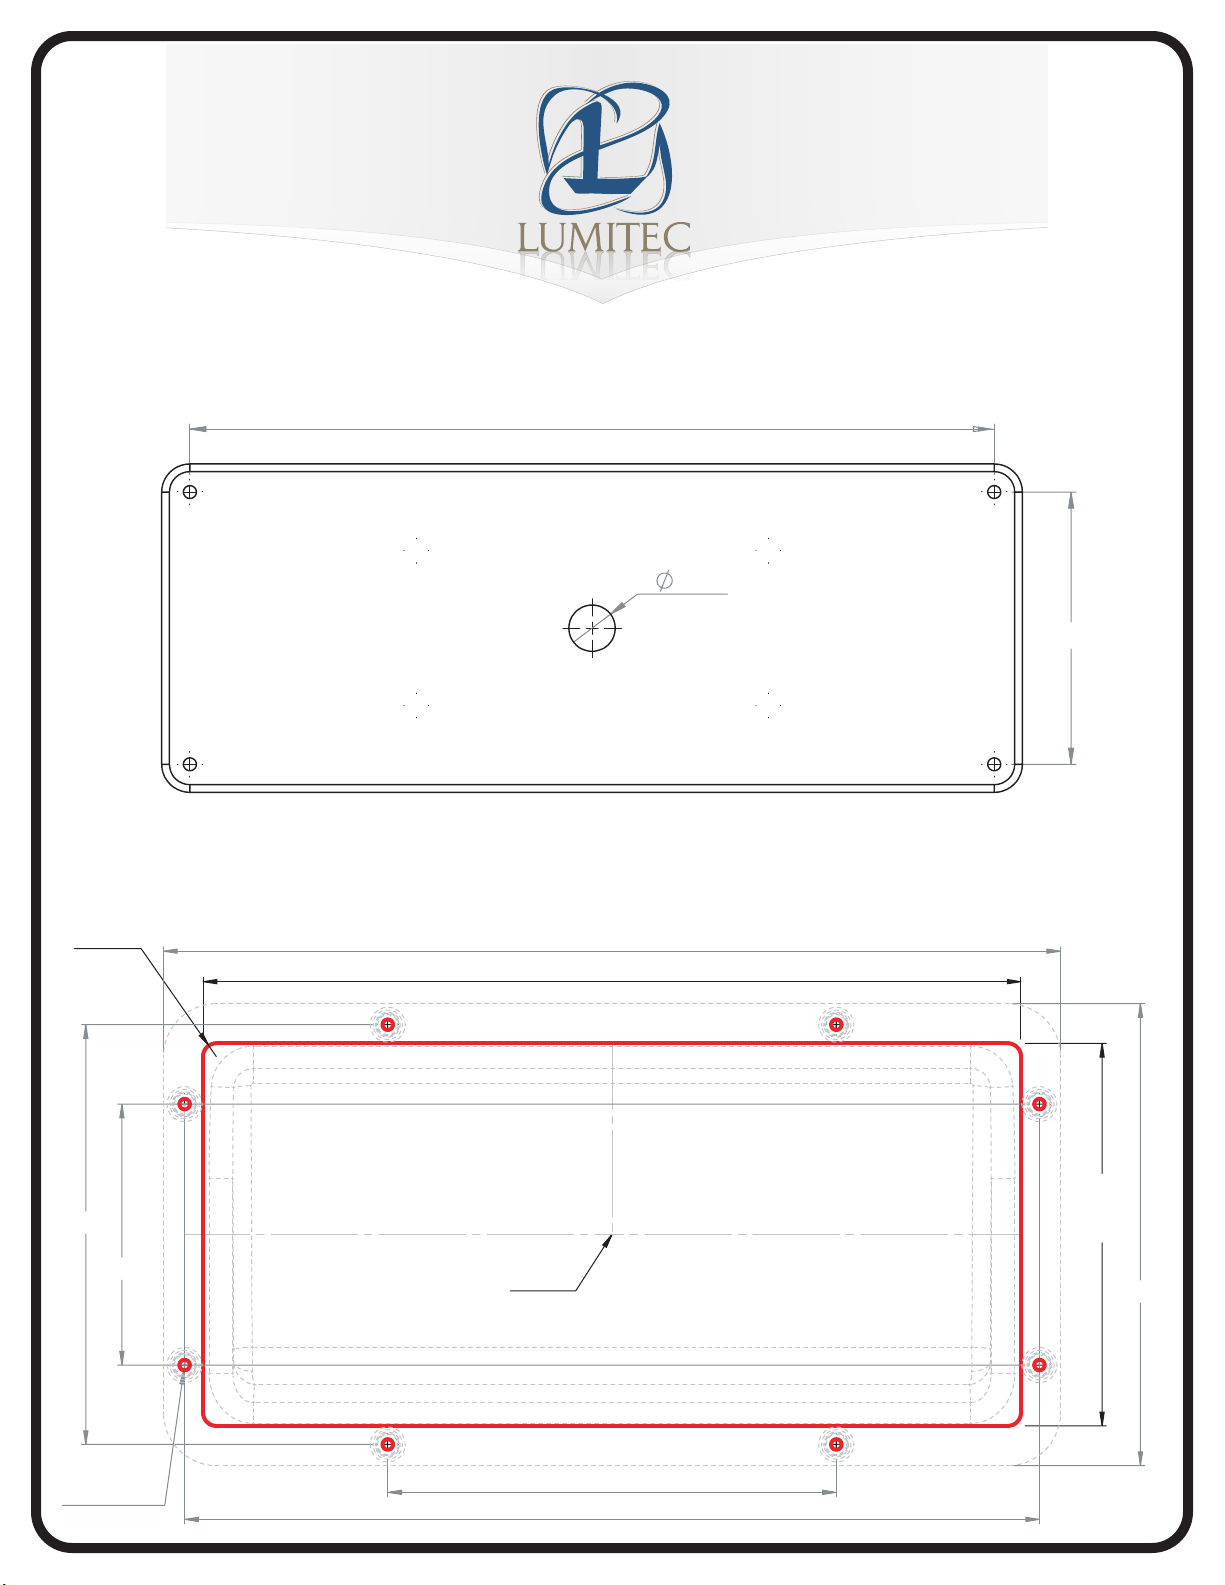
Light Head Assembly & Surface Mount Mounting Hole Locations
13.00
0.75
4.40
Semi-Recess Mount Mounting Hole Locations
R0.25
7.96
8x
4.95
17.00
15.50 Hole Width
Center
8.50
16.20
7.25
Hole
Height
8.76
 Loading...