

Page 1
Thank you for choosing the Lumiscope® Digital Blood Pressure Monitor!
Please read this instruction manual before using your Blood Pressure Monitor.
Please keep this instruction manual safe for future use.
Introduction............................................................................................... 1
Symbols.................................................................................................... 2
Important Safety Precautions ................................................................ 3-4
Know Your Blood Pressure Monitor....................................................... 5-6
IHB Introduction........................................................................................ 7
Before Taking a Measurement.................................................................. 8
Battery lnstallation / Replacement............................................................ 9
Adjusting Settings
1. To Set Year..................................................................................... 10
2. To Set Date and Time................................................................ 11-12
3. To Set positioning sensor ............................................................... 12
4. To Set Display of the Date and Time.........................................13-14
5. To Set Volume ................................................................................ 15
6. To Set Language (English / Spanish) ............................................. 17
Proper Measurement Method................................................................. 18
Take a Measurement.........................................................................19-21
To delete the memory value ................................................................24
Before Using the Monitor
Care and Maintenance
Operating Instructions
Limited Warranty ...............................................................................37-38
Warranty
EMC Information ...............................................................................39-44
1146 Tensiómetro Manual de Instrucciones en Español ............... 45
Appendix A: EMC (Electro-Magnetic-Compatibility)
Use the Memory Function
To read the average value...................................................................22
To read the measurement value..........................................................23
About Blood Pressure
Blood Circulation .................................................................................25
Health and Blood Pressure .................................................................26
Classification of Blood Pressure.....................................................27-28
Troubleshooting
Error Indicators....................................................................................29
Eliminate Fault..................................................................................... 30
Care and Maintenance
Care..................................................................................................... 31
Maintenance........................................................................................32
Specifications .................................................................................... 33-36
1146-INS-LAB-RevA14
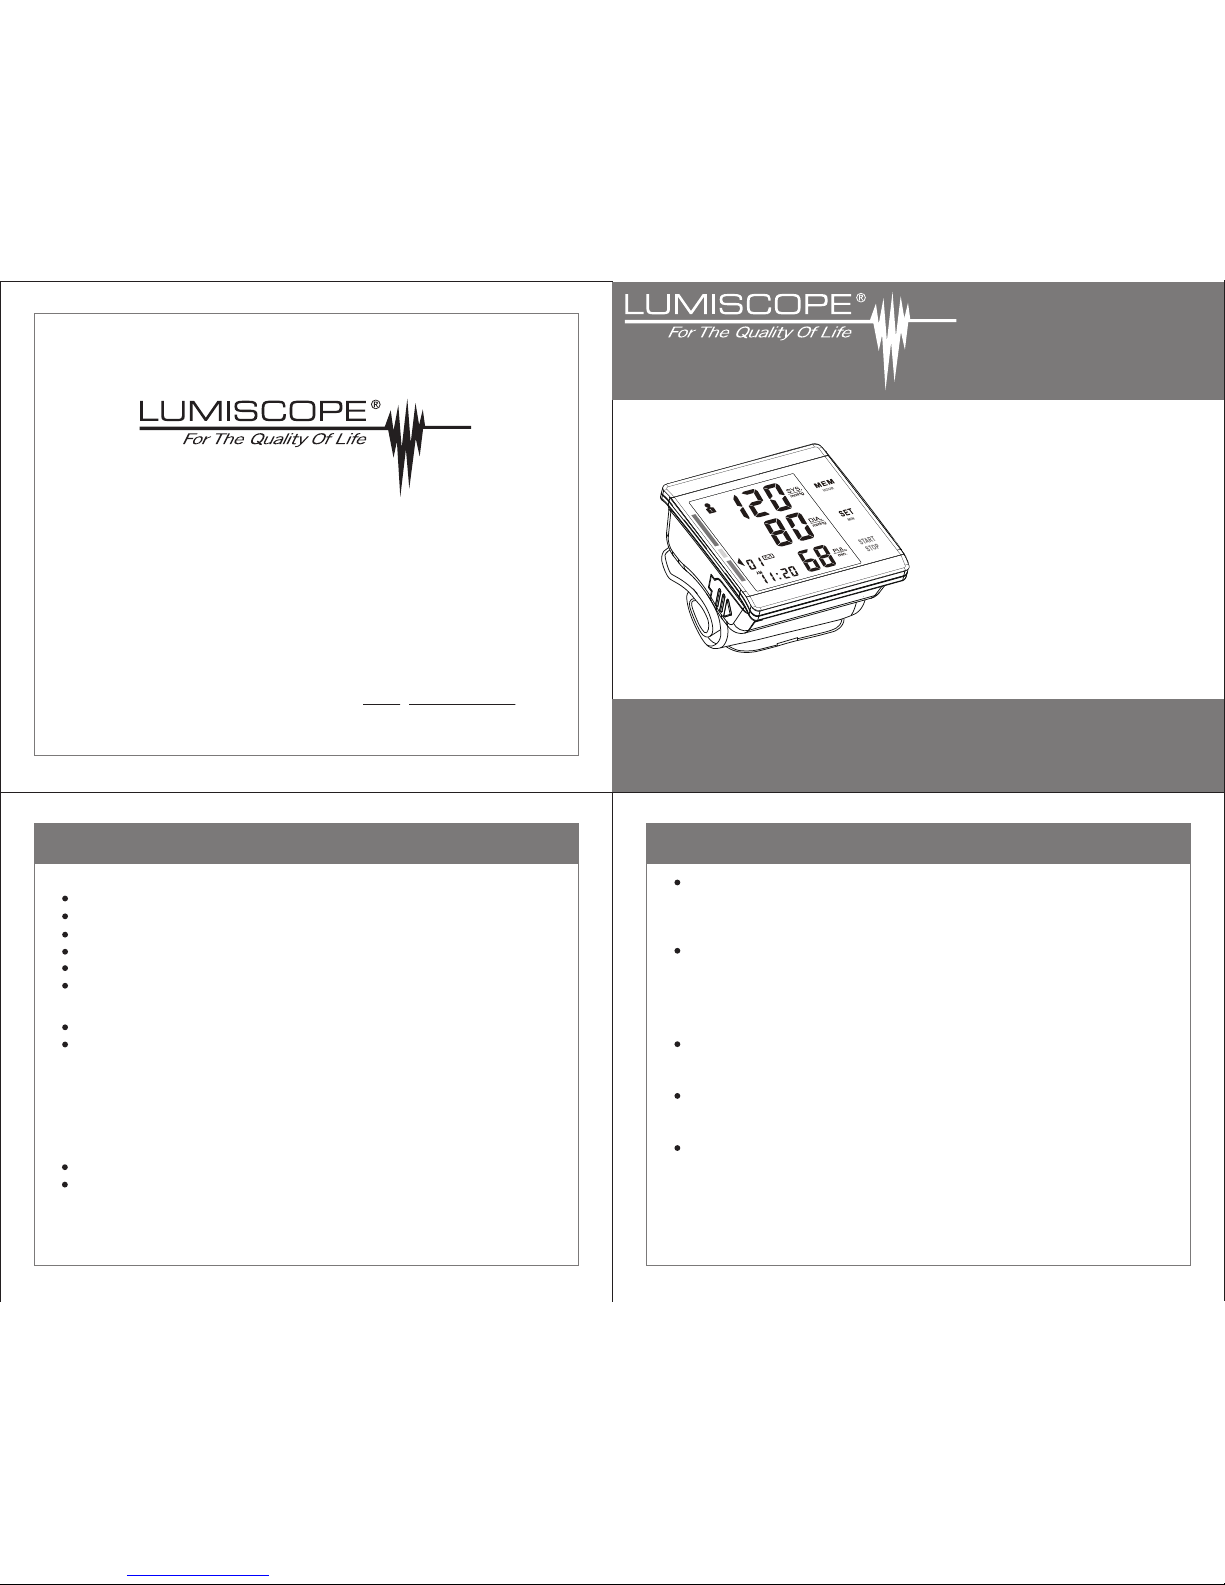
Model 1146
Digital Blood Pressure Monitor
Fully Automatic Wrist Style
Instruction Manual *
en Español consulte p 45
Table of ContentsTable of Contents
Manufactured for GF Health Products, Inc.
Atlanta GA 30360
770-368-4700
GF Health Products, Inc. is not responsible for typographical errors. All
illustrations, specifications, packaging and warranties contained in this
literature are based on the latest product information available at the time of
printing. The most current product information, including the most current
version of this manual, can be found online at www.grahamfield.com.
Graham-Field, Lumiscope, and Lumiscope For The Quality Of Life are registered
trademarks of GF Health Products, Inc. © 2014 GF Health Products, Inc.
Page 2
2
Important Safety Precautions
Important Safety Precautions
NOTICE: Do not use a cellular phone near the device. It may result in
operational failure.
NOTICE: Avoid use of the device in areas of high heat; this may affect the
accuracy of the measurement.
NOTICE: Do not modify, disassemble, or attempt to repair the device or
components.
3
Symbols
Indicates a potentially hazardous situation which, if not
avoided, could result in death or serious personal injury.
Type B applied part
Refer to instruction manual/booklet
SERIAL NUMBER
The marking of electrical and electronics devices according
to Directive 2002/96/EC. The device, accessories and
packaging must be disposed of correctly at the end of their
usage. Please follow Local Ordinances and Regulations for
disposal.
SYMBOL KEY
WARNING
CAUTION
Indicates a potentially hazardous situation which, if not
avoided, could result in minor or moderate personal injury to
the user or patient.
Indicates a potentially hazardous situation which, if not
avoided, could result in
damage to the equipment or other
property.
1
Introduction
Thank you for purchasing the Lumiscope Model 1146 Fully Automatic Wrist Style
Digital Blood Pressure Monitor.
Intended Use: This device is intended to measure blood pressure and pulse rate
of adults only, at home or medical center. The device is NOT recommended for
neonatal use.
The unit uses the oscillometric method of blood pressure measurement, which
means the unit detects the movement of your blood through your brachial artery,
and converts your blood pressure into a digital reading. The unit is simple to use
because a stethoscope is not needed while using an oscillometric monitor.
The unit automatically stores 180 (2 * 90) sets of measurement values with the
measuring date and time. You can read the stored data conveniently by pressing
the memory button.
The unit comes with the following components:
• Main Unit
• Storage Case
• Instruction Manual printed in English and Spanish
The unit has the following advanced functions:
• Backlight
• Voice Function
•
Positioning Sensor
• Display of the date and time
4
NOTICE
SAFETY GUIDELINES - PLEASE READ BEFORE USE
Important! Read and understand these instructions before using the Blood
Pressure Monitor. If you do not understand any part of these instructions,
contact your medical professional or Graham-Field dealer for direction in the
use of this product.
WARNING: If components are damaged or missing, contact your
Graham-Field dealer immediately. DO NOT use substitute parts. Use only
Lumiscope replacement parts. Non-Lumiscope replacement parts could
cause personal injury and damage to the Blood Pressure Monitor
.
WARNING: Contact your physician for specific information about your
blood pressure. Self-diagnosis and treatment using measured results may be
dangerous. Follow the instructions of your healthcare provider.
WARNING:
Operate the device only as intended. DO NOT use it for any other purpose.
WARNING: Do not use the device where flammable gas (such as anesthetic
gas, oxygen or hydrogen) or flammable liquid (such as alcohol) are present.
WARNING:
Notice for California Customers- California Proposition 65 WARNING:
This product contains a chemical known to the State of California to cause
cancer and reproductive or developmental harm.
WARNING: GF Health Products, Inc. assumes no responsibility for any
damage or injury caused by improper installation or use of this product.
Page 3
8
5
6
7
1. Avoid eating,drinking alcohol, smoking, exercising and bathing for
30 minutes before taking a measurement.
2. Stress raises blood pressure. Avoid taking measurements during
stressful times.
3. The cuff can be applied to your left or right wrist. Always measure your
blood pressure on the same wrist.
4. Measurements should be taken in a quiet place.
5. Position the unit at heart level throughout the measurement.
6. Remain still and do not talk during the measurement.
7. Keep a record of your blood pressure and pulse readings for your
physician. A single measurement does not provide an accurate indication
of your true blood pressure. You need to take and record several readings
over a period of time. Try to measure your blood pressure at the same time
each day for consistency.
8. Wait 30 ~ 60 seconds between measurements. The wait time allows the
arteries to return to their condition prior to taking the blood pressure
measurement. You may need to increase the wait time depending on your
individual physiological characteristics.
Before Taking a Measurement
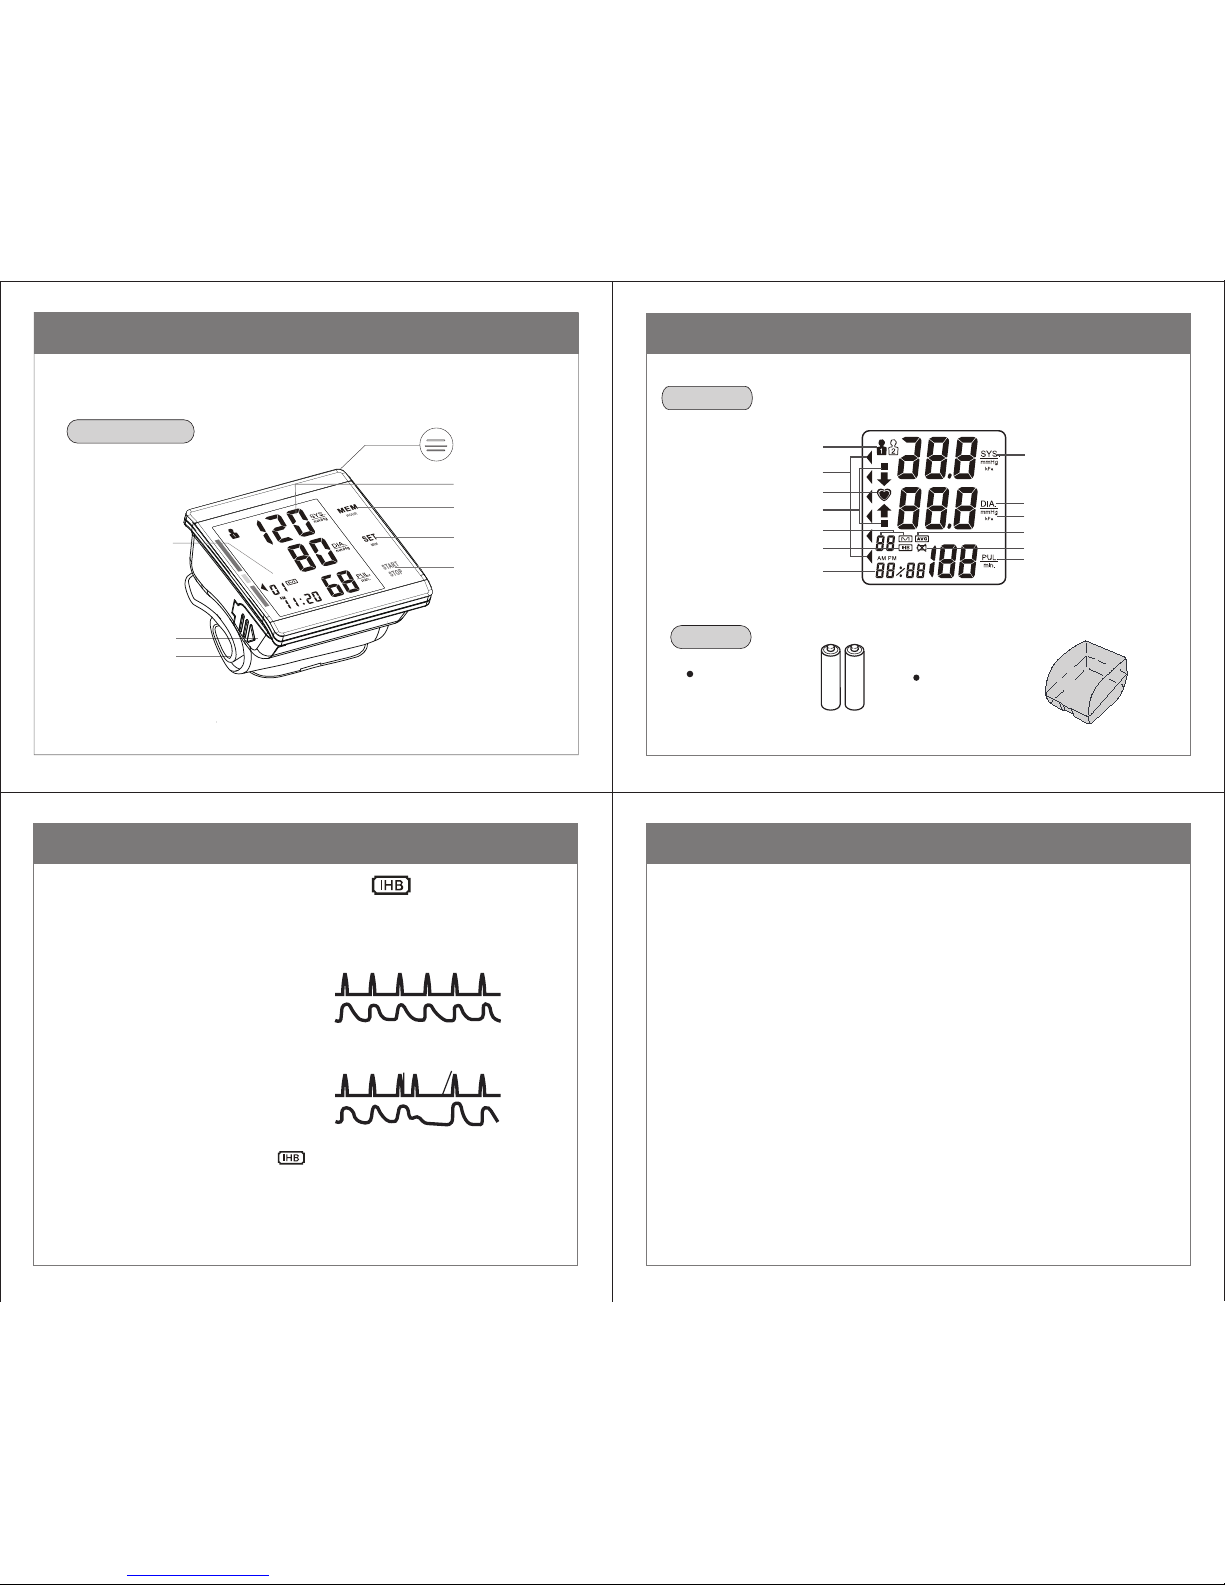
2 AAAAlkaline
Batteries
Power
Display
Storage Case
Know Your Blood Pressure Monitor
Unit lndication
Systolic Blood
Pressure
Diastolic Blood
Pressure
Heartbeat Symbol
Pulse
Memory and Times
Irregular Heartbeat Symbol
Low Battery Symbol
Average Value Symbol
User Symbol
Position Symbol
Date/Time
Inflation/Deflation Symbol
or WHO Indication
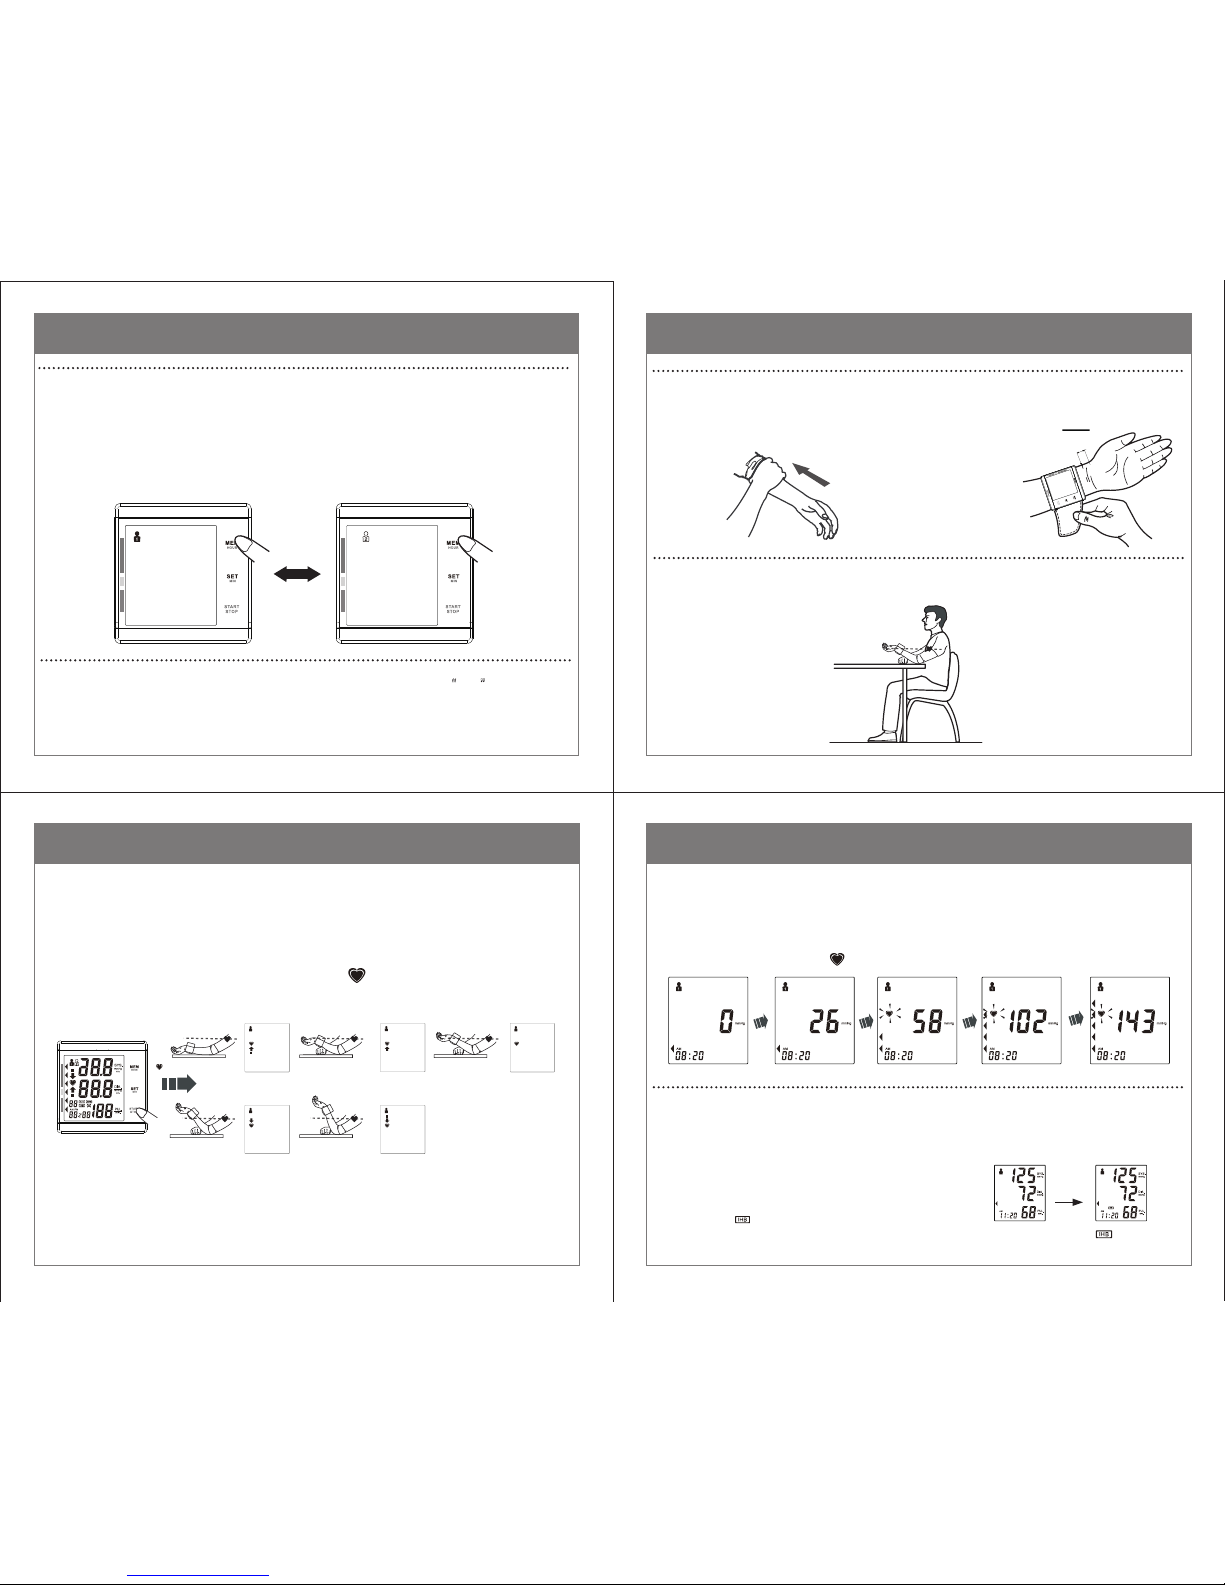
When the unit detects an irregular rhythm two or more times during the
measurement, the Irregular Heartbeat Symbol will appear on the
display with the measurement values.
An irregular heartbeat rhythm
is defined as a rhythm that
varies by less than 25%
from the average rhythm
or 25% more than the
average rhythm detected
while the monitor is
measuring the systolic and
diastolic blood pressure.
If the Irregular Heartbeat Symbol ( ) displays with your measurement
results, we recommend you consult your physician.
Follow the directions of your doctor.
IHB Introduction
Normal Heartbeat
Irregular Heartbeat
Pulse
Blood
pressure
Pulse
Blood
pressure
Short Long
) ( lobmyS taebtraeH ralugerrI
Body & Cuff
Know Your Blood Pressure Monitor
fuC tsirW f
Battery Compartment
Start/Stop Button
Display
Setting Button
Memory Button
Voice
Backlight
Page 4
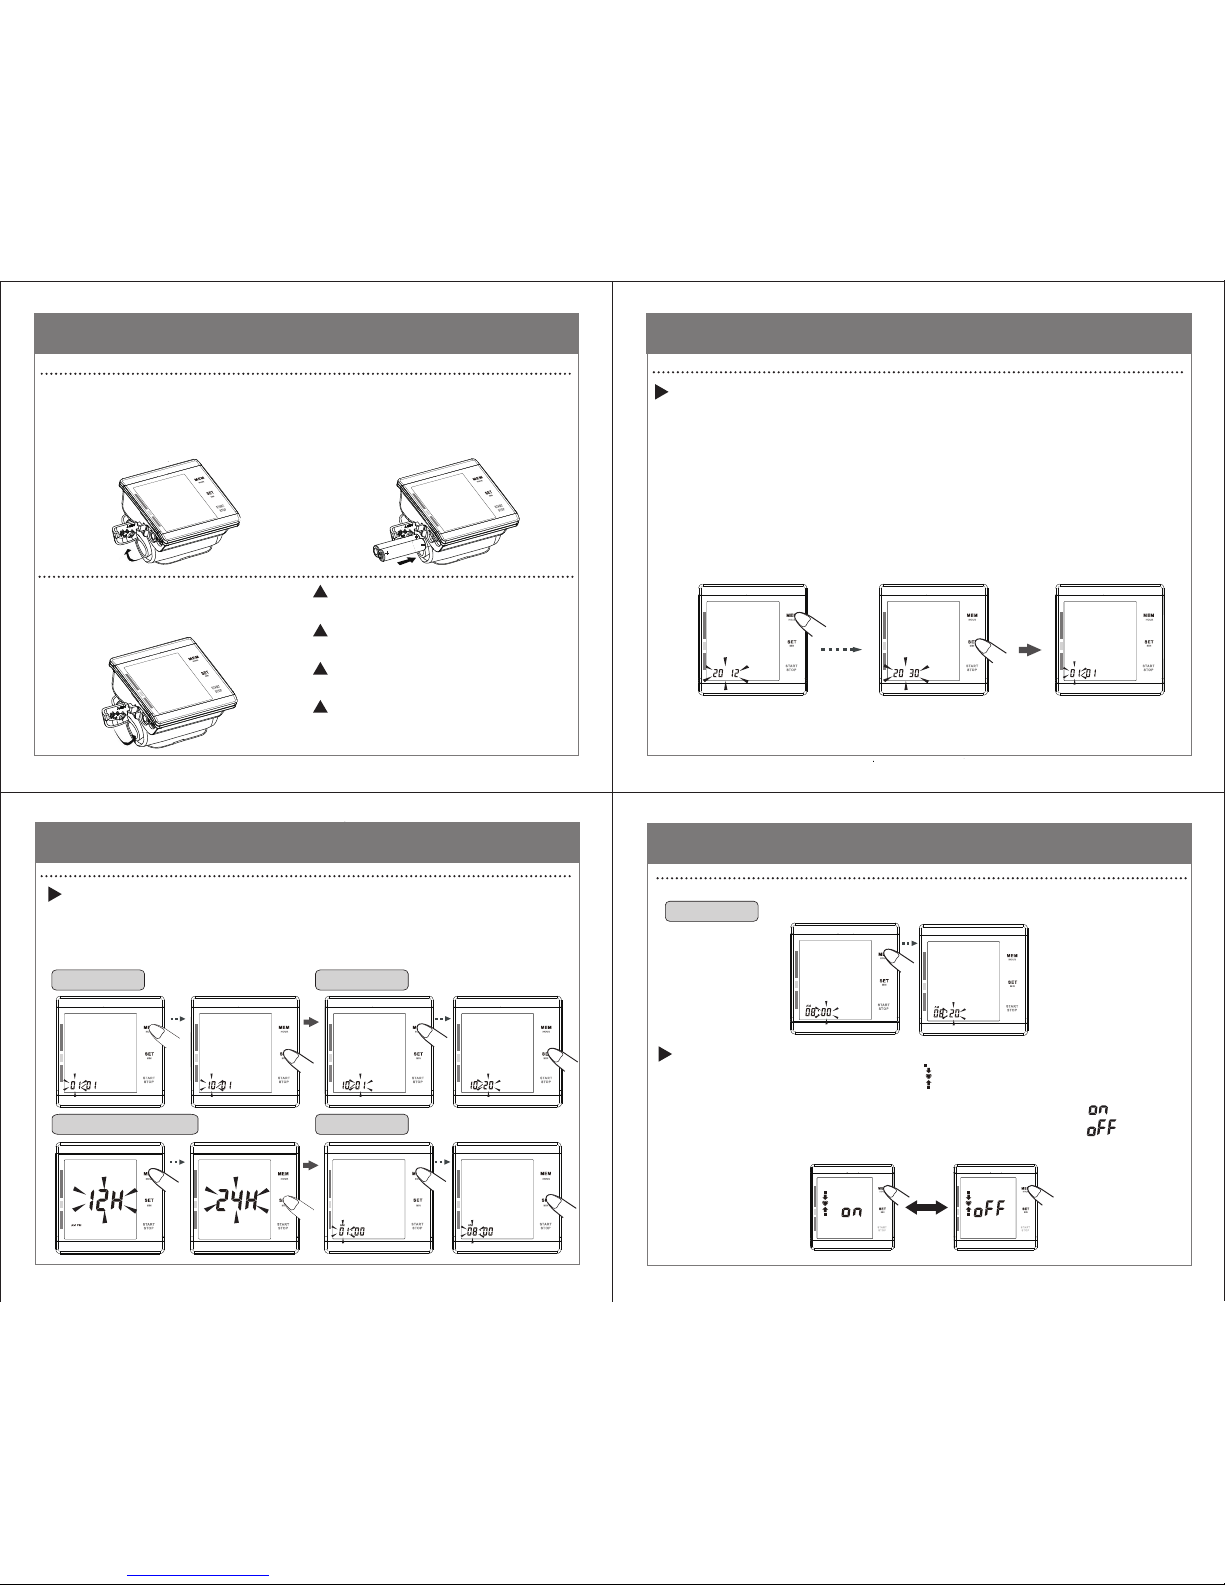
Hour Setting
time system conversion
The year can be set between 2012 and 2030.
After displaying 2030, the year will return to 2009.
3
The Positioning Sensor symbol “ ” will appear.
Press the “MEM” button to change the current setting.
If the positioning system is turned on, the LCD will display " ".
If the positioning system is turned off, the LCD will display " ".
Press the “SET” button and continue with step 4.
Day SettingMonth Setting
Minute Setting
1.2 The year appears and flashes after pressing the “SET” button
for 3~4 seconds while the unit is off. Press the “SET” button
again and continue with step 2.
Press the “MEM” button one time to increase one year, twice for
two years, etc. Keep the “MEM” button depressed and the
value quickly increases.
1.1
All information will appear on the display when the batteries are installed
for the first time. After 2 seconds the year flashes on the display.
Press the “SET” button and continue with step 2.
Press the “MEM” button to change the month, then press the “SET” button
and continue with next step. Then set the day, the time system conversion,
the hour and the minute by using the same method. Continue with step 3.
Adjusting Settings
Adjusting Settings
Adjusting Settings
10
12
11
1 To set year
2
To set positioning sensor
To set date and time
Battery Installation / Replacement
9
NOTICE: Use two identical 1.5V
alkaline batteries type AAA / LR03.
NOTICE: DO NOT use rechargeable
batteries.
NOTICE: Replace BOTH batteries
if the low battery symbol displays.
NOTICE: DO NOT leave low batteries
in the battery compartment! They may
leak and cause damage to the unit.
1
Remove the battery cover from
the battery compartment.
Use two identical 1.5V alkaline
batteries, type AAA / LR03.
2
Install the batteries so the + (positive)
and - (negative) battery polarities match
the polarities of the battery compartment
as indicated.
Replace the battery cover.
3
+
+
-
-
Page 5

14
13
15 16
12 Hour System
Conversion
Hour Display
Minute Display
Second Display
Hour Display
Minute Display
Second Display
24 Hour System
Conversion
Date Display Date Display
Adjusting Settings
4
Adjusting Settings
Press the “MEM” button
and confirm whether the unit displays
the date and time after turning off.
P
ress the “SET” button and continue with step 5.
When the display function of the date and time is ON, the LCD will
display " " .
When the display function of the date and time is OFF, the LCD will
display " " .
Adjusting Settings
If selected to display the date and time, the current date and time
will display when unit has been turned off.
Adjusting Settings
6
After Volume has been set, ”0 mmHg” will display. Press the
“SET” button again to continue to the Set Language screen.
Press the “MEM” button to cycle between languages (English and
Spanish). Choose “ESP” to select SPANISH: the talking language will
change to Spanish.
Note that the language setting can only be changed during the initial
settings adjustment. The default language is English. If you later wish
to change the language setting, the batteries must be removed and
steps 1 to 6 repeated.
After Language has been set, ”0 mmHg” will display.
Press the “SET” button again to continue to the set user screen.
START
STOP
5
To set Display of date and time
To set Language (English / Spanish)To set Volume
Press the “MEM” button and the volume will cycle from 0 to 7.
Select desired volume level, press the “SET” button, and continue to step 6.
Press the “ ” button to save the current setting and turn the unit off.
When the volume is level 0, the LCD will display “ ” and the voice
function is OFF.
When the volume is set between level 1 and level 7, the LCD will
display “ ” and the voice function is ON.
......
Volume Level 7 Volume Level 0 Volume Level 1
Sound Symbol
Volume Level
Voice ON/OFF
Page 6
18
17
20
19
2
3
Take a Measurement
The hearbeat symbol “ ” flashes once a pulse is detected.
Measurement CompleteContinues InflatingHeartbeat appearsInflatingStarts to inflate
The cuff deflates automatically and
the measurement results are stored
in memory with date and time.
The “ ” symbol will display
if irregular heartbeat is detected.
The blood pressure and pulse rate are displayed when
the measurement is complete.
OR
“ ”display
“mmHg”displ
ay
When your arm is in the proper position and the heartbeat
symbol disappears, the unit will automatically begin to
inflate and measure.
Proper Measurement Method
1 2
Wrap the cuff tightly around
your wrist by using the
hook and loop strip.
Sit in a chair with your feet flat on the floor.
3
Remove all clothes from your
arm, allowing the cuff to fit
directly on the skin.
1cm
(0.4'')
All display symbols appear.
If the positioning system is turned on, and the unit
detects your arm is not in the proper position, it will sound the alarm to remind
you
to raise or lower the cuff. The arrowhead will then flash, then the
arrowhead symbol will disappear, and the “ ” symbol will display.
Take a Measurement
Press the “ ” button.
1
High
Too High
Too Iow
Iow
OK
Bi...Bi...Bi
Bi Bi Bi Bi
Bi Bi Bi Bi
Bi--Bi Bi Bi
Bi...Bi...Bi
START
STOP
Press the “SET” button and the user symbol will appear when turned off or
You can stop the setting anytime when you press the “ ” button to
save the current setting and turn the unit off.
If select to display the date and time, the current date and time will
display when the unit is turned off.
the display function of the date and time is ON. Then press the “MEM” button
to change the current user.
Finally, press the “ ” button to confirm user and turn off.
7 To set user
Adjusting Settings
START
STOP
START
STOP
Page 7
23
22
24
21
the average value of the
latest 3 measurements
Turn to next
Use the Memory Function
..............................................
To read the measurement value
Backward
Forward
The 1st latest
measurement value
The 2nd latest
measurement value
The 90th latest
measurement value
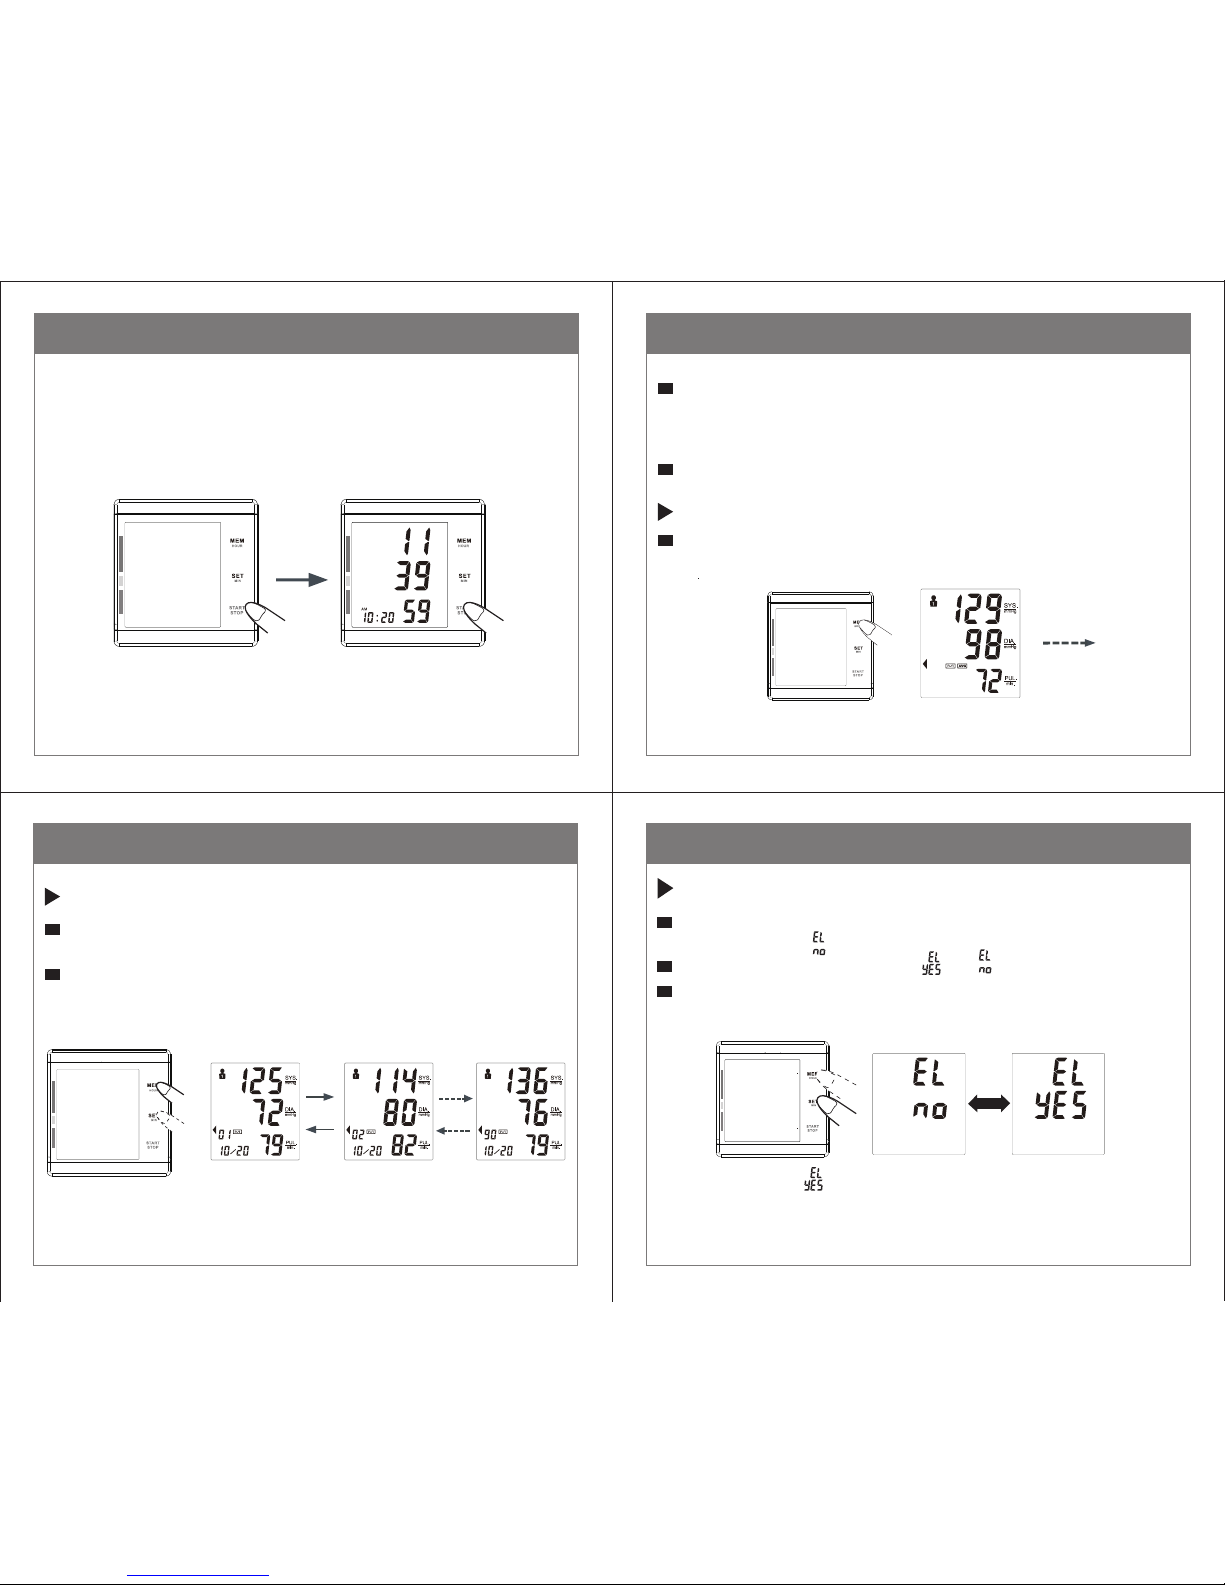
Press the “MEM” button to display the set of measurement values with the
measuring date from the most recent to the oldest.
Press the “SET” button to display the next set of measurement values with the
measuring date from the oldest to the most recent.
The unit also calculates an average reading based on the values of the
latest 3 measurements taken.
Press the “MEM” button; the average value of
the current user’s latest 3
measurements
will display.
Use the Memory Function
To read the average value
...................................
Use the Memory Function
To delete the memory value
...........................................
In the memory reading mode,
press
the “SET” button for 4-6 seconds;
the unit will display “ ”.
Press the “MEM” button and confirm “ ” or “ ”.
If you are sure all of the corresponding user’s data can be deleted, press the
“ ” button; all the corresponding user’s data will then be deleted and the
unit will turn off.
Note: If you have set “ ”, but do not press a button for 2 minutes, the unit
will turn off automatically, but the corresponding user’s blood pressure data
will not be deleted. The delete operation must be confirmed by the user.
After the measurement has finished and the memory values display, the
backlight remains on for about 10 seconds.
The unit stores the blood pressure and pulse rate in the memory each time
a measurement is completed. It can automatically store180 sets of
measurement values for 2 users (2 * 90). The earliest record is deleted to
save the latest measurement value when any one user has more than 90 sets.
START
STOP
Take a Measurement
The unit will automatically turn off after two minutes if you have forgotten
to turn it off.
If selected to display the date and time, the current date and time will display
when the unit is turned off.
Press the “ ” button to turn the unit off.
4
NOTE:
To stop the inflation or measurement, press the “ ” button at any time.
The unit will stop inflating and then release and turn off.
OR
START
STOP
START
STOP
Page 8
26
About Blood Pressure
The incidence of hypertension increases with age. In addition, lack of exercise;
excess body fat; and high levels of cholesterol (LDL), which sticks to the inside
of blood vessels, reduce their elasticity. Hypertension accelerates
arterial sclerosis, which can lead to very serious conditions such as stroke and
myocardial infarction. For these reasons it is very important to know whether the
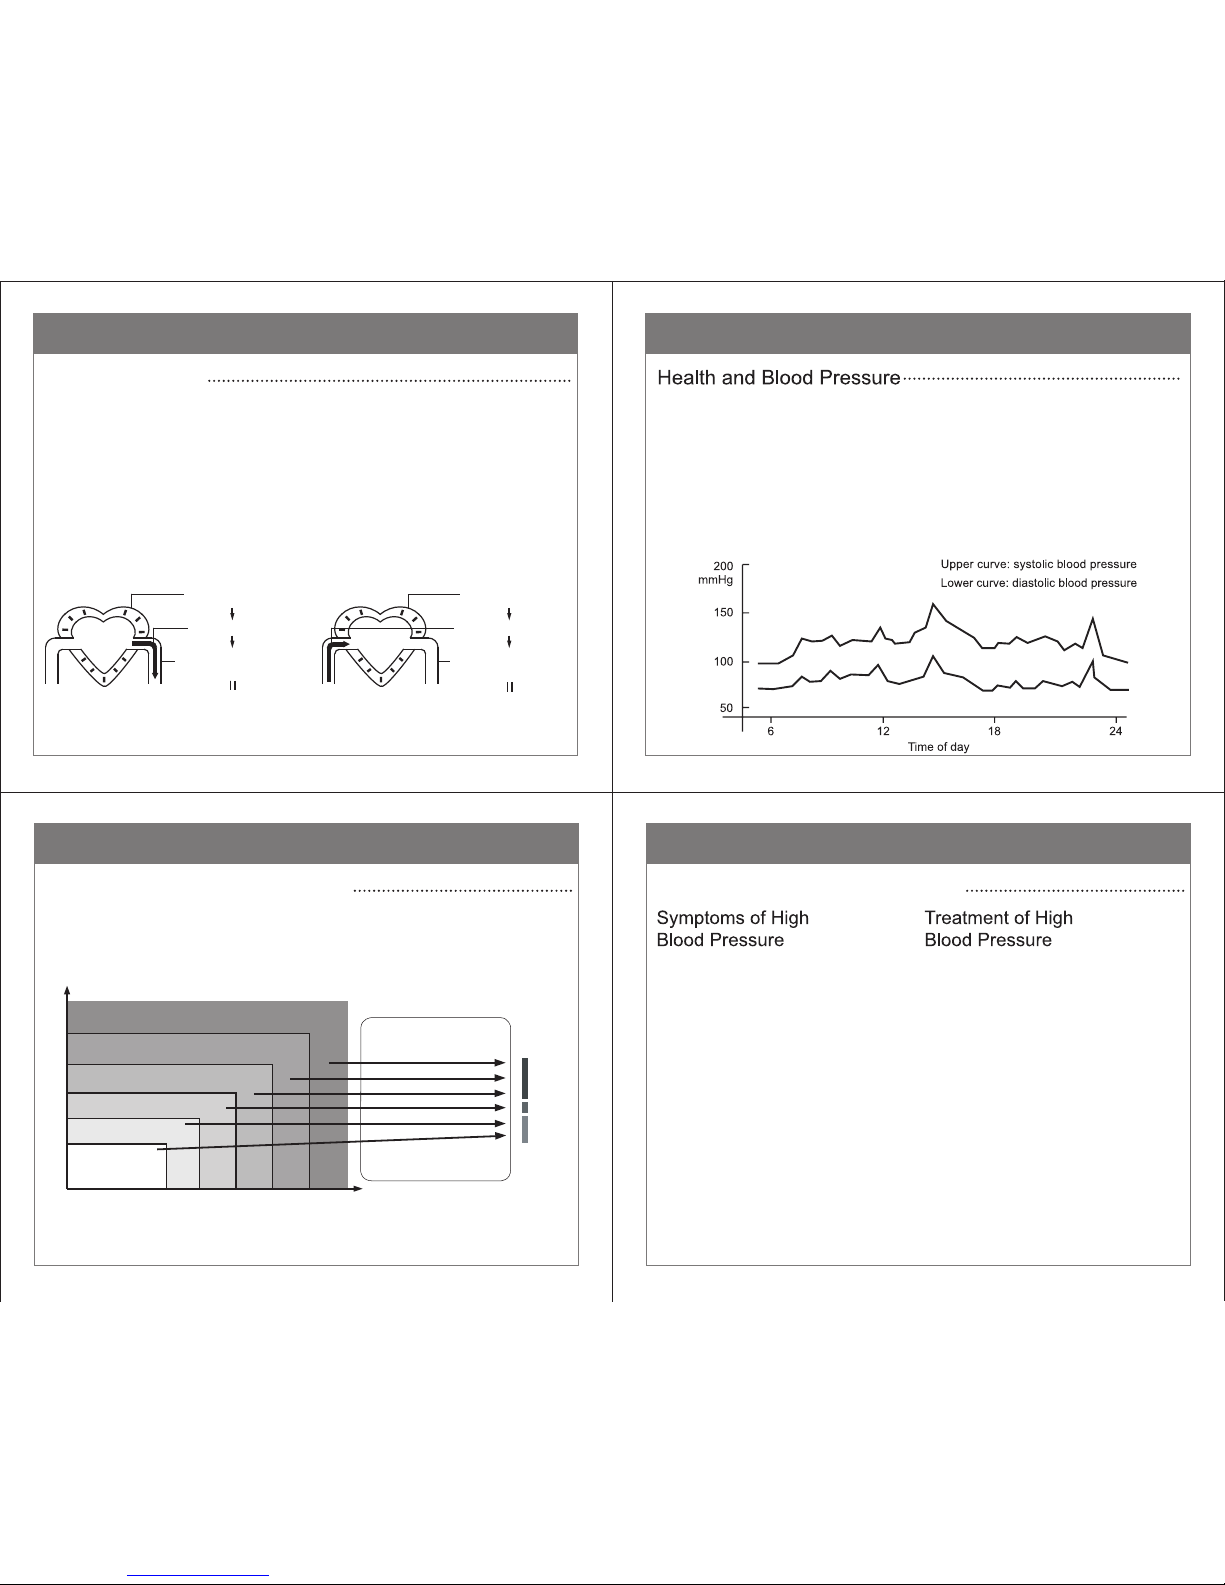
blood pressure is within a healthy range. Blood pressure fluctuates from minute
to minute throughout the day, making it essential to take regular measurements
to help you identify an average blood pressure.
27
About Blood Pressure
*Note!
When a person’s systolic and diastolic pressures fall into different categories, the
higher category should apply.
WHO
Red
Yellow
Green
80
85
90
100
110
Diastolic Blood Pressure (mmHg)
120 130 140 160 180
Systolic Blood Pressure (mmHg)
Optimal
blood pressure
(target value)
Normal blood pressure
Normal systolic value
Mild hypertension
Moderate hypertension
Severe hypertension
After each measurement is completed, the LCD will automatically show your
position on the six segments of the bar indicator which correspond to the WHO
(World Health Organization) Blood Pressure Indicator, shown below.
Reference Material: Journal of Hypertension 1999, Vol 17 No.2
Classification of Blood Pressure
High blood pressure can go unnoticed
for a long time, since it doesn’t cause
noticeable symptoms. The following
are all possible causes of abnormally
high blood pressure:
• Overweight;
• High cholesterol level;
• Smoking;
• Excessive alcohol consumption;
• Stress and emotional upset;
• Excessive consumption of salt;
• Lack of physical exercise;
• Genetic / hereditary predisposition;
• Underlying illness, such as kidney
disorders or endocrine disturbance.
If your blood pressure reaches upper
values of 140~160 mmHg and lower
values of 90~95 mmHg in repeated
measurements over several days, you
should consult your doctor for detailed
medical examination. You can assist
the treatment prescribed by your
doctor in the following ways:
• Lose weight and lower your
cholesterol level;
• Reduce the consumption of alcohol;
• Reduce the intake of salt;
• Stop smoking;
• Take regular exercise;
• Monitor your blood pressure.
28
About Blood Pressure
Classification of Blood Pressure
25
About Blood Pressure
Lower pressure
Relaxation of the
heart muscle
Pressure decreased
to the blood vessel
Blood returns to heart
Higher pressure
Contraction of
the heart muscle
Pressure increased
to the blood vessel
Extrude blood
Diastolic Blood PressureSystolic Blood Pressure
Blood Circulation
The blood circulation is responsible for supplying the body with oxygen.
Blood pressure is the pressure exerted on the arteries.
The systolic blood pressure value (higher pressure or top value) represents
the blood pressure produced by contraction of the heart muscle.
The diastolic blood pressure value (lower pressure or lower value) represents
the blood pressure produced by relaxation of the heart muscle.
Page 9

30
31
32
29
Causes and SolutionsProblem
Eliminate Fault
Care and Maintenance
Care
Maintenance
Care and Maintenance
Troubleshooting Troubleshooting
CorrectionCauseSymbol
Error Indicators
The following symbol will appear on the display when measuring abnormally.
NOTICE: Store the unit in a clean,
dry location. DO NOT subject the unit
to extreme hot or cold temperature,
humidity, or direct sunlight.
Blood pressure varies constantly. Many
factors including stress, time of day, how
you wrap the cuff, etc., may affect your
blood pressure. Review the sections
"Proper Measurement Method" and
"Take a Measurement".
Check the battery installation for proper
placement of both battery polarities
Measurement values
appear too high or too low
Nothing appears on the
display
No power
Replace both worn batteries with new ones
NOTICE: Avoid subjecting the monitor to strong shocks or vibrations, such as
dropping the unit on the floor.
NOTICE: Use the unit in accordance with the instructions provided in this
manual. Use only authorized parts and accessories.
Keep the unit in the storage case
when not in use.
Clean the unit with a soft dry cloth.
NOTICE: DO NOT use any abrasive
or volatile cleaners.
NOTICE: DO NOT immerse the unit
or any components in water.
Maintenance
naphtha
thinner
gasoline
NOTICE: Remove the batteries if the
unit will not be used for 3 months or
longer. Always replace both batteries
with new ones at the same time.
NOTICE: DO NOT wet the cuff or
attempt to clean the cuff with water.
NOTICE: DO NOT clean the body or cuff with
solvents, naphtha, thinner or gasoline etc.
+
+
-
-
Wrap the cuff correctly
Inflate again, ensuring cuff is
wrapped correctly
Measure again, ensuring correct
procedure
Do not move your arm or body;
remain still and quiet
Battery power is too
low
Inflation error
Measurement has
failed
Replace both worn batteries with
new ones
Page 10

34
36
35
33
Specifications
10 ~ 40 C (50 ~ 104 F)
15 ~ 90%RH (Noncondensing)
-20 ~ 60 C (-4 ~ 140 F)
10 ~ 95% RH (Noncondensing)
Temperature
Humidity
Temperature
Humidity
Barometric Pressure
Memory 180 (2*90) Sets of Measurement Values
Automatic by Internal Pump
Automatic by Air Valve
In 2 Minutes
Approx. 170g (Batteries not included)
Operating
Environment
Storage
Environment
Memory Function
Inflation
Power Source
Rapid Air Release
Automatic Power-Off
Gross Weight
80~105 kPa
2 AAA Alkaline Batteries
Specifications
Specifications
The unit satisfies the requirements of IEC60601-1 Medical electrical equipment,
EN1060-1: Non-invasive sphygmomanometer, EN1060-3: Non-invasive
sphygmomanometer,IEC80601-2-30: Medical electrical equipment.
The unit satisfies the requirements of EN60601-1: Medical electrical equipment
Part 1: General requirements for basic safety and essential performance;
EN60601-1-2: Medical electrical equipment Part 1-2: General requirements for
basic safety and essential performance – Collateral standard: Electromagnetic
compatibility – Requirements and tests; EN1060-1:Non-invasive
sphygmomanometers – Part 1: General requirements; EN1060-3: Non-invasive
sphygmomanometers – Part 3: Supplementary requirements for
electro-mechanical blood pressure measuring system. EN1060-4: Non-invasive
sphygmomanometers – Part 4: Test procedures to determine the overall
system accuracy of automated non-invasive sphygmomanometers.
The unit has passed the EMC Test.
Blood pressure measurements determined with this device are equivalent to
those obtained by a trained observer using the cuff/stethoscope auscultatory
method, within the limits prescribed by the American National Standard,
Manual, electronic, or automated sphygmomanometers.
The risk of patient and user can be lowered to an acceptable level.
Specifications are subject to change without notice due to improvements in
performance.
Applied parts include cuff.
The device, accessories, and packaging must be disposed of correctly at the
end of their usage. Please follow Local Ordinances and Regulations for
disposal.
Protection Class: Internally powered equipment
Applied Part Type: Type B
Moisture Protection: IPX0, continue operation
Specifications
Lumiscope 1146
LCD Digital Display
Oscillometric Method
Measurable
Model No.
Display
Measuring Principle
Circumference of Wrist
13.5~21.5cm
(5.3''~8.5'')
Electric Shock
Protection
Measurement
Range
Accuracy
Pressure
Pulse
Pressure
Pulse
Pressure
0 to 299 mmHg (0~39.9 kPa)
40 to180 Pulses/min
3 Digits Display of mmHg or kPa
3 Digits Display
Memory/IHB/Heartbeat/Low Battery,etc.
3 mmHg (0.4kPa)
5% of reading
Pulse
Internal power supply appliance type B
LCD
Indication
Symbol
Backlight
White
Page 11

3837
40
39
Limited Warranty Limited Warranty
Appendix A: EMC Information Appendix A: EMC Information
Guidance and manufacturer’s declaration – electromagnetic emission
Emission test
RF emission
Harmonic
Voltage
Group 1
Class B
Not applicable
Not applicable
The Digital Blood Pressure Monitor uses RF energy only for
its internal function. Therefore, its RF emissions are very low
and are not likely to cause any interference in nearby
electronic equipment.
The Digital Blood Pressure Monitor is suitable for use in all
establishments other than domestic and those directly
connected to the public low-voltage power supply network
that supplies buildings used for domestic purposes.
CISPR 11
RF emissions
emissions
fluctuations/
flicker emissions
IEC 61000-3-3
IEC 61000-3-2
CISPR 11
Compliance
Electromagnetic environment – guidance
The Digital Blood Pressure Monitor is intended for use in the electromagnetic environment
specified below. The customer of the user of the Digital Blood Pressure Monitor should
assure that it is used in such an environment.
Guidance and manufacturer’s declaration
NOTICE: This machine should not be used adjacent to or stacked with other
equipment. If adjacent or stacked use is necessary, this machine should be
observed to verify normal operation in the configuration in which it will be used.
NOTICE: MEDICAL ELECTRICAL EQUIPMENT needs special precautions
regarding EMC and needs to be installed and put into service according to the
EMC information provided in the ACCOMPANYING DOCUMENTS.
NOTICE: Portable and mobile RF communications equipment can affect
MEDICAL ELECTRICAL EQUIPMENT.
NOTICE: Do not use a mobile phone, or other devices that emit electromagnetic
fields, near the unit. This may result in incorrect operation of the unit.
NOTICE: This unit has been thoroughly tested and inspected to assure proper
performance and operation.
NOTICE: The use of ACCESSORIES, transducers and cables other than
those specified, with the exception of transducers and cables sold by the
MANUFACTURER of the Digital Blood Pressure Monitor as replacement parts
for internal components, may result in increased EMISSIONS or decreased
IMMUNITY of the ME EQUIPMENT or ME SYSTEM.
SCOPE OF WARRANTY
GF Health Products, Inc. (“GF”) warrants to the original purchaser (“Customer”) only,
that it will replace or repair components, at GF’s sole discretion, that are defective in
material or workmanship under normal use for the following period after the purchase
date unless there is an expiration date on the component in which case the warranty
shall expire on the earlier of the warranty period or the expiration date.
Blood Pressure Monitor: two years
Cuff: one year
The warranty does not extend to non-durable parts and does not include labor or costs
of shipping. This limited warranty is not transferable. All warranties are conditioned
upon the proper use of the product strictly in accordance with good commercial
practice and applicable GF instructions and manuals, including proper use and
maintenance. The warranty is void if the defect is caused by any other reason not
related to defects in materials or workmanship.
OBTAINING WARRANTY SERVICE
GF’s customer service team must be notified of any warranty claim within the
applicable warranty period. Call 770-368-4700, or fax 770-368-2386 or e-mail
cs@grahamfield.com. There is a $15 fee for return shipping and handling. Please
make checks payable to GF Health Products, Inc. Failure to follow the specific
directions provided by the GF customer service team will result in denial of the
warranty claim.
ENTIRE WARRANTY, EXCLUSIVE REMEDY AND CONSEQUENTIAL
DAMAGES DISCLAIMER
THIS WARRANTY IS GF’S ONLY WARRANTY AND IS IN LIEU OF ALL OTHER
WARRANTIES, EXPRESS OR IMPLIED. GF MAKES NO IMPLIED WARRANTIES OF
ANY KIND INCLUDING ANY IMPLIED WARRANTIES OF MERCHANTABILITY OR
FITNESS FOR A PARTICULAR PURPOSE. IF ANY MODEL OR SAMPLE WAS
SHOWN TO THE CUSTOMER, SUCH MODEL OR SAMPLE WAS USED MERELY TO
ILLUSTRATE THE GENERAL TYPE AND QUALITY OF THE PRODUCT AND NOT TO
REPRESENT THAT THE PRODUCT WOULD NECESSARILY CONFORM TO THE
MODEL OR SAMPLE IN ALL RESPECTS.
GF’S TOTAL LIABILITY FOR ANY PRODUCT OR SERVICE PROVIDED IS LIMITED
TO THE COST OF THE PRODUCT GIVING RISE TO THE CLAIM. IN NO EVENT
WHETHER IN CONTRACT, INDEMNITY, WARRANTY, NEGLIGENCE, STRICT
LIABILITY OR OTHERWISE WILL GF BE LIABLE FOR ANY DIRECT, SPECIAL,
INDIRECT, INCIDENTAL, EXEMPLARY OR CONSEQUENTIAL DAMAGES,
INCLUDING, BUT NOT LIMITED TO: DAMAGES FOR LOSS OF PROFITS OR
INCOME, LOSS OF USE, DOWNTIME, COVER, OR EMPLOYEE OR INDEPENDENT
CONTRACTOR WAGES, PAYMENTS AND BENEFITS.
This warranty gives you specific legal rights. You may have additional rights which vary
from state to state.
Page 12

41 42
43
44
Appendix A: EMC Information Appendix A: EMC Information
Appendix A: EMC InformationAppendix A: EMC Information
Guidance and manufacturer’s declaration – electromagnetic immunity
Immunity test
Power frequency
magnetic field IEC
61000-4-8
±6 kV contact
±8 kV air
±6 kV contact
±8 kV air
3A/m 3A/m
Floors should be wood, concrete or
ceramic tile. If floor are covered with
synthetic material, the relative humidity
should be at least 30%.
Power frequency magnetic fields should
be at levels characteristic of a typical
location in a typical commercial or
hospital environment.
(50Hz/60Hz)
Electrostatic
IEC 61000-4-2
discharge (ESD)
IEC 60601 test Compliance
level level
Electromagnetic environment - guidance
NOTE UT is the a.c. mains voltage prior to application of the test level.
Guidance and manufacturer’s declaration – electromagnetic immunity
Immunity test
80 MHz to 2.5
GHz
3A/m
3A/m
80 MHz to 800 MHz
800 MHz to 2.5 GHz
Portable and mobile RF communications
equipment should be used no closer to any
part of the Digital Blood Pressure Monitor,
including cables, than the recommended
separation distance calculated from the
equation applicable to the frequency of the
transmitter.
Where P is the maximum output power
rating of the transmitter in watts (W)
according to the transmitter manufacturer
and d is the recommended separation
distance in meters (m).
Field strengths from fixed RF transmitters,
as determined by an electromagnetic site.
Radiated RF
IEC 61000-4-3
IEC 60601 test
Compliance
level level
Electromagnetic environment - guidance
Recommended separation distance
The Digital Blood Pressure Monitor is intended for use in the electromagnetic environment
specified below. The customer or the user of the Digital Blood Pressure Monitor should
assure that it is used in such an environment.
The Digital Blood Pressure Monitor is intended for use in the electromagnetic environment
specified below. The customer or the user of the Digital Blood Pressure Monitor should
assure that it is used in such an environment.
Immunity test
80 MHz to 2.5
GHz
3A/m
3A/m
NOTE 1 At 80 MHz and 800 MHz, the higher frequency range applies.
NOTE 2 These guidelines may not apply in all situations. Electromagnetic propagation is
affected by absorption and reflection from structures, objects and people.
Field strengths from fixed transmitters, such as base stations for radio (cellular/cordless)
telephones and land mobile radios, amateur radio, AM and FM radio broadcast and TV
broadcast cannot be predicted theoretically with accuracy. To assess the electromagnetic
environment due to fixed RF transmitters, an electromagnetic site survey should be
considered. If the measured field strength in the location in which the Digital Blood Pressure
Monitor is used exceeds the applicable RF compliance level above, the Digital Blood
Pressure Monitor should be observed to verify normal operation. If abnormal performance is
observed, additional measures may be necessary, such as reorienting or relocating the
Digital Blood Pressure Monitor.
Radiated RF
IEC 61000-4-3
IEC 60601 test
Compliance
level level
Electromagnetic environment - guidance
Field strengths from fixed RF transmitters,
as determined by an electromagnetic site
survey, should be less than the compliance
level in each frequency range.
Interference may occur in the
vicinity of equipment marked
with the following symbol:
Recommended separation distances between
portable and mobile RF communications equipment and the Digital Blood Pressure Monitor.
Output power
of transmitter
(W)
For transmitters rated at a maximum output power not listed above, the recommended
separation distance d in metres (m) can be estimated using the equation applicable to the
frequency of the transmitter, where P is the maximum output power rating of the transmitter
in watts (W) according to the transmitter manufacturer.
Separation distance
(m)
according to frequency of transmitter
The Digital Blood Pressure Monitor is intended for use in an electromagnetic environment in
which radiated RF disturbances are controlled. The customer or the user of the Digital Blood
Pressure Monitor can help prevent electromagnetic interference by maintaining a minimum
distance between portable and mobile RF communications equipment (transmitters) and the
Digital Blood Pressure Monitor as recommended below, according to the maximum output
power of the communications equipment.
80 MHz to 800 MHz
0.01
0.1
1
10
100
0.117 0.233
0.369 0.738
1.167 2.333
3.689 7.379
11.667 23.333
80 MHz to 800 MHz
Page 13

Gracias por elegir el Tensiómetro Digital de Muñeca Lumiscope!
Por favor, lea este manual de instrucciones antes de utilizar el Tensiómetro.
Guarde este manual de instrucciones para utilización futura.
Introducción.................................................................................................1
Símbolos......................................................................................................2
Precauciones Importantes de Seguridad..................................................3-4
Conozca su Tensiómetro..........................................................................5-6
Introducción a IHB.......................................................................................7
Antes de Comenzar.....................................................................................8
Instalación y Reemplazo de Baterías..........................................................9
Ajuste de Funciones
1. Ajuste del Año ..................................................................................10
2. Ajuste de Día y Hora ...................................................................11-12
3. Ajuste del Sensor de Posicionamiento .............................................12
4. Ajuste la Pantalla de Fecha y Hora .............................................13-14
5. Ajuste del Volumen ..........................................................................15
6. Ajuste el Idioma (Inglés / Español) ...................................................16
Método Apropiado de Medición.................................................................18
Tomando una Medición .......................................................................19-21
Como eliminar el valor de medición .....................................................24
Antes de Utilizar el Tensiómetro
Cuidado & Mantenimiento
Instrucciones de Operación
Garantía Limitada................................................................................37-38
Garantía
Información de EMC............................................................................39-44
Appéndice A: Emisiones Electromagnéticas
Uso de la Función Memoria
Como leer el promedio de meciciones .................................................22
Como leer el valor de medición ............................................................23
Acerca de la Presión Sanguínea
Circulación de la sangre .......................................................................25
Salud & Presión sanguínea ..................................................................26
Clasificación de la presión sanguínea .............................................27-28
Solución de Problemas
Indicadores de Error .............................................................................29
Elimina la Falla .....................................................................................30
Cuidado & Mantenimiento
Cuidado ................................................................................................31
Mantenimiento ......................................................................................32
Especificaciones ..................................................................................33-36
1146-INS-LAB-RevA14
Modelo 1146
Tensiómetro Digital
de Muñeca
Completamente Automático
Manual de Instrucciones
ÍNDICE ÍNDICE
Fabricado para: GF Health Products, Inc.
Atlanta GA 30360
770-368-4700
www.grahamfield.com
GF Health Products, Inc. no es responsable por errores tipográficos.
Para obtener la información más actualizada y vigente relativa a los
envases, garantías, productos y especificaciones, incluyendo la versión
más actualizada de estas instrucciones, por favor visite nuestro sitio
web en www.grahamfield.com.
Graham-Field, Lumiscope, y Lumiscope For The Quality Of Life son
marcas registradas de GF Health Products, Inc.
© 2014 GF Health Products, Inc. Fabricado en China
.....
Page 14

2
Precauciones Importantes de Seguridad Precauciones Importantes de Seguridad
AVISO: No utilice un teléfono celular cerca de la unidad, dado que podría
inteferir en la medición.
AVISO: Evite el uso del aparato en áreas de alta temperatura; dado que
podría afectar la exactitud de la medición.
AVISO: No intente desarmar y/o reparar la unidad.
3
Símbolos
Indica una situación de peligro potencial o de práctica insegura
que de no ser evitada, pudiera resultar en la muerte o en
lesiones graves a la persona.
Tipo B Parte Aplicado
Consulte las instrucciones para su uso
NÚMERO DE SERIE
El marcado de los aparatos eléctricos y electrónicos según de
la Directiva 2002/96/EC. El aparato, los accesorios y el
embalaje deben eliminarse adecuadamente al final de su uso.
Por favor, siga las ordenanzas y reglamentos locales para su
destrucción.
CLAVE DE SÍMBOLOS
ADVERTENCIA
PRECAUCIÓN
Indica una situación de peligro potencial o de práctica insegura
que de no ser evitada, pudiera resultar en lesiones menores o
moderadas a la persona.
Indica una situación de peligro potencial o de práctica insegura
que de no ser evitada, pudiera resultar en daños al producto o a
a propiedad.
1
Introducción
Gracias por eligir el Tensiómetro Digital Completamente Automático de Muñeca
Lumiscope 1146.
Uso Previsto: La unidad fue diseñada para monitorear la presión sanguínea y el
pulso sólo en adultos. No use en menores o bebés, o en los establecimientos
médicos (hospital, clínicas, etc.).
La unidad utiliza el método oscilométrico de medición de la presión sanguínea.
Esto significa que detecta el movimiento de su sangre a través de la arteria braqial
y transforma la presión sanguínea en un dato digital de simple lectura. La unidad
es de fácil uso dado que no es necesario un estetoscopio gracias al monitor
oscilómetrico.
La unidad almacena automáticamente 180 mediciones. Ud puede acceder a la
información almacenada simplemente presionando el botón Memory.
La unidad cuenta con los siguientes accesorios:
• Unidad / Tensiómetro
• Estuche protector
• Manual de Instrucciones (en Inglés y Español)
El tensiómetro cuenta con las funciones principales:
• Iluminar desde el Fondo
• Función de Voz
•
Sensor de Posicionamiento
• Indicación de la Fecha y la Hora
4
AVISO
DIRECTRICES DE SEGURIDAD - LEA ANTES DE USAR
ADVERTENCIA:
Lea y entiende estas instrucciones antes de usar el Tensiómetro.
Si no entiende cualquier parte de estas advertencias o instrucciones, llame a
profesional de cuido de salud para dirección en como utilizar este producto.
ADVERTENCIA:
Si componentes están dañados o no están presentes, contacte
a su distribuidor autorizado de GF inmediatamente. No substituya piezas.
Utilice solamente partes de reemplazo de Lumiscope. Partes de reemplazo
de no-Lumiscope pueden causar herida personal o daños a la propiedad.
ADVERTENCIA: Consulte a su médico para mayor información respecto a
su presión sanguínea. El auto-diagnóstico puede ser peligroso sin la
supervisión de un especialista.
ADVERTENCIA: Opere la unidad tal como se describe en este manual.
ADVERTENCIA: No utilice cerca de elementos inflamables.
ADVERTENCIA: Aviso para los Clientes de California - Proposición 65 de
California ADVERTENCIA: Este producto contiene una sustancia química
conocida en el estado de California por causar cáncer y daños reproductivos
o del desarrollo.
ADVERTENCIA: GF Health Products, Inc. no asume ninguna responsabilidad
por cualquier daño o perjuicio causado por el manejo o uso inadecuadamente
de este producto.
Page 15

8
5
6
7
Antes de Comenzar
2 AAABaterías
Alcalinas
(no Incluidos)
Baterías
Pantalla
Estuche
Unidad de Medición
Presión Sistólica
Presión Diastólica
Símbolo de Latido del Corazón
Pulso
Memoria y Tiempo
Sensor de Arritmia (IHB)
Símbolo de Batería Baja
Símbolo de Valor Promedio
Símbolo de Usuario
Símbolo de Posición
Día/Hora
Símbolo de Inflado/Desinflado
o Indicación de WHO
Introducción a IHB: Sensor de Arritmia
) (Símbolo de Arritmia (IHB)
Tensiómetro y Muñequera
Conozca su Tensiómetro Conozca su Tensiómetro
Muñequera
Compartimento
para Baterías
Botón de Encendido
y Apagado
(Start/Stop Button)
Pantalla
Botón de Programación
(Set Button)
Botón de Memoria
Voz Audible
Luz de Fondo
Page 16

Conversión del Sistema de Tiempo
El año puede ajustarse entre 2012 y 2030.
Después de mostrar 2030 volverá al año 2009.
3
El símbolo del sensor de posicionamiento “ ” aparecerá.
Pulse el botón "MEM" para cambiar la configuración actual.
Si el sistema de posicionamiento está activado, la pantalla LCD mostrará “ ”.
Si el sistema de posicionamiento está apagado, la pantalla LCD mostrará “ ”.
Pulse el botón “SET” y continúe con el paso 4.
Ajuste Minuto
1.2 El Año aparecerá en pantalla y parpadeará al apretar el botón “SET” durante
durante unos 3-4 segundos.
Pulse el botón
“SET” y continue con el paso 2.
Pulse el botón “MEM” una vez para aumentar de un año, dos veces por dos
años, etc. Mantenga pulsado el botón “MEM” deprimido y el valor aumenta
rápidamente.
1.1
Toda la información aparecerá en la pantalla cuando se instalan las baterías
por primera vez. Después de 2 segundos el año parpadea en la pantalla.
Pulse el botón
“SET” y continue con el paso 2.
Ajuste de Funciones
Ajuste de Funciones
Ajuste de Funciones
10
12
11
1 Ajuste del Año
2
Ajuste del Sensor de Posicionamiento
Ajuste de Día y Hora
Instalación y Reemplazo de Baterías
9
AVISO: Utilice dos 1.5V baterías
identiques alcalinas de tipo
AAA / LR03.
AVISO:
NO USE baterías recargables.
AVISO: Sustituya las dos baterías
si el símbolo de batería baja muestra.
AVISO: No deje las baterías
descargadas en el compartimiento!
Pueden causar daño a la unidad.
1
2
3
+
+
-
-
Info:
Pulse el botón "MEM" para cambiar el mes, entonces pulse el botón "SET" y
continúa con el siguiente paso. Entonces establezca el día, la conversión del
sistema de tiempo, la hora y el minuto utilizando el mismo método. Continúe
con el paso 3.
“ ”
Page 17

14
13
15 16
Conversión del
Sistema
de 12 Horas
Pantalla de Hora
Pantalla de Minuto
Pantalla de Segundo
Pantalla de Hora
Pantalla de Minuto
Pantalla de Segundo
Conversión del
Sistema
de 24 Horas
Pantalla de FechaPantalla de Fecha
Ajuste de Funciones
4
Ajuste de Funciones
Pulse el botón “MEM” y confirmar si la unidad muestra la fecha y la hora
después de apagar.
Pulse el botón “SET”
y continue al paso
5.
Cuando la función de pantalla de la fecha y hora está activado, el LCD
mostará “ ”.
Cuando la función de visualización de la fecha y hora está apagado,
el LCD mostará
“
”.
Ajuste de Funciones
Si es seleccionado para mostrar la fecha y la hora, la fecha y hora actuales
mostrarán cuando la unidad se ha apagado.
Ajuste de Funciones
6
Después de que el volumen se ha establecido, "0 mmHg" se mostrará.
Pulse el botón “SET” de nuevo para continuar a la pantalla para
Ajuste Idioma (Set Language).
Pulse el botón “MEM” para cambiar entre idiomas (Inglés y Español).
Elija “ESP” para seleccionar ESPAÑOL: el idioma que habla cambiará
al Español.
Info: El ajuste de idioma se puede cambiar sólo durante el Ajuste de
Configuración original. El idioma por defecto es el Inglés. Si más
adelante desea cambiar la configuración del idioma, las baterías deben
retirarse y pasos 1-6 repetidas.
Después de que el idioma se ha establecido, "0 mmHg" mostrará.
Pulse el botón "SET" de nuevo para continuar estableciendo la pantalla
del usuario.
START
STOP
5
Ajuste la Pantalla de Fecha y Hora
Ajuste el Idioma (Inglés / Español)Ajuste del Volumen
Seleccione el nivel de volumen deseado, pulse el botón
“SET”
y continue al
paso 6.
Pulse el botón “ ” para guardar la configuración actual y apagar la unidad.
Cuando el nivel de volumen es 0, el LCD mostrará “ ” y la función
de voz está desactivado.
Cuando el volumen se establece entre el nivel 1 y el nivel 7, el LCD
mostrará “ ” y la función de voz está activado.
......
Nivel de Volumen 7 Nivel de Volumen 0 Nivel de Volumen 1
Símbolo de
Sonido
Nivel de Volumen
Voz Encendido/
Apagado
Page 18

18
17
20
19
2
3
Tomando una Medición
El símbolo de latido “ ” parpadea una vez se detecta un pulso.
Medición CompletaContinúa InflarAparece LatidoInflandoComienza a Inflarse
La muñequera se desinfla automáticamente
y los resultados de las mediciones se
almacenan en la memoria con fecha y hora.
El símbolo “ ” aparecerá si se detecta
latidos irregulares del corazón.
La presión y el pulso aparecerán cuando la medición se completa.
O
“ ”display
“mmHg”displ
ay
Cuando el brazo está en la posición correcta y el símbolo del latido “ ”
desaparece, quedará automáticamente la unidad para comenzar inflar
y medir.
Método Apropiado de Medición
1
3
2
Envuelva la muñequera
firmemente alrededor
su muñeca utilizando
la tira de gancho
y bucle.
Siéntese en una silla con los pies apoyados en el suelo.
Descubra su muñeca de
manera tal que el
tensiómetro quede en
contacto con la piel.
1cm
(0.4'')
Todos los Símbolos apareceran. Si el sistema de posicionamiento se activa,
y la unidad detecta el brazo no está en la posición correcta, sonará la alarma
para recordar usted para subir o bajar la muñequera. El símbolo de la punta
de flecha parpadeará a continuación, entonces el símbolo punta de flecha va
a desaparecer, y el símbolo del latido “ ” aparecerá.
Tomando una Medición
Presione el botón “ ” para iniciar una medición.
1
ALTA
Muy ALTA
Muy BAJA
BAJA
OK
Bi...Bi...Bi
Bi Bi Bi Bi
Bi Bi Bi Bi
Bi--Bi Bi Bi
Bi...Bi...Bi
Presione el botón “SET”; el símbolo de usuario aparece cuando apogado o
la función de pantalla de la fecha y la hora está encendido. A continuación,
pulse el botón “MEM” para cambiar el usuario actual.
Por último, pulse el botón “ ” para confirmar el usuario y apague la unidad.
Usted puede dejar el ajuste en cualquier momento al pulsar el botón
“ ” para guardar la configuración actual y apagar la unidad.
Si es seleccionado para mostrar la fecha y la hora, la fecha y hora
actuales mostrarán cuando la unidad se ha apagado.
r.
ff.
Selección de Usuario7
Ajuste de Funciones
START
STOP
START
STOP
START
STOP
Page 19

23
22
24
21
el valor promedio
de las
tres últimas mediciones
Turn to next
Uso de la Función Memoria
Como leer el valor de medición:
Backward
Forward
El último primer
valor de medición
El segundo último
valor de medición
El 90a último
valor de medición
Pulse el botón “MEM” para ver los valores almacenados desde la última a la
más antigúa medición obtenida.
Pulse el botón “SET” para ver los valores almacenados desde la más antigúa
a la última medición obtenida.
La unidad calcula el promedio de las tres últimas mediciones.
Pulse el botón “MEM”; el valor promedio
de las tres últimas mediciones
del usuario actual mostrará.
Uso de la Función Memoria
Como leer el promedio de meciciones:
Uso de la Función Memoria
Como eliminar el valor de medición:
Mientras se encuentre dentro de la función Memoria, mantenga pulsado el
botón “SET” durante 4-6 segundos; “ ” aparecerá.
Pulse el botón “MEM” y confirmar “ ” o “ ”.
Si está segura de que desea eliminar los datos almacenados en memoria,
pulse el botón “ ”. Todo los datos correspondiente de este usuario serán
eliminados y la unidad se apagará.
INFO: Si he seleccionado“ ”, pero no pulsa ningún botón durante 2 minutos,
la unidad se apagará pero los valores almacenados no serán eliminados.
La operación de eliminación debe ser confirmada por el usuario. Después
de la medición ha terminado y la memoria se muestran los valores, la luz
de fondo permanece encendida durante aproximadamente 10 segundos.
La unidad almacena autocáticamente los valores de presion sanguinea y
pulso obtenidos en la medición. La unidad puede almacenar hasta 180 valores
de medición en dos grupos de 90 (dos usuarios). El valor más antiguo en
memoria es borrado para almacenar el valor más reciente, cuando uno de los
grupos ha alcanzado las 90 memorias.
Tomando una Medición
La unidad se apagará automáticamente después de dos minutos sin
actividad.
Si es seleccionado para mostrar la fecha y la hora, la fecha y hora
actuales mostrarán cuando la unidad se ha apagado.
Pulse el botón “ ” para apagar la unidad.
4
INFO:
Para detener el inflado o la medición, presione el botón “ ” en cualquier
momento.
La unidad dejará de inflarse, suelte y se apagará.
O
START
STOP
START
STOP
START
STOP
Page 20

26
Acerca de la Presión Sanguínea
27
Acerca de la Presión Sanguínea
*Info!
Cuando el valor de presión sistólica y diastólica se encuentren en categorías
diferentes, consideré aquella más alta.
Enfermedad fundamental, como
trastorno renal o perturbación
endocrinal.
28
Acerca de la Presión Sanguínea
25
Acerca de la Presión Sanguínea
WHO
Rojo
Amarillo
Verde
Page 21

30
31
32
29
Causa y SoluciónProblema
Elimina la Falla
Cuidado & Mantenimiento
Cuidado
Cuidado & Mantenimiento
Solución de Problemas Solución de Problemas
SoluciónCausaSímbolo
Indicadores de Error
Los símbolos siguientes pueden aparecer cuando se mide de manera anormal.
AVISO: Guarde la unidad en un lugar limpio
y seco. No exponga la unidad al calor
excesivo, ni a bajas temperaturas, ni a
ambientes extremadamente húmedos.
Asegúrese de que las baterías hayan sido
colocadas de manera correcta
La presion sanguínea varía
constantemente; factores como el estrés,
el momento del día, o como ajusta la
muñequera pueden afectar los valores
obtenidos — lea cuidadosamente las
recomendaciones de uso de la unidad
Los valores obtenidos son
muy altos o muy bajos
No aparece nada en la
pantalla
No enciende
Reemplace las dos baterías por nuevas
AVISO: Evite vibraciones y/o golpes a la unidad.
AVISO: Use la unidad de acuerdo con las instrucciones proporcionadas en
este manual. Use sólo las piezas y accesorios autorisée por
GF Health Products, Inc.
Guarde la unidad en su caja cuando
no la utilice.
Limpie la unidad con un paño limpio.
AVISO: No utilice ningún limpiador
abrasivo o detergente para su
limpieza.
AVISO: Nunca sumerja la unidad
debajo del agua, ni tampoco alguna
de sus componentes.
Mantenimiento
naphtha
thinner
gasoline
AVISO:
Retire las baterías de la unidad
si no la utilizará durante un período
de 3 meses.
AVISO:
No sumerja ni la muñequera ni
la unidad debajo de agua.
AVISO:
No limpie la unidad ni la muñeuera
con nafta, thinner y/o abrasivos.
+
+
-
-
Ajuste correctamente la muñequera
Asegúrese de que el muñequera
se ajusta correctamente y
comenzar de nuevo
Mida otra vez, garantizar el
procedimiento correcto
No mueva su brazo ni cuerpo;
manténgase quieto
Las baterías tienen
baja carga
Aparece mientras se
encuentra inflando
la muñequera
Falla en la medición
Reemplace las baterías gastadas
por nuevas
Page 22

34
36
35
33
Especificaciones
10° ~ 40° C (50° ~ 104° F)
15 ~ 90%RH (sin condensación)
-20° ~ 60° C (-4° ~ 140° F)
10 ~ 95% RH (sin condensación)
Temperatura
Humedad
Temperatura
Humedad
Presión ambiente
180 (2*90) sets
Automático via bomba interna
Automático via válvula de aire
En 2 Minutos
Aprox. 170g (sin incluir baterías)
Ambiente
operativo
Ambiente de
Almacenamiento
Memorias
Inflado
Alimentación
Desinflado / Escape
Apagado Automático
Peso (en grs)
80~105 kPa
2 baterías alcalinas AAA
Especificaciones
Especificaciones
La unidad satisface los requisitos de:
IEC60601-1 equipos médicos eléctricos,
EN1060-1 esfigmomanómetro no invasivo,
EN1060-3 esfigmomanómanetro no invasivo, y
IEC80601-2-30 equipos médicos eléctricos.
La unidad satisface los requisitos de EN60601-1: Equipos médicos eléctricos
Parte 1: Requisitos generales para la seguridad básica y funcionamiento esencial;
EN60601-1-2: Equipos médicos eléctricos Partes 1-2: Requisitos generales
para la seguridad básica y funcionamiento esencial – Norma colateral:
Compatibilidad electromagnética - Requisitos y tests; EN1060-1:
Esfigmomanómetros no invasivos – Parte 1: Requisitos generales; EN1060-3:
Esfigmomanómetros no invasivos – Parte 3: Requisitos suplementarios para el
sistema de medición de la presión arterial electromecánico. EN1060-4:
Esfigmomanómetro no invasivos – Parte 4: Los procedimientos de prueba para
determinar la precisión total del sistema de los esfigmomanómetros no
invasivos automizados.
La unidad ha pasado la prueba de EMC.
Mediciones de la presión arterial determinadas con este aparato son
equivalentes a los obtenidos por un observador entrenado utilizando el método
de auscultación con brazalete / estetoscopio, dentro de los límites establecidos
por The American National Standard, esfigmomanómetros manuales,
electrónicos o automatizados.
El riesgo de paciente y el usuario se puede reducir a un nivel aceptable.
Las especificaciones están sujetas a cambios sin previo aviso debide a las
mejoras en rendimiento.
Piezas aplicadas incluyen muñequera.
El aparato, los accesorios y el embalaje deben eliminarse correctamente en el
final de su uso. Por favor, siga las ordenanzas y los reglamentos locales para
disposición.
Clase de protección: Equipo alimentado internamente.
Pieza clasificada como de Tipo B.
Protección contra la humedad: IPX0, operación continua.
Especificaciones
Lumiscope 1146
Pantalla LCD Digital
Oscilómetrico
Circunferencia de la muñeca
Modelo
Pantalla
Método de medición
13.5~21.5cm
(5.3''~8.5'')
Protección contra descarga
eléctrica
Rango de
medición
Precisión
Presión
Pulso
Presión
Pulso
Presión
0 a 299 mmHg (0~39.9 kPa)
40 a180 pulsos/min
3 digitó para mmHg
3 digitó
Memoria / IHB / latido / batería baja,etc.
3 mmHg (0.4kPa)
5% de medición
Pulso
Fuente de alimentación interna
tipo de aparato B
Indicadores
LCD
Símbolo
Luz desde el fondo (Backlight)
Blanco
Page 23

3837
40
39
Garantía Limitada Garantía Limitada
Appéndice A: Emisiones Electromagnéticas Appéndice A: Emisiones Electromagnéticas
Guía y declaración del fabricante –
emisiones electromagnéticas
Test de emisiones
Emisiones RF
Emisiones
armónicas
Grupo 1
Clase B
No aplicable
No aplicable
El Tensiómetro Digital utiliza energía de RF sólo para su
funcionamiento interno. Por lo tanto, sus emisiones de RF
son muy bajas y no es probable que causen interferencias
en los equipos electrónicos cercanos.
El Tensiómetro Digital es adecuado para su uso en todos
los establecimientos que no sean domésticos y los
conectados directamente a la red eléctrica pública de baja
tensión que alimenta a edificios usados con fines
domésticos.
CISPR 11
Emisiones RF
IEC 61000-3-3
IEC 61000-3-2
CISPR 11
Cumplimiento
Ambiente electromatnético — Guía
El Tensiómetro Digital está destinado para uso en el siguiente ambiente electromagnético
especificado abajo a continuación. El cliente o el usuario del modelos Lumiscope 1146
deberâ asegurar que sea usado en dicho ambiente.
Guía y Declaración del Fabricante
AVISO: Este aparato no debería ser utilizado adyacente o apilado con otros
equipos. Si el uso adyacente o apilado es necesario, este aparato debería ser
observado para verificar su funcionamiento normal en la configuración en la que
se va a utilizar.
AVISO: El equipo médico eléctrico requiere precauciones especiales en cuanto
a EMC y necesita ser instalado y puesto de acuerdo con la Información de EMC
proporcionada en los documentos que acompañan al servicio.
AVISO: Los equipos de comunicaciones de RF portátiles y móviles pueden
afectar los equipos médicos eléctricos.
AVISO: No utilice un teléfono móvil u otros dispotivos que emiten campos
electromagnéticos cerca de la unidad. Esto podría causar un funcionamiento
incorrecto de la unidad.
AVISO: Esta unidad ha sido probado y examinado a fondo para asegurar un
rendimiento y un funcionamiento adecuado.
AVISO:
El uso de accesorios, transductores y cables distintos a los especificados,
con la excepción de los transductores y cables vendidos por el fabricante del
tensiómetro digital como piezas de reemplazo para los componentes internos,
puede producir un aumento o disminución de las emisiones INMUNIDAD del
equipo médico eléctrico o sistema médico eléctrico.
AMBITO DE GARANTÍA
GF Health Products, Inc. (“GF”) garantía al comprador original (el “Cliente”)
solamente, que va reemplazar o reparar componentes, a la decisión solo de
GF, cuales son defectos en material o calidad utilizados normalmente para el
período posterior a la fecha de compra a menos que haya una fecha de
caducidad en el componente, en cuyo caso la garantía expirará en la anterior
del período de garantía o la fecha de caducidad.
Tensiómetro: dos años
Muñequera: un año
La garantía no se extiende a los componentes no durables y no fuerza laboral o
el costo de transporte. Esta garantía limitada no es transferible. Todas
garantías son condicionales por el uso apropiado de producto estrictamente en
acuerdo con las instrucciones aplicables de GF, incluyendo uso apropiado y
mantenimiento. La garantía será nula si el defecto es causado por cualquier
otra razón no relacionada con defectos en los materiales o mano de obra.
OBTENIENDO SERVICIO DE GARANTIA
Equipo de servicio al cliente de GF debe ser notificado de cualquier
reclamación de garantía dentro del período de garantía aplicable. Llame
770-368-4700, o por fax 770-368-2386, o por email a cs@grahamfield.com.
Hay una tarifa de $ 15 para envío de retorno y la manipulación. Por favor haga
los cheques a GF Health Products, Inc. Falta de seguir las instrucciones
específicas resultará en rechazo de la reclamación de garantía.
GARANTÍA COMPLETA, RECURSO EXCLUSIVO Y DAÑOS CONSECUENTES
ESTA GARANTÍA ES ÚNICA GARANTÍA DE GF Y EN LUGAR DE
CUALQUIER OTRA GARANTÍA, EXPRESA O IMPLÍCITA. GF NO OFRECE
GARANTÍAS IMPLÍCITAS DE NINGÚN TIPO, INCLUIDAS LAS GARANTÍAS
DE COMERCIALIZACIÓN O IDONEIDAD PARA UN PROPÓSITO
PARTICULAR. SI CUALQUIER MODELO O MUESTRA FUE MOSTRADO AL
CLIENTE, COMO MODELO O MUESTRA FUE UTILIZADO ÚNICAMENTE
PARA ILUSTRAR EL TIPO GENERAL Y CALIDAD DEL PRODUCTO Y NO
REPRESENTA QUE EL NECESARIAMENTE ESTARÁ CONFORME AL
MODELO O MUESTRA EN TODOS LOS ASPECTOS. LA RESPONSABILIDAD
TOTAL DE GF PARA CUALQUIER PRODUCTO O SERVICIO
PROPORCIONADO SE LIMITA AL COSTO DEL PRODUCTO QUE DIO
LUGAR A LA RECLAMACIÓN. EN NINGÚN CASO, YA SEA POR CONTRATO,
INDEMNIZACIÓN, GARANTÍA, NEGLIGENCIA, ESTRICTAR
ESPONSABILIDAD, O CUALQUIER OTRA FORMA SE GF SERÁN
RESPONSABLES POR DAÑOS DIRECTOS, INDIRECTOS, INCIDENTALES,
EJEMPLARES O INDIRECTOS, INCLUYENDO, PERO NO LIMITADO A:
DAÑOS POR PÉRDIDA DE BENEFICIOS O INGRESOS PÉRDIDA DE USO,
TIEMPO DE INACTIVIDAD, CUBIERTA O EMPLEADO O CONTRATISTA
INDEPENDIENTE SALARIOS, PAGOS Y BENEFICIOS.
Esta garantía le da derechos legales específicos. Puede tener derechos
adicionales que varían estado por estado.
Fluctuaciones
de voltaje/
Emisiones icker
Page 24

41 42
43
44
Appéndice A: Emisiones Electromagnéticas Appéndice A: Emisiones Electromagnéticas
Appéndice A: Emisiones ElectromagnéticasAppéndice A: Emisiones Electromagnéticas
Guía y declaración del fabricante — emisiones electromagnéticas
Test de
inmunidad
Frecuencia de poder
(50/60 Hz) Campo
Magnético
IEC 61000-4-8
±6 kV contacto
±8 kV aire
±6 kV contacto
±8 kV aire
3A/m 3A/m
Los pisos deberán ser de madera,
concreto o cerámica. Si los pisos están
cubiertos con material sintético,
la humedad relativa deberá ser al menos
del 30%.
Los campos magnéticos deben estar a
los niveles característicos de una
situación en un ambiente típico
comercial u hospitalario.
Descarga
electrostática (ESD)
IEC 61000-4-2
IEC 60601
nivel de test
Nivel de
cumplimiento
Ambiente electro magnético — guía
Test de
inmunidad
IEC 60601
nivel de test
Nivel de
cumplimiento
Ambiente electro magnético — guía
Test de
inmunidad
IEC 60601
nivel de test
Nivel de
cumplimiento
Ambiente electro magnético — guía
NOTA: UT es la corriente alterna (a.c.) tensión de red antes de la aplicación del nivel de test.
Guía y declaración del fabricante — emisiones electromagnéticas
80 MHz to 2.5
GHz
3A/m
3A/m
Los equipos de comunicaciones de RF
portátiles y móviles no deben ser usados
más cerca de ninguna parte del
Tensiómetro Digital, incluyendo cables, que
la distancia de separación recomendada
calculada a partir de la ecuación aplicable a
la frecuencia del transmisor.
Distancia recomendable:
80 MHz a 800 MHz
800 MHz a 2.5 GHz
donde P es nivel máximo de potencia de
salida del transmisor en watts/vatios (W)
según el fabricante del transmisor y d es la
distancia de separación recomendada en
metros (m).
Las intensidades de campo de transmisores
de RF fijos, según lo determinado por una
encuesta electromagnética,
Radiada a RF
IEC 61000-4-3
El Tensiómetro Digital está destinado intended para uso en el siguiente ambiente
electromagnético especificado abajo a continuación. El cliente o el usuario del Tensiómetro
Digital deberâ asegurar que sea usado en dicho ambiente.
El Tensiómetro Digital está destinado intended para uso en el siguiente ambiente
electromagnético especificado abajo a continuación. El cliente o el usuario del Tensiómetro
Digital deberâ asegurar que sea usado en dicho ambiente.
80 MHz to 2.5
GHz
3A/m
3A/m
Las intensidades de campo de transmisores
de RF fijos, según lo determinado por una
encuesta electromagnética, deben ser
menores que el nivel de cumplimiento en
cada rango de frecuencias.
Se pueden producir interferencias
en las proximidades de los
equipos, con el siguiente símbolo:
NOTA 1: A 80 MHz y 800 MHz, se aplica la frecuencia más alta.
NOTA 2: Estas directivas pudieran no aplicar en todas las situaciones. La propagación
electromagnética se ve afectada por la absorción y reflexión proveniente de las estructuras,
objetos y personas.
Las intensidades de campo de transmisores fijos, tales como estaciones base de radio y
teléfonos (móviles / inalámbricos) y radios móviles terrestres, equipos de radioaficionados,
emisión de radio AM y FM y emisoras de televisión no se pueden predecir teóricamente con
exactitud. Para evaluar el entorno electromagnético debido a transmisores de RF fijos, un
estudio local electromagnético debe ser considerado. Si la intensidad de campo medida en el
lugar en el que se utiliza
el Tensiómetro Digital supera el nivel de cumplimiento de RF
aplicable anterior, el Tensiómetro Digital debe ser observada/vigilada para verificar su
funcionamiento normal. Si se observa un funcionamiento anormal, algunas medidas
adicionales pudieran ser necesarias, tales como la reorientación o reubicación del
Tensiómetro Digital.
Radiada RF
IEC 61000-4-3
Distancias recomendables entre equipos de comunicación portátil y móvil y
el Tensiómetro Digital
Potencia medida
máxima de salida
del transmisor
(W)
Para transmisores clasificados con una potencia máxima de salida no mencionados
anteriormente, la distancia de separación recomendada d en metros (m) puede estimarse
utilizando la ecuación aplicable a la frecuencia del transmisor, donde P es la potencia de
máxima de salida del transmisor en vatios/watts (W) según el fabricante del transmisor.
Distancia de separación de acuerdo a frecuencia de transmisor (m)
El Tensiómetro Digital está destinado para uso en un entorno electromagnético en el que
perturbaciones de RF radiada están controladas. El cliente o usuario del Tensiómetro Digital
puede contribuir a prevenir la interferencia electromagnetica manteniendo una distancia
minima entre los equipos portátiles y móviles de comunicación de RF (trasnmisores) y el
Tensiómetro Digital, como se recomienda a continuación abajo, de acuerdo a la potencia
máxima de salida del equipo de comunicaciones.
80 MHz a 800 MHz
0.01
0.1
1
10
100
0.117 0.233
0.369 0.738
1.167 2.333
3.689 7.379
11.667 23.333
80 MHz a 800 MHz
 Loading...