

Page 1

®
www.luminox.com
GGM.L006 Ed. 05/08
COMPASS
INSTRUCTION MANUAL
For other languages, please visit
SR-71 BL ACK BI RD™
www.luminox.com
Page 2

CONGRATULATIONS
CONGRATULATIONS
A
B
C
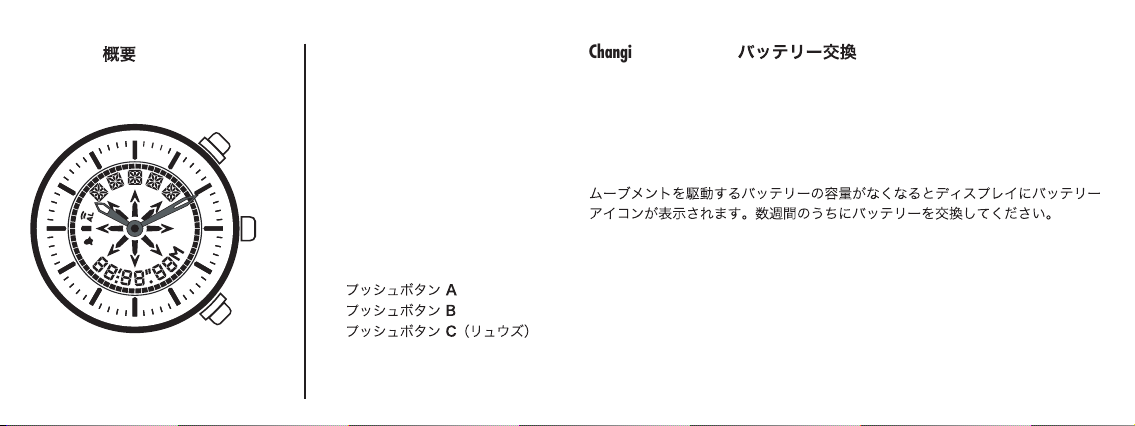
GENERAL/
Pushbutton A
Pushbutton B
Pushbutton C (Crown)
On the purchase of your Luminox timepiece, highly skilled craftsmen using the latest technologies and finest
materials built your state-of-the-art watch in Switzerland. You can be assured of many years of enjoyment and
accurate timekeeping from this exceptional timepiece.
Luminox has been the driving force in self-powered illumination Swiss watches since 1989 and will continue
to push the design envelope by incorporating classic watch design (form) with state-of-the-art unparalleled
illumination technology for the ultimate in time-at-a-glance readability (function). Luminox continues to draw
from its “real world” experience by making watches for elite military and civilian organizations such as the
following: U.S. Navy SEALs, U.S. Air Force pilots, ATF, U.S. Border Patrol, Secret Service, FBI, Coast Guard,
and many other highly respected groups of professionals in the field of law enforcement and security.
Luminox has become the watch of choice for those leading “the active life” worldwide, in over 35 nations already.
Thank you for your support of our product and welcome to the Luminox “Club.”
Page 3
A
B
C
GENERAL/
Pushbutton A
Pushbutton B
Pushbutton C (Crown)
Changing the battery/
When the battery voltage has reached the minimum voltage to power the movement, the icon of a
battery appears on the display indicating that the battery has to be changed in the next few weeks.
Pushbutton A
Pushbutton B
Pushbutton C (Crown)
Page 4

SR-71 BLACKBIRD™
SR-71 BLACKBIRD™
We are immensely proud of our licensing program with Lockheed Martin®,the lar gest defense contractor
in the world, and maker of some of the most unique and compelling jets in aviation history. As we move
into the future look for more series from us that are tied to other Lockheed Martin®aviation properties.
The SR-71 Blackbird™is one of the most spectacular aircraft ever build, a long range advanced strategic
reconnaissance aircraft developed when the USAF and the CIA decided to replace the U-2 Dragonlady
reconnaissance jets, initially with the Lockheed Martin®. A-12, and ultimately the SR-71 Blackbird™.
The first flight of the SR-71™took place on December 22, 1964 and the USAF retired the SR-71™on January
26, 1990. They were capable of flying at speeds of over Mach 3.2 and at 85’000 feet. Throughout its nearly 24-year career, the SR-71™remained the fastest and highest flying production aircraft in the world.
Clearly, the SR-71 Blackbird™was a remarkable aircraft. Our watch series acknowledges and celebrates its
record accomplishments and significance in aviation history.
™
Page 5

Overview of all modes: Push C /
TIME 1
ALARM
DATE WEEK
CHRONO TACHOMETER
TIME 2 TIME 3 TIMER
SECOND
COMPASS
C
C
CC
C
C
C
C
CC
C
TIME 2 TIME 3 TIMER
SECOND
COMPASS
C
C
C
TACHYMETER
Page 6
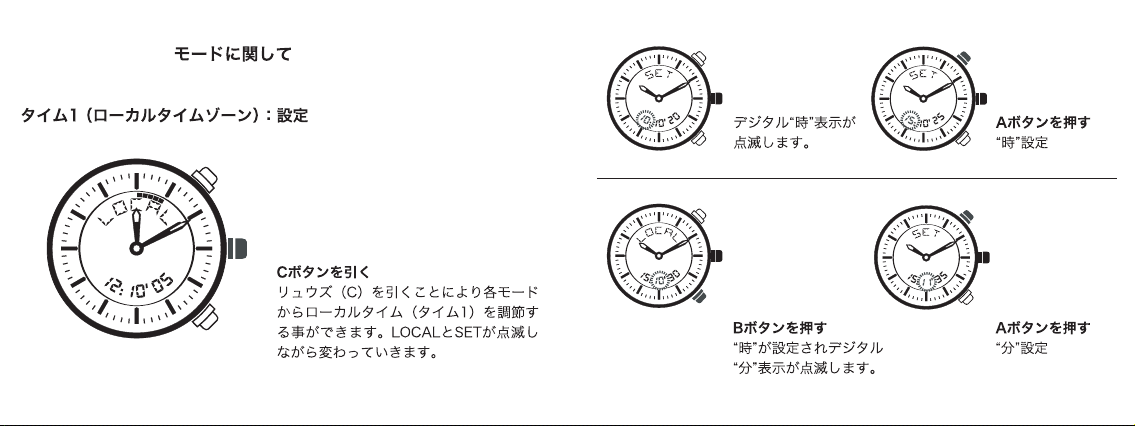
Digital hour indication
starts blinking.
PUSH B
Confirm selected hour and
digital minute indication
starts blinking.
PUSH A
Select hour.
PUSH A
Select minute.
MODE DESCRIPTIONS/
PULL C
From each mode, local time (TIME1) can be adjusted
by pulling the crown (C).
LOCAL and SET are blinking alternatively.
TIME 1 (Local time zone): SETTING
Page 7
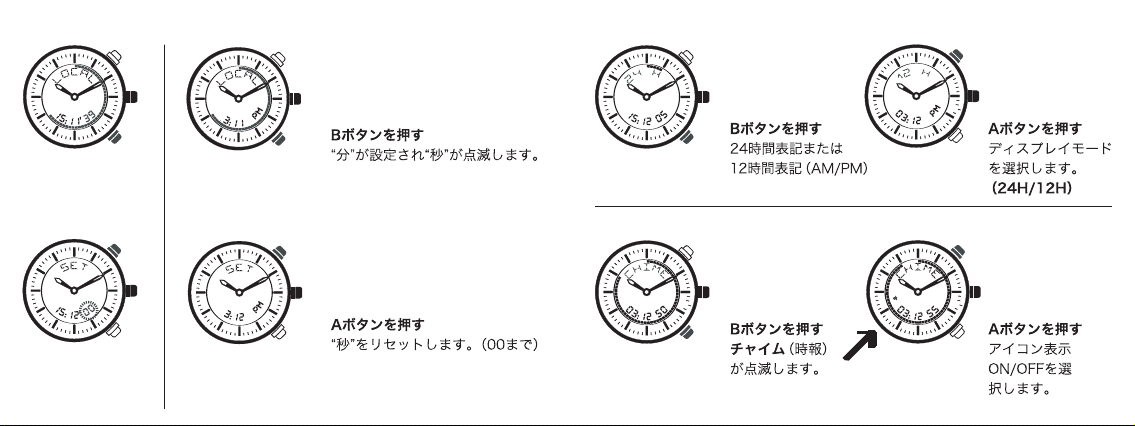
PUSH B
24H or 12H AM/PM
selection.
PUSH B
Chime starts blinking.
(Alarm tone every full
hour)
PUSH A
Select the display mode.
(24H / 12H )
PUSH A
ON/OffIcon appears.
PUSH B
Confirm minute and second starts blinking
PUSH A
Reset seconds
Page 8

PUSH C
Push on C to DATE.
To enter to setting: PUSH B
Year
Month Day
Changes are made by pressing A in each mode
Date setting /
PUSH B
Push B for going to
beginning.
PUSH C
When time setting
finished
To enter to setting: PUSH B for more than 1 second
à Month à Day
Year
Changes are made by pressing
A in each mode
Page 9

PRESS B
Alarm can be adjusted by pressing B at least one
second in ALARM mode.
Alarm mode/
The display shows calendar week,this number is
automatically calculated according perpetual calendar. No setting required.
Calendar week/
Page 10

PUSH B
End of adjustment.
PUSH A - ALARM ON
The Icon appears
on the display.
Alarm will start when alarm is ON and is set for Time zone 1! Stop alarm by
pushing either A, B or C.Alarm is repeated after 2minutes if the first
alarm is not stopped. Alarm pictogram will switch automatically on OFFafter
alarm (alarm being stopped or not). Alarm time will
not be reset.
Hour indication starts
blinking.
PUSH A
Select hour.
PUSH B
Confirm hour and
minute indication
starts blinking.
PUSH A
Select minute.
PUSH B
End of adjustment.
PUSH A - ALARM ON
The Icon appears
on the display.
Alarm will start when alarm is ON and is set for Time zone 1! Stop alarm by
pushing either A, B or C.Alarm is repeated after 2minutes if the first
alarm is not stopped. Alarm pictogram will switch automatically on OFFafter
alarm (alarm being stopped or not). Alarm time will
not be reset.
Page 11

PUSH A
Chrono starts.
PUSH A again to stop chrono.
To continue same timing, push A,and to stop
again, push A.Toreset to zero, press B
(only when chrono stopped).
Chronograph/
1. Start - stop - zero/
PUSH A
Chrono starts.
PUSH B
Split time, display freezed, but Chrono is still running internally. If pressing A now,
chrono will stop. To view total time, press B.Toreset to zero, press B now.
2. Intermediate (Split) time/
PUSH A to stop and
then B to recet to zero
Aボタンを押す
クロノスタート
PUSH A
Chrono starts.
Aボタンを押す
クロノスタート
PUSH B
Split time afterfirst round. Chrono still running internally.
To split next elapsed times (rounds), press B again
3. Measuring “Rounds” (e.g. racing rounds/
PUSH A
Chrono starts.
PUSH B
Split time, display freezed, but Chrono is still running internally. If pressing A now,
chrono will stop. To view total time, press B.Toreset to zero, press B now.
2. Intermediate (Split) time/
PUSH A to stop and
then B to recet to zero
Aボタンを押す
クロノスタート
PUSH A
Chrono starts.
Aボタンを押す
クロノスタート
PUSH B
Split time afterfirst round. Chrono still running internally.
To split next elapsed times (rounds), press B again
3. Measuring “Rounds” (e.g. racing rounds/
Page 12

TIME 2 (Second time zone) (Setting)/
タイム2:(セカンドタイムゾーン)設定
To adjust time zone 2, use same procedure as for TIME 1
Use same procedure as for Chrono; Start A. Press
Atostop, then C to show speed. (Example: Drive
exactly1kmand calculate speed by measuring
elapsed time. Or calculate speed of one racing
round, etc) To reset to zero, press first A again to
stop then B. (Some message of errors can appear
if result value is too high)
Tachometer mode (Speed measurement in km/h or MPH)
Change km/h -- MPH:
PressBfor more the 1 second, then adjunst to
km/h or MPH by pressing A, than confirm with B.
TIME 3: To adjust time zone 3, use same procedure as for TIME 1
Minutes are synchronised with TIME1. Seconds are the same as TIME1 and cannot be changed.
Change between TIME 1 and TIME 2
Push A andBtogether to switch between TIME1 and TIME2.
TIME 2 (Second time zone) (Setting)/
タイム2:(セカンドタイムゾーン)設定
To adjust time zone 2, use same procedure as for TIME 1
TIME 3: To adjust time zone 3, use same procedure as for TIME 1
Minutes are synchronised with TIME1. Seconds are the same as TIME1 and cannot be changed.
Change between TIME 1 and TIME 2
Push A andBtogether to switch between TIME1 and TIME2.
Tachymeter mode
Press B for more than 1 second, then adjust to km/h or
MPH by pressing A, than confirm with B.
Page 13

Timer/
PUSH A
TIMER starts.
When countdown time elapsed, Alarm will ring
(20 rings, or stop by pressing A, B or C)
PRESS B
Press on B for more than
one second to enter into
adjust mode
PUSH A
Select hour and confirm
with B
PUSH A
Select minute and
confirm with B
Timer setting (count-down with Alarm)/
PUSH A
Select second and
confirm with B
Page 14

PUSH A to set hour hand to 12. PUSH B to set minute hand to 12.
When holding push button, hand move in fast mode. When pushing by pulses, hand move step by step.
Push on C to exit mode setting.
SECOND MODE: SYNCHRONIZING HANDS/
PUSH C
Get into Second Mode.*
*If the two hands are not on 12h they are no longer synchronised
PUSH A and B toget-
her hold 2 seconds
Hands go on position 12h.
Second mode/
Enter to this mode, if you wish no other information
on display then just the digital seconds.
PUSH A to set hour hand to 12. PUSH B to set minute hand to 12.
When holding push button, hand move in fast mode. When pushing by pulses, hand move step by step.
Push on C to exit mode setting.
SECOND MODE: SYNCHRONIZING HANDS/
PUSH C
Get into Second Mode.*
*If the two hands are not on 12h they are no longer synchronised
PUSH A and B together hold 2 seconds
Hands go on position 12h.
Page 15

Compass mode/
PUSH A
Each time pressing A, compass will be active for
30 seconds
You n eed to initialize and calibrate the
compass depending on your position, see
world map!
Push B (1sec) to enter to initialising mode
Push A: Set angle of deviation of your current
position ( see worldmap)
Push B: To confirm deviation
Push A: The calibration of the compass will start
new. During this calibration, one second segment
flashes in rotation. Turn the watch, so to keep the
flashing second segment always in front of you.
When the calibration is finished, the compass is
intialised and turns into operating mode. To view
compass for 30 seconds, pressA
CALIBRATION OF COMPASS/
Page 16

IMPORTANT: COMPASS/
-Always maintain compass in horizontal position. In this case, accuracy will be +/- 3°
-Ifthe watch is close to a strong magnetic field (e.g. presence of magnets, electromagnets, highvoltage lines, electrical & household appliances, etc.), the compass is likely to lose its
settings (compass blocked or pointing in a direction other than the North).
Re-initialise the compass
 Loading...