

Page 1
Matrix Plus & Matrix Mini Plus - Installation Instructions
Models MP-XX & MMP-XX
Please read all instructions prior to installation and keep for future reference!
1. Product should be installed by a qualified electrician.
2. Prior to installation ensure power is off at fuse box to prevent electrical shock.
3. Use only with Class 2 power unit.
4. Suitable for Damp Locations.
5. For under-cabinet or shelf mount.
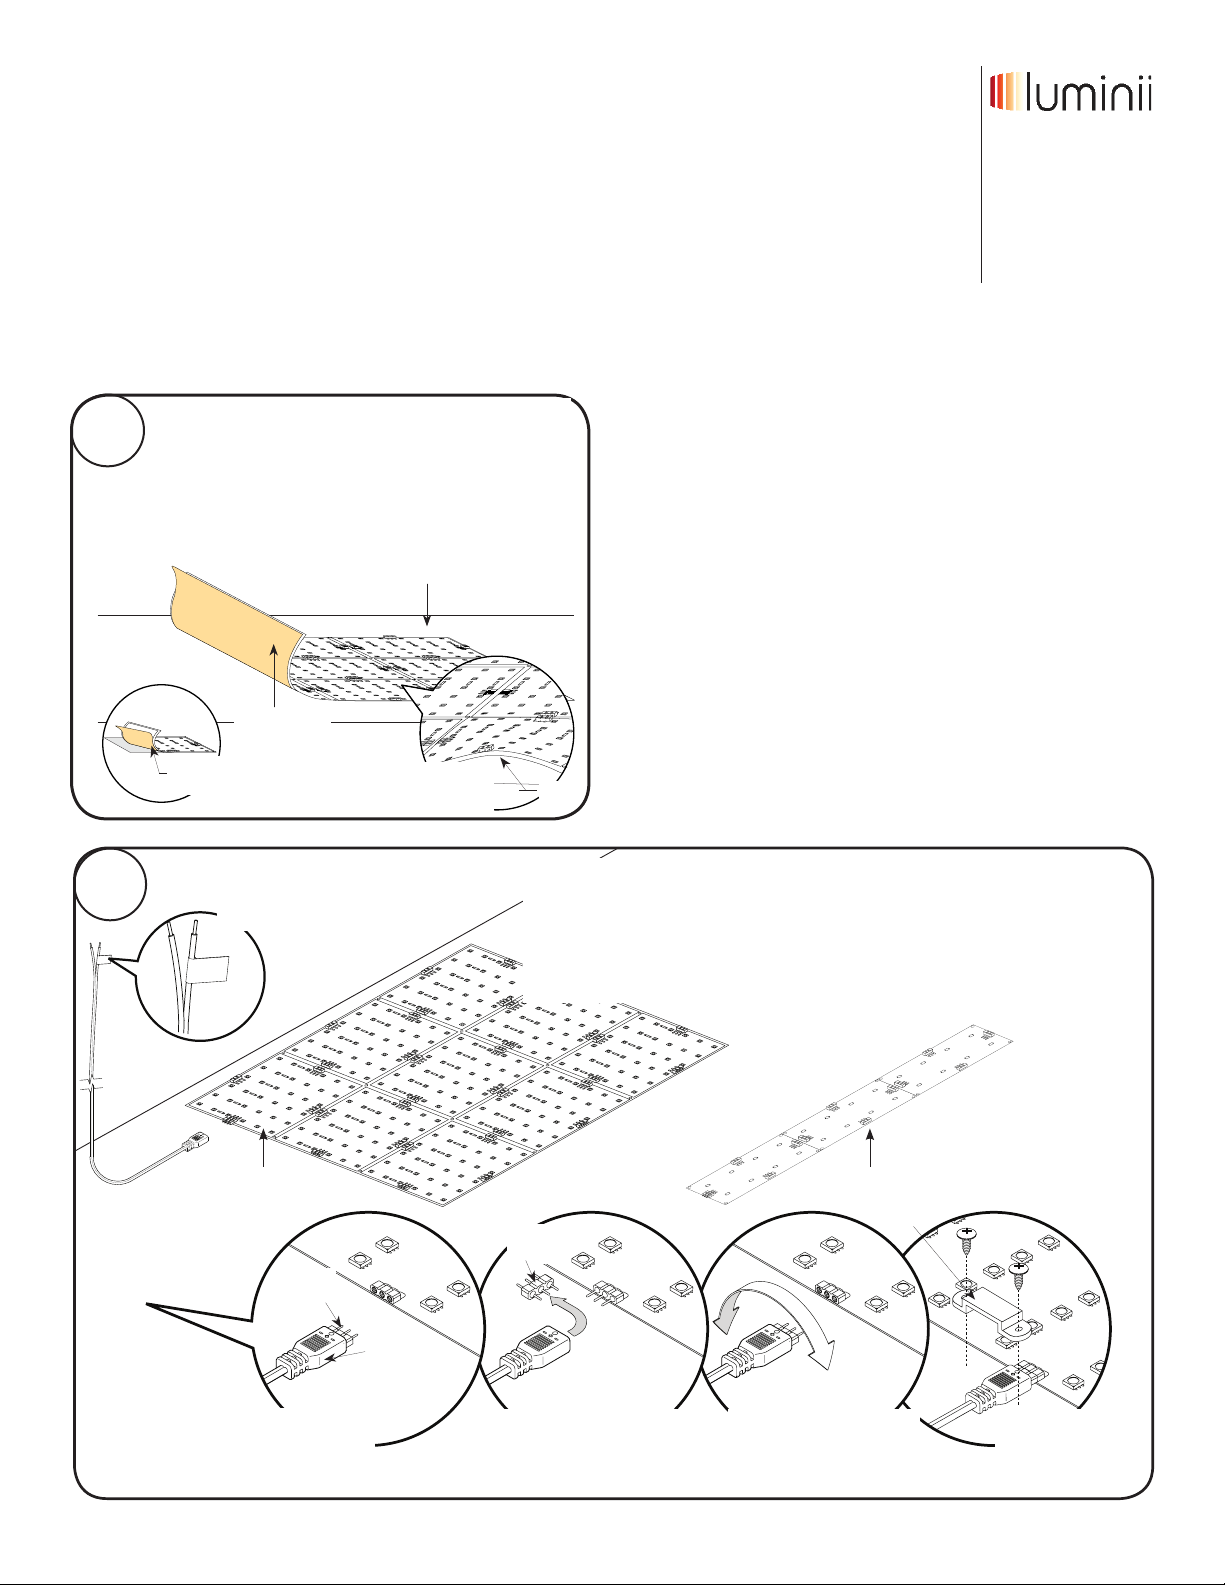
NOTE - Matrix can be cut into smaller sections. Matrix Plus
can be cut to 9 section or 3 sections for Matrix Mini Plus.
Refer to step 3 for details.
1
Remove the paper backing from the Matrix. Firmly press
down onto the aluminum heat sink. Make sure there are no air
bubbles that can cause surface irregularities. If adhesive not
sticking well to the surface. Reference step 4 to use the
mounting hardware (not included).
Utiliser seulement avec Classe 2 unite d’alimentation electrique.
Convient Aux Emplacements Humides.
Attention: Always test Matrix Plus operation before installing.
Connect Matrix to power supply to ensure it is working properly
and no damage has occurred during shipping.
Matrix Plus
Page 1 of 2
7777 Merrimac Ave
Niles, IL 60714
T 224.333.6033
F 224.757.7557
[email protected]
www.luminii.com
2
+
paper backing
Matrix Plus
section
NOTE - When removing backing
& laying LineLED to surface avoid
ripples on LineLED.
NOTE - Plus-sign label on power feed
wire cable indicates positive polarity.
Non-marked wire cable indicates
negative polarity.
+
Matrix Plus Matrix Mini Plus
provided
3-pin
connector
ripple
If Matrix power feed is with a 72” wire leads, proceed to wiring with power supply.
Otherwise, connect the Matrix power feed connector to the Matrix by sliding and securing
end of Matrix power feed to male or female connector. Secure by placing clip (CL-1)
over the connector and secure using the two screws. Shown below
NOTE - Provided 3-pin connector in the Matrix power feed can be removed to allow
connection to female end of Matrix Plus. See second illustration below.
OR
removed
3-pin
connector
clip (CL -1)
LineLED
powerfeed
connector
Align Matrix power feed connector
pins with female end of Matrix and
push-in to secure connection.
*LUMINII RESERVES THE RIGHTS TO CHANGE SPECIFICATIONS WITHOUT NOTICE
If Matrix has a male end, carefully remove
the provided 3-pin connector from the Matrix
power feed connector. Align Matrix power
feed connector wit h male end of Matrix and
push-in to secure connection.
Matrix power feed connector can be
installed in any orienta tion concerning
polarity since the center pin is posit ive
and the two outer pins are negative.
Place the clip (CL -1) over
the connector t o secure
in place
REV0.0
Page 2
Matrix Plus & Matrix Mini Plus - Installation Instructions
Models MP-XX & MMP-XX
Please read all instructions prior to installation and keep for future reference!
1. Product should be installed by a qualified electrician.
2. Prior to installation ensure power is off at fuse box to prevent electrical shock.
3. Use only with Class 2 power unit.
4. Suitable for Damp Locations.
5. For under-cabinet or shelf mount.
Utiliser seulement avec Classe 2 unite d’alimentation electrique.
Convient Aux Emplacements Humides.
Page 2 of 2
7777 Merrimac Ave
Niles, IL 60714
T 224.333.6033
F 224.757.7557
[email protected]
www.luminii.com
3
5
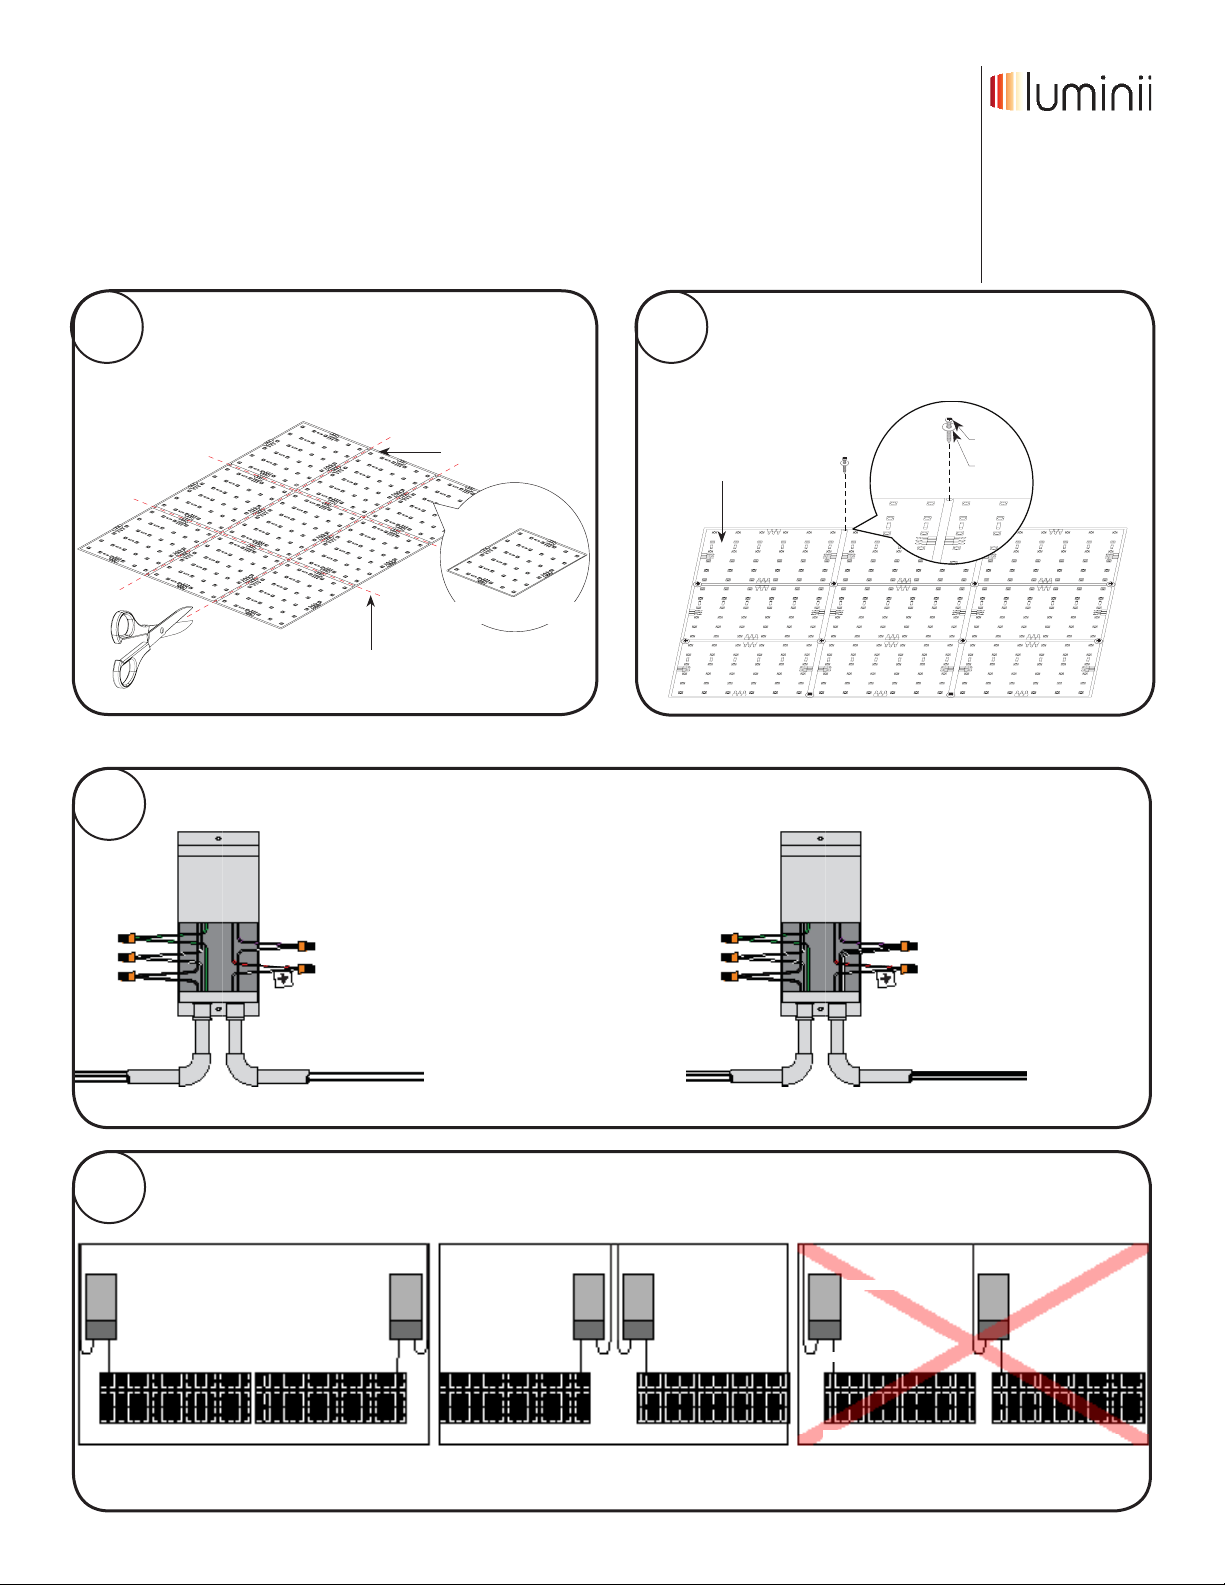
OPTIONAL: Matrix Plus & Matrix Mini Plus can
be cut into individual sections, and orientated in
varies ways. Cut Matrix Plus board in between the
connectors to cut properly. Refer back to step 2 for
wiring Matrix Plus properly.
Matrix Plus
individual Matrix section
reference lines for
cutting Matrix PLus
Always ensure power to power supply is off! Follow diagrams to connect power feed wires to power supply. Refer to power supply
instructions for wiring line voltage side.
24VDC
class II
power
supply
PURPLE
RED
Connect positive wire (plus
sign tag or red wire) to
RED low voltage wire from
power supply. Also, connect
_
negative wire (no tag or
black wire) to PURPLE low
voltage wire from power
+
supply.
OR
4
OPTIONAL: When the adhesive tape is not sticking on to
the surface properly. Use #0 screw size with an electrical
insulating polypropylene plastic washer 0.065’’ID, 0.188’’
OD. Insert the screw/washer through the Matrix Plus
mounting holes to secure Matrix properly to surface.
screw
Matrix Plus
24VDC
class II
power
supply
PURPLE
RED
washer
Connect positive middle
wire (plus sign tag) to
RED low voltage wire
from power supply. Also,
connect BOTH negative
_
wires (no tags) to PURPLE
+
low voltage wire from
power supply.
line voltage wires low voltage wires
power feed wires
from LineLED
3-pin connector and 72” wire lead power feed wiring
6
Matrix Plus Matrix PlusMatrix Plus
*LUMINII RESERVES THE RIGHTS TO CHANGE SPECIFICATIONS WITHOUT NOTICE
Multiple powerfeed variations
power supply power supply
low voltage wires
power supplies at the end of run power supplies in the middle of run consecutive layout, NOT RECOMMENDED
power supply
low voltage wires
line voltage wires
field-cut connector power feed wiring
low voltage wires
low voltage wires
power feed wires
from LineLED
REV0.0
 Loading...