

Page 1
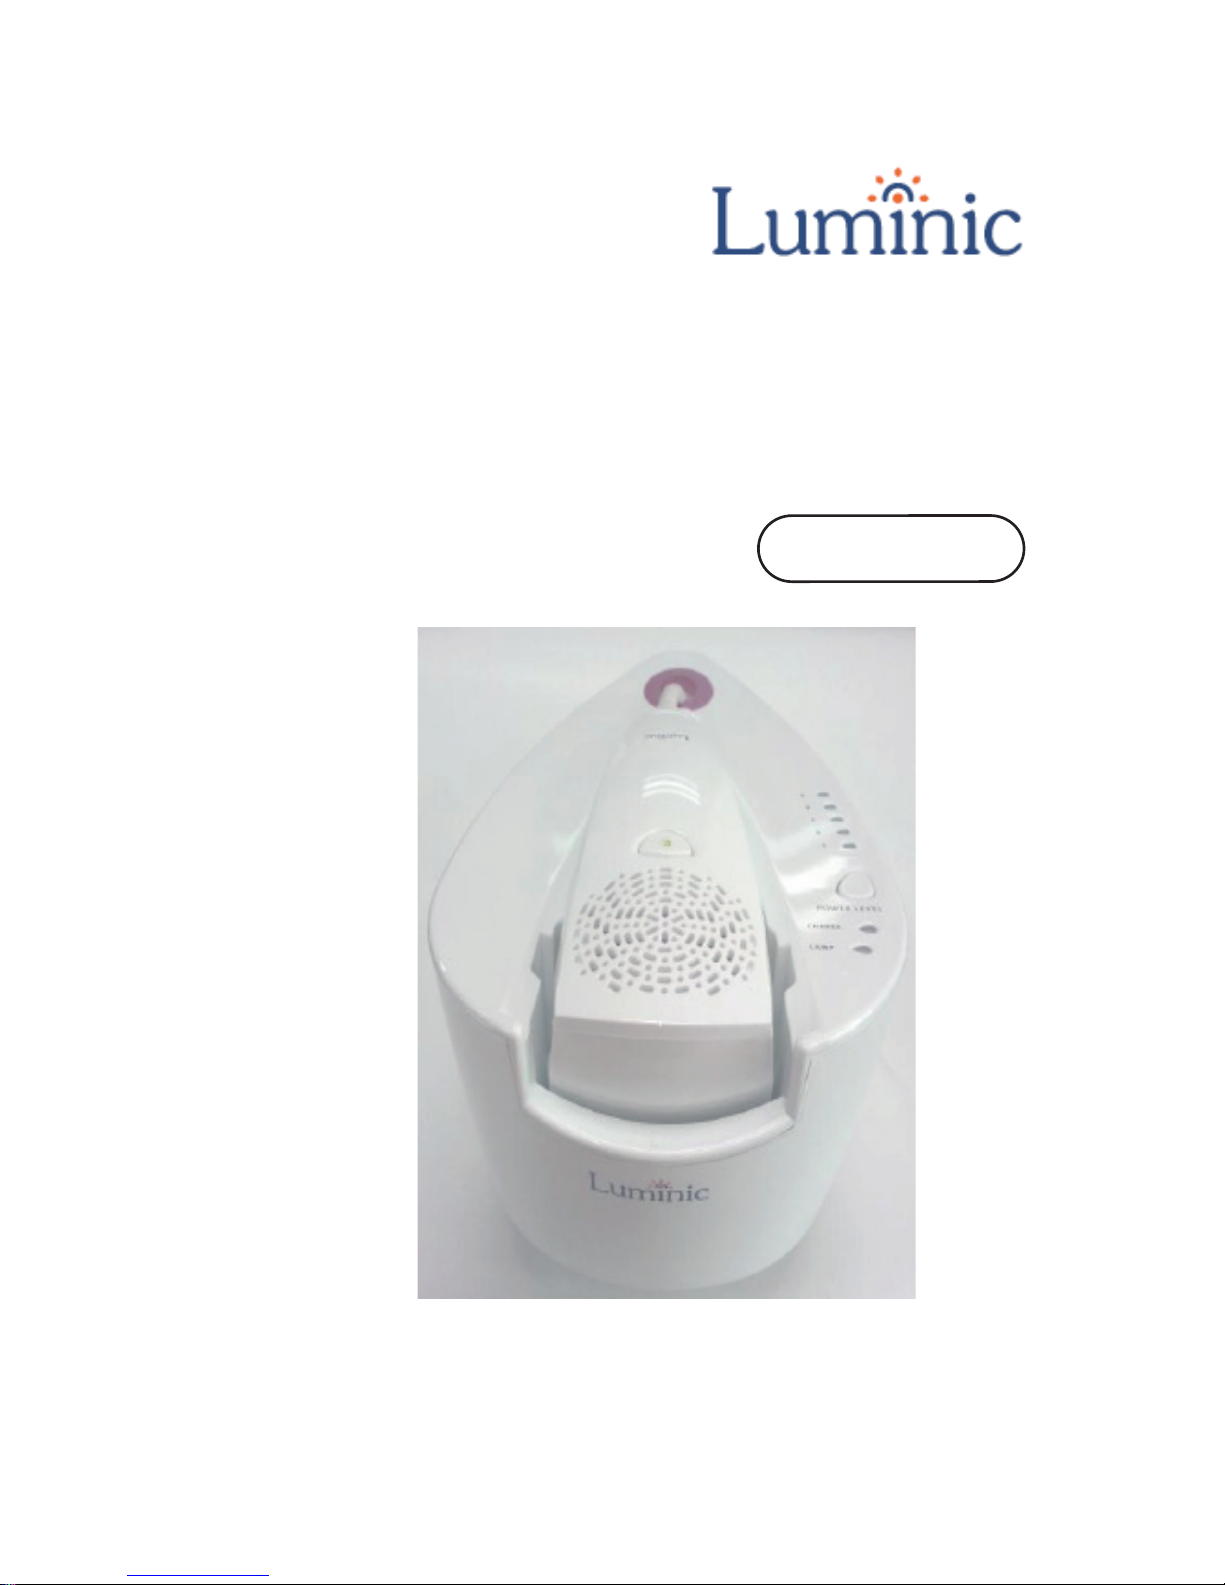
For your safety and correct usage of our device
We strongly recommend reading through this user manual.
Luminic-IPL
IPL-101
11111
User Manual
Page 2

Table of ConTenTs
o
ImporTanT safe Ty InformaTIon
o
The name of eaCh parT
o
how To use lumInIC sIpl-10?
o
operaTIon for haIr removal
o
operaTIng for skIn Care
o
user TIps
o
TroubleshooTIng
o
replaCIng lamp
o faQ
o
produCT speCIfICaTIon
o
warranTy ----- 32
o
TreaTmenT reCord sheeT ----- 33
----- 4
-----10
-----12
-----13
-----23
----- 27
-----28
-----29
----- 30
----- 31
Page 3
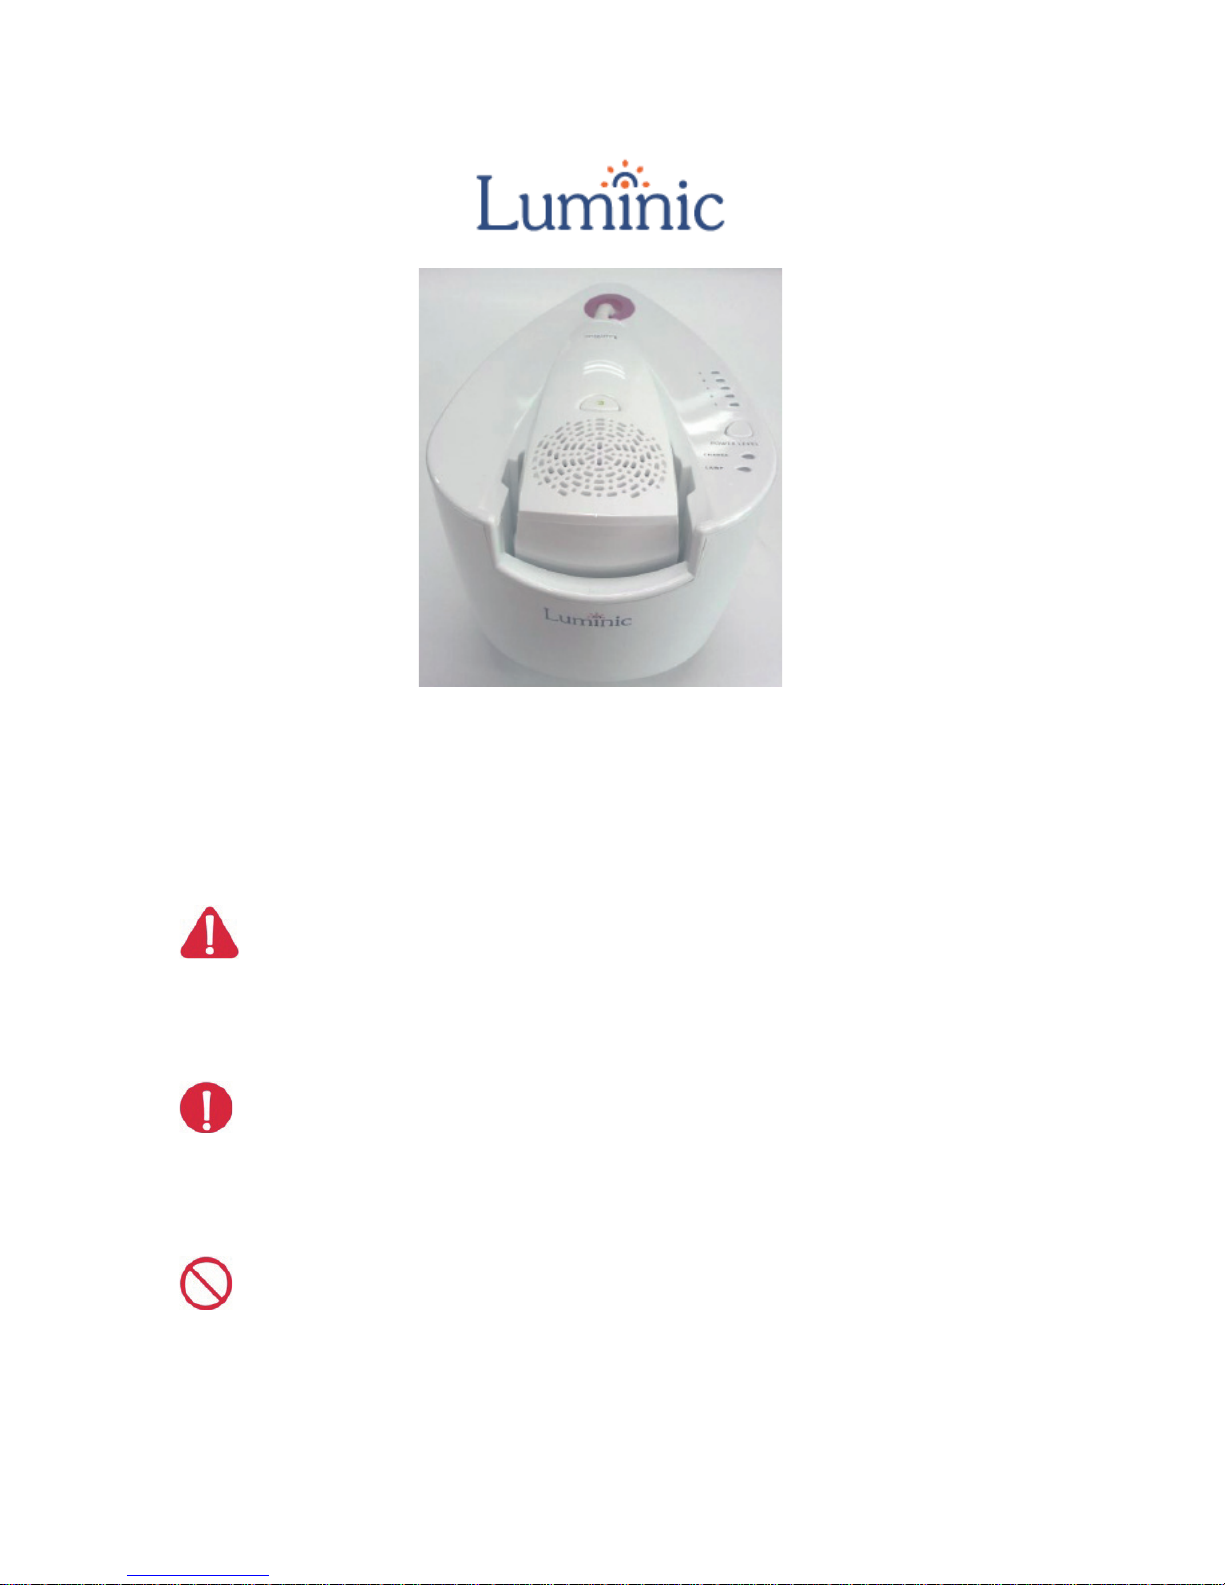
We appreciate for the purchasing Luminic SIPL-10. For the safe
treatment and caring, you should be well-acquainted with this user
manual. Particularly, please follow RESTRICTION before the treatment.
Danger
The following instructions contain important safety information,
which may lead to death or critical injury if not followed.
Warning
Injury may occur when the following instructions are not
followed.
Restriction
Refrain from administering if the person or the ara to be treated is
affected by one of the following conditions.
3
Page 4
Danger
The following instructions contain important
safety information, which may lead to death
or critical injury if not followed.
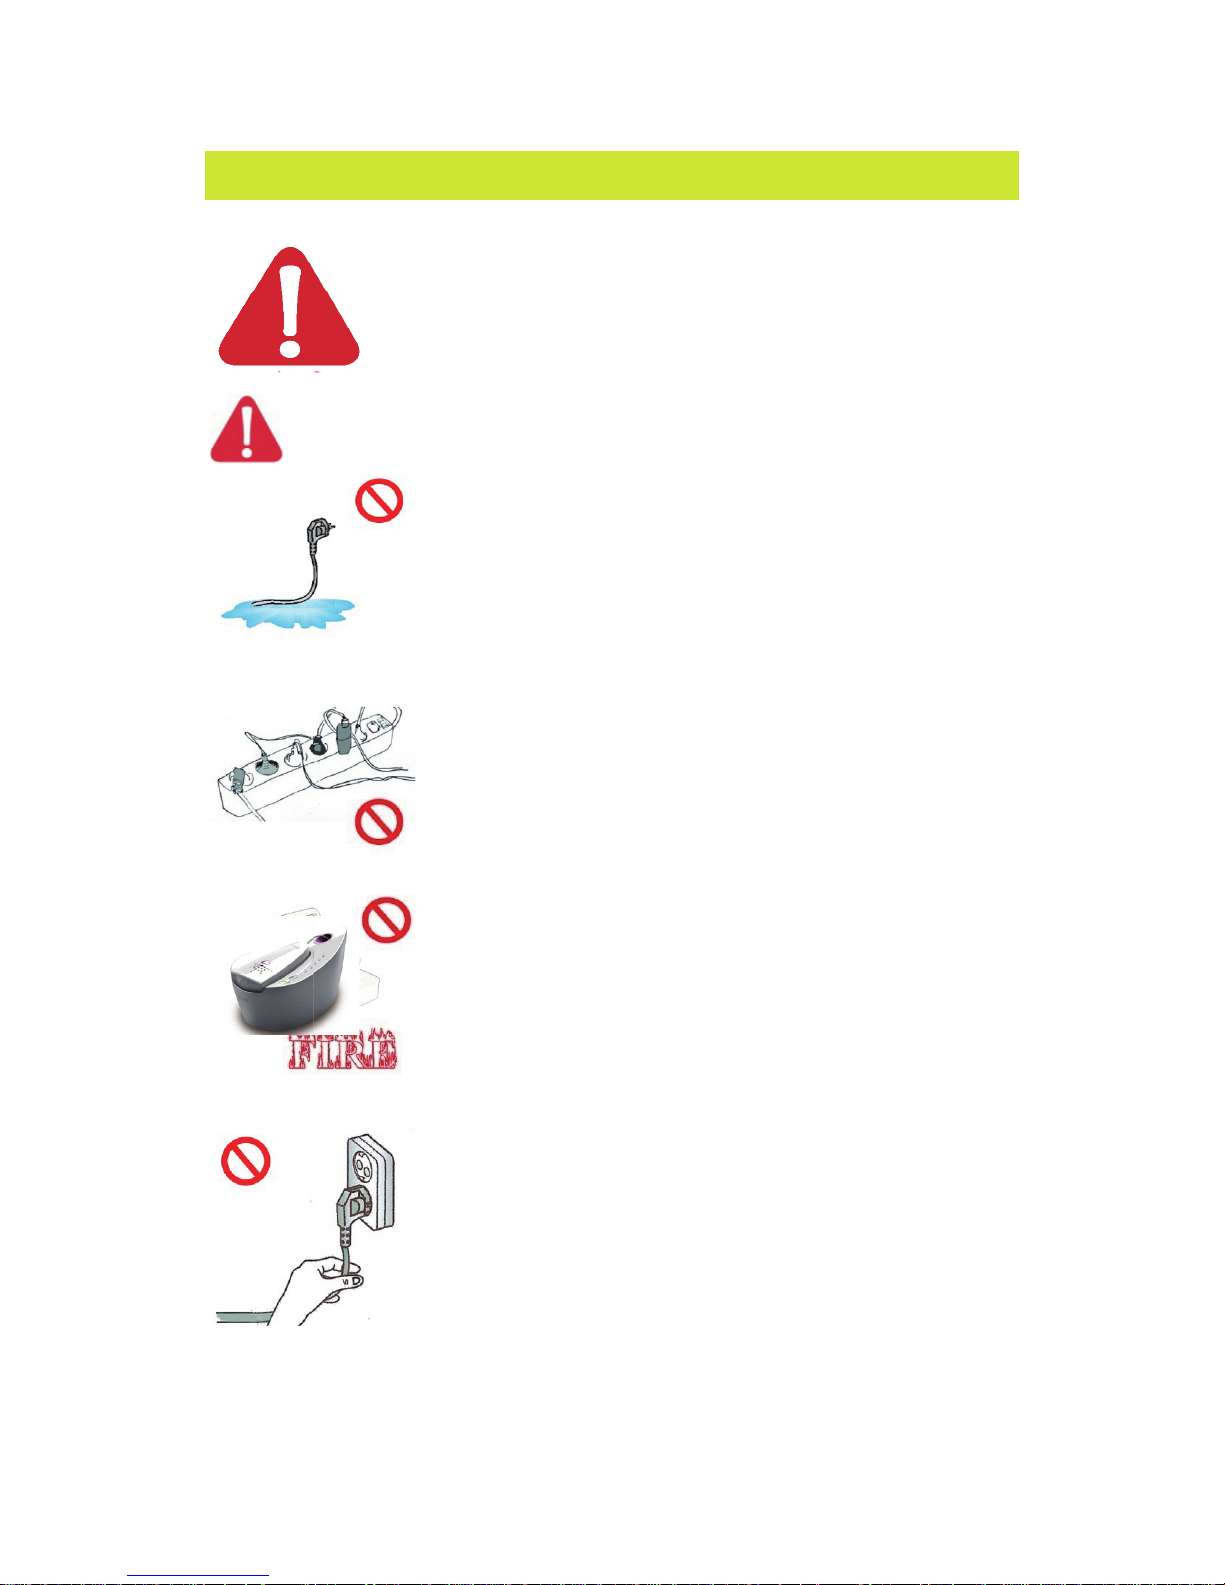
Be sure to keep the metal pins of the
power plug free from dust or moisture.
When cleaning, use a cloth-cleaner
ImporTanT safeTy InformaTIon
Using multiple products on a single
outlet is not recommended.
Keep the unit and the power plug
away from heaters or stoves.
DO NOT pull the power plug by force
or with wet hands.
4
Page 5
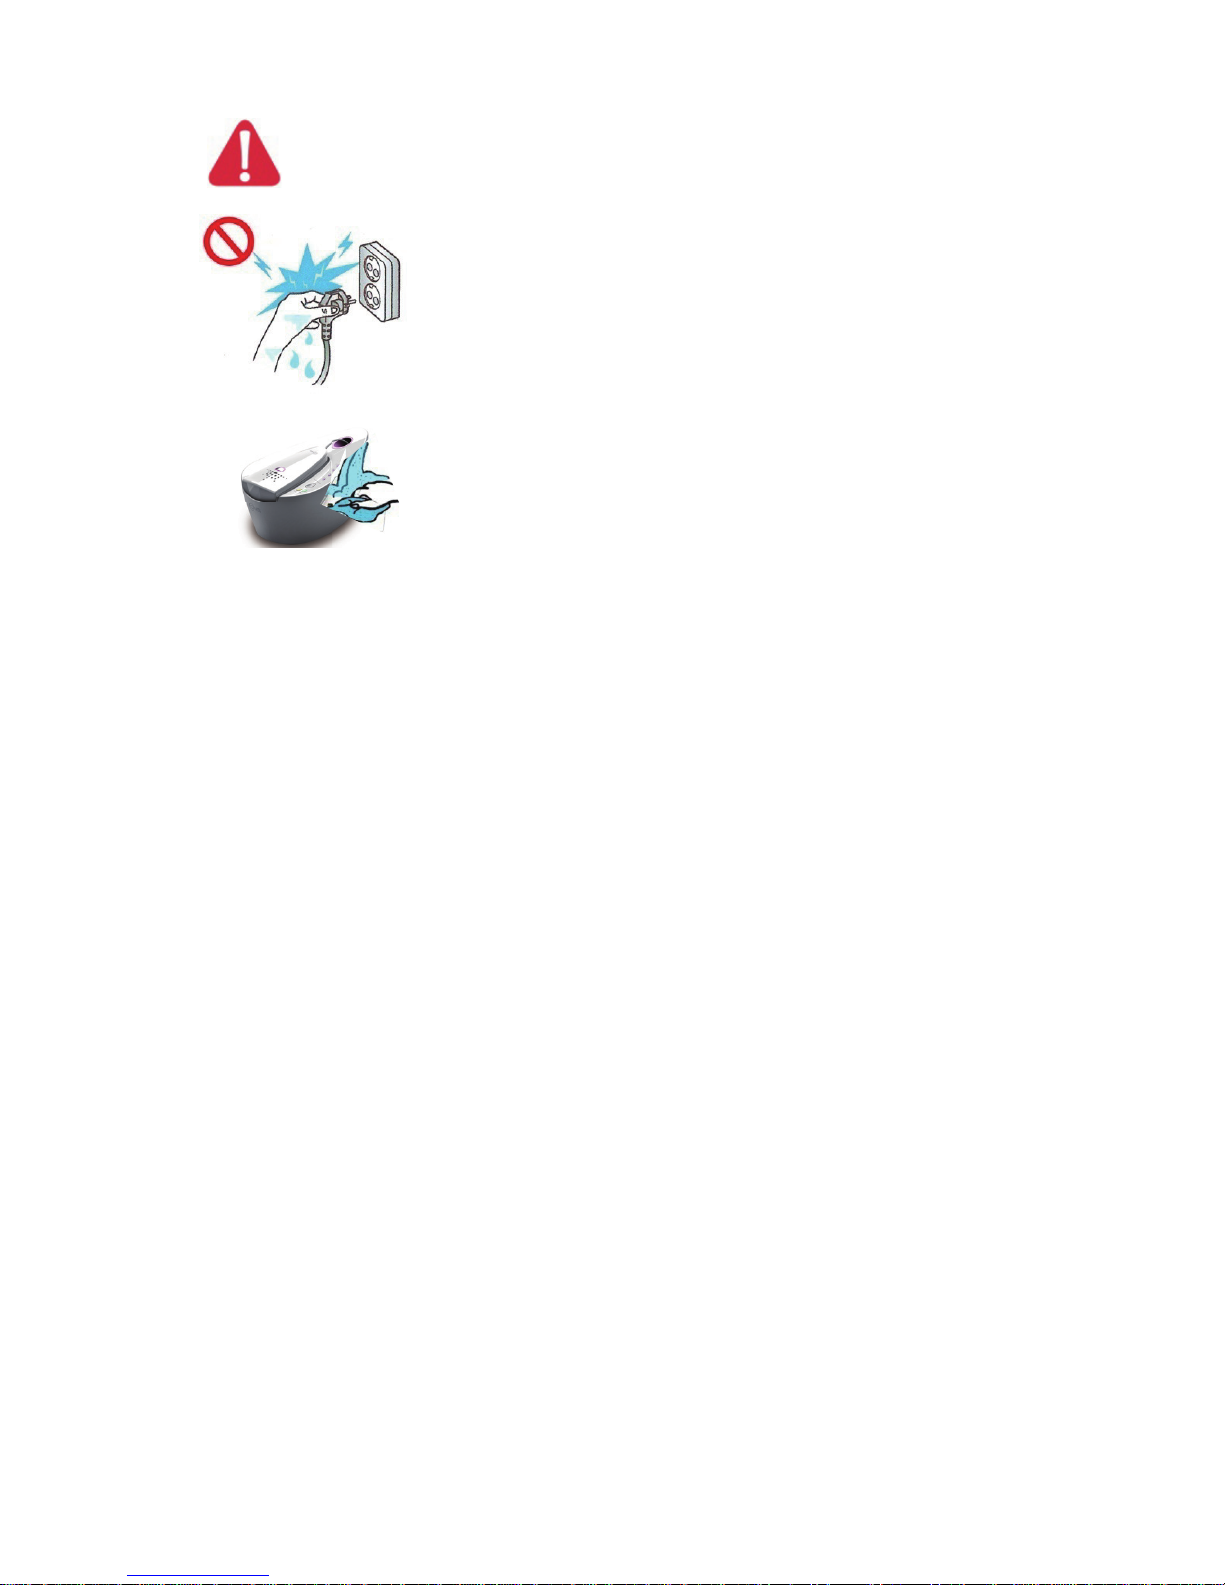
Neither bending the power cord nor
placing heavy objects on the power
plug is recommended.
The unit is not designed for cleaning
with water. Always clean with a dry clothcleaner before storing the unit.
•DO NOT operate the product in elevated or wet places.
•Ensure that the unit is turned off when connecting or
disconnecting the power plug.
•DO NOT leave the unit connected to the power when not
in use over a long period of time
•Disconnect from the power supply when cleaning the unit.
5
Major safety instructions
Please do not dissemble the product discretionally.
If customer dissemble product discretionally, free repair is not
available.
Please do not fill up the air vent of fan during usage of main
body or hand piece.
In case that ventilation does not work, it could cause the
trouble on main body.
Please do use the provided cord only by our company in case
that power plug and cord are broken.
Page 6
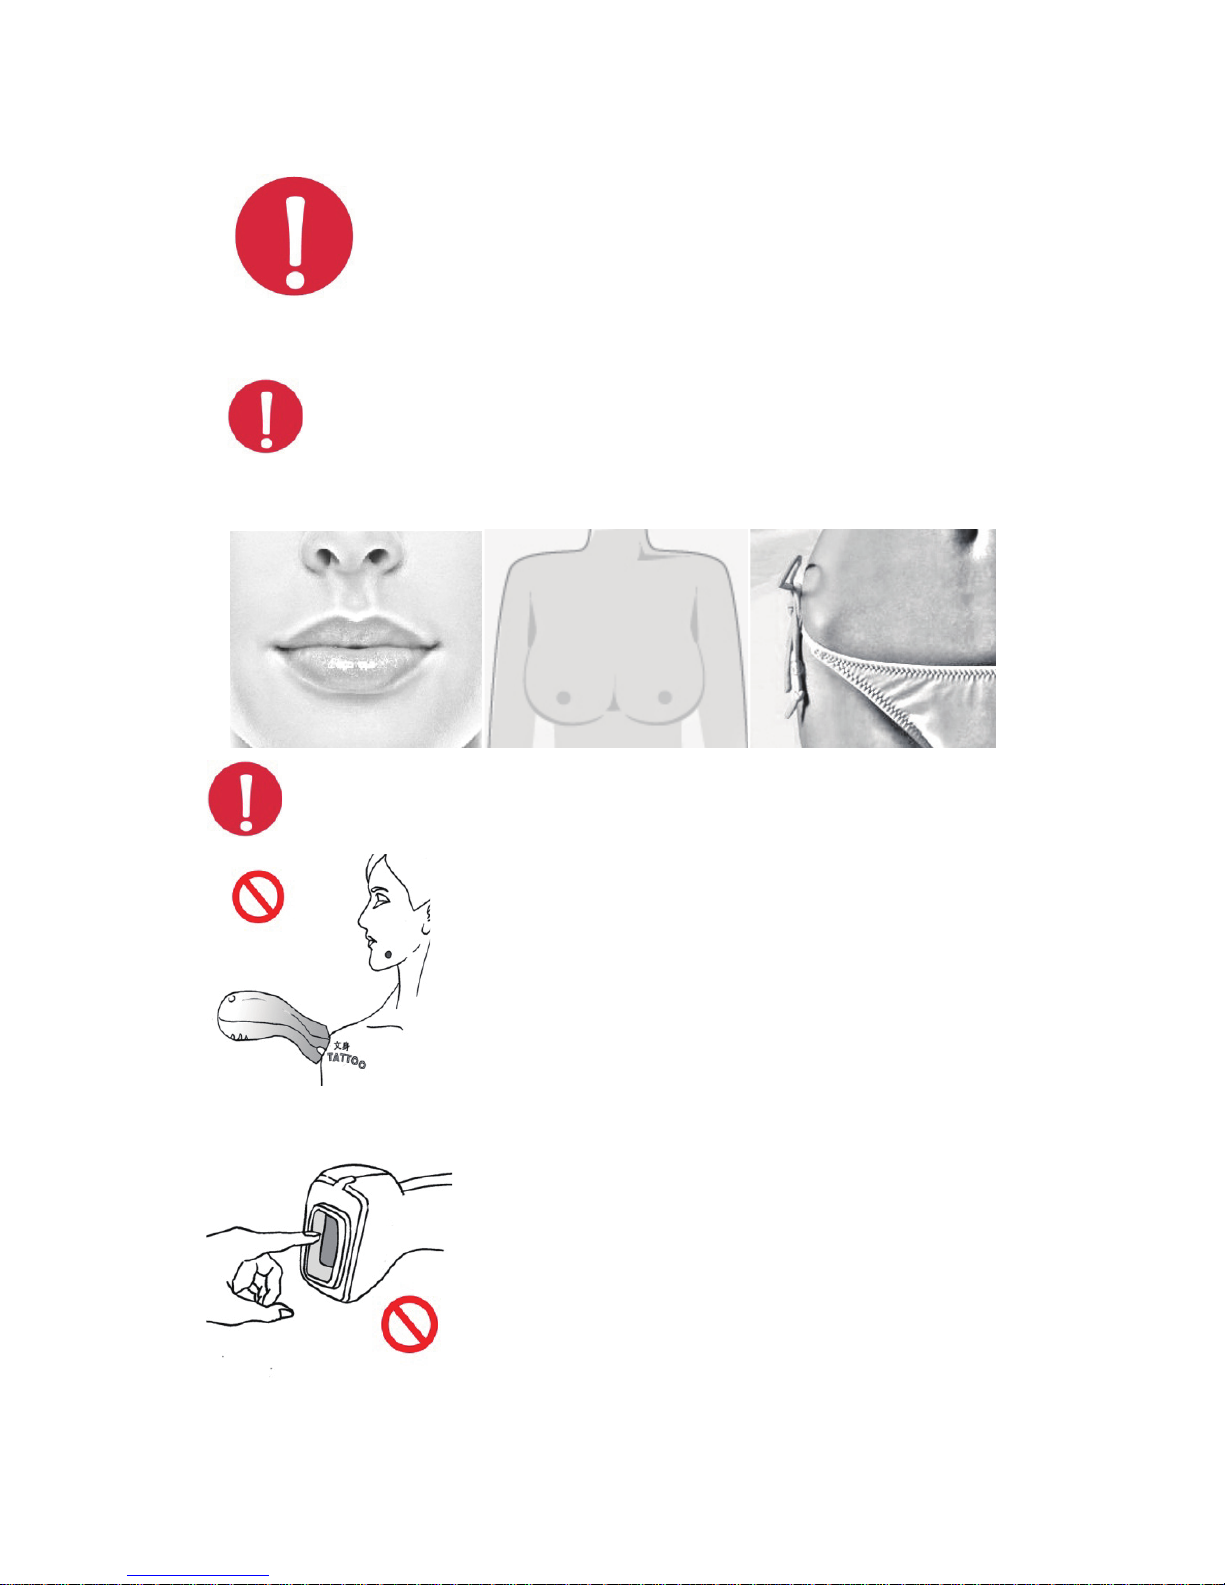
Warning
Injury may occur when the following instructions
are not followed.
DO NOT use mucous membrane area such as
lips,anus, or vagina, and this will cause a serious
skin trouble.
Product use should be limited on
severe corium pigment, darkening,
moles, age, spots, or birthmarks, which
should be taped over before the
treatment
DO NOT touch the lamp with bare
hands. If there is any thouch, you can
get burned.
6
Page 7
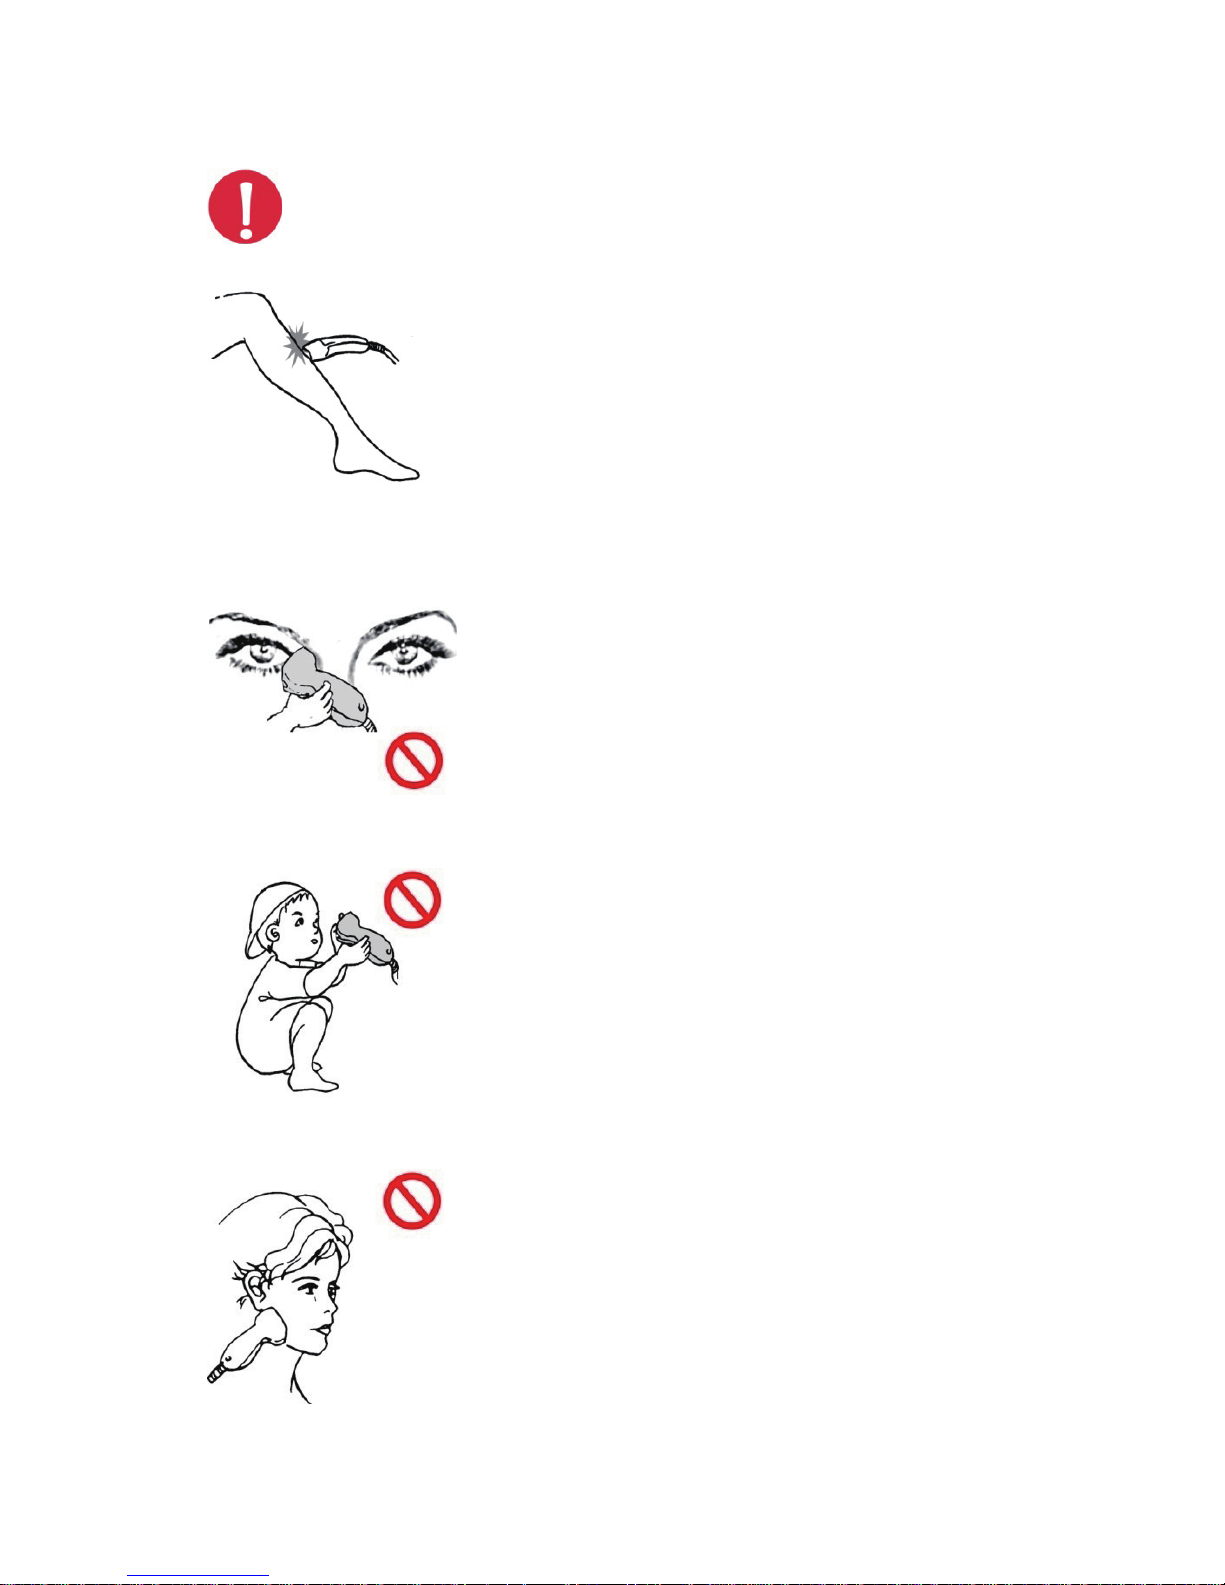
Always keep the hand piece in contact
with the skin when the beam is on.
DO NOT beam direct on to unshielded
eyes. DO NOT use the unit to eyes or
eyelids
The unit is not to be used by children
or persons with reduced physical,
sensory or mental capabilities, or lack
of experience and knowledge, unless
they have been given instruction.
DO NOT use this unit for your face or
neck for your safety
7
Page 8
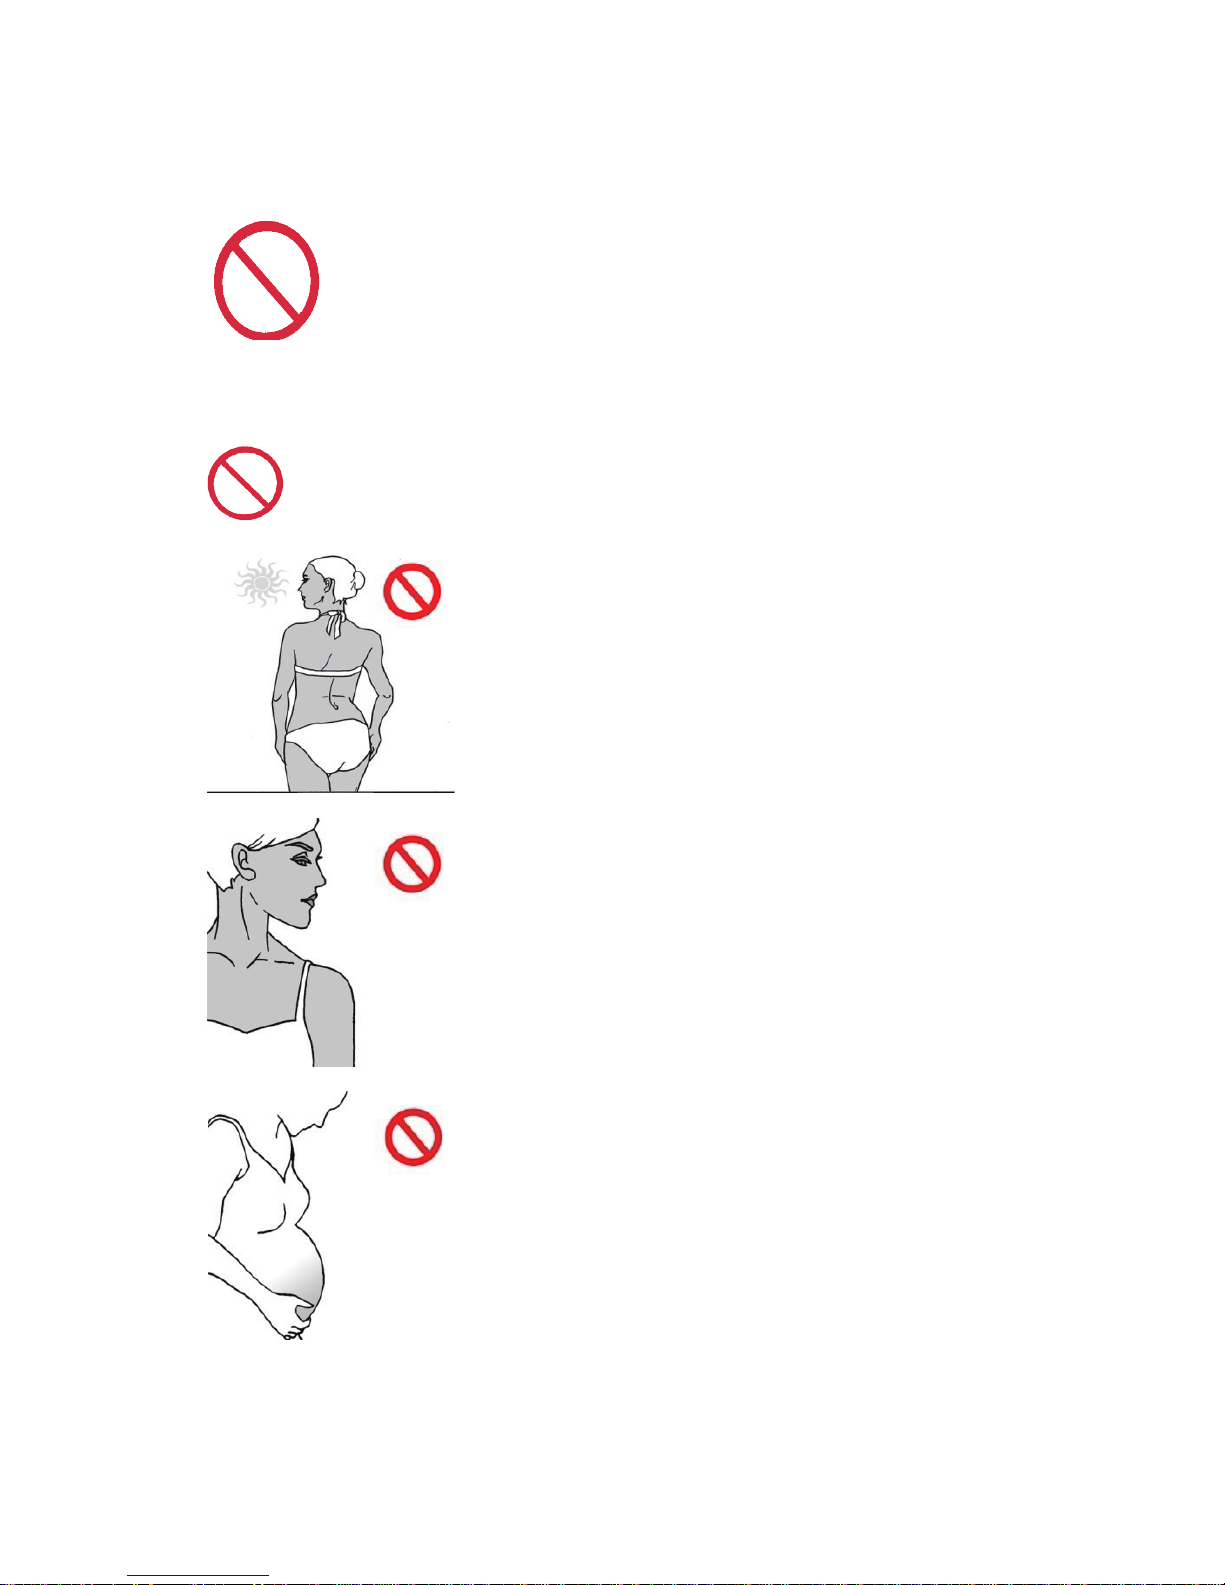
Restriction
Refrain from administering if the person or
the area to be treated is affected by
one of the following conditions.
A person whose activity was outdoors
under strong sunlight, or who has
received tanning treatment within the
last 4 weeks.
A person whose skin color is black, or
dark brown (page 18)
Pregnant women or the breast during
the breast-feeding period.
8
Page 9
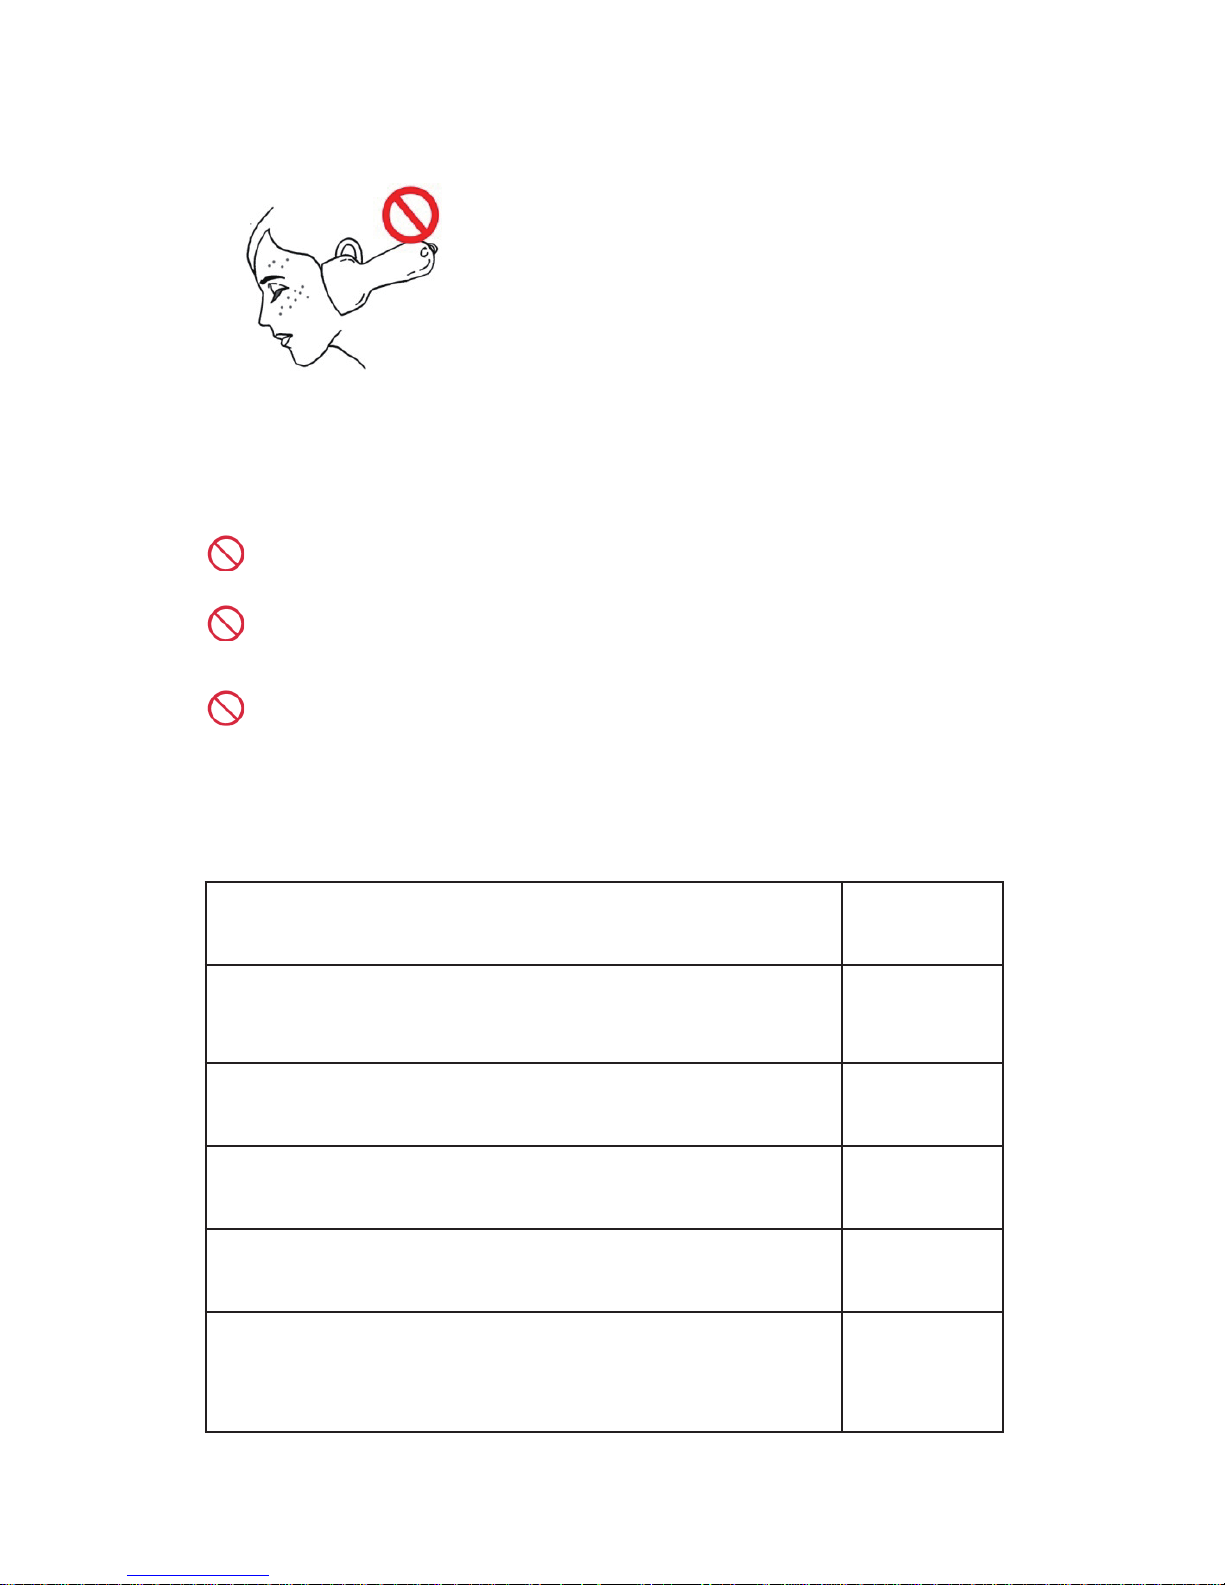
Acne treatment medication (such as
Accutane), whitening treatment, Retin
A ointment, or cosmetics with retinol
composition within the last 7 days.
Skin area with tatoos or permanent makeup.
Skin area with severe pigment discoloring, or with thick or
dense hair.
Skin affected by diabetes or other skin diseases.
have used steroid products over an extended
period of time, causing the skin to become thin.
Yes
are photosensitivity or sun allergy patients
(porphyria, polymorphous light eruption, transient
urticaria, erythematous).
Yes
are administered with a heart pacer, insulin pump,
or any other medical device
Yes
have had radio-active treatment or chemical
therapy within the last 3 months
Yes
have had skin cancer or has a higher chance of
contracting skin cancer
Yes
have used medication or lotion with characteristics
of higher photo-sensitive reactions within the last
one month
Yes
9
DO NOT USE TO THIS DEVICE IF YOU...
DO NOT USE TO THIS AREA...
Page 10
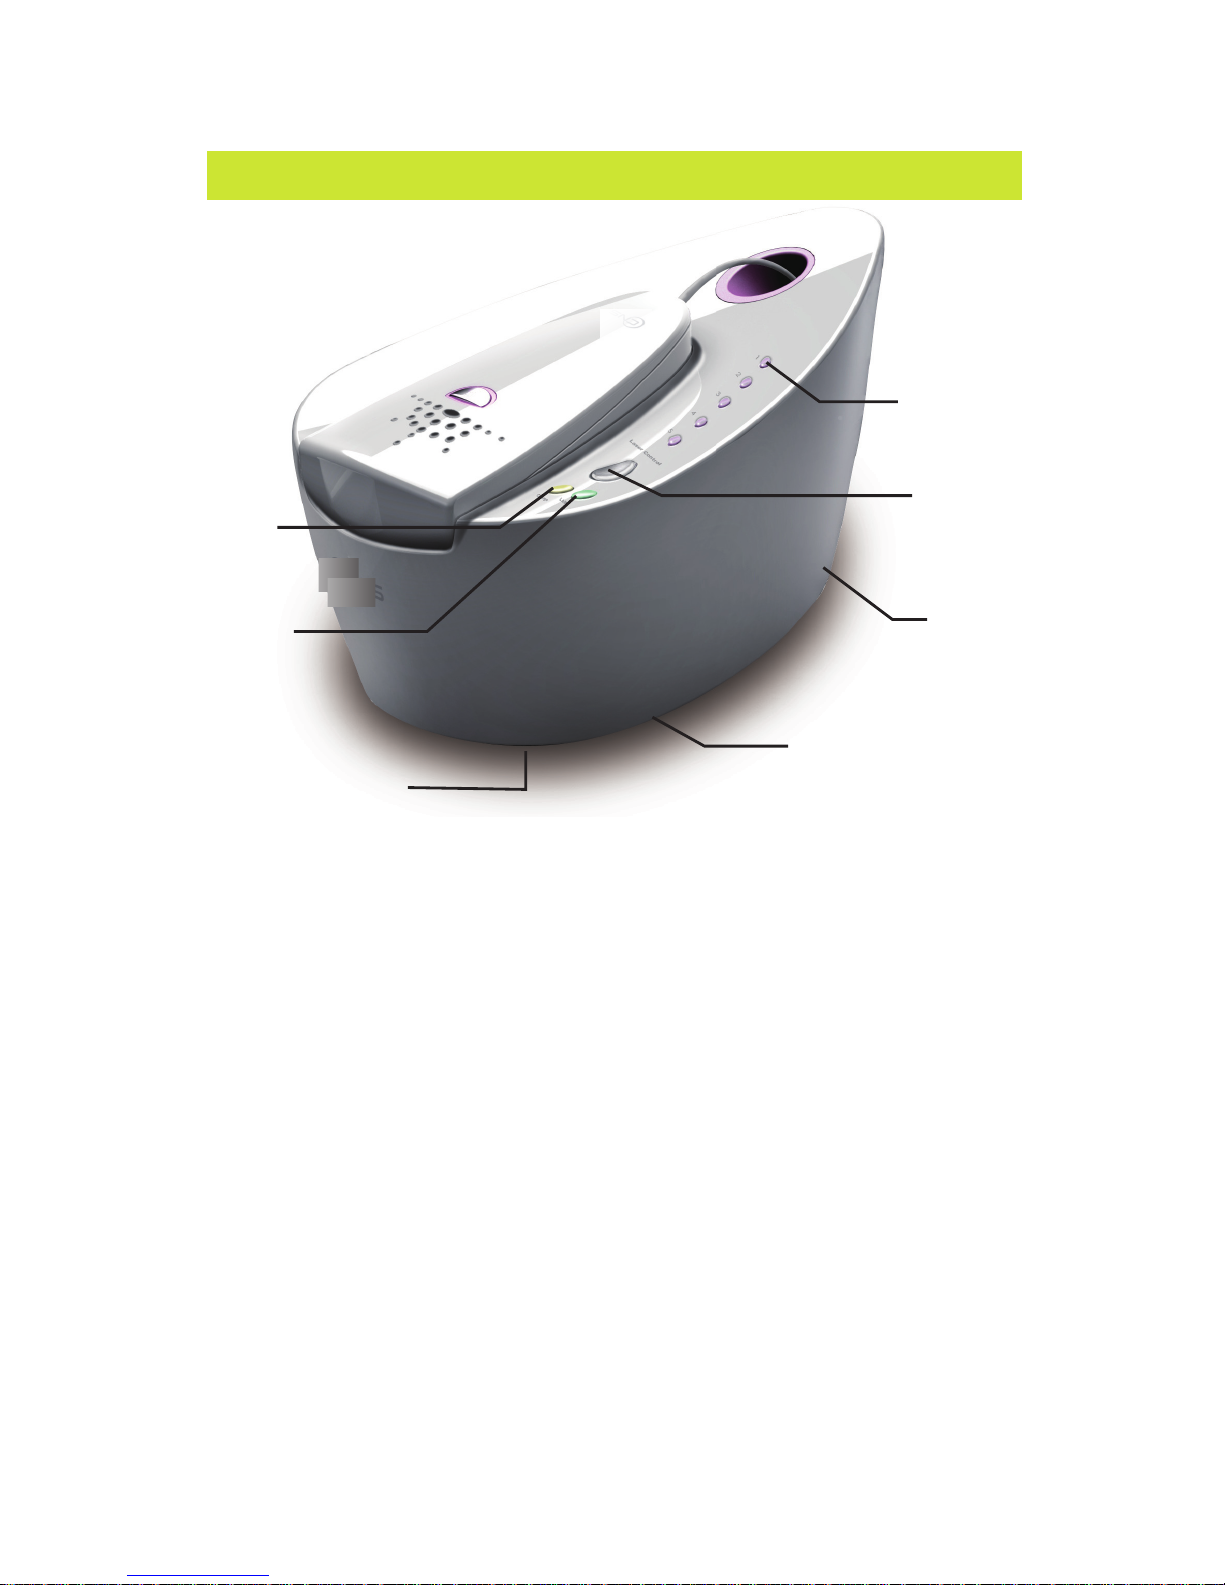
The name of eaCh parT
①
②
③
④
⑤
⑥
① Power SW : Power on/off
② Power Level : select the power level. ( from level 1 to level 5 )
③ Reset : this switch is located at the bottom
To activate reset function, press and hold more than 3 seconds
④ Power Level: 1(min), 2, 3, 4, 5(max)
⑤ Charge: When this is red, Charging: When green, ready to flash
⑥ Lamp: When this is green, lamp is OK, when this is red,
the lamp should be replaced with new one. After replacement
the reset should be done. Make sure to get after service in case green
LED blinks indicating fan's stoppage. Be sure not to use SIP-10 in case
red LED blinks indicating the inside temperature of main body raised
up, then, stop using for the time being. If possible, it is
not recommendable not to use SIP-10 for the long time.
⑦ Mode Switch : Hair Removal (downward), Skin Care (upward)
⑦
10
Page 11
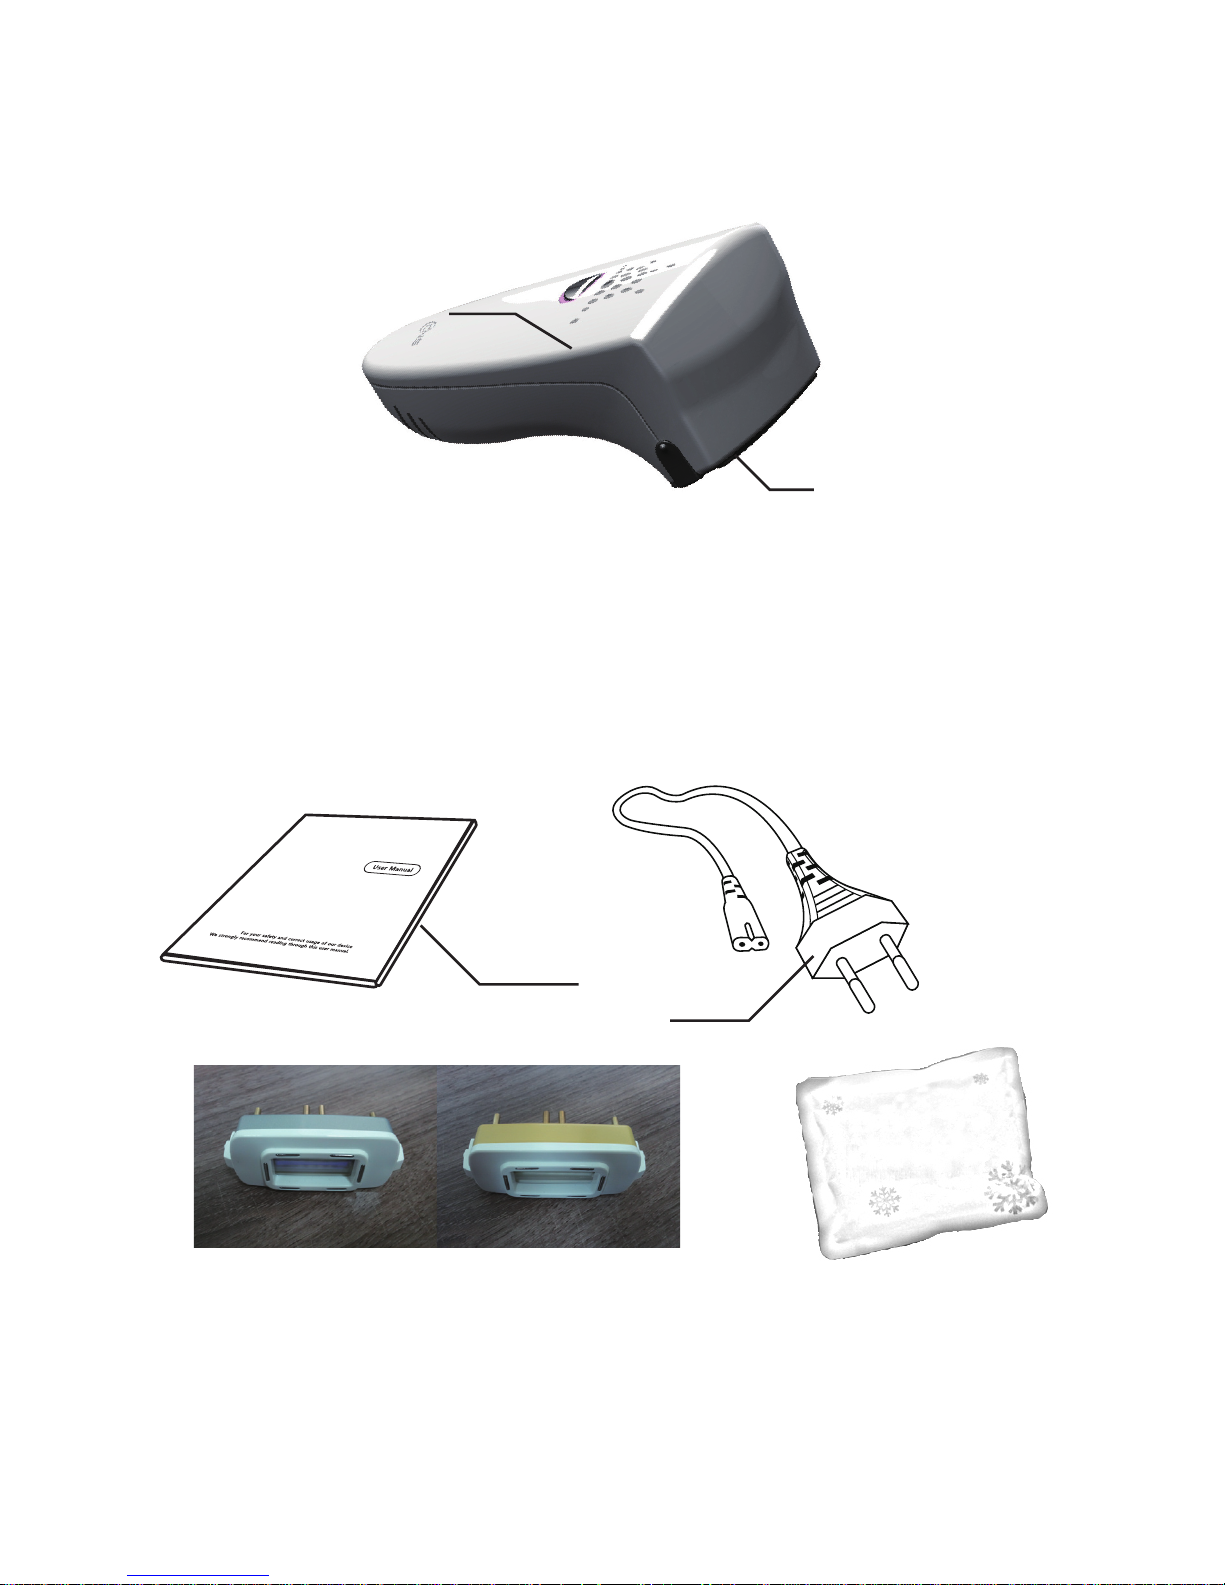
① Flash button
② Touch sensor : for safety, checking the touch state between
the skin and the aperture of lamp module.
①
②
Hand piece
Accessory
11
① User Manual
② Power Cord
③ Lamp (Hair Removal , Skin Care)
④ Cooling Pack (Option)
①
②
③
④
Page 12
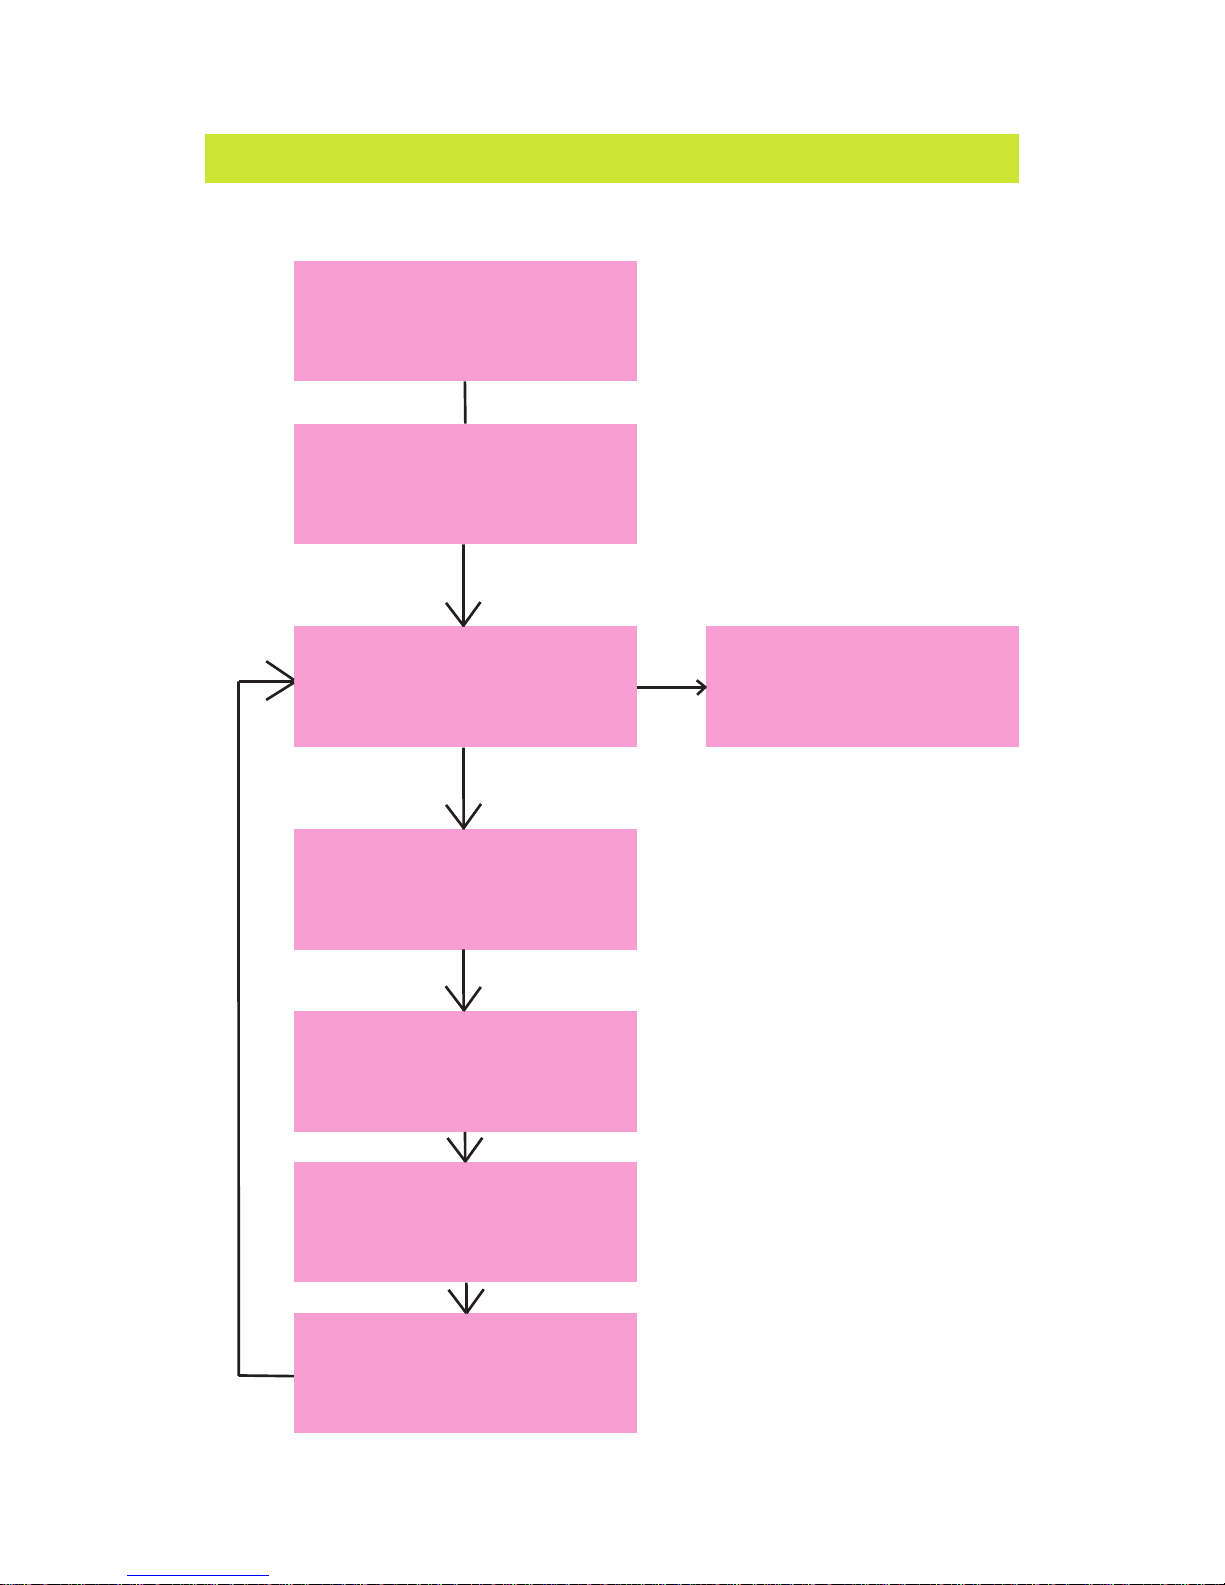
② Read ‘RESTRICTION’
③ Skin Test
Any reaction?
④ Shaving
(For Hair Removal Only)
⑤ Cleaning
Keep clean & dried
⑥ Select Skin type
(Adjust Level)
⑦ Treatment
STOP
① START
Yes
No
Yes
12
how
To use
lumInIC Ipl101?
Page 13

haIr growTh
Hair normally grows in three phases
Anagen phase (growing phase)
The concentration of melanin is highest when the hair grows
most actively from the root. Melanin is the key factor to
make the pigmentation of the hair, such that the darker
the hair is, the more melanin there is in its root. Hence,
controlling the melanin level is the key to this method of
improving hair-growth efficacy. The most effective time for
the IPL treatment is in the anagen phase of hair growth.
Catagen phase (degradation phase)
In decline period, hair growth stops, the pore and root
shrink, and the old hair is then fallen out.
Telogen phase (resting phase)
Once the old hair is fallen out, a new hair will be slowly
grown in the same root. The old root remains empty until
the biological cycle restarts and a new hair grows in the
place of the old one.
13
operaTIon for haIr removal
Page 14
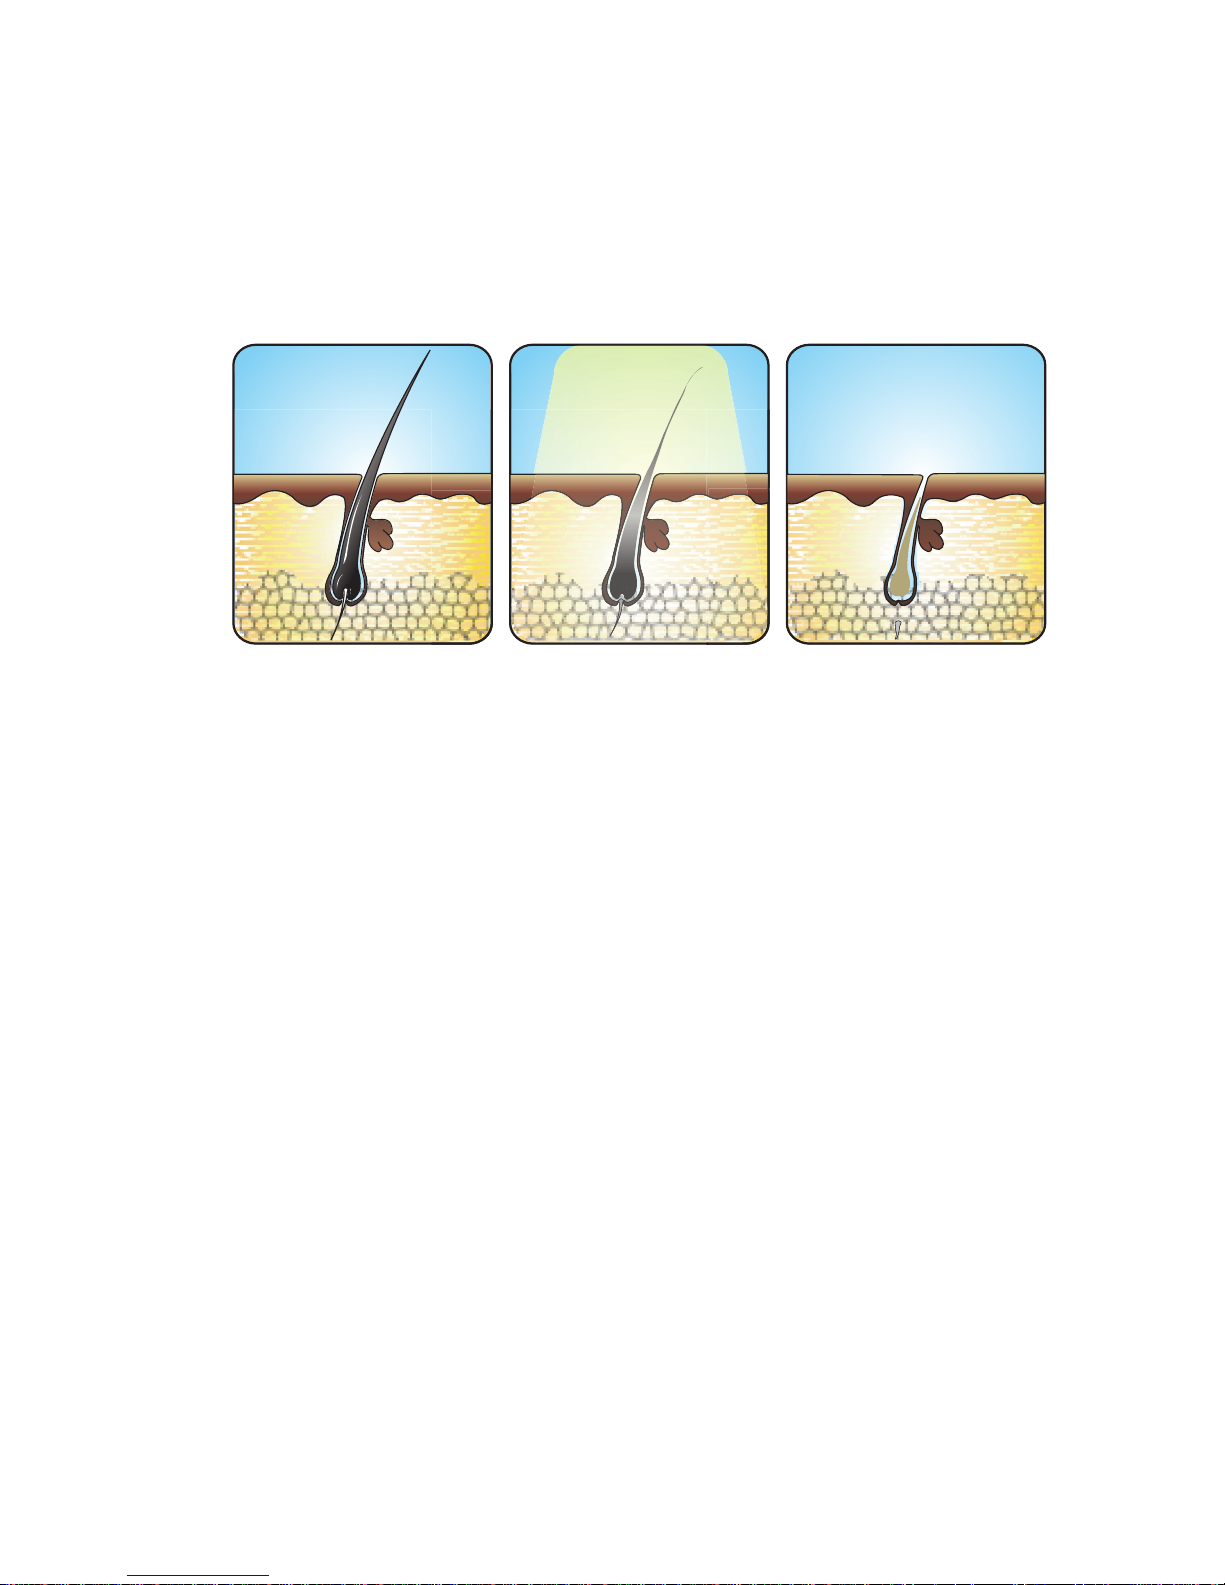
operaTIon prInCIple
• Luminic SIPL-10 removes hair by intense pulsed light
which heats up the hair shaft and it’s root.
• Through light transformation, the darker hair receives
more heat.
• This process stops the hair growth early, in the
anagen phase.
• Hairs are usually in different states of the hair growth’
s cycles.
• Hence, more than 4 treatments are required to give
you long-lasting hair-removal successfully.
14
Page 15
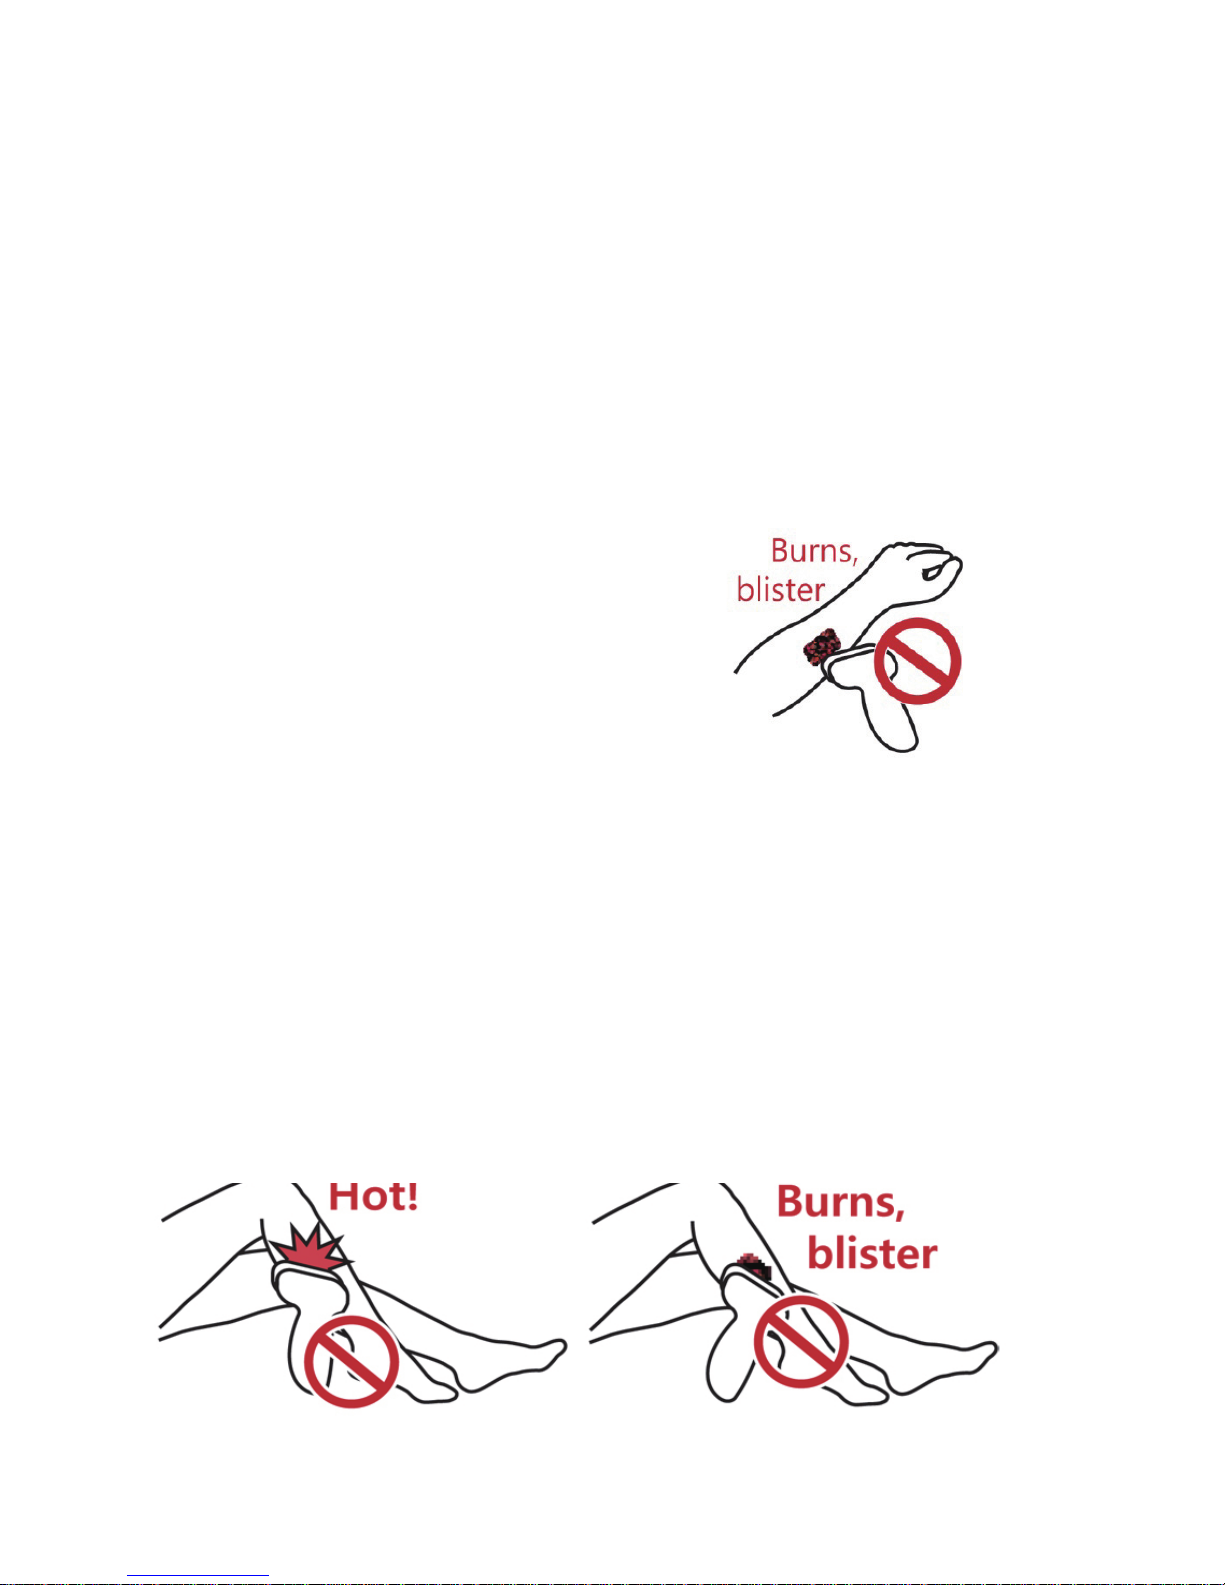
※ Before the treatment, read ‘RESTRICTIONS’ cautiously for your safety.
▶ Be sure that your skin is in
a normal before starting the
treatment.
1) Skin Test
▶ For the first-time use (or after
increasing levels), test the skin
reaction by emitting on the arms
or back of the hands if there is any
trace of vesicles, blisters, burns, or
any other reactive symptoms on
any other area not exposed to the
beam.
▶ If you see any of the listed symptoms in 30
minutes, DO NOT start the treatment.
15
1. pre-operaTIon
Page 16

▶ If serious stinging occurs in the exposed area, STOP the
treatment immediately.
▶ You skin shows slight redness, prickles, tingles, or
feels warm. This reaction is harmless and you can start the
treatment if this disappears quickly.
2) Scheduling
▶ A typical full hair growth cycle may take 18~24 months.
During this time multiple Luminic SIPL-10 treatment may be
required in order to achieve long term hair removal
• Treat the entire place where you want to remove the hair
in one time.
• Apply an ice pack every time in the place where you want to
repeat the treatment. It is highly recommended to apply an
ice pack in the place where the skin is sensitive and hair is
strong such as under the arms part especially.
• Apply an ice pack on the place where you treated as long
as hot temperature is just cool down, approximately 3 to
8 seconds.
• Try 2nd treatment as partial in the place where the hair is
remained only after 3days from the 1st entire treatment.
• Perform the entire treatment and partial treatment as a
couple and repeat the couple treatment in every two weeks.
16
Page 17
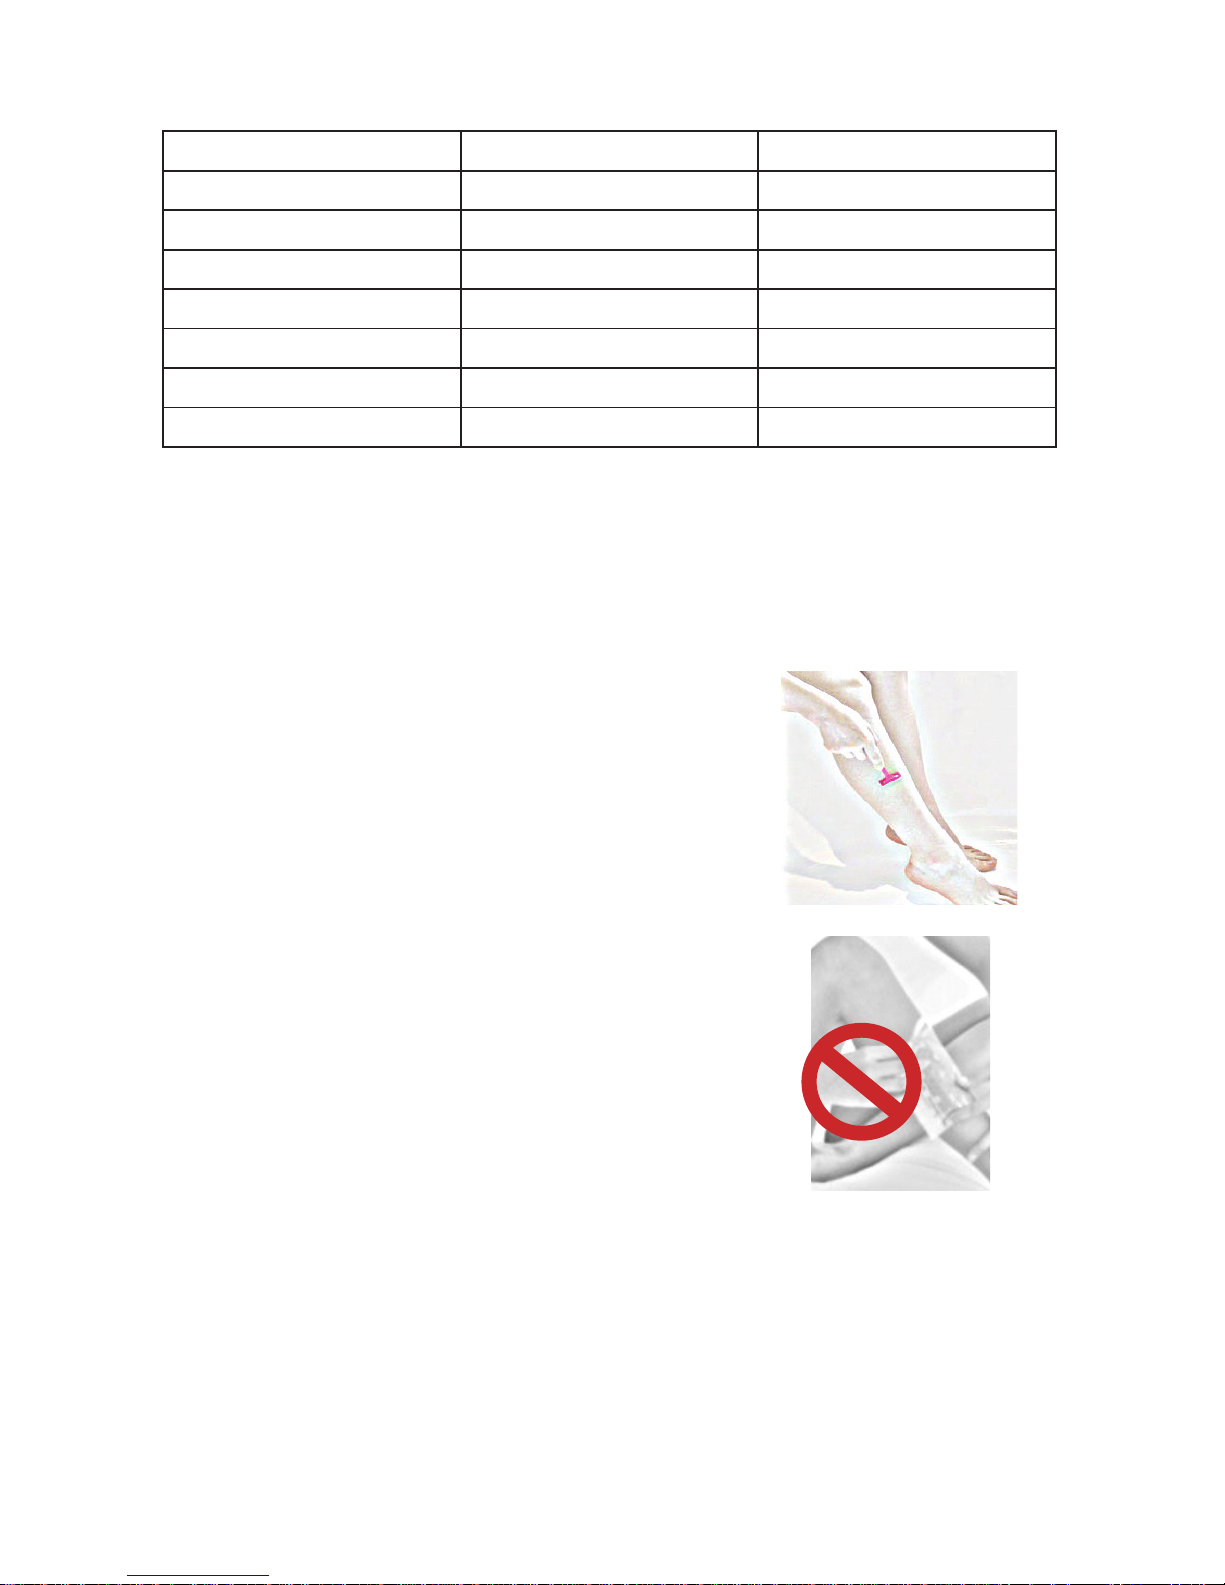
▶ Shave with razors to ensure the light
energy is channeled to the hair root.
▶ DO NOT remove the hairs by means
of wax, epilator, tweezers, or depilation
cream. Have your hairs cut by 1mm or so.
This helps you check the treatment effect
easily. After flashing, you can see if the
hair is burned out or not.
4) Cleaning
▶ Clean the treatment skin area and make sure it is dried and
free from grease or oil.
17
1st Treatment D-day Entire treatment
2nd Treatment D + 3day Partial treatment
3rd Treatment D + 14day Entire treatment
4th Treatment D + 17day Partial treatment
5th Treatment D + 28day Entire treatment
6th Treatment D + 31day Partial treatment
7th Treatment D + 42day Entire treatment
8th Treatment D + 45day Partal treatment
• Repeat the entire treatment and partial treatment as long
as all the hairs are removed in every 2 weeks. It will take
approximately 7 to 8 weeks in total.
3) Shaving
Page 18
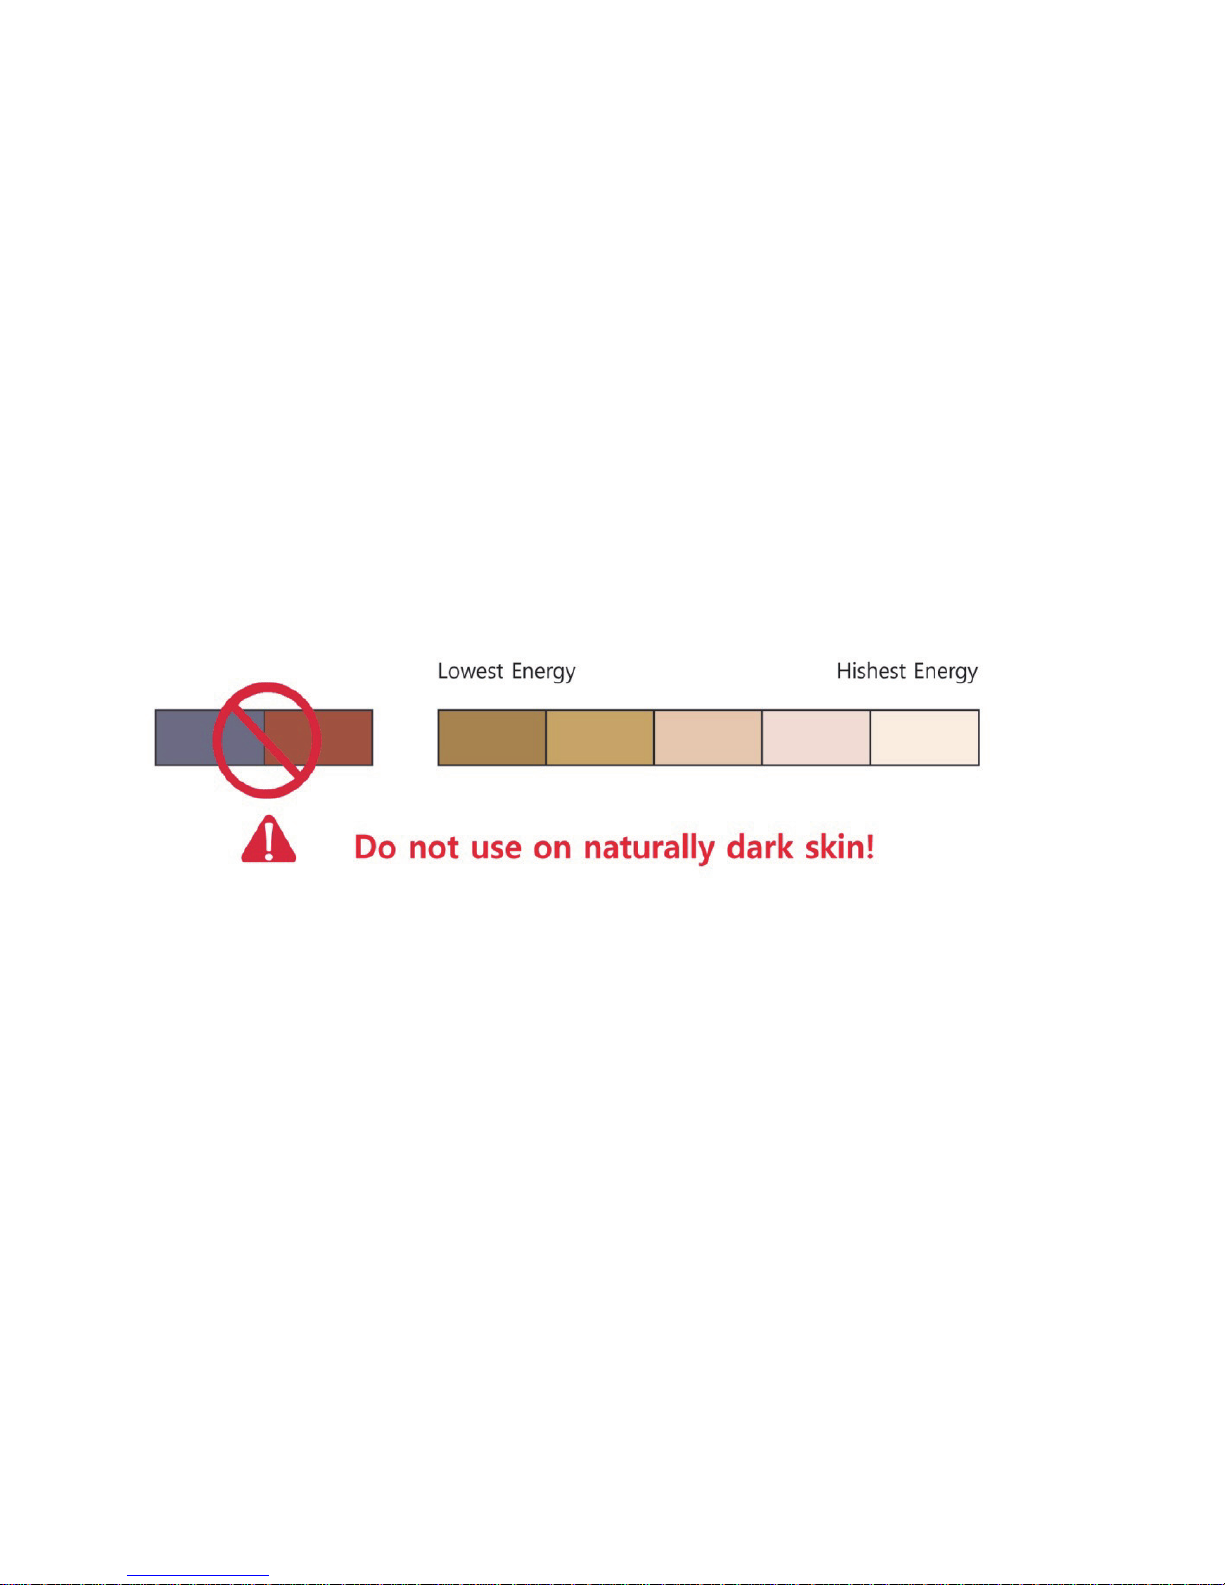
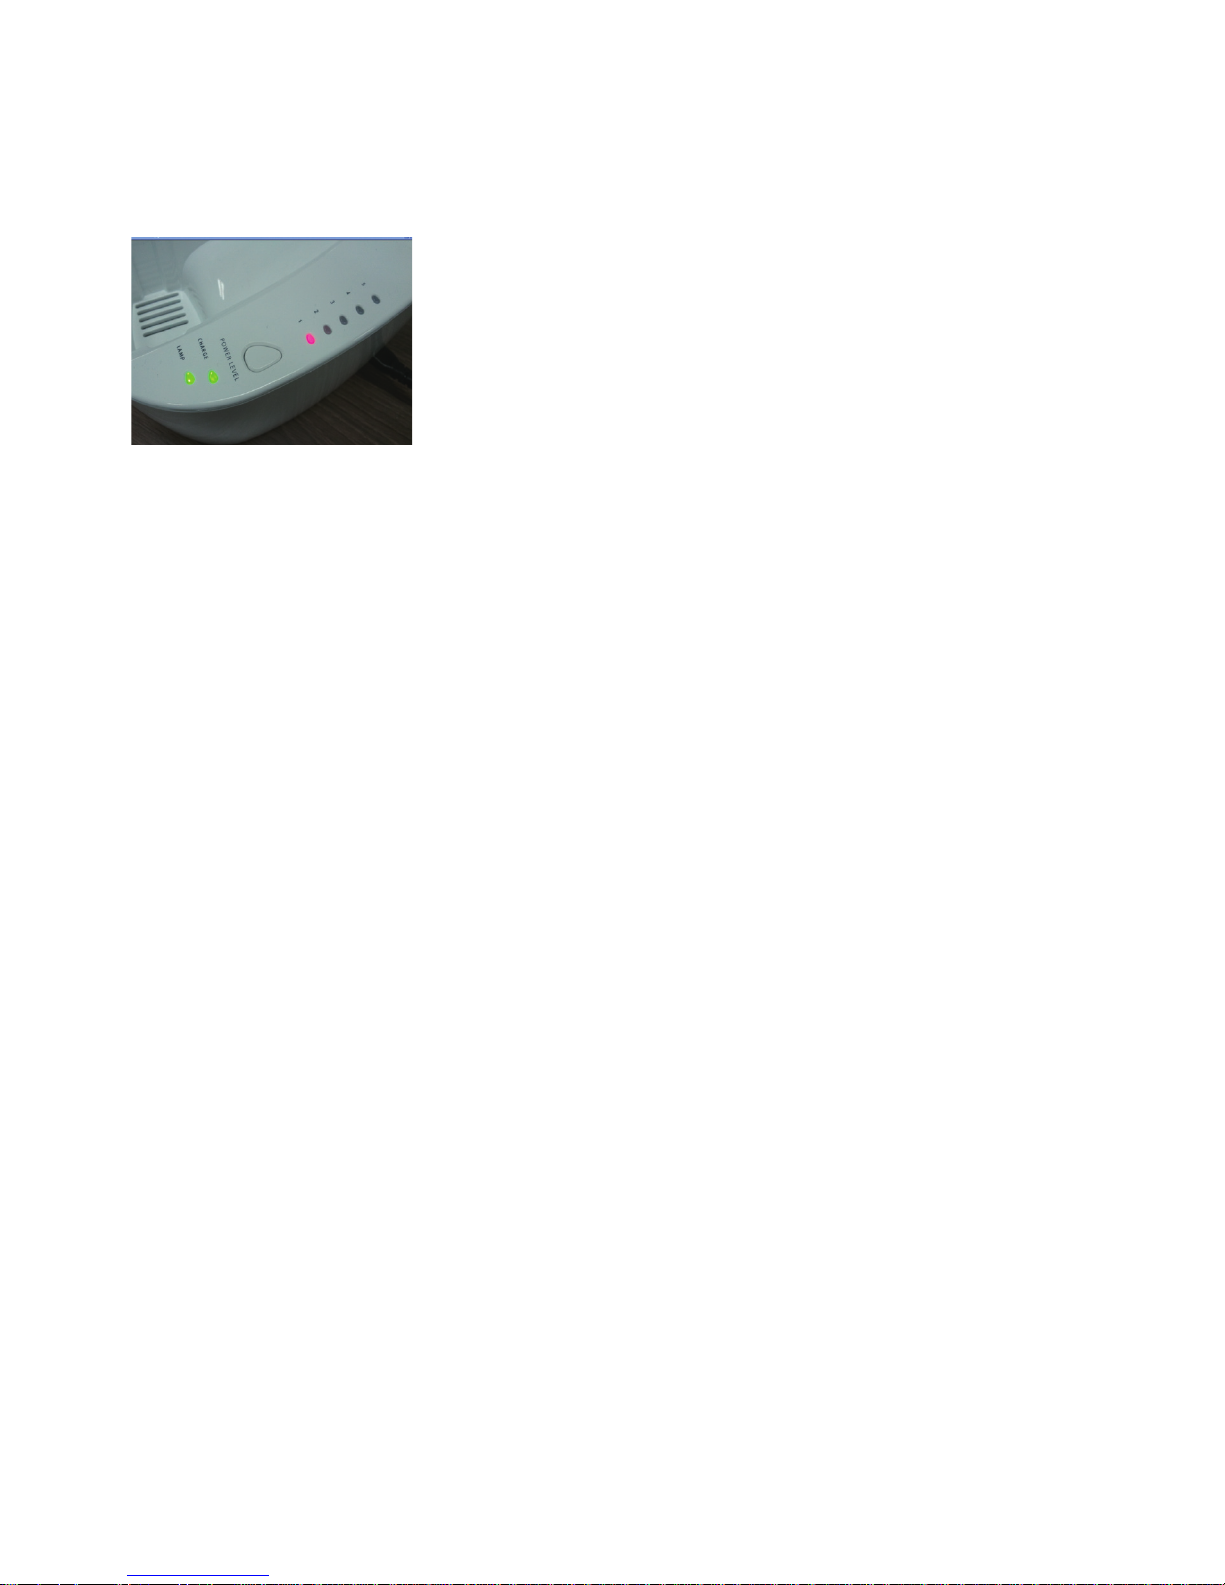
5) Checking if the MODE is positioned to ‘HR’ mode.
▶ Insert HR lamp module into the Hand Piece.
▶ Check if the LED lamp on the level is ‘RED’ color.
▶ Set the bottom switch to the ‘HR’ mode.
▶ Proceeding the treatments on dark brown, black skin, or on
the tanned skin may result in adverse effects like burns blisters,
coloring/discoloring on the skin, the inflation of follicles, etc., and
not recommended to be treated.
18
Page 19

6) Setting the Energy Level
▶ You can get more comfort and effective treatment from
proper energy level.
▶ By pressing STEP button, increase or decrease the energy
level.
▶ For the users’ safety, the energy level is back to ‘Level 1’
automatically when it is OFF and ON again.
▶ Higher step delivers you high efficiency, but may bring
you more risk simultaneously. So, setting the right STEP is
very important before the treatment.
19
※ In case of initial usage of SIPL-10, please start with STEP 1 for
safer treatment
Page 20
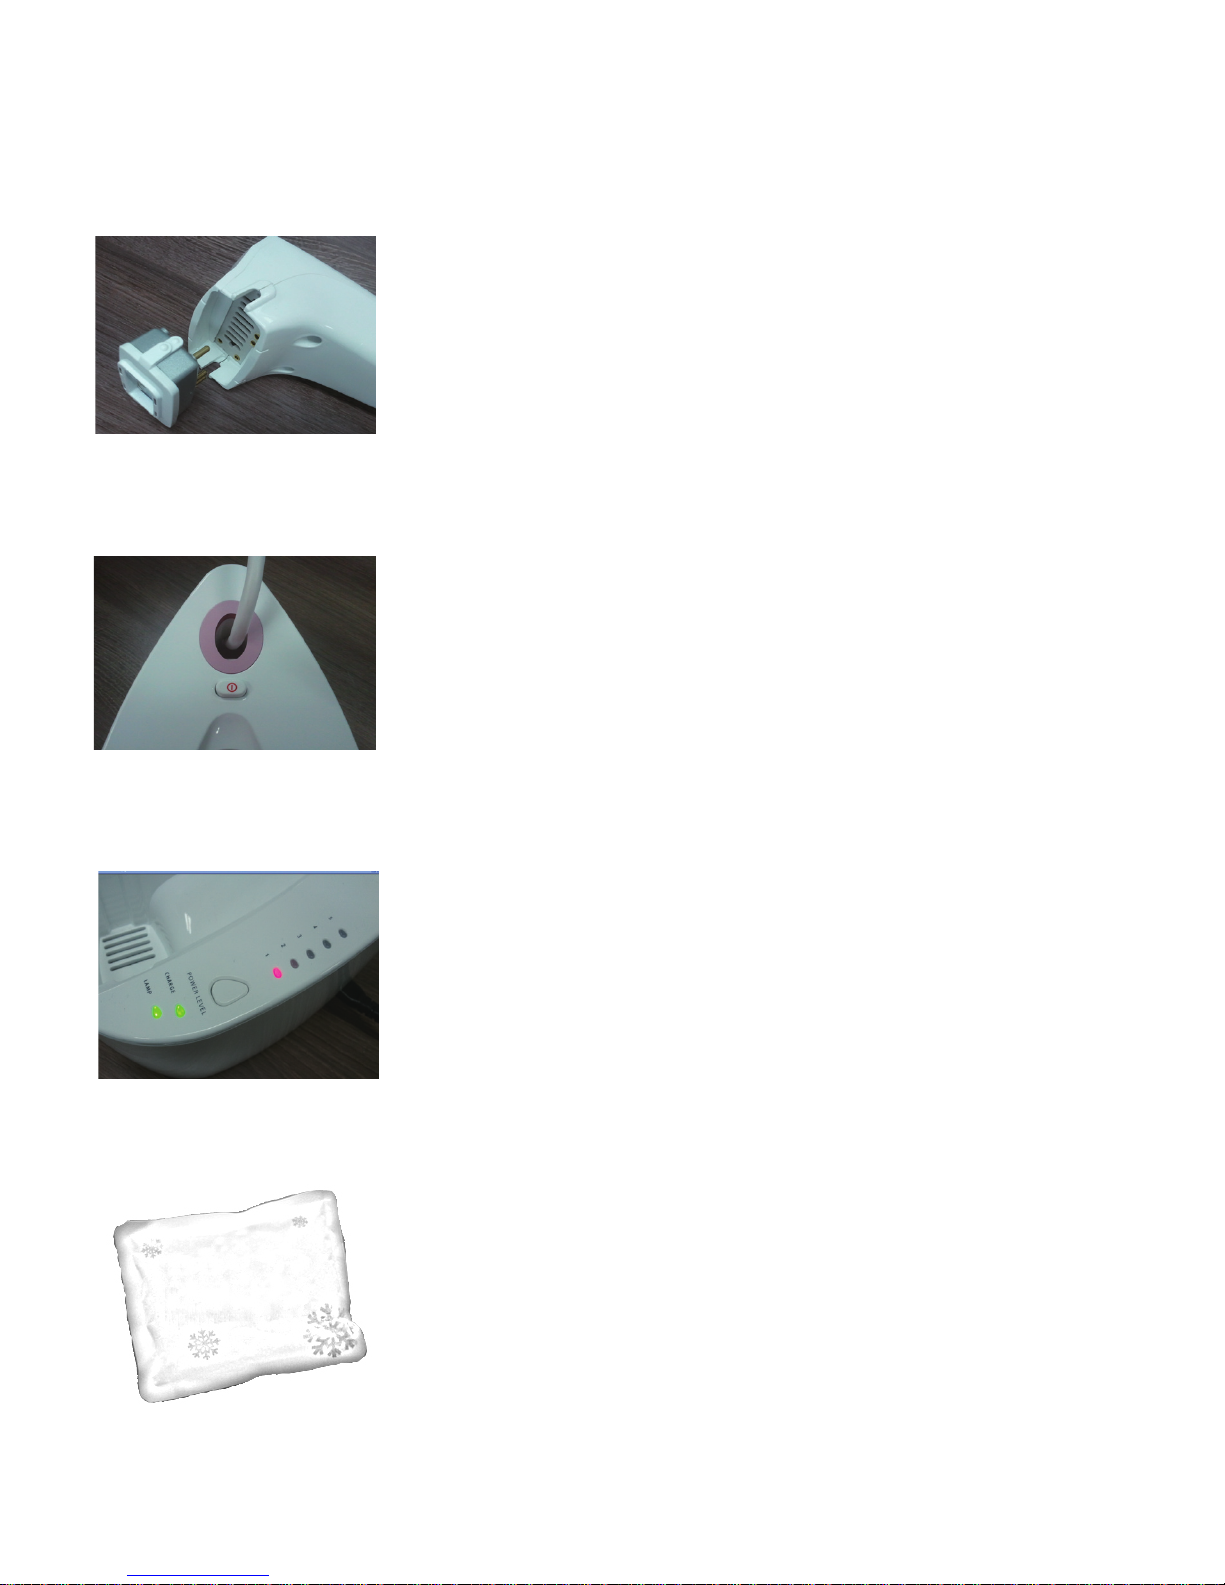
CheCkIng The lamp
▶ Before connecting the power to the unit,
check the lamp position of the hand piece.
▶ Check if the lamp module color is ‘SILVER’.
TurnIng on The power
▶ Plug in the power and turn on the unit.
CheCk The led Color and seTTIng The level
▶ Check if the LED color is RED. If it is
GREEN, then adjust the bottom switch to
opposite side.
CoolIng
▶ Cool down the skin site with cooling pack
before the treatment. Cooling eases your pain.
(Option)
20
2. Operation
Page 21
fIrsT proCedure
▶ When the READY LED becomes green,
indicating that the unit is ready, place the
hand piece to the skin site to treat.
▶ Press the START button. Keep pressing until
you see two flashes, which is called ‘doubleshot’ and has normally 0.5~1.2sec of interval.
※ Double-shot comes from level 2.
※ The buzzer will not sound if the contact is not
accurately made or the unit is muted.
21
sun bloCkIng
▶ Do not take an intensive sunbath or suntan.
▶ Apply a sun blocker to the treated areas.
▶ Avoid swimming in chlorinated water for 48 hours.
▶ Avoid applying cosmetic substances immediately after
treatment
3. posT operaTIon
Page 22
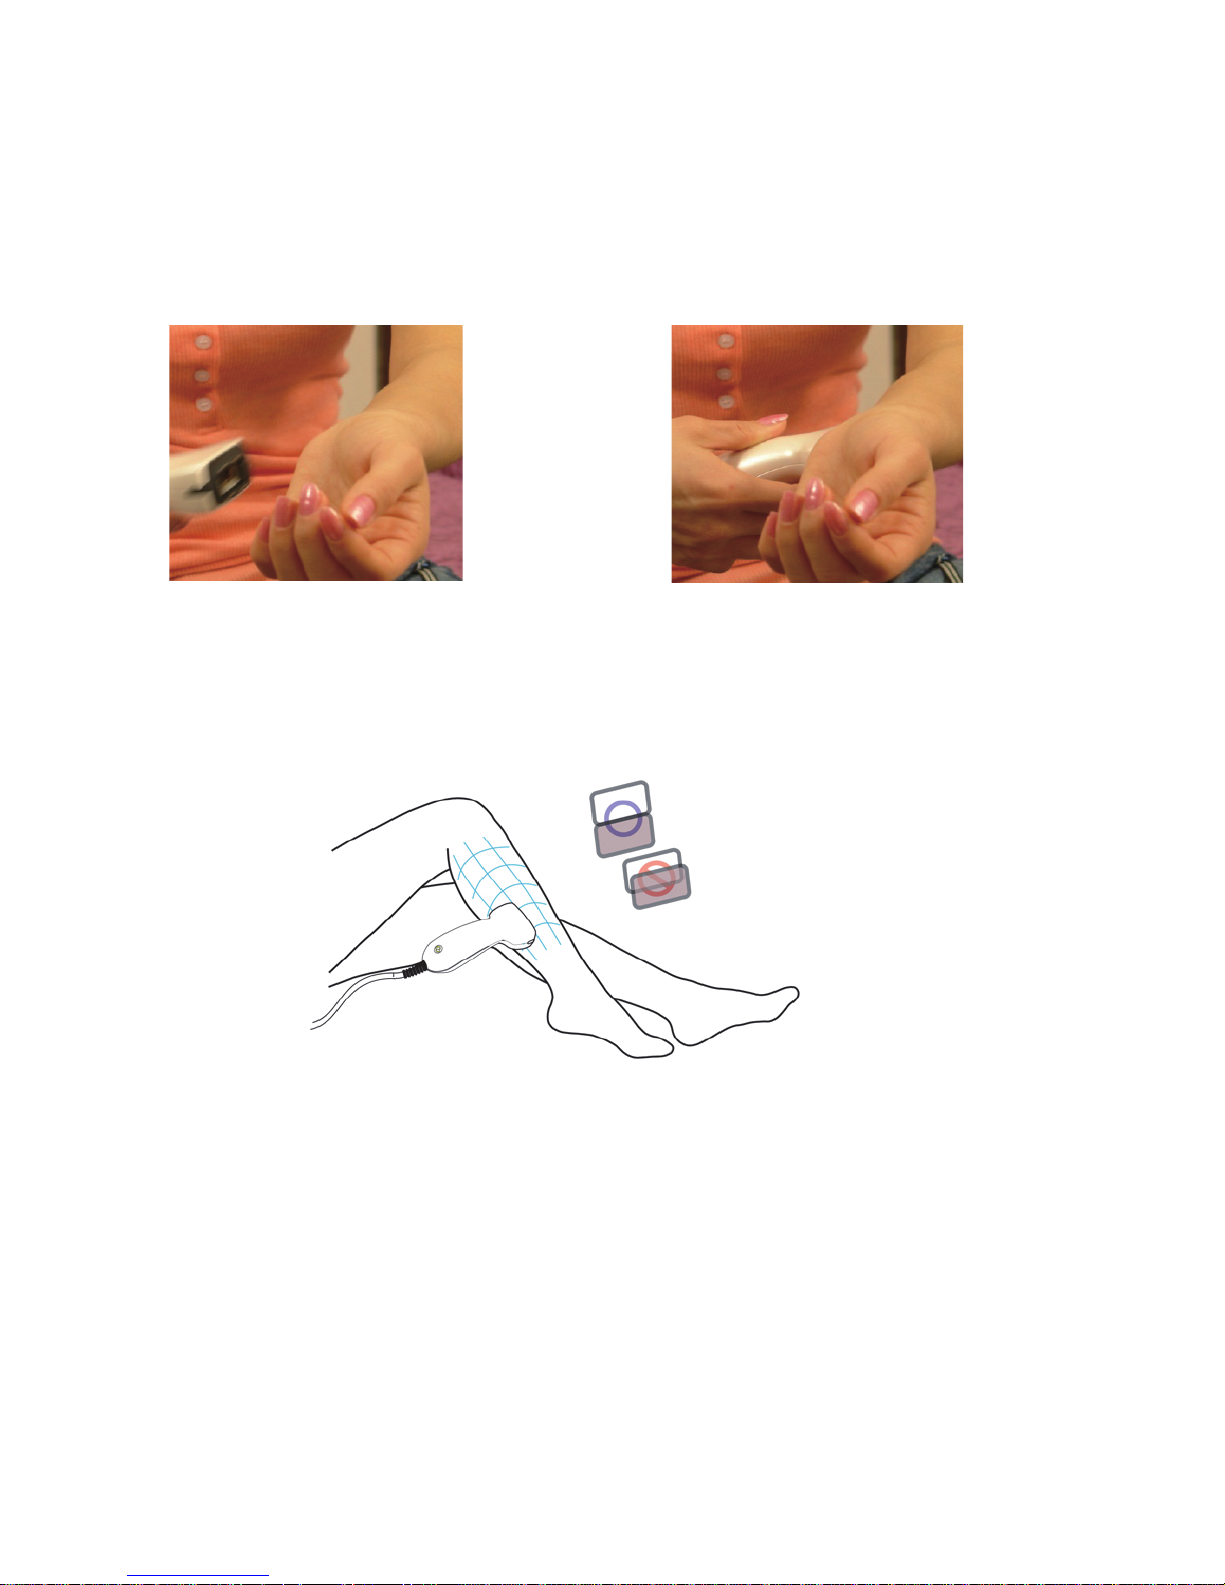
usIng hand pIeCe
▶ Wait during charging time (Ready LED indicates red)
Keeping the hand piece far away from the skin for cooling
lamp module down.
< Charging > < Emitting >
※ DO NOT treat consecutively on to the same site more than
twice or do not overlap.
22
fIlTer CleanIng
▶ Please clean the lamp filter softly using cotton bud with dip
in alcohol, in case the lamp filter is contaminated by dust
or ashes.
Page 23
※ Before the treatment, read ‘RESTRICTIONS’ cautiously for your
safety.
1) Skin Test : Please follow the Hair Removal Skin Test
Method. (page 15)
2) Scheduling
▶ The total of 10 times treatments is one session.
The recommended schedule is of twice or three times
treatments per week and it takes 4 to 5 weeks for one
session.
▶ When the beginning treatment of session, start with
level 1, and increase the level from next treatment.
▶ The Power level lamp indicate the energy level while
the procedure should start over from Level 1 when the
treatment has been paused for over two weeks.
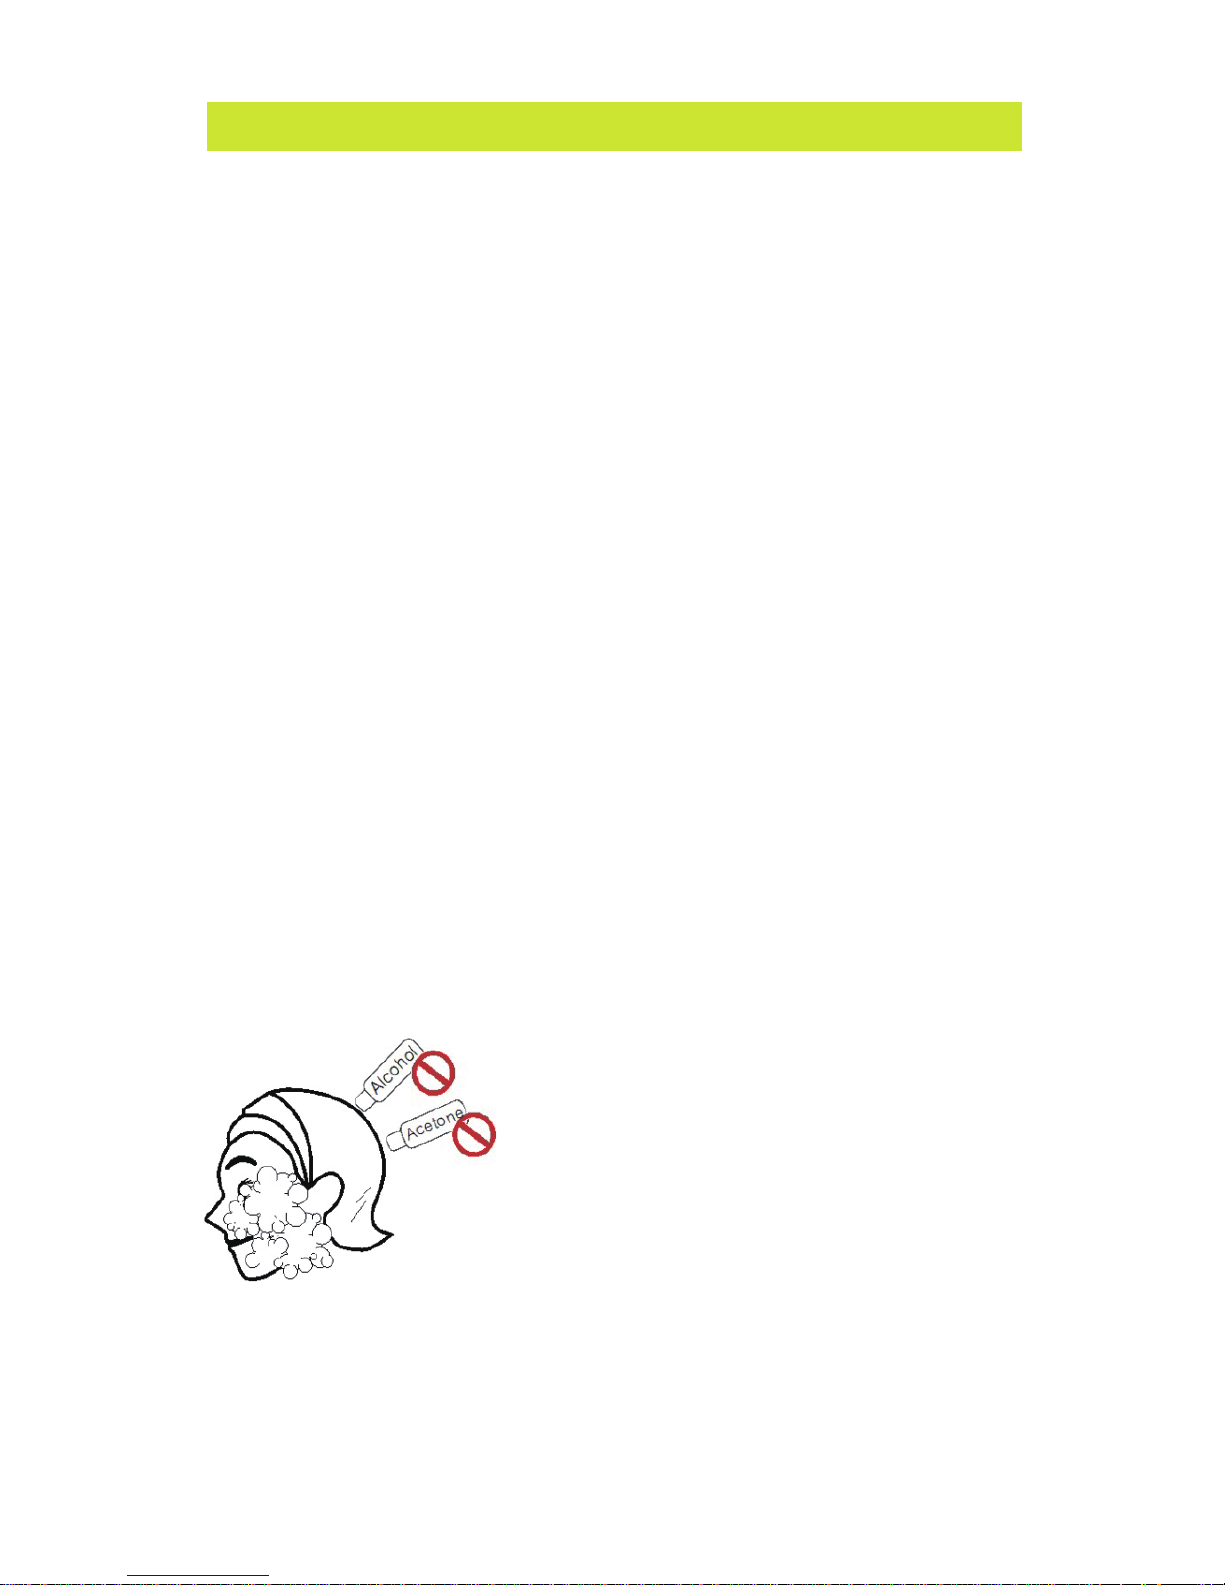
3) Face Cleaning
▶ DO NOT use alcohol or
acetone with and inflammable
composition.
▶ Use a peeling solution suitable
for your skin type such as glycolic
acid peeling 10% to remove any
keratin or dead skin cells.
▶ Use non-alcohol toner when
the face is dried after cleansing.
23
1. Pre-operation
operaTIng for skIn Care
Page 24
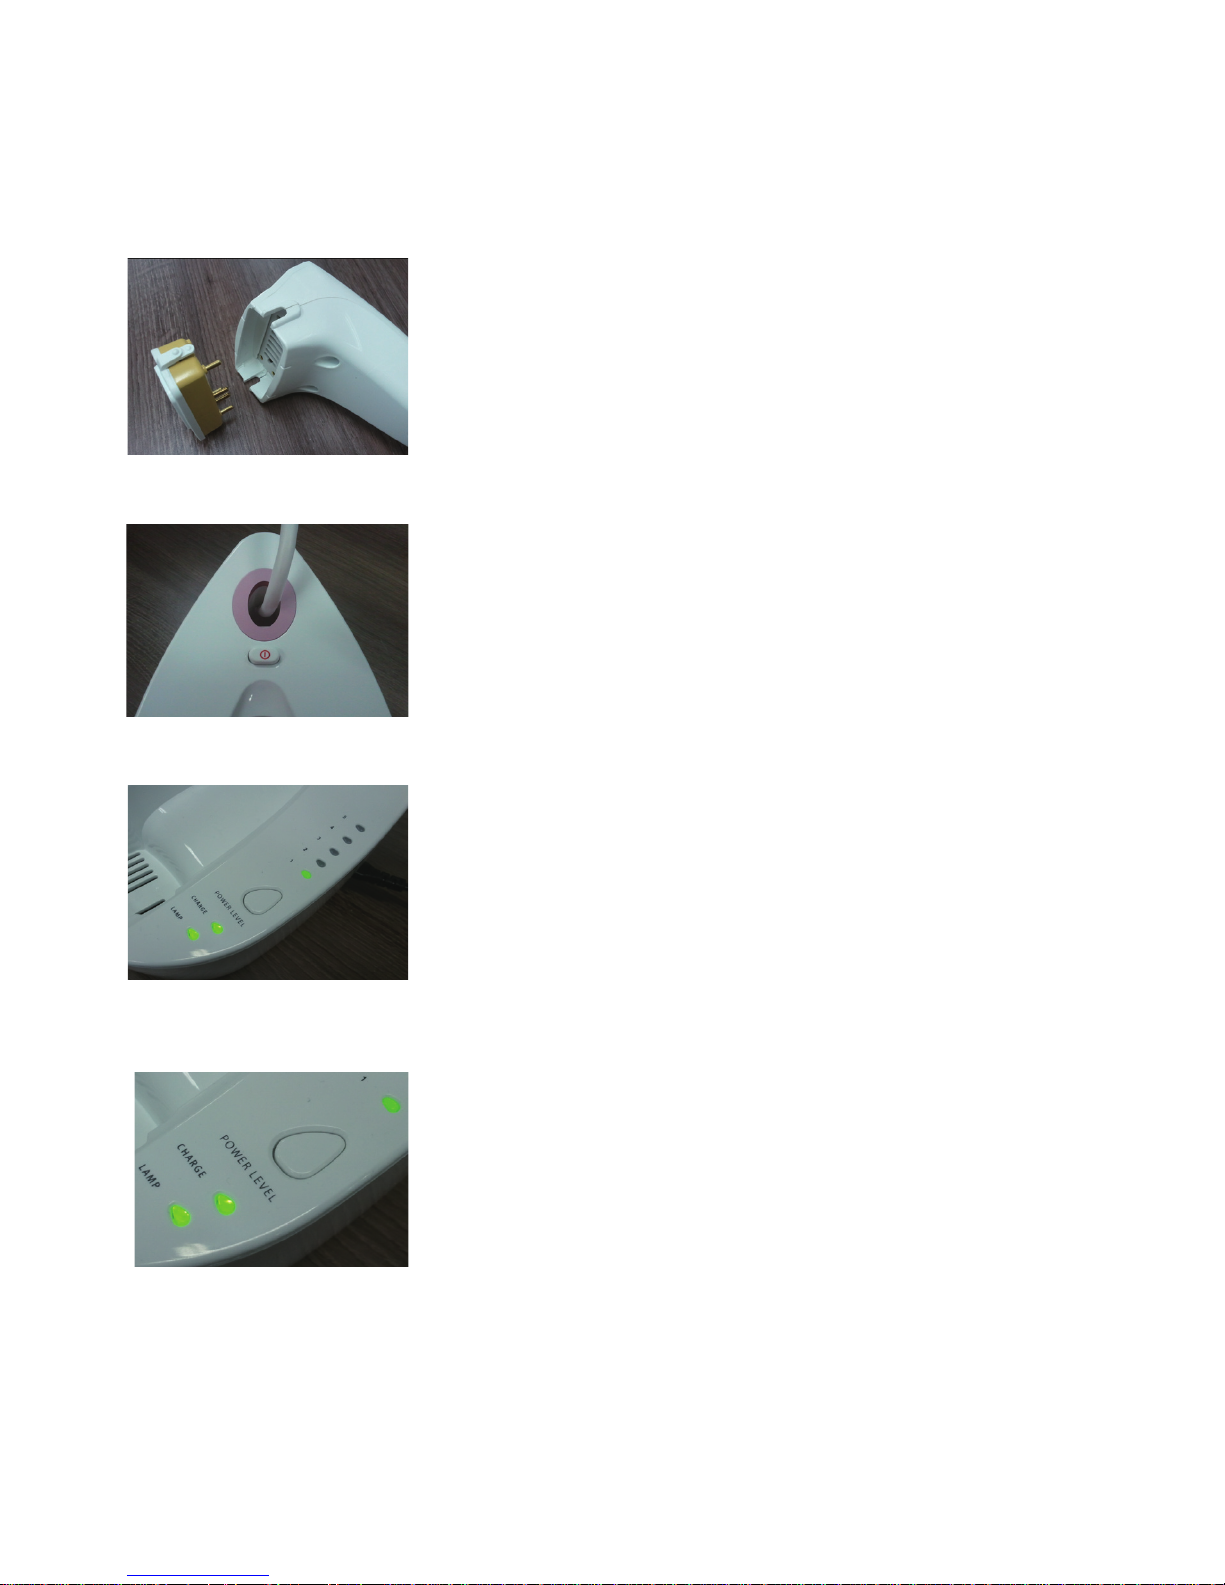
CheCkIng The lamp
TurnIng on The power
CheCk The led Color and seTTIng The level
fIrsT proCedure
▶ Plug in the power and turn on the unit.
▶ Check if the LED color is GREEN. If it
is RED, then adjust the bottom switch to
opposite side.
▶ When the READY LED is green, indicating
the unit is ready. Place the hand piece to
the skin site while keeping the skin site taut
by gently pulling the skin in the opposite
direction.
▶ Press the START button. The buzzer will
not sound if the contact is not accurately
made or the unit is muted.
24
▶ Before connecting the power to the unit,
check the lamp position of the hand piece.
▶ Check if the lamp module color is ‘YELLOW’.
2. Operation
Page 25
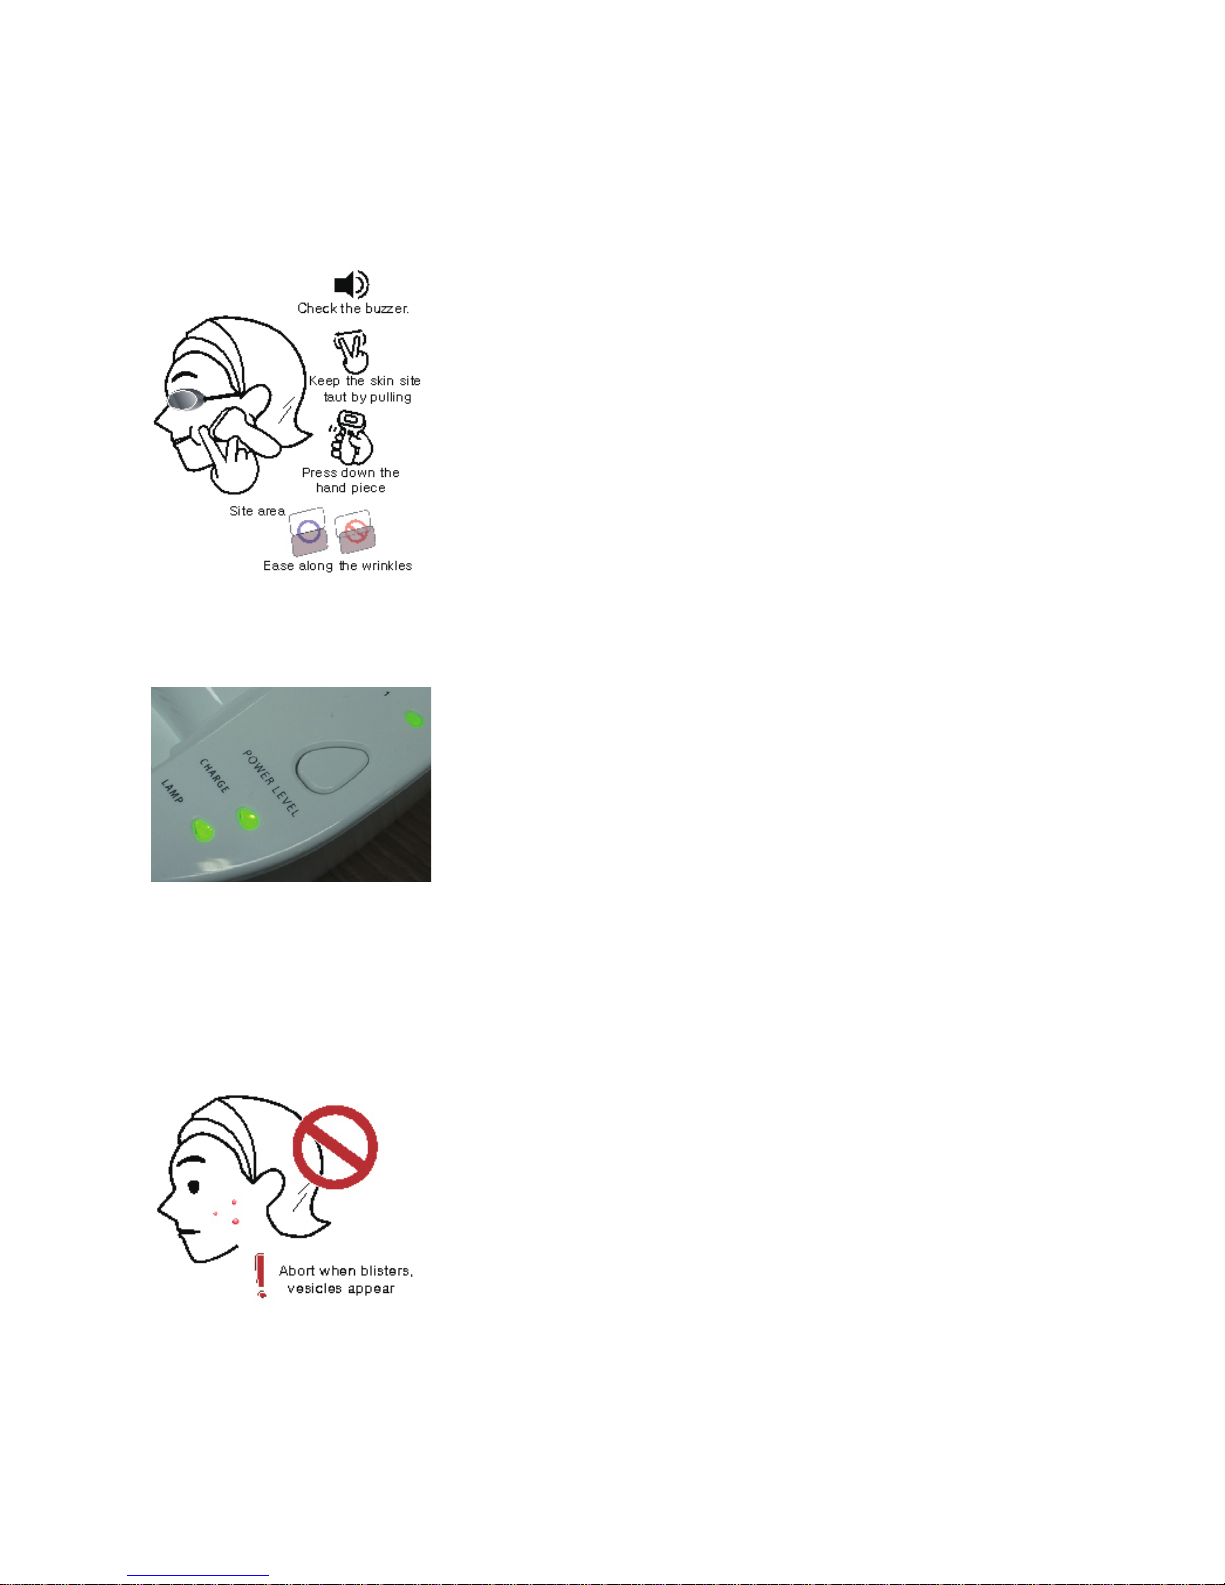
ChargIng and emITTIng
▶ After emitting a sequence of pulse,
the READY LED will become red and start
blinking. Wait until the LED becomes green
before moving on to another site. (Tip:during
recharging, keep the hand piece away from
the skin site to cool down, and do not block
the vent located in the hand grip.)
seCond proCedure
CheCkIng The reaCTIon
▶ When the 1st procedure has covered the
entire facial area, start the 2nd procedure.
▶ Move along the site area for full coverage
rather than focusing on a specific area
repeatedly.
▶ After the 2nd procedure, the face should
assume a slight reddish tint from the heat.
However, terminate the procedure if blisters or
vesicles appear on the site area.
25
Page 26
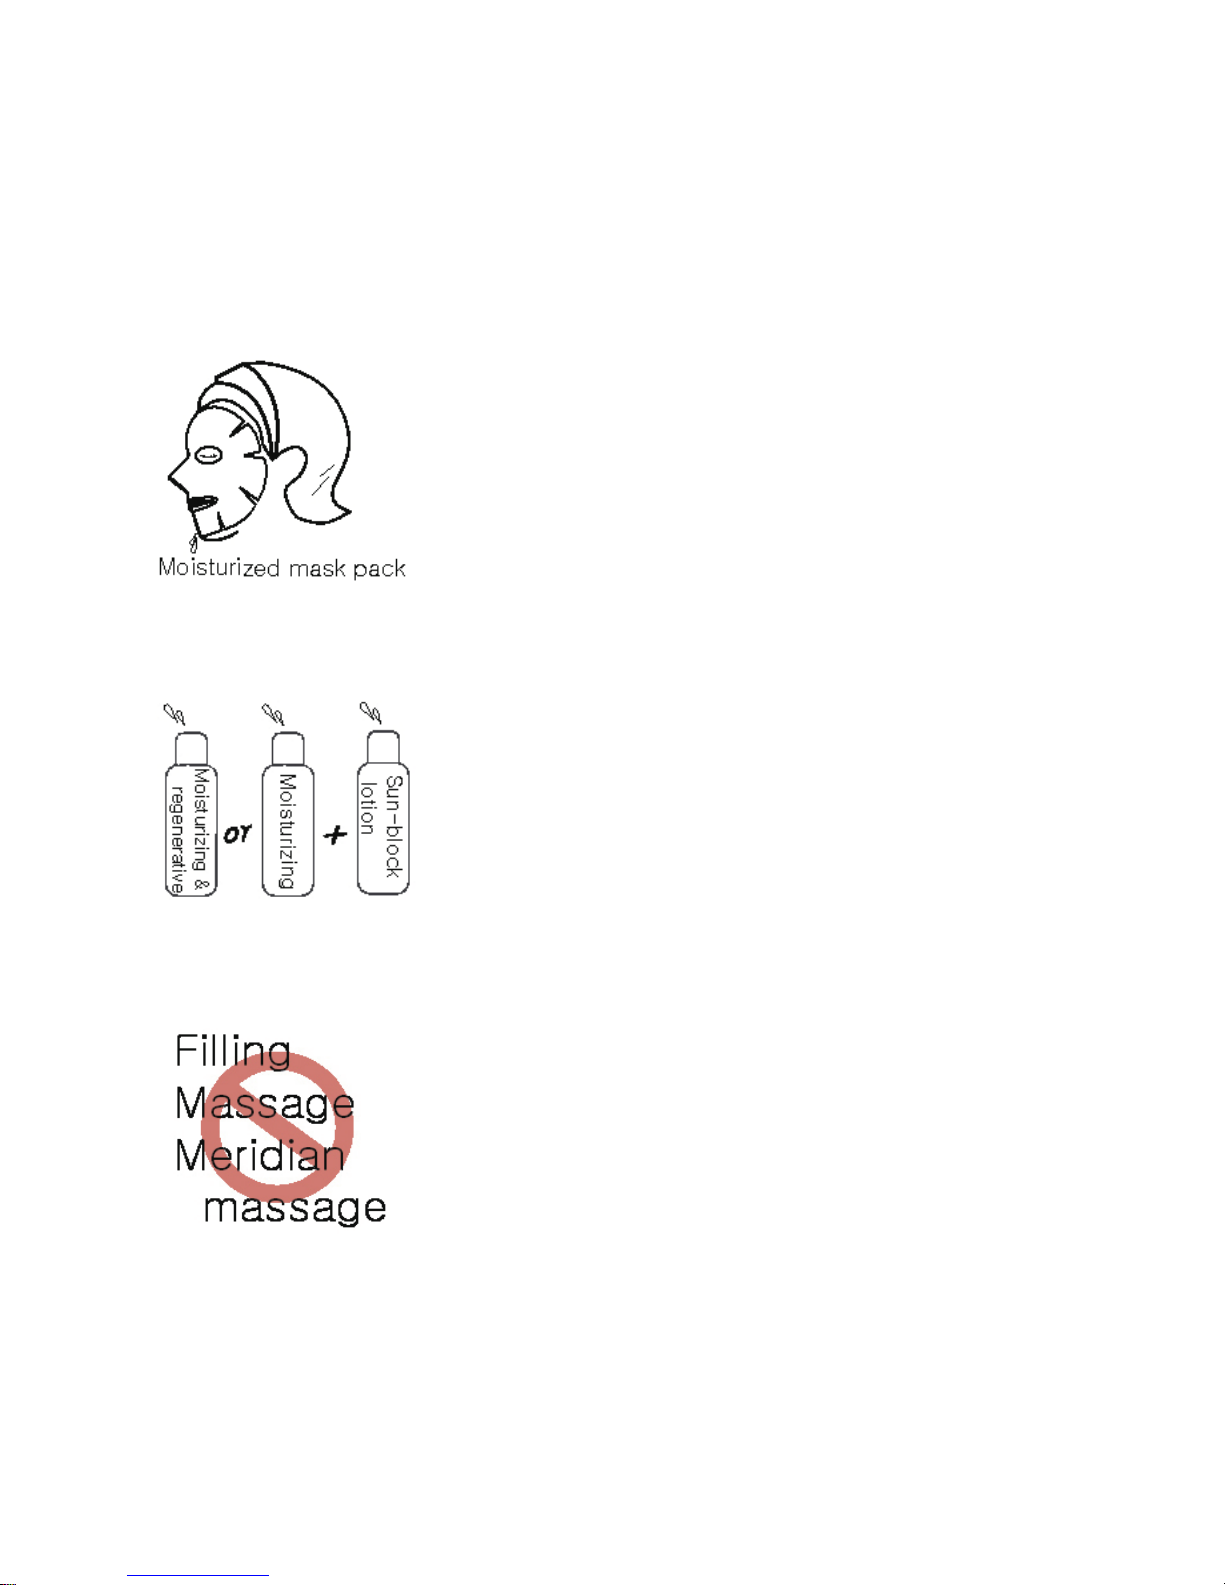
▶ Apply a moisturizing mask or modeling
pack as described in the process of treatment,
and complete the treatment by applying
moisturizer or regeneration cream and sun
block lotion.
▶ From the start of the treatment and one
month after the completion of 1 session,
avoid direct sun exposure or apply sun block
cream to protect the skin from damaging UV
rays.
▶ Keep you skin moisturized to prevent it
from becoming dry.
26
3. Post Operation
Page 27
user TIps
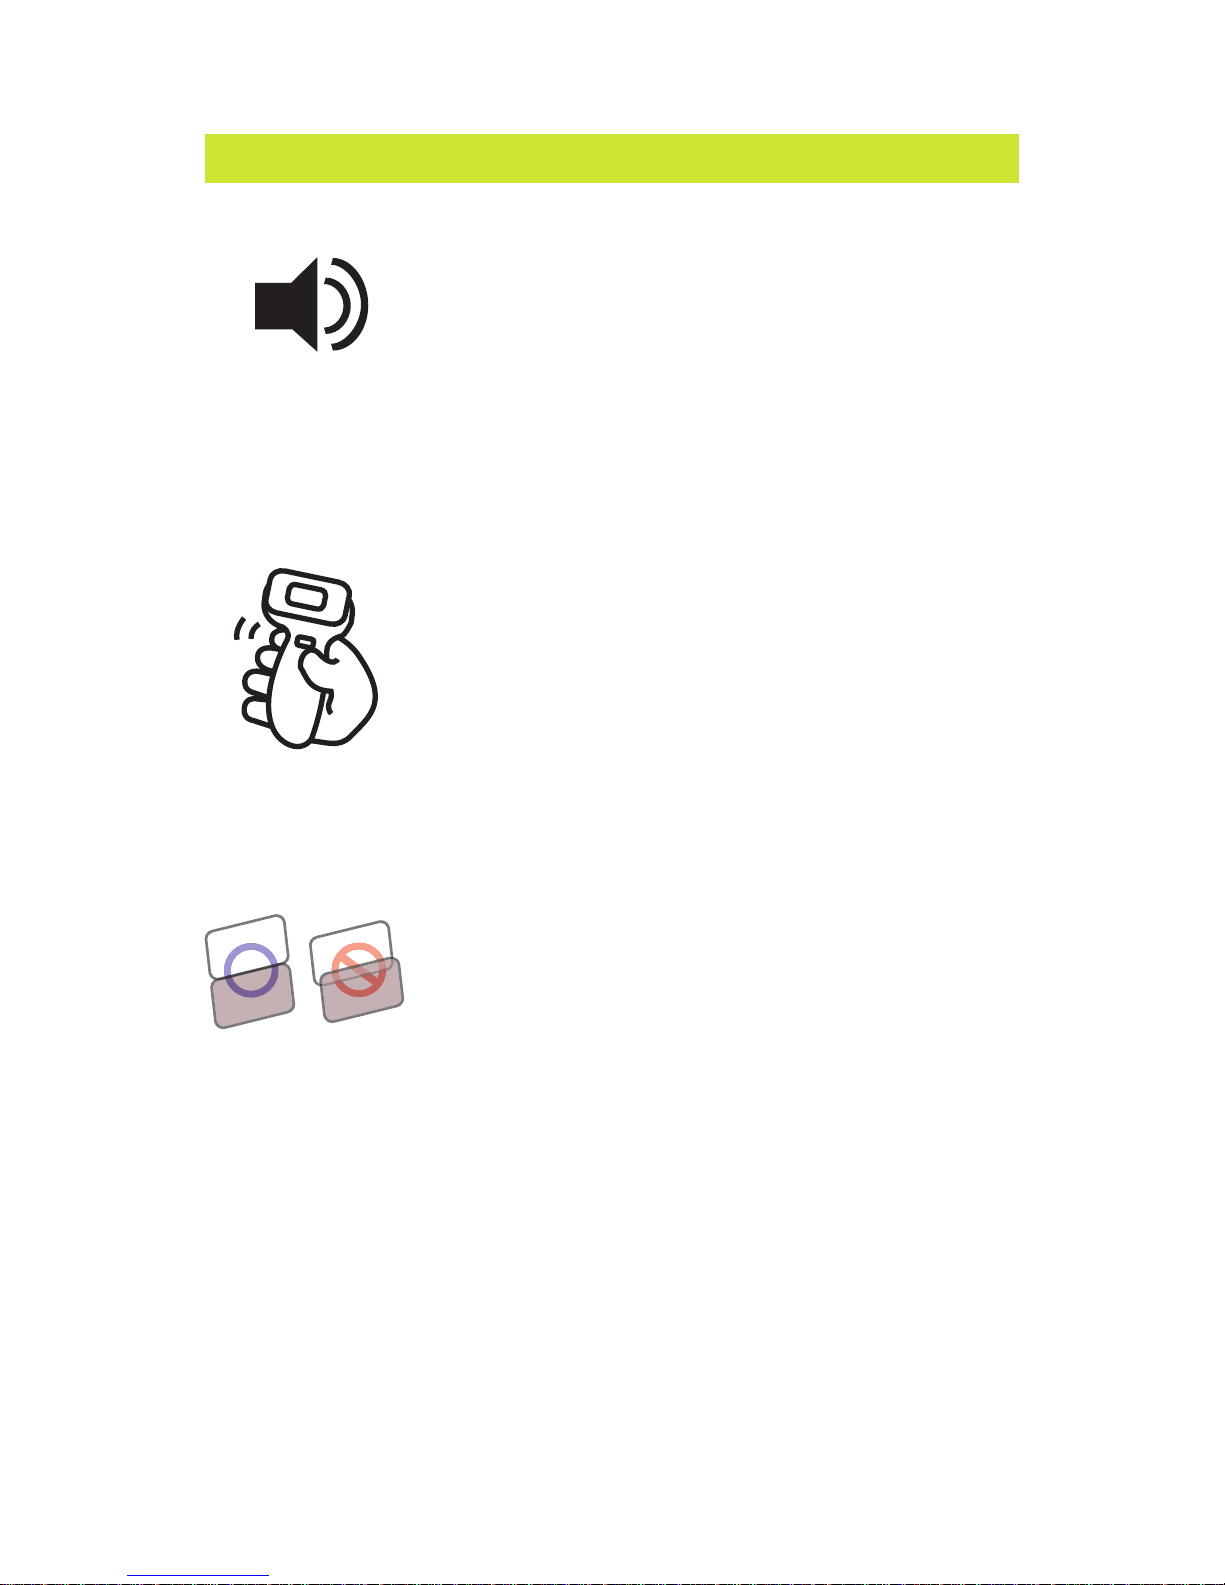
• The buzzer sound indicates that contact
with the skin site has been made and
the unit is ready for operation. Always
check the buzzer sound before emitting
a sequence.
• Move the hand piece far away from the
skin site so that the skin and the hand
piece can cool down thoroughly.
• Do not overlap.
Try to cover every area of the skin site.
• When the skin becomes excessively
hot, abort the operation even during
the treatment, and wait until recharging
is complete before moving to another
designated skin site.
• Do not use hair removing on the face or
neck
• Adjust the hand piece so that the touch
switch remains in contact and ease
along curved contours.
Press down the
hand piece
Ease along the wrinkles
Check the buzzer.
27
Page 28
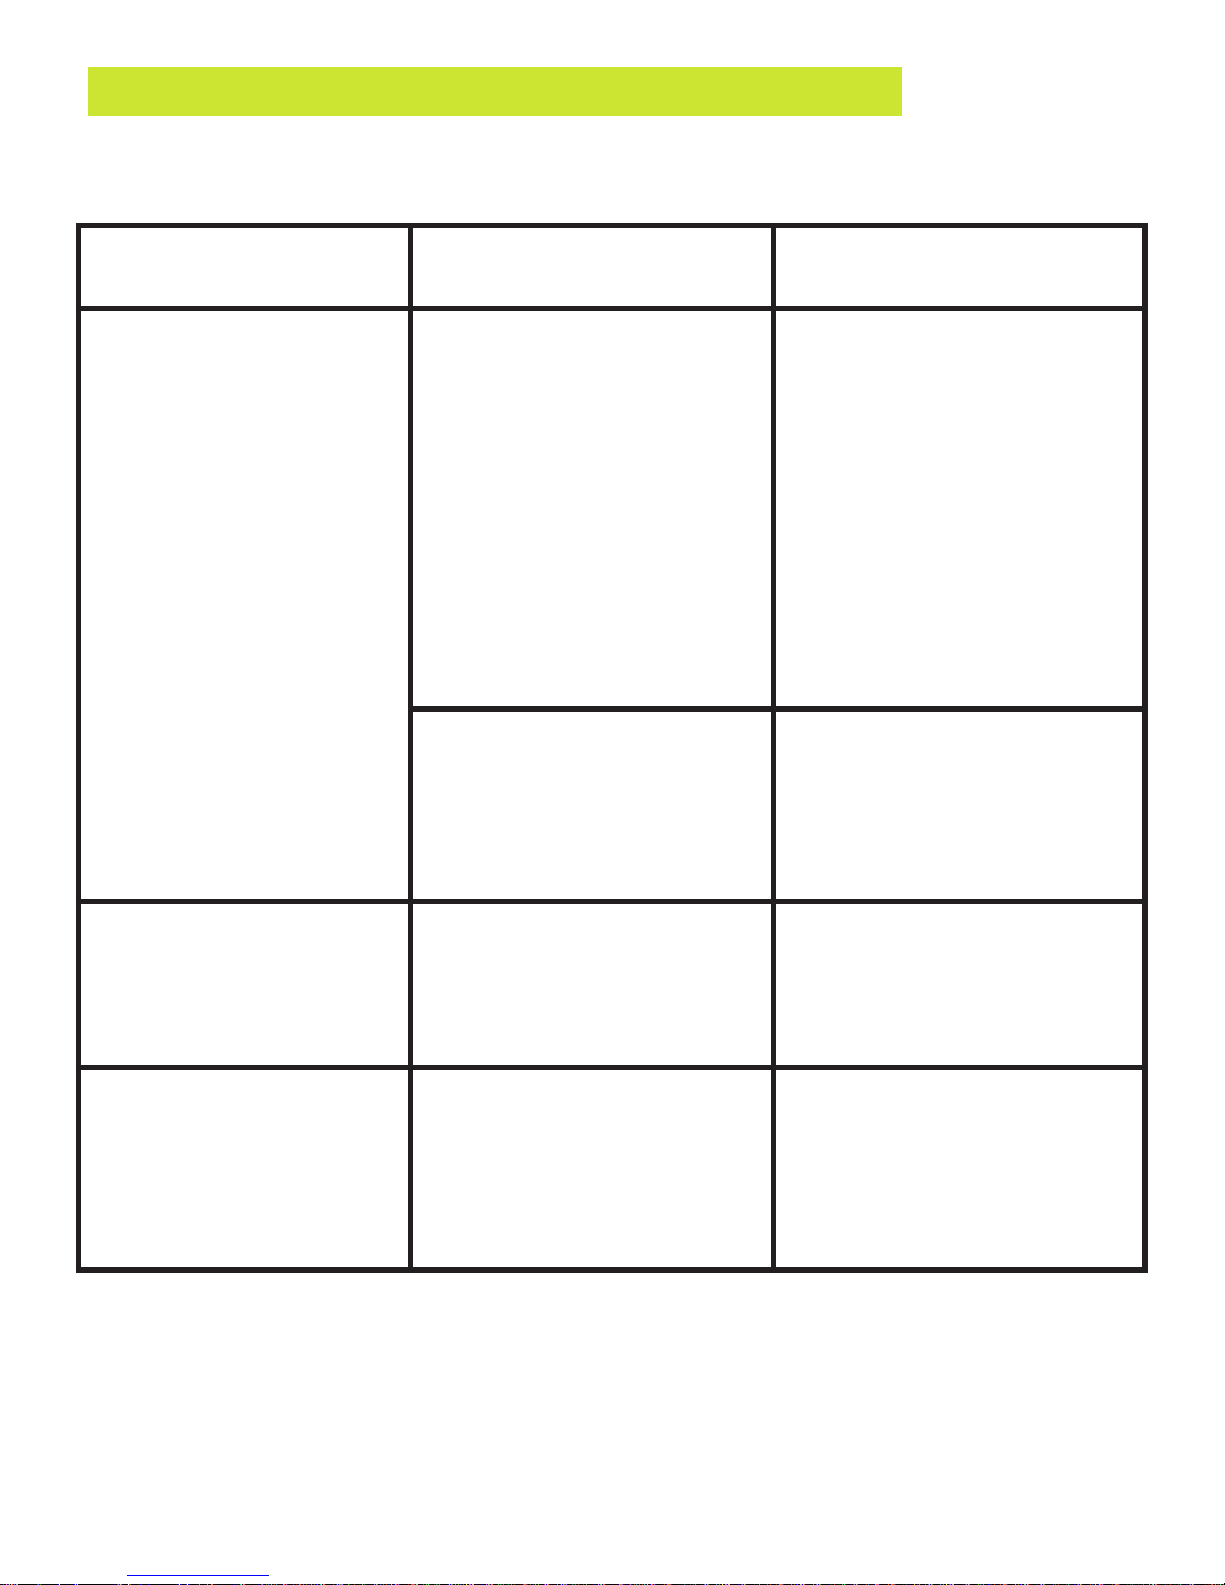
Please refer to the following table for troubleshooting before requesting
service.
Symptom Checkpoint Troubleshooting
When the unit is not
oprating
Check the power connection.
Ensure the unit is connected
to AC Power.
Check if the lamp unit is
overheated.
Make sure that the power
connection is securely in
place.
Turn off the unit for
30 minutes to
relieve overheating.
Check if the power cord
is damaged or exposed to
water.
Call service for evaluation or
repair. DO NOT disassemble
or modify for yourself.
When the beam becomes
weak during the procedure
Check the lamp life indicator
located on the right side of
the unit.
Replace the lamp unit.
Purchase the optional lamp
unit.
When the illumination
button does not work
Check to see if the buzzer
sounds.
Check to see if the unit is set
to mute.
Contact the hand piece to the
skin site again and see if the
buzzer sounds.
Please note that service may not be free if the request is made and the unit is
found to be in perfect working condition.
If the problem continues, please contact your local distributor office for further
information and instructions.
28
TroubleshooTIng
Page 29
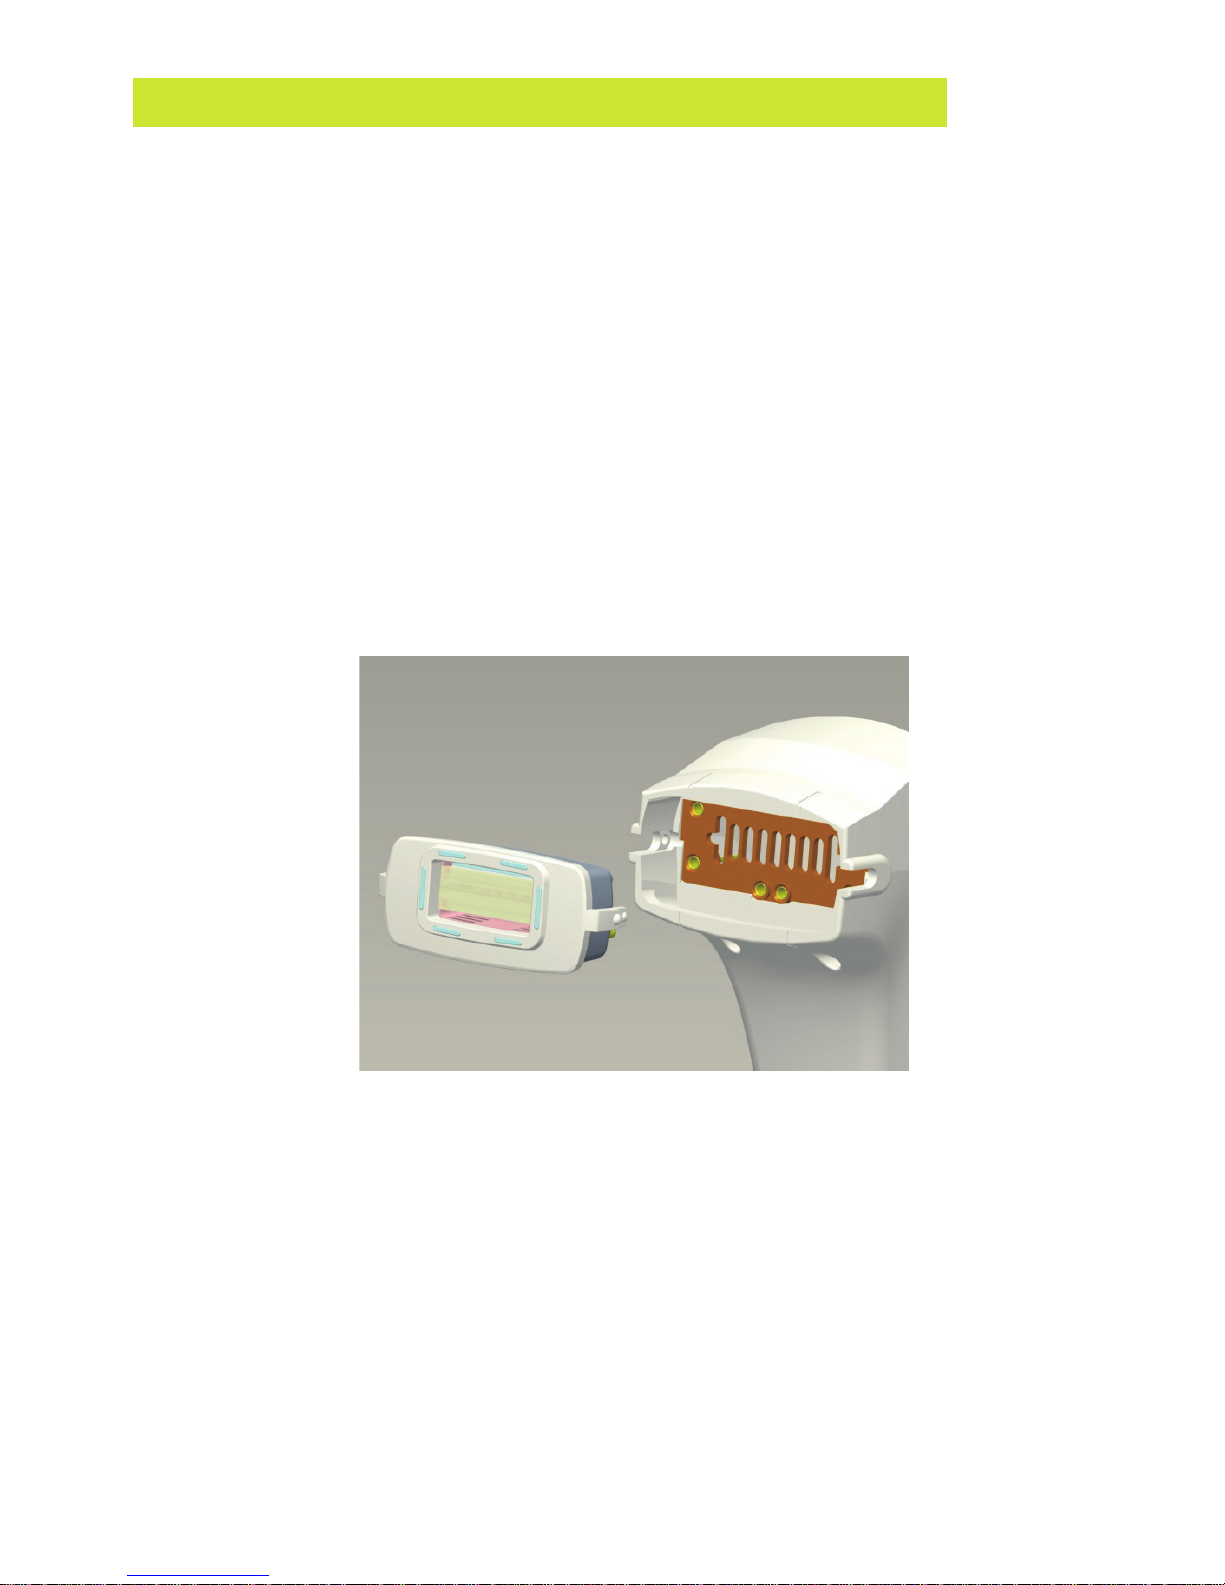
replaCIng The lamps
When to replace the lamp
• If the lamp is used in excess of it's lifetime, it will cause
deteriorated treatment. Then, replace the lamp which
blink continously
• Turn the device off and unplug the cord from the
electrical outlet
• Grip the unit with both hands and pull out the lamp.
• Don’t touch any metallic materials.
• Insert a new lamp unit, Turn the device on, and use a
sharp-edged tool to press the initiation button (RESET)
for 3 seconds to reset the lamp life indicator.
Clean the lamp filter softly using cotton bud with dip in alcohol
in case the lamp filter is contaminated by dust or ashes.
Lamp Cleaning
29
Page 30

Q. Is the IPL harmless if I see it direct?
A. Luminic SIPL-10 is designed for safe treatment. It has the touch
sensor at the head of hand piece, and without touching this sensors
to your skin, the light is not emitted.
Q. What is the lamp life?
A. Luminic SIPL-10 indicator shows you when you have to change the
lamp module. Averagely, lamp life is 6,000 shots in HR mode, and
20,000 shots in SC mode. if the light intensity falls below acceptable
level, it stops emitting light automatically, then you have to change to
new lamp module.
Q. When uses Hair Removal, do I have to remove hairs
completely before the treatment?
A. Just shave by 1mm of height. If you remove your hairs by waxing,
epilator, tweezers, your hair follicle absorb less heat, and this will
lessen the effect.
Q. Can I see the hair remained after the HR treatment?
A. Several hairs can be remained after the normal treatment.
This will be removed automatically within two weeks because the hair
follicle was affected/harmed by IPL.
Do not remove the remained hairs by wax, epilator, tweezers.
faQ
30
Page 31
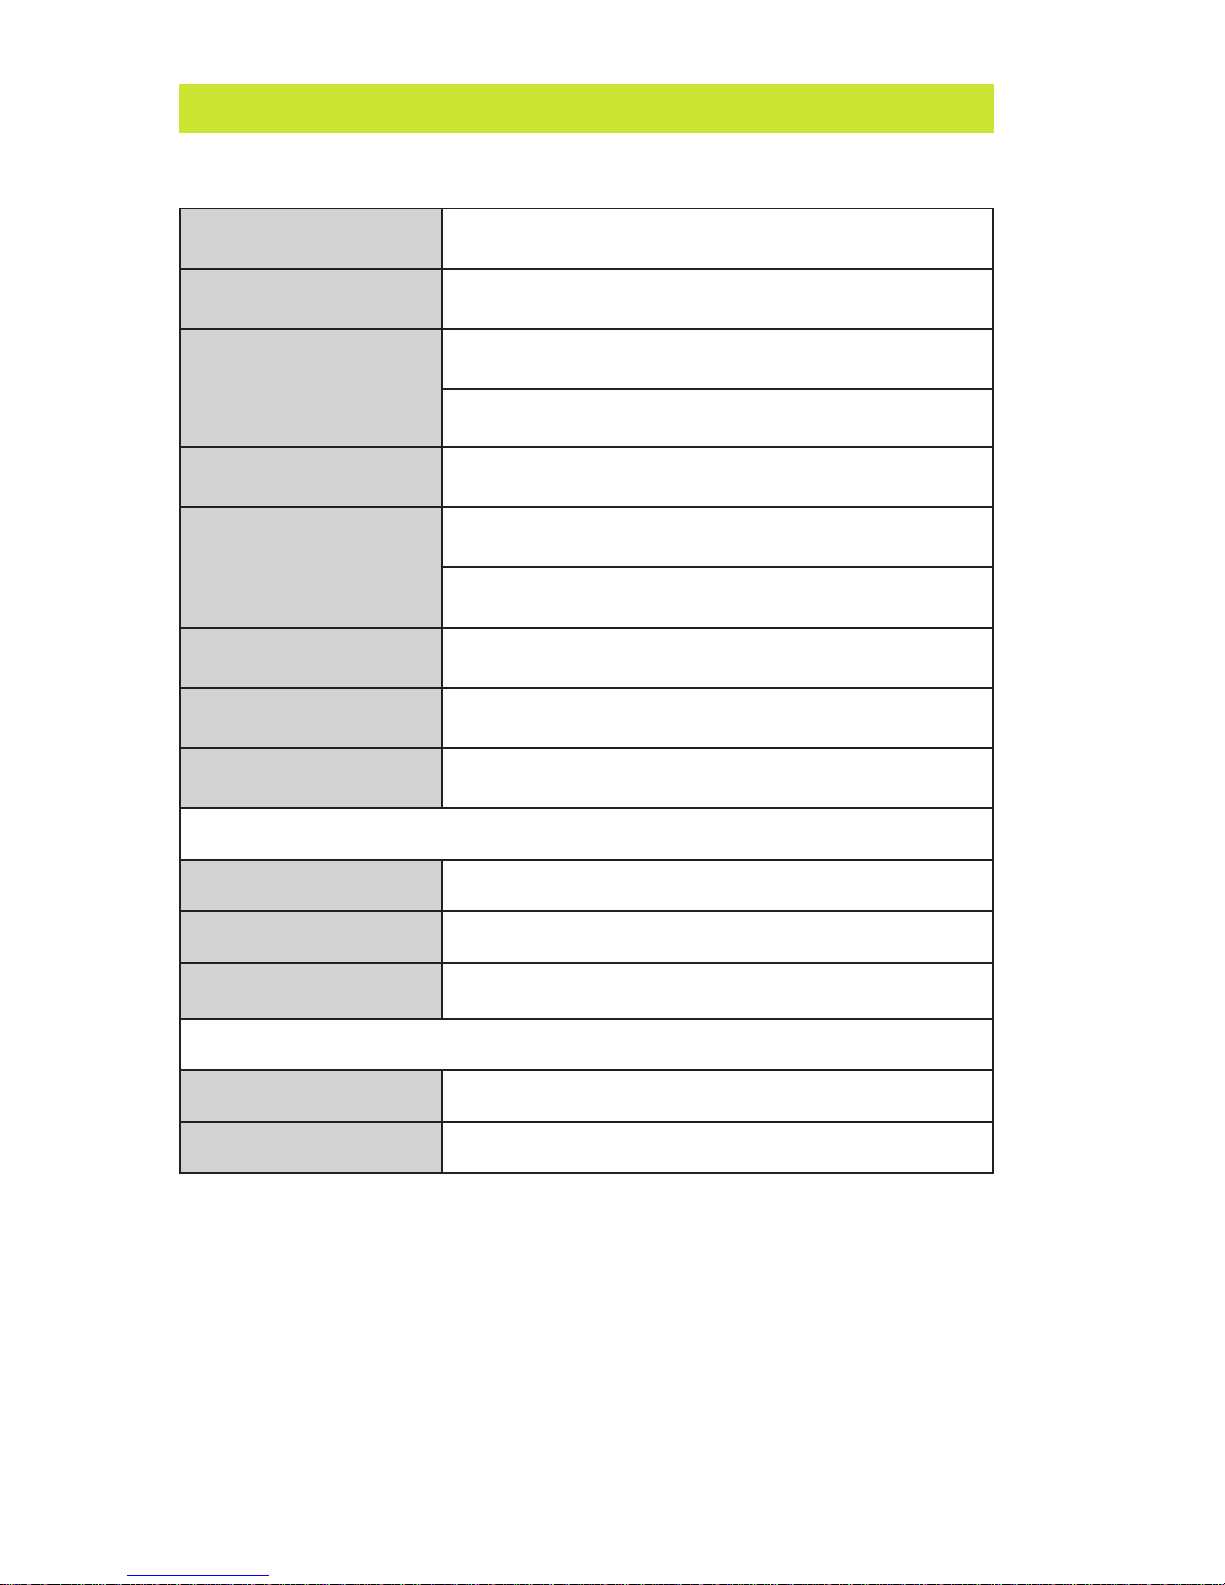
produCT speCIfICaTIons
Lamp Xenon Lamp
Light Source Pulsed light
Energy Fluency
Hair removal : 3.0J/cm
2
~ 10.4J/cm
2
Skin care : 1.8J/cm2 ~ 5.5J/cm
2
Spot Size 30 mm x 15 mm
Wavelength
Hair removal : 470 - 1100 nm
Skin care : 420 ~ 1100 nm
Lamp Life HR : 6000 flash , SC : 20000 flash
Weight 1.7Kg
Dimension 245mm (L) X 135mm (W) X 125mm (H)
Operation Conditions
Temperature 5
o
C - 30oC
Humidity 30% - 80% RH
Rated Power 230VAC , 50 or 60 Hz, 200W
Storage Conditions
Temperature -20
o
C to 80oC
Humidity 0%-95% RH
The design and specifications may be subject to change without prior
notice in order to improve the product performance.
31
Page 32
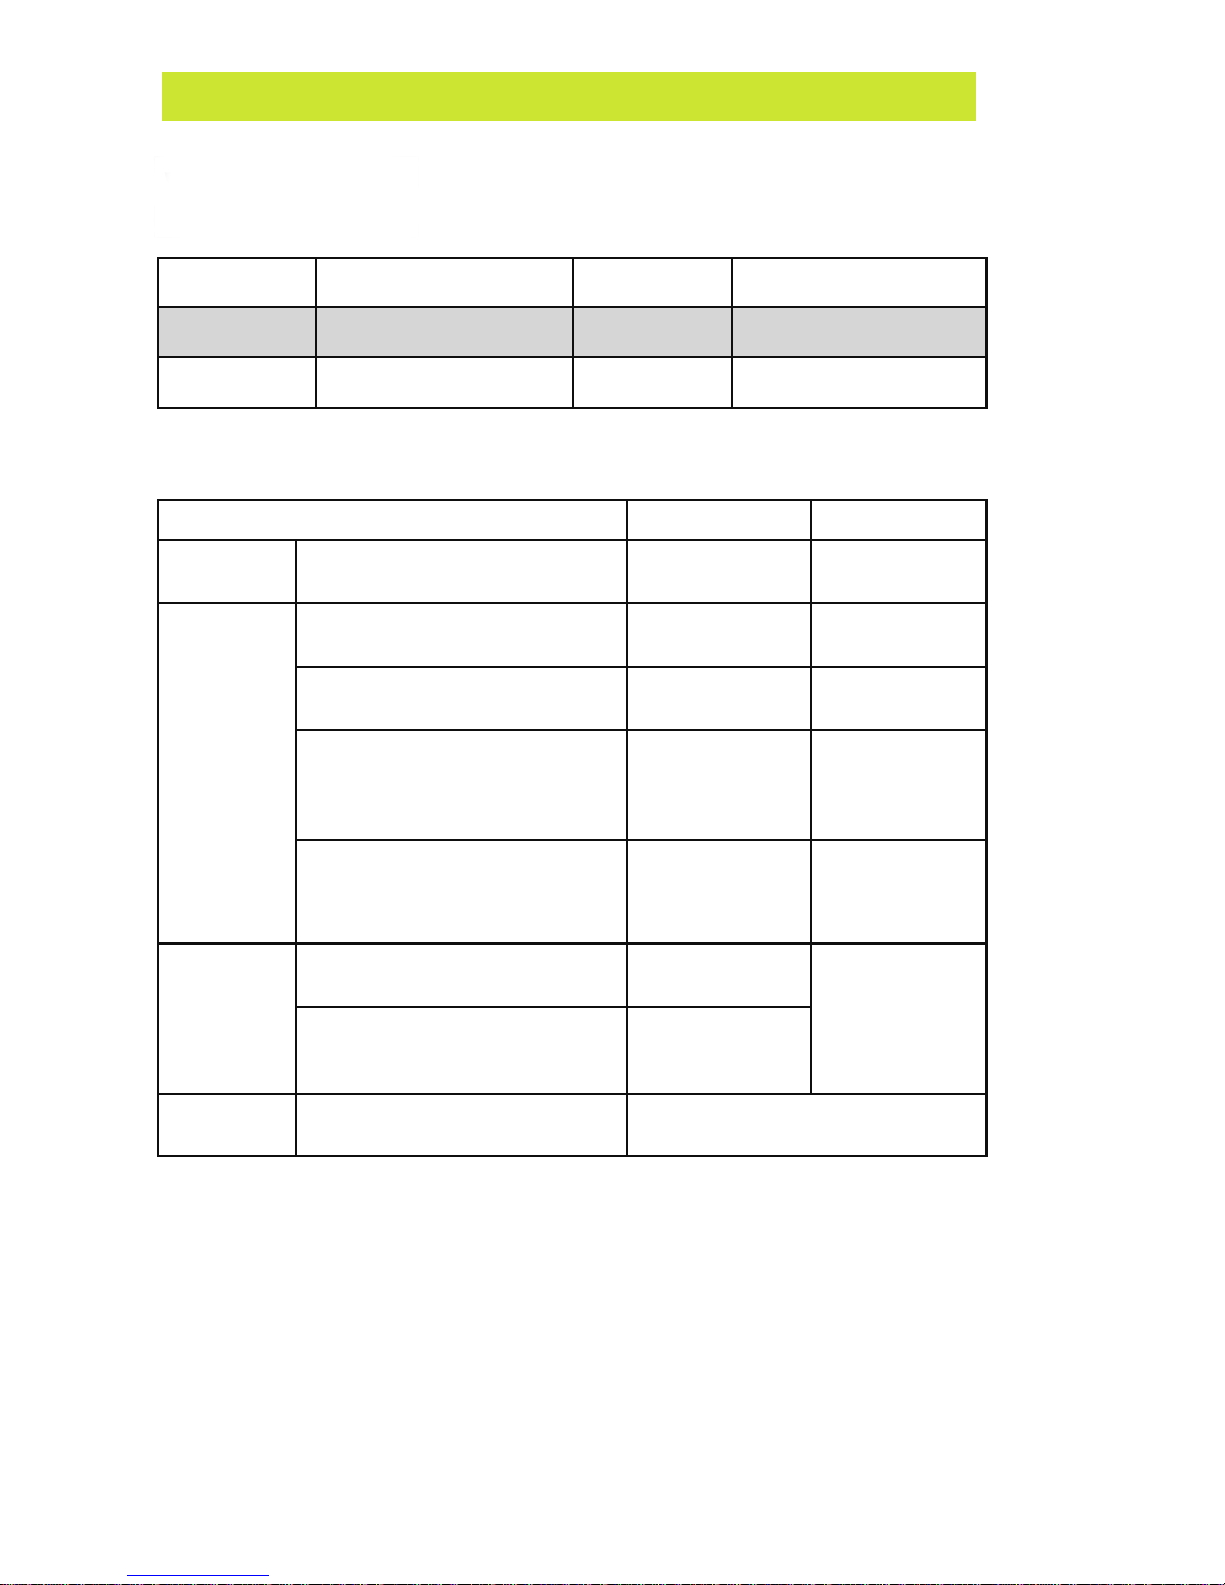
Warranty
Warranty Service
Consumer Service Information Within the warranty period A fte r the wa rranty period
Service requested within a month from the date of
purchase under normal use or operation.
Replace the product o r
refund
Not applicable
Defects in work-
manship or
pe rform a nce du rin g
the wa rra nt y pe rio d,
under the normal
use or operation
For defects Free-of-cha rge se rvi ce
provided
At minimum service
cha rge
For the 2nd de fe ct after the firs t repai r se rvice Replace the product or full
refund
At minimum service
cha rge
For defects unable to fix Replace the product Replace the product after
cha rgi ng the service cos t
accordin g to re fle cting the
depreciation
The replaced product is major defect again within a
month
Full refund
For dama ges due to
se rvi ce able p arts
not on stock during
the manda tory
pe riod
For the defects contributable to normal use and
de teriorated performan ce. .
Replace the product At minimum charge of
se rvi ce
For defects due to misuse or accident. Replace the product after
charging the cost.
Injuries caused by product replacement Medical bills, other normal expenses and compensation
for dama ge
Not applicable
Servi ce cos t c har ging
*Ple ase be sure that you rea d the warranty a nd troubleshooting information before sendi ng the unit
to service. In case you send the unit to service is not out of order, just caused by misconceived defects
as one of following reasons, you wi ll be cha rged the cost of expenses.
1. If the defects are caused by any other means than cleaning, adj usting, instruction or installation.
2. If the defects are caused by consumer misuse.
3. If the defe cts are cause d by sort of disaster or over end l ife of consumi ng components.
Pro du ct Name Model Name
Purchased on
MM DD Y Y Serial N o.
Seller Price
3 2
warranTy
Page 33
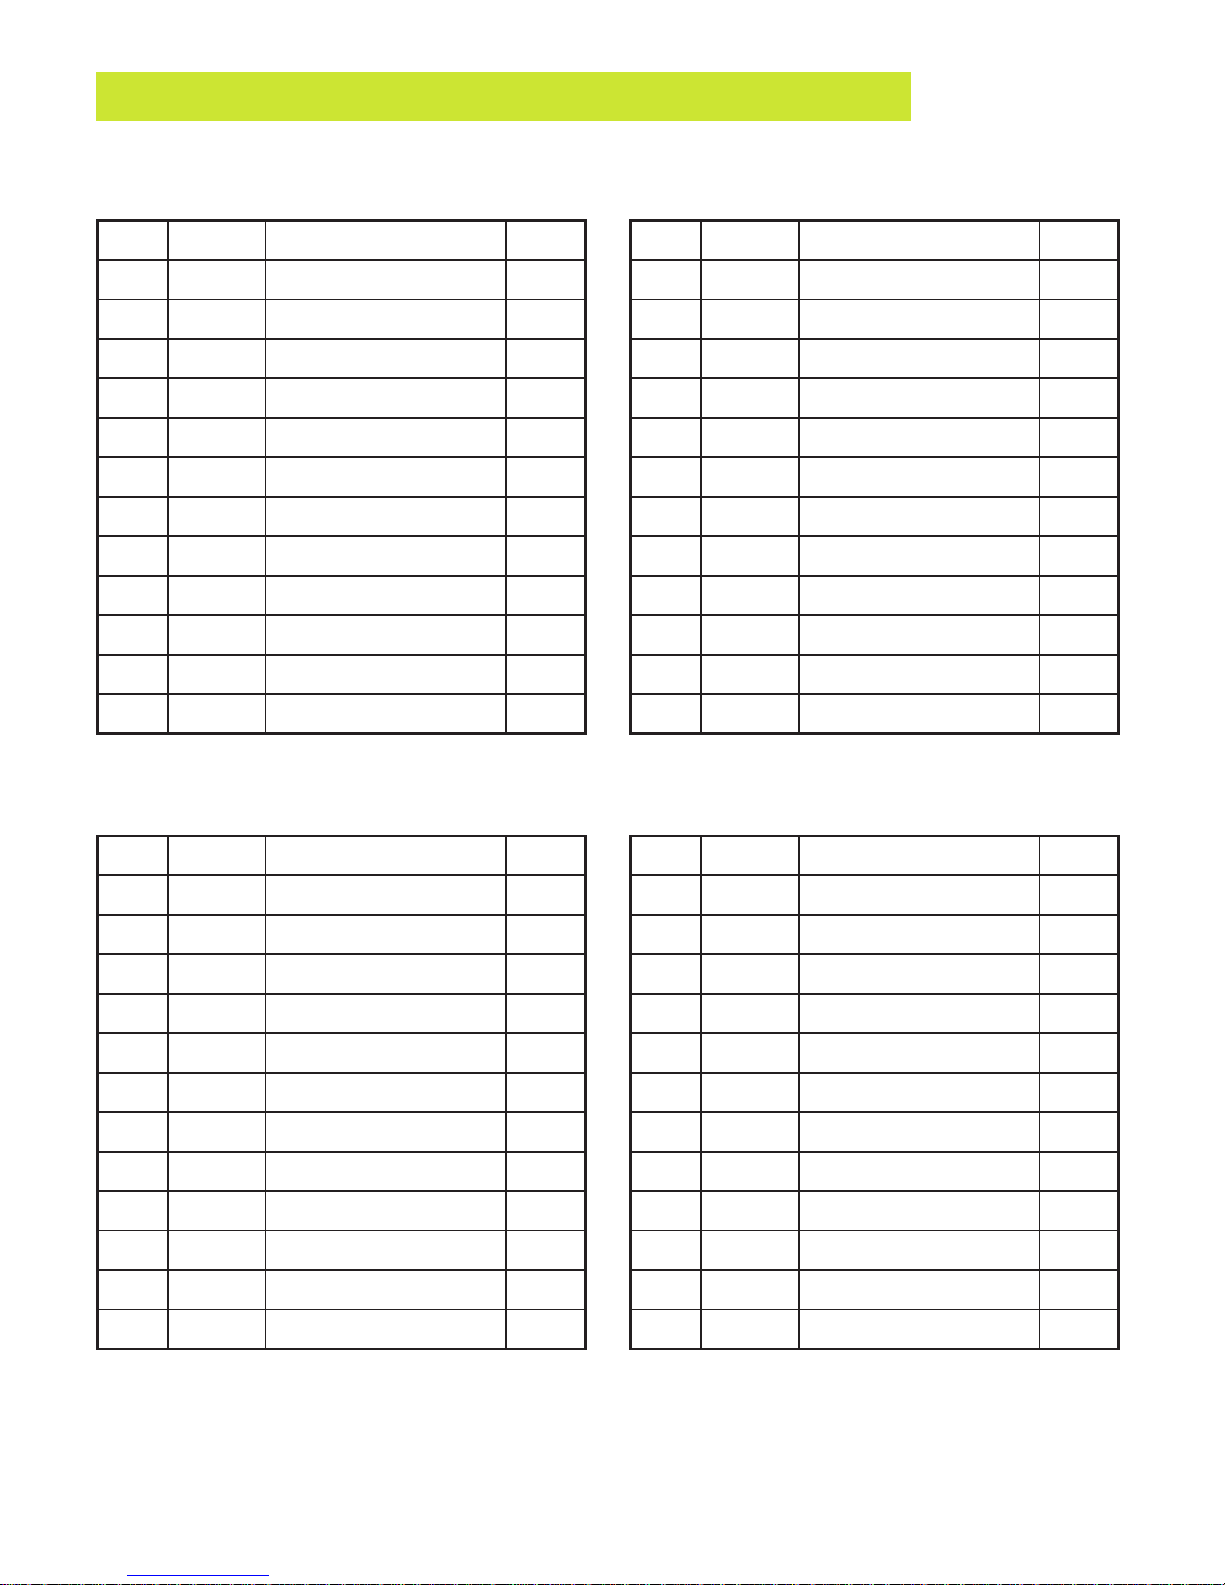
No. Date Treatment Area Step
1
2
3
4
5
6
7
8
9
10
11
12
No. Date Treatment Area Step
1
2
3
4
5
6
7
8
9
10
11
12
No. Date Treatment Area Step
1
2
3
4
5
6
7
8
9
10
11
12
No. Date Treatment Area Step
1
2
3
4
5
6
7
8
9
10
11
12
<Record # _________>
<Record # _________>
<Record # _________>
<Record # _________>
33
TreaTmenT reCord sheeT
Page 34
No. Date Treatment Area Step
1
2
3
4
5
6
7
8
9
10
11
12
No. Date Treatment Area Step
1
2
3
4
5
6
7
8
9
10
11
12
No. Date Treatment Area Step
1
2
3
4
5
6
7
8
9
10
11
12
No. Date Treatment Area Step
1
2
3
4
5
6
7
8
9
10
11
12
<Record # _________>
<Record # _________>
<Record # _________>
<Record # _________>
34
Page 35
No. Date Treatment Area Step
1
2
3
4
5
6
7
8
9
10
11
12
No. Date Treatment Area Step
1
2
3
4
5
6
7
8
9
10
11
12
No. Date Treatment Area Step
1
2
3
4
5
6
7
8
9
10
11
12
No. Date Treatment Area Step
1
2
3
4
5
6
7
8
9
10
11
12
<Record # _________>
<Record # _________>
<Record # _________>
<Record # _________>
35
Page 36
 Loading...