

Page 1
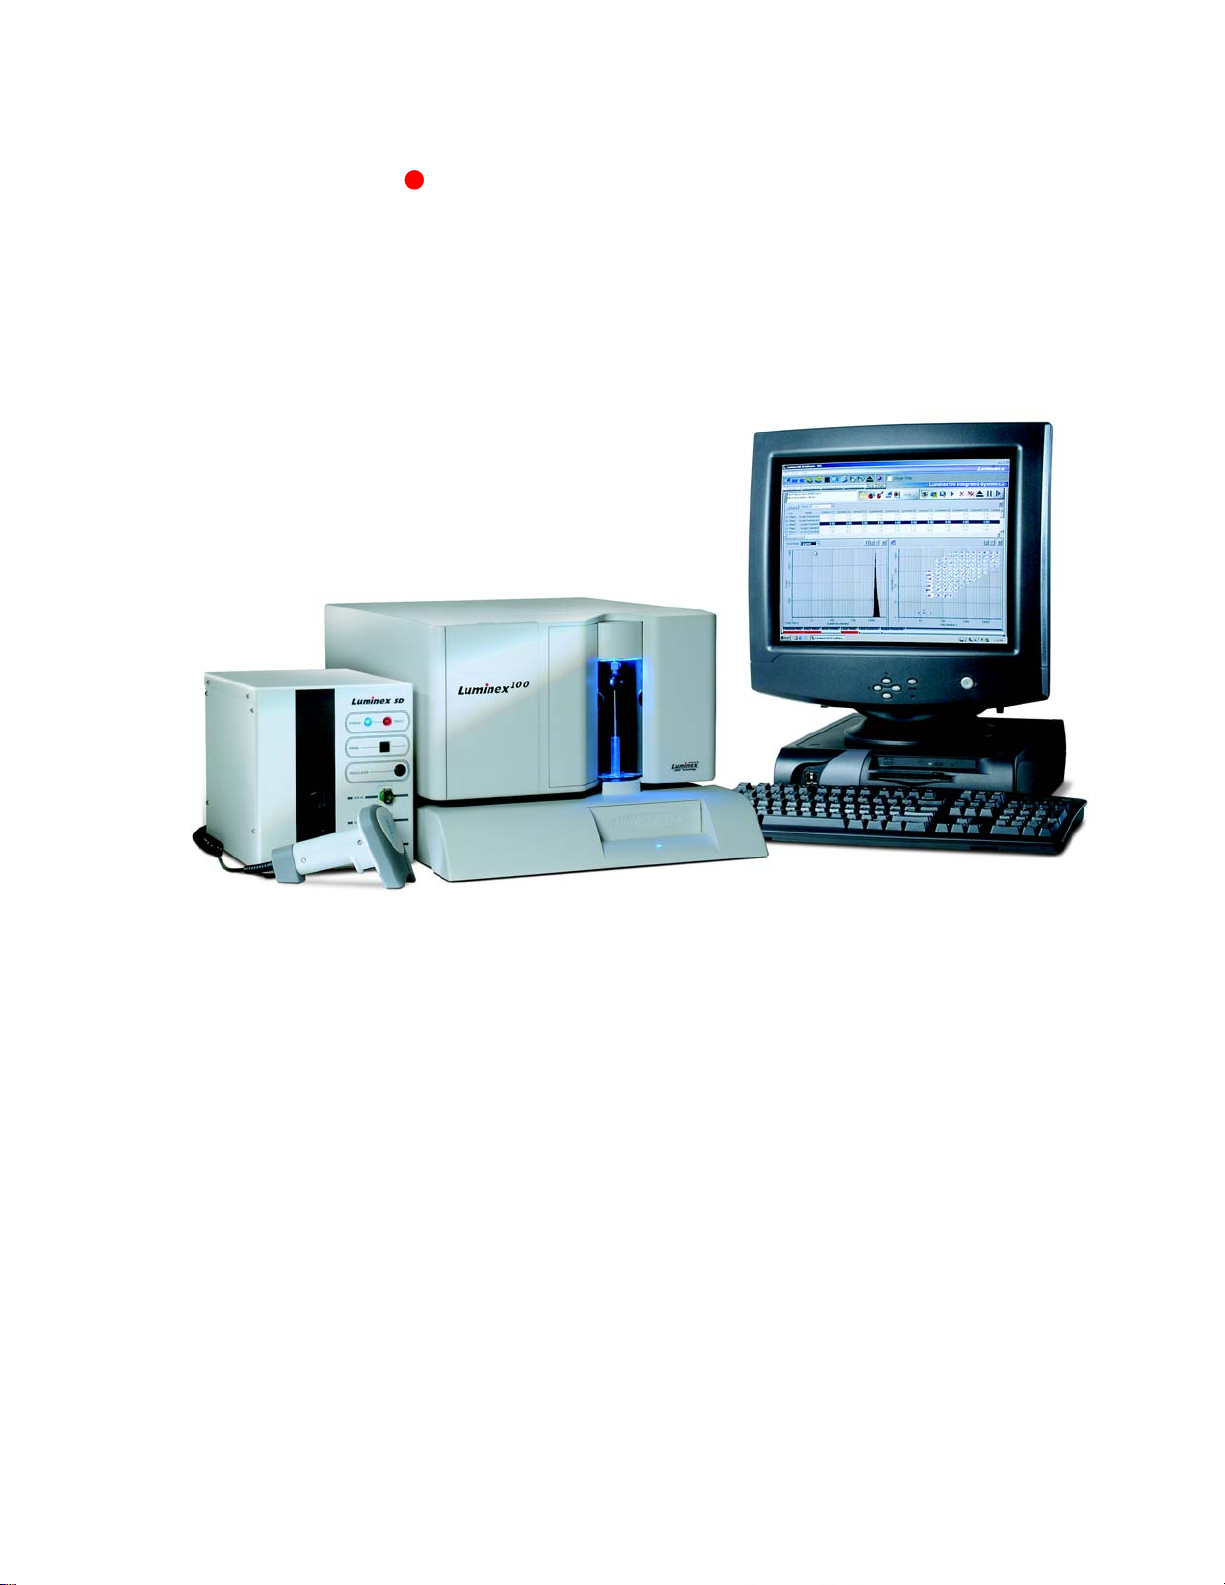
Lum/nex
®
Luminex 100™ IS
Addendum for User Manual Version 2.3
Apéndice para la Versión 2.3 de Manual de Usuario
Nachtrag für die Benutzerhandbuch-Version 2.3
Addenda pour la Version 2.3 de Manuel d'Utilisateur
Supplemento per il manuale dell'utente, Versione 2.3
Adenda da Versão 2.3 de Manual de Usuário
Tillæg til brugervejledning, version 2.3
Παράρτηµα στο Εγχειρίδιο Χρήσης Έκδοση 2.3
Apêndice do Manual de Instruções, Versão 2.3
August, 2005
Page 2

© LUMINEX CORPORATION, 2001-2005. All rights reserved. No part of this publication may be reproduced,
transmitted, transcribed, or translated into any language or computer language, in any form or by any means
without prior express, written consent of Luminex Corporation.
© LUMINEX CORPORATION, 2001-2005. Todos los derechos reservados. Queda prohibida cualquier
reproducción, transmisión, transcripción o traducción a cualquier idioma o lenguaje informático de parte o la
totalidad de esta publicación, en cualquier formato o por cualquier medio sin el consentimiento expreso y por
escrito de Luminex Corporation.
© LUMINEX CORPORATION, 2001-2005. Alle Rechte vorbehalten. Kein Teil dieser Veröffentlichung darf
ohne die ausdrückliche schriftliche Genehmigung der folgenden Stelle nachgedruckt, übermittelt, übertragen
oder in jegliche Sprache oder Computercodierung übersetzt werden: LUMINEX CORPORATION.
© LUMINEX CORPORATION, 2001-2005. Tous droits réservés. Toute reproduction, transmission, transcription ou traduction dans une autre langue ou un autre langage informatique de cette publication, partiellement
ou totalement, sous quelque forme et par quelque moyen que ce soit, est interdite sans l'autorisation
expresse préalable par écrit de Luminex Corporation.
© LUMINEX CORPORATION, 2001-2005. Tutti i diritti riservati. Non è consentita la riproduzione, trasmissione, trascrizione o traduzione in qualsiasi lingua o linguaggio informatico di alcuna parte della presente
pubblicazione, in nessuna forma o con nessun mezzo senza il previo consenso scritto di Luminex Corporation
© LUMINEX CORPORATION, 2001-2005. Todos os direitos reservados. Nenhuma parte desta publicação
poder ser reproduzida, transmitida, transcrita ou traduzida para qualquer idioma ou linguagem informática,
sob qualquer forma ou por quaisquer meios sem a autorização prévia por escrito por parte da Luminex
Corporation.
© LUMINEX CORPORATION, 2001-2005. Alle rettigheder forbeholdes. Ingen del af denne publikation må i
nogen form eller på nogen måde reproduceres, transmitteres, omskrives eller oversættes til andre sprog eller
computersprog uden tidligere, udtrykkelig, skriftlig tilladelse fra Luminex Corporation.
© LUMINEX CORPORATION, 2001-2005. Με την επιφύλαξη κάθε δικαιώµατος. Κανένα µέρος της
παρούσας έκδοσης δεν µπορεί να αναπαραχθεί, να µεταβιβαστεί, να µεταγραφεί ή να µεταφραστεί σε
οποιαδήποτε
προηγούµενη σαφή, γραπτή συγκατάθεση της εταιρείας Luminex Corporation.
© LUMINEX CORPORATION, 2001-2005. Todos os direitos reservados. Nenhuma parte desta publicação
poder ser reproduzida, transmitida, transcrita ou traduzida para qualquer idioma ou linguagem de computador, sob qualquer forma ou por quaisquer meios sem a autorização prévia por escrito por parte of Luminex
Corporation.
γλώσσα ή γλώσσα προγραµµατισµού, σε οποιαδήποτε µορφή ή οποιοδήποτε µέσο, χωρίς
LUMINEX CORPORATION
12212 Technology Boulevard
Austin, Texas 78727-6115
U.S.A
.
Voice: (512) 219-8020
Fax: (512) 219-5195
Luminex® 100™ IS Addendum for User Manual Version 2.3
PN 89-00002-00-140 Rev. A
August 2005
Page 3
Addendum to User Manual Version 2.3
This Addendum to the Luminex® 100TM IS User Manual Version 2.3
contains information that became available after the release of the
manual. Some of the topics presented in this addendum were not
published in the previous release; some topics replace information
that exists in the previous manual. Please read through this
addendum to familiarize yourself with the new conten t.
This addendum contains the following topics:
• Equipment Disposal
• Safety and Regulatory Symbols
• Calibrators and Controls
• Storing the Analyzer
• Sample Volume/Sample Dilution
• Cleaning the Analyzer
• Waste Container/Waste Line
• Sheath Delivery System Setup
• Replacing the Sheath Delivery System with Sheath Bottles
• Probe Height Adjustment
• Sheath Fluid
Equipment Disposal The Waste Electrical and Electronic Equipment Directive 2002/96/
EC requires that you properly dispose of electrical and electronic
equipment when it reaches its end of life.
NOTE: This directive applies to customers in the European Union
(EU) only. Users outside of the EU may disregard this section.
TM
If you are disposing of a Luminex 100 Analyzer, SD
TM
Instrument, you must decontaminate the system. Refer to the
XYP
"Decontaminating the Luminex 100 Analyzer for Return Shipment"
section in the Safety chapter of the Luminex 100 IS User Manual
Version 2.3. Next, call Luminex Technical Support for a Recycled
Returned Materials Authorization (RMA) number at +1 512-3814397 between the hours of 7:00 a.m. to 7:00 p.m. Central Time,
Monday through Friday. You will then return the equipment to:
North America:
Luminex Corporation
12201 Technology Blvd., Suite 130
Austin, TX 78727
For information on disposing of the barcode scanner, PC, or monitor,
refer to manufacturer documentation.
System, or
PN 89-00002-00-140 Rev. A 1
Page 4

Addendum to User Manual Version 2.3 xMAP Technology
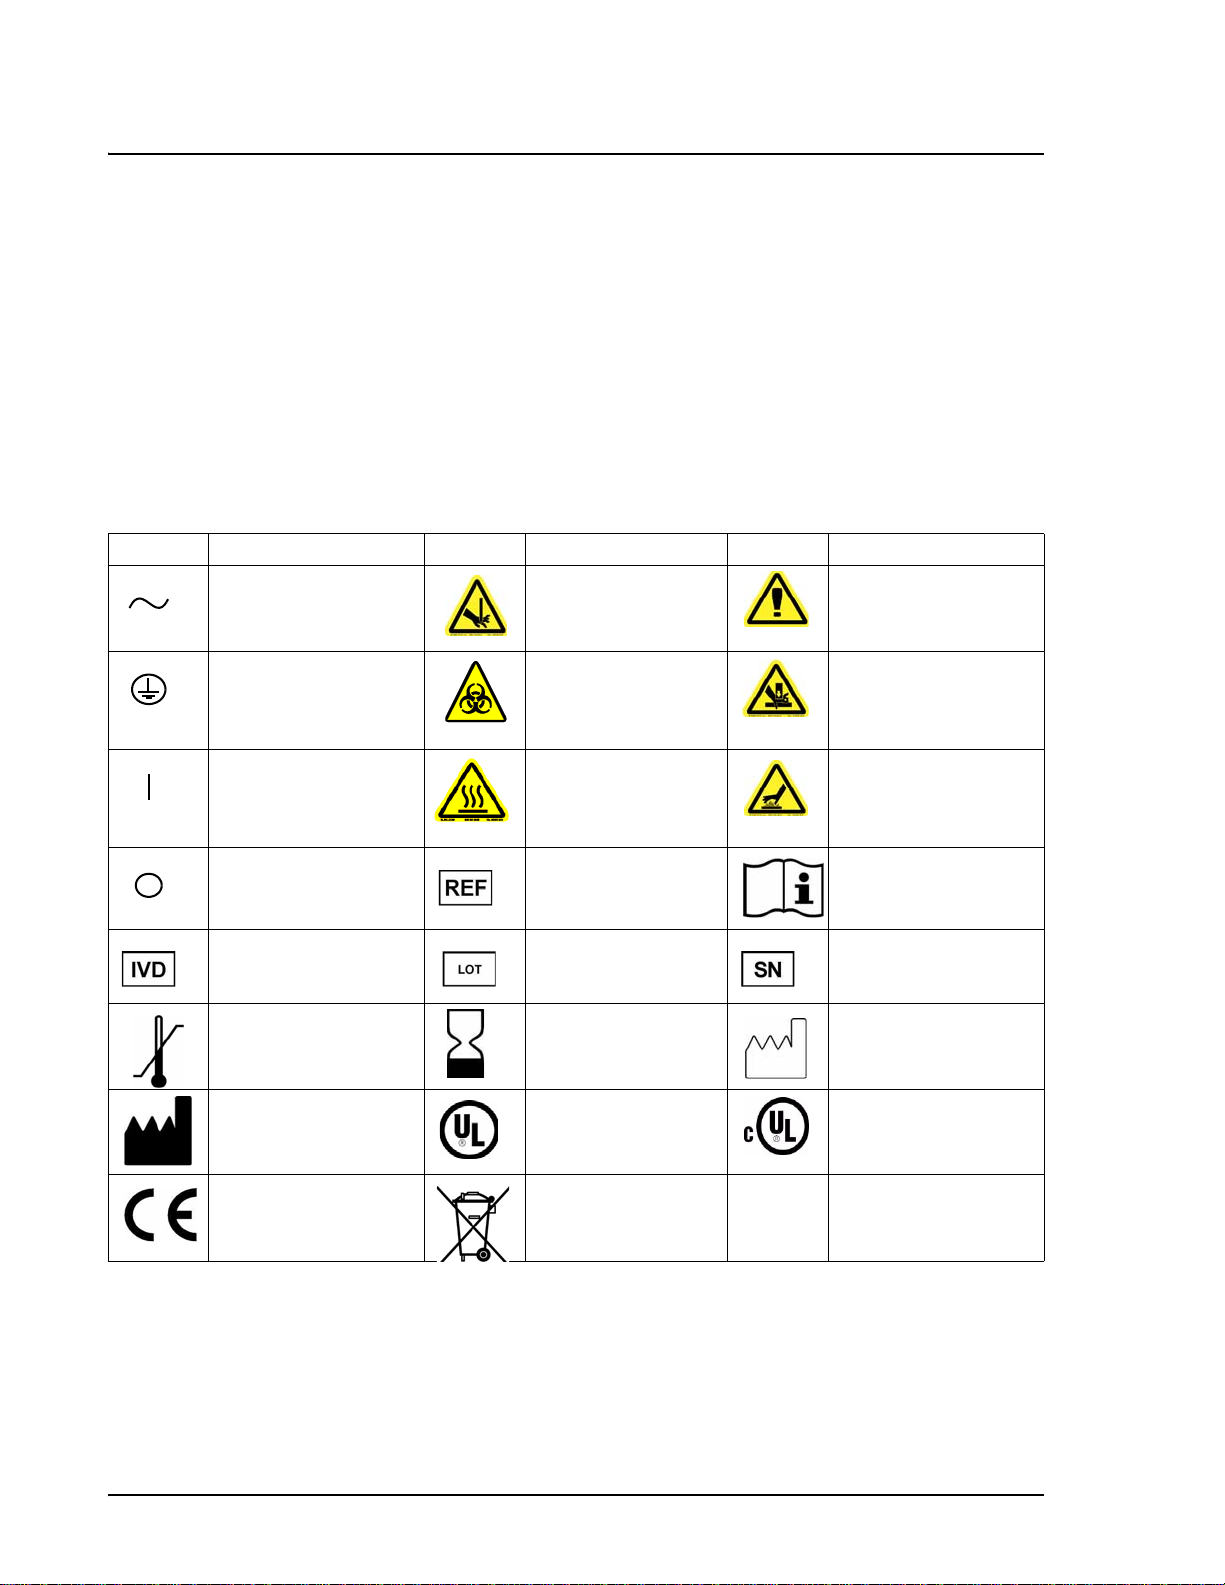
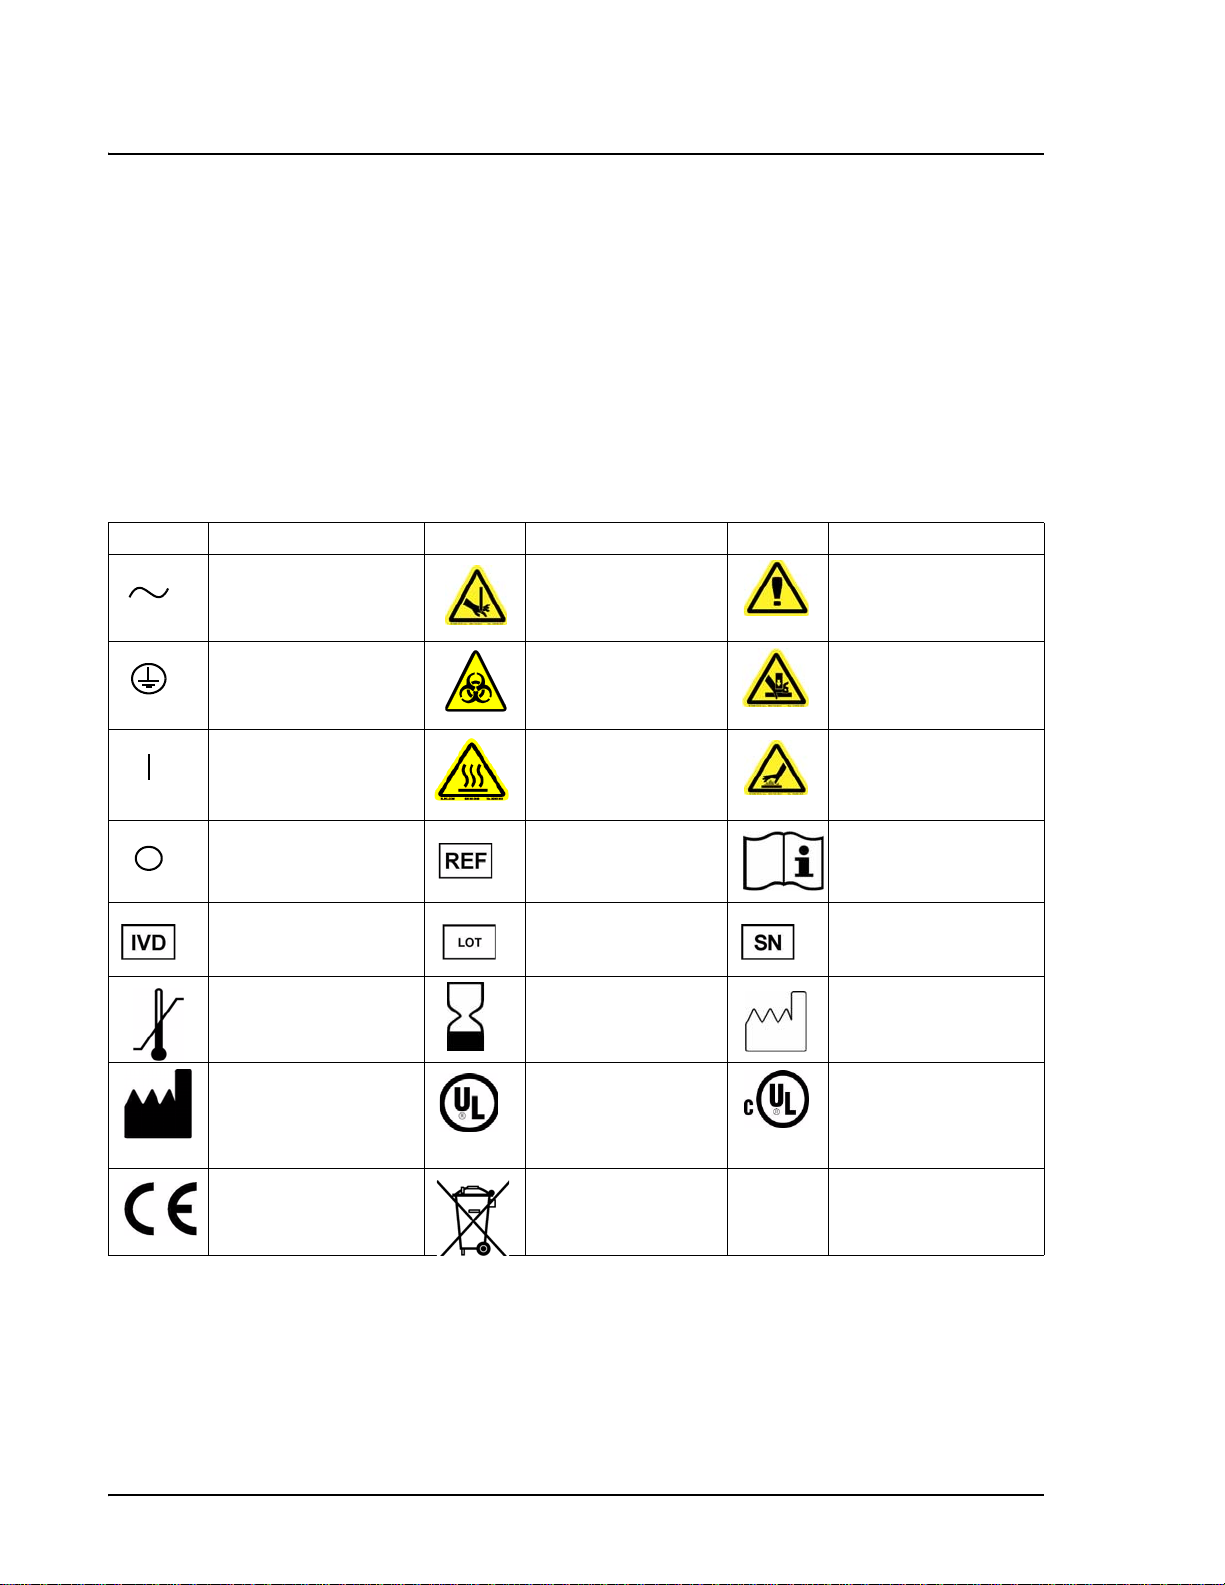
Safety and
Regulatory Symbols
New safety and regulatory symbols have been added to the Luminex
100 system and manuals. Please become familiar with these symbols.
These symbols describe warnings, cautions, and general information
used in the operation of this instrument.
Symbol Description Symbol Description Symbol Description
Alternating current
(ac)
Protective ground
On
Off
In vitro Diagnostic
Medical Device
Warning
(refer to manual)
Warning
(refer to manual)
Warning
(refer to manual)
Catalog Number Consult instructions
Batch Code Serial Number
Warning
(refer to manual)
Warning
(refer to manual)
Warning (refer to
manual)
for use
Temperature
Limitation
Manufacturer
European Union
Conformity
Calibrators and
Controls
Expiration Date Date of Manufacture
Underwriter’s
Laboratory
US
WEEE - Do not
throw in trash
Canadian
Underwriter’s
Laboratory
Vortex the xMAP calibrators and controls containers to ensure
homogeneity. Do not dilute xMAP calibrator and control reagents.
Note that position of the vial may affect drop size. Be sure to invert
the vial such that it is perpendicular to the plate surface. When
calibrating the analyzer, load a microtiter plate with at least five
drops of each: CAL1 in well A1, CAL2 in well B1, CON1 in well
C1, CON2 in well D1 and distilled water in well E1 through H1 to
Wash a total of four times. You can use different wells as necessary.
To select different well locations in the software, click on the dropdown arrow next to the entry cell for the calibrator or control, then
click in the well location on the microtiter plate image.
2 PN 89-00002-00-140 Rev. A
Page 5

xMAP Technology Addendum to User Manual Version 2.3
Storing the Analyzer To prepare the system for storage:
1. Run a Sanitize command with 10% to 20% household bleach
solution.
2. Run a Sanitize command with distilled water.
3. Run four Wash commands with distilled water.
4. Remove the sample probe from the instrument, flush with
distilled water from the narrow end out through the larger end,
replace it in the sample arm and wrap the end with Parafilm.
To prepare the system for first use after it has been in storage:
1. Turn on the Luminex 100 and XY Platform and watch for the
following indications that the instruments are responding
correctly:
• The light above the sample probe on the Luminex 100 and the
light next to the door of the XY platform are lit.
• The compressor starts in the Luminex 100. It is a low
rumbling sound.
• Place your hand behind the Luminex 100 to feel air coming
out of the rear fan. Place your hand on the left side of the XY
to feel air coming out of the XY.
• Observe movement of the syringe inside the front middle door
of the Luminex 100 shortly after the instrument is powered on.
Sample Volume/
Sample Dilution
2. Turn on the PC and start up the IS software.
3. Complete a Warmup command, which will take 30 minutes.
4. Remove the Parafilm from the end of the sample probe.
5. After Warmup is complete, run three Backflush commands, three
Drain commands, two Alcohol Flush commands, and three Wash
commands with distilled water. Make sure that the sheath bottle
or Luminex SD has a sufficient amount of sheath fluid and that
the waste container is empty. Verify that the pressure during each
of the maintenance commands reads between 6 and 9 psi in the
System Monitor.
For optimal sampling efficiency and to reduce matrix effects,
concentrated biological fluids such as serum or plasma should be
diluted at least 1:5.
To minimize the chance of acquiring air, be sure that the sample
acquisition volume is at least 25 µL less than the total volume in the
well.
PN 89-00002-00-140 Rev. A 3
Page 6

Addendum to User Manual Version 2.3 xMAP Technology
Cleaning the
Analyzer
Perform the following steps during Startup:
1. Warmup
2. Prime
3. Alcohol Flush with 70% isopropanol or 70% ethanol
4. Wash twice with distilled water
Perform the following steps during Shutdown
1. Sanitize with 10% to 20% household bleach solution.
2. Wash twice with distilled water.
3. Soak with distilled water.
Perform the Preventative Maintenance/Clog Troubleshooting
Procedure weekly, or more often if sample acquisition problems
arise, and whenever a clog is suspected.
1. Remove the sample probe and sonicate the narrow end for 2- 3
minutes.
2. Run three Backflush commands.
Waste Container
and Waste Line
3. Run three Drain commands.
4. Run two Alcohol Flush commands.
5. Run three Washes with distilled water.
Be careful not to touch the seal in the waste bottle cap or allow it to
become wet or dirty. This could cause the bottle to become
pressurized, causing pressure errors in the system. If the seal gets
wet, let it air-dry. Touching the seal can contaminate it. If it gets
dirty, you should replace the waste bottle cap.
To maintain a stable flow rate, do not move the waste container or
waste line during system operation.
If you are using the waste line, do not move it while the system is
running. While you can move the line along a horizontal surface, do
not permanently reroute the waste line elevation without first
contacting Technical Support. You can move the line temporarily for
cleaning and maintenance purposes.
4 PN 89-00002-00-140 Rev. A
Page 7

xMAP Technology Addendum to User Manual Version 2.3
Sheath Delivery
System Setup
Replacing the
Sheath Delivery
System with Sheath
Bottles
When adjusting the Luminex 100 regulator, turn it clockwise as far
as it will go to the fully closed position, then turn it back 1/2 of a
turn. Be careful not to force the regulator past the fully closed
position.
You may need to replace the Sheath Delivery (SD) system with
sheath bottles for maintenance or troubleshooting, as directed by
Luminex Technical Support.
To replace the SD system with sheath bottles:
1. Power off and disconnect the SD system from the Luminex 100.
2. Turn the black regulator screw inside the center door of the
Luminex 100 one full turn counter-clockwise.
3. Attach the sheath and waste bottle containers. Make sure there is
sheath fluid in the bottle (to the fill line) and the sheath cap is
tightened.
4. Prime the system.
5. As the system is priming, adjust the black regulator screw inside
the center door of the Luminex 100. Turn clockwise to increase
or counterclockwise to decrease, until the sheath pressure value
is within +/- 0.1 psi of the normal level of your instrument.
Please visually monitor the pressure gauge on the Run Batch
tab. Make sure pressure is centered within green tolerance
range.
6. When the prime function is complete, loosen the sheath bottle
cap to release pressure.
7. Tighten sheath cap and prime the system once again.
8. Make sure that the sheath and air pressure values increase to the
normal level once again.
Probe Height
Adjustment
PN 89-00002-00-140 Rev. A 5
This information supplements the information in the IS 2.3 User
Manual.
Be sure the plate you are using is completely flat – warped plates can
lead to incorrect probe height adjustment.
In a 96-well microtiter plate where overall height is no more than
0.75 inches (19 mm), place the appropriate alignment tool in the
plate:
Page 8

Addendum to User Manual Version 2.3 xMAP Technology
• For a standard plate with flat-bottomed wells – stack two of the
larger (5.08 mm diameter) alignment discs together and place
them into the selected well.
• For a filter-bottom plate – stack three of the larger (5.08 mm
diameter) alignment discs together and place them into the
selected well.
• For a half-volume plate with flat-bottomed wells – stack two of
the smaller (3.35 mm diameter) alignment discs together and
place them into the selected well.
• For a round-bottom (U-bottom) plate – stack two of the smaller
(3.35 mm diameter) alignment discs together and place them into
the selected well.
• For a plate with conical wells – place one alignment sphere into
the selected well.
Sheath Fluid USE OF NON-LUMINEX APPROVED SHEATH FLUID
SHALL CONSTITUTE “IMPROPER USE” AND MAY VOID
WARRANTY RIGHTS PROVIDED BY LUMINEX AND/OR
ITS AUTHORIZED PARTNER.
6 PN 89-00002-00-140 Rev. A
Page 9

Apéndice para la versión 2.3 del Manual de Usuario
Este apéndice al Manual de Usuario Luminex® 100TM IS, versión 2.3
contiene información disponible después de la publicación del
manual. Algunos de los temas que se incluyen en este apéndice no se
publicaron en la versión anterior, otros sustituyen a la información
existente en el manual anterior. Lea detenidamente este apéndice
para familiarizarse con los nuevos contenidos.
Este apéndice se compone de los temas siguientes:
• Eliminación del equipo
• Símbolos de seguridad y normativos
• Calibradores y controles
• Almacenamiento del analizador
• Volumen de la muestra/Dilución de la muestra
• Limpieza del analizador
• Contenedor de desechos/Línea de desechos
• Configuración del sistema de entrega de funda
• Sustitución del sistema de entrega de funda por botellas de funda
• Ajuste de la altura de la sonda
• Fluido de funda
Eliminación del
equipo
La directiva de eliminación de equipos electrónicos y eléctricos
2002/96/EC requiere que se deshaga de los equipos eléctricos y
electrónicos de la forma adecuada cuando dejen de funcionar.
NOTA: Esta directiva se aplica únicamente a los usuarios de la
Unión Europea (UE). Los usuarios que residan fuera de la UE
pueden pasar por alto esta sección.
TM
Si se deshace de un sistema analizador Luminex 100, SD
instrumento XYP
sección "Descontaminación del analizador Luminex 100 para envío
de devolución" en el capítulo relativo a la seguridad del Manual de
Usuario Luminex 100 IS, versión 2.3. A continuación, llame al
Soporte Técnico de Luminex para solicitar un número de
autorización para devolución del material (RMA) al +1 512-3814397 de 7 de la mañana a 7 de la tarde de la zona horaria central
estadounidense, de lunes a viernes. A continuación, podrá devolver
el equipo a la dirección siguiente:
Norteamérica:
Luminex Corporation
12201 Technology Blvd., Suite 130
Austin, TX 78727
TM
, debe descontaminar el sistema. Consulte la
o un
Número de pieza 89-00002-00-140 Rev. A 7
Page 10
Apéndice para la versión 2.3 del Manual de Usuario xTecnología MAP
Para obtener información sobre cómo deshacerse del escáner de
código de barras, el ordenador o el monitor, consulte la
documentación del fabricante.
Símbolos de
seguridad y
normativos
Se han añadido nuevos símbolos de seguridad y normativos al
sistema Luminex 100 y a los manuales. Es importante que se
familiarice con estos símbolos.
Estos símbolos describen advertencias, precauciones e información
general utilizada en el manejo de este instrumento.
Símbolo Descripción Símbolo Descripción Símbolo Descripción
Advertencia
(consulte el manual)
Advertencia
(consulte el manual)
Advertencia
(consulte el manual)
Consulte las
instrucciones de uso
Corriente alterna
(CA)
Toma de tierra para
protección
Encendido
Apagado
Advertencia
(consulte el
manual)
Advertencia
(consulte el
manual)
Advertencia
(consulte el
manual)
Número de
catálogo
Dispositivo médico
de diagnóstico invitro
Limitación de
temperatura
Fabricante
Conformidad de la
Unión Europea
Calibradores y
controles
Mezcle en el vórtice los calibradores xMAP y los contenedores de
controles para asegurar su homogeneidad. No diluya el calibrador
xMAP ni los reactivos de control. Tenga en cuenta que la posición
Código del lote Número de serie
Fecha de
expiración
Underwriter’s
Laboratory
EE.
WEEE – No tirar a
la basura
Fecha de fabricación
Canadian
Underwriter’s
Laboratory
de la ampolla puede afectar al tamaño de las gotas. Asegúrese de
invertir la ampolla de modo que esté perpendicular con respecto a la
8 Número de pieza 89-00002-00-140 Rev. A
Page 11

xTecnología MAP Apéndice para la versión 2.3 del Manual de Usuario
superficie de la bandeja. Cuando calibre el analizador, cargue una
placa de microvaloración con cinco gotas de cada una como mínimo:
CAL1 en el pozo A1, CAL2 en el pozo B2, CON1 en el pozo C1,
CON2 en el pozo D1 y agua destilada en los pozos de E1 a H1 para
lavar un total de cuatro veces. Puede utilizar pozos diferentes si es
necesario. Para seleccionar ubicaciones de pozo diferentes en el
software, haga clic sobre la flecha desplegable hacia abajo junto a la
celda de entrada del calibrador o control y, a continuación, pulse en
la ubicación del pozo sobre la imagen de la placa de
microvaloración.
Almacenamiento del
analizador
Para preparar el sistema para su almacenamiento:
1. Desinféctelo con una solución de lejía común del 10% al 20 %.
2. Desinféctelo con agua destilada.
3. Ejecute cuatro lavados con agua destilada.
4. Retire la sonda de muestreo del instrumento, limpie con agua
destilada desde el extremo estrecho hasta el extremo más ancho,
vuelva a colocarla en el brazo de muestreo y envuelva el extremo
con Parafilm.
Para preparar el sistema para su primera utilización después de
que haya estado almacenado durante un tiempo:
1. Encienda Luminex 100 y la plataforma XY y observe las
indicaciones siguientes para asegurarse de que los instrumentos
funcionan correctamente:
• La luz que se encuentra sobre la sonda de muestreo en
Luminex 100 y la luz que se encuentra al lado de la puerta de
la plataforma XY están encendidas.
• El compresor de Luminex 100 se pone en marcha y emite un
sonido de vibración de baja frecuencia.
• Coloque la mano detrás de Luminex 100 para comprobar que
sale aire procedente del ventilador trasero. Ponga la mano en
el lado izquierdo de XY para comprobar que sale aire de XY.
• Observe el movimiento de la jeringa dentro de la puerta
central delantera de Luminex 100 poco después de que se haya
encendido el instrumento.
2. Encienda el ordenador e inicie el software IS.
3. Complete la instrucción Warmup (Calentamiento), que durará 30
minutos.
4. Retire el Parafilm del extremo de la sonda de muestreo.
Número de pieza 89-00002-00-140 Rev. A 9
Page 12

Apéndice para la versión 2.3 del Manual de Usuario xTecnología MAP
5. Una vez que se ha completado el calentamiento, ejecute tres
instrucciones de Backflush (reflujo), tres instrucciones Drain
(drenaje), dos instrucciones Alcohol Flush (evacuación de
alcohol) y tres instrucciones Wash (lavado) con agua destilada.
Asegúrese de que la botella de funda o el sistema Luminex SD
tienen la cantidad suficiente de fluido de funda y que el
contenedor de desechos está vacío. Compruebe que la lectura de
la presión durante cada una de las instrucciones de
mantenimiento es de entre 6 y 9 psi en el supervisor del sistema.
Volumen de la
muestra/Dilución de
la muestra
Limpieza del
analizador
Para obtener una eficiencia de muestreo óptima y reducir los efectos
de matriz, los fluidos biológicos concentrados, como suero o plasma,
se deben diluir por lo menos 1:5.
Para minimizar las posibilidades de adquirir aire, asegúrese de que el
volumen de adquisición de muestras es por lo menos 25 µL menos
que el volumen total en el pozo.
Realice los pasos siguientes durante la puesta en marcha:
1. Warmup (calentar)
2. Prime (cebar)
3. Limpieza con alcohol isopropanol 70% o alcohol 70%
4. Lavar dos veces con agua destilada
Realice los pasos siguientes durante el apagado:
1. Desinfectar con una solución de lejía doméstica del 10% al 20%
2. Lavar dos veces con agua destilada.
3. Empapar con agua destilada.
Realice el procedimiento de mantenimiento preventivo/
resolución de problemas debidos a obstrucciones una vez por semana
o con una frecuencia mayor si se presentan problemas con la
adquisición de muestras y siempre que sospeche que se ha producido
una obstrucción.
1. Retire la sonda de muestreo y sumerja el extremo estrecho
durante 2-3 minutos.
2. Ejecute tres instrucciones Backflush (reflujo).
3. Ejecute tres instrucciones Drain (drenar).
4. Ejecute dos instrucciones Alcohol Flush (evacuación de alcohol).
10 Número de pieza 89-00002-00-140 Rev. A
Page 13

xTecnología MAP Apéndice para la versión 2.3 del Manual de Usuario
5. Ejecute tres lavados con agua destilada.
Contenedor de
desechos y línea de
desechos
Configuración del
sistema de entrega
de funda
Tenga cuidado de no tocar el sello de la tapa de la botella de
desechos y no deje que se moje o ensucie. Esto podría provocar la
presurización de la botella y ocasionar errores de presión en el
sistema. Si el sello se moja, déjelo secar al aire libre. Si toca el sello
puede contaminarlo. Si el sello se ensucia, debe sustituir la tapa de la
botella de desechos.
Para mantener una velocidad de flujo estable, no mueva el
contenedor de desechos o la línea de desechos durante el
funcionamiento del sistema.
Si está utilizando la línea de desecho, no la mueva mientras el
sistema se está ejecutando. Aunque puede mover la línea por una
superficie horizontal, no redireccione permanentemente la elevación
de la línea de desechos sin ponerse en contacto en primer lugar con
el Soporte Técnico. Puede mover la línea temporalmente con fines de
mantenimiento y limpieza.
Cuando ajuste el regulador Luminex 100, gírelo en el sentido de las
agujas del reloj hasta el tope de modo que quede en la posición
completamente cerrada, a continuación gírelo 1/2 vuelta hacia atrás.
Tenga cuidado de no forzar el regulador más allá de la posición
completamente cerrada.
Sustitución del
sistema de entrega
de funda por
botellas de funda
Número de pieza 89-00002-00-140 Rev. A 11
Es posible que necesite sustituir el sistema de entrega de funda (SD)
por botellas de funda con fines de mantenimiento o resolución de
problemas, siguiendo las indicaciones del Soporte Técnico de
Luminex.
Para sustituir el sistema SD por botellas de funda:
1. Apague y desconecte el sistema SD de Luminex 100.
2. Gire el tornillo del regulador negro dentro de la puerta central del
Luminex 100 una vuelta completa en el sentido contrario a las
agujas del reloj.
3. Conecte los contenedores de botella de desechos y de funda.
Compruebe que hay fluido de funda en la botella (hasta la línea
de llenado) y que el tapón de la funda está apretado.
4. Cebe el sistema.
5. Mientras se ceba el sistema, ajuste el tornillo del regulador negro
dentro de la puerta central del Luminex 100. Gire en el sentido
Page 14

Apéndice para la versión 2.3 del Manual de Usuario xTecnología MAP
de las agujas del reloj para aumentar la presión o en el sentido
contrario a las agujas del reloj para disminuirla, hasta que el
valor de presión de la funda esté dentro de +/- 0,1 psi del nivel
normal de su instrumento.
Supervise visualmente el medidor de presión de la ficha Run
Batch (ejecutar lote). Asegúrese de que la presión está
centrada dentro del rango de tolerancia verde.
6. Cuando se haya completado la función de cebado, afloje el tapón
de la botella de funda para liberar presión.
7. Apriete el tapón de la funda y cebe el sistema de nuevo.
8. Asegúrese de que los valores de presión de funda y del aire
aumentan hasta alcanzar el nivel normal de nuevo.
Ajuste de la altura
de la sonda
Esta información complementa la información que se incluye en el
Manual de Usuario IS 2.3.
Asegúrese de que la placa que utiliza es completamente plana, las
placas que están curvadas pueden causar un ajuste de la altura de la
sonda incorrecto.
En una placa de microvaloración de 96 pozos, donde la altura total
no supere los 19 mm, coloque la herramienta de alineación
apropiada:
• Para una placa estándar con pozos de fondo plano, junte dos de
los discos de alineación más grandes (5,08 mm de diámetro) y
colóquelos en el pozo seleccionado.
• Para una placa de fondo de filtro, junte tres de los discos de
alineación más grandes (5,08 mm de diámetro) y colóquelos en
el pozo seleccionado.
• Para una placa de mitad de volumen con pozos de fondo plano,
junte dos de los discos de alineación menores (3,35 mm de
diámetro) y colóquelos en el pozo seleccionado.
• Para una placa con pozos de fondo redondo (fondo en forma de
U), junte dos de los discos de alineación menores (3,35 mm de
diámetro) y colóquelos en el pozo seleccionado.
• Para una placa con pozos cónicos, coloque una esfera de
alineación en el pozo seleccionado.
Fluido de funda EL USO DE FLUIDO DE FUNDA NO APROBADO POR
LUMINEX SE CONSIDERARÁ UN USO INADECUADO Y
PUEDE INVALIDAR LA GARANTÍA DE LUMINEX Y/O SUS
SOCIOS AUTORIZADOS.
12 Número de pieza 89-00002-00-140 Rev. A
Page 15
Nachtrag für das Bedienungshandbuch, Version 2.3
Dieser Nachtrag für das Luminex® 100TM IS-Bedienungshandbuch
(Version 2.3) enthält Informationen, die nach Veröffentlichung des
Handbuchs bekannt wurden. Manche in diesem Nachtrag aufgeführten
Themen sind nicht in der letzten Version enthalten und manche Themen
ersetzen Informationen aus der letzten Version. Bitte lesen Sie diesen
Nachtrag und machen Sie sich mit dem neuen Inhalt vertraut.
Dieser Nachtrag umfasst die folgenden Themen:
• Entsorgung der Geräte
• Sicherheitssymbole
• Kalibratoren und Kontrollen
• Lagerung des Analysegeräts
• Probenvolumen/Probenverdünnung
• Reinigung des Analysegeräts
• Abfallbehälter/-leitung
• Einrichtung des Luminex-Zuführungssystems für die
Hüllenflüssigkeit
• Ersetzen des Zuführungssystems für die Hüllenflüssigkeit durch
Flaschen
• Einstellung der Sondenhöhe
• Hüllenflüssigkeit
Entsorgung der Geräte Die WEEE-Richtlinie 2002/96/EWG erfordert die ordnungsgemäße
Entsorgung von Elektroschrott am Ende der Einsatzzeit.
HINWEIS: Diese Richtlinie gilt nur für Kunden in der Europäischen
Union (EU). Benutzer außerhalb der EU können diesen Abschnitt
überspringen.
TM
Bei der Entsorgung des Luminex 100-Analysegeräts, SD
oder des XYP
werden. Siehe Kapitel „Dekontaminierung des Luminex 100Analysegeräts im Falle eines Rückversands“ im Kapitel mit den
Sicherheitsinformationen im Luminex 100 IS-Bedienungshandbuch,
Version 2.3. Sie erhalten eine RMA-Nummer von Montag bis Freitag
von 7 Uhr bis 19 Uhr (Texas-Zeit) telefonisch unter der Rufnummer
+1 512-381-4397. Senden Sie die Geräte an folgende Anschrift
zurück:
Nordamerika:
Luminex Corporation
12201 Technology Blvd., Suite 130
Austin, TX 78727, USA
TM
Instruments muss das System dekontaminiert
Systems
Best.-Nr. 89-00002-00-140 Rev. A 13
Page 16
Nachtrag für das Bedienungshandbuch, Version 2.3 xMAP-Technologie
A
Informationen zur Entsorgung des Barcode-Lesegeräts, des PCs bzw.
des Monitors entnehmen Sie bitte den Angaben des Herstellers.
Sicherheitssymbole Neue Sicherheitssymbole wu rden dem Luminex 100-System un d den
Handbüchern hinzugefügt. Bitte machen Sie sich mit diesen
Symbolen vertraut.
Diese Symbole beschreiben Warnhinweise, Vorsichtsmaßnahmen
sowie allgemeine Informationen, die bei der Bedienung des
Instruments verwendet werden.
Symbol Beschreibung Symbol Beschreibung Symbol Beschreibung
Wechselstrom
Warnhinweis
(siehe Handbuch)
Warnhinweis
(siehe Handbuch)
Warnhinweis
Schutzerdung
Ein
Aus
In-vitro-Diagnostikum Satzcode Seriennummer
Temperaturgrenzen
Hersteller
(siehe Handbuch)
Warnhinweis
(siehe Handbuch)
Bestellnummer Siehe
Verfallsdatum Datum der
Underwriter’s
Laboratory (UL)
US
Warnhinweis
(siehe Handbuch)
Warnhinweis (siehe
Handbuch)
Bedienungsanleitung
Herstellung
Canadian
Underwriter’s
Laboratory (UL
Kanada)
EU-Konformität WEEE-Verordnung
– Nicht in den Müll
geben.
Kalibratoren und
Kontrollen
Verwirbeln Sie die Behälter mit xMAP-Kalibratoren und Kontrollen,
um eine homogene Konsistenz sicherzustellen. Weder xMAPKalibratoren noch Kontrollreagenzien dürfen verdünnt werden. Die
Position des Fläschchens kann sich auf die Tropfengröße auswirken.
Achten Sie darauf, dass das Fläschchen so gehalten wird, dass es sich
14 Best.-Nr. 89-00002-00-140 Rev. A
Page 17

xMAP-Technologie Nachtrag für das Bedienungshandbuch, Version 2.3
im rechten Winkel zur Plattenfläche befindet. Bei der Kalibrierung
des Analysegeräts sind mindestens jeweils 5 Tropfen der Folgenden
auf die Mikrotiterplatte zu geben: CAL1 in Kavität A1, CAL2 in
Kavität B1, CON1 in Kavität C1, CON2 in Kavität D1 und
destilliertes Wasser in die Kavitäten E1 bis H1 für insgesamt vier
Waschvorgänge. Sie können je nach Bedarf andere Kavitäten
verwenden. Klicken Sie zur Auswahl von anderen
Kavitätenpositionen in der Software auf den Dropdown-Pfeil neben
der Eingabezelle für den Kalibrator oder die Kontrolle und klicken
Sie dann auf die Kavitätenposition im Bild der Mikrotiterplatte.
Lagerung des
Analysegeräts
Bereiten Sie das System wie folgt auf die Lagerung vor:
1. Führen Sie den Desinfektionsvorgang mit 10–20 %iger
Natriumhypochloritlösung durch.
2. Verwenden Sie destilliertes Wasser für den Desinfektionsvorgang.
3. Führen Sie vier Waschvorgänge mit destilliertem Wasser aus.
4. Entfernen Sie die Sonde vo m Instrument, spülen Sie sie mit
destilliertem Wasser vom schmalen Ende zum breiten Ende und
setzen Sie sie wieder in den Sondenarm. Wickeln Sie das Ende in
Parafilm.
Bereiten Sie das System wie folgt nach einer Lagerung auf den
ersten Einsatz vor:
1. Schalten Sie das Luminex 100 und die XY-Plattform ein. Achten
Sie auf folgende Anzeichen, dass die Instrumente richtig
reagieren:
• Die Lampe über der Probensonde auf dem Luminex 100 und
die Lampe neben der Tür der XY-Plattform leuchten auf.
• Der Kompressor im Luminex 100 startet. Hierbei handelt es
sich um ein leises Rummeln.
• Führen Sie Ihre Hand hinter das Luminex 100, um zu prüfen,
ob Luft am hinteren Gebläse austritt. Führen Sie Ihre Hand auf
die linke Seite des XY, um zu prüfen, ob Luft am XY austritt.
• Beobachten Sie die Bewegungen der Spritze in der vorderen,
mittleren Tür des Luminex 100 kurz nach Einschalten des
Systems.
2. Schalten Sie den PC ein und starten Si e die IS-Software.
3. Führen Sie den Aufwärmbefehl aus. Dies nimmt ca. 30 Minuten in
Anspruch.
4. Entfernen Sie den Parafilm vom Ende der Probensonde.
Best.-Nr. 89-00002-00-140 Rev. A 15
Page 18

Nachtrag für das Bedienungshandbuch, Version 2.3 xMAP-Technologie
5. Nach dem Aufwärmen führen Sie drei Rückspülbefehle, drei
Ablassbefehle, zwei Alkoholspülungen und drei Waschvorgänge mit
destilliertem Wasser aus. Vergewissern Sie sich, dass die Flasche
mit der Hüllenflüssigkeit bzw. das Luminex SD über ausreichend
Hüllenflüssigkeit verfügt und dass der Abfallbehälter leer ist.
Vergewissern Sie sich, dass der Druck im Systemmonitor während
jedes Wartungsbefehls zwischen 6 und 9 psi liegt.
Probenvolumen/
Probenverdünnung
Reinigung des
Analysegeräts
Für eine optimale Probeneffizienz und zur Reduzierung der
Matrixeffekte sollten konzentrierte biologische Flüssigkeiten, z.B.
Serum und Plasma, in einem Verhältnis von mindestens 1:5 verdünnt
werden.
Zur Minimierung des Risikos der Luftaufnahme muss sichergestellt
sein, dass das Probenaufnahmevolumen mindestens 25 µl unter dem
Gesamtvolumen der Kavität liegt.
Führen Sie die nachfolgenden Schritte bei Inbetriebnahme durch:
1. Anwärmen
2. Vorfüllen
3. Mit Alkohol (70 %iges Isopropanol oder 70 %iges Ethanol) spülen
4. Zweimal waschen (destilliertes Wasser)
Führen Sie die nachfolgenden Schritte bei Herunterfahren durch:
1. Desinfizieren (10-20 %ige Natriumhypochloritlösung)
2. Zweimal waschen (destilliertes Wasser)
3. Tränken (destilliertes Wasser)
Führen Sie das Verfahren zur vorbeugenden Wa rtun g/ Fehlersuche
und –behebung bei Okklusion wöchentlich oder häufiger durch, wenn
Probleme bei der Probenaufnahme entstehen oder wenn Verdacht auf
Okklusion vorliegt.
1. Nehmen Sie die Probensonde heraus und geben Sie das dünnere
Ende 2-3 Minuten in ein Ultraschallbad.
2. Führen Sie drei Rückspülungen aus.
3. Führen Sie drei Ablassvorgänge aus.
4. Führen Sie zwei Alkoholspülungen aus.
5. Führen Sie drei Waschvorgänge mit destilliertem Wasser aus.
16 Best.-Nr. 89-00002-00-140 Rev. A
Page 19

xMAP-Technologie Nachtrag für das Bedienungshandbuch, Version 2.3
Abfallbehälter/-leitung Achten Sie darauf, dass Sie die Dichtung des Verschlusses an der
Abfallflüssigkeitsflasche nicht berühren. Die Dichtung darf auch
weder nass noch schmutzig werden. Dadurch kann sich Druck in der
Flasche aufbauen. Das System zeigt dann falsche Druckwerte an.
Wenn die Dichtung nass wird, lassen Sie sie an der Luft trocknen.
Bei Kontakt mit der Dichtung besteht Kontaminationsgefahr. Bei
Verschmutzungen der Dichtung sollte der Verschluss der
Abfallflüssigkeitsflasche ausgewechselt werden.
Zur Aufrecherhaltung einer stabilen Durchflussrate darf der
Abfallbehälter bzw. die Abfallleitung während des Systembetriebs
nicht bewegt werden.
Bei Verwendung der Abfallleitung darf diese bei laufendem System
nicht bewegt werden. Sie können die Leitung zwar horizontal
bewegen, allerdings darf sie ohne Verständigung des Kundendiensts
nicht permanent tiefer oder höher gelegt werden. Sie können die
Leitung vorübergehend zu Reinigungs- und Wartungszwecken
bewegen.
Einrichtung des
LuminexZuführungssystems
für die
Hüllenflüssigkeit
Ersetzen des
Zuführungssystems
für die
Hüllenflüssigkeit
durch Flaschen
Bei der Einstellung des Luminex 100-Reglers drehen Sie ihn im
Uhrzeigersinn, bis er vollkommen geschlossen ist. Drehen Sie ihn
dann eine halbe Drehung zurück. Drehen Sie den Regler nicht über
die vollkommen geschlossene Position hinaus.
Sie müssen das SD-System im Rahmen der Wartung oder bei der
Fehlersuche und -behebung u.U. gemäß den Anweisungen des
Luminex-Kundendiensts durch Flaschen ersetzen.
Ersetzen Sie das SD-System wie folgt durch Flaschen:
1. Schalten Sie das SD-System aus und trennen Sie es vom
Luminex 100.
2. Drehen Sie die schwarze Reglerschraube in der Tür in der Mitte des
Luminex 100 einmal vollständig gege n den Uhrzeigersinn.
3. Befestigen Sie die Hüllenflüssigkeits- und
Abfallflüssigkeitsflaschenbehälter. Vergewissern Sie sich, dass sich
Hüllenflüssigkeit in der Flasche befindet (bis zur Markierung
gefüllt) und dass der Verschluss fest sitzt.
4. Füllen Sie das System vor.
5. Während das System vorgefüllt wird, justieren Sie die schwarze
Reglerschraube in der Tür in der Mitte des Luminex 100. Drehen
Sie sie im Uhrzeigersinn, um den Wert zu erhöhen, oder gegen den
Best.-Nr. 89-00002-00-140 Rev. A 17
Page 20

Nachtrag für das Bedienungshandbuch, Version 2.3 xMAP-Technologie
Uhrzeigersinn, um den Wert zu senken, bis sich der Druckwert der
Hüllenflüssigkeit bis auf +/- 0,1 psi dem Normalwert Ihres
Instruments genähert hat.
Beobachten Sie das Druckmessgerät auf dem Register zur
Satzbearbeitung. Vergewissern Sie sich, dass sich der
Druckwert in der Mitte des grünen Toleranzbereichs befindet.
6. Nach dem Vorfüllvorgang lockern Sie den Verschluss der Flasche
für die Hüllenflüssigkeit, um Druck abzulassen.
7. Drehen Sie den Verschluss der Flasche fest und füllen Sie das
System noch einmal vor.
8. Vergewissern Sie sich, dass die Druckwerte der Hüllenflüssigkeit
und der Luft wieder auf Normalwerte ansteigen.
Einstellung der
Sondenhöhe
Diese Informationen ergänzen die Angaben im IS 2.3Bedienungshandbuch.
Vergewissern Sie sich, dass die verwendete Platte vollkommen flach
ist – verwölbte Platten können zu falschen Einstellungen der
Sondenhöhe führen.
Legen Sie die geeignete Justierungsscheibe in eine Mikrotiterplatte
mit 96 Kavitäten ein. Die Gesamthöhe der Platte darf 19 mm nicht
überschreiten.
• Wenn Sie Standardplatten mit Flachbodenkavitäten verwenden,
legen Sie zwei der größeren Justierungsscheiben (Durchmesser
5,08 mm) übereinander in die gewählte Kavität.
• Bei Platten mit Filterböden werden drei der größeren
Justierungsscheiben (Durchmesser 5,08 mm) übereinander in die
gewünschte Kavität eingelegt.
• Wenn Sie halbe Platten mit Flachbodenkavitäten verwenden,
setzen Sie zwei der kleineren Justierungsscheiben (Durchmesser
3,35 mm) aufeinander in die gewählte Kavität.
• Wenn Sie Rundbodenplatten verwenden, setzen Sie zwei der
kleineren Justierungsscheiben (Durchmesser 3,35 mm)
übereinander in die gewählte Kavität.
• Bei Platten mit kegelförmigen Kavitäten wird eine
Justierungskugel in die gewünschte Kavität gelegt.
Hüllenflüssigkeit DIE VERWENDUNG VON HÜLLENFLÜSSIGKEITEN, DIE
NICHT VON LUMINEX GENEHMIGT SIND, FÄLLT UNTER
DIE UNSACHGEMÄSSE VERWENDUNG DES SYSTEMS
UND KANN ZUM ERLISCHEN DER VON LUMINEX UND/
ODER EINEM AUTORISIERTEN PARTNER GEWÄHRTEN
GARANTIE FÜHREN.
18 Best.-Nr. 89-00002-00-140 Rev. A
Page 21

Addenda du manuel d'utilisation Version 2.3
Cet addenda du manuel d’utilisation de Luminex® 100TM IS Version 2.3
contient des informations qui ont été connues après la publication du
manuel. Certains des sujets présentés dans cet addenda n’ont pas été
publiés dans la version précédente, tandis que d’autres remplacent des
informations qui existent dans le manuel précédent. Veuillez lire
l’ensemble de cet addenda pour vous familiariser avec ses nouveautés.
Cet addenda comporte les sujets suivants :
• Mise au rebut du matériel
• Symboles de sécurité et réglementaires
• Microbilles d’étalonnage et contrôles
• Stockage de l’analyseur
• Volume de l'échantillon / Dilution de l’échantillon
• Nettoyage de l’analyseur
• Réservoir de déchets / ligne de déchets
• Installation du système de distribution de fluide gaine
• Remplacement du système de distribution de fluide gaine par des
bouteilles de fluide gaine
• Réglage de la hauteur de la sonde
• Fluide gaine
Mise au rebut du
matériel
La directive 2002/96/CE concernant le matériel électronique et
électrique destiné à la mise au rebut exige la mise au rebut du matériel
électronique et électrique lorsqu’il arrive en fin de vie utile.
REMARQUE : Cette directive s’applique aux clients de l’Union
européenne (UE) uniquement. Les utilisateurs résidant en dehors de
l’UE peuvent ignorer cette section.
TM
Si vous mettez au rebut un analyseur Luminex 100, SD
Instrument XYP
section « Décontamination de l’analyseur Luminex 100 en cas de retour
» au chapitre Sécurité du manuel d’utilisation de Luminex 100 IS
Version 2.3. Ensuite, appelez l’assistance technique au +1 512-381-4397
pour obtenir un numéro d’autorisation de retour de matériel (RMA,
Returned Material Authorization) du lundi au vendredi de 7h à 19h,
heure du Centre. Vous retournerez ensuite le matériel à :
TM
, vous devez décontaminer le système. Consultez la
ou d’un
Luminex Corporation
12201 Technology Blvd., Suite 130
Austin, TX 78727
Pour obtenir des renseignements concernant la mise au rebut du lecteur
de codes barres, PC, ou moniteur, consultez la documentation du
fabricant.
PN 89-00002-00-140 Rév. A 19
Page 22

Addenda du manuel d'utilisation Version 2.3 xTechnologie MAP
A
Symboles de
sécurité et
réglementaires
Symbole Description Symbole Description Symbole Description
Courant alternatif
(ca)
Mise à la terre
Marche
Arrêt
De nouveaux symboles de sécurité et réglementaires ont été ajoutés au
système Luminex 100 et aux manuels. Familiarisez-vous avec ces
symboles.
Les symboles ci-dessous désignent des avertissements, des mises en
garde et des informations générales que vous rencontrerez en utilisa nt
l'appareil.
Avertissement
(consulter le
manuel)
Avertissement
(consulter le
manuel)
Avertissement
(consulter le
manuel)
Référence
catalogue
Avertissement
(consulter le manuel)
Avertissement
(consulter le manuel)
Avertissement
(consulter le manuel)
Consulter le mode
d’emploi
Dispositif médical de
diagnostic in vitro
Température
Limitation
Fabricant
Conformité avec
l’Union européenne
Microbilles
d’étalonnage et
contrôles
Code de lot Numéro de série
Date de péremption Date de fabrication
Underwriter’s
Laboratory
US
OHhh – Ne pas
jeter avec les
déchets ménagers
À l'aide de l'agitateur à vortex, mélangez les microbilles d'étalonnage et
de contrôle xMAP afin d'assurer l'homogénéité. Ne diluez pas les
réactifs des microbilles d’étalonnage et de contrôle xMAP. Notez que la
position du flacon risque d’affecter la taille des gouttes. Veillez à
incliner le flacon de manière à ce qu’il soit perpendiculaire à la surface
de la plaque. Lors de l’étalonnage de l’analyseur, chargez une plaque de
microtitration contenant au moins cinq gouttes de chaque : CAL1 dans
la cupule A1, CAL2 dans la cupule B1, CON1 dans la cupule C1, CON2
dans la cupule D1 et eau distillée dans les cupules E1 à H1 pour
Underwriter’s
Laboratory au
Canada
20 PN 89-00002-00-140 Rév. A
Page 23

Technologie xMAP Addenda du manuel d'utilisation Version 2.3
effectuer quatre lavages au total. Vous pouvez utiliser des cupules
différentes selon les besoins. Pour sélectionner d'autres emplacements
de cupules dans le logiciel, cliquez sur la flèche déroulante du champ
d'entrée d'étalonnage ou de contrôle, puis cliquez sur l'emplacement de
cupule dans la représentation graphique de la plaque de microtitration.
Stockage de
l’analyseur
Pour préparer le stockage du système :
1. Exécutez la commande Sanitize (Désinfecter) avec de l'eau de
javel diluée entre 10 et 20 %.
2. Exécutez la commande Sanitize (Désinfecter) avec de l'eau
distillée.
3. Exécutez quatre commandes Wash (Laver) avec de l'eau distillée.
4. Retirez la sonde de prélèvement de l’instrument, rincez-la avec
de l’eau distillée de la petite extrémité vers la grande extrémité,
replacez-la dans le bras de prélèvement et enveloppez son
extrémité avec du parafilm.
Pour préparer le système à sa première utilisation après son
stockage :
1. Mettez le Luminex 100 et la plate-forme XY sous tension et
observez les indications suivantes pour vous assurer que les
instruments répondent correctement :
• Le voyant lumineux au-dessus de la sonde du Luminex 100 et
le voyant situé près de la porte de la plate-forme XY sont
allumés.
• Le compresseur du Luminex 100 se met en marche. Il fait
entendre un léger grondement.
• Placez votre main derrière le Luminex 100 pour sentir l’air
sortant du ventilateur arrière. Placez votre main sur le côté
gauche de la plate-forme XY pour sentir l’air sortant de
l’appareil.
• Observez le mouvement de la seringue à l’intérieur de la porte
avant du milieu sur le Luminex 100 peu de temps après la
mise sous tension de l’instrument.
2. Mettez le PC sous tension et lancez le logiciel IS.
3. Exécutez la commande Warmup (Préchauffage) qui prendra 30
minutes environ.
4. Retirez le parafilm de l’extrémité de la sonde de prélèvement.
5. Une fois le préchauffage terminé, exécutez trois commandes
Backflush (Inverser la circulation), trois commandes Drain
PN 89-00002-00-072 Rév. A 21
Page 24

Addenda du manuel d'utilisation Version 2.3 xTechnologie MAP
(Vidange r), deux commandes (Rincer à l’alcool) et trois commandes
Wash (Laver) avec de l’eau distillée. Assurez-vous que la bouteille
de fluide gaine ou le Luminex SD dispose d’une quantité de fluide
gaine suffisante et que le réservoir de déchets est vide. Vérifiez que
la pression lors de chacune des commandes maintenance est bien
entre 6 et 9 psi dans le System Monitor (Moniteur système).
Volume de
l'échantillon /
Dilution de
l’échantillon
Nettoyage de
l’analyseur
Pour obtenir un rendement optimal lors du prélèvement et pour diminuer
les effets de matrice, les échantillons de contrôle concentrés tels que le
sérum ou le plasma doivent être dilués au 1/5 au moins.
Pour minimiser le risque d’acquisition d’air, assurez-vous que le volume
d’acquisition d’échantillon est au moins de 25 µL inférieur au volume
total de la cupule.
Exécutez les étapes ci-dessous au démarrage :
1. Warmup (Préchauffage)
2. Prime (Amorcer)
3. Alcohol Flush (Rincer à l'alcool) avec de l’isopropanol à 70 %
ou de l’éthanol à 70 %
4. Laver deux fois avec de l’eau distillée
Exécutez les étapes ci-dessous à l’arrêt :
1. Désinfecter avec une solution d'eau de javel entre 10 et 20 %
2. Laver deux fois avec de l’eau distillée.
3. Exécutez la commande Soak (Mouiller) avec de l'eau distillée.
Exécutez la maintenance préventive / la procédure de résolution des
problèmes d’obstruction chaque semaine, ou plus souvent en cas de
problèmes d’acquisition, et à chaque fois qu’une obstruction est
suspectée.
1. Retirez la sonde de prélèvement et nettoyez aux ultrasons la
petite extrémité pendant 2 à 3 minutes.
2. Exécutez trois commandes (Inverser la circulation)
3. Exécutez trois commandes (Vidanger)
4. Exécutez deux commandes Prime (Rincer à l’alcool).
5. Exécutez trois lavages avec de l'eau distillée.
22 PN 89-00002-00-140 Rév. A
Page 25

Technologie xMAP Addenda du manuel d'utilisation Version 2.3
Réservoir de
déchets et ligne de
déchets
Installation du
système de
distribution de
fluide gaine
Veillez à ne pas toucher le joint du bouchon de la bouteille de déchets et
à ce qu’il ne soit ni mouillé, ni sale. La bouteille risquerait de se
pressuriser, ce qui pourrait entraîner des erreurs de pression dans le
système. Si le joint est mouillé, laissez-le sécher à l’air libre. Le joint
risque d’être contaminé si vous le touchez. S’il se salit, remplacez le
bouchon de la bouteille.
Pour maintenir un débit de fluide stable, ne déplacez pas le réservoir de
déchets ou la ligne de déchets lors du fonctionnement du système.
Si vous utilisez la ligne de déchets, ne la déplacez pas pendant que le
système est en marche. Vous pouvez déplacer la ligne en bordure d’une
surface horizontale, ne réacheminez pas l’élévation de la lig ne de
déchets de façon permanente sans contacter l’assistance technique au
préalable. Vous pouvez déplacer la ligne temporairement à des fins de
nettoyage et de maintenance.
Lors du réglage du régulateur du Luminex 100, tournez-le le plus loin
possible dans le sens des aiguilles d’une montre jusqu’en position
complètement fermée, puis tournez-le d’un demi tour dans le sens
opposé. Veillez à ne pas forcer le régulateur au-delà de la position
complètement fermée.
Remplacement de la
gaine du système
de distribution par
des bouteilles de
fluide gaine
Il est possible que vous ayez besoin de remplacer le système de
distribution de fluide gaine (SD) par des bouteilles de fluide gaine pour
la maintenance ou la résolution des problèmes, conformément aux
instructions du service d’assistance technique de Luminex.
Pour remplacer le système SD par des bouteilles de fluide gaine :
1. Mettez le système Luminex SD hors tension et débranchez-le du
Luminex 100.
2. Faites tourner la vis noire du régulateur à l’intérieur de la porte
centrale du Luminex 100 d’un tour complet dans le sens inverse
des aiguilles d’une montre.
3. Fixez les réservoirs de fluide gaine et de déchets. Vérifiez la
présence de fluide gaine dans la bouteille (jusqu’à la limite de
remplissage) et assurez-vous que le couvercle fluide gaine est
vissé.
4. Amorcez le système.
5. Pendant l’amorçage du système, réglez la vis noire du régulateur
à l’intérieur de la porte centrale du Luminex 100. Tournez-la
dans le sens des aiguilles d’une montre pour augmenter ou dans
PN 89-00002-00-072 Rév. A 23
Page 26

Addenda du manuel d'utilisation Version 2.3 xTechnologie MAP
le sens inverse des aiguilles d’une montre pour diminuer, jusqu’à
ce que la valeur de la pression de gaine soit dans les limites de +/
- 0,1 psi du niveau normal de votre instrument.
Surveillez visuellement l’indicateur de pression situé sur
l’onglet Run Batch (Traiter groupe). Assurez-vous que la
pression est au centre de la plage de tolérance verte.
6. Lorsque l’amorçage est terminé, desserrez le bouchon de la
bouteille de fluide gaine pour relâcher la pression.
7. Serrez le couvercle fluide gaine et amorcez à nouveau le
système.
8. Assurez-vous que les valeurs de pression d’air et de fluide gaine
remontent à nouveau au niveau normal.
Réglage de la
hauteur de la sonde
Ces informations viennent en complément des informations figurant
dans le manuel d’utilisation IS 2.3.
Assurez-vous que la plaque que vous utilisez est complètement plate
(les plaques faussées peuvent être à l’origine d’un mauvais réglage de la
hauteur de la sonde).
Sur une plaque de microtitration à 96 cupules de 19mm de hauteur totale
au maximum, placez l'outil d'alignement adéquat :
• Pour une plaque standard avec cupules à fond plat, empilez deux
des plus grands disques d'alignement (5,08 mm de diamètre) dans la
cupule sélectionnée.
• Pour une plaque à fond filtre, empilez trois des plus grands disques
d'alignement (5,08 mm de diamètre) dans la cupule sélectionnée.
• Pour une plaque demi-volume avec cupules à fond plat, empilez
deux des plus petits disques d'alignement (3,35 mm de diamètre) et
placez-les dans la cupule sélectionnée.
• Pour une plaque à fond arrondi (fond en U), empilez deux des plus
petits disques d'alignement (3,35 mm de diamètre) dans la cupule
sélectionnée.
• Pour une plaque à cupules coniques, placez une bille d'alignement
dans la cupule sélectionnée.
Fluide gaine L’UTILISATION DE FLUIDES GAINE NON APPROUVÉS PAR
LUMINEX CONSTITUE UNE « UTILISATION ABUSIVE » ET
ANNULE LES DROITS DE GARANTIE FOURNIS PAR
LUMINEX ET/OU SON PARTENAIRE AGRÉÉ.
24 PN 89-00002-00-140 Rév. A
Page 27

Supplemento al manuale dell'utente, Versione 2.3
Il presente supplemento al manuale dell'utente Luminex® 100TM IS
Versione 2.3 contiene informazioni rese disponibili dopo il rilascio
del manuale. Alcuni argomenti non sono stati pubblicati nella release
precedente, altri sostituiscono le informazioni contenute nel
precedente manuale. Leggere il presente supplemento per acquisire
familiarità con le nuove informazioni.
Il supplemento tratta i seguenti argomenti:
• Smaltimento delle apparecchiature
• Simboli di sicurezza e delle norme
• Calibratori e controlli
• Conservazione dell'analizzatore
• Volume campione/Diluizione campione
• Pulizia dell'analizzatore
• Contenitore degli scarti/linea di scarto
• Installazione del sistema Sheath Delivery
• Sostituzione del sistema Sheath Delivery con bottiglie guaina
• Regolazione dell'altezza della sonda
• Liquido guaina
Smaltimento delle
apparecchiature
La direttiva 2002/96/EC (WEEE, Waste Electrical and Electronic
Equipment) richiede che lo smaltimento dei dispositivi elettrici ed
elettronici a fine vita venga gestito in conformità con le normati ve
vigenti.
NOTA: la direttiva è valida solamente nei paesi dell'Unione
Europea. Gli utenti residenti nei paesi non appartenenti all'UE
possono ignorare questa sezione.
Per lo smaltimento di un analizzatore Luminex 100, un sistema SD
o uno strumento XYP
Consultare la sezione "Decontaminazione dell'analizzatore Luminex
100 per la spedizione di restituzione" nel capitolo sulla sicurezza del
Manuale dell'utente di Luminex 200 IS, Versione 2.3. Contattare
l'Assistenza tecnica per ottenere un numero di autorizzazione per la
restituzione dei materiali (RMA) al numero telefonico +1 512-3814397, dalle 07.00 alle 19.00 (orario degli stati centrali) dal lunedì al
venerdì. L'apparecchiatura verrà quindi restituita a:
Luminex Corporation
12201 Technology Blvd., Suite 130
Austin, TX 78727
TM
, è necessario decontaminare il sistema.
TM
PN 89-00002-00-140 Rev. A 25
Page 28

Supplemento al manuale dell'utente, Versione 2.3 tecnologia xMAP
A
Per informazioni sullo smaltimento dello scanner per codici a barre,
del PC o del monitor, fare riferimento alla documentazione del
produttore.
Simboli di sicurezza
e delle norme
Al sistema e ai manuali Luminex 100 sono stati aggiunti nuovi
simboli di sicurezza e delle norme. È necessario acquisire familiarità
con detti simboli.
I seguenti simboli descrivono le avvertenze, le precauzioni e le
informazioni generali utilizzate per il funzionamento dello
strumento.
Simbolo Descrizione Simbolo Descrizione Simbolo Descrizione
Corrente alternata
(CA)
Messa a terra
On
Off
Avvertenza
(vedere il manuale)
Avvertenza
(vedere il manuale)
Avvertenza
(vedere il manuale)
Numero catalogo Consultare le
Avvertenza
(vedere il manuale)
Avvertenza
(vedere il manuale)
Avvertenza (vedere il
manuale)
istruzioni per l'uso
Dispositivo medico
diagnostico in vitro
Limitazione
temperatura
Produttore
Conformità Unione
Europea
Calibratori e
controlli
Vorticare i calibratori xMAP e i contenitori dei controlli per garantire
l'omogeneità. Non diluire i reagenti di controllo e del cabibratore
xMAP. Si noti che la posizione della fiala potrebbe può alterare la
Codice batch Numero di serie
Data di scadenza Data di produzione
Underwriter’s
Laboratory
US
WEEE - Non
gettare nei rifiuti
domestici
Canadian
Underwriter’s
Laboratory
dimensione della goccia. Assicurarsi di capovolgere la fiala in modo
26 PN 89-00002-00-140 Rev. A
Page 29

Tecnologia xMAP Supplemento al manuale dell'utente, Versione 2.3
che sia perpendicolare alla superficie della piastra. Durante la
calibratura dell'analizzatore, caricare una piastra microtitolo con
almeno cinque gocce di quanto segue: CAL1 nel pozzetto A1, CAL2
nel pozzetto B1, CON1 nel pozzetto C1, CON2 nel pozzetto D1 e
acqua distillata nei pozzetti da E1 a H1 per un totale di quattro
lavaggi. È possibile utilizzare diversi pozzetti in base alle esigenze.
Per selezionare diversi pozzetti di destinazione nel software, fare clic
sulla freccia dell'elenco a discesa accanto alla casella di immissione
relativa al calibratore o al controllo, quindi fare clic sul pozzetto di
destinazione sull'immagine della piastra microtitolo.
Conservazione
dell'analizzatore
Per preparare il sistema da conservareall'archiviazione:
1. Eseguire un comando Sanitize (Disinfetta) con candeggina per
uso domestico al 10% - 20%.
2. Eseguire un comando Sanitize (Disinfetta) con acqua distillata.
3. Eseguire quattro comandi Wash (Lavaggio) con acqua distillata.
4. Rimuovere la sonda di campionamento dallo strumento,
sciacquare con acqua distillata partendo dall'estremità stretta e
finendo con l'estremità larga, sostituirla reinserirla nel braccio
del campione e avvolgere l'estremità con Parafilm.
Per preparare il sistema dopo un periodo di inutilizzo:
1. Accendere il sistema Luminex 100 e la Piattaforma XY, quindi
osservare le seguenti indicazioni per verificare il corretto
funzionamento degli strumenti:
• La spia sulla sonda di compionamento del sistema Luminex
100 e la spia accanto allo sportello della piattaforma XY sono
accese.
• Il compressore di Luminex 100 si accende. Si udirà un lieve
frastuono.
• Posizionare la mano dietro all'analizzatore Luminex 100 per
sentire l'espulsione dell'aria dalla ventola posteriore.
Posizionare la mano sul lato sinistro della piattaforma XY per
sentire l'espulsione dell'aria.
• Osservare il movimento della siringa all'interno dello sportello
centrale anteriore dell'analizzatore Luminex 100
immediatamente dopo l'accensione dello strumento.
2. Accendere il PC e lanciare il software IS.
3. Completare un comando Warmup (Riscaldamento) che richiede
30 minuti.
PN 89-00002-00-140 Rev. A 27
Page 30

Supplemento al manuale dell'utente, Versione 2.3 tecnologia xMAP
4. Rimuovere la pellicola Parafilm dall'estremità della sonda di
campionamento.
5. Al termine del riscaldamento, eseguire tre comandi Backflush
(Risciacquo), tre comandi Drain (Drenaggio), due comandi
Alcohol Flush (Risciacquo con alcool) e infine tre comandi
comandi W ash (Lavaggio) con acqua distillata. Assicurarsi che la
bottiglia della guaina o del sistema Luminex SD contenga una
quantità sufficiente di liquido guaina e che il contenitore degli
scarti sia vuoto. Verificare che durante l'esecuzione dei comandi
la pressione di manutenzione sia compresa fra 6 e 9 psi nel
System Monitor (Monitor di sistema).
Volume campione/
Diluizione campione
Pulizia
dell'analizzatore
Per un'efficienza di campionamento ottimale e per ridurre gli effetti
matrice, eseguire una diluizione 1:5 dei liquidi biologici concentrati
come il siero o il plasma.
Per ridurre al minimo la probabilità di acquisire aria, assicurarsi che
il volume di acquisizione del campione sia almeno 25 µL in meno
rispetto al volume totale nel pozzetto.
Durante la procedura di avvio, eseguire le seguenti fasi:
1. Warmup (Riscaldamento)
2. Prime (Esegui priming)
3. Risciacquo con alcool con isopropanolo al 70% o etanolo al 70%
4. Doppio lavaggio con acqua distillata
Durante la procedura di chiusura, eseguire le seguenti fasi:
1. Disinfezione con soluzione di candeggina per uso domestico al
10-20%
2. Doppio lavaggio con acqua distillata.
3. Bagno con acqua distillata.
Eseguire la procedura di manutenzione preventiva/risoluzione
dei problemi di ostruzione su base settimanale o più spesso in caso di
problemi di acquisizione dei campioni e ogni qualvolta si sospetti
un'ostruzione del sistema.
1. Rimuovere la sonda di campionamento ed eseguire la
sonicazione dell'estremità ristretta per 2-3 minuti.
2. Eseguire tre comandi Backflush (Risciacquo).
28 PN 89-00002-00-140 Rev. A
Page 31

Tecnologia xMAP Supplemento al manuale dell'utente, Versione 2.3
3. Eseguire tre comandi Drain (Drenaggio).
4. Eseguire due comandi Alcohol Flush (Risciacquo con alcool).
5. Eseguire tre lavaggi con acqua distillata.
Contenitore degli
scarti e linea di
scarto
Installazione del
sistema Sheath
Delivery
Fare attenzione a non toccare, bagnare o sporcare il sigillo del tappo
della bottiglia degli scarti poiché quest'ultima potrebbe pressurizzarsi
con conseguenti errori di pressione nel sistema. Qualora il sigillo si
bagnasse, lasciarlo asciugare all'aria. È possibile contaminare il
sigillo con il contatto. Qualora si sporcasse, sostituire il tappo della
bottiglia degli scarti.
Per mantenere una portata costante, non spostare il contenitore degli
scarti o la linea di scarto durante il funzionamento del sistema.
Se si utilizza la linea di scarto, non spostarla durante il
funzionamento del sistema. Sebbene sia possibile muovere la linea
lungo una superficie orizzontale, non modificare in modo
permanente l'altezza della linea di scarto senza prima contattare
l'assistenza tecnica. È possibile spostare temporaneamente la linea
per scopi di pulizia e manutenzione.
Durante la regolazione del regolatore Luminex 100, ruotarlo in senso
orario fino a portarlo nella posizione di chiusura totale, quindi
ruotare di 1/2 giro in senso contrario. Fare attenzione a non forzare il
regolatore oltre la posizione di chiusura completa.
Sostituzione del
sistema Sheath
Per la manutenzione o la risoluzione dei problemi, potrebbe può
essere necessario sostituire il sistema Sheath Delivery (SD) con le
bottiglie guaina, come indicato dall'Assistenza tecnica Luminex.
Delivery con
bottiglie guaina
PN 89-00002-00-140 Rev. A 29
Per sostituire il sistema SD con bottiglie guaina:
1. Spegnere e scollegare il sistema SD dall'analizzatore Luminex
100.
2. Ruotare la vite nera del regolatore all'interno dello sportello
centrale dell'analizzatore Luminex 100 di un giro completo in
senso antiorario.
3. Collegare i contenitori del liquido guaina e degli scarti.
Assicurarsi che la bottiglia contenga il liquido guaina (fino alla
linea di riempimento) e che il cappuccio guaina sia serrato.
4. Eseguire il priming del sistema.
Page 32

Supplemento al manuale dell'utente, Versione 2.3 tecnologia xMAP
5. Durante il priming del sistema, regolare la vite nera del
regolatore all'interno dello sportello centrale dell'analizzatore
Luminex 100. Ruotare in senso orario o in senso antiorario per
aumentare o diminuire rispettivamente il valore fino a quando la
pressione della guaina non raggiunge +/- 0,.1 psi del livello
normale dello strumento.
Monitorare visivamente il misuratore di pressione nella
scheda Run Batch (Esegui batch). Assicurarsi che la
pressione sia compresa entro il range di tolleranza di colore
verde.
6. Al termine del priming, allentare il cappuccio della bottiglia
della guaina per rilasciare la pressione.
7. Serrare il cappuccio della guaina ed eseguire nuovamente il
priming del sistema.
8. Assicurarsi che i valori della pressione dell'aria e della guaina
tornino al loro livello normale.
Regolazione
dell'altezza della
sonda
Le seguenti informazioni integrano le informazioni contenute nel
manuale dell'utente IS 2.3.
Assicurarsi che la piastra in uso sia completamente piana: le piastre
deformate possono causare regolazioni dell'altezza della sonda errate.
In una piastra microtitolo a 96 pozzetti, in cui l'altezza complessiva non
è superiore a 19 mm, posizionare lo strumento di allineamento nella
piastra.
• Per una piastra standard con pozzetti a fondo piano, impilare due
dischi di allineamento grandi (diametro 5,08 mm) e posizionarli nel
pozzetto selezionato.
• Per una piastra con fondo a filtro, impilare tre dischi di allineamento
grandi (diametro 5,08 mm) e posizionarli nel pozzetto sele zionato.
• Per una piastra a mezzo volume con pozzetti a fondo piano,
impilare due dischi di allineamento piccoli (diametro 3,35 mm) e
posizionarli nel pozzetto selezionato.
• Per una piastra a fondo tondo (fondo a U), impilare due dischi di
allineamento piccoli (diametro 3, 35 mm) e posizi on arli nel pozzetto
selezionato.
• Per una piastra con pozzetti conici, posizionare una sfera di
allineamento nel pozzetto selezionato.
Liquido guaina L'UTILIZZO DI LIQUIDO GUAINA NON APPOVATO DA
LUMINEX COSTITUISCE UN "USO IMPROPRIO" E PUÒ
RENDERE NULLA LA GARANZIA FORNITA DA LUMINEX
E/O EVENTUALI PARTNER AUTORIZZATI.
30 PN 89-00002-00-140 Rev. A
Page 33

Apêndice do Manual de Instruções, Versão 2.3
Este Apêndice do Manual de Instruções, Versão 2.3 do Luminex
TM
IS inclui informações disponibilizadas após a edição do
100
manual. Alguns dos tópicos apresentados neste apêndice não foram
publicados na edição anterior; alguns tópicos substituem informações
existentes no anterior manual. Leia este apêndice atentamente para
ficar a conhecer o novo conteúdo.
Este apêndice inclui os seguintes tópicos:
• Eliminação do Equipamento
• Símbolos de Segurança e de Regulamentação
• Calibradores e Controlos
• Armazenamento do Analisador
• Volume das Amostras/Diluição das Amostras
• Limpeza do Analisador
• Contentor de Resíduos/Linha de Resíduos
• Configuração do Sistema de Fornecimento de Invólucro
• Substituição do Sistema de Fornecimento de Invólucro por
Contentores de Invólucro
• Ajuste da Altura da Sonda
• Fluido do Invólucro
®
Eliminação do
Equipamento
A Directiva 2002/96/CE, relativa aos Resíduos Eléctricos e
Electrónicos, obriga à elimianção adequada do equipamento eléctrico
e electrónico quando este atinge o final da sua vida útil.
NOTA: Esta directiva só se aplica aos consumidores da União
Europeia (UE). Os utilizadores fora da UE não são obrigados a
cumprir esta directiva.
TM
Se eliminar um Analisador Luminex 100, um Sistema SD
Instrumento XYP
"Descontaminar o Analisador Luminex 100 para Devolução" no
capítulo Segurança do Manual de Instruções do Luminex 100 IS,
Versão 2.3. Em seguida, entre em contacto com a Assistência
Técnica Luminex para obter um número de Autorização de Materiais
Reciclados (RMA), através do n.º +1 512-381-4397, entre as 07:00 e
as 19:00, Hora Central, de Segunda a Sexta-feira. O equipamento
será devolvido para:
América do Norte:
Luminex Corporation
12201 Technology Blvd., Suite 130
Austin, TX 78727
TM
, deve descontaminar o sistema. Consulte a alínea
, ou um
PN 89-00002-00-140 Rev. A 31
Page 34

Apêndice ao Manual do Utilizador, Versão 2.3 xTecnologia MAP
Para obter informações sobre a eliminação do scanner de códigos de
barras, PC ou monitor, consulte a documentação do fabricante.
Símbolos de
Segurança e
Regulamentação
Foram adicionados novos símbolos de segurança e regulamentação
ao sistema Luminex 100 e aos manuais. Informe-se acerca destes
símbolos.
Estes símbolos descrevem avisos, cuidados e informações gerais
utilizados na utilização deste instrumento.
Símbolo Descrição Símbolo Descrição Símbolo Descrição
Corrente alterna (CA)
Terra de protecção
Ligado
Desligado
Dispositivo Médico
de Diagnóstico In
vitro
Temperatura
Limitação
Aviso
(consultar o
manual)
Aviso
(consultar o
manual)
Aviso
(consultar o
manual)
Número do
Catálogo
Código de Lote Número de Série
Data de Validade Data de Fabrico
Aviso
(consultar o manual)
Aviso
(consultar o manual)
Aviso (consultar o
manual)
Consulte as
instruções de
utilização
Fabricante
Conformidade da
União Europeia
Calibradores e
Controlos
Provoque um vórtice nos contentores de calibradores e controlos
xMAP para garantir a homogeneidade. Não diluir o calibrador
xMAP e os reagentes de controlo. Note que a posição do frasco
Laboratório de
Aprovação
US
WEEE – Não deitar
no lixo
Laboratório de
Aprovação
Canadiano
poderá afectar o tamanho das gotas. Certifique-se de que inverte o
frasco de forma a que este se encontre numa posição perpendicular à
superfície da placa. Quando calibrar o analisador, carregue uma
32 PN 89-00002-00-140 Rev. A
Page 35

xTecnologia MAP Apêndice do Manual de Instruções, Versão 2.3
placa de microtítulo com, no mínimo, cinco gotas de cada: CAL1 no
poço A1, CAL2 no poço B1, CON1 no poço C1, CON2 no poço D1
e água destilada no poço E1 a H1 para efectuar um total de quatro
lavagens. Pode utilizar poços diferentes, se necessário. Para
seleccionar diferentes localizações de poços no software, faça clique
sobre a seta de lista pendente junto à célula de entrada para o
calibrador ou controlo e, em seguida, faça clique sobre a localização
do poço na imagem da placa de microtítulo.
Armazenamento do
Analisador
Preparar o sistema para armazenamento:
1. Execute um comando Sanitize (Esterilizar) com uma solução de
lixívia doméstica de 10% a 20%.
2. Execute um comando Sanitize (Esterilizar) com água destilada.
3. Execute quatro comandos de Wash (Lavar) com água destilada.
4. Retire a sonda de amostra do instrumento, lave-a com água
destilada da extremidade mais estreita para a extremidade maior,
substitua-a no braço de amostra e envolva a extremidade com
Parafilm.
Para preparar o sistema para uma primeira utilização após ter
estado armazenado.
1. Ligue o Luminex 100 e a Plataforma XY e tenha em atenção as
seguintes indicações para verificar se o sistema está a responder
de forma correcta:
• Verifique se a luz acima da sonda de amostra no Luminex 100
e a luz que se encontra perto da porta da plataforma XY estão
acesas.
• Verifique se o compressor se liga no Luminex 100. É um ruído
grave e prolongado.
• Coloque a sua mão atrás do Luminex 100 para sentir o ar a
sair da ventoinha traseira. Coloque a sua mão na parte
esquerda do XY para sentir o ar a sair do XY.
• Observe o movimento da seringa no interior da porta central
frontal do Luminex 100 logo após o instrumento ter sido
ligado.
2. Ligue o PC e inicie o software IS.
3. Conclua o comando Warmup (Aquecimento), o qual demora 30
minutos.
4. Retire o Parafilm da extremidade da sonda de amostra.
PN 89-00002-00-140 Rev. A 33
Page 36

Apêndice ao Manual do Utilizador, Versão 2.3 xTecnologia MAP
5. Após o Warmup (Aquecimento) estar concluído, execute três
comandos Backflush (Retrolavagem), três comandos Drain
(Drenagem), dois comandos Alcohol Flush (Evacuação de
álcool) e três comandos Wash (Lavagem) com água destilada.
Certifique-se de que o contentor de invólucro ou o Luminex SD
possui uma quantidade suficiente de fluido de invólucro e de que
o contentor de resíduos está vazio. Verifique se a pressão durante
cada um dos comandos de manutenção se encontra entre 6 e 9
psi no System Monitor (Monitor do Sistema).
Volume das
Amostras/Diluição
das Amostras
Limpeza do
Analisador
Para uma eficiência ideal da amostragem e para reduzir os efeitos de
matriz, devem ser diluídos numa relação de 1:5 os fluidos biológicos
concentrados, tais como soro ou plasma.
Para minimizar as hipóteses de aparecimento de ar, certifique-se de
que o volume de aquisição da amostra é de, no mínimo, 25 µL
inferior ao volume total no poço.
Execute as seguintes etapas durante o Arranque:
1. Warmup (Aquecimento)
2. Prime (Escorvar)
3. Evacuação de álcool com isopropanol a 70% ou etanol a 70%
4. Lavagem dupla com água destilada
Execute as seguintes etapas durante o Encerramento
1. Esterilizar com solução de lixívia doméstica de 10% a 20%.
2. Lavagem dupla com água destilada.
3. Embeber com água destilada.
Execute a Manutenção Preventiva/Procedimento de Resolução
de Problemas Relacionados com Obstrução semanalmente, ou com
mais frequência, se surgirem problemas de aquisição de amostra e
sempre que se suspeitar de obstrução.
1. Retire a sonda de amostra e limpe através de ultra-sons a
extremidade estreita durante 2/3 minutos.
2. Execute três comandos Backflush (retrolavagem).
3. Execute três comandos Drain (drenagem).
4. Execute dois comandos Alcohol Flush (Evacuação de álcool).
5. Efectue três Lavagens com água destilada.
34 PN 89-00002-00-140 Rev. A
Page 37

xTecnologia MAP Apêndice do Manual de Instruções, Versão 2.3
Contentor de
Resíduos e Linha de
Resíduos
Configuração do
Sistema de
Fornecimento de
Invólucro
Tenha atenção para não tocar no selo na tampa do contentor de
resíduos, nem deixe que este se molhe ou fique sujo. Tal poderá
originar pressão no contentor, levando à ocorrência de erros de
pressão no sistema. Se o selo se molhar, deixe-o secar ao ar. Não
tocar no selo. Tal poderá contaminá-lo. Se ficar sujo, deverá
substituir a tampa do contentor de resíduos.
Para manter uma taxa de fluxo estável, não mova o contentor de
resíduos ou a linha de resíduos durante o funcionamento do sistema.
Se estiver a utilizar a linha de resíduos, não a mova enquanto o
sistema estiver em funcionamento. Apesar de poder mover a linha
numa superfície horizontal, não altere permanentemente a elevação
da linha de resíduos sem contactar primeiro a Assistência Técnica. É
possível mover a linha temporariamente para limpeza e manutenção.
Quando ajustar o regulador Luminex 100, rode-o no sentido dos
ponteiros do relógio ao máximo para que fique numa posição
totalmente fechada e, em seguida, rode-o no sentido inverso 1/2
volta. Atenção para não forçar o regulador para além da posição
totalmente fechada.
Substituição do
Sistema de
Fornecimento de
Invólucro por
Contentores de
Invólucro
Poderá ser necessário substituir o sistema de fornecimento de
invólucro (Sheath Delivery - SD) por contentores de invólucro para
manutenção ou resolução de problemas, como indicado pela
Assistência Técnica Luminex.
Para substituir o sistema SD por contentores de invólucro,
proceda do seguinte modo:
1. Desligue da alimentação e desligue o sistema SD do Luminex
100.
2. Rode o parafuso regulador preto que se encontra dentro da porta
central do Luminex 100 uma volta completa no sentido inverso
ao dos ponteiros do relógio.
3. Encaixe os contentores de invólucro e de resíduos. Certifique-se
de que existe fluido do invólucro no contentor (até à linha de
enchimento) e que a tampa do invólucro está apertada.
4. Escorve o sistema.
5. Quando o sistema estiver a escorvar, ajuste o parafuso regulador
preto dentro da porta central do Luminex 100. Rode no sentido
dos ponteiros do relógio para aumentar ou no sentido inverso ao
dos ponteiros do relógio para diminuir, até qu e o valor da pressão
PN 89-00002-00-140 Rev. A 35
Page 38

Apêndice ao Manual do Utilizador, Versão 2.3 xTecnologia MAP
do invólucro se encontre entre +/- 0,1 psi do nível normal do seu
instrumento.
Verifique visualmente o mostrador da pressão no separador
Run Batch (executar lote). Certifique-se de que a pressão
está centrada dentro do limite de tolerância verde.
6. Quando a função de escorvamento estiver concluída, desaperte a
tampa do contentor do invólucro para libertar a pressão.
7. Aperte a tampa do invólucro e escorve o sistema novamente.
8. Certifique-se de que os valores do invólucro e da pressão do ar
aumentam novamente para o nível normal.
Ajuste da Altura da
Sonda
Esta informação complementa a informação presente no Manual do
Utilizador IS 2.3.
Certifique-se de que a placa que está a utilizar se encontra
completamente plana – as placas deformadas podem conduzir a um
ajuste da altura da sonda incorrecto.
Numa placa de microtítulo de 96 poços, em que a altura global é de,
no máximo, 0,75 polegadas (19 milímetros), coloque a ferramenta de
alinhamento adequada na placa:
• Para uma placa padrão com poços de fundo plano – empilhe dois
dos maiores discos de alinhamento (5,08 mm de diâmetro) e
coloque-os no poço seleccionado.
• Para uma placa de fundo de filtro – empilhe três dos maiores discos
de alinhamento (5,08 mm de diâmetro) e coloque-os no poço
seleccionado.
• Para uma placa de meio volume com poços de fundo plano –
empilhe dois dos menores discos de alinhamento (3,35 mm de
diâmetro) e coloque-os no poço seleccionado.
• Para uma placa de fundo redondo (fundo em U) - empilhe dois dos
menores discos de alinhamento (3,35 mm de diâmetro) e coloque-os
no poço seleccionado.
• Para uma placa com poços cónicos – coloque uma esfera de
alinhamento no poço seleccionado.
Fluido do Invólucro A UTILIZAÇÃO DE FLUIDO DE INVÓLUCRO NÃO
APROVADO PELA LUMINEX CONSTITUI UMA
“UTILIZAÇÃO INADEQUADA” E PODERÁ ANULAR OS
DIREITOS DA GARANTIA FORNECIDOS PELA LUMINEX
E/OU PELO PARCEIRO AUTORIZADO.
36 PN 89-00002-00-140 Rev. A
Page 39

Tillæg til brugervejledning, version 2.3
Dette tillæg til Luminex® 100TM IS brugervejledning, version 2.3
indeholder oplysninger, der bl ev tilgæng elige efter vejledn ing en blev
udgivet. Nogle af de emner, der fremlægges i dette tillæg, blev ikke
offentliggjort i den tidligere udgave; andre emner erstatter
oplysninger, der eksisterer i den tidligere vejledning. Læs venligst
dette tillæg for at gøre dig bekendt med det nye indhold.
Dette tillæg indeholder følgende emner:
• Bortskaffelse af udstyr
• Sikkerheds- og myndighedssymboler
• Kalibratorer og kontroller
• Opbevaring af analysatoren
• Prøvevolumen/Prøvefortynding
• Rengøring af analysatoren
• Affaldsbeholder/Affaldsslange
• Opsætning af sheathleveringssystem
• Udskiftning af sheathleveringssystemet med sheathflasker
• Justering af sondehøjde
• Sheathvæske
Bortskaffelse af
udstyr
Direktiv 2002/96/EF om bortskaffelse af elektrisk og elektronisk
udstyr (WEEE) kræver, at du kasserer elektrisk og elektronisk udstyr
på behørig vis, når det når slutningen af dets brugsliv.
BEMÆRK: Dette direktiv gælder kun for kunder inden for den
Europæiske Union (EU). Brugere uden for EU kan ignorere dette
afsnit.
Hvis du bortskaffer et Luminex 100 analysator, SD
TM
XYP
instrument, skal du dekontaminere systemet. Se afsnittet
”Dekontaminering af Luminex 100 analysatoren ved
returforsendelse” i Sikkerhedskapitlet i Luminex 100 IS
brugervejledning, version 2.3. Ring derefter til Luminex teknisk
support for at anskaffe et RMA-nummer (Return Materials
Authorization - autorisation for returnering af materiale), på
telefonnummer +1 512-381-4397 mellem kl. 14:00 of 02:00, mandag
til fredag. Du skal derefter tilbagesende udstyret til:
Luminex Corporation
12201 Technology Blvd., Suite 130
Austin, TX 78727
Der henvises til fabrikantdokumentationen for oplysninger om
bortskaffelse af stregkodescanneren, PC’en, eller monitoren.
TM
system eller
Varenr. 89-00002-00-140 rev. A 37
Page 40

Tillæg til brugervejledning, version 2.3 xMAP-teknologi
Sikkerheds- og
myndighedssymbol
er
Nye sikkerheds- og myndighedssymboler er blevet føjet til Luminex
100 systemet og vejledninger. Bliv venligst bekendt med disse
symboler.
Disse symboler beskriver advarsler, forsigtighedsregler og generelle
oplysninger anvendt under betjening af dette instrument.
Symbol Beskrivelse Symbol Beskrivelse Symbol Beskrivelse
Vekselstrøm
Beskyttelsesjording
Til
Fra
Advarsel
(der henvises til
vejledningen)
Advarsel
(der henvises til
vejledningen)
Advarsel
(der henvises til
vejledningen)
Katalognummer Se brugsanvisningen
Advarsel
(der henvises til
vejledningen)
Advarsel
(der henvises til
vejledningen)
Advarsel (der
henvises til
vejledningen)
Medicinsk anordning
til in-vitro diagnostisk
brug
Temperatur
Begrænsning
Fabrikant
European Union
Conformity
Kalibratorer og
kontroller
Batchkode Serienummer
Udløbsdato Fremstillingsdato
Underwriters
Laboratories
US
Direktiv om
bortskaffelse af
elektrisk og
elektronisk udstyr
(WEEE) – Må ikke
kasseres i
affaldsspanden
Underwriters
Laboratories i
Canada
Hvirvl xMAP-kalibrator- og kontrolbeholderne for at sikre
ensartethed. Fortynd ikke xMAP-kalibrator- og kontrolreagenser
Vær opmærksom på at positionen af hætteglasset kan påvirke
størrelsen af dråben. Sørg for at vende hætteglasset på hovedet, så
det er vinkelret i forhold til pladeoverfladen. Når analysatoren
kalibreres, indsæt en mikrotiterplade med mindst fem dråber af hver:
38 Varenr. 89-00002-00-140 Rev. A
Page 41

xMAP-teknologi Tillæg til brugervejledning, version 2.3
CAL1 i brønd A1, CAL2 i brønd B1, CON1 i brønd C1, CON2 i
brønd D1 og destilleret vand i brønd E1 gennem H1 for at vaske i alt
fire gange. Forskellige brønde kan bruges efter behov. Vælg andre
brøndlokaliteter i softwaren ved at klikke på rullepilen ud for
indtastningscellen for kalibratoren eller kontrollen, klik derefter på
brøndlokaliteten på billedet af mikrotiterpladen.
Opbevaring af
analysatoren
Klargøring af systemet for opbevaring:
1. Kør en Sanitize (Desinficér) cyklus med 10-20 %
husholdningsblegemiddelopløsning.
2. Kør en Sanitize (Desinficér) cyklus med destilleret vand.
3. Kør fire Wash (Vask) cyklusser med destilleret vand.
4. Fjern prøvesonden fra instrumentet, skyl med destilleret vand fra
den smalle ende ud gennem den større ende, sæt den tilbage i
prøvearmen og pak enden ind i Parafilm.
Klargøring af systemet til første brug, efter det har været
opbevaret:
1. Tænd for Luminex 100 og XY platformen og hold øje med
følgende indikationer for at sikre, at instrumenterne reagere
korrekt:
• Lyset oven over prøvesonden på Luminex 100 og lyset ved
siden af døren på XY platformen er tændte.
• Kompressoren starter i Luminex 100 maskinen. Det er en lav,
rumlende lyd.
• Anbring en hånd bag Luminex 100 maskinen for at føle om
der kommer luft ud af blæseren bagtil. Anbring en hånd på
venstre side af XY enheden for at føle om der kommer luft ud
af den.
• Hold øje med bevægelsen af sprøjten inden for den forreste
midterdør in Luminex 100 enheden, kort efter der tændes for
instrumentet.
2. Tænd for PC’en og start IS softwaren.
3. Fuldfør en Warmup (Opvarmining) cyklus, hvilken vil tage 30
minutter.
4. Fjern Parafilmen fra enden af prøvesonden.
5. Efter fuldførsel af Warmup (Opvarmning) cyklussen kør tre
Backflush (Tilbageskyl) cyklusser, tre Drain (Aftap) cyklusser , to
Alcohol Flush (Alkoholskyl) cyklusser og tre Wash (Vask)
cyklusser med destilleret vand. Sørg for at sheathflasken eller
Varenr. 89-00002-00-140 rev. A 39
Page 42

Tillæg til brugervejledning, version 2.3 xMAP-teknologi
Luminex SD har en tilstrækkelig mængde sheathvæske, og at
affaldsbeholderen er tom. Kontrollér at trykket under hver af
vedligeholdelsecyklusserne viser mellem 6 og 9 psi i System
Monitor (Systemmonitoren).
Prøvevolumen/
Prøvefortynding
Rengøring af
analysatoren
For at opnå en optimal prøveeffektivitet og for at formindske
matrixeffekter, bør koncentrede biologiske væsker, såsom serum eller
plasma, fortyndes mindst 1:5.
For at minimere risikoen for opsamling af luft, skal det sikres, at
prøveindsamlingsmængden er mindst 25 µl mindre end den samlede
brøndmængde.
Udfør følgende trin under Startup (Start):
1. Warmup (Varm op)
2. Prime (Prim)
3. Alkoholskyl med 70% isopropanol eller 70% ethanol
4. Vask to gange med destilleret vand
Udfør følgende trin under Shutdown (Nedlukning):
1. Desinficér med 10% til 20 %
husholdningsblegemiddelopløsning.
2. Vask to gange med destilleret vand.
3. Gennemvæd med destilleret vand.
Foretag den forebyggende vedligeholdelses-/
tilstopningsfejlfindingsprocedure én gang om ugen eller oftere, hvis
der opstår prøveindsamlingsproblemer, og når der er mistanke om en
tilstopning.
1. Fjern prøvesonden og sonikér den smalle ende i 2-3 minutter.
2. Kør tre Backflush (Tilbageskyl) cyklusser .
3. Kør tre Drain (Aftap) cyklusser.
4. Kør to Alcohol Flush (Alkoholskyl) cyklusser.
5. Kør to Washes (Vaske) med destilleret vand.
40 Varenr. 89-00002-00-140 Rev. A
Page 43

xMAP-teknologi Tillæg til brugervejledning, version 2.3
Affaldsbeholder og
Affaldsslange
Opsætning af
sheathleveringssyst
em
Vær forsigtig med ikke at røre tætningen i affaldsflaskens hætte eller
lade den blive våd eller beskidt. Dette kunne forårsage, at flasken
kommer under tryk, hvilket kan føre til trykfejl i systemet. Hvis
tætningen bliver våd, lad den lufttørre. Berøring af tætningen kan
kontaminere den. Hvis den bliver beskidt, skal affaldsflaskens hætte
udskiftes.
For at vedligeholde en stabil gennemstrømningshastighed må
affaldsbeholderen eller affaldsslangen ikke flyttes, mens systemet er i
drift.
Hvis affaldsslangen anvendes, må den ikke flyttes, mens systemet er
i drift. Selvom slangen kan flyttes langs en vandret overflade, må
affaldsslangens højdes ikke omlægges permanent, medmindre
teknisk support kontaktes først. Slangen kan flyttes midlertidigt i
rengørings- og vedligeholdelsesøjemed.
Når Luminex 100 regulatoren justeres, skal den drejes så langt som
muligt med uret til den helt lukkede position. Drej den derefter ½
omdrejning tilbage. Vær forsigtig med ikke at tvinge regulatoren
forbi dens helt lukkede position.
Erstatning af
sheathleveringssyst
emet med
sheathflasker
Det kan være nødvendigt at erstatte sheathleveringssystemet (SD)
med sheathflasker, så vedligeholdelse eller fejlfinding kan foretages,
som instrueret af Luminex teknisk support.
Sådan erstattes SD systemet med sheathflasker:
1. Sluk og afmontér SD systemet fra Luminex 100 enheden.
2. Drej den sorte regulatorskrue inden for midterdøren i Luminex
100 enheden en hel omdrejning mod uret.
3. Fastgør sheath- og affaldsflaskebeholderne. Sørg for, at der er
sheathvæske i flasken (op til påfyldningslinien), og at
sheathhætten er stram.
4. Prim systemet.
5. Mens systemet primes, justér den sorte regulatorskrue inden for
midterdøren i Luminex 100 enheden. Drej med uret for at øge
eller mod uret for at mindske, indtil sheathtrykværdien er
indenfor ± 0,1 psi af det normale niveau på instrumentet.
Overvåg trykmåleren visuelt på fanebladet Run Batch (Kør
batch) Sørg for, at trykket ligger i midten af det grønne
toleranceområde.
Varenr. 89-00002-00-140 rev. A 41
Page 44

Tillæg til brugervejledning, version 2.3 xMAP-teknologi
6. Når primfunktionen er fuldført, løsnes sheathflaskens hætte for at
frigive trykket.
7. Stram sheathhætten og prim systemet én gang til.
8. Sørg for, at sheath- og lufttryksværdierne stiger til det normale
niveau igen.
Justering af
sondehøjde
Disse oplysninger supplerer oplysningerne i IS 2.3
Brugervejledningen.
Sørg for, at den anvendte plade er helt flad – bøjede plader kan
resultere i forkert justering af sondehøjden.
Det egnede tilpasningsredskab anbringes i en mikrotiterplade med 96
brønde, hvor den samlede højde er maks. 19 mm.
• Hvis der skal bruges en standardplade med fladbundede brønde –
sæt to af de største (5,08 mm diameter) tilpasningsskiver oven på
hinanden og anbring dem i den valgte brønd.
• Hvis der skal bruges en plade med filterbund – sæt tre af de
største (5,08 mm diameter) tilpasningsskiver oven på hinanden
og anbring dem i den valgte brønd.
• Hvis der skal bruges en halvvolumen-plade med fladbundede
brønde – sæt to af de mindste (3,35 mm diameter)
tilpasningsskiver oven på hinanden og anbring dem i den valgte
brønd.
• Hvis der skal bruges en rundbundet (U-bund) plade – sæt to af de
mindste (3,35 mm diameter) tilpasningsskiver oven på hinanden
og anbring dem i den valgte brønd.
• Hvis der skal bruges en plade med koniske brønde – anbring én
tilpasningssfære i den valgte brønd.
Sheathvæske ANVENDELSE AF SHEATHVÆSKE, DER IKKE ER
GODKENDT AF LUMINEX, UDGØR ”FORKERT
ANVENDELSE” OG KAN UGYLDIGGØRE DE
GARANTIRETTIGHEDERNE DER ER BLEVET UDSTEDT
AF LUMINEX OG/ELLER DETS AUTORISEREDE
PARTNER.
42 Varenr. 89-00002-00-140 Rev. A
Page 45

Παράρτηµα στο Εγχειρίδιο
Απόρριψη
Εξοπλισµού
Χρήσης Έκδοση 2.3
Το παρόν Παράρτηµα στο Εγχειρίδιο Χρήσης Luminex® 100TM
IS Έκδοση 2.3 περιέχει πληροφορίες που έγιναν διαθέσιµες
µετά την έκδοση του εγχειριδίου. Ορισµένα από τα θέµατα που
παρουσιάζονται στο παράρτηµα δεν έχουν δηµοσιευτεί στην
προηγούµενη έκδοση, ενώ υπάρχουν επίσης θέµατα που
αντικαθιστούν πληροφορίες οι οποίες περιλαµβάνονταν στο
προηγούµενο εγχειρίδιο Παρακαλείστε να
παράρτηµα για να εξοικειωθείτε µε τα νέα περιεχόµενα
Το παρόν παράρτηµα περιέχει τα ακόλουθα θέµατα:
• Απόρριψη Εξοπλισµού
• Σύµβολα Ασφαλείας και Ρυθµιστικά Σύµβολα
• Βαθµονοµητές και Μάρτυρες
• Αποθήκευση του Αναλυτή
• Όγκος ∆είγµατος /Αραίωση ∆είγµατος
• Καθαρισµός του Αναλυτή
• ∆οχείο
• ∆ιευθέτηση Συστήµατος Χορήγησης Περιβλήµατος
• Αντικατάσταση του Συστήµατος Χορήγησης Περιβλήµατος
µε Φιάλες Υγρού Περιβλήµατος
• Ρύθµιση Ύψους Ακροφυσίου
• Υγρό Περιβλήµατος
Η Οδηγία 2002/96/EC περί Απόρριψης Ηλεκτρικού και
Ηλεκτρονικού Εξοπλισµού προβλέπει την κατάλληλη
απόρριψη του ηλεκτρικού και ηλεκτρονικού εξοπλισµού όταν
φτάνει στο τέλος της ωφέλιµης ζωής του
Αποβλήτων/Γραµµή Αποβλήτων
διαβάσετε το
ΣΗΜΕΙΩΣΗ: Αυτή η οδηγία ισχύει µόνο για τους πελάτες της
Ευρωπαϊκής Ένωσης (ΕΕ). Οι χρήστες εκτός ΕΕ µπορούν να
αγνοήσουν την παρούσα
Αν πρόκειται να απορρίψετε έναν Αναλυτή Luminex 100, ένα
Σύστηµα SD
απολυµάνετε το σύστηµα =Ανατρέξτε στην ενότητα
"Απολύµανση του Αναλυτή Luminex 100 για Επιστροφή" του
ΚεφαλαίουΑσφάλεια στο Εγχειρίδιο Χρήσης Luminex 100 IS
Έκδοση 2.3. Κατόπιν, καλέστε την Τε χ νι κ ή Υποστήριξη της
Luminex για να πάρετε έναν αριθµό RMA (Recycled Returned
Materials Authorization, Εξουσιοδότηση για Ανακυκλωµένα
Επιστρεφόµενα Υλικά) στον αριθµό +1 512-381-4397 µεταξύ
των ωρών 7:00
Παρασκευή. Τον εξοπλισµό θα τον επιστρέψετε στη
διεύθυνση:
Βόρεια Αµερική:
Luminex Corporation
12201 Technology Blvd., Suite 130
Austin, TX 78727
Για πληροφορίες σχετικά µε την απόρριψη του σαρωτή
γραµµωτού κώδικα, του PC ή της οθόνης, ανατρέξτε στα
εγχειρίδια του κατασκευαστή.
Αρ. Κατ. 89-00002-00-140 Αναθ. A 43
TM
ή ένα Όργανο XYPTM, θα πρέπει να
π.µ. έως 7:00 µ.µ. Κεντρική ώρα, ∆ευτέρα έως
ενότητα
Page 46

Παράρτηµα στο Εγχειρίδιο Χρήσης Έκδοση 2.3 Τεχνολογία xMAP
Σύµβολα
Νέα σύµβολα ασφαλείας και ρυθµιστικά σύµβολα έχουν
προστεθεί στο σύστηµα και στα εγχειρίδια του Luminex 100.
Ασφαλείας και
Ρυθµιστικά
Παρακαλείστε να εξοικειωθείτε µε αυτά τα σύµβολα.
Τα παρακάτω σύµβολα επισηµαίνουν προειδοποιήσεις,
προφυλάξεις και γενικές πληροφορίες που χρησιµοποιούνται
Σύµβολα
Σύµβολο Περιγραφή Σύµβολο Περιγραφή Σύµβολο Περιγραφή
Εναλλασσόµενο
ρεύµα (ac)
Γείωση προστασίας
On (Εντός)
Off (Εκτός)
Ιατροτεχνολογικό
Βοήθηµα που
Χρησιµοποιείται στη
∆ιάγνωση In Vitro
Θερµοκρασιακός
Περιορισµός
στη λειτουργία του παρόντος οργάνου
Προειδοποίηση
(ανατρέξτε στο
εγχειρίδιο)
Προειδοποίηση
(ανατρέξτε στο
εγχειρίδιο)
Προειδοποίηση
(ανατρέξτε στο
εγχειρίδιο)
Αριθµός Καταλόγου Συµβουλευτείτε τις
Κωδικός Οµάδας Αύξοντας
Ηµεροµηνία Λήξης Ηµεροµηνία
Προειδοποίηση
(ανατρέξτε στο
εγχειρίδιο)
Προειδοποίηση
(ανατρέξτε στο
εγχειρίδιο)
Προειδοποίηση
(ανατρέξτε στο
εγχειρίδιο)
οδηγίες χρήσης
αριθµός
Κατασκευής
Κατασκευαστής
Συµµόρφωση για
Ευρωπαϊκή Ένωση
44 Αρ. Κατ. 89-00002-00-140 Αναθ. A
Underwriter’s
Laboratory
ΗΠÁ
WEEE – Να µην
απορριφθεί στα
σκουπίδια
Underwriter’s
Laboratory Καναδά
Page 47

Τεχνολογία xMAP Παράρτηµα στο Εγχειρίδιο Χρήσης Έκδοση 2.3
Βαθµονοµητές
και Μάρτυρες
Αποθήκευση
του Αναλυτή
Αναδεύστε σε Vortex τα δοχεία των βαθµονοµητών xMAP και
των µαρτύρων για να διασφαλιστεί η οµοιογένεια Μην
αραιώσετε το βαθµονοµητή xMAP και τα αντιδραστήρια των
µαρτύρων Σηµειώστε ότι η θέση του φιαλιδίου ενδέχεται να
επηρεάζει το µέγεθος της σταγόνας. Βεβαιωθείτε ότι
αναστρέψατε το φιαλίδιο µε τέτοιον τρόπο
κάθετο προς την επιφάνεια της πλάκας Κατά τη βαθµονόµηση
του αναλυτή, τοποθετήστε µια πλάκα µικροτιτλοδότησης µε
πέντε τουλάχιστον σταγόνες από τα εξής: CAL1 στο φρεάτιο
A1, CAL2 στο φρεάτιο B1, CON1 στο φρεάτιο C1, CON2 στο
φρεάτιο D1 και αποσταγµένο νερό στα φρεάτια E1 έως H1
ώστε να γίνουν τέσσερις εκπλύσεις συνολικά. Μπορείτε να
χρησιµοποιήσετε διαφορετικά φρεάτια, ανάλογα µε τις ανάγκες
Για να επιλέξετε διαφορετικές θέσεις φρεατίων στο λογισµικό,
κάντε κλικ στο βέλος του πτυσσόµενου µενού, στο κελί
εισαγωγής βαθµονοµητή ή µάρτυρα, και µετά κάντε κλικ στη
θέση του φρεατίου στην εικόνα της πλάκας µικροτιτλοδότησης
ώστε να είναι
Για να ετοιµάσετε το σύστηµα για αποθήκευση:
1= Εκτελέστε µια εντολή Sanitize (Καθαρισµός) µε 10% έως
20% διάλυµα οικιακής χλωρίνης
2= Εκτελέστε µια εντολή Sanitize (Καθαρισµός) µε
αποσταγµένο νερό
3= Εκτελέστε τέσσερις εντολές Wash (Πλύση) µε
αποσταγµένο νερό
4= Αφαιρέστε το ακροφύσιο δείγµατος από το όργανο,
ξεπλύντε µε αποσταγµένο νερό
φαρδύτερο άκρο και εξέρχεται από το πιο στενό,
επανατοποθετήστε το στο βραχίονα δείγµατος και τυλίξτε
το άκρο µε Parafilm.
που περνά από το
Αρ. Κατ. 89-00002-00-140 Αναθ. A 45
Page 48

Παράρτηµα στο Εγχειρίδιο Χρήσης Έκδοση 2.3 Τεχνολογία xMAP
Για να ετοιµάσετε το σύστηµα για πρώτη χρήση µετά από
αποθήκευση:
1= Ενεργοποιήστε τα Luminex 100 και XY Platform και δείτε
αν εµφανίζονται οι ακόλουθες ενδείξεις σωστής λειτουργίας
των οργάνων:
• Το φως πάνω από το ακροφύσιο δείγµατος στο Luminex
100 και το φως δίπλα στη θύρα του οργάνου XY
Platform είναι αναµµένα.
• Ο συµπιεστής ξεκινά στο Luminex 100. Ακούγεται ένα
χαµηλό βουητό.
• Βάλτε το χέρι σας πίσω από το Luminex 100 για να
αισθανθείτε τον αέρα που βγαίνει από τον οπίσθιο
ανεµιστήρα Βάλτε το χέρι σας στην αριστερή πλευρά του
XY για να αισθανθείτε τον αέρα που βγαίνει από το XY.
• Παρατηρήστε την κίνηση
της µεσαίας πρόσθιας θύρας του Luminex 100 λίγη ώρα
µετά την ενεργοποίηση του οργάνου.
της σύριγγας στο εσωτερικό
Όγκος
∆είγµατος /
Αραίωση
2= Ξεκινήστε το PC και το λογισµικό IS.
3= Εκτελέστε µια εντολή Warmup (Προθέρµανση), η οποία θα
διαρκέσει 30 λεπτά
4= Αφαιρέστε το Parafilm από το άκρο του ακροφυσίου
δείγµατος
5= Αφού ολοκληρωθεί η εντολή Warmup (Προθέρµανση),
εκτελέστε τρεις
τρεις εντολές Drain (Αποστράγγιση), δύο εντολές Alcohol
Flush (Έκπλυση Αλκοόλης) και τρεις εντολές Wash
(Πλύση) µε αποσταγµένο νερό. Βεβαιωθείτε ότι η φιάλη
υγρού περιβλήµατος ή το Luminex SD διαθέτει αρκετή
ποσότητα υγρού περιβλήµατος και ότι το δοχείο
αποβλήτων είναι άδειο Βεβαιωθείτε ότι η πίεση κατά την
εκτέλεση των εντολών συντήρησης
στο System Monitor (Παρακολούθηση Συστήµατος).
Για βέλτιστη αποτελεσµατικότητα δειγµατοληψίας και για να
µειωθούν οι παρεµβολές, τα συµπυκνωµένα βιολογικά υγρά
όπως ο ορός ή το πλάσµα πρέπει να αραιώνονται µε αναλογία
τουλάχιστον 1:5.
εντολές Backflush (Αντίστροφη Έκπλυση),
είναι µεταξύ 6 και 9 psi
∆είγµατος
46 Αρ. Κατ. 89-00002-00-140 Αναθ. A
Για να ελαχιστοποιηθεί η πιθανότητα πρόσληψης αέρα,
βεβαιωθείτε ότι ο όγκος παραλαβής δείγµατος είναι
τουλάχιστον 25 µL µικρότερος
φρεάτιο.
από το συνολικό όγκο στο
Page 49

Τεχνολογία xMAP Παράρτηµα στο Εγχειρίδιο Χρήσης Έκδοση 2.3
Καθαρισµός του
Αναλυτή
Εκτελέστε τα ακόλουθα βήµατα κατά την Εκκίνηση του
Συστήµατος:
1= Warmup (Προθέρµανση)
2= Prime (Εκκίνηση)
3= Alcohol Flush (Έκπλυση Αλκοόλης) µε 70%
ισοπροπανόλη ή 70% αιθανόλη
4= Wash (Πλύση) δύο φορές µε αποσταγµένο νερό
Εκτελέστε τα ακόλουθα βήµατα κατά τον Τε ρ µατισµό
Λειτουργίας του Συστήµατος
1= Sanitize (Καθαρισµός) µε 10% έως 20% διάλυµα οικιακής
χλωρίνης
2= Wash (Πλύση) δύο φορές µε αποσταγµένο νερό
3= Soak (∆ιαπότιση) µε αποσταγµένο νερό
Εκτελείτε τη ∆ιαδικασία Προληπτικής Συντήρησης/
Αντιµετώπισης Απόφραξης κάθε βδοµάδα ή πιο συχνά αν
παρουσιάζονται προβλήµατα στην παραλαβή δείγµατος,
καθώς και όταν υποψιάζεστε ότι υπάρχει απόφραξη
1= Αφαιρέστε το ακροφύσιο δείγµατος και τοποθετήστε το
λεπτό άκρο σε λουτρό µε συσκευή υπερήχων για 2-3
λεπτά
2= Εκτελέστε τρεις εντολές Backflush (Αντίστροφη
3= Εκτελέστε τρεις εντολές Drain (Αποστράγγιση).
4= Εκτελέστε δύο εντολές Alcohol Flush (Έκπλυση Αλκοόλης).
5= Εκτελέστε τρεις εντολές Wash (Πλύση) µε αποσταγµένο
νερό
Έκπλυση).
Αρ. Κατ. 89-00002-00-140 Αναθ. A 47
Page 50

Παράρτηµα στο Εγχειρίδιο Χρήσης Έκδοση 2.3 Τεχνολογία xMAP
∆οχείο
Αποβλήτων και
Γραµµή
Αποβλήτων
∆ιευθέτηση
Συστήµατος
Χορήγησης
Περιβλήµατος
Προσέξτε να µην ακουµπήσετε το στεγανοποιητικό στο πώµα
της φιάλης αποβλήτων και µην το αφήσετε να υγρανθεί ή να
λερωθεί Κάτι τέτοιο µπορεί να δηµιουργήσει πίεση στη φιάλη,
µε αποτέλεσµα να υπάρξουν προβλήµατα πίεσης στο σύστηµα
Αν το στεγανοποιητικό υγρανθεί, αφήστε το να στεγνώσει
αέρα Αν αγγίξετε το στεγανοποιητικό, µπορεί να το µολύνετε.
Αν λερωθεί, θα πρέπει να αντικαταστήσετε το πώµα της
φιάλης αποβλήτων
Για να διατηρείτε σταθερό το ρυθµό ροής, µη µετακινείτε το
δοχείο αποβλήτων ή τη γραµµή αποβλήτων όταν έχετε θέσει
σε λειτουργία το σύστηµα
Αν χρησιµοποιείτε
µετακινήσετε όταν το σύστηµα είναι σε λειτουργία Παρόλο που
µπορείτε να µετακινείτε τη γραµµή σε οριζόντια επιφάνεια, µην
αλλάζετε συνεχώς το ύψος της γραµµής αποβλήτων χωρίς
προηγούµενη επικοινωνία µε την Τεχ ν ι κ ή Υποστήριξη
Μπορείτε να µετακινήσετε τη γραµµή προσωρινά
καθαρισµού και συντήρησης
Όταν προσαρµόζετε το ρυθµιστή του Luminex 100,
περιστρέψτε τον δεξιόστροφα όσο περισσότερο µπορείτε µέχρι
να φτάσει στην έντελώς κλειστή θέση και µετά περιστρέψτε τον
προς τα πίσω κατά 1/2 της στροφής Προσέξτε να µην
ασκήσετε δύναµη στο ρυθµιστή ώστε να ξεπεράσει την
εντελώς κλειστή θέση
τη γραµµή αποβλήτων, µην την
για λόγους
στον
48 Αρ. Κατ. 89-00002-00-140 Αναθ. A
Page 51

Τεχνολογία xMAP Παράρτηµα στο Εγχειρίδιο Χρήσης Έκδοση 2.3
Αντικατάσταση
του Συστήµατος
Χορήγησης
Περιβλήµατος
µε Φιάλες Υγρού
Περιβλήµατος
Μπορεί να χρειαστεί να αντικαταστήσετε το σύστηµα
Χορήγησης Περιβλήµατος (SD) µε φιάλες υγρού περιβλήµατος
για λόγους συντήρησης ή αντιµετώπισης προβληµάτων,
σύµφωνα µε τις οδηγίες της Τε χν ι κ ής Υποστήριξης της
Luminex.
Για να αντικαταστήσετε το σύστηµα SD µε φιάλες υγρού
περιβλήµατος:
1= Απενεργοποιήστε και αποσυνδέστε το σύστηµα SD από το
Luminex 100.
2= Περιστρέψτε τη µαύρη βίδα του ρυθµιστή στο εσωτερικό
της κεντρικής θύρας του Luminex 100 µία πλήρη στροφή
προς τα αριστερά
3= Τοπ οθ ε τή σ τε τα δοχεία περιβλήµατος και αποβλήτων
Βεβαιωθείτε ότι υπάρχει υγρό
(έως τη γραµµή πλήρωσης) και ότι το πώµα του
περιβλήµατος είναι σφιχτό
4= Εκκινήστε (prime) το σύστηµα.
5= Καθώς πραγµατοποιείται η εκκίνηση του συστήµατος,
ρυθµίστε τη µαύρη βίδα του ρυθµιστή στο εσωτερικό της
κεντρικής θύρας του Luminex 100. Περιστρέψτε δεξιά για
αύξηση ή
πίεσης του υγρού περιβλήµατος διαφέρει κατά +/- 0,1 psi
από την κανονική τιµή του οργάνου
Παρακολουθήστε οπτικά το µετρητή πίεσης στην
καρτέλα Run Batch (Εκτέλεση Οµάδας). Βεβαιωθείτε
ότι η πίεση είναι κεντραρισµένη στην πράσινη
περιοχή ανοχών
αριστερά για µείωση, µέχρις ότου η τιµή της
περιβλήµατος στη φιάλη
6= Αφού ολοκληρωθεί η διαδικασία εκκίνησης (prιming),
ξεσφίξτε
ελευθερωθεί η πίεση
7= Σφίξτε το πώµα του υγρού περιβλήµατος και εκκινήστε
(prime) πάλι το σύστηµα.
8= Βεβαιωθείτε ότι οι τιµές πίεσης του περιβλήµατος και του
αέρα αυξάνονται στα κανονικά επίπεδα και πάλι.
Αρ. Κατ. 89-00002-00-140 Αναθ. A 49
το πώµα της φιάλης περιβλήµατος για να
Page 52

Παράρτηµα στο Εγχειρίδιο Χρήσης Έκδοση 2.3 Τεχνολογία xMAP
Ρύθµιση Ύψους
Ακροφυσίου
Οι πληροφορίες αυτές συµπληρώνουν τις πληροφορίες που
υπάρχουν στο Εγχειρίδιο Χρήσης IS 2.3.
Βεβαιωθείτε ότι η πλάκα που χρησιµοποιείτε είναι εντελώς
επίπεδη – οι παραµορφωµένες πλάκες µπορεί να
προκαλέσουν λανθασµένη ρύθµιση του ύψους του
ακροφυσίου
Σε µια πλάκα µικροτιτλοδότησης 96 φρεατίων µε συνολικό
ύψος όχι µεγαλύτερο από 0,75 ίντσες (19 mm), τοποθετήστε
κατάλληλο εργαλείο ευθυγράµµισης στην πλάκα.
• Για µια τυπική πλάκα µε φρεάτια επίπεδου πυθµένα—
τοποθετήστε δύο από τους µεγαλύτερους δίσκους
ευθυγράµµισης (διαµέτρου 5,08 mm) στο επιλεγµένο
φρεάτιο.
• Για µια πλάκα µε φίλτρο στον πυθµένα—τοποθετήστε τρεις
από τους µεγαλύτερους δίσκους ευθυγράµµισης
(διαµέτρου 5,08 mm) στο
• Για µια πλάκα µισού όγκου µε φρεάτια επίπεδου
πυθµένα—τοποθετήστε δύο από τους µικρότερους δίσκους
ευθυγράµµισης (διαµέτρου 3,35 mm) στο επιλεγµένο
φρεάτιο
• Για µια πλάκα σφαιρικού πυθµένα (πυθµένας U)—
τοποθετήστε δύο από τους µικρότερους δίσκους
ευθυγράµµισης (διαµέτρου 3,35 mm) στο επιλεγµένο
φρεάτιο
• Για µια
σφαιρίδιο ευθυγράµµισης στο επιλεγµένο φρεάτιο
πλάκα µε κωνικά φρεάτια—τοποθετήστε ένα
επιλεγµένο φρεάτιο
το
Υγρό
Περιβλήµατος
50 Αρ. Κατ. 89-00002-00-140 Αναθ. A
Η ΧΡΗΣΗ ΥΓΡΟΥ ΠΕΡΙΒΛΗΜΑΤΟΣ ΠΟΥ ∆ΕΝ ΕΧΕΙ
ΕΓΚΡΙΘΕΙ ΑΠΟ ΤΗ LUMINEX ΣΥΝΙΣΤΑ “ΑΚΑΤΑΛΛΗΛΗ
ΧΡΗΣΗ” ΚΑΙ ΜΠΟΡΕΙ ΝΑ ΑΚΥΡΩΣΕΙ ΤΑ ∆ΙΚΑΙΩΜΑΤΑ ΤΗΣ
ΕΓΓΥΗΣΗΣ ΠΟΥ ΠΑΡΕΧΟΝΤΑΙ ΑΠΟ ΤΗ LUMINEX Η/ΚΑΙ
ΤΟΝ ΕΞΟΥΣΙΟ∆ΟΤΗΜΕΝΟ ΑΝΤΙΠΡΟΣΩΠΟ ΤΗΣ
Page 53

Apêndice do Manual de Instruções, Versão 2.3
Este Apêndice do Manual de Instruções, Versão 2.3 do Luminex® 100TM
IS contém informações que se tornaram disponíveis após a publicação
do manual. Alguns dos tópicos apresentados neste apêndice não foram
publicados na versão anterior; alguns tópicos substituem informações
existentes na versão anterior do manual. Leia todo o conteúdo deste
apêndice para familiarizar-se com o novo conteúdo.
Este apêndice inclui os seguintes tópicos:
• Descarte do Equipamento
• Símbolos de Segurança e de Regulamentação
• Calibradores e Controles
• Armazenamento do Analisador
• Volume das Amostras/Diluição das Amostras
• Limpeza do Analisador
• Recipiente de Resíduos/Linha de Resíduos
• Configuração do Sistema de Fornecimento de Invólucro
• Substituição do Sistema de Fornecimento de Invólucro por
Frascos de Invólucro
• Ajuste da Altura da Sonda
• Fluido do Invólucro
Descarte do
Equipamento
A diretiva 2002/96/CE, relativa a Resíduos de Equipamentos Elétricos e
Eletrônicos, exige que equipamentos elétricos e eletrônicos sejam
descartados adequadamente quando atingem o final de sua vida útil.
NOTA: Esta diretiva se aplica somente a clientes da União Européia
(UE). Os usuários externos à UE podem desconsiderar esta seção.
Ao descartar um Analisador Luminex 100, um Sistema SDTM ou um
Instrumento XYP
seção "Descontaminação do Analisador Luminex 100 para Devolução"
no capítulo Segurança do Manual de Instruções do Luminex 100 IS,
Versão 2.3. Em seguida, entre em contato com a Assistência Técnica da
Luminex para obter um número de Autorização de Devolução de
Material (RMA) pelo telefone +1 512-381-4397, das 07:00 às 19:00,
Hora Central, de segunda a sexta-feira. O equipamento será devolvido
para:
Luminex Corporation
12201 Technology Blvd., Suite 130
Austin, TX 78727
Para obter informações sobre o descarte do leitor de códigos de
barras, PC ou monitor, consulte a documentação do fabricante.
TM
, é preciso descontaminar o sistema. Consulte a
PN 89-00002-00-140 Rev. A 51
Page 54

Apêndice do Manual de Instruções, Versão 2.3 xTecnologia MAP
Símbolos de
Segurança e de
Regulamentação
Novos símbolos de segurança e regulamentação foram adicionados
ao sistema Luminex 100 e aos manuais. Informe-se acerca destes
símbolos.
Estes símbolos descrevem avisos, cuidados e informações gerais
utilizados na operação deste instrumento.
Símbolo Descrição Símbolo Descrição Símbolo Descrição
Corrente alternada
(CA)
Terra de proteção
Ligado
Desligado
Dispositivo Médico
de Diagnóstico In
vitro
Temperatura
Limitação
Aviso
(consultar o
manual)
Aviso
(consultar o
manual)
Aviso
(consultar o
manual)
Número do
Catálogo
Código do Lote Número de Série
Data de Validade Data de Fabricação
Aviso
(consultar o manual)
Aviso
(consultar o manual)
Aviso (consultar o
manual)
Consulte as
instruções de
utilização
Fabricante
Conformidade da
União Européia
Calibradores e
Controles
Provoque um vórtice nos recipientes de calibradores e controles
xMAP para garantir a homogeneidade. Não dilua o calibrador
xMAP e os reagentes de controle. Note que a posição do frasco pode
Laboratório de
Aprovação
US
WEEE – Não
descartar no lixo
Laboratório de
Aprovação
Canadense
afetar o tamanho das gotas. Certifique-se de inverter o frasco de
forma que fique perpendicular à superfície da placa. Ao calibrar o
analisador, carregue uma placa de microtítulo com no mínimo cinco
gotas de cada: CAL1 no poço A1, CAL2 no poço B1, CON1 no po ço
C1, CON2 no poço D1 e água destilada nos poços E1 a H1 para
efetuar um total de quatro lavagens. É possível utilizar poços
52 PN 89-00002-00-140 Rev. A
Page 55

xTecnologia MAP Apêndice do Manual de Instruções, Versão 2.3
diferentes, conforme necessário. Para selecionar diferentes
localizações de poços no software, clique na seta de lista suspensa
junto à célula de entrada para o calibrador ou controle e, em seguida,
clique na localização do poço na imagem da placa de microtítulo.
Armazenamento do
Analisador
Preparação do sistema para armazenamento:
1. Excute um comando Sanitize (Esterilizar) com uma solução de
alvejante doméstico a 10% a 20%.
2. Execute um comando Sanitize (Esterilizar) com água destilada.
3. Execute quatro comandos Wash (Lavar) com água destilada.
4. Retire a sonda de amostra do instrumento, lave-a com água
destilada da extremidade mais estreita para a extremidade mais
larga, substitua-a no braço de amostra e envolva a extremidade
com Parafilm.
Para preparar o sistema para a primeira utilização após ter estado
armazenado:
1. Ligue o Luminex 100 e a Plataforma XY, e aguarde pelas
seguintes indicações de que os instrumentos estão respondendo
de forma correta:
• A luz acima da sonda de amostra no Luminex 100 e a luz
próxima à porta da plataforma XY estão acesas.
• O compressor começa a funcionar no Luminex 100. É um som
de vibração com baixa intensidade.
• Coloque sua mão atrás do Luminex 100 para sentir o ar saindo
da ventoinha traseira. Coloque sua mão na lateral esquerda do
XY para sentir o ar saindo do XY.
• Observe o movimento da seringa no interior da porta central
frontal do Luminex 100 logo após o instrumento ter sido
ligado.
2. Ligue o PC e inicie o software IS.
3. Execute o comando Warmup (Aquecimento), o qual demora 30
minutos.
4. Retire o Parafilm da extremidade da sonda de amostra.
5. Após o Warmup (Aquecimento) estar concluído, execute três
comandos Backflush (Retrolavagem), três comandos Drain
(Drenagem), dois comandos Alcohol Flush (Evacuação de
álcool) e três comandos Wash (Lavagem) com água destilada.
Certifique-se de que o frasco de invólucro ou o Luminex SD
possua uma quantidade suficiente de fluido de invólucro e que o
PN 89-00002-00-140 Rev. A 53
Page 56

Apêndice do Manual de Instruções, Versão 2.3 xTecnologia MAP
recipiente de resíduos esteja vazio. Verifique se a pressão durante
cada um dos comandos de manutenção se encontra entre 6 e 9
psi no System Monitor (Monitor do Sistema).
Volume das
Amostras/Diluição
das Amostras
Limpeza do
Analisador
Para uma eficiência ideal da amostragem e para reduzir os efeitos de
matriz, os fluidos biológicos concentrados, tais como soro ou pl asma,
devem ser diluídos em pelo menos 1:5.
Para minimizar o risco de aquisição de ar, certifique-se de que o
volume de aquisição da amostra seja pelo menos 25 µL inferior ao
volume total no poço.
Execute as seguintes etapas durante o Startup (Inicialização):
1. Warmup (Aquecimento)
2. Prime (Preparar)
3. Alcohol Flush (Evacuação de álcool) com isopropanol a 70% ou
etanol a 70%
4. Lavar duas vezes com água destilada
Execute as seguintes etapas durante o Shutdown (Encerramento)
1. Esterilizar com solução de alvejante doméstico a 10% a 20%.
2. Lavar duas vezes com água destilada.
3. Embeber com água destilada.
Execute o Procedimento de Manutenção Preventiva/Solução de
Problemas de Obstrução semanalmente, ou com maior freqüência
caso surjam problemas de aquisição de amostras, e sempre que
houver suspeita de obstrução.
1. Retire a sonda de amostra e limpe a extremidade estreita atra vé s
de ultra-som durante 2 a 3 minutos.
2. Execute três comandos Backflush (Retrolavagem).
3. Execute três comandos Drain (Drenagem).
4. Execute dois comandos Alcohol Flush (Evacuação de álcool).
5. Execute três comandos Wash (Lavar) com água destilada.
54 PN 89-00002-00-140 Rev. A
Page 57

xTecnologia MAP Apêndice do Manual de Instruções, Versão 2.3
Recipiente de
Resíduos e Linha de
Resíduos
Configuração do
Sistema de
Fornecimento de
Invólucro
Tenha cuidado para não tocar no selo da tampa do frasco de resíduos,
ou deixar que fique molhado ou sujo. Isso poderia causar pressão no
frasco, gerando erros de pressão no sistema. Se o selo ficar molhado,
deixe-o secar ao ar. O ato de tocar no selo pode contaminá-lo. Se o
selo ficar sujo, a tampa do frasco de resíduos deverá ser substituída.
Para manter um débito estável, não mova o recipiente de resíduos ou
a linha de resíduos durante o funcionamento do sistema.
Se estiver utilizando a linha de resíduos, não a mova enquanto o
sistema estiver em funcionamento. Embora seja possível mover a
linha ao longo de uma superfície horizontal, não altere
permanentemente a elevação da linha de resíduos sem co ntactar
primeiro a Assistência Técnica. A linha pode ser movida
temporariamente para fins de limpeza e manutenção.
Ao ajustar o regulador Luminex 100, gire-o no sentido horário até
que fique na posição de totalmente fechado, em seguida gire-o 1/2
volta no sentido inverso. Tenha cuidado para não forçar o regulador
além da posição de totalmente fechado.
Substituição do
Sistema de
Fornecimento de
Invólucro por
Frascos de
Invólucro
É possível que seja necessário substituir o sistema de fornecimento
de invólucro (Sheath Delivery - SD) por frascos de invólucro pa ra
fins de manutenção ou solução de problemas, conforme indica do
pela Assistência Técnica da Luminex.
Para substituir o sistema SD por frascos de invólucro:
1. Desligue a alimentação e desconecte o sistema SD do Luminex
100.
2. Gire o parafuso regulador preto que se encontra dentro da porta
central do Luminex 100 uma volta completa no sentido antihorário.
3. Encaixe os recipientes de invólucro e de frascos de resíduos.
Certifique-se de que exista fluido do invólucro no frasco (até à
linha de enchimento) e que a tampa do invólucro esteja apertada.
4. Prepare o sistema.
5. Enquanto o sistema estiver sendo preparado, ajuste o parafuso
regulador preto que se encontra dentro da porta central do
Luminex 100. Gire-o no sentido horário para aumentar ou no
sentido anti-horário para diminuir, até que a pressão do invólucro
esteja entre +/- 0,1 psi do nível normal do seu instrumento.
PN 89-00002-00-140 Rev. A 55
Page 58

Apêndice do Manual de Instruções, Versão 2.3 xTecnologia MAP
Acompanhe visualmente o indicador de pressão na guia Run
Batch (Executar lote). Certifique-se de que a pressão esteja
posicionada no centro da faixa verde de tolerância.
6. Quando a função Prime (Preparar) estiver concluída, desaperte a
tampa do frasco do invólucro para liberar a pressão.
7. Aperte a tampa do invólucro e prepare o sistema novamente.
8. Certifique-se de que os valores da pressão do invólucro e do ar
subam novamente para o nível normal.
Ajuste da Altura da
Sonda
Esta informação complementa a informação presente no Manual de
Instruções IS 2.3.
Certifique-se de que a placa que está sendo utilizada esteja
completamente plana – placas deformadas podem levar a um ajuste
incorreto da altura da sonda.
Em uma placa de microtítulo de 96 poços, em que a altura global é
de no máximo 0,75 polegadas (19 milímetros), coloque a ferramenta
de alinhamento adequada na placa:
• Para uma placa padrão com poços de fundo plano, empilhe dois
dos maiores discos de alinhamento (5,08 mm de diâmetro) e
coloque-os no poço selecionado.
• Para uma placa plana de filtro, empilhe três dos maiores discos
de alinhamento (5,08 mm de diâmetro) e coloque-os no poço
selecionado.
• Para uma placa de meio volume com poços de fundo plano,
empilhe dois dos menores discos de alinhamento (3,35 mm de
diâmetro) e coloque-os no poço selecionado.
• Para uma placa de fundo redondo (fundo em U), empilhe dois
dos menores discos de alinhamento (3,35 mm de diâmetro)
juntos e coloque-os no poço selecionado.
• Para uma placa com poços cônicos, coloque uma esfera de
alinhamento no poço selecionado.
Fluido do Invólucro A UTILIZAÇÃO DE FLUIDO DE INVÓLUCRO NÃO
APROVADO PELA LUMINEX CONSTITUI UMA
“UTILIZAÇÃO INADEQUADA” E PODERÁ ANULAR OS
DIREITOS DA GARANTIA FORNECIDOS PELA LUMINEX
E/OU PELO PARCEIRO AUTORIZADO.
56 PN 89-00002-00-140 Rev. A
 Loading...