

Page 1

02001346 Rev 1
HPP-1000/6000 User Manual
Page 1 of 19
26 Ward Hill Ave., Bradford, MA 01835
Phone: 978-241-8260 Fax: 978-241-8262
USER MANUAL
HPP-1000 thru 6000-XX-YY-ZZ
XX= Ioutmax
YY = Maximum Compliance Voltage
ZZ = Max Pulse Width in µsec
Page 2

02001346 Rev 1
HPP-1000/6000 User Manual
Page 2 of 19
Table of Contents
1. Warnings ...................................................................................................................... 3
2. Description of HPP System ......................................................................................... 4
3. Pulsing Characteristics ................................................................................................ 5
4. DC power supply for HPP ........................................................................................... 7
5. Supply Interface Connections ...................................................................................... 8
6. LDD/HPP integration and theory of operation ............................................................ 9
7. LDD with HP option.................................................................................................. 11
8. LDN with VP option.................................................................................................. 12
9. HPP-6000 Specifications ........................................................................................... 13
10. HPP Interface ............................................................................................................. 14
11. Operation of the HPP ................................................................................................. 15
12. Product Limited Warranty ......................................................................................... 18
13. Service ....................................................................................................................... 19
Tables and Figures
Table 1, HPP Interface ...................................................................................................... 14
Figure 1, HPP Block Diagram ............................................................................................ 4
Figure 2, Typical Rise Time ............................................................................................... 5
Figure 3, Typical Fall Time ................................................................................................ 5
Figure 4, Pulse Output ........................................................................................................ 6
Figure 5, Repetition Rate .................................................................................................... 6
Figure 6, Connection Diagram ............................................................................................ 8
Figure 7, HPP Mechanical Outline Drawing .................................................................... 16
Figure 7, HPP Connections ............................................................................................... 17
Page 3

02001346 Rev 1
HPP-1000/6000 User Manual
Page 3 of 19
1. Warnings
Warning – Voltage Compliance Requirement
Warning – Output Floating
Each HPP is custom configured to deliver current pulses into a diode array requiring a
predefined compliance voltage.
See the Serial Number label of the unit for the compliance voltage rating. The HPP
takes DC input voltage and will not operate properly when the input is great than 10V
higher than the load compliance voltage and will not start when the input is 20V lower
that the rating on the S/N label or lower than 20V.
Consult factory more wider operating window.
The output of the HPP is floating and therefore, neither side of the laser diode is
allowed to be connected to the same ground as signal ground (Program, Monitor).
WARNING: Only Lumina Power, Inc. qualified service personnel are allowed to
remove the covers and service this equipment.
WARNING: NEVER OPERATE THE POWER SUPPLY:
1. Without providing adequate protection of personnel from high voltage.
2. Without proper ground connections.
3. Without covers and panels properly installed.
4. Without a suitable load for the application and properly rated for the
required power dissipation.
Page 4
02001346 Rev 1
HPP-1000/6000 User Manual
Page 4 of 19
2. Description of HPP System
High Power
Linear Regulator
DC
Input Voltage
Control System
Hall Effect
Sensor
Laser
Diode
Iout Control
Iout Monitor
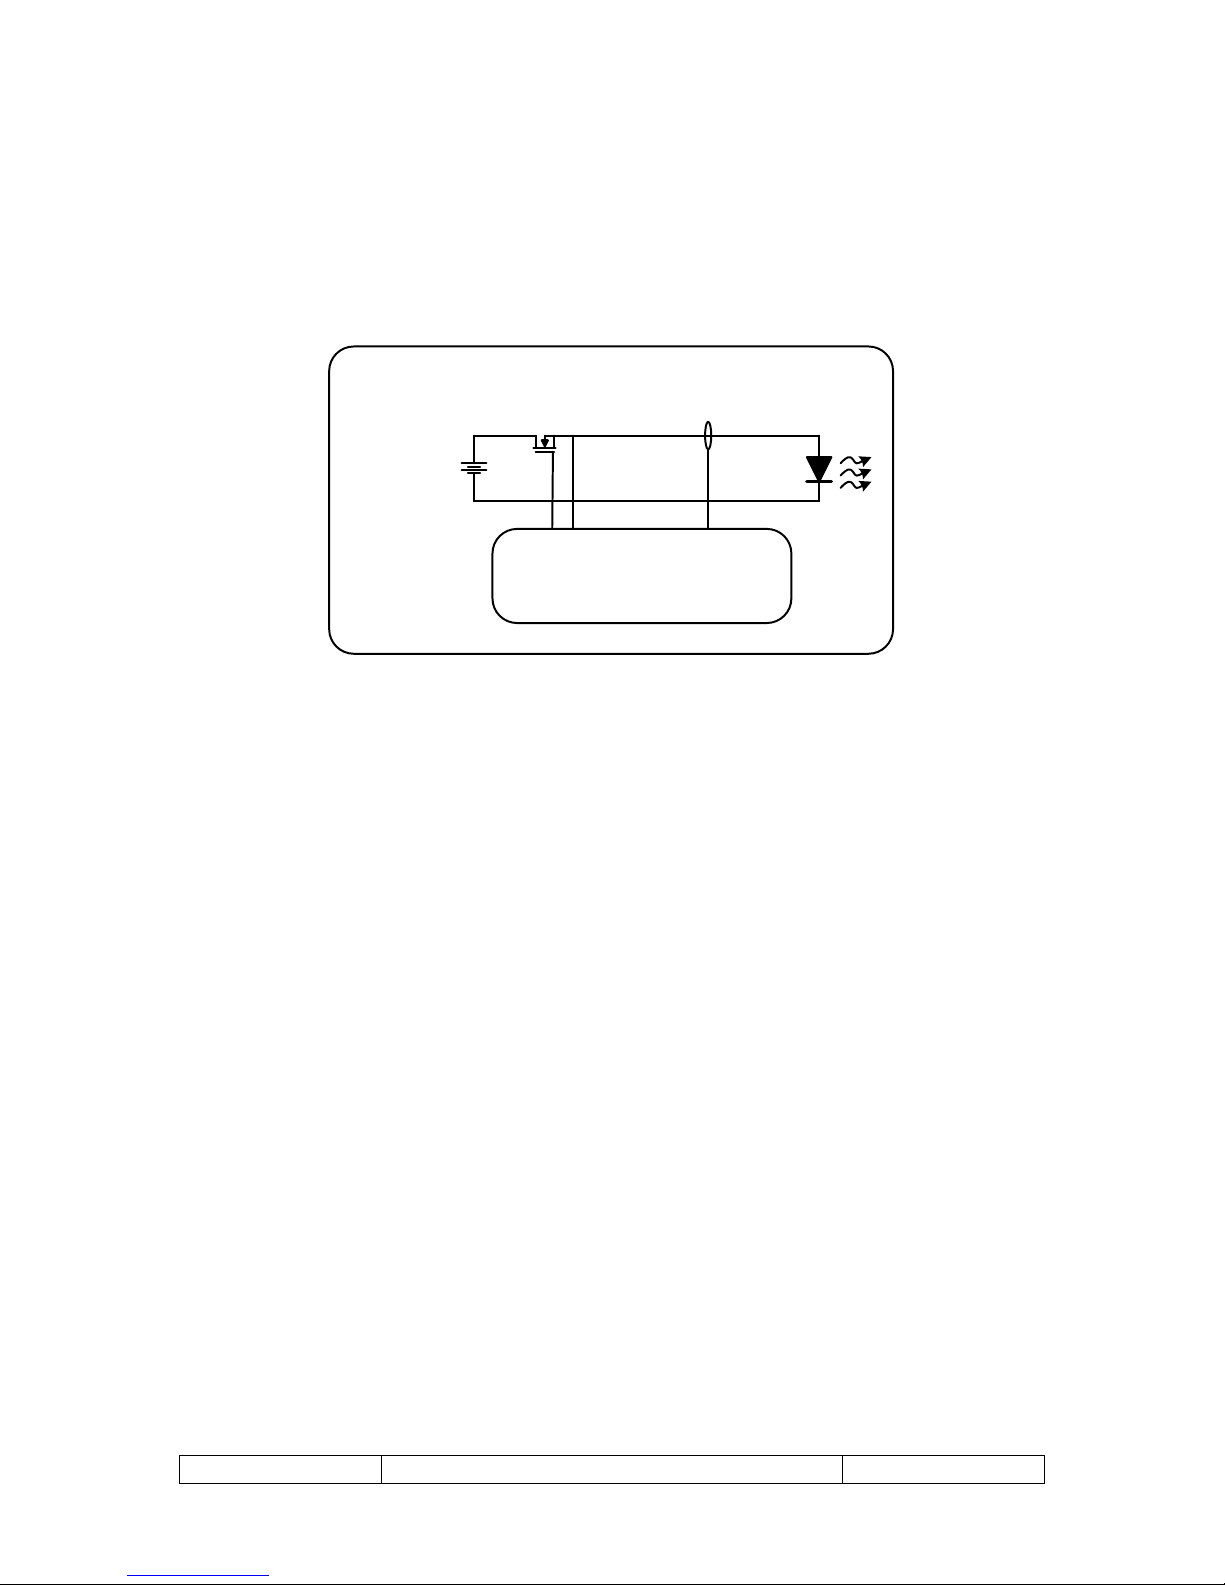
Lumina Power’s HPP power supplies are designed for pulsing diode lasers in Quasi-CW
applications. Before operating this unit, it is important to understand the operation. A
block diagram of the power supply is shown below.
Figure 1, HPP Block Diagram
Referring to Figure 1, it’s easiest to think of the basic elements of the system as a high
power linear regulator. The four main components are:
• A storage capacitor which holds the energy for a high power pulse.
• A high power linear regulator which is controlled by an error signal.
• A high current sensing circuit.
• Control system.
The DC input voltage source must be voltage programmable and have current limit but
not fold-back. It must be able to deliver constant current into a big capacitor which is a
short at start up and the voltage will be discharged to a low level at the end of every
pulse. Set the output voltage at 2 to 5V higher that the load compliance voltage for
optimal efficiency.
Even though the HPP output current has better than 15us rise/fall time, the compliance
voltage is only a few volts higher than the load voltage and the LDD-xx-yy-HP will
perform this requirement automatically.
The high power linear regulator is typically a bank of high power MOSFETS mounted
on an appropriate heat sink with over-temp protection.
The control system provides the interface to the supply and provides various protection
circuits for the laser diode.
Page 5

02001346 Rev 1
HPP-1000/6000 User Manual
Page 5 of 19
3. Pulsing Characteristics
The rise and fall times of HPP pulses are a compromise between speed and minimization
of overshoot. The following figures show typical pulse performance for a HPP with
300Apeak output.
Figure 2, Typical Rise Time
Channel 1: Output Current. 100Amp/V
Channel 2: Pulse Command Signal
Channel 3: Current Monitor
Figure 3, Typical Fall Time
Channel 1: Output Current. 100Amp/V
Channel 2: Pulse Command Signal
Channel 3: Current Monitor
Page 6

02001346 Rev 1
HPP-1000/6000 User Manual
Page 6 of 19
Figure 4, Puls e Output
Channel 1: Output Current. 100Amp/V
Channel 2: Pulse Command Signal
Channel 3: Current Monitor
Channel 1: Output Current. 100Amp/V
Channel 2: Pulse Command Signal
Channel 3: Current Monitor
Figure 5, Repetition Rate
Page 7

02001346 Rev 1
HPP-1000/6000 User Manual
Page 7 of 19
4. DC power supply for HPP
The HPP can be driven by any DC power source without current foldback.
When the HPP in on, it will draw high current from the DC source which should send
continuous limited current to the HPP and should not fold back because the HPP needs
certain input voltage to operate.
It is recommended to use a LDD-3000 or LDD-6000 with a HP option to drive the HPP.
The LDD-3000/6000-xx-yy-HP is configured to run with the HPP. Output voltage can be
set to match the laser load and output current can be set to meet the max average load
current.
Besides, the LDD-3000/6000-xx-yy-HP interfaces with the HPP to regulate the output
voltage to perfectly match the load voltage for the highest efficiency and least heat
dissipation inside the HPP.
For lower average power a LDN-2000 series power supply can be used with the VP
option. This power supply does not have the HP feedback to automatically adjust the
output voltage to the HPP demand. However, this version has a voltage adjust control
input on pin 2 of the control interface to allow the user to match the LDN output voltage
to the HPP load requirements.
Page 8

02001346 Rev 1
HPP-1000/6000 User Manual
Page 8 of 19
5. Supply Interface Connections
*
The programming, monitoring and control functions of the HPP Interface are shown
below. Refer to Figure 6 below for a simple laser setup.
Due to high switching current at high frequency and the capacitive coupling from the
laser diodes to heatsinks , a ground loop is usually hard to avoid and interferes with the
pulse current. An isolator board has been designed to use in series with the interface
cable of the HPP to break the ground loop.
Please refer to document 33001346, HPP-LDD Interconnection Instructions.
* Note, the voltage control feedback is only available when using a LDD-3000/6000 with
the HP option.
Figure 6, Connection Diagram
Page 9

02001346 Rev 1
HPP-1000/6000 User Manual
Page 9 of 19
6. LDD/HPP integrat ion and theory of ope r a t ion
The HPP was designed to work with Lumina Power’s LDD power supplies with the HP
option, which is the output voltage programmable feature.
The complete system includes:
1 LDD-pp-xx-yy-HP where pp is max power, xx is max current, yy is max output
voltage and HP designates output voltage program feature.
2 HPP-pp-xx-yy-zz. pp is maximum average power, xx is maximum output current,
yy is maximum load voltage, zz is maximum pulse width up to CW.
3 HPP Isolator PCB. Due to possible ground loops at high pulsing current and
frequency, the isolator PCB will be inserted between the HPP and the customers’
control system to break the ground loop.
Isolator PCB theory of operation:
The Isolator has 2 elect ri call y isolat ed secti ons: one is connected to the H PP and another
is connected to the customer’s control system.
The HPP supplies 15V to operate the isolator pc board. Th e customer’s control system
must supply 15V to run the section that is connected to the customer’s controller per HP P
pin out assignment.
The Isolator carries all control signals through linear optocouplers for analog signals and
logic optocouplers for logic signals. The pin outs of the isolator PCB is 1-to-1 as an
extension of the control cable with a male connector for the customer’s c ontroller and a
female connector for the HPP.
HPP theory of operation.
The HPP is a High Power Pulser. It is a linear current regulator with fast rise and fall
time. The input voltage of the HPP must be higher than its output voltage. The ratio of
Vout/Vin is roughly its efficiency.
The HPP is the most efficient pulser on the market given the rise time and fall time better
than 15µs. In pulse mode, it communicates with the LDD power supply to adjust the
LDD output voltage which is the HPP input voltage to match the load voltage. The
average input voltage for a given load varies due to pulse current, pulse width but is
regulated such that at the end of the pulse, there will be about 1V across the “linear
regulator”. The average input voltage is higher than the load voltage because the voltage
on the internal capacitors will have some droop during the pulse.
The HPP utilizes a proprietary scheme to have fast rise time even though the input
voltage is a few volts higher than the output voltage and this gives the HPP the highest
efficiency for a linear regulator and the inductance of the output cable seems to have
disappeared.
This feature also allows the voltage tracking when the laser diodes get hot and reduce
their forward voltage drop, Vf.
Page 10

02001346 Rev 1
HPP-1000/6000 User Manual
Page 10 of 19
The HPP communicates with the LDD to decrease the output voltage up to 25% of the
programmed voltage in order to have good efficiency. The requirement is that the LDD
output voltage must be programmed to be higher than the expected load voltage but not
too high that the HPP cannot pull it down to have 1V at the end of the pulse. The HPP
has a “load-Match” det ector circuit and will sh ut down i f the differ ence betw een Vin and
Vout is too high (more than 10V at more than 51% rated output current). To allow the
best Vout program, the HPP will defeat this protection feature when the output current is
programmed less than 50%.
For proper voltage programming, we can set and record the input voltage as follows:
Program the output voltage to about 20% higher than the expected load voltage.
Run pulses with lower than 50% max pulse current. The input voltage will be reduced
automatically. Monitor the output current to make sure the pulse shape is correct. Reduce
the input voltage further by reducing the V-program signal on the LDD until the output
current fails to regulate at the end of the pulse. This is the minimum input voltage
required for this particular load. Now we can stop the pulser and program the LDD
output voltage about 20% higher than this minimum voltage. Make sure the HPP is OFF
(disabled) at this time.
If the voltage is so high that the HPP cannot pull it down to have 1V at the end of the
pulse, the system will be inefficient and will result in over heat and thermally shut down.
If the voltage is too high, the HPP will shut off by the “load-match” detector when the
output current is higher than 50%.
The HPP has an optional programmable simmer up to 10Amp. The simmer current is
ON when the pulse current is OFF and OFF when the pulse current is ON.
CW/Pulse mode selection: (Optional)
In some applications where the system can switch from pulse to CW, the signal
CW/Pulse can be used.
When in Pulse mode, the HPP is working as a linear regulator and puts out the pulsed
current requested at the I-program signal. This operation will require some voltage
across the linear regulator and that translate into power loss.
When in CW mode, the transistors in the linear regulator are saturated and the onl y loss
will be the Rds-on of the FET bank against the output current. The HPP is now acting as
a wire with the impedance of the Rds-on and the current should be controlled by the
LDD.
It is advisable that the HPP must be disabled, LDD output voltage should be programed
to lower than the load voltage and current should be programmed to minimum when
switching from pulse to CW mode.
If the output voltage is higher than the load voltage, there will be current spikes to the
load and may damage the load.
Another option is to run the HPP at 100% duty cycle. In this case, we can turn the HPP
current program to 105% and control the output current by the LDD.
Page 11

02001346 Rev 1
HPP-1000/6000 User Manual
Page 11 of 19
7. LDD with HP opti on
In a standard LDD, the output voltage is set to be 105% of the required load voltage and
it is just the compliant voltage, determined by the load.
The LDD is the Laser Diode Drive and the HP option designates the additional feature of
programming the output voltage. The LDD-HP is set to normally have 5V higher than
the companion HPP.
Additionally, the LDD-HP has a pair of twisted wires to communicate with the HPP.
This pair of wires is working in conjunction with the V-Program signal to determine the
output voltage.
This pair can only lower the output voltage by 20 – 25%.
At the end of the pulse, the HPP compares the cap bank voltage against the load voltage
and tells the LDD to adjust the voltage so that it has about 1V difference.
The communication is active only when the HPP is running (pulsing).
If the HPP is in standby, the output voltage will rise to the level set by the V-Program
signal.
When running with the HPP, set the LDD output current about 5% more than the max
average HPP current. For example: HPP-2000-200-50-500. That is 2000 Watts, 200
Amp, 50V, 500us max pulse width.
Calculation:
Pulse power: 200A * 50V = 10,000 Watts.
Pulse energy: 500uS of 10000 Watts is 5 Joules.
Max frequency: 2000 Watts/5 Joules = 400 Hz.
Duty Cycle: 500us/400Hz = 20%.
Setting on LDD: Vout ~55V
I-out = 105% * P/Vload = 1.05 * (2000/50) = 42 Amp.
The LDD interface is listed below for reference.
Page 12

02001346 Rev 1
HPP-1000/6000 User Manual
Page 12 of 19
LDD-6000-XX-YY -HP
Pin #
Pin Name
Functional Voltage
Level
Description
High = RUN = +5V to
The Enable function turns the output
the Enable signal.
V-Program
0 – 10V = 0-Full Scale
Program Output Voltage. Open =
Default = Full Scale.
Interlock
Open = OFF
The Interlock function can be
switches.
4
GND
V-Monitor:
impedance)
0 – 10V = 0 – Full Scale
Monitors output Voltage.
I-Mon
impedance)
0 – 10V = 0 – Full Scale
Monitor Output Cu rrent
I-Program
0-10V = 0 - Ioutmax
The power supply output current is
Iprogram(+).
9
GND
5V @0.2A
(output)
Auxiliary 5V power supply for user.
Up to 0.2A output current available.
-15V @0.2A
(output)
Auxiliary -15V power supply for user.
Up to 0.2A output current available.
15V @0.2A
(output)
Auxiliary 15V power supply for user.
Up to 0.2A output current available.
15
GND
Connector Type 15 pin D-sub Female
1
2
3
5
6
7
Enable
(input. 10k
impedance)
(Output 100Ω
(Output 100Ω
(Input 200k
impedance)
+15V
Low = OFF = 0V
Connect to GND = RUN
section of the power supply ON and
OFF. Enable signal must be inserted
AFTER AC power has been applied
as the power supply starts up
Disabled disregarding the state of
connected to external interlock
switches such as door or over-temp
set by applying
a 0-10V analog signal to
10, 11
12
13, 14
8. LDN with VP option
Another compatible power supply is the LDN series with the VP option. This option sets
pin 2 on the control interface to be a voltage output control supply. Although the output
voltage control feedback feature from the HPP is not used, the customer can set the Vprogram on pin 2 of the LDN to match the voltage requirements for op erating the HPP.
Please consult the factory for further information.
Page 13

02001346 Rev 1
HPP-1000/6000 User Manual
Page 13 of 19
9. HPP-6000 Specifications
Average
Pout
Input
Voltage
Up to 600A Pulse
150A CW
XX * YY* Duty Cycle cannot exceed 6000W
Model
HPP-6000-XX-YY-ZZ 6000W
Where XX = Iout
YY = Vcompliance
Auxiliary Outputs: +15V @0.2A,
max
max
Output Current
Size (L x W x H)
15 – 150VDC 12” x 8.1” x 3.5
Input
Voltage 15-160 VDC current source, voltage limited
Output
Power 6000 Watts average
Pulsed Current up to 600 A peak
Continuous Current up to 150 A
Interface
Connector 15 Pin “D” Sub Female
Pulse Current Program 0-10V for 0-Max Current
Current Monitor 0-10V for 0-Max Current
Simmer Current Program 0-10V for 0-Max Current
Aux. Output +15VDC @ 0.2A on interface
Performance
Max Rep Rate: 5 kHz
Rise/Fall Time: ~15 µs typical (10% to 90% Full Current)
Current Regulation: 0.5% of maximum output current
Current Ripple: <0.5% of maximum output current
Current Overshoot: <1% of maximum output current
Efficiency: >90% at full load
Environment
Operating Temp 0 to 40 oC
Storage -40 to 85 oC
Humidity 0 to 90% non-condensing
Cooling Forced air
Altitude and Pressure 2000 meters maximum, 80 to 103 kPa
Dimensions Please see Figure 7, HPP Mechanical Outline Drawing
Outline 13.8 inch length, 8.15 inch wide, 3.93 inch high
(does not include mounting flanges or electrical terminals)
Page 14

02001346 Rev 1
HPP-1000/6000 User Manual
Page 14 of 19
10. HPP Interface
Pin #
Pin Name
Functional Level
Description
Pulse Input
impedance)
High = RUN = +5V
Low = OFF = 0V
The Pulse function turns the pulse current On/OFF at
is delivered to load as programmed via Iprogram(+)
2, 3
GND
Temp-Fault
impedance)
0V = Good
Fault
0 – 10V = 0 – Full
Iprogram(+):
impedance)
The power supply output current is se t by applying a 0higher than simmer program on pin 8.
Poor Load Match
impedance)
Too low load voltage causes excessive voltage across
end of each pulse. Toggle Enable signal to clear fault.
Return Signal for
supply
Simmer Program
(Optional)
CW mode = +5 to
default
15V @0.2A
(output)
Auxiliary 15V power supply for user. Up to 0.2A output
current available.
Ready
Impedance)
Automatically adjusts the output voltage of the LDD
varies. DO NOT CONNECT
OFF = 0V, default
The Enable function turns the output section of the
delivered to the load as programmed via Iprogram(+).
The Interlock function can be connected to external
to operate.
Connector Type 15 pin D-sub Female
Table 1, HPP Interface
1
4
5
6
7
8
9
(input, 10k
(Output, 10k
Iout Monitor:
(output)
(input, 20k
(Output, 10k
Voltage Adjust
Return
(input, 100k
impedance)
to +15V
15V = Over Temp
Scale
0 – 10V = 0 – Full
Scale
0V=Good.
15V = Fault
Voltage Adjust loop
to LDD power
0 – 10V = 0 to
12Amp simmer
current
high speed when the power supply is enabled. Current
Stops power supply when internal heatsink(s) reaches
75 ºC
Monitors output cur rent in real ti me.
10V analog signal to Iprogram(+). Iprogram must be
the series regulator. This voltage is measured at the
DO NOT CONNECT
Programmed DC simmer current will be present when in
Pulse mode and when the power supply is Enabled.
CW/Pulse
10
11
12
13
14 Enable
15 Interlock
(Input, 10k
impedance)
(output, 10k
Auto Voltage
Adjust
+15V
0V = Pulse mode,
0V = Not Ready.
15V = Ready.
Output to LDD-HP
RUN = +5V to 15V
Open = OFF
GND = Operate
Pulser becomes a virtual short in CW mode.
Power supply starts up = OFF. Insert Enable signal
after power-up to initiate Ready signal.
power supply for optimal efficiency if load voltage
power supply ON and OFF. When the power supply is
enabled, Pin 1 pulse control is operational and current is
interlock switches such as a door. Ground to pin 2 or 3
Page 15

02001346 Rev 1
HPP-1000/6000 User Manual
Page 15 of 19
11. Operation of the HPP
Warning – Voltage Compliance Requirement
Warning – Output Floating
allowed to be connected to the same ground as signal ground (Program, Monitor).
Each HPP is custom configured to deliver current pulses into a diode array requiring a
predefined compliance voltage.
See the Serial Number label of the unit for the compliance voltage rating. The HPP
takes DC input voltage and will not operate properly when the input is great than 10V
higher than the load compliance voltage and will not start when the input is 20V lower
that the rating on the S/N label or lower than 20V.
Consult factory more wider operating window.
The output of the HPP is floating and therefore, neither side of the laser diode is
1. Connect diode laser load to the HPP. A custom strip line cable has been supplied to
minimize inductance. Please note the cable is marked with (+) and (-) labels. Do not
extend output cable or performance will be compromised.
2. Connect appropriate interface to HPP Interface Connector. Make sure Iprogram(+),
pin 6, is set to 0.0V.
3. Connect HPP to the feeding DC power supply which is OFF.
4. Turn ON the feeding DC power supply. Increase DC output voltage and the HPP will
start when it sees appropriate DC voltage. After a few seconds the cooling fan should
begin to operate.
5. Set Iprogram(+), Pin 6 of the interface connector, This signal is the 0-10V program
which will program the output current level. Calibration is set so that 0-10V = 0 –
Iout
6. Enable the output by applying a TTL level high signal to pin 14 of the interface
connector. The Enable control checks for faults and prepares the system for pulsing.
7. Pulse the unit via the Pulsing Input control, pin 1. Maximum pulse widths should
not be greater than specified on the system label. The amplitude of the pulses will be
determined via the analog Iprogram(+) signal. Maximum average power delivered
to the load should not exceed the rated power capability of the unit.
max
.
Unit Faults
The unit is designed to monitor various faults such as:
• Temp Fault: (Output, TTL, Pin 4) When the temperature of the internal heat sink
has exceeded a safe operating level, the system is shut off and this fault is transmitted.
Fault output is TTL high. Fault can be cleared by setting the Enable, pin 14, to TTL
low and then high.
• Poor load match: (Output, TTL, Pin 7) When the voltage compliance of the diode
laser load is 8V lower than the DC input voltage. This fault may be cleared via the
Enable signal.
Page 16

02001346 Rev 1
HPP-1000/6000 User Manual
Page 16 of 19
Figure 7, HPP Mechanical Outline Drawing
Page 17

02001346 Rev 1
HPP-1000/6000 User Manual
Page 17 of 19
Figure 8, HPP Connections
Page 18

02001346 Rev 1
HPP-1000/6000 User Manual
Page 18 of 19
12. Product Limited Warranty
Lumina Power, Inc., as Seller, warrants that each Product sold by it is free of defects in materials and
workmanship. Duration of warranty is as follows:
a. All Chassis enclosed products are covered for twenty four (24) months from date of shipment. Products
included but are not limited t o the following product families: CCPF, CCHP, LDY, LDYHC, LDQCW,
XLB (exclud ing XLB-300), and MLB. Custom fully enclosed products may be covered for the same 24
months. Please consult factory for specific terms.
b. All Open Frame products are covered for 12 months from date of shipment. Open frame power supplies
are defined as any product that is not enclosed in a metal or plastic enclosure. Products included but are not
limited to the following produc t families: LDPC, LDQPC, XLB-300 and any open frame custom products.
c. All products returned for repair are covered for a period of 6 month or the balance of the original
warranty, whichever is longer.
Warranty is not transferable t o parties outside of original Buyer's corporate or educational organization.
Seller will have sole discretion in making de termination of validit y of warranty if the Pr oduct is transferred
to a different user group than the original Buyer .
Normal wear and tear and items expendable in normal use are not covered by this warranty. All warranty
repair or replacement o f parts shall b e li mited to P r oduct malfunct ions, which, in the so le o pinion o f Sel ler,
are due or traceable to defects in original materials or workmanship. Such determination will be made when
the Product is returned to the Seller's factory, transportation prepaid by the Buyer, within the warranty
period.
All obligations under this warranty shall cease immediately in the event of abuse, accident, alteration,
misuse, or neglect of the Product. Us e and ser vice of the Product i n a manner not in ac cordance with the
Owner's Manual (if furnished) will likewise cause all obligations under this warranty to cease. Repaired or
replacement parts are warranted only for the remaining unexpired portion of t he origina l warranty pe riod
for the Product. After expiration of the applicable warranty period, Buyer shall be charged at the then
current prices for parts, labor and transportation.
Seller has no responsibility under this warranty for the cost of any work (material, labor, and/or other
expenses) performed by or incurred by Buyer or any third party for modification or repair of the Product
unless specifically authorized in advance in writing by Seller.
Reasonable care must be used to avoid hazards. Seller expressly disclaims responsibility for loss or damage
caused by use of its Products other than in accordance with proper operation procedures. Other than those
expressly stated herein, there are no other warranties of any kind, expressed or implied, and specifically
included but not by way of limitation are the implied warranties of fitness or merchantability for a
particular purpose.
It is understood and agreed the seller’s liability whether in contract, in tort, under any warranty, in
negligence or otherwise shall not exceed the return of the amount of the purchase price paid by the
purchaser and under no circumstance shall seller be liable for special, indirect, incidental or consequential
damages. The price stated for the product is a consideration in limiting seller's liability. No action,
regardless of form, arising out of the transactions of this agreement may be brought by purchaser more than
one year after the cause of action has accrued.
Seller’s maximum liability sh all not exceed and b uyer 's remedy is limited to either (i) repair or replacement
of the defective part of product, or at seller's option (ii) return of the product and refund of the purchase
price, and such remedy shall be the buyer's entire and exclusive remedy.
Page 19

02001346 Rev 1
HPP-1000/6000 User Manual
Page 19 of 19
13. Service
Rev
ECO
Description
Doc Ctrl
Date
App
1
7682
Initial Release
MJ
6/20/2017
EK
This unit contains no use r serviceable parts.
performed only by qualified personnel from Lumina Power, Inc. For more
information contact
Email: sales@luminapower.com Web site: www.luminapower.com
Service and repair should be
Lumina Power, Inc.
26 Ward Hill Ave.,
Bradford, MA 01835
Ph: 978-241-8260
Fx: 978-241-8262
Your distributor:
 Loading...