

Page 1
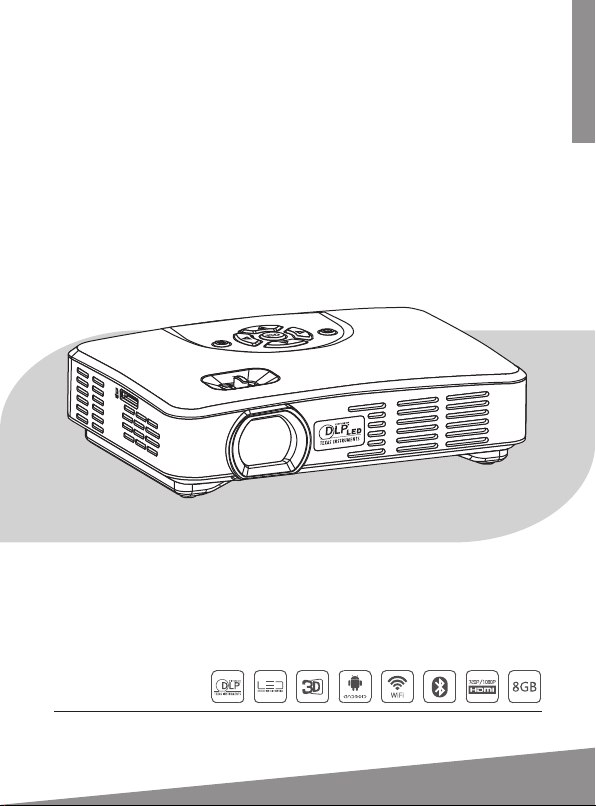
SMART PROJECTOR
USER MANUAL
Please read the manual carefully before using and keep it in a safe place for future reference.
.
Page 2

Page 3

Contents
1 Introduction .......................................................................................................
2 Specification ......................................................................................................
3 Package Content ...............................................................................................
4 Projector Parts ...................................................................................................
5 Remote Control ................................................................................................
6 Using and Connection ...................................................................................
7 Bluetooth ...........................................................................................................
8 Watching 3D Videos ....................................................................................... 8
9 WiFi Display (Miracast) ..................................................................................
10 WiFi Display (DLNA) .....................................................................................
11 Projection Settings ......................................................................................
12 Troubleshooting ...........................................................................................
1
2
3
4
5
6
7
9
10
11
12
Page 4
1 Introduction
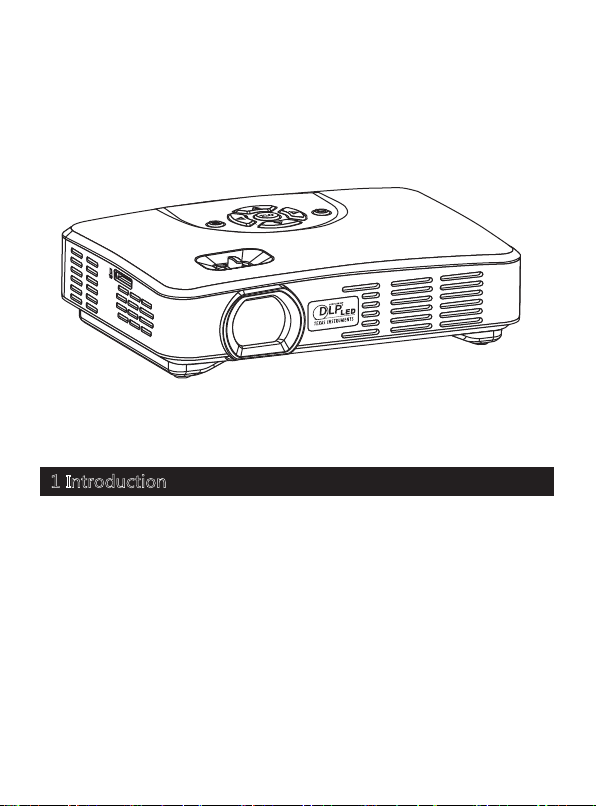
The Smart Projector is based on Adnroid Operating System (4.4.2). It is
capable of installing and using of application. With built-in WiFi module, it
supports surfing the web, watching online video, playing online games and
downloading apps. Users can read and edit offices files such as Word, Excel,
Powerpoint and PDF stored in internal or external memory.
Users can have ultra 3D experience from the projector with Active
DLP-Link 3D Glasses. It decodes 3D video clip as well as supports transferring
2D video to 3D.
It's compatible with Smartphone, Laptops, Tablets, Game Consoles,
Digital Cameras and other devices via HDMI, VGA and AV ports. It's a perfect
partner to BigScreen Entertainment and Presentation.
- 1 -
Page 5
2 Specification
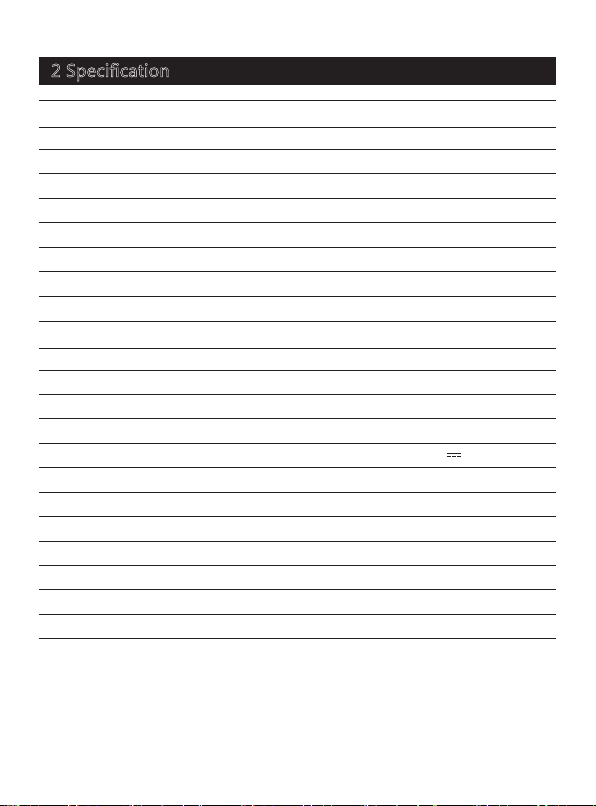
Projection technology
Operating system
CPU
RAM
Resolution
Projection mode
Uniformity
Contrast ratio
Projection size
Project distance
Throw ratio
Light source
Power supply
Power consumption
Speaker
Memory 8GB internal memory, external memory supported
Input
Output
Weight
Dimension 5.9x4.3x1.7 inches (150x108x44 mm)
Texas Instruments DLP®
Android 4.4.2, supports Mircast and DLNA, with Bluetooth.
Cortex A9 Quad-core, 1.4GHz
1G DDR3
Native WXGA (1280x800), supports 1080p-decoding
16:10 (4:3 compatible)Aspect ratio
+/-40 degrees (auto/manual)Keystone correction
Front / rear / front ceiling / rear ceiling
100%
1000:1
20-120 inches
1-10 feet (0.5-3 meters)
1.2:1
RGB LED, life span over 20,000 hours
AC 100-240V~ 50Hz/60Hz;
45W
3watt*1
USB 2.0, OTG 2.0, microSD card, HDMI, VGA, AV
Φ3.5mm earphone/audio
425g
DC 19V 3.42A
- 2 -
Page 6
3 Package Content
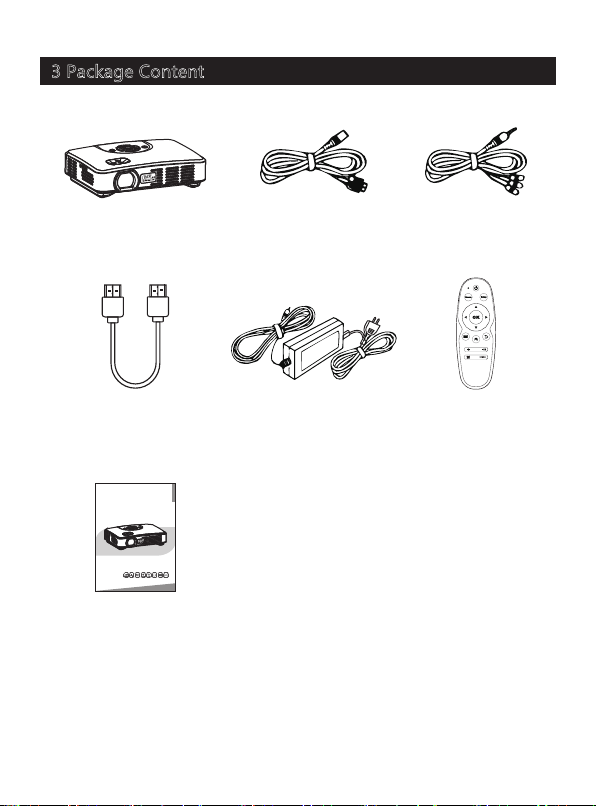
Smart projector
HDMI cable
SMART PROJECTOR
USER MANUAL
Please read the manual carefully before using and keep it in a safe place for future reference.
.
User manual
OTG cable
Power adapter
& AC cable
- 3 -
AV cable
Remote control
Page 7
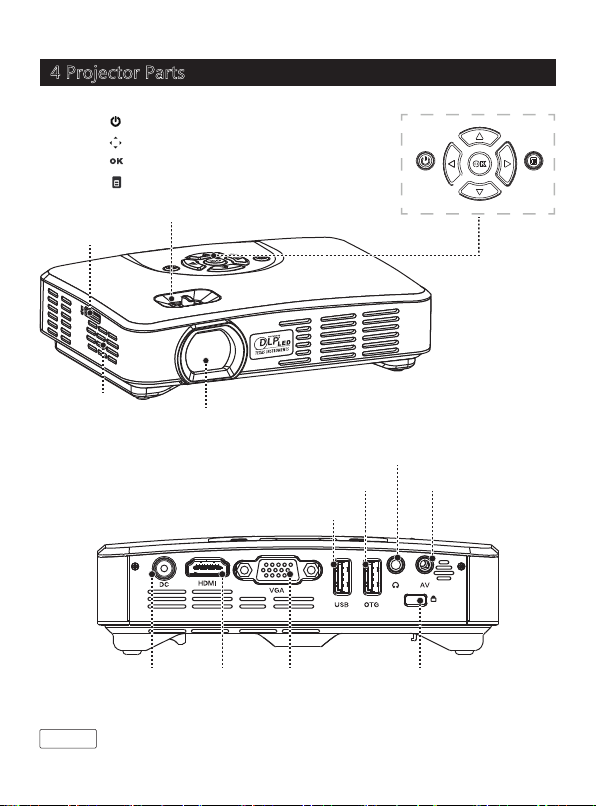
4 Projector Parts
(Power) Standby / Wake-up
(Arrows) Move the cursor
(Enter) Enter the option or save the settings
(Menu) Open / close the menu
MicroSD card slot
Focus
Speaker
Power (DC)
Note
Use the Focus to adjust the clarity of the image.
Lens
HDMI VGA
- 4 -
USB
Earphone
OTG
AV
Security slot
Page 8
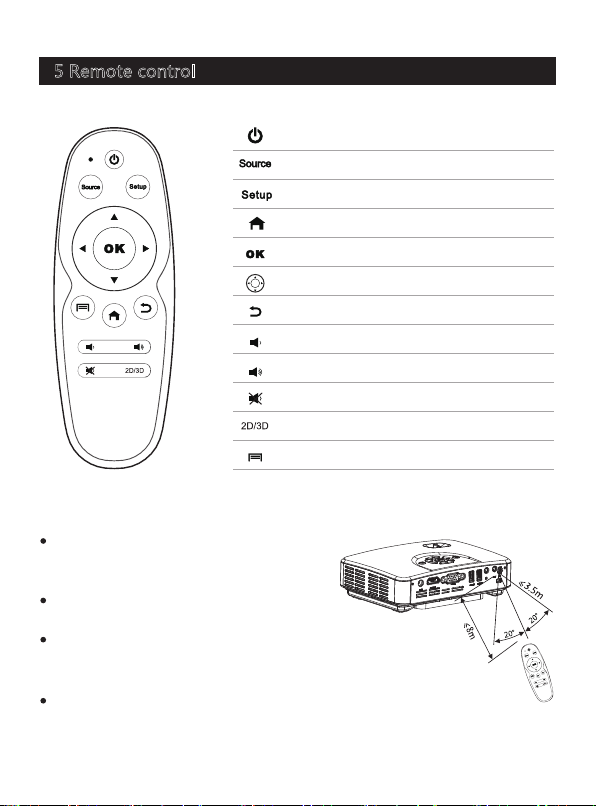
5 Remote control
Point the remote control towards the
projector to accept position. To operate,
please refer to the photo.
If the operation button does not work,
replace the battery in the remote.
Please remove battery from the remote
when the remote is not in use for long
periods.
The longest receive distance is 8 meters
in maximum horizontal, oblique angle 20
the biggest receive distance is 3.5 meters.
- 5 -
Standby / wake-up
Switch input source
Projection settings
Return to Home page
Confirm the option
Move the cursor
Return
Volume down
Volume up
Mute
2D/3D conversion
Enter the menu
Page 9
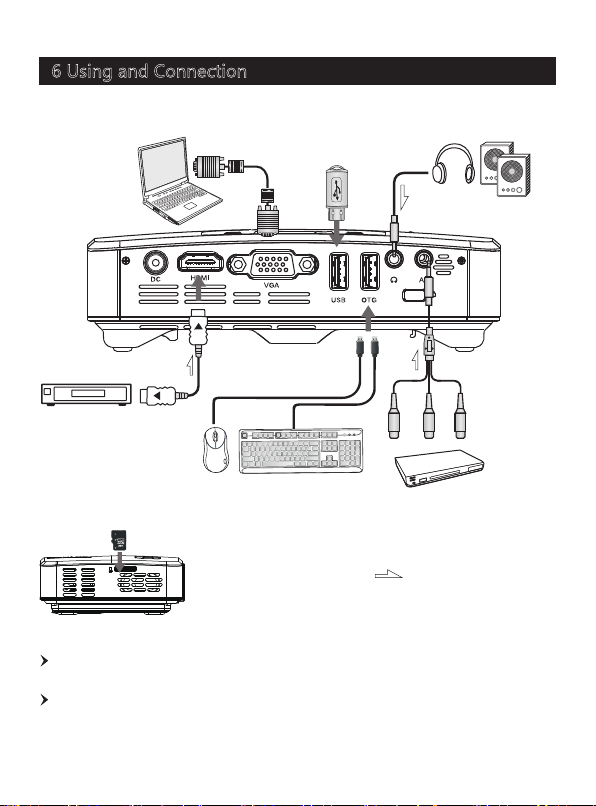
6 Using and Connection
Laptop / PC
HD devices
(Blu-ray player and etc.)
MicroSD card
VGA cable
Mouse
USB flash drive
Keyboard
Earphone
/external speakers
AV cable
DVD/VCD players and etc.
: Singal flow direction
The maximum resolution supported is 1920x1080. The highest refresh
frequency is 75Hz.
Switch the laptop/PC to the projection mode if needed.
- 6 -
Page 10
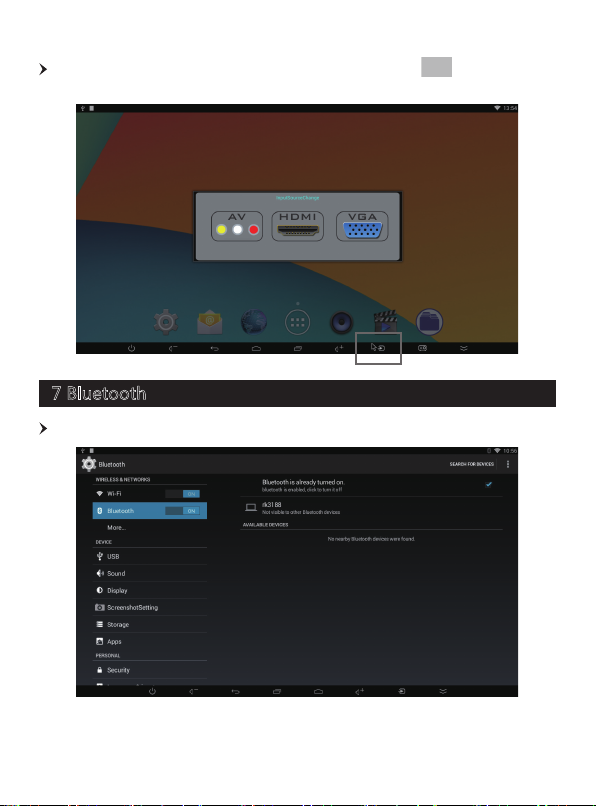
Press 'Source' button on the remote control, or press” “ to switch
input source.
7 Bluetooth
Enter Setting, turn on Bluetooth, and search for devices.
- 7 -
Page 11
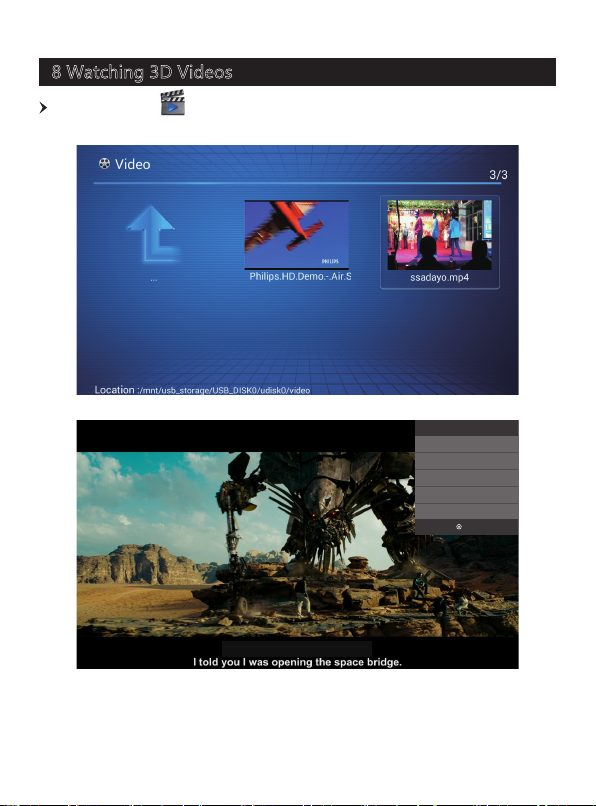
8 Watching 3D Videos
Enter the menu , select a video file and play it. Enter '3D' menu and
choose '2D to 3D', '3D (Left Right)' or 3D (Up Bottom) accordingly.
3D Options
2D
2D TO 3D
3D(Left Right)
3D(Up Bottom)
OK
- 8 -
Page 12
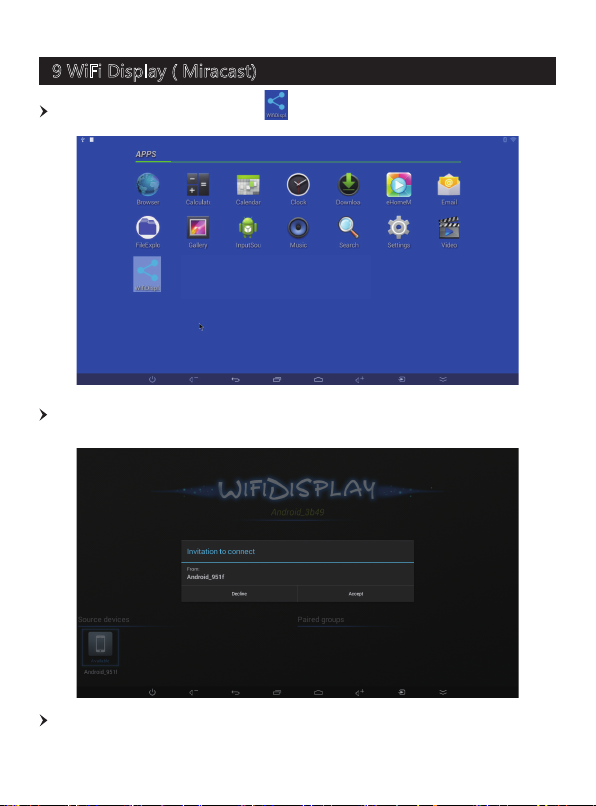
9 WiFi Display ( Miracast)
Turn on WiFi and run the app ' '.
Click the 'Accept' button and begin the connection. For example, the
projector ID is 'Android_3b49'.
Connect it with an Android phone that supports Miracast (take Google
Nexus 4 as an example).
- 9 -
Page 13
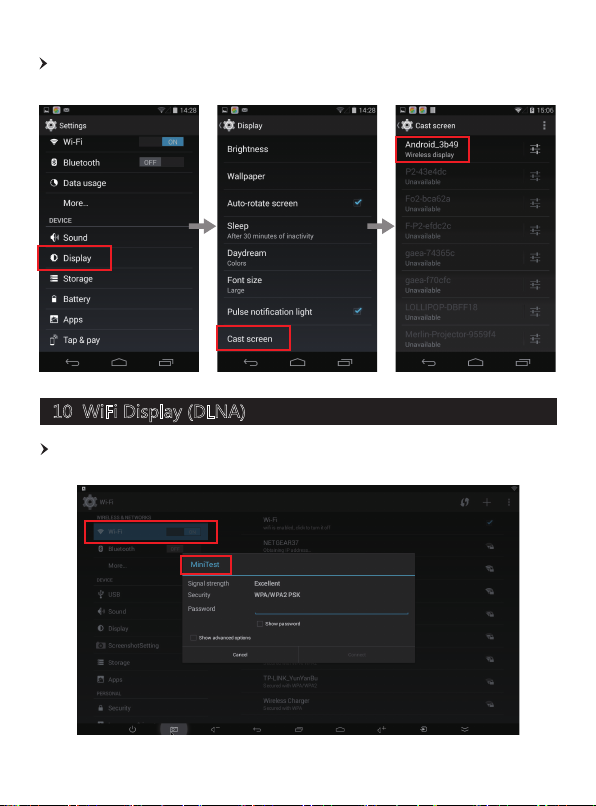
Setting -> Display -> Cast screen -> Enable wireless display. Select the
projector ID and connect to it.
10 WiFi Display (DLNA)
Projector setting: Setting –turn on Wi-Fi – search and connect to an access
point, for example ‘MiniTest’.
- 10 -
Page 14
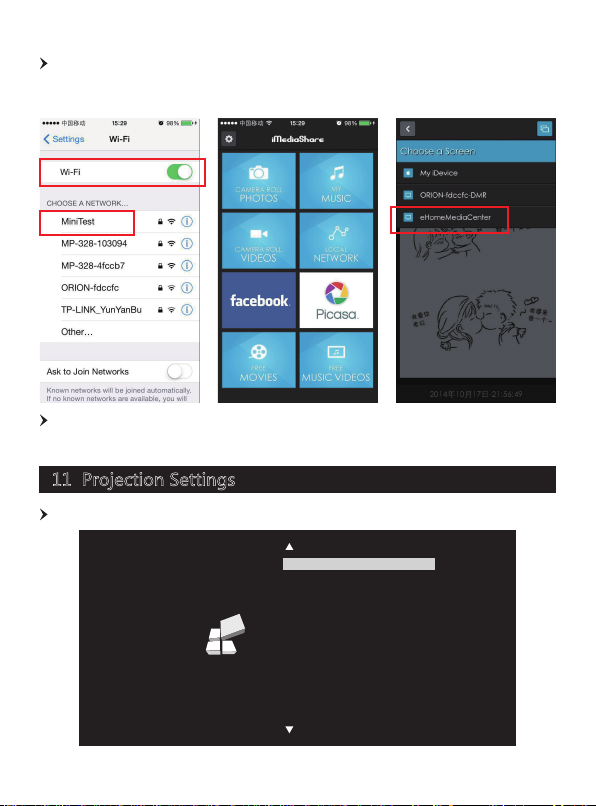
iPhone setting: Download DLNA app iMediaShare (for iPhone) from App
Store - Turn on Wi-Fi – search and connect to the same access point that
the projector connects to, for example ‘MiniTest’.
Run iMediaShare in iPhone - choose photos/videos/music or other supports
content you want to project – choose a Screen and select ‘eHomeMediaCenter’.
11 Projection Settings
Press 'Setup' button on the remote control and enter.
Picture Mode Movie
Aspect Ratio 16:9
PC Setup
Sound Mode Standard
OPTION
Auto Keystone Off
Keystone
Projection Type Front-Desktop
Resolution Panoramic Screen
Display Type 0
- 11 -
Page 15
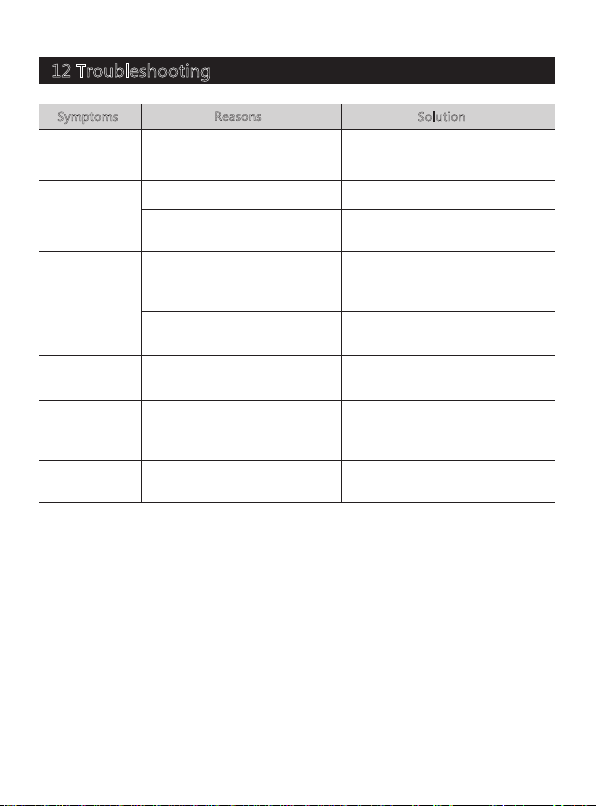
12 Troubleshooting
Symptoms
The projector
does not power
on.
Images are
not clear
Images are not
displayed
The projector is
not working
Unable to
connect to
Internet
Files can't be
read
Reasons
No power
The lens is not focused correctly
The screen is not aligned
properly
The input signal device is not
connected with the projector
correctly
The input signal isn't selected
correctly
Teh system crashes
Wrong WiFi setting / no WiFi
signal / Weak WiFi signal
Open the file with an incorrect
app
Solution
Ensure the power adapter and AC
cable is properly connected.
Adjust the focus.
Adjust the position. Suggested
projection distance is 1-10 feet.
Check the connection
Select the correct input signal
Disconnect the power and re-start
Setup and connect to the WiFi
network correctly
Download the correct app from
GooglePlay
- 12 -
Page 16
 Loading...