

Page 1
料号 :4000xx xx
平面 尺寸 :360X26 0MM
成品 尺寸 :90x130 mm
颜色 :单 黑印 刷
材料 :128g铜板 纸
FRONT VIEW
1 2
LEFT VIEW
4
5
RIGHT VIEW
8
9 11
BUTTON VIEW
OVERVIEW
3
6
7
10
12
13
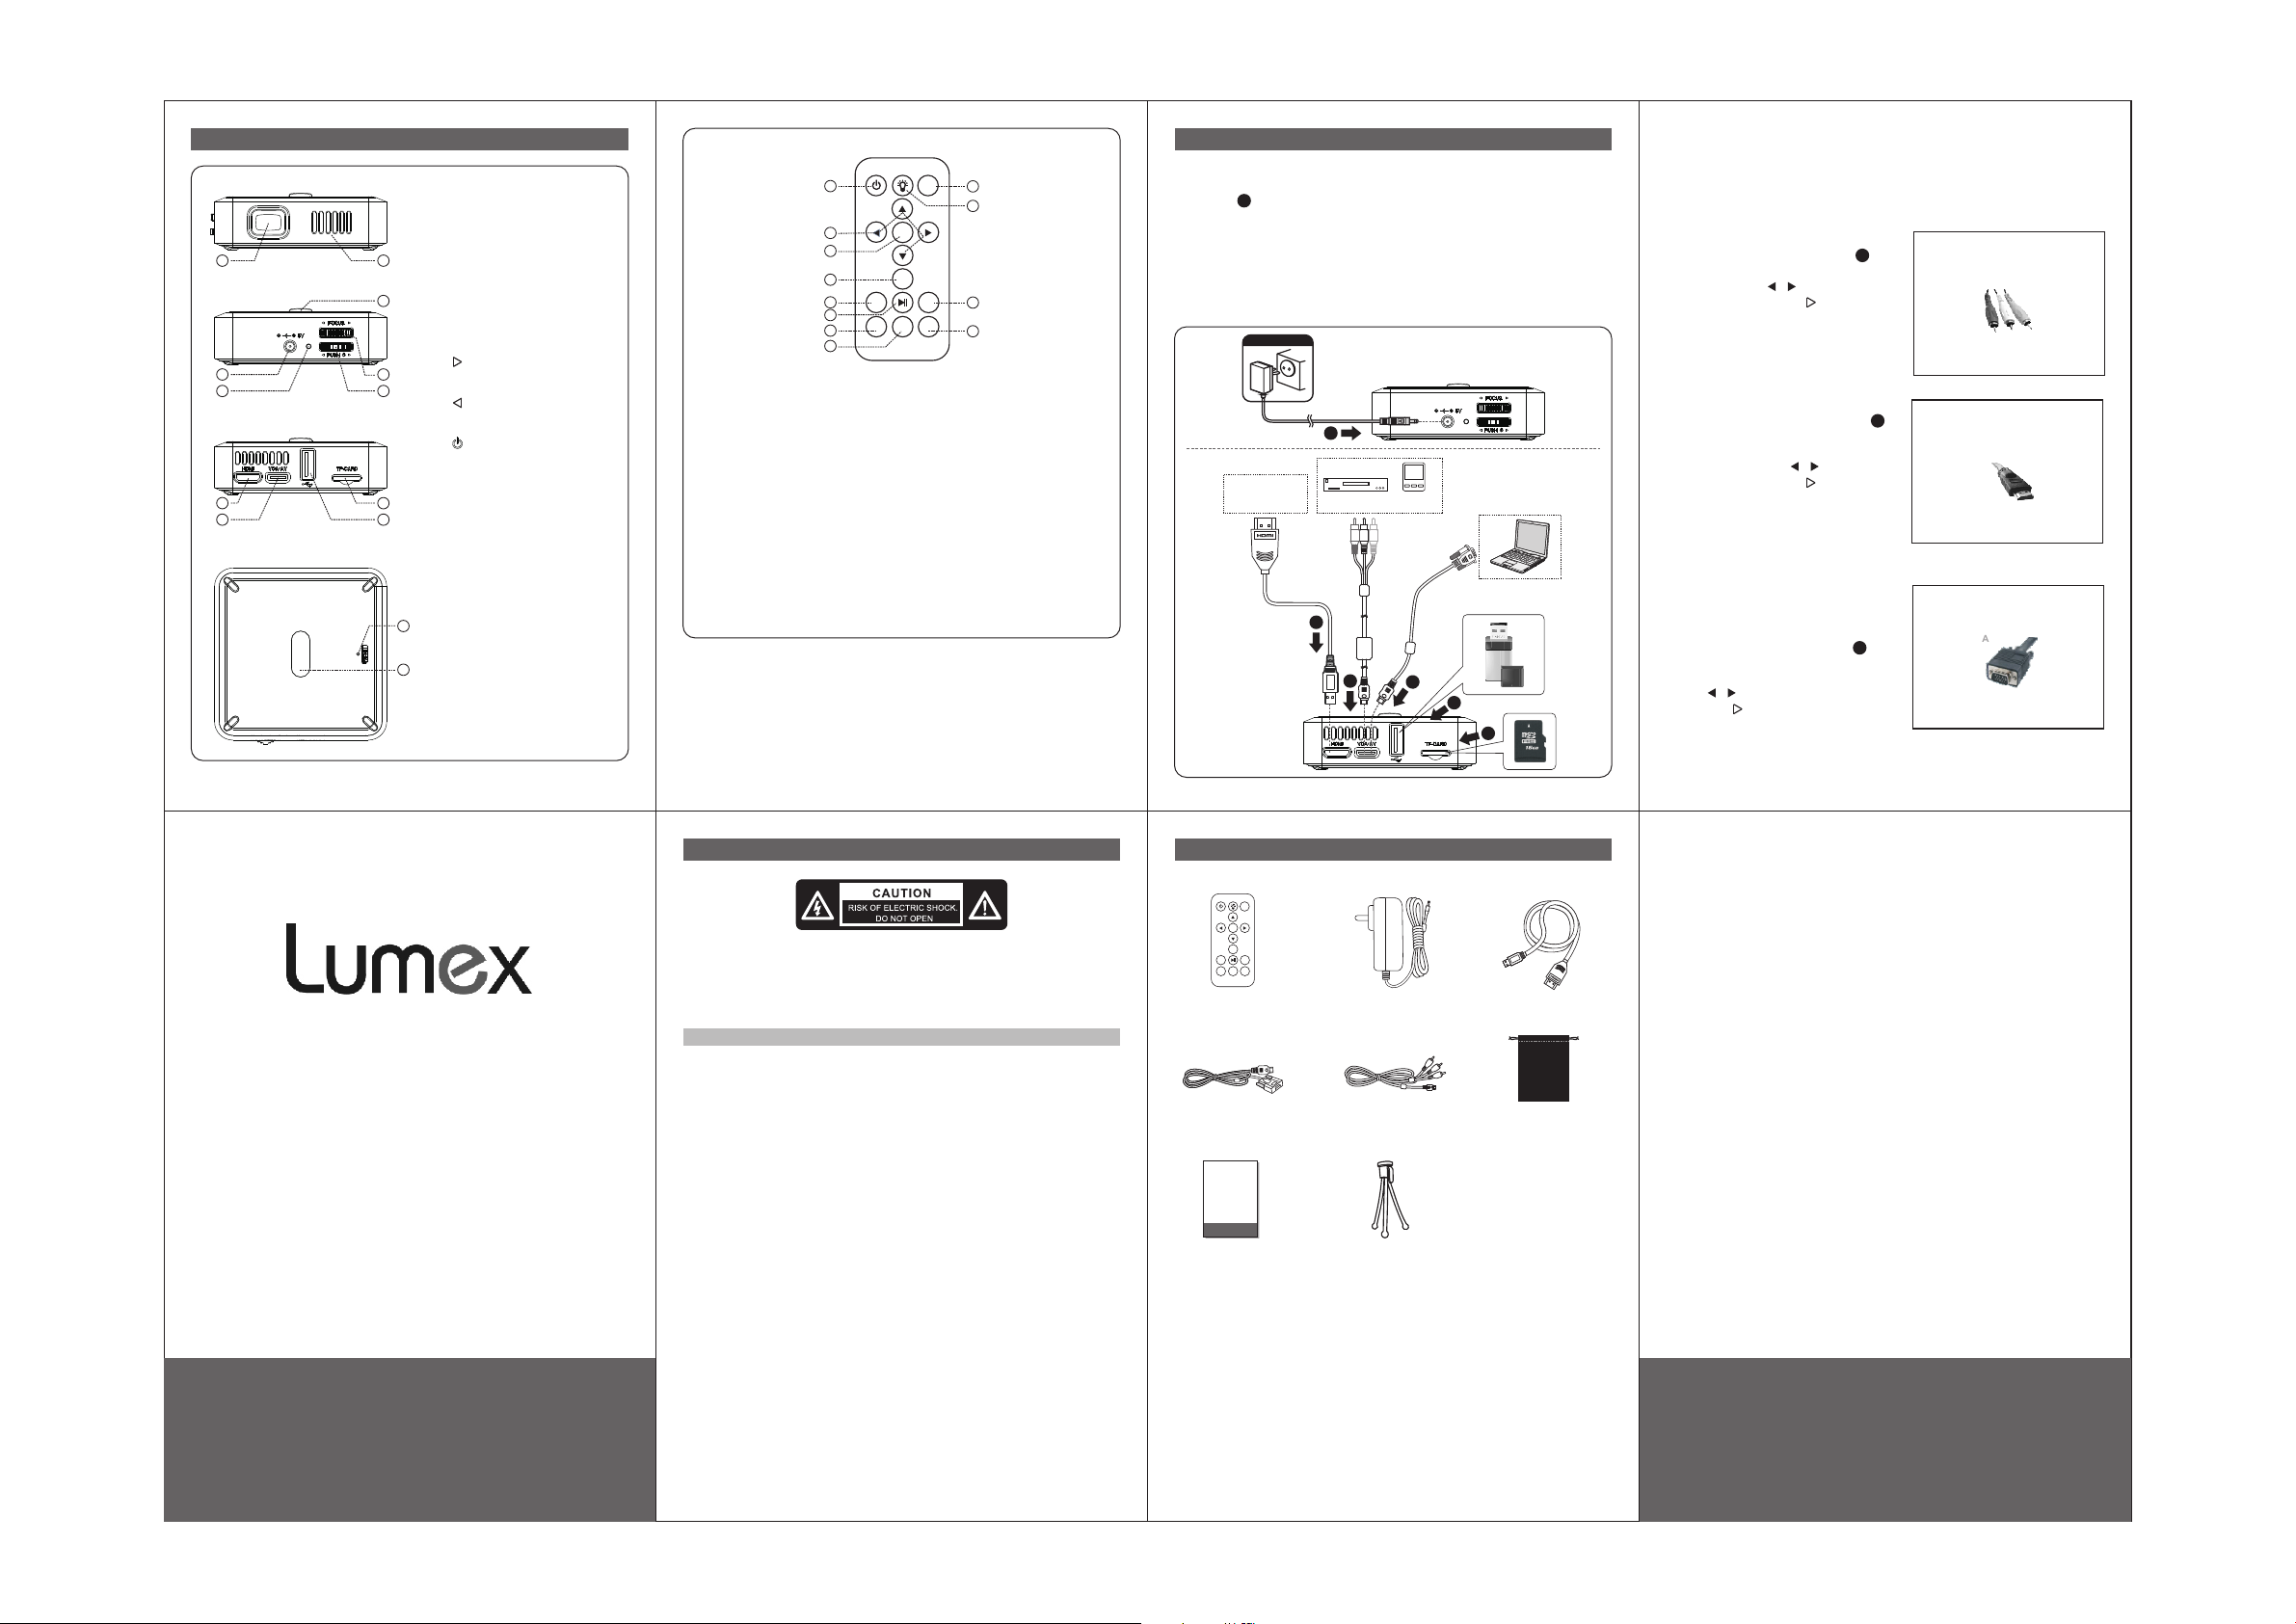
Projection Lens
1.
Cooling Holes
2.
3.IR Sensor
4.Power Supply Receptacle
5.LED Indicator
6.Focus
7.Wheel Key
Upper wheel key
Select loop/ Volume +
Down wheel key
Return/ Volume -
Middle w heel k ey
Short pr ess: C onf irm
Long pre ss: Tur n off
8. HDMI Input
9.VGA Input/AV Input
10.TF Card
Slot
11.USB Input
12.Reset
13.Magnet
REMOTE CONTROL FUNCTIONS
1
2
3
4
5
6
7
8
Power On /Off
1.
Up/Down/Left/Right
2.
Ok
3.
4.AUTO(detect the external input signal again )
MIRROR
RMT-
SRC
12
11
OK
AUTO
ESC
10
MUTE
VOL+
VOL-
800
9
STARTUP AND S HUTDOWN
STARTUP - Co nnect the e xternal p ower supply to DC in jack o n project or, see
connection , pre ss Power ke y on remote c ontrol or long press th e middle wh eel
key on th e project or to turn on t he device .
SHUT DO WN - when the p rojecto r is ON, pres s Power key on remote con trol and
long press the mid dle wheel k ey to turn off t he device .
FOCUS AD JUSTMEN T
The foc us can be adj usted by tu rning the w heel located at the fro nt of the pro jector.
1
CONNECTION DIA GRAM
Power supply
操 作
OPERATION
1
5.Rotation/Mirror
iPh one4
6.Play/Pause
Volume Down
7.
Mute
8.
Volume Up
9.
Return to upper menu
10.
、iPa d2、
DC、Bl u-ray Di sc
CD V CD DV D/ /
MP3/MP4
Media player
11.Brightness(Circular select brightness mode)
12.Return to main menu directly
2
3
4
5
6
5 6 7 8
BATTERY CHA RGING
This device is wit h built-i n lithium b attery, indi cation li ght is red when chargin g,
indication lig ht become s green whe n battery is full. In cas e the indic ation lig ht is
abnormal, it ind icate the b attery is i n unusual condition o r damaged , please
stop us ing the dev ice to prev ent from th e danger, and contact wit h the servi ce
center for maint enance.
AV INPUT
Connect with AV cable, see ,
connect the proj ector wit h any devic e with
AV output . Press “ / ” on rem ote
please
3
AV
contr ol or the whe el key “ ” on pro jector,
then yo u can proje ct the vide o from
exter nal sourc e by press “ OK ” k ey on
remote control o r middle wh eel key on th e
projector.
(FIG URE 1)
INPUT
HDMI
Connect with HDM I cable, pl ease see ,
plug the HDMI cabl e into the mi ni HDMI
jack on the projec tor, the othe r side into t he
2
HDMI
HDMI de vice . Pres s “ / ” on remote
control or the whe el key “ ” on pro jector,
select “HDMI inp ut” then yo u can proje ct
the video from ext ernal sou rce by pres s
“ OK ” key on r emote con trol or mid dle
wheel key on the pro jector.
(FIG URE 2)
VGA INP UT
When using VGA input t erminal t o connect
to the vi deo outpu t of other de vice, the
projector proj ect the vid eo out. Con nect
VGA cable, please se e connect ion ,
plug mini VGA termin al to the VGA jac k on
4
VGA
projector, the oth er side to th e VGA device.
Press “ / ” on remote co ntrol or th e
wheel key “ ” on proje ctor, selec t “VGA
Input ”, then you ca n project t he video fr om
exter nal sourc e by press “ OK ” k ey on
remote control o r middle wh eel key on th e
projector.
7 8
(FIG URE 3)
U ER M AN UA LS
PO RTA BLE PRO JEC TOR MX- 60
WARNINGS
Caution: To prevent electric sho ck, match t he wide bla de on the pow er cord plug
to the wi de slot on an e lectric o utlet. If t he plug does not fit, con sult a lice nsed
electrician to r eplace th e obsolet e outlet. Do not modify t he power co rd plug, or
you will defeat th is safety f eature.
Impor tant Safe ty Instru ctions
1. Read t hese inst ruction s.
2. Keep t hese inst ruction s.
3. Heed a ll warnin gs.
4. Foll ow all inst ruction s.
5. Do not u se this app aratus ne ar water.
6. Clea n only with d ry cloth.
7. Do not b lock any ve ntilati on openin gs. Install in accord ance with t he
manufacture' s instruc tions.
8. Do not i nstall ne ar any heat s ources su ch as radiators, heat r egister s, stoves ,
or othe r apparat us (inclu ding ampl ifiers) that produc e heat.
9. Prot ect the pow er cord fro m being wal ked on or pinched parti cularly a t plugs,
convenience re ceptacl es, and the p oint where they exit fr om the appa ratus.
10. Only use attachments/accessories specified by the manufacturer.
11. Unplu g this apparatus duri ng lighte ning stor ms or when un used for long
periods of time.
12. Refer all serv icing to qu alified s ervice personnel. S ervicin g is requir ed when
the apparatus ha s been dama ged in any wa y, such as p ower-su pply cord o r
plug is damaged, l iquid has b een spill ed or objects have fall en into the
apparatus, the a pparatu s has been ex posed to rain or moistu re, does no t
operate normal ly, or has been dr opped.
13. The a pparatus shall not be e xposed to d ripping o r splashi ng and that no
objects filled w ith liqui ds, such as v ases, shall be placed o n the appar atus.
14. The m ains plug or an applian ce couple r is used as di sconnec t device, the
disconnect dev ice shall r emain rea dily operable.
15. Do not use this ap paratus i n the box or in t he cabinet, it should b e placed on a
venti lation ar ea.
16. Warn ing: To reduce the r isk of elec tric shoc k, do not remove the cove r or
back, do not expos e this appa ratus to ra in or moisture. There a re no userservi ceable pa rts insid e. Refer se rvicing to qualifie d service p ersonne l.
ACCES SORIES
SRC
OK
AUTO
ESC
MIRROR
MUTE
VOL+
VOL-
800
RMT-
HDMI CAB LE
REM OTE C ONTR OL POW ER ADA PTER
VGA CABLE
USER MAN UAL
2 3
2 3
AV CABLE
TRI POD
HDM I CABLE
POR TABLE B AG
For warranty inform ati on an d reg ist rat ion, please log onto
www.s hop pro jec tor .com.
3
Page 2
MULTIME DIA PLAYER
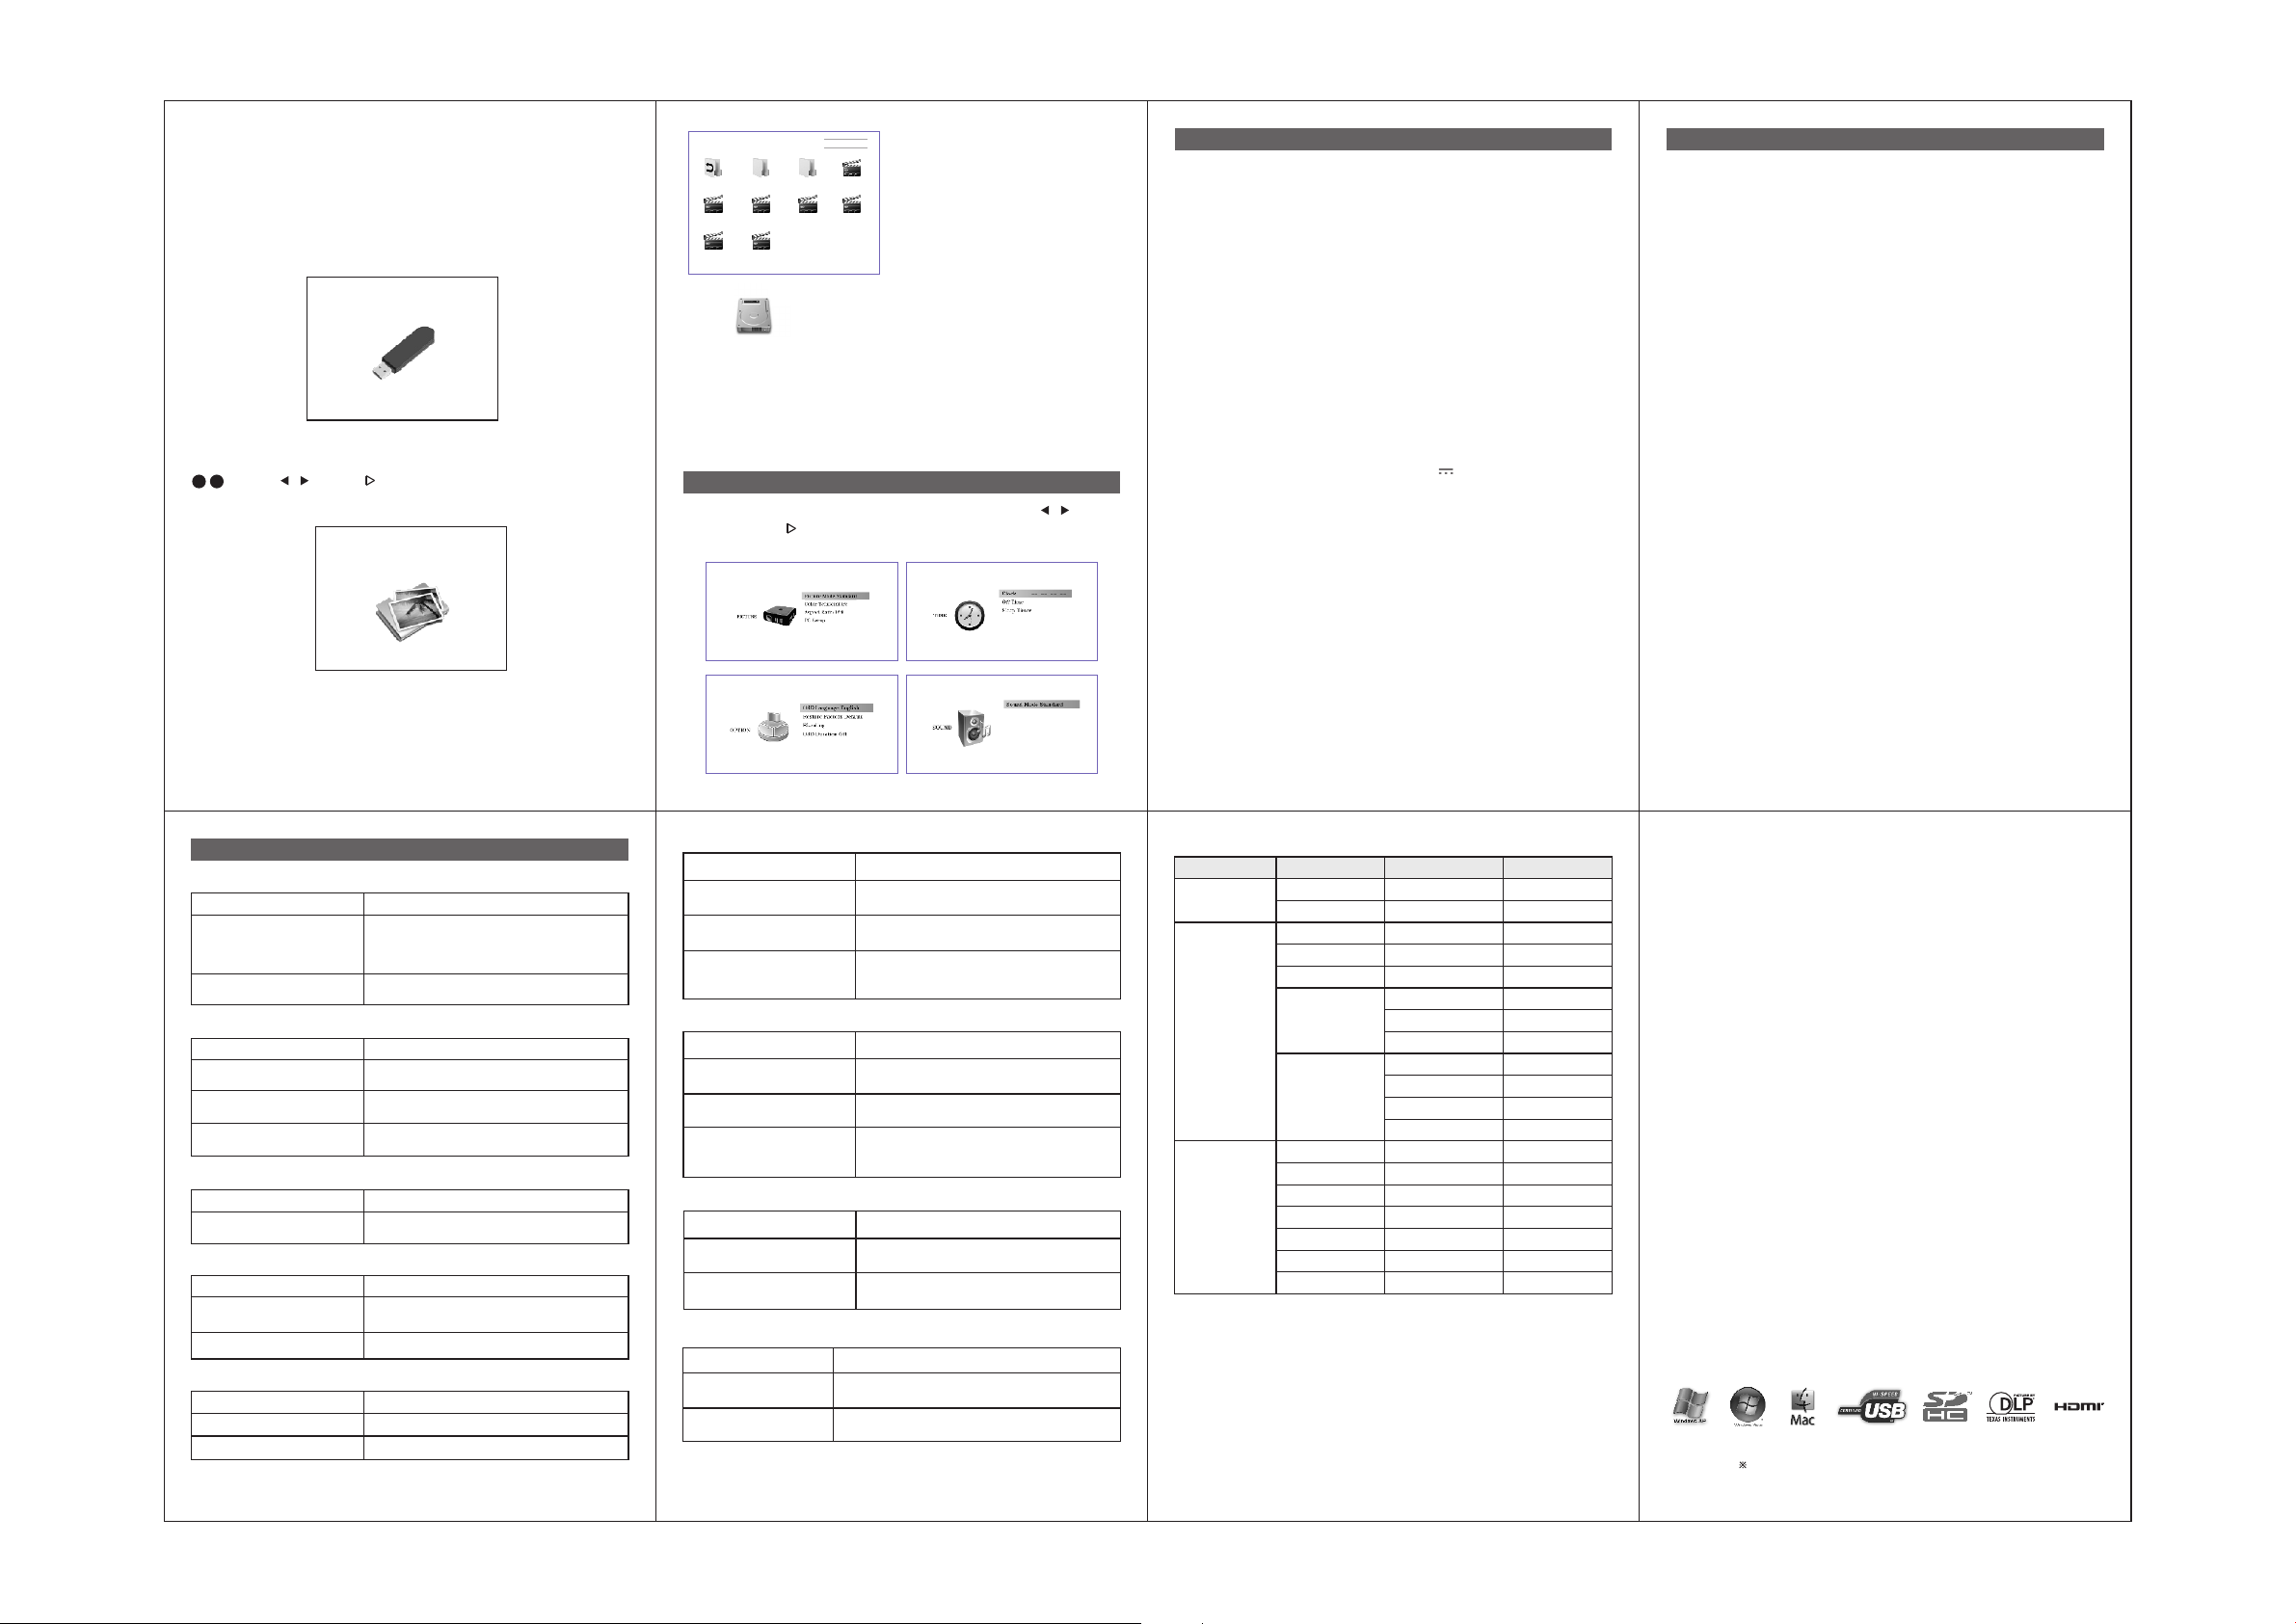
Player support s the follo wing form ats:
Pictu re format : JPEG、BMP、PN G
Audio format:WMA、M P3
Video f ormat:MPEG、H.264、MJPE G、MOV、AVI、RMVB、RM、MK V、MP4
Text format:T XT
Photo, Audio, Video and Text fil e can be acce ssed via TF ca rd and USB. Tur n on
the projector, go in to the defa ult main in terface, please see a s below:
USB
(FIG URE 4)
Ins ert the U SB and TF c ard int o the pro jecto r (see co nnec tion on p age 7 at
), pr ess “ / ” key o r “ ” wheel k ey to sel ect to en ter into menu o f
65
USB a nd TF card. Then pr ess “ OK ” ke y on rem ote con trol or m iddle w heel ke y
on th e proje ctor to e nter in to next menu.
PHOTO
(FIG URE 5)
Choose vid eo, m usic, photo, text in the same way t o sta rt playing video, music,
photo, text and s o on, the ope ration is alm ost the same. Take browsing photo as
example:
First select menu “ PHOTO ” and press “ OK ” key on r emote contro l or middle
wheel key on the pro jector to e nter into n ext menu.
1/1
Alizee.L a.lsl a.B.
MISC
DCIM
Retrun
MADAGA-1 .MP4
Rro 1080P.mp 4
Rio 1080P.mo v
Rlo 1080P.mp 4
1ce Age- Dawn
Rro 1080P.mp 4
(FIG URE 6)
Sel ect “ ” , pre ss “ O K ” k ey on remote cont rol or the whee l key on
pro ject or, the file s on U SB an d TF ca rd wi ll be show n. Se e pict ure 6 , sel ect t he
pho tos you want to brow se, and pres s “ PLAY ” k ey on remo te contr ol or the
mid dle whee l ke y on proje ctor to st art the brow se. Unde r project or m ode, you
can cont rol th e set up menu by p ress “ OK ” k ey on r emot e con trol o r the middl e
whe el key o n proj ecto r. Cont rol me nu inc lude t he fun ctio ns as be low,
Pla y/Pa use, Pr eview, Ne xt, Sto p & Exit , Repe at, bac kgro und mus ic On/Off,
Pla y list, Inf orma tion o f cur rent p hoto play, Cl ockw ise rotate , Cou nterclock wise
rot ate, Z oom ou t, Zoom i n, Mov e.
MENU SE TTINGS
In an y mode, p ress key t o retur n to main m enu. Pr ess “ / ” on
rem ote con trol or “ ” o n wheel k ey of project or, select and en ter in “ SE TUP ”
men u, you ca n set up th e video , sound, time , setup , speci fic set up is as be low.
“ SET UP ”
SPECI FICATIONS
PROJE CTION SYS TEM
Resolution: VGA (640x480)
Brightness: 60 ANSI-Lumens
Contrast Ratio : 1000:1
Aspect ratio: 4:3
Noise: <28 dBA
Projection Siz e: Avail able Size 25 ~ 90 inch
Projection Len s: Manual Focus
Lamp: 30, 000 Hours
Projection Angle : 33.6°
GENER AL SPECS
Audio/Video Input: Stere o Audio
Composite Video (CVBS)
Audio Output: built-in 1 x 1W spea ker
VGA: PC V GA
USB: Standard 4 Pin USB
HDMI: Type C
SD/MM C Card: S DHC
Power Adaptor: Input: AC100 - 2 40V, 50Hz/60H z
Power Consumpt ion: 8 Watts
Batte ry: Lithium batter y 2000mAh /3.7V
Opera ting temp erature : 0°C - 40°C
Opera ting humi dity: 25% - 88%
Supported Lang uages: English, Spani sh, Portu guese, Fr ench,
Deuts ch, Itali an
Weigh t: 150g
Outpu t: 5V 2A
The Pro jector ne eds prope r mainten ance.
Lens Cl eaning - You shou ld keep the l ens clean a nd free of dirt and debri s by
using a soft lint- free clot h.
Gener al Cleani ng - To clean t he projec tor, first un plug the projector an d wipe the
projector with a s oft lint- free clot h. Slightly moisten c loth as nee ded. Do not u se
alcohol, benze ne, or othe r cleanin g detergents as this ma y cause dis colorat ion or
warping of the cas e.
Lamp Re placeme nt – The proj ector use a 2 0,000 hour LED lamp tha t does not
need replaceme nt. Do not at tempt to re place the LED lamp.
Openi ng the Proj ector – The re are no ser viceable parts in the p rojecto r. Do not
attem pt to open.
Remote Control B attery Re placeme nt – The Remote control u ses a CR202 5
batte ry. Please use only CR202 5 type batt eries for r eplacem ent.
MAINT ENANCE
Dimensions: 75*75*22mm(L xWxH)
9 10 11 12
TROUBLESHOOTING
THE PRO JECTOR DOES NOT TURN ON
Possi ble Cause s
Che ck to en sure th e powe r plug or batte ry
On power
Over he ating
sou rce is g ood. Ch eck th e power a dapt er to
ens ure a pr oper co nnec tion wi th the w all
out let as w ell as th e proj ector.
Wai t unti l the proje ctor h as fu lly co oled to
restar t.
IMAGE I S BLURRED
Possi ble Cause s
The Pro jector is n ot in focus
Lens protectiv e film is not
removed
The lens is dirty
REMOTE C ONTR OL DOE S NOT W ORK
Adjust the focus w ith the foc us adjust ment
dial until the ima ge comes in to focus.
Please tear off the protecti ve film.
With a so ft , lint-f ree cloth t o wipe the pr ojector
lens.
Possible Cause s Solution
The r emote c ontr ol is dea d
Rep lace th e batt ery wit h comp arabl e CR20 25
bat tery
TF CARD I S NOT RECOG NIZED
Possible Cause s Solution
TF Card is not in serte d
properly
TF Ca rd is d amag ed
Re-ins ert TF C ard
Replac e TF Car d
USB DOE S NOT RECOG NIZE
Possible Cause s Solution
USB i s not ins erte d prope rly
Re- insert Remo vable D isk
USB i s damag ed Replace Removable Disk
Solution
Solution
VGA PORT D OES NOT WOR K
Possi ble Cause s
VGA ca ble i s not co nne cted
proper ly
Lap top doe s not swi tch to
ext ernal V GA mode
PC VGA outp ut mode is no t in
range of specifi cation of t he
projector
Reconn ect VG A cabl e to ens ure pr ope r
connec tion
Swi tch lap top to ex terna l VGA mode
See page 15 : The projector supports common
formats
Solution
HDMI PO RT DOES NOT W ORK
Possi ble Cause s
HDMI cab le is no t con nect ed
proper ly
Lap top doe s not swi tch to
ext ernal V GA mode
HDMI output mode i s not in
range of specifi cation of t he
projector
Reconn ect HD MI ca ble to e nsur e pro per
connec tion
Switch laptop to external VGA mode
See page 15 : The projector supports common
formats table
Solution
AV PORT DOE S NOT WORK
Possi ble Cause s Solution
AV cab le is not con nect ed
proper ly
Ext ern al vid eo de vice , has
not disp lay
Reconn ect AV cab le to en sur e the co rrect
connec tion .
Ensure e xter nal v ideo d evic e has o utpu t.
Compos ite
video
Analog R GB
(VG A)
THE PROJECTOR SUPPORTS COMMON FORMATS
Source Signal
Refresh rate (HZ)
NTS C
PAL
VGA 60/66/ 72/7 5
SVG A
XVG A
56/60/ 72/7 5
60/70/ 75
60/70/ 75
SXV GA
60/72/ 75
WXV GA
SDTV(4 80i)
SDTV(5 76i)
SDTV(4 80P)
HDMI
SDTV(5 76P)
HDTV(7 20P)
HDTV(1 080i )
HDTV(1 080P )
Resolution
60 720*4 80
50 720 *5 76
640*4 80
800*6 00
1024* 768
1152 *86 4
60/75
60/75
60
60/75
60
60
50
60
50
50/60
50/60
50/60
1280* 960
1280* 1024
1280* 768
1360* 768
1280* 800
1400* 900
720*4 80
720*5 76
720*4 80
720*5 76
1280* 720
1920* 1080
1920* 1080
THE BATTERY CAN NOT BE CHARGED
Possi ble Cause s
the battery is dam aged
the battery is ove r-heat
Please contact w ith servi ce center f or maintenance
(do not unpack in pe rson).
Please turn off the device and t hen re-ch arge when
cool down.
13
Solution
Description: DLP, DLP logo and DLP badge is a trademark of Texas Instruments Incorporated .
Tip: product pictures, information may be nuances and physical, if it updated without notice .
14 15 16
 Loading...