

Page 1
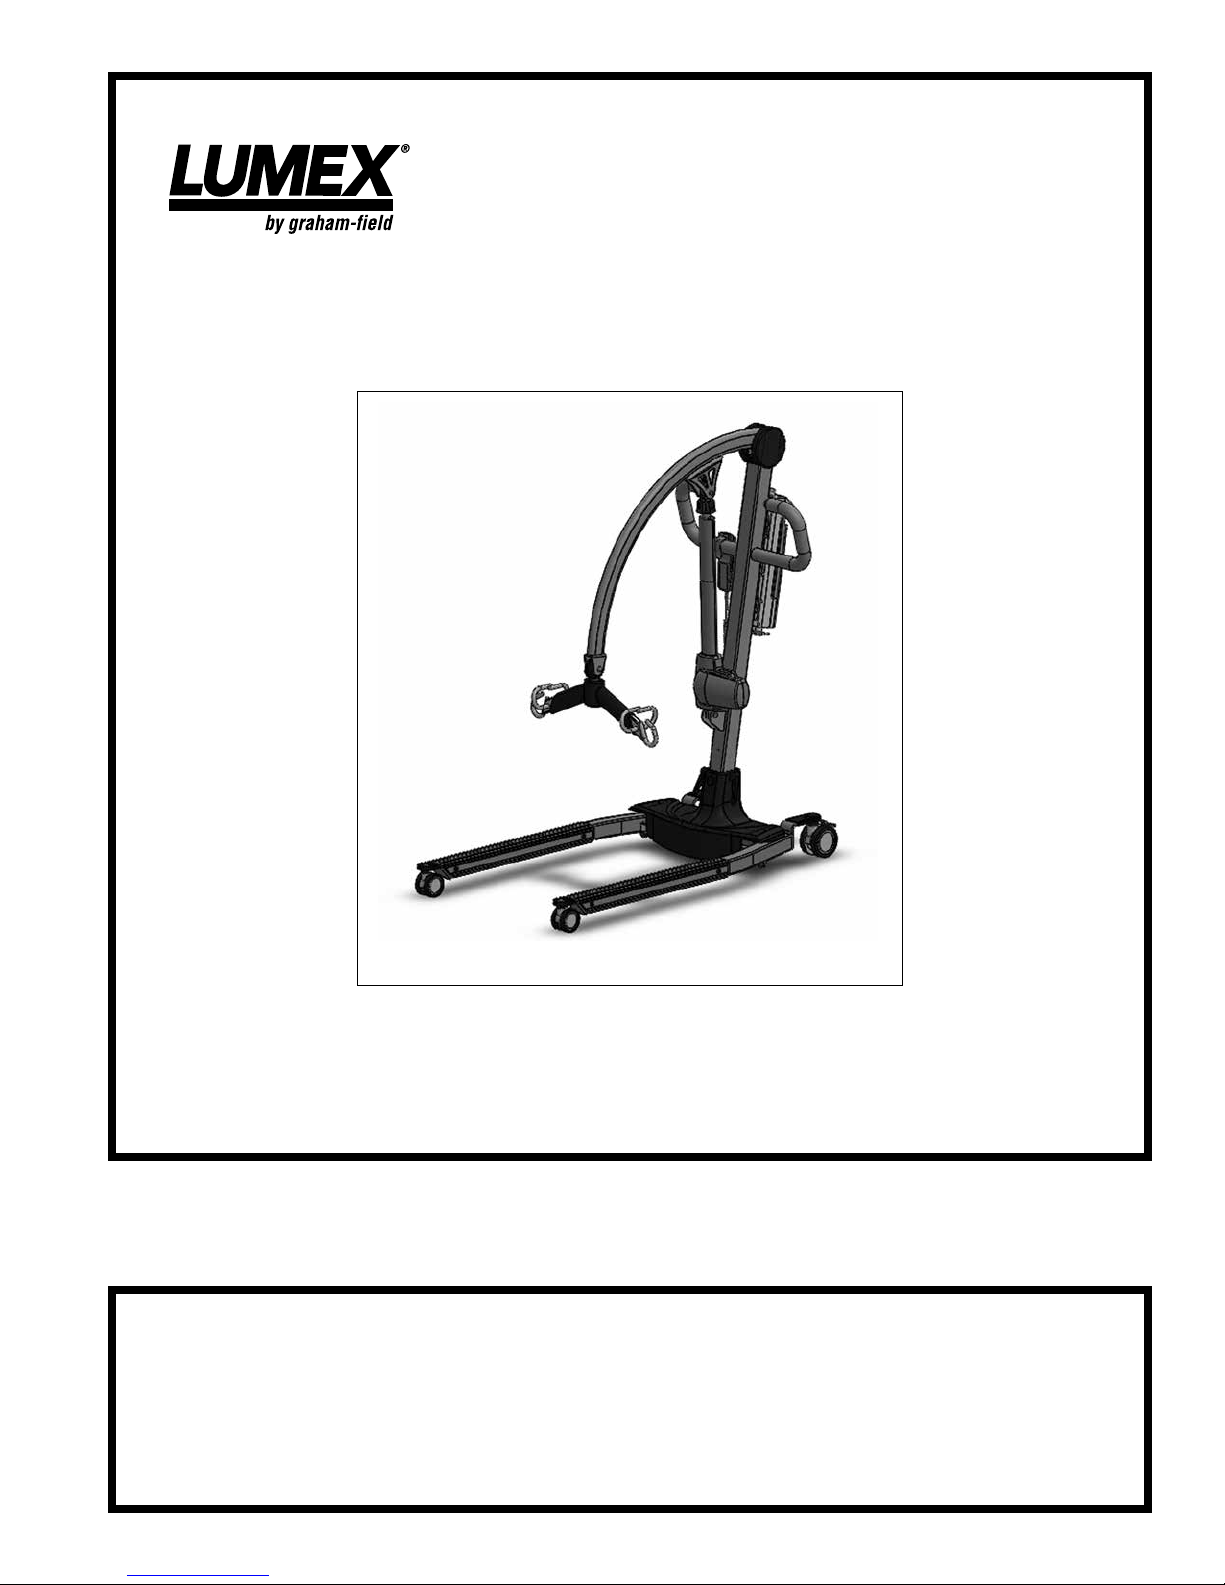
LF500 PATIENT LIFT
USER MANUAL
Read this manual before operating your Patient Lift.
LF500-INS-LAB-RevC18
Save this manual for future use.
Page 2

CONTENTS
1 INTRODUCTION ......................................................................................................................... 3
2 SAFETY PRECAUTIONS ........................................................................................................... 4
WARNINGS ........................................................................................................................... 4
3 FEATURES ................................................................................................................................. 6
LIFT COMPONENTS ............................................................................................................ 6
CONTROL BOX COMPONENTS ......................................................................................... 6
4 HANDLING PROCEDURES ....................................................................................................... 7
SHIPPING AND TRANSPORTATION INSTRUCTIONS ....................................................... 7
5 SETUP ........................................................................................................................................8
ASSEMBLY INSTRUCTIONS ...............................................................................................8
6 USER GUIDE ............................................................................................................................ 10
CHARGING THE BATTERY ...............................................................................................10
OPERATING INSTRUCTIONS — USING THE CONTROL BOX ....................................... 11
OPERATING INSTRUCTIONS — USING THE HAND PENDANT ..................................... 12
LIFT PREPARATION AND PROCEDURE .......................................................................... 13
LIFTING THE PATIENT ....................................................................................................... 13
EMERGENCY RELEASE .................................................................................................... 17
7 CARE AND MAINTENANCE .................................................................................................... 18
BEFORE EACH USE .......................................................................................................... 18
AT LEAST ONCE A MONTH .............................................................................................. 18
LUBRICATION .................................................................................................................... 18
CLEANING .......................................................................................................................... 19
CARE OF SLINGS .............................................................................................................. 19
MAINTENANCE SCHEDULE ............................................................................................. 19
8 TROUBLESHOOTING .............................................................................................................. 20
9 SPECIFICATIONS .................................................................................................................... 20
10 LIMITED WARRANTY .............................................................................................................. 21
11 INDEX .......................................................................................................................................23
LF500-INS-LAB-RevC18 2
Page 3

1 INTRODUCTION
Congratulations on your purchase of the Lumex LF500 Patient Lift. The following pages will
provide you with important safety and operating instructions on the use of patient lifts, slings,
and accessories, as well as maintenance and warranty information. Read this manual carefully
before operating your patient lift and refer to it as often as needed. Consult your authorized
distributor and / or healthcare professional with any questions or concerns regarding safe and
effective techniques for operating your patient lift.
DO NOT attempt any transfer without prior approval of the patient’s healthcare provider. With
their assistance, select the sling that best serves the needs, abilities, comfort and safety of the
person being lifted. It is important that you use correct slings adapted to the body shape and
weight and ability of the patient and the specic type of transfer needed.
Upon receipt of the patient lift, and prior to each use, inspect it closely to ensure that nothing
is damaged, there are no loose or broken parts, that all patient lift parts are in the proper place,
etc. Immediately replace any worn or broken components. Your patient lift should receive
maintenance on a regular schedule and should be inspected daily for proper operation. Contact
GF Tech Support at 1.770.368.4700 with any maintenance concerns.
Before lifting anyone, thoroughly read the instructions in this manual. Ideally, observe a team
of trained experts performing the lifting procedures. The operator should then practice the
entire lifting procedure several times with proper supervision and with a capable individual
acting as patient. It is extremely important to know how a patient will feel in the patient lift. We
suggest that the operator try all the various lifting slings and equipment until the operator is
condent with how the patient lift operates. The lifting procedures should be explained to the
patient before the actual lifting. Remember that safety requires the constant attention of the lift
occupant and the operator. Use extreme care and common sense when operating a patient lift.
This guide covers the use of the Lumex LF500 Patient Lift. Keep in mind that the basic safety
procedures included in this manual are to be used as a guide only. You may nd it necessary
to develop your own unique methods for safely utilizing the patient lift. Again, consult your
healthcare professionals for their recommendations and never hesitate to ask for their
assistance.
Info: Before attempting to assemble the patient lift, refer to the section titled “ASSEMBLY
INSTRUCTIONS” contained elsewhere in this manual. Contact GF Tech Support at
1.770.368.4700 or your GF authorized distributor if additional assistance is needed.
Info: In this manual, the person being lifted is referred to as the “patient” or “occupant”
and the person operating the patient lift is called the “operator” or “attendant”.
Intended use
The Lumex LF500 Patient Lift is intended to aid in the transfer of an individual who is unable to
independently transfer between bed, chair, bathtub, wheelchair, and / or commode.
WARNING: The Lumex LF500 Patient Lift is designed for transfer only (to and from bed,
chair, bathtub, toilet, wheelchair, commode etc.). This Patient Lift is not intended to be
used for transporting or moving a patient from one location to another.
LF500-INS-LAB-RevC18
3
Page 4

2 SAFETY PRECAUTIONS
IMPORTANT: Before using patient lift, read and adhere to the following safety
precautions and warnings. Failure to do so could result in serious personal injury or
damage to your patient lift.
Always consult your healthcare professional to determine safe methods most suitable for
your individual abilities. Protect yourself, your attendant and patient lift by having it serviced
regularly. If you experience any malfunction, contact GF Tech Support at 1.770.368.4700 or your
GF authorized distributor immediately, as a hazardous condition could result, causing personal
injury or damage to your patient lift.
Periodic inspection, adjustment and replacement of worn parts are necessary to provide years
of excellent service. Refer to CARE AND MAINTENANCE section of this manual.
Maintenance MUST be performed by qualied personnel ONLY.
Signicance of safety statements
Note the following special statements, used throughout this manual, and their signicance:
WARNING: Indicates a potential hazard situation or unsafe practice that, if not avoided,
could result in death or serious personal injury.
CAUTION: Indicates a potential hazard situation or unsafe practice that, if not avoided,
could result in minor or moderate personal injury.
s NOTICE: Indicates a potential hazard situation or unsafe practice that, if not avoided,
could result in product or property damage.
Info: Provides application recommendations or other useful information to ensure that you
get the most from your product.
WARNINGS
WARNING: Important! Read and understand these instructions before assembling
or using the Lumex LF500 Patient Lift. If you do not understand any part of these
warnings, cautions or instructions, contact a healthcare professional for direction in the
use of this product. If the Lumex LF500 Patient Lift is not properly assembled, personal
injury and damage to the LF500 could result.
WARNING: If components are damaged or missing, contact your GF authorized
distributor immediately. DO NOT use substitute parts. Use only Lumex replacement
parts. The use of non-Lumex replacement parts could cause personal injury, property
damage, and void the warranty.
WARNING: Unauthorized modication of your patient lift could cause personal injury,
property damage, and void the warranty.
WARNING: The Lumex LF500 Patient Lift maximum weight capacity is 500 lb, EVENLY
DISTRIBUTED. DO NOT exceed the maximum weight capacity.
WARNING: GF Health Products, Inc. assumes no responsibility for any damage or injury
caused by improper assembly or use of this product.
WARNING: Check all parts for shipping damage before using. In case of damage, DO
NOT USE the equipment. Contact the carrier or your GF authorized distributor for
further instructions.
LF500-INS-LAB-RevC18 4
Page 5

WARNING: Patient lift may tip over if used incorrectly. Read and adhere to the operating
instructions prior to lifting anyone.
WARNING: GF Health Products, Inc. strongly recommends that two caregivers take part
in the lifting process.
WARNING: When transferring a patient, always keep the patient centered over the base.
WARNING: Ensure that lifting sling loops are correctly attached to the hooks to prevent
the patient from sliding or falling out of the sling, which could result in personal injury.
Never use the patient lift to lift or transfer anything other than a person.
WARNING: Do not lock the brakes or block the wheels when lifting. The casters must
be FREE to roll to allow the patient lift to stabilize itself when the patient is initially lifted
from a chair, bed, or any stationary object.
WARNING: Do not attempt to maneuver the lift by pushing on the mast, boom, actuator,
or patient. Always maneuver the lift with the handle.
WARNING: During lifting or lowering, whenever possible, always keep the patient lift
legs in the maximum open position.
WARNING: To facilitate movement, close patient lift legs before moving the lift.
WARNING: Replace any worn or broken parts immediately! Torn, cut, frayed, or broken
slings can fail, resulting in serious personal injury. Use only slings that are in good
condition.
WARNING: Use extreme care, caution, and common sense when utilizing a patient lift.
Special attention must be given to patients who are disoriented and cannot cooperate
while being lifted, such as comatose, agitated, spastic, or mentally confused persons.
Consult their healthcare professional for assistance in lifting these types of patients.
WARNING: Cancer and Reproductive Harm - www.p65warnings.ca.gov.
WARNING: GF Health Products, Inc. specically disclaims responsibility for any bodily
injury or property damage which may occur during any use which does not comply with
federal, state or local laws or ordinances.
LF500-INS-LAB-RevC18
5
Page 6
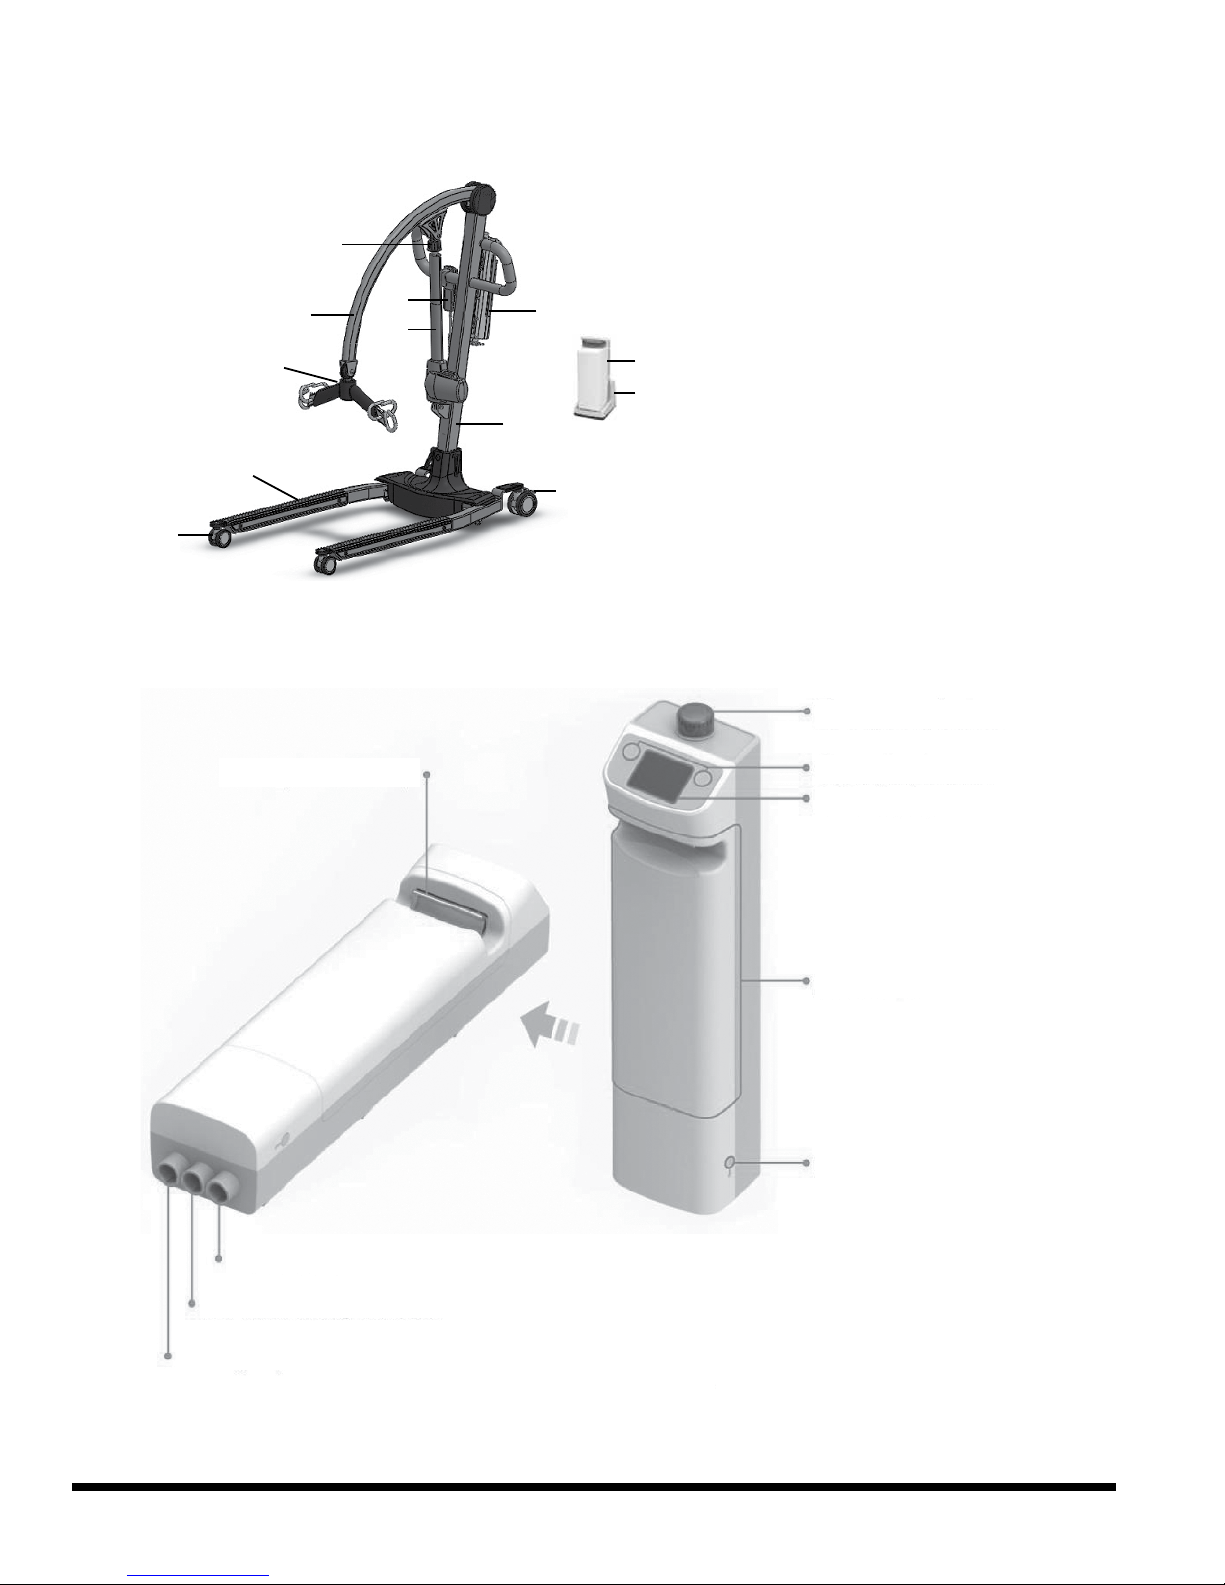
3 FEATURES
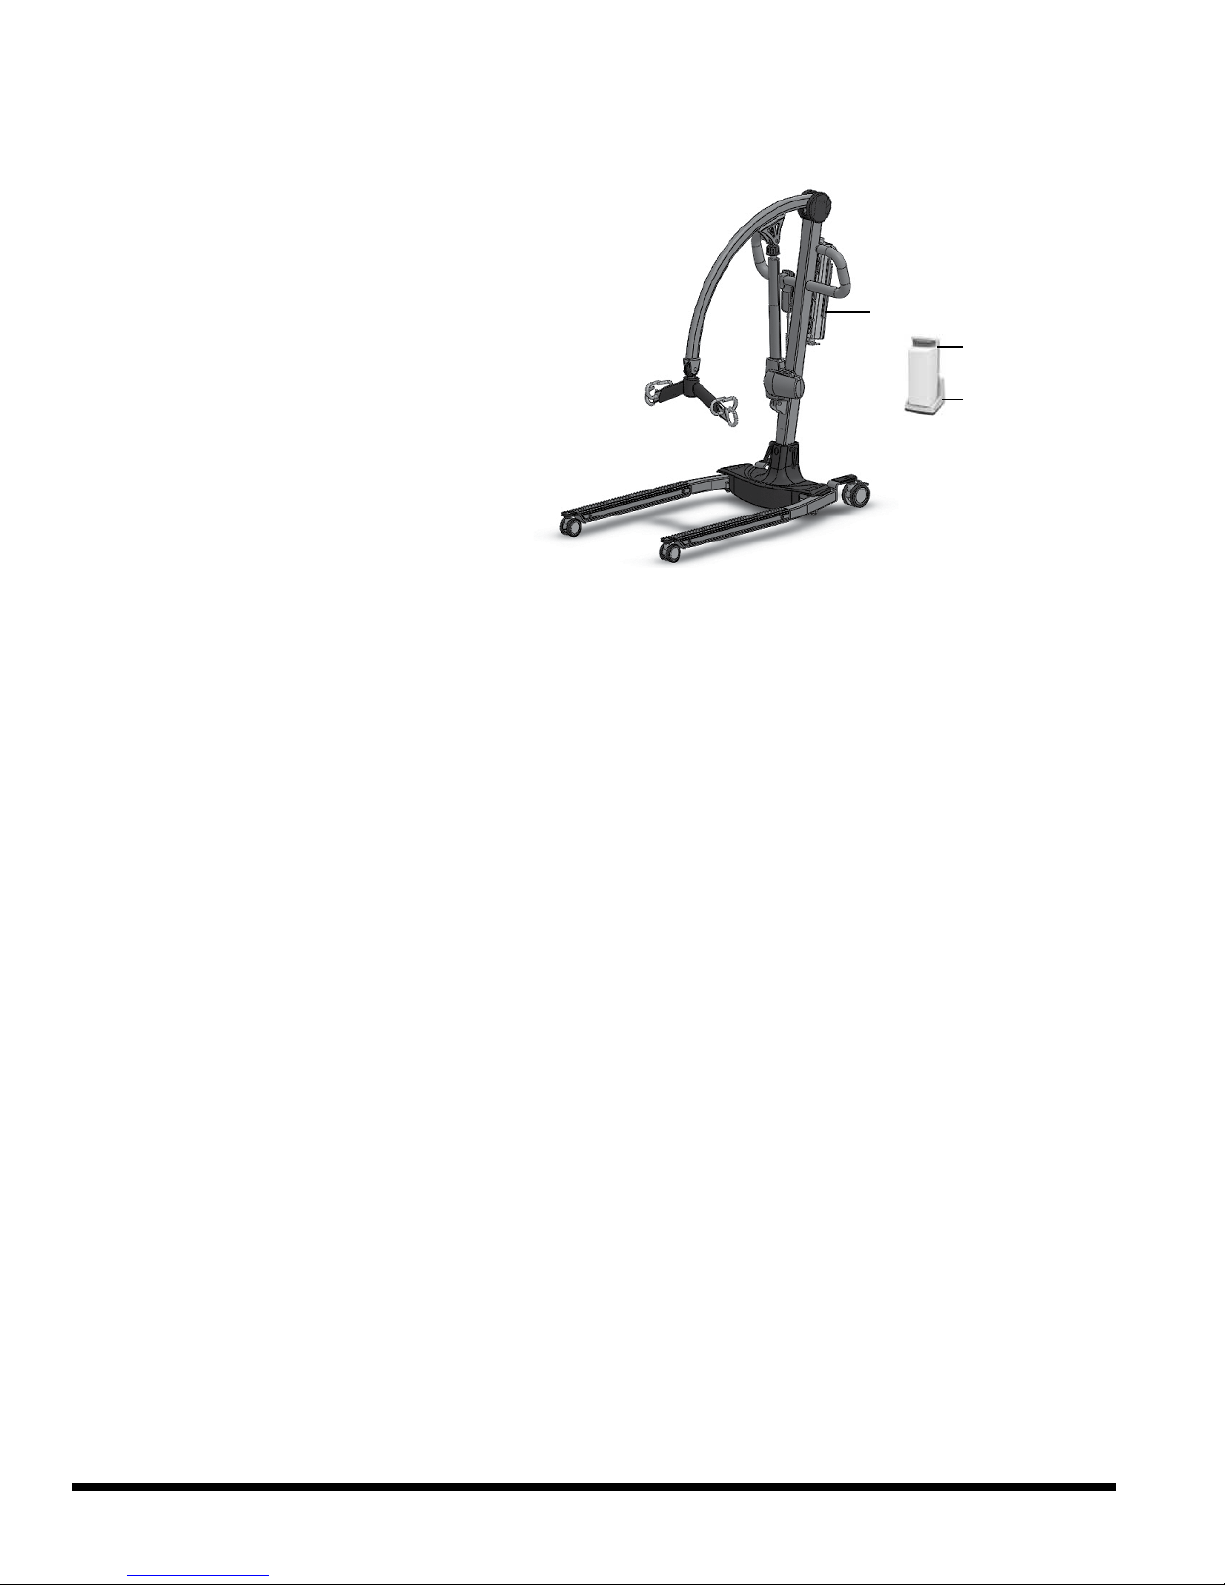
l. Wall / desk charging caddy
LIFT COMPONENTS
a
d
c
i
a. Boom
b. Mast
j
e
f
g
b
h
c. Base
d. Spreader bar
e. Hand pendant
f. Actuator
k
g. Control box
l
h. Rear braking caster
i. Front caster
j. Emergency lowering device
(Emergency button)
k. Extra battery pack
CONTROL BOX COMPONENTS
Battery release clip
Control box on / off and
emergency stop button
Control buttons
LCD screen
Battery pack
Charger connector
Hand pendant connector
Lifting actuator connector
Base leg actuator connector
s NOTICE: DO Not operate the lift while it is charging.
LF500-INS-LAB-RevC18 6
Page 7

4 HANDLING PROCEDURES
SHIPPING AND TRANSPORTATION INSTRUCTIONS
If the patient lift is to be reshipped by common carrier, it should be packed in the same carton
in which it was received.
Unpacking
WARNING: The lift is heavy. To avoid personal injury, DO NOT attempt to remove the lift
from the box without assistance.
1. Check for any obvious damage to the carton or its contents. If damage is evident, notify the
carrier or your GF authorized distributor.
2. Remove all loose packing from the carton.
3. Carefully remove all the components from the carton.
Info: Unless the patient lift is to be used immediately, retain boxes, containers and packing
material for use in storing until use of patient lift is required.
Inspection
1. Examine the exterior of the patient lift for nicks, dents, scratches or other damage.
2. Inspect all components.
Storage
1. Store the repackaged patient lift in a dry area.
2. DO NOT place other objects on top of the repackaged patient lift.
s NOTICE: DO Not operate the lift while it is charging.
LF500-INS-LAB-RevC18
7
Page 8
5 SETUP
ASSEMBLY INSTRUCTIONS
WARNING: The lift is heavy. To avoid personal injury, DO NOT attempt to assemble the
lift without assistance.
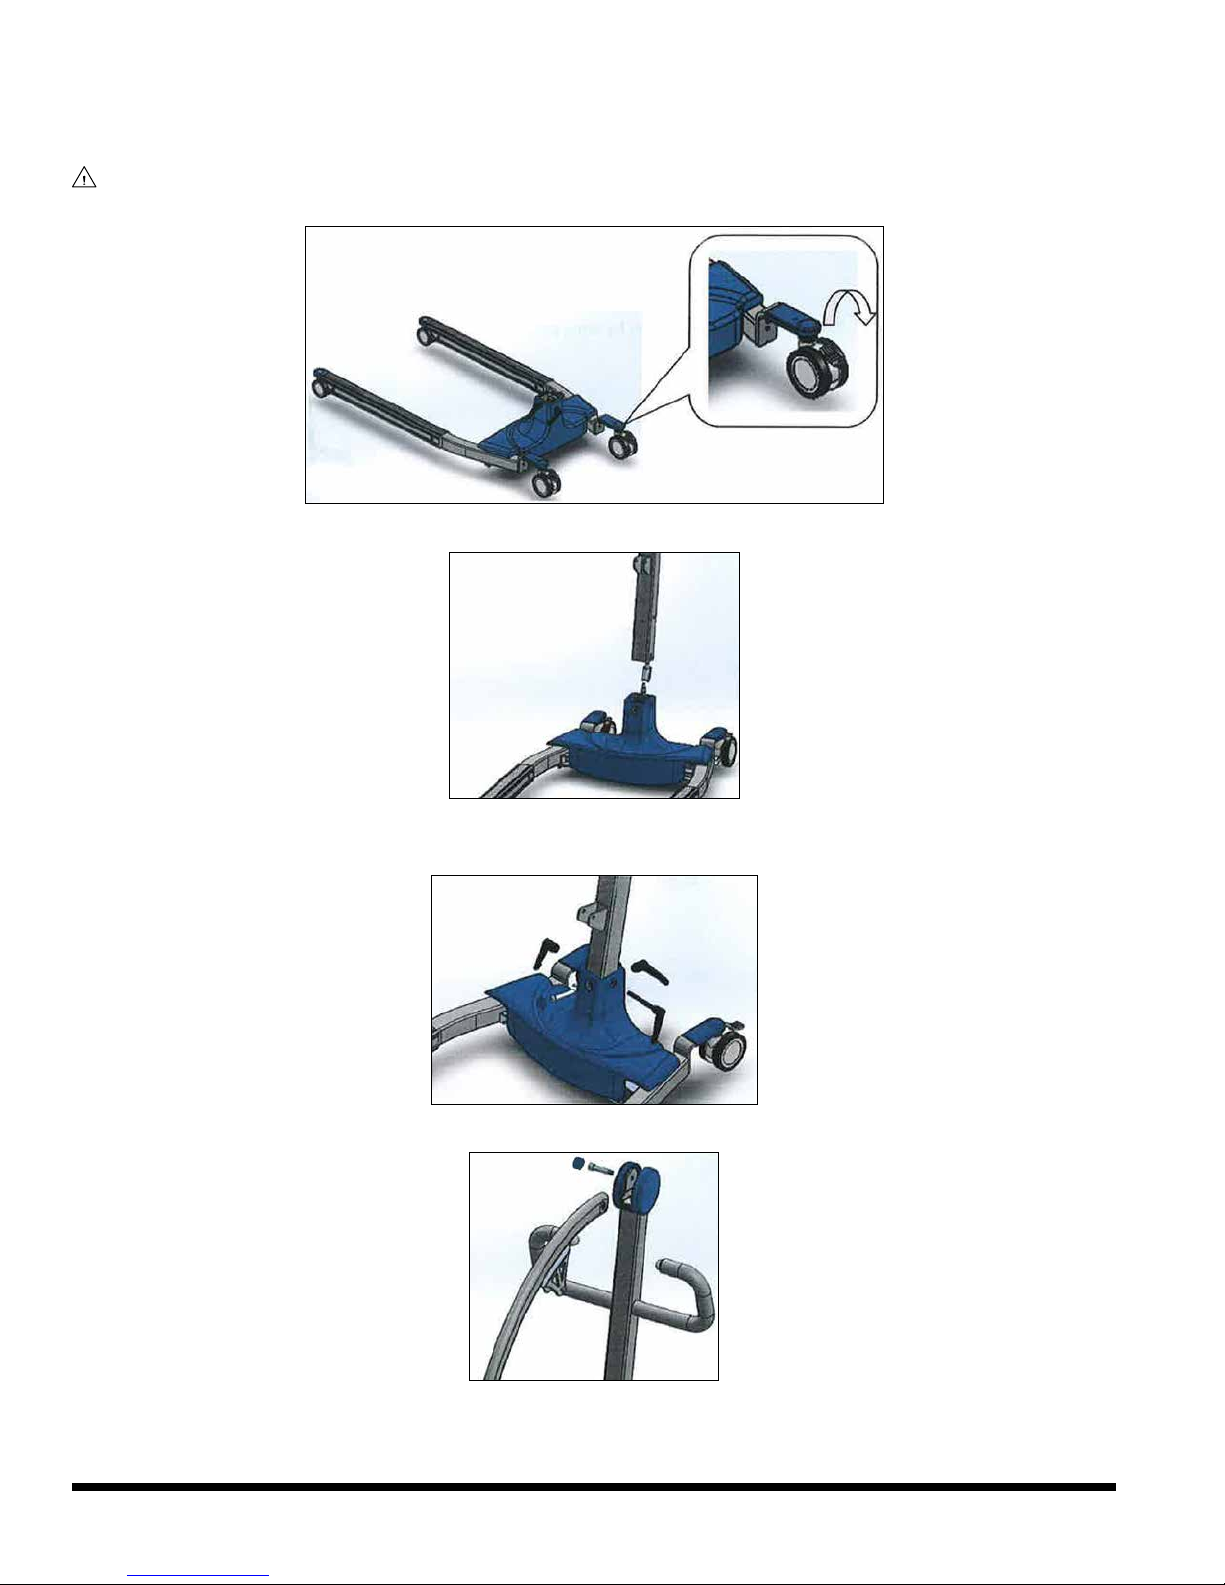
1. Engage the lift brakes as shown above.
2. Plug the power base into the mast connector as shown above. Ensure the connector is
securely installed and inside the mast. Install the mast in the base as shown above.
3. Tighten the 3 black bolts and place the blue plastic soft cover on the base as shown above.
4. Attach boom to top of mast and place the blue plastic soft cover on top of mast and boom
as shown above.
LF500-INS-LAB-RevC18 8
Page 9
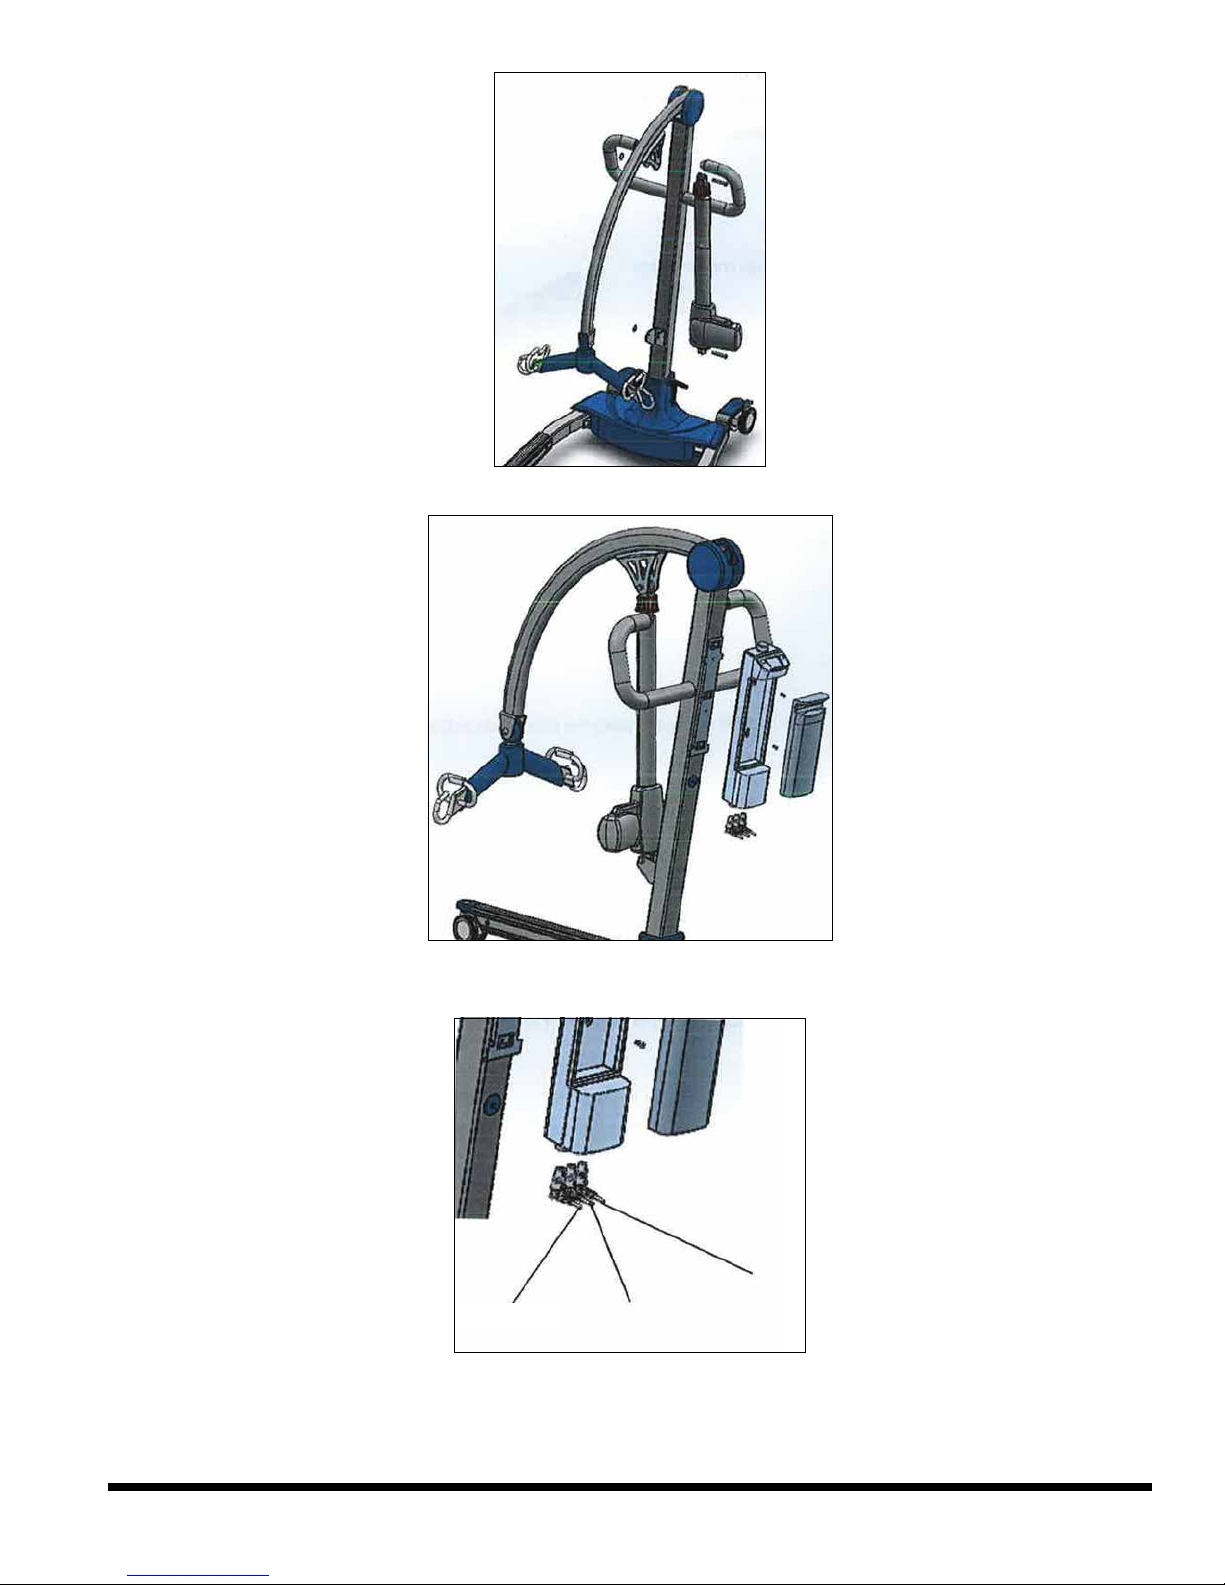
5. Attach the actuator to the lifter with cotter pins as shown above.
6.
Attach the control box bracket to the mast with the two screws, then attach the control box to
the mast with the two screws, then slide the battery in until it snaps into place, as shown above.
7. Insert the actuator and hand pendant connectors as shown above.
Info: Ensure the connectors are fully seated inside mast.
Info: Before using the lift, charge the battery.
LF500-INS-LAB-RevC18
Base leg
actuator
Lifting
actuator
Hand
pendant
9
Page 10
6 USER GUIDE
charging caddy
CHARGING THE BATTERY
The lift battery can be charged by plugging the charger directly into the control box while it is
attached to the lift,
Or
The battery pack can be charged in
the wall / desk charging caddy.
Info: The lift battery will be partially
charged when it is new, but your new
lift battery should be charged for 1012 hours before use.
Charging the Battery in the Lift
The lift battery can be charged with
the battery pack in place. Plug the
charging cable into the side of the
control box (the control box holds the
battery pack and PC board).
Info: Place the red button on top of the control box in the UP position while charging.
Control box
Extra battery
pack
Wall / desk
• When the battery indicator shows a full black bar and the pendant shows 3 green
nonashing lights, battery is fully charged.
• When the pendant shows 2 green ashing lights, battery will take 14 hours to fully recharge.
• When the pendant shows 1 green ashing light, battery will take 18 hours to fully recharge.
• When the pendant shows 1 orange ashing light, battery will take 20 hours to fully recharge.
• When the battery is fully charged, the pendant lights will stop ashing.
Info: When the battery is fully charged, place the red button on top of the control box in the
DOWN position to prevent the battery from draining.
Charging the Battery in the Caddy
The battery can also be charged in the wall / desk charging caddy. Squeeze the lever to release
the battery pack and seat it in the caddy. Plug the charger into the side of the caddy.
•
If you are charging in the caddy, when the charger is plugged in, the caddy light will be green.
• The charger light will be green if the battery is more than 80% charged.
• The charger light will be orange if the battery is less than 80% charged.
The LF500 comes with a spare battery pack. For convenience, keep the spare battery fully
charged.
LF500-INS-LAB-RevC18 10
Page 11
OPERATING INSTRUCTIONS — USING THE CONTROL BOX
Control Buttons
•
•
•
s NOTICE: DO Not operate the lift while it is charging.
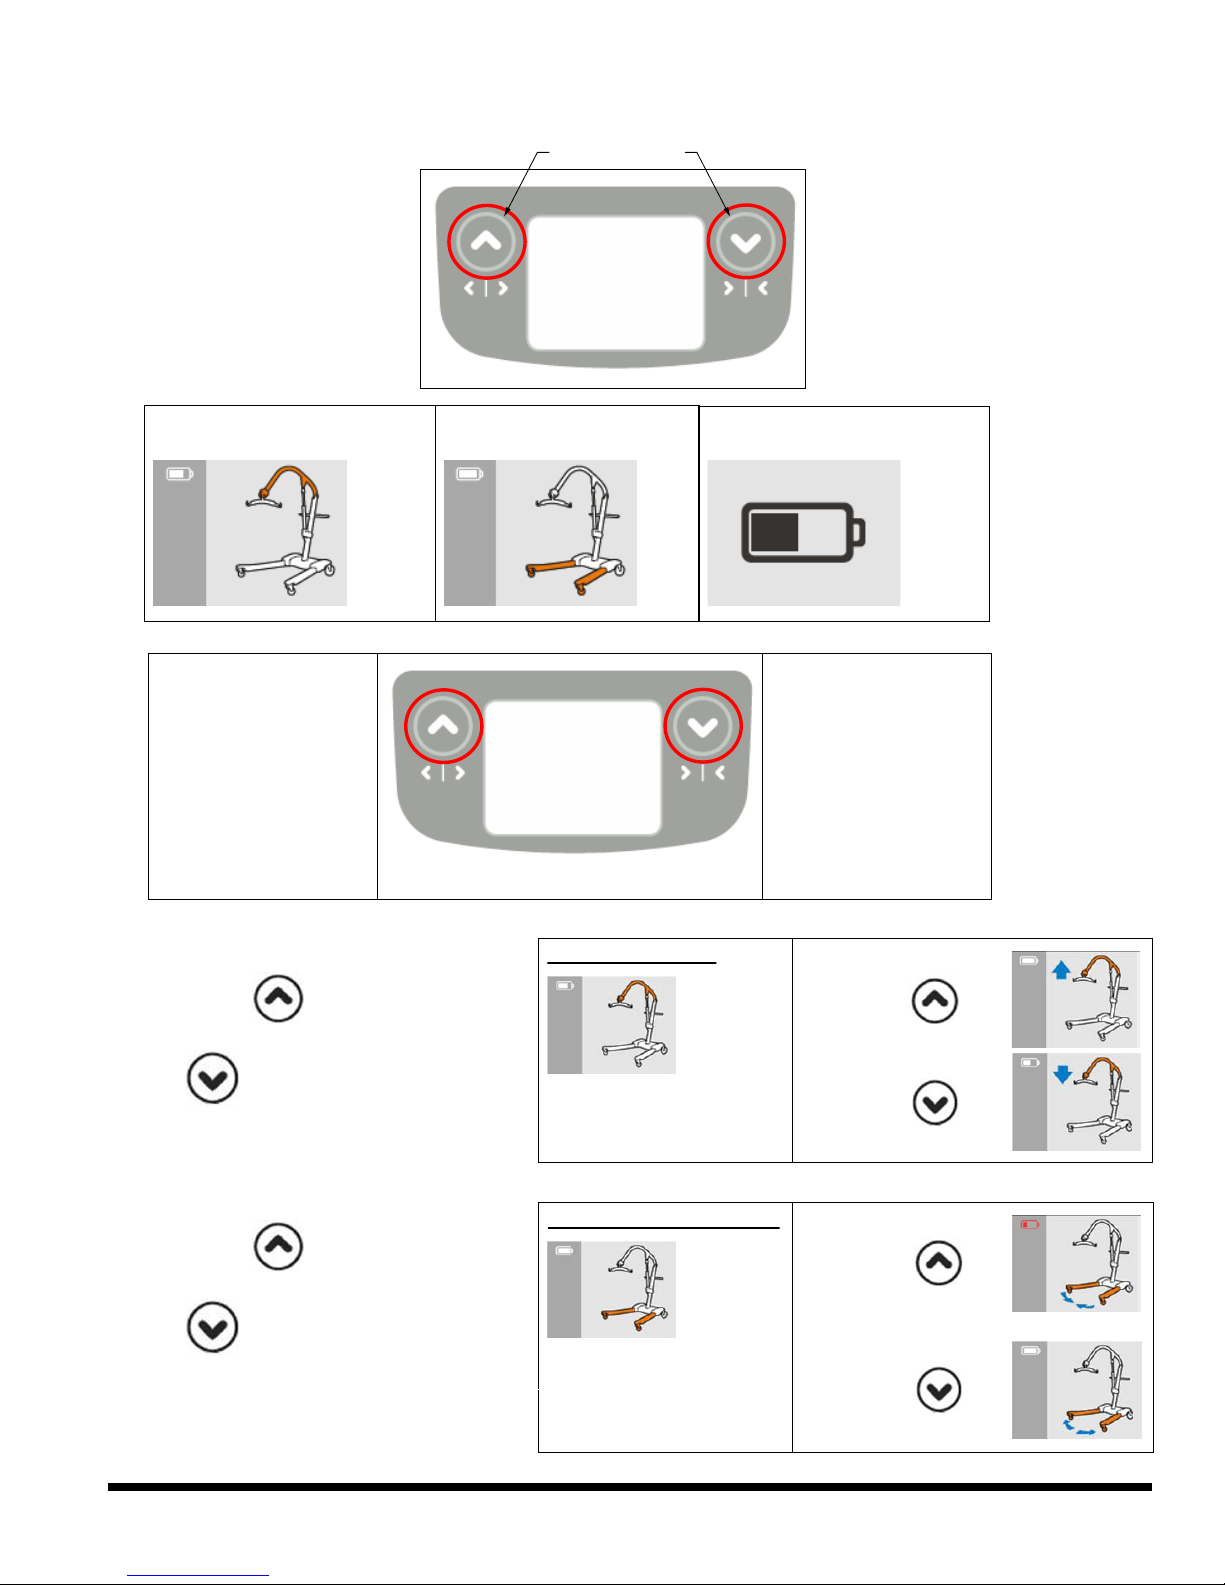
1. If you press either
Control Button
(shown at right) for
less than 0.5 seconds,
you can access the
screens shown below:
Raise or lower the lift
2.
LLeft button
Pressing the left button
for more than 0.5
seconds will begin
actuator extension.
Adjust the distance
3. Press the button to raise
or
the
button to lower the lift.
between the lift legs
Raise / Lower Lift
Remaining battery capacity
RRight button
Pressing the right button
for more than 0.5
seconds will begin
actuator retraction.
Long press
to raise lift
Long press
to lower lift
4. Press the button to open
or
the
button to close the lift
base legs.
LF500-INS-LAB-RevC18
Open / Close Base Legs
Long press
to close
base legs
Long press
to open
base legs
11
Page 12
OPERATING INSTRUCTIONS — USING THE HAND PENDANT
s NOTICE: DO Not operate the lift while it is charging.
Raise / Lower Lift
Long press
to raise lift
Long press
to lower lift
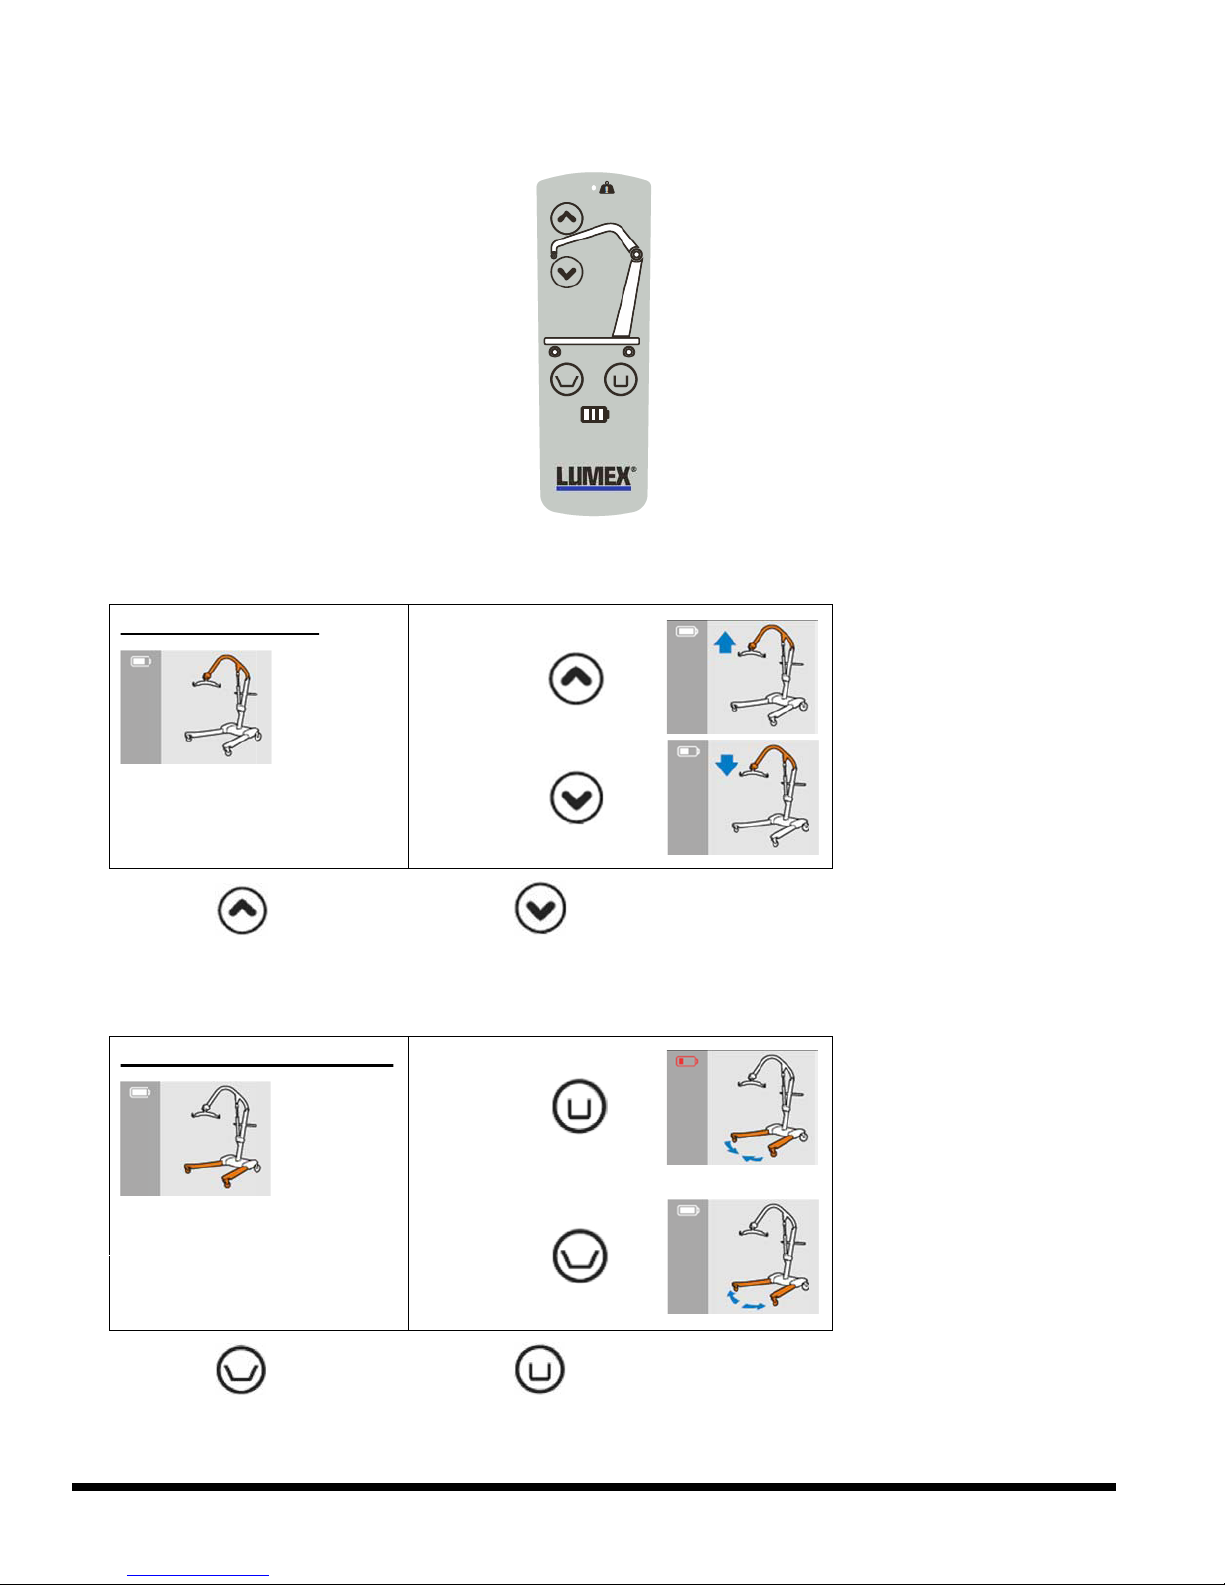
1. Press the button to raise or the button to lower the lift.
Open / Close Base Legs
Long press
to close
base legs
Long press
to open
base legs
2. Press the button to open or the button to close the lift base legs.
LF500-INS-LAB-RevC18 12
Page 13

LIFT PREPARATION AND PROCEDURE
WARNING: During lifting and lowering, whenever possible, always keep the base legs of
the lift in the widest position.
WARNING: Use only Lumex slings specially designed for the Lumex LF500 Patient Lift.
WARNING: Do not put anything (e.g. cushion, pad, etc.) between the user and the sling.
This may cause user to slide out of the sling and could cause injury.
WARNING: GF Health Products, Inc. strongly recommends that two caregivers take part
in the lifting process.
Info: Instructional videos that review the application of several sling styles and lifting
scenarios are available at www.grahameld.com.
Info: While transferring a patient, the patient lift legs can be in either open or closed
position.
Preparation before lifting
1. Turn on the power.
2. Ensure the battery is charged.
3. Press the hand pendant UP or DOWN button once.
4. Push the hand pendant UP button and DOWN button to ensure the lift is operating correctly.
5. Position the lift base around or under the patient.
6. Widen the base.
LIFTING THE PATIENT
WARNING: Do not attempt to transfer a patient without prior approval of the patient’s
healthcare professional and without having read the instructions and practiced using
the patient lift.
WARNING: Use special care for those patients who cannot cooperate while being lifted.
WARNING: Ensure all bolts, hooks, and loops are securely fastened.
WARNING: Use only Lumex slings with the Lumex LF500 Patient Lift.
WARNING: DO NOT use torn, cut, frayed or broken slings as injury could result.
WARNING: Ensure the oor area is clear of any obstacle that could cause a caster to
stop and possibly tip the patient lift.
LF500-INS-LAB-RevC18
13
Page 14

Lifting the patient from a bed or oor with a full-body sling
1. Position patient face-up in center of bed (or oor). Roll patient onto their side facing away
from you.
2. Fold sling lengthwise, face down, and place it halfway under patient with lower edge just
beneath knees and sling handle on the outside, facing away from patient. If the sling has a
head support, ensure that it supports the patient’s neck and head.
3.
Roll patient onto their side facing you. Pull sling out beneath patient inside up, smooth it,
and center patient on sling.
4. Roll the patient lift under the bed (or around the patient’s head if on the oor), locating the
spreader bar over the patient. Be careful not to lower the spreader bar onto the patient.
Center the spreader bar over the patient before lifting.
WARNING: Do not lock or block the patient lift casters when lifting. The casters must be
free to roll so that the patient lift can stabilize as the patient is lifted from the bed.
WARNING: To ensure stability while lifting or lowering a patient, the patient lift legs
should be in the maximum open position.
5. Hook the sling loops onto the spreader bar, head loops followed by leg loops.
6. If the patient is in an adjustable bed, raise the bed’s head section to elevate the patient.
7. Carefully and slowly raise the patient. If possible, lower the bed. Reposition the patient as
needed, using the handle on the back of the sling, to ensure a safe and comfortable sitting
position as the patient is raised.
8.
Raise the patient until the buttocks are just above the mattress (or off the oor). Lift the
patient’s legs and turn the patient to face the lifting column. Move the patient lift away from the
bed. Ensure that the patient’s arms and legs clear the patient lift, bed, or any other obstacles.
Lowering the patient onto a bed
1.
Raise the patient lift until the patient’s buttocks are above the surface of the bed. Ensure that
there are no obstacles underneath or around the bed. Move the patient lift under the bed.
Ensure the patient does not hit any portion of the bed and that the patient’s legs have cleared
the bed.
2.
Center the patient over the bed, and rotate the patient to face the foot section of the bed.
SLOWLY lower the patient onto the bed. Support the patient’s head, if necessary, while being
lowered. Remove the sling by reversing the procedures used when lifting patient from bed.
LF500-INS-LAB-RevC18 14
Page 15

Transferring the patient from a chair to a wheelchair or commode chair with a universal
sling
WARNING: GF Health Products, Inc. recommends that two attendants be used when
transferring a patient to and from a wheelchair.
1. While maintaining support, gently lean the patient forward. Place the sling behind the
patient’s back and push it down until it touches the seat of the chair.
2. Use the straps to pull the leg sections of the sling forward and beneath the patient’s thighs.
Then cross the straps, one through the other.
3. Move the patient lift around to the front of the chair.
4. Hook all sling loops onto the spreader bar: rst head straps, followed by middle straps, then
leg straps.
5. Carefully raise the patient.
6. The second attendant should now move the wheelchair into position.
7. Engage the wheelchair wheel locks to prevent movement.
WARNING: Before transfer, ensure wheelchair wheel locks are in locked position.
Wheelchair wheel locks must be in LOCKED POSITION before lowering the patient into
the wheelchair, or unexpected wheelchair movement could result, which may result in
serious injury to both the patient and the attendants.
8. Position the patient over the wheelchair with their back against the back of the wheelchair.
9. SLOWLY lower the patient into the wheelchair.
10. With one attendant behind the wheelchair and the other operating the lift, the attendant
behind the chair should pull back on the handle or sides of the sling to place the patient
into the back of the chair. This will maintain a good center of balance and prevent the chair
from tipping forward.
Removing the sling
Gently pull the leg sections to the side, out from under the patient’s thighs. Standing by the
patient’s side, lean the patient forward while supporting the patient with one hand. Pull the
sling up from behind the patient’s back and position the patient in the chair.
WARNING: DO NOT pull sharply on the sling. Pulling sharply on the sling may cause
the patient to fall forward, resulting in personal injury. Always support the patient by
keeping one arm around the patient’s shoulders when placing or removing the sling.
Info: If possible, the patient should be encouraged to take an active part in removing the
sling. The patient can lean forward, lift their thighs, and help in removing the leg sections.
LF500-INS-LAB-RevC18
15
Page 16

Transferring the patient from a bed or oor to a wheelchair or commode chair with a full-
body sling
1. For smooth, easy lifting, have the wheelchair or commode chair in ready position with
wheel locks in locked position.
2. Position patient face-up in center of bed (or oor). Roll patient onto their side facing away
from you.
3. Fold sling lengthwise, face down, and place it halfway under patient with lower edge just
beneath knees and sling handle on the outside, facing away from patient. If the sling has a
head support, ensure that it supports the patient’s neck and head.
4.
Roll patient onto their side facing you. Pull sling out beneath patient inside up, smooth it,
and center patient on sling.
5. Roll the patient lift under the bed (or around the patient’s head if on the oor), locating the
spreader bar over the patient. Be careful not to lower the spreader bar onto the patient.
Center the spreader bar over the patient before lifting.
WARNING: Do not lock or block the patient lift casters when lifting. The casters must be
free to roll so that the patient lift can stabilize as the patient is lifted from the bed.
WARNING: To ensure stability while lifting or lowering a patient, the patient lift legs
should be in the maximum open position.
6. Hook the sling loops onto the spreader bar, head loops followed by leg loops.
7. If the patient is in an adjustable bed, raise the bed’s head section to elevate the patient.
8. Carefully and slowly raise the patient. If possible, lower the bed. Reposition the patient as
needed, using the handle on the back of the sling, to ensure a safe and comfortable sitting
position as the patient is raised.
9. Raise the patient until the buttocks are just above the mattress (or off the oor). Lift the
patient’s legs and turn the patient to face the lifting column. Move the patient lift away from
the bed. Ensure that the patient’s arms and legs clear the patient lift, bed, or any other
obstacles.
10. Position patient above wheelchair or commode chair. Lock lift brakes.
WARNING: Before transfer, ensure wheelchair or commode chair wheel locks are in
locked position. Wheelchair wheel locks must be in LOCKED POSITION before lowering
the patient into the wheelchair, or unexpected wheelchair movement could result, which
may result in serious injury to both the patient and the attendants.
11. SLOWLY lower patient. During descent, assist patient in attaining correct sitting posture.
12. When patient is seated, push down on boom to slacken sling loops. Patient can remain
seated on sling.
13. For commode chair use (use full body sling with commode opening), adjust clothing before
moving lift to straddle commode chair. Keep sling loops taut and ensure that patient is in a
comfortable position.
LF500-INS-LAB-RevC18 16
Page 17
EMERGENCY RELEASE
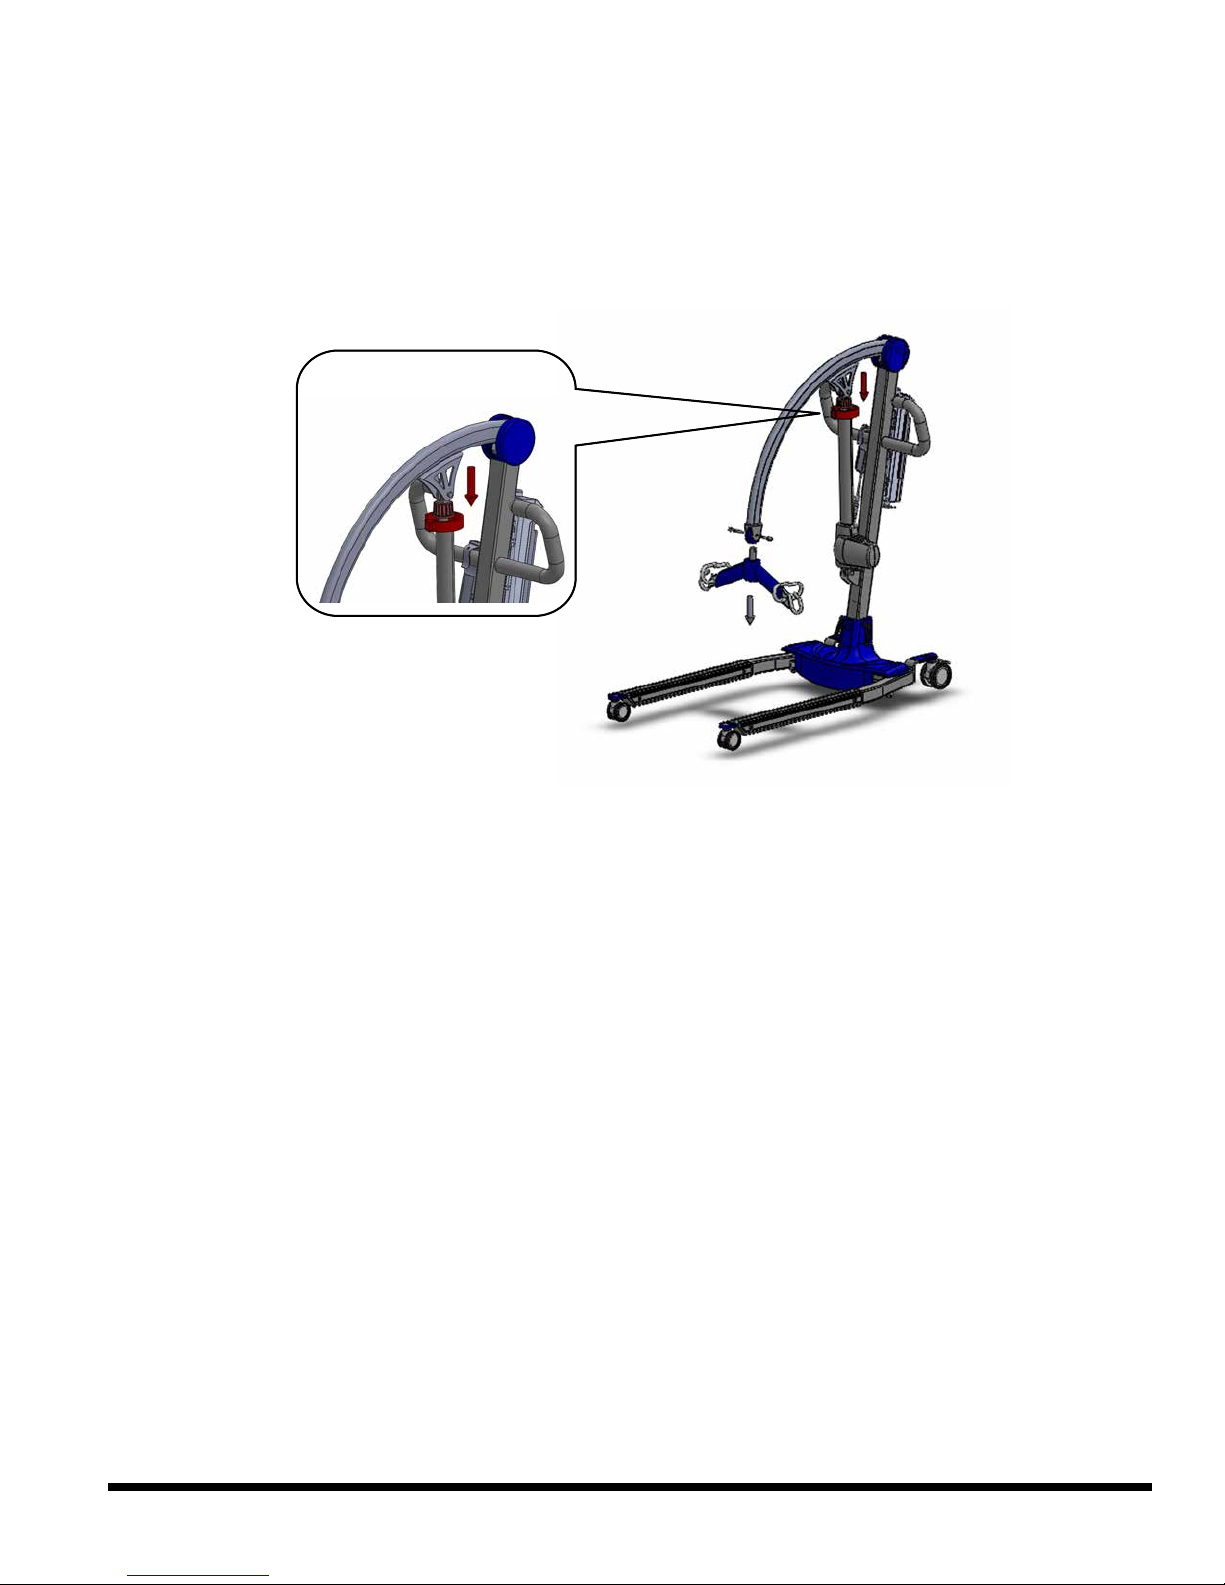
In case of lift failure while using the Lumex LF500 Patient Lift, follow the procedure below to
safely lower the user. The Emergency Lowering Device is located at the top of the actuator
shaft. It is intended for use if the actuator fails to operate while a patient is suspended.
Pull down and
turn clockwise to lower
The device consists of a plastic collar ring that should be pulled down, then turned clockwise
continually until the patient has been lowered.
Contact your dealer immediately if standard troubleshooting techniques do not correct the
failure. Do not attempt to lift patients until all failure issues have been safely resolved.
Info: The emergency lowering device is intended for use during lift failure. This device
will allow lowering of patients only. Contact GF Tech Support at 1.770.368.4700 or your GF
authorized distributor immediately in case of failure.
LF500-INS-LAB-RevC18
17
Page 18

7 CARE AND MAINTENANCE
Proper care and maintenance are essential to keeping your Lumex LF500 Patient Lift in a safe
operating condition. In addition to inspecting the unit before each use, periodic maintenance
checks should be done.
WARNING: It is extremely important that the patient lift be inspected before each use.
Ensure that all hardware and accessories are secure and that the actuator is functioning
properly. Failure to do so could result in patient / attendant injury or damage to your
patient lift. Torn, cut, frayed or broken slings can fail, resulting in serious injury. Only
use slings in good condition. Inspect before each use. Destroy and discard old worn
and unusable slings.
WARNING: Service and repair of the Lumex LF500 Patient Lift MUST be performed by
qualied personnel ONLY.
WARNING: Unauthorized modication of the patient lift or the use of non-Lumex
replacement parts may change the structure of the lift and could create a hazardous
condition, which may result in serious injury and will void the warranty.
WARNING: The electronics and actuator contain no serviceable components. DO NOT
attempt to open the electronics or actuator. If service is required, consult GF Tech
Support at 1.770.368.4700 for further information.
When you believe a component or part is not functioning properly, immediately contact GF
Tech Support at 1.770.368.4700, as a potentially hazardous condition could exist.
BEFORE EACH USE
Before each use of the patient lift, ensure that:
• All nuts and bolts are tight
• The base can be easily widened
• All lift parts are in place
• All casters turn freely
• Caster brakes can be engaged
• All necessary items (i.e. slings, wheelchairs, etc.) are accessible and ready for use
• Check battery capacity
AT LEAST ONCE A MONTH
The lift should be thoroughly inspected by a person qualied to recognize any signs of wear,
and looseness of bolts or parts. Replace any worn parts immediately.
LUBRICATION
When the lift is serviced, and every month thereafter, place a drop of lubricant (White Lithium
Grease is recommended) on the following points:
• Top of mast
• Spreader hinge
• Caster axles
LF500-INS-LAB-RevC18 18
Page 19

CLEANING
Regular cleaning is recommended every three months; clean the lift more often as needed.
A soft cloth, dampened with water and a mild NON-ABRASIVE detergent (household cleaner,
soapy water, or hospital grade disinfectant) is all that is needed to clean your patient lift.
Automobile wax or furniture polish will help maintain the nish over a long period of time.
s NOTICE: DO NOT wash patient lift under water pressure or steam clean.
CARE OF SLINGS
Lumex slings are washable at 120°F or less. If there is a removable plastic insert in the head
support, remove insert before washing. Air dry or dry at temperature less than 120°F.
s NOTICE: DO NOT bleach slings!
MAINTENANCE SCHEDULE
Info: Only qualied persons should service and repair your Lumex LF500 Patient Lift.
Regular maintenance of your patient lift is necessary to ensure continuing proper and safe
operation. Read and observe the following recommended maintenance schedule:
Item Inspect Inspect / Adjust
initially monthly every 3
months
Boom & spreader bar
Check connections between 1) boom and spreader bar and 2) boom and
mast for improper connection, looseness, or wear
Inspect boom for bending or deection X X
Mast
Inspect mast for bending or deection X X
Inspect steering bar for damage or loose hardware X X
Base
Ensure all hardware is tight X X
Ensure casters and axle bolts are tight X X
Inspect rubber parts of casters for deection X X
Apply grease to caster ball bearings if needed X
Actuator and control box
Ensure control box is rmly afxed to the mast X X
Ensure pins that connect actuator to boom and mast are rmly afxed X X
Ensure cables that connect actuators and control box are rmly afxed X X
Ensure battery indicator has at least 2 green LEDs illuminated before use X X
Sling and sling hardware
Check sling for wear; discard if worn X X
Ensure sling hardware is in good condition before each use X X
X X
LF500-INS-LAB-RevC18
19
Page 20
8 TROUBLESHOOTING
The following list of encountered problems and their solutions will assist you in determining
what may be causing your Lumex lift not to function as designed. If you have a problem
occurring which is not listed below, contact GF Tech Support at 1.770.368.4700 for further
information. Do not attempt to repair components or parts on your lift, as this may invalidate
your warranty or cause further problems that may result in patient injury. Stop using your lift
immediately if it is not functioning correctly or any warning beeps are heard.
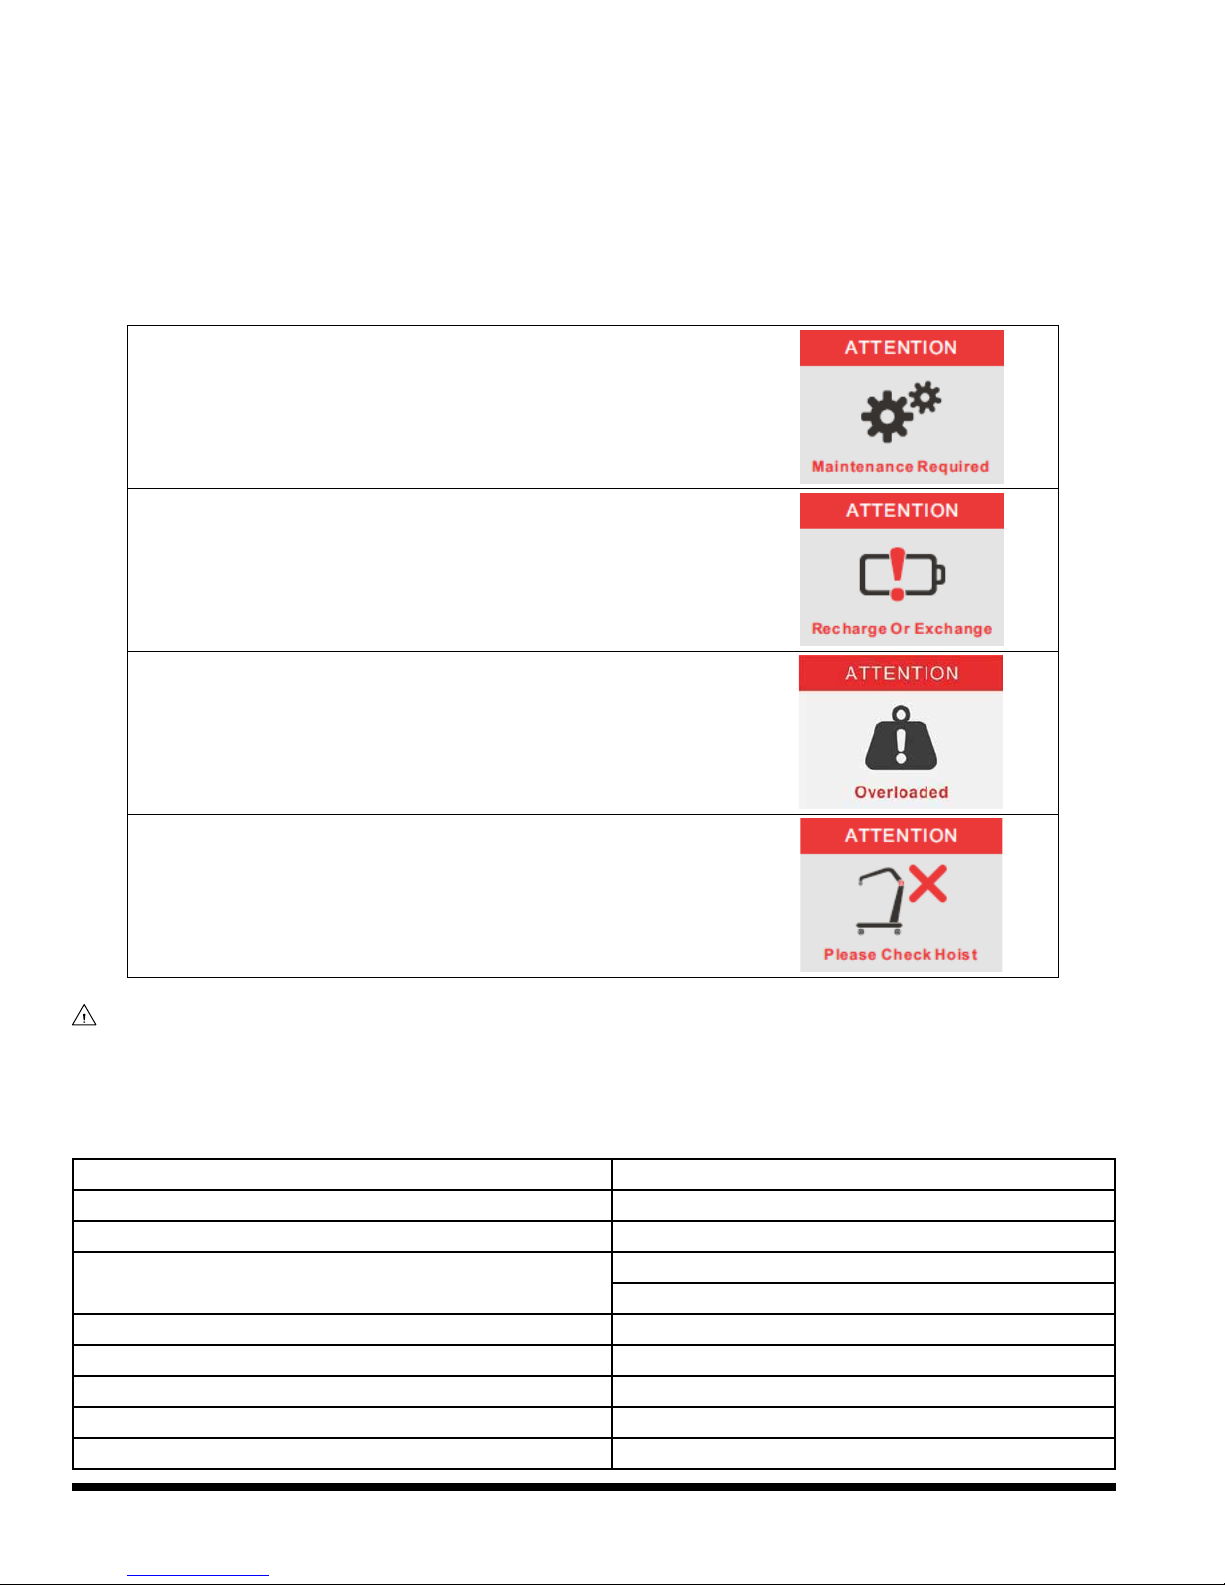
If any of the following notications, follow the steps below to troubleshoot:
Maintenance Notification:
Check the state of the lift and actuators.
Low Battery Capacity:
Recharge battery. If it does not hold a proper charge, the battery will
need to be replaced.
Overload Alarm:
Weight has exceeded the set maximum limit. Remove weight from the
lift and retry.
Force Interference:
If any force interferes when the lift is lowered, the lift will stop working
to avoid injury to the patient. Remove interference immediately.
This image will also appear if the actuator connectors are installed in
the wrong positions in the control box. See page 9.
WARNING:
If you experience a problem with your lift and are unable to service it
yourself, contact GF Tech Support at 1.770.368.4700 or your GF authorized distributor.
9 SPECIFICATIONS
Info: All dimensions are given in inches unless otherwise specied.
External base width Open: 39.4"; Closed: 25.6"
Base height clearance 4.3"
Overall base length 49.2"
Lifting height range
Info: As measured from sling hooks.
Mast height 53.5"
Maximum weight capacity 500 lb (230 kg), EVENLY DISTRIBUTED
Caster size 4" diameter locking; 3" diameter non-locking
Lifting mechanism 24 DC actuator
Battery charger AC 100V-240V to DC 29V, 1.5A
Minimum: 19.3"; Maximum: 74.8"
Range: 55.5"
LF500-INS-LAB-RevC18 20
Page 21

10 LIMITED WARRANTY
SCOPE OF WARRANTY
GF Health Products, Inc. (“GF”) warrants to the original purchaser only that it will replace or
repair components, at GF’s sole discretion, that are defective in material or workmanship under
normal use and service. All warranties are conditioned upon the proper use of the products
strictly in accordance with good commercial practice and applicable GF instructions and
manuals, including proper use and maintenance. To the extent that a component is warranted
by a third party, GF conveys all of its rights under that warranty to the original purchaser, to
the extent permitted. This limited warranty shall only apply to defects that are reported to GF’s
customer service team within the applicable warranty period and which, upon examination by
GF or its authorized representative, prove to be a warranty item. This limited warranty is not
transferable.
The warranted components and time period are set forth below:
Lift frame and spreader bar: ............................................................ 3 years
Actuators:........................................................................................... 2 years
Parts, including casters, control box, PCB, pendant, charger: ...2 years
Batteries: ............................................................................................ 1 year
The applicable warranty period shall commence from date of shipment to the original
customer, unless there is an expiration date on the component in which case the warranty shall
expire on the earlier of warranty period or the expiration date.
OBTAINING WARRANTY SERVICE
This limited warranty shall only apply to defects that are reported to the Distributor from
whom the Customer purchased the product within the applicable warranty period. If there is
not a Distributor, you must contact GF directly by calling 1.770.368.4700, sending a fax request
to 1.770.368.2386, or by e-mailing a request to cs@grahameld.com. Specic directions will be
provided by the Customer Service Representative. Failure to abide by the specic directions
will result in denial of the warranty claim.
The warranty does not cover and GF shall not be liable for the following:
1) Defects, damage, or other conditions caused, in whole or in part, by misuse, abuse,
negligence, alteration, accident, freight damage, tampering or failure to seek and obtain
repair or replacement in a timely manner;
2) Products which are not installed, used, or properly cleaned and maintained as required in
the ofcial manual for the applicable product;
3) Products considered to be of a non-durable nature including, but not limited to: lters,
fuses, gaskets, lubricants, and charts;
4) Accessories or parts not provided by GF;
5) Charges by anyone for adjustments, repairs, replacement parts, installation or other work
performed upon or in connection with such products which are not expressly authorized in
writing, in advance, by GF;
6) Any labor or shipping charges incurred in the replacement part installation or repair;
7) Costs and expenses of regular maintenance and cleaning; and
8) Representations and warranties made by any person or entity other than GF.
LF500-INS-LAB-RevC18
21
Page 22

ENTIRE WARRANTY, EXCLUSIVE REMEDY AND CONSEQUENTIAL DAMAGES
DISCLAIMER
THIS WARRANTY IS GF’S ONLY WARRANTY AND IS IN LIEU OF ALL OTHER WARRANTIES,
EXPRESS OR IMPLIED. GF MAKES NO IMPLIED WARRANTIES OF ANY KIND INCLUDING ANY
IMPLIED WARRANTIES OF MERCHANTABILITY OR FITNESS FOR A PARTICULAR PURPOSE. IF
ANY MODEL OR SAMPLE WAS SHOWN TO THE CUSTOMER, SUCH MODEL OR SAMPLE WAS
USED MERELY TO ILLUSTRATE THE GENERAL TYPE AND QUALITY OF THE PRODUCT AND
NOT TO REPRESENT THAT THE PRODUCT WOULD NECESSARILY CONFORM TO THE MODEL
OR SAMPLE IN ALL RESPECTS. THIS WARRANTY IS LIMITED TO THE REPAIR OR REPLACEMENT
OF THE DEFECTIVE PARTS. GF SHALL NOT BE LIABLE FOR AND HEREBY DISCLAIMS ANY
DIRECT, SPECIAL, INDIRECT, INCIDENTAL, EXEMPLARY OR CONSEQUENTIAL DAMAGES,
INCLUDING, BUT NOT LIMITED TO: DAMAGES FOR LOSS OF PROFITS OR INCOME, LOSS OF
USE, DOWNTIME, COVER, OR EMPLOYEE OR INDEPENDENT CONTRACTOR WAGES, PAYMENTS
AND BENEFITS.
The warranties contained herein contain all the representations and warranties with respect
to the subject matter of this document, and supersede all prior negotiations, agreements and
understandings with respect thereto. The recipient of this document hereby acknowledges
and represents that it has not relied on any representation, assertion, guarantee, warranty,
collateral contract or other assurance, except those set out in this document.
For additional information on this product or this warranty, please contact a GF Customer
Service Representative.
NOTES:
1) Additional terms and conditions may apply.
2) Freight claims must be notated on the appropriate shipping documents and must be made
with immediacy. International, federal and state regulations govern specic requirements
for freight claims. Failure to abide by those regulations may result in a denial of the freight
claim. GF will assist you in ling the freight claim.
3) Claims for any short shipment must be made within three (3) days of the invoice date.
LF500-INS-LAB-RevC18 22
Page 23

11 INDEX
A
Assembly instructions 8
B
Before each use 18
C
Care and maintenance 18
Care of slings 19
CAUTION statement, signicance 4
Charging the battery 10
Cleaning 19
E
Emergency release 17
F
Features 6
H
Handling Procedures 7
I
Info statement, signicance 4
Inspection 7
Intended use 3
Introduction 3
L
Lifting the patient 13
Lifting the patient from a bed or oor with a full-body
sling 14
Lift preparation and procedure 13
Lowering the patient onto a bed 14
Lubrication 18
S
Safety precautions 4
Safety statements, signicance of 4
Setup 8
Shipping and transportation instructions 7
Specications 20
Storage 7
T
Transferring the patient from a bed or oor to a
wheelchair or commode chair with a full- body
sling 16
Transferring the patient from a chair to a wheelchair or
commode chair with a universal sling 15
Troubleshooting 20
U
Unpacking 7
V
Videos, instructional, at www.grahameld.com 13
W
Warnings 4
WARNING statement, signicance 4
Warranty, limited 21
Weight capacity, maximum 4
M
Maintenance schedule 19
N
NOTICE statement, signicance 4
O
Operating instructions — using the control box 11
Operating instructions — using the hand pendant 12
P
Preparation before lifting 13
R
Removing the sling 15
LF500-INS-LAB-RevC18
23
Page 24

The most current and complete product information can be found on our website.
Information contained herein is subject to change.
1.770.368.4700
www.grahameld.com
GF Health Products, Inc., One Graham-Field Way, Atlanta GA 30340-3140
© 2016, GF Health Products, Inc. All Rights Reserved.
Graham-Field and Lumex are trademarks of
GF Health Products, Inc. is an ISO 13485 Certied Company.
Manufactured for GF Health Products, Inc.
Made in Taiwan
 Loading...