

Page 1
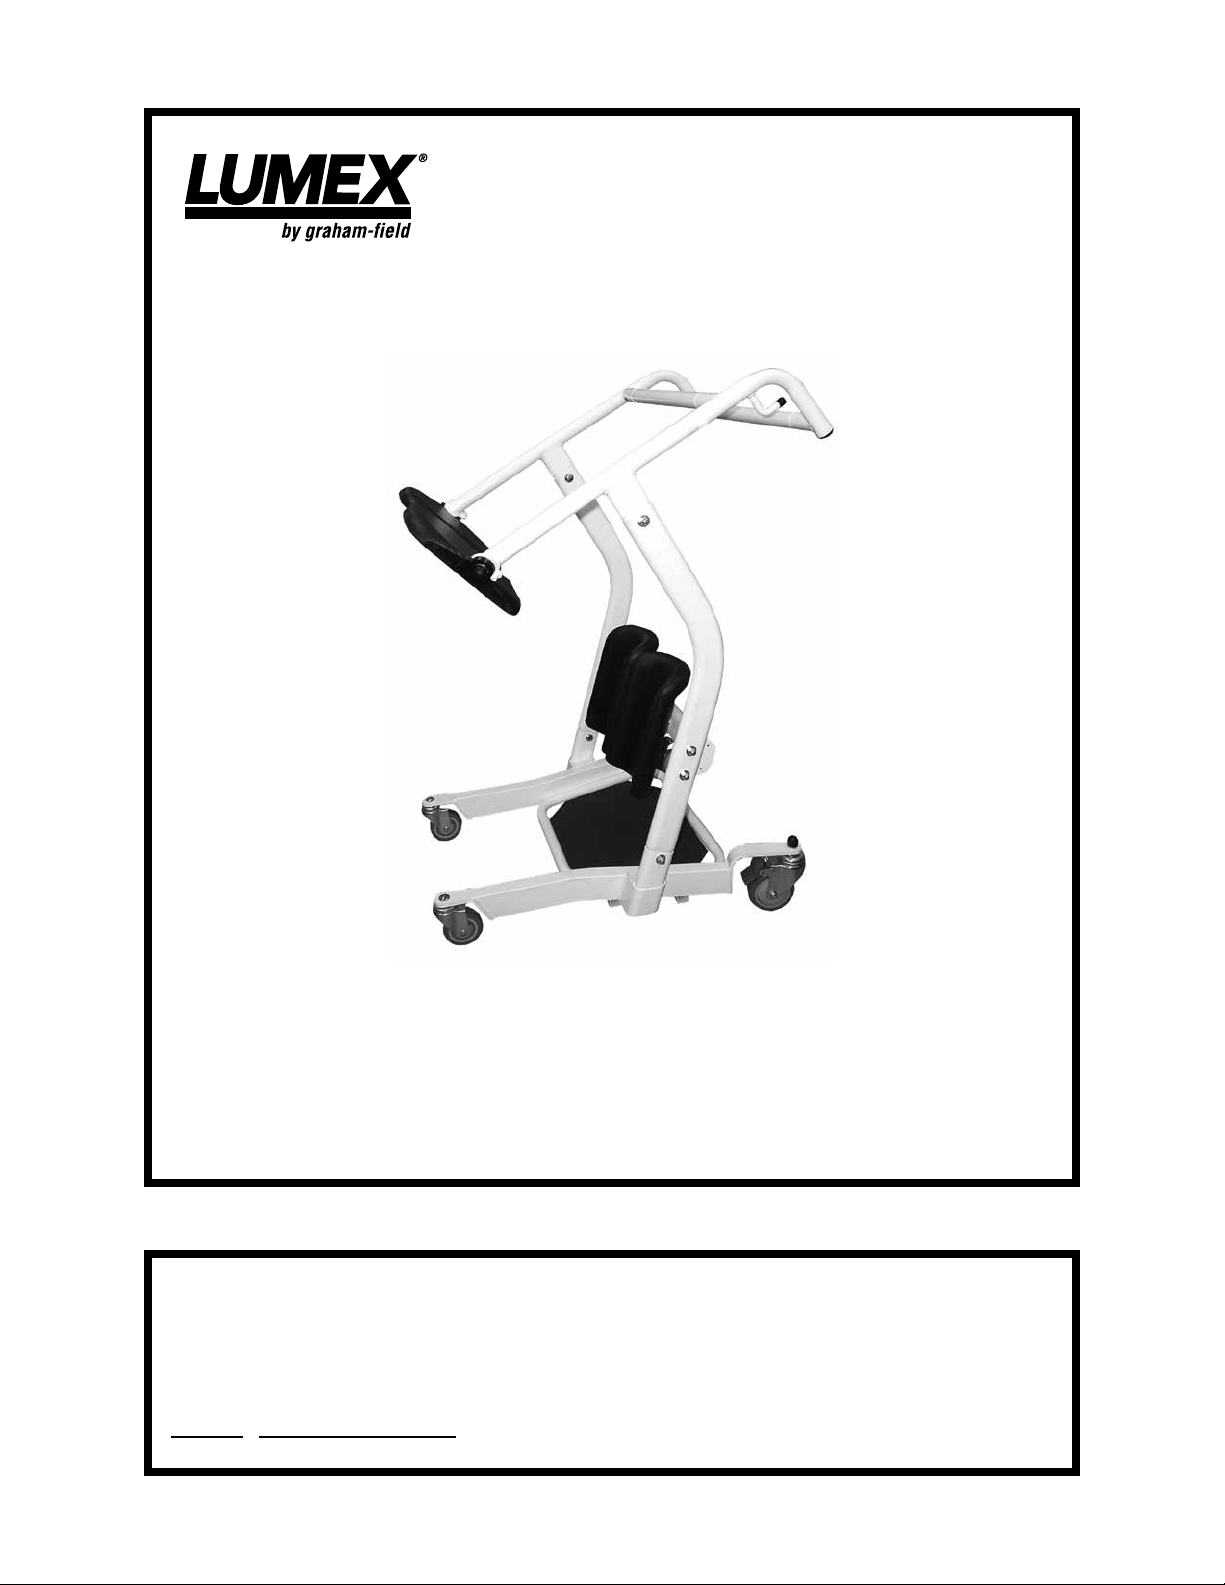
LF1600 Stand Assist
Assembly and Operation Manual
LF1600-INS-LAB-RevH18
LF1600 Stand Assist user and attendant: Read this manual before
operating the Stand Assist.
Save this manual for future reference.
The most current version of this manual can be found online at
www.grahameld.com.
Page 2

WARNING: LF1600 Stand Assist attendant: Do not operate the LF1600
Stand Assist without rst reading and understanding this manual. If you do
not understand the warnings, cautions, and instructions provided herein,
contact your professional medical advisors, GF authorized distributor, or
technical representative before proceeding with the use of this product;
otherwise personal injury or damage to your Stand Assist could result.
CONTENTS
1 INTRODUCTION .........................................................................................................3
INTENDED USE .................................................................................................... 3
2 SAFETY PRECAUTIONS ........................................................................................... 4
SIGNIFICANCE OF SAFETY STATEMENTS .......................................................4
WARNINGS ...........................................................................................................4
3 HANDLING PROCEDURES ....................................................................................... 5
SHIPPING AND TRANSPORTATION INSTRUCTIONS ....................................... 5
4 FEATURES ................................................................................................................. 6
COMPONENTS ..................................................................................................... 6
FASTENERS AND TOOLS ...................................................................................6
5 ASSEMBLY INSTRUCTIONS .....................................................................................7
6 OPERATION ............................................................................................................. 11
7 MAINTENANCE ........................................................................................................13
CLEANING THE STAND ASSIST ....................................................................... 13
8 LIMITED WARRANTY .............................................................................................. 14
9 INDEX .......................................................................................................................15
LF1600-INS-LAB-RevH18 • LF1600 Stand Assist 2
Page 3

1 INTRODUCTION
Important safety, operating, and maintenance instructions that warrant your
attention are included in this manual. Read the entire manual carefully before
operating your new LF1600 Stand Assist, keep it handy for future reference, and refer
to it as often as necessary to help maintain good performance standards.
The Lumex Stand Assist is a manual standing aid that requires patients to assist
themselves in preparation for transport. Patients qualied to use the Stand Assist
must have adequate arm strength to pull themselves upward and enough leg
strength to support their own weight. Patients who meet these criteria and have
difculty walking will nd the Stand Assist a useful transport device. Functionally,
the Stand Assist is positioned between a traditional walker and a battery powered
sit-to-stand lift. The Stand Assist is a convenient toileting alternative to a wheelchair.
Once the resident has positioned themself on board, the split seat can be positioned
to allow the resident to sit comfortably while a caregiver performs the transport.
For residents lacking the strength to assist themselves, we recommend a battery
powered sit-to-stand lift.
The Stand Assist is capable of the following transfers when used according to the
instructions:
• Bed to chair/wheelchair
• Bed/chair/wheelchair to commode
• Room to room
The safety precautions in this manual are general warnings intended to be used only
as basic guidelines. You may nd it necessary to develop your own methods for
safely solving frequently encountered challenges. Again, consult your professional
medical advisors for their recommendations about safety methods, and never
hesitate to ask for their assistance.
All information and specications in this manual are current at the time of printing.
INTENDED USE
The Lumex Stand Assist’s intended use is as a transport assistance unit.
Contraindication
The Lumex Stand Assist is intended for use by residents who have the strength
and stability to lift and support themselves. We recommend a battery powered
sit-to-stand lift for residents with limited strength and stability.
WARNING: Personal injury - this device is designed for transport assistance
of individuals between approximately 5'1" and 6'6" (155 cm and 198 cm) in
height. Ensure the LF1600 properly ts the individual being transferred before
use.
LF1600-INS-LAB-RevH18 • LF1600 Stand Assist 3
Page 4

2 SAFETY PRECAUTIONS
WARNING: Always follow these safety precautions when using your LF1600
Stand Assist. Failure to do so could result in personal injury to you or others
or damage to the Stand Assist.
Safety requires the constant attention of the Stand Assist user and attendant. It is
extremely important to learn and always use safe methods of performing basic daily
activities. Always consult your professional medical advisors to determine those
methods most suitable for your individual abilities.
SIGNIFICANCE OF SAFETY STATEMENTS
Please note the following special statements, used throughout this manual, and their
signicance:
WARNING: Indicates a potential hazard situation or unsafe practice that, if not
avoided, could result in death or serious personal injury.
CAUTION: Indicates a potential hazard situation or unsafe practice that, if not
avoided, could result in minor or moderate personal injury.
s NOTICE: Indicates a potential hazard situation or unsafe practice that, if not
avoided, could result in product or property damage.
Info: Provides application recommendations or other useful information to
ensure that you get the most from your product.
WARNINGS
WARNING: Only qualied caregivers trained in the proper use of the
Stand Assist should use it to transport patients.
WARNING: Do not use the Stand Assist to transport patients who are unable to
pull themselves upright and support their own weight.
WARNING: The LF1600 Stand Assist maximum weight capacity is 400 lb (180
kg), EVENLY DISTRIBUTED. Never use the Stand Assist to transport a patient
whose weight exceeds 400 lb (180 kg).
WARNING: Before using the Stand Assist for patient transport, check the
Stand Assist to ensure all components are properly and securely assembled
and in working order.
WARNING:
WARNING:
distributor immediately. DO NOT use substitute parts. Use only Lumex
replacement parts. The use of non-Lumex replacement parts could cause personal
injury, property damage, and void the warranty.
Do not leave a patient unattended during any part of the transport.
If components are damaged or missing, contact your GF authorized
WARNING: Cancer and Reproductive Harm - www.p65warnings.ca.gov.
WARNING: GF Health Products, Inc. specically disclaims responsibility for
any bodily injury or property damage which may occur during any use which
does not comply with federal, state or local laws or ordinances.
LF1600-INS-LAB-RevH18 • LF1600 Stand Assist 4
Page 5

3 HANDLING PROCEDURES
SHIPPING AND TRANSPORTATION INSTRUCTIONS
If the Stand Assist is to be reshipped by common carrier, it should be packed in the
same carton in which it was received.
Unpacking
WARNING: The lift is heavy. To avoid personal injury, DO NOT attempt to
remove the lift from the box without assistance.
1. Check for any obvious damage to the carton or its contents. If damage is evident,
notify the carrier or your GF authorized distributor.
2. Remove all loose packing from the carton.
3. Carefully remove all the components from the carton.
Info: Unless the Stand Assist is to be used immediately, retain boxes, containers
and packing material for use in storing until use of Stand Assist is required.
Inspection
1. Examine the exterior of the Stand Assist for nicks, dents, scratches or other
damage.
2. Inspect all components.
Storage
1. Store the repackaged Stand Assist in a dry area.
2. DO NOT place other objects on top of the repackaged Stand Assist.
LF1600-INS-LAB-RevH18 • LF1600 Stand Assist 5
Page 6
4 FEATURES
COMPONENTS
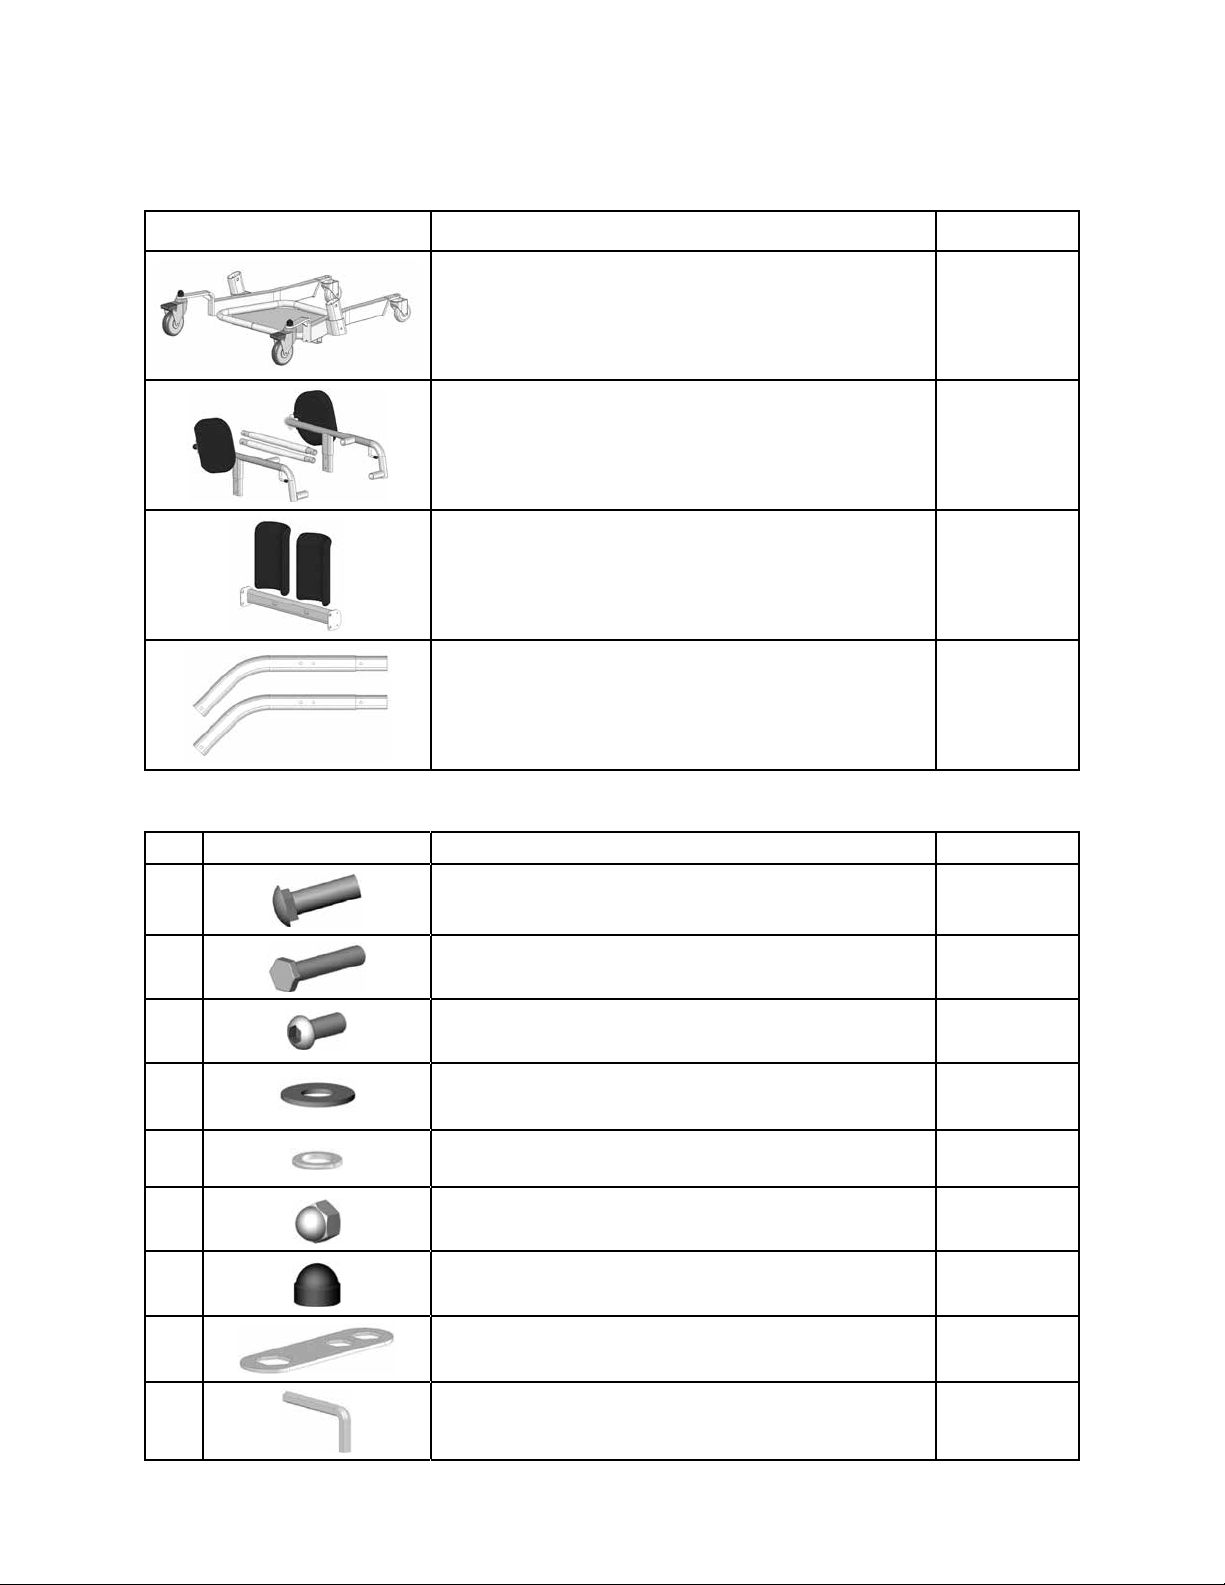
Item Description Quantity
Base preassembled with footplate and casters 1
Side support arm unit 2
Kneepad assembly 1
Seat pad and handle bar support unit with cross
bar tube
2
FASTENERS AND TOOLS
No. Item Description Quantity
A1
A2
A3
A4
A5
A6
Carriage bolt 8
Hex bolt 2
Button socket head cap screw 4
Flat washer 10
Lock washer 10
Acorn nut 8
A7
T1
T2
LF1600-INS-LAB-RevH18 • LF1600 Stand Assist 6
Plastic cap 2
Wrench 1
Hex key 1
Page 7
5 ASSEMBLY INSTRUCTIONS
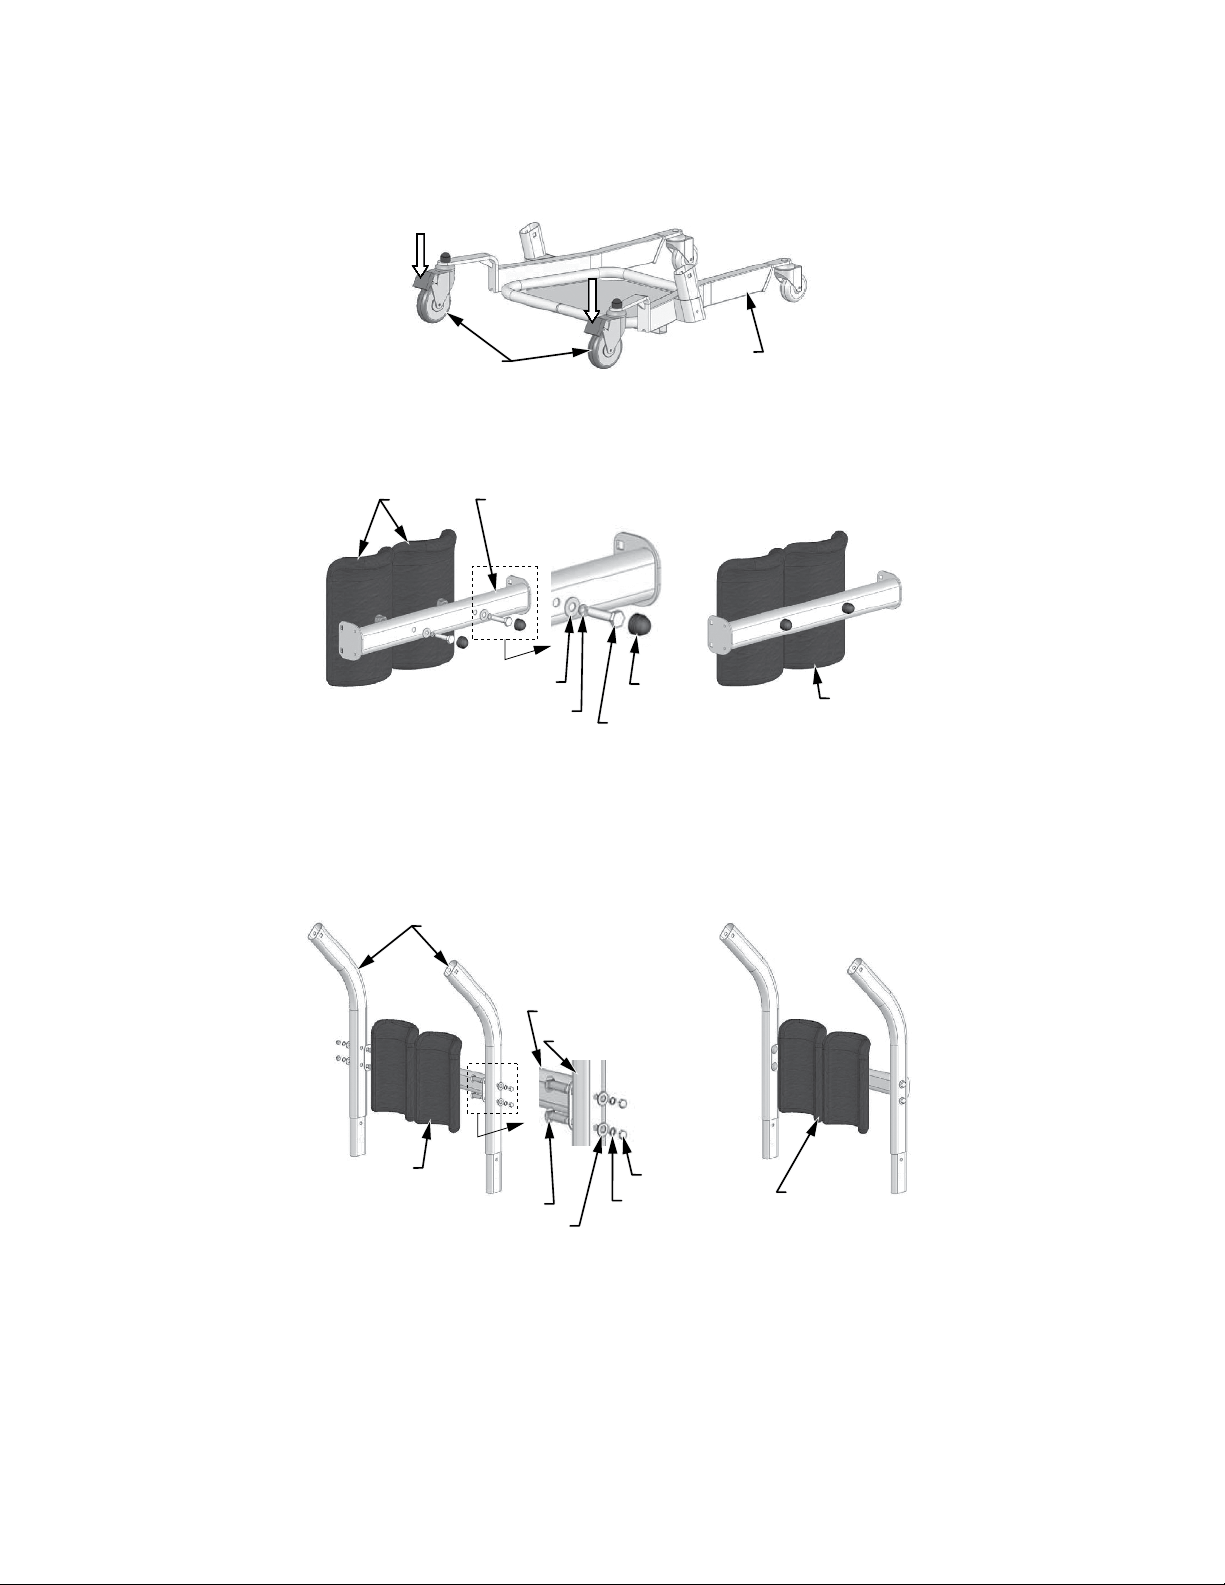
back casters
hex bolt
kneepad
kneepad
flat washer
Tools required: provided wrench, provided hex key, Phillips screwdriver
base assembly
1. Place the base assembly on the oor and lock the back casters for ease of
assembly, as shown above.
support unit
flat washer
lock washer
plastic
cap
kneepad
assembly
2. Insert the kneepads into the kneepad support unit. Install the two hex bolts
through lock washers, at washers, and kneepad support unit into nuts as shown
above. Tighten securely with the provided wrench. Install the two plastic caps on
the hex bolts. The nished assembly is shown at right above.
side support arm
kneepad assembly
side support arm
kneepad
assembly
carriage bolt
acorn nut
lock washer
kneepad side
support assembly
3. Attach the kneepad assembly to the two side support arms. Face the square holes
on the side support arms inward; t the square shoulder of each carriage bolt
in the square hole, installing each carriage bolt through the kneepad assembly
bracket and side support arm from the inside as shown above. Install the at
washer, lock washer, and acorn nut on the end of each carriage bolt as shown
above. Do not tighten the nuts; some play in this assembly will be needed to
assemble the entire unit. The nished assembly is shown at right above.
LF1600-INS-LAB-RevH18 • LF1600 Stand Assist 7
Page 8
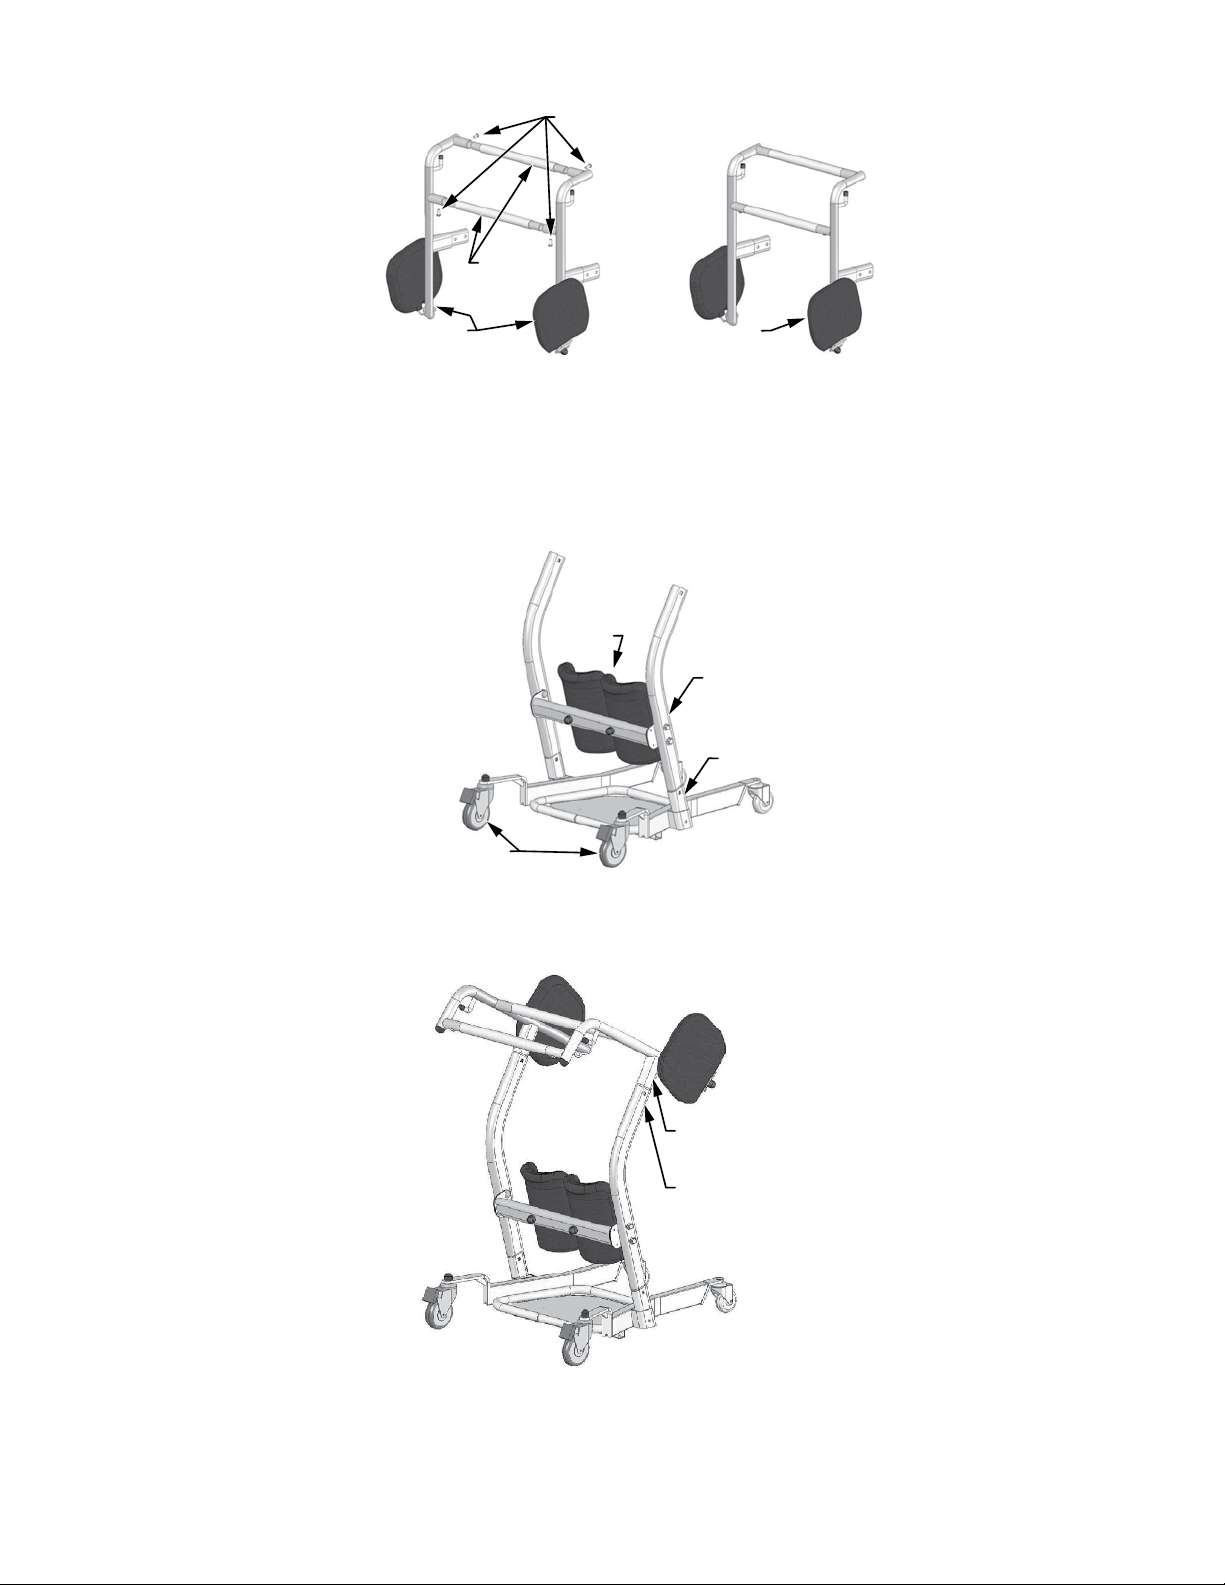
buttonsockethead
tubular
crossbar
capscrew
seatpadandhandle
barsupportunit
crossbarassembly
seatand
4. Insert the two tubular cross bars into the holes on the seat pad and handle bar
support units as shown above. Align the small holes on the cross bar undersides
with the holes in the support units. Install the four button socket head cap screws
through the support units into the cross bars. Use the hex key to tighten. The
nished assembly is shown at right above.
kneepads
kneepadside
supportassembly
basebracket
lockablecasters
5. Insert the kneepad side support assembly into the base brackets as shown above.
The kneepads and arm curvature should be facing away from the lockable casters.
seat and cross
bar assembly
kneepad side
support assembly
6. Insert the seat and cross bar assembly into the tubes at the top of the kneepad
side support assembly as shown above.
LF1600-INS-LAB-RevH18 • LF1600 Stand Assist 8
Page 9
seat and cross bar
acorn nut
assembly
kneepad side
support assembly
base assembly
b
b
c
c
a
a
carriage bolt
flat washer
lock washer
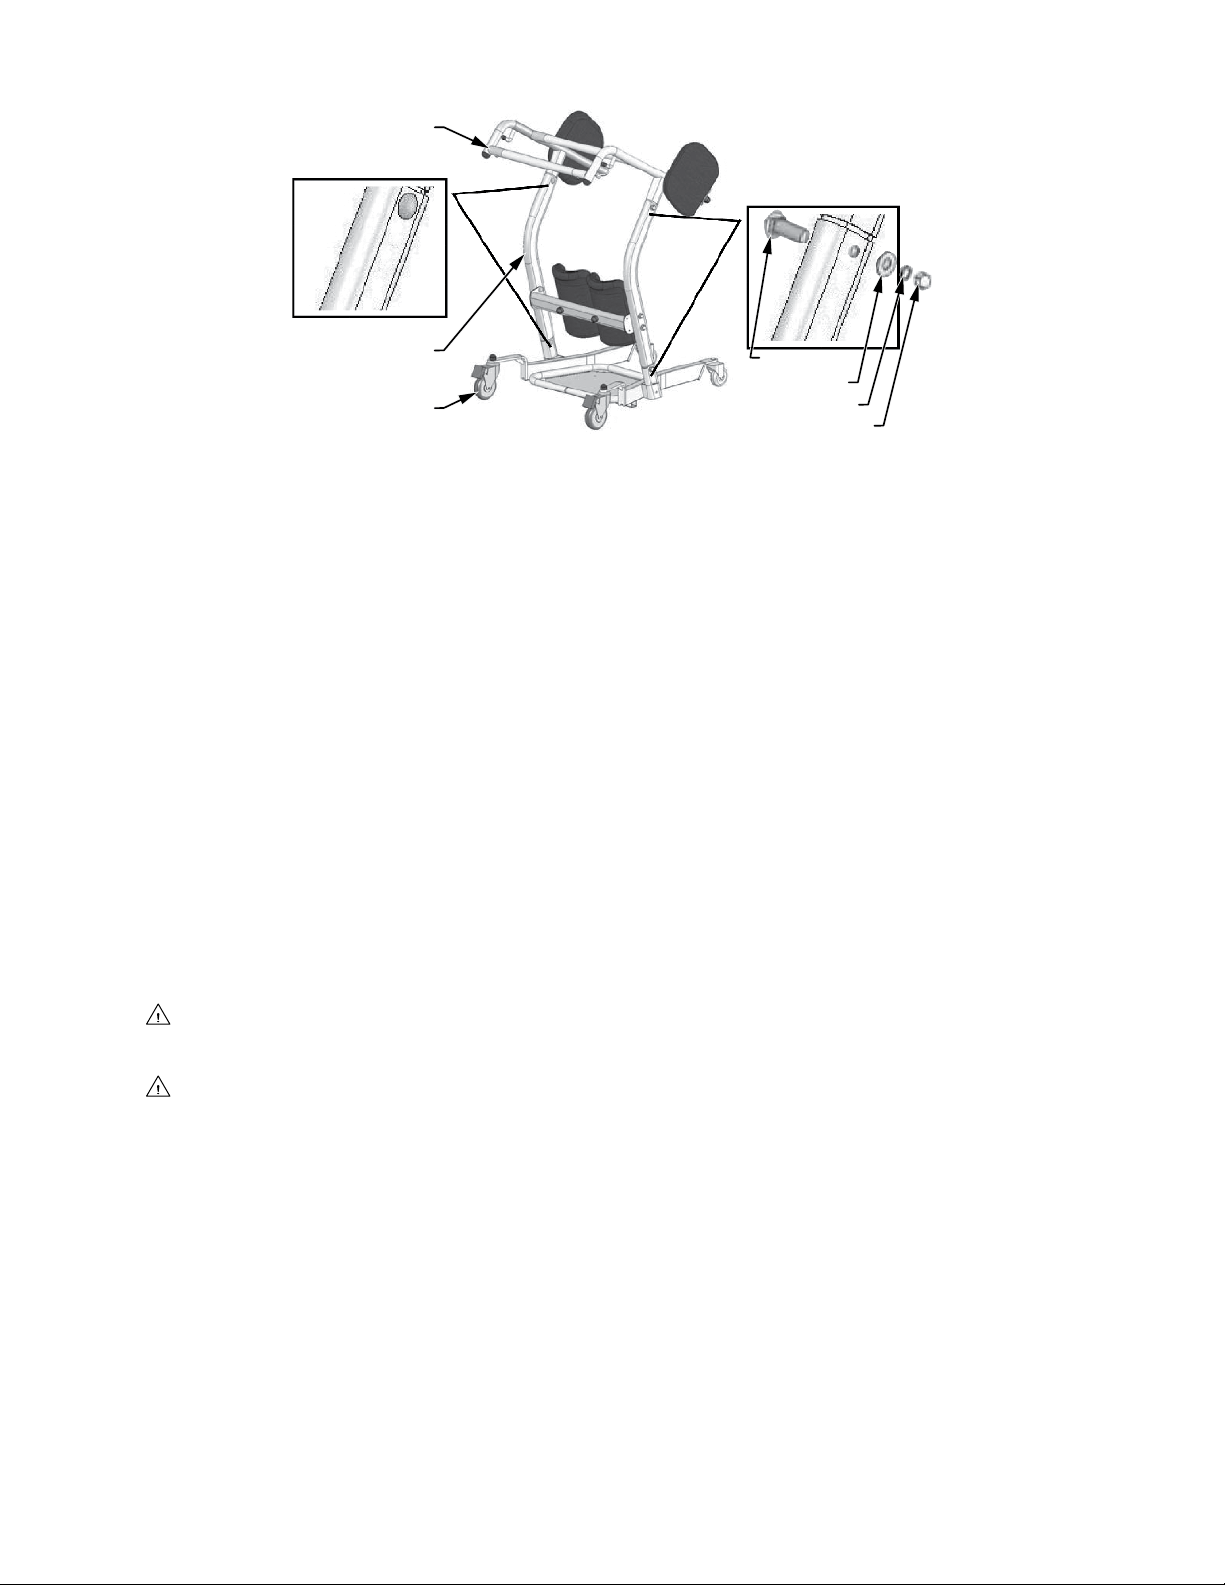
7. Fasten the seat and cross bar assembly, kneepad side support assembly, and base
assembly together with carriage bolts:
a. Attach the kneepad side support assembly to the base assembly. Fit the square
shoulder of each carriage bolt in the square hole at inside of base bracket,
installing each carriage bolt through the base and kneepad side support
assembly as shown above. Install the at washer, lock washer, and acorn
nut on the end of each carriage bolt as shown above. Tighten the two nuts
securely using the provided wrench.
b. Attach the seat and cross bar assembly to the kneepad side support assembly.
Fit the square shoulder of each carriage bolt in the square hole at inside of
kneepad side support assembly, installing each carriage bolt through the
kneepad side support assembly and seat and cross bar assembly as shown
above. Install the at washer, lock washer, and acorn nut on the end of
each carriage bolt as shown above. Tighten the two nuts securely using the
provided wrench.
c. Securely tighten the four nuts that attach the kneepad assembly to the two
side support arms, installed in step 3, using the provided wrench.
WARNING: Before operating the Stand Assist, ensure that all components are
properly and securely assembled and that all fasteners are secure.
WARNING: Before operating the Stand Assist, read the operation instructions.
LF1600-INS-LAB-RevH18 • LF1600 Stand Assist 9
Page 10
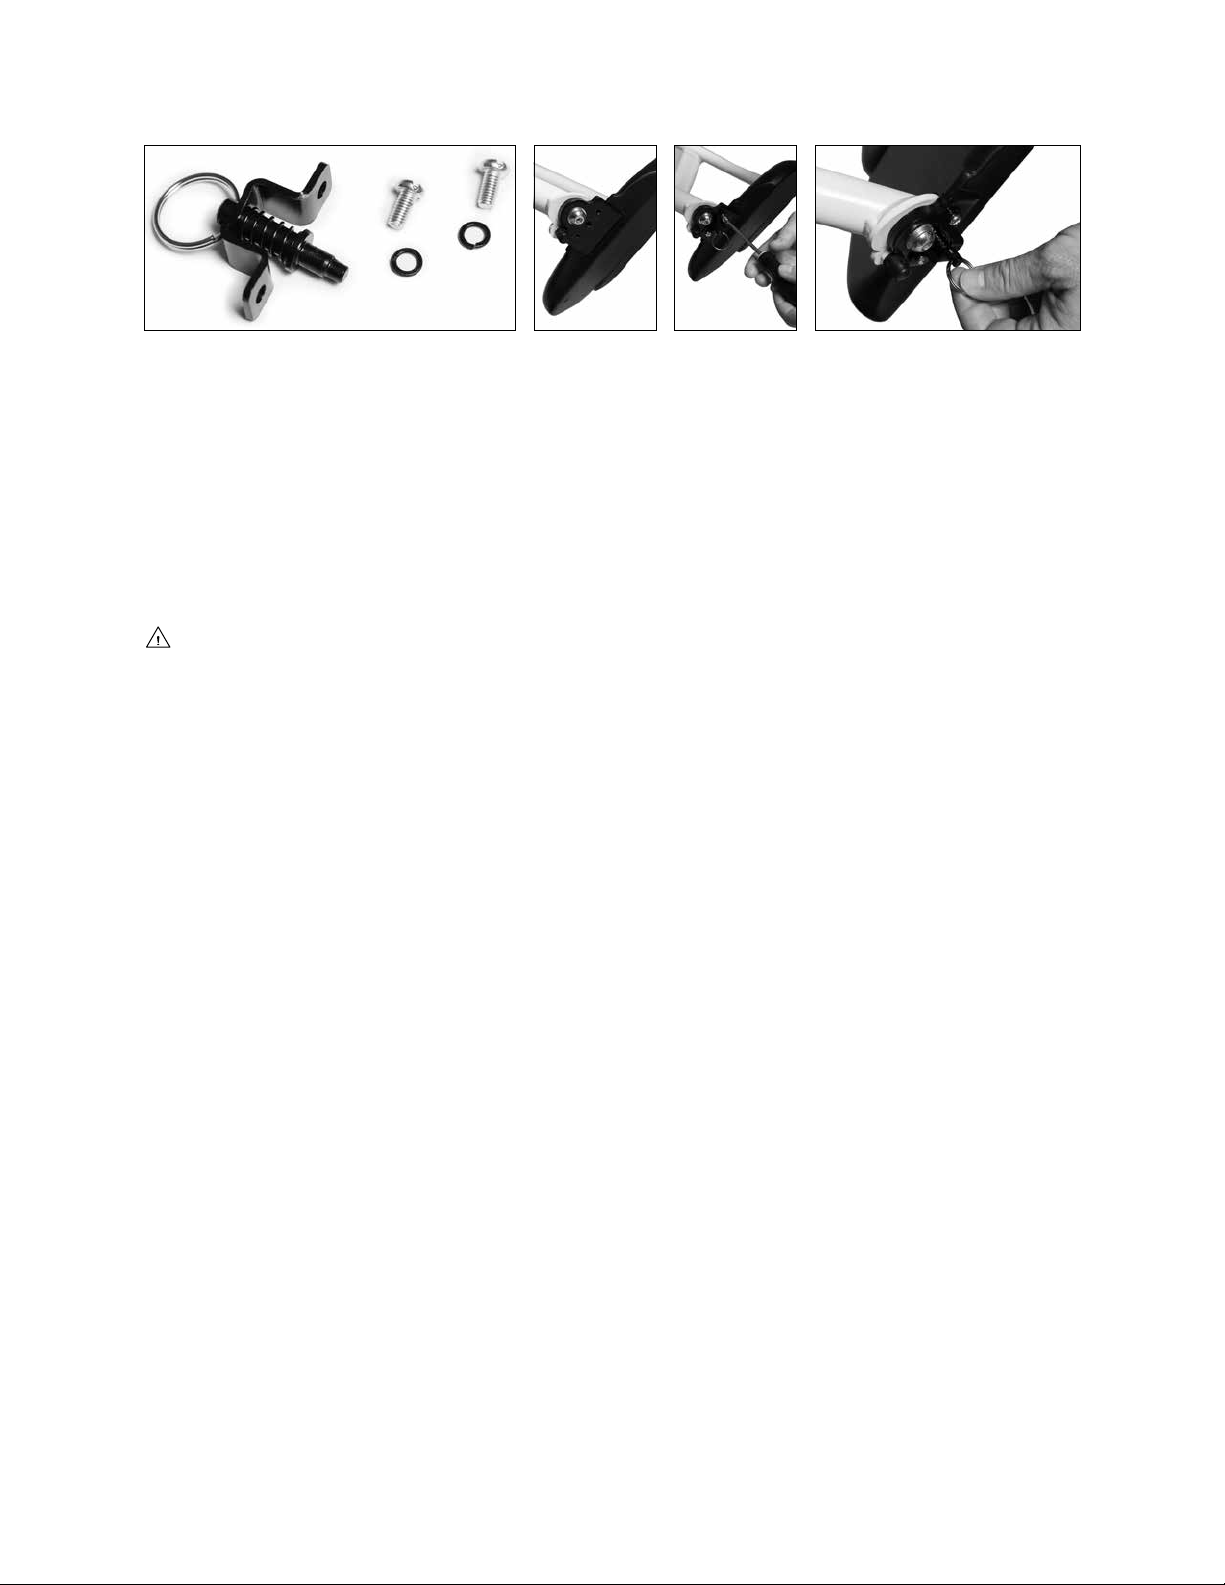
Seat Lock Installation
A - Ring Style lock with
mounting hardware
B - Seat
bracket
without lock
C - Lock
installation
D - Pull ring to disengage
lock
Ring style lock with mounting hardware (two Phillips head screws and two lock
washers) is shown in Image A above. Install one lock on each side of Stand Assist.
1. Align lock with existing bracket holes.
2. Insert screws and tighten as shown in Image C.
3. Pull ring to disengage lock as shown in Image D.
WARNING: Ensure the Seat Lock is installed as described above before use.
If the Seat Lock is not properly installed, personal injury and/or damage to the
Seat Lock could result.
LF1600-INS-LAB-RevH18 • LF1600 Stand Assist 10
Page 11
6 OPERATION
Info: Patients who desire additional security may wish to use the optional
DSLSA9 Sit-to-Stand Buttock Strap, available through your GF authorized
distributor.
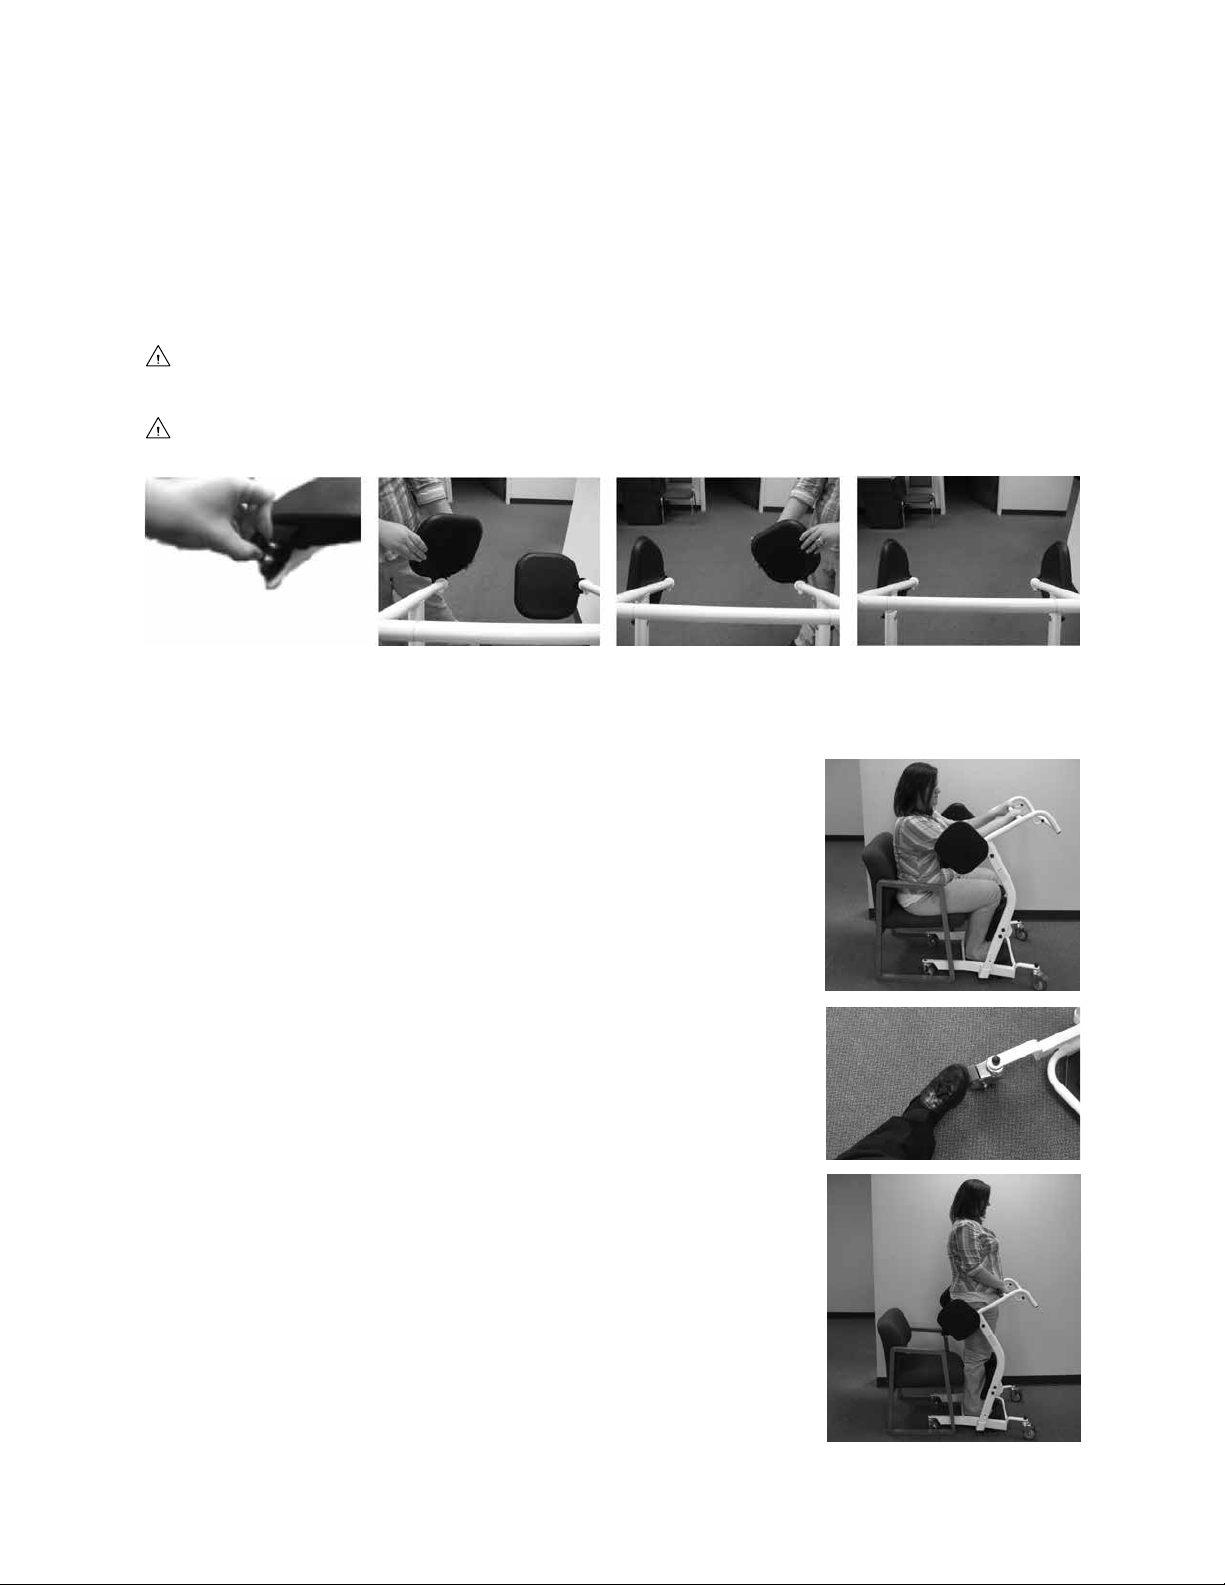
The split seat units can be rotated upward to allow for patient loading then, once the
patient is in an upward standing position, lowered to form a complete two-sided seat.
WARNING: Ensure that both seat units are fully lowered and form a complete
seat before having the patient sit down on the Stand Assist.
WARNING: Do not leave a patient unattended during any part of the transport.
1. Pull the lock/bottom on the back of the seat, as shown at above left. Raise the two
split seat units so that they are parallel to the side of the Stand Assist, as shown
above.
2. Have the patient positioned at the edge of the surface
to be transferred from. Move the Stand Assist in front
of the patient. Position the patient so that her feet are
rmly on the platform and her knees and shins are in
contact with the two cupped kneepads, as shown at
right.
3. Lock the casters by stepping on the caster clip and
pushing down, as shown at right.
4. Have the patient grasp the cross bar closest to her and,
using her own strength, pull herself up into a standing
position securely on the base platform, as shown at
right.
LF1600-INS-LAB-RevH18 • LF1600 Stand Assist 11
Page 12
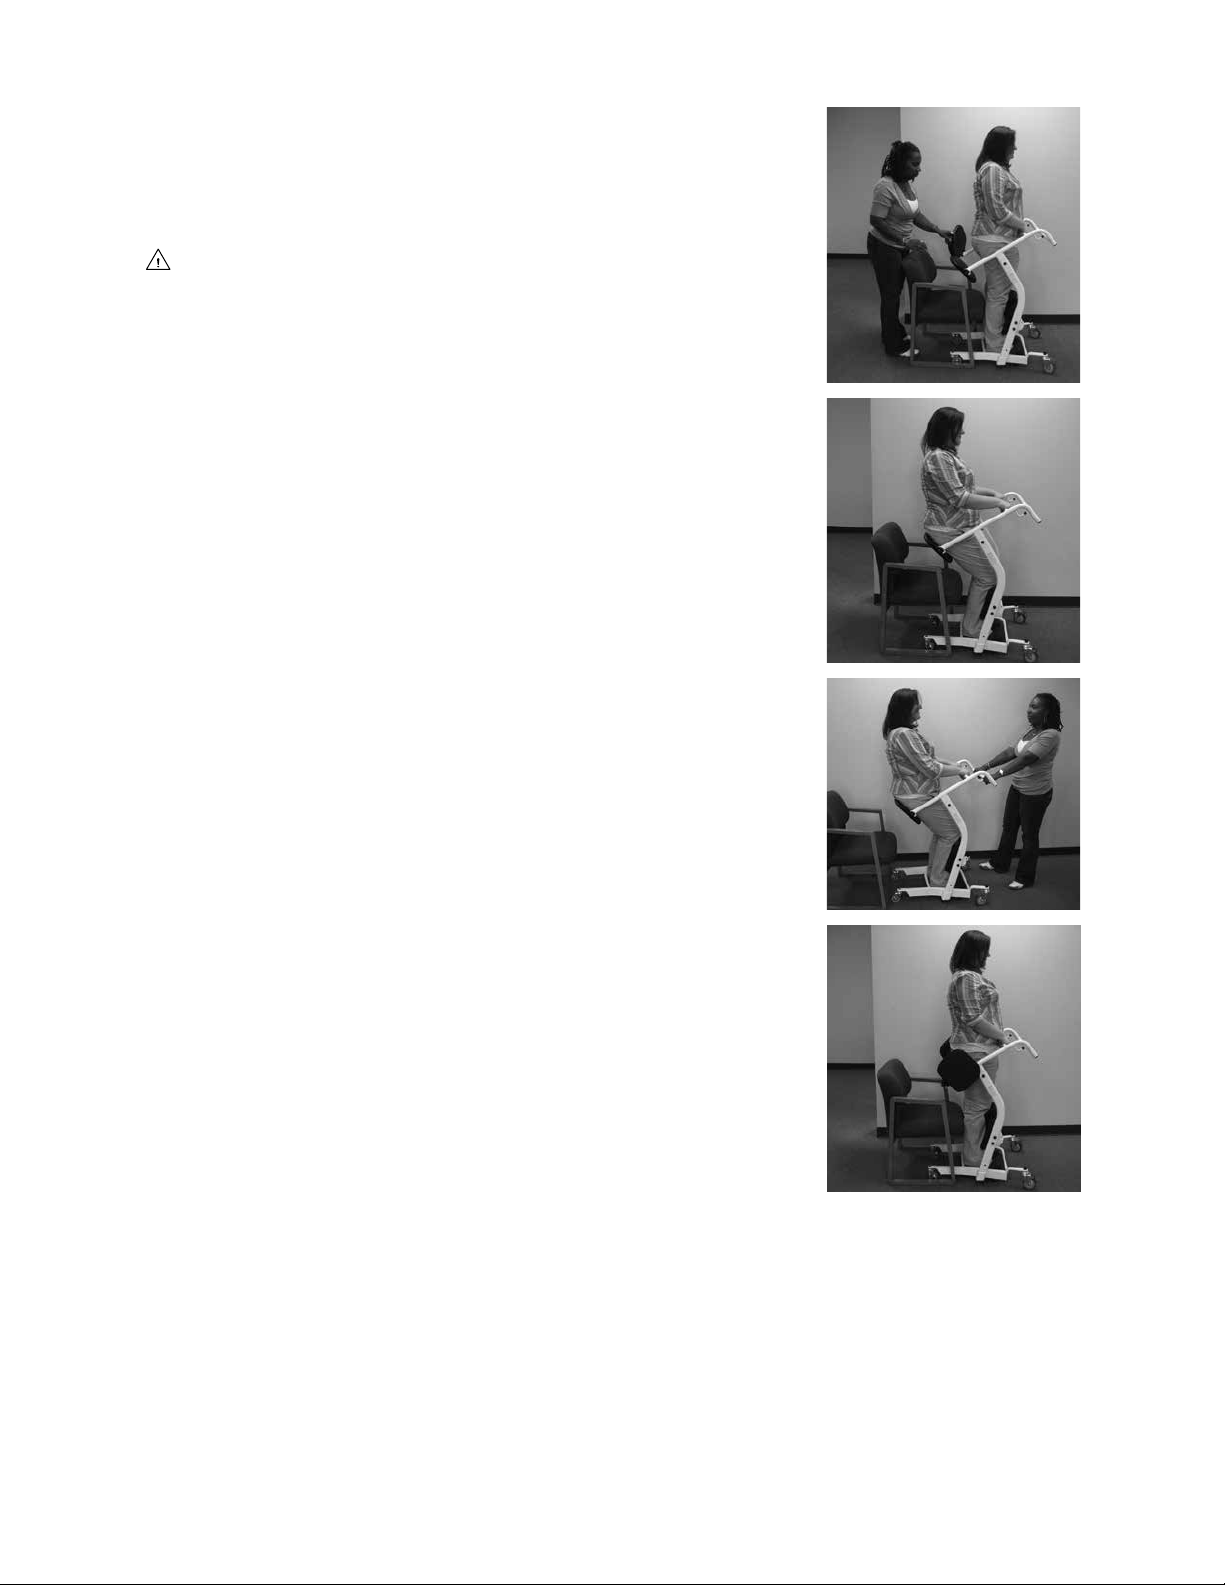
5. Pull the ring lock on the back of the seat and open/turn
the split seat. Lower both of the split seat units down
into position to form a complete seat, as shown at right.
WARNING: Ensure that both seat units are lowered
and form a complete seat before having the patient sit
down on the Stand Assist.
6. Have the patient lower herself down onto the seat while
keeping her knees and shins in the kneepads, and while
continuing to hold the cross bar with both hands, as
shown at right.
7. Unlock the casters. Place both hands on the cross bar
furthest from the patient, as shown at right, and move
the Stand Assist to the new surface. Ensure that the
patient is secure and in proper position as described in
Step 6 before and during transfer, as shown at right.
8. Position the Stand Assist against the new surface,
ensuring that the patient will be in a position to sit down
rmly and safely on the transfer surface.
9. Lock the casters.
10. Have the patient pull herself back up to a full standing
position.
11. Pull the ring lock on the back of the seat. Raise the two
split seat units so that they are parallel to the side of the
Stand Assist, as shown at right, to allow the patient to
lower herself.
12. Stand beside the patient as she lowers herself down
onto the new surface.
13. Ensure that the patient is safely positioned. Unlock the
casters and move the Stand Assist to storage.
LF1600-INS-LAB-RevH18 • LF1600 Stand Assist 12
Page 13

7 MAINTENANCE
To ensure safety and proper use, perform the following steps monthly:
• Check all fasteners to ensure that they are securely fastened and no wear and tear
is evident. Replace and tighten any worn fasteners before using the Stand Assist.
• Check the two seat assemblies to make sure they are not worn or damaged, and
that the bolts are tight. Replace any worn or damaged seat components before
using the Stand Assist.
• Check the casters to make sure they are in working order and are secured rmly
to the Stand Assist. Replace any worn or damaged casters before using the
Stand Assist.
If any maintenance procedure is not clear to you, ask your GF authorized distributor
for assistance.
s NOTICE: Improper maintenance can cause operating problems and may affect
your warranty.
WARNING: Unauthorized modication or the use of non-Lumex replacement
parts could change the structure of the Stand Assist, void the warranty, and
create a hazardous condition resulting in serious personal injury.
CLEANING THE STAND ASSIST
• Wipe off the frame at least once a week with a soft cloth. Dry the Stand Assist
immediately if exposed to moisture.
• Clean the frame every three months with a mild soap and water solution. The
frame does not need to be waxed.
• Clean upholstery and plastic components at least once a month with a mild soap
and water solution.
s NOTICE: Do not use solvents, abrasive waxes, caustic chemicals or spray
silicone to clean the Stand Assist.
s NOTICE: Do not use abrasive cleansers to clean the Stand Assist; they could
scratch the nish.
s NOTICE: Do not use steam or high pressure cleaners to clean the
Stand Assist.
LF1600-INS-LAB-RevH18 • LF1600 Stand Assist 13
Page 14

8 LIMITED WARRANTY
SCOPE OF WARRANTY
GF Health Products, Inc. (“GF”) warrants to the original purchaser only that it will replace or repair components,
at GF’s sole discretion, that are defective in material or workmanship under normal use and service. All warranties
are conditioned upon the proper use of the products strictly in accordance with good commercial practice and
applicable GF instructions and manuals, including proper use and maintenance. To the extent that a component is
warranted by a third party, GF conveys all of its rights under that warranty to the original purchaser, to the extent
permitted. This limited warranty shall only apply to defects that are reported to GF’s customer service team
within the applicable warranty period and which, upon examination by GF or its authorized representative, prove
to be a warranty item. This limited warranty is not transferable.
The warranted components and time period are set forth below:
Frame: .................................... three years
Parts, including casters: ...... one year
The applicable warranty period shall commence from date of shipment to the original customer, unless there is an
expiration date on the component in which case the warranty shall expire on the earlier of warranty period or the
expiration date.
OBTAINING WARRANTY SERVICE
This limited warranty shall only apply to defects that are reported to the Distributor from whom the Customer
purchased the product within the applicable warranty period. If there is not a Distributor, you must contact
GF directly by calling 1.770.368.4700, sending a fax request to 1.770.368.2386, or by e-mailing a request to
cs@grahameld.com. Specic directions will be provided by the Customer Service Representative. Failure to abide
by the specic directions will result in denial of the warranty claim.
The warranty does not cover and GF shall not be liable for the following:
1) Defects, damage, or other conditions caused, in whole or in part, by misuse, abuse, negligence, alteration,
accident, freight damage, tampering or failure to seek and obtain repair or replacement in a timely manner;
2) Products which are not installed, used, or properly cleaned and maintained as required in the ofcial manual
for the applicable product;
3) Products considered to be of a non-durable nature including, but not limited to: lters, fuses, gaskets,
lubricants, and charts;
4) Accessories or parts not provided by GF;
5) Charges by anyone for adjustments, repairs, replacement parts, installation or other work performed upon or
in connection with such products which are not expressly authorized in writing, in advance, by GF;
6) Any labor or shipping charges incurred in the replacement part installation or repair;
7) Costs and expenses of regular maintenance and cleaning; and
8) Representations and warranties made by any person or entity other than GF.
ENTIRE WARRANTY, EXCLUSIVE REMEDY AND CONSEQUENTIAL DAMAGES DISCLAIMER
THIS WARRANTY IS GF’S ONLY WARRANTY AND IS IN LIEU OF ALL OTHER WARRANTIES, EXPRESS OR
IMPLIED. GF MAKES NO IMPLIED WARRANTIES OF ANY KIND INCLUDING ANY IMPLIED WARRANTIES OF
MERCHANTABILITY OR FITNESS FOR A PARTICULAR PURPOSE. IF ANY MODEL OR SAMPLE WAS SHOWN TO THE
CUSTOMER, SUCH MODEL OR SAMPLE WAS USED MERELY TO ILLUSTRATE THE GENERAL TYPE AND QUALITY
OF THE PRODUCT AND NOT TO REPRESENT THAT THE PRODUCT WOULD NECESSARILY CONFORM TO THE
MODEL OR SAMPLE IN ALL RESPECTS. THIS WARRANTY IS LIMITED TO THE REPAIR OR REPLACEMENT OF THE
DEFECTIVE PARTS. GF SHALL NOT BE LIABLE FOR AND HEREBY DISCLAIMS ANY DIRECT, SPECIAL, INDIRECT,
INCIDENTAL, EXEMPLARY OR CONSEQUENTIAL DAMAGES, INCLUDING, BUT NOT LIMITED TO: DAMAGES
FOR LOSS OF PROFITS OR INCOME, LOSS OF USE, DOWNTIME, COVER, OR EMPLOYEE OR INDEPENDENT
CONTRACTOR WAGES, PAYMENTS AND BENEFITS.
The warranties contained herein contain all the representations and warranties with respect to the subject matter
of this document, and supersede all prior negotiations, agreements and understandings with respect thereto.
The recipient of this document hereby acknowledges and represents that it has not relied on any representation,
assertion, guarantee, warranty, collateral contract or other assurance, except those set out in this document.
For additional information on this product or this warranty, please contact a GF Customer Service Representative.
NOTES:
1) Additional terms and conditions may apply.
2) Freight claims must be notated on the appropriate shipping documents and must be made with immediacy.
International, federal and state regulations govern specic requirements for freight claims. Failure to abide by
those regulations may result in a denial of the freight claim. GF will assist you in ling the freight claim.
3) Claims for any short shipment must be made within three (3) days of the invoice date.
LF1600-INS-LAB-RevH18 • LF1600 Stand Assist 14
Page 15

9 INDEX
A
Assembly instructions 7
C
CAUTION statement, signicance 4
Cleaning the Stand Assist 13
Components, identication 6
F
Fasteners and tools, identication 6
Features 6
H
Handling Procedures 5
I
Info statement, signicance 4
Inspection 5
Intended use 3
Introduction 3
M
Maintenance 13
N
NOTICE statement, signicance 4
O
Operation 11
S
Safety precautions 4
Safety statements, signicance of 4
Seat lock installation 10
Shipping and transportation instructions 5
Signicance of safety statements 4
Sit-to-Stand Buttock Strap, optional 11
Storage 5
T
Tools required for assembly, list 7
Transport, perform 11
U
Unpacking 5
W
WARNING statement, signicance 4
Warranty 14
Weight capacity 4
LF1600-INS-LAB-RevH18 • LF1600 Stand Assist 15
Page 16

The most current and complete product information can be found on our website.
Information contained herein is subject to change.
1.770.368.4700
www.grahameld.com
© 2007, GF Health Products, Inc. All Rights Reserved.
GF Health Products, Inc., One Graham-Field Way, Atlanta GA 30340-3140
Graham-Field and Lumex are trademarks of
GF Health Products, Inc. is an ISO 13485 Certied Company.
Manufactured for GF Health Products, Inc.
Made in Taiwan
 Loading...