

Page 1

To download the latest version of Quick Start Guide,
multilingual user manual, software, or driver, etc.,
please visit Lumens
https://www.Mylumens.com/support
User Manual - English
VS-LC102
CaptureVision Station
[Important]
Page 2

Table of Contents
Copyright Information ...................................................................................... 4
Chapter 1 Safety Instructions ......................................................................... 5
Chapter 2 Package Contents .......................................................................... 6
Chapter 3 Product Overview ........................................................................... 7
3.1 Front-End Panel Descriptions ............................................................................ 7
3.2 Rear-End I/O Descriptions.................................................................................. 7
3.3 Panel Keys Descriptions .................................................................................... 8
3.4 Panel Indicator Introduction .............................................................................. 8
3.5 Remote Control Buttons Descriptions .............................................................. 9
Chapter 4 System Requirements .................................................................. 11
4.1 Basic Devices .................................................................................................... 11
4.2 Recommended Devices .................................................................................... 11
Chapter 5 Instruction for installation ........................................................... 12
5.1 How to Connect ................................................................................................. 12
5.2 Initial Setup ........................................................................................................ 15
Chapter 6 OSD Function Descriptions ......................................................... 23
6.1 Setting Menu ..................................................................................................... 24
6.2 Basic Instruction ............................................................................................... 25
Chapter 7 Web Function Description – System Configuration .................. 31
7.1 System Configuration ....................................................................................... 32
7.1.1 System Information ........................................................................................................... 32
7.1.2 Video Source Setting ......................................................................................................... 33
7.1.3 Network Setting .................................................................................................................. 34
7.1.4 Record Setting ................................................................................................................... 34
7.1.5 Local Storage Setting ........................................................................................................ 36
7.1.6 Layout Manager ................................................................................................................. 36
7.1.7 Lecture Manager Configuration ....................................................................................... 37
7.1.8 Photo Manager ................................................................................................................... 37
7.1.9 Schedule Manager Configuration .................................................................................... 38
7.1.10 Event Log: .......................................................................................................................... 38
7.1.11 About Page Description .................................................................................................... 39
7.2 System Configuration Operation ..................................................................... 40
7.2.1 Change Host Name ............................................................................................................ 40
7.2.2 Change System Time......................................................................................................... 40
1
Page 3

7.2.3 Source Setting .................................................................................................................... 40
7.2.4 Connect IP Camera ............................................................................................................ 41
7.2.5 Volume adjustment ............................................................................................................ 43
7.2.6 Add Logo or Other Video in a Video ................................................................................ 43
7.2.7 Storage Device Setting ...................................................................................................... 44
7.2.8 Layout Management .......................................................................................................... 45
7.2.9 Schedule Manager ............................................................................................................. 47
7.2.10 Lecture Manager ................................................................................................................ 47
7.2.11 Edit Lecture Keynote ......................................................................................................... 48
7.2.12 Change Username and Password .................................................................................... 48
7.2.13 Startup Screen ................................................................................................................... 49
7.2.14 Network Setting .................................................................................................................. 49
7.2.15 Webpage Language ........................................................................................................... 49
Chapter 8 Webpage Function Description-Director .................................... 50
8.1 Director Instructions ......................................................................................... 51
8.1.1 Director Introduction ......................................................................................................... 51
8.1.2 Director Instructions.......................................................................................................... 52
8.1.3 Director Screen Instructions - Record Setting ............................................................... 53
8.2 Director Instructions ......................................................................................... 54
8.2.1 Basic Recording Operations ............................................................................................ 54
8.2.2 Change Display Layout ..................................................................................................... 54
8.2.3 Insert Key Notes ................................................................................................................. 54
8.2.4 Network Camera Control ................................................................................................... 55
8.2.5 Other Recording Settings ................................................................................................. 55
8.2.6 Webpage Language ........................................................................................................... 55
Chapter 9 Web Page Function Description - Viewer ................................... 56
9.1 Page Description ............................................................................................... 57
Chapter 10 Advanced Function Menu ..................................................... 58
10.1 Enable Automatic Recording Backup ............................................................. 58
10.1.1 Set Up FTP Connection ..................................................................................................... 58
10.1.2 Backup Setting ................................................................................................................... 59
10.2 Use RTP to Share Screen ................................................................................. 60
10.2.1 Set RTP Sharing ................................................................................................................. 60
10.2.2 Start RTP Sharing .............................................................................................................. 60
10.2.3 View Screen Sharing ......................................................................................................... 60
10.2.4 Use Online Director page for RTP sharing setup ........................................................... 61
10.3 How to live stream ............................................................................................ 62
10.3.1 Enable the YouTube live streaming ................................................................................. 63
10.3.2 Create a live event ............................................................................................................. 65
10.3.3 Configure VS-LC102 .......................................................................................................... 67
2
Page 4

10.3.4 Start live streaming ............................................................................................................ 68
10.4 Insert and Use Key Notes ................................................................................. 69
10.4.1 Insert Key Notes ................................................................................................................. 69
10.4.2 Modify Index ....................................................................................................................... 69
10.4.3 Use Key Notes .................................................................................................................... 70
10.5 PPT Installation and Instructions .................................................................... 70
10.5.1 Installation .......................................................................................................................... 70
10.5.2 Interface Description ......................................................................................................... 70
Chapter 11 Troubleshooting ..................................................................... 72
Attachment 1 ................................................................................................. 74
3
Page 5

Copyright Information
Copyrights © Lumens Digital Optics Inc. All rights reserved.
Lumens is a trademark that is currently being registered by Lumens Digital Optics Inc.
Copying, reproducing or transmitting this file is not allowed if a license is not provided by
Lumens Digital Optics Inc. unless copying this file is for the purpose of backup after
purchasing this product.
In order to keep improving the product, Lumens Digital Optics Inc. hereby reserves the right
to make changes to product specifications without prior notice. The information in this file is
subject to change without prior notice.
To fully explain or describe how this product should be used, this manual may refer to
names of other products or companies without any intention of infringement.
Disclaimer of warranties: Lumens Digital Optics Inc. is neither responsible for any possible
technological, editorial errors or omissions, nor responsible for any incidental or related
damages arising from providing this file, using, or operating this product.
4
Page 6

Chapter 1 Safety Instructions
Please use the product following the safety instructions below:
1 Operation
1.1 Please use the product in the recommended operating environment.
1.2 Do not place the product in tilted position.
1.3 Do not place the product on an unstable trolley, stand or table.
1.4 Do not use this product near water or source of heat.
1.5 Use attachments only as recommended.
1.6 Use the type of power source indicated on this product. If you are not sure of the
type of power available, consult your dealer or local electricity company for advice.
1.7 Always take the following precautions when handling the plug. Failure to do so may
result in sparks or fire:
Ensure the plug is free of dust before inserting it into a socket.
Ensure that the plug is inserted into the socket securely.
1.8 Do not overload wall sockets, extension cords or multi-way plug boards to avoid
potential risks.
1.9 Do not block slots and openings in the case of this product as poor ventilation may
lead to overheating of this product.
1.10 Except as specifically instructed in this User Manual, do not attempt to open or
remove covers by yourself. It may expose you to electric shock or other hazards.
Refer all servicing to licensed service personnel.
1.11 Unplug this product from the outlet and refer servicing to licensed service personnel
when the following situations happen:
If the power cords are damaged or frayed.
If liquid is spilled into the Product or the Product has been exposed to rain or water.
2 Storage
2.1 Do not place the Product where the cord can be stepped on as this may result in
fraying or damage to the lead or the plug.
2.2 Never push objects of any kind through cabinet slots. Never allow liquid of any kind
to spill into the Product.
2.3 Unplug this product during thunderstorms or if it is not going to be used for an
extended period.
2.4 Do not place this product or accessories on top of vibrating equipment or heated objects.
3 Cleaning
3.1 Unplug all the cables before cleaning. Use a damp cloth for cleaning. Do not use
liquid or aerosol cleaners.
4 Remote control (if the accessories are equipped with remote control)
4.1 Using an incorrect battery type in the remote control may result in breakdown.
Follow local instructions on how to dispose of used batteries.
FCC Warning
The product has been tested and found to comply with the limits for a Class B digital device,
pursuant to Article 15-J of FCC Rules. These limits are designed to provide reasonable
protection against harmful interference in a commercial installation.
This digital apparatus does not exceed the Class B limits for radio noise emissions from
digital apparatus as set out in the interference-causing equipment standard entitled "Digital
Apparatus," ICES-003 of Industry Canada.
Cet appareil numerique respecte les limites de bruits radioelectriques applicables aux
appareils numeriques de Classe B prescrites dans la norme sur le material brouilleur:
"Appareils Numeriques," NMB-003 edictee par l'Industrie.
5
Page 7

Chapter 2 Package Contents
VS-LC102
Quick Installation Guide
Remote Control
Power Adapter
Battery x 4
DIDO connector
Appearance may vary
depending on country/region
Quick Installation Guide
6
Page 8

Chapter 3 Product Overview
NO.
Name
Function Descriptions
1.
Remote
Control
Receiver
Infrared remote control reception area
2.
Indicator
Recording/Power
3.
Function
Shortcuts
Record/Play/Pause/Stop/Menu/Channel/Layout Display
4.
Operation
Selection
Up/Down/Left/Right/Return/OK
5.
Power Button
Power Switch
6.
USB Port
Use the USB drive to insert an export file or proceed with
firmware update through the USB drive
NO.
Name
Function Descriptions
7.
Power IN
12V/2A
8.
Image Input
VGA/HDMI device image input
Note: Compatible with DVI to HDMI adapter or VGA adapter for
device image input
9.
Image Output
VGA/HDMI device image output
10.
Audio In
Line/MIC device Audio In
11.
Audio Out
Allows line audio out to amplifier transfer
12.
Hard Disk In
USB/eSATA interface for hard drive storage
13.
WAN
LAN access
14.
LAN port
1. Image input for IP camera
2. Connect to the computer directly for online management
operations
15.
DIDO
RS-232 control signal port
16.
Reset
Reset to factory default settings
3.1 Front-End Panel Descriptions
3.2 Rear-End I/O Descriptions
7
Page 9

3.3 Panel Keys Descriptions
NO.
Icon
Name
Function Descriptions
1.
Power
Turn on and off.
2.
●
Record
Start recording.
3.
Play/Pause
Play video/Pause video during playback
4.
■
Stop
Stop playback/Exit recording
5.
Menu
Enter Main Menu: Playback/Recording/Settings
6.
CH
Channel
Change channels.
7.
Layout
Display
Change monitor layout during playback
8.
^
﹀
〈〉
Direction
Keys
Move up/down/left/right and select item
9.
OK
OK
Execute item in the menu screen. Enlarge display
window during playback
10.
Return
Return to the previous menu or cancel selection
Indicator
Indicator Display
Description
Record
Orange light stays lit
Recording in progress
Power
Red light stays lit
In standby mode
Red and green
indicators alternately
flicker
Startup in progress
Green light stays lit
Startup completed
Flickering red light
Abnormal fan
Flickering green light
(once)
Receiving remote control command
<>
Record
Power
3.4 Panel Indicator Introduction
8
Page 10

3.5 Remote Control Buttons Descriptions
NO.
Icon
Name
Function Descriptions
1.
Power
Turn on and off
2.
Aspect Ratio
Automatic output resolution detection and adjustment
3.
ABCD
A: Exit export USB drive
B ~ D: Function keys; please refer to the instructions
provided on each
4.
Numeric Keys
Camera: PRESET setting by the camera
5.
●
Record
Start recording
6.
Snapshot
Capture screenshot and save as image file
7.
Menu
Enter/Exit Menu
When using the remote control, please point the remote control at the infrared reception area on the
front panel of the product to ensure that the signal is successfully received. The valid angle of the
remote control is +/- 30°, and the vertical range is within 10 m.
<Remark 1> The remote control and panel commands become invalid when controlling the product
through the web.
<Remark 2> The camera control function becomes available once the Webcam channel is switched to
full-screen mode.
9
Page 11

NO.
Icon
Name
Function Descriptions
8.
Return
Return to the previous menu or cancel selection
9.
Layout
Display
Change monitor layout during playback
10.
Top, Bottom,
Left and Right
LC102: Move up/down/left/right and select item
Camera: Rotate camera lens
11.
OK
OK
Select and activate menu item
12.
Exit
Exit all settings or dialogue windows and return to
display window
13.
Maximize
Display
Sequentially switch between the methods for maximizing
windows of all channels
14.
Volume/
Slow zoom
LC102: Adjust volume
Camera: Fine-tune image size
15.
CH
Channel/
Fast zoom
LC102: Switch layout channels
Camera: Adjust image size
16.
Mute
Turn off sound
17.
Information
Display detailed video information
18.
Previous Key
Note
Next Key
Note
During playback, select key note to rapidly switch
chapters
[Remark] Key notes must be inserted within the video
beforehand to activate this function
19.
Recording
Layout
Changing screen layout during recording
20.
Play
Play video. Press this key during playback to pause the
video.
21.
Pause
Pause video playback/recording
22.
■
Stop
Stop video playback/recording
23.
Previous/Next
Skip to previous/next video during playback
24.
P1
Reserved
25.
P2
Reserved
26.
P3
Reserved
27.
Home
Camera: Return to initial position
28.
Set Preset
Camera: Set default position
29.
Zoom In
Camera: Zoom in the image
30.
Zoom Out
Camera: Zoom out the image
10
Page 12

Chapter 4 System Requirements
Browser
Version
Operating System
Windows
MAC
IE
IE9 and above
Yes
NA
360 Safe Browsing
7.1 and above
(Applicable only in
“Speed Mode”)
Yes
NA
To control this product remotely via the Internet, please use the following
recommended browser:
[Note] Browsers, such as Chrome, Firefox, and Safari have stopped supporting NPAPI and cannot
install the FireBreadthed VLC component. It is not recommended for use with VS-LC102
4.1 Basic Devices
VS-LC102 x 1
Computer (or Laptop) x 1
Router x 1 (Giga routers are recommended)
Lumens Webcam x 1-3; e.g. VC-A20P x 3
Network cables x 3-5
HDMI or VGA cable x 2
Speaker x 1
Microphone x 1
4.2 Recommended Devices
Display x 1
Amplifier x 1
Mixer x 1
[Remark] The number of connected devices can be increased or adjusted based on
environment needs
11
Page 13

Chapter 5 Instruction for installation
NO.
Function
How to connect
1.
Power
Connect the power cord
2.
Image Input
Connect the image output cable of the computer with the image
input port (HDMI IN/VGA IN) to establish an HDMI or VGA
connection
Note: Alternative devices can be used to replace the computer as the
image input device, such as cameras or projectors…
3.
Image Output
Connect HDMI OUT to HDMI of the TV screen
Note: If HDMI is not available on the TV, adapters can be used
according to the specification of the TV
4.
Audio In
Connect the audio input cable of a line device, such as an
amplifier, mixer, or microphone
5.
Audio Out
Connect the audio output cable of a line device, such as an
amplifier
6.
Storage Device
Insert a USB or eSATA external hard drive as the storage device
7.
WAN
Connect the WAN port to the router and computer to remotely
control the VS-LC102
Note: Please connect the computer to the LAN port (8) first, and
then connect the computer to a router after the completion of
external network settings
5.1 How to Connect
Please follow the following instructions to connect your devices.
12
Page 14

8.
LAN port
1. Connect an IP camera (e.g. VC-A20P) as the image input
2. Connect to the computer directly for online management; for
the initial use, please connect the port for further operations
9.
Digital I/O
Connect the RS232 device
VS-LC102 Digital I/O
DIDO connector
5.TxD
RxD
4.RTS
CTS
3.RxD
TxD
2.CTS
RTS
1.Gnd
Gnd
Pin NO.
Function
1
Gnd
2
CTS
3
RxD
4
RTS
5
TxD
5.1.1 Digital I/O Pin Descriptions
5.1.2 Digital I/O Connection Descriptions
13
Page 15

5.1.3 Connection diagram
Lumens VC-A50P
GbE Switch
IP
WAN
Internet
Network
Ethernet
Lumens VC-A50P
Ethernet
Lumens VS-KB30
Lumens VS-LC102
HDMI OUT
LCD Display
Lumens VC-A50P
Ethernet Cable
GbE Switch
Lumens VC-A50P
Ethernet Cable
Lumens VS-KB30
Ethernet Cable
Lumens VS-LC102
HDMI Cable
LCD Display
Ethernet
Internet network
Connection diagram (A)
The following connections show that the VC-A50P and VS-KB30 are both
connected to the VS-LC102. This connection environment can avoid some
unpredictable problems, such as image delay, image block, operation control
error or bandwidth error.
Connection diagram (B)
The following connections show that the VC-A50P and VS-KB30 and
VS-LC102 are all connected to the GbE switch. This connection method is
acceptable, but try to avoid other devices connected to the GbE switch
resulting in insufficient bandwidth allocation
14
Page 16

5.2 Initial Setup
C-Video Cable
TV
DVI Cable
Monitor or HDTV
5.2.1 Confirm and Set the VC-A20P Network Settings
Use a C-Video or a DVI cable to connect the VC-A20P with the monitor
(please refer to the connection diagram for the connection method).
After startup, press the
[MENU]
on the VC-A20P remote control to
open the OSD menu.
Scroll down to
Press [
[Closed].
Press
Confirm the default
[Remark] If more than one VC-A20P devices are installed, sequentially modify the IP
After confirming the IP addresses and completing modifications, press
[MENU]
addresses as [192.168.100.x], e.g. [192.168.100.151], [192.168.100.152],
and so forth…
[Ethernet]
] to enter the
to exit the
[IP Address]
, and press [
[DHCP]
settings screen. Confirm
[DHCP]
is set as
] to enter.
settings screen.
[192.168.100.150]
[DHCP]
.
is set as
[MENU] repeatedly to exit the OSD menu.
/
[Remark] For more instructions related to VC-A20P operations, please go to the
Lumens website and download the VC-A20P User Manual
Before continuing with settings below, please ensure that the settings in 5.1 How
to Connect have been completed.
5.2.2 Confirming the VS-LC102 IP Address
Press the button on the VS-LC102 remote control to open the OSD
menu.
Scroll right to
Scroll down to
[Setting]
[About]
confirm the IP address.
Repeatedly press the button to exit the OSD menu.
[Remark] If the IP address indicates 169.175.x.x, reconfirm the connection and the
router settings.
15
and press
and press
to enter the settings screen.
[OK]
to enter the
[OK]
[About]
page and
Page 17

5.2.3 Connecting to the VS-LC102 Webpage (Incl., log in)
VS-LC102
IP Address
[Remark 1] For the initial setting, please directly connect the computer to the
VS-LC102 LAN port, and set to automatically obtain IP address
Open the computer’s Internet browser.
[Remark 2] For the browser, it is recommended to use Firefox or Safari (for MAC)
Enter the VS-LC102 IP address; e.g.
Select
Enter the VS-LC102 Admin username and password.
[System Configuration]
http://192.168.1.150 (default IP address)
User: admin
Password: admin
16
Page 18

Click
[Log in]
5.2.4 Settings
1 Confirm Time Setting
Confirm the time setting. The time can be manually set or chosen from
other NTP servers if modifications are required.
2 Confirm hard drive status
Open the
to enter the System Configuration.
[Local Storage Setting]
Confirm hard drive status and then configure depending on the status
Unformatted:
Click to format the hard drive, which will take several
minutes depending on the storage device format; do not close the page
until successful operation (
it will erase the whole hard drive)
Unmounted:
Mounted:
Check
Check
[Enable Local Storage]
[Cycling Record]
Follow the instruction below to mount the hard drive
Skip this step to connect to a camera
to cycle hard drive space. When the hard drive
Note:
Backup hard drive prior to formatting, as
to mount the hard drive.
space is used up, the oldest data will be automatically overwritten by the
newest data, allowing the system to continue storing information.
Select the drive
[SATA/USB/eSATA]
and choose the desired storage
device.
Select
Select
Click
The storage device status changes to
[SATA]
[USB/eSATA]
[Apply]
for the built-in hard drive.
for the external hard drive.
to apply the settings.
[Mounted]
, indicating that the
storage device has been successfully set.
17
Page 19

3 Connect IP Camera
Open the
[Source Setting]
.
Click on
After the search is complete, the available camera will be shown in the
list. Select the .
Enter the VC-A20P account name and password.
Administrator: admin
Password: 9999
Click
[Discovery]
[Submit]
, and wait until the camera status changes to
and then
[Refresh]
.
[OK]
.
18
Page 20

4 Image Input Settings
○
6
Open the
Select the
4
Click the [+] symbol to set the input channel name/image source for
image capture
After the setting of image source is completed, click [x] to close the p
op-up window
Click
Image Port
[Source Setting]
[Source Setting]
[Apply]
to apply the settings
page. Set the video sources for Channel 1 to
In Image Setting, select
Select the image port as
19
[Image Port]
[HDMI or VGA]
according to the capture source
Page 21

Network Camera
In Image Setting, select
Select the network camera that has been connected and press the [+]
[Network Camera]
symbol to confirm
Network Encoder
When the image source is an encoder, input the UDP or RTP connection
port number of encoder settings.
If the source encoder setting has more than two connection port numbers,
one of them is for recording and another for casting in order to distinguish
sources of signal.
Click the [+] symbol to select the image input encoder that you want to
connect.
[Note] The encoder must be used in Unicast mode
20
Page 22

5 Image Input Settings
Set Audio In
Select the audio output according to the output device
(
[Note]
Click
Line audio output is preferably selected)
[Apply]
to apply the settings.
[Remark] When connecting Line In to a microphone, click to change
to microphone input .
6 Monitor and Recording Screen Configuration
Open
Set style in
Set style in
[Remark]
[Layout Manager]
[Display Layout]
[Record Layout]
Refer to
layout.
7.2.8 Layout Management
.
. 9 sets of styles can be selected.
. 9 sets of styles can be selected.
for layout configuration related to
Log out the webpage once the above settings are completed.
5.2.5 Confirm Various Settings
1 Confirm Layout Style Settings
Confirm CH1 to CH4 screens. If the screen is different from the setting,
please refer to
Press the button on the remote control and check if the 9 layout
recording styles are consistent with the settings. Blue indicates that a
style is currently applied. Press again to exit.
21
5.2.4 Settings (Image Input Settings)
to reset
image input
.
Page 23

Press the button on the remote control and check if the 9 layout
styles are consistent with the settings. Blue indicates that a style is
currently applied. Press again to exit.
2 Confirm Capture Screenshot Function
Use the remote control to test the Capture Screenshot function. If it fails,
please refer to
5.2.4 Settings (Confirm hard drive status)
whether the hard drive is properly installed.
Press on the remote control to take a screenshot.
3 Confirm Recording Function
Use the remote control to test the recording function. If recording fails, refer
to
5.2.4 Settings (Confirm hard drive status)
drive is properly installed.
Press ● on the remote control to access the recording screen. Press ●
again to begin recording. Recording begins following the countdown.
Press ■ to stop recording.
4 Confirm Playback Function
to check
to check whether the hard
Use the playback function to confirm screenshot and recording results.
Press on the remote control to access the OSD menu.
Select [
[Photo
Press to exit picture browser.
[Video
Check whether the record screen layout and audio are normal and
Playback
] ->Select folder by date ->Select picture
] ->Select folder by date ->Select and playback video.
] ->[
Local Storage
]
whether video and audio are synchronized. If the video and audio are not
synchronized, go to the
Recording Setting in System Configuration
adjust audio lag, and repeat the recording and playback actions until the
playback is synchronized.
Press to exit video playback.
Press to exit screen.
Installation is completed once the above functions operate normally.
,
22
Page 24

Chapter 6 OSD Function Descriptions
About
Setting Menu
Playback
Record
Setting
Local Storage
Start Record
Export Lecture
Delete Lecture
Record Setting
Volume
Screen
Adjustment
Output
Resolution
PPT Index
Language
Live Broadcast
Network
Streaming
23
Page 25

6.1 Setting Menu
1st Level
Major Items
2nd Level
Minor Items
3rd Level
Options
Function Descriptions
Playback
Local Storage
Video/Photo
Read stored videos or images
Live Broadcast
NA
Broadcast the video directly streaming from
other VS-LC102
For related settings and usage, please refer
to 10.2 Use RTP to Share Screen
Record
Start Record
NA
Start Recording
Export Lecture
Video/Photo
Export stored videos and images to USB drive
Delete Lecture
Video/Photo
Delete stored videos or images
Setting
Language
1. Traditional Chinese
2. Simplified Chinese
3. English
Change setting menu language
Record Setting
Record Layout
Set recording screen configurations
Volume
1. HDMI 1
2. HDMI 2
3. Line in / Mic 1
4. Line in / Mic 2
5. Output
Set input/output volume
Screen
Adjustment
1. Brightness
2. Contrast
3. Saturation
4. Hue
5. Default
Adjust screen brightness/contrast/saturation/
hue
Streaming
Turn On / Turn Off
Network Streaming Address
Resolution
1. Auto Scan
2. 1920x1080[16:9]
3. 1280x720[16:9]
4. 1280x1024[5:4]
5. 1024x768[4:3]
Adjust monitor output resolution
PPT Index
1. Disconnect with PC
2. Clear paired PC
The connection and pairing settings of the PPT
Index software can be used to remove the
connection or clear paired PCs
About
1. NA
VS-LC102 information; e.g. IP address,
available capacity, etc…
<Remark> Press [MENU] on the Remote Control to enter the setting menu.
24
Page 26

6.2 Basic Instruction
Monitor menu, remote control, and panel instructions are provided below.
6.2.1 I would like to view screenshots or videos
Press
[Menu]
menu.
Use [
Use [
Use [
Press
[EXIT]
6.2.2 I would like to capture screenshot
Use the Remote Control or Control Panel:
Press to take a screenshot.
6.2.3 I would like to start recording
Use the Remote Control or Control Panel:
Press ● to access the recording preview screen.
Press ●or
Click
Use the Main menu:
Press
menu.
Use [
Use [
preview screen.
Press
Viewing details under recording preview:
[STOP]
[Menu]
[OK]
on the remote control or panel to access the main
] to select
] to select
[Playback]
[Local Storage]
] to select the desired
or
[OK]
[Return]
to start recording
. Press
[OK]
. Press
image
or
to exit.
to enter.
video
. Press
[OK]
to enter
[OK]
■ to stop recording
on the remote control or panel to access the main
] to select
] to select
[Record]
[Start Record]
. Press
. Press
[OK]
to enter
to access the recording
[OK]
to start recording
to play.
1. Recording Codec:
2. Output Resolution:
3. Storage Drive:
4. Available Space:
5. Available Recording Time:
6. Network Streaming:
7. Key Note:
Display key note insertion method
Display current recording format
Display current resolution
Display the location of the saved files
Display the free space on the hard drive
Display current recording time available
Display network streaming status
8. Recording Mode
* Please refer to 6.2.6 Switch Record screen layout for instructions to Switch
Record screen layout.
* Please refer to 7.1.4 Record Setting for instructions on custom recording
format; e.g. recording layout, length of countdown, output resolution, etc…
* Please refer to 8.2 Director Instructions for online director and recording
methods.
25
Page 27

6.2.4 In-Recording Actions
Remote Control or Panel: Press /
stop recording.
In-Recording rapid key note insertion: Press
insert a key note.
[Remark] For other detailed operation related to key notes, please refer to 10.4
Insert and Use Key Notes
6.2.5 Switch Preview screen layout
The display screen is set to CH1 full screen by default. Users can change the
layout of the channels as desired. 9 layout style presets are available, or users
can redefine layout settings as desired. Please refer to 7.2.8 Layout
Management for relevant instructions.
Press on the remote control or the panel to access
Screen Layout]
Use [
After selecting the
within the layout. However, channels already displayed on the monitor
cannot be changed.
] and
[OK]
layout display
to select layout.
, press
to pause recording; press ■ to
on the remote control to
[C]
[Switch Preview
to cycle through the channels
[CH]
6.2.6 Switch Record screen layout
The Record Screen Layout is set to CH1 full screen by default. Users can
change the layout of the channels as desired. 9 layout style presets are
available, or users can redefine layout settings as desired. Please refer to 7.2.8
Layout Management for relevant instructions.
Use remote control:
Press to sequentially switch the preset recording layout.
Use the Main menu:
Press
[Menu]
menu.
Use [
Use [
Select
Use [
[Record Layout]
or
[MENU]
26
on the remote control or panel to access the main
] to select
] to select
[Setting]
[Record Setting]
. Press
and press
] to select the
Record Screen Layout
to exit.
[OK]
. Press
[OK]
to enter
[OK]
.
to enter
and press
[OK]
. Press
Page 28

Picture
Name
Description
Fit to Height
Adjust to channel to fit the height of the
window
Fit to Width
Adjust to channel to fit the width of the
window
Fit to Height and
Width
Adjust to channel to fit the width of the
window
Original Image
Restore to original output size
Maximize Display
Enlarge channel to fit the window
6.2.7 Channel Full-Screen Mode
Change channel to full-screen mode.
Press [
Press
[OK]
] on the remote control to select channel.
to switch channel to full-screen mode. Press
channel to the original size.
[Remark] If the selected channel is a camera, the VS-LC102 can be used to control
the camera.
6.2.8 Maximize Display Settings
Each channel in the Layout Display can be independently enlarged.
Use the remote control to select the channel to switch to full-screen mode.
Press on the remote control to cycle through the method of enlarging
the channel (Fit to Height/Fit to Width/Fill/Letter Box/Auto Cut).
[OK]
to restore
6.2.9 Screen Resolution Settings
Adjust display screen resolution to match the output resolution with the
display device.
Use remote control:
Press to automatically detect the optimal settings supported by the
monitor.
27
Page 29
Use the Main menu:
Name
Description
1920x1080
Full HD output
1280x720
HD output
1280x1024
SXGA output
1024x768
XGA output
Auto detection
Auto-detect and switch to the optimal resolution
supported by the output device
Name
Description
Brightness
The monitor become brighter with a higher brightness
value
Contrast
Whites and blacks become brighter with a higher
contrast value
Saturation
Color purity increases with a higher saturation value;
otherwise, the color become greyer
Tone
Screen become bluer with a lower tone value; otherwise
the screen become greener
Default Settings
Restore to default settings
Press
[Menu]
on the remote control or panel to access the main
menu.
Use [
Use [
Press [
] to select
] to select
[Setting]
[Resolution]
] and
[OK]
. Press
[OK]
. Press
[OK]
to set the resolution (1920 x 1080 / 1280 x 720 /
1280 x 1024 / 1024 x 768 / Auto)
6.2.10 Image Quality Settings and Adjustment
Adjust the brightness, contrast, saturation, and tone of the image to increase
the color saturation, contrast, and vividness of the image, achieving optimal
output.
Press
[Menu]
on the remote control or panel to access the main
to enter
to enter
menu.
Use [
Use [
Press [
settings
] to select
] to select
.
6.2.11 Volume Setting
HDMI in; Line in/Mic; Output Volume Adjustment
Press
[Menu]
menu.
Use [
Use [
Press [
Press to mute audio output.
on the remote control or panel to access the main
] to select
] to select
[Setting]
. Press
[Screen Adiustment]
[OK]
to enter.
. Press
[OK]
to enter.
] to select and adjust various settings or restore
[Setting]
[Volume ]
. Press
. Press
[OK]
[OK]
to enter.
to enter.
] to select and adjust.
default
28
Page 30

6.2.12 I would like to export lecture
Recordings and images can be exported to portable storage devices, enabling
users to view the content easily.
Prior to export, ensure that the storage device (e.g., portable flash disk or hard
drive) is plugged into the USB port on the front panel of the host device. A
progress meter is displayed during export.
Users can exit during export, canceling backup.
Use remote control:
Press [MENU] to access the main menu.
Use [
Use [
Use [
Press
Multiple files can be selected for in a single export.
Press
Press
] to select
] to select
] to move to the desired
again to cancel selection.
[OK]
to cancel all selections.
[C]
to export. Press
[D]
[Record]
[Export Lecture]
. Press
[Confirm]
lecture.
Press to cancel course export.
[Remark] VLC Player is suggested for viewing videos for better quality.
6.2.13 I want to upload files to FTP
You must first complete FTP connection settings before using this function.
Please refer to 10.1.1 Set up FTP Connection
Use remote control:
Press
Use [
[MENU]
to access the main menu
] to select
[Record]
. Press
[OK]
. Press
image
. Press
[OK]
to enter.
[OK]
or
video
[OK]
to enter
to enter
. Press
[OK]
to select.
to begin exporting the
Use [
Use [
] to select
] to move to the desired
[Export Lecture]
again to cancel selection
Multiple files can be selected for in a single export
Press
Press
Select export method
Select export format
Press to cancel course uploading
to cancel all selections
[C]
to export. Press
[D]
[FTP]
[MP4]
[OK]
to start uploading
6.2.14 I would like to delete lecture
Press
main menu.
Use [
Use [
Use [
[Menu]
button on the remote control or panel to access the
] to select
] to select
[Record]
[Delete Lecture]
. Press
] to move to the desired
. Press
video
. Press
[OK]
[OK]
to enter
to select. Press
to begin exporting the lecture,
to enter.
[OK]
. Press
image
or
video
[OK]
to enter.
.
[OK]
29
Page 31

Press
to exit the window. Press
[OK]
[Confirm]
cancel deletion.
6.2.15 I would like to change the menu language
to delete. Press
[Cancel]
to
Press [
main menu
Use [
Use [
Use [
Menu
] button on the remote control or panel to access the
] to select [Function Setting]. Press [OK] to enter
] to select [Language Setting]. Press [OK] to enter
] to select the desired language. Press
[Confirm]
to apply
30
Page 32

Chapter 7 Web Function Description – System
Configuration
System management enables users to manage basic system settings,
advanced function settings, and data storage.
Before adjusting the settings in System Configuration, follow the below
instructions to log in.
Open the web browser on the PC and enter the IP address of VS-LC102; e.g.
http://192.168.1.150.
Select
Enter the VS-LC102 Admin username and password.
User: admin
Password: admin
[System Configuration]
.
Click
[Log in]
31
to enter the System Configuration.
Page 33

7.1 System Configuration
1 Device Setting
1.1 Host Name: Name of the host device
1.2 Host Description: User-defined device description
1.3 IP Address: IP address of the host device
1.4 Time Zone: Current selected time zone
1.5 Current Time: System time can be adjusted manually/automatically
2 System Configuration/Director/Viewer: Change Username and Password
2.1 New User: Enter a custom username for System Configuration/Director/Viewer
2.2 New Password: Enter a custom password for System Configuration/Director/Viewer
2.3 Confirm Password: Enter again the custom password for System Configuration/Director/Viewer
2.4 Show Characters: Display the keystrokes onscreen when entering the password
3 Boot Screen: Select the display screen during startup
4 Boot Setting: Set startup mode
[Remark] After the desired settings are adjusted, press [Apply] on the bottom-right of the
screen to apply the adjustments.
7.1.1 System Information
32
Page 34

7.1.2 Video Source Setting
1 Source Setting:
1.1 Video Source: Video priority
1.2 Audio source: Set input/output audio
2 Discovery
2.1 Network Camera: Network camera list, including located, connected, and previously connected
network cameras
33
Page 35

7.1.3 Network Setting
1 DHCP: Automatically allocate IPs based on the connected router
2 Manual Configuration: Manually enter network information
1 Basic Settings:
1.1 Audio Delay: Set audio delay time after video is transmitted
1.2 Line out Loop Through: Activate/Deactivate line out loop through. A high-frequency
high-pitched sound is played back if audio from the speaker is picked up by the microphone,
amplified, and retransmitted from the same speaker; in this instance deactivate line out loop
through to prevent feedback
1.3 Key note: Key notes can be inserted manually, or automatically on a fixed timer or when
changing PPT index
1.4 Enable PPT Index: Check to enable PPT index software. For other related operations, please
refer to 10.4 Insert and Use Key Notes
1.5 Video Systems: NTSC or PAL can be selected
7.1.4 Record Setting
34
Page 36

2 Storage Setting:
2.1 Recording Mode: Movie mode (MP4)
2.2 Encode Profile: Offers 15 encoding formats and user customization
2.3 Inject Logo: Select screen position from the pull-down menu and press
to upload the
inserted Logo file
2.4 Add Head/Tail to Video: To add a head or tail to the video, press to select or upload the
desired video file
2.5 Enable Record Backup: To automatically upload and backup video via FTP/SFTP, press
to access the backup settings window. For other related operations, please refer to 10.1 Enable
Automatic Recording Backup
2.6 Enable prefix to the filename:To add name of lecture to the filename of the video exported to
USB/FTP.
3 Streaming Setting:
3.1 Streaming Mode: Supports RTP multicast and online director. For other related operations,
please refer to 10.2 Use RTP to Share Screen and 10.3 Use RTMP Live Broadcast Function
3.2 Encode Profile: Offers 15 encoding formats and user customization
Items
Compression Format
Description
1
Dynamic Scene Full HD
(1920 x 1080)
Large film site; local drive recording
2
General Scene Full HD
(1920 x 1080)
Medium film site; local drive recording
3
Static Scene Full HD
(1920 x 1080)
Small film site; local drive recording
4
Dynamic Scene HD (1280 x 720)
Large film site; LAN streaming
5
General Scene HD (1280 x 720)
Medium film site; LAN streaming
6
Static Scene HD (1280 x 720)
Small film site; LAN streaming
7
Dynamic Scene SD (720 x 480)
Large film site; LAN streaming
8
General Scene SD (720 x 480)
Medium film site; LAN streaming
9
Static Scene SD (720 x 480)
Small film site; LAN streaming
10
Dynamic Scene for Internet
(720 x 480)
Large film site; online director (for viewing on PCs and tablets)
11
General Scene for Internet
(720 x 480)
Medium film site; online director (for viewing on PCs and tablets)
12
Static Scene for Internet
(720 x 480)
Small film site; online director (for viewing on PCs and tablets)
13
Dynamic Scene Mobile Network
(720 x 480)
Large film site; online director (for viewing on mobile devices)
14
General Scene Mobile Network
(720 x 480)
Medium film site; online director (for viewing on mobile devices)
15
Static Scene Mobile Network
(720 x 480)
Small film site; online director (for viewing on mobile devices)
16
User-Defined
To customize settings, press to access the configuration
window
Encoding Formats
35
Page 37

7.1.5 Local Storage Setting
1 Storage device: Set local storage device
2 Storage Setting:
2.1 Enable Local Storage: Save record file
2.2 Cycling Record: Enabling the cycle record function can prevent recording error when storage
device is full
2.3 Preferentially record to front USB flash drive: Videos or pictures will be preferentially
recorded to the USB flash drive which has already been connected to the front USB port.
2.4 Disk Select: When two or more storage devices are installed, the priority of the devices can be
set
1 Display Layout: Select the default screen display layout; the layout can be changed quickly using
the remote control
2 Record Layout: Select the default record screen layout; the layout can be changed quickly using the
7.1.6 Layout Manager
36
Page 38

remote control
3 Layout List: Manage layout templates
4 Editor: Manage layout templates
1 Lecture Information: Record lecture tables; edit, delete and download lecture information
1 Photo Manager: Sorted by date; delete and download images
7.1.7 Lecture Manager Configuration
7.1.8 Photo Manager
37
Page 39

7.1.9 Schedule Manager Configuration
1 Schedule Manager: Pre-set when to start recording, and edit lecture information.
1 Browse event message, warning, and error logs
7.1.10 Event Log:
38
Page 40

7.1.11 About Page Description
1 Firmware Update: Update product firmware
2 Export: Export settings
3 Import: Select and upload update file
39
Page 41

7.2 System Configuration Operation
7.2.1 Change Host Name
Go to
[Apply]
[System Information]
on the bottom right to apply change.
7.2.2 Change System Time
Go to
[System Information]
manually.
NTP:
Check
[NTP Service]
reflect the server time, select
if required. Click
Time
Manually :
Check
[Manually]
time in the time fields. Click
changes.
7.2.3 Source Setting
Go to [Source Setting] and then [Video Source]. Click on the [images] to set
name/video source/image setting/image port of the image capture input
channel.
. Change host name and description, click
. Change date and time using NTP service or
. Choose NTP server to change system time to
[Apply]
. Select the correct date and enter the correct
Time Zone
, and check
Daylight Saving
at the bottom right to apply changes.
[Apply]
on the bottom right to apply
VGA or HDMI can be selected for the image capture source, which is the host
input port VIDEO IN 1 and 2. When either VGA or HDMI is connected, the host
automatically detects and switches to the signal source.
To connect a network camera, the connection settings in the network
camera must first be set. Refer to
instructions.
40
7.2.4 Connect IP Camera
for
Page 42

7.2.4 Connect IP Camera
Switch to [Discovery] in [Source Setting]. Cameras can be added
automatically or manually.
7.2.4.1 Automatic Search
Ensure the camera is connected to the host.
Detect Network Camera:
the status field when a device is detected or added.
Click . On the device settings, enter the
network camera. The status field will be changed to .
7.2.4.2 Setting the Network Camera as the Video Source
Go to [Source Setting] and then [Video Source]. Click on the [images] to set name/video
source/image setting/image port of the image capture input channel.
Click
[Refresh]
to detect network camera. A appears in
username
and
password
to connect the
Click on any of the channel images in Video Source to access
=>
Click in
Click the [+] on the right of desired network camera in the list to connect the camera.
Click
[x]
Click
[Apply]
41
[Channel Configuration]
on the top right of the window to exit
in Video Source to apply settings.
to access
Channel Configuration
[Select Video Source]
[Channel Configuration]
.
.
.
Page 43

7.2.4.3 Network Camera Information
Switch to “Search” on “VideoSourceSetting”. Select the camera.
1. Enter the username and password to connect the network camera. Images can be
captured with the camera once the login details are accepted.
2. Camera quality information and brightness settings
3. Camera screen zoom in/out
4. Camera lens angle adjustment
5. Changing Default Camera Lens Position: Adjust lens angle. Select preset [Preset
0-9]. Click [Save] to change present setting
6. Change lens angle to default position
7. Advance: Access Camera Settings
7.2.4.4 Deleting Network Camera Position
Reconfigure video source settings according to
the Video Source
Switch to
[Search]
. Click [-] to remove camera connection.
in
[Video Source]
7.2.4.2 Setting the Network Camera as
. Click in the camera list to delete the camera.
42
Page 44

7.2.5 Volume adjustment
?
Open [Source Setting]
To adjust Line in 1 and Line in 2 input audio, change to . Mic1 and
Mic2 are interchangeable.
To adjust HDMI1 and HDMI2 audio, change the HDMI input volume
The volume of the audio source can be adjusted from 0 to 50
Audio output mode is set according to the connection
7.2.6 Add Logo or Other Video in a Video
Enable [Record Setting]
7.2.6.1 Inserting a logo into Video
Click to access the logo uploader
Select the position of image in the drop down menu
Select the logo file
Click
7.2.6.2 Add Head/End to Video
[Upload]
Check
Click
[
Press to open the upload window
Select the video files to be inserted
[Insert Logo]
on the bottom right of
[OK]
Remark
43
] Click to view supported file formats
and return to Record Setting
[Save Setting]
to apply settings
Page 45

?
Click
[Upload]
and return to Record Setting
Check
Click
[
[Add Head to Video]/[Add End to Video]
on the bottom right of
[OK]
Remark
] Click to view supported file formats
7.2.7 Storage Device Setting
Open [Local Storage Setting]
For initial hard disk installation, follow the following installation instructions:
[Save Setting]
to apply settings
Format hard drive:
Select hard disk and click . A query window will
appear to confirm format. Click “Yes” to begin formatting. After formatting is
complete, close the message box to complete the process.
[Remark] Formatting the hard drive will erase all the information on the hard drive.
Please backup any data on the hard drive before formatting the disk.
[Remark] Format time differs depending on hard disk specification. Do not close the
window while the hard disk is formatting.
Check [Enable Local Storage]:
Checking this item enables files to be
stored to this hard disk once it is mounted.
Check [Cycling Record]:
When the hard drive space is used up, the oldest
data will be automatically overwritten by the
newest data, allowing the system to continue
storing information.
Check the option of [Preferentially record to front USB flash drive]:
Videos or pictures will be preferentially recorded to the
USB flash drive which has already been connected to
the front USB port.
Mounting a Hard Disk:
Select according to the storage device
[USB1/eSATA/SATA]
, and click [Apply] on the
bottom right to complete the mounting
(
[Note]
The device to mount must be specified
when two or more storage devices are connected)
44
Page 46

7.2.8 Layout Management
Open [Display Layout]. This window enables users to add, delete, or reset
screen layout.
7.2.8.1 Add Layout templates
Select a layout from the top section.
Drag the left channel into the right section.
If a small triangle icon is available at the bottom right corner of the grey frame in the panel,
click the icon to freely enlarge, shrink, or move the frame.
Check
After each section is configured, click
In editor, click
setting and restart.
[Enable Fill Window]
[Preview]
to maximize the channel on the output screen.
[Save]
at any time to view the output screen, or click
on the bottom right to complete addition.
[Reset]
to clear all
45
Page 47

7.2.8.2 Delete Layout templates
Display and delete the preset and user-defined layouts.
Click
layout.
[Delete]
at the bottom of the layout. A reminder will appear. Click
7.2.8.3 Change Display Layout/Record Layout
Select a layout as one of the 9 presets.
to delete the
[OK]
Select a layout. Click
to change the layout.
[Remark] During recording, the layout is defined by the online director. Refer to 8.2.2
Change Display Layout for instructions
[Select]
at the bottom. The layout window will appear. Select layout
7.2.8.4 Align the record layout with the display layout
Have the record layout aligned with the display layout for consistent screen display.
46
Page 48

Under the
to align the record layout with the display layout
[Record Layout]
, check
[Enable record layout synchronize display layout]
Uncheck
the display layout separately
[Enable record layout synchronize display layout]
7.2.9 Schedule Manager
Open [Schedule Manager] to book recording time and pre-edit lecture related
information
7.2.9.1 Add recording schedule
to set the record layout and
Click the time table to open the
Enter the name of the lecture, set the recording start and end times, and press to edit
lecture details
Click
[Apply]
to apply the setting
[Add schedule]
7.2.9.2 Modify or delete the recording schedule
Click the schedule already set to open the schedule setting page
After the modification is complete, press
Press
[Delete]
to delete a specific recording schedule
7.2.10 Lecture Manager
Open [Lecture Manager]. This window enables users to delete, download, and
edit lecture information and key notes.
[Apply]
page
to apply the setting
7.2.10.1 Delete Lecture
Select lecture and click . A reminder will be presented. Click
47
to delete lecture.
[OK]
Page 49

7.2.10.2 Download Lecture
Select lecture and click . A reminder will be presented. Click
[Remark] The downloaded file format is *.mp4. Please use Video Playback Software to
view
7.2.10.3 Edit Lecture Information
Select lecture and click to access [Edit Lecture Information]. Enter lecture information
and click
[Submit]
to complete editing.
to download lecture.
[OK]
7.2.11 Edit Lecture Keynote
Select lecture and click to access
Edit Lecture Keynote: Enter title in and click to apply
the changes.
Delete key note: Select the keynote and click . A reminder will be
presented. Click
[Confirm]
[Edit Lecture Information]
to delete keynote.
.
7.2.12 Change Username and Password
48
Page 50

Go to
Enter the new username and password into
[System Information]
.
System Configuration/
Director/ Viewer
Check
[Show Characters]
ensure that the password is properly set.
[Remark] Re-log in once the administration account has been changed.
7.2.13 Startup Screen
Go to
Select the startup image to open the uploader window.
Select the startup image.
Click
[Remark] A file should be a 1280 x 720 *.png file.
[System Information]
[Send]
to accept changes.
7.2.14 Network Setting
and click
[Apply]
on the bottom right to accept changes.
to show the characters that are being typed to
.
Switch to
Depending on the type of network, check either
Configuration
For manual configuration, change the IP address based on your network
configurations.
Click
[Network Setting]
.
[Confirm]
at the bottom right once changes have been made to
accept the changes.
[Remark] Re-log in once the IP address has been changed.
7.2.15 Webpage Language
Click [Language] at the bottom right of either the Network Configuration or
Director screen to switch the operating language at any time. Currently, the
system supports [Traditional Chinese/Simplified Chinese/English].
.
Using DHCP
or
Manual
49
Page 51

Chapter 8 Webpage Function Description-Director
The Director function enables users to record or change recording
settings.
Before using the Director functions, following the below instructions
to log in.
Open the web browser on the PC and enter the VS-LC102 IP address; e.g.
http://192.168.1.150.
Select
[Director]
.
Enter the VS-LC102 director username and password.
User: director
Password: director
Click
[Log In]
Installation of the
streaming. Follow the instructions presented onscreen to install the plugin.
to access the Online director.
FireBreadthed VLC
plugin will be promoted on initial login to
50
Page 52

8.1 Director Instructions
Recording Display Layout
Preset Recording Display
Self-Defined Display Layout
Camera Control
Input/Output Volume Control
Channel Display
8.1.1 Director Introduction
51
Page 53
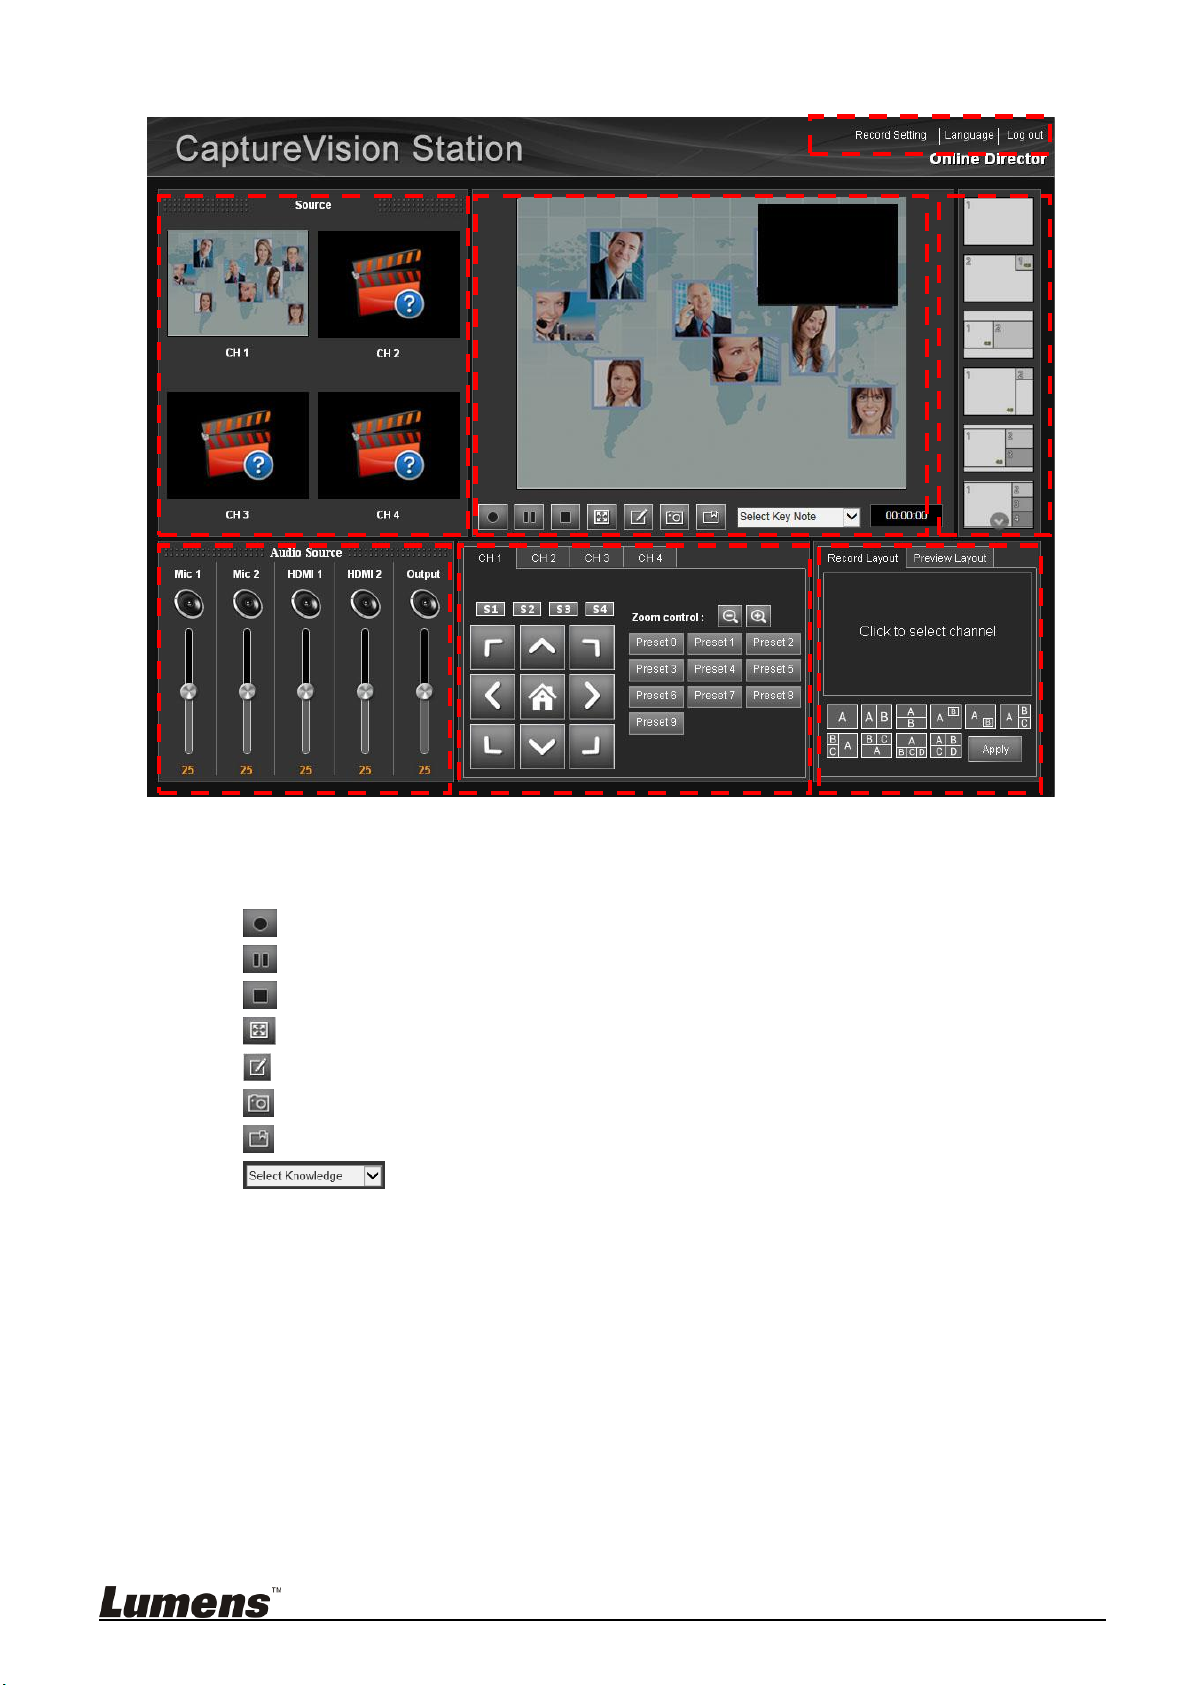
8.1.2 Director Instructions
1 Source: The output video for each channel
2 Audio Source: Various input/output audio volume adjustment
3 Recording display layout preview; also offers recording and snapshot functions
3.1 : Record
3.2 : Pause Recording
3.3 : Stop Recording
3.4 : Enlarge channel to fit the window
3.5 : Edit course information, and it must be completed before starting the recording
3.6 : Take Snapshot
3.7 : Add Key Note
3.8 : Set Auto-Keynote Time
4 Channel 1 – 4: Recording angle control; Lumens network cameras must be used
5 Preset recording display layouts; rapid switching between layouts
6 Recording Layout/Preview Layout: Self-defined recording display layout and monitor display layout
channel configuration
7 Record Setting/Language /Log Out
52
Page 54

8.1.3 Director Screen Instructions - Record Setting
1 Video System: NTSC or PAL can be selected
2 Line out Loop Through: Activate/Deactivate line out loop through A high-frequency high-pitched sound
is played back if audio from the speaker is picked up by the microphone, amplified, and retransmitted
from the speaker; in this instance deactivate line out loop through to prevent feedback
3 Audio Delay: Set audio delay time after video is transmitted
4 Drop Record: Adjust recording intervals. If 1 second is selected, a 1-second interval is delayed before
recording begins
5 Recording Mode: MP4 Movie
6 Storage Encode Profile: Offers 15 encoding formats and user customization
7 Record To: Set local recording storage location
8 Stream Encode Profile: Offers 15 encoding formats and user customization
9 Streaming Mode: Supports RTP multicast and online streaming. Refer to 10.2Use RTP to Share
Screen and 10.3 Use RTMP Live Broadcast Function for detailed instructions
53
Page 55

8.2 Director Instructions
8.2.1 Basic Recording Operations
Click to start recording
Click to pause recording
Click to stop recording
8.2.2 Change Display Layout
8.2.2.1 Rapidly switch between display layout channels
Double-click the right template to rapidly switch between recording display layout channels
8.2.2.2 Self-Defined Recording Display Layout
Click the Record Layout tab on the bottom right template
Click any layout configuration
Click on a block to set the various used channels
Click
8.2.2.3 Custom Layout
[Apply]
Click the video template on the bottom right to switch to the teacher video template
Click any layout configuration
after the display layout is set to take effect.
Click on a block to set the various used channels
Click
[Apply]
after the display layout is set to take effect.
8.2.3 Insert Key Notes
Custom:
Timed:
54
Click while recording to add a keynote
Set to automatically add a keynote at a set time
Page 56

while recording
[Remark 1] When using PPT index, a keynote is automatically added each time a
page is changed
[Remark 2] Keynotes can be renamed or deleted in the Configuration. Refer
to 7.2.10 Edit Lecture Keynote for detailed instructions
8.2.4 Network Camera Control
Select Camera:
Rotate Camera:
Select Channels 1 to 4 to switch between camera channels
Click the keypad on the right to rotate the camera lens.
Click [Home] to return the lens to the center position
Change the rotational speed of camera lens: Click S1 - S4 to switch the
moving speed
Rapidly Change Camera Angle:
lens to the set position
[Remark 1] The default position can be changed in the Configuration. Refer
: Adjust Zoom In (+)/Zoom Out (-)
to 7.2.4.3Network Camera Information for detailed instructions
8.2.5 Other Recording Settings
Change Local Recording Output Resolution:
resolution can be changed in
Change Streaming Media Output Resolution:
output resolution can be changed in
Streaming Mode-RTP:
Multicast]
, depending on IP address and connection ports, you can use
VLC and other software or use other
same domain to connect and view synchronously. For related operations,
please refer to
10.2 Use RTP to Share Screen
When changing
Click [Presets 0 to 9] to rotate the camera
The local recording output
[Storage Encode Profile]
The streaming media
[Streaming Encoding Profile]
[Streaming Mode]
to
[RTP
Intellectual Recording System
in the
Streaming Mode-WebCasting:
[WebCasting]
, the connection address can be directly entered into the URL
field to stream video after starting recording. For related operations, please
refer to
10.3 Use RTMP Live Broadcast Function
8.2.6 Webpage Language
Click [Language] at the bottom right of either the Network Configuration or
Director screen to switch the operating language at any time. Currently, the
system supports [Traditional Chinese/Simplified Chinese/English].
55
When changing
[Streaming Mode]
to
Page 57

Chapter 9 Web Page Function Description - Viewer
The user can browse or download videos in this page.
Before adjusting the settings in System Configuration, follow the below
instructions to log in.
Open the web browser on the PC and enter the IP address of VS-LC102; e.g.
http://192.168.1.150
Select
Enter the VS-LC102 Viewer username and password
User: viewer
Password: viewer
[Viewer]
Click
[Login]
56
to enter the Viewer page
Page 58

9.1 Page Description
1 Course List: Provide course online viewing and download
2 Change screen language/Log Out
57
Page 59

Chapter 10 Advanced Function Menu
10.1 Enable Automatic Recording Backup
[Remark] When connecting to FTP for the first time, all courses saved will be uploaded.
Thus, please proceed with FTP setup after the operation is complete
10.1.1 Set Up FTP Connection
Open the browser and log into the system administration page
Switch to
Click
window
[Storage Setting]
behind
[Enable Record Backup]
to open the
[Backup Setting]
Enter FTP Connection Setting
Backup Mode: FTP / SFTP
IP Address: Please enter FTP connection IP
Folder: Please enter the existing FTP folder name
Username/Password: Please enter the FTP username/ password
Video format: MP4 format
Backup Schedule: Upload after recording stopped/Upload before
turned off/Schedule upload
Start time/End time: Please set the routine schedule for backup while
the routine upload is activated
Press
Press
Select the [Enable Recording Backup] to turn on the backup function
Click
[Connection Test]
to apply connection setting
[OK]
[Apply]
in the lower right corner to apply the settings
to confirm the FTP connection setting
58
Page 60

10.1.2 Backup Setting
1 Backup Mode: Set FTP Uploading
2 IP Address/Port: FTP connection IP address and port number
3 Folder: FTP folder name
4 Account/Password: Set the desired login account and password
5 Video Format: Upload the backup video format
6 Backup Schedule: Pull-down menu to set the backup start time [After Recording
Stopped/Before shutdown/Schedule upload ]
[Remark] If it is set that a backup is performed after recording stops, the backup will be
initiated approximately 3 minutes after the recording is completed
7 Start time/End time: Set the routine schedule to upload routinely
59
Page 61

10.2 Use RTP to Share Screen
10.2.1 Set RTP Sharing
Open the browser and log into the system administration page
Go to
Streaming Mode:
Encode Profile:
Click
Log out the web administration page
[Remark] After the page setup is complete, you can open the screen sharing at
[Record Setting]
[Apply]
in the lower right corner to apply the settings
any time
10.2.2 Start RTP Sharing
Use the Remote Control or Control Panel:
Press˙to access the recording preview screen
Press˙or
After pressing to stop recording, screen sharing is stopped
[Remark] After recording is started, the connection can be conducted to obtain
[OK]
Dynamic Scene HD (1280 x 720)
to start recording, and provide screen sharing
. Change
RTP Multicast
[Streaming Setting]
as follows
the screen sharing
10.2.3 View Screen Sharing
10.2.3.1 Use the computer connection and viewing
VLC and other software can be used for Stream connection; VLC provides the
following two connection methods
Local Area Network (LAN) Connection
[Remark] Use a LAN connection; the computer and the host must be
located in the same segment, e.g. 192.168.1.x
Open VLC, click [Network Stream (SAP)] and devices that can be
connected will appear in the right pane, and click on a device to start
viewing
60
Page 62

Stream Connection
Get the host Stream address
Press the button on the VS-LC102 remote control to open the
OSD menu
Scroll right to [Setting] and press [OK] to enter the settings screen
Confirm Network Streaming Address
Open VLC, click [Media] in the list at the top, select [Open Network
Stream...] and enter the network streaming address to start viewing
10.2.3.2 Use VS-LC102 for Connection and Viewing
Press
[Menu]
on the remote control or panel to access the main
menu
Use [
Use [
Press
] to select
] to select
[EXIT]
or
[Playback]
. Press
[Live Broadcast]
[Return]
to exit
10.2.4 Use Online Director page for RTP sharing setup
Open the browser and log into the Online Director page
Click
[Recording Setting]
[Streaming Setting]
Streaming Mode:
RTP Multicast
as follows
Stream Encode Profile:
Click [Apply] in the lower right corner to save the settings
Press˙to start recording, and to start sharing
For how to connect and view, please refer to
Sharing
After recording is stopped, the screen will stop sharing
in the upper right of the screen, and change
Dynamic Scene HD (1280 x 720)
[OK]
. Press
to enter
to enter
[OK]
10.2.3View Screen
61
Page 63

10.3 How to live stream
To start
Enable YouTube live streaming
Start live
streaming
Create live
schedule & get
server address
Start recording
function in
VS-LC102
Playback
VS-LC102 setup
Launch
YouTube live
streaming
Log in admin
page to modify
record setup
Complete
This product supports live events online. It allows you to live stream via YouTube online. The
steps are as follow:
62
Page 64

10.3.1 Enable the YouTube live streaming
Log in your YouTube account
Select [My Channel] => [Video Manager]
Click [Live Events] => [Enable live streaming]
63
Page 65

To complete the account verification, select how you like to receive the verification code
and enter your mobile phone number
Enter the verification code received to complete the process
64
Page 66

10.3.2 Create a live event
Create a live event (Schedule a new event)
Select the [Custom] Type, then enter the start time, end time and title of the event and
click [Create event].
65
Page 67

Select a basic ingestion bitrate in the content capture setup. Any bitrate larger than
720P is not suggested
Select [Other encoders] under [Select encoder].
Below [Copy and paste into your encoder] are [Stream Name] and [Primary Server
URL]. Copy the data in the two sections and paste into VS-LC102
66
Page 68

10.3.3 Configure VS-LC102
Open a web and log in the VS-LC102’s System Administration page
Select [Record Setting] page and modify the setting as below
Streaming Mode: WebCasting
Encode Profile: Dynamic Scene SD (720x480). This setup need to match your setup
[Basic ingestion] in YouTube
Press , and enter the URL: The main server website and streaming name, e.g.
Primary Server URL: rtmp://a.rtmp.YouTube.com/live2
Stream Name: LadibugUS.k6k4-qgsj-vq32-46mw
Log out of the System Administration page
Start recording function in VS-LC102 using online directing or a remote controller
67
Page 69

10.3.4 Start live streaming
Go back to YouTube’s [Video manager] and open [Live Control Room]. You can take a
preview on this page and start live streaming
Go back to [My Channel] and you can see the scheduled stream setting on the right
Click on it and select [Share] to see links for sharing. This link is provided to allow other
users to watch this channel
68
Page 70

10.4 Insert and Use Key Notes
During the video recording, mark an index for video searching
10.4.1 Insert Key Notes
VS-LC102 provides manual adding, automatic timing, PTT of the remote control
and other ways for index marking, which are described below
10.4.1.1 Manual Adding
Remote Control or Panel: Press˙to start recording
10.4.1.2 Auto Adding
Key Note: Select the time interval to add a key note
Enable PPT Index: Select the function, which can work with PPT Index to
automatically add a key note
Press
Launch the web, and log in VS-LC102 administration page
Select
Click
Log out the web administration page
[Remark] After completing the setup, a key note will be added according to
on the remote control to insert a key note
[C]
[Record Setting]
[Apply]
in the lower right corner to apply the settings
page, change the setting as follows
the preset time interval when recording is started
10.4.1.3 PPT Index
Key notes are automatically added during PPT playback, which must be
collocated with PPT software. Please download the software from LUMENS
website. For installation instructions, please refer to 10.5 PPT Installation and
Instructions
Open PPT Index, and click to search VS-LC102
Double-click to open VS-LC102; do not close the window after the
connection to confirm the program is working
[Remark] In case of multiple VS-LC102, please confirm the IP address of
VS-LC102 to connect
Open PPT Files
VS-LC102 to start recording
After a presentation is finished, please stop recording, close PPT, and
stop PPT connection sequentially
10.4.1.4 Use Online Director Adding
In addition to the above methods, key notes can also be added when using
online director management. Please refer to 8.2.3 Insert Key Notes
10.4.2 Modify Index
You must log in the administration page to modify and delete the name of key
notes. For related modification, please refer to 7.2.11Edit Lecture Keynote
69
Page 71

10.4.3 Use Key Notes
When playing videos, switch a key note to directly jump to a labeled paragraph, as
follows:
1. Switch paragraph sequentially: Press the button on the remote control
to select the previous or next key notes
2. Select a specific paragraph: Press the button on the remote control and
video key notes will appear, press [
switch thereto
10.5 PPT Installation and Instructions
10.5.1 Installation
Please download
Extract the file downloaded and then click
install.
The installation wizard will guide you through the process. Please follow
the on-screen instruction through the installation process.
10.5.2 Interface Description
Main Screen
PPT-Indexer
] to select a key note, and press [OK] to
software at
[PPT-Indexer-Setup-vxx]
Lumens™
website.
to
1 Device List: List of the available VS-LC102
2 Discovery: Search for the available VS-LC102 hosts
3 Settings: Change language and delay time for adding a key note after slide
changes
4 Power: Close the software
70
Page 72

Settings Screen
1 Change Language: Support English, Traditional Chinese, and Simplified
Chinese
2 Delay Settings: The delay time for adding a key note after slide changes
3 Reset to the default value
71
Page 73

Chapter 11 Troubleshooting
No.
Problems
Solutions
1.
Boot without power
signal
Make sure you have plugged in the power cord.
2.
No image output
1. Check the power.
2. Check if the input/output device cables are loose
3. Replace the cables and make sure they are not faulty.
4. Confirm if the input source is set correctly, refer to the 5.2.4Settings
(video input)
3.
The live streaming
function lags when 4
VC-A20P are connected
to the network
Because live streaming is transferred over the network, connecting 4
network cameras may result in insufficient broadband. Please change
VC-A20P settings.
Resolution: 1920x1080
FPS: 30fps
Bitrate: 2M
4.
No image output after
logging into Director
Certain browsers may have firewall limitations. Change the firewall
permission to include the software. Please following the below instructions
to set up your browser:
1. Click [Start] and then [Control Panel] In the search field, enter [Firewall]
and click [Windows Firewall].
2. Click [Allow an app or feature through Windows Firewall] on the left panel.
3. Click [Change Settings]. (Administrator privileges required) If an
administer password or confirmation is required, enter the password or
provide confirmation information.
4. Select the program from the checkbox for approval and press [Confirm].
If the above configuration is invalid, first suspend the antivirus software and
ensure that the program is not blocked by the antivirus.
5.
Unable to log into
System Configuration or
Director once the
VS-LC102 is connected
1. Check username and password. These fields are caps sensitive.
2. Check browser version. Refer to 4. System Requirements to view the
supported versions.
6.
Unable to record with
USB with the error
message,“Failedto
record, please check
storage device or
turn-onstreaming.”
1. Check Local Storage Settings configuration and whether the portable
disk is formatted. Refer to 5.2.4 Settings (Format Hard Drive).
2. Check connection method. The PC must be connected to the VS-LC102
via a router, and the IP address must be on the same network segment.
3. Test with another portable disk.
4. Deactivate network streaming: Open browser and log into System
Configuration/Director. Change recording settings and deselect
streaming mode.
7.
“HDCPLock”is
displayed when
connecting the
VS-LC102 to a notebook
HDMI with HDCP encryption is the default output for a variety of
notebooks. Configure the notebook to VGA output.
8.
Can I access System
Configuration or Director
without connecting the
VS-LC102 to my PC via a
Yes, but the IP address of the VS-LC102 and the PC must be manually
adjusted to the same network segment (e.g., 192.168.0.x) before connecting
the PC network to the WAN terminal of the VC-LC102.
[Remark] 169.172.x.x is an invalid network segment, and should not be
This chapter describes problems you may encounter while using VS-LC102. If you have questions, please refer to
related chapters and follow all the suggested solutions. If the problem still occurred, please contact our
distributors or service center.
72
Page 74
router
used.
9.
The remote control or
panel keys are not
responding
The remote control and panel keys become non-functional when logging
into the system
10.
The remote control is
not responding, but the
panel keys are
The remote control uses infrared signals. Devices with a stronger infrared
signal is placed nearby (e.g., infrared digital whiteboards) may interfere
with the signal of the remote control. Please keep the VS-LC102 away from
such devices.
11.
Lecture information is
not presented when
selecting a lecture in
System Configuration
The system uses the FireBreadthed VLC plugin to view lecture information.
If lecture information fails to load, this may be because this component has
not been installed. Refer to Chapter 8 to access Director and begin
installation.
12.
Forget username and
password
Use a small screwdriver to press the Reset Button on the rear side of the
host for several seconds to restore the host to its factory settings
13.
When playing PPT with
the PPT-index,
VS-LC102 does not
automatically add a key
note
Please open a browser, log in the administration page, switch to [Record
Setting] page, and confirm if the [Start PPT Index] is enabled.
Confirm [Start PPT Index] is enabled, log out the administration page after
applying the settings, and re-execute the PPT playback and recording.
14.
After switching the FTP
server, the video is not
automatically uploaded
VS-LC102 will mark videos that have been uploaded to FTP, which will not
be automatically uploaded again. To upload the video to other FTP, you
can upload files manually after FTP setup is complete. For related
instructions, please refer to 6.2.13 I want to upload files to FTP
15.
What is the duration of
the recording schedule
by the schedule
manager
The duration of the recording schedule is at least within the following 6
months for a single recording
16.
Will a scheduled
recording be activated
when a manual
recording is being
performed at the same
time?
No, the current manual recording will not be interrupted (manual recording
will take precedence over the scheduled recording)
17.
When powered off and
the scheduled recording
is about to start, will
CaptureVision be
automatically turned on
and start recording
No, the scheduled recording will start only when the CaptureVision Station
is turned on
18.
The maximum duration
of a single recording
The maximum duration of a single recording is 8 hours
73
Page 75

Attachment 1
I c o n
N a m e
Function Description
Network
Disconnected
LAN connection failure
Network connected
LAN connection successfully
Auto display screen
Auto detect output device and set to optimum screen resolution
Display 16:9
Display screen resolution: Full HD(1920x1080)/ HD (1280x720) output
Display 5:4
Display screen resolution: XGA(1024x768) output
Display 4:3
Display screen resolution: SXGA(1280x1024) output
Display failure
Display screen output failure for lack of support to resolution of the display.
You may run the Display Ratio function of remote controller.
Hard disk lost
Hard disk set for local recording removed. Please check it.
Hard disk about to
be full
Insufficient free space of local hard disk. Please check its free space.
HD digital contents
protection
Source of signal is HDCP protected.
Administrator mode
There is user log in the system configuration page. The panel and remote
controller operation permission are revoked.
Online director
mode
There is user log in the online director page.
Streaming
recording
Start up network streaming recording mode.
Local recording
Record to local hard disk.
Pause
Recording paused. Video and audio data are lost before recording is
resumed.
Remote controller
ineffective
This button of remote controller is functionless now.
Snap shot
Capture current display.
Channel enlarge
Current channel goes to full screen mode.
See table below for event icons for local teaching and teaching display screens during performing.
74
Page 76

Fit the frame
Zoom in the channel to fit the frame.
Fit width
Zoom in the channel to fit the frame horizontally.
Fit height
Zoom in the channel to fit the frame vertically.
Fit width and height
Zoom in the channel to fit the frame both vertically and horizontally.
Original image
Output source image of the channel without adjustment.
Manual knowledge
point
Manual insert knowledge point with remote controller during recording.
Auto Key Note
Auto inserts Auto-Tracking Mount by the presentation indexing software.
Eject USB export
drive
Export completed, eject the USB export drive.
75
 Loading...