

Page 1

USER MANUAL
STAKING TOOL
(30° Shoulder Profile)
Due to continuing improvements, actual product may differ slightly from the product described herein.
Lumberjack Tools Inc.
PO Box 730
Chippewa Falls, WI 54729
www.lumberjacktools.com
Email: [email protected]
Phone: 715-720-4719
Rev: 03/19
MODEL: ST2000
Page 2

About Your Product
Thank you for purchasing our 30� Staking Tool!
The dual-bladed stake tool will cut a 30� point on a log or square timber in
seconds. The body of the tool is CNC machined from a solid aluminum
billet to ensure each cut is precise. The blades are stamped, heat treated
and ground to provide years of service if properly maintained.
Our lifetime guarantee covers the tool body and shank. The blades are
covered for 90 days from the date of purchase for breakage under normal
working conditions. Blades will dull faster cutting hardwoods vs
softwoods (peeled or unpeeled). Soil and other abrasive substances will
reduce blade life and is not covered under this warranty. When making a
claim, you must show proof of purchase from an authorized distributor.
This is valid only to the original buyer, and not for tools sold secondhand,
used, or sold “as is” to a second party.
What Voids Warranty
In order to keep our lifetime and 90 day warranty you must AVOID the
following actions:
● Operating the tool in a drill press or lathe (or any system other than a
hand-held drill)
● Running the tool into a nail or foreign object
● Altering or misusing the tool
2
Page 3

SAFETY
Before beginning any project, carefully read and follow ALL safety and
operational instructions for any tools or devices you will be using. Failure to do
so may cause physical harm to yourself or those around you. If you feel
uncomfortable using our staking tool, STOP immediately. Lumberjack Tools
assumes no responsibility for injury caused to the operator, bystander, or tools
used in conjunction with the use or misuse of our tools.
NEVER OPERATE POWER TOOLS UNDER THE INFLUENCE OF
DRUGS, ALCOHOL, OR ANY MEDICATIONS
ALWAYS WEAR SAFETY GLASSES, DUST MASK, AND ANY OTHER
PERSONAL PROTECTION ITEMS AS NEEDED
NEVER WEAR LOOSE ITEMS THAT COULD BE CAUGHT IN MOVING
PARTS. SECURE LOOSE OR LONG HAIR AWAY FROM AREA
WE STRONGLY RECOMMEND A SINGLE-SPEED, GEAR DRIVEN
DRILL WITH RPMS OF 500 OR LESS. EXCEEDING THESE RPMS MAY
RESULT IN DAMAGE TO THE TOOL
ALWAYS DISCONNECT POWER AND ALLOW DRILL TO COME TO A
COMPLETE STOP BEFORE INSTALLING, REMOVING, OR ADJUSTING
THE TOOL
NEVER APPLY BENDING FORCE (SIDE LOADING) TO THE TOOL. SIDE
LOADING COULD CAUSE THE SHANK TO FAIL, OR MAY RESULT IN
BLADE DAMAGE
ALWAYS SECURE THE LOG IN A VISE OR CLAMP PRIOR TO
STARTING YOUR DRILL. FAILURE TO DO SO MAY RESULT IN INJURY
ALWAYS HANDLE THE BLADES WITH EXTREME CARE! FAILURE TO
DO SO MAY RESULT IN SERIOUS INJURY
NEVER PUT HANDS OR ANY BODY PART INSIDE THE TOOL WHILE THE
BLADES ARE ATTACHED! DOING SO MAY CAUSE SERIOUS INJURY
WHEN EXCESSIVE FORCE IS REQUIRED TO CUT, RE-SHARPEN OR
REPLACE THE BLADES. A SHARP TOOL IS A SAFE TOOL!
3
Page 4

Setting the Blades
1.50” x 1.50”
Max Capacity
Round 2.00” DIA
Square
● CAUTION, keep
TIP
● The cardboard box that the tool
comes in is about 1/8”
● Remove a piece of box to use as a
quick spacer for blade gap setting
Blade Offset
the blade offset
of both blades
equal (see below)
Cardboard
Spacer
● Install and secure
the blades with
the Button Head
Cap Screws
1/8”
WRONG (too close)
To cut a stake that comes to a point the blade offset has to be at 1/8”. If
the blades are set too close the tool will not cut. If the blades are set too
far the tool may cut but the stake will not have a point.
Correct
WRONG (too far)
4
Page 5
Would you like to cut smoother
●
●
●
stakes?
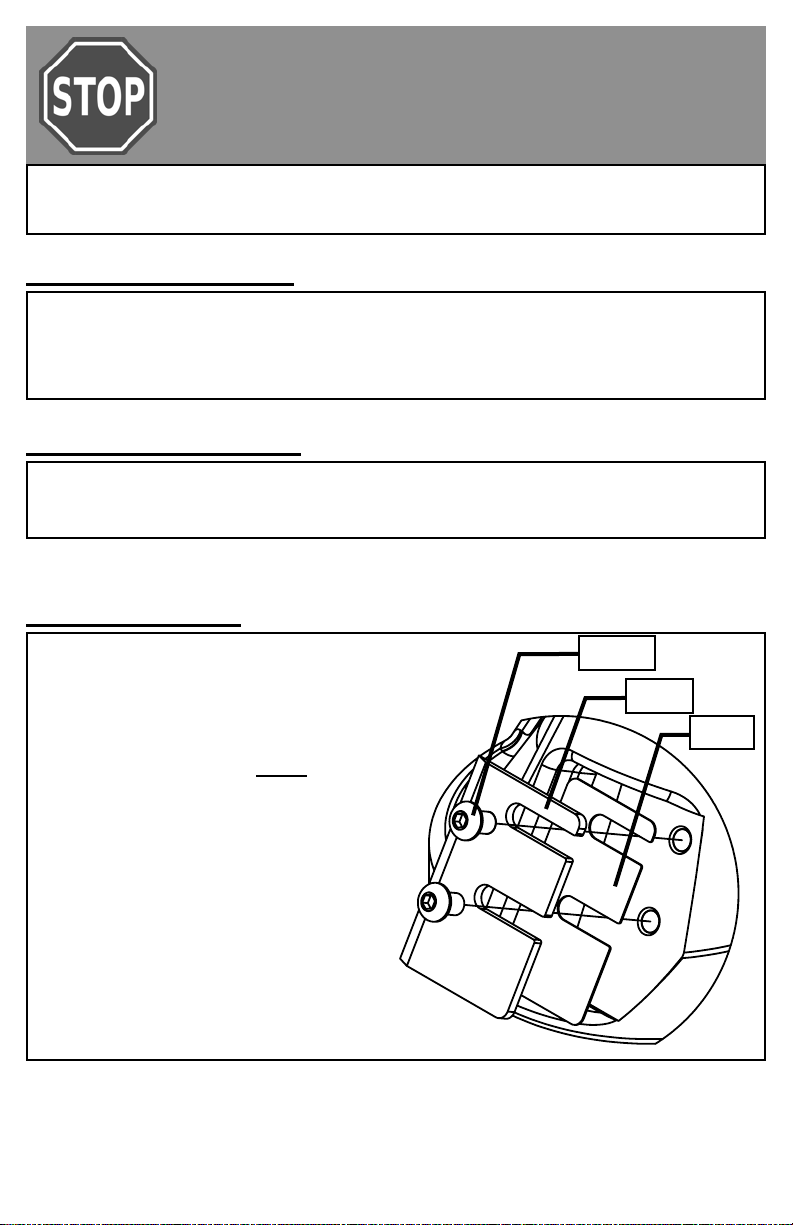
Included with your tool are the TB2500 Blade Shims.
Pros of using shims
● Smoother stake
● Reduced drill torque
● Less aggressive blade bite
Cons of using shims
● Increased time to cut
Installing Shims
● Place a shim underneath a
TB2500 blade and secure
both with screws as shown
● The shim should NOT
extend into cutting area or
cover the sharp edge of the
blade
● If installed properly the right
edge of the shim will be
flush with the right edge of
the blade (the non-cutting
edge)
Screw
Blade
Shim
5
Page 6
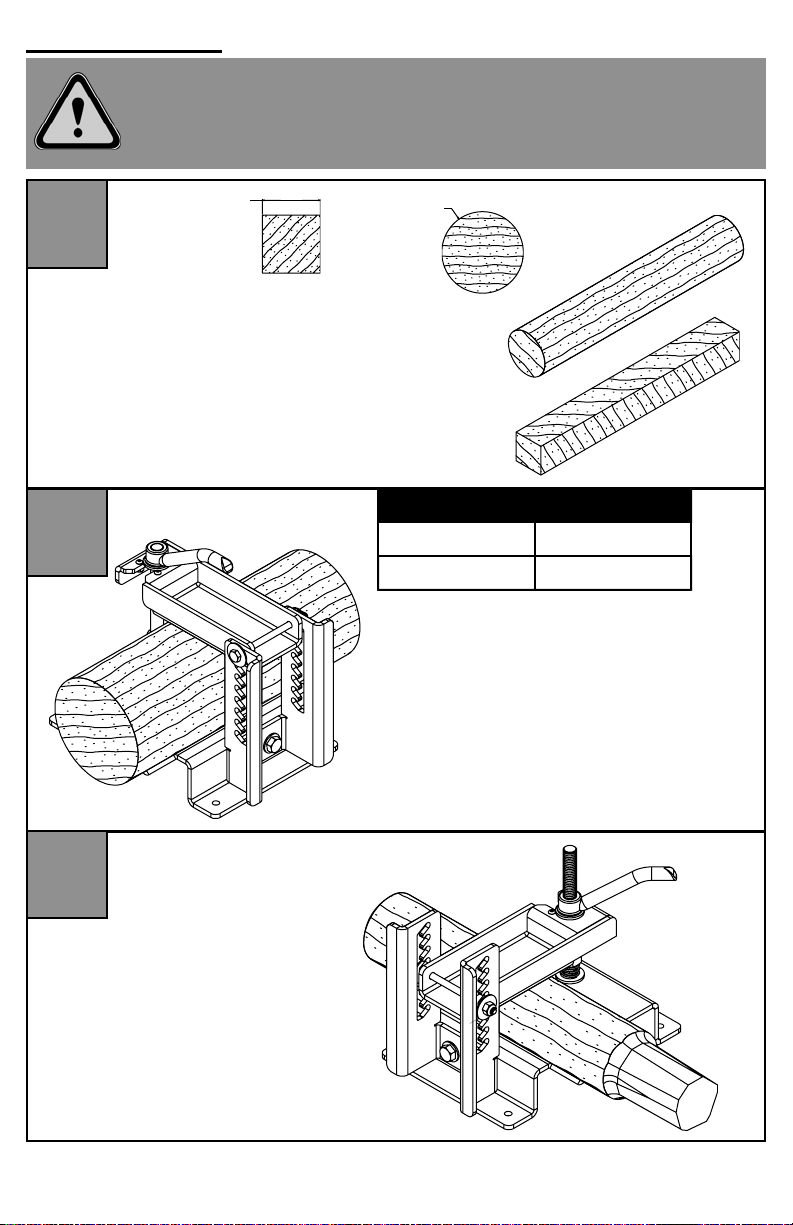
Cutting Stakes
1
2
3
1-1/2” Max
2” Max
1.50” x 1.50”
WARNING: If the stock comes loose or unclamped while cutting the
stake, DO NOT drop the drill or try to grab the stock! Stop the drill and
remove it from the end of the log. Re-secure the log, and resume
Square
● Obtain the stock you want to point
● Make sure the diameter fits the tool
● Cut it to length and make sure the ends
are flat. If the ends are not even/flat, the
point will be crooked
Round
Round 2.00” DIA
Square
● Secure the stock in a vise, clamp,
● The Log Lock (LL1545) is a safe,
Max Capacity
or fixture with a “V” shaped
notch
easy, economical way to clamp
material, and is available on our
website
● If the diameter is larger
than the tool can accept,
taper the end with a
hatchet or draw knife
6
Page 7
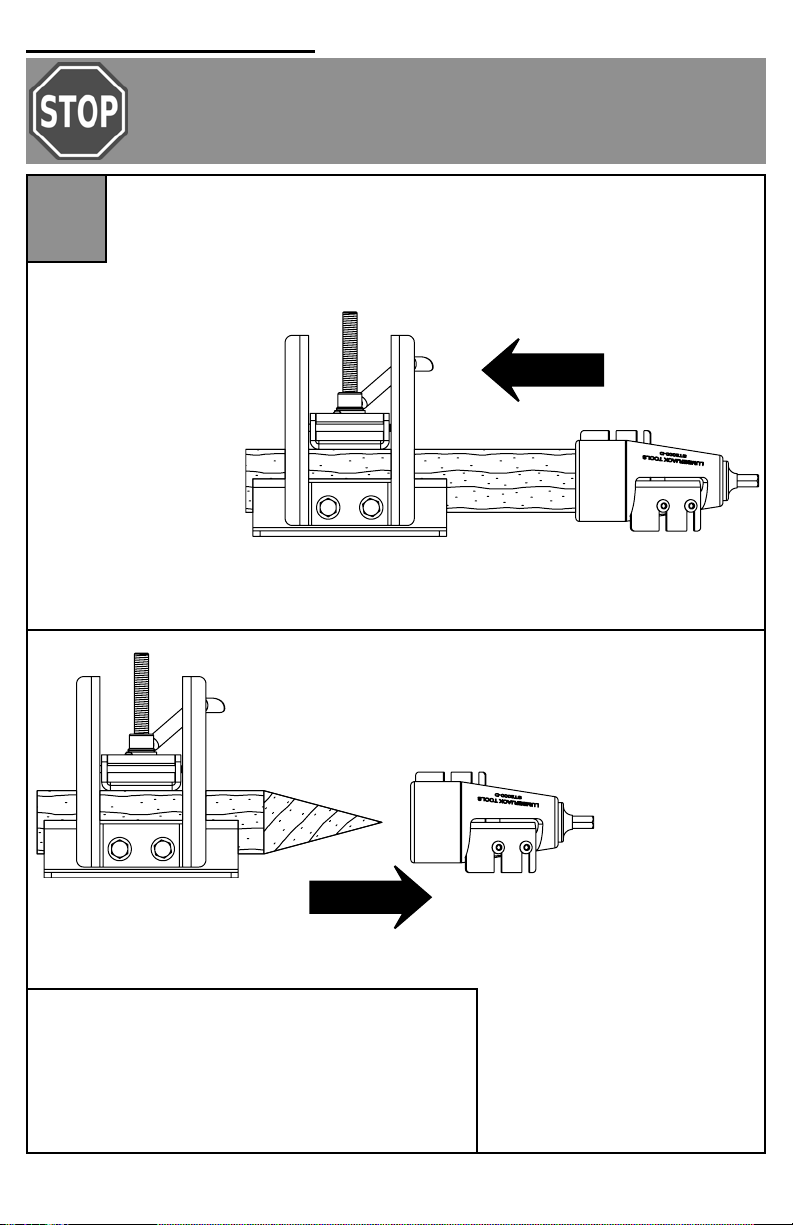
Cutting Stakes (cont.)
4
ALWAYS unplug the drill before adjusting the
blades or adjusting the chuck
● Carefully install the staking tool into an unplugged 1/2” drill,
and tighten it firmly. Use the chuck key to tighten the chuck
● With the tool
installed, square up to
the log/stock so that
the cutting face is
flush with the end of
the log/stock
● Apply body pressure by
leaning against the back
of the drill
Maintain
constant
pressure
Pull back
once drill has
stopped
TIP
● The staking tool will continue to cut even
after the log is pointed
● Stop the drill immediately after the point
is cut to avoid wasting material
● Pull the trigger to cut a
stake. Continue applying
body pressure as the tool
cuts
● Wait until the drill comes
to a complete top before
removing the cutter from
the log/stock
7
Page 8
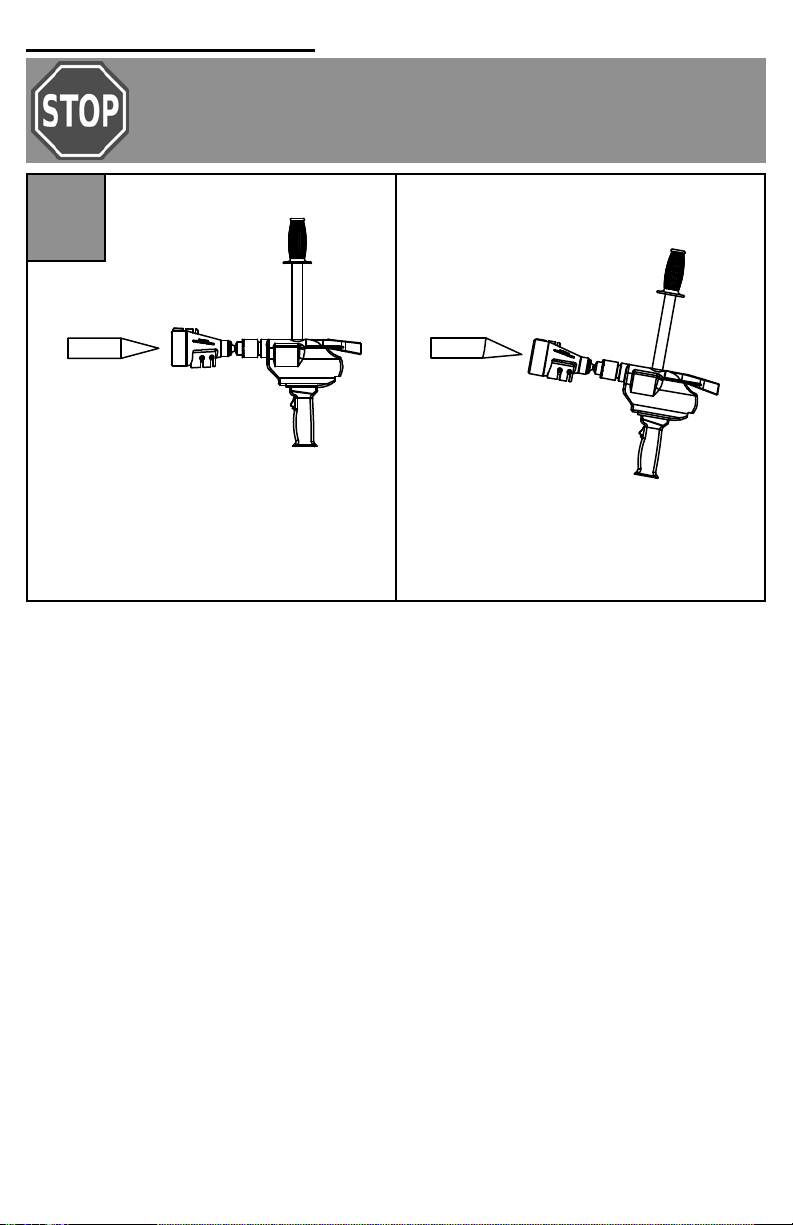
Cutting Stakes (cont.)
● Make sure the tool is square against the end of the log
before cutting
● If the tool is held at an angle the stake will be cut angled
4.5
CORRECT
Drill in-line with stock
WRONG
Drill not in-line with stock (crooked)
8
Page 9
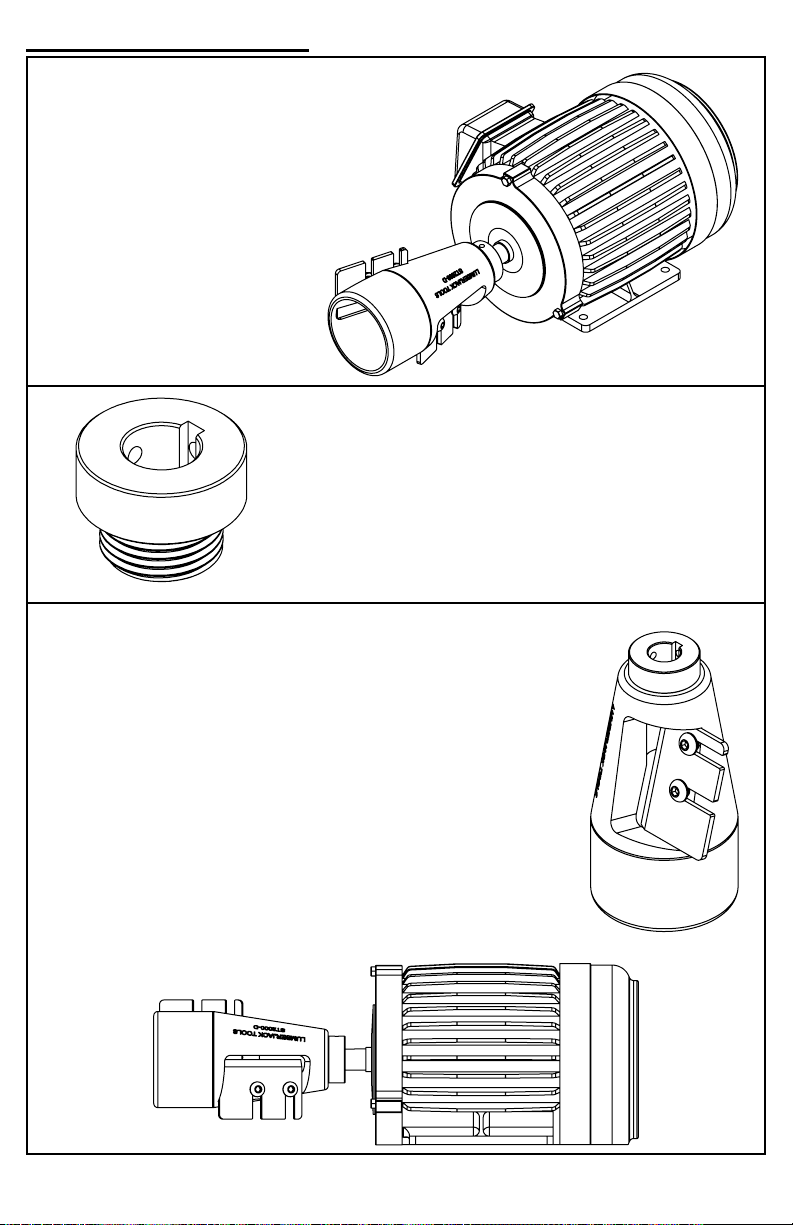
Motor Mount Adapter
● If desired the ST2000 can be
mounted to a motor for
production stake cutting
● We offer an adapter that allows the tool to
fit over a motor shaft. The Motor Shaft
Adapter is available for purchase on our
website or by phone
● Remove the shank that comes pre-installed to the
tool by using a pipe wrench
● Screw the adapter into the tool where the shank
was removed
● Slide the tool with the adapter over the motor
shaft and secure in place by tightening the set
screws
● NEVER exceed more than 1750 RPM when
operating the tool
● If you have any questions or would like to know
more information customer service is always glad
to help!
9
Page 10
Maintenance
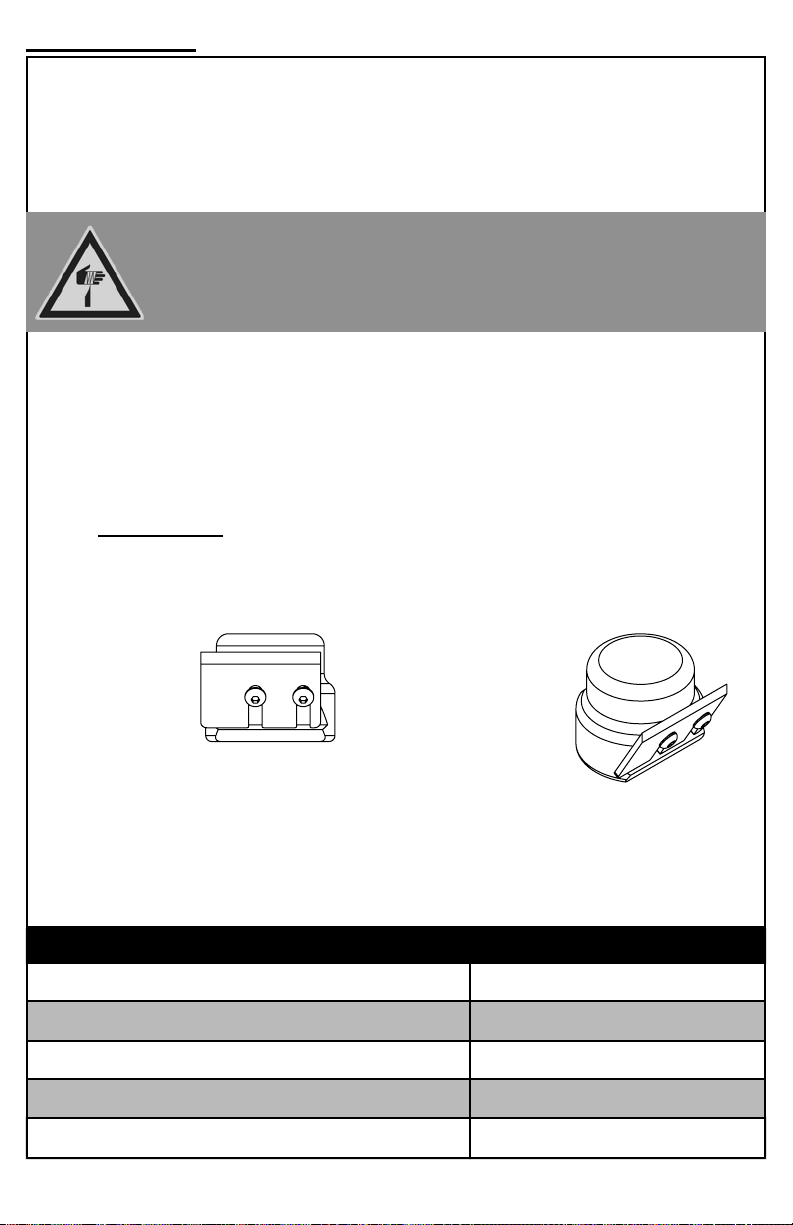
● Body
- Cleaning
○ Keep the staking tool body clear of sap and other build-up
○ Always remove the blades before cleaning
○ Clean the tool with a solvent (such as mineral spirits)
WARNING: ALWAYS HANDLE THE BLADES WITH EXTREME
CARE! FAILURE TO DO SO MAY RESULT IN SERIOUS INJURY
● Blades
- Care
○ Always wipe blades with a thin film of oil at the end of the day
to help prevent oxidation
- Cleaning
○ Clean the blades with a solvent (such as mineral spirits) and
immediately apply a thin film of oil to prevent oxidation
- Sharpening
○ Use a sharpening stone, file or the Blade Boss (BB2575) to re-
sharpen the blades, then clean the blades and apply a thin film
of oil
Visit our website or call
for more information
about our Blade Boss
● Shank
- Replacement
○ If your shank breaks, we offer replacement shanks (see first
page for contact information)
○ Turn the shank counter-clockwise to remove
○ Turn the shank clockwise to install
TASK EACH USE
Clean blade pockets X
Clean cutter bore X
Clean blades X
Inspect blades X
Oil blades X
10
Page 11

Troubleshooting
PROBLEM CAUSE SOLUTION
• Tool Skips off
to one side or
bounces around
• Not cutting
stock
• Takes too
much of a "bite"
• Crooked Stake
• Drill stops or
cuts on small
diameter stock
but not larger
• Spiral grooves
on Stake
• Stock is larger than tool will
accept
• Not enough pressure is being
applied
• Stock is larger than tool will
accept
• Blades are slid too close
• Blades are dull
• Not applying enough
pressure
• Aggressive cutting from dual
blades
• Holding drill crooked while
cutting
• Using a variable speed drill
• Using a non-Milwaukee
brand drill
• Lateral wobbling of the drill
• Removing the cutter while
drill is still spinning
• Taper down the end of the
stock with a draw knife
• Lean into drill with body
• Taper down the end of the
log with a draw knife
• Position blades so they are
back no closer than 1/8"
• Sharpen blades
• Purchase new blades
• Lean into drill with body
• Use the TB2500 Blade
Shims
• Position the drill square
against the stock before
cutting
• Make sure you are using a
single-speed drill with low
RPMs
• We recommend purchasing
a Milwaukee brand hole hog
drill
• Hold the drill as steady as
you can while cutting
• DO NOT remove the cutter
until the drill has come to a
complete stop
11
Page 12

Unexpected Occurrences
Engineers and Quality Control staff at Lumberjack Tools have provided
you with one of the easiest to use and safest staking tools on the market.
However, there is always the unexpected chance of failure.
● Please contact our customer support for a replacement if a failure
ever occurs to the tool body, shank or blades
Thank you again for purchasing our tools!
PO Box 730 • Chippewa Falls, WI 54729 • 715.720.4719 • www.lumberjacktools.com
 Loading...