

Page 1

DP16-910B-VS
SAFETY AND OPERATING MANUAL
16mm Bench Top Drill Press
DP16-910B-VS
ORIGINAL INSTRUCTIONS
Page 2

DP16-910B-VS
TABLE OF CONTENTS
Welcome to Lumberjack!
Dear custo
mer, Congratulations on your purchase. Before using the
product for the first time please be sure to read these instructions for use.
They provide you with all information necessary for using the product safely and to
ensure its long service life.
Closely observe all safety information in these instructions!
General Power Tool Safety Warnings………………………………….…......
Symbols & Cable Rating Chart ……….…………………………………….………
Machine Details and Product Features……….…………………………….….
Assembly……………………………………………………………………………………..
Adjustments………………………………………………………………………………..
Operation, Maintenance and Service…………………………………………..
Lumberjack Guarantee………….…………………………………………………….
Declaration of Conformity……………………………………………………………
Parts List…………..………………………………………………………………………...
Parts Diagram………………………………………………………………………………
01
05
06
08
10
12
15
17
18
21
Page 3

d) Do not abuse the cord. Never use the cord for
carrying, pulling or unplugging the power tool.
Keep cord away from heat, oil, sharp edges or
moving parts. Damaged or entangled cords
increase the risk of electric shock.
e) When operating a power tool outdoors, use an
extension cord suitable for outdoor use. Use of a
cord suitable for outdoor use reduces the risk of
electric shock.
f) If operating a power tool in a damp location is
unavoidable, use a residual current device (RCD)
protected supply. Use of an RCD reduces the risk
of electric shock.
3. Personal safety
a) Stay alert, watch what you are doing and use
common sense when operating a power tool. Do
not use a power tool while you are tired or under
the influence of drugs, alcohol or medication. A
moment of inattention while operating power
tools may result in serious personal injury.
b) Use personal protective equipment. Always
wear eye protection. Protective equipment such
as dust mask, non-skid safety shoes, hard hat, or
hearing protection used for appropriate conditions
will reduce personal injuries.
c) Prevent unintentional starting. Ensure the
switch is in the off position before connecting to
power source and/or battery pack, picking up or
carrying the tool. Carrying power tools with your
finger on the switch or energising power tools that
have the switch on invites accidents.
d) Remove any adjusting key or wrench before
turning the power tool on. A wrench or a key left
attached to a rotating part of the power tool may
result in personal injury.
WARNING Read all safety warnings and
all instructions
.
Failure to follow the warnings
and instructions may result in electric shock, fire
and/or serious injury.
Save all warnings and instructions for
future reference
.
The term "power tool" in
the warnings refers to your electric (corded)
power tool or battery-operated (cordless) power
tool.
1. Work area safety
a)Keep work area clean and well lit. Cluttered
or dark areas invite accidents.
b) Do not operate power tools in explosive
atmospheres, such as in the presence of
flammable liquids, gases or dust. Power tools
create sparks which may ignite the dust or
fumes.
c) Keep children and bystanders away while
operating a power tool. Distractions can cause
you to lose control.
2. Electrical safety
a) Power tool plugs must match the outlet.
Never modify the plug in any way. Do not use
any adapter plugs with grounded power tools.
Unmodified plugs and matching outlets will
reduce risk of electric shock.
b) Avoid body contact with grounded surfaces,
such as pipes, radiators, ranges and
refrigerators.There is an increased risk of electric
shock if your body is grounded.
c) Do not expose power tools to rain or wet
conditions. Water entering a power tool will
increase the risk of electric shock.
GENERAL POWER TOOL SAFETY WARNINGS
DP16-910B-VS 01
Page 4

DP16-910B-VS 02
GENERAL POWER TOOL SAFETY WARNINGS
e) Do not overreach. Keep proper footing and
balance at all times. This enables better control
of the power tool in unexpected situations.
f) Dress properly. Do not wear loose clothing or
jewellery. Keep your hair, clothing and gloves
away from moving parts. Loose clothes,
jewellery or long hair can be caught in moving
parts.
g) If devices are provided for the connection of
dust extraction and collection facilities, ensure
these are connected and properly used. Use of
dust collection can reduce dust-related hazards.
4. Power tool use and care
a) Do not force the power tool. Use the correct
power tool for your application. The correct
power tool will do the job better and safer at the
rate for which it was designed.
b) Do not use the power tool if the switch does
not turn it on and off. Any power tool that
cannot be controlled with the switch is
dangerous and must be repaired.
c) Disconnect the plug from the power source
and/or the battery pack from the power tool
before making any adjustments, changing
accessories, or storing power tools. Such
preventive safety measures reduce the risk of
starting the power tool accidentally.
d) Store idle power tools out of the reach of
children and do not allow persons unfamiliar
with the power tool or these instructions to
operate the power tool. Power tools are
dangerous in the hands of untrained users.
e) Maintain power tools. Check for misalignment
or binding of moving parts, breakage of parts and
any other condition that may affect the power
tool’s operation. If damaged, have the power tool
repaired before use. Many accidents are caused
by poorly maintained power tools.
f) Keep cutting tools sharp and clean. Properly
maintained cutting tools with sharp cutting edges
are less likely to bind and are easier to control.
g) Use the power tool, accessories and tool bits
etc. in accordance with these instructions, taking
into account the working conditions and the work
to be performed. Use of the power tool for
operations different from those intended could
result in a hazardous situation.
5. Service
a) Have your power tool serviced by a qualified
repair person using only identical replacement
parts. This will ensure that the safety of the power
tool is maintained.
b) If the replacement of the supply cord is
necessary, this has to be done by the
manufacturer or its agent in order to avoid a
safety hazard.
6. Battery Tool Use and Care
a) Recharge only with the charger specified by
the manufacturer. A charger that is suitable for
one type of battery pack may create a risk of fire
when used with another battery pack.
b) Use power tools only with specifically
designated battery packs. Use of any other
battery packs may create a risk of injury or fire.
Page 5

DP16-910B-VS 03
GENERAL POWER TOOL SAFETY WARNINGS
c) When Battery pack is not in use, keep it away
from other metal objects, like paper clips, coins,
keys, nails, screws or other small metal object
that can make a connection from one terminal
to another. Shorting the battery terminals
together may cause burns or a fire.
D) User abusive conditions, liquid may be
ejected from the battery; Avoid contact. If
contact accidentally occurs, flush with copious
amounts of water. If liquid contacts eyes, seek
medical help immediately. Liquid ejected from
the batter may cause irritation or burns.
7. Additional Safety and working
Instructions
7.1. Dust from materials such as lead-containing
coatings, some wood types, minerals and
metals can be harmful to one’s health and
cause allergic reactions, leading to respiratory
infections and/or cancer. Materials containing
asbestos may only be worked by specialists.
Observe the relevant regulations in your country
for the materials to be worked.
7.2. Prevent dust accumulation at the
workplace. Dust can easily ignite.
8 Additional Safety Warning for Bench
Drills
8.1 Always wear hairnet for long hair, and
make sure you are wearing safety goggles.
8.2 Do not wear gloves, ties or loose clothing.
8.3 while drilling make sure the piece is
secured with a vice; never hold the workpiece
by hand! Never keep your fingers near where
they could touch the drill in case the piece
moves suddenly.
8.4Do not use the machine until it has been
properly installed in accordance with the
instructions provided.
8.5Do not switch on the machine until all pieces
have been firmly tightened together.
8.6Do not use the machine if it is damaged or
functioning badly.
8.7 Perform all adjustments before switching
on the machine, make sure to set table height
or depth stop to prevent the drill entering the
table.
8.8(If Applicable) Always make sure chick key is
removed before use.
8.9Before switching on the machine check the
chuck has been mounted correctly and
securely, and that the safety guard is engaged.
8.10In operations stick to recommended
speeds for the drilling accessories and material
being used.
8.11 Switch off the power before handling the
drill or chuck. Once finished remove drill and
clean the table before leaving the machine.
8.12 Always lock the on/off switch when
leaving the machine.
9. Safety Warnings for Lasers
The bench drills has a built-in laser light. The laser
is CLASS 2. These lasers do not normally present
an optical hazard. However, DO NOT stare at the
beam, as this can cause flash blindness.
a) Do not remove or deface any product labels.
Removing product labels increases the risk of
exposure to laser radiation.
Page 6

DP16-910B-VS 04
GENERAL POWER TOOL SAFETY WARNINGS
b) The laser beam can be harmful to the eyes.
Always avoid direct expose to eyes. Do not
project the laser beam directly into the eyes or
at any object other than the work piece.
c) Do not look directly into the laser-beamoutput aperture during operation.
d) Turn the laser on only when making cuts. The
laser on the mitre saw is not a toy. Always keep
it out of the reach of children. The laser light
emitted from this device should never be
directed toward any person for any reason.
e) Always turn the laser beam off when it is not
in use. Leaving the tool will increase the risk of
someone inadvertently staring into the laser’s
beam.
f) Be sure that the laser beam is aimed at a
work piece (such as wood or a rough-coated
surface) that does not have a reflective surface.
g) Do not use on materials that have shiny,
reflective surfaces, such as sheet metal. The
reflective surface could reflect the beam back at
the operator. Be aware that laser light reflected
off of a mirror or any other reflective surfaces
can also be dangerous.
h) Always wear laser-protective eyewear when
working on or near reflective surfaces.
i) Do not attempt to activate the laser when the
tool housing is removed.
j) The laser is activated by means of a button
switch that is independent of the main switch
for the saw.
k) Do not replace the laser light assembly with a
different one. Any repairs must be carried out by
the laser manufacturer or an authorized service
agent.
l) Do not attempt to repair the laser guide by
yourself.
m) Do not attempt to change any parts of the
laser guide.
10. Using an Extension Cable
.
10.1. If an extension cable is required, use an
approved triple core extension cable suitable for
the power input of the tool.
10.2. Grounded tools always require a three wire
extension cable.
10.3. As the distance from the supply outlet
increases you must use a heavier gauge extension
cable. Using extension cables with inadequately
sized wire causes a serious drop in voltage,
resulting in loss of power and possible tool
damage.
10.4. The smaller the gauge number of the wire
the greater the capacity of the cord.
10.5. When using a cable reel, always unwind the
cable completely.
Page 7

DP16-910B-VS 05
SYMBOLS AND POWER RATING CHART
Danger! – Read the operating
instructions to reduce the risk of
injury.
Caution! Wear safety goggles.
Caution! Wear ear defenders. The
impact of noise can cause damage
to hearing.
Amperes 7.5M 15M 25M 30M 45M 60M
0 – 2.0 6 6 6 6 6 6
2.1 – 3.4 6 6 6 6 6 6
3.5 - 5.0 6 6 6 6 10 15
5.1 – 7.1 10 10 10 10 15 15
7.1 – 12.0 15 15 15 15 20 20
12.1 – 20.0 20 20 20 20 25 -
Caution! Risk of Injury! Do
not reach into the running
saw blade
.
Caution! Wear a dust mask.
Caution: Laser radiation. Do
not look into the beam!
Laser class II product!
Page 8

AIR6V 01AIR6V 01AIR6V 01AIR6V 01
DP16-910B-VS 06
MACHINE DETAILS AND PRODUCT FEATURES
Machine Details
Usage
Your bench drill has been designed for the
drilling of holes in metal, plastics and wood.
It has not been designed for commercial use.
Specifications:
Mains Voltage - 230V/50Hz
Power – 550W
Motor Speed – 970min-1
Speed Range – 360-3500RPM
Swing –300mm
Spindle Taper – MT2
Max. Spindle Travel – 90mm
Drill Capacity – 16mm
Chuck Capacity – 16mm
Max. Distance From Chuck to the table –
275mm
Max. Distance From Chuck to the base –
445mm
Table Size – 243X243mm
Base Size – 450X270mm
Over all Height – 910mm
Nett Weight - 40Kgs
Gross Weight – 42Kgs
Package Contents:
1. Base X 1
2. Cloum support asm X 1
3. Screw X 4
4. Table/support asm X 1
5. Table handle X 1
6. Head asm X 1
7. Feed handle X 1
8. Chuck X1
9. Chuck guard asm X1
10. Chuck key X 1
11. Hex key X 3
12. Remove chuck the special tool X 1
The design of the model may be different
depending on manufacturing changes.
Page 9
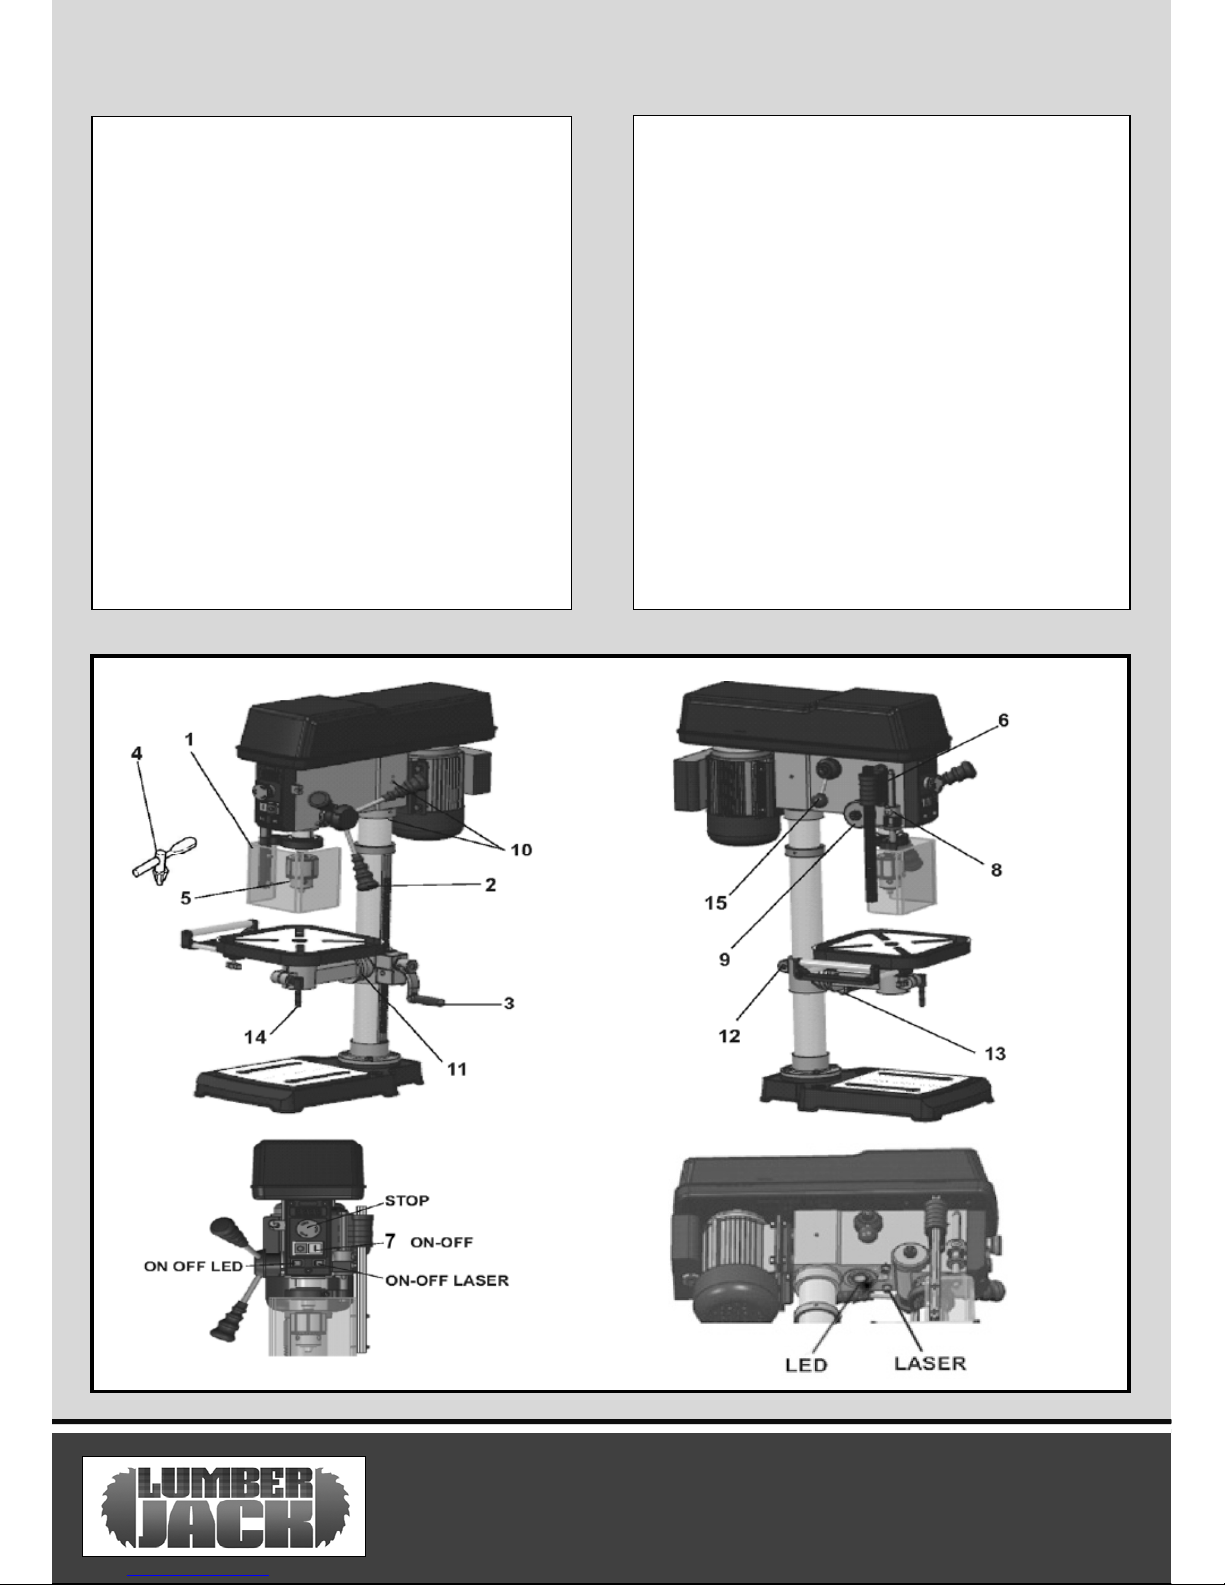
DP13-580B 07
MACHINE DETAILS AND PRODUCT FEATURES
Features
1. Chuck guard
2. Feed handle
3. Table crank
4. Chuck key
5. Chuck
6. Depth scale
7. Drill ON-OFF switch
8. Depth scale lock
9. Spring cap
10. Head locks
11. Bevel scale
12. Support lock
13. Table Bevel Lock
14. Table rotation lock
15. Speed variator
Unpacking Instructions
1. Separate all parts from packaging materials
and check all items are accounted for.
2. Remove the protective oil that is applied to
the table and column. Any ordinary grease and
spot remover will do.
3. Apply a coat of paste wax to the table and
column to prevent rust. Wipe all parts
thoroughly with clean dry cloth.
Page 10

DP16-910B-VS 08
Assembly
Avoid unintentional starting of the machine.
During assembly and for all work on the
machine, the power plug must not be
connected to the mains supply.
Carefully remove all parts included in the
delivery from their packaging.
Remove all packaging material from the machine
and the accessories provided.
Before starting the operation of the machine for
the first time, check if all parts listed in the box
content section have been supplied
Note: Check the power tool for possible damage.
Before further use of the machine, check that all
protective devices are fully functional. Any
lightly damaged parts must be carefully checked
to ensure flawless operation of the tool. All parts
must be properly mounted and all conditions
fulfilled that ensure faultless operation.
Damaged protective devices and parts must be
immediately replaced by an authorised service
centre.
Base and column assembly
1. Position the base on the floor. Remove the
protective covering and discard.
2. Remove protective sleeve from the column
and discard. Place the column assembly on the
base, align the holes in the column support with
the holes in the base.
3. Locate three long bolts from the parts bag.
4. Install a bolt in each hole through the column
support and the base and tighten with the
adjustable wrench.
Installation of the table /support assembly
and hardware
1. Locate the table/support assembly.
2. Slide the table/support assembly onto the
column.
3. Locate the support lock handle among the loose
parts.
4. Install the support lock handle from the left side
into the table support. Raise the table to working
height by sliding it on the column and then by
tightening the lock handle by hand.
Installation the head
1. Remove the protective covering from the head
assembly.
2. Carefully lift the head above the column and
slide it down on the column as far as it will go.
Align the head with the table and the base.
3. Using a 4mm hex. Key, tighten the head set
screws on the right side of the head.
ASSEMBLY INSTRUCTIONS
Page 11

DP16-910B-VS 09
Installation the chuck
1.Locate the chuck in the box of parts.
2.Clean out the tapered hole in the chuck, also
clean the spindle nose with a clean cloth. Make
sure there are no foreign particles sticking to the
surfaces. The slightest piece of dirt on the
spindle nose or the chuck will prevent the chuck
from seating properly. This will cause the drill to
“wobble .
NOTE: If the tapered hole in the chuck is
extremely dirty, use a cleaning solvent on a clean
cloth.
3.Push the chuck up on the spindle nose as far as
it will go.
4. Turn the chuck sleeve clockwise and open the
chuck jaws completely.
5. Lightly tap the nose of the chuck with a piece
of wood to insure the proper seating of the
chuck on the spindle.
Installation the feed handles
1. Locate the three feed handles among the
loose parts..
2. Screw the feed handle tightly into the
threaded holes in the hub.
Installing the chuck guard
1.The chuck guard insert the micro switch seat set
and then by tightening the screw by tool.
WARNING!: To avoid possible injury, keep the
guard in place and in proper working order while
operating.
ASSEMBLY INSTRUCTIONS
Page 12

DP16-910B-VS 10
ADJUSTMENTS
WARNING! For your own safety, turn the switch OFF
and remove the plug from the power source before
making any adjustements. To avoid injury from
thrown parts due to the spring release, follow
instructions carefully and wear safety glasses.
Installing drill bits
Insert the drill bit into the chuck far enough to obtain
the maximum gripping of the chuck jaws. The chuck
jaws are approximately 1” long. When using a small
drill bit, do not insert it so far that the jaws touch the
flutes (spiral grooves) of the bit.
Make sure the drill bit is centered in the chuck before
tightening the chuck with the key. Tighten the drill bit
well, so that it doesn’t slip while drilling. Turn the
chuck key clockwise to tighten, counter clockwise to
loosen.
Drilling to a specific depth
To drill a blind hole(not all the way through) to a
given depth, proceed as follows.
1.Mark the depth of the hole on the workpiece.
2.Loosen the depth scale lock knob.
3.With the switch OFF, bring the drill bit down
until the tip of the lips of the drill bit are even
with the mark.
4.Turn the depth scale counterclockwise until it
stops moving.
5.Tighten the depth scale lock knob.
6. The drill bit will stop at this depth until the
depth scale is readjusted.
Another way-depth scale
1.With the power OFF, loosen the depth scale lock
knob
2.Place workpiece on table. Adjust table until the
tip of the drill is just a little above the top of the
workpiece.
3.Turn the depth scale clockwise until the depth
scale indicator points to the desired drilling depth
on the scale.
4.Tighten the depth scale lock knob.
5.The chuck or drill will now be stopped after
traveling downward the distance selected on the
depth scale.
Page 13
DP16-910B-VS 11
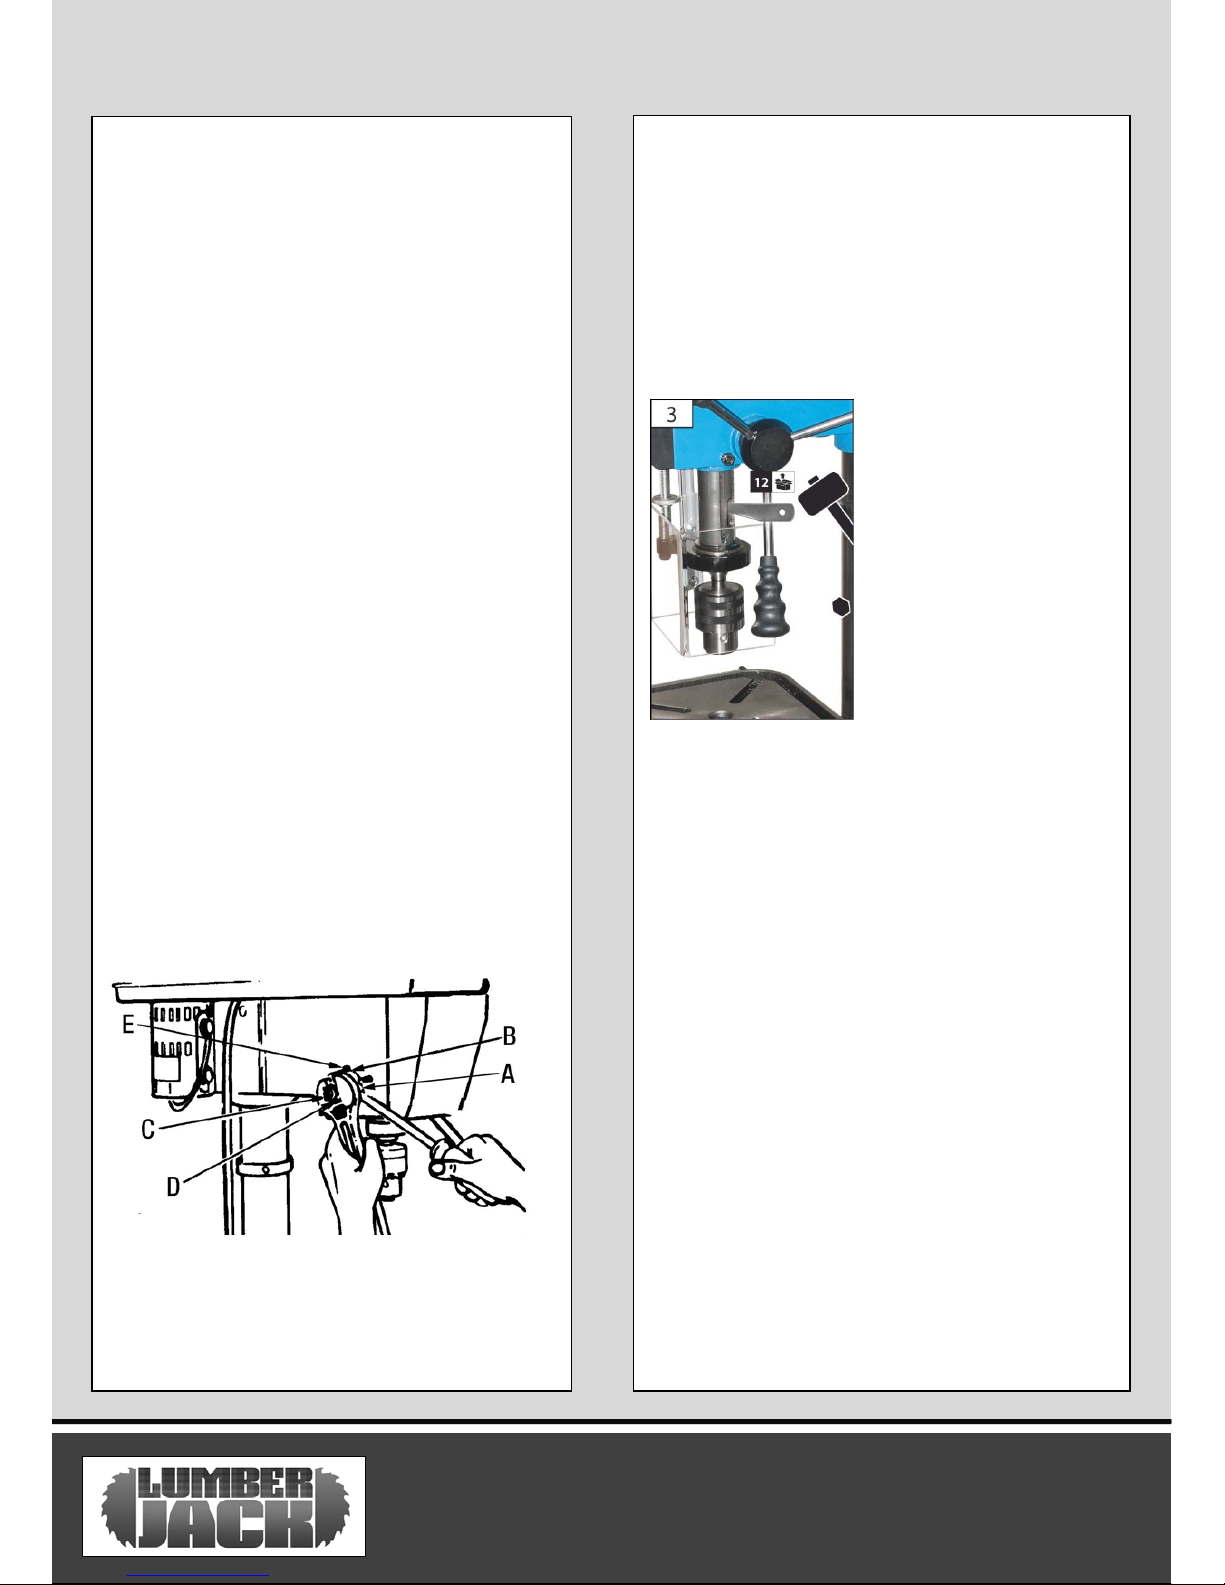
Adjusting the quill return spring
NOTE: The return spring tension is set at the
factory and should not require further
adjustment.
1.With the chuck at its highest possible position,
turn the depth scale clockwise until it stops and
tighten the depth scale lock knob. This will
prevent the quill from dropping while tensioning
the spring.
2.Lower the table for additional clearance.
3.Work from the left side of the drill press.
4.Place screwdriver in the lower front notch
Fig.20 of the spring cap), and hold it in place
while loosening and removing the outer nut
(only).
5.With screwdriver remaining in the notch,
loosen inner nut (approx. 1/8”) until the notch
disengages from the boss on the head. Do not
remove this nut.
6.Carefully turn screwdriver counterclockwise
and engage the next notch in the boss. Do not
remove screwdriver.
7.Tighten nut with wrench only enough to
engage boss. Do not over tighten as this will
restrict quill movement.
8. Check tension while turning feed handles.
9.If there is not enough tension on the spring,
repeat step 4-8 moving only one notch each time
and checking tension after each repetition.
Removing the chuck & arbor
1. Align key holes in spindle and quill by rotating
the chuck by hand.
2. Insert drift key into key holes in the quill.
3. Tap key drift key lightly until the chuck and
arbor fall out of the spindle.
NOTE: Place one hand below the chuck to catch
it when it falls out.
ADJUSTMENTS
Page 14

DP16-910B-VS 12
OPERATION
Operation
–Practise on waste material first to learn how to
operating the machine.
–When drilling all the way through a piece of
material, adjust the table so the drill is aligned
with the centre of the table. Secure the work
piece securely an unsecured work piece results
in a rough drilling hole and increases the risk of
the drill bit breaking.
–Use a piece of waste wood beneath your
workpiece to reduce the risk of the work piece
splinting and protect the drill tip.
–Use the lift handles to slowly bring the drill
downwards and slowly feed the drill into the
workpiece.
–Drill extra slowly when the drill bit is about to
break through the workpiece to prevent
splintering.
Switching ON/OFF
Lift the safety stop case and engage the green
start button.
Simply press the Red button to stop the machine
Light & dual laser guide system
WARNING! Do not look directly at the laser
beams. Do not aim the laser beams at any
person or any object other than your
workpiece.
If you desire using the dual laser guides, use the
laser switch to turn them On or Off. If an
adjustment to the laser guides are necessary ,
proceed as follows;
1) Loosen set screw (one set screw for each
laser) and then slightly turn laser guide in either
direction, this will reposition the laser beams
Trajectory , adjust the position of the laser
guides this way until both beams intersect at the
point where the drill bit touches the workpiece.
Retighten set screw after each adjustment.
The light ON-OFF switch turns ON and OFF a
halogen light bulb which is found inside the head
casting.
Tilting the table
To use the table in a bevel position, loosen the
bevel lock bolt with an adjustable wrench. Tilt the
table to the desired angle by reading the bevel
scale on the table support. Retighten the bevel
lock bolt.
Adjustment the extension table
To use the extension table, loosen the lock nut
with pull the extension table. Retighten the lock
nut.
Page 15

DP16-910B-VS 13
OPERATION & MAINTENANCE AND SERVICE
Feeding
Pull down the feed handles (A) Fig.22 with only
enough effort to allow the drill to cut. Feeding
too slowly might cause the drill to burn...feeding
too rapidly might stop the motor...cause the belt
or drill to slip... tear the workpiece loose or
break the drill bit.
Hole location
Make an indentation in the workpiece where
you want the to drill a hole using a centre punch
or a sharp nail. Before turning the switch ON,
bring the drill bit down to the workpiece, lining it
up with the hole location.
Positioning the table and workpiece
Lock the table to the column in a position so that
the tip of the drill is just a little above the top of
the workpiece. Always place a piece of back-up
material (wood, plywood) on the table
underneath the workpiece. This will prevent
splintering or making a heavy burr on the
underside of the workpiece as the drill breaks
through. To keep the back-up material from
spinning out of control, it must come in contact
with the left side of the column, as illustrated in.
WARNING! To prevent the workpiece or the
back-up material from being torn from your
hand while drilling, position them against the left
side of the column. If the workpiece or the backup material are not long enough to reach the
column, clamp them to the table. Failure to do
this could result in personal injury.
Cleaning And Maintenance
Before performing any work on the equipment,
pull the power plug.
Regularly clean the ventilation slots, dust build
up can damage the motor.
Grease every three months by turning the drill
to maximum drill depth and greasing the shaft
with oil.
No repairs should be carried out without first
contacting the supplier as this will void your
warranty.
Storage
thoroughly cleans the whole machine and
accessories before storing to keep the machine
in good running condition.
Store out of reach of children in a stable cool
temperature dry place and avoid too high or too
low temperatures.
Page 16

Trouble Probable cause Remedy
Noisy operation 1.Dry spindle
2.Loose spindle pulley
3.Loose motor pulley
1.Lubricate spindle
2.Check tightness of retaining nut on pulley
3. Tighten set screws in pulleys
Drill bit burns 1. Incorrect speed
2. Chips not coming out of hole
3. Dull drill bit
4. Feeding too slow
5. Drill bit not lubricated
1. Change speed
2.Retract drill bit frequently to clear chips
3.Resharpen drill bit
4.Increase feeding speed
5. Lubricate drill bit
Hole is not round 1. Length of drill bit cutting lips and/or
angles not equal
2. Bent drill bit
1. Resharpen drill bit correctly
2. Replace drill bit
Wood splinters on
underside
1. No back up material under workpiece 1. Support workpiece or clamp it
Woodpiece torn
loose from hand
1. Not supported or clamped properly 1.Support workpiece or clamp it
Drill bit binds in
workpiece
Excessive drill bit
run out or wobble
1.Workpiece pinching drill bit or excessive
feed pressure
2.Bent drill bit
3. Worn spindle bearings
4. Drill bit not correctly installed in the
chuck
5.Chuck not correctly assembled
1. Support workpiece or clamp it
2.Use a straight drill bit
3. Replace bearings
4. Install drill bit correctly
5.Correctly assemble the chuck
Quill returns too
slow or too fast
1.Spring has improper tension 1. Adjust spring tension
Chuck will not stay
attached to
spindle. It falls off
when trying to
install it
1. Dirt or oil on the tapered inside surface
of chuck or on the spindles tapered
surface
1.Using a household detergent, clean the
tapered surfaces of the chuck and spindle
to remove all dirt, grease and oil
DP16-910B-VS 14
OPERATION & MAINTENANCE AND SERVICE
Page 17

DP16-910B-VS 15
LUMBERJACK GUARANTEE
1. Guarantee
1.1 Lumberjack guarantees that for a period of
12 months from the date of purchase the
components of qualifying products (see clauses
1.2.1 to 1.2.8) will be free from defects caused
by faulty construction or manufacture.
1.2. During this period Lumberjack, will repair or
replace free of charge any parts which are
proved to be faulty in accordance with
paragraph 1.1 providing that:
1.2.1 You follow the claims procedure set out in
clause 2
1.2.2 Lumberjack and its authorised dealers are
given reasonable opportunity after receiving
notice of the claim to examine the product
1.2.3 If asked to do so by Lumberjack or its
Authorised dealer, you return the product at
your own cost to Lumberjack’s or supplying
Authorised Dealer’s premises, for the
examination to take place clearly stating the
Returns Material Authorisation number given by
Lumberjack or an Authorised Dealer.
1.2.4 The fault in question is not caused by
industrial use, accidental damage, fair wear and
tear, wilful damage, neglect, incorrect electrical
connection, misuse, or alteration or repair of the
product without approval.
1.2.5 The product has been used in a domestic
environment only
1.2.6 The fault does not relate to consumable
items such as blades, bearings, drive belts, or
other wearing parts which can reasonably be
expected to wear at different rates depending
on usage.
1.2.7 The product has not been used for hire
purposes.
1.2.8 The product has been purchased by you as
the guarantee is not transferable from a private
sale.
2. Claims Procedure
2.1 In the first instance please contact the
Authorised Dealer who supplied the product to
you. In our experience many initial problems with
machines that are thought to be faulty due to
faulty parts are actually solved by correct setting
up or adjustment of the machine. A good
Authorised Dealer should be able to resolve the
majority of these issues much more quickly than
processing a claim under the guarantee. If a
return is requested by the Authorised Dealer or
Lumberjack, you will be provided with a Returns
Material Authorisation number which must be
clearly stated on the returned package, and any
accompanying correspondence. Failure to provide
a Returns Material Authorisation number may
result in item being refused delivery at Authorised
Dealer.
2.2 Any issues with the product resulting in a
potential claim under the guarantee must be
reported to the Authorised Dealer from which it
was purchased within 48 hours of Receipt.
2.3 If the Authorised Dealer who supplied the
product to you has been unable to satisfy your
query, any claims made under this Guarantee
should be made directly to Lumberjack. The Claim
itself should be made in a letter setting out the
date and place of purchase, giving a brief
explanation of the problem which has led to the
claim. This letter should be then sent with proof
Page 18

DP16-910B-VS 16
LUMBERJACK GUARANTEE
of purchase to Lumberjack. If you include a
contact number with this it will speed your claim
up.
2.4 Please note that it is essential that the letter
of claim reaches Lumberjack on the last day of
this Guarantee at the latest. Late claims will not
be considered.
3. Limitation of Liability
3.1 We only supply products for domestic and
private use. You agree not to use the product for
any commercial, business or resale purposes and
we have no liability to you for any loss of profit,
loss of business, business interruption or loss of
business opportunity.
3.2 This Guarantee does not confer any rights
other than these expressly set out above and
does not cover any claims for consequential loss
or damage. This Guarantee is offered as an extra
benefit and does not affect your statutory rights
as a consumer.
4. Notice
This Guarantee applies to all product purchased
from an Authorised Dealer of Lumberjack within
the United Kingdom. Terms of Guarantee may
vary in other countries.
Page 19

DP16-910B-VS 17
CE DECLARATION OF CONFORMITY
TOOLSAVE
Unit C, Manders Ind. Est.,
Old Heath Road, Wolverhampton,
WV1 2RP.
Tel: 01902 450 470
Declares that the Bench Top Drill Press (DP16-910B-VS)
Is in compliance with the regulations included in the Directives:2006/95/EC
EC DECLARATION OF CONFORMITY
Certificate for EC-type examination delivered by TÜV SÜD Product Service GmbH-ZertifiziersteelleRidlerstraße 65-80339 München GERMANY (No.:N8MA 16 06 95901 001)
Person who declares: Bill Evans
01.03.2017
The Director
Page 20

AIR6V 01AIR6V 01AIR6V 01
DP16-910B-VS 18
No. Description No. Description
1 Base 28 Bearing 6201
2 Column seat 29 Depth button
3 Hexbolt M8x20 30 Spring
4 Column 31 Self-Locking nut
5 Rack 32 Depth cave with thread
6 Crank 33 Depth stop block
7
Socket head cap screw
M6x10
34 Depth rod
8 Locking handle 35 Nut
9 Worm-elevation 36 Depth seat
10 Pin gear 37 Hex cap screw
11 Gear-helical 38
Cross recessed pan head
screws
12 Support 39 Light switch
13 Collar rack 40 Magntic switch
14 Hexbolt M12x25 41 Emergency stop switch
15 Arm table,with scale 42 Plate-display
16 Table 43 Box switch
17 Extension rod 44 Self tapping screw
18 Locking button 45 Digital display assembly
19 Extension holder 46 Key-seat
20 Extension roller 47 Depth stop plate
21
Hexagon socket
countersunk head screws
48
Cross recessed pan head
screws
22 Hex cap screw 49 Self-Locking nut
23 Chuck 50 Washer
24 Abor 51 Handle seat
25 Spindle 52
Cross recessed head
screws
26 Bearing 6204 53 Adjusted gear plate
27 Tube 54 Flat
Parts List
Page 21

AIR6V 01AIR6V 01AIR6V 01
DP16-910B-VS 19
No. Description No. Description
55 Speed control gear 84 Soket head cap screw
56 Handle lever 85 Fixed Motor pulley
57 Knob 86 Circlip ring
58 Nut for spring cap 87 Probe head
59 Spring cap 88 Washer
60 Spring 89
Cross recessed pan head
screws
61 Case 90 Speed sensor head
62 Hex cap screw 91 Self tapping screw
63 Washer 92 Circlip ring
64 Spring 93 Bearing 6203
65 Speed rack 94 Circlip ring
66 LED worklight 95 Spline housing
67 Laser 96 Flat
68 Soket head cap screw 97 Circlip ring
69 Gear shaft 98 Guard
70 Handle seat 99 Fixed spindle pulley
71 Handle lever 100 Activity spindle pulley
72 Knob 101 Circlip ring
73 Soket head cap screw 102 Circlips for holes
74 Hex bolt M8x20 103 Bearing
75 Washer 104 Speed seat
76 Junction plate 105 Hex cap screw M8x10
77 Hex bolt M8x16 106 Belt
78 Motor 107 Hex cap screw M6x8
79 Nut 108 Washer
80 Flat 109 Micro switch seat set
81 Motor spring seat 110 Locking button
82 Motor spring 111 Chuck guard rod
83 Activity Motor pulley 112
Cross recessed pan head
screws
Parts List
Page 22

AIR6V 01AIR6V 01AIR6V 01
DP16-910B-VS 20
No. Description No. Description
113 Chuck guard 117 Micro switch
114 Washer 118 Cover-Micro switch
115 Nut 119 Self tapping screw
116 Plate-Micro switch
Parts List
Page 23

DP16-910B-VS 21
Parts Diagram
 Loading...