

Page 1

110 Series Mini Dome
1080p Analog Surveillance Camera
Quick-Start
Guide
Page 2

Luma 110 Series Mini Dome Camera
Box Contents
• Camera and mount
• DC 12V power adapter
• Self-adhesive mounting template
• 4 × camera mount screws with anchors
• Extra desiccant pack
• 2.5mm hex wrench
Other Required Equipment
Aside from the contents of this box, you will need
• Phillips screwdriver
• Power source: 12V DC
• CC-TV tester (recommended)
2
Page 3

Luma 110 Series Mini Dome Camera
Inspection
Before you start, ensure that the device is in good condition and
all the assembly parts are included.
} Power off all equipment during installation.
} Ensure the wall is strong enough to hold three times the
weight of the camera and the mount.
} If the mounting surface is cement, use the included expansion
screws to install the camera. If mounting to a wood surface,
use self-tapping wood screws (not included) to secure the
camera.
} If the product does not function properly, please contact
technical support. Do not disassemble the camera for repair
or maintenance.
WARNING: This product can expose you to chemicals
including cadmium, which is known to the State of
California to cause cancer. For more information go to
www.P65Warnings.ca.gov.
3
Page 4
Luma 110 Series Mini Dome Camera
Overview
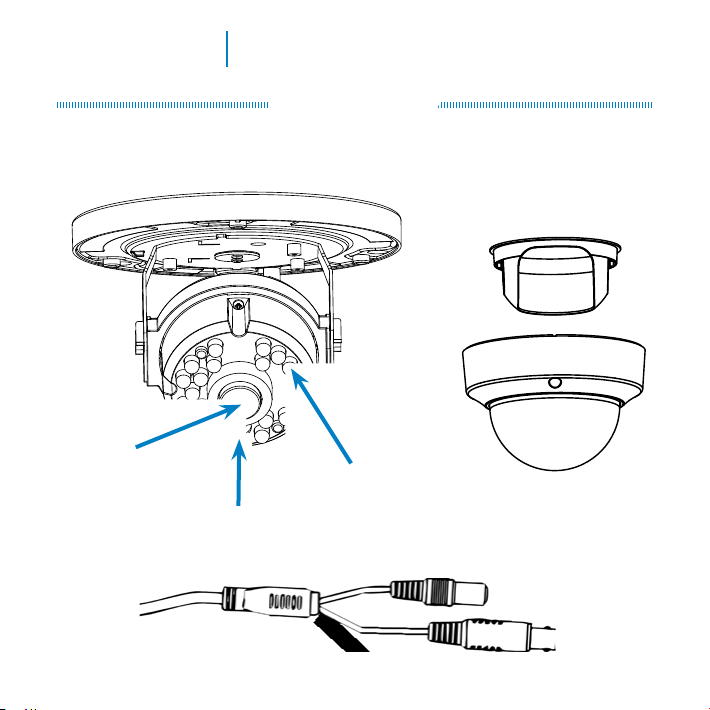
Before installing, acquaint yourself with the parts of your camera.
Camera
Shroud
Lens
Infrared
LEDs
Light
Sensor
Dome
Cover
Power
Barrel Cable
Video
BNC Cable
4
Page 5

Luma 110 Series Mini Dome Camera
Prepare for Installation
1. Drill a cable hole and pilot holes for your screws in the ceiling,
using the supplied template. We recommend installing with
RJ59 or RJ6 cabling with two-wire power (regular or siamese).
This provides better performance over distance than category
cable with baluns.
2. Loosen the hex screws on the dome to remove the dome and
the black shroud. Do not throw away the foam around the
camera lens! It protects the camera from glare from its infrared
lights.
5
Page 6
Luma 110 Series Mini Dome Camera
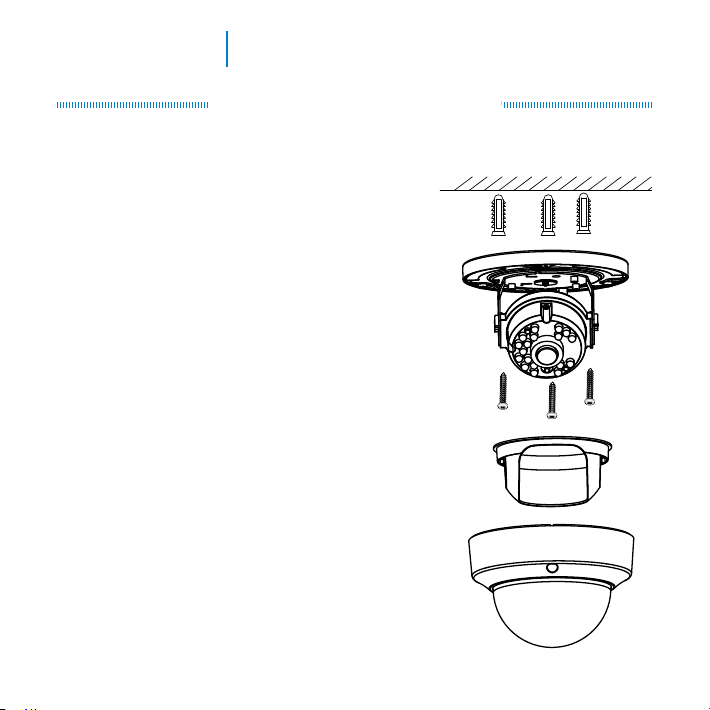
Install the Camera
3. Connect the cables, and route the
cables through the hole.
4. Attach the base of the camera to the
ceiling and secure it.
5. Gripping the side of the camera,
rotate, angle, and spin the lens to get
the orientation you desire.
6. Ensure the black foam ring around
the lens is in its proper position.
Replace the black shroud and
protective dome.
6
Page 7

Luma 110 Series Mini Dome Camera
Adjustments
If you want to use the camera’s on-screen display through your
DVR or the web interface, go into the DVR’s menu and set
the camera protocol to UTC (Coaxitron). To do so from the
DVR’s local interface, go to Settings > Camera > PTZ, then
click the PTZ Settings button. From the web interface, go to
Configure the
Recorder > Camera Settings > PTZ Settings.
7
Page 8

Luma 110 Series Mini Dome Camera
Support
Call 866-838-5052 or email [email protected].
For information, instructional videos, support documentation, or
ideas, visit our website.
5-Year Limited Warranty
This Luma Surveillance™ product has a 5-Year Limited Warranty. This
warranty includes parts and labor repairs on all components found to be
defective in material or workmanship under normal conditions of use. This
warranty shall not apply to products that have been abused, modified or
disassembled. Products to be repaired under this warranty must be returned
to a designated service center with an assigned return authorization (RA)
number. Contact technical support for an RA number.
Copyright ©2015–2019 by SnapAV. All rights reserved. SnapAV, Luma
Surveillance, and all related marks and images are trademarks or registered
trademarks of SnapAV.
Version 190104-1539
8
 Loading...