

Page 1
Start Here
unpacking your
LULZBOT™ TAZ 3D
PRINTER
Save all packaging materials,
foam, clips, inserts, documents,
and the cardboard box in case
Note:
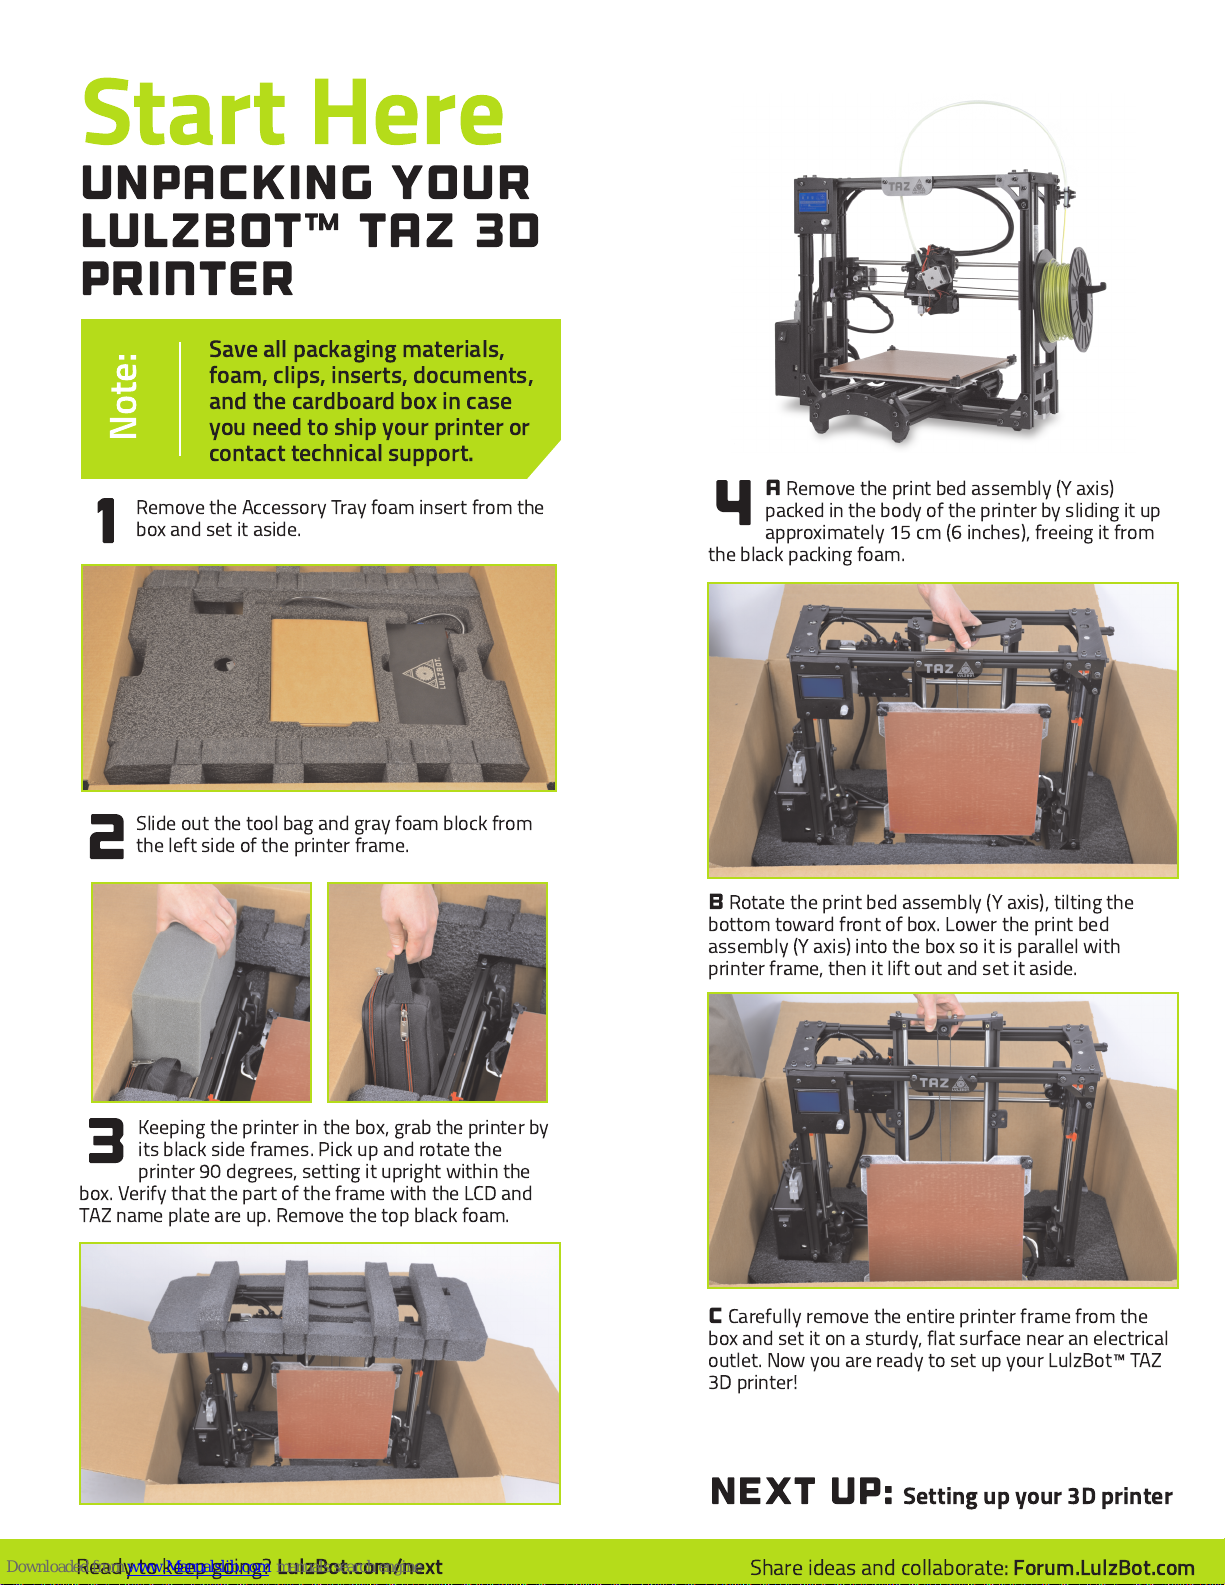
Remove the Accessory Tray foam insert from the
box and set it aside.
1
you need to ship your printer or
contact technical support.
A
Remove the print bed assembly (Y axis)
packed in the body of the printer by sliding it up
4
approximately 15 cm (6 inches), freeing it from
the black packing foam.
Slide out the tool bag and gray foam block from
the left side of the printer frame.
2
Keeping the printer in the box, grab the printer by
its black side frames. Pick up and rotate the
3
printer 90 degrees, setting it upright within the
box. Verify that the part of the frame with the LCD and
TAZ name plate are up. Remove the top black foam.
B
Rotate the print bed assembly (Y axis), tilting the
bottom toward front of box. Lower the print bed
assembly (Y axis) into the box so it is parallel with
printer frame, then it lift out and set it aside.
C
Carefully remove the entire printer frame from the
box and set it on a sturdy, flat surface near an electrical
outlet. Now you are ready to set up your LulzBot™ TAZ
3D printer!
Ready to keep going?
LulzBot.com/next
next up:
Share ideas and collaborate:
Setting up your 3D printer
Forum.LulzBot.com
Page 2
Quick Start Guide
SETTING UP your
LULZBOT™ TAZ 3D
PRINTER
READ THE ENCLOSED USER MANUAL
COMPLETELY BEFORE POWERING UP
YOUR LULZBOT™ TAZ 3D PRINTER
Mounting Printer Bed (Y Axis) to Printer Frame
Remove Protective Pieces!
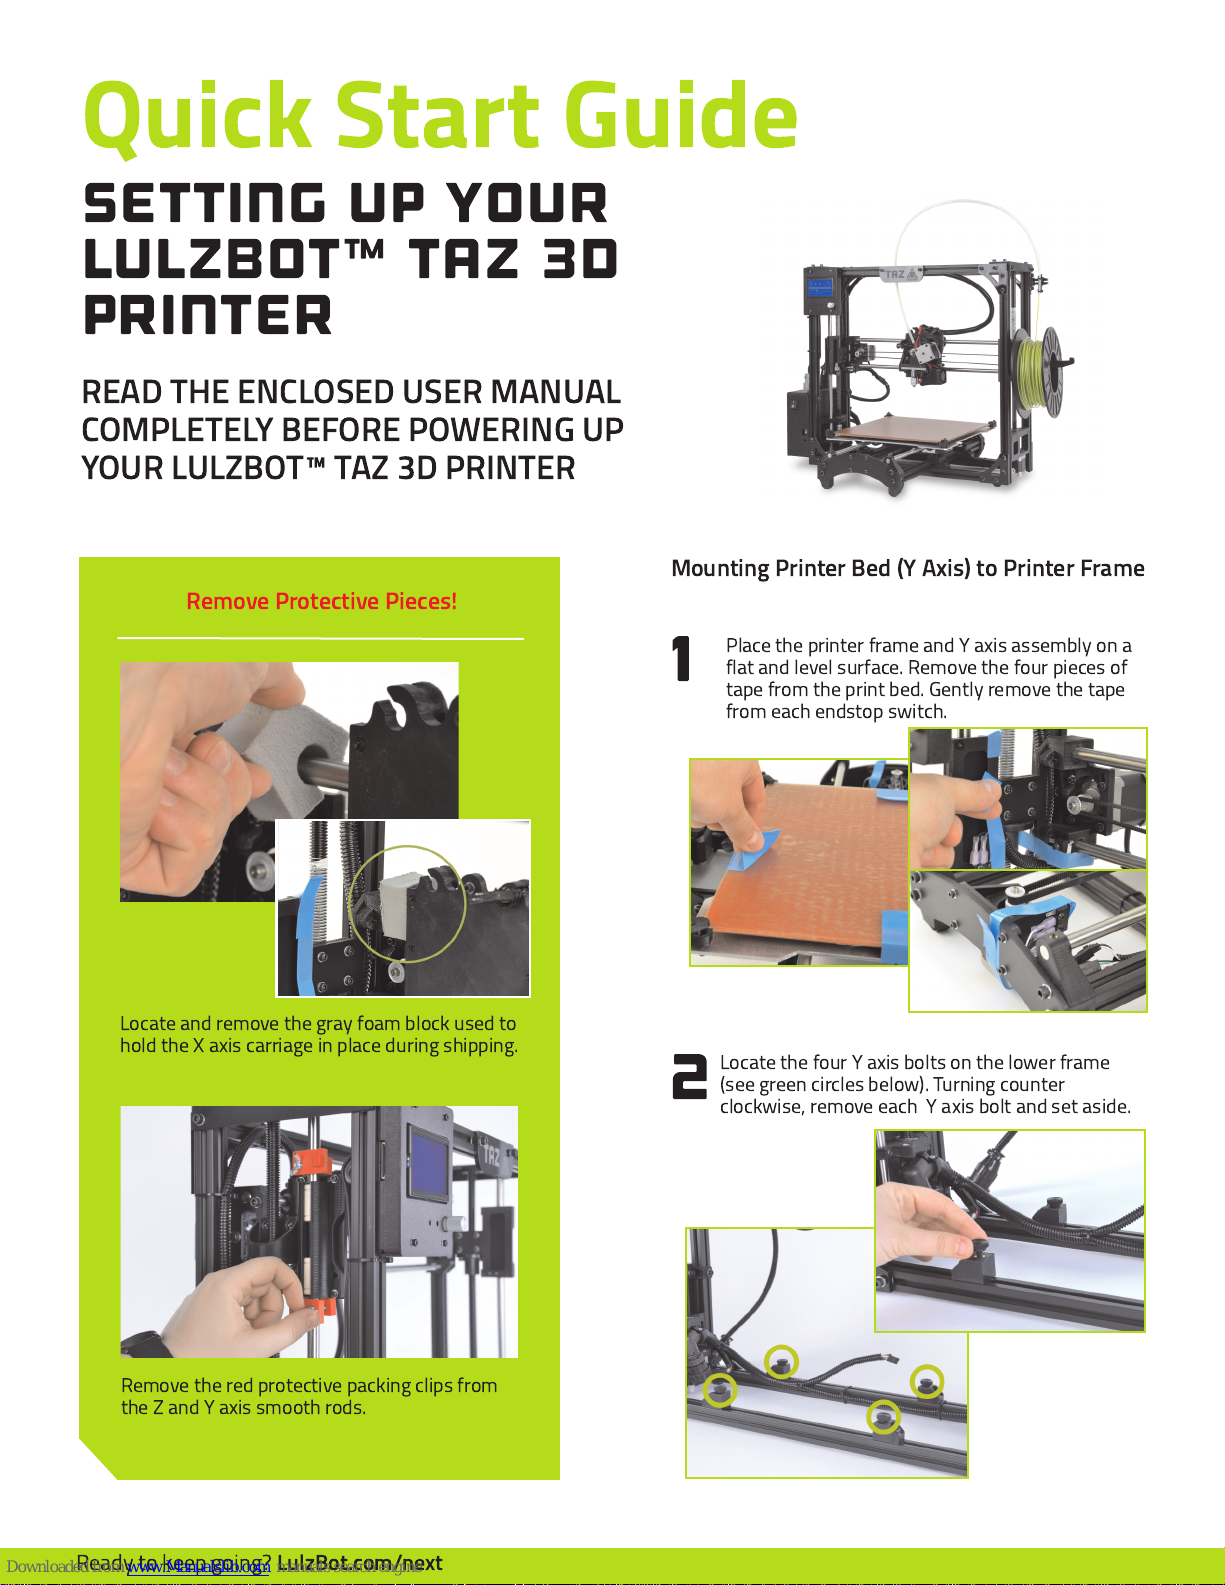
Place the printer frame and Y axis assembly on a
flat and level surface. Remove the four pieces of
1
tape from the print bed. Gently remove the tape
from each endstop switch.
Locate and remove the gray foam block used to
hold the X axis carriage in place during shipping.
Remove the red protective packing clips from
the Z and Y axis smooth rods.
Ready to keep going?
LulzBot.com/next
Locate the four Y axis bolts on the lower frame
(see green circles below). Turning counter
2
clockwise, remove each Y axis bolt and set aside.
Page 3
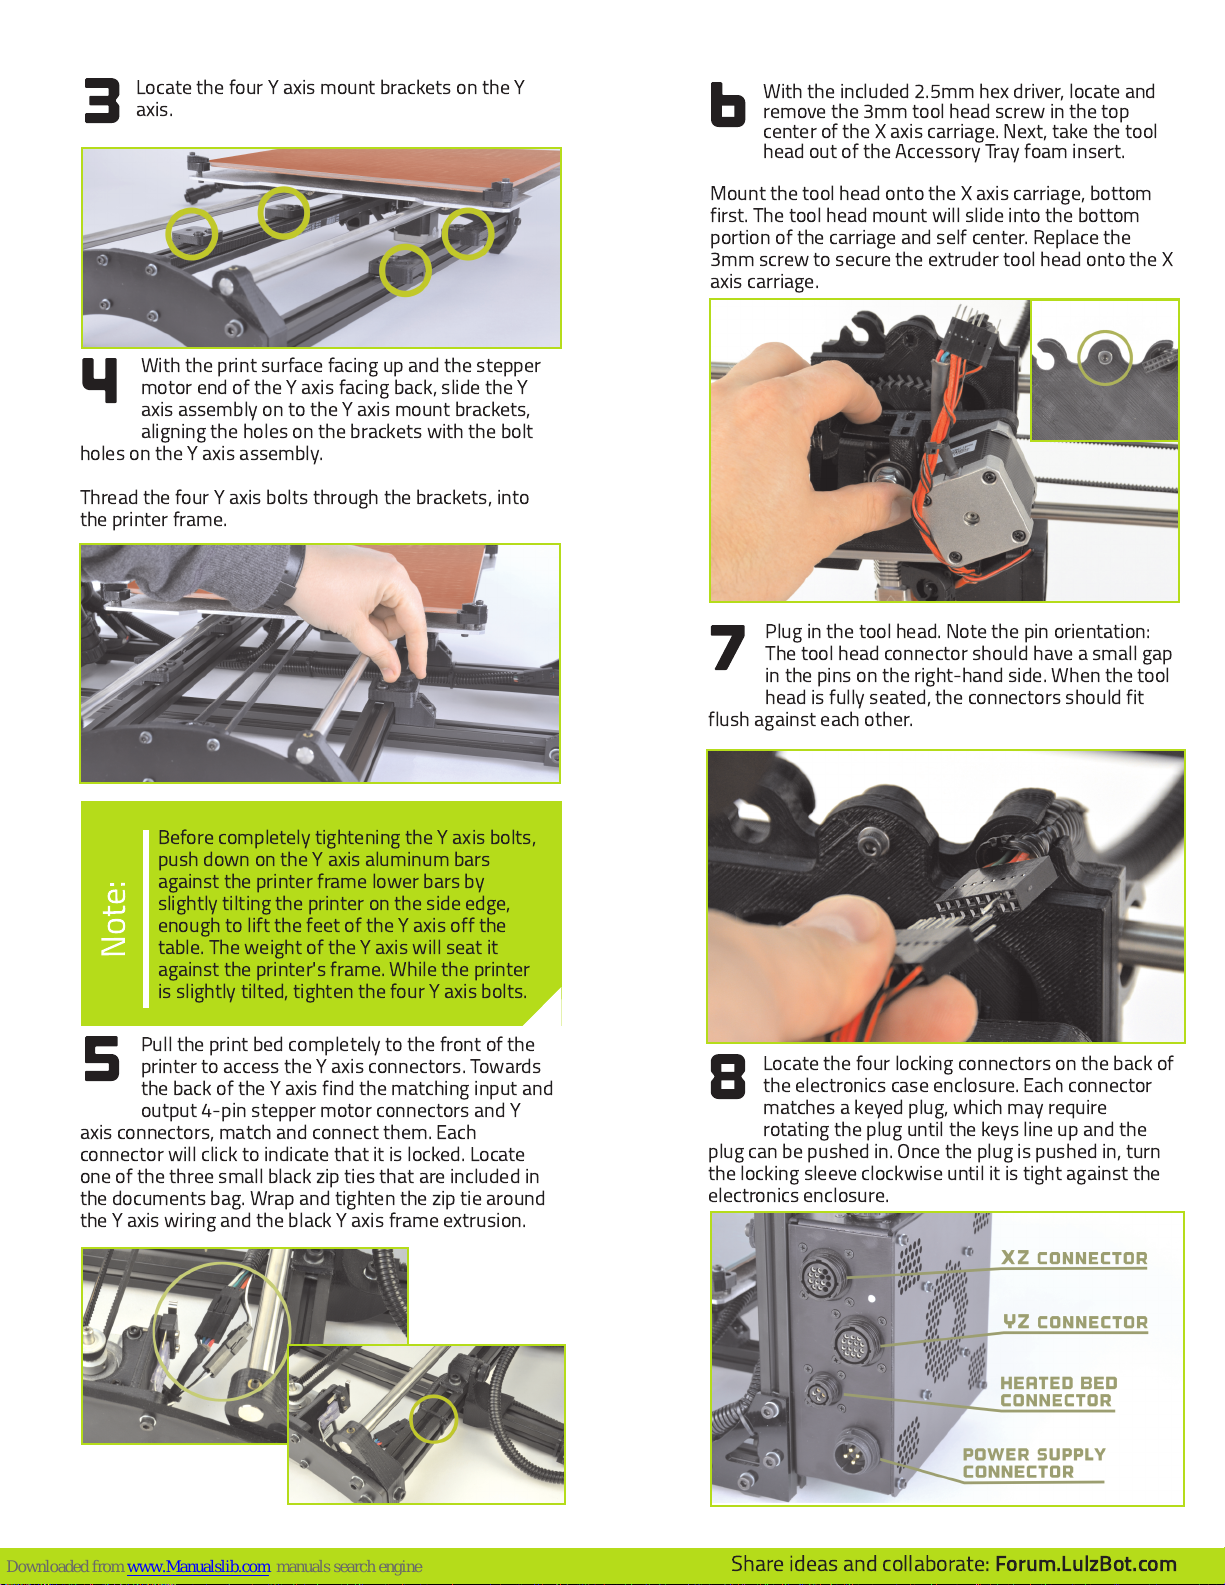
Locate the four Y axis mount brackets on the Y
axis.
3
With the print surface facing up and the stepper
4
holes on the Y axis assembly.
Thread the four Y axis bolts through the brackets, into
the printer frame.
motor end of the Y axis facing back, slide the Y
axis assembly on to the Y axis mount brackets,
aligning the holes on the brackets with the bolt
With the included 2.5mm hex driver, locate and
remove the 3mm tool head screw in the top
6
center of the X axis carriage. Next, take the tool
head out of the Accessory Tray foam insert.
Mount the tool head onto the X axis carriage, bottom
first. The tool head mount will slide into the bottom
portion of the carriage and self center. Replace the
3mm screw to secure the extruder tool head onto the X
axis carriage.
Plug in the tool head. Note the pin orientation:
The tool head connector should have a small gap
7
in the pins on the right-hand side. When the tool
head is fully seated, the connectors should fit
flush against each other.
Before completely tightening the Y axis bolts,
push down on the Y axis aluminum bars
against the printer frame lower bars by
slightly tilting the printer on the side edge,
enough to lift the feet of the Y axis off the
table. The weight of the Y axis will seat it
Note:
against the printer's frame. While the printer
is slightly tilted, tighten the four Y axis bolts.
Pull the print bed completely to the front of the
5
axis connectors, match and connect them. Each
connector will click to indicate that it is locked. Locate
one of the three small black zip ties that are included in
the documents bag. Wrap and tighten the zip tie around
the Y axis wiring and the black Y axis frame extrusion.
printer to access the Y axis connectors. Towards
the back of the Y axis find the matching input and
output 4-pin stepper motor connectors and Y
Locate the four locking connectors on the back of
the electronics case enclosure. Each connector
8
matches a keyed plug, which may require
rotating the plug until the keys line up and the
plug can be pushed in. Once the plug is pushed in, turn
the locking sleeve clockwise until it is tight against the
electronics enclosure.
Share ideas and collaborate:
Forum.LulzBot.com
Page 4
cont.
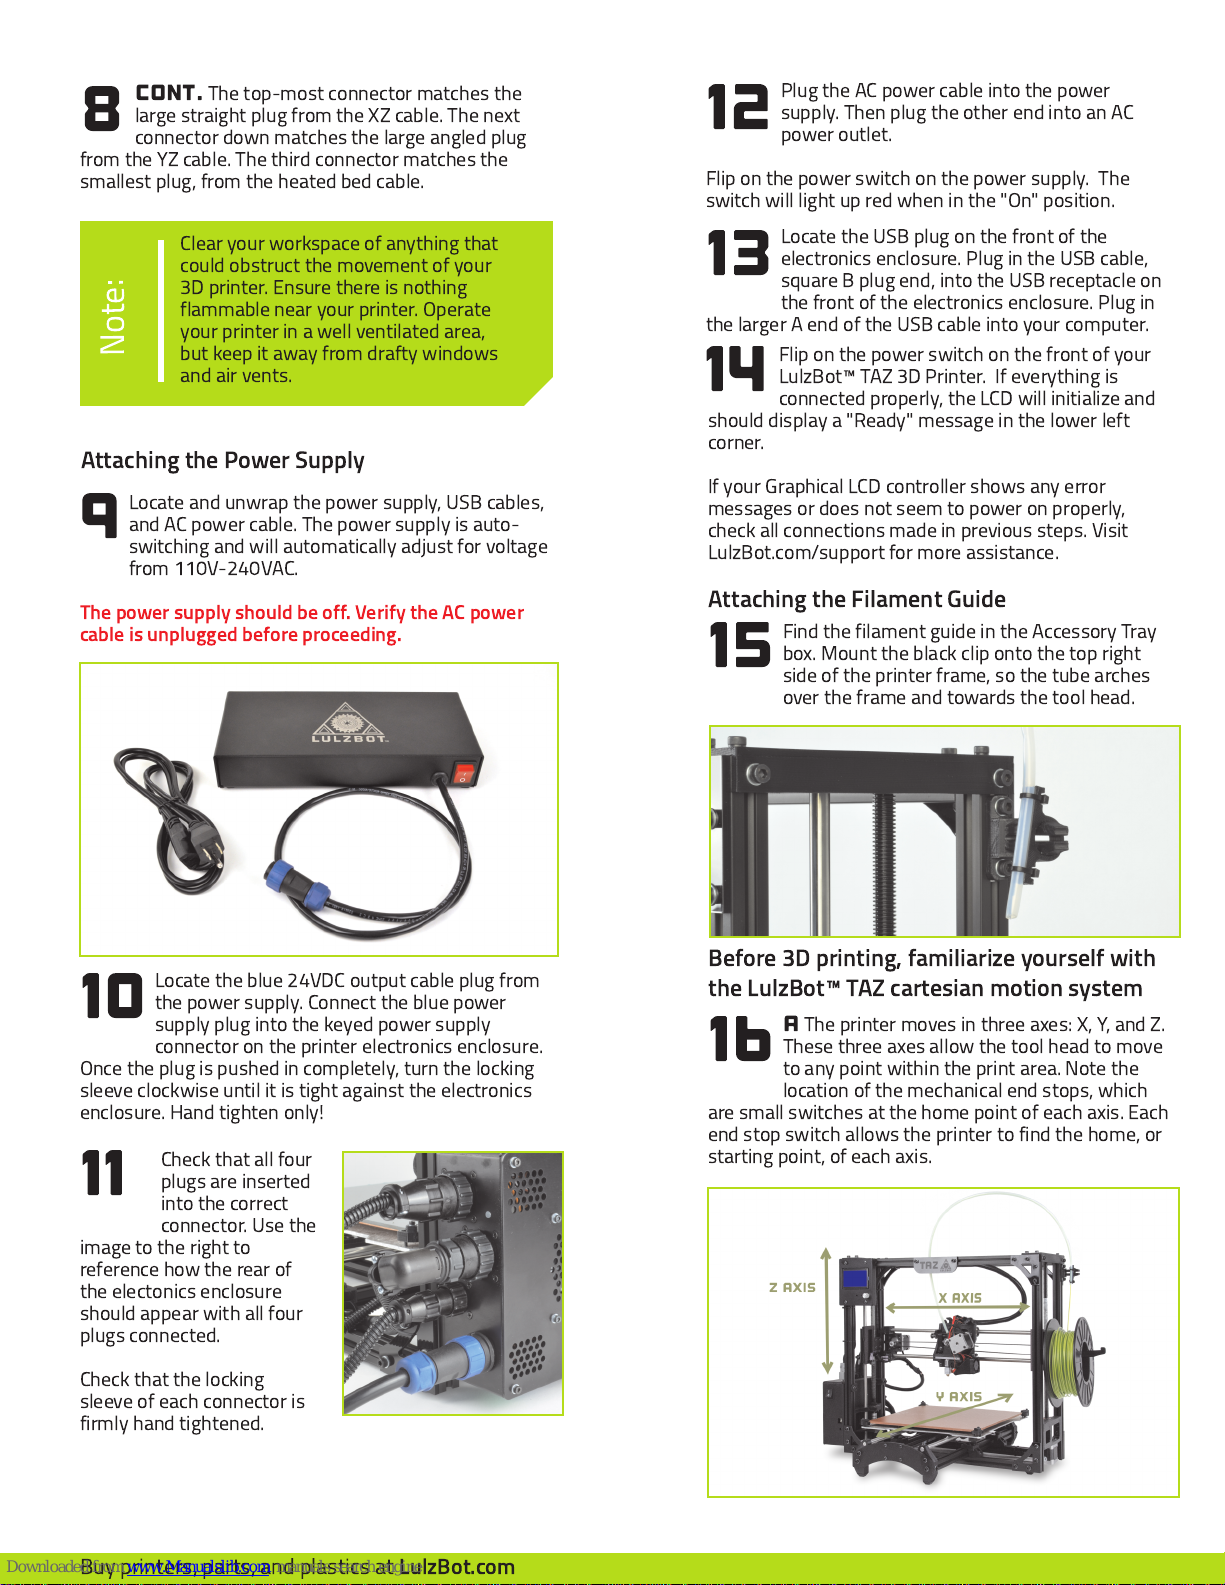
large straight plug from the XZ cable. The next
8
connector down matches the large angled plug
from the YZ cable. The third connector matches the
smallest plug, from the heated bed cable.
The top-most connector matches the
Plug the AC power cable into the power
12
Flip on the power switch on the power supply. The
switch will light up red when in the "On" position.
supply. Then plug the other end into an AC
power outlet.
Clear your workspace of anything that
could obstruct the movement of your
3D printer. Ensure there is nothing
flammable near your printer. Operate
your printer in a well ventilated area,
Note:
but keep it away from drafty windows
and air vents.
Attaching the Power Supply
Locate and unwrap the power supply, USB cables,
and AC power cable. The power supply is auto-
9
switching and will automatically adjust for voltage
from 1 1 0V-240VAC.
The power supply should be off. Verify the AC power
cable is unplugged before proceeding.
Locate the USB plug on the front of the
13
the larger A end of the USB cable into your computer.
14
should display a "Ready" message in the lower left
corner.
If your Graphical LCD controller shows any error
messages or does not seem to power on properly,
check all connections made in previous steps. Visit
LulzBot.com/support for more assistance.
Attaching the Filament Guide
15
electronics enclosure. Plug in the USB cable,
square B plug end, into the USB receptacle on
the front of the electronics enclosure. Plug in
Flip on the power switch on the front of your
LulzBot™ TAZ 3D Printer. If everything is
connected properly, the LCD will initialize and
Find the filament guide in the Accessory Tray
box. Mount the black clip onto the top right
side of the printer frame, so the tube arches
over the frame and towards the tool head.
Locate the blue 24VDC output cable plug from
10
Once the plug is pushed in completely, turn the locking
sleeve clockwise until it is tight against the electronics
enclosure. Hand tighten only!
11
image to the right to
reference how the rear of
the electonics enclosure
should appear with all four
plugs connected.
Check that the locking
sleeve of each connector is
firmly hand tightened.
the power supply. Connect the blue power
supply plug into the keyed power supply
connector on the printer electronics enclosure.
Check that all four
plugs are inserted
into the correct
connector. Use the
Before 3D printing, familiarize yourself with
the LulzBot™ TAZ cartesian motion system
A
The printer moves in three axes: X, Y, and Z.
16
are small switches at the home point of each axis. Each
end stop switch allows the printer to find the home, or
starting point, of each axis.
These three axes allow the tool head to move
to any point within the print area. Note the
location of the mechanical end stops, which
Buy printers, parts, and plastics at
LulzBot.com
Page 5
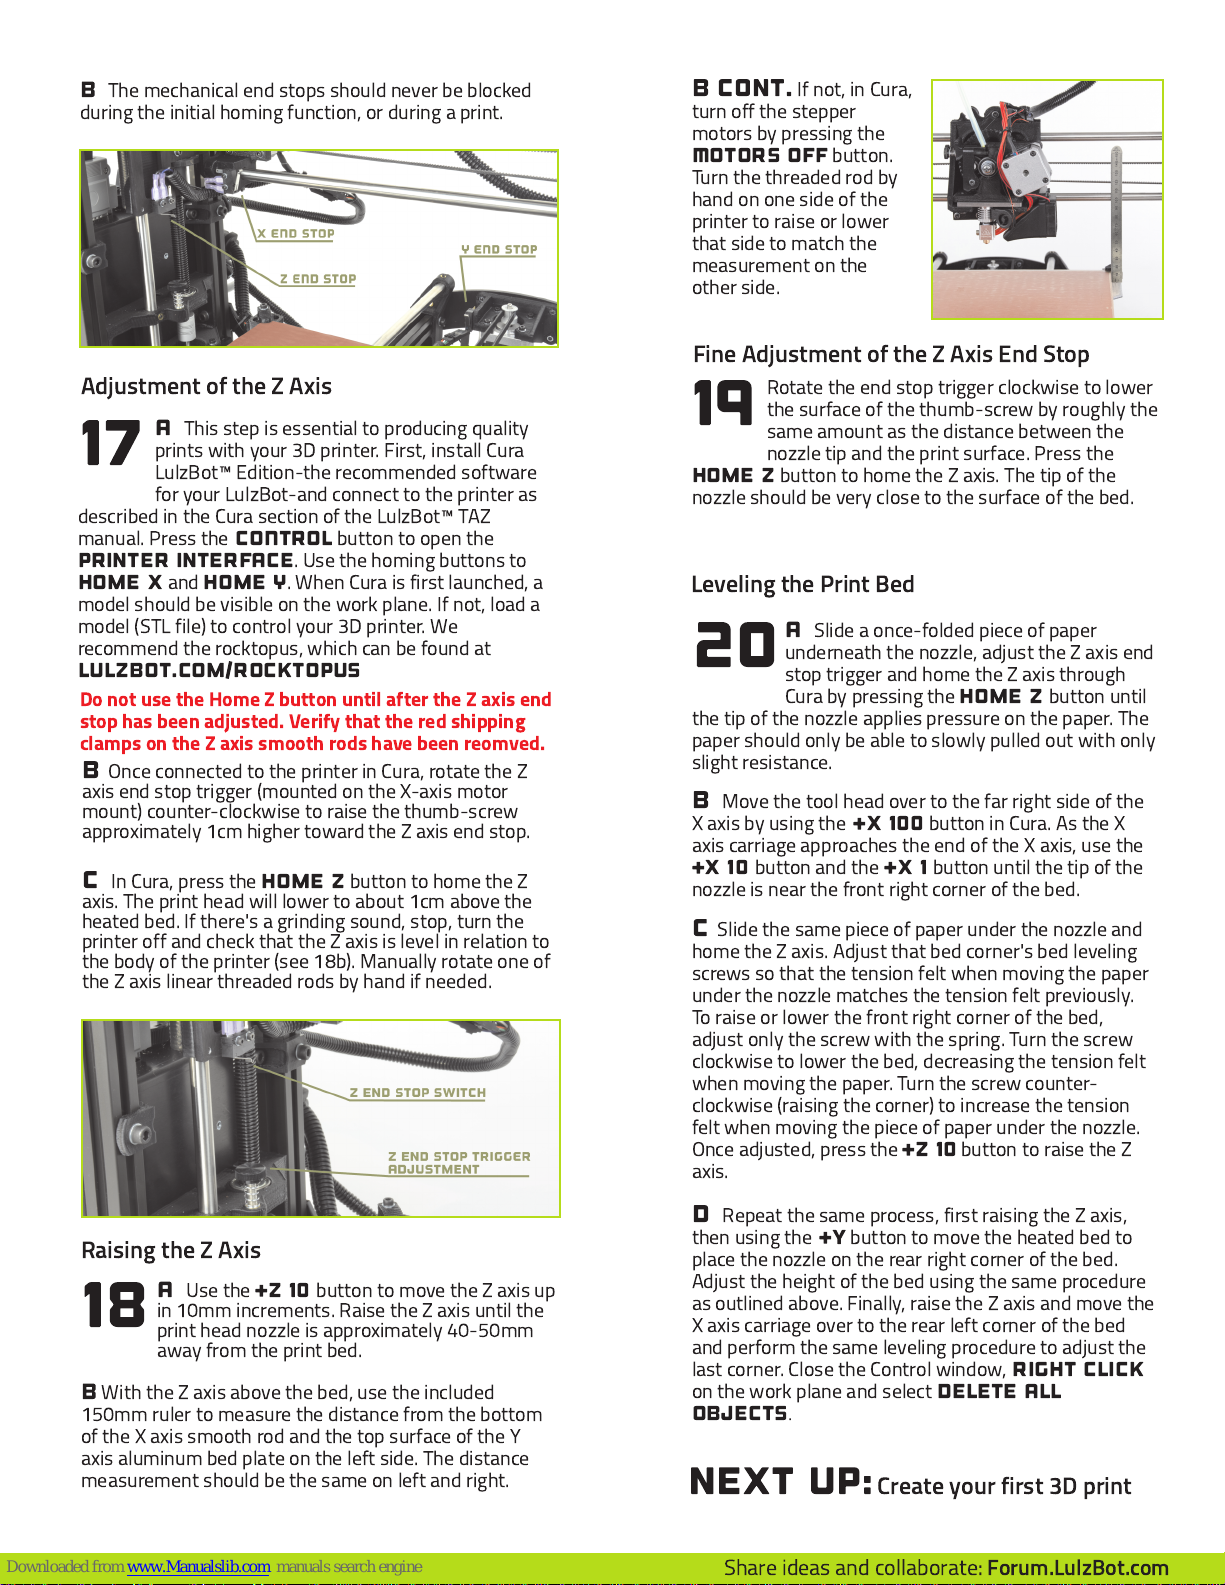
B
The mechanical end stops should never be blocked
during the initial homing function, or during a print.
Adjustment of the Z Axis
A
This step is essential to producing quality
17
described in the Cura section of the LulzBot™ TAZ
manual. Press the
Printer Interface
Home X
model should be visible on the work plane. If not, load a
model (STL file) to control your 3D printer. We
recommend the rocktopus, which can be found at
LulzBot.com/rocktopus
Do not use the Home Z button until after the Z axis end
stop has been adjusted. Verify that the red shipping
clamps on the Z axis smooth rods have been reomved.
B
axis end stop trigger (mounted on the X-axis motor
mount) counter-clockwise to raise the thumb-screw
approximately 1cm higher toward the Z axis end stop.
C
axis. The print head will lower to about 1cm above the
heated bed. If there's a grinding sound, stop, turn the
printer off and check that the Z axis is level in relation to
the body of the printer (see 18b). Manually rotate one of
the Z axis linear threaded rods by hand if needed.
prints with your 3D printer. First, install Cura
LulzBot™ Edition-the recommended software
for your LulzBot-and connect to the printer as
CONTROL
and
Home Y
Once connected to the printer in Cura, rotate the Z
In Cura, press the
Home Z
button to open the
. Use the homing buttons to
. When Cura is first launched, a
button to home the Z
B cont.
turn off the stepper
motors by pressing the
Motors Off
Turn the threaded rod by
hand on one side of the
printer to raise or lower
that side to match the
measurement on the
other side.
If not, in Cura,
button.
Fine Adjustment of the Z Axis End Stop
Rotate the end stop trigger clockwise to lower
19
Home Z
nozzle should be very close to the surface of the bed.
the surface of the thumb-screw by roughly the
same amount as the distance between the
nozzle tip and the print surface. Press the
button to home the Z axis. The tip of the
Leveling the Print Bed
A
Slide a once-folded piece of paper
20
the tip of the nozzle applies pressure on the paper. The
paper should only be able to slowly pulled out with only
slight resistance.
B
Move the tool head over to the far right side of the
X axis by using the
axis carriage approaches the end of the X axis, use the
+X 10
nozzle is near the front right corner of the bed.
C
Slide the same piece of paper under the nozzle and
home the Z axis. Adjust that bed corner's bed leveling
screws so that the tension felt when moving the paper
under the nozzle matches the tension felt previously.
To raise or lower the front right corner of the bed,
adjust only the screw with the spring. Turn the screw
clockwise to lower the bed, decreasing the tension felt
when moving the paper. Turn the screw counter-
clockwise (raising the corner) to increase the tension
felt when moving the piece of paper under the nozzle.
Once adjusted, press the
axis.
underneath the nozzle, adjust the Z axis end
stop trigger and home the Z axis through
Cura by pressing the
+X 100
button and the
+X 1
Home Z
button in Cura. As the X
button until the tip of the
+Z 10
button to raise the Z
button until
Raising the Z Axis
A
Use the
18
B
1 50mm ruler to measure the distance from the bottom
of the X axis smooth rod and the top surface of the Y
axis aluminum bed plate on the left side. The distance
measurement should be the same on left and right.
in 10mm increments. Raise the Z axis until the
print head nozzle is approximately 40-50mm
away from the print bed.
With the Z axis above the bed, use the included
+Z 10
button to move the Z axis up
D
Repeat the same process, first raising the Z axis,
then using the+ybutton to move the heated bed to
place the nozzle on the rear right corner of the bed.
Adjust the height of the bed using the same procedure
as outlined above. Finally, raise the Z axis and move the
X axis carriage over to the rear left corner of the bed
and perform the same leveling procedure to adjust the
last corner. Close the Control window,
on the work plane and select
Objects
.
next up:
Delete All
Create your first 3D print
Share ideas and collaborate:
right click
Forum.LulzBot.com
Page 6
Create Your
First 3D Print
Attach filament
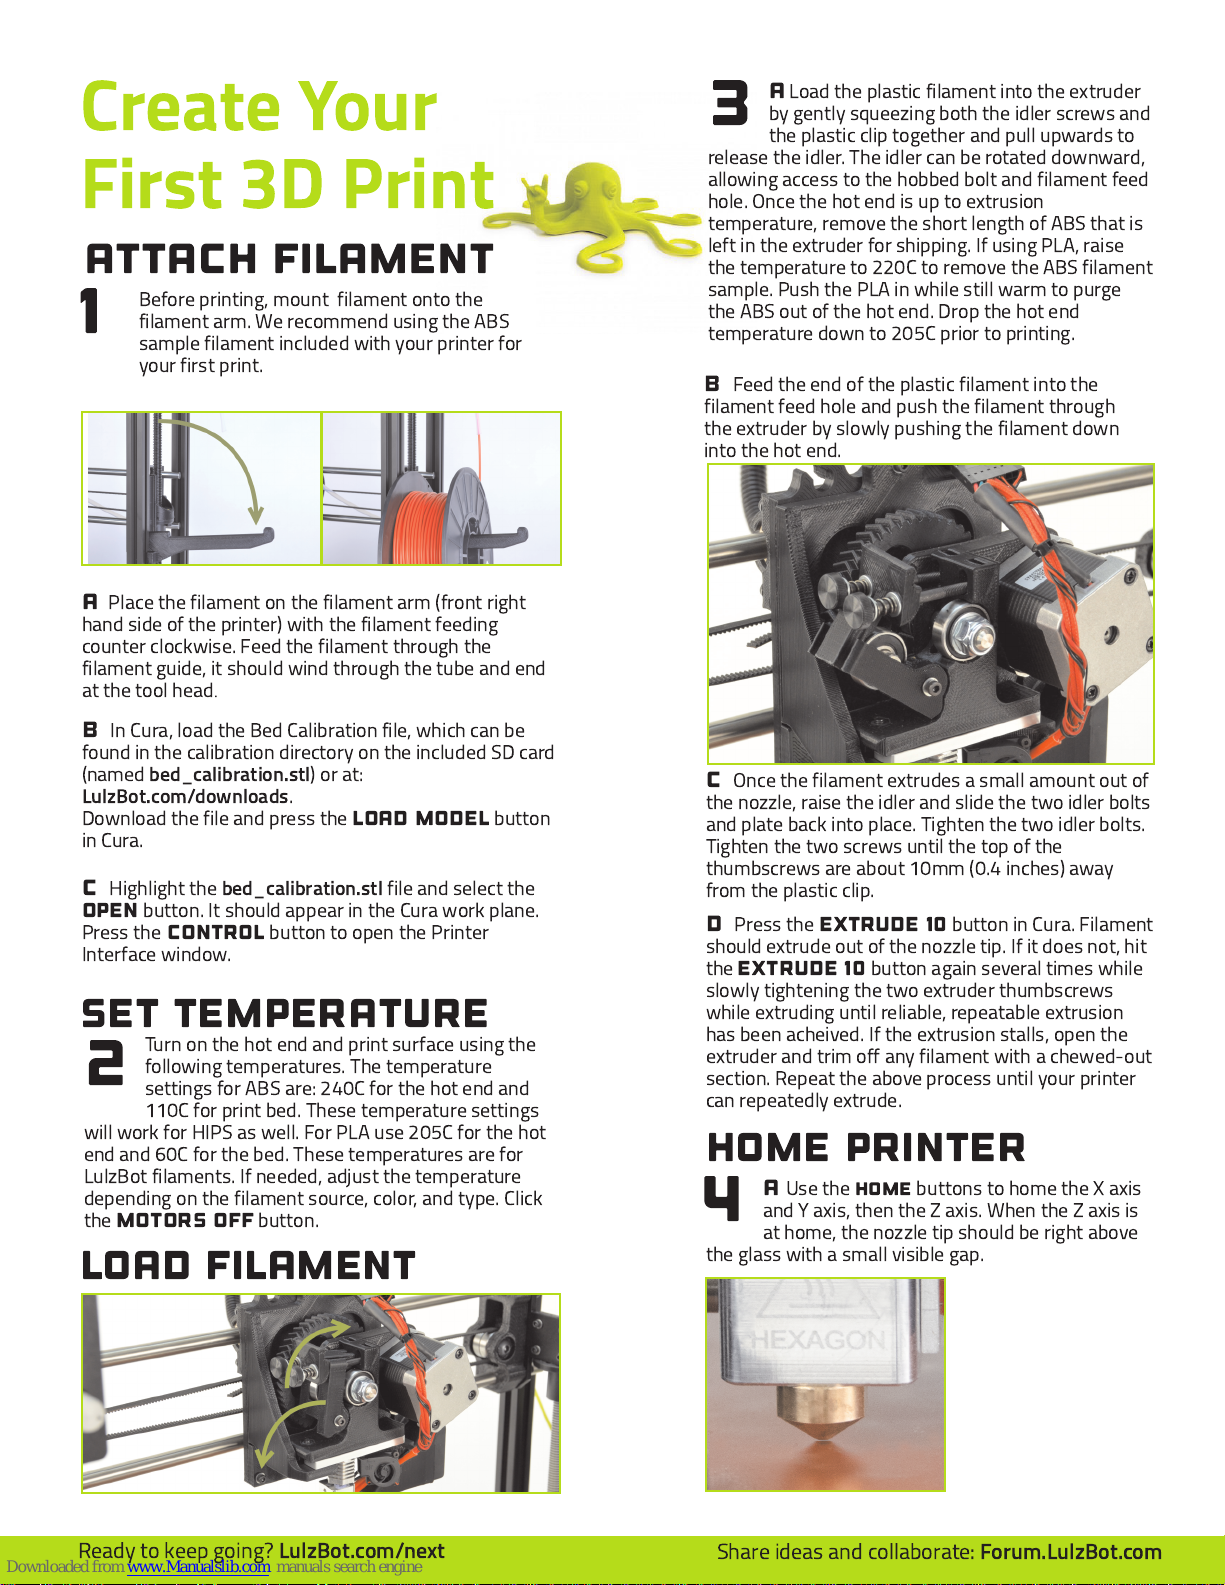
Before printing, mount filament onto the
filament arm. We recommend using the ABS
1
sample filament included with your printer for
your first print.
A
Place the filament on the filament arm (front right
hand side of the printer) with the filament feeding
counter clockwise. Feed the filament through the
filament guide, it should wind through the tube and end
at the tool head
.
A
Load the plastic filament into the extruder
3
release the idler. The idler can be rotated downward,
allowing access to the hobbed bolt and filament feed
hole. Once the hot end is up to extrusion
temperature, remove the short length of ABS that is
left in the extruder for shipping. If using PLA, raise
the temperature to 220C to remove the ABS filament
sample. Push the PLA in while still warm to purge
the ABS out of the hot end. Drop the hot end
temperature down to 205C prior to printing.
B
filament feed hole and push the filament through
the extruder by slowly pushing the filament down
into the hot end.
by gently squeezing both the idler screws and
the plastic clip together and pull upwards to
Feed the end of the plastic filament into the
B
In Cura, load the Bed Calibration file, which can be
found in the calibration directory on the included SD card
(named
LulzBot.com/downloads
Download the file and press the
in Cura.
C
Open
Press the
Interface window.
bed_calibration.stl
Highlight the
button. It should appear in the Cura work plane.
bed_calibration.stl
Control
) or at:
.
Load model
file and select the
button to open the Printer
button
Set Temperature
Turn on the hot end and print surface using the
2
will work for HIPS as well. For PLA use 205C for the hot
end and 60C for the bed. These temperatures are for
LulzBot filaments. If needed, adjust the temperature
depending on the filament source, color, and type. Click
the
following temperatures. The temperature
settings for ABS are: 240C for the hot end and
1 1 0C for print bed. These temperature settings
motors Off
button.
Load Filament
C
Once the filament extrudes a small amount out of
the nozzle, raise the idler and slide the two idler bolts
and plate back into place. Tighten the two idler bolts.
Tighten the two screws until the top of the
thumbscrews are about 1 0mm (0.4 inches) away
from the plastic clip.
D
Press the
should extrude out of the nozzle tip. If it does not, hit
the
extrude 10
slowly tightening the two extruder thumbscrews
while extruding until reliable, repeatable extrusion
has been acheived. If the extrusion stalls, open the
extruder and trim off any filament with a chewed-out
section. Repeat the above process until your printer
can repeatedly extrude.
extrude 10
button again several times while
button in Cura. Filament
Home Printer
A
Use the
4
and Y axis, then the Z axis. When the Z axis is
at home, the nozzle tip should be right above
the glass with a small visible gap.
home
buttons to home the X axis
Ready to keep going?
LulzBot.com/next
Share ideas and collaborate:
Forum.LulzBot.com
Page 7
B
Too
Low
Low High
Too
high
Perfect
To decrease or increase the Z homing height, adjust
the Z end stop trigger, which is on the far left of the
printer, mounted on the X axis motor mount. Decrease
the gap by turning clockwise. Increase the gap by turning
counter-clockwise. Once the axes have been homed, the
hot end, and print surface have reached the correct
temperature, it is time to print!
Z Print Height
A
Confirm that the top of the Printer Interface
5
printing the Bed Calibration file.
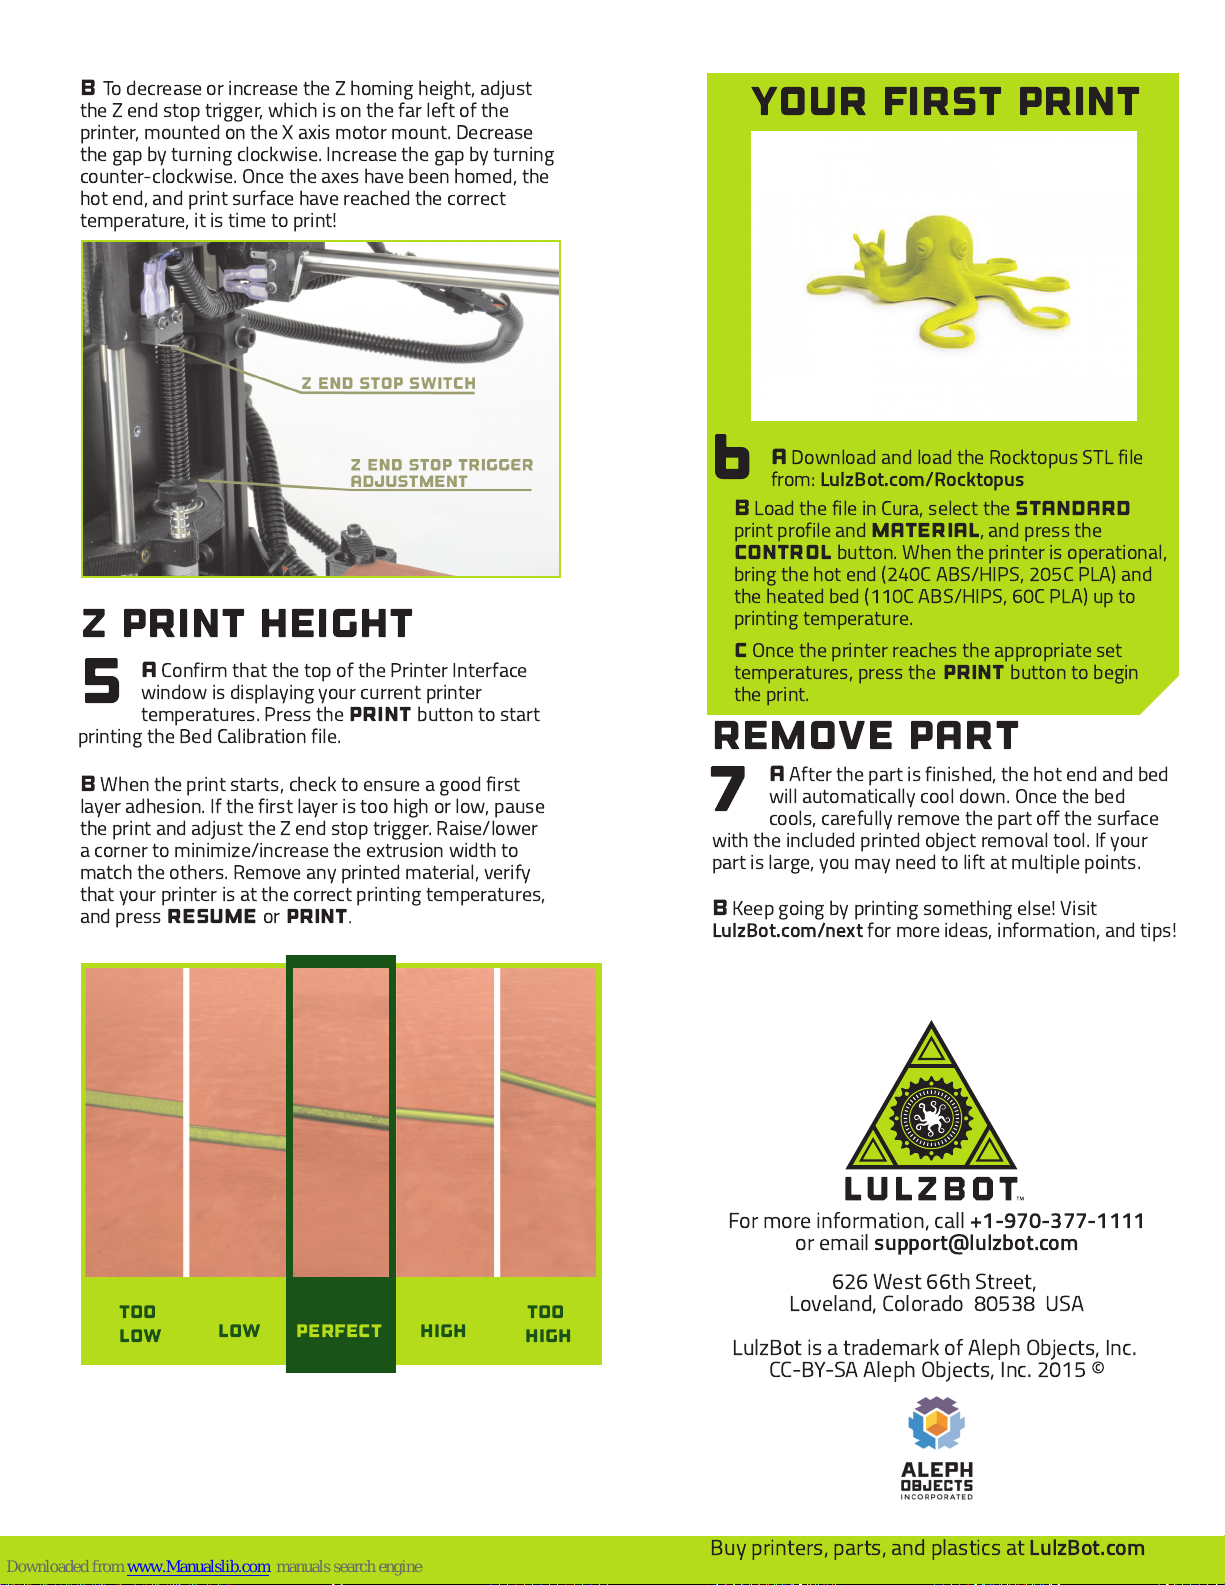
B
layer adhesion. If the first layer is too high or low, pause
the print and adjust the Z end stop trigger. Raise/lower
a corner to minimize/increase the extrusion width to
match the others. Remove any printed material, verify
that your printer is at the correct printing temperatures,
and press
window is displaying your current printer
temperatures. Press the
When the print starts, check to ensure a good first
ResumeorPrint
Print
.
button to start
your first print
A
6
Download and load the Rocktopus STL file
from:
LulzBot.com/Rocktopus
B
Load the file in Cura, select the
print profile and
Control
bring the hot end (240C ABS/HIPS, 205C PLA) and
the heated bed (1 1 0C ABS/HIPS, 60C PLA) up to
printing temperature.
C
Once the printer reaches the appropriate set
temperatures, press the
the print.
material
button. When the printer is operational,
Print
Standard
, and press the
button to begin
Remove Part
A
After the part is finished, the hot end and bed
7
will automatically cool down. Once the bed
cools, carefully remove the part off the surface
with the included printed object removal tool. If your
part is large, you may need to lift at multiple points.
B
Keep going by printing something else! Visit
LulzBot.com/next
for more ideas, information, and tips!
For more information, call
or email
Loveland, Colorado 80538 USA
LulzBot is a trademark of Aleph Objects, Inc.
CC-BY-SA Aleph Objects, Inc. 201 5 ©
Buy printers, parts, and plastics at
support@lulzbot.com
626 West 66th Street,
+1 -970-377-111 1
LulzBot.com
Page 8
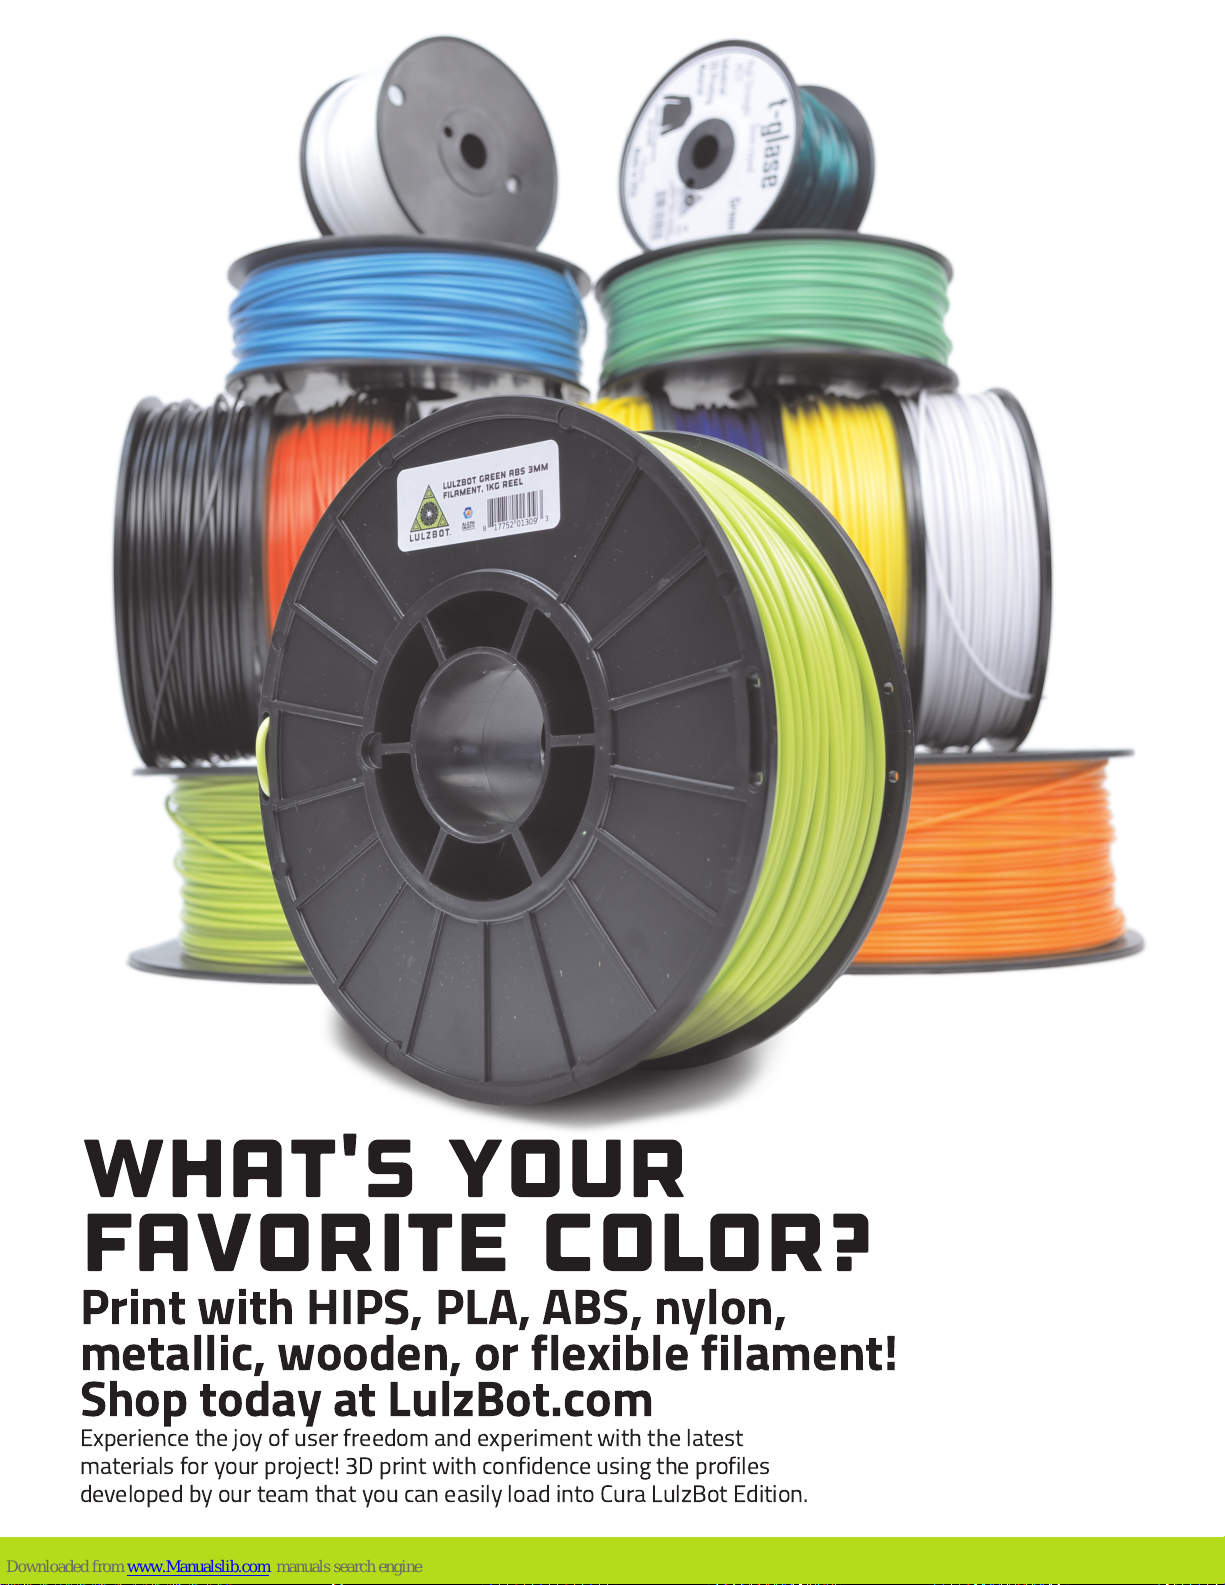
what's your
favorite color?
Print with HIPS, PLA, ABS, nylon,
metallic, wooden, or flexible filament!
Shop today at LulzBot.com
Experience the joy of user freedom and experiment with the latest
materials for your project! 3D print with confidence using the profiles
developed by our team that you can easily load into Cura LulzBot Edition.
 Loading...