

Page 1
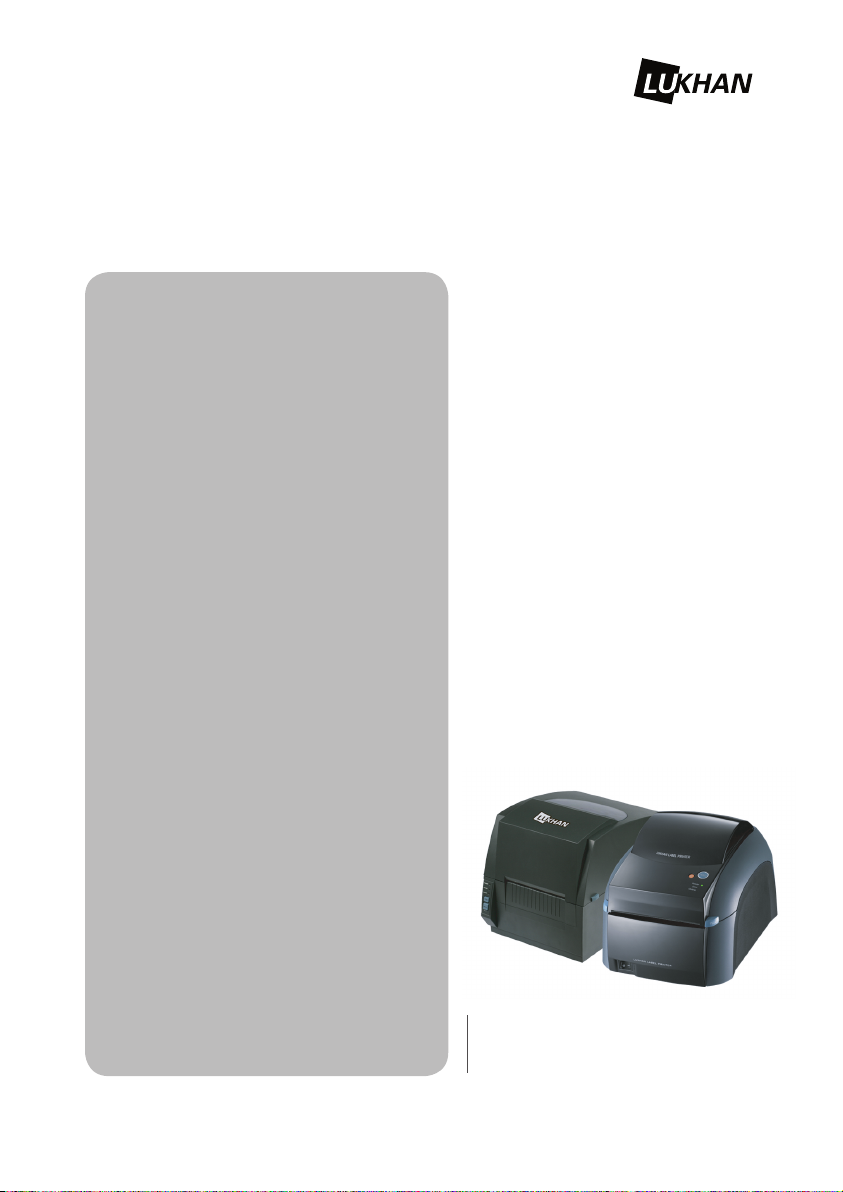
Command Manual
This section contains a complete listing of all
commands in alphabetical order.
4” DESKTOP LABEL PRINTER
MODEL : LK-B10/B20/B30
Page 2

Page 3
2
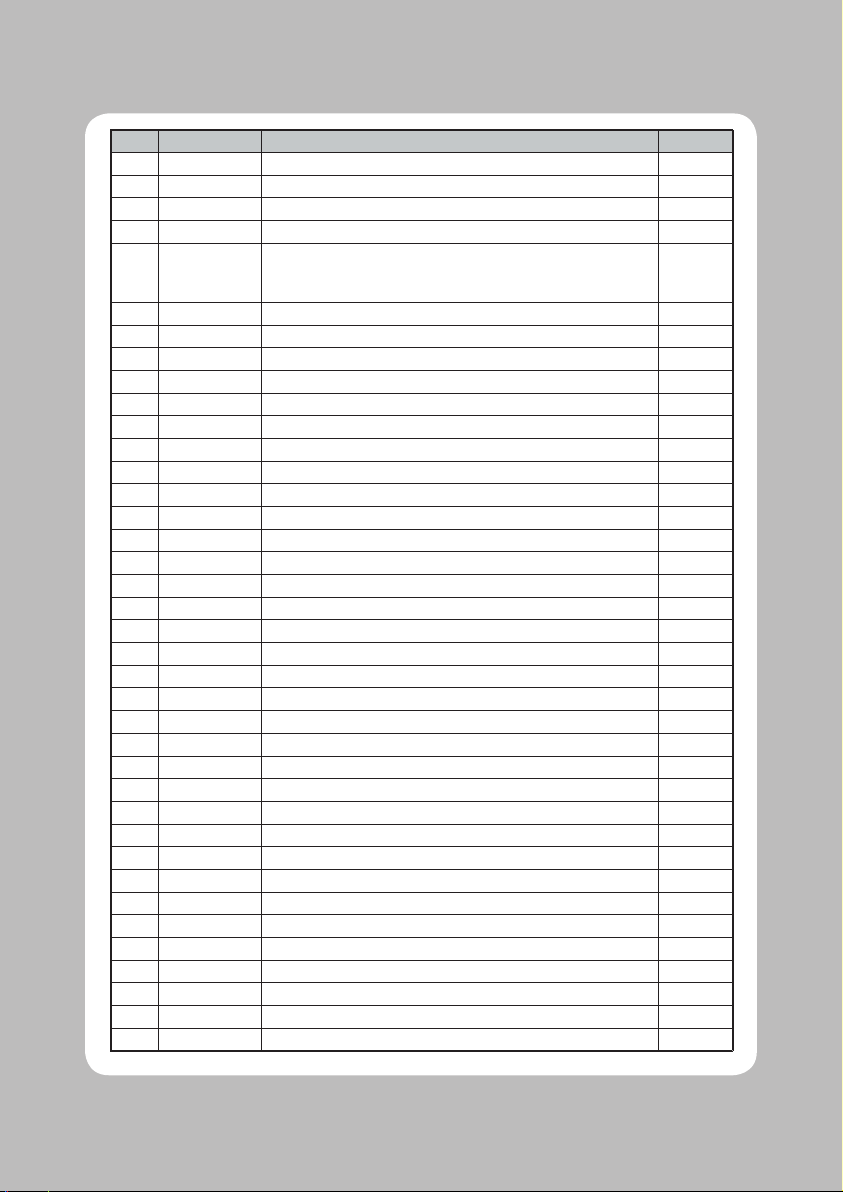
No. Command Description Page
1 A ASCⅡ Text 4
2 AUTOFR Automatic Form Printing 9
3 B Bar Code 11
4 B RSS-14 Bar Code 16
5 b
Data Matrix
MaxiCode
PDF417
20
6 C Counter 37
7 C Cut Immediate 39
8 D Density 40
9 EI Print Soft Font Info. 43
10 EK Delete Soft Font 44
11 eR User Definable Error Response 42
12 ES Store Soft Font 45
13 f Cut/Peel Position 50
14 FE End Form Store 51
15 FI Print Form Info. 52
16 FK Delete Form 53
17 FR Retrieve Form 54
18 FS Store Form 55-56
19 GG Retrieve Graphics 57
20 GI Print Graphics Info. 58
21 GK Delete Graphic 59
22 GM Store Graphic 60-61
23 GW Direct Graphic Write 62
24 I Character Set Selection 63-64
25 JB Disable Top Of Form Backup 65
26 JC Disable Top Of Form Backup –All Cases 66
27 JF Enable Top Of Form Backup 67
28 LE Line Draw Exclusive OR 68
29 LO Line Draw Black 69
30 LS Line Draw Diagonal 70
31 LW Line Draw White 71
32 M Memory Allocation 72
33 N Clear Image Buffer 73
34 o Cancel Customized Settings 74
35 oB Cancel Customize Bar Code 75
36 oE Line Mode Font Substitution 76
37 oH Macro PDF Offset 77-78
38 oM Disable Initial Esc Sequence Feed 79
Page 4
3
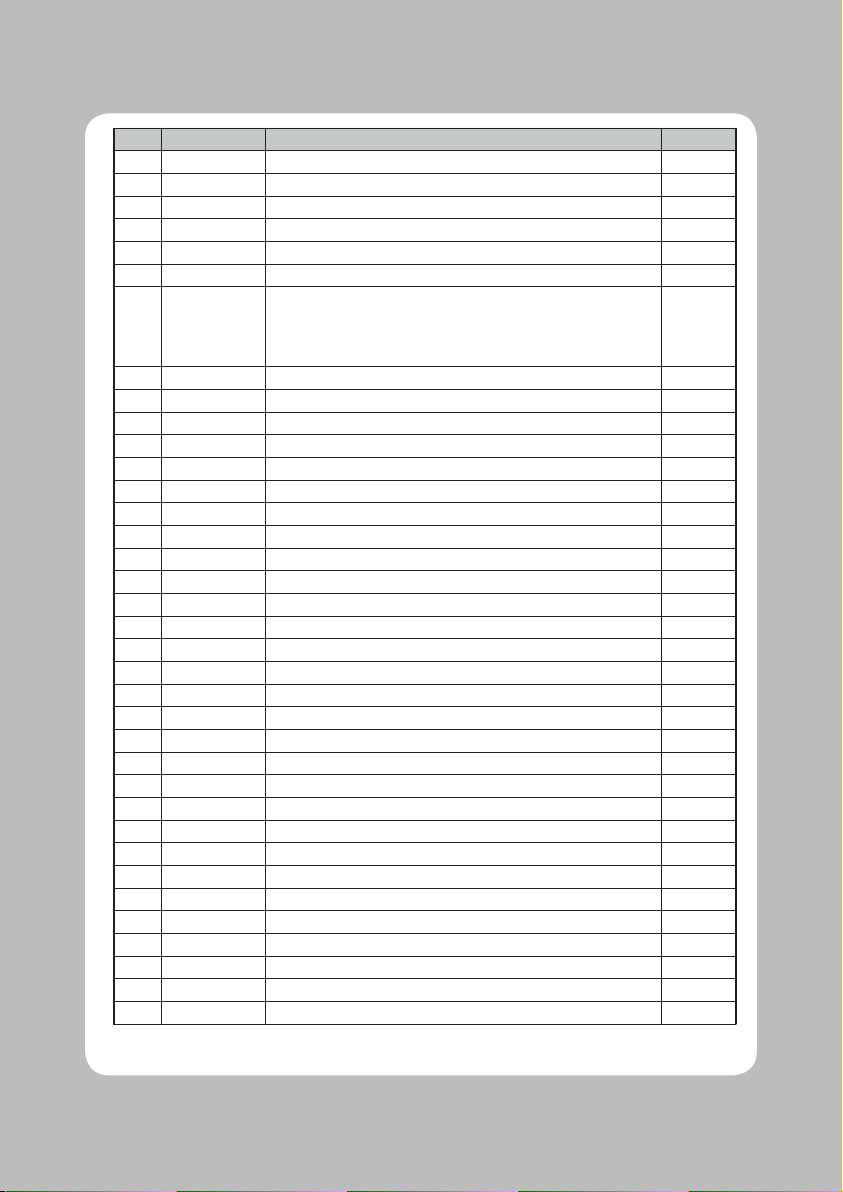
No. Command Description Page
39 oR Character Substitution(Euro) 80-81
40 oW Customize Bar Code Parameters 82-83
41 O Options Select 84-85
42 OEPL1 Set Line Mode 86
43 P Print 87
44 PA Print Automatic 88
45 Q
Set Form Length
Transmissive(Gap)Sensor
Black Line Sensor
Continuous Stock
89-90
46 q Set Form Width 91-94
47 r Set Double Buffer Mode 95
48 R Set Reference Point 96
49 S Speed Select 97
50 TD Define Date Layout(& Print Date) 98
51 TS Set Real Time Clock 99
52 TT Define Time Layout(& Print Time) 100
53 U Print Configuration 101
54 UA Enable Clear Label Counter Mode 102
55 UB Reset Label Counter Mode 103
56 UE External Font Information Inquiry 104
57 UF Form Information Inquiry 105
58 UG Graphic Information Inquiry 106
59 UI Host Prompts/Codepage Inquiry 107
60 UM Codepage& Memory Inquiry 108
61 UN Disable Error Reporting 109
62 UP Codepage& Memory Inquiry/Print 110
63 UQ Configuration Inquiry 111
64 US Enable Error Reporting 112-115
65 V Define Variable 116
66 W Windows Mode 117
67 xa Sense Media 118
68 X Box Draw 119
69 Y Serial Port Setup 120
70 Z Print Direction 121
71 ? Download Variables 122
72 ^ @ Reset Printer 123
73 ^ default Set Printer to Factory Defaults 124
74 ^ ee Status Report – Immediate 125
Page 5
4
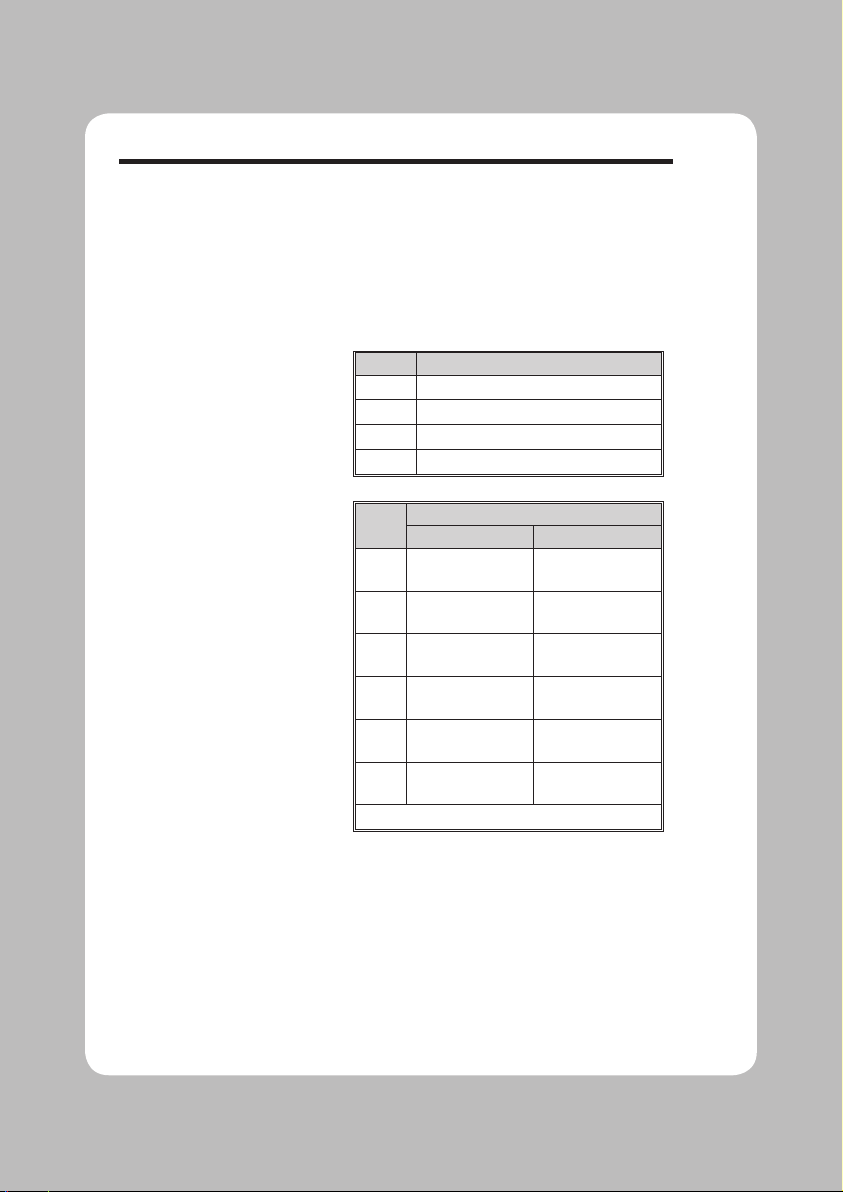
A Command - ASCII Text
Description Prints an ASCII text string.
Syntax Ap
1,p2,p3,p4,p5,p6,p7
,“DATA”
Parameters
p1 = Hor izontal start po sition (X) in dots.
p2 = Vertical start position (Y) in dots.
p3 = Ro tation
Value De scrip tion
0
No rotation
1
90 degrees
2
180 degree
s
3
270 degree
s
p4 = Font se lection
Value
De
scr
ip
tion
203 dpi 300 dpi
1
20.3 cpi, 6 pts
,
(8 x 12 dots)
25 cpi, 4 pts,
(12 x 20 dots)
2
16.9 cpi, 7 pts
,
(10 x 16 dots)
18.75 cpi, 6 pts,
(16 x 28 dots)
3
14.5 cpi, 10 pts
,
(12 x 20 dots)
15 cpi, 8 pts,
(20 x 36 dots)
4
12.7 cpi, 12 pts
,
(14 x 24 dots)
12.5 cpi, 10 pts,
(24 x 44 dots)
5
5.6 cpi, 24 pts
,
(32 x 48 dots)
6.25 cpi, 21 pts,
(48 x 80 dots)
A -
Z
Reserved for
Soft Fonts
Reserved for
Soft Fonts
Fonts 1 - 5 are fixed pitch.
p5= Hor i
zon tal
mul ti
plier, ex
pands the text
hor i zon tally. Values: 1, 2, 3, 4, 5, 6, & 8.
p6= Ver
ti cal
mul
ti plier, ex pands the
text ver-
tically. Values: 1, 2, 3, 4, 5, 6, 7, 8, & 9.
p7 = N for nor mal or R for re verse im age
“DATA” = Rep resents a fixed data field.
Page 6
5
A Command - ASCII Text
The backslash (\) character designates the fol
lowing character is a literal and will encode into
the data field. Refer to the following examples:
To Print
Enter into data field
“ \”
“Company” \”Company\”
\ \\
\code\ \\code\\
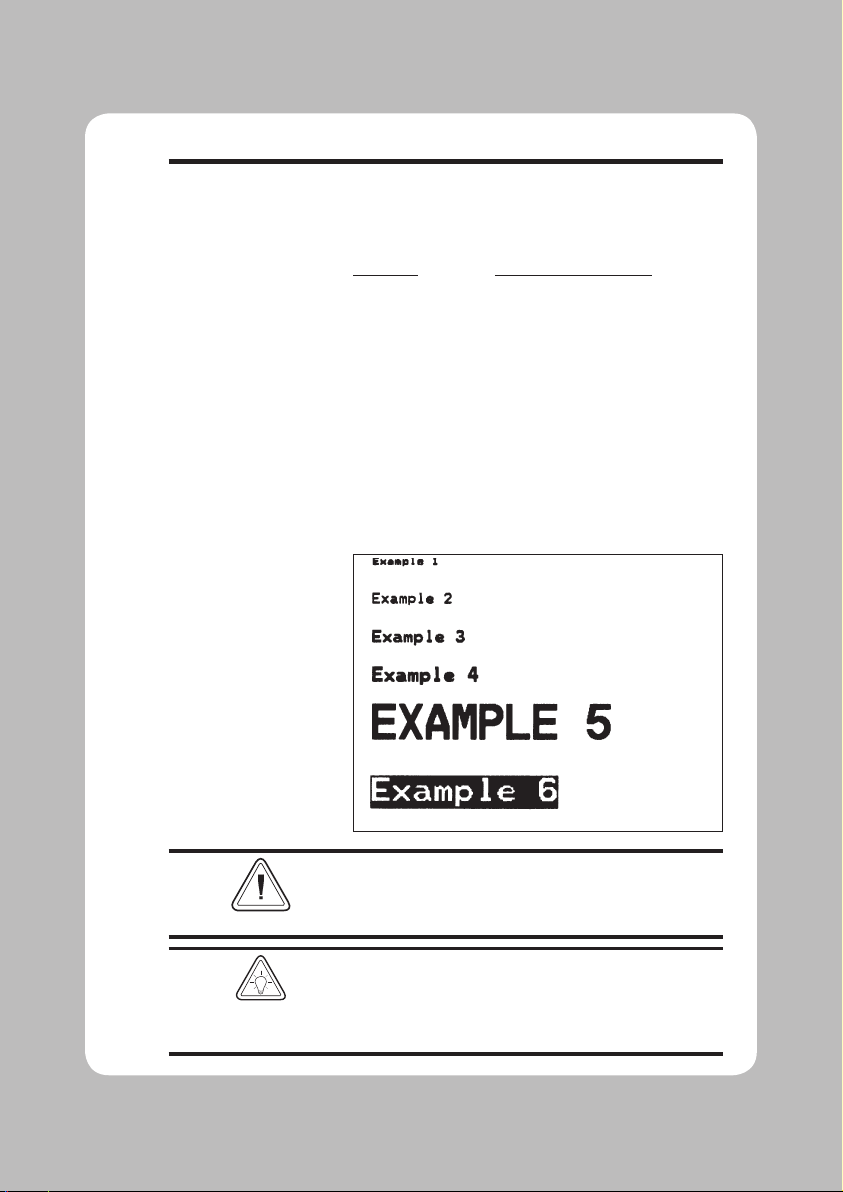
Examples:
�
N�
A50,0,0,1,1,1,N,"Example 1"�
A50,50,0,2,1,1,N,"Example 2"�
A50,100,0,3,1,1,N,"Example 3"�
A50,150,0,4,1,1,N,"Example 4"�
A50,200,0,5,1,1,N,"EXAMPLE 5"�
A50,300,0,3,2,2,R,"Example 6"�
P1�
Will Produce:
As shown in example 5 above, font 5 only supports
upper case characters. Refer to Appendix A for a
complete
listing of available fonts and character sets
supported.
Use
the
LE command
to create
reverse print
text in
stead
of
the
“
R” i
n
the
A command parameter p7.
This is the recommend method because it provides
the best size, position and centering of the black line
(rectangle) bordering the reversed text.
HINT
Page 7

6
A Com mand - ASCII Text
Variable Data and
Counter Functions
The
“
Data”
field
can be replaced by
or
com-
bined with
the following com mands:
Vnn= Prints the con tents of vari able
“nn” at
this po si tion where nn is a 2 digit num
-
ber from 00 to 99. See the
V com mand,
page 3-116
Cn= Prints the con tents of coun ter “n” at this
position where n is a one digit num ber
from 0 to 9. See th
e C com mand,
page 3-37
.
Example:
A50,0,0,1,1,1,N,"DATA"� : Writes Text
A50,50,0,2,1,1,N,V01
� : Writes contents of vari able 01
A50,100,0,3,1,1,N,C1
� : Writes con tents of coun ter
1
A50,100,0,3,1,1,N,C1+2
� : Writes con tents of coun ter 1 plus 2
Data with the RTC
Time & Date
Functions
The
“
Data”
field
can be replaced by
or
com-
bined with the fol lowing vari ables:
TT = Prints the cur rent time at this po sition in
the pre defined for mat. See the TT com
mand for format selection. This vari able
is avail able only if the printer Time
&
Date op tion is in stalled.
TD =Prints the cur rent date at this po sition in
the pre defined for mat. See the TD com
mand for format selection. This vari able
is avail able only if the printer Time
&
Date op tion is in stalled.
Examples:
A50,150,0,4,1,1,N,TT� : Writes cur rent time
A50,200,0,5,1,1,N,TD� : Writes
cu
rrent date
or a com bination of sev eral op tions
:
A50,300,0,3,2,2,R,"De luxe"V01C2"Combo"TDV01TT
�
:Writes the text “Deluxe” fol lowed by the contents of variable 01 fol
-
lowed by the con tents of coun ter 2 followed by the text “Combo” fol
lowed by the cur rent date fol lowed by the con tents of vari able 01
followed by the current time.
Page 8

7
A Command - ASCII TEXT
Simple Expressions
in Data Fields
An
ad
vanced
func
tion
of the
A com mand
al
lows ad dition and subtraction to be performed
on con stant and variable values in flash print ers.
Syntax Ap
1,p2,p3,p4,p5,p6,p7
,“DATA”[p8p9p10…]
Parameters For the
p1 - p7 and “DATA” pa ram e ters -
See first page of A com mand, page 3-4.
p8 = Re quired. Must be a vari able data field
number, e.g. V00, V01 etc.
p9 = Re quired. Op erator, + or –
p10 = Re quired. Variable data field num ber
or constant value.
Valid Num ber Ranges:
Constant = 0 to 2147483647
Variable = 0 to 2147483647
Result = -2147483648 to 2147483647
� The Ex pression must start with a vari able
field.
� The char acter field length de fined for the first
variable
in the
ex
pression
will
be used
to
for
-
mat
the re
sult.
If the
re
sult
is of
a greater
length
than
the
de
fined
char
acter
length,
then
the re sult field will contain ‘X’s.
� A syn tax
er
ror will
be gen
erated
dur
ing
form
storage if the con stant value is too large.
� If an er ror oc curs during the eval uation of the
expression,
the re
sultant
field will be fill
ed
with ‘X’s.
Page 9

8
A Com mand - Sim ple Ex pressions in Data Fields
Example:
�
FK"1"
�
FK"1"�
FS"1"
�
V00,10,N,"En
ter cur
ren
t mile
age"
�
A100,100,0,4,1,1,N,"Current mile age is “V00" miles.
”�
A100,200,0,4,1,1,N,"Change oil at “V00+3000" miles.”
�
FE�
�
FK"2"�
FK"2"�
FS"2"
�
V00,10,N,"En
te
r cur
rent
mile
age."
�
V01,10,N,"En te
r in ter val mile age."�
A100,100,0,4,1,1,N,"Current mile age is “V00" miles.”�
A100,200,0,4,1,1,N,"Mileage in terval is “V01" miles.”
�
A100,200,0,4,1,1,N,"Change oil at “V00+V01" miles.”�
FE
�
�
FK"3"�
FK"3"
�
FS"3"
�
V00,10,N,"Enter value 1."
�
V01,10,N,"Enter value 2."
�
V02,10,N,"Enter value 3."
�
A100,200,0,4,1,1,N,"An
swer: “V01+123+V00-10-V02�
FE
�
Asian Character
Font Sets
The
lan
guage
quires
flash based
guage char ac
sup
port
spe
a
cial
printers
ter
is
ver
sup
(ideogram)
an op
tional
the printer
of
sion
port
up to
sets.
fea
support the large Asian character sets.
The Asian character maps and spe cial fea tures
of the
can
sets
A com mand
be found
in
that sup
a sep
arate
port
pub
the char
lication
our Asian Desk top printer CD ROM.
For
Asi an lan
gua ge
fir mware up
publications and sup port op tions see:
www.miniprinter.com
five Asia
Asian
ture
(PCBA)
lan
and
acter
or
dat es,
re
to
on
n
-
-
Page 10

9
AUTOFR Command - Au to matic Form Print ing
Description This spe cial form pro cess al lows you to de tach
the printer from
the com puter and print in a
standalone mode. The LK-B10 printer
the form nam
e AUTOFR to al low the printer to
automatically start a form when the printer is in
itialized power-up. This fea ture can be used
many ways, that in clude the following:
• Feed a single label in peel mode and print
multiple la bels set to the num ber of la bels on
the roll.
• Have a form with a variable and en ter the
iable with a scanner, ter minal, weight
var
scale,
cir cuit an alyzer or any other de vice ca -
ending ASCII character data.
ig nore
a form to the printer with the name
.
g AUTOFR Download
Usin
Example:
pable of s
Mobile print ers, such as the printer,
mand.
com
AUTOFR
:Line Feed to initialize the printer
FK”AUTOFR” :Form Kill(delete any existing AUTOFR)
FS”AUTOFR” :Form Save(save file from here to FE at
:the bottom)
V00,8,L,”” :Variable field definition
Q254,20 :Label height followed by gap width
S2 :Speed(2ips)
D7 :Density setting
ZB :Print direction(ZT flips it 180 degrees)
A340,20,0,4,1,2,N,”QUANTITY” :Fixed text line
B265,75,0,3,2,4,101,B,V00 :Bar code definition
PA1 :Print 1 label Automatically*
FE :Form End(Line Feed)
reserves
-
in
this
* - If us ing the CAL TOOLS, CAL WIN, etc. programs to gen erate label files (files
must be
with .ejf ex tensions), then the PA com mand
added manually by ed iting the .ejf file.
Page 11

AUTOFR - Au tomatic Form Printing Fea ture
AUTOFR treats any in coming data as a vari able in -
tended for printing.
This means if you send the
printer a mem ory par tition command, the la bel will
print,
if you send a delete com mand - the la bel will
print! So, while you are testing AUTOFR it is best to
use an other name for the form. Once you are sat is
-
fied
w
ith
the form, re
name
it
AUTOFR
be
fore you
download
i
t. There is
no
need
to
specify a
file
ex
ten-
sion.
Isolating Data From
the Input Device
Place the printer in the di agnostic dump mode
and send from your data in put de vice.
• All
char
acters
the
de
vice
sends wi
ll
be
printed
on the la bel.
• If
noth
ing
pri
nts, nothing
is
ar riving - check
pin-outs and se rial settings.
Disabling AUTOFR Send
a XO
FF
data char
acter
(13 hex. or
A
SCII
19)
or
a NUL (00
hex. or AS
CII
0) to the printer.
The
form
may
now
be deleted from
the
printer.
Removing AUTOFR The pro grammer must send a De lete Form - FK
co mmand to the p rinter af ter dis ablin g
AUTOFR
.
Example:
FK"AUTOFR"�
FK"AUTOFR"�
10
Page 12
B Command - Bar Code
Description Use this command to print standard bar codes.
Syntax Bp
1,p2,p3,p4,p5,p6,p7,p8
,“DATA”
Parameters
p1 = Hor i zon tal start po si tion (X) in dots
p2 = Vertical start position (Y) in dots.
p3 = Ro tation
Value De scrip tion
0
No rotation
1
90 degrees
2
180 degree
s
3
270 degree
s
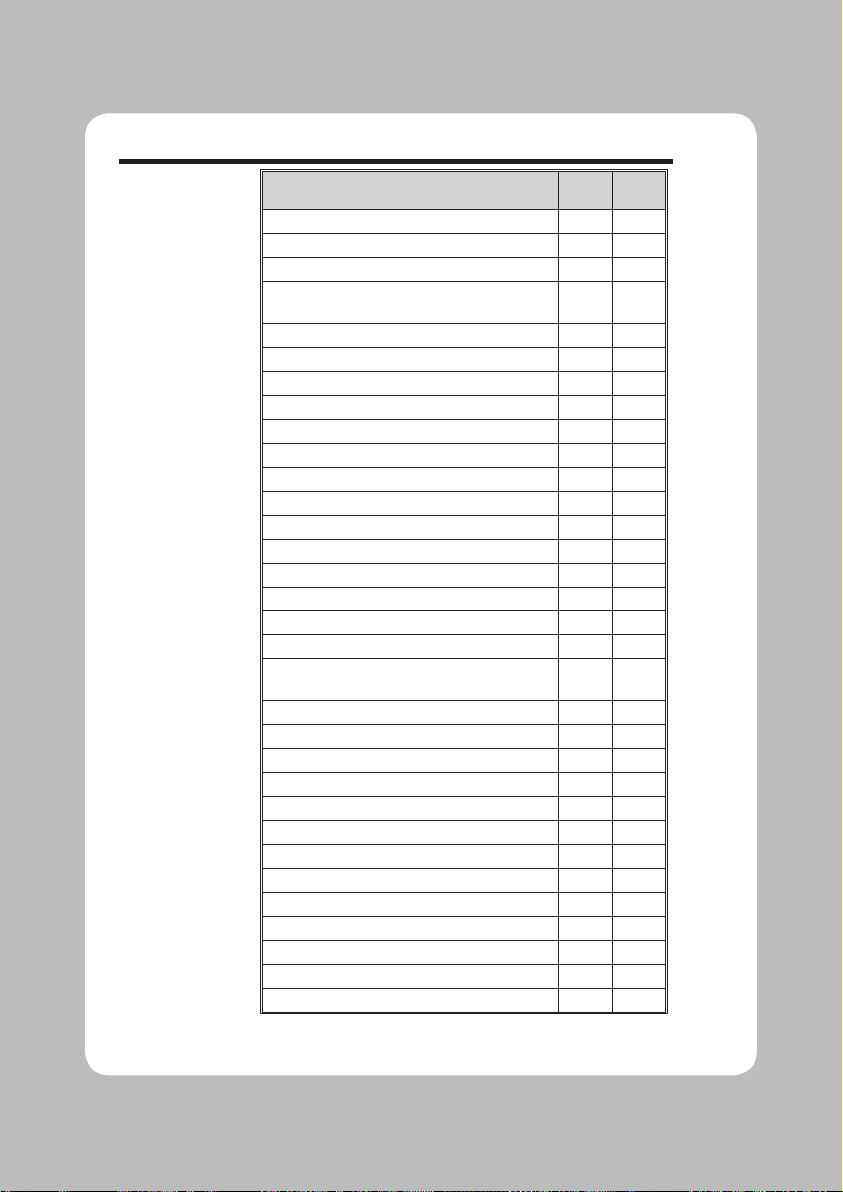
p4 = Bar Code se lection (see Ta ble 2-1 on
next page).
p5 = Narrow bar width in dots. (see Ta ble
2-1 on next page).
p6 = Wide bar width in dots.
Ac cept abl
e val ues are 2-30.
p7 = Bar code height in dots.
p8 = Print hu man readable code.
Values:
B=yes or N=no.
“DATA” =
Rep
resents
a fixed
data
field.
The
data in this field must comply with the se lected
bar code’s specified for mat.
The back slash (\)
char
acter des ignates the
fol
-
lowing
char
acter
is a
lit
eral
and
will
en
code
into
the data field. Re fer to the fol lowing ex amples:
To Print
Enter into data field
“ \”
“Company” \”Company\
”
\ \\
\code\ \\code\\
11
Page 13
B Command - Bar Code
De scrip tion
P
4
Value
P
5
Value
Code 39 std. or extended
3 1-10
Code 39 with check digit
3C 1-10
Code 93
9 1-10
Code 128 UC
C
Serial Shipping Container Code
0 1-10
Code 128 auto A, B, C modes
1 1-10
Code 128 mode A
1A 1-10
Code 128 mode
B
1B 1-10
Code 128 mode
C
1C 1-10
Codabar
K 1-10
EAN8
E80 2-4
EAN8 2 digit add-on
E82 2-4
EAN8 5 digit add-on
E85 2-4
EAN13
E30 2-4
EAN13 2 digit add-on
E32 2-4
EAN13 5 digit add-on
E35 2-4
German Post Code
2G 3-4
Interleaved 2 of 5
2 1-10
Interleaved 2 of 5 with mod 10 check digit
2C 1-10
Interleaved 2 of
5 wit
h human readable
check digit
2D 1-10
Postne
t 5, 9, 11 & 13 digit
1
P —
Planet 11 & 13 digit
1
Japanese Postnet
J —
UCC/EAN 128
2
1E 1-10
UPC
A
UA0 2-4
UPC A 2 digit add-on
UA2 2-4
UPC A 5 digit add-on
UA5 2-4
UPC
E
UE0 2-4
UPC E 2 digit add-on
UE2 2-4
UPC E 5 digit add-on
UE5 2-4
UPC
Interleaved 2 of 5
2U 1-10
Plessey (MSI-1) with mod. 10 check digit
L —
MSI-3 with mod. 10 check digit
M —
1. Hy
phens maybe
used
in
data, as a data
separator and
will be ignored.
2. Use ASCII 06 to delimit variable length fields.
Bar Codes
PL
12
Page 14
B Com mand - Bar Code
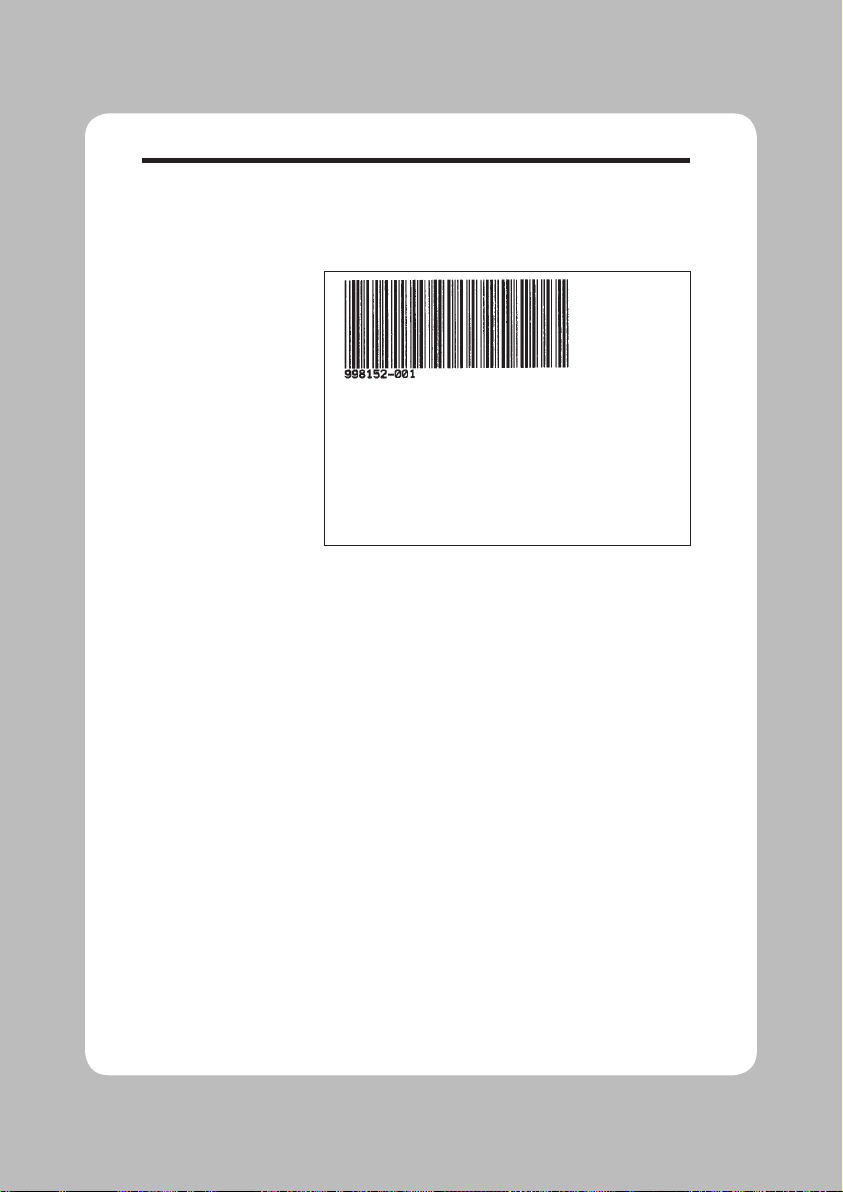
Example:
�
N�
B10,10,0,3,3,7,200,B,"998152-001"
�
P1
�
Will Produce:
Bar Codes wit
h
Variables & Counters
The
data field can be re
placed
by or combined
with
the following com mands:
Vnn =Prints the con tents of vari able
“nn” at
this po sition. Range of nn = 00 to 99.
Cn =Prints the con tents of coun ter “n” at this
po si tion. Range of
n = 0 to
9
See Ap
pen dix C for ad
ditional Data pa
ram e
-
ters for printers with
the RTC
(real
time
clock)
op tion in stalled.
Examples:
B50,0,0,3,1,2,50,B,"DATA"� : Writes bar code
B50,50,0,3,1,2,50,N,V01� : Writes
co
ntents of vari able 01 as bar
: code
B50,50,0,3,1,2,50,N,C1
� : Writes con tents of coun ter 1 as bar
: code
B50,50,0,3,1,2,50,N,C1+2
� : Writes con tents of coun ter 1 plus2 as
: bar code
or a com bination of sev eral op tions:
B50,300,0,3,1,2,50,B,"De luxe"V01C2"Combo"V01�
:Writes the text “Deluxe” fol lowed by the contents of variable 01 fol
-
lowed by the con tents of coun ter 2 followed by the text “Combo” fol
-
lowed by the con tents of vari able 01 all as a code 39 bar code.
13
Page 15
B Com mand - Bar Code
Data with the RTC
Time & Date
Functions
The
“
Data”
field
can be replaced by
or
com-
bined with the fol lowing vari ables:
TT = Prints the cur rent time at this po sition in
the pre defined for mat. See the TT com
mand for format selection. This vari able
is avail able only if the printer Time
&
Date op tion is in stalled.
TD
=Prints the cur rent date at this po sition in
the pre defined for mat. See the TD com
mand for format selection. This vari able
is avail able only if the printer Time
&
Date op tion is in stalled.
Some bar code for mats will not sup port date names
or the date or time de limiters used by the printer to
sep a rate data pa ram e ters.
Code 128 Bar Code
Function Characters
The printer sup ports code 128 func tion con trol
char ac ters
(FCN#). Mul ti ple FCN#s, TTs, TDs
and “DATA” strings can be con catenated, al lowing them to be in serted any where within the
sym bol.
FCN2, FCN3 and FCN4 are il
legal in code
128 mode C
(
p4 = 1C) and will re sult in a syn -
tax error.
Please
re
fer
to the
Cod
e 128
stan
dard for
a de
-
scrip tion of func tion char ac
ter
s FNC1 through
FNC3.
“Standard” Code 128 can encode all
128
stan
-
dard
A
SCII
char
acters
(0-127).
Func
tion
char
-
ac
ter FCN4
pro vides a means of
also encoding
extended ASCII char acters (128-255). It di rects
the
reader to
add
128 to the value of each af
-
fected char ac ter be fore trans mit ting it.
Two con sec u tive FCN4s tog gle be
tween stan
-
dard
and ex
tended
ASCII
mode
f
or
all suc
ceed
ing data characters (un til the end of the sym bol,
or un til an other pair of
s is en countered). This is
referred to
as latch ing into ex tended ASCII
mode or latching into standard ASCII mode
.
14
Page 16

B Com mand - Bar Code
Code 128 Bar Code
Function Characters
(continued)
A sin gle FCN4
tog gles be tween stan dard and
extended ASCII mode
for only a single fol lowing data char acter. This is re ferred to as shift ing
into ex tended ASCII mode or shift ing into stan
-
dard ASCII mode
.
Both code sets A and B are needed to rep resent
the en tire ex tended ASCII char acter set, just as
both sets are needed to rep resent the stan dard
ASCII char ac
ter set.
FCN4s
can
be
in
serted
manually, if
nec
essary
or de sired, by following the syn tax de scribed
above. The printer will, however, in sert them
au
to mat i cally if ex tended ASCII char ac ters are
encountered in the DATA. It will do so in the
most ef
fi cient man ner pos si ble:
• If up to 4 contiguous ex tended ASCII characters are en countered, it
will shift into extended
ASCII mode by inserting a sin gle FCN4
be -
fore each one;
• If 5 or more con tiguous ex tended ASCII characters are en countered, it
will latch into ex -
tended
ASCII mode by inserting tw
o
FCN4
s
be fore them.
• While latched into ex tended ASCII mode, it
will ap ply
the same rules
if
stan dard
ASCII
char
ac
ters are en coun
tered
.
Thus,
the pre
ferred
way
to
en
code
ex
tended
ASCII
char
acters
is to
sim
ply
em
bed
them
in the
DATA and let
the printer manage the
en
coding
task.
For
best
r
esults,
the code
set
sho
uld also
not
be spec
ified
(i.e., p4 =
1).
FCN4 s should
be
manually
in
serted
only in sys
tems
where
ex
-
tended ASCII
char
acters
can
not
be trans
mitted
to the printer.
It is il legal to mix au tomatic and manual modes
within the data for a sin gle symbol; i.e., an ex tended
ASCII char acter en countered in the data af ter an will
be
con
sidered
a syntax er
ror. Likewise,
an
FCN4
af
-
ter
an
extended ASCII char
acter
will
also
be
con
sid
-
ered a syntax er ror.
15
Page 17
16
B Command - RSS-14 Bar Code
Description Use this command to print RSS-14 b ar c ode
family bar codes for nu meric data. The printe
r
supports a sub set of the RSS ba
r code family set.
The sub set in
cludes b a sic RSS-14, RSS L im -
ited
, RSS S tacked and RSS T run cated. T he
printer does n
ot sup port RSS Ex tended or two
di men sional com pos ite bar codes.
Printer Model
s: LK-B10
Syntax Bp
1,p2,p3,p4,p5,p6,p7,p8
,“DATA”
Parameters
p
1
= Hor i zon tal start po si tion (X) in dots
p
2
= Ver ti cal start position (Y) in dots.
p
3
= Ro tation
Valu e De scrip tion
0
No rotation
1
90 degrees
2
180 degree
s
3
270 degree
s
p
4
= RSS-14 Bar Code se lec tion.
Valu e De s crip tion
Wid
th
Mu
l
ti plie r
Min. Hei
gh t
Mul ti plier
R14 Ba sic RSS-14 96 33
RL Lim ited 50 13
RS Stacked 96 13
RT Trun cated 74 10
p
5
= Narrow bar width in dots.
The nar
rowest mod ule will be this num -
ber
of dots. Range: 1-10 .
Sym
bol Width is the value of
p
5
times
th
e ap pli ca ble bar code Width Mul ti -
plie
r listed in the ta ble for the se lected
RSS-1
4
bar code type (
p
4
). This over all
symbol width value in
cludes the re-
quired sym
bol "quite zone".
p
6
= Required Value is 2
Page 18
B Command - RSS-14 Bar Code
p
= Bar code height in dots. See the ta ble
7
above for the Min imum Height Multi
plier. The printer will au tomatically select the larger of of two val ues: 1) this
value and 2 ) the Se lected narrow bar
width (p5) times the Min. Height Mul -
ti plie r listed in the ta ble for the se lected
RSS-14
p
= Print hu man readable code.
8
Val ues: B=yes or N =no.
DATA
“
nu meric data, 0-9 only.
The printer's data parser will al low the
use of lead ing ze ros (0's) or spaces
which will be dis carded when data is en coded in the bar code
Value (P4) De s crip tion Max. Nu meric Valu e
R14 B
RL Lim ited 999999999999
RS Stacked 999999999999
RT
bar code type (p4).
” = Rep resents a fixed data field of
a sic RSS-14 9999999999999
Trun
cated
.
199999999999
-
9
9
9
Data with the RTC
Time & Dat
Functions
Data
The “
bined with the fol lowing vari ables:
e
” field can be replaced by or com-
TT = Prints the cur rent time at this po sition in
the pre defined for mat. See the TT com mand for format selection. This vari able
is avail able only if the printer RTC Time
& Date op tion is in stalled.
TD = Prints the cur rent date at this po sition in
the pre defined for mat. See the TD com mand for format selection. This vari
is avail able only if the printer RTC Time
& Date op tion is in stalled.
Be cause the RSS-14 bar c ode sym bols only
support nu meric data, the time and date data
recalled by the TD and TT com mands must not
in clude de lim it ers, i.e. "/,-, or : " or any other de-
limiters that may be set.
able
17
Page 19
B
Com mand - RSS-14 Bar Code
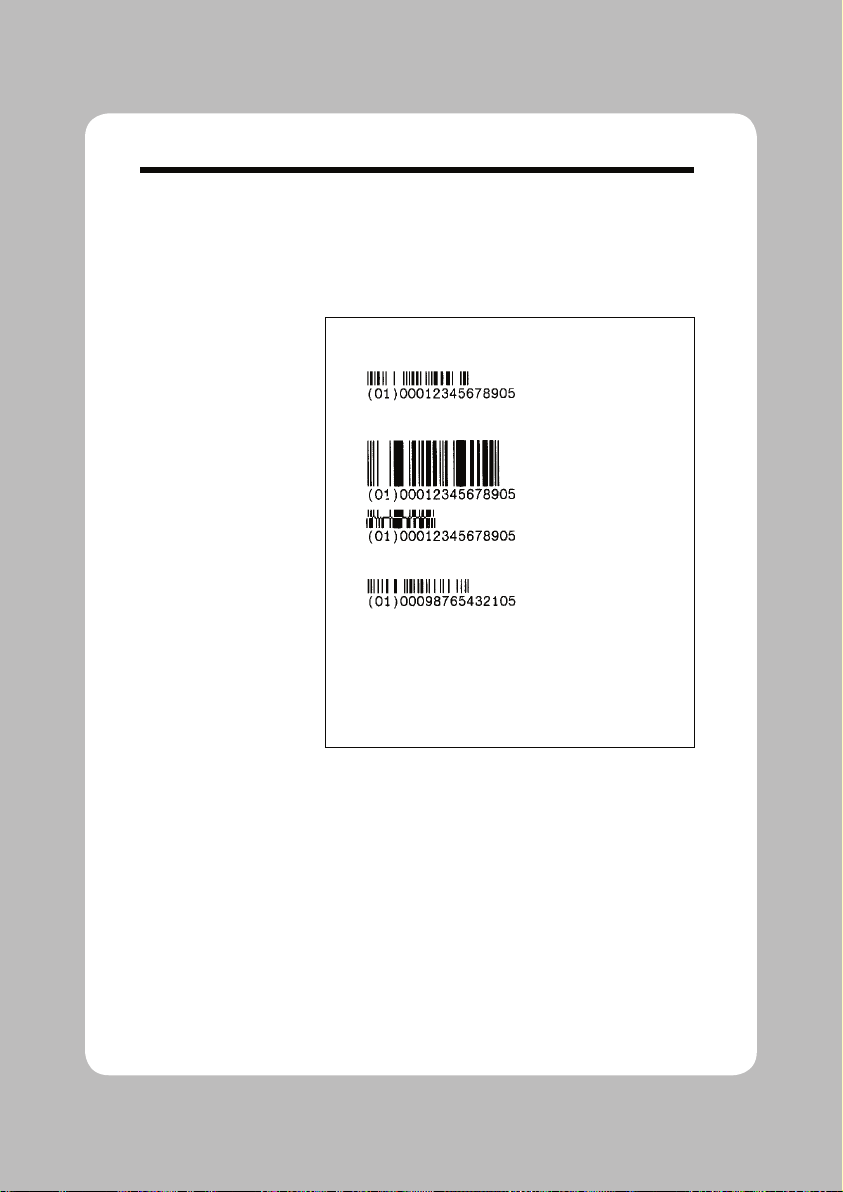
Example #1
Will Produce
N
B100,100,0,RL,4,4,40,B,"1234567890"
B100,300,0,R14,4,4,40,B,"1234567890"
B100,500,0,RS,4,4,52,B,"1234567890"
B100,700,0,RL,4,4,40,B,"9876543210"
P
18
Page 20
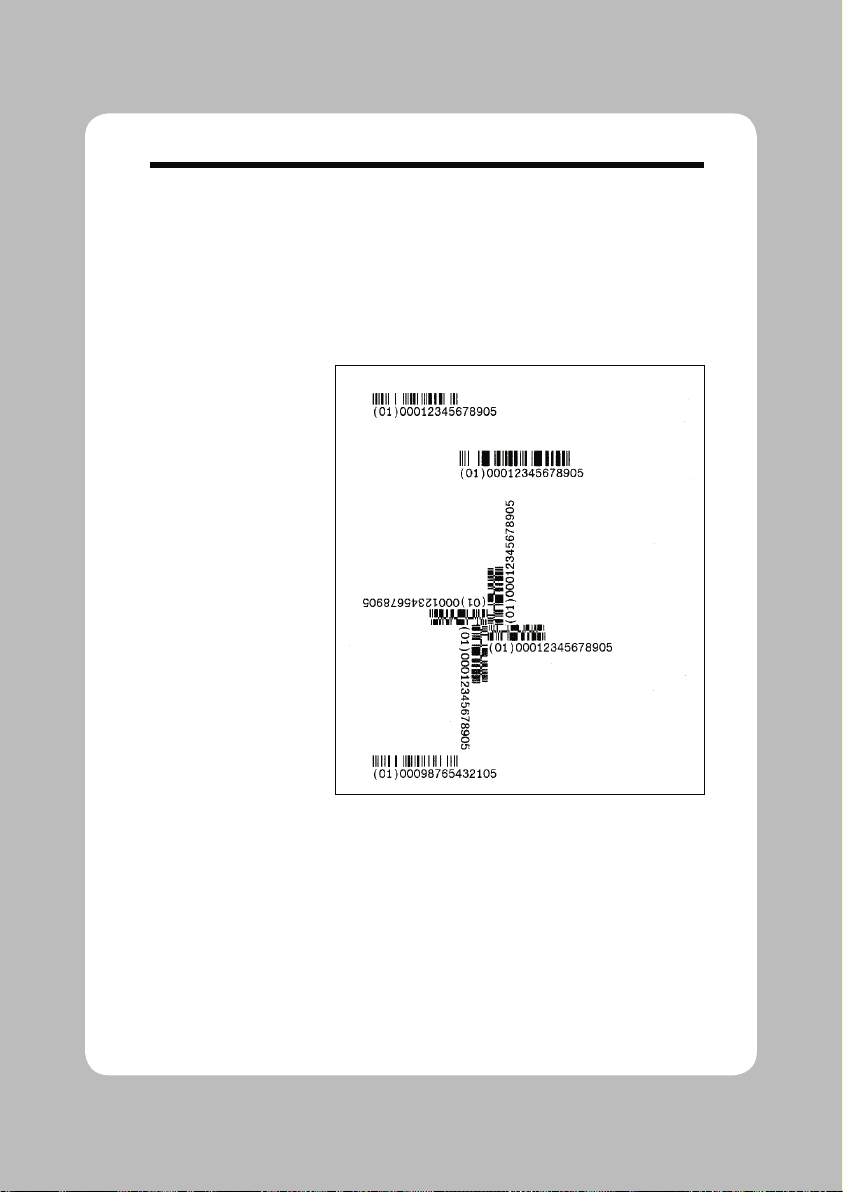
B
Com mand - RSS-14 Bar Code
Example #2
Will Produce
N
B100,100,0,RL,4,4,40,B,"1234567890"
B400,300,0,RT,4,4,40,B,"1234567890"
B500,900,0,RS,4,4,54,B,"1234567890"
B500,900,1,RS,4,4,54,B,"1234567890"
B500,900,2,RS,4,4,54,B,"1234567890"
B500,900,3,RS,4,4,54,B,"1234567890"
B100,1350,0,RL,4,4,40,B,"9876543210"
P
19
Page 21

b Command - 2D Bar Code - Data Matrix Specific Options
Description Use this com mand to print Data Ma trix two di -
Printer Models: LK-B10
Syntax
Paramet
mensional bar
au to mat
Data Ma trix bar code symbols, us ing the ECC
20
0 data qual ity for mat. In di vid ual mod ule size,
columns and rows pa rameters can be specified
or the printer can au
set one or all of these pa rameters.
The
symbol is made of square mod ules arranged within a rect angular shape
cludes
The scan rec ognition pat tern pro duced by the
LK-B10
module
code to en sure data in tegrity.
bp1,p2,p3,[,p4,][,p5][,p6][,p7],”DATA”
ers The printer will au to mat i cally gen er ate the Data
Ma
trix bar code us ing the fol low ing pa ram e ters.
p1 = Hor izontal start po sition (X) in dots.
p2 = Vertical start position (Y) in dots.
p3 = D - Selects Data Ma trix bar codes
der is not im por tant for pa ram e ters p4-p
Or
Include
parameter fol lowed by a valid nu meric value.
p4(c) = Num ber of col umns to en code
See the Sym bol Ge om e triesta ble for
valid col umn val ues.
code symbols. The printer will
i cally in ter pret and en code data into
to mat i call
a per im e ter scan rec og ni tion pat tern.
printer also in cludes a "quiet zone" one
wide on all outside edges of the bar
the prefix let
ter (c,r ,h,or v) to
y cal
cu late
and
which in
7
se
the
lect
-
20
p5(r) = Num ber of rows to en code
See the Sym bol Ge om e triesta ble for
valid row val ues.
p6(h) = Sets the min imum square data
module s
Rang
p7(v) = Se lects an inverse im age of the bar
code (sometimes known as reverse
video or a negative im age)
ize used for en coding data.
e: 1-40 De fault : 5
.
Page 22

21
b Com mand - 2D Bar Code - Data Ma trix Spe cific Options
“DATA” = ASCII data or Bi nary data bytes
Any com bination of data strings, time fields
(TT), date fields (TD), vari ables and/or coun ters
(the lat
ter two within forms only) that re solve to
a valid string of char acters.
Within literal string
s all ASCII char acters
0–255
dec.
(00-FF hex.)
are
al
lowed.
Quotes
(ASCII
34d) and backslashes (ASCII
92d)
must
be uniquely han dled.
The
back
slash
(\) character des
ignates
the fol
-
lowing
char
acter
is
a lit
eral
and
will
en
code
into
the data field. Re fer to the fol
lowing ex amples:
To Print
Enter into data field
“ \”
“Company” \”Company\
”
\ \\
\code\ \\code\\
� \�
Within forms
, fur ther lim i ta tions in clude that a
NULL (ASCII 0) char acter may not ap pea
r
within bar code DATA and en try lim itations do
not pro vide for a way to en ter line feed char ac
-
ters into vari ables.
The pro grammer should rely on thesym bology’s
spec
i fi ca
tion
to in
sure
for
mat
com
pli
ance
an
d
proper im plementation.
See
the AIM
web
site
for spec
i
fi
ca
tions
at:
http://www.aimi.org/
Page 23
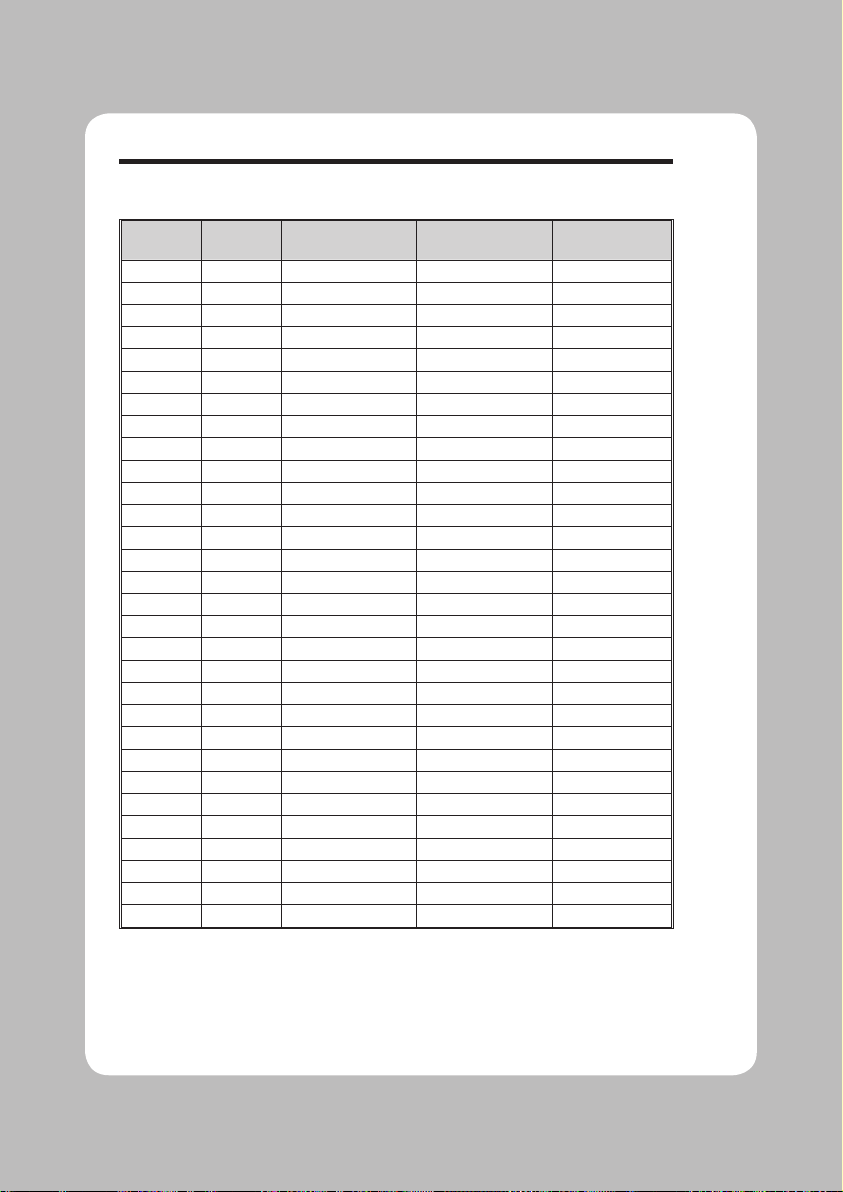
b Com mand - 2D Bar Code - Data Ma trix Spe cific Op tions
Rows
Col umns
Nu meric
Ca pac ity
1
Al pha-numeric
Ca pac ity
2
Com pressed
data size
3
8 18 10 6 5
8 32 20 13 1
0
10 10 6 3
3
12 12 10 6 5
12 26 32 22 16
12 36 44 31 22
14 14 16 10
8
16 16 24 16 12
16 36 64 46 32
16 48 98 72 49
18 18 36 25 18
20 20 44 31 22
22 22 60 43 30
24 24 72 52 36
26 26 88 64 44
32 32 124 91 62
36 36 172 127 86
40 40 228 169 114
44 44 288 214 144
48 48 348 259 174
52 52 408 304 204
64 64 560 418 280
72 72 736 550 368
80 80 912 682 456
88 88 1152 862 576
96 96 1392 1042 696
104 104 1632 1222 816
120 120 2100 1573 1050
132 132 2608 1954 1304
144 144 3116 2335 1558
1. Paired digits rep resents the best-case compression. Ad jacent digit pairs can be en coded into
eight bits.
2. The im plied compressibility requires the data be com posed of either all lowercase or all up percase characters with dig its and spaces al lowed.
3. Any ASCII character (0-127) can be en coded one-to-one, extended ASCII (128-255) re
-
quires an additional two-byte overhead.
Data Matrix Symbol Geometries
22
Page 24

b Com mand - 2D Bar Code - Data Ma trix Spe cific Op tions
Automatic Data
Matrix Bar Code
Generation
The
printer au
tomatically
tests and
changes
the
Data Ma trix bar code ge ometry to optimize th
e
symbol size per the specified col
umn and row
(p4 - the c prefix and p5 - the r pre fix) pa ram e ters. If no row
or col umn pa ram e ters are spec i -
fied, the printer will create a min imum size
symbol based on the calculated com pressed
size
of
the
data.
The
num
ber
of columns
an
d
rows in the symbol will be au tomatically determined with a pref erence to wards the smallest
square
sym bol that will ac commodate
the
com
pres
sed size
.
The
user may
wish to force the number of rows
and/or
columns to a
larger
value to
achieve
uni
-
form sym bol sizes.
If the col
umn (c)pa ram e ter is only spec i fied and
it's “18”, “26”, “32”, “36”, or “48”, or if only
rows
is specified and it is “8”, “12”, or “16”, a
rectangular sym bol may be produced. For ex ample, if “,r12” is spec ified (with no column
pa -
rameter),
then sizes 12x12, 12x26, and 12x36
are pos si ble se lec tions. The al pha nu meric ca
-
pacity
of
those
sym
bols
is
6, 22, or 31 char
acters
respectively. The smallest sym bol size that wil
l
accommodate the data will be cre ated.
If rows,
cols, and/or data length
are not com patible
with
a
sym
bol
from the
Sym
bol
Ge
ometries
ta
ble,
an
error 03 (Data
Length Error) will
be reported,
and no symbol will be pro duced.
23
Page 25
24
b Com mand - 2D Bar Code - Data Ma trix Spe cific Op tions
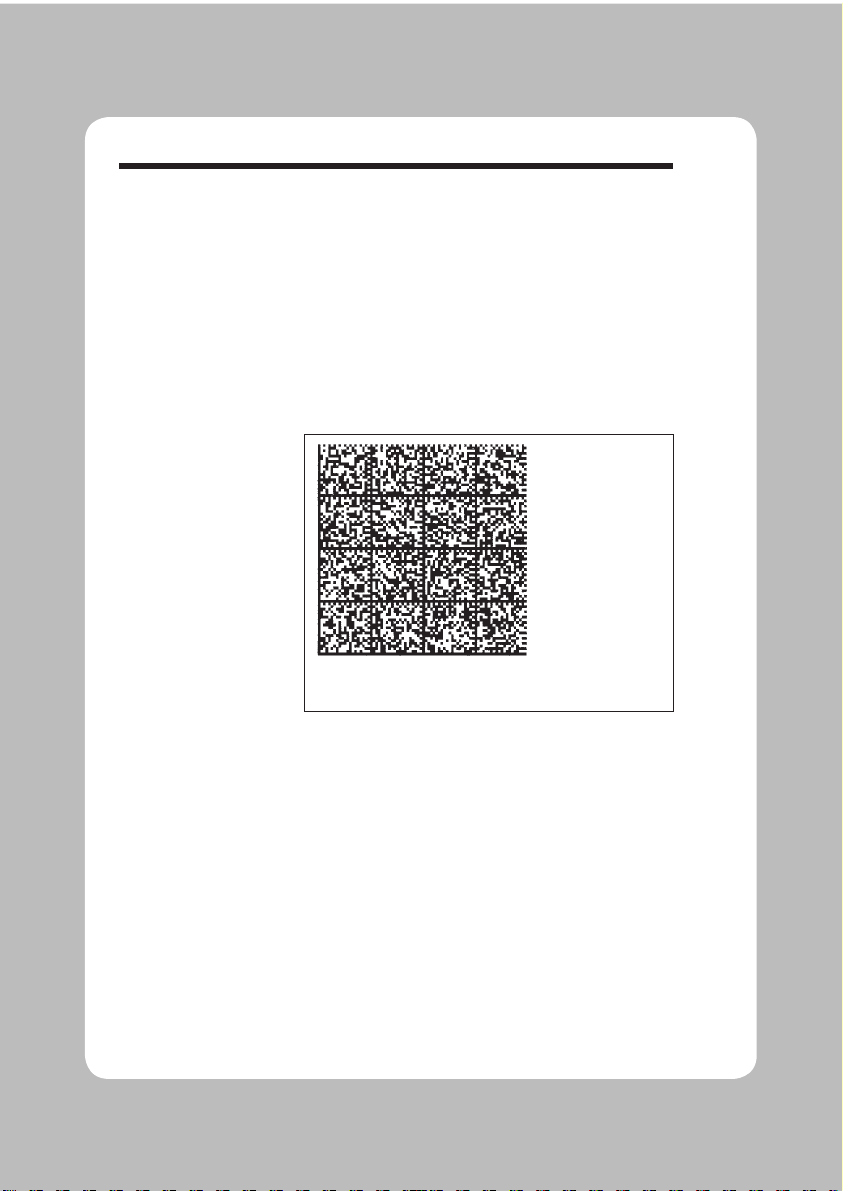
Example:
N
b30,20,D,h8, “SEWOO TECH is the leading
worldwide manufacturer of bar code labeling solutions and
a leading provider of instant-issuance plastic card printers.
We distribute our on-demand bar code label printer,
plastic card printers, secure ID printing systems, software
and related supplies under the SEWOO and brand names
to users in more than 90 countries. Our products are used
in hight-growth automatic identification applications that
improve quality and productivity.
Will Produce:
Page 26
b Command - 2D Bar Code - MaxiCode Specific Options
Description Use this com mand to generate MaxiCode bar
code sym bols with a single com mand. The
printer will au to mat i cally in ter pret and en code
data
into
MaxiCode
sym
bols
for data modes 2,
3, 4, and 6. Up to eight sym bols can be linked.
Syntax bp
1,p2,p3
,[p4,][p5,]“DATA”
Parameters
p1 = Hor i zon tal start po si tion (X) in dots
p2 = Vertical start position (Y) in dots
p3 = M - Must be “M” for MaxiCode
p4 = Mode Se
lec
tion
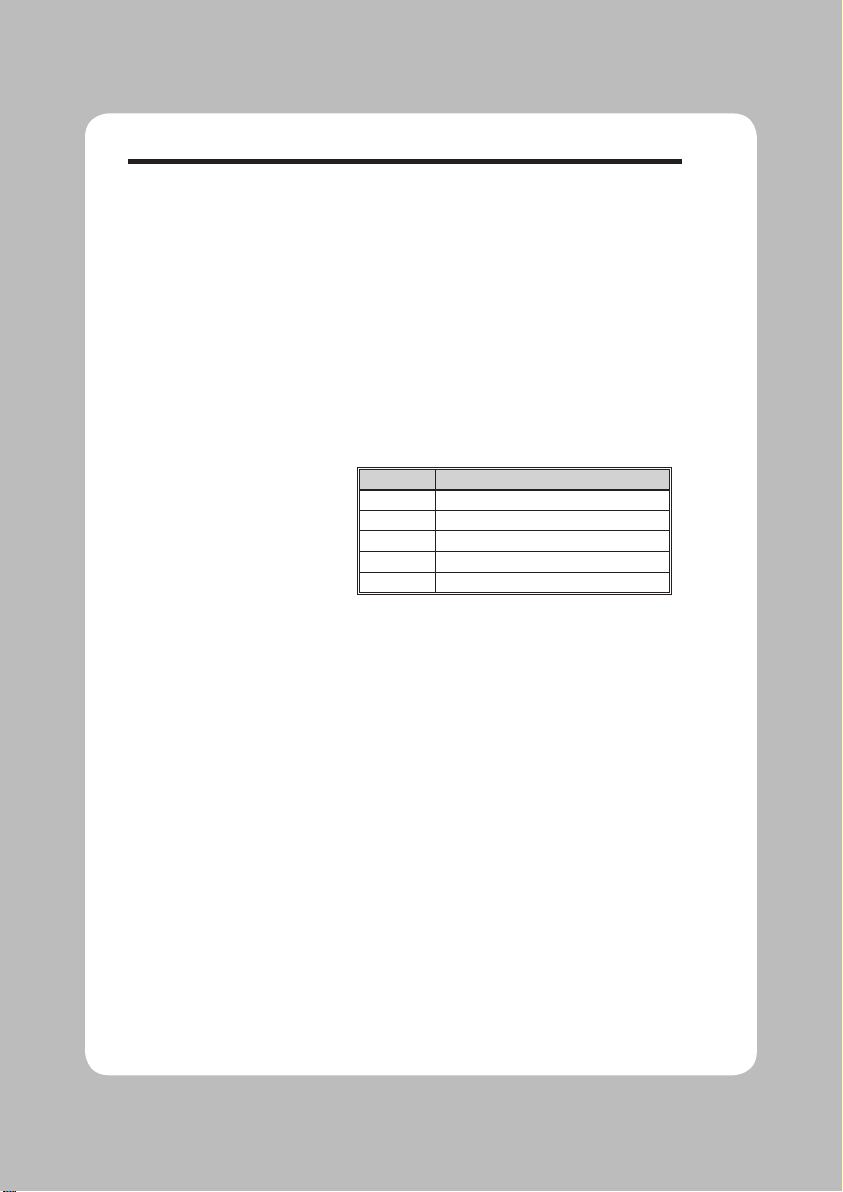
Value De scrip
tion
Not Used Automatic Se lection Mode 2 or 3
M2 Mode
2
M3 Mode
3
m4 Mode
4
m6 Mode
6
1. If p4 (Mx) is not used, the printer will use the
fol low in
g rules to au to mat i cally for mat the
“DATA” pa rameter. If the postal code (third
parameter, PC) in the
“
DATA” is:
• All
nu
meric
characters, the printer
w
ill
au
to
-
mat i
cally se
lect Mode 2.
• Al
pha only
or al
pha-nu
meric char
ac ter
com-
binations will set the printer to Mode 3.
• Not
used,
the
printer automatically
selects
Mode
3.
2. If p4 value
is
“
M2
or M3”, the
printer
wil
l use
the following
rules to
for mat the
“Data” pa
ram
-
e ter:
• In Mode 2 - If a non-numeric character is en -
tered
in
t
he
Posta
l
Code “Data” parameter
field,
then the MaxiCode bar code will
not print.
• In
Mode 3
– If
the Postal Code
“
Data”
field
exceed 6 characters, then the ad ditional characters will be
truncated from the bar code field.
25
Page 27
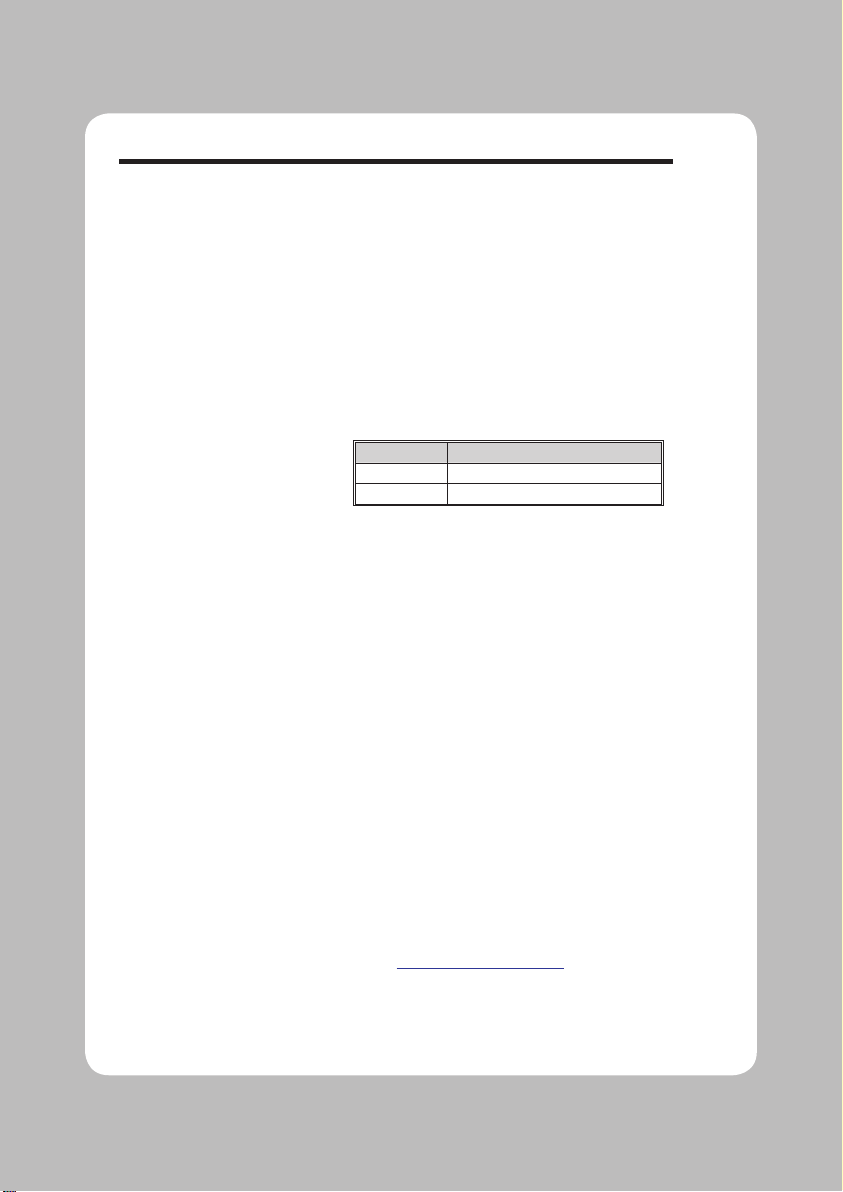
b Com mand - 2D Bar Code - MaxiCode Spe cific Op tions
p5= x,y
As so ci ated MaxiCode sym bol num
ber ing
where:
x = Sym bol Num ber of
y = To tal Number of As sociated Sym-
bols
De fault: Not used
Range: 1-8 for both
x or y
”DATA”=
Mode De pendent Data For ma
t
Mode de pendent data is bounded by quotation
marks. Maximum of 2 KBytes of data.
Mode Data For mat
2 & 3 “cl,co,pc,lpm
”
4 & 6 “lpm
”
cl = Class Code (3 dig its re quired)
co
= Coun try Code (3 dig its re quired)
Mode 2 = Nu meric Characters
Mode 3 = In
ter
na tional Char
ac
ter
s
(up to 6 char acters)
pc = Postal Code
Mode 2 = 5 or 9 characters
(All Nu meric, in clud ing USA
Postal ZIP 5 or 9 char.)
For less than 9 characters, the
printer will pad the field with 0’s.
Mode
3 (In
ter na
tional)= Any
al pha
nu meric
char
ac ter
(up to 6 char acters)
lpm = Low pri or
ity
mes sage (data)
ASCII printable characters (up to
84 char acters per symbol), an
y
256 character map.
The
pro
grammer
should rely
on
the
symbology’s
spec i fi ca
tion to in sure for mat com pli ance and
proper im plementation. See the AIM web site
for spec i fi ca tions at:
http://www.aimi.org/
26
Page 28
b Com mand - 2D Bar Code - MaxiCode Spe cific Op tions
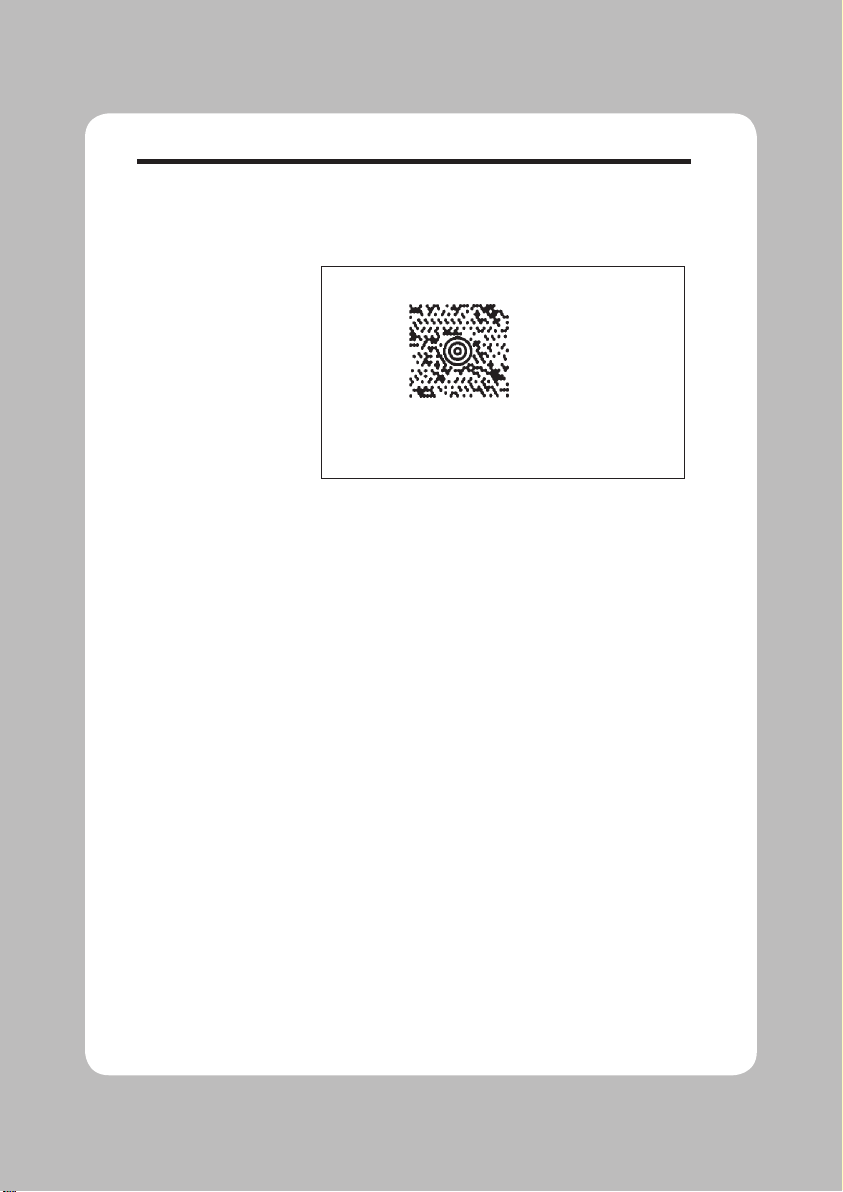
Example:
N�
b20,20,M,"300,840,93065,1692,This is MaxiCode, but not MaxiCode
for mat te
d data"�
P1�
Will Produce:
27
Page 29
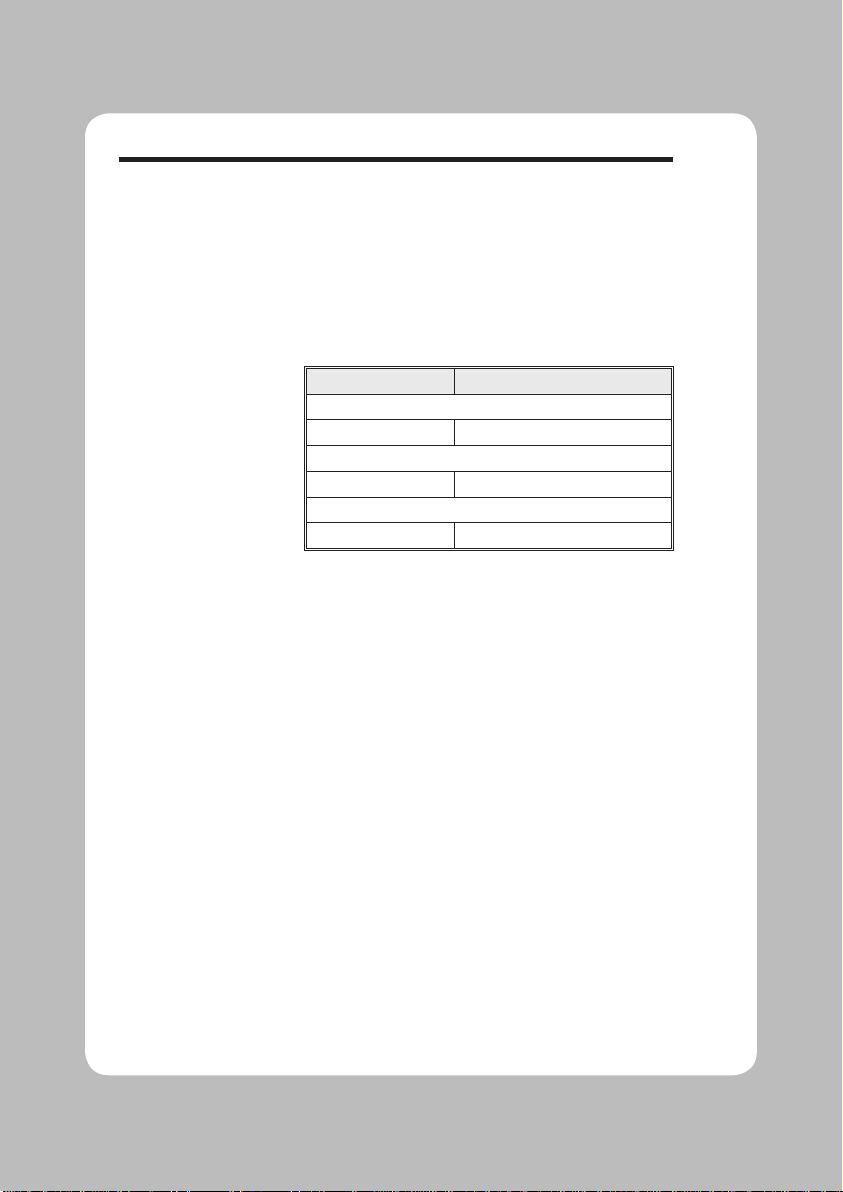
28
Using AIM Specified
Con
trol Stri
ng Hex
a dec
i ma
l Code
Mes
sage/Start Header
[ ) >
R
S
5B 29 3E 1E
Field Sep a ra tor
G
S
1D
End Of Mes sage Marker
RSE
OT
1E 04
Syntax bp1,p2,M,p4 “[AIM MaxiCode Data]”
Example b20,400,M,m2”001,840,93065,1692,[)>R
S
01GS98XXXZZFDAAFGSSHIPGS309GSGS1/1GS10G
S
NGSGSCAMARILLOGSCAGSRSEOT!!! !!!!!!!!!!!!!!!!!!!!”�
Notes:
1) This pro gramming ex ample rep resents actual data used to
format a sin gle AIM compliant MaxiCode sym
bol as pro grammed by a major in ternational and domestic shipping company.
2) The shipper has explicitly set the MaxiCode
sym bol for
Mode 2. This can be omitted by the programmer and the
printer will auto-select the mode per the rules on page 3-25
.
3) The shipper has used the
“!”
char acter to pad the symbol’s
data. A scanner reads back all the “Data” within the quo tation
marks, in cluding the
“
!” char acters fol lowing the End Of Mes
-
sage Marker (EOT).
4) All of the data fields in the Low Pri ority Message are not
used in the example. Some are left empty with the field de lim
-
it
ing
GS char acter used as a format field holder.
MaxiCode Data
Formatting
The
LK-B10 printer can use and au tomatically de-
code the AIM
ITS (In ternational Tech nical Stan dards) MaxiCode data format. The printer
detects the mes sage/start header
([)>RS), field
sep a ra tor (GS), and the end of message marker
(RSEOT) data control strings.
The hex a dec i mal (ASCII) data con trol strings
are in the fol
lowing ta ble. See the LK-B10 dump
mode character map in Ap pendix A.
Page 30

b Command - 2D Bar Code - PDF417 Specific Options
Description Use this com mand to print PDF 417 and Macro
PDF bar code symbols. The printer will au tomatically change from PDF417 to
Macro PDF
bar
code mode if the data sent to the printer ex
ceeds the maximum amount sup ported by the
PDF417 symbol. The
oH com mand is used to
place
the ad
dition
Macro PDF sym
bols
needed
for the con
tin
u a tion data.
The printer will au
to
mat i cally
op
ti
mize
the sym
bol
for
read ability
of
data
(and use the min
i-
mum num ber of symbols when us ing Macr
o
PDF). The sym bol’s geometry is ad justed (typ ically
reducing the size of the sym bol) per the de fined pa rameters. The printer will use the largest
module
size (bar width and
height)
and min
i-
mize the num ber of rows and columns.
Syntax bp
1,p2,p3,p4,p5
[,p6][,p7][,p8][,p9][,p10]
[,p
11
][,p12][,p13][,p14][,p15],”DATA”
Parameters The printer will au to mat i cally gen er ate the
PDF417 bar code us ing the fol lowing pa rameters.
p1 = Hor izontal start po sition (X) in dots
p2 = Vertical start position (Y) in dots
p3 = P - Must be “P” for PDF 417 bar codes
p4(www) =max
i mu
m
print width in dots
p5(hhh) = max i mum
print height in dots
The
pro
grammer
should rely
on
the
symbology’s
spec
i
fi ca
tion
to in sure for
mat
com
pli
ance
an
d
proper im plementation. See the AIM web site
for spec i fi ca tions at:
http://www.aimi.org/
29
Page 31
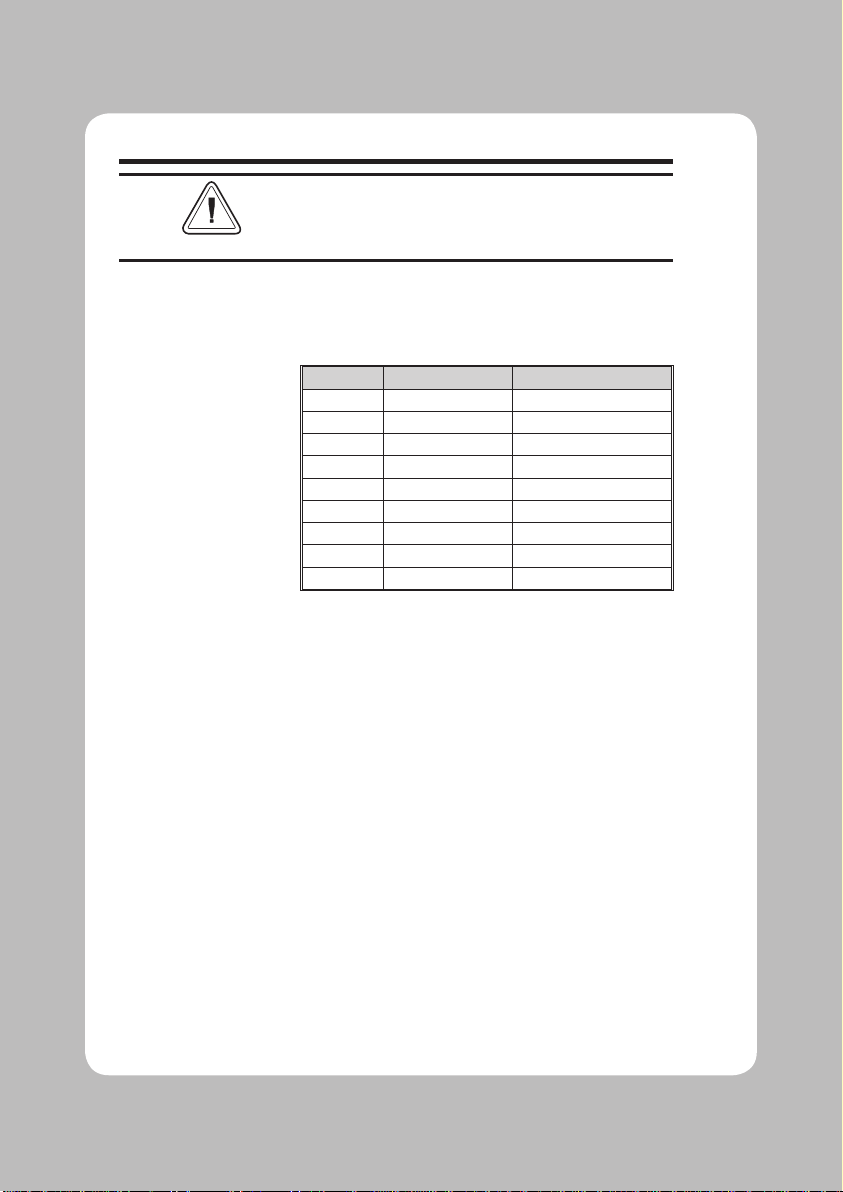
b Com mand - 2D Bar Code - PDF417 Specific Op tions
The fol lowing pa rameters may be omit ted and de fault values will automatically be in serted. Each pa
-
rameter value (data string) must be pro ceeded by
its
as so ci ated com man
d pre fix char ac ter.
p6(s) = sets er ror cor rection level
Er ror Cor rec tion codewords per sym bol
Values: s1 - s8
If level is not spec
ified, a level will au tomati-
cally be as signed as per the fol lowing ta ble:
EC level EC Codewords Auto Se lect Level
0 2 —
1 4 0-31
2 8 32-63
3 1
6 64-127
4 3
2 128-255
5 6
4
256-511
6 128 512-928
7 256 —
8 512 —
p7(c) = se lects data compaction (com pres-
sion) method
Val ues:
0 or 1, de fault is 0
c0 = Auto-en coding
The printer will switch be
tween the three
compaction modes as needed to cre ate
the small est pos sible sym bol for the
given data
.
c1 = Bi nary mode
The printer will en code the symbol in
byte com pac tion mode.
PDF417 uses an in termediate data type called a
“codeword” to store the char acters in the sym
-
bol. Each code word typ
ically consumes a
fixed-size
por tion of the to tal sym bol. More
characters
in
serted
into a codeword
results
in
fewer codewords needed
to cr
eate
a sym
bol.
This re sults in a smaller sym bol. To provide
ef ficient data compaction, PDF-417 sup ports three
types of codewords: text, nu meric and bi
nary.
30
Page 32
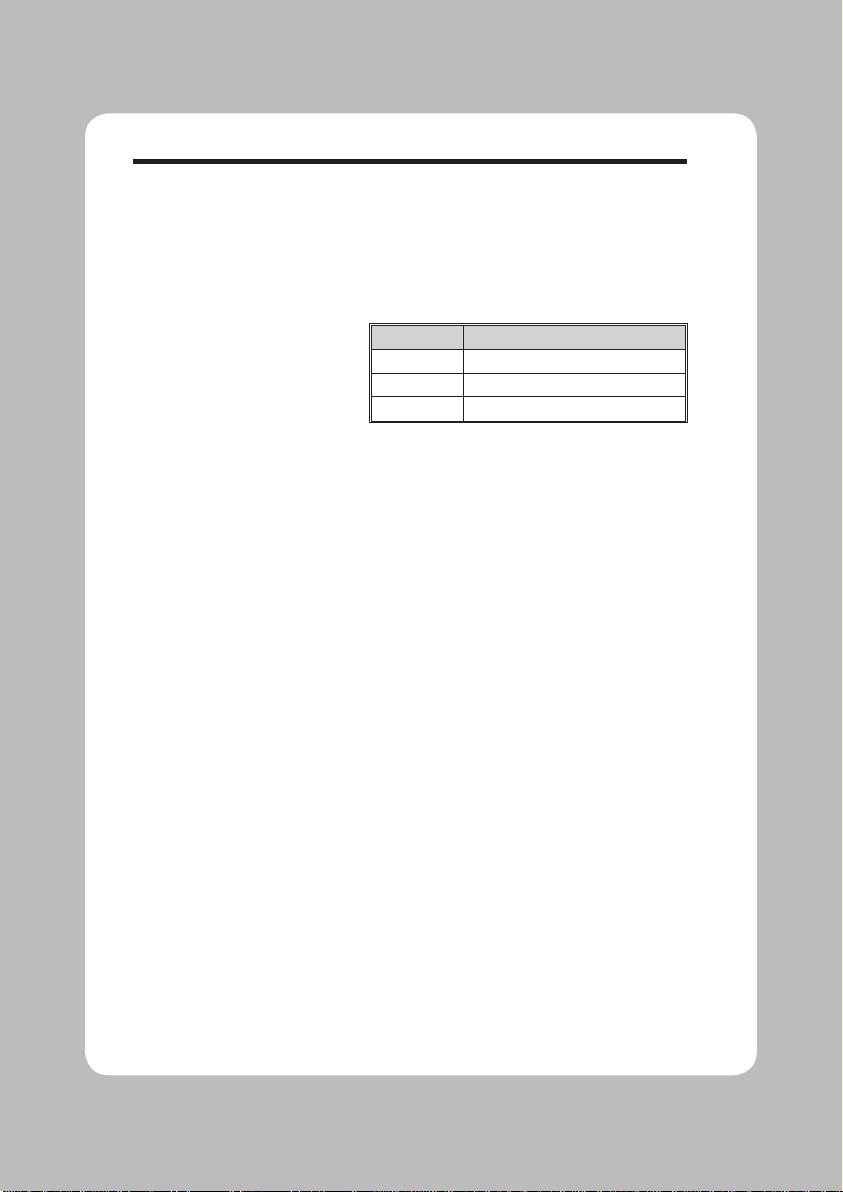
b Com mand - 2D Bar Code - PDF417 Specific Op tions
Auto-En cod ing (c0) data com paction method
is set by de fault, and provides the best compaction. If Bi nary data compaction
(c1) is se lected
the symbol will typically be larger. Binary dat
a
compaction may help to minimize the amount
of time it takes a sys tem to scan and de code the
data en coded within the sym bol.
Data Type Compaction (Byte by Byte)
Text 2 Char acters per code word
Nu meric 2.93 Characters per code word
Bi
nary 1.2 Bytes per code word
• Text compaction can be used for up percase,
low
er
c
ase, num
bers,
space, car riage re turn,
tab, line feed, and the following char acters:
&,:#-.$/+%*=^;@[\]_’~!"|(){}`
With text com paction, up to two char acters
can be encoded in a sin gle code word.
• Numeric compaction can be used for numbers
only.
Up to
2
.93
char
acters can
be en
-
coded in a sin gle code word.
• Byte
compaction can be
used
for
any
charac
-
ter.
But the flex
ibility comes
at a pri
ce;
byt
e
com pac
tion
en codes only 1.2 char
ac ters
per
code
word.
p8(pxxx,yyy,mm) = print hu man readable
This parameter is a non-standard
implementor of the PDF417 and is only
recommended for troubleshooting purposes.
Additional vari ables:
p ="p“ - pa
ram
e ter iden
ti
fier
xxx = hor izontal start lo cation
yyy = ver tical start lo cation
mm = max imum characters per line
31
Page 33

b Com mand - 2D Bar Code - PDF417 Specific Op tions
p9(f) = Bar code or igin point
Val ues:
0 or 1, De fault is 1
f1- Cen ter of bar code as defined by the
au to mat i cally ad justed
sym bol size, i.e.
width and height. Pa rameters p4 and
p5 val ues are max imum values only.
f0- Up per left corner of bar code.
p10(x) - mod ule width (in dots)
Values: 2 -
9
(i.e. x2-x9)
Default: Auto se
lects 6 (dots). Tests data
with maximum size limit set by
p4 and
p5 and then the other optional pa rame-
ters. The printer au
to
mat i cally
re
duces
the mod ule width in one dot in crements
until the data fits within the sym bols
max
i mum di men
sions (and
other ap
-
plied pa ram e ters) or un til
3 dots has
failed, then re ports an error
.
p11 (y) - set bar height (in dots)
Range: 4 - 99 (i.e. y4-y99)
Default: 4 times mod ule width
(p10)
p12 (r) - max imum row count
Maximum limit for the num ber of rows to
be used for auto se lecting sym bol fea tures.
p13 (l) - max imum col umn count
Maximum limit for the num ber of col umns to be used for auto se lecting sym
-
bol fea
tures.
p14 (t) - trun cated flag - le gal values are:
0 = not trun cated, 1= trun cated
See the PDF 417 spec ification for de tails.
p15 (o) - rotation
Values:
0= 0º, 1= 90º, 2= 180º, 3= 270º
Settings of 90° & 270° will cause the sym
-
bols max imum height
(
p4) and width (p5)
val ues to trans pose when au to mat i cally cal
-
cu
lat
ing and
gen
er
at ing the
sym
bol,
i.e. the
height would af fect col umn di mensions and
width would affect row di mensions
.
32
Page 34

b Com mand - 2D Bar Code - PDF417 Specific Op tions
“DATA” = ASCII data or Bi nary data bytes
Rep resents a fixed data field
.
The back slash (\) character des ignates the fol
lowing char acter is a lit eral and will en code into
the data field. Re fer to the fol lowing ex amples:
To Print
Enter into data field
“ \”
“Company” \”Company\”
\ \\
\code\ \\code\\
� \�
PDF417: General
Information
A PDF417
symbol
is or
ganized into
min
imum
of 3
to
a
max
imum
of
90
rows
and
a minimum
of 5 to
a ma x imu m of 34 col u m ns of
codewords
.
Each code word is 17 mod ules wide. There are
4
bars and 4 spaces per code word.
Multiply the module width (in dots,
p10) by 17
to get the codeword width.
Multiple the mod ule height (in dots,
p11) by the
number of rows to get the symbol height.
Four of the codewords in each row are start,
stop and
two
row
in dicators.
The re
maining
codewords are
re
ferred
to
as the
data
re
gion
and
con
tain
sym
bol
over
head
and com
pacte
d
data.
There
can be
no more
than
928
codewords in
the
data
re
gion. All com
bi na
tion
s o
f rows
and col umns are
not
le
gal; 90 rows times 30
columns would pro duce a data re gion of 270
0
codewords which ex ceeds the 928 code word
maximum per sym bol. See the fol lowing table
(on
the next page) that shows the maxi
mum
number of rows and the resulting num ber of
codewords in the data re gion for each
col umn
count.
33
Page 35
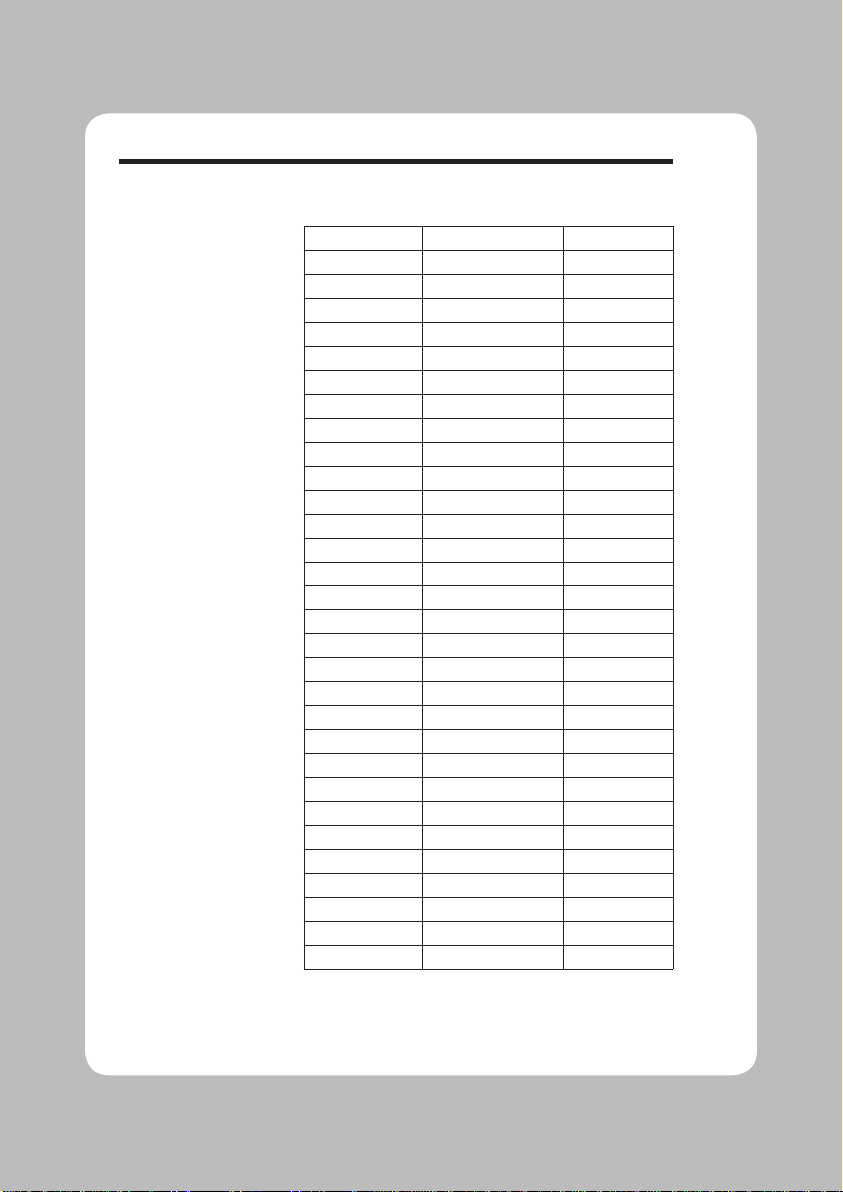
b Com mand - 2D Bar Code - PDF417 Specific Op tions
PDF417
Symbol Geometry
Col umns Max i mum Rows Codewords
5 90 9
0
6 9
0 180
7 9
0 270
8 90 360
9 9
0 450
10 90 540
11 90 630
12 90 720
13 90 810
14 90 900
15 84 924
16 77 924
17 71 923
18 66 924
19 61 915
20 58 928
21 54 918
22 51 918
23 48 912
24 46 920
25 44 924
26 42 924
27 40 920
28 38 912
29 37 925
30 35 910
31 34 918
32 33 924
33 32 928
34 30 900
34
Page 36

b Com mand - 2D Bar Code - PDF417 Specific Op tions
Automatic PDF 417
Bar Code Generation
The
printer au
tomatically
tests and
changes
the
PDF 417 bar code ge ometry to maximize th
e
readability of the bar code for a given maximum
height and width, spec ified by
p4 and p5.
The
printer tests the PDF 417 pa
rameters
in this
order
for a giv
en
data string (er
ror
cor
rectio
n
and com pres sion in cluded):
1. Mod ule width
p10 (for code word width)
2. Sym bol widt
h p
4
3. Sym
bol col umn max i
mu
m p
13
4. Mod ule height p
11
5. Sym bol height p
5
6. Sym bol row max imum p
12
The printer will start with the max imum value
(default or explicit) for these pa
rameters. The
printer re duces these val ues to get the module
width and height to maximize read ability.
35
Page 37
b Com mand - 2D Bar Code - PDF417 Specific Op tions
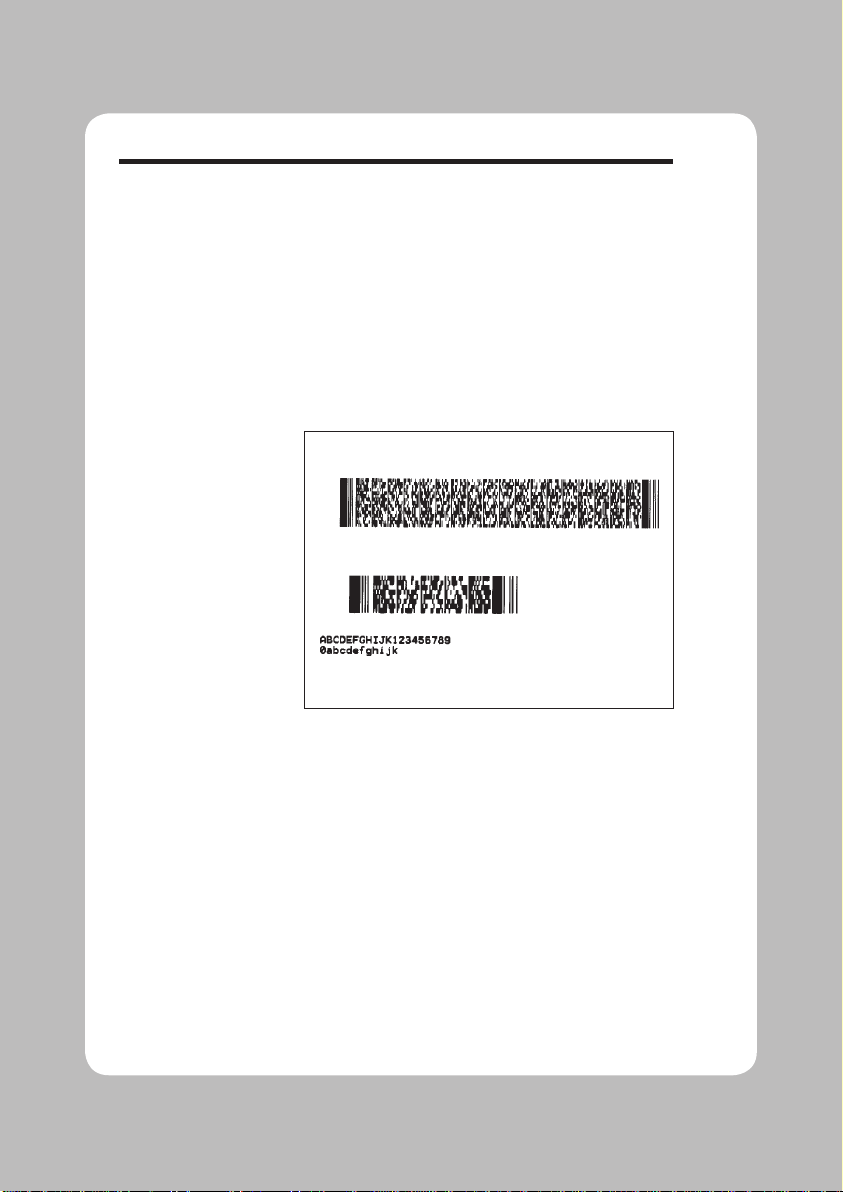
Example:
N�
b80,100,P,700,600,x2,y7,l100,r100,f0,s5," \ �
Fourscore and seven years ago our fa thers brought forth on this con ti
nent a new na tion, conceived in lib erty and ded icated to the prop osition that all men are cre ated equal. Now we are en gaged in a great
civil war, test ing whether that na tion or any na tion so con ceived an
d
so ded icated can long endure.
“�
�
b80,200,P,400,300,p40,440,20,f1,x3,y10,r60,l5,"ABCDEFGHIJK12345
67890abcdefghijk"
�
P�
Will Produce:
The
sec
ond
symbol has
been set
to
print hu
ma
n
readabl e
data wit h
the
p8pa r a m
e t e r
(p40,440,20)
and
is not part of the
PDF417
sym bol.
36
Page 38

C Command - Counter
Description The coun ter (C) com mand de fines one of 10 au -
to matic coun ters used in con sec u tive num ber ing ap pli ca tions (i.e. se rial num bers). Counters
must be de fined af ter vari ables.
For Numeric Serialization Only. The counter
function does
not support Alpha or Alpha-Numeric
Serialization.
Syntax Cp1, p2, p3, p4, “[-]PROMPT”
Parameters
p1 = Counter num ber. Range: 0 to 9
p2 = Maximum num ber of digits for coun ter.
Range:
1 to 29
p3 = Field Jus ti fi ca tion.
L = Left R = Right
C = Cen ter N = N
o Jus
ti
fi ca
tion
p4 = Step Value. + or - sign followed by
a
single digit of 1 -
9. Using a step value
of +0 al lows the counter to be used as
an ad ditional vari able data field.
“PROMPT”= An ASCII text field that will be
trans
mit ted to
the KDU or host (via the
serial in terface) each time the command
is ex ecuted. Typically used to request
the op erator to en ter a start ing coun ter
value.
KDU Prompt
Options
[-] = Having the first char acter of the prompt
a sin gle mi nus sign will cause the
prompt to dis play only once af ter form
re
tri
eval.
37
Page 39
C Com mand - Counter
The C com mand is used in forms that require se quential num bering. When initializing coun ters,
they must be de fined in or der (e.g. C0 first, C1
sec ond...).
Field jus ti fi ca
tion (p3) af fects the print ing of
counter data. When
L, R or C are se lected, the
counter field is the width of
p2 value. Data will
justify within the coun ter (p
2
) field per the se -
lected
p3.
The
N pa rameter
will pr
int
the min
i-
mum num ber of characters.
To
print
the con
tents
of the coun
ter,
the coun
ter
number is
ref
erenced
in
the
“
DATA”
field of
th
e
A (ASCII text) or B (Bar Code) com mands.
If the start ing value of a coun ter is “1“, then no leading zero padding will be added. If the starting value
is
“01”, then the counter will be pad ded, up to the
max i mum num ber of dig its (p
2
), with ze ros.
Example:
C0,10,L,+1,"-En ter Se rial Num ber:"�
Saving and
Protecting
Consecutive
Numbers in
Nonvolatile Memory
This fea
ture is use ful when the coun ter field rep -
resents a se rial num ber (or oth ers types of num
-
bers)
that should never be re
peated.
This
feature
al
lows
for
au tomatic
re
trieval
and
in cre
-
ment
(or decrement)
of
the pre
vious
coun
ter
value
used ev
ery time
a for
m is
re
trieved
(and
printed).
By plac ing one
mi
nus sign
as the
first
char
acter
of
the prompt, the prompt
will
ap pear
only
once
after
the
form
is
re
trieved,
thereby
pro tecting
the in tegrity of the data.
Single Digit
Summation with
Counters
Add or sub tract a sin gle digit from the re called
counter
value in a for
m.
If form
re called coun ter
C0 had a value of 3, then pro cessing C0+1
would yield a value of
4 and C0-2 would yield a
value of
1.
38
Page 40
39
C Command - Cut Immediate
Description: This com mand al lows the printer to ini tiate an
immediate me dia cut with out a form
print op eration. The printer must have the cut ter op tion
in stalled.
✟ The C com mand – Cut Im mediate can not
be used in side of a form.
✟ The ini tial char ac ter C in a com mand string is
used for both the Cut Im mediate (C) and
Counter Command func tion (Cp
1
) which
can only be used within a form. The Cut Imme
di ate Com mand (C) can not be used in a
form
.
✟ The C com mand
– Cut Im mediate can not
be
used with the KDU
.
Mobile print ers, such as the printer,
ig
nore
this
com mand.
Syntax:
C
Paramet
ers: None
Example:
C
Only cut
la
bel
li
n
er
(bac
k
ing)
or
tag stock. L
abel
ad
-
hesive
will built up on the cutter blade and cause the
cutter
to operate poorly or jam if the la bels are cut
along
with the label liner.
Use the C com mand - Cut Immediate 5 times with out
me dia loaded, to perform a self cleaning of the
cut
ter blade.
Page 41
40
D Command - Density
Description Use this com mand to se lect the print den sity.
Syntax
Dp
1
Parameters p1 = Den sity set ting. Ac cept able val ues are:
The
den
sity
com
mand
controls the amount of
heat pro duced by the print head. More heat wil
l
produce a darker im age. Too much heat ca
n
cause the printed im age to dis tort.
The density and speed com mands can dra matically
affect
print quality. Changes in
the
speed
set ting typ i-
cally re
quire a change to the print den sity.
Example
D5 :selects density 5
Page 42

dump Command - Enable Dump Mode
Description This com mand al lows the ad vanced pro gram-
mer to force a user di agnostic “data dump”
mode. Sending the dump
com mand to the
printer
al
lows
the programmer to compare ac
-
tual data sent to printer with the host pro gram.
Send data to
the printer af ter the dump com-
mand has been is sued to eval uate pro gram an
d
printer control data. The printer will pro cess all
data
bytes
into ASCII char
acter
data, range
0-255 dec
i
ma
l (00-FF hex
a
dec i ma
l).
Press
the
printer’s
Feed
but
ton
un
til
“Out
of
Dump” is printed or power cy cle the printer to
terminate the dump mode.
Syntax dump
Parameters
None
� Set the im age buffer width with the q com -
mand to match the me dia width prior to is suing the dump com mand.
� Use
the
“Dump Mode” character
map
in
Appendix A to in terpret the dump mode data
(characters printed on the labels) back into
ASCII data
.
� Press
the Feed
but
ton
to view
dump da
ta
tha
t
exceeds a sin gle la bel’s print area. Re peat to
view more dump data as re quired.
� Pressing
the Feed
but
ton
af
ter
the dump
data
is fin ished print ing will
cause
the printer
to
exit the dump mode.
� Graphics data dump may be large and re -
quire mul
tiple la bels to print.
Example
dump�
41
Page 43
42
eR Command - User Defined Error/Status Character
Description This com mand al lows the ad vanced pro gram-
mer to specify the printer’s er ror/status re port
character
for er ror re porting via the RS-232
serial interface.
Mobile print ers, such as the printer,
ig nore this
com mand.
Syntax eR
p1,p
2
Parameters p1 = Any sin gle ASCII char acter
Ran
ge: 0-255 dec i mal (00-FF hex a dec i -
mal
)
p2 = Er ror/Status Re sponse Mode
p
2
Mod
e De scrip tions
0
Stan
dard
(de
fault
)
:
XO
N (17 dec. / 11 hex.) on Re covery
XOF
F (19 dec. / 13 hex.) on Er ror
1
Char
ac ter Only
:
Re ports the se lected er ror/sta
tus char ac ter fol-
lowed by a Car riage Re turn and Line Feed.
2
Char ac ter & Er ror/Sta
tu s Code:
Re ports the se lected er ror/sta tus char ac ter, error/status code (see page 3-126 for codes),
and then by a Car riage Re turn and Line Feed.
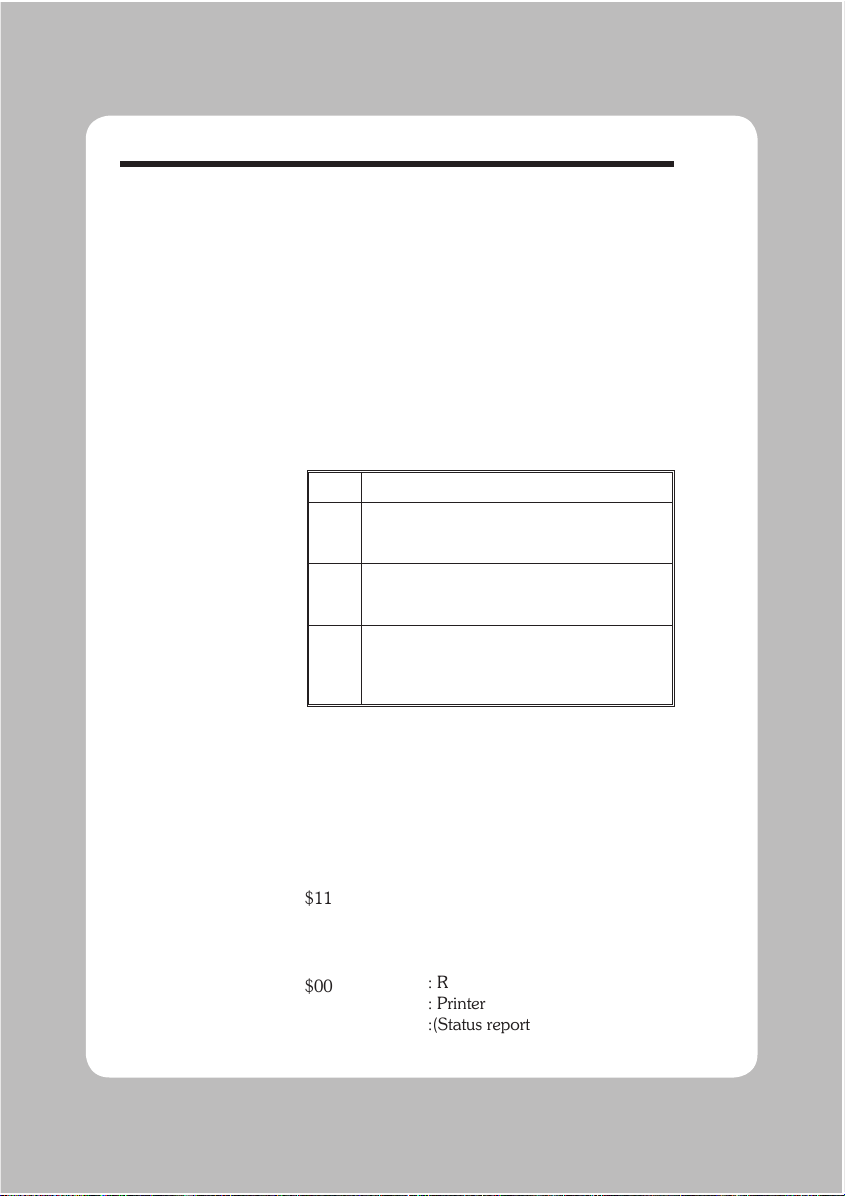
Example For Mode 2 Er ror and Sta tus Reporting:
eR$,2
$11
: Sets Error Character to “$” and
: Sets Error Mode to “2”.
: User operates and prints with printer.
: User opens print head.
: Reports Print Head Open
: User closes print head
$00
: Reports No Error
: Printer Ready for next command.
:(Status report for Print Head Closed)
Page 44
EI Command - Print Soft Font Information
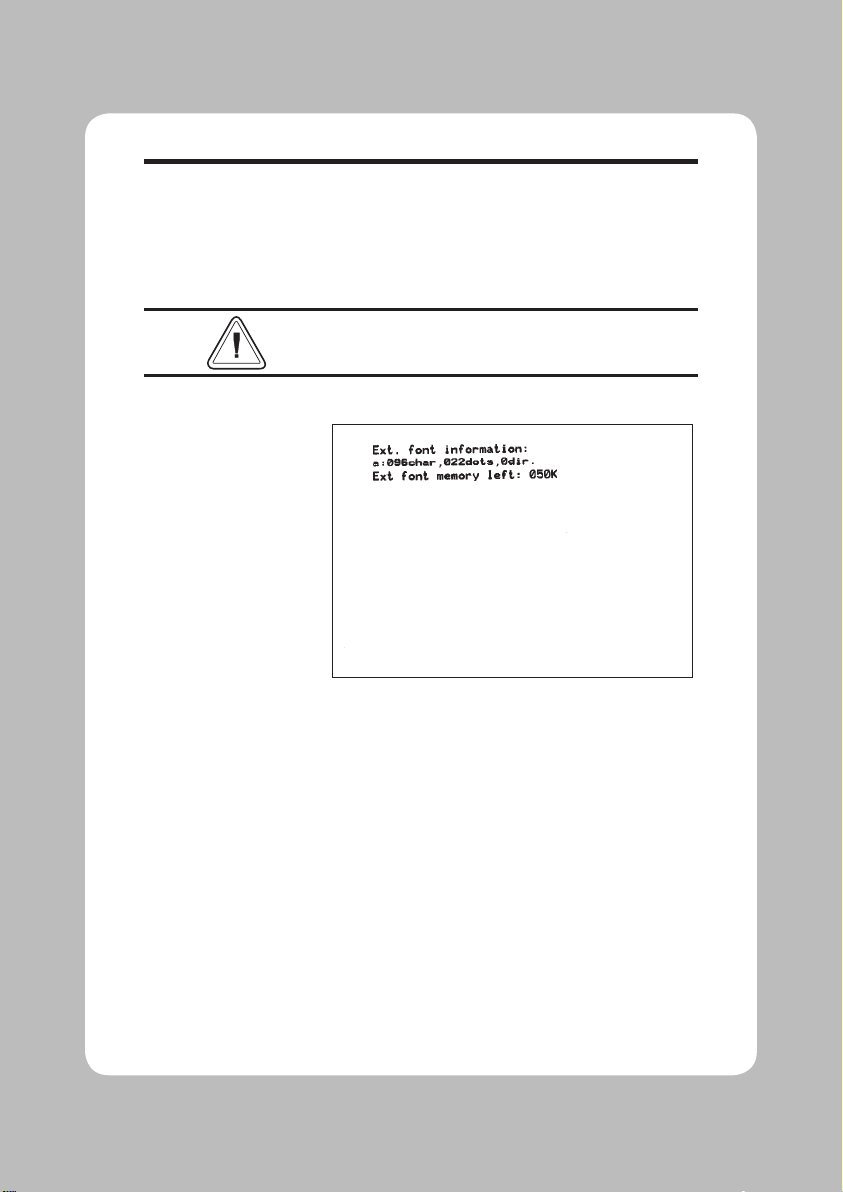
Description This com mand will cause the printer to print a
list of all soft fonts that are stored in memory.
Syntax
EI
�
Soft fonts can be down loaded to and deleted from
the printer from the Soft Font Downloader
Util ity,
CAL Tools or CAL3 software.
Example
EI� :prints soft font list
Will Produce
43
Page 45

EK Command - Delete Soft Font
Description This com mand is used to de lete soft fonts from
mem ory.
Soft fonts can be down loaded to and deleted from
the printer from the Soft
Font Downloader Utility,
CAL Tools or CAL3.
Syntax EK {“FONTNAME”|"*"}
Parameters “FONTNAME” = By en tering the name of a
font, that font will be de leted from memory.
“*” = By in cluding an “*” (wild card), ALL
fonts will be de leted from mem ory.
Example
EK"A"� :deletes font
“A
”
EK"*"
� :deletes all fonts
44
Page 46

ES Command - Store Soft Font
Description This com mand is used to down load and store
soft fonts in mem ory.
Soft fonts can be down loaded to and deleted from
the printer from the Soft Font Downloader
Util ity,
CAL Tools or CAL3.
Syntax ES"FONTNAME"p1p2p3a1b1c1“DATA1”a
2b2c2
“DATA2” ... anbncn“DATAn”
Parameters “FONTNAME
” = One let ter font name
Range: a-z, Lower Case
• Lower
Case named
fonts
min
imize
soft font
memory us age to only store fonts
down -
loaded and have 256 character limit.
The fol low ing use hex a dec i mal
cod
ing for
pa
ram e ter val ues.
p1: Number of characters to be down loaded
Range: 00 - FF hex. (0-255 dec imal)
for 1 to 256 fonts per soft font set.
p2: Char ac ter Ro ta tion
• 00 hex. = 0 and 180 degrees
• 01 hex. = 90 and 270 degrees (clockwise)
• 02
hex. = Both
0
and 180
de
gree
rotation
pair
and the
90
and 270
de
gree
rotation pair
p3: Font Height
Range: 00 to FF hex.
Measured in dots and ex pressed as a
hexadecimal num ber, i.e. 1B hex. = 27
dots
Font height in cludes accentors and dissenters of characters and need to fit in
the char ac
ter cell
• 203 dpi printers =
256 dots = 1.26 inches = 32.03 mm
• 300 dpi printers = 00 to FF hex.
256 dots = 0.85 inches = 21.67 mm
45
Page 47

ES Com mand - Store Soft Font
a1: (1st) Down load Char ac ter (map po si tion)
Range: 00 to FF hex.
b1: (1st) Spacing To Next Print Character
Down loaded char ac ter’s next printed
character position in dots, i.e. Character
tracking - the space between characters.
Must be greater than or equal to the
character width, see parameter
c1. Dots
in a dec imal num ber converted to a
hex
a dec
i mal
num
ber.
Range: 00 to FF hex.
c1: (
1
st
) Down
loaded Char ac
ter’s Width
Dots in a decimal num ber converted to
a hex
a dec i mal
num
ber.
Range: 00 to FF hex.
“DATA
1
” : (1st) Char ac ter Bitmap
p3 × c1 = bit map data (in bytes)
Data is re ceived in bytes, on a line by
line ba sis. The font char acter’s 0,0 cell
map po sition is in the top left cor ner of
the map as viewed in the 0 de gree rota
tion. See the ex amples on the fol lowing
pages.
a2: (2nd) Down load Char ac ter (map po si tion)
b2: (
2
nd
) Spacing To Next Print Character
c2: (2nd) Down loaded Char ac ter’s Width
“DATA
2
”: (2nd) Char
ac ter
Bitmap
p3 × c2 bytes = bit map data
Repeat
for each
char
acter
un
til
the last
cha
r-
acter in the set is down loaded.
an: (Last) Download Character (map po si-
tion)
bn: (Last) Spacing To Next Print Char acter
cn: (Last) Down
loaded
Char
ac ter’s Width
“DATA
n
” : Char acter Bitmap
p3 × cn bytes = bit map data
46
Page 48
ES Com mand - Store Soft Font
For fonts with the ro tation pa rameter set
for “both”
(p2 = 02 hex.):
Re peat the in di vid ual font char ac
ter down load
for each 90° rotated char acter from the start of
the char acter set un til the last ro tated char acter
in the set is down loaded
.
a
1-90°b1-90°c1-90°
“DATA
1-90°
”
a
2-90°b2-90°c2-90°
“DATA
2-90°
”
a
3-90°b3-90°c3-90°
“DATA
3-90°
”
a
n-90°
: (Last) Down load Char acter
b
n-90°
: (Last) Spacing To Next Print Charac-
ter
c
n-90°
: (Last) Down loaded Character’s Width
“DATA
n-90°
” : Char acter Bitmap
p3 × cn bytes = bit map data
The num ber of in di vid ual char ac ter
maps downloaded will be dou ble th
e
characters in the font set
(p1).
Example of
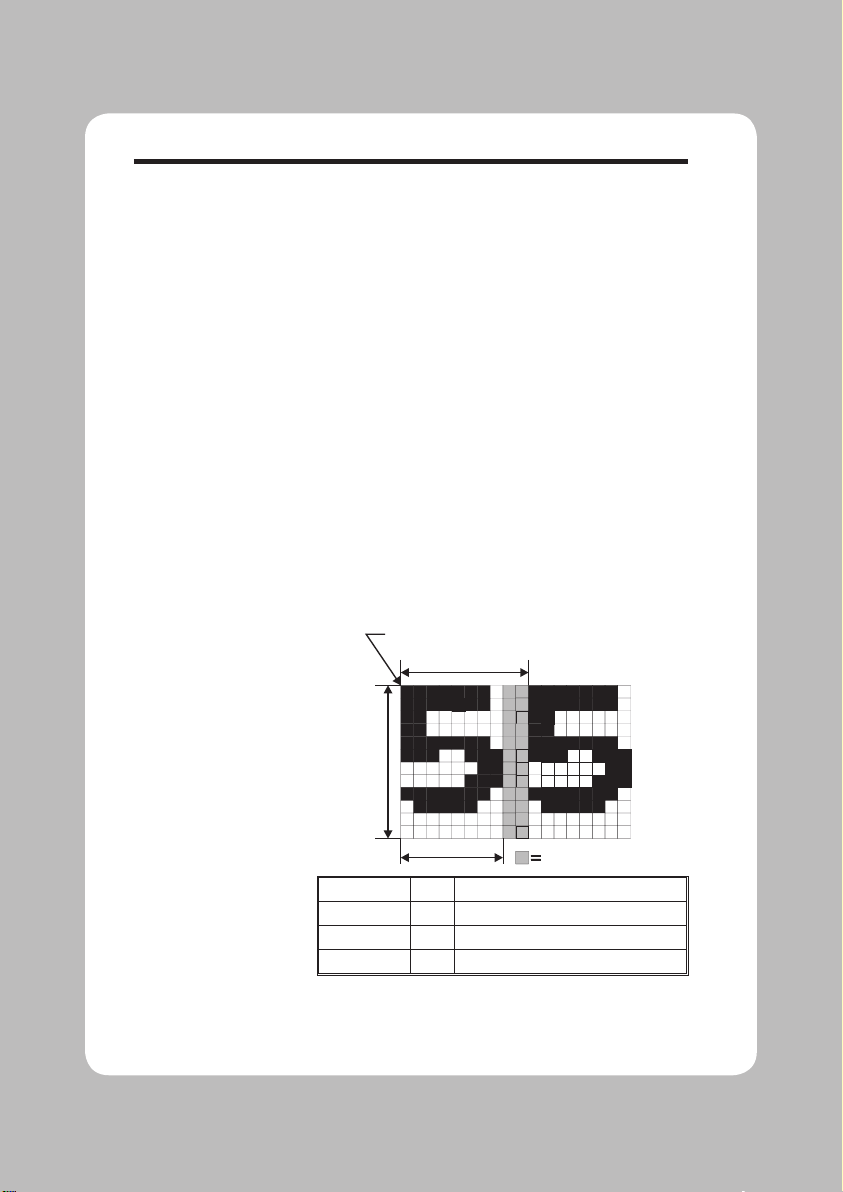
Measuring Soft Font
Size
Pa ram e ter Dots Data En tered as Hex a dec i mal
p
3
12 0C hex.
b 10 0A hex.
c 8 08 hex.
Inter-character Space
(actuall
y
white dots)
12
D
o
t
s
8 Dots
10 Dots
Reference Point
47
Page 49
ES Com mand - Store Soft Font
Soft Fonts
Programming Cod
e
Example
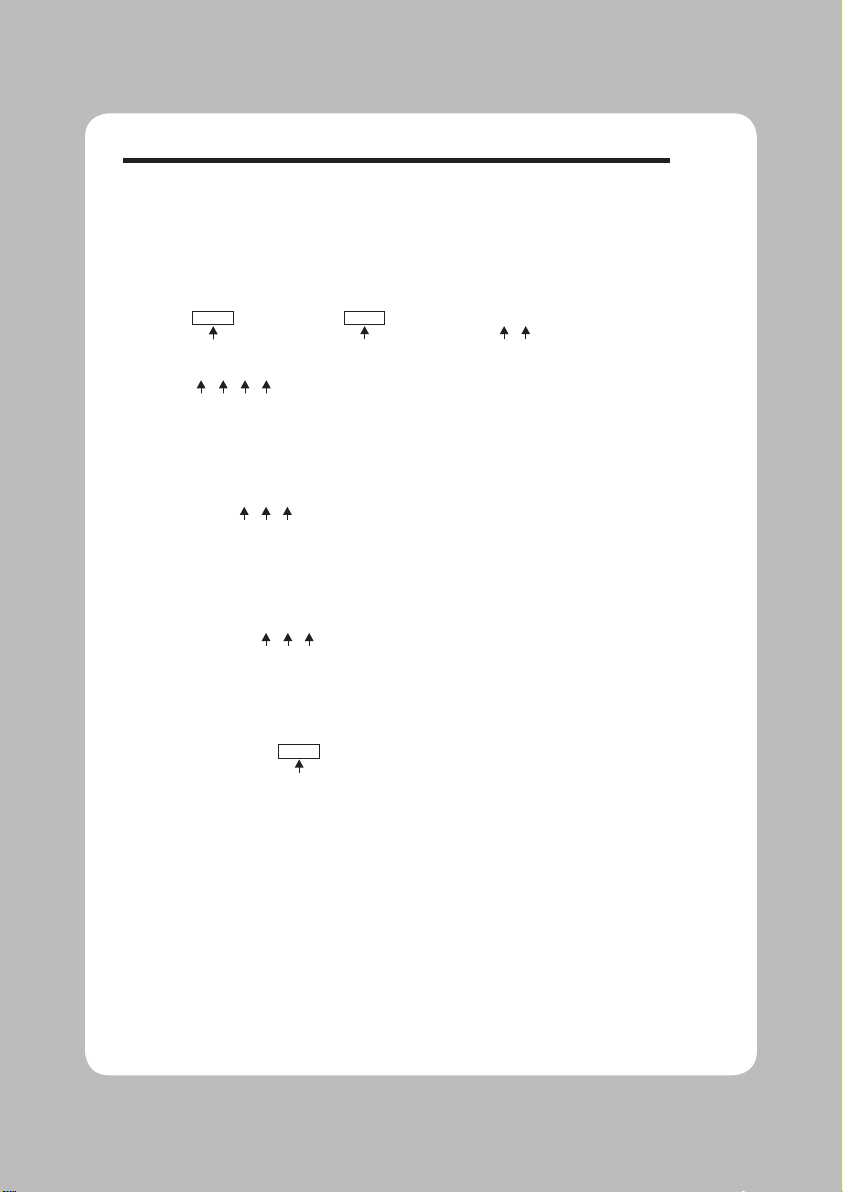
The typical soft font down load com mand
strings to the printer. The fol
lowing ex ample
was gen erated with the CAL3 soft ware.
00000000
0D 0A 45 4B 22 61 22 0D 0A 45 53 22 61 22 03 00
..EK"a"..ES"a"..
00000010
1A 41 17 03 00 7C 00 00 7C 00 00 7C 00 00 EE 00
.A...|..|..|....
00000020
00 EE 00 01 EF 00 01 C7 00 01 C7 00 03 83 80 03
................
00000030
83 80 07 83 C0 07 01 C0 07 01 C0 0E 00 E0 0F FF
................
00000040
E0 0F FF E0 1F FF F0 1C 00 70 3C 00 78 38 00 38
.........p<.x8.8
00000050
38 00 38 70 00 1C 70 00 1C F0 00 1E E0 00 0E 00
8.8p..p.........
00000060
00 00 42 17 03 1F FF 00 1F FF C0 1F FF E0 1C 01
..B.............
00000070
E0 1C 00 F0 1C 00 70 1C 00 70 1C 00 70 1C 00 E0
......p..p..p...
00000080
1C 01 E0 1F FF C0 1F FF C0 1F FF E0 1C 00 F0 1C
................
00000090
00 70 1C 00 38 1C 00 38 1C 00 38 1C 00 38 1C 00
.p..8..8..8..8..
000000A0
38 1C 00 70 1C 00 F0 1F FF E0 1F FF C0 1F FF 00
8..p............
000000B0
00 00 00 43 19 03 00 7F 00 01 FF C0 03 FF E0 07
...C............
000000C0
C1 F0 0F 00 78 1E 00 38 1C 00 3C 1C 00 18 3C 00
....x..8..<...<.
000000D0
00 38 00 00 38 00 00 38 00 00 38 00 00 38 00 00
.8..8..8..8..8..
000000E0
38 00 00 38 00 00 1C 00 0C 1C 00 0E 1C 00 1C 0E
8..8............
000000F0
00 3C 0F 00 7C 07 C0 F8 03 FF F0 01 FF E0 00 7F
.<..|...........
00000100
80 00 00 00 0D 0A
......
CR & LF
CR & LF
CR & LF
p
1
p
2
p
3
a
1
b
1
c
1
a
2
b
2
c
2
a
3
b
3
c
3
48
Page 50
ES Com mand - Store Soft Font
Font Bitmap Data
Format
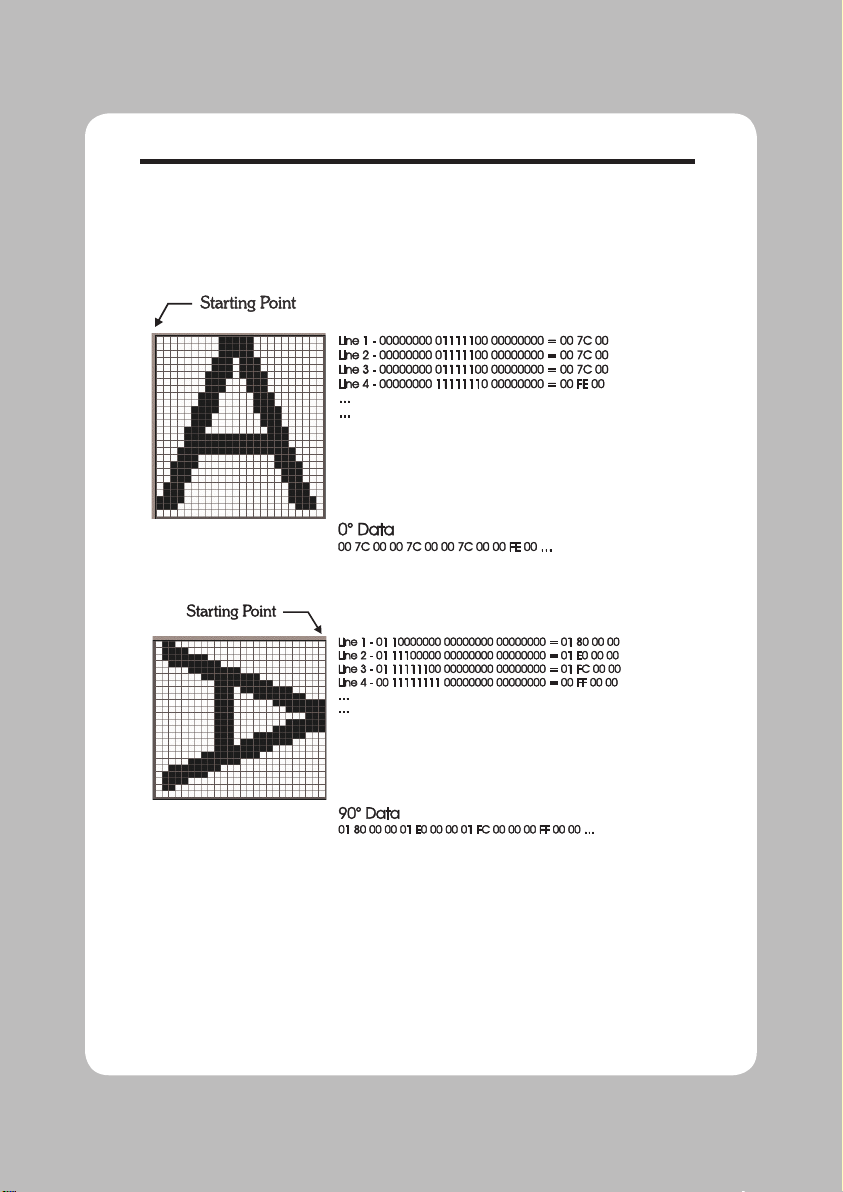
The black and white bitmap that represents the
font must be converted into ASCII hex adecimal
code. The 0° font format has dot con verted to
data bytes read ing from left to
right and the last
byte in a line is pad ded with ze ros to complete
the line and data byte.
The
0°
and 90° font data is then sent to the
printer in line order.
49
Page 51
50
f Command - Cut Position
Description Use this command on an in di vid ual
printer to
pro vide pre ci sion cut place ment to:
• Compensate for small sensor to cut ter po sition
differences on a printer by printer basis.
• Fine-tune the cut po sition to com pensate for
dif
fer ences in me dia.
Mobile print ers, such as the printer, ig nore this
com mand.
Syntax
fp
1
Parameters p1 = Cut po sition in dex mea sured in dots.
Acceptable values: 070 to 130. The de
-
fault
value is 100.
When
us
ing
the la
bel
liner cut
ter
op
tion,
the
printer
will ad
vance each
printed
label
to the
ap
-
pro
pri at
e pro grammed off set cut po si tion,
between labels, before cutting. Due to media
differences,
the printer may not accurately
position the labels before cutting, causing the
cutter to cut the label instead of the liner.
The printer’s cutter is not de signed to cut la bels.
Label
s have adhesive that may in terfere with the
proper op
eration of the cut ter.
Onl
y cut la bel liner and tag stock
and
do
not ex ceed
the
spec ified me dia den sity and thickness of the
cutter
.
If the cut po sition causes the la bel just printed
to
be cut, in crease the cut po sition in dex value
(>100). If the cut po sition causes the la bel fol lowing the one just printed to
be cut, de crease
the cut po sition in dex value (<100).
Page 52

FE Command - End Form Store
Description This com mand is used to end a form store se-
quence.
Syntax FE
Example
FS"FORMNAME"�
...
FE�
The form store se quence is started with the FS
com
mand.
51
Page 53
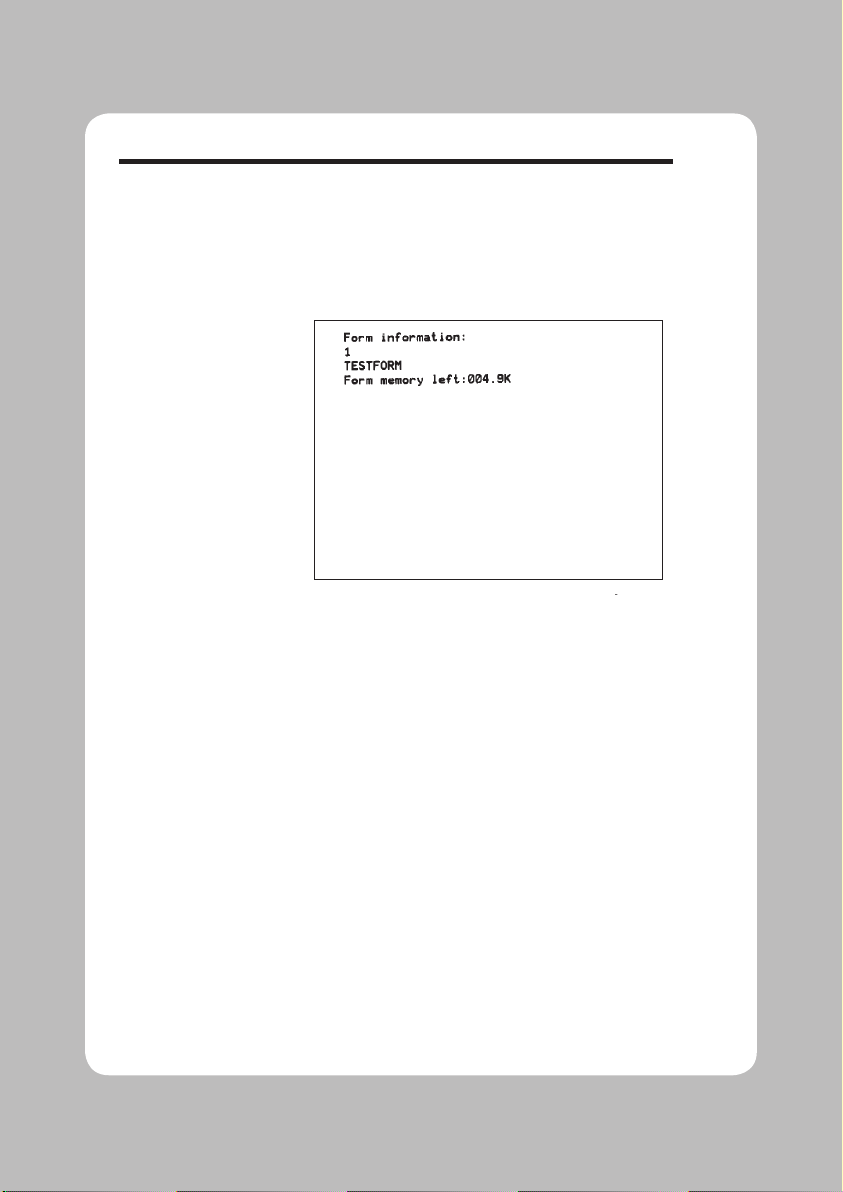
FI Command - Print Form Information
Description This com mand will cause the printer to print a
list of all forms stored in mem ory.
Syntax FI
Example
FI� :prints forms list
Will Produce
52
Page 54

FK Command - Delete Form
Description This com mand is used to de lete forms from
mem ory.
Syntax FK [ “FORMNAME” | “*”
]
Parameters “FORMNAME” = By en tering the name of a
form, that form will be de leted from
mem ory.
• The name may be up to 8 char ac ters long.
• Form names stored by the printer are case
sensitive and will be stored
ex actly as en tered
on
the
FS
com mand
line; i.e.
“FORM1”,
“form1”
and “FoRm1” are three different
forms
when stored into the printer or when re -
trieved by the user.
• Delet i n g a
sin
gle
form
re
quir e s
the
FK”FORMNAME” be is sued twice for each
form to be de leted. Some la bel gen eration
programs
re-is
sue
forms
(form
de
lete
and
store) every time a la bel is printed which re
-
duces flash mem ory life.
“*” = By in cluding an “*” (wild card), ALL
forms will be de leted from mem ory. The
FK”*
” does not need to be is sued twice
to de lete all forms.
Example
FK"AFORM"� :deletes form “AFORM”
FK"AFORM"
� :second de lete form “AFORM” re quired
:for flash printers
FK"*"
� :deletes all forms
53
Page 55

FR Command - Retrieve Form
Description Use this com mand to re trieve a form that was
previously stored in memory.
Syntax FR"FORMNAME"
Parameters “FORMNAME” = This is the form name
used when the form was stored.
• The
name may be
up to
8 char
ac ters long.
• Form names stored by the printer are case
sensitive
and
will be
stored
ex actly as
en
tered
on the FS
com mand line; i.e. “FORM1”,
“form1”
and “FoRm1” are three different
forms w
hen
stored
into
t
he
printer or
when
re
-
trieved by the user.
Example
FR"TEST1"� :retrieves the form named TEST1
To print a list of the forms currently stored in
memory, use the FI com mand.
54
Page 56
FS Command - Store Form
Description This com mand be gins a form store se quence.
Syntax FS"FORMNAME
"
Parameters “FORMNAME
” =This is the form name that
will be used when re trieving the stored
form.
• The name may be up to 8 char ac ters long.
• Form names stored by the printer are case
sensitive
and wi
ll
be
stored
ex actly as
en
tered
on
the
FS
com mand line; i.e. “FORM1”,
“form1”
and “FoRm1” are three different
forms
w
hen stored
into
t
he printer
or
when
re
-
trieved by the user.
• Global
com
mands such
as
EI, EK, ES,
FI,
FK, GI, GK, GM, M, N, P, TS, U, UE, UF,
UG, Y, W, ?, ^@ should not be used in
a
form store se quence.
Form
name,
AUTOFR,
is
re
served
for au
tomatic
,
single form re call, see page 3-9 for de tails.
� All com
mands
fol
low
in
g FS will
be
stored
in
form mem ory un til th
e FE com mand is re -
ceived, end ing the form store process.
� Delete
a form
prior
to
up dating the
form
by
us
ing
the FK command.
If
a form
(with
the
same
name)
is already
sto
red
in memory, is
-
su
ing the
FS com mand will re sult in an er ror
and the pre viously stored form is re tained.
� To print
a list
of
the for
ms currently stored in
memory, use the FI com mand.
� Data stored within a form can not have the
Null (0 dec. 00 hex.) char acter as part of any
data within that form
.
� A form will not
stor
e if
insuf
ficient
memory
is
available.
S
ee
the
M com mand
for de
tails
on
ad
just ing
and con
fig ur ing
mem
ory
for forms,
graphics and soft fonts.
55
Page 57

FS Com mand - Store Form
Example
�
FK"TESTFORM"� :delete form “TESTFORM”
FS"TESTFORM"� :begins the form store sequence of
:the form “TESTFORM”
V00,15,N,"En
ter Prod uct Name:"�
B10,20,0,3,2,10,100,B,"998152.001"
�
A50,200,0,3,1,1,N,"Ex
am ple
Form"�
A50,400,0,3,1,1,N,"Model Name: “V00
�
FE
� :ends form store sequence
FI
� :prints list of stored forms
56
Page 58

GG Command - Print Graphics
Description Use this command to print a PCX (format)
graphic that has been pre viously stored in
printer memory.
Syntax GGp
1,p2
,{“NAME” | Vari able Data}
Parameters
p1 = Hor
i zon tal start
po
si tion (X)
in dots.
p2 = Vertical start position (Y) in dots.
“NAME” or Vari able Data = This is the
graphic name used when the graphic
was stored. This name can be sup plied
via vari able data
(V00 - V99
).
• The name may be up to 8 char ac ters long.
• Graphic
names
sto
red
by
the
pri
nter
are
ca
se
sensitive and will be stored
ex actly as en tered
with the GM
c o m m and l ine; i.e.
“GRAP H I C 1 ”
, “ graphi c 1 ” an d
“graPHic1”
are three different graph ics
when stored into
the printer or when re trieved
by the user.
Example:
GG50,50,"LOGO1"�
FK"TESTFORM"
� :delete form “TESTFORM”
FS"TESTFORM"� :begins the form store sequence of
:the form “TESTFORM
”
V00,8,N,"Enter Graphic Name:"�
GG50,50,V00
�
FE
� :ends form store sequence
FR"TESTFORM" :retrieves the form named TESTFORM
?� :Down
load
vari
ables
LOGO1 :Graphic name to be re called and
:printed
P1
� :Print one la bel with graphic LOGO1
57
Page 59
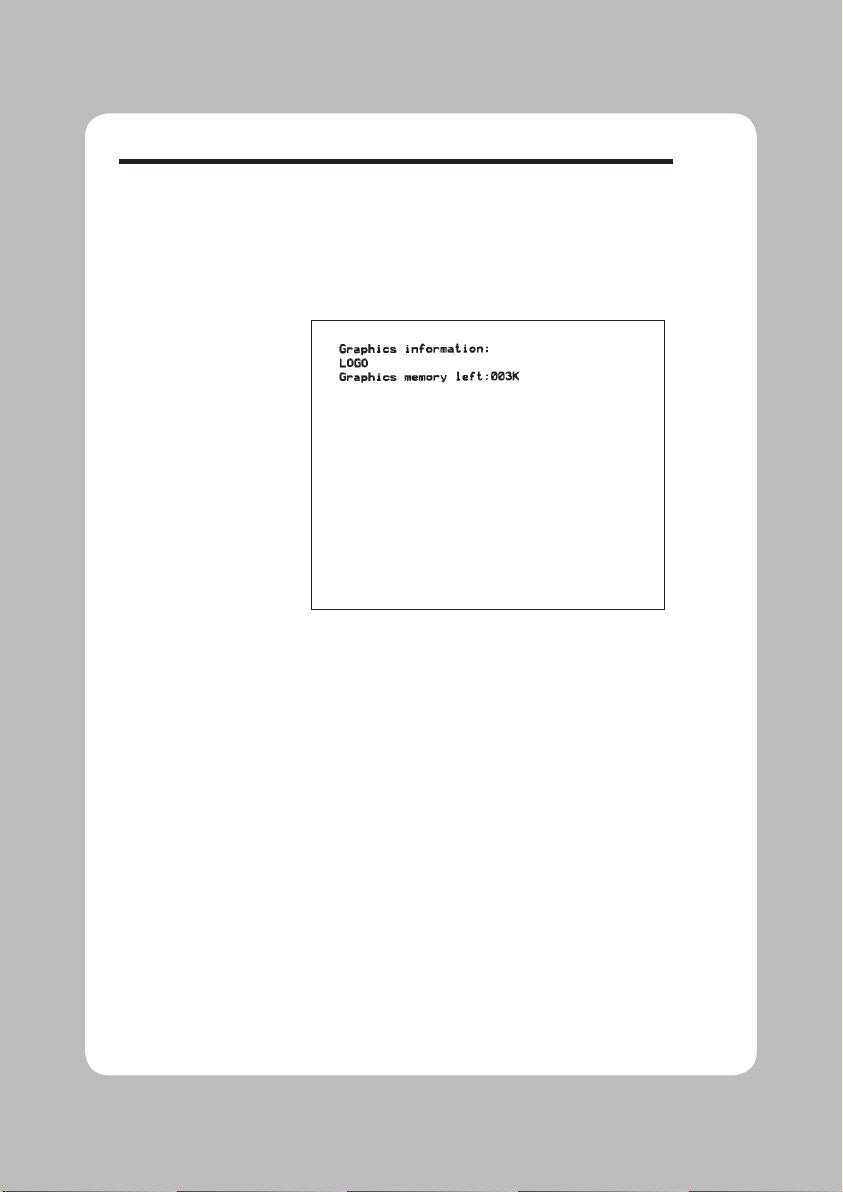
GI Command - Print Graphics Information
Description This com mand will cause the printer to print a
list of all graphics stored in memory.
Syntax GI
Example
GI� :prints graph ics list
Will Produce
58
Page 60

GK Command - Delete Graphics
Description Use this com mand to delete graph ics from
mem ory.
Syntax GK {“NAME”|"*"}
Parameters “NAME” = By en tering the name of
a
graphic, that graphic will be de leted
from mem ory.
• Graphic names stored by the printer are case
sensitive
and
wi
ll
be
stored
ex actly as
en
tered
with the GM
com mand line; i.e. “LOGO1”,
“logo1” and “LoGo1” are three different
graphics
w
hen
stored
into
t
he
printer
or
when
retrieved by the user.
• Deleting
a sin
gle
graphic re
quires
that the
GK”FORMNAME” com mand string be is
sued twice for each form de leted. Some la bel
gen er a ti on pro grams re -i s sue g ra ph ics
(graphic de lete and store) ev ery time a la
bel is
printed which will re duce flash mem ory life.
“*” = By in cluding an “*” (wild card), ALL
graphics will be deleted from mem ory.
The GK”*” does not need to be is sued
twice to de lete all graphics.
Example:
GK"LOGO"� :deletes graphic “LOGO”
GK"LOGO"� :second de lete graphic “LOGO” re quired
:for flash printers.
GK"*"
� :deletes all graphics
59
Page 61

GM Command - Store Graphics
Description Use this com mand to store PCX graphics files in
mem ory.
Syntax
GM"NAME"
p1�
“DATA”
Parameters “NAME” = This is the graphic name that will
be used when retrieving the stored
graphic.
• The name may be up to 8 char ac ters long.
• Graphic
names
sto
red
by
the pri
nter
are ca
se
sensitive and will be stored
ex actly as en tered
with
the
GM
com mand
lin
e; i.e. “LOGO1”,
“logo1” and “LoGo1” are three different
graphics
when stored into the printer or when
retrieved by the user.
p1 = This is the file size in bytes. Use the DOS
DIR command to determine the ex act
file size.
“DATA” = Graphic data in 1-bit (black
&
white) PCX (bi nary data) for mat file.
� A
graphic will not store if suf
ficient
mem
ory
is
not al located to graphic mem ory. See the M
command
for de
tails on
ad
justing
and
con fig
-
uring
mem
ory
to store gr
aphics
(forms
an
d
soft fonts).
� Verify the proper storage of the graphic with
the GI com mand.
60
Page 62

GM Com mand - Store Graphics
Example
GK"LOGO1"� :deletes graphic “LOGO1” - Re quired
GK"LOGO1"� :second de lete graphic - Re quired
GM"LOGO1"584� :Prepares printer to re ceive graphic
:“LOGO1”
DATA : Data string in PCX for mat
If us ing a DOS sys tem, the PCX format file (binary data) portion can be sent to the printer us
-
ing the DOS COPY
com mand. For ex ample, if
you have a PCX file named LOGO1.PCX in
your cur rent di rec tory, the ap pro pri ate com
-
mand would be:
COPY LOGO1.PCX PRN /b
Af ter down loading, the GI com mand can be
used to ver ify that the graphic was suc cessfully
stored.
Example First, create a text file “STOREIT.TXT” with an
ASCII text ed itor, as fol
lows:
�
GK“WORLD”�
GK“WORLD”�
GM"WORLD"2004
�
Where
WORLD
is
the name
of
the
graphic
an
d
2004 is the size (in bytes) of the PCX file.
DO N O T
add e x t r a
linefeeds t o
th
e
STOREIT.TXT file.
Next, at the DOS prompt, type:
COPY STOREIT.TXT + WORLD.PCX PRN /b
or use the Ze bra Firmware Downloader from
Windows
OS down
load
the
STOREIT.TXT
and
WORLD.PCX in se quence to the printer.
61
Page 63

GW Command - Direct Graphic Write
Description Use this command to load bi nary graphic data
directly into the Im age Buffer mem ory for im -
mediate print ing. The printer does not store
graphic data sent di rectly to the im age buffer.
The graphic data is lost when the im age has fin
ished print ing, power is removed or the printer
is re set. Com mands that size
(Q and q) or clear
(N
and
M)
the im
age
buffer will
also
remove
graphic im age data.
Syntax
GWp
1,p2,p3,p4
DATA�
Parameters
p1 = Hor
i zon tal start
po
si tion (X)
in dots.
p2 = Vertical start position (Y) in dots.
p3 = Width of graphic in bytes.
Eight (8) dots = One (1) byte of data
p4 = Length of graphic in dots (or print lines).
DATA
= Raw bi nary data with out graphic file
formatting. Data must be in bytes. Multiply the width in bytes
(p3) by the num -
ber of print lines
(
p4) for the tota
l
amount of graphic data. The printer au
-
to mat
i cally cal cu lates the
ex act size of
the data block based upon this formula.
62
Page 64
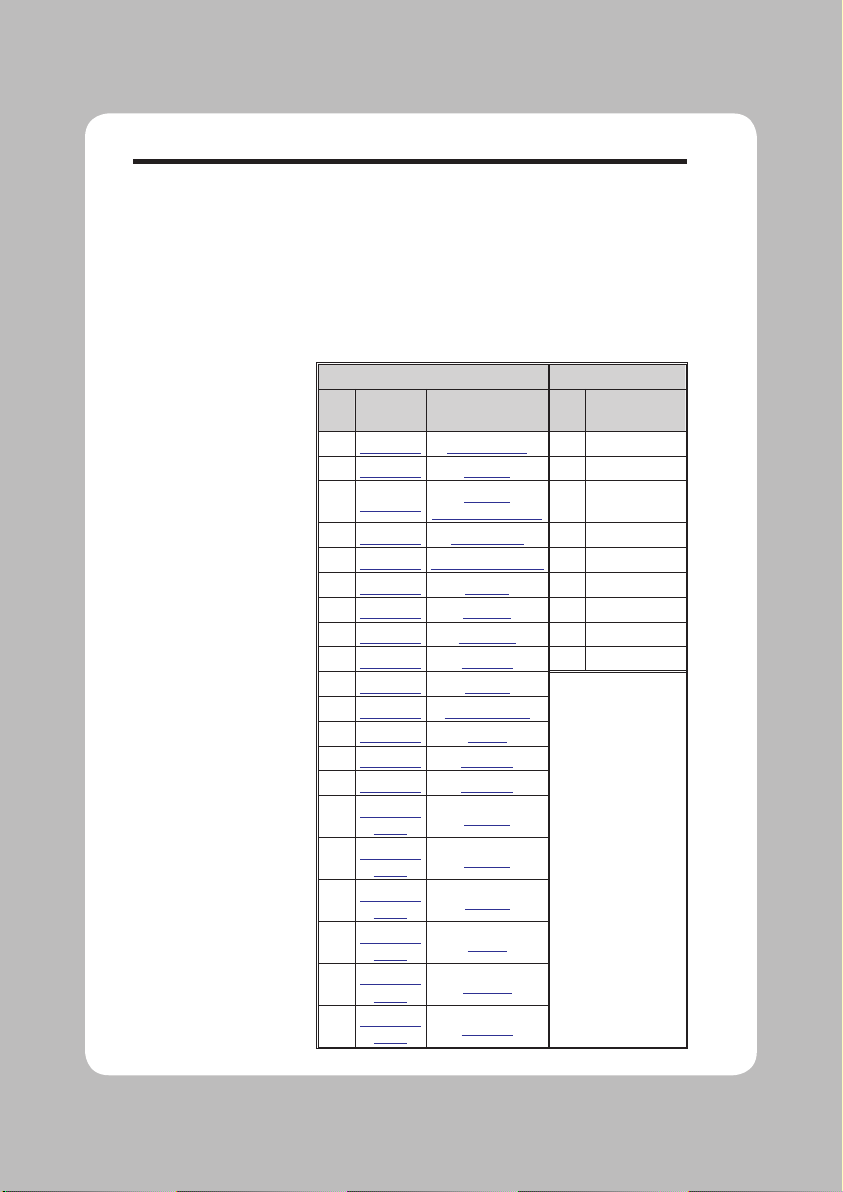
I Command - Character Set Selection
Description Use this com mand to se lect the ap pro pri ate
char ac ter set for print ing and dis play (KDU).
Syntax Ip
1,p2,p3
Parametersp1 = Num
ber of data bits -
8 for 8 bit data or
7 for 7 bit data.
p2 = Printer Code page/Lan guage Sup port
8 Bit Da
ta
7 Bit Da
ta
p
2
Code
Page
De
scrip tion
p
2
De
scrip tion
0 DOS 437
Eng lish - US
0 USA
1 DOS 850
Latin 1
1 Brit ish
2 DOS 852
Latin 2
(Cy
ril lic II/Slavic)
2 Ger man
3 DOS 860
Por
tu guese
3 French
4 DOS 863
French Ca
na dian
4 Dan
ish
5 DOS 865
Nordic
5 Ital
ian
6 DOS 857
Turk
ish
6 Span
ish
7 DOS 861
Ice
lan
dic
7 Swed
ish
8 DOS 862
He brew
8 Swiss
9 DOS 855
Cy
ril lic
10 DOS 866
Cy
ril
lic CIS
1
11 DOS 737
Greek
12 DOS 851
Greek
1
13 DOS 869
Greek
2
A
Win dows
1252
Latin
1
B
Win dows
1250
Latin 2
C
Win dows
1251
Cy ril lic
D
Win dows
1253
Greek
E
Win
dows
1254
Turk ish
F
Win dows
1255
He
brew
63
Page 65
I Com mand - Char acter Set Se lection
p3 = KDU Coun try Code (8 bit data only)
KDU Coun try Code (8 bit only)
032 Bel gium 049 Ger many 027 S. Af rica
002 Can ada 031 Netherl’ds 034 Spain
045
Den
mark
039 It
aly
046 Swe
den
358 Fin
lan
d 003 Latin Am. 041 Swizerl’d
033 France 047 Nor
way
044 U.K.
351 Por
tu
gal
001 U.S.A.
The de fault set ting is I8,0,001. See Ap pendix
LK-B10 stan dard font char acter maps.
A for
3-64 980352-001 Rev.
64
D
Page 66
JB Command - Disable Top Of Form Backup
Description This com mand disables the Top Of Form
Backup fea ture when print ing mul tiple la bels.
At power up,
Top Of Form Backup will be en -
abled.
Syntax JB
Example:
JB�
With the JB com mand enabled, the first la bel will
backup to
the
Top Of
Form
be
fore
printing.
This pre -
serves
the first
label which has
stopped ap
proxi-
mately one-half inch
from
the
print
head.
This is
the
label’s tear away point as set by the pre vious print
op er a tion
.
65
Page 67

66
JC Command - Disable Top Of Form Backup- All Cases
Description This com mand disables the Top Of Form
Backup fea
ture for all op erations. Use this com -
mand for
liner-less print ing and spe cial me dia
cut
ting modes.
Syntax JC
Example:
JC
Page 68

JF Command - Enable Top Of Form Backup
Description This com mand en ables the Top Of Form
Backup fea ture and presents the last la bel of
a
batch print op er a tion. Upon re quest ini ti at ing
the print ing of the next form
(or
batch), the last
label backs up the Top Of Form be fore print ing
the next la bel.
Syntax JF
Example:
JF�
67
Page 69
LE Command - Line Draw Exclusive OR
Description Use this command to draw lines with an “Ex clu-
sive OR” function. Any area, line, im age or field
that this line in tersects or overlays will have the
image re versed or
in verted (sometimes known
as re verse video or a negative im age). In other
words, all black will be
reversed to white and all
white will be re versed to black within the line’s
area (width and length).
Syntax
LEp1, p2, p3, p
4
Parametersp1 = Hor
i zon tal start
po
si tion (X)
in dots.
p2
= Vertical start position (Y) in dots.
p3
= Hor i zon tal length in dots.
p4
= Vertical length in dots.
Example:
N� :clear im age buffer
LE50,200,400,20
�:draw a line
LE200,50,20,400
� :draw an other line
P1
� :print one la bel
Will Produce:
68
Page 70
LO Command - Line Draw Black
Description Use this com mand to draw black lines, over writ-
ing pre vi ous in for ma tion.
Syntax LOp
1,p2,p3,p4
Parameters p1 = Hor
i zon tal start
po
si tion (X)
in dots.
p2 = Vertical start position (Y) in dots.
p3 = Hor i zon tal length in dots.
p4 = Vertical length in dots.
Example:
N� :clear im age buffer
LO50,200,400,20
� :draw a line
LO200,50,20,400
� :draw an other line
P1
� :print one la bel
Will Produce:
69
Page 71
LS Command - Line Draw Diagonal
Description Use this command to draw di agonal black lines,
over writ ing pre vi ous in for ma tion.
Syntax LSp
1,p2,p3,p4,p5
Parameters p1 = Hor
i zon tal start
po
si tion (X)
in dots.
p2 = Vertical start position (Y) in dots.
p3 = Line thick ness in dots.
p4 = Hor i zon tal end po si tion (X) in dots.
p5 = Vertical end po sition (Y) in dots.
Example:
N� :clear im age buffer
LS10,10,20,200,200� :draw a di
ag
o
nal line
P1
� :print one la bel
Will Produce:
70
Page 72

LW Command - Line Draw White
Description Use this com mand to draw white lines, ef fec-
tively eras ing pre vi ous in for ma tion.
Syntax
LWp1,p2,p3,p
4
Parameters p1 = Hor
i zon tal start
po
si tion (X)
in dots.
p2 = Vertical start position (Y) in dots.
p3 = Hor i zon tal length in dots.
p4 = Vertical length in dots.
Example:
N� :clear im age buffer
LO50,100,400,20
� :draw black line
LO50,200,400,20
� :draw an other black line
LO50,300,400,20
� :draw an other black line
LW200,50,20,400
� :draw a white line over all 3 black lines
P1� :print 1 la bel
Will Produce:
71
Page 73
M Command - Memory Allocation
Description Use this command to set the size of form mem -
ory. The re minder of the form stor age mem ory
will be shared by soft fonts and graphics data.
For leg acy printers, this com mand was origi
nally used for mem ory con fig u ra tion (par ti tion)
of forms, im age buffer, graphics and soft font
s
memory which was shared
in leg acy SRAM and
early model flash print ers.
Syntax
Mp1,p2,p
3
Parameters p1 = Pa ram e ter ig nored, but re quired to pro-
cess. Rep resents Im age buffer size in
whole KBytes
.
p2 = Form(s) memory size in whole KBytes.
The pa
ram e ter, p2 (form mem ory size),
inversely ef fects the size of the shared
graphics/soft fonts memory.
p3 = Pa ram e ter ig nored, but re quired to pro-
cess. Graph ics (and soft font) memory
size in whole Kbytes.
If the
M com mand is is sued, then all three pa -
rameters must be present.
Avail
able
memory and the cur rent al
lo ca
tion
of
memory can be
displayed
w
ith
the
U com mand
or
an AutoSense
pro
cedure,
see the
printer
user’s
man
-
ual for details.
72
Page 74

N Command - Clear Image Buffer
Description This com mand clears the im age buffer prior to
building a new la bel im age.
Syntax
N
Considerations
� Do not use the N com mand within stored
forms.
� All printer con fig u ra tion com mands should
be is sued prior to is suing the
N com mand to
begin build ing the im age for printing within
the im age buffer.
� Always send a Line Feed (LF) prior to the N
command
to
en
sure
that
pre
vious
data
in the
command buffer has cleared and the printer
is
initialized and ready to ac cept commands.
Example:
� :ac ti vates com mand pro cess
ing
N� :clears the im age buffer
73
Page 75

o Command - Cancel Software Options
Description This com mand allows the user to can cel most
printer cus tom iz ation pa ram e ters set by o se ries
com mands.
Pa ram e ters set by the fol low ing com mands are
can celed and re turned to de fault op er a tion:
• oH
• oM
• oE
Syntax o
Parameters
None
The
o com mand is a global printer com mand.
� It can not be is sued in side of a form.
� It must be is sued prior to is suing a text or bar
code com mand (and printing).
74
Page 76
oB Command - Cancel Auto Bar Code Optimization
Description: This com mand al lows the ad vanced pro gram-
mer to disable bar code op timization for ro tated
(90° & 270°) bar codes.
Syntax:
oB
Parameters:
None
The
oB com mand is a global printer com -
mand.
� It can not be is sued in side of a form.
� It
must
be is
sued
prior
to
is
suing
a
bar co
de
command (and print ing).
To
re
apply
bar
code
defaults, is
sue
a
o (small
letter
“o”) com
mand. See
page
C-74
for
im
por
-
tant de tails on the ef fects of us ing the
o com -
mand.
Reset
the
printer with a
^@ com mand
with
flash firm ware print ers or cy cle printer power to
clear the
oB com mand and re turn the printer to
nor mal op er a tion.
Ze bra Tech
nol
ogies Cor po
ra tion
does not war rant,
support,
or
en dorse
the
use
of ba
r codes gen erated
by the
print
er af ter a
oB com mand
has
been
is
sued.
Ze bra Tech
nol
ogies Cor
po ra
tion
does not sup
por
t
this feature
other
than
wi
th the
in
formation supplied
in this document.
75
Page 77

oE Command - Line Mode Font Substitution
Description: This com mand is a Page Mode (LK-B10 com -
Syntax: oE
mand that al lows the printer to set al ternate
Mode font char acter sets. The fonts are
Line
ac ti vate
fo
Mobile print ers, such as the printer,
com mand.
p1 = 5 x 7 bitmap font - Nor mal (CCSET4)
p2 = 5 x 7 bitmap font - Bold (CCSET4)
p3 = 5 x 7 bitmap font - Dou bled (CCSET4)
p4 = 14 x 22 bitmap font - (CCSET1)
p5 = 10 x 18 bitmap font - (CCSET3)
✟ Pa ram e ters p1-p5 are preloaded soft fonts.
✟ Pa ram e ters p1-p5 must be all belower case
✟ The LK-B10 font sets 2 & 4 can be re stored as
d by theoE com mand and are in tended
r LK-B10 em u la tion.
ig nore this
p1,p2,p3,p4,p
Line Mod
Total char acter area is 8 x 11 dots
Line Mod
Total char acter area is 8 x 11 dots
Line Mode LK-B10 Com patibility Font A0
Total char acter size is 8 x 11 dots
Line Mode LK-B10 Compatability Font
Total char acter area is 16 x 26 dots
Line Mode LK-B10 Compatability Font
Total char acter area is 12 x 22 dots
alpha soft fonts.
page 3-45 for more de tails on soft fonts.
the de fault Line Mode fonts by sending the
mand with out a pa ram e ter.
com
5
e LK-B10
e LK-B10 Com patibility Font A0
Com
See the
patibility Font A0
ES com mand on
A
A
o
76
Page 78

oH Command - Macro PDF Offset
Description Use this command to place ad dition sec ondary,
associated Macro PDF sym bols for the con tinuation of data greater than a sin gle PDF 417 bar
code can store.
This com mand must precede any PDF 417 bar code
commands in order to print Macro PDF (multiple ba
r
code)
sym
bols
from
a
sin
gle b com mand’s
data
field.
Syntax oHp
1
, p
2
Parameters p1 = Hor i zon tal off set po si tion (X) in dots of
the next Macro PDF bar code symbol.
p2 = Vertical offset po sition (Y) in dots of the
next Macro PDF bar code sym bol.
See the
fol
lowing page
for an
ex
ample.
77
Page 79
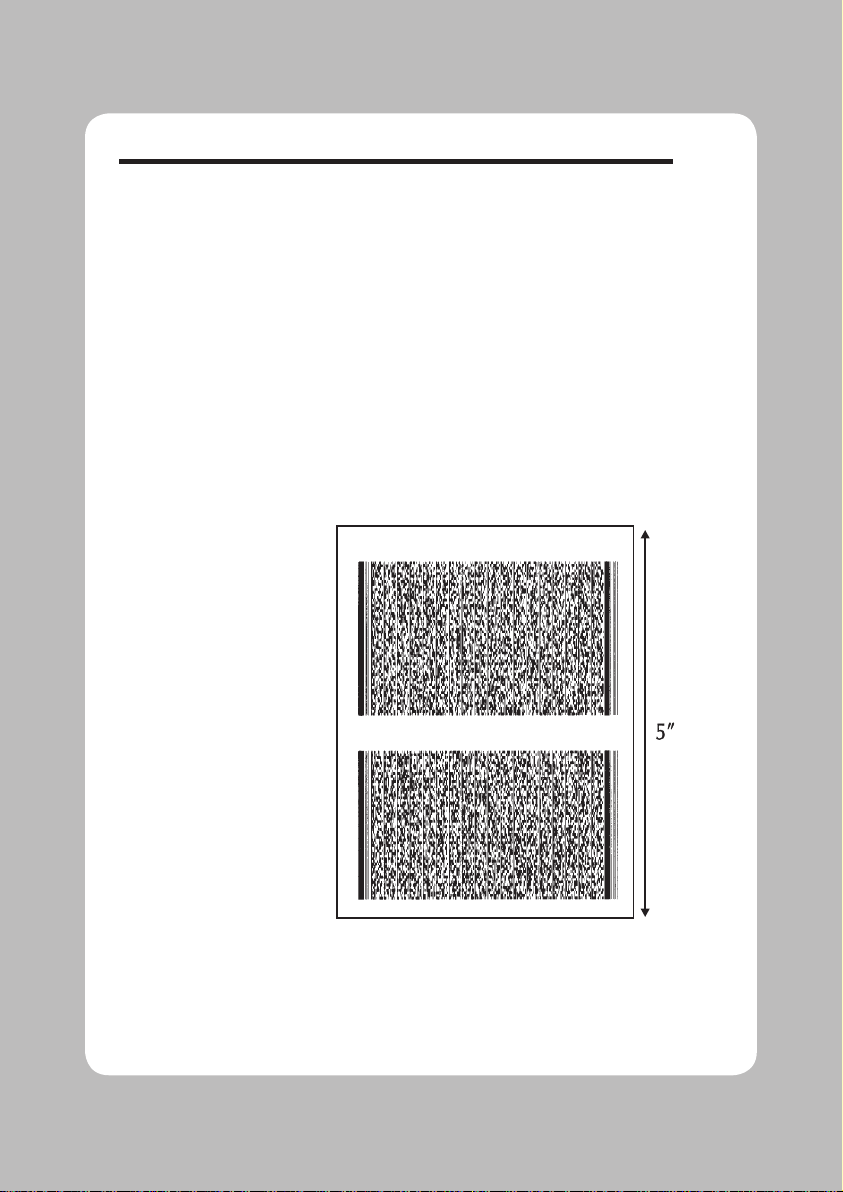
oH Com mand - Macro PDF Off set
Example:
N�
q784
�
Q1215,24�
R0,0
�
oH0,500
�
�
N�
b80,100,P,700,600,x2,y7,l100,r100,f0,s5,"\
Fourscore and seven years ago our fa thers...
<< the rest of Lin coln’s Get tysburg Ad dress HERE >>
... and that gov ernment of the peo ple, by the peo ple, for the peo ple
shall not perish from the earth.
“�
P�
Will Produce:
78
Page 80

79
oM Command - Disable Initial Esc Sequence Feed
Description This com mand dis ables the au tomatic la bel cal -
ibration rou tine ex ecuted by the printer upon
receiving the first es cape com mand se quence
from the Win dows printer driver. The printer
normally mea sures a sin gle la bel and sets the
top
of form prior to print ing the first label af ter a
power-up re set. The Win dows™ printer driver
issues es cape se quences when print ing.
This
com mand’s pri mary use
is
to save
preprinted forms such as se rialized la bels, tags
or tick ets.
Mobile print ers, such as the printer,
ig nore this
com mand.
Syntax oM
This com mand must be
is sued prior to print ing
with the Win dows driver’s or any other Escap
e
(esc) mode print ing op er a tion.
To reinitialize la bel cal i bra tion, is sue a o (111
dec. or 6
F hex.) com mand.
Page 81

oR Command - Character Substitution (Euro)
Description This command allows the advanced program
mer to substitute the Euro currency character
for any ASCII character in printer resident font
numbers 1-4.
The
second
function
this command supports
is
the zero character style togglingbetween a plain
zero character and a zero with a slash.
Character
substitution settings are stored in the
printers non-volatile
'flash' memory.
The origi
-
nal
character can
be
restored
by sending the
oR
command without a parameter.
Syntax oR [p
1,p2
]
Parameters: p
1
= E
If the p
2
parameter is not provided,
then the Euro character will map to
code page position 213 decimal (D5
hexadecimal) for all code pages.
p
1
= 0 (zero)
Toggles the zero character:
slash — no slash (out of box default)
p
2
= Decimal number
Range: 0 to 255
The active code page’s ASCII character
map position to be replaced by the Euro
character. The Euro character will be ac
tive in this map position for all code
pages. See the I command for details
on code page selection.
None = No Parameters (p
1/p2
) resets to all
code pages to original default character
mapping.
Optionally, to reapply normal character opera
-
tions,
issue
a
o (111
dec.
or 6F hex.) command.
See page 3-74 for important details on the ef
-
fects of using the o command.
The Euro character is not supported in Font 5 char
-
acter set.
80
Page 82

oR Com mand - Char ac ter Sub sti tu tion (Euro)
The oR com mand is a global printer com mand.
� It can not be is sued in side of a form.
� It must be is sued prior to is suing a text com-
mand (and print ing).
� Effects a sin gle character on a sin gle code
page. Changing the char acter po sition will re
-
store the orig i nal char ac ter
.
� Flash mem ory printer pa rameter data is pre-
served un til it is changed by the
oR com mand
or reprogramming of the printer
.
Example:
oRE� : Places the Euro character into character
: map po sition 213 decimal
: (D5 hex a dec i mal)
oRE,128
� : Places the Euro into character map
: po
si tio
n 128 dec
i mal (80
hex
a dec i mal)
oR� : Clears Char ac ter Sub sti tu tion,
: Re stores de fault char ac ter maps
81
Page 83

oW Command - Customize Bar Code Parameters
Description: This com mand al lows the ad vanced pro gram-
mer to mod ify specific bar code parameters to
exceed the spec ified bar code’s de sign tol er
-
ances, i.e. re duce the bar code size.
Using the oW com mand may cause bar codes to be come unreadable by some or all bar code
scan ners.
Syntax: oWp1,p2,p3,p4,p
5
Parameters: p1 = Ini tial width nar row white bar.
Default value is
2
p2 = Ini tial width nar row black bar.
Default value is
2
p3 = Ini tial width wide white bar.
Default value is
4
p4 = Ini tial width wide black bar.
Default value is
4
p5 = Ini tial bar code gap.
Default value is
3
The
oW com mand is a global printer com -
mand.
� They can not be is sued in side of a form.
� They
must be
is
sued
prior
to is suing a
bar
code com mand (and printing).
� Use
only
one
bar code
for mat.
Using more
than
one bar
code
may
cause
un
predictable
re sults or op er a tion.
� Issue
all
5 com
mand
pa
rameters
(p1-5
). Use
the
de
fault
pa
rameter
val
ues
as place hol
d-
ers.
� Bar code printed with this command should
be printed in the picket fence orientation (0º
& 180º rotations) to maximize scanning.
82
Page 84
oW Com mand - Cus tomize Bar Code Pa rameters
Reset the printer with a ^@ or o com mands
with flash firm ware print ers or cy cle printer
power to clear the
oW com mand and return the
printer to
normal op eration. See page C-74 for
important de tails on the ef fects of us ing the
o
com mand.
The
B com mand pa ram e ters p5 & p6 must be
set to 0 to use bar codes cus tomized with this
com
mand.
The oW command
has
been
tested
for
pa
rameter
functionality
for
Bar
Code 39 on
ly.
The
oW com -
mand may also function with Codabar and Inter
leaved 2 of 5 bar code, but they have not been
func tion ally ver i fied for this com mand.
Ze bra Tech nol ogies Cor po ra tion does not war rant,
support,
or
en dorse
the use of ba
r codes
gen erated
by
the
print
er
af
ter
a
oW
com
mand
has
been
is
sued.
Ze bra Tech nol
ogies Cor po ra tion does not sup port
this feature other than with the in formation supplied
in this document.
83
Page 85

84
O Command - Hardware Options
Description Use this com mand to se lect var ious printer op-
tions. Op tions avail able vary by printer
configu-
ra tion.
Options se lected and en abled in a printer can be
ver i fied by check ing the printer con fig u ra tion
printout, Dump
Mode printer sta tus la bel. See
the
U com mand and the Ex pla na tion of the
Sta
tus Print out on page 2-2.
Syntax
O[C[p1], D, L, S]
Parameters
D = En able Di rec t Ther mal Mod e, use this
option when us ing di rect ther mal me dia
in a ther mal transfer printer.
d = Out of box de fault Di re ct Ther mal
Mod
e
and is
set ting used in thermal transfer printer’s
displayed in the
Dump Mode st
a
tu
s
print
out. Chang ing the printer to thermal transfer mode or when the printer
detects a trans fer rib bon will cause this
op tion pa ram e ter to per ma nently be re
-
moved from the sta tus print out.
L = En able Label Dispense M ode - Tap
to Print . The printer will present each
label and wait for a tap of the feed
switch be fore print ing the next la bel. Use
this mode when printing mul tiple cop ies
of liner-free la bels.
Fp1 = Form Feed Setting.
p1= Sets the type of op eration the feed
but
ton .
f = De fault, nor mal op er a tion.
Tap to feed
.
r = Re print last la bel printed.
i = Ignore the feed button.
Page 86

O Com mand - Hard ware Op tions
C = En able op tional Label Liner Cutter.
The cut ter will cut at the end of each
form as spec ified by the
Q com mand.
Cp1 = Batch Print La bels and Liner Cut.
p1= Sets the num ber of la bels to print
prior to cut.
If a num ber be tween 1 - 255 is spec ified
for
p1, the printer will cut af ter the spec -
ified num ber of labels have been
printed.
If
b is spec i fied for p1, the “batch print
& cut” fea
ture is en abled. This fea ture
uses the
P com mand to con trol cut ter
op
er
a tion.
S = Re verse the Transmissive (Gap) Sen-
sor Op er a tion.
Examples: O :disables all op tions.
OC :enables cut ter only, la bels are
cu
t af ter eac
h
:label is printed, dis
ables all other op tions
OD :enables di rect thermal mode on thermal transfer
:printers, dis ables all other op tions
OCb :labels are cut af ter a batch of five has printed,
… :disables all other op tions
P5 :Sets the num ber of la bels to print be fore the cut
85
Page 87

OEPL1 Command - Set Line Mode
Description: This com mand is used to switch the printer op -
Syntax OEPL1
Example:
Returning to
Page Mod
Example:
e
mode from Page Mode (LK-B10) to Line
erating
(LK-B10 emulation).
Mode
Line Mode con fig u ra
reset has been is sued or power has been cy cled.
OEPL1
The Line Mode comman
the printer to return the printer to Page (LK-B10)
Mode op er a tion.
The LK-B10
(27 dec or 1Bh) character and followed by a line
feed
(CR - 13 dec or 0D hex) or CR/LF.
LK-B10
com mand is pre ceded by an ES C ape
(LF - 10 dec or 0A hex), a car riage re turn
tion set ting isre tained af ter
d LK-B10 can be sent to
86
Page 88

OEPL1 Command - Set Line Mode
Description: This com mand is used to switch the printer op -
Syntax OEPL1
Example:
Returning to
Page Mod
Example:
e
mode from Page Mode (LK-B10) to Line
erating
(LK-B10 emulation).
Mode
Line Mode con fig u ra
reset has been is sued or power has been cy cled.
OEPL1
The Line Mode comman
the printer to return the printer to Page (LK-B10)
Mode op er a tion.
The LK-B10
(27 dec or 1Bh) character and followed by a line
feed
(CR - 13 dec or 0D hex) or CR/LF.
LK-B10
com mand is pre ceded by an ES C ape
(LF - 10 dec or 0A hex), a car riage re turn
tion set ting isre tained af ter
d LK-B10 can be sent to
86
Page 89

PA Command - Print Automatic
Description Use this com mand in a stored form se quence to
automatically print the form (as soon as all variable data has been sup plied).
Syntax
PAp1, [p2]
Parameters
p1 = Number of la bel sets. Can be vari able
data.
Range: 1 to 9999
p2 = Number of copies of the same la bel.
Can be vari able data.
Range: 1 to 9999
Sets the num ber of copies of each la bel
(used in com bination with coun ters) to
print mul tiple cop ies of the same la bel.
This value is only set when us ing coun
-
ters.
Example:
FK"1"� : de lete form named
“1
"
FS"1"
� : start form store sequence
V00,10,N,"prompt:"
� : de fine variable 00
V01,1,N,"prompt:"
� : de fine variable 01
V02,4,N,"prompt:"
� : de fine variable 02
A24,24,0,4,1,1,N,V00
�: write a line of text in cluding variable
PAV01,V02
� : print 1 la bel au to mat i cally
FE� : end form store sequence
FR"1"� : re trieve form “1"
?� : get vari ables
This Is Text
� : data for V00
3� : data for V01= p1- num ber of sets
2� : data for V02= p2 - num ber of copies
88
Page 90
q Command - Set Label Width
Description Use this com mand to set the width of the print -
able area of the me dia.
Syntax
qp
1
Parameters p1 = The width of the la bel mea
sured in dots.
The
q com mand
will
cause
the im
age
buffer to
reformat and position to match the se lected la
-
bel width (p
1
).
Printable
Are
a
Print Head
Max.
Image
Buffer
Max.
Image
Buffer
Center Alignment
q
Image Buffer
Positioning - Center
Aligned Printers
Printable
Area
Print Head
Image
Buffer
Left Alignment Edge
Q
q
Image Buffer
Positioning - Left
Aligned Printers
89
Page 91
90
q Com mand - Set Label Width
All Printers
This
com mand will automatically set the left mar gin
ac
cord ing to the fol low ing rules:
(print head width
- la bel width) / 2
The q value affects the available print width. Min imiz
ing the q value will maximize the print length and
print spee
d (dou ble buff ering).
If the R Com mand (Reference Point) is sent after this
command,
the im age buffer will be automatically re-
formatted
to match the width of the print head and is
offset by the R com mand spec i fied im age buffer
star
t ing point, nul li fy ing the q com mand.
Example:
q416 :sets label width to 416 dots wide
Page 92

Q Command - Set Form Length
Description Use this com mand to set the form and gap length or
black line thick ness when us ing the transmissive
(gap) sen sor, black
line sen sor, or for set ting the
printer
into the continuous me
dia
print mode.
The
Q com mand will cause the printer to re cal-
cu late and re for ma
t im age buffer.
Syntax
Qp1,p2[±p3]
Parameters p1 = Label length measured in dots
Default: Set by the AutoSense of media
.
Max i mum Value: 65535 (dots)
• Distance be tween edges of the label or black
line marks.
• For con tin u ous mode, the p1pa ram e ter sets
the feed distance be tween the end
of one
form and be ginning of the next.
p2 = Gap length or thick ness of black line
Range: 16-240 (dots) for 203 dpi printers
[18-240 (dots) for 300dpi print ers
]
Gap Mode - By de fault, the printer is in
Gap mode and pa rameters are set with
the me dia AutoSense.
Black Line Mode - Set
p2 to B plus
black line thick ness in dots. See the
Gap mode range.
Con
tin u
ous Me
dia Mode
Set
p2 to 0 (zero)
The transmissive (gap) sen sor will be
used to de tect the end of me dia
.
±p
3
=Off set length mea
sured in dots
• Required for black line mode op er a tion.
• Optional
for Gap
de tect
or con
tinuous
media
modes. Use only pos
itive off set val ues.
91
Page 93
92
Q Com mand - Set Form Length
AutoSense routine does not de tect black line
Sen sor lo ca tion is im por tant when se lect ing the
proper of label or tag type for printing.
See the
printer user’s man ual for specific information on
al ig n ment, ad
ju st m ent, a nd p o s i tion o f the
transmissive (gap) or re flective (black line) sensors.
If
the la
bel
size is not set prop
erly,
the pri
nter
may
print
off th
e edge
of th
e la bel
or
tag
and
onto the
backing or
platen
rol
ler.
Re
peated
pri
nting off the
edge of
the
la
bel
can cause ex
cessive
pri
nt
head
wear
.
Maintain a min imum mar gin of 0.04 inches (1
mm)
on all sides of the label.
Setting the la bel size to large can cause the printer to
skip la bels.
or continuous media.
All LK-B10
sor
tag. It does this in one of two ways
print ers have a transmissive (gap) sen -
designed to de tect the top of each label or
:
liner
at
the
gap
be
• Sensing
• Looking through a hole (notch) in the tag.
through the
tween labels.
la
bel
-
Printers
determine
a
equipped with a black line sen
the top of each la
“black line”
preprinted on
or
bel
tag
the me
dia
sor
by sens
back
ing.
ca
n
ing
Page 94
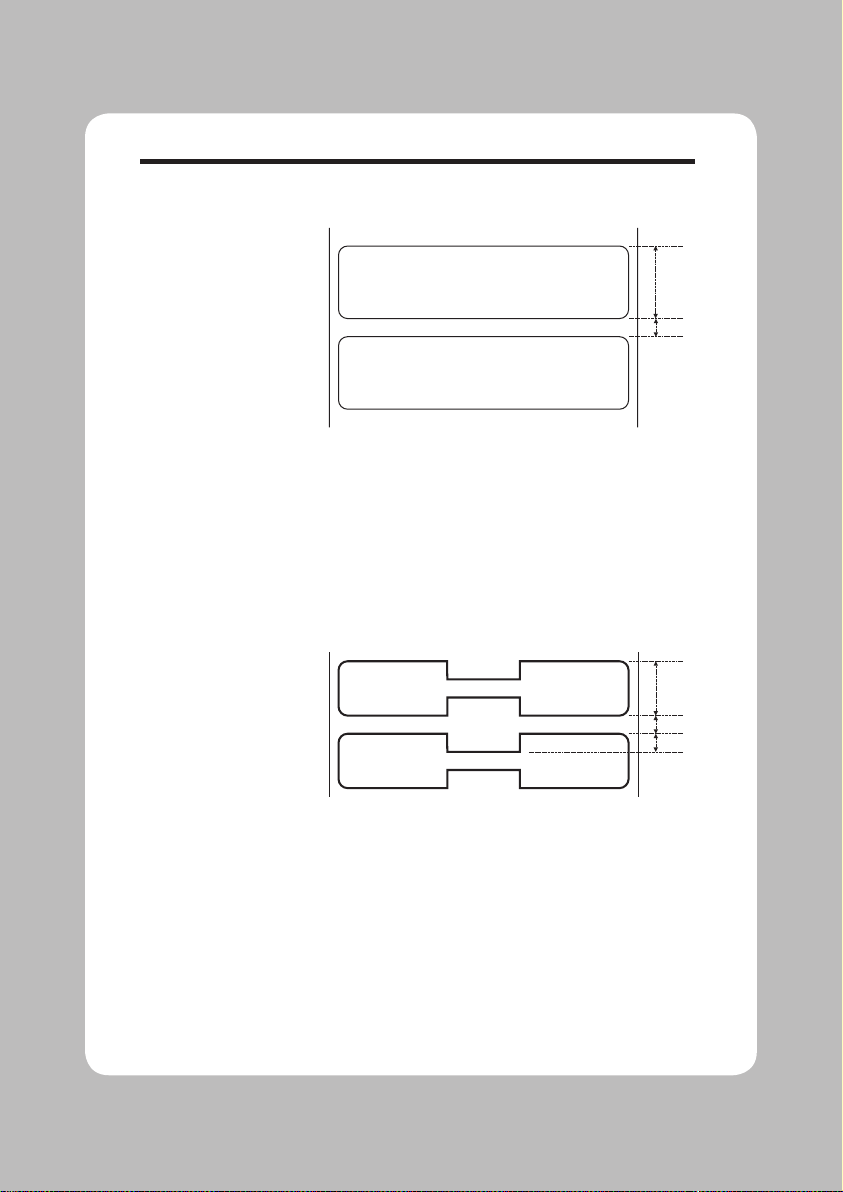
Q Com mand - Set Form Length
Examples:
p
1
p
2
p
3
p
2
Standard Label
Butterfly Label
Where:
p =
20.0 mm (160 dots)
1
p = 3.0mm (24 dots)
2
The Q command would be:
Q160,24↵
Where:
p =
12.5 mm (100 dots)
1
p = 3.0mm (24 dots)
2
p = 3.0mm (24 dots)
3
The Q command would be:
Q100,24+24↵
p
1
93
Page 95
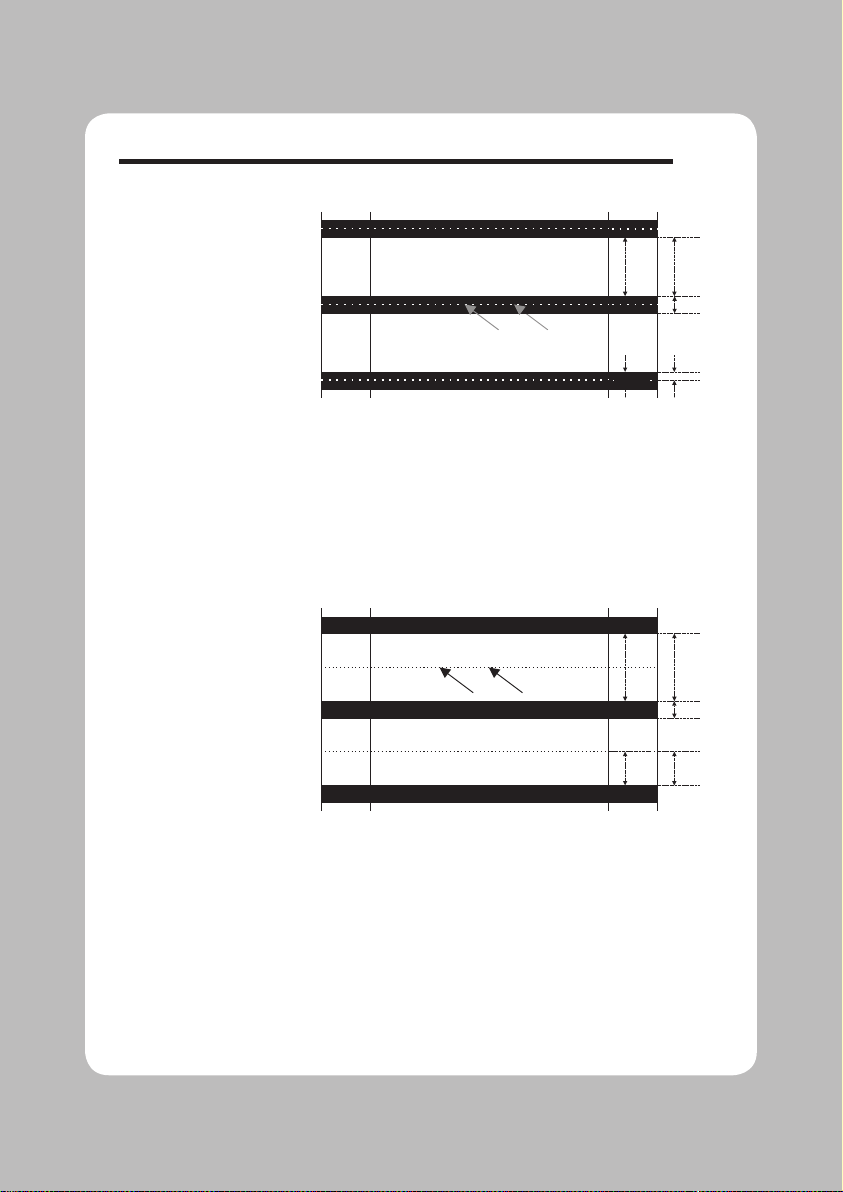
Q Com mand - Set Form Length
p
2
p
3
Where:
1
2
3
p
1
p
2
p
3
Where:
1
2
3
p
1
p
2
p
3
Black Line Between Perforation
Where:
p =
31.0 mm (248 dots)
1
p = 7.0mm (56 dots)
2
p = 17 mm (136 dots)
3
The Q command would be:
Q248,B56-136
↵
p
1
Perforation
p
2
p
3
Black Line On Perforation
Where:
p =
31.0 mm (248 dots)
1
p = 7.0mm (56 dots)
2
p = 0.5 mm (4 dots)
3
The Q command would be:
Q248,B56+4↵
p
1
Perforation
94
Page 96
95
r Command - Set Double Buffer Mode
Description: Use this com mand to disable or reenable the
double buffer im age (la bel) print ing. The dou
-
ble buffer fea ture is a au tomatically tested
and
set by the q and Q com mands.
Mobile print ers, such as the printer,
ig nore this
command and au tomatically set the printer
to
single buffer mode.
Syntax:
rp
1
Parameters: p1 = N - Dis able Double Buffer Mode
Y - Re-en able the Double Buffer Mode if
the printer memory sup ports the im age
buffer size set by
Q and q pa ram e ters
The rN com mand must fol low the q and Q com mands in a fo
rm (la bel) program.
Verify the im age buffer status with the U com mand(s
). See page 2-2, for a sam ple of the
Dum
p
Mode P
rintout.
Page 97
96
R Command - Set Reference Point
Description Use this com mand to move the ref erence point
for the X and
Y axes. All hor izontal and vertical
measurements in other commands use the set
-
ting
for R as the or igin for mea surements. Use
the
R com mand as an alternative to send ing the
q com mand to position (cen ter) la bels that are
narrower than the print head.
Syntax
Rp1,p
2
Parameters p1 = Hor i zon tal (left) mar gin mea sured in
dots
.
p2 = Vertical (top) margin mea sured in dots.
The
R com mand in teracts with im age buffer set -
ting, as fol lows:
• The R com mand forces the printer to use the
full
wi
dth
of
the print head as the width of th
e
image
buffer. The R com mand overrides the
q com mands print width setting.
• Rotate the im age buffer with the Z com mand
to es tablish top and left
margins (ZT) or the
bottom and right mar
gins (ZB).
• When po si tioned cor rectly, pre vents print ing
off two (2) edges of the la
bel op posite the 0,0
ref
er
ence point.
Use the Q and R com mands to gether for the
ea
sies
t
method
of po sitioning form el ements in the print im-
age
in left aligned printers: LK-B10
Repeated printing off the edge of the la bel can cause
excessive pr
int head wear.
Page 98

97
S Command - Speed Select
Description Use this com mand to se lect the print speed.
Mobile print ers, such as the printer
ig nore this
command and au tomatically set speed to
op ti-
mize bat tery use.
Syntax
Sp
1
Parameters p1 = Speed se lect value.
Example:
S2 :selects 2 ips(50 mmps)
Page 99
TD Command - Date Recall & Format Layout
Description Use this com mand to define the date for mat and
print date data. The TD vari able is in serted
within a Text or Bar Code com mand's DATA
parameter to print the date. The TD vari able
supports off setting day by up to 253 days (see
ex am ples be low for us age).
This com mand
only
works
in
print ers
equi
pped with
the Real Time Clock time and date op
tion.
Syntax TDp1[|p2|p3]
Parameters p
1
, p2, p3 = The pa rameters de scribe the
format of the date dis play. At lease on
e
parameter must be sup plied. Each pa
rameter can be any of the ac ceptable
values listed be low.
Value De scrip tion
y2
Year displayed as 2 digits (95)
y4
Year displayed as 4 digits (1995
)
me
Month displayed as 3 letters (JAN)
mn
Month displayed as 2 digits (01)
dd
Day displayed as 2 digits (15)
| = Sep a
ra
tor
char
ac
ter
. The sep a
ra
tor
ma
y
be any ASCII char acter value be
tween
032 and 063. The sep arator char ac
ter is
printed be
tween the re sults of each of
the sup
plied pa
ram
e ters.
Power-Up
De
fault
For
mat - mn-dd-y4
Examples: If the cur rent date is Jan uary 15, 2000:
TDy2/me/dd� :00/JAN/15
TDdd-me-y4
� :15-JAN-2000
TDdd,mn,y4� :15,01,2000
TDdd/me/y2 :15/09/00
A100,100,0,4,1,2,N,"To day is"TD :Today is 15/09/00
A100,200,0,4,1,2,N,"Next Week-"TD+07 :Next Week-22/09/00
A100,300,0,4,1,2,N,"Next Month-"TD+30 :Next Month-15/10/00
A100,400,0,4,1,2,N,"Two Months-"TD+61 :Two Months-15/11/00
98
Page 100

TS Command - Set Real Time Clock
Description Use this com mand to set the time and date in
printers equipped with the Real Time Clock op tion.
Syntax TSp
1,p2,p3,p4,p5,p6
Parameters p1 = Month
Range: 01 to 12
p2 = Day
Range: 01 to 31
p3 = Year
Last two dig its of Year (e.g. 95)
Range: Years 1991- 1999 = 90-99
Years 2000- 2090 = 00-89
p4 = Hour in 24 hour format
Range: 00 to 23
p5 = Min
utes
Range: 00 to 59
p6 = Sec onds
Range: 00 to 59
Example:
TS01,01,95,01,00,00 : sets the date to Jan. 1, 1995
: and the time to 1:00 a.m.
TS12,31,01,15,31,00 : sets the date to Dec. 31, 2001
: and the time to 3:31 p.m.
99
 Loading...