

Page 1
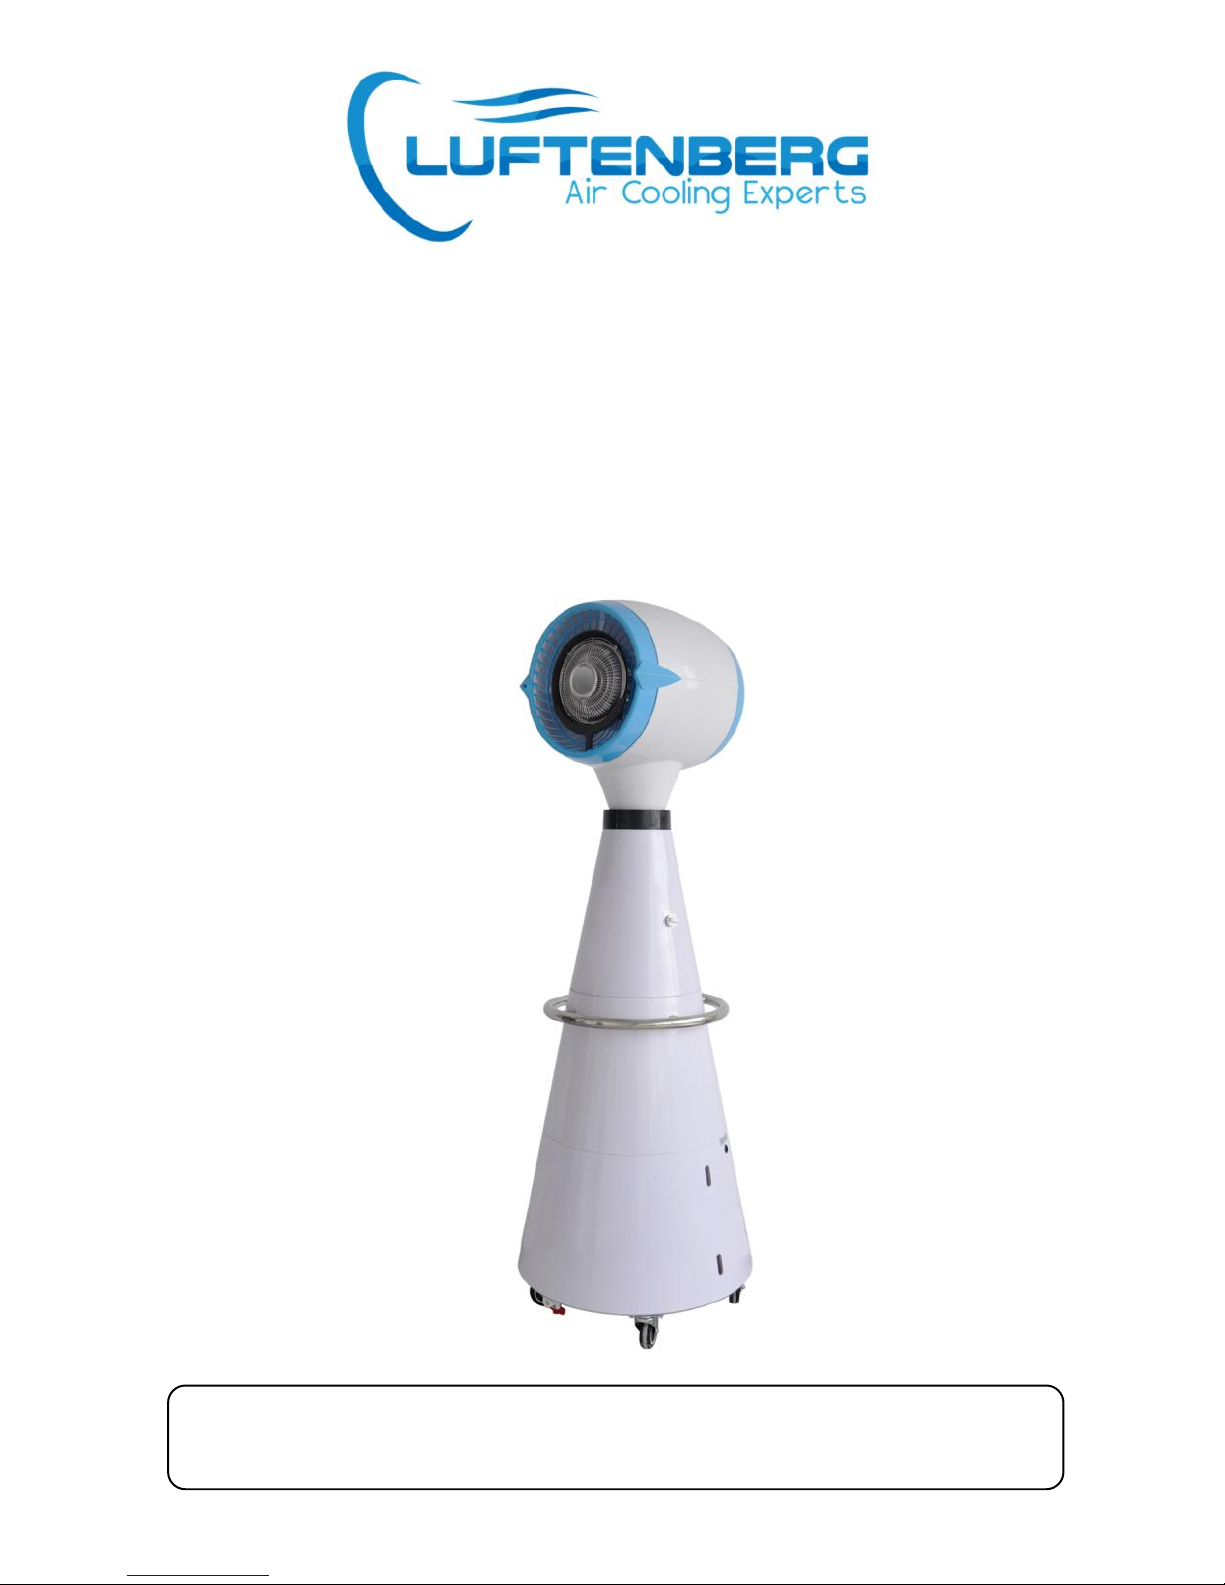
MISTING AIR COOLER
(LBCA4)
Manual
CAREFULLY READ IT BEFORE USING IT;
PROPERLY KEEP IT FOR FUTURE REFERENCE.
Page 2

LBCA4 Page 2 of 15
Contents
Instruction............................................................................ ....3
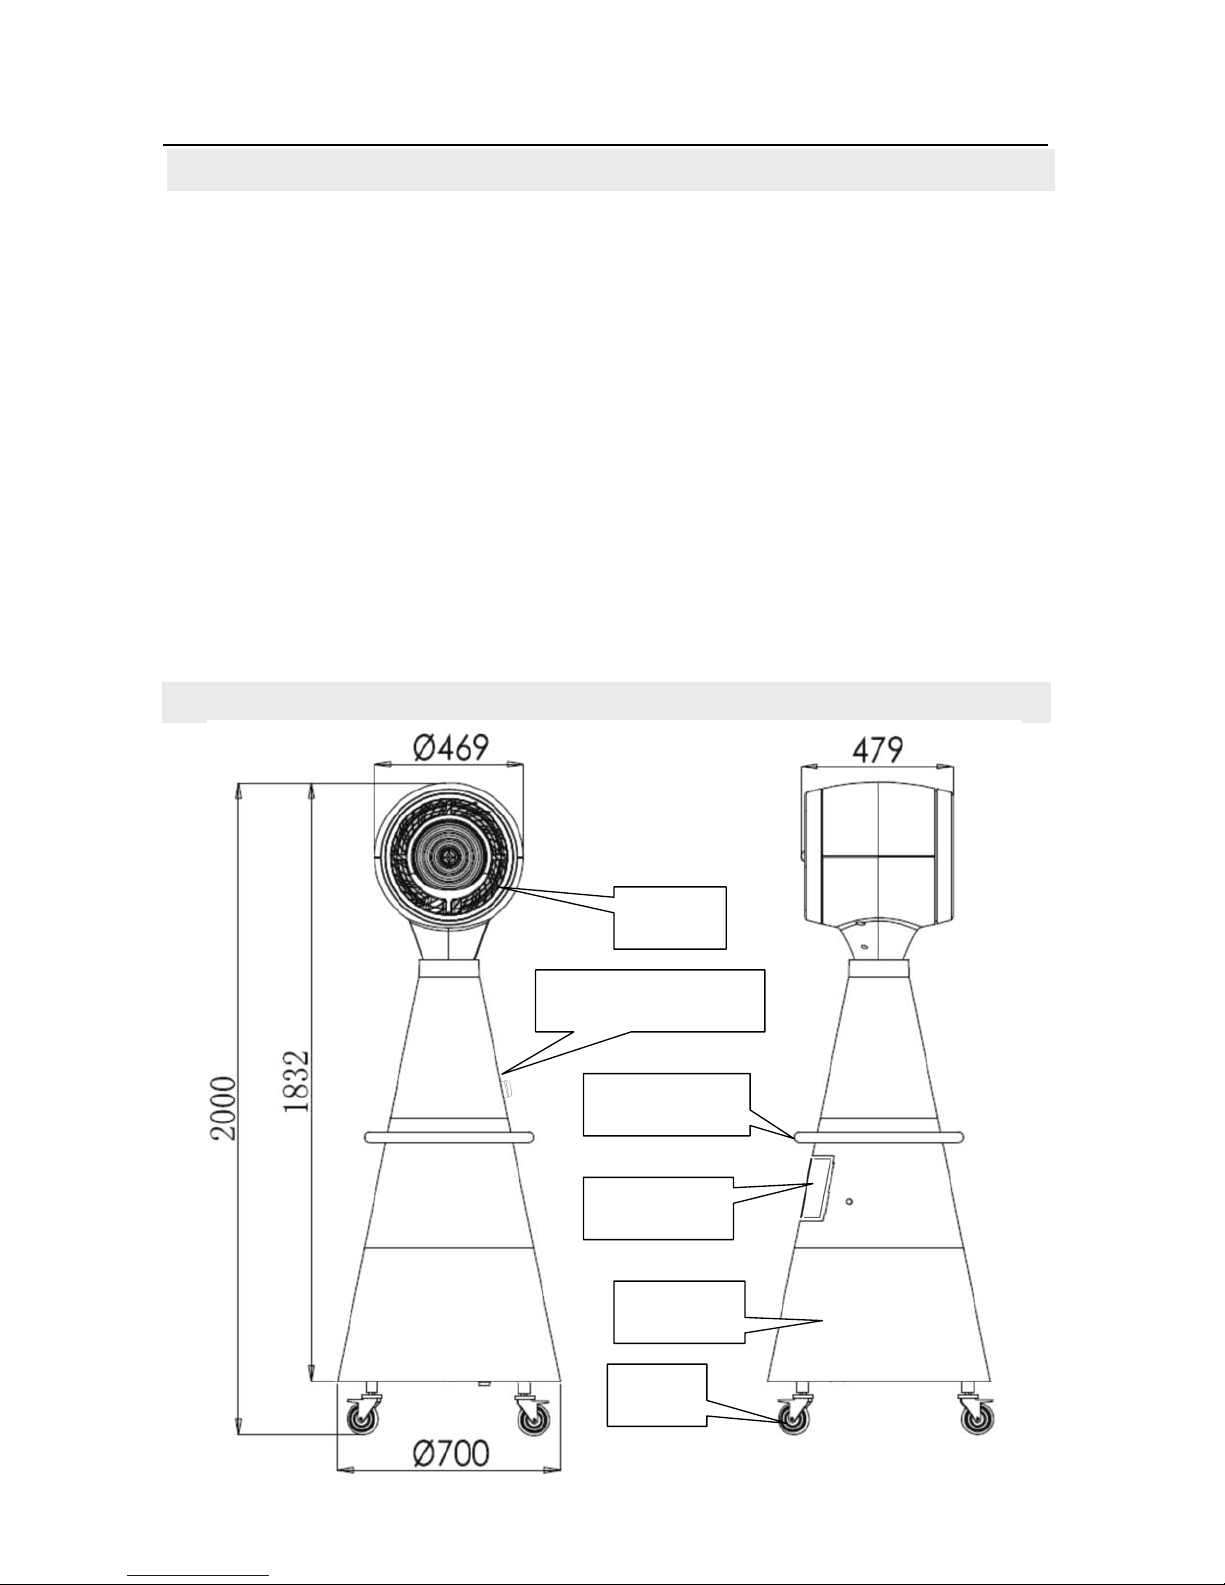
Outline Drawing.......................................................................3
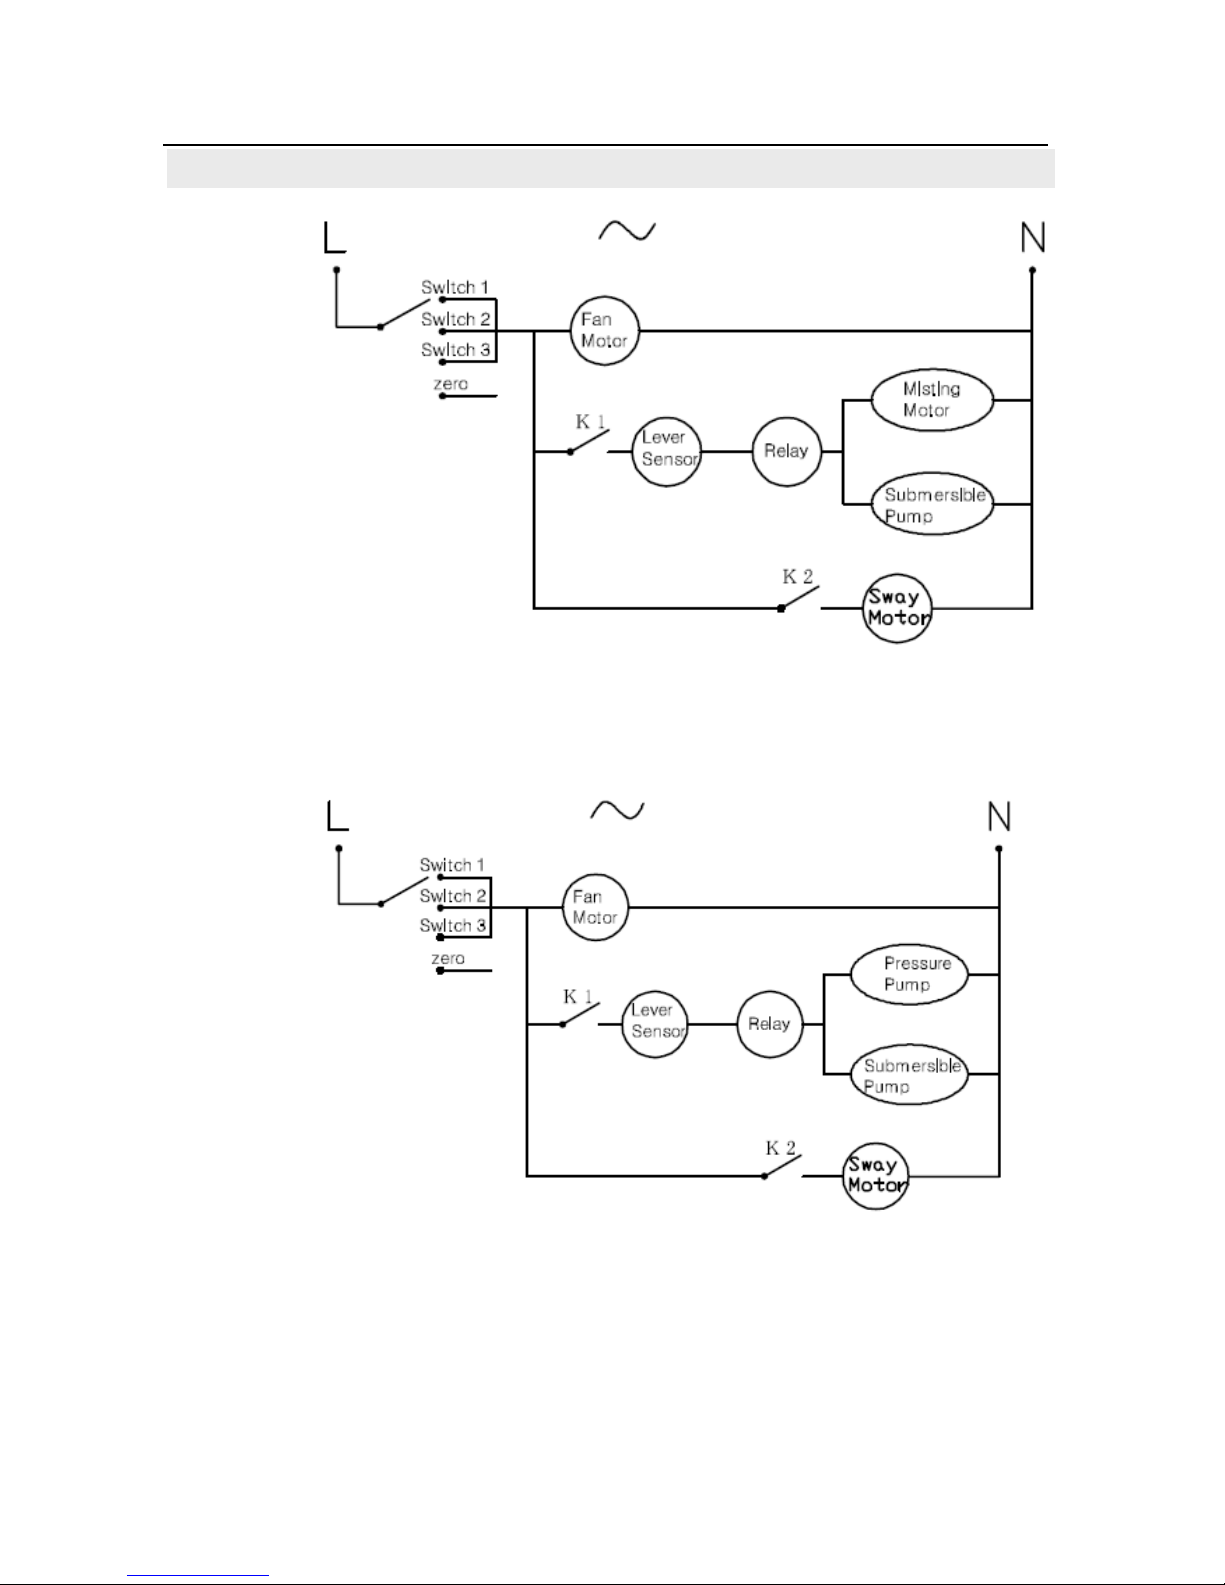
Wiring Diagram...................................... ................................4
Installation Instructions.........................................................5-8
Checking after Installation........................................................8
Trial Operation.....................................................................9-10
Attentions..........................................................................11-12
Common Malfunction Analysis and Maintenance..............13-15
PICTURES ARE ONLY FOR INFORMATION, TAKE MATERIAL OBJECT AS STANDARD
Page 3
LBCA4 Page 3 of 15
Fan head
Mist Regulating Switch
Water Tank
Wheels
Control Panel
Pushing Handle
■Instruction
Misting Air Coolers adopt user-friendly design and colorful appearance. The mist
particles (diameter of 10-25 microns) emitted by misting device will take away the heat
through evaporation, which travel to target area when the fan blows. In the effective area, it
can decrease temperature by 3-8℃and help increase relative humidity, reduce dust and
purify air, which makes a comfortable living & working space.
The internal structure uses independent control devices and human-intelligent
warning protection system, which separates electricity from water so as to eliminate safety
risk. Featured by non-clogged misting system, low energy consumption, low pollution, low
noise, low heat & low carbon, our products are widely used in various public places, such as
open square, playgrounds, stadiums, airports, walk streets, bus stations, outdoor restaurant
and villa gardens; they are also used in industrial workshops of textiles, porcelain, casting
factories & etc.
■Outline Drawing
Page 4
LBCA4 Page 4 of 15
■ Wiring Diagram
A-4C
A-4P
Page 5
LBCA4 Page 5 of 15
■ Installation Instructions
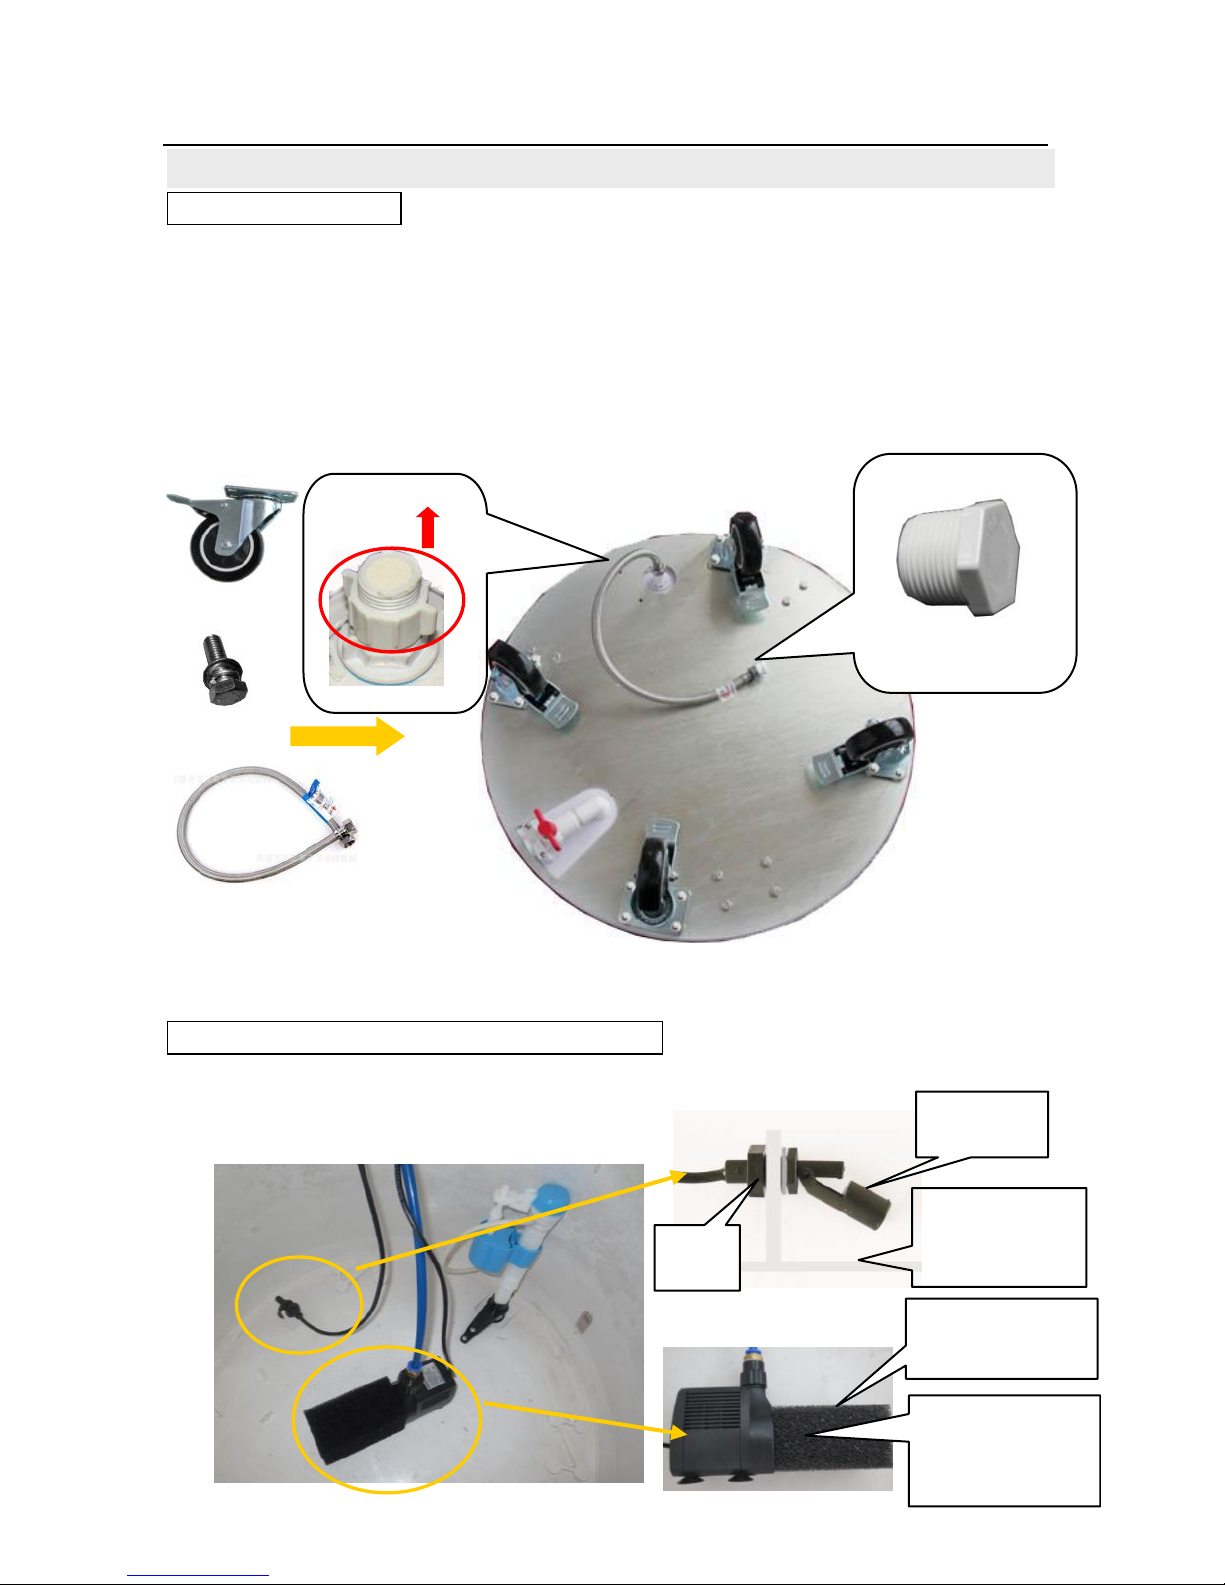
1、 Wheels Installation
Take out the Water Tank from the box, overturn it, and then fasten the 4 wheels on the
corresponding position with 16 sets of M8X16 Hex Head Cap Screw, spring washer and flat
washer. (Picture 1)
When using " automatic adding water", please take off the cover, then fix the weaved pipe.
When the weaved pipe is apart from the water supply, please screw on the choke plug so as to
avoid water leakage.
Picture 1
Remarks: As the Water Tank is very heavy, please be careful to avoid scratches of Water
Tank or hurt of the assemblers.
2、Fasten the Submersible Pump and Level Sensor
Turn the Water Tank with installed wheels back, and fasten the Submersible Pump and
Level Sensor inside the Water Tank. (see Picture 2)
choke plug
Cover
Picture 2
Nut
Make sure the
water inlet is
not shielded.
Bottom of
Water Tank
Floater
Submersible
Pump and filter
Page 6
LBCA4 Page 6 of 15
Remarks: Put the Submersible Pump into the corresponding trench and press it. It will be
fasten by sucks installed beneath the pump.
Fasten the Level Sensor with the Nut into the corresponding trench. Make sure the
floater is flapped down like the picture shows.
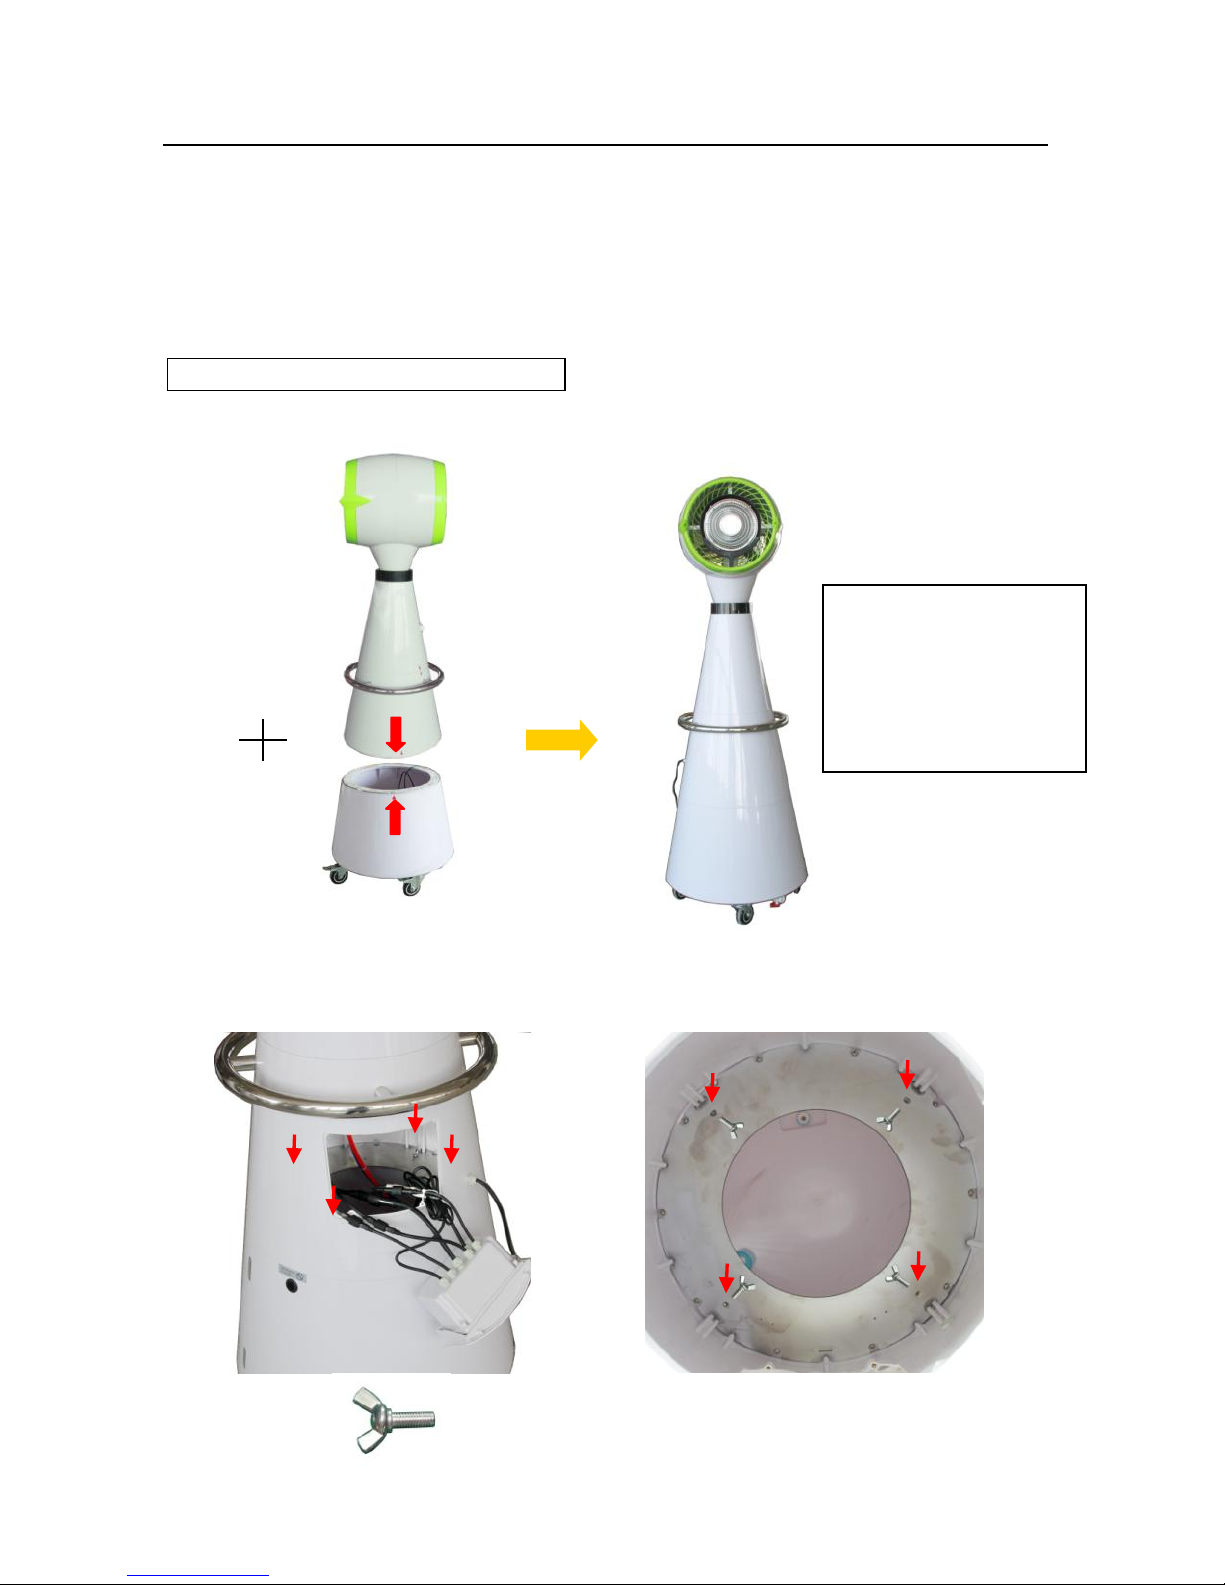
3、 Combine Main Part and Water Tank
Lock the 4 wheels, and then place the Main Part on the Water Tank. (Picture 3)
Picture 3
Rip off the protective coating of the Electricity Box on the Main Part, take it out and then
fasten the two connecting plate together with 4 M6X20 Butterfly screws. (see Picture 4)
Picture 4
When installing,
please align the 2
arrows of the 2 parts.
Page 7
LBCA4 Page 7 of 15
4、Connect the Electric Wire of Submersible Pump and Level Sensor
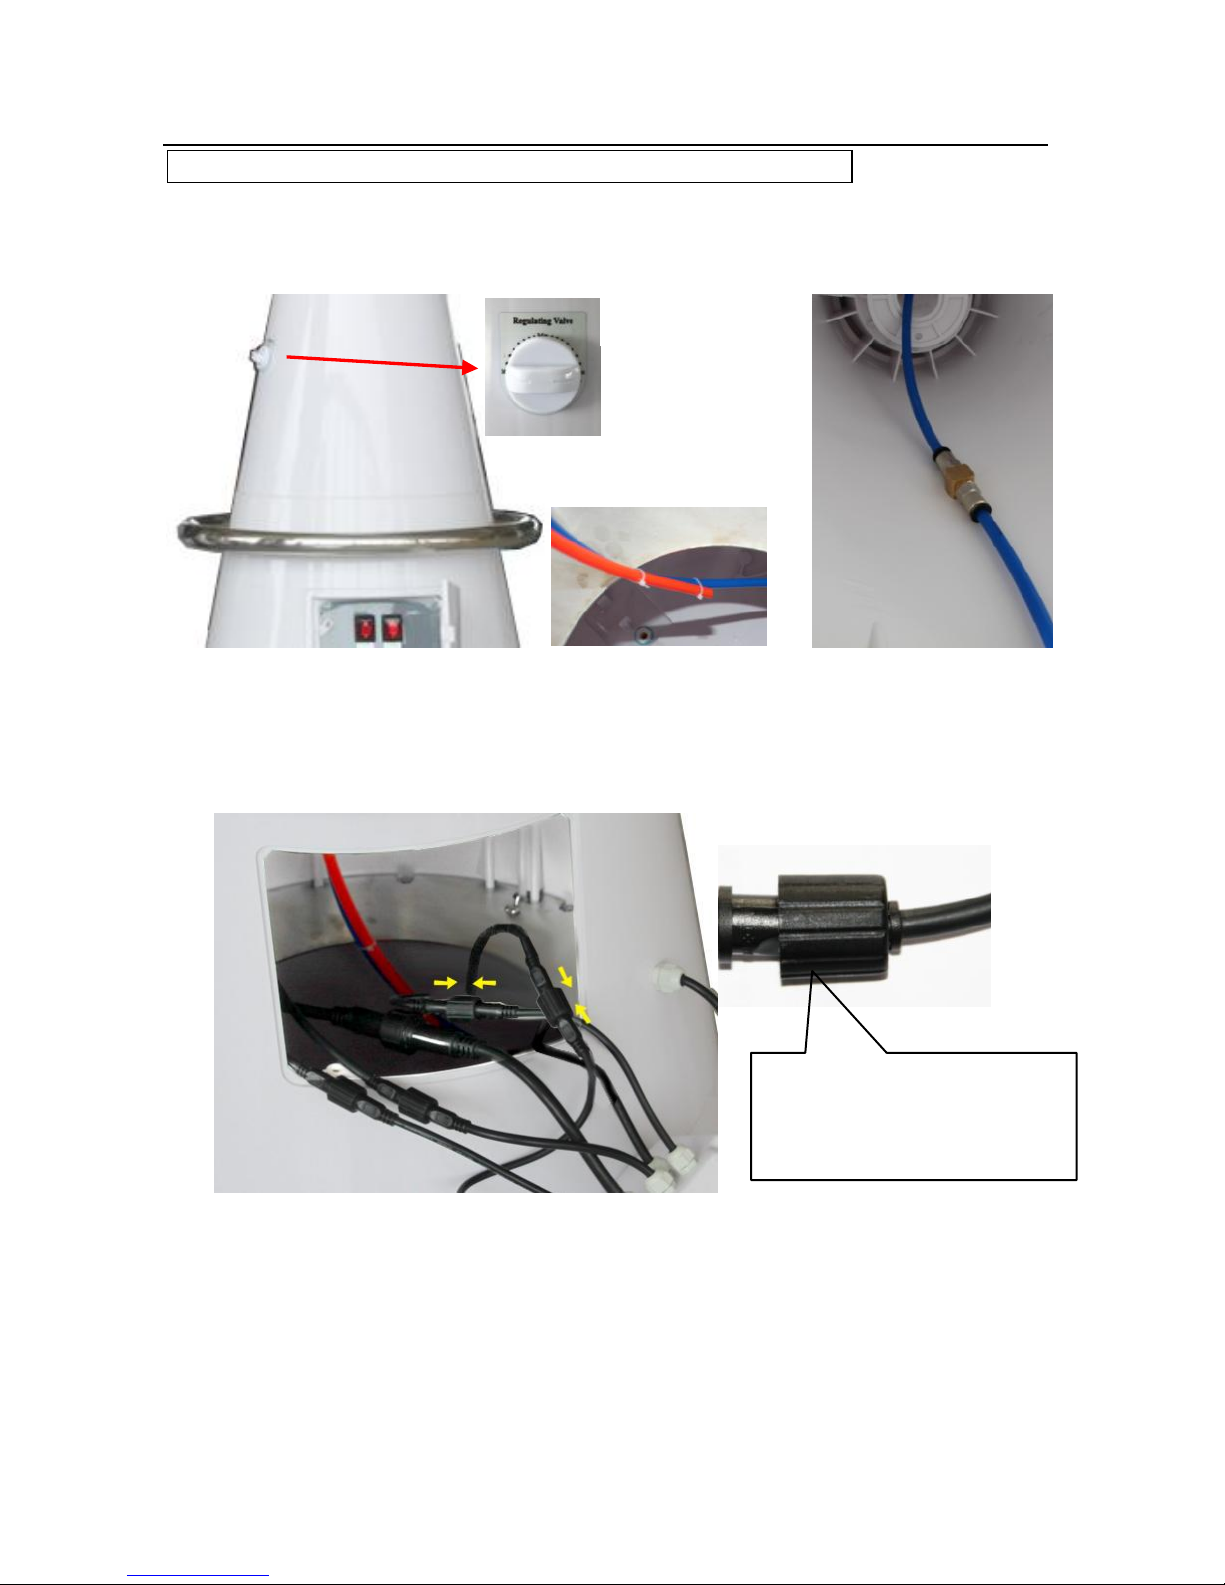
Connect the blue outlet pipe to the quick coupling of the Mist Regulating Switch, and
then tie up the orange return pipe and blue outlet pipe with ribbon. (see Picture 5)
Picture 5
Connect the 2-core interface from the Submersible Pump and Level Sensor with the
corresponding interface from the Electricity Box, and fasten the Nuts. (see Picture 6)
Picture 6
Remarks: For ensure waterproof, please make sure the rubber ring is inside the Electric
Wire interface.
Besides, interfaces of Submersible Pump and Level Sensor are two pins, but different
from each other. For avoiding any destroying of interfaces, please don’t insert them
violently.
Make sure the rubber ring is
inside the Electric Wire
interface
Nut
Page 8
LBCA4 Page 8 of 15
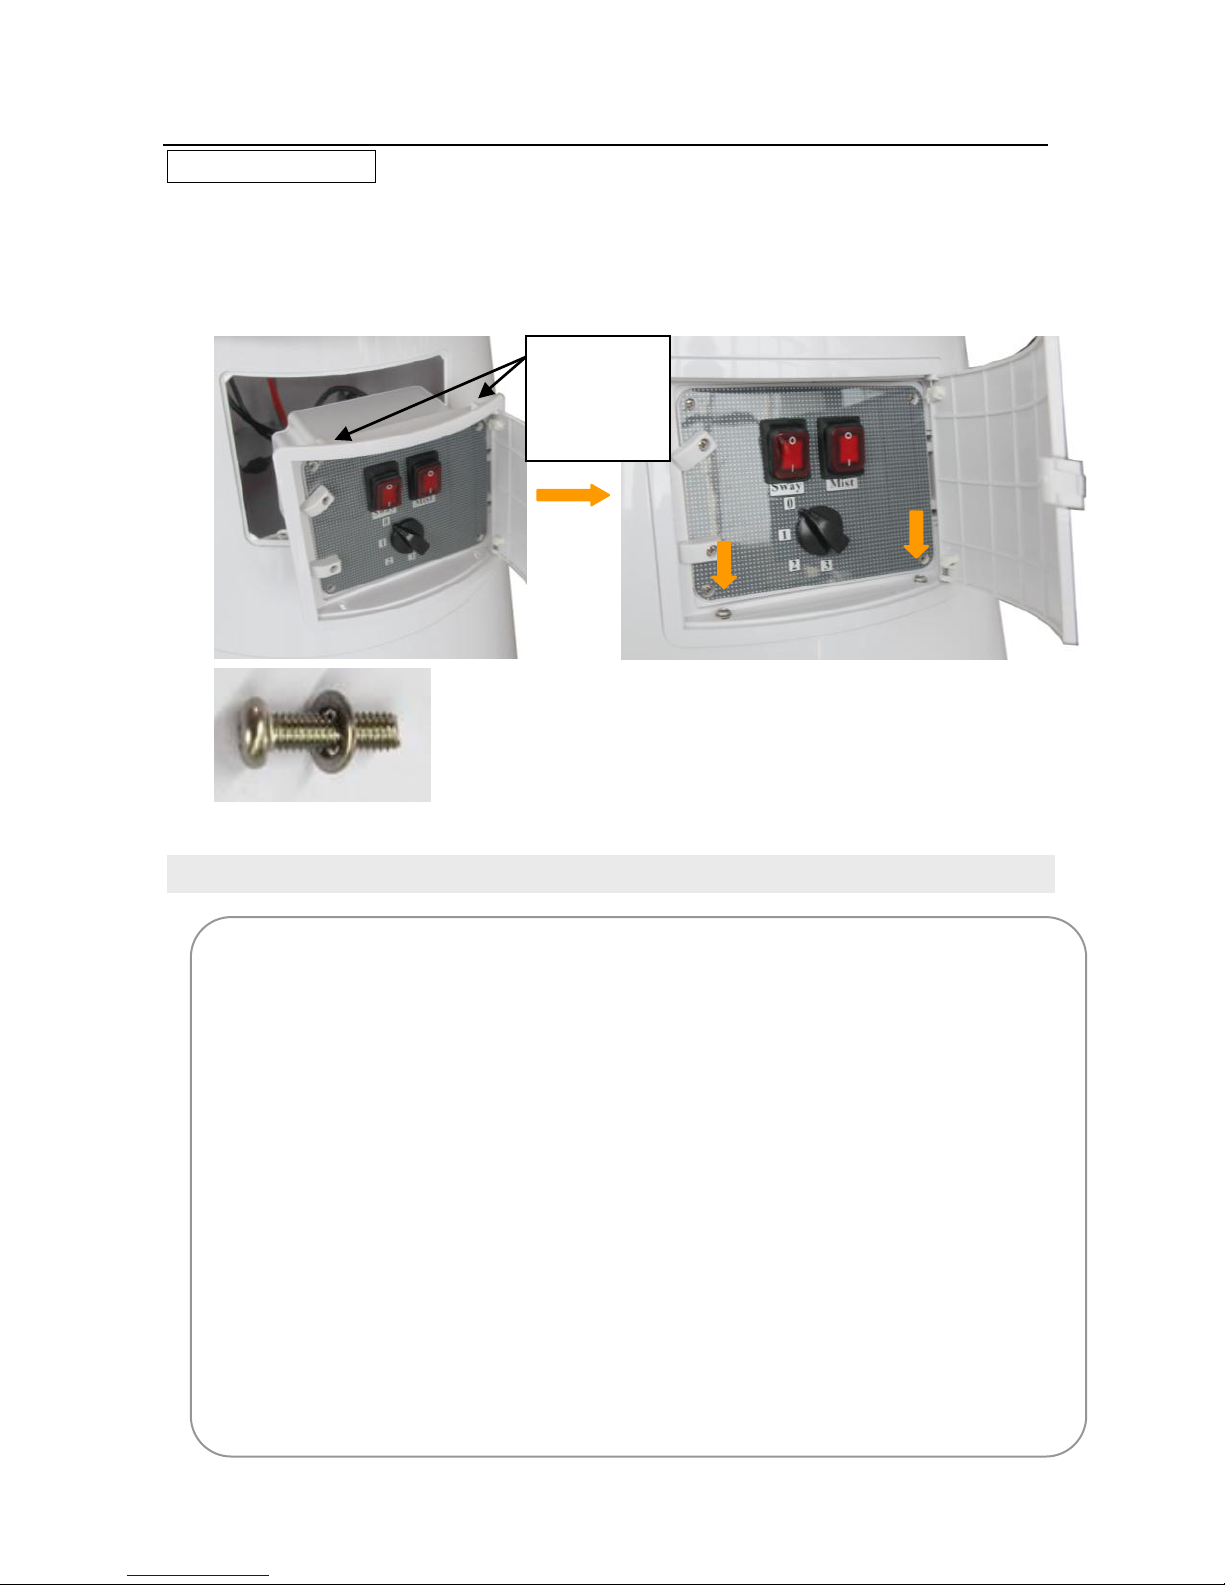
5、Fix Electric Box
After ensuring all the cables are connected right, fasten TWO button positions to the fan
body firstly, then fix the electric box with TWO 5x16 screws and flat washers (shown as
picture 7). Installation completed.
Picture 7
Checking after Installation
1、Install the product according to the Instructions; check whether all the parts
are firmly connected.
2、Twirl the impeller with insulating material, like batten. Check the normal rotation
and isolation between the blades and casing.
3、Before using, check whether the voltage and frequency on the nameplate match
those in use. Then add water into the tank (manual inflowing or automatic
inflowing). Check whether there is any leakage of the water tank.
4、Power on the product to see its operation. Switch on each speed, check whether it
sounds abnormal, vibrates obviously. Press the button "MIST", 10 seconds later,
rotate the "Mist regulating Switch" from “Min" to "Max", and check whether mist
is normal. Power off the product immediately once there are some abnormalities.
Button
Positions
Page 9
LBCA4 Page 9 of 15
Trial Operation
After installation, fill the water tank with water to the depth of 20 cm. Then you can try to
operate it.
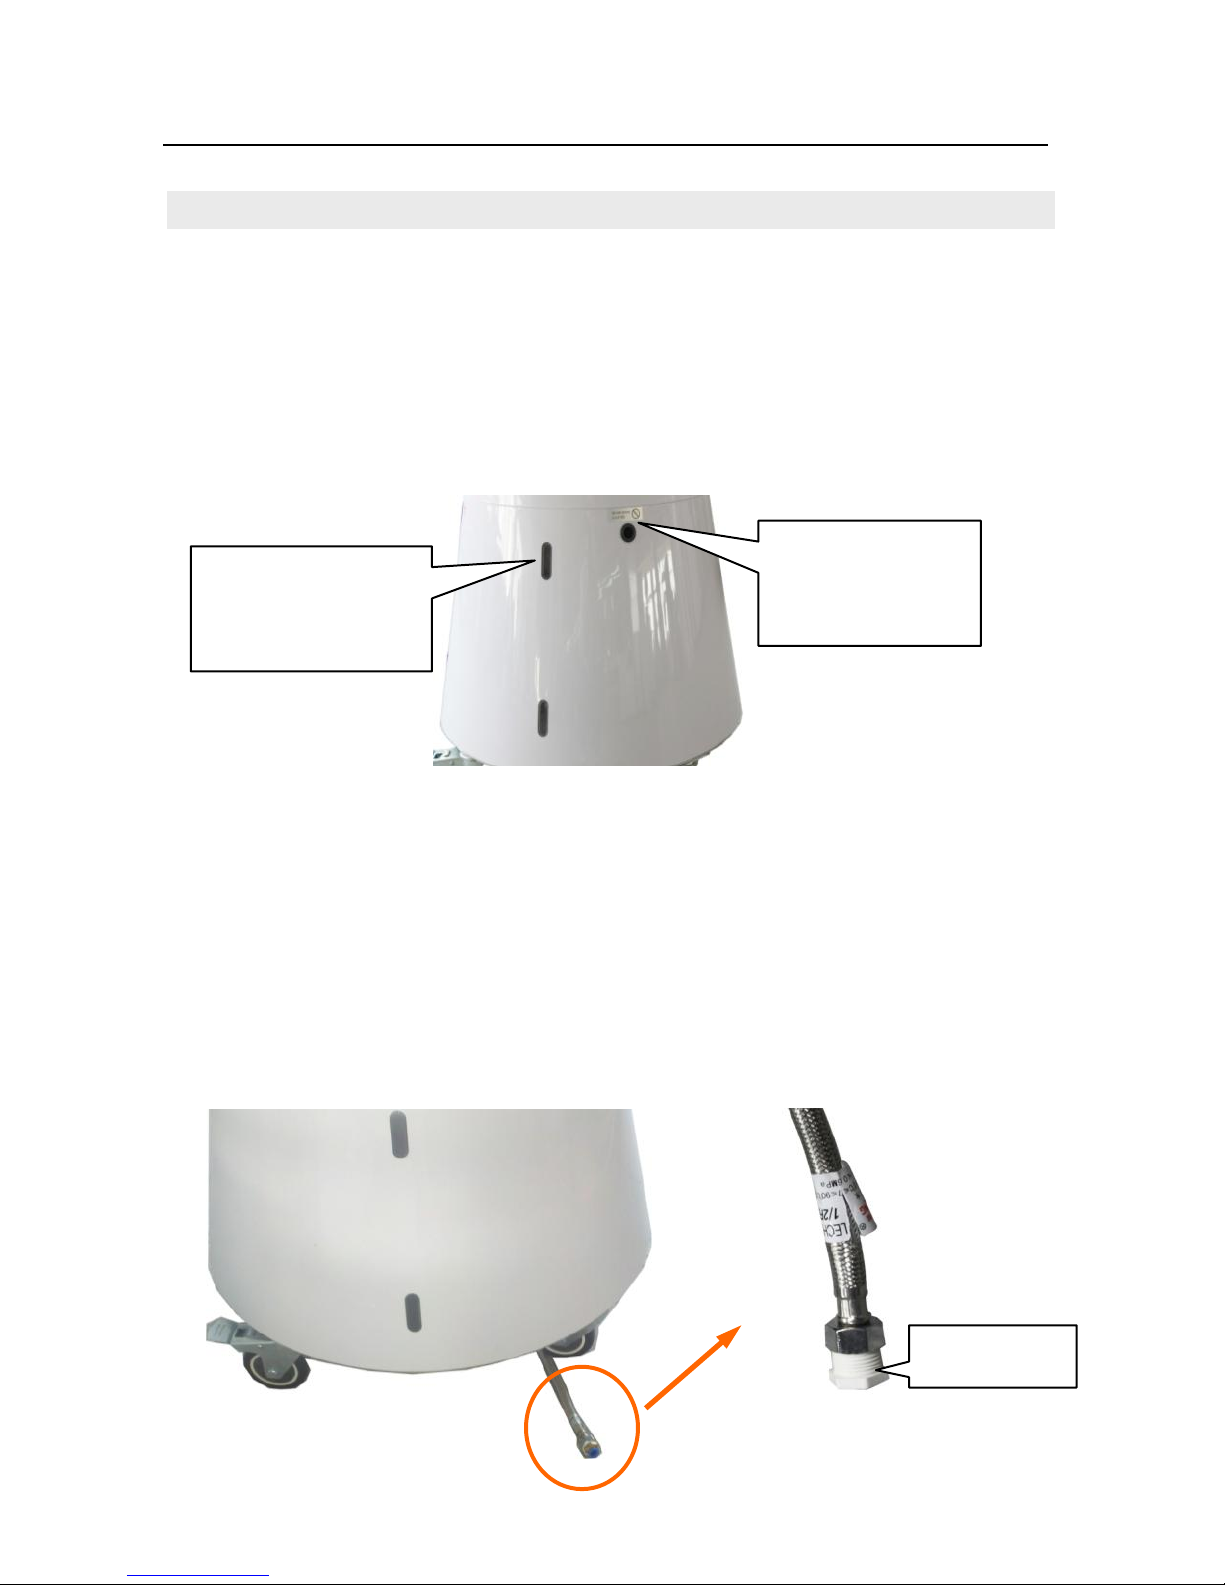
Manual Adding Water:
Insert a hose to the tank through the hole (as shown). DON’T go away while adding water.
You can view the water level through the window (as shown). Stop adding water when it
reaches the highest level.
Automatic Adding Water:Please remove the choke plug and then connect the weaved hose
(at the bottom of the tank) to water supply; turn on the faucet and begin adding water; there is
a water level sensor inside the tank. When the tank is full, it will stop inflowing. When water
reaches the lowest level, it would restart inflowing automatically.
When the weaved pipe is apart from the water supply, please screw on the choke plug so as to
avoid water leakage
Hole for manual
water adding
Window—view
water level
choke plug
Page 10
LBCA4 Page 10 of 15
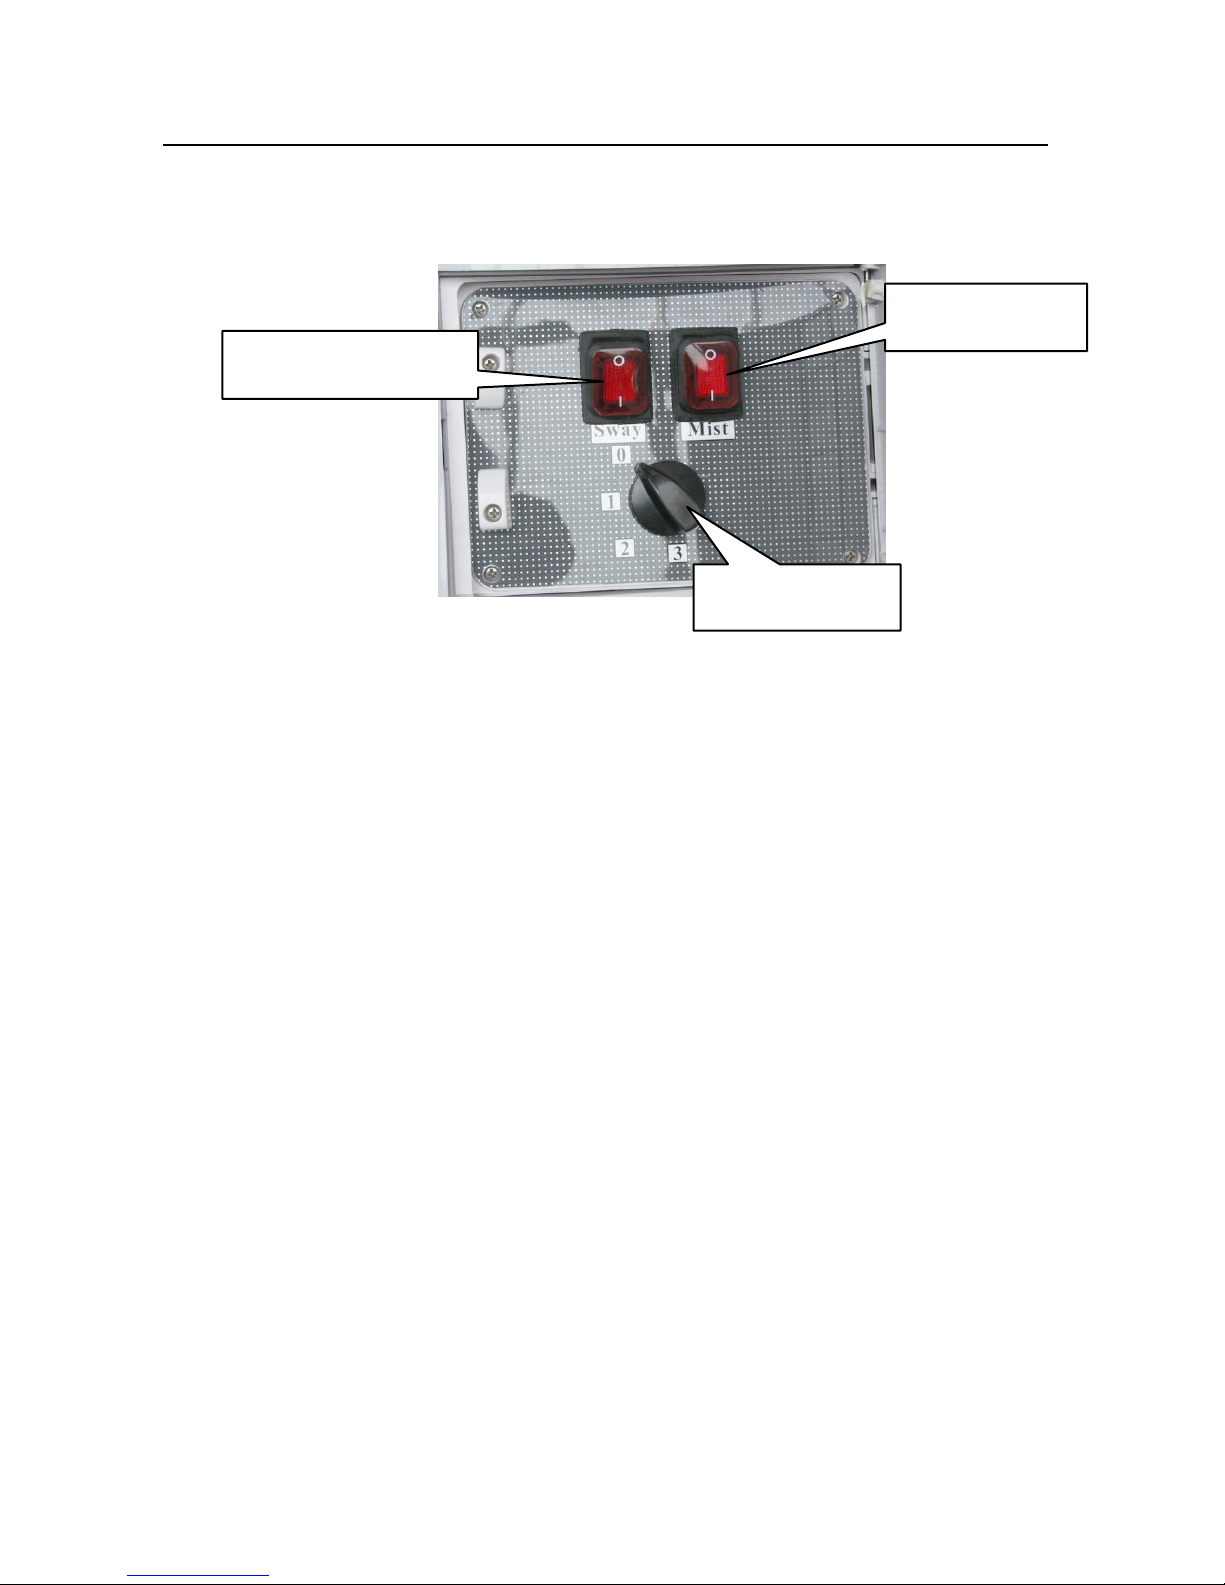
Electric Control Box:
Way of trial operation:
1. Power on, switch to the Speed 1. The product would begin blowing. Observe whether the
fan blows normally, by switching the speed 1 / 2 / 3.
2. Press the button “MIST”, the centrifugal disc would begin rotating and producing mist.
View whether there is any difference of the mist quantity while rotating the “Mist
regulating switch” from “Min” to “Max”.
Swaying Switch
Misting Switch
Blowing Switch
Page 11
LBCA4 Page 11 of 15
■ Attentions:
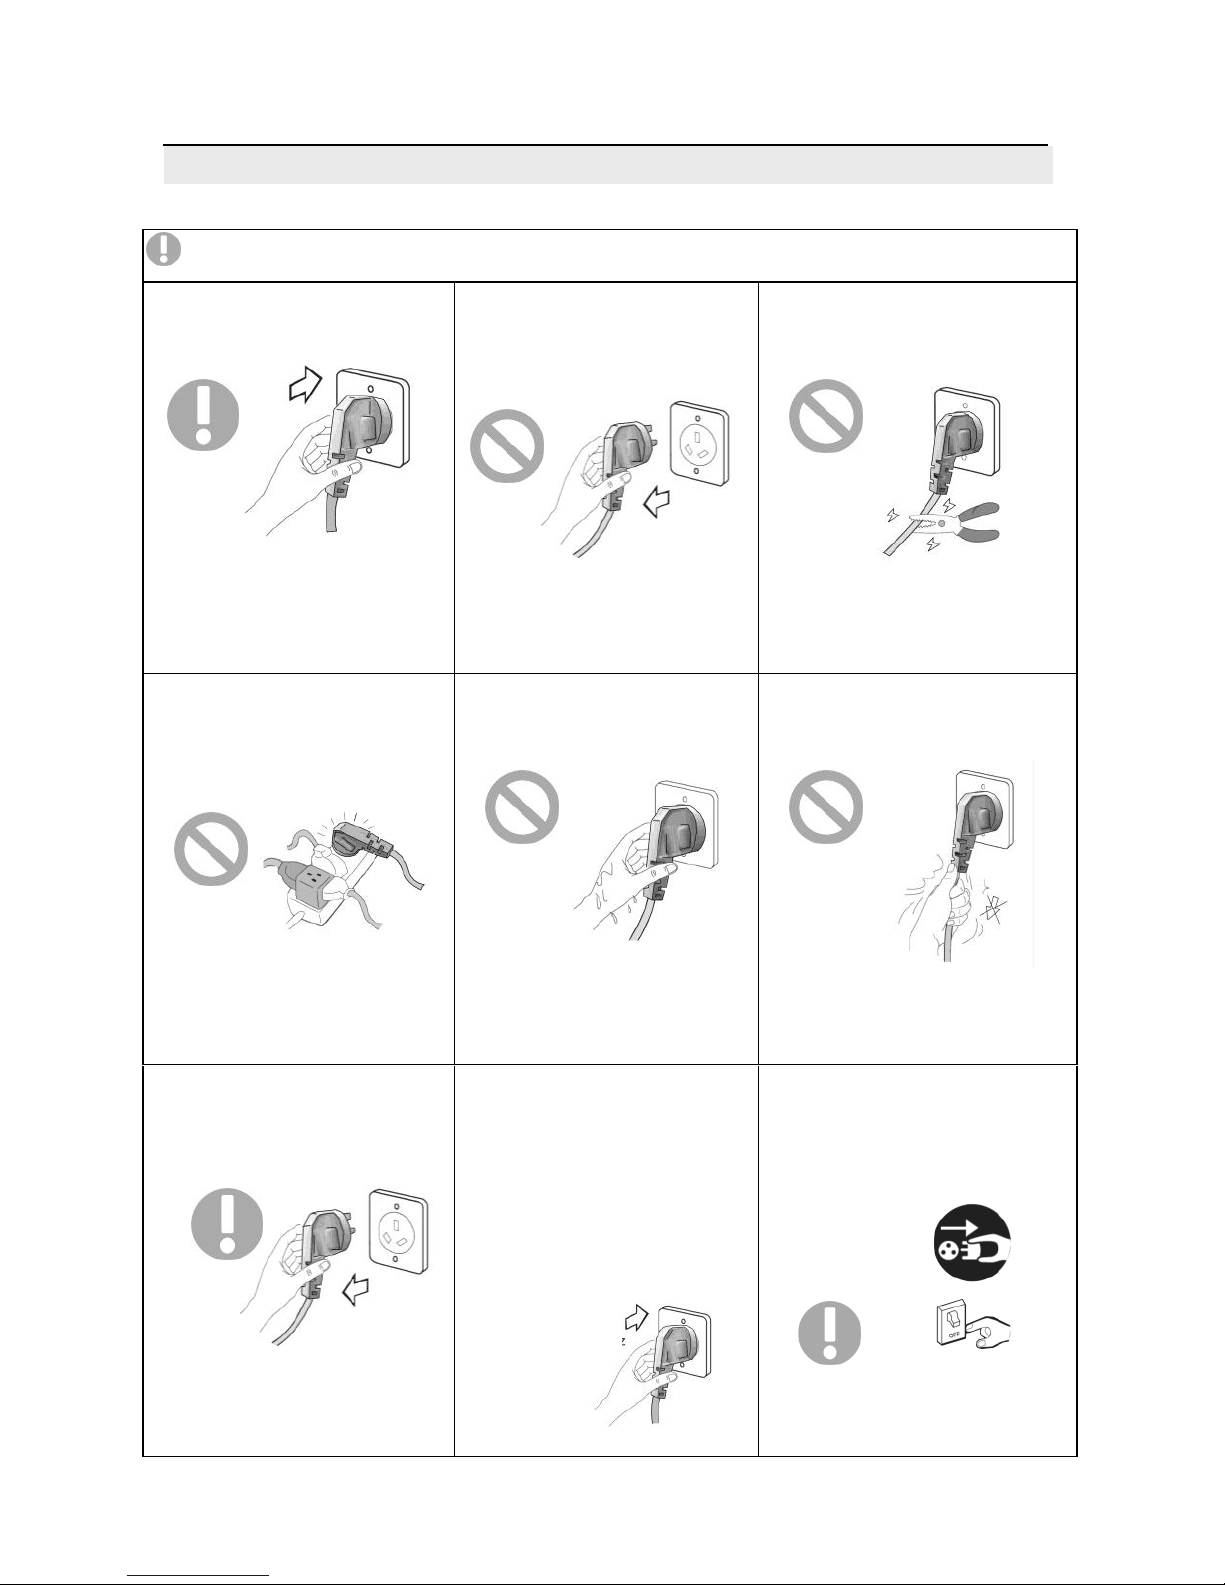
Please carefully read the following items:
Caution:The product MUST be connected to the power with leakage protection device.
Make sure firmly plugged
Be sure not to take off the plug
while operating.
Otherwise, it may cause electric
shock or fire hazard.
Be sure not to damage or use
unspecified power line.
Otherwise, it may cause electric
shock or fire hazard.
Please do not use the same
socket with other equipment, or
use extended cable.
Otherwise, it may cause electric
shock or fire hazard.
Be sure not to operate the
product with a wet hand.
Otherwise, it may cause electric
shock or fire hazard.
Don’t take off the plug by
pulling the power cord.
Otherwise, it may cause electric
shock or fire hazard.
Power off while adding water or
cleaning the product.
The voltage used can be
fluctuated within the rated
voltage range. Too low or too
high voltage may damage the
motor.
Power off the product immediately
once there are some abnormalities.
Otherwise, it may cause
electric shock or fire hazard
Page 12
LBCA4 Page 12 of 15
■ Attentions
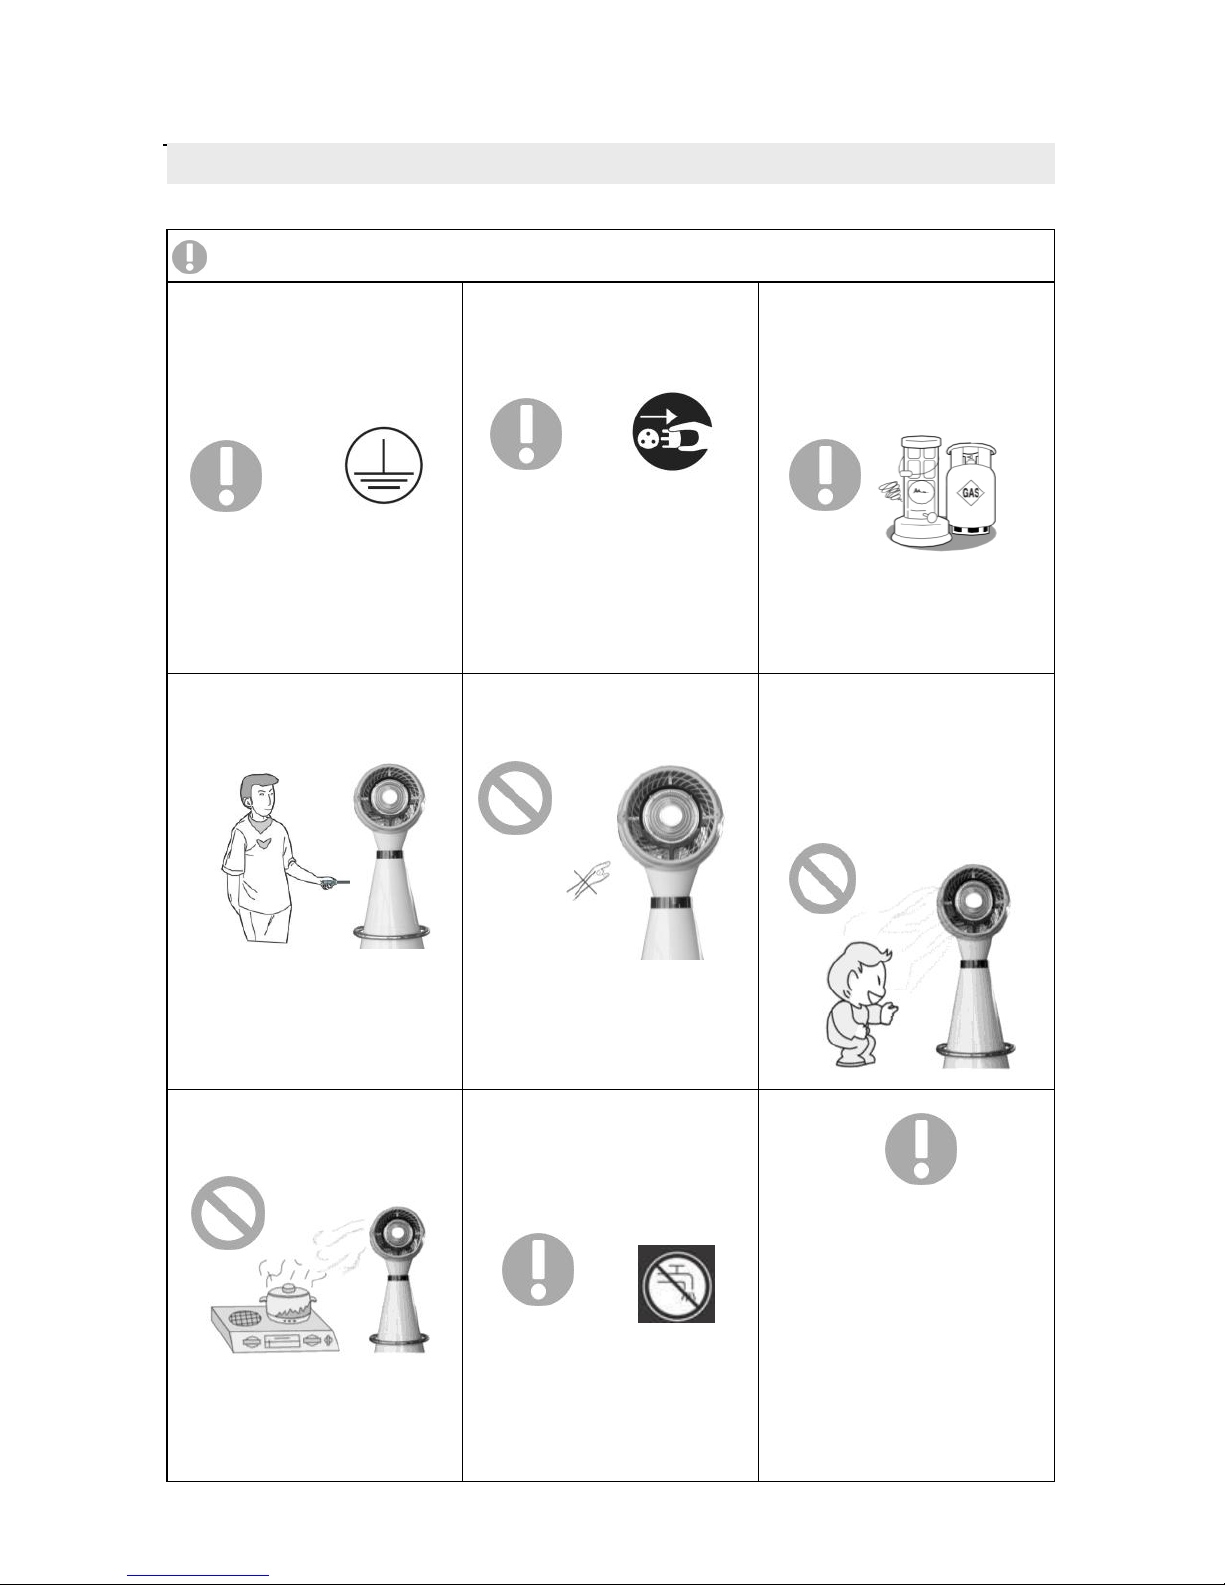
Caution:The product MUST be connected to the power with leakage protection device.
◆ Earthing: Make sure the
earthing wire is connected to
specified earthing system of the
construction.
◆ Power off the product if you
don’t use for a long time.
◆ Please keep the product more
than 1 m away from chemical
spray or gas container.
◆ Be sure not to repair the
product by yourself.
◆ Be sure not to put finger or
stick into the net of the fan head
◆ The elderly, weak and children
shall not be blower directly by
the fan. Otherwise, they may get
harm.
◆Please not to let the product
blow directly to stove.
◆Please do not connect the
product to potable water mains.
Water Pressure Range: 0.1-0.45
M Pa
◆Make sure the water tank is
cleaned before using.
◆For long time no using the
product, please drain off the
tank, so as to avoid the growth of
bacteria
Otherwise, accumulative
dirt and likely to cause
fever or fire accidents.
If not, please require professional
to install one. Be sure not to
connect the earthing wire to gas
pipe, water pipe or discharge pipe.
Otherwise, it may cause
explode or fire hazard.
Incorrect repair may cause an
electric shock or fire.
Otherwise, it may cause
personal injury or damage
to the cooler.
Otherwise, it may cause
poisoning.
Page 13
LBCA4 Page 13 of 15
■ Common Malfunction Analysis and Maintenance
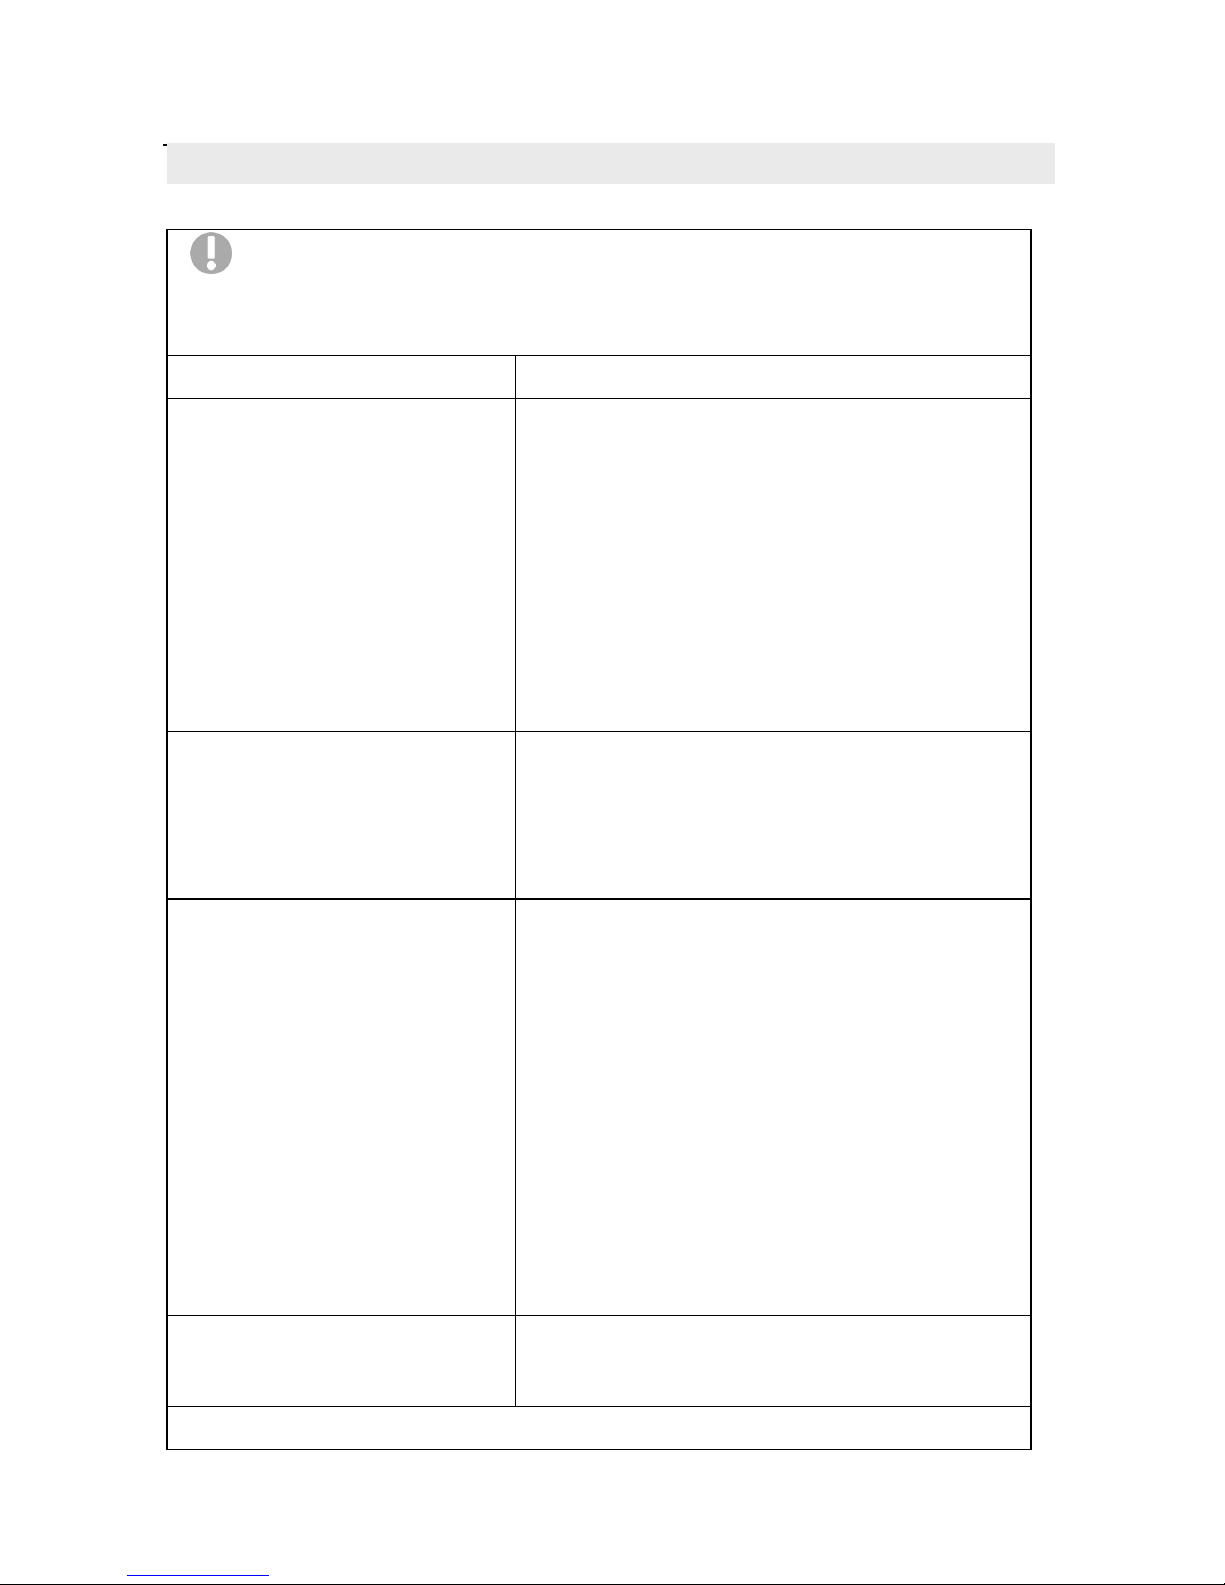
Common Malfunction Analysis
Warning: Wrong operation and maintenance will cause electric shock or a fire.
Please contact the agent or dealer to repair the product by professionals. It can save your time and
expense to check the following before calling service.
Malfunction Description
Analysis
It does not work
※ Power failure?
※ The plug is loose from the socket?
※ Circuit protection device is tripping?
※ Leakage protector is off?
※ Check if the voltage is too high or too low?
(measured by professionals)
※Proper use of the timer? (refer to product with
remote control)
It can mist but fail to blow air
※ Twirl the impeller to check if the blade is stuck?
※ Check if each switch works?
※Is male & female plug of fan motor connected
properly?
It can blow air but fail to spray mist
※ Mist regulating switch is on or off?
※ MIST switch is on or off?
※ The tank is with water and reaches the lowest
water level?
※ Water level sensor is installed correctly or is
turned on?
※ Power cord of the pump and atomization motor
are connected correctly?
※ Misconnect the blue outlet pipe and orange return
pipe?
Guard net is dripping
※ Please use the right amount of detergent to
smear the guard net.
Please contact the agent or dealer if the following happens:
Page 14
LBCA4 Page 14 of 15
Maintenance – Water Tank Cleaning
Warning:
To ensure the cleanness of the mist, the product should be cleaned before each use.
Before cleaning the product, stop it and unplug the power, otherwise there
would be risk of electric shock.
Do not use high-pressure water jets to clean this product.
If the power line is damaged, ask service agent or professionals to replace it.
Volatile liquid such as thinner or gasoline will damage the appearance, please use
a soft cloth with neutral detergent to clean this product.
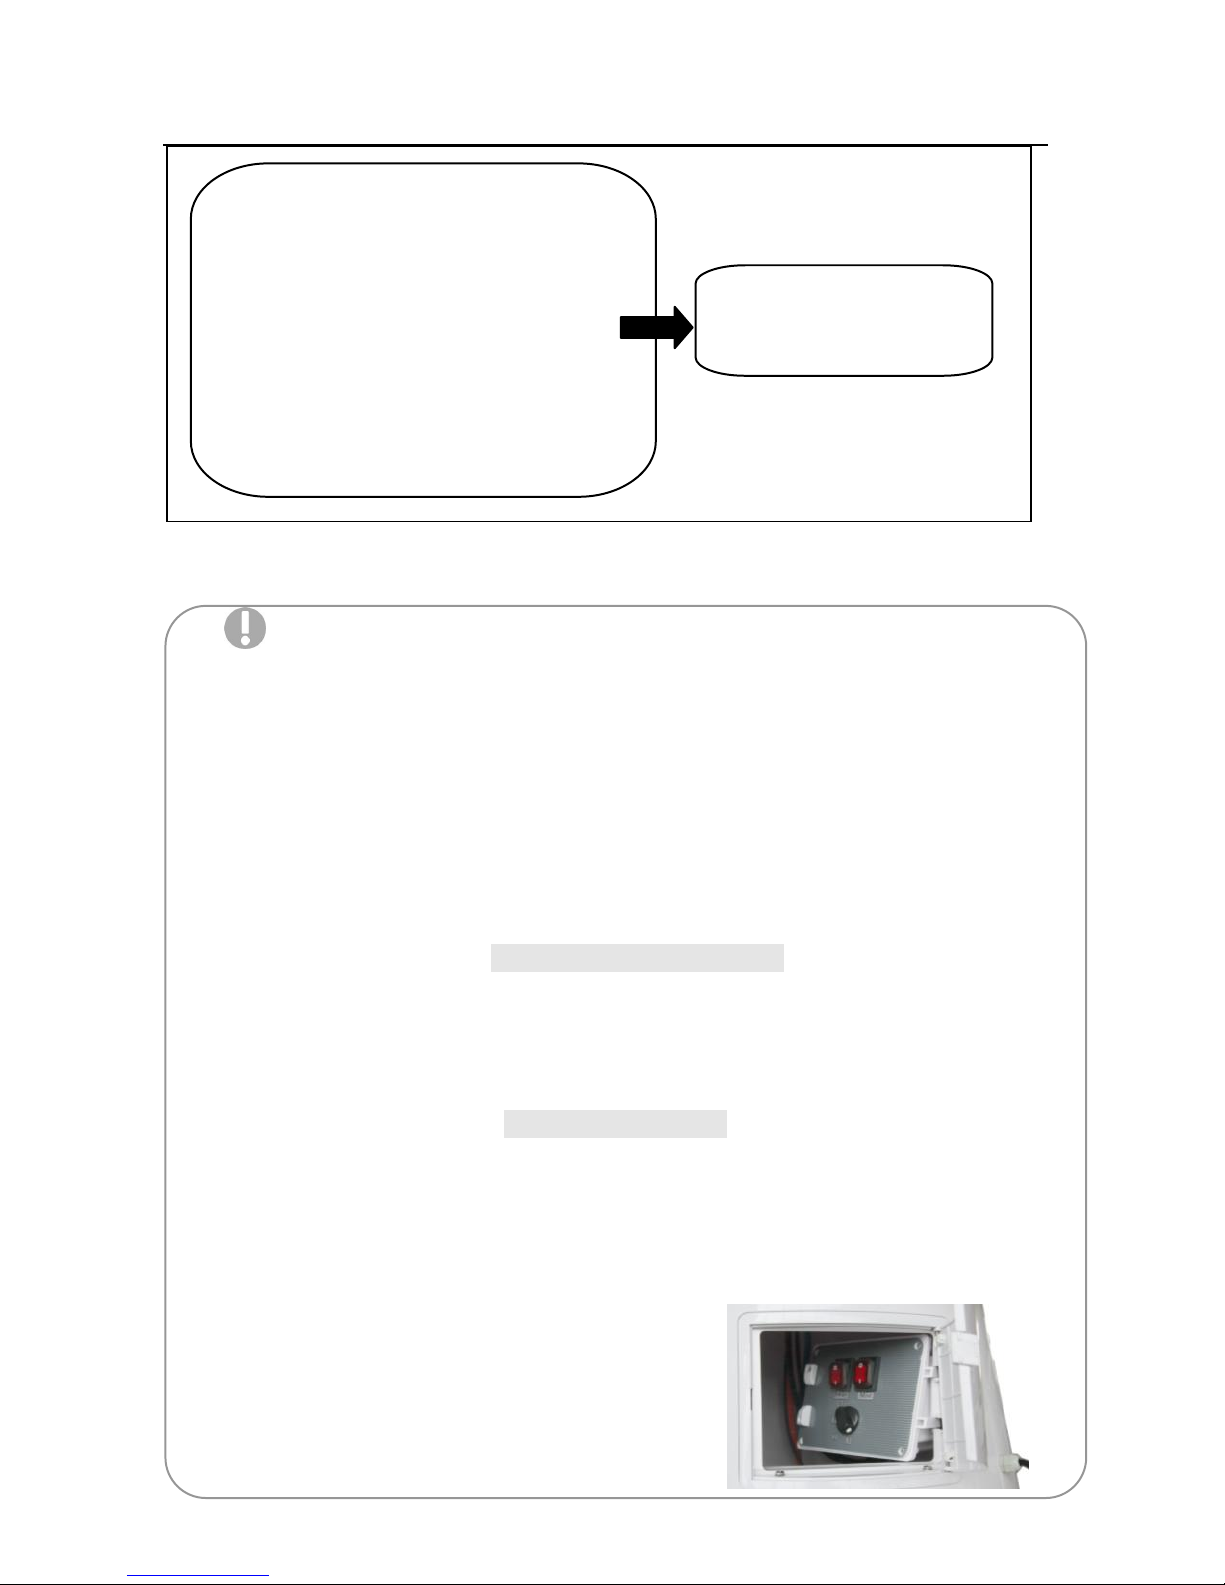
Protection for Control panel
After adjusting the switches, please close the cover of the control box and tighten
the screws as shown, so as to prevent erosion of rainwater or PVC panel aging
caused by sun exposure.
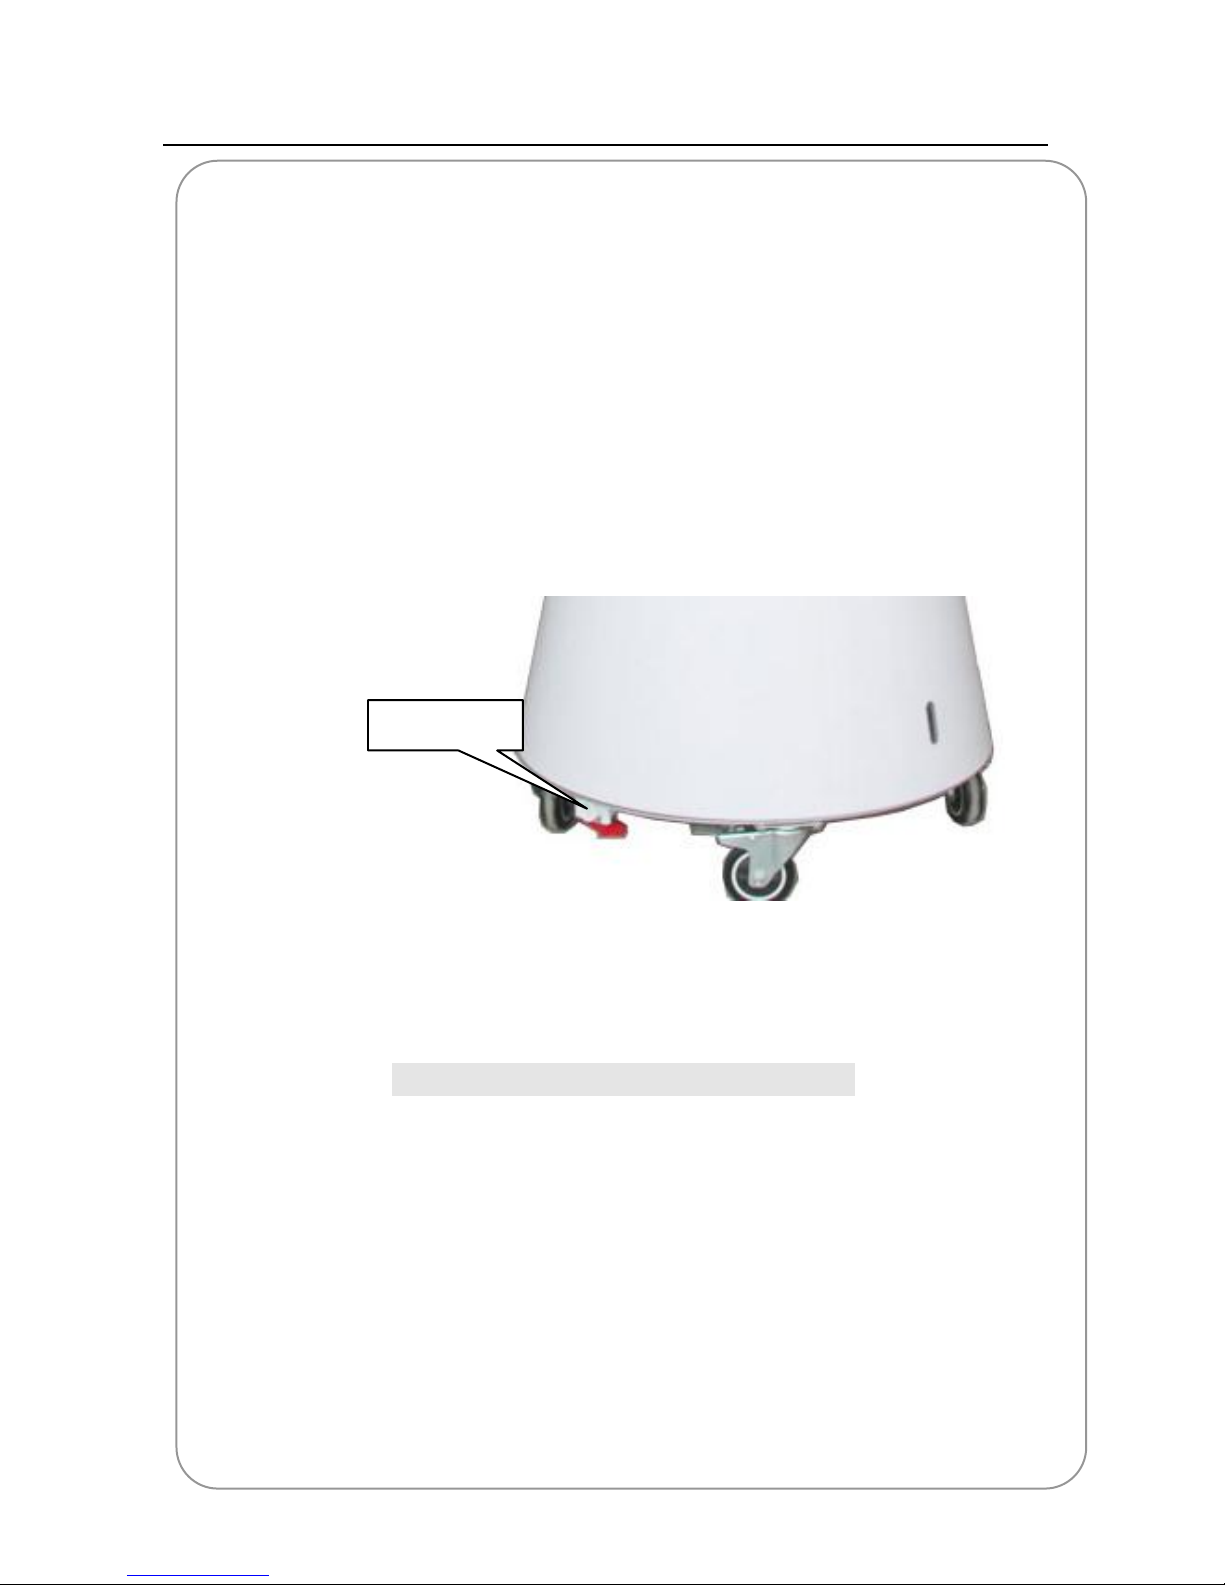
Water Tank Cleaning
Simple cleaning ( Suitable for the cleaning of each use)
Rotate the two nuts on the control panel; push the panel inwards; clean the inner tank
with long-handled brush; then open the drain valve to drain off the waste water; wash
the tank with clean water; then close the drain valve again; Ensure the water level
sensor is firmly fixed; close the control box.
~There is abnormal noise when the
device is running
~There is smoke or unpleasant smell
~There is water leakage
~Leakage protector is tripping
~Power cord is abnormally hot and
become abnormally soft.
Stop it and disconnect the
power plug
Page 15
LBCA4 Page 15 of 15
Thoroughly Cleaning ( Suitable for cleaning after 60 hours’ operation)
1. Take the main body apart with the water tank.
1.1 Loosen the 4 butterfly screws on the plate inside the tank
(Refer to the Installation Instruction—Step 3 / Picture 4)
1.2 Take the main body apart with the water tank; take out the submersible pump
and water level sensor (Refer to Installation Instruction—Step 2 / Picture 2)
2. Clean the water tank
Wash the Water Tank inwall with towels or soft brush; open the drain valve
to drain off the waste water; then wash it again with fresh water and the right
amount of cleanser; close the drain valve.
3、Refix the submersible pump and water level sensor; Connect the main body with
the water tank. (Refer to the Installation Instruction—Step 2 / Picture 3)
Note: Please make sure the floater should face the bottom. Otherwise the Level
Sensor will not work.
Inspection and Maintenance in Daily Use
1、Make sure the machine is connect to the Electricity Leakage protector, and the
earthing wire is connected to specified earthing system of the construction.
2、Before running the product, please check if there any damage or jamming with the
Guard Nets, or if the Impeller rotates smoothly.
3、Pay attention to waterproof and damp-proof.
4、When the Misting Air Cooler is not in the need of using for a long time,
5、4.1 Power should be cut.
6、4.2 The Guard Net, Impeller and body should be clean regularly.
7、4.3 Use specialized protective cover to prevent the damage of rain and dust.
Drain Valve
 Loading...