

Manual C100/C110/C120 english
Version V1 (1/2003)
page 1 of 22

Manual C100/C110/C120 english
Table of contents
1 READ BEFORE FIRST USE 4
2 C100/C110/C120 6
3 THE DISPLAY 7
4 OPERATION 8
5 THE UPPER MENU 10
6 THE LOWER MENU 11
page 2 of 22
7 CHANGING THE BATTERY 21

Manual C100/C110/C120 english
8 MAINTENACE AND ADJUSTMENT 22
page 3 of 22

Manual C100/C110/C120 english
1 Read before first use
· Prior to using the instrument (commissioning / assembly)
the user is requested to thoroughly read the instruction
manual and comply with it in all points.
· Never take measurements on live parts
· Please observe the measuring ranges of the different
sensors (Overheating may cause irrversible damage).
· Take care of storage and transport conditions (No direct
exposure to solar radiation).
· Temperature adjustments may only be carried out with
proper reference material.
· In case of use in changing locations with different
climatical conditions the instrument requires a recovery
period of several minutes.
· Technical data, storage and transport conditions can be
found on the technical data sheet.
· Warranty : 12 months on the instrument.
page 4 of 22

Manual C100/C110/C120 english
Proper use:
· The instrument may only be used under the conditions
defined in the technical data sheet.
· The measuring instrument may only be used under those
conditions and for those purposes for which it was built.
· Operational safety can no longer be ensured when the
instrument is opened or modified.
page 5 of 22

Manual C100/C110/C120 english
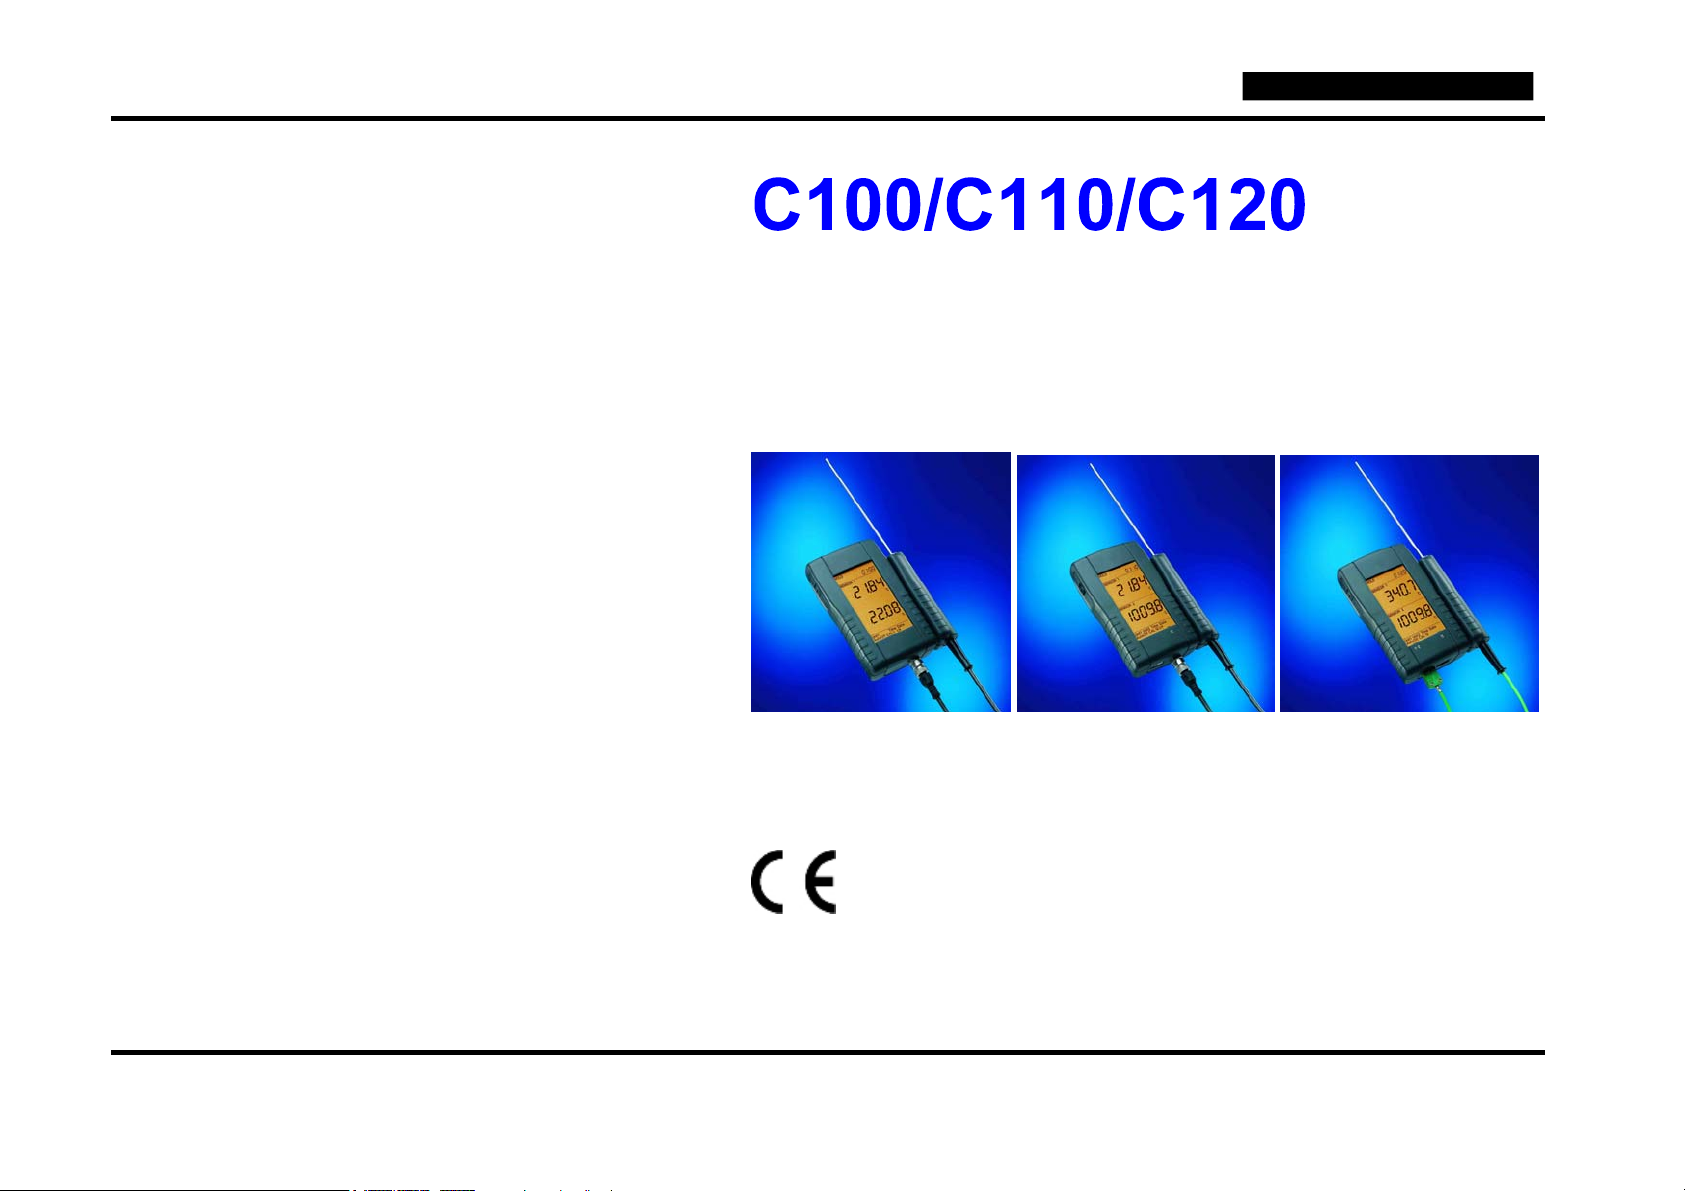
2 C100/C110/C120
The new Compact hand held device series for measuring
temperature stands out due to:
· big display with backlight
C100
C110
C120
· easy thumb wheel operation
· resistant and elegant housing
· high accuracy and resolution (0,01°C for PT100)
· low price
Channels PT100 TC
C100 1
C110 2
C120 2
£
£ £
£
Table: No. of channels and configuration of the entries
page 6 of 22
Manual C100/C110/C120 english
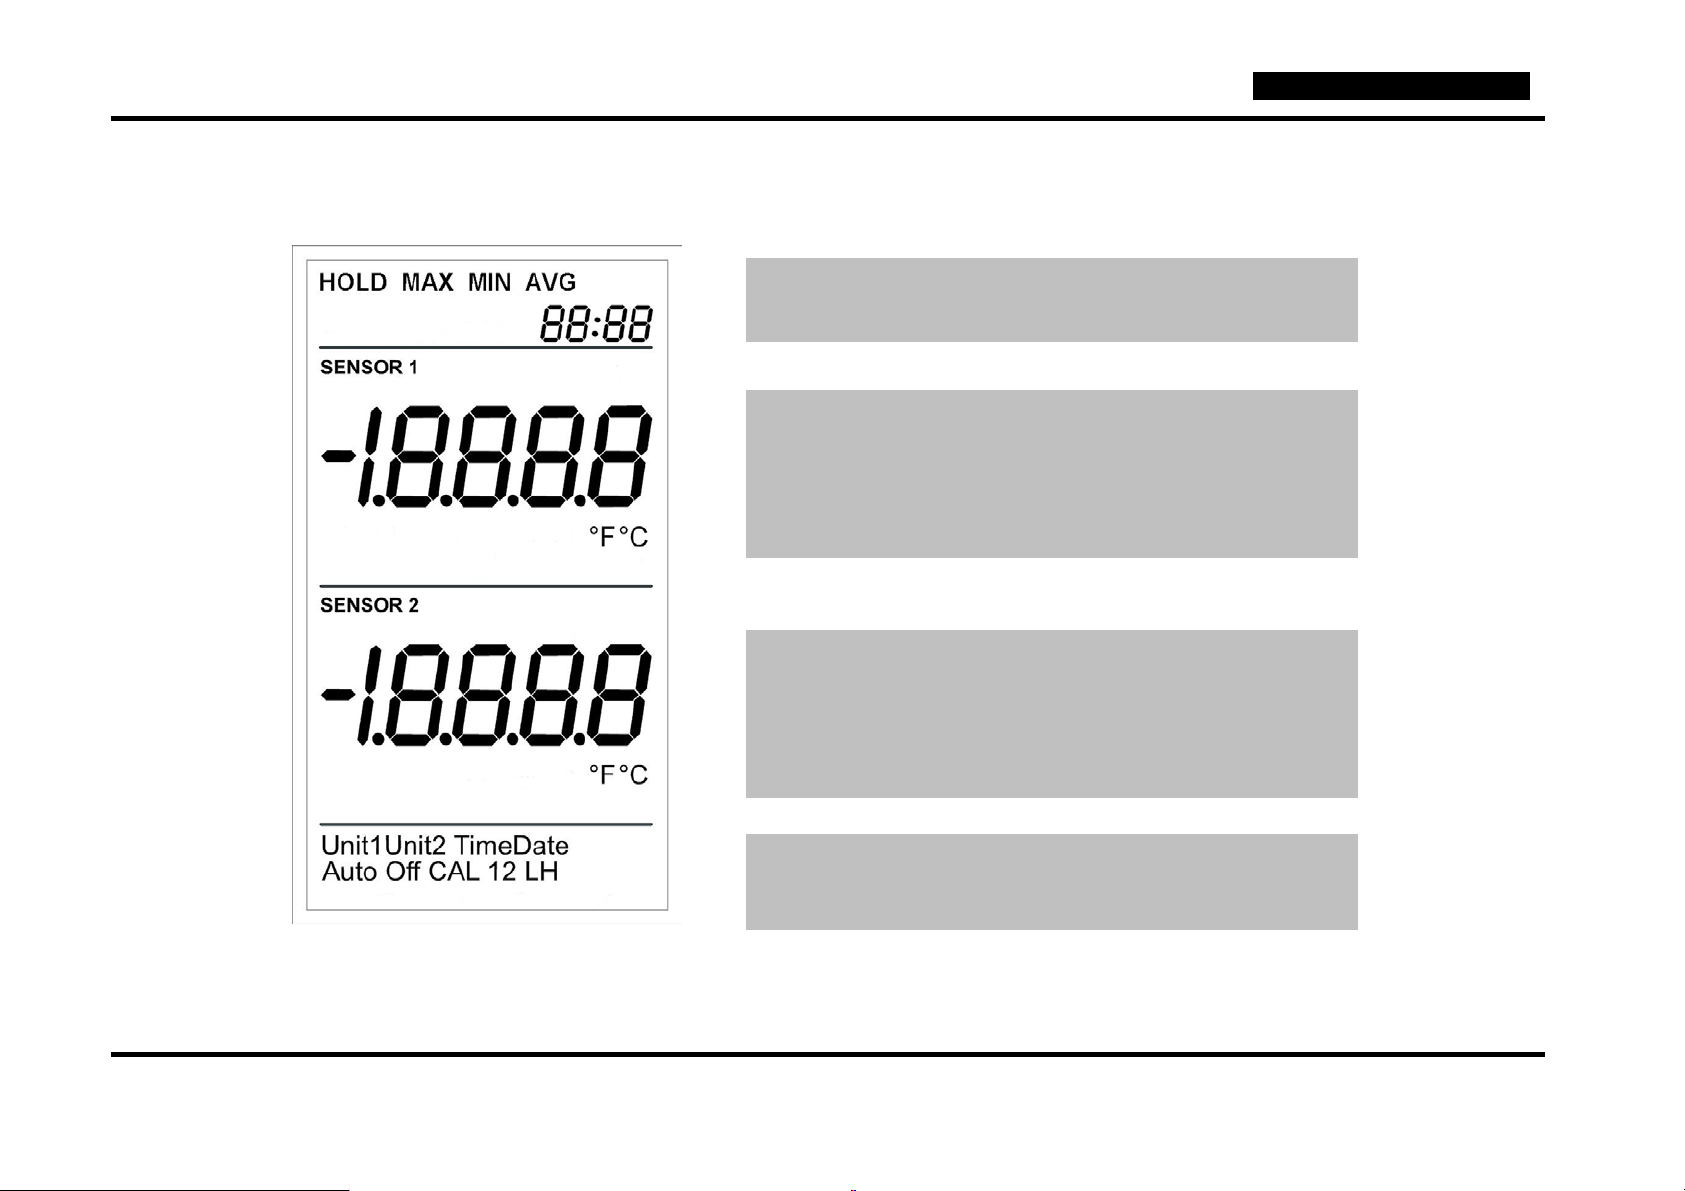
3 The Display
◄ Upper menu with date and time
◄ Probe 1 value (temperature 1)
◄Probe 1 units (°C, °F)
◄ Probe 2 value (temperature 2)
Hold, Min, Max, Avg. indication on C100
◄ Probe 2 units (°F,°C)
◄ Lower menu for configuration and
page 7 of 22
adjustment

Manual C100/C110/C120 english
4 Operation
In contrast to most traditional hand held instruments, the C1x0
devices do not have a key field but a thumb wheel on their left
side.
The wheel permits a 15º turn up and downwards and can
additionally be pressed in the central position.
A turn upwards selects the upper menu whereas the lower
menu for configuration and adjustment is selected by turning
the wheel downwards.
For switching the instrument on and off or confirm the selection
THUMB-WHEEL
page 8 of 22
of values the thumb wheel has to be pressed in the central
position.

Manual C100/C110/C120 english
3 positions of the THUMB-WHEEL
Symbol in the text
Switch on: press shortly
Switch on with light: press for approx. 2 seconds
Switch off: press for approx. 2 seconds (no menu activated)
Symbol in the text
Activate upper menu with HOLD MAX MIN AVG
Selection with ▲, confirm with ►, cancel with▼ or leave the
wheel unpressed during 20 seconds
Symbol in the text
Activate lower menu for configuration and adjustment
Select with ▲, confirm with ►, cancel with▼ or leave the wheel
unused for 20 seconds
page 9 of 22

Manual C100/C110/C120 english
▲
HOLD
▲
MAX
▲
MIN
▲
AVG
▲
5 The upper menu
The upper menu contains the standard functions, which are:
HOLD MAX MIN AVG
Select with ▲, the selected function flashes and can be
confirmed with ►. When a function has been confirmed it
remains continuously on the display. The menu can be
cancelled with ▼ or by leaving the wheel unused for 20
seconds.
Hold: Hold „freezes“ the value.
MAX: MAX displays the maximum value in the active time
interval.
MIN: MIN displays the minimum value in the active time
interval. AVG: AVG displays the arithmetical average value in
the active time interval.
page 10 of 22

Manual C100/C110/C120 english
▼
Unit 1
▼
Unit 2
▼
Time
▼
Date
▼
AutoOff
▼
CAL 12LH
▼
6 The lower menu
The following functions can be selected in the lower menu for
configuration and adjustment:
Unit1 Unit2 Time Date AutoOff CAL 12LH
Select with ▼, the selected function flashes and can be
confirmed with ►. The menu can be cancelled with ▲ or by
leaving the wheel unused for 20 seconds.
page 11 of 22

Manual C100/C110/C120 english
Fig.: C110 TC Selection
In the instruments C110 and C120 the additional menu TC
defines the thermocouple type. Types K, J, N, E, R, S, T can
be connected.
Due to the limitated possibilities of the screen the following
settings are used:
Thermocouple (TC) Display
K
J
E
N
H
J
E
n
R
S
r
S
Select with ▲ and ▼; confirm with ►.
T
t
page 12 of 22

Manual C100/C110/C120 english
Fig.: C120 TC; Selection of the temperature
difference indication
Model C120 is equipped with extra menu t1-t2 for indicating the
difference in temperature of the two thermocouple sensors.
This difference is displayed in the sensor 2 section on the
screen.
The function is stopped by re-confirming the extra menu.
page 13 of 22
Manual C100/C110/C120 english
Unit1: Unit1 selects the unit of temperature 1 which is either °C
or °F. Select with▲ and ▼; confirm with ►.
Unit2: Unit2 selects the unit of temperature 2 which is either ºC
or ºF (only C110 and C120). Select with ▲ and ▼; confirm
with►.
Time: Set time. Hours and minutes are set one after the other.
Select with▲ and ▼; confirm with ►.
Date: Set Date. Day, month and year are set one after the
other. Select with▲ and ▼; confirm with ►.
page 14 of 22

Manual C100/C110/C120 english
AutoOff: AutoOff is used to define an interval in minutes after
which the instrument switches off automatically. The setting
OFF (<1) deactivates the automatic switch off. Select with▲
and ▼; confirm with ►.
One point temperature calibration
CAL1: CAL1 (one point calibration) gives the user the
possibility to define an offset for temperature 1. The offset is
displayed in the lower part of the screen. Maximum offsets are:
PT100 channel: +/- 2.5°C/°F in 0.01°C/°F steps
TC channel: +/- 10°C/°F in 0.1°C/°F steps.
The offset will be valid over the complete measuring range.
Factory calibration can be obtained by setting the offset to
0.0.
page 15 of 22

Manual C100/C110/C120 english
Important: Calibrations only make sense if
they are carried out by specially skilled
persons using appropriate calibration
equipment.
CAL2: CAL2 (one point calibration) gives the user the
possibility to set an offset for temperature 2 (only C110 and
C120). The offset is displayed on the upper part of the screen.
The maximum offset on the TC channel is +/- 10°C/°F in
0,1°C/°F step.
The offset is valid over the complete measuring range.
Factory calibration can be obtained by setting the offset to
0.0.
page 16 of 22

Manual C100/C110/C120 english
Important: the determination of the
coefficients A,B,C and R0 must only be
carried out by accredited laboratories.
Calibration of the PT100 channel by means of coefficients
CAL1 LH: Every characteristic curve of a PT100 sensor can be
defined by a polynomial. Polynomials are used for minimizing
errors and non-linear behaviour of a sensor element.
For temperatures –200°C ... 0°C the characteristic of a PT100
corresponds to the following polynomial:
Rt = R0 [1 + At + Bt² + C(t-100°C) t³]
For temperatures > 0°C the polynomial is:
Rt is the resistance at temperature t, R0 resistance at
temperature 0°C. A,B and C are coefficients of the polynomial
Rt = R0 [1 + At + Bt²]
equation.
In menu CAL1 LH these coefficients as well as the value R0
can be set.
page 17 of 22

Manual C100/C110/C120 english
The following table contains the factory settings for the values
A, B, C and R0.
coefficient default value
A + 3,9083 x 10⁻³
B - 5,775 x 10-7
C - 4,183 x 10-12
R0 100.0000
Select your coefficient first, using ▲ and ▼; then confirm with
►.
page 18 of 22

Manual C100/C110/C120 english
Due to display limitations the following settings are used:
Coefficient Display
A
B
A
b
C
C
R0
r0
page 19 of 22

Manual C100/C110/C120 english
Changing coefficient A
1. Select sign with: ▲ and ▼; confirm with►.
2. Change number by number with ▲ and ▼,
confirm with ►.
For cancelling the menu, leave the wheel
unused for 20 seconds.
Coefficients B,C and R0 can be entered correspondingly.
page 20 of 22

Manual C100/C110/C120 english
7 Changing the battery
The letters „BAT“ on the display indicate a remaining operating
time of a few hours. Open the battery case on the back of the
instrument. Remove the empty batteries and insert new ones.
Please use only batteries type IEC LR6 AA.
Do not use rechargeable batteries!
open battery case C1x0
Reverse polarity may destroy the instrument. Make sure to
place the batteries in the correct position and to use high
quality batteries only.
page 21 of 22

Manual C100/C110/C120 english
8 Maintenance and adjustment
For use in climatological purposes we recommend a yearly
maintenance.
Before checking or adjusting the instrument it should be left in
an environment of 20ºC to 25ºC temperature for about 12
hours.
Recalibrations should recommendably be carried out only by
skilled persons or better still by accredited laboratories.
For cleansing the instrument use humid cloth. Do not use any
detergents but only clear water.
page 22 of 22
 Loading...