

Page 1
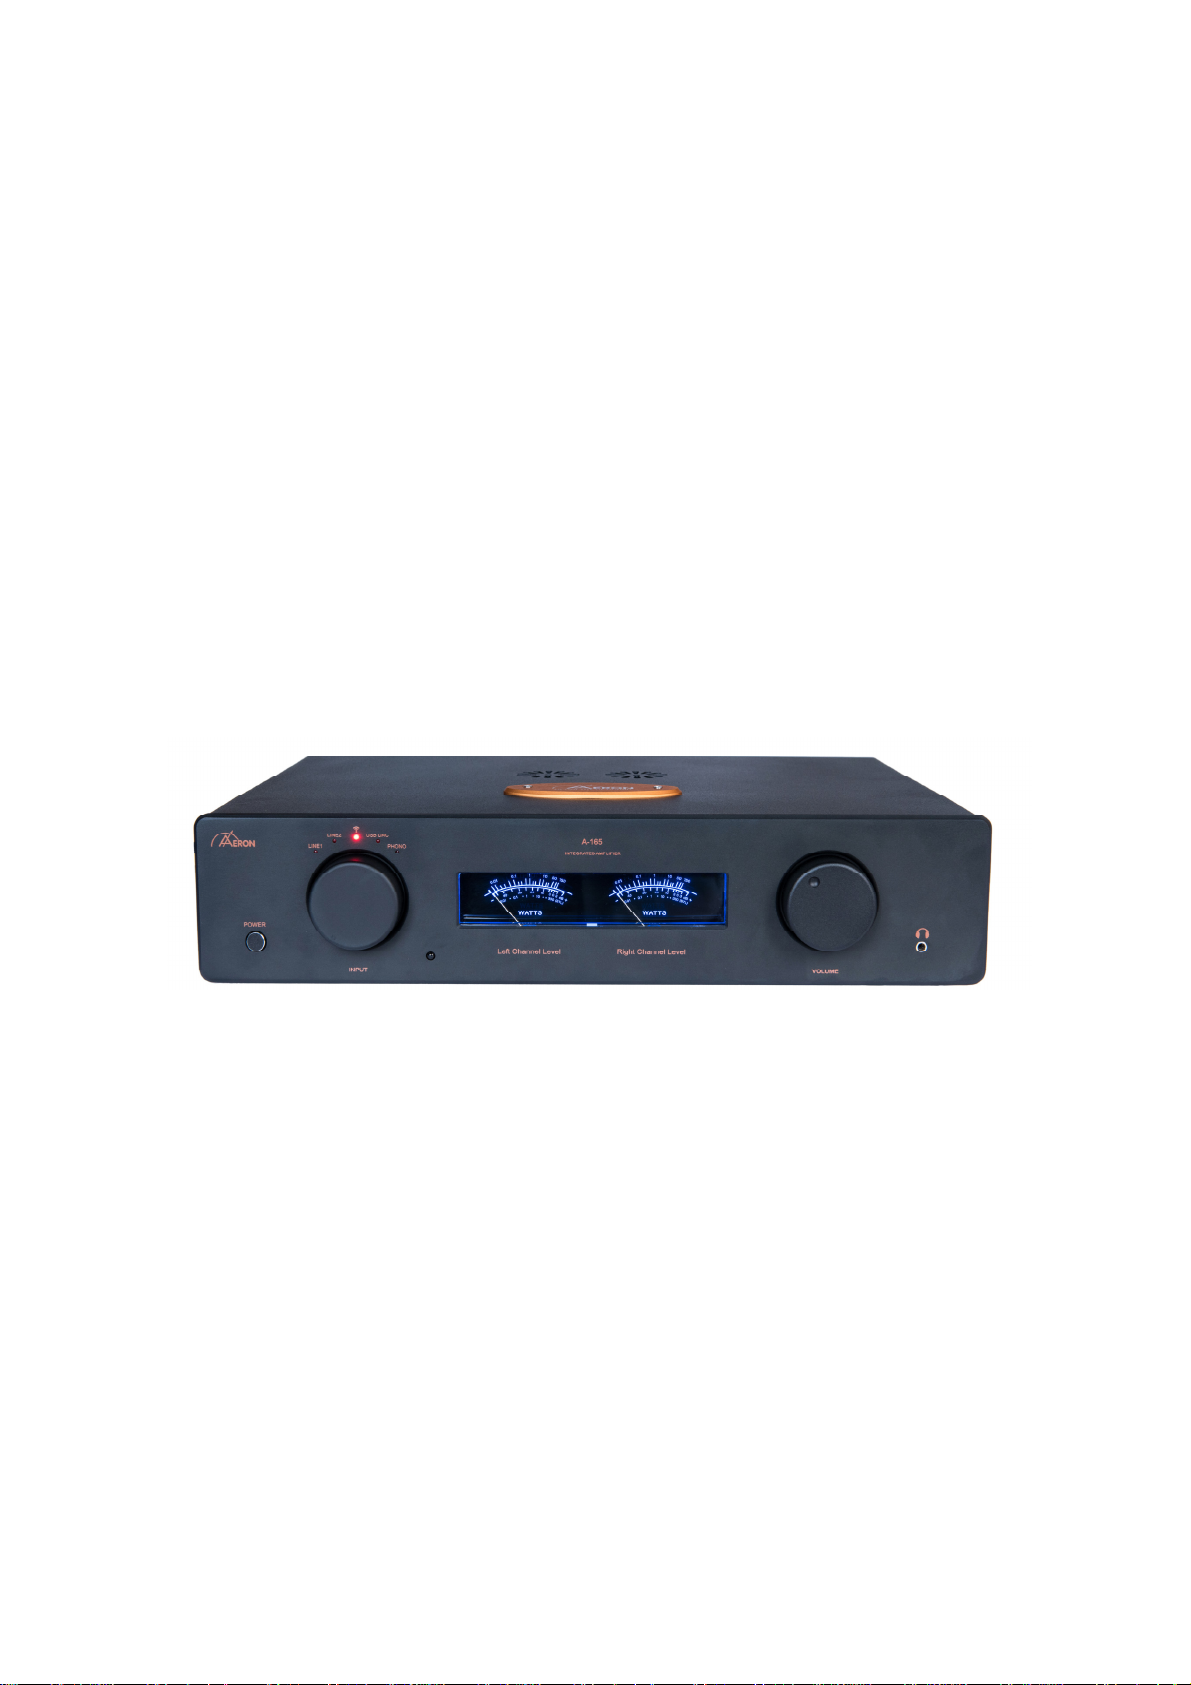
VACUUM TUBE AMPLIFIER
A-165
USER MANUAL
Manual Rev 1.1 2016
1
Luen Hing Electrical (HK) Limited
Page 2

Contents
Preface 3
Illustrations 4
Safety Notice 5
Installation
In your System 6
Connections
Rear Panel Connections 7
AC Power Connection 8
Operation
Power-up Procedure 9
Front Panel Control Function 10
Headphone 10
Remote Control Function 10
Wireless Audio/USB DAC OPERATION 11
Maintenance
Tube Replacement 12
Servicing 13
Cleaning 13
Disposal and Recycling Guidelines 13
Limited Warranty 14
Specifications 15
2
Page 3

Preface
Thank you for purchasing the A-165 as part of your music entertainment system. The engineers and designers at Aeron have spent countless hours of listening and testing to create a Hybrid Integrated Amplifier of the highest caliber for music reproduction. The A-165 has been
designed to provide you many years of playback.
Before use we encourage you to please read this manual thoroughly to
properly acquaint yourself with its features. We hope you enjoy listening to Aeron product as much as we have had the pride that we have
taken in manufacturing this fine receiver for your listening pleasure.
If you have any questions regarding the operational functions, contact
your dealer or distributor for assistance.
Thank you for choosing AERON for your audio experience!
3
Page 4
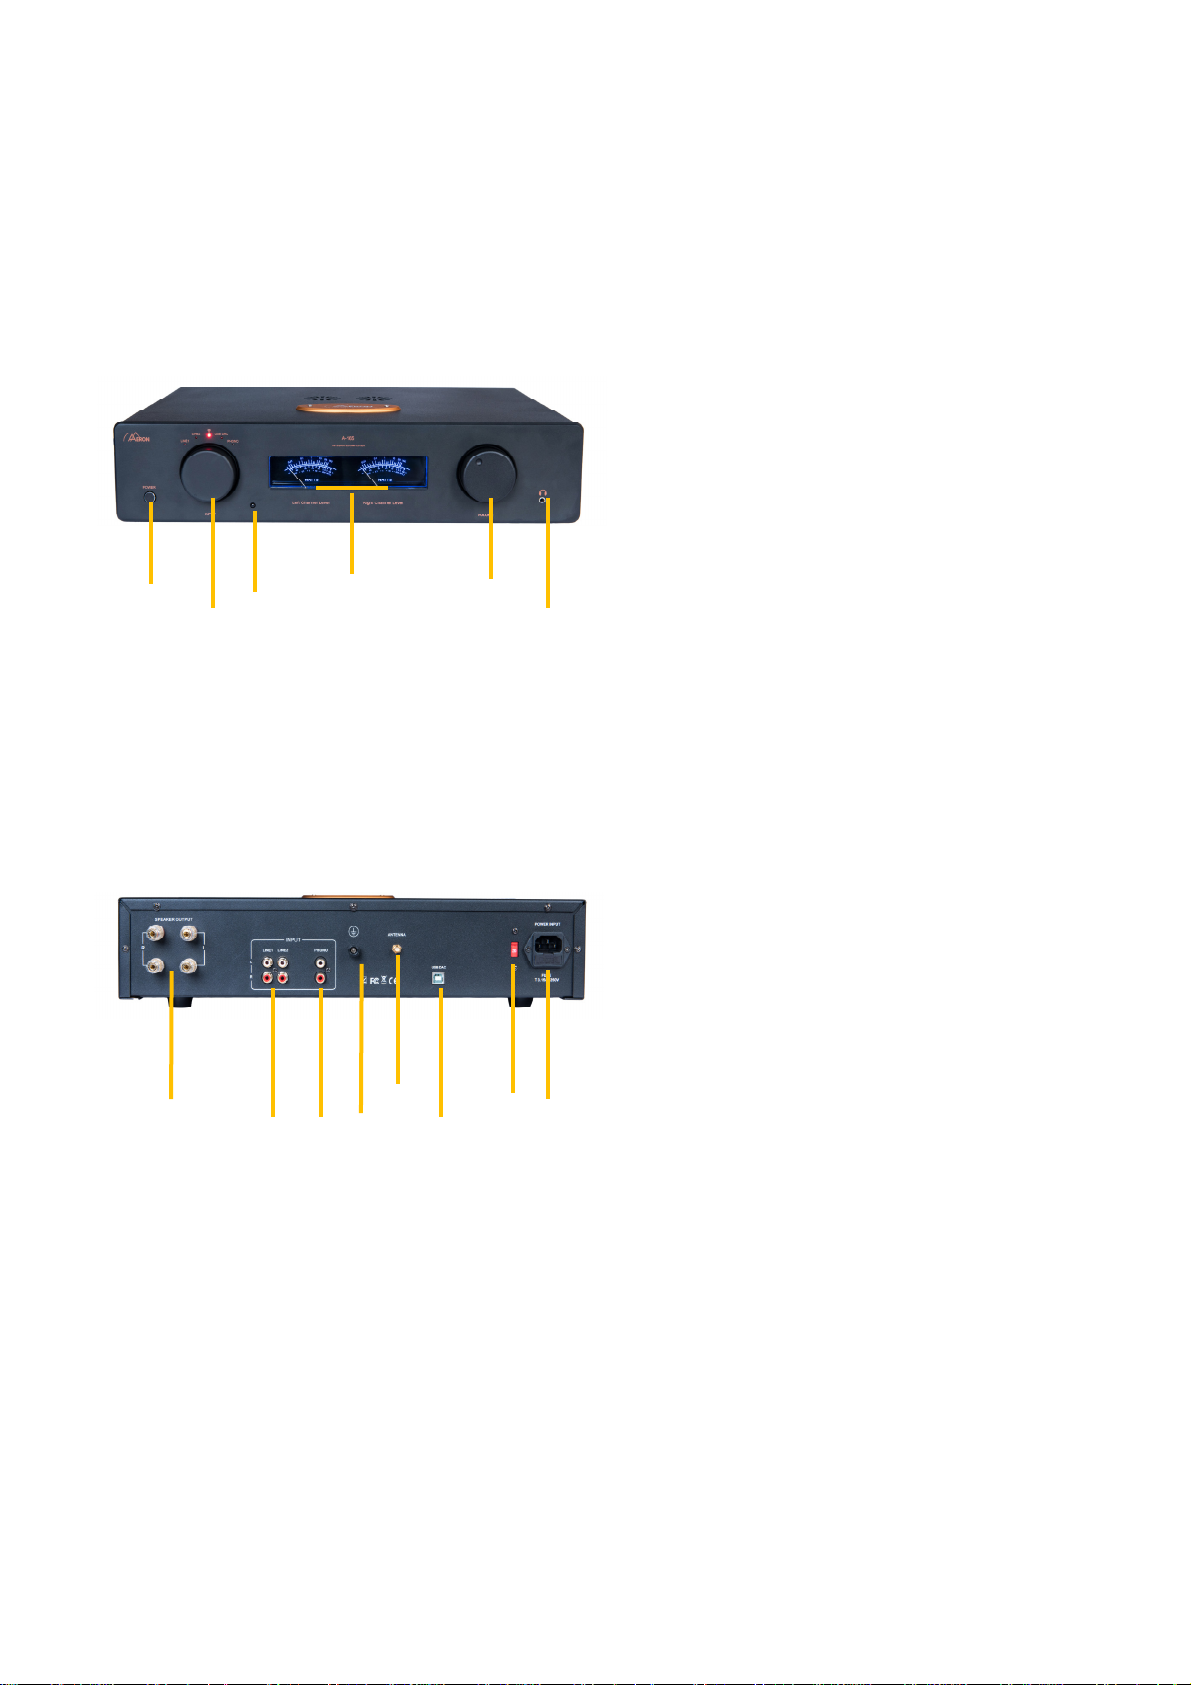
①
②
⑥
③
Illustrations
Front Panel
④
⑤
1. Power switch/indicator. Press in to
turn on the power. Press again to
turn off.
2. Input Selector (LINE, Wireless, USB
DAC, Phono)
3. VU Meter
4. Volume Control
5. Headphone Output
6. IR Receiver
①
② ③
④
⑤
⑥
Rear Panel
⑧
⑦
1. Right & Left Speaker Output
2. LINE Input (for CD Player, Tuner, TV,
DVD etc)
3. Phono Input (for Turntables)
4. GND for Phono Input
5. Antenna for Wireless Receiver
6. USB DAC Input (Digital-to-Analogue
Conversion)
7. IEC AV LINE CORD Input Connection
Port
8. AC Voltage Selevtor
4
Page 5

Safety Notices
1. Heed all warnings and follow all instructions in this manual.
2. Do not use this apparatus near water.
3. Clean only with a dry cloth.
4. Do not block ventilation openings. Install in accordance with instructions.
5. Do not install near any heat sources such as radiators, heat registers, stoves or another
apparatus that produces heat.
6. Do not defeat the safety purpose of the polarized or grounding type plug. If the provided
plug does not fit into the outlet, consult your Reseller.
7. Protect the power cord from being walked on or pinched, particularly at plugs, convenience receptacles, etc.. Unplug the AC mains cord as well as all other connecting cables
during transportation.
8. Only use attachments and accessories specified by Aeron or your Authorized Aeron
dealer.
9. Use a surge protector on the main AC-Line to this component as well as all other components connected to this product. Unplug this apparatus during lightning storms or when
unused for long periods of time.
10. Refer all servicing to qualified service personnel. NO USER SERVICEABLE PARTS INSIDE.
Owner may change tubes.
OTHER SAFETY CONSIDERATIONS
1. ALWAYS disconnect your entire system from the AC mains before connecting or disconnecting any cables, or when cleaning any component. To completely disconnect this apparatus
from the AC mains, disconnect the power supply cord plug from the AC receptacle.
2. NEVER use flammable or combustible chemicals for cleaning audio components.
3. NEVER wet the inside of this component with any liquid. If a liquid substance does enter
your unit, immediately disconnect it from the AC mains and take it to your Aeron Dealer for
inspection.
4. NEVER spill or pour liquids directly onto this component.
5. NEVER block air flow through ventilation slots or heat sinks.
6. NEVER bypass any fuse or replace any fuse with a value or type other than those specified.
7. NEVER expose the A-165 to extremely high or low temperatures. If the A-165 has been taken
out of storage from an unheated environment, let the unit acclimate to room temperature before making any connections and applying power to the unit.
8. ALWAYS keep electrical equipment out of reach of children. Do not handle the tubes when
hot, or wet them. Only touch the tubes only when they are cold and the unit is unplugged
from its source of AC Power.
9. ALWAYS unplug sensitive electronic equipment such as this unit during lighting storms.
5
Page 6

Installation
In your System
To insure normal component life and safe operation this unit must be operated only in a horizontal (upright) position. Adequate airflow and proper
cooling thereby can occur only if there is no restriction below, behind and
above the unit.
The four special non-marring elastomer feet provide adequate spacing only
from a smooth, hard surface. Never operate the unit while it is sitting on a
surface such as a rug or carpet.
If the unit is to be operated in an enclosed equipment cabinet, an exhaust
fan is desirable so as not to operate the A-165 in overheated ambient air.
The “ambient” operating temperature should never exceed 120oF or 49oC.
Improper installation will cause premature tube failure and will affect your
warranty, as well as the service life of the unit.
6
Page 7

Connections
Rear Panel Connections
All two sets of Single-Ended inputs, one set of USB DAC and one set of mm
Phono input are clearly marked to indicate use.
4-Loudspeaker output binding posts (+) and (-), L & R, for 4-8 ohm speaker connection
1 — Power line cord inlet
1 — Power line fuseholder
It is important sonically that your entire system be connected so that the audio
signal arriving at the speakers has correct, or “absolute” polarity (i.e., noninverted). Connect the black or “-” speaker terminal to the wire that connects to
the “black (-)” terminal on the A-165. Connect the red or “+” speaker terminal to
the wire that connects to the “red(+)” terminal on the A-165, and tighten the
speaker terminals securely to ensure best sonic results.
Wireless Antenna:
Connect the specified wireless antenna provided by Aeron.
About Cables:
Use the best available speaker wires and interconnects. Aeron cannot emphasize
this enough. As better components and systems are developed, it becomes increasingly important to avoid the limitations of inferior system interconnections.
Connect the A-165 input the source components only the highest grade of audio
interconnect cables. To avoid sonic degradation use the shortest practical
length of cables.
7
Page 8

Connections
AC Power Connection
It is essential that the amplifier be connected to wall AC power receptacle, or a
similar heavy-duty source. If it is connected to convenience receptacles on preamplifiers, etc., the full sonic capabilities of both the A-165 and the preamplifier
will be compromised.
For the very best sonic performance, the A-165 should be connected to its own
AC power circuit branch, protected by a 15 or 20 amp breaker. The other audio
equipment should be connected to a different power circuit and breaker. Avoid
the use of extension cords. If they must be used on a temporary basis, use
High quality power cords.
The A-165 utilizes a compatible grounding system that generally does not require
a “ground lifter” adapter plug on the AC power cord to minimize hum. The power
cord supplied with the A-165 has a standard three-prong grounding plug to provide maximum safety when it is connected to a grounded wall receptacle. If there
is any question regarding the safety of grounding procedures, be certain to
seek competent help with the installation.
If electronic crossovers or other AC powered equipment are used with the A-165
it may be necessary to use “ground lifter” adapters on the power plugs of that
equipment to minimize system hum. Generally, the lowest hum is achieved when
the only direct connection between audio common “ground” and true earth
ground occurs in the preamplifier, through its grounded power cord. Other
equipment in the system should have some form of isolation to prevent ground
loops and associated hum.
8
Page 9

Operation
Power-up Procedure
Make sure you have read and complied with the Installation and Connection instructions prior to attempting operation.
Power-On
1. Adjust volume control to minimum setting
2. Press the “Power” button to turn unit ON
3. Choose the Audio Source, the source LED indicator is sparkling, wait 30secs
to 1mins, till the LED is ON
4. Turn Volume Control to audience level
Shut-Down
1. Adjust Volume control to minimum setting
2. Press the “Power” button shut unit OFF
General Notes about Usage
Turn off the A-165 wait at least five minutes before turning it on again. This brief
cool down period will reduce stress on the output tubes and potential
damage to them.
Aeron does not recommend leaving your A-165 on 24 hours a day as is the custom of some listeners to achieve maximum sonic performance on demand. While
this is often recommended for solid-state equipment, Aeron does not
recommend this procedure for vacuum tube integrated amplifiers.
CAUTION: Always turn the volume control down when changing program
sources.
9
Page 10
Operation
Front Panel Control Functions
VOLUME CONTROL: Rotate the down or up volume control decreases or
increases the volume level.
INPUT: Allows selection of any of three single-ended input sources 1, 2, 3. Switch
the input selector button through each input as indicated on the panel.
POWER: Toggles power on and off from AC wall outlet to A-165.
Headphone
3.5mm Headphone output for conventional 32-200ohms stereo headphone.
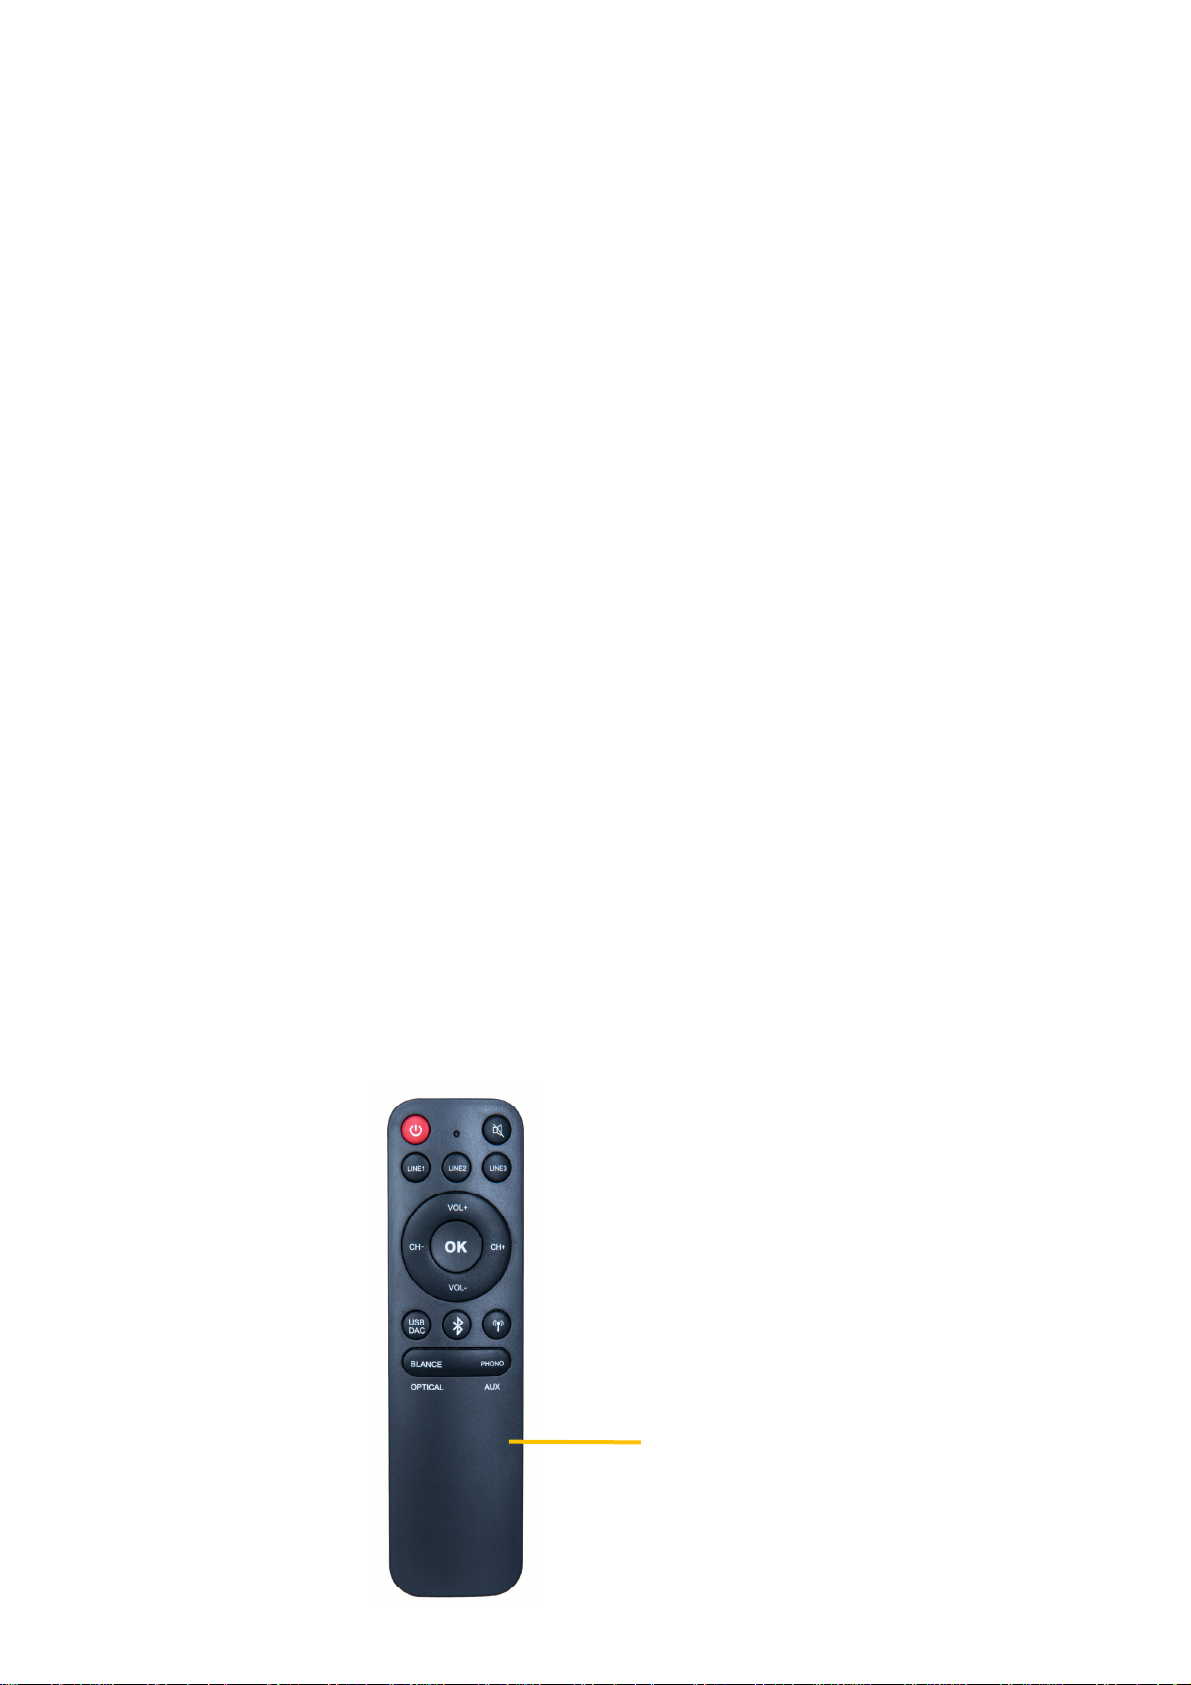
Remote Control Functions
1. Press the button to choose your desire source.
2. Press Volume “up” or “down” bottom to increase or decrease the volume
level.
10
Remote Control
Page 11

Operation
Wireless Audio / USB DAC OPERATION
Wireless
Usually your wireless device will automatically search for a visible wireless device at first try, in this case the A-165 hybrid integrated amplifier. Your device
should search and connect to the AERON A-165. If your device does not see the
AERON “wireless device” appear after 30 seconds or so, then you may search
for a USB device manually with your unit.
If you have difficulty in connecting, start your mobile device’s wireless search
function and turn off then back on the A-165 amplifier.
(Your wireless antenna needs to be connected to the rear of the A-165.)
USB DAC
You may play your favorite tunes from your PC or laptop. Connect the data cable
between the PC and the A-165’s DAC connection. When connecting with the A165 hybrid integrated amplifier, the name on the PC’s sound card will appear as
“AERON A 165 USB DAC”.
NOTE: You may not listen to two inputs at the same time. The wireless connection
takes precedence over the USB DAC input. If you decide to use the wireless connection between your mobile device and the wired connection to your computer, you must disconnect the wireless connection between your mobile device
and the wireless receiver.
11
Page 12
Maintenance
Tube Replacement
As usual, the audio tubes used in A-165 can last for 10,000 hours or above.
The audiophile enthusiasts like changing different kind of audio tubes to
ambience different sonic characters.
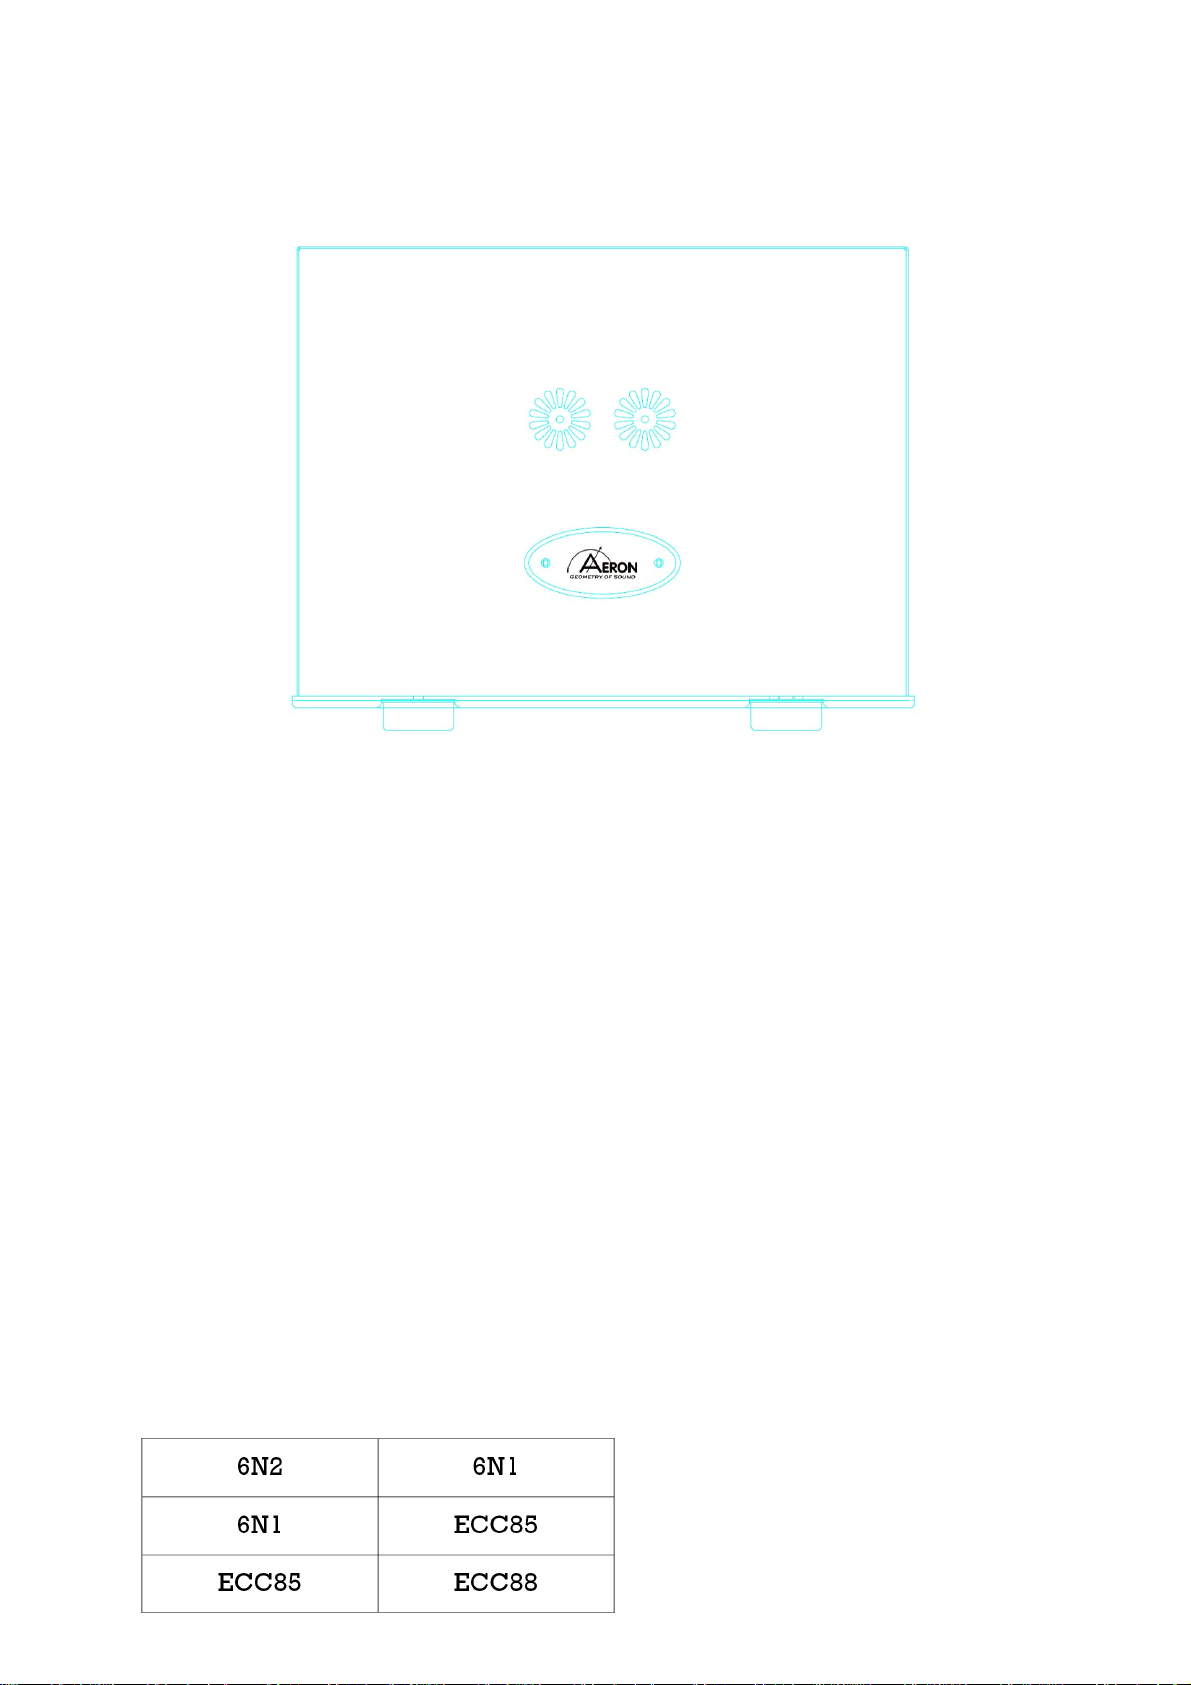
V1 V2
Please consult the distributor or your local dealer before changing the
tubes.
CAUTION: If misuse the tube or re-placement the tubes by yourself,
the machine have cause any malfunction, will not be eligible for warranty.
The models that used in A-165 of audio tubes.
V1 — 6N2 V2 — 6N1
Beside the above models, alternative models are capable for replacement,
please check the following tubes:
V1 V2
6N2 6N1
6N1 ECC85
ECC85 ECC88
12
Page 13

Maintenance
Servicing
CAUTION: Your A-165 contains sufficient levels of voltage and current to be lethal. Do not tamper with a component or parts inside the unit. Refer any needed
service to your authorized Aeron dealer or other qualified technician. Should
service be necessary, please contact your Aeron dealer, or Aeron Customer
Service Email: [email protected] or [email protected].
Cleaning
To maintain the visual appearance of your A-165, occasionally wipe the front
panel and top cover surfaces with a soft damp (not wet) cloth to remove dust. A
mild, non-alkaline soap solution may be used to remove fingerprints or similar
smudges. Cleaners containing abrasives should not be used as they will damage
the brushed grain of the front panel finish.
Disposal and Recycling Guidelines
To dispose of this electronic product, do not place in landfill. This product may
contain regulated materials which upon disposal require special reuse and recycling processing. Please contact your dealer or importing distributor for instructions on proper disposal of this product on your country. Packing and shipping
materials may be disposed of in a normal manner.
13
Page 14

Limited Warranty
Aeron products are covered by 2-Year Limited Warranty, or a 90-Day Limited Warranty on vacuum tubes. This Limited Warranty initiates from the
date of purchase, and is limited to the original purchaser, or in the case of
demonstration equipment, limited to the original purchaser, or in the case
of demonstration equipment, limited to the balance of warranty remaining
after original shipment to the retailer or importer.
The authorized importing retailer or distributor has accepted the responsibility for warranty of Aeron products sold by them. The specific terms and
remedies for fulfillment of the Limited Warranty may vary from country to
country. Warranty service should normally be obtained from the importing
retailer or distributor from whom the product was purchased.
In the unlikely event that technical service beyond the ability of the importer is required, Aeron will fulfill the terms and conditions of the Limited
Warranty. Such product must be returned at the purchaser’s expense to
the Aeron factory, along with a photocopy of the dated purchase receipt
for the product, a written description of the problem(s) encountered, and
any information necessary for return shipment. The cost of return shipment
is the responsibility of the purchaser.
14
Page 15
AERON A-165 Specifications:
Power Output: 70Wx2 (8ohms)
Frequency Response: 20Hz-50kHz (10W, 8ohms)
Distortion: 0.05%
LINE Gain: 34dB
Phono Gain: 74dB
S/N Ratio (LINE Signal): 86dB
LINE Input Impedance: 80k ohms
Speaker Output Impedance: 4ohms-8ohms
Phono Impedance: 47kohms/68pF
Headphone Impedance: 32-200ohms
USB DAC: 24bit 96kHz
Wireless: Bluetooth 4.0
Power Supply: AC100-120V/AC220-240V/50-60Hz
Tubes: 6N2 (6N1), 6N1 (ECC88)
Dimensions: 350x380x120mm (LxWxH)
Weight: 18kg
Note: IR Remote Control
The manufacturer herewith declares that the product is in conformity with
the provisions of the CE directive(s) including all applicable amendments.
Luen Hing Electrical (HK) Limited
Address: G/F., 152 Apliu Street, Shamshuipo, Kowloon, H.K. www.stereoland.info
Email: [email protected]
15
ropean Distribution
Eu
Page 16

FCC Warning:
This equipment has been tested and found to comply with the limits for a Class
B digital device, pursuant to part 15 of the FCC Rules. These limits are
designed to provide reasonable protection against harmful interference in a
residential installation. This equipment generates, uses and can radiate radio
frequency energy and, if not installed and used in accordance with the
instructions, may cause harmful interference to radio communications.
However, there is no guarantee that interference will not occur in a particular
installation. If this equipment does cause harmful interference to radio or
television reception, which can be determined by turning the equipment off and
on, the user is encouraged to try to correct the interference by one or more of
the following measures:
• Reorient or relocate the receiving antenna.
• Increase the separation between the equipment and receiver.
• Connect the equipment into an outlet on a circuit different from that to which
the receiver is connected.
• Consult the dealer or an experienced radio/TV technician for help.
Caution: Any changes or modifications to this device not explicitly approved
by manufacturer could void your authority to operate this equipment.
This device complies with part 15 of the FCC Rules. Operation is subject to the
following two conditions: (1) This device may not cause harmful interference,
and (2) this device must accept any interference received, including
interference that may cause undesired operation.
The device has been evaluated to meet general RF exposure requirement. The device
can be used in portable exposure condition without restriction.
 Loading...