

Page 1
Instrukcja obsługi
ODKURZACZ BEZPRZEWODOWY
English version
Model: OP 2019
ON PAGE 8!
GRATULACJE!
Drogi Konsumencie, dziękujemy, że wybrałeś produkt polskiej marki
Łucznik. Odkurzacz to sprzęt codziennego użytku - dla Twojego bezpieczeństwa, wygody i bezproblemowego korzystania z urządzenia,
zalecamy zapoznać się z niniejszą instrukcją obsługi przed pierwszym użyciem.
Page 2
ZASADY BEZPIECZEŃSTWA
1. Produkt powinien być używany zgodnie z jego przeznaczeniem.
2. Urządzenie przeznaczone jest do odkurzania na sucho. Nie używaj go do wciągania cieczy, aby
uniknąć uszkodzenia.
3. Chroń odkurzacz i ładowarkę przed kontaktem z wodą.
4. Upewnij się, że szczeliny wentylacyjne urządzenia są odsłonięte.
5. Nie wciągaj urządzeniem substancji łatwopalnych, takich jak np. benzyna.
6. Upewnij się, że napięcie wyjściowe odpowiada napięciu podanemu na tabliczce znamionowej
urządzenia.
7. Nie używaj urządzenia z uszkodzoną ładowarką, przewodem lub wtyczką, gdy urządzenie nie
działa prawidłowo, zostało upuszczone, uszkodzone lub jeśli obudowa silnika została wystawiona na działanie wody lub innych cieczy. Nie próbuj samodzielnie sprawdzać ani naprawiać
tego produktu. Tylko wykwalikowany personel serwisowy powinien wykonywać wszelkie
czynności serwisowe.
8. Niniejsze urządzenie może być używane wyłącznie z akcesoriami i częściami dostarczonymi
przez producenta.
9. Przed czyszczeniem odłącz urządzenie od zasilania, aby uniknąć porażenia prądem.
10. Sprzęt może być użytkowany przez dzieci w wieku co najmniej 8 lat i przez osoby o obniżonych
możliwościach zycznych, umysłowych oraz osoby o braku doświadczenia i znajomości sprzętu, jeżeli zapewniony zostanie nadzór lub instruktaż odnośnie użytkowania sprzętu w bezpieczny sposób tak, aby związane z tym zagrożenia były zrozumiałe. Dzieci nie powinny bawić
się sprzętem. Dzieci bez nadzoru nie powinny wykonywać czyszczenia i konserwacji sprzętu.
11. Urządzenie nadaje się wyłącznie do użytku domowego. Nie należy używać go na zewnątrz.
12. Akumulator należy prawidłowo zutylizować. Zabrania się wyrzucania go do śmieci lub wrzucania do ognia, ponieważ grozi to wybuchem.
13. Nie ponosimy odpowiedzialności za szkody wynikające z niewłaściwego użytkowania urządzenia lub w przypadku nieprzestrzegania niniejszej instrukcji obsługi.
WYŁĄCZNIE DO UŻYTKU DOMOWEGO
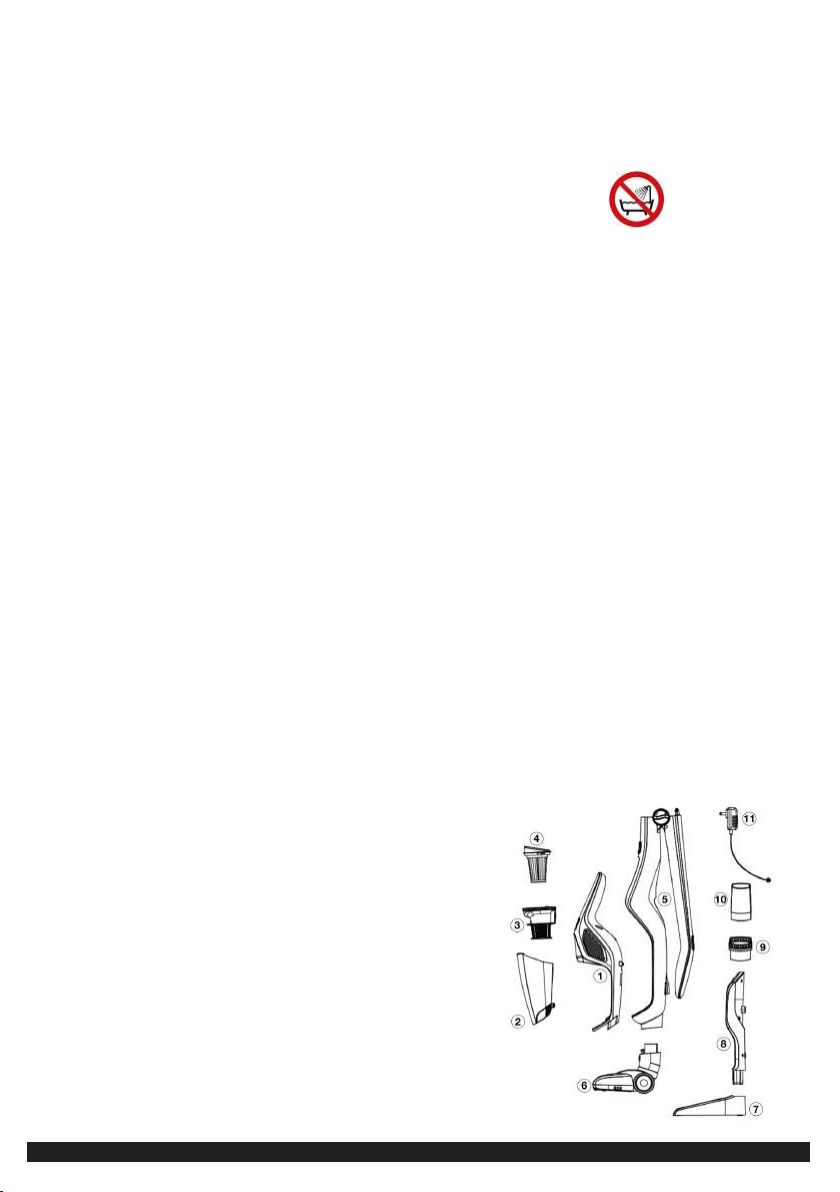
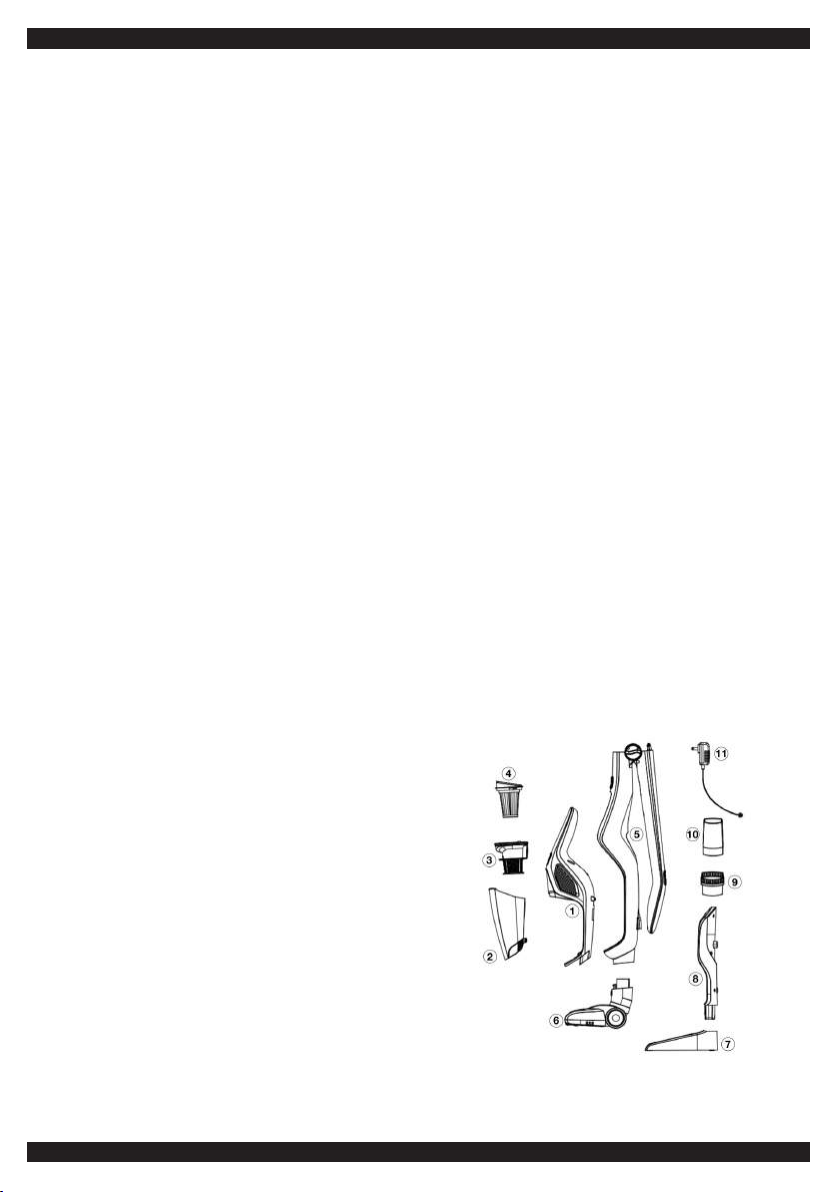
OPIS ELEMENTÓW URZĄDZENIA
1. Podjednostka
2. Pojemnik na kurz
3. Filtr siatkowy
4. Filtr EPA
5. Korpus
6. Szczotka podłogowa
7. Podstawa ładowarki
8. Ładowarka
9. Ssawka okrągła
10. Ssawka płaska
11. Zasilacz
2
Page 3
INSTRUKCJA UŻYTKOWANIA
Montaż
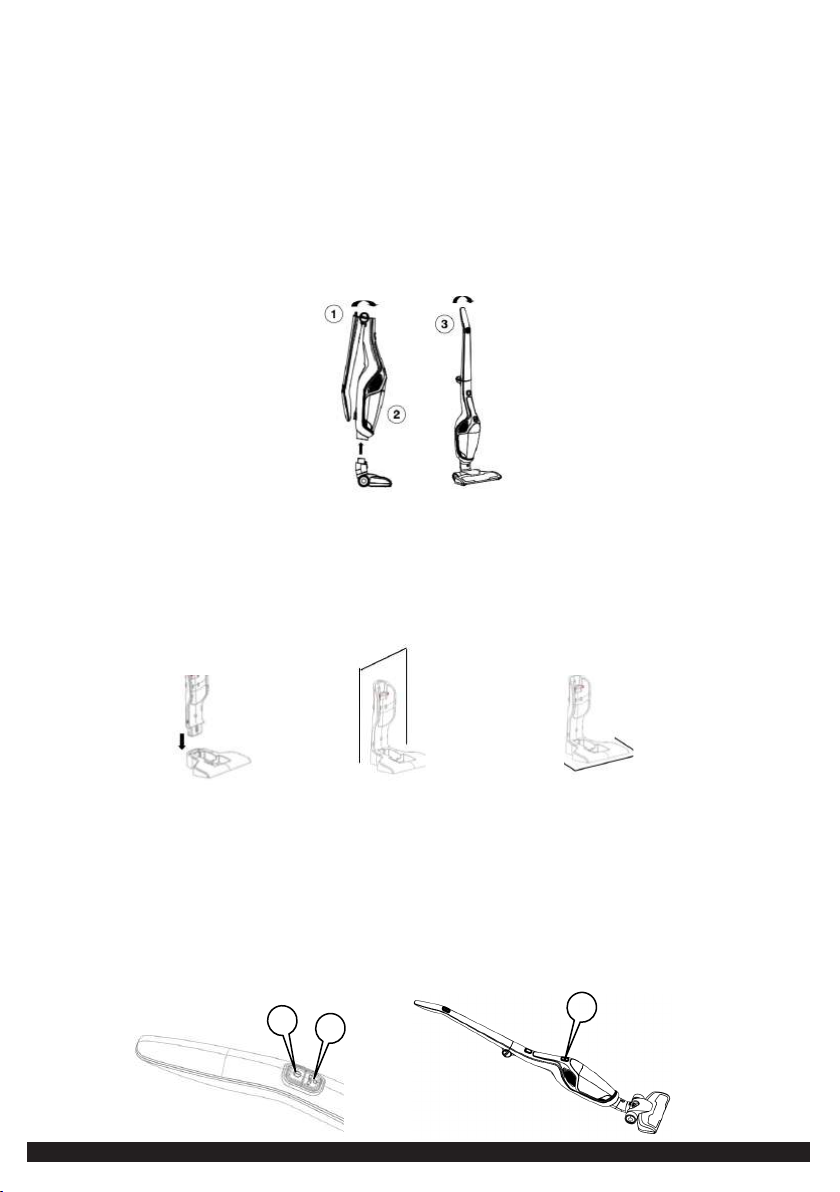
• Korpus i szczotka czyszcząca
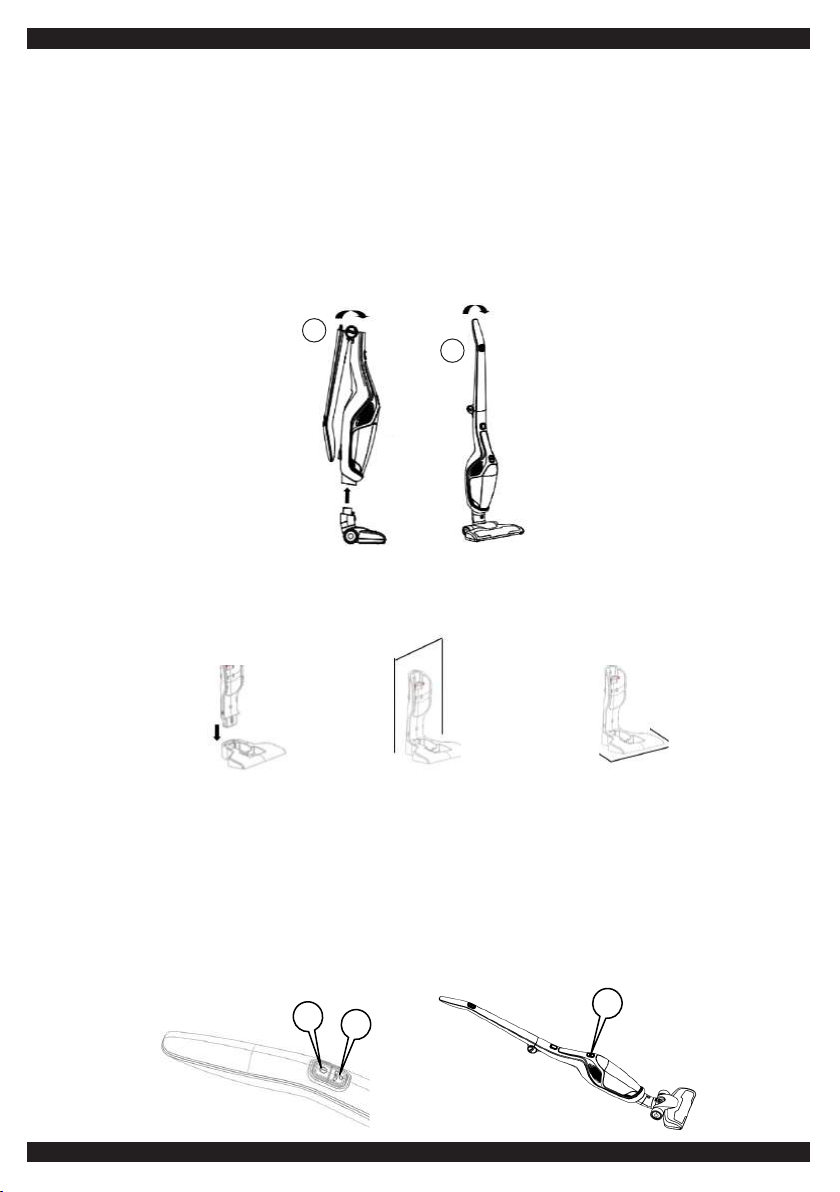
Włóż szczotkę podłogową w korpus, postępując zgodnie ze strzałką (rys. 1), gdy przycisk zwalniający się zablokuje, obróć uchwyt (1) i włóż go w korpus. Jeśli chcesz złożyć odkurzacz, obróć pokrętło zgodnie z narysowanymi na nim strzałkami (w kierunku otwartej kłódki) i delikatnie opuść ruchomą część korpusu (2), (rys.2).
1
2
rys. 1 rys. 2
• Stacja ładująca
Włóż ładowarkę w podstawę (rys. 3), a następnie użyj dołączonych śrub, aby przymocować całość do ściany lub
umieścić na poziomej powierzchni (rys. 4 i 5).
rys. 3 rys. 4
rys. 5
• Obsługa całego urządzenia
Odkurzacz posiada dwa przełączniki: przełącznik zasilania (1) i przełącznik prędkości (2) (rys. 6). Naciśnij przełącznik zasilania (1), aby włączyć odkurzacz. Naciśnij przełącznik prędkości (2) raz - aby przejść do niższej mocy,
dwa razy- aby przejść do wyższej mocy. Naciśnij wyłącznik zasilania (1), jeśli chcesz, aby urządzenie przestało
działać. Podczas pracy należy zwrócić uwagę na wskaźnik poziomu naładowania akumulatora (3), kreski gasną
stopniowo w miarę spadku energii w akumulatorze. Urządzenie wyłączy się automatycznie, gdy poziom naładowania akumulatora będzie zbyt niski.
1
2
rys. 6
3
3
Page 4
• Obsługa urządzeń dodatkowych
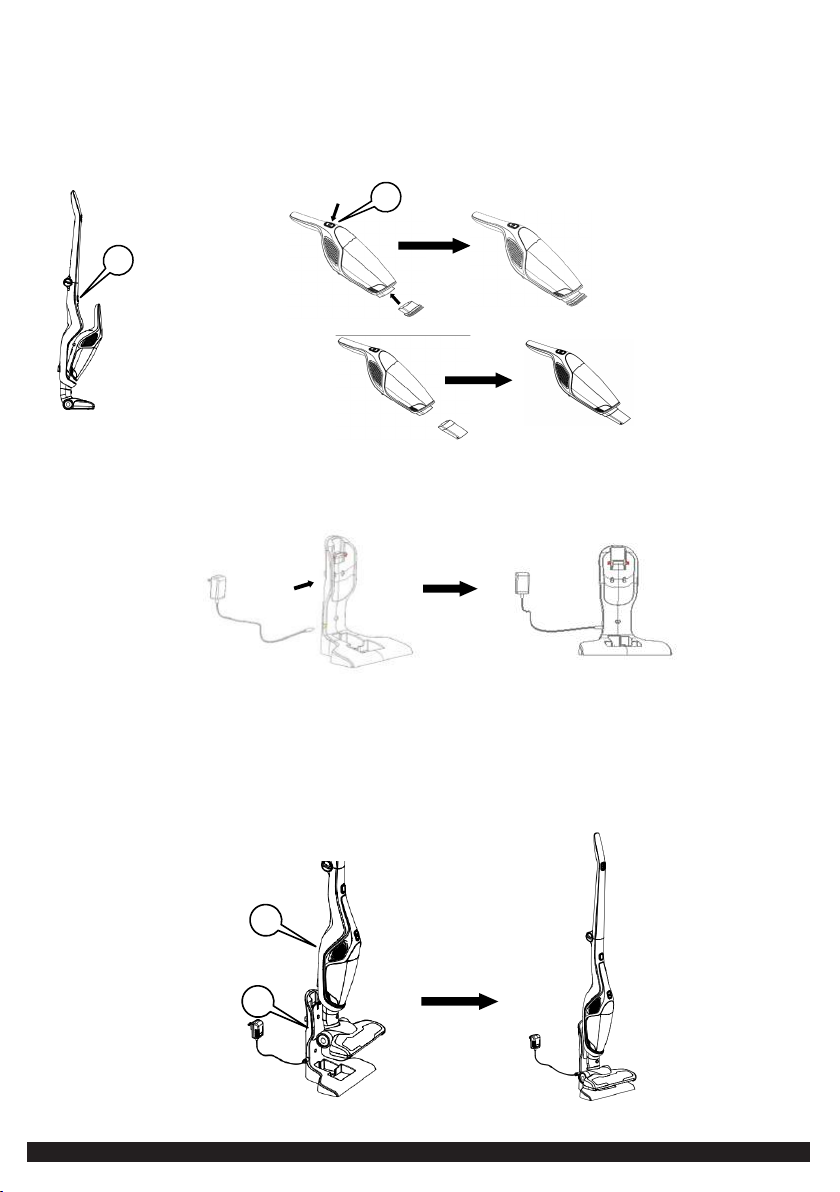
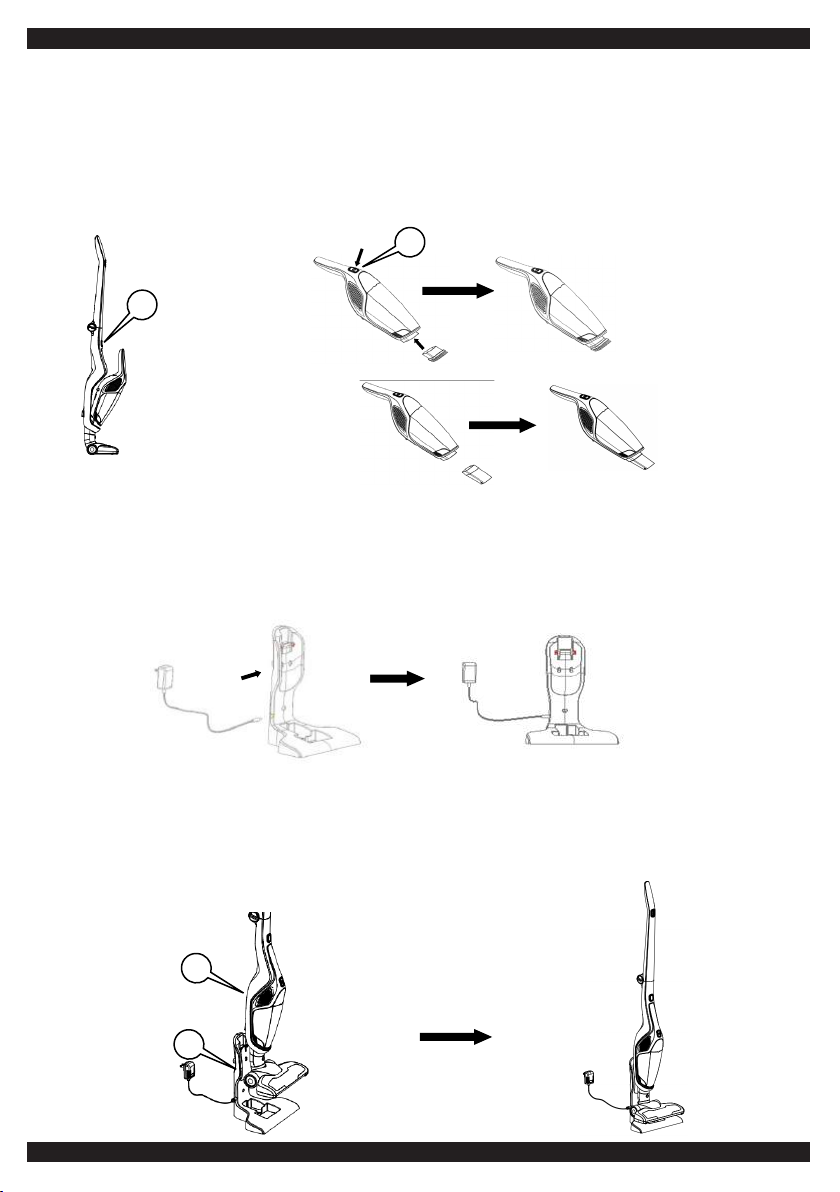
Naciśnij przycisk zwalniający (4) podzespół (rys. 7), złap za uchwyt odkurzacza ręcznego, aby wyjąć go z korpusu odkurzacza. Następnie naciśnij przełącznik odkurzacza ręcznego (5) (rys. 8), aby włączyć podjednostkę. Jeśli
potrzebujesz użyć ssawki, włóż ją do dyszy podjednostki (rys. 8-9 oraz 10-11).
5
4
rys. 8 rys. 9
rys. 7
rys. 10
rys. 11
ŁADOWANIE
• Włóż małą końcówkę adaptera w podstawę ładowarki (rys. 1).
• Włóż zasilacz do gniazda elektrycznego (rys.2).
rys. 1
• Podnieś urządzenie i włóż je do ładowarki. Upewnij się, że gniazdo korpusu (1) zakrywa podstawkę ładowarki (2) (rys. 3 i 4). Jeśli odkurzacz został poprawnie włożony, wskaźnik poziomu naładowania akumulatora zacznie pulsować. Po zakończeniu ładowania, wszystkie cztery kreski będą wyświetlone jednostajnie.
UWAGA: Nie można włączać urządzenia podczas ładowania!
1
rys. 2
2
rys. 3
rys. 4
4
Page 5
CZYSZCZENIE I KONSERWACJA
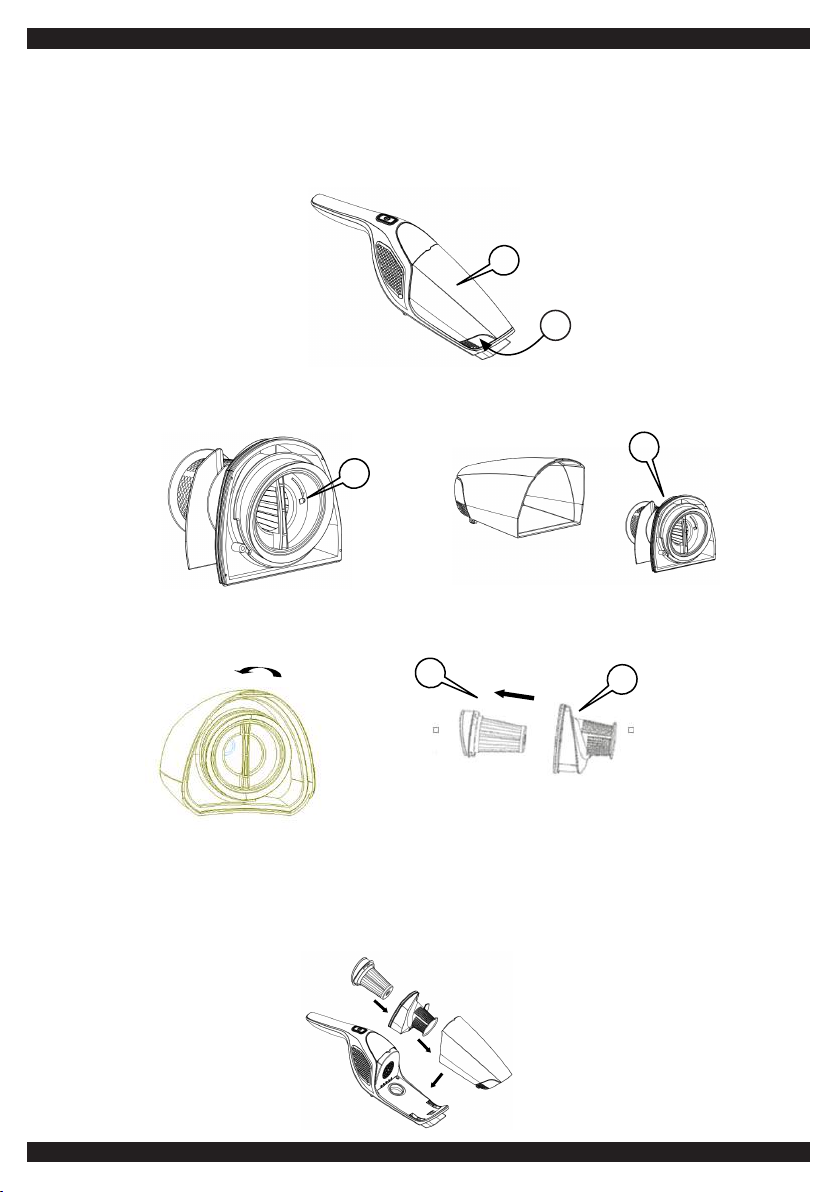
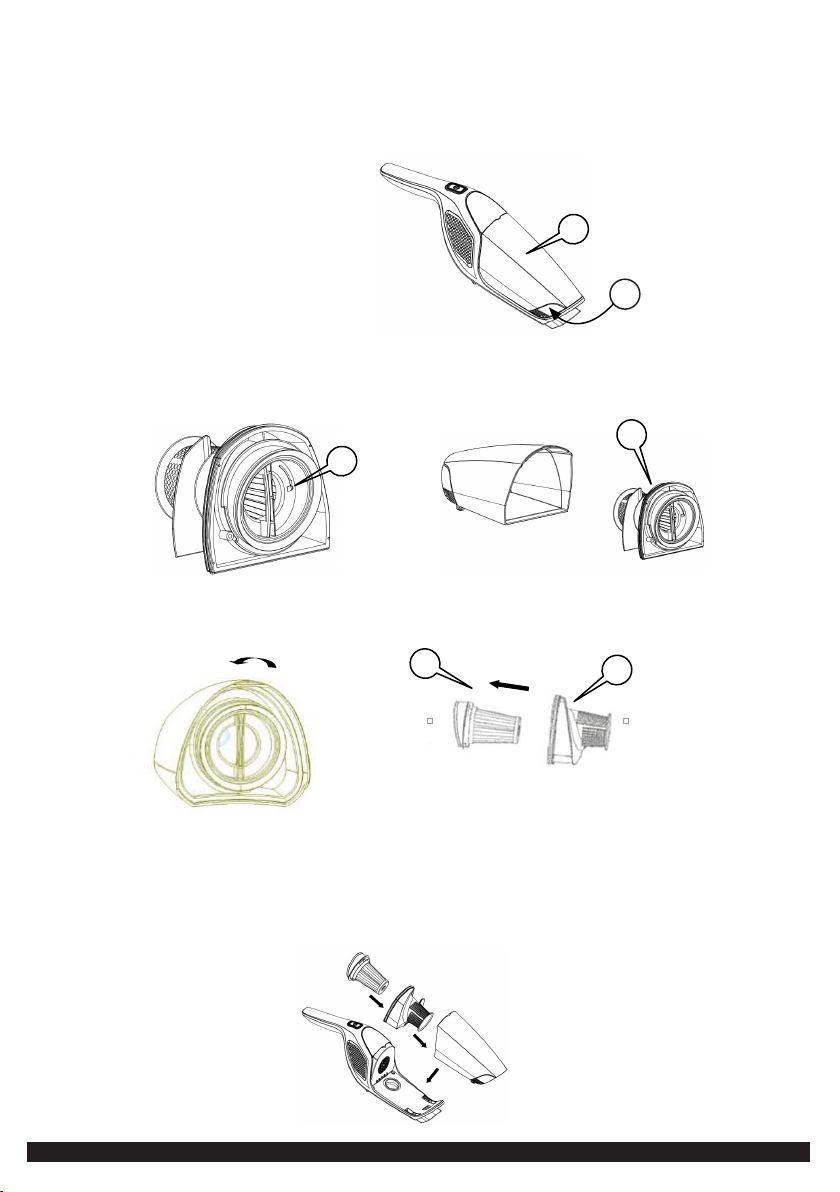
• Odłącz dodatkowe akcesoria od urządzenia, a następnie naciśnij lewy i prawy przycisk zwalniający (2)
pojemnika na kurz (1), aby oddzielić go od podjednostki.
1
rys. 1
2
• Złap za uchwyt ltra (3) (rys.2) i wyjmij jego elementy (4) (rys.3). Następnie opróżnij pojemnik na kurz i
przepłucz go wodą. Na koniec wytrzyj pojemnik suchą ściereczką.
4
3
rys. 2
rys. 3
• Złap uchwyt ltra (3) (rys.2) i obróć go w kierunku przeciwnym do ruchu wskazówek zegara (rys.4), aby
wyciągnąć ltr EPA (5), a następnie opróżnij pokrywę ltra (6) i przepłucz ją wodą. Na koniec wytrzyj
wszystko suchą ściereczką.
5
rys. 4 rys. 5
6
• Gdy urządzenie działa nieefektywnie, oczyścić ltr EPA (5) (rys.5) wodą.
• Po oczyszczeniu pojemnika na kurz, najpierw zainstaluj ltr EPA w pokrywie ltra, a następnie
włóż go do pojemnika na kurz. Włóż pojemnik na kurz do podjednostki .
rys. 6
5
Page 6
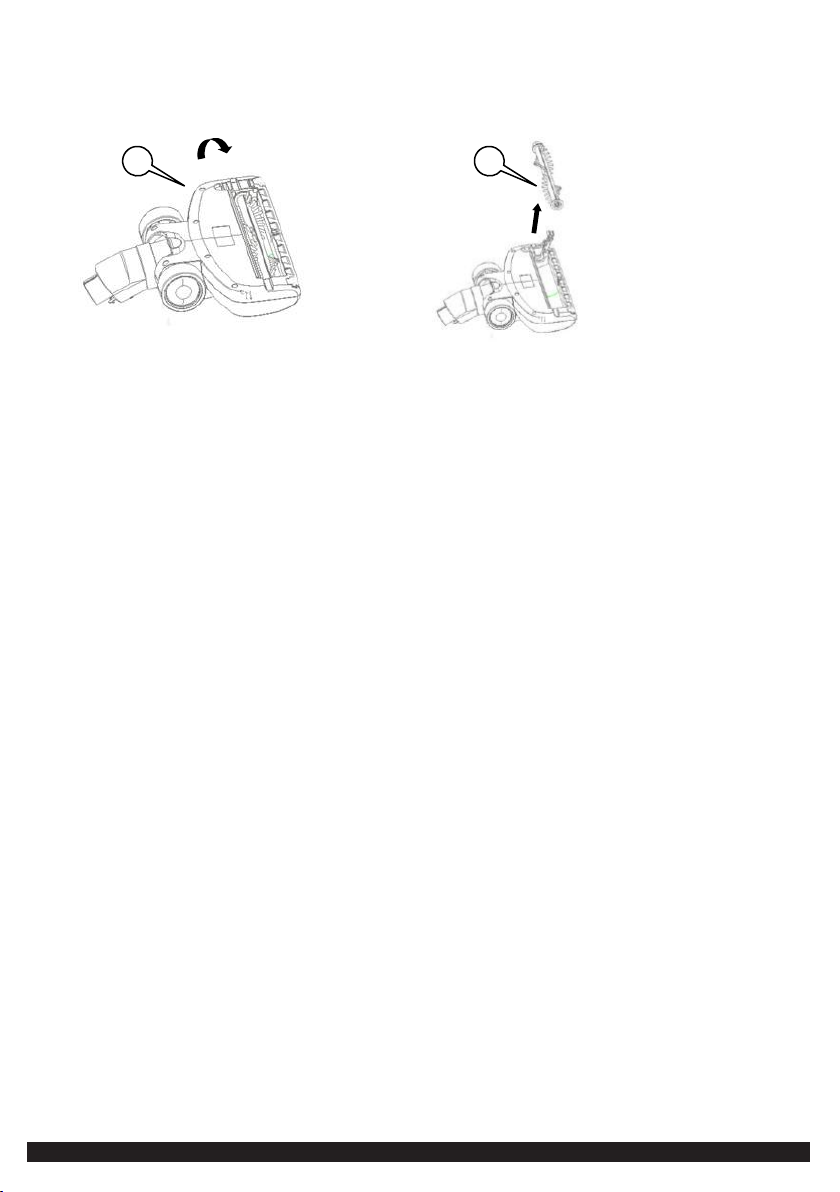
• Jeśli na szczotce podłogowej znajdują się włosy, naciśnij zatrzask zwalniający szczotki rolkowe
(7), aby otworzyć pokrywę szczotki. Następnie wyjmij szczotkę (8) i oczyść ją z włosów.
7 8rys. 7 rys. 8
UWAGA
kurzu, należy go wyczyścić lub wymienić. Szczotka rolkowa po użyciu może być owinięta włosami, należy
czyścić regularnie, aby działała poprawnie.
: Zaleca się czyszczenie urządzenia po każdym użyciu. Jeśli ltr EPA jest zablokowany przez nadmiar
DANE TECHNICZNE
Zasilanie akumulatorowe: 21,6V 2200mAh LI-ION
Czas ładowania: 4-6 godzin
Moc silnika: 115W
6
Page 7
Ta instrukcja zawiera informacje o wszystkich podstawowych parametrach urządzenia.
Aspa ELECTRO Sp. z o.o.
51-162 Wrocław, ul. Macieja Miechowity 1
Importer deklaruje, że wyrób został wyprodukowany zgodnie z Dyrektywą Niskonapięciową
LVD 2014/35/EU. Dyrektywą o Kompatybilności Elektromagnetycznej EMC 2014/30/EU.
Dyrektywą ws. Ograniczenia stosowania niektórych niebezpiecznych substancji w sprzęcie
elektrycznym i elektronicznym ROHS 2011/65/EU.
Importer:
7
Page 8
Instruction manual
VACUUM CLEANER
Model: OP 2019
CONGRATULATIONS!
Dear Consumer, thank you for choosing the Polish brand Łucznik.
Vacuum Cleaner is a product of everyday use. For your safety, convenience and trouble free use of the device, we recommend that you
read this user manual before the rst use.
8
Page 9
SAFETY WARNINGS
1. The product shall be suitable for its purpose.
2. This is a dry vacuum cleaner, do not use it to suck liquid to avoid being damaged.
3. Do not immerse the charger or vacuum cleaner into the water for cleaning.
4. Make certain that the ventilation slits of the appliance are not covered.
5. Do not use the appliance to suck ammable or combustible liquids, such as gasoline.
6. Make sure that your outlet voltage corresponds to the voltage stated on the rating label of the
charger.
7. Do not use the appliance with damaged charger, cord or plug, when appliance is not working
properly, has been dropped, damaged, or if the Motor Housing has been exposed to water or
other liquids. Do not attempt to examine or repair this product yourself. Only qualied service
personnel should perform any servicing.
8. This appliance may only be used with the accessories and parts provided by the manufacturer.
9. Before cleaning, cut off the power source of charger to avoid electric shock.
10. The battery must be disposed properly. if it can no longer be used, never scrap it into re as
explosion may occur.
11. This appliance is not intended for use by persons (including children) with reduced physical,
sensory or mental capabilities, or lack of experience and knowledge, unless they have been
given supervision or instruction concerning use of the appliances by a person responsible for
their safety.
12. This appliance is only suitable for indoor use and domestic purposes.
13. No responsibility is accepted if damage results from improper use and mishandling, or if these
instructions are not complied with.
HOUSEHOLD USE ONLY
PRODUCT DESCRIPTION
1. Sub- unit
2. Dust cup
3. Filter cover
4. EPA lter
5. Body
6. Floor brush
7. Charger stand
8. Charger
9. Small hair brush
10. Flat suction spout
11. Adaptor
9
Page 10
OPERATING INSTRUCTIONS
Assembly
• Body and oor brush
Insert the oor brush into the body by following the arrow shown in gure 1, when the release button (2) locks
the body, rotate the handle (1) and make it be inserted into the body. If need to fold the handle, rotate the handle
release button (3) like in gure 2.
g. 1 g. 2
• Charger and charger stand
Insert the charger into charger stand (see Figure 3), after it, use the screws attached to x the whole unit onto
the wall or put in on a horizontal surface (Figure 4 and 5).
g. 3 g. 4 g. 5
• Operate the whole unit
There are two switches including power switch (1) and speed switch (2) (see Fig.6). Press down power switch (1),
the motor starts to run, the oor brush indicator turns on and the appliance enters into working condition; Press
down the speed switch (2) once to change to the lower power. Press the speed switch (2) again to change to the
higher power. Press the power switch (1) if you want to make the appliance stop working. During operation, please pay attention to electricity quantity indicators (3), the indicators will extinguish gradually as the electricity
quantity reduces and the appliance will stop working automatically when all the indicators extinguish.
1
2
g. 6
10
3
Page 11
• Operate the sub-unit
Press down the sub-unit release button (4) (see Fig.7), grasp the handle of sub-unit to remove it by following
the arrow shown, and then press down the sub-unit switch (5) (see Fig.8 ), the sub-unit enters into working
condition, and you can press the switch (5) to make it stop working. If need to use small hair brush, please insert
it into the suction nozzle of sub-unit (Fig. 9), and then activate it again; If need to use at suction spout, insert
it into the suction nozzle of sub-unit (Fig. 10-11), and then activate it again.
5
g. 9
g. 7
4
g. 8
g. 10 g. 11
CHARGING
• Fix the charger (Fig. 2), insert the small end of adaptor into the charger stand (Fig. 1).
• Insert the large end of adaptor into power outlet and then connect the power source well (see Fig. 2)
g. 1
g. 2
• Lift the appliance and put it onto the charger, make the socket of body (1) cover the charger stand (2)
(Fig. 3), at that time, the electricity quantity indicator turns on, and the appliance enters into the charging
condition, all the charging indicators will turn on when nish charging. (see Fig. 4)
Warning: The appliance can not be acvated during charging process!
g. 3
g. 4
1
2
11
Page 12
CLEANING AND CARE
• Detach the accessory on the sub-unit, and then press the left & right release button (2) of dust cup (1) to
make it be separated from the sub-unit.
1
g. 1
2
• Grasp the lter handle (3) and remove the lter assembly (4) in the dust cup, and then empty the dust cup
and rinse it with water. Finally, wipe the residual water on the dust cup.
4
3
g. 2
g. 3
• Grasp the lter handle (3) and rotate it anticlockwise to remove EPA lter (5), and then empty the lter
cover (6) and rinse it with water. Finally, wipe the residual water on the lter cover.
5
g. 5
g. 4
6
• Clean EPA lter (5) with water when the appliance works inefciently, dry it completely after cleaning.
Note: EPA lter and other spare parts can be purchased from the vacuum cleaner retailers.
• After cleaning the dust cup assembly, please install the EPA lter into the lter cover rstly and then put
them into the dust cup, after it, install the dust cup into the sub-unit.
g. 6
12
Page 13
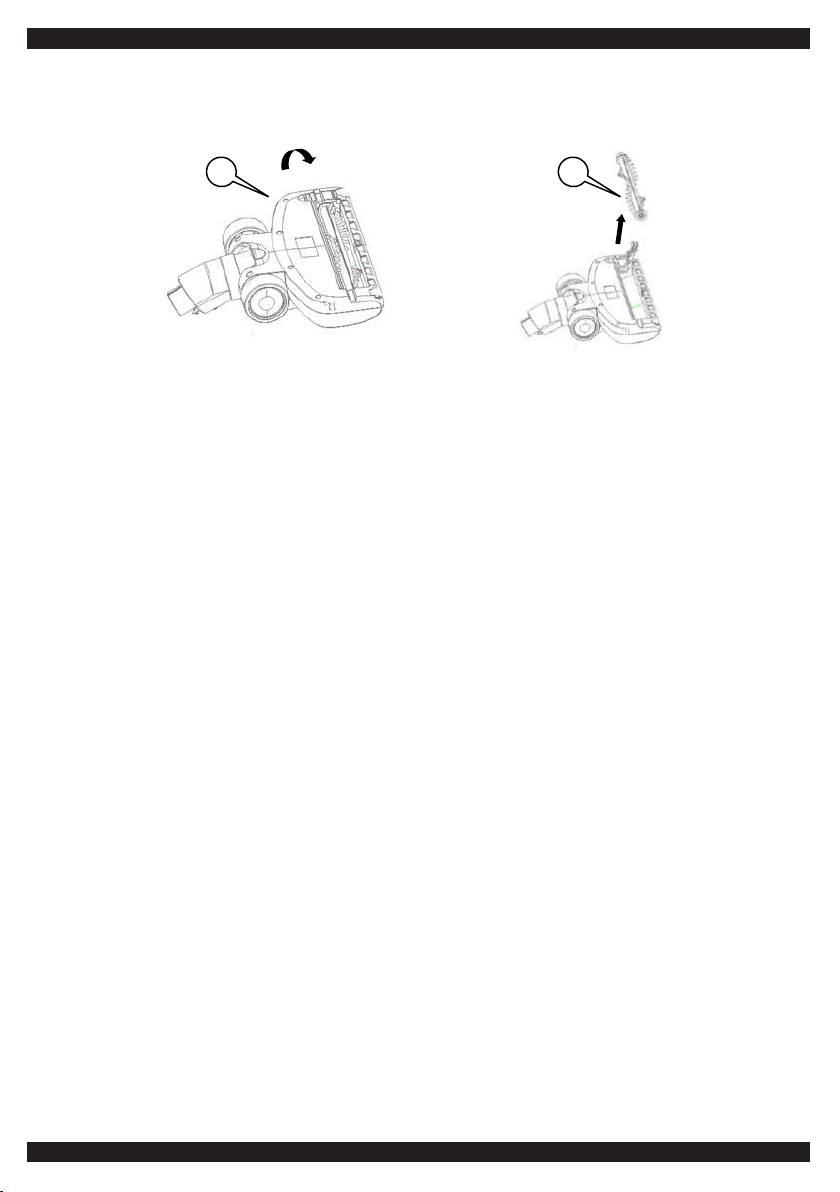
• If hair found on the oor brush, press the roll brush release tab (7) as shown below to open the roll brush
cover, and then remove the roll brush (8).
7 8
g. 7
NOT
E: It is recommended to clean the duct cup after every use. If the EPA lter is blocked caused by the cumu-
g. 8
lation of dust, please clean or replace it in time. The electric roll brush may be wrapped with some hair or other
occule after long time use, so please clean it in time to make the appliance work efciently.
TECHNICAL SPECIFICATIONS
Battery powered: 21.6V 2200mAh LI-ION
Charging time: 4-6 hours
Engine power: 115W
13
Page 14
INFORMATION
on the treatment of used electrical and electronic equipment
To observe the regulations regarding use and disposal of electronic and electric equipment, please be
advised of the following:
1. Worn electrical and electronic equipment must not be placed with other wastes. Such equipment
should be collected selectively, as indicated by the marking on the product’s packaging and in this
manual (crossed-out waste container).
2. Failure to observe this rule may result in a threat to the environment and human health resulting
from the presence of components which are considered hazardous or dangerous for the environment
(such as electrical wiring, plastics, batteries, switches, printed circuit boards, etc.) in the equipment.
To avoid such a threat, the equipment should be collected and appropriately processed by specialized
companies.
3. This manual contains information on all the basic parameters of the device. Remember that your
household plays an important role in contributing to re-use and recovery, including recycling, of used
equipment. This is done in particular through participation in the collection of used equipment.
Be advised that in most countries used equipment can be returned free of additional charge (save
eventual shipping costs) at the store where it was purchased, or at a specialized recycling center or
company dealing in processing, re- covery (incl. recycling) and the disposal of hazardous components.
For details, please contact your local government representative. Disassembly of used equipment is
not allowed.
WE WISH YOU SATISFACTION WITH THE USE OF THIS PRODUCT !
Importer:
ul. Miechowity 1, 51-162 Wrocław, Poland
The importer declares that the product has been manufactured in accordance with the LVD
Low Voltage Directive 2014/35/EU, Directive on Electromagnetic Compatibility EMC 2014/30/EU
and the Directive on restrictions on the use of certain hazardous substances in electrical and
electronic equipment ROHS 2011/65/EU.
ASPA Electro Sp. z o.o.
14
Page 15
ODKURZACZ BEZPRZEWODOWY OP 2019
IMPORTER:
ASPA Electro Sp. z o.o.
ul. Miechowity 1, 51-162 Wrocław
MAGAZYN GŁÓWNY / SERWIS
ASPA Electro Sp. z o.o.
ul. Bierutowska 81 bud. A
51-317 Wrocław,
tel.: +48 71 722 52 88
e-mail: [email protected]
15
 Loading...