

Page 1
COLOR MONITOR
USER’S GUIDE
Model No :L710/L710M
Page 2
As an ENERGY STAR®Partner, Daewoo Lucoms Co., Ltd. has
determined that this product meets the Energy Star®guidelines for
energy efficiency.
FEDERAL COMMUNICATIONS COMMISSION
RADIO FREQUENCY INTERFERENCE STATEMENT
NOTE : This equipment has been tested and found to comply with the
limits for a Class B digital device, pursuant to Part 15 of the FCC
Rules. These limits are designed to provide reasonable protection
against harmful interference in a residential installation. This
equipment generates, uses and can radiate radio frequency energy and,
if not installed and used in accordance with the instructions, may
cause harmful interference to radio communications. However, there
is no guarantee that interference will not occur in a particular
installation. If this equipment does cause harmful interference to
radio or television reception, which can be determined by turning the
equipment off and on, the user is encouraged to try to correct the
interference by one or more of the following measures :
- Reorient or relocate the receiving antenna.
- Increase the separation between the equipment and receiver.
- Connect the equipment to an outlet on a circuit different from that to
which the receiver is connected.
- Consult the dealer or an experienced radio or TV technician for help.
CAUTION : Any changes or modifications not expressly approved by the
party responsible for compliance could void the user
’s authority
to operate the equipment.
CANADIAN NOTICE
AVIS CANADIEN
This Class B digital apparatus meets all requirements of the Canadian
Interference-Causing Equipment Regulations.
Cet appareil numérique de la Class B respecte toutes les exigences du
Règlement sur le matériel brouilleur du Canada.
Page 3
English - 1
INTRODUCTION
This manual explains how to correctly install, operate and get the
best performance from your monitor. Please read this user’s guide
carefully before installing your monitor, then keep it near your
monitor for quick reference.
First, please check that the contents of the box corresponds with the
following checklist :
TFT LCD monitor
Power cord
15 pin signal cable
User’s guide
Audio cable(L710M only)
Warranty card (Optional)
If any item is missing or damaged, please contact your dealer. Please
keep the box and packing materials so that you may properly store or
transport your monitor.
CONTENTS
Introduction ............................................................................. 1
Product Features ................................................................. 2
Setup ......................................................................................... 3
Connecting the 15 Pin Signal Cable and Power Cord..........3
Operation & Adjustment ...................................................... 4
Specifications ......................................................................... 11
Factory Preset Timings ......................................................... 12
Changing the Stand ............................................................... 13
Troubleshooting ..................................................................... 15
Page 4
English - 3
English - 2
PRODUCT FEATURES
The monitor is designed for use in a small work area or for
those who need more work space on the desk.
The convenient and user-friendly on-screen display allows for
easy and accurate adjustments of screen size, position and
screen color.
The monitor supports a safe working environment in strict
compliance with the TCO 99 standard for low emissions .
The monitor complies with the VESA Display Data Channel
(DDC) specification for Plug and Play compatibility.
Advanced microcircuitry makes setup and configuration fast
and effortless.
The monitor features Advanced Color Controls for fine-tuning
to meet your own personal tastes or application requirements.
Use the on-screen controls to adjust the color temperature,
RGB gain value for the best possible screen color and
intensity.
Press the menu button and activate the Self-Diagnosis menu to
determine whether your monitor is functioning normally, not
receiving a signal or is receiving a signal that is out of
scanning range.
Activate the higher refresh rates of the monitor to stabilize the
screen and eliminate the annoying flicker that contributes to
eye-strain and headaches.
The monitor supports the optimal display performance with
1280x1024 at 75Hz.
With the POWER LIGHT function added,you can enjoy the
bright screen for movie or any other multimedia utilization.
This product has the stereo speaker(L710M only).
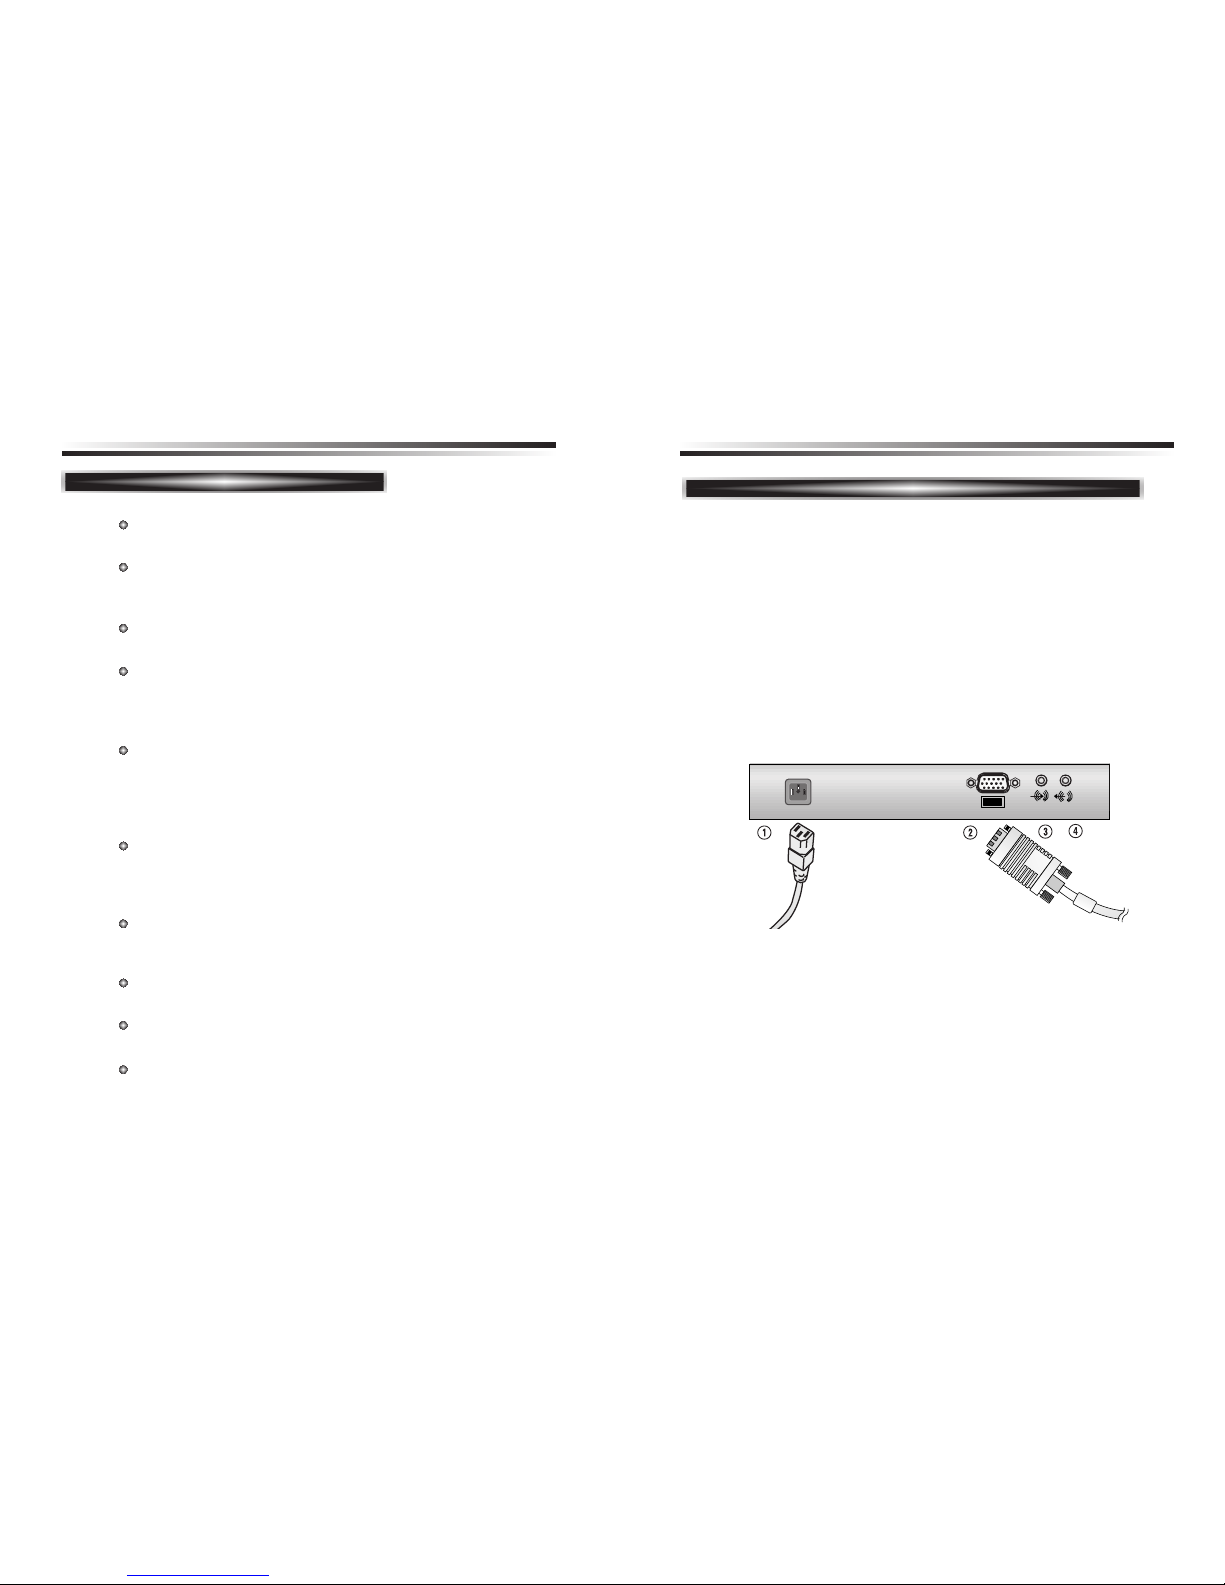
! Plug the power cord into the AC receptacle located on the back of the
monitor.
@ Connect the 15 pin signal cable to the output port of the video card in
your computer and monitor.
# Connect the Audio cable to the sound card of computer(L710M only).
$ Headphone jack(L710M only).
CONNECTING THE 15 PIN SIGNAL CABLE AND POWER CORD
SETUP
AC POWER
15 pin signal
cable
Power Cord
Page 5
English - 5
OPERATION & ADJUSTMENT
English - 4
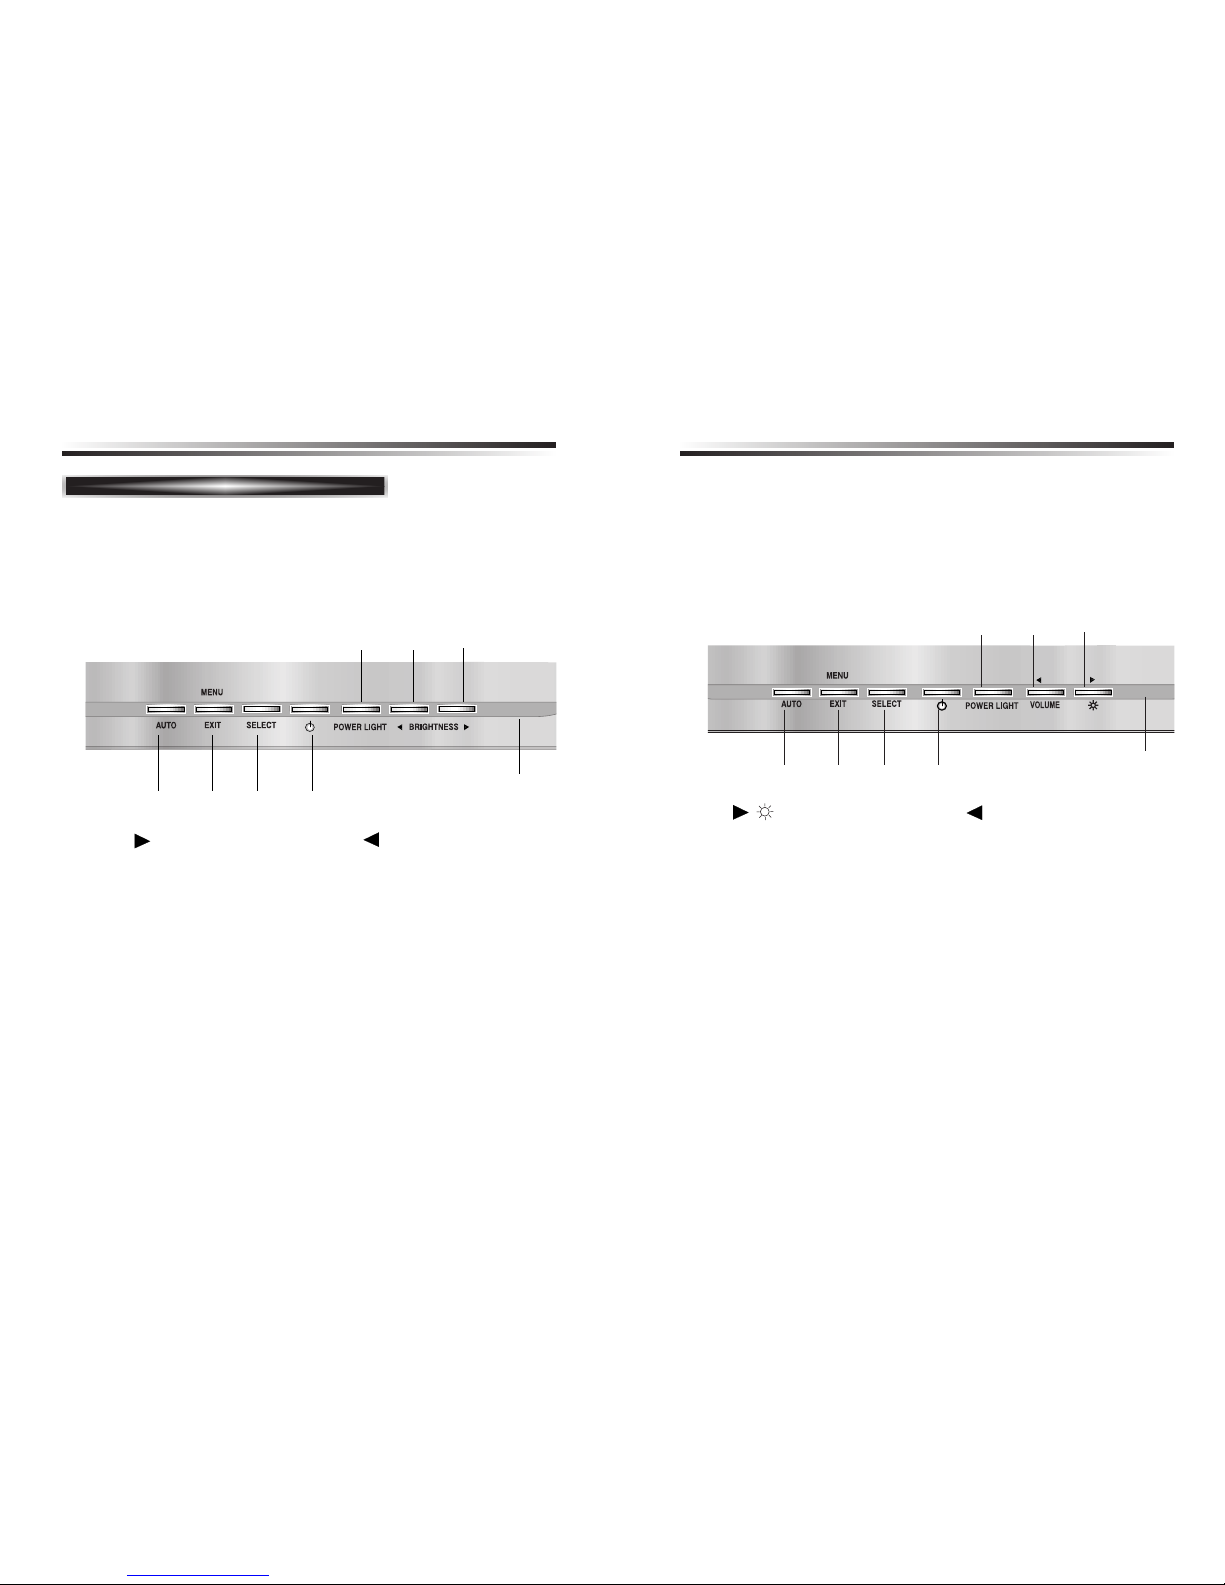
POWER LIGHT
MENU/EXIT
Swithes the monitor on and
off.
Shows both normal operation
and power management status
with power indicator light.
POWER Indicator
POWER
1
3
4
5
7
2
Moves cursor to the right or
low window in the OSD
window and increases the
value of any selected function.
Moves cursor to the left or
high window in the OSD
window and decreases value
of any selected function.
While the OSD screen is off,
you can adjust the screen
brightness according to each
situation.
SELECT
6
Moves from top menu to sub
menu in the OSD window and
opens the function window for
the selected icon.
Turns the OSD window on.
Turns the OSD (On-Screen
Display) window off and moves
from sub menu to top menu in
the OSD window.
AUTO
8
Launches the AUTO
TRACKING function directly.
*
( )
*
( )
*
( )
*
( )
: Hot Key
CONTROL PANEL
Swithes the monitor on and
off.
Shows both normal operation
and power management status
with power indicator light.
POWER Indicator
POWER
1
3
4
2
Moves cursor to the right or
low window in the OSD
window and increases the
value of any selected function.
While the OSD screen is off,
you can adjust the brightness
directly.
Moves cursor to the left or high
window in the OSD window and
decreases value of any selected
function.
While the OSD screen is off, you
can adjust the volume directly.
*
/VOLUME( )
*
/ ( )
3
1
2
6
7
8
45
< L710 >
< L710M >
POWER LIGHT
MENU/EXIT
5
7
While the OSD screen is off,
you can adjust the screen
brightness according to each
situation.
SELECT
6
Moves from top menu to sub
menu in the OSD window and
opens the function window for
the selected icon.
Turns the OSD window on.
Turns the OSD (On-Screen
Display) window off and moves
from sub menu to top menu in
the OSD window.
AUTO
8
Launches the AUTO
TRACKING function directly.
*
( )
*
( )
: Hot Key
3
1
2
6
7
8
45
Page 6
English - 7
English - 6
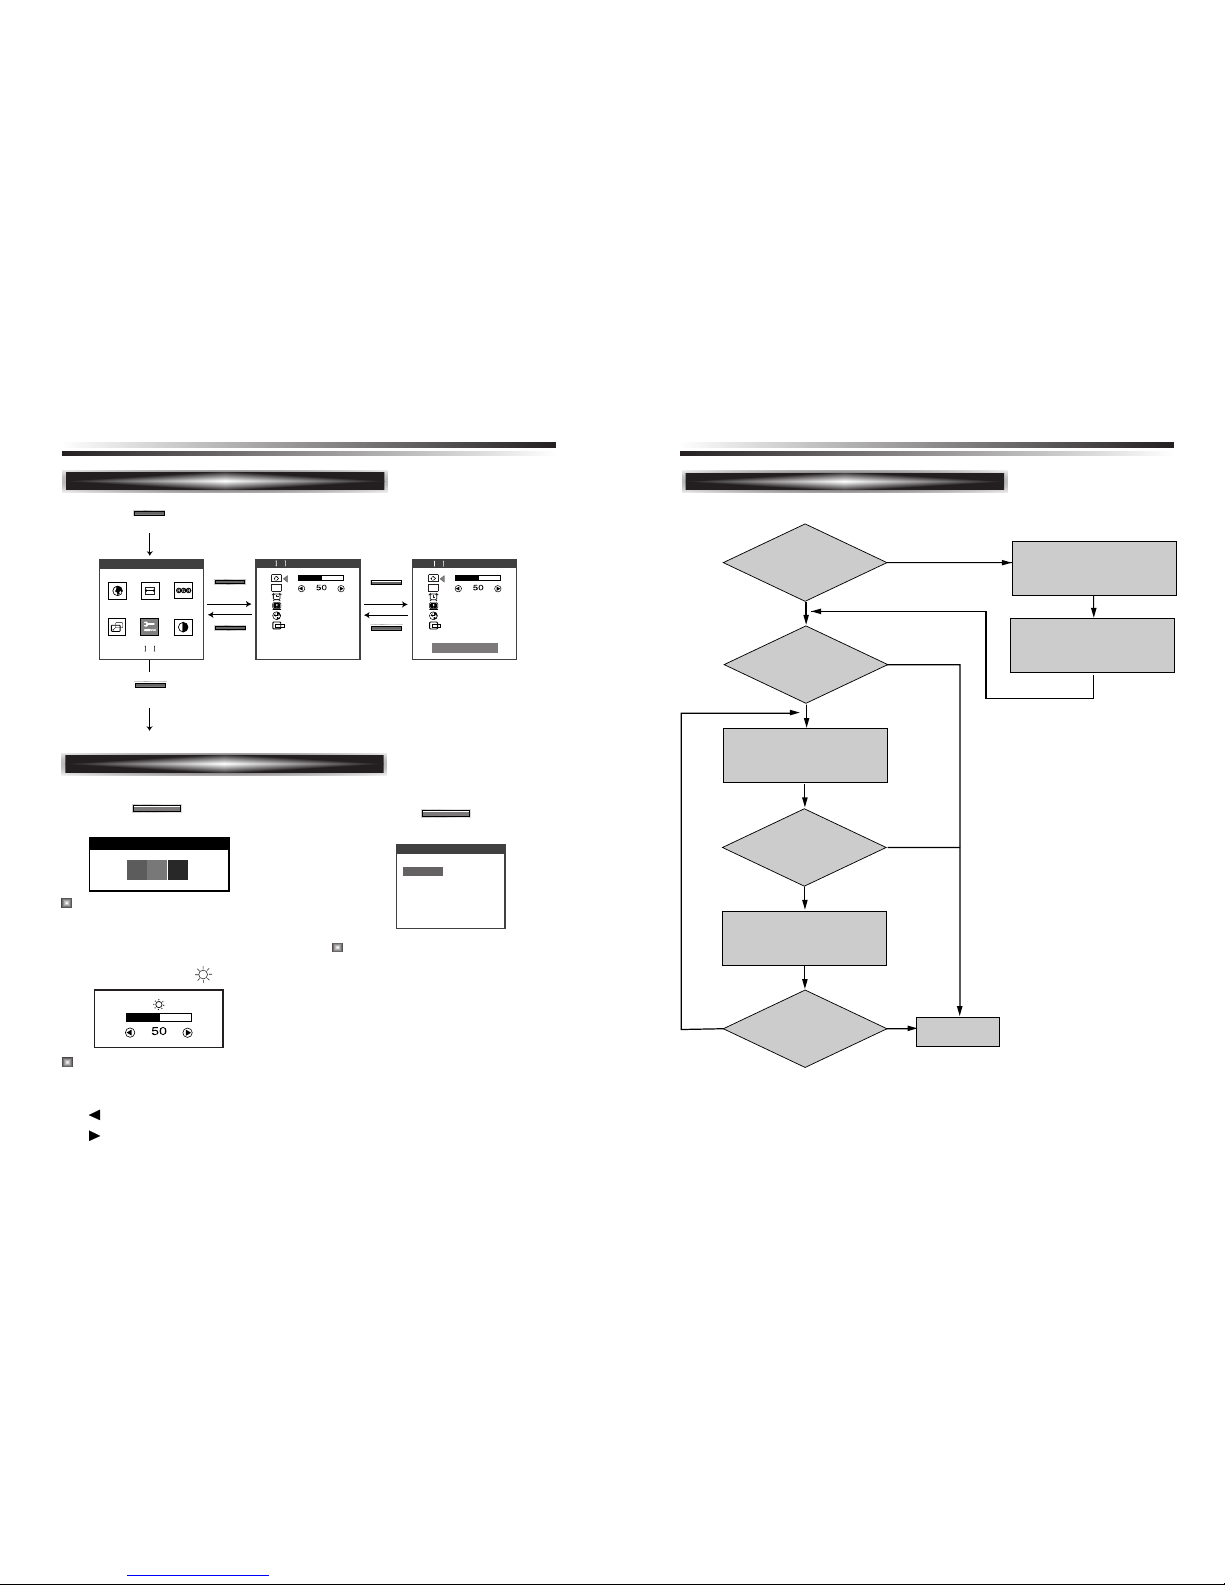
KEY PROCESS
OSD OFF
MENU
EXIT
EXIT
EXIT
OSD
OSD
SHARPNESS
SHARPNESS
UT L TY
UT L TY
UT L TY
1280X1024 64K 60
SELECT
SELECT
HOT KEY
When there is no OSD, if you press this
AUTO button, you can use the best display
performance fit for a current mode.
When there is no OSD, if you press this
BRIGHTNESS button, you can adjust the
brightness directly.
: decreases brightness
: increases brightness
AUTO TRACKING
AUTO
The screen will be brightened progressively
by 10%. If you carry out general PC works
such as document edition on the Movie
mode,you may shorten the life span of LCD
panel. Thus,it is recommended to verify the
selected mode before use.
POWER LIGHT
PC MODE
GAME MODE
MOVIE MODE
POWER LIGHT
ADJUSTMENT PROCEDURE
Adjust the CLOCK control.
Perform the AUTO
POSITION.
Is the H.Size
proper?
Is the
noise displayed on
the screen?
Perform the AUTO
TRACKING.
Is the
noise displayed on
the screen yet?
Is the
noise displayed on
the screen yet?
Adjust the CLOCK FINE
until the screen is cleared.
Yes
Yes
Yes
Yes
No
No
No
No
End
BRIGHTNESS /
Page 7
English - 9
English - 8
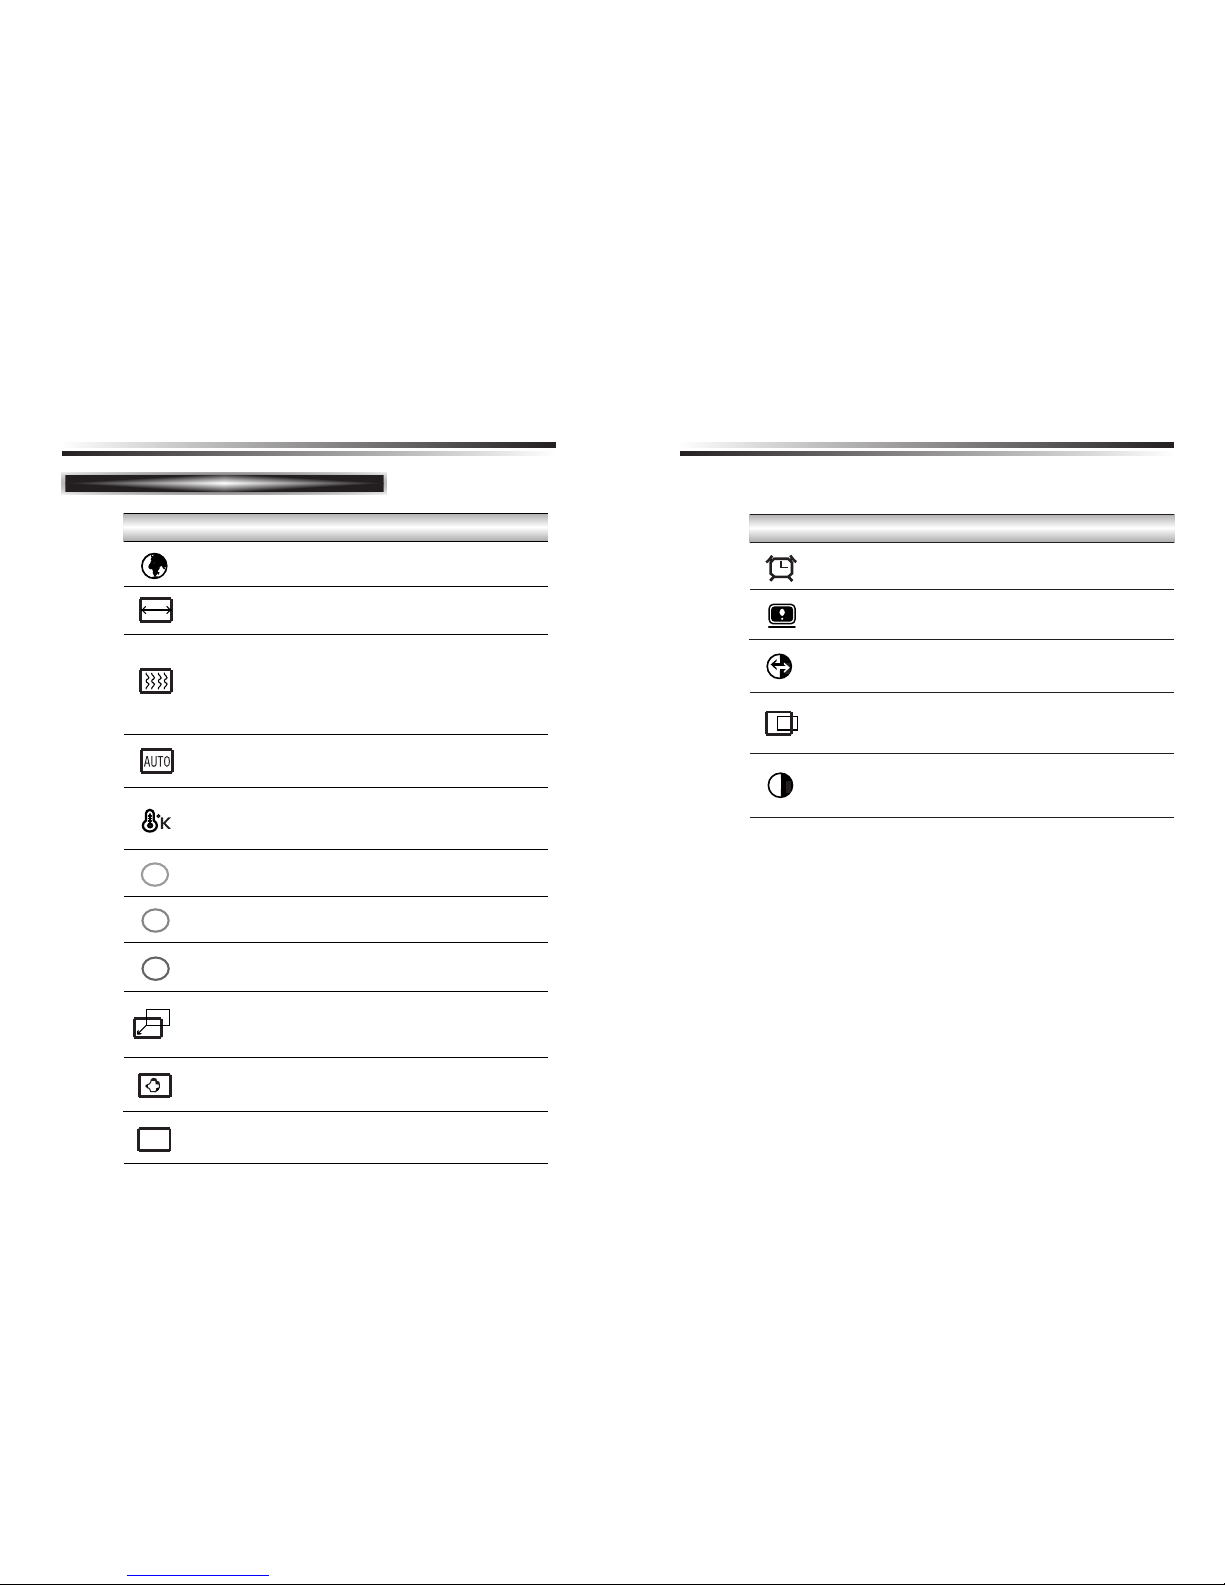
ICON CONTROL FUNCTION
OSD FUNCTIONS
Adjust the display image quality (if the
screen proceed to scaling up).
SHARPNESS
AUTO
TRACKING
Adjust the horizontal & vertical picture
image quality and size.
Select language for OSD (6 languages).
LANGUAGE
Adjust the width (horizontal size) of the
screen image.
CLOCK
R
G
B
Adjust the OSD position horizontally (left
or right) and vertically (up or down).
OSD
POSITION
OSD
Choose different preset color temperatures
or set your own customized color
parameters.
Sharpen the focus by aligning the
illuminated pixels and adjust until the
screen image looks focused, crisp and
sharp. Adjusting the CLOCK FINE after
the CLOCK adjustment will produce a
clear screen.
Adjust the red color.
Adjust the green color.
CLOCK FINE
COLOR
TEMPERATURE
RED CONTROL
GREEN
CONTROL
Adjust the blue color.
Adjust the position of the display
horizontally (left or right) and vertically
(up or down).
BLUE
CONTROL
H. CENTER &
V. CENTER
ICON CONTROL FUNCTION
Reset the screen to the Factory Preset
Display Settings.
RECALL
Choose automatically the proper
horizontal position and vertical position &
size of the screen image.
AUTO
POSITION
Display horizontal & vertical frequency
and polarity.
STATUS
OSD
TIME OUT
Adjust the display OSD Menu.
Adjust the contrast of image, the
difference between light and dark areas on
the screen.
CONTRAST
Page 8
English - 11
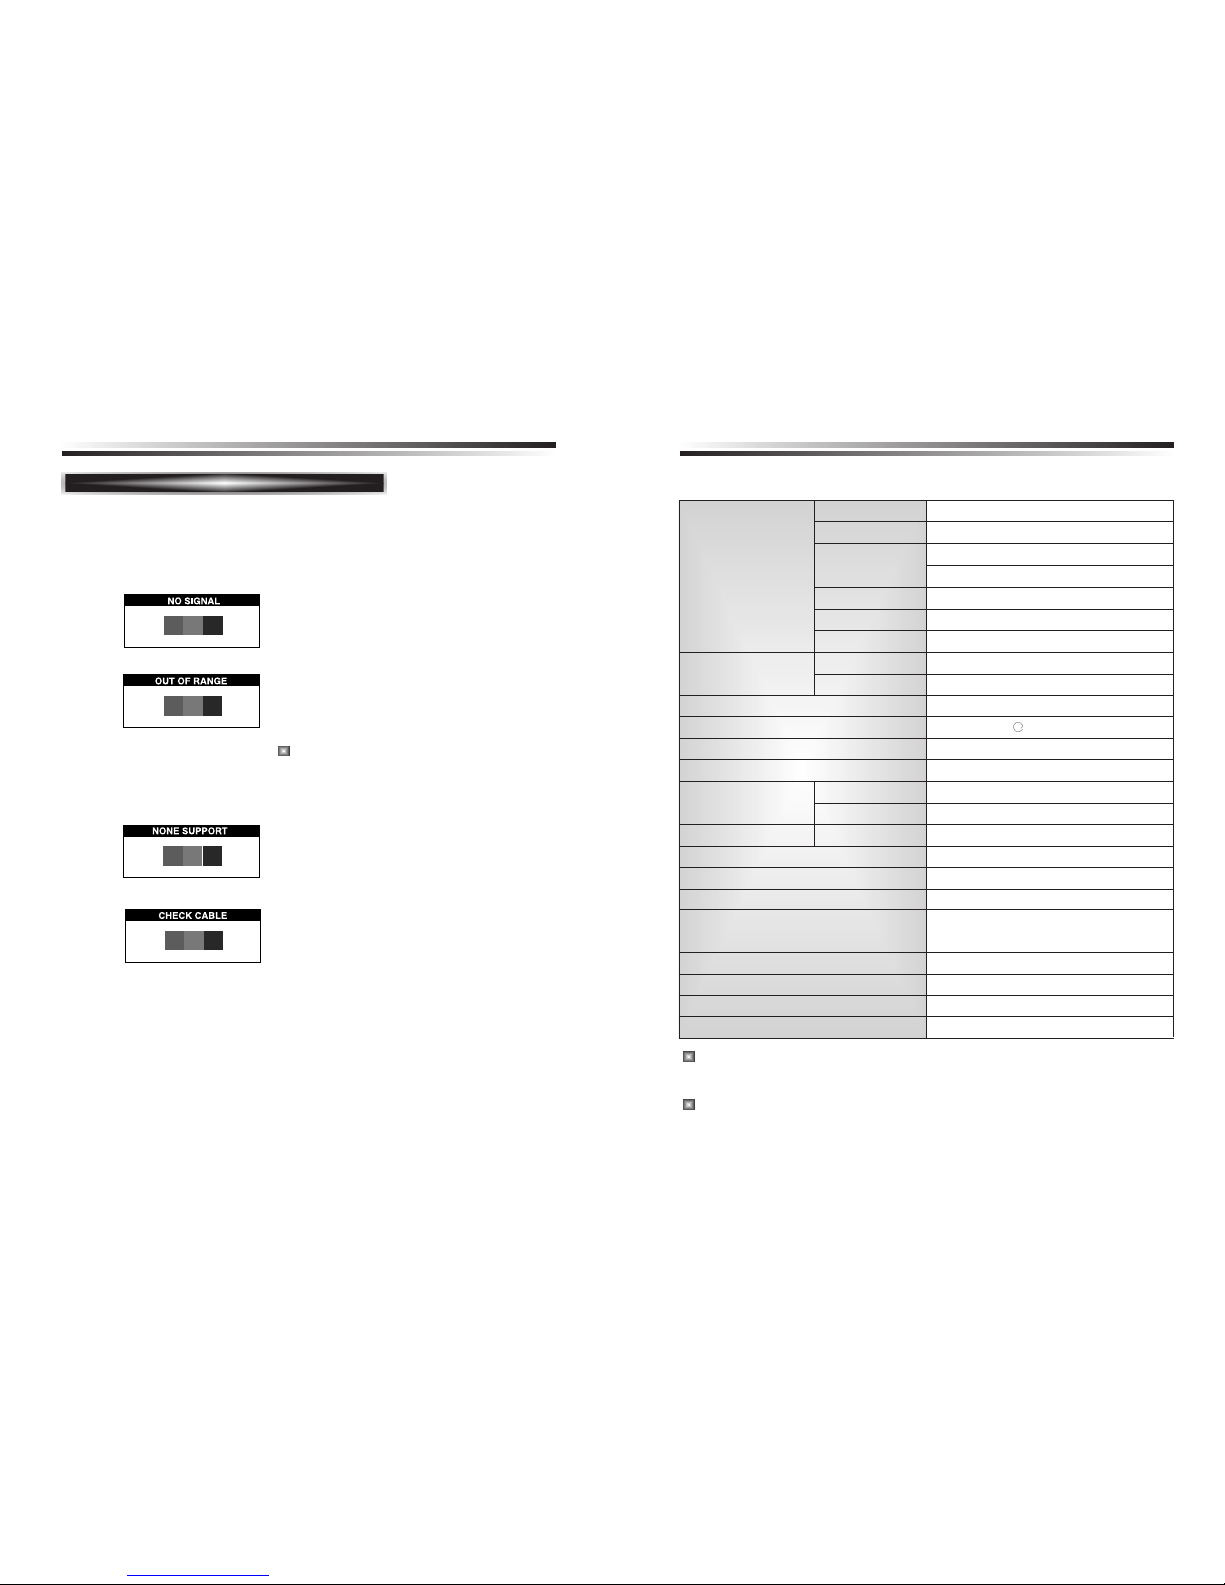
SPECIFICATIONS
SELF DIAGNOSIS
English - 10
If there is no image, the Self Diagnosis screen will be displayed.
Self Diagnosis function checks if the status of the monitor screen
is No Signal, Out of range or None support .
No Signal screen is displayed when the DSub signal connector is connected but the
status of the monitor is on DPMS mode.
Out of Range screen is displayed when the
applied frequency is under or over normal
range.
Normal range
(Non-interlaced mode only)
H : 30 - 80 KHz
V : 56 - 77 Hz
None support screen is displayed when the
applied frequency is under or over factory
preset timings.
Panel Size 17-inch (43.2cm) diagonal
Pixel Pitch 0.264 x 0.264mm
Viewing Angle 60°(Right/Left)
45°(up), 45°(down)
Contrast Ratio 400:1 contrast ratio (typ)
Brightness 250cd/m
2
brightness (typ)
Color Filter RGB vertical stripe
Synchronization Horizontal 30 - 80 KHz
Vertical 56 - 77Hz
Video Bandwidth 135MHz
Max Resolution 1280 x 1024 75Hz
Colors 16M Colors
Display Area 337.9mm x 270.3mm
PC Input Signal Sync H/V separate (TTL)
Video 15 pin mini D-sub(Analog RGB)
Speaker Max. Output 2W(Left 1W+Right 1W)
Plug and Play VESA DDC Compatible
Power Source 100-240Vac, 50/60Hz (Free Voltage)
Power Consumption 35W
Dimension-W x H x D 386 x 398 x 190mm (with stand)
386 x 346 x 60mm (without stand)
a
Check cable screen is displayed when the
signal cable is disconnected.
The specification can be changed without any prior notice to improve the
quality of the product.
The LCD panel may have some defective pixels (e.g. slightly light or
dark) due to a characteristic of the LCD panel. But there is no defect in
your LCD product itself.
Weight-net/gross 6.2/7.6Kg(13.6/16.7lbs)
Power Saving EPA, VESA DPMS, Nutek Compliant
Tilt Range 5° forward, 30° backward
Operating Temperature 10 ~ 40°C /50 ~ 104°F
Page 9
English - 13
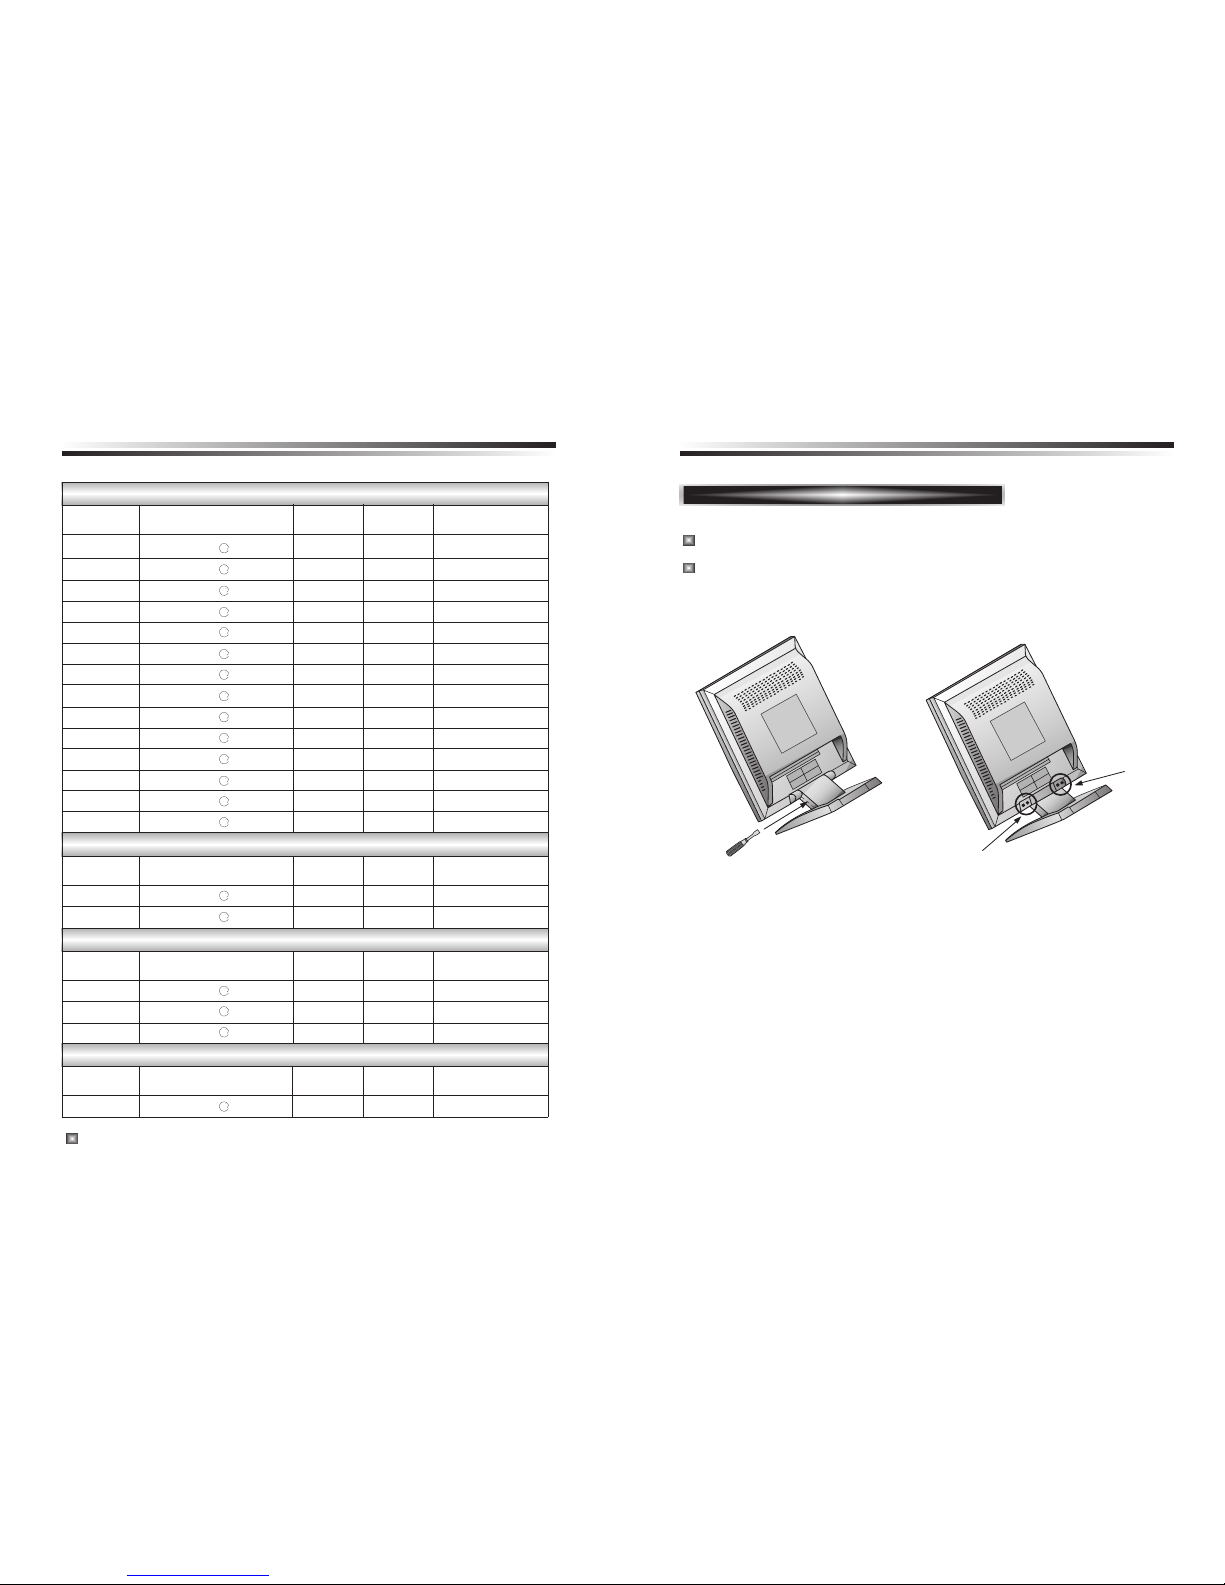
CHANGING THE STAND
English - 12
F ACT OR Y PRESET TIMINGS
VESA MODES
IBM MODES
MAC MODES
THE OTHERS
VGA 640
X
480 60Hz 31.5 60 Non-interlaced
VGA 640
X
480 72Hz 37.9 72 Non-interlaced
VGA 640
X
480 75Hz 37.5 75 Non-interlaced
SVGA 800
X
600 56Hz 35.2 56 Non-interlaced
SVGA 800
X
600 60Hz 37.9 60 Non-interlaced
SVGA 800
X
600 72Hz 48.1 72 Non-interlaced
SVGA 800
X
600 75Hz 46.9 75 Non-interlaced
XGA 1024
X
768 60Hz 48.4 60 Non-interlaced
XGA 1024
X
768 70Hz 56.5 70 Non-interlaced
XGA 1024
X
768 75Hz 60.0 75 Non-interlaced
SXGA 1280
X
1024 60Hz 64.0 60 Non-interlaced
SXGA 1280
X
1024 75Hz 80.0 75 Non-interlaced
SXGA 1152
X
864 75Hz 67.5 75 Non-interlaced
SXGA 1280
X
960 60Hz 60.0 60 Non-interlaced
EGA 640
X
350 70Hz 31.5 70 Non-interlaced
DOS 720
X
400 70Hz 31.3 70 Non-interlaced
VGA 640
X
480 67Hz 35.0 67 Non-interlaced
SVGA 832
X
624 75Hz 49.7 75 Non-interlaced
SXGA 1152
X
870 75Hz 68.7 75 Non-interlaced
SXGA 1280
X
1024 70Hz 74.4 70 Non-interlaced
Mode H.Freq (KHz) V.Freq (Hz) Remark
Resolution
(dots
X
lines)
Mode H.Freq (KHz) V.Freq (Hz) Remark
Resolution
(dots
X
lines)
Mode H.Freq (KHz) V.Freq (Hz) Remark
Resolution
(dots
X
lines)
Mode H.Freq (KHz) V.Freq (Hz) Remark
Resolution
(dots
X
lines)
aaaaaaaaaaaaaaaaaaa
a
The LCD Monitor has only Non-interlanced modes without flicker.
Removing Original Stand
1. Detach the rear cover of the stand with a screwdriver.
2. Remove the four screws connecting the stand and the body and the
stand is disassembled.
1
2
2
Turn off the monitor and pull out the power cable.
Place a cushion or a soft cloth on the floor and put the product on it with
the front of the monitor facing the floor.
Page 10
English - 15
English - 14
TROBLESHOOTING
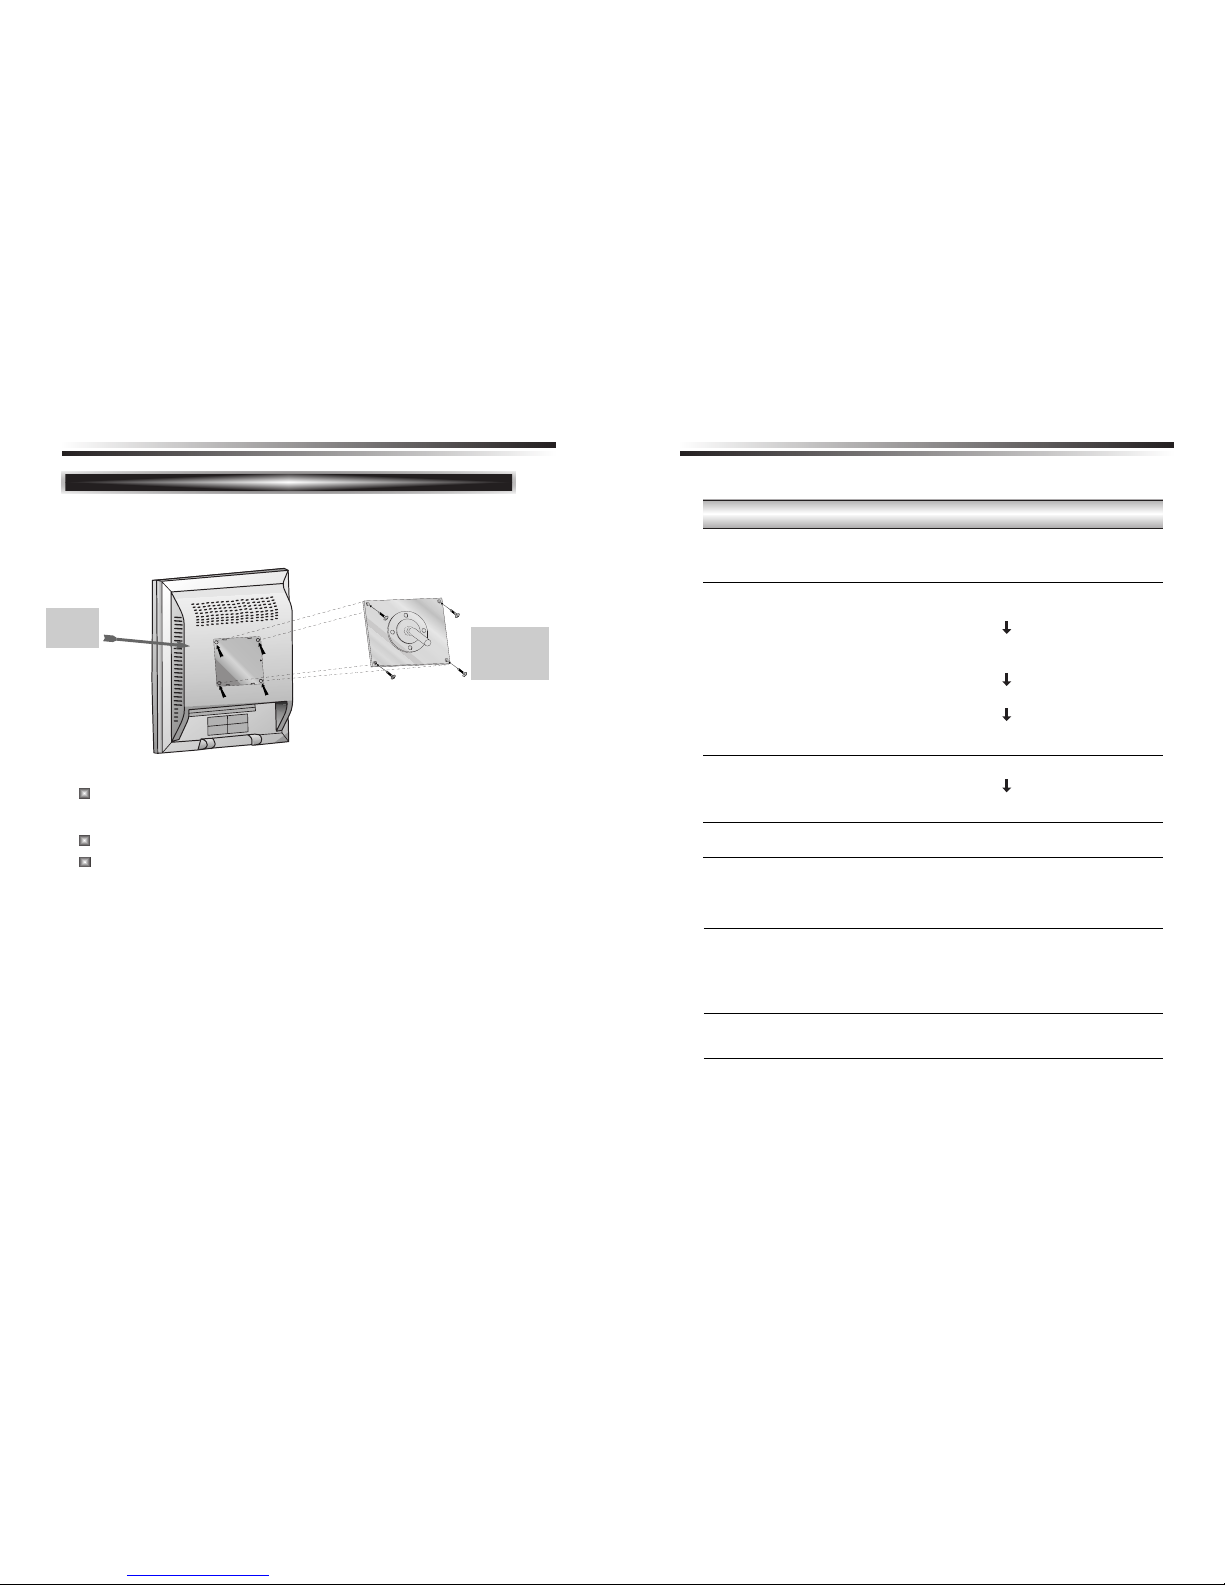
Attaching the monitor with the arm-stand(option)
Adjust Clock to set the screen position and adjust
Clock fine until a noise isn’t displayed.
Check if power switch and computer power switch
are in the on position.
Check if the signal cable is correctly connected to
the video card.
Check if the pins of D subconnector are not bent.
Check if the computer is in the power- saving mode.
Check if power switch is in the on position.
Check if the power cord is correctly connected.
Check if the signal cable is suitable to the video card.
Adjust Clock or H&V Center to get the proper
image.
Keep the devices that may cause electrical
interference away from the monitor.
Adjust Contrast and Brightness.
Symptom
Picture is jitterd.
No picture.
POWER LED is not
lit.
Image is unstable.
Image is not
centered, too small
or too large.
Picture bounces or a
wave pattern is
present in the
picture.
Picture is blurred.
Check
Tighten up screws at the locations
indicated by arrows.
Support
stand
Surface for
stand
installation
This monitor’s installation surface is compatible with various kinds
of VESA standard stands.
Hole spacing : 100x100 mm
Screw Length : 8~12 mm
Page 11
English - 16
Check the audio cable are correctly connected to the
computer.
Adjust the volume after checking the sound is muted.
Check the audio system in the computer.
Adjust the volume on the OSD Menu.
Adjust the volume of the sound card in the computer.
Symptom
No sound.
Low sound.
Check
 Loading...