

Page 1
USER GUIDE
GUIDE D’UTILISATION
BEDIENUNGSANLEITUNG
GUÍA DE USO
MANUALE D’USO
Page 2
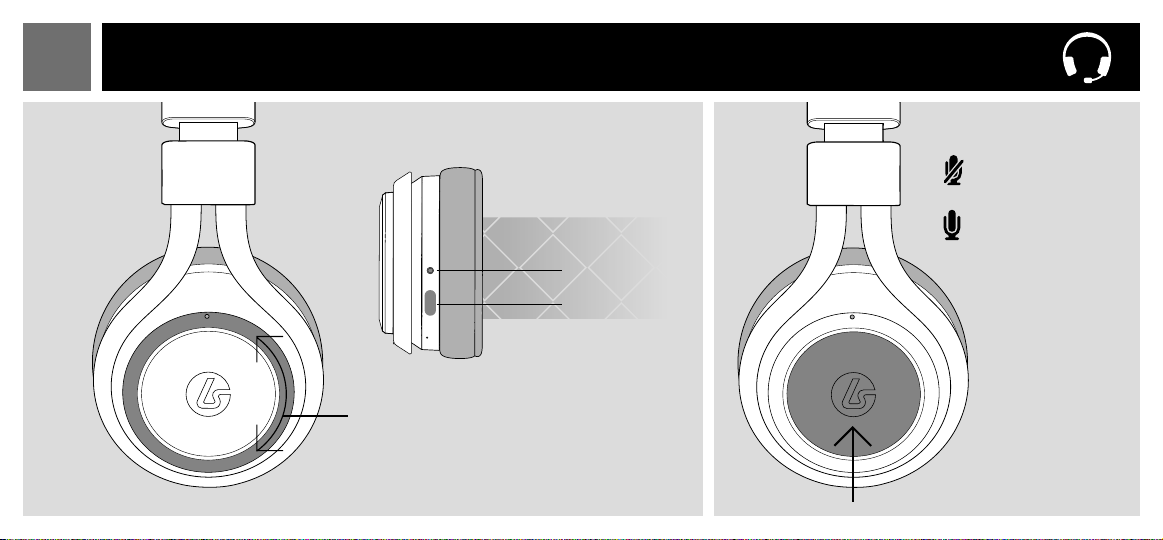
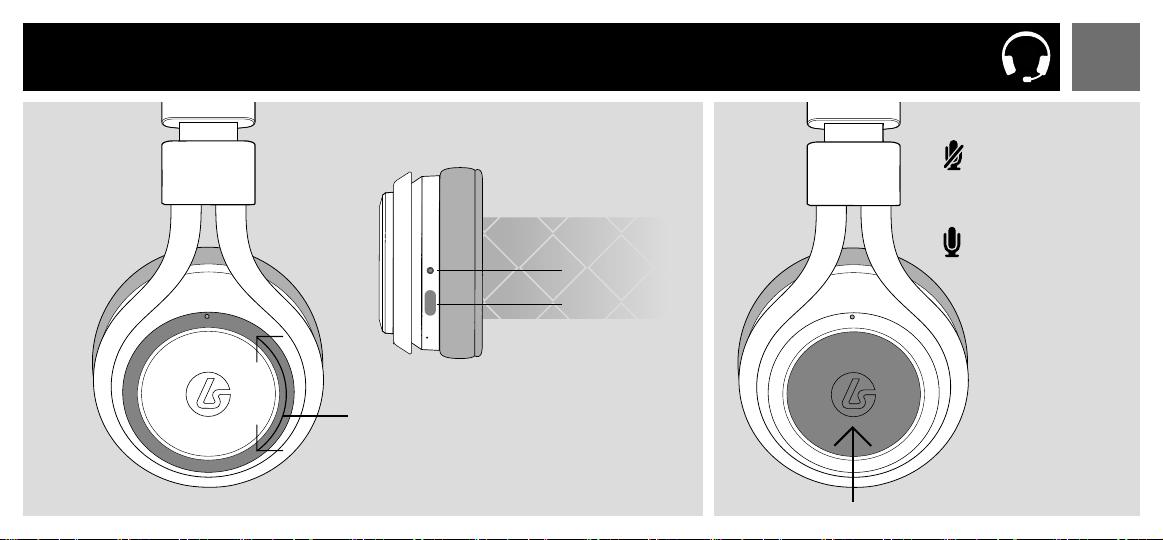
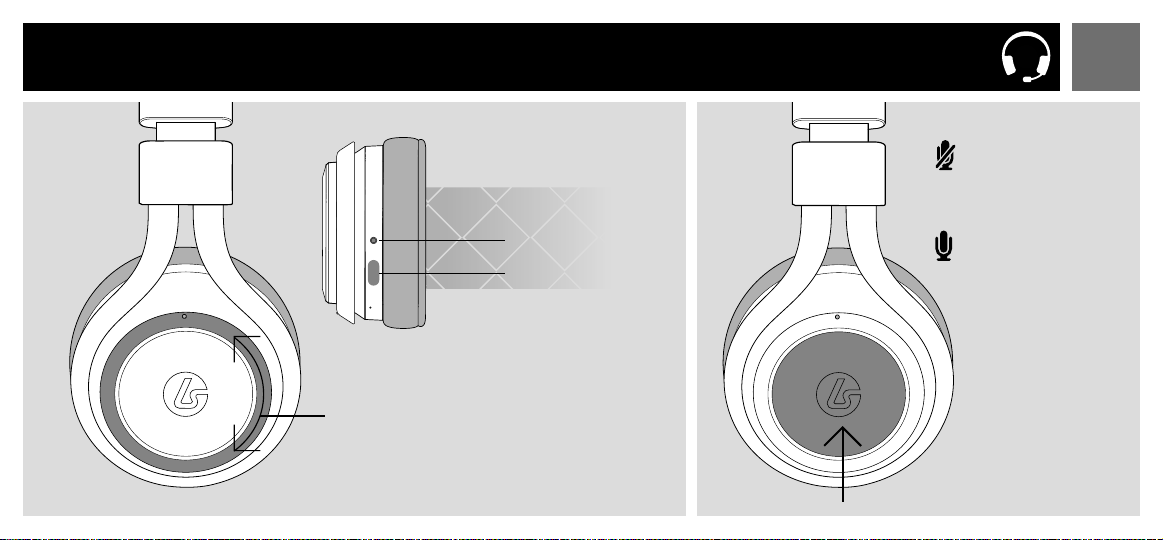
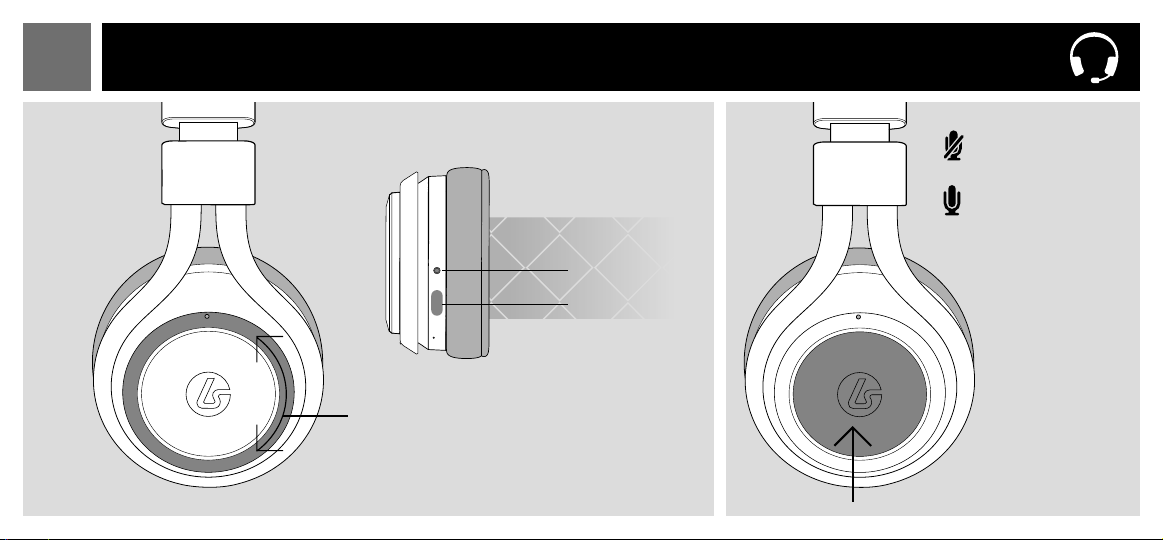
EN HEADSET
[L]
[R]
Press to mute
Press again to
unmute
3.5mm Port
Microphone
Port
Volume
Wheel
Page 3
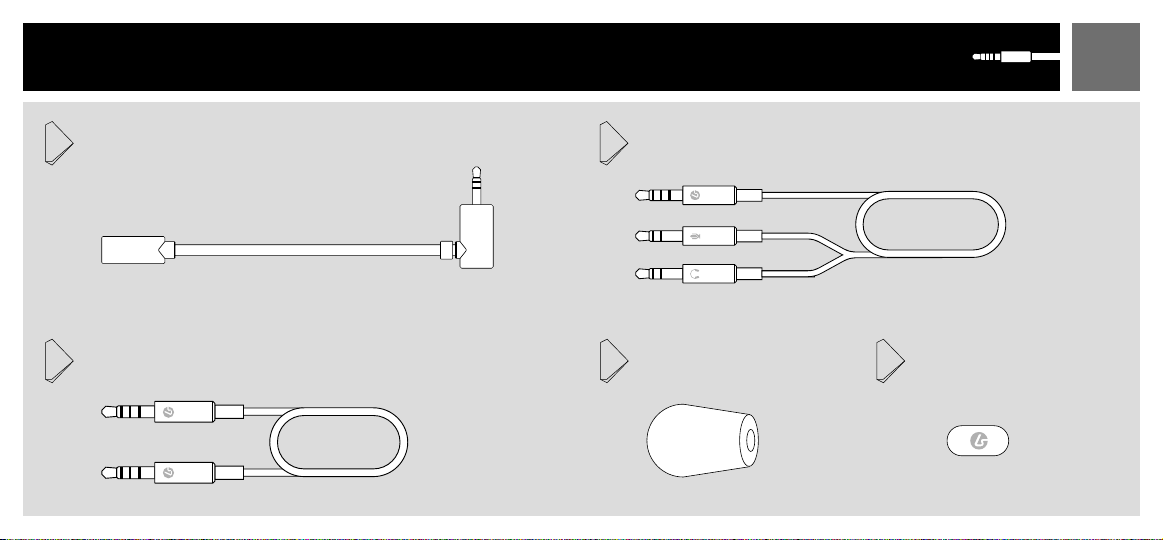
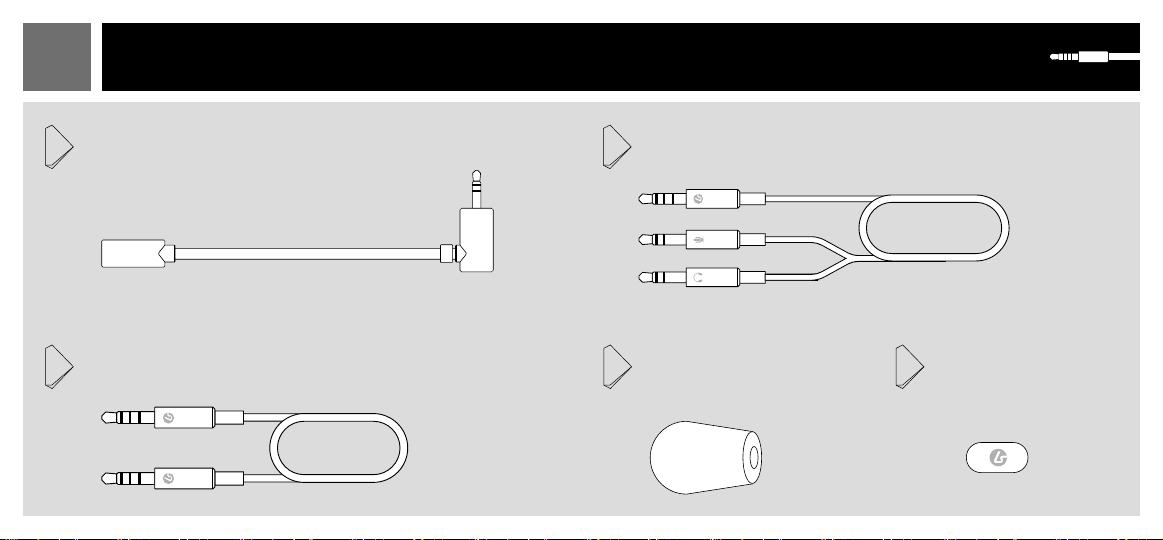
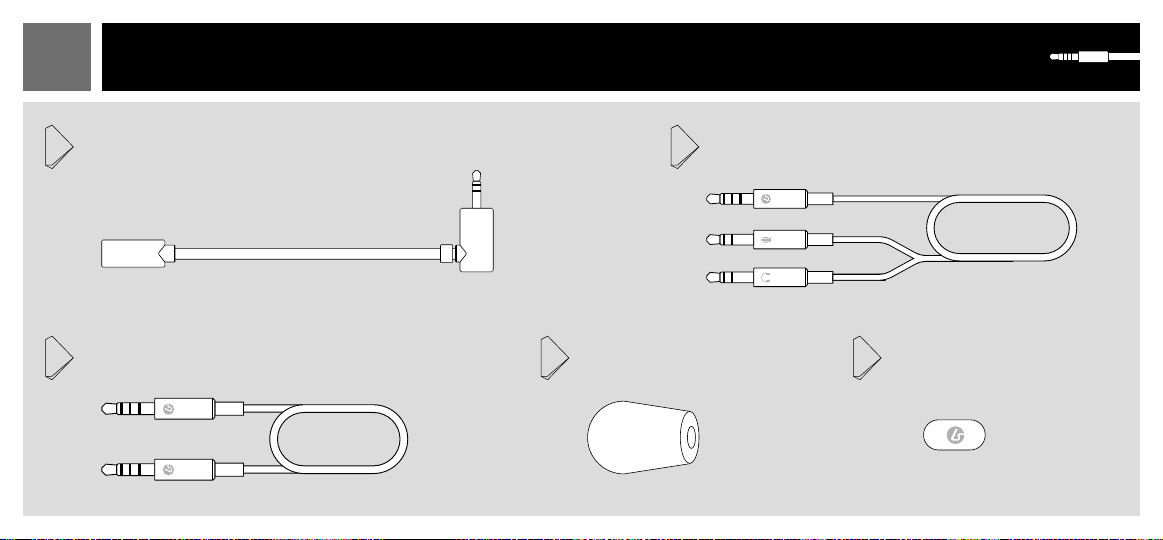
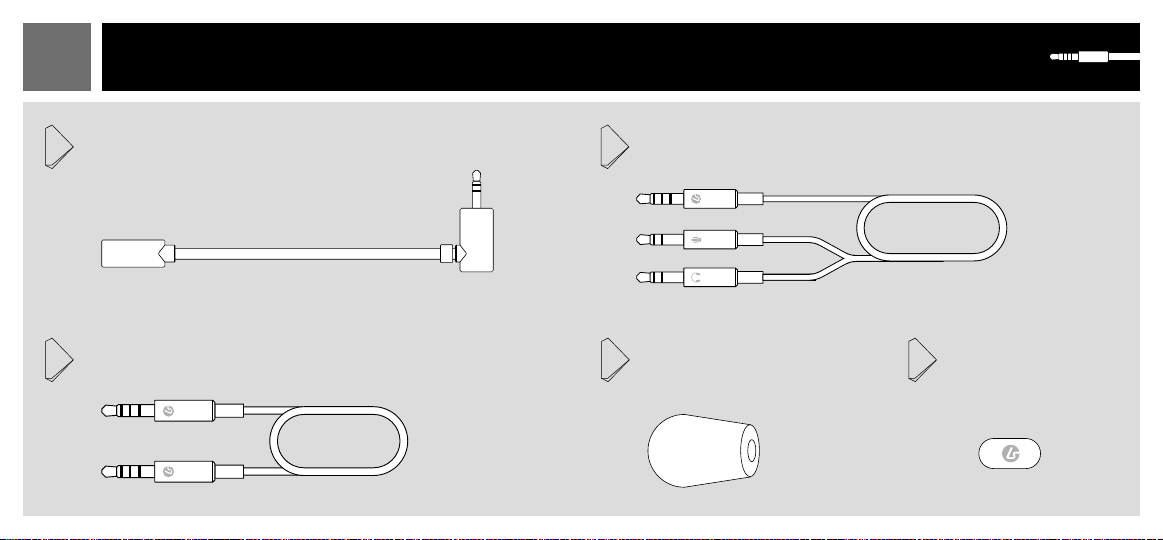
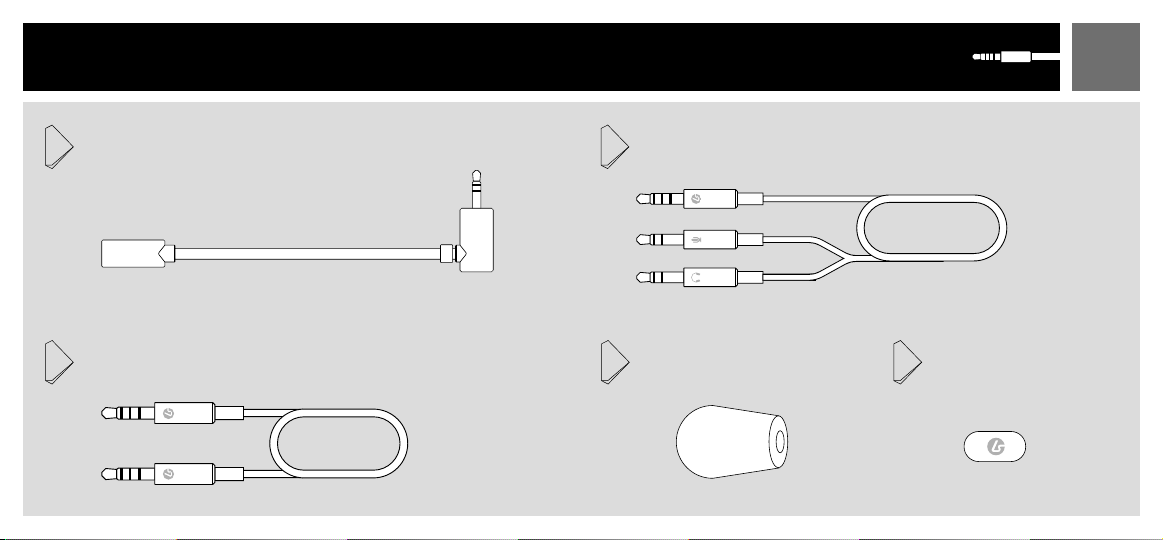
Boom Mic 3.5mm to PC cable
1
3
ENACCESSORIES
Mobile / Console cable
Wind Sock
42
Mic Port Cover
5
Page 4
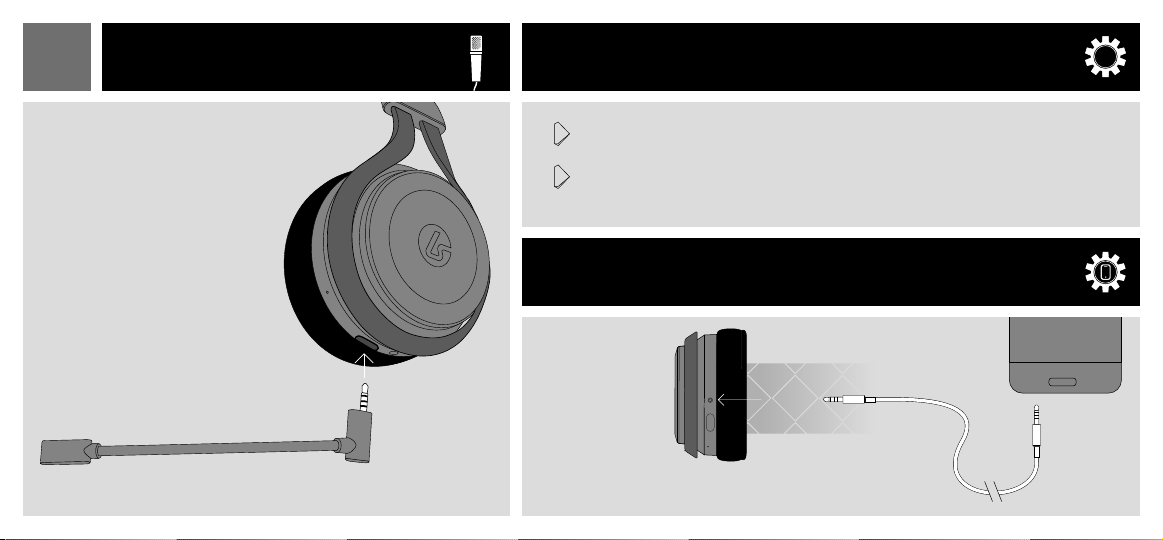
EN MICROPHONE PLAYSTATION®4 SETUP
1 Go into Settings > Devices > Audio Devices and set the ‘Output to Headphone’ to
‘All Audio’.
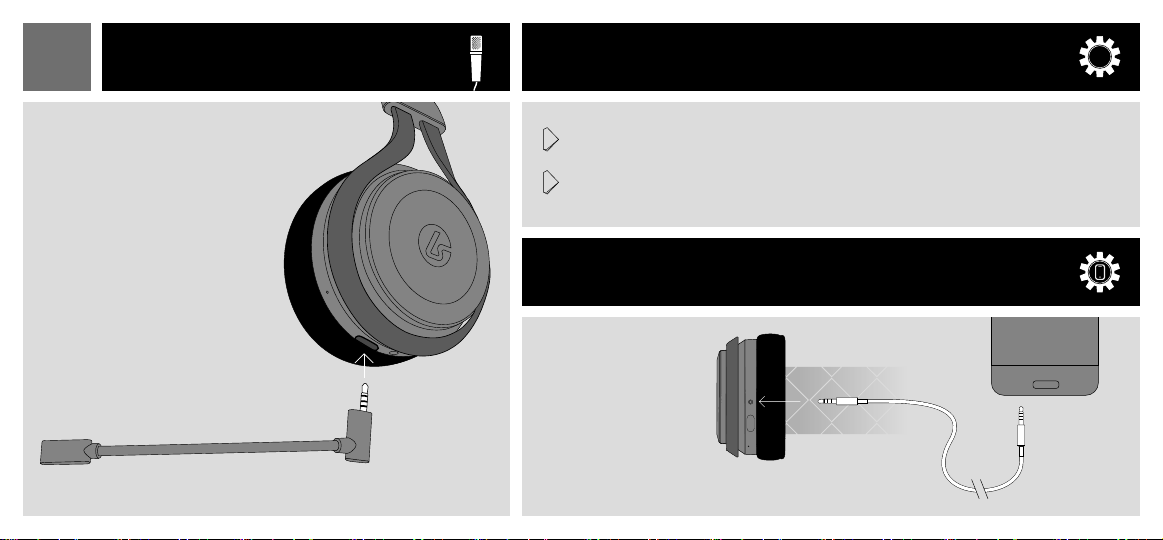
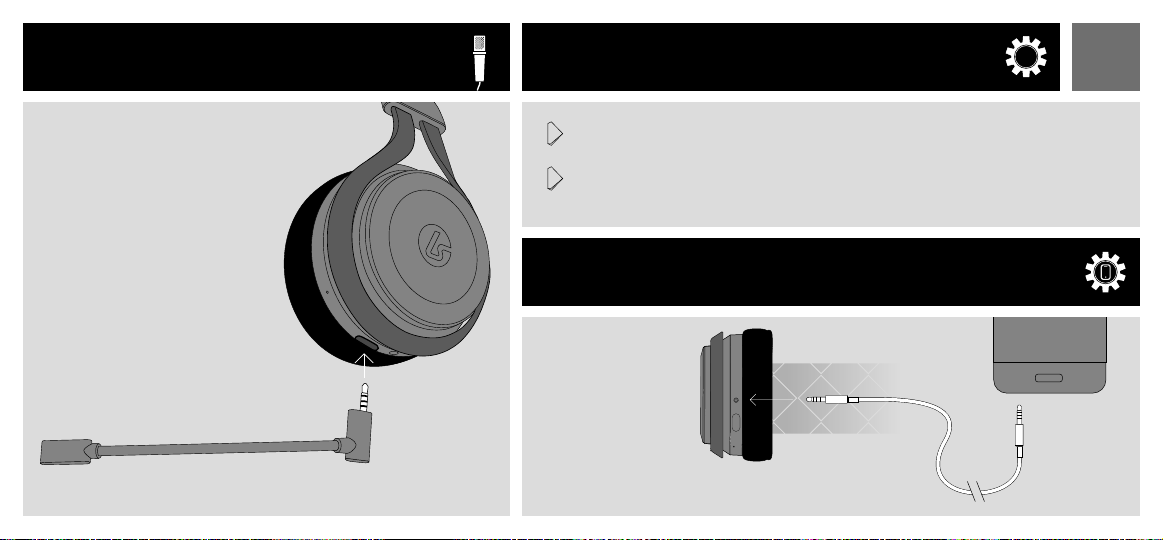
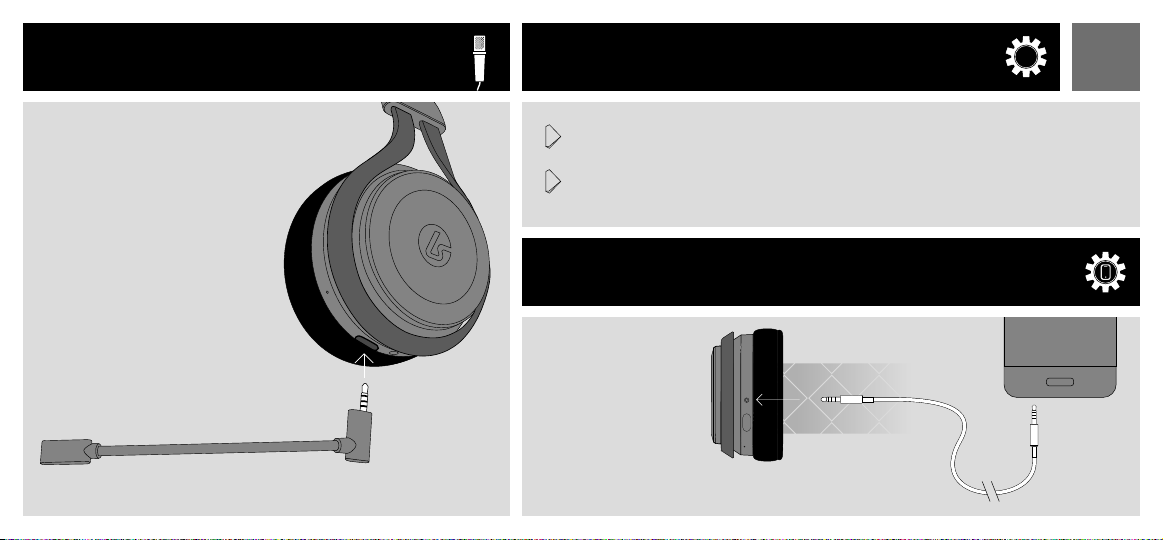
The LS25 includes an optional
boom microphone. When
this microphone is removed,
an internal microphone is
activated.
To connect the boom
microphone, insert it into the
port on the bottom of the
headset.
2 Set the ‘Volume Control (Headphones)’ to maximum.
You can now use the controls on the headset to adjust volume and mute.
MOBILE SETUP
Connect one end of
the mobile cable to the
3.5mm input on the
headset and the other
end to the 3.5mm output
on the mobile device.
PS4
Page 5
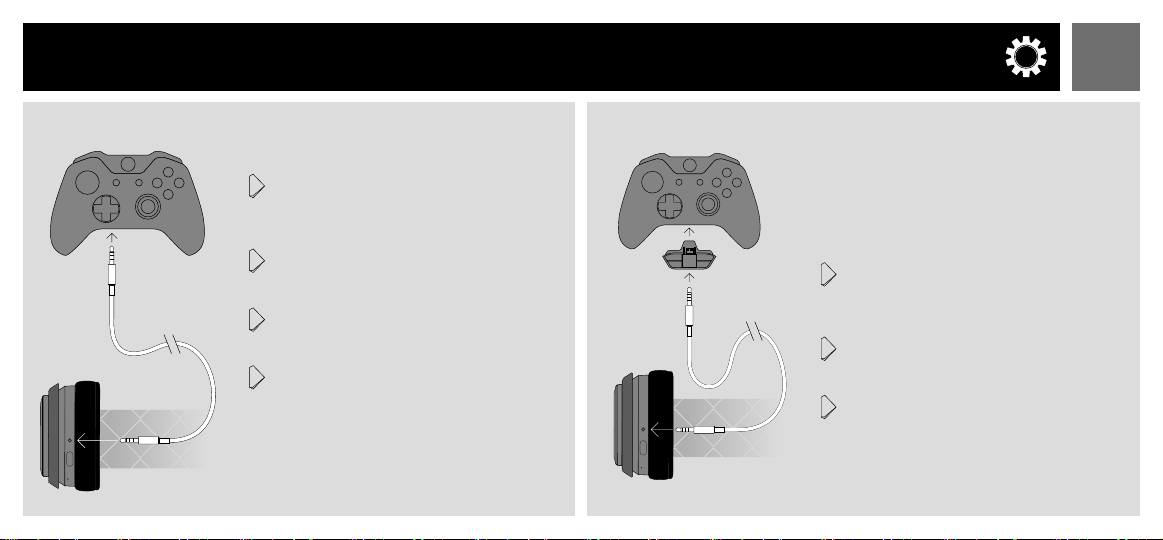
XB1
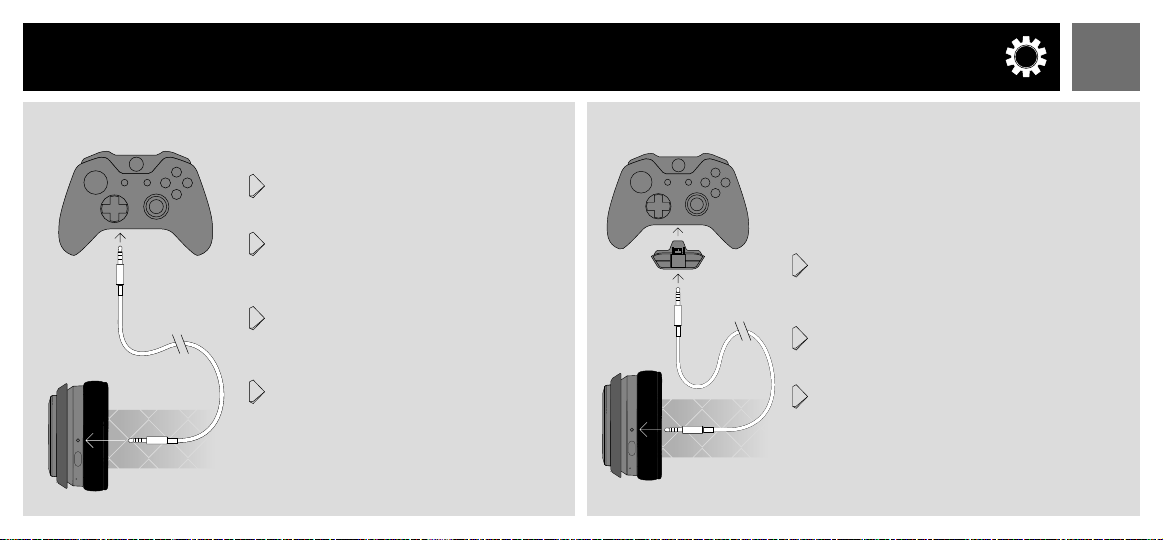
ENXBOX ONE SETUP
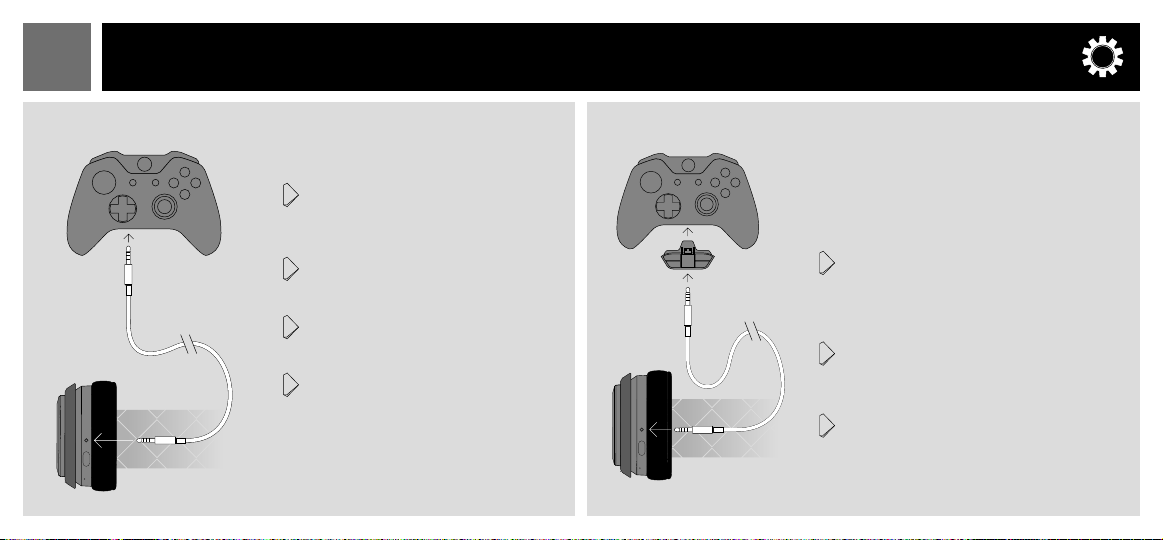
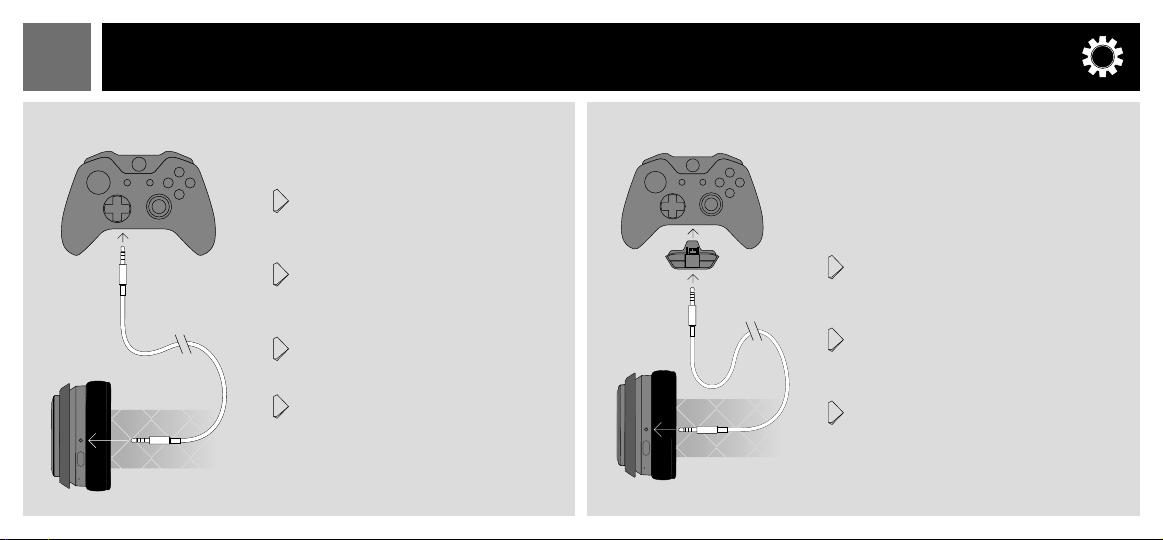
Controllers with 3.5mm port
1 Connect one end of the Xbox One chat
cable to the 3.5mm port on the headset
and the other end to the 3.5mm port on
the Controller.
2 Press the Xbox Guide button and
navigate to the gear icon. Then, scroll
down and select ‘Audio.’
3 Set ‘Headset volume’ to maximum.
Make sure that ‘Headset mic’ is turned
to ‘On’.
4 Set ‘Headset chat mixer’ for the
desired level of game and chat audio
balance (default is 50%). You can now
use the controls on the headset to adjust
volume and mute.
Controllers without 3.5 mm port
If the Xbox One Controller does not
have a 3.5mm port, an Xbox One Stereo
Headset adapter is required
(not included).
1 Connect one end of the Xbox One chat
cable to the 3.5mm port on the headset
and the other end to the 3.5mm port on
the Stereo Headset Adapter.
2 Adjust the game/chat balance on the
Stereo Headset Adapter for the desired
level of chat and game audio balance.
3 Adjust the volume on the Stereo Headset
Adapter to Maximum. You can now use
the controls on the headset to adjust
volume and mute.
Page 6
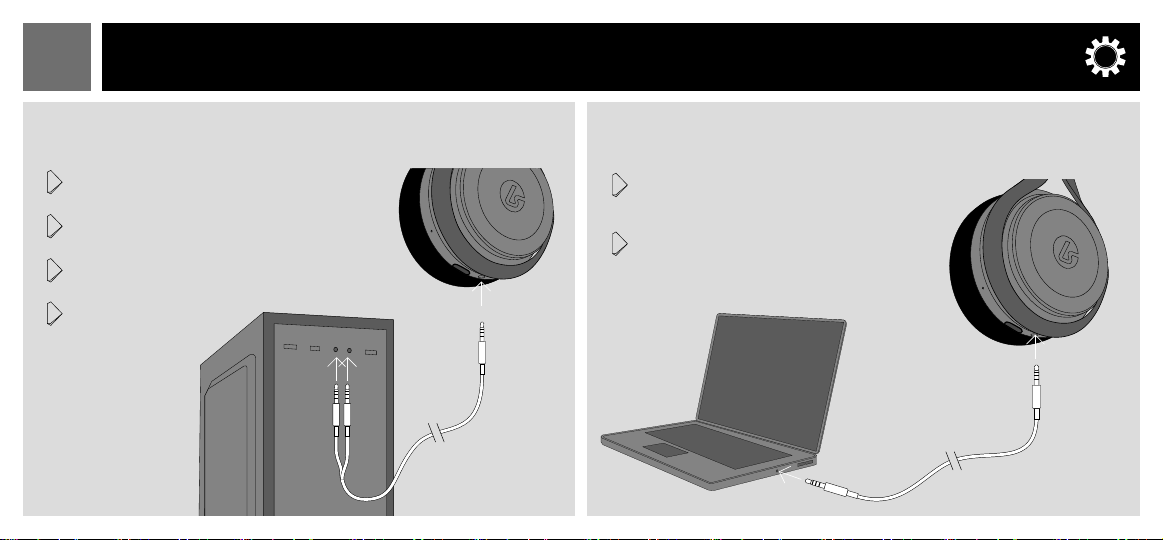
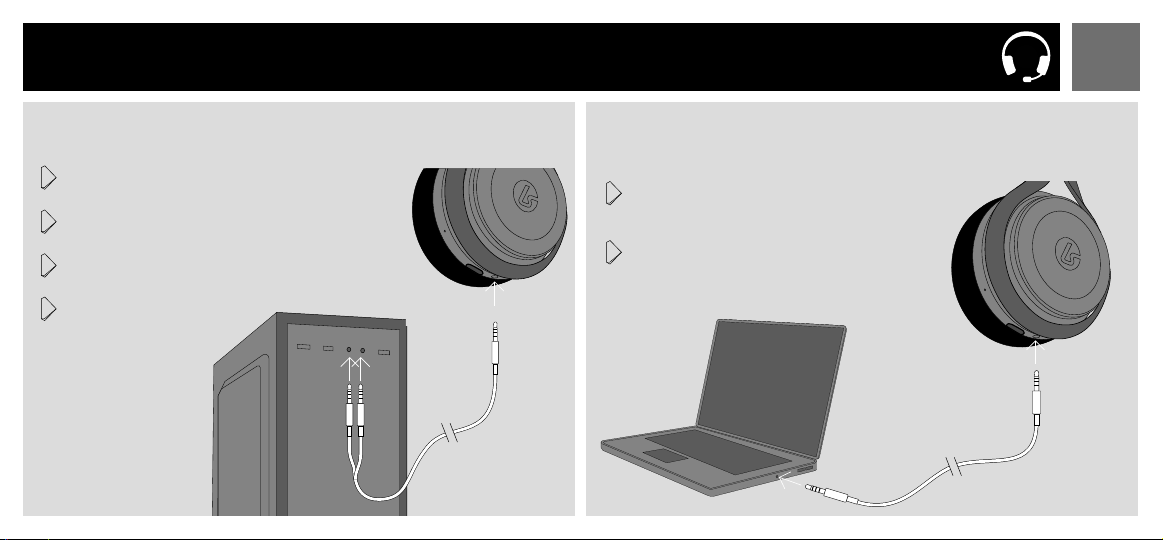
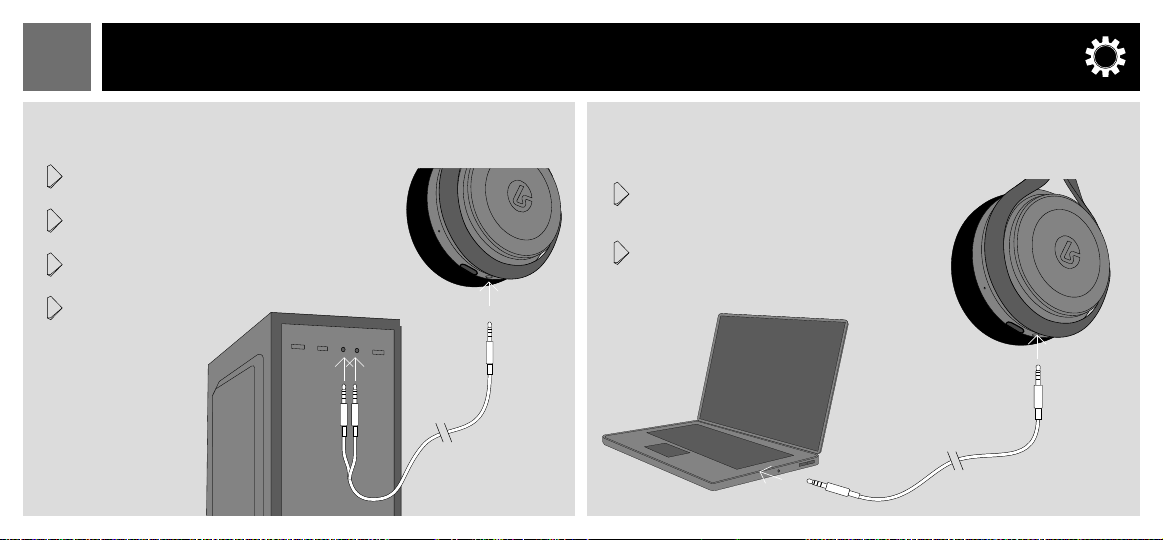
EN PC SETUP
PC
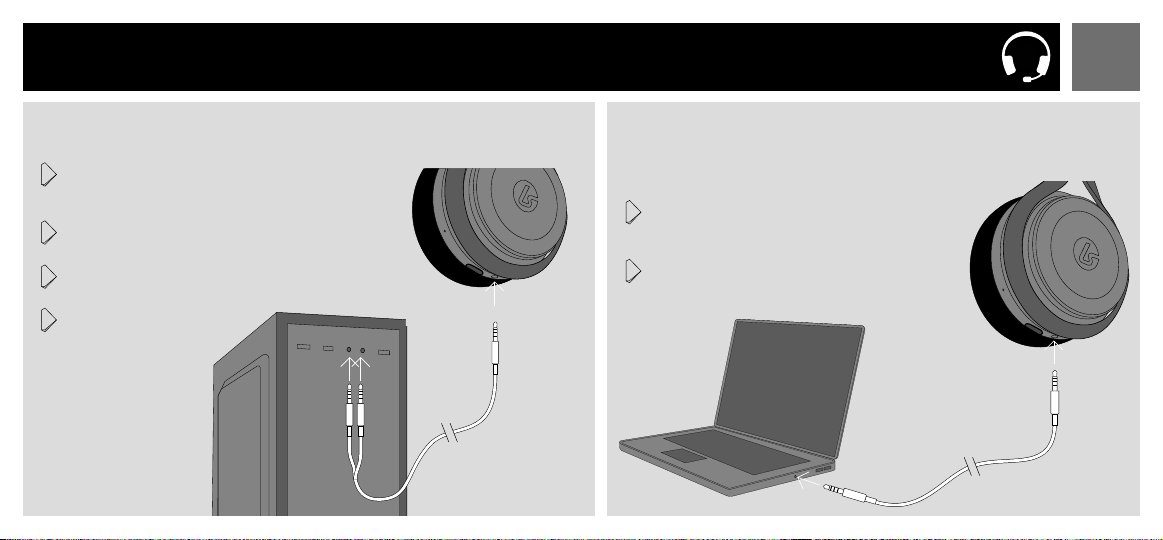
For computers with separate headphone and mic ports
1 Connect the single jack end of the 3.5mm to PC
cable to the 3.5mm port on the headset.
2 Connect the green jack to the headphone port on the
computer.
3 Connect the pink jack to the microphone port on the
computer.
4 Open the computer’s
sound control panel
and set the LS25
to be the input and
output device.
3.5mm to PC cable
For computers with a single combined headphone/mic port
1 Connect one end of the mobile cable to the
3.5mm port on the headset and the other end to
the 3.5mm port on the computer.
2 Open the computer’s sound control panel and set
the LS25 to be the input and output device.
Mobile / Console Cable
Page 7

PC
XB1
ENENABLING WINDOWS SONIC FOR HEADPHONES [ XBOX ONE | PC ]
For PCFor XBOX ONE
Press the Xbox Guide button and navigate to All settings > Display & sound
> Audio output. Under the Headset Audio dropdown select ‘Windows Sonic
for Headphones’.
Right click the speaker icon in the taskbar. Choose Spatial Sound (None)
from the pop up menu. Choose ‘Windows Sonic for Headphones’ as the
Spatial sound format. Click ‘OK.’
SUPPORT
Model No: LS25
LucidSound, Inc.
Made in China
©2018 Lucid Sound, Inc. 701 Palomar Airport Rd., Suite 230, Carlsbad, CA 92011 U.S.A. LucidSound and the Lucid Sound logo, are trademarks of Lucid Sound, Inc., its subsidiaries, and aliates.
The shape and design of this product are a trade dress of Lucid Sound, Inc., its subsidiaries and aliates. All rights reserved. All other product names and images are trademarks or registered
trademarks of their respective owners. Made in China. Product features, appearance and specications may be subject to change without notice. Please retain this information for future reference.
A copy of the EU/ED Declaration of Conformity can be found at lucidsound.com/EUDOC.
?#!*
Page 8

EN SUPPORT
?#!*
Warranty
LucidSound, Inc. warrants this product to be free from defects in materials and workmanship for
the warranty period. This non-transferable, 1-year limited warranty is only to you, the rst end-user
purchaser. If a defect covered by this warranty occurs AND you provide proof of purchase,
LucidSound, Inc., at its option, will repair or replace the product at no charge (excluding shipping
to LucidSound).
The LucidSound, Inc., 1-year limited warranty is available to customers in the United States and
worldwide. Your sole and exclusive remedy is repair or replacement of your LucidSound product.
In no event shall LucidSound’s liability exceed the original purchase price of the product. This
warranty does not apply to: (a) normal wear and tear or abusive use; (b) industrial, professional
or commercial use; (c) if the product has been tampered with or modied. This non-transferable
warranty is only valid in the region/country in which the headset was originally purchased.
To receive warranty service, please contact us at:
lucidsound.com
(toll free) 888-661-4469
1-760-579-6969
Europe
LucidSound, Inc. 2-year limited warranty is available to customers in Europe.
Australia
Our goods come with guarantees that cannot be excluded under the Australian Consumer Law.
You are entitled to a 1 year replacement warranty in which you are entitled to have the goods
repaired or replaced if the goods fail to be of acceptable quality and the failure does not amount
to a major failure.
What you must do:
If a defect has appeared within 90 days from the date of purchase, the product may be returned to
the retailer for a replacement.
If a defect has appeared after 90 day from the date of purchase, you must initiate a repair by
following the online repair process at www.lucidsound.com.au.
Once all details are completed, you will receive a return authorisation number.
Then label and ship your LucidSound headset – including the return authorisation (RA) number,
freight prepaid, to LucidSound’s authorised repair centre.
LucidSound
c/o Tecworks International Pty Ltd
Unit 1 / 12 Tollis Place
Seven Hills NSW 2141
Please ensure the return authorisation (RA) number is prominently displayed on the outside of your
packaging. The cost incurred to return the product to the retailer or to the authorised repair centre
as part of a Warranty claim are your responsibility.
What we will do:
During the Warranty Period, we will, at our option, repair or replace the product or any defective
parts. We will also bear the reasonable costs of standard return shipping. If this cannot be done,
then we will refund the purchase price to you.
AU wholesale distributor:
Bluemouth Interactive Pty Ltd, Level 2, 2 Darling Street, South Yarra, Victoria, 3141
Email: [email protected]
Page 9
FRCASQUE
[G]
Volume
Prise 3,5mm
Prise micro
[D]
Appuyez pour
désactiver le
son du micro
Appuyez à
nouveau pour
réactiver le son
du le micro
Page 10
FR ACCESSOIRES
Micro externe Câble 3,5mm à PC
1
3
Câble mobile / console
Bonnette anti-vent
42
Couverture du prise
5
micro externe
Page 11
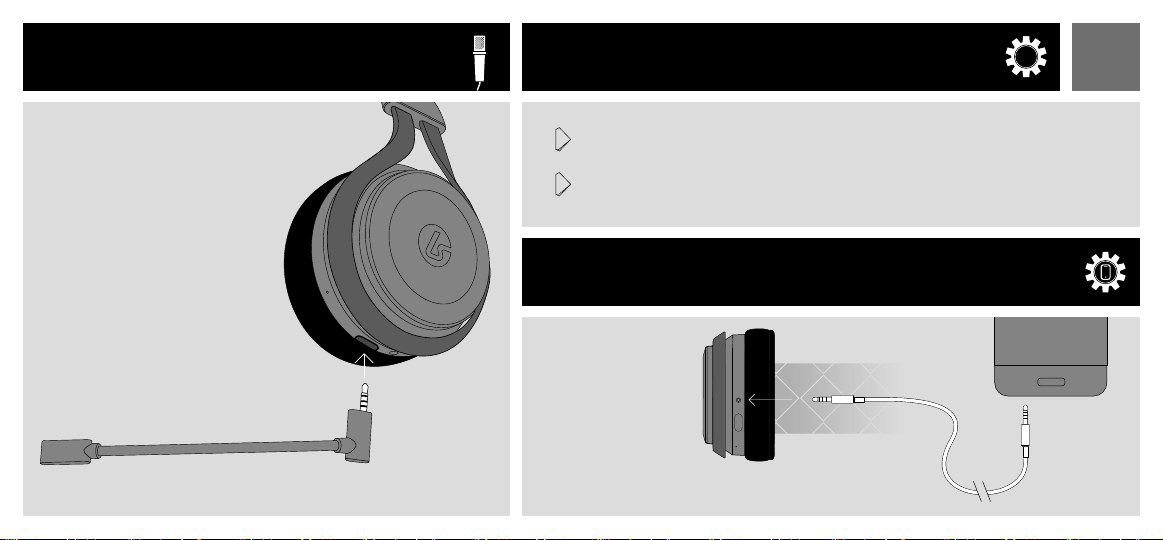
MICRO EXTERNE INSTALLATION PLAYSTATION®4
1 Aller dans reglages > appareils > appareils audio et regler la sortie vers casque sur
«tout audio».
Le LS25 inclus un micro externe
optionnel. Lorsque ce micro n’est
pas branché, un micro interne est
active.
Pour connecter le micro externe,
inserer le simplement dans le port
prevu a cet eet sur la partie
inferieure du casque.
2 Regler le «Controle du volume casque» sur maximum. Vous pouvez maintenant utiliser les
controles du casque pour ajuster le volume et le coupure du volume.
MOBILE
Connecter le câble
mobile sur le port
3,5mm du casque
et l’autre extremité
sur le port 3,5mm de
l’appareil mobile.
PS4
FR
Page 12
FR INSTALLATION XBOX ONE
XB1
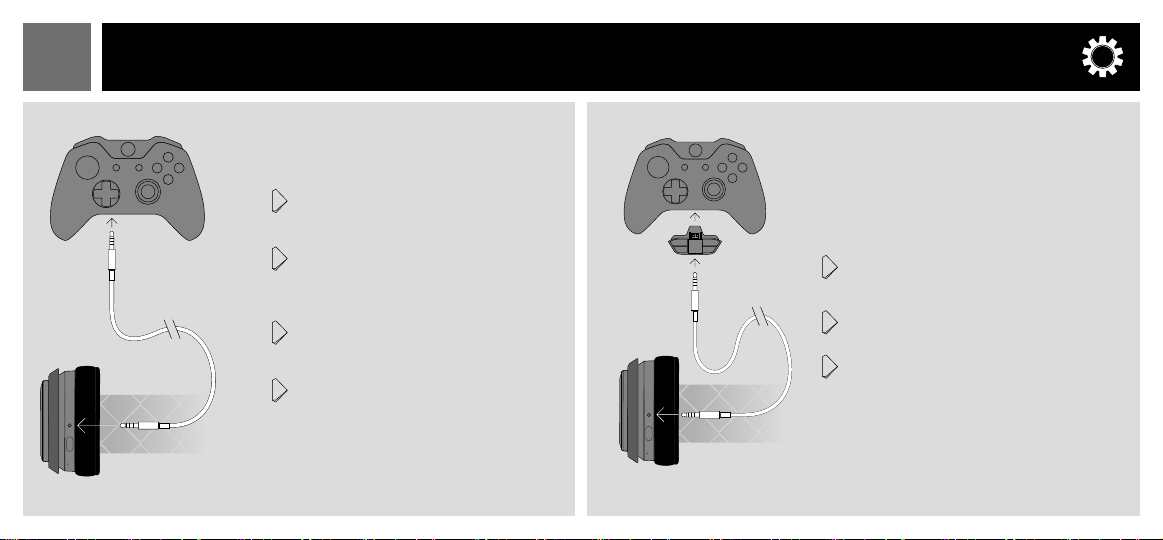
Manettes avec port 3,5mm
1 Connecter le câble chat sur le port
3,5mm du casque et l’autre extremité sur
le port 3,5mm de la manette.
2 Appuyez sur le bouton Xbox Guide et
naviguez jusqu’à l’icône de l’engrenage.
Ensuite, faites déler vers le bas et sélectionnez «audio».
3 Mettre le «volume casque» au maximum.
Assurez-vous que «micro casque» est
activé.
4 Regler le niveau du chat du casque au
niveau desire, 50% est le reglage par
defaut. Vous pouvez maintenant utiliser
les controles du casque pour ajuster le
volume et le coupure du volume.
Manettes sans port 3,5 mm
Si la manette ne dispose pas de port
3,5mm, un adaptateur Xbox One pour
casque Stereo est requis (non inclus).
1 Connecter le câble chat sur le port 3,5mm
du casque et l’autre extremité sur le port
3,5mm de la manette.
2 Ajuster la balance jeu/chat sur l’adaptateur
stereo au niveau désiré.
3 Ajuster le volume de l’adaptateur stereo au
maximum. Vous pouvez maintenant utiliser
les controles du casque pour ajuster le
volume et le coupure du volume.
Page 13
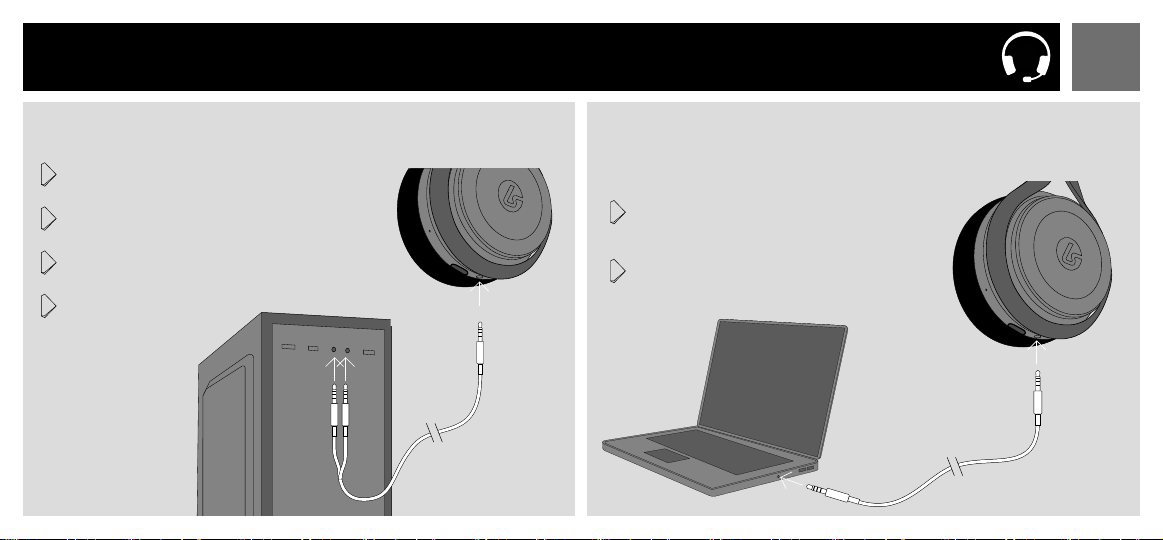
FRINSTALLATION PC
Pour les ordinateurs avec des ports casque et micro distincts
1 Connectez la prise simple sur une extrémité du
câble de 3,5 mm au PC au port 3,5 mm du casque.
2 Connectez la prise verte au port du casque sur
l’ordinateur.
3 Connectez la prise rose au port du microphone
sur l’ordinateur.
4 Ouvrez le panneau de contrôle
du son de l’ordinateur
et congurez le LS25
comme périphérique
d’entrée et de sortie.
Pour ordinateurs équipés d’un seul combiné
casque / microphone
1 Connectez une extrémité du câble mobile au port
3,5 mm du casque et l’autre extrémité au port de
3,5 mm sur l’ordinateur.
2 Ouvrez le panneau de contrôle du son de
l’ordinateur et congurez le LS25 comme étant le
périphérique d’entrée et de sortie.
Câble Mobile / Console
Page 14

FR
Appuyez sur le bouton Xbox Guide et naviguez à Reglages > Image et
son > Sortie Audio. Dans la liste déroulante «Casque Audio», sélectionnez
«Windows Sonic for Headphone».
ACTIVATION DE WINDOWS SONIC FOR HEADPHONES
[ XBOX ONE | PC ]
PC
Pour PCPour XBOX ONE
Cliquez avec le bouton droit de la souris sur l’icône du haut-parleur dans la barre des
tâches. Choisissez le son de Spatial (None) dans le menu contextuel. Choisissez «Win-
dows Sonic for Headphones» en tant que format de son spatial. Cliquez sur ‘OK’.
XB1
SUPPORT
Model No: LS25 ©2018 Lucid Sound, Inc.
Fabriqué en Chine
Lucid Sound Inc garantit ce produit contre tout défaut de matériau ou de fabrication durant la période de garantie. Cette garantie limitée non transférable de 2 ans (Canada: garantie limitée non
transferable de 1 an) n’est valable que pour le premier acheteur du produit. Si un défaut couvert par cette garantie survient ET si vous avez la preuve d’achat du produit, Lucid Sound Inc, procèdera, a sa
discrétion, au remplacement ou à la réparation du produit à sa charge (excepte les frais d’envoi à Lucid Sound). Cette garantie non transférable n’est valable que dans la région / le pays dans lequel le
casque a été acheté à l’origine.
La garantie limitee de 2 ans oerte par Lucid Sound Inc, est valable pour les clients Européens. Le seul et unique remède est la réparation ou le remplacement de votre produit Lucid Sound. En aucun
cas la responsabilité de Lucid Sound ne pourra excéder le montant initial d’achat du produit. Cette garantie ne s’applique pas à : (a) Usure normale due a l’utilisation ou utilisation abusive ; (b) usage
industriel, professionnel ou commercial ; (c) Si le produit a été modié ou démonté.
Pour recevoir le service de garantie s’il vous plaît nous contacter à : lucidsound.com
Un examplaire de la Déclaration de Conformité CE/UE peut être trouvé à lucidsound.com/EUDOC.
?#!*
Page 15
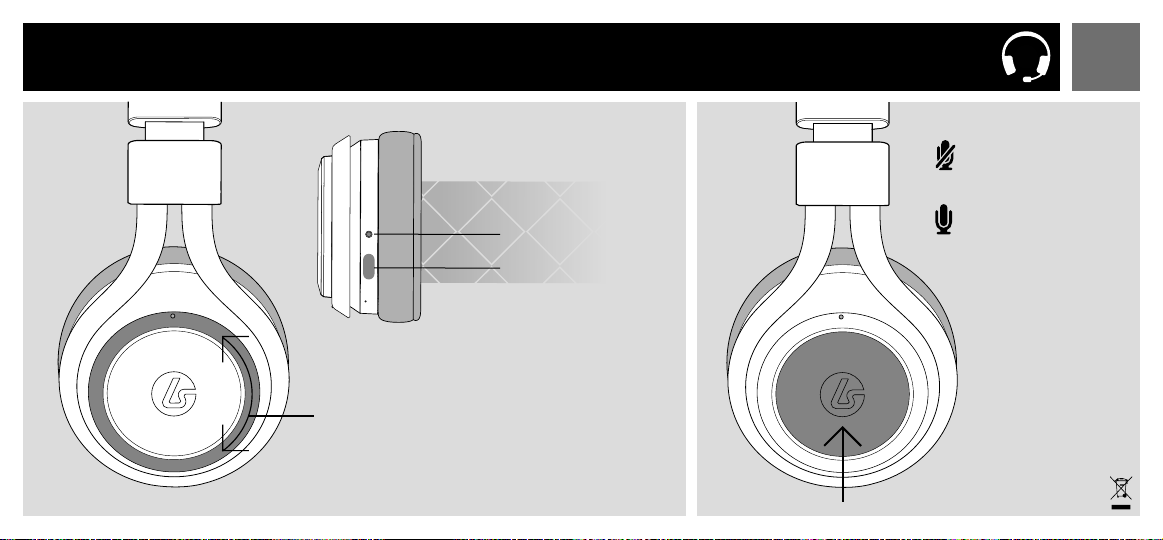
DEHEADSET
[L]
Lautstärke
3,5mm Anschluss
Mikrofonanschluss
[R]
Drücken Sie:
Mikrofon stumm
Erneut drücken:
Mikrofon stumm
ausschalten
Page 16
DE ZUBEHÖR
Mikrofonarm 3,5mm zum PC-Kabel
1
3
Kabel für Mobil / Konsole
Mikrofon-Windschutz
42
Mikrofonanschluss Kappe
5
Page 17
MIKROFON PLAYSTATION®4 SETUP
1 Gehen sie in Einstellungen -Geräte - Audiogeräte und stellen sie den Ausgang zum
Kopfhörer auf “Gesamtes Audio”.
Das LS25 wird mit einem
optionalen Mikrofonarm geliefert.
Wenn dieses Mikrofon entfernt
wird, dann wird automatisch ein
internes Mikrofon aktiviert.
Um den Mikrofonarm mit dem
Headset zu verbinden, muss es
einfach in den entsprechenden
Anschluss an der Unterseite des
Headsets gesteckt werden.
2 Stellen Sie die Lautstärkeregelung (Kopfhörer) auf Maximum ein.Sie können nun die
Bedienelemente am Headset verwenden, um die Lautstärke einzustellen und stumm zu
schalten.
MOBILE SETUP
Verbinde das eine
Ende des
Mobilgerätekabels mit
dem 3,5mm
Anschluss am Headset
und das andere Ende
des Kabels mit dem
3,5mm Ausgang am
Mobilgerät.
PS4
DE
Page 18
DE XBOX ONE SETUP
Mit 3,5mm Anschluß Ohne 3,5mm Anschluß
XB1
1 Stecke das eine Ende des Xbox One
Chatkabels in den 3,5mm Anschluss am
Headset und das andere Ende in den
3,5mm Anschluss des Controllers
2 Drücken Sie die Taste Xbox Guide und
Navigiere zum Gang-Symbol. Scrollen Sie
dann nach unten und wählen Sie “Audio”.
3 Setze “Headset Lautstärke” auf
maximum. Versichern Sie sich, dass das
Headset Mikrofon eingeschaltet ist.
4 Stellen sie den “Headset Chat Mixer” auf
das gewünschte Niveau von Chat- und
Spielaudio Balance (Standard ist 50%).
Sie können nun die Bedienelemente am
Headset verwenden, um die Lautstärke
einzustellen und stumm zu schalten.
Wenn der Xbox One Controller nicht über
einen 3,5mm Anschluss verfügt, wird
der Xbox One Stereo Headset Adapter
benötigt. (nicht beinhaltet).
1 Stecke das eine Ende des Xbox One
Chatkabels in den 3,5mm Anschluss am
Headset und das andere Ende in den
3,5mm Anschluss des Stereo Headset
Adapter .
2 Justieren sie die Game / Chat Balance am
Stereo Headset Adaper auf das gewünschte Niveau von Chat und Spielaudio
Balance.
3 Stellen sie die Lautstärke am Stereo Head-
set Adapter auf Maximum. Sie können
nun die Bedienelemente des Headsets
verwenden, um die Lautstärke einzustellen
und stumm zu schalten.
Page 19
DEPC SETUP
Für Computer mit separaten Kopfhörern und Mikrofonanschlüssen
1 Verbinden Sie die einzelne Buchse am Ende des
3,5-mm-PC-Kabels mit dem 3,5-mm-Anschluss am
Headset.
2 Verbinden Sie die grüne Buchse mit dem Kopfhöre-
ranschluss am Computer.
3 Verbinden Sie die rosa Buchse mit dem Mikrofonan-
schluss am Computer.
4 Önen Sie das
Sound-Bedienfeld des
Computers und stellen Sie das LS25
als Eingabe- und
Ausgabegerät ein.
3,5mm zum
PC-Kabel
Für Computer mit einem einzigen kombinierten
Kopfhörer / Mikrofonanschluss
1 Verbinden Sie ein Ende des Mobilkabels mit dem
3,5-mm-Port am Headset und das andere Ende
mit dem 3,5-mm-Port am Computer.
2 Önen Sie das Sound-Bedienfeld des Computers
und stellen Sie das LS25 als Eingabe- und
Ausgabegerät ein.
Kabel Mobil / Konsole
Page 20

DE
Drücken Sie die Xbox Guide-Taste und navigieren Sie zu Alle Einstellungen> Display
& Sound> Audio-Ausgang. Wählen Sie unter dem Headset Audio Dropdown ‘Win-
dows Sonic for Headphones’ aus
AKTIVIEREN VON WINDOWS SONIC FOR HEADPHONES
PC
[ XBOX ONE | PC ]
XB1
FÜR PCFÜR XBOX ONE
Klicken Sie mit der rechten Maustaste auf das Lautsprechersymbol in der Taskleiste.
Wählen Sie Spatial Sound (None) aus dem Popup-Menü. Wählen Sie “Windows
Sonic for Headphones” als das räumliche Klangformat. “OK” klicken.
SUPPORT
Model No: LS25 ©2018 LucidSound, Inc.
Lucid Sound, Inc. garantiert, dass dieses Produkt frei von Mängeln in Material und Verarbeitung für den Garantiezeitraum ist. Diese nicht übertragbare, 2 Jahre Garantie (Canada: 1 Jahre Garantie) ist
nur für Sie, den ersten Käufer und Endbenutzer. Soweit ein Mangel, der von dieser Garantie gedeckt wird, auftritt und Sie über einen Nachweis über den Kauf des Produkt verfügen, wird Lucid Sound,
Inc. nach eigenem Ermessen entweder reparieren oder das Produkt kostenlos (ohne Versandkosten zu Lucid Sound) ersetzen. Diese nicht übertragbare Garantie gilt nur in der Region / Land, in der das
Headset ursprünglich gekauft wurde.
Die Lucid Sound, Inc. 2 Jahre Garantie ist für Kunden in Europe verfügbar. Die einzige und ausschließliche Abhilfe ist Reparatur oder der Ersatz Ihres Lucid Sound Produkts. In keinem Fall überschreitet
die Haftung von Lucid Sound, Inc. den ursprünglichen Kaufpreis des Produkts. Diese Garantie gilt nicht für: (a) normalen Verschleiß oder Missbrauch; (b) Industrie, beruiche oder kommerzielle Zwecke;
(c) wenn das Produkt manipuliert oder verändert wurde.
Um Garantieservice zu erhalten kontaktieren Sie uns bitte wie folgt:
Eine Kopie der EU/EG-Konformitätserklärung nden sie unter lucidsound.com/EUDOC.
lucidsound.com
?#!*
Page 21
ITCUFFIA
[S]
Volume
Porta 3,5 millimetri
Porta microfono
[D]
Premere per
silenziare il
microfono
Premere nuovamente per riattivare il microfono
Page 22
IT ACCESSORI
Microfono a braccio Cavo 3,5 millimetri a PC
1
Cavo per dispositivo mobile / console
3
Protezione anti-vento
42
Coperchio della
5
porta Mic
Page 23
MICROFONO CONFIGURAZIONE PLAYSTATION®4
1 Andate in Impostazioni > Dispositivi > dispositivi audio Impostare l’uscita per cue per
L’LS25 include un microfono ad
asta opzionale. Quando questo
microfono viene rimosso, un
microfono interno è attivato.
Per collegare il microfono ad asta,
è suciente inserirlo nella porta
sulla parte inferiore della cua.
‘All Audio’
2 Impostare il ‘controllo del volume (cue)’ al massimo. È ora possibile utilizzare i controlli
sull’auricolare per regolare il volume e disattivare la funzione.
CONFIGURAZIONE CELLULARE
Collegare un’estremità
del cavo cellulare
all’ingresso 3,5mm
Dell’auricolare e l’altra
estremità all’uscita
3,5mm del dispositivo
mobile.
PS4
IT
Page 24
IT CONFIGURAZIONE XBOX ONE
XB1
Con porta 3,5mm
1 Collegare un’estremità del cavo chat
Xbox One alla porta 3,5 millimetri
dell’auricolare e l’altra estremità alla porta
3,5mm sul controller.
2 Premere il pulsante Guida Xbox e
Spostarsi sull’icona a forma di ingranaggio. Quindi, scorrere verso il basso e
selezionare ‘Audio’.
3 Selezionare ‘Volume’ e impostare ‘il vol-
ume Auricolare’ a massimo. Assicurarsi
che ‘auricolare microfono’ è rivolto a ‘On’.
4 Impostare ‘mixer auricolare chat’ per il
livello desiderato di chat ed gioco audio
bilanciato (di default è 50%). È ora possibile utilizzare il controllo del volume sulla
rotella per regolare il volume e disattivare
il microfono.
Senza porta 3,5mm
Si la manette ne dispose pas de port
3,5mm, un adaptateur Xbox One pour
casque Stereo est requis (non inclus).
1 Collegare un’estremità del cavo chat
alla porta 3,5 mm dell’auricolare e l’altra
estremità alla porta 3,5mm dell’adattatore
Auricolare Stereo.
2 Regolare il volume sul Adattatore aurico-
lare stereo su Massimo. È ora possibile
utilizzare il controllo del volume sulla rotella
di sinistra per regolare il volume.
3 SImpostare il ‘controllo del volume (cue)’
al massimo. È ora possibile utilizzare il
controllo del volume sullarotella di sinistra
per regolare il volume.
Page 25
ITCONFIGURAZIONE PC
Per i computer con cuffie separate e porte microfono
1 Collegare l’estremità singola jack del cavo da
3,5 mm a PC alla porta da 3,5 mm sull’auricolare.
2 Collegare il jack verde alla porta cue del
computer.
3 Collegare il jack rosa alla porta del microfono
del computer.
4 Aprire il pannello di
controllo del suono
del computer e impostare LS25 come
dispositivo di input e
output.
Câble 3,5mm à PC
Per i computer con una singola cuffia / microfono combinato
1 Collegare un’estremità del cavo mobile alla
porta da 3,5 mm sull’auricolare e l’altra
estremità alla porta da 3,5 mm sul computer.
2 Aprire il pannello di controllo del suono del
computer e impostare LS25 come dispositivo di input e output.
Câble Mobile / Console
Page 26

IT
Premere il pulsante Guida Xbox e passare a Tutte le impostazioni> Display
e audio> Uscita audio. Sotto il menu a discesa Audio auricolare selezionare
‘Windows Sonic per le cue’.
ABILIT
ANDO WINDOWS SONIC FOR HEADP
HONES
[ XBO
X ONE | P
C ]
PC
Per PCPer XBOX ONE
Fare clic con il pulsante destro del mouse sull’icona dell’altoparlante nella barra delle
applicazioni. Scegli il carattere Spatial (Nessuno) dal menu a comparsa. Scegliere
“Windows Sonic per le cue” come formato audio spaziale. Fai clic su “OK”.
XB1
SUPPORTO
Model No: LS25 ©2018 Lucid Sound, Inc.
Lucid Sound, Inc. garantisce che questo prodotto è privo di difetti in materiali e manodopera per il periodo di garanzia. Questa garanzia limitata, non trasferibili, di 2 anni (Canada: 1 anno) è solo per voi,
il primo utente nale acquirente. Se un difetto coperto da questa garanzia si verica E potete fornire la ricevuta di acquisto, Lucid Sound, Inc., a sua discrezione, riparerà o sostituirà il prodotto gratuitamente (escluso il trasporto a Lucid Sound). Questa garanzia non trasferibile è valida solo nella regione / paese in cui l’auricolare è stato originariamente acquistato.
Lucid Sound, Inc., garanzia limitata di 2 anni di è disponibile per i clienti europei. L’unico ed esclusivo rimedio è la riparazione o la sostituzione del prodotto Lucid Sound. In nessun caso la responsabilità
di Lucid Sound puó essere superiore al prezzo di acquisto originale del prodotto. Questa garanzia non si applica a: (a) normale usura o uso abusivo; (b), l’uso professionale,
commerciale o industriale; (c) se il prodotto è stato manomesso o modicato.
Per ricevere assistenza in garanzia, vi preghiamo di contattarci all’indirizzo: lucidsound.com
Una copia della dichiarazione UE/CE di Conformità è disponibile all’indirizzo lucidsound.com/EUDOC.
?#!*
Page 27

SUPPORTO IT
INFORMAZIONE AGLI UTENTI DI APPARECCHIATURE DOMESTICHE
Ai sensi dell’art. 26 del Decreto Legislativo 14 marzo 2014, n. 49 “Attuazione della Direttiva 2012/19/UE sui Riuti di Apparecchiature Elettriche ed Elettroniche
(RAEE)” e del Decreto Legislativo 188 del 20 novembre 2008.
Il simbolo del cassonetto barrato riportato sull’apparecchiatura o sulla sua confezione indica che il prodotto alla ne della propria vita utile deve essere raccolto
separatamente dagli altri riuti per permetterne un adeguato trattamento e riciclo.
Si ricorda che le pile/accumulatori eventualmente presenti, laddove possibile, debbono essere rimosse dall’apparecchiatura prima che questa sia conferita come riuto.
L’utente potrà , pertanto, conferire gratuitamente l’apparecchiatura e l’eventuale batteria giunta a ne vita agli idonei centri comunali di raccolta dierenziata dei riuti
elettrici ed elettronici. In alternativa l’utente potrà riconsegnarle al rivenditore secondo le seguenti modalità:
• sia pile portatili sia apparecchiature di piccole dimensioni, ovvero con almeno un lato esterno non superiore a 25 cm, è prevista la consegna gratuita senza obbligo
di acquisto presso i negozi con una supercie di vendita delle apparecchiature elettriche ed elettroniche superiore ai 400 mq. Per negozi con dimensioni inferiori, tale
modalità è facoltativa.
• per apparecchiature con dimensioni superiori a 25 cm, è prevista la consegna in tutti i punti di vendita in modalità 1 contro 1, ovvero la consegna al rivenditore potrà
avvenire solo all’atto dell’acquisto di un nuovo prodotto equivalente, in ragione di uno a uno.
L’adeguata raccolta dierenziata per l’avvio successivo dell’apparecchiatura e delle pile/accumulatori dismessi al riciclaggio, al trattamento e allo smaltimento
ambientalmente compatibile contribuisce ad evitare possibili eetti negativi sull’ambiente e sulla salute e favorisce il reimpiego e/o riciclo dei materiali di cui essi sono
composti.
Lo smaltimento abusivo di apparecchiature, pile ed accumulatori da parte dell’utente comporta l’applicazione delle sanzioni di cui alla corrente normativa di legge.
?#!*
Page 28
ES AURICULAR
Volume
Puerto 3,5mm
Entrada
Micrófono
[D][I]
Presione para
silenciar Micrófono
Presione nuevamente para
activar el
micrófono
Page 29
Brazo de micro Cable de 3,5 mm a PC
1
3
ESACCESSORIO
Cable para dispositivo móvil / consola
Quitaviento micrófono
42
Puerto de micro
5
cubierto
Page 30
ES MICRÓFONO CONFIGURACIÓN PLAYSTATION®4
1 Ves a Ajustes > Dispositivos > Dispositivos de audio y ajusta la salida de todo el audio
del Auricular.
El LS25 incluye un micrófono
opcional. Cuando el brazo del
micro se desístala, un micrófono interno se activa.
Para conectar el micrófono, es
muy sencillo, inserta el brazo
del micro en el puerto del
auricular.
2 Ajusta “Control de Volumen (Auricular)” al máximo. Podrás controlar las funciones en el
altavoz izquierdo.
CONFIGURACIÓN MOBILE
Conecta el jack
3.5 mm en la
salida del auricular,
y el otro extremo
en la salida de audio del dispositivo
móvil.
PS4
Page 31
XB1
ESCONFIGURACIÓN XBOX ONE
Con conexión en el puerto 3.5mm del Mando
1 En la Xbox One conecta el cable Jack
3.5 mm en el puerto del auricular, el otro
extremo en el puerto 3.5 mm del Mando.
2 Presione el botón Guía Xbox y navegue
hasta el icono de engranaje. Luego,
desplácese hacia abajo y seleccione
‘Audio’.
3 Selecciona Volumen y establece el Volu-
men Auricular al máximo y el control del
micrófono al mínimo. Asegúrese de que
‘micrófono auricular está activada.
4 Ajuste “Auricular chat mixer” para el los
niveles de chat y el balance del audio del
juego(por defecto el 50%). Ahora puede
utilizar los controles de los auriculares
para ajustar el volumen y mute.
Cuando se utiliza un adaptador de auriculares estéreo
En el caso de que tú mando de la Xbox One
no incluya el puerto para la conexión del
auricular estéreo. Es necesario el adaptador
correspondiente (no incluido).
1 En tu Xbox One conecta el cable Jack 3.5
mm en el puerto del auricular, el otro extremo en el puerto 3.5 mm del adaptador
para el auricular estéreo.
2 Ajustar los niveles de audio del juego/ chat
en el auricular estéreo.Adaptador para el
los volúmenes personalizados.
3 Ajustar el volumen del auricular estéreo
hasta para maximizar. Ahora puede utilizar
los controles de los auriculares para
ajustar el volumen y mute.
Page 32
ES CONFIGURACIÓN PC
PC
Para equipos con auriculares y puertos de micrófono independiente
1 Conecte el extremo del conector del cable de
3,5 mm a 3,5 mm PC al puerto de los auriculares.
2 Conecte la toma verde al puerto de auriculares
del equipo.
3 Conecte el conector de micrófono de color rosa al
puerto en el equipo.
4 Abra panel de control de
sonido del ordenador y
en septiembre la LS25
para ser el dispositivo de entrada y de
salida.
Cable de 3,5 mm
a la PC
Para equipos con un puerto de salida de auriculares / micrófono combinado
1 Conecte un extremo del cable otante en el puerto
de 3.5mm en el auricular y el otro extremo al
puerto de 3,5 mm en el equipo.
2 Abra panel de control de sonido del ordenador y
en septiembre la LS25 para ser el dispositivo de
entrada y de salida.
Cable Móvil / Consola
Page 33

Presione el botón Guía Xbox y vaya a todos los ajustes> Sonido y pantalla>
Salida de audio. Bajo el menú desplegable de auriculares de audio seleccione ‘de
Windows para Sonic Auriculares’.
PC
XB1
ESACTIVACIÓN DE WINDOWS SONIC FOR HEADPHONES [ XBOX ONE | PC ]
Para PCPara XBOX ONE
Haga clic en el icono del altavoz en la barra de tareas. Elija Spatial de sonido (Ningu-
no) en el menú emergente. Elija ‘de Windows para Sonic Auriculares’ como el formato
de sonido espacial. Haga clic en ‘Aceptar’.
SOPORTE
Model No: LS25 ©2018 Lucid Sound, Inc.
Lucid Sound, Inc. garantiza los materiales y mano de obra durante el periodo de garantía del producto. Esto no es transferible, la garantía tiene una limitación de 2 años (Canada: 1 año). Importante!
sólo podrá ser utilizada por el al usuario nal. Cualquier defecto será cubierto bajo esta garantía. Es necesario presentar el comprobante de compra. Lucid Sound, Inc., reparará o reemplazará el
producto sin cargos (Como excepción la compañía no se hará cargo del coste del envío en tu dirección del auricular Lucid Sound). Esta garantía intransferible solo es válida en la región / país en el
que se adquirió originalmente el auricular.
La garantía limitada de 2 años será para los clientes europeos. Su único, y exclusivo derecho es la reparación o sustitución de su producto Lucid Sound. En ningún caso la responsabilidad de auricular Lucid Sound excederá del precio de compra original del producto. Esta garantía no se aplica a : ( a) el desgaste normal o el uso abusivo ;
( b ) el uso industrial , comercial o profesional ; ( c ) si el producto ha sido manipulado o modicado previamente.
Para recibir la garantía, por favorcontacte con nosotros en:
La Declaración de Conformidad de la UE/CE se puede consultar en lucidsound.com/EUDOC.
lucidsound.com
?#!*
Page 34

 Loading...