

Page 1
CCESS OINT
UILDER
. . . . . . . . . . . . . . . . . . . . . . . . . . . . . . . . . . . . . . . . . . . . . . . . . . . . . . . . . . . . . . . . . . .
SER UIDE
. . . . .
This manual describes how to use the Access Point QVPN Builder™ application with Access Point™ IP Services routers.
Product: Access Point QVPN Builder
Version: Version 2.4
Part Number: 610-5004-061
Lucent Technologi es May 2001
Page 2

Page 3

Important - Please Read
. . . . .
IMPORTANT - PLEASE READ
. . . . . . . . . . . . . . . . . . . . . . . . . . . . . . . . . . . . . . . . . . . . . . . . . . . . . . . . . . . . . . . . . . . . . . .
NOTICE
The information i n this manu al is pr ovided wit hout warr anty of a ny kind and is
subject to change wit hout not ice. Luc ent Techno logies Inc. ass umes no respon sibility, and shall have no liability of any kind arising from supply or use of
this publication or any material contained herein.
Company and product names are trademarks or registered trademarks of their
respective companies.
Copyright © 1997 - 2001 by Lucent Technologies Inc. All rights reserved. No
part of this publication may be reproduced, photocopied, or transmitted without express, written consent of Lucent Technologies Inc.
Lucent Technologies Inc.
50 Nagog Park
Acton, MA 01720
USA
http://www .lucent.com
FEDERAL COMMUNICATIONS COMMISSION WARNING
This device complies with Part 15 of the FCC Rules and Regulations. Operation is subject to the following two conditions:
• The device may not cause harmful interference.
• The device must withstand any interference received, including interfer-
ence that may cause undesired operation.
The Access Point rout er has been tested and found to comply with the limits
for a Class A digital device pursuant to Part 15 of the FCC Rules and Regulations. These limits are designed to provide reasonable protection against harmful interference when this equipment is operated in a commercial environment.
This equipment generat es, uses , an d can ra diate radi o-frequen cy e ner gy an d, if
not installed and used in accordance with the instruction manual, may cause
harmful interfer ence to radio and televisi on communica tions. Oper ation of thi s
equipment in a residential area is likely to cause interference in which case the
user will be required to correct the interference at his or her own expense.
Access Point QVPN Builder User Guide III
Page 4

Important - Please Read
Shielded cables must be used with this unit to ensure compliance with the FCC
Class A limits.
IV Access Point QVPN Builder User Guide
Page 5

C
ONTENTS
. . . . . . . . . . . . . . . . . . . . . . . . . . . . . . . .
Preface ........................................................................................................XI
1 Product Overview ........................................................................................ 1
Access Point QVPN Builder Application...................................................................1
Integrated Applications...............................................................................................2
Platform Requirements ...............................................................................................2
NT 4.0 Requirements.................................................................................................................2
Solaris 2.6 Requirements............................................................................................................3
Access Point Operating System Support Matrix ........................................................3
2 Installing the QVPN Builder........................................................................5
Installing Builder ........................................................................................................5
Installing the Standalone Version on Solaris Systems...............................................................6
Installing the Client/Server Version on Solaris Systems ...........................................................9
Installing the Standalone Version on Windows NT Systems ....................................................13
Installing the Client/Server Version on Windows NT Systems.................................................14
Initial Startup Tasks....................................................................................................16
Logging In For the First Time....................................................................................................17
Logging In For the First Time As a Client.................................................................................17
Evolving Version 2.1 and 2.3 Databases....................................................................................18
Accessing UNIX Server Databases From Windows NT Client Systems..................................19
Setting Up the QVPN Request Config Daemon to Access UNIX Databases............................20
. . . . .
QVPN Builder User Guide V
Page 6

CONTENTS
3 Getting Started With Builder ............................ ..................................... .....21
About the Builder Window ........................................................................................21
The Tree Frame ..........................................................................................................................23
The Configuration and Deployment Tabs..................................................................................23
The Log Frame ...........................................................................................................................24
Getting Detailed Help Information.............................................................................26
Configuring SNMP Access Settings ..........................................................................26
Managing Access Point Systems................................................................................28
Adding Access Point Systems....................................................................................................28
Modifying Access Point Systems...............................................................................................28
Removing Access Point Systems ...............................................................................................28
Using the Traffic Status and Tunnel Status Applications ..........................................29
Traffic Status Application ..........................................................................................................30
Tunnel Status Application..........................................................................................................31
Using the QVPN Request Config Daemon................................................................32
Starting Up the Daemon.............................................................................................................33
Using the Daemon......................................................................................................................33
Shutting Down the Daemon .......................................................................................................34
Verifying Daemon Operation............................... ......................................................................34
Changing the SNMP Community Name for the Daemon..........................................................35
Troubleshooting the Daemon.....................................................................................................35
4 Managing VPNs ...........................................................................................37
Creating or Modifying VPN Definitions....................................................................38
Selecting the Configuration Method...........................................................................................38
Changing VPN Settings for the VPN.........................................................................................39
Changing VPN Settings for the Access Point Systems..............................................................41
Changing Probe Settings ............................................................................................................43
Saving the VPN Definition.........................................................................................45
Saving the VPN Definition With the Standalone Version .........................................................46
Saving the VPN Definition With the Client/Server Version......................................................46
Opening VPN Definitions ..........................................................................................46
Opening the VPN Definition With the Standalone Version.......................................................47
Opening the VPN Definition With the Client/Server Version ...................................................47
Accessing Locked Files..............................................................................................................48
Removing VPN Definitions .......................................................................................48
Removing the VPN Definition With the Standalone Version....................................................48
VI QVPN Builder User Guide
Page 7

CONTENTS
Removing the VPN Definition With the Client/Server Version................................................49
Using VPN Definitions...............................................................................................49
Exporting Data ...........................................................................................................................49
Importing VPN Data Files..........................................................................................................50
Importing VPN Definitions From Version 1.1...........................................................................53
Verifying the Configuration........................................................................................53
Deploying the Configuration ......................................................................................53
Using the VPN Deployment Tables............................................................................54
VPN Statistics ............................................................................................................................55
VPN or AP Summary Information.............................................................................................55
Tunnel, Route, and IPSec Interface Information........................................................................56
Managing Security Profiles ........................................................................................58
Adding Security Profiles............................. ..... ...... ....................................................................59
Modifying Security Profiles.......................................................................................................59
Deleting Security Profiles ........................... ..... .............................................. ............................60
. . . . .
5 Managing QoS/Firewall Policies................................................................61
Using the QoS/Firewall Rule Set Editor.....................................................................62
Default Template Rule Set Definition and Modification...........................................................64
Defining a Rule Set.....................................................................................................66
Adding a Rule............................. ..... ...... .....................................................................................67
Specifying Parameters................................................................................................................67
Changing the Rule Name...........................................................................................................75
Specifying Execution Order.......................................................................................................76
Adding or Changing Comments.................................................................................................76
Removing a Rule........................................................................................................................77
Purging Unused Parameters......................................... ..... ...... ...................................................77
Modifying a Rule Set..................................................................................................77
Modifying the Default New Rule Set .........................................................................78
Removing a Rule Set ..................................................................................................79
Associating a Rule Set................................................................................................79
Setting Parameter Values............................................................................................80
Verifying the QoS/Firewall Policies...........................................................................82
Deploying the QoS/Firewall Policies to APs..............................................................82
Using the QoS/Firewall Deployment Table................................................................83
Modifying the Definition View..................................................................................................83
Using the Apply/Query View.....................................................................................................84
QVPN Builder User Guide VII
Page 8

CONTENTS
Using Rule Sets ..........................................................................................................85
Exporting Rule Sets....................................................................................................................85
Importing Rule Set Files.............................................................................................................86
Specifying a Rule Set for a VPN................................................................................87
Using the QoS/Firewall: Examples............................................................................88
Configuring a Firewall That Allows Web Surfing.....................................................................88
Configuring SYN Flood Protection............................................................................................95
Classifying ICMP Packets..........................................................................................................99
Creating a Forwarding Policy.....................................................................................................101
6 Managing NAT .............................................................................................105
Configuring General NAT Parameters.......................................................................106
Enabling NAT.............................................................................................................................106
Specifying Maximum Number of Sessions................................................................................107
Specifying Session Timers.........................................................................................................107
Applying Parameters..................................................................................................................108
Saving the NAT Configuration...................................................................................................109
Adding the NAT Layer...............................................................................................109
Configuring Static Bindings.......................................................................................111
Configuring Address Translation Pools .....................................................................112
Configuring Basic NAT Pools....................................................................................................113
Configuring NAPT Pools...........................................................................................................114
Configuring LSNAT Pools.........................................................................................................115
Removing Pools..........................................................................................................................117
Configuring Private Networks....................................................................................117
Checking the Configuration .......................................................................................119
Deploying the NAT Configuration to All APs...........................................................120
Using the NAT Deployment Tab ...............................................................................120
7 Advanced Features of Builder....................................................................125
Specifying Preferences...............................................................................................126
General Preferences.................................................................................................................... 126
Logging Preferences...................................................................................................................126
Directory Preferences.................................................................................................................128
Configuring Logging..................................................................................................129
Clearing the Log Display............................................................................................................ 129
Purging the Log Database...........................................................................................................129
VIII QVPN Builder User Guide
Page 9

CONTENTS
Exporting the Log Table To a File.............................................................................................130
Managing User Profiles ..............................................................................................130
Adding User Profiles........................................ ...... ...... ............................................. .................131
Modifying User Profiles.............................................................................................................131
Deleting User Profiles................................................................................................................132
Restoring VPN Databases...........................................................................................132
Finding a VPN Name..................................................................................................133
Troubleshooting..........................................................................................................133
Figures
Figure 1 QVPN Builder Login Screen ........................................................................16
Figure 2 QVPN Builder Definition View Window .....................................................22
Figure 3 QoS/Firewall Rule Set Editor Window ........................................................62
Figure 4 Stateful Firewall that Allows Web Surfing ...................................................88
. . . . .
Tables
Table 1 Definition View Tool Bar Buttons . . . . . . . . . . . . . . . . . . . . . . . . . . . . . . . . 25
Table 2 QoS/Firewall Rule Set Editor Tool Bar Buttons . . . . . . . . . . . . . . . . . . . . . 62
Table 3 Default Action Profiles and Associated CBQ Trees . . . . . . . . . . . . . . . . . . 75
QVPN Builder User Guide IX
Page 10

CONTENTS
X QVPN Builder User Guide
Page 11

P
REFACE
. . . . . . . . . . . . . . . . . . . . . . . . . . . . . . . . . .
The Access Point™ IP Services family comprises a set of bridging routers with advanced bandwidth management and VPN server capabilities.
The Access Point QVPN Builder
monitor a virtual private network of Access Point systems. This guide
explains how to install, configure, and manage the Access Point QVPN
Builder application. Chapter titles and their subject areas are outlined
below.
Chapter Title Areas Treated
1
2
3
4
5
6
7
Product Overview Provides an overview of the Access Point
Installing the QVPN Builder Provides information about installing Access
Getting Started With Builder Provides general information about the
Managing VPNs Explains how to configure IPSEC tunnels
Managing QoS/Firewall
Policies
Managing NAT Explains how to configure the Network
Advanced Features of
Builder
™ application lets you manage and
QVPN Builder application
Point QVPN Builder
Builder graphical user interface, applicationwide tasks, and associated applications
using VPN definitions
Explains how to set firewall rules and QoS
policies
Address Translator (NAT)
Provides information about preferences,
logging, and user profiles for Builder
. . . . .
Audience
The Access Point product is a bridging router with advanced bandwidth
management and VPN capabilities. Configuring any IP routing engine
Access Point QVPN Builder User Guide XI
Page 12

PREFACE
requires considerable experience with routers, hubs, bridges, and other networking devices. In particular, Lucent Technologies assumes that persons
installing, configuring, and managing the Access Point product have several
years of networking experience.
The Access Point QVPN Builder application lets you configure and manage
virtual private networks from a cen tral management stati on. Build er is fl exibl e
enough to provis ion t he sec urit y prof iles , fir ewall rule s, and Quali ty of Servi ce
policies for small or large VPNs.
Conventions
This guide uses the following conventions.
• Bold indicates items that you select from the Builder application.
• Italics indicates command.
• A vertical bar | between elements indicates that you must choose one of
them.
• Square brackets [ ] indicate optional elements.
• Parentheses ( ) contain a group from which you make a selection.
• Angle bracket s < > con tain a n element that y ou sp ecify, suc h as a name o r
an address.
• Ellipses ... following a component, subcomponent, or parameter indicate
that it can be repeated.
S
AFETY SYMBOLS
The following safety symbols are used to call attention to certain topics. To
avoid equipment damage or possible injury, please devote special attention to
these areas and follow all applicable procedures and warnings.
WARNING:
This symbol calls attention to issues or practices that
could cause serious injury to yourself or others if safety
precautions are disregar ded .
CAUTION: This symbol calls attention to issues or practices that
could damage the equipment or cause loss of data if you
disregard the required safety precautions.
XII Access Point QVPN Builder User Guide
Page 13

Contacting Lucent Support
For questions or probl ems with th e Access Point QVPN Builder app licati on or
the Access Point router, refer to this manual or to the Lucent Technologies
Lucent Worldwide Services Web site at:
http://www.lucent.com/networkcare
If you are not able to find t he he lp you need, contact Lucent Technologi es I nc.
at one of the following locations:
Customer Service: 1.800.272.3634
E-mail:webmail@lucent.com
PREFACE
. . . . .
Access Point QVPN Builder User Guide XIII
Page 14

PREFACE
XIV Access Point QVPN Builder User Guide
Page 15

P
RODUCT
. . . . . . . . . . . . . . . . . . . . . . . . . . . . . . . . . . .
O
VERVIEW
The Access Point QVPN Builder™ applic ation (Builde r) lets you manage
and monitor a virtual private network consisting of Access Point
tems (APs). This application lets you:
• Configure and create virtual private networks
• Configure QoS/Firew all parameters
• Configure NAT
• Monitor usage data
. . . . .
™ sys-
ACCESS POINT QVPN BUILDER APPLICATION
. . . . . . . . . . . . . . . . . . . . . . . . . . . . . . . . . . . . . . . . . . . . . . . . . . . . . . . . . . . . . . . . . . . . .
As use of the Interne t for busi ness-class application s continues to grow , so
has the importance of virtual private networks (VPNs). VPNs use a combination of encryption, authentication, and tunneling techniques to create
secure pathways, or tunnels, between geographicall y separ ated ho sts ove r
a public network infrastructure. Moreover, with the increasing flow of
data over costly infrastructure, bandwidth management and firewalling
capabilities are essential to classify and schedule IP traffic. Setting up
secure tunnels and managing bandwidth and firewalls to protect business
communications among widely dispersed sites can be time-consuming
and costly.
The Access Point QVP N Builder application is a powerful tool that l ets
you create and deploy VPNs easily from a central management station.
While most VPNs must be configured on a host-by-host basis, Builder
enables VPNs to be defined at a single location and exported to defined
Access Point QVPN Builder User Guide 1
Page 16

1
PRODUCT OVERVIEW
Integrated Applications
sets of hosts (Acce ss Po int systems) without network disrupt ions. Builder also
lets you incorporate firewall and Quality of Service (QoS ) parameters as part
of a VPN definition, allowing you to rate-limit and shape traffic flowing over
tunnels. Thus, you get the benefits of IP QoS integrated within a remotely
managed tunnel framework, or QVPN.
INTEGRATED APPLICATIONS
. . . . . . . . . . . . . . . . . . . . . . . . . . . . . . . . . . . . . . . . . . . . . . . . . . . . . . . . . . . . . . . . . . . . . . .
The Builder includes integrated applications:
• The QVPN Request Config dae mon a ll ows APs to request (pull) t hei r con-
figuration information from a Builder client or server.
• The Traffic Status applic ati on di splays dynamic bandwidth usage inf orma -
tion with pie and bar graphs and tracks the performance of defined traffic
classes with a graph wizard.
• The Tunnel Status application has specialized applets that display sum-
mary information and traffic rate usage for the tunnels.
PLATFORM REQUIREMENTS
. . . . . . . . . . . . . . . . . . . . . . . . . . . . . . . . . . . . . . . . . . . . . . . . . . . . . . . . . . . . . . . . . . . . . . .
To run the Builder application, your NT or Solaris platform, for standalone or
client/server operation, should meet the following requirements:
NT 4.0 R
EQUIREMENTS
• Standalone
• 400 MHz system
• 50 MB disk (and additional space for the user-created databases)
• 128 MB RAM
• Java Runtime Environment version 1.2.2 software
• Client/Server
• 400 MHz system
• 270 MB disk (and additional space for the user-created databases on
the server)
2 Access Point QVPN Builder User Guide
Page 17

S
OLARIS
• 256 MB RAM
• Java Runtime Environment version 1.2.2 software
2.6 R
EQUIREMENTS
• Standalone
• 100 MB disk (and additional space for the user-created databases)
• 256 MB RAM
• Java Runtime Environment version 1.2.2 software
• Client/Server
• 200 MB disk (and additional space for the user-created databases on
the server)
• 256 MB RAM
PRODUCT OVERVIEW
Access Point Operating S ystem Support Matrix
. . . . .
• Java Runtime Environment version 1.2.2 software
ACCESS POINT OPERATING SYSTEM SUPPORT MATRIX
. . . . . . . . . . . . . . . . . . . . . . . . . . . . . . . . . . . . . . . . . . . . . . . . . . . . . . . . . . . . . . . . . . . . . . .
The follow ing table shows the relationsh ip of AP operating systems and features that Builder sup ports.
Access Point
Operating System
V2.1 Yes No No
V2.2.0 Yes Yes Partial
V2.2.1 Yes Yes Yes
V2.3 Yes Yes Yes
V2.4 Yes Yes Yes
VPN CBQ NAT
Access Point QVPN Builder User Guide 3
Page 18

1
PRODUCT OVERVIEW
Access Point Operating System Support Matrix
4 Access Point QVPN Builder User Guide
Page 19

I
NSTALLING THE
. . . . . . . . . . . . . . . . . . . . . . . . . . . . . . . . . . .
This section provides general information about installing the Access
Point QVPN Builder application (Builder) and performing initial startup
tasks. Read through the installation and initial startup sections to determine specific requirements for those tasks.
QVPN B
UILDER
. . . . .
INSTALLING BUILDER
. . . . . . . . . . . . . . . . . . . . . . . . . . . . . . . . . . . . . . . . . . . . . . . . . . . . . . . . . . . . . . . . . . . . .
Before installing or using Builder, make sure the Access Point systems
(APs) are configured and reachable through SNMP. Otherwise, Builder
will not be able to configure these systems. You must configure the AP
with Access Point version 2.2.1 or later software beforehand (including
SNMP access and routing informat ion) so that the Builder can connect to
each AP to perform its tasks.
The Builder has two versions — standalone and client/server.
The standalone version has these features:
• Installs on a single system
• Supports up to 250 QVPN nodes per VPN (VPN count is limited
by only disk space)
The client/server version has these features:
• Installs on a single server or many clients of the central server
• Supports up to 800 QVPN nodes per VPN (VPN count is limited
by only disk space)
Access Point QVPN Builder User Guide 5
Page 20

2
INSTALLING THE QVPN BUILDER
Installing Builder
This section describes how to install either the standalone or the client/server
version of the Builder on Solaris or Windows NT systems. You will find
instructions fo r installing Bui lder from bot h a CD-ROM and an exec utable file.
Refer to one of the following sections to install the Builder.
• “Installing the Standalone Version on Solaris Systems” on Page 6
• “Installing the Clie nt/Server Version on Solaris Systems” on Page 9
• “Installing the Standalone Version on Windows NT Systems” on Page 13
• “Installing the Client/Server Version on Windows NT Systems” on Page
14
I
NSTALLING THE STANDALONE VERSION ON SOLARIS SYSTEMS
Builder runs on a Sun SPARC workstation with these system requirements:
• Solaris 2. 6 operating system
• The JDK patches for Solaris SPARC 2.6 (5.6) with these patch IDs:
- 105490-05 (Linker Patch)
- 105568-13 (Libthread Patch)
- 105210-17 (LibC Patch)
- 105181-11 (Kernel Update Patch — socket close/hang)
- 105669-04 (CDE 1.2: libDTSvc Patch — dtmail)
To download the patches, start at http://www.sun.com/solaris/java and fol-
low the link s to download the JDK; the patche s are available on the same
page as the JDK. Follow the instructions to load the patch from the
README.sparc file.
• 100 MB disk, 256 MB RAM (standalone version)
NSTALLING THE STANDALONE VERSION ON SOLARIS SYSTEMS FROM A CD-ROM
I
Builder is distributed on a CD-ROM. LUxavs, the standalone version of the
Builder applica ti on, co me s as a directory pack age that is ready f or i nst allation.
The following procedure describes how to install Builder:
1 Make sure you are logged on as a superuser (root).
2 To install Builder, enter the following command:
6 Access Point QVPN Builder User Guide
Page 21

INSTALLING THE QVPN BUILDER
Installing Builder
pkgadd -d /cdrom/builder -R <desired-install-path> LUxavs
3
The installation asks if you want to create the installation directory if it
doesn’t already exist.
4 Next, the installation asks if you want to run the included scripts as root.
Answer “y”.
5 You’ll be asked additional questions about how you want to configure
Builder. After you’ve answered all the questions, the installation begins.
6 After the in stallation completes , you can check if the package is installed
or retrieve additional package information by entering the following command:
pkginfo -l -R <installed-package-path> LUxavs
To remove the Builder installation from the system, enter the following
command:
pkgrm -R <installed-package-path> LUxavs
. . . . .
NOTE Be sure to use the pkgrm command to delete the installation,
so files are removed in an orderly manner.
Solaris systems provide man pages for th e various pac kage commands jus t
mentioned.
7 After Builder is installed, you can go to the installation directory where
you will find the AccessView subdirectory. The QVPNBuilder script is
located in the bin subdirectory. You can include the path to Build er in your
shell initialization file. You can also create a soft link to the Builder using
the ln -s com mand.
Start Builder with the following command:
> QVPNBuilder
NOTE You must not be logged on as the superuser when starting the
application.
INSTALLING THE STANDALONE VERSION ON SOLARIS SYSTEMS FROM AN
E
XECUTABLE FILE
To install the standalone version of Builder from an executable file, complete
the following steps:
1 Make sure you are logged on as a superuser (root).
Access Point QVPN Builder User Guide 7
Page 22

2
INSTALLING THE QVPN BUILDER
Installing Builder
2 Copy the xavs2_4_R001.bin program to the appropriate directory.
3 Use the chmod +x command (specifying your program file) to change the
privileges so you can execute the program.
4 Use the ./xavs2_4_R001.bin command to install the program.
You are asked if you want to con figur e the QVPN Reques t Confi g daemon
to start at system boot as part of the installation procedure. If you reply
with yes, then the necessary boot script files are created and the installation procedure asks if you want to start the QVPN Reques t Config daemon
immediately. If you reply with yes, the Config daemon is started immediately. If you reply with no, you can start the daemon at any time with the
QVPNRequestConfigDaemon command. Refer to “Using the QVPN
Request Config Daemon” on Page 32 for more information.
You will see output simila r to the following:
Installing Lucent Technologies Access Point QVPN Builder Client/Server version: 2.4.B002 02-27-2001...
Checking for available space...
Unpacking...
Checksumming...
0
0
Extracting...
Done.
Shutting down the ObjectStore Server in /AV2.4/Acc essView /odi/ostore on host psara.
Shutting down the ObjectStore Cache Manager in /AV2.4/Acce ssView/odi/ostore on host psara.
Shutting down Cache Manager process
010321 140658.168 ObjectStore Release 6.0 Service Pack 4 Database Server
The ObjectStore server is running.
Successfully created /etc/rc2.d/S80ostore4.
Successfully created link from /etc/rc2.d/K80ostore4
to /etc/rc2.d/S80ostore4.
This script will now verify the installation:
The ObjectStore Server daemon process is accessible.
Schema databases are accessible.
The cache manager launcher (/AV2.4/AccessView/odi/ostore/lib/oscminit6)
has correct modes and ownership.
ObjectStore configuration completed.
Do you wish to evolve existing databases ? [yes] no
QVPNBuilder setup ...
Lucent Access Point QVPN Builder configuration completed.
QVPNRequestConfigDaemon setup ...
8 Access Point QVPN Builder User Guide
Page 23

INSTALLING THE QVPN BUILDER
Do you want the QVPNRequestConfigDaemon configured to start at system boot ? [yes]
Successfully created /etc/rc2.d/S90rcd.
Successfully created link from /etc/rc2.d/K90rcd
to /etc/rc2.d/S90rcd.
Do you want to start the QVPNRequestConfigDaemon now ? [yes]
Starting AccessView QVPNRequestConfigDaemon 2.4.B002 02-27-2001
QVPNRequestConfigDaemon configuration completed.
Lucent Access Point QVPN Builder 2.4.B002 02-27-2001 Installation Complete:
To start the QVPN Builder application run /AV2.4/AccessView/bin/QVPNBuilder
To start the Tunnel Status application run /AV2.4/AccessView/bin/TunnelStatus
To start the Traffic Status application run /AV2.4/AccessView/bin/TrafficStatus
To control the Request Config Daemon use the "/etc/rc2.d/S90rcd <start|stop>" command
Note that the Tunnel Status and Traffic Status applications were installed
and can be run. Refe r to “Usin g the Traffic Status and Tunnel Status Appli-
cations” on Page 29 for more information.
Installing Builder
. . . . .
5 You can include the path to Builder in your shell in itializatio n file. You can
also create a soft link to the Builder using the ln -s comman d. The Builder
executable file is located in the directory where you installed the application.
After installing Builder, you can start up the application with this command:
> QVPNBuilder
NOTE You must not be logged on as the superuser when starting the
application.
To uninstall the application, execute this command as the superuser:
# ./uninstall
This procedure keeps the AccessView directories for upgrade purposes. To
completely remove the application, delete the AccessView directory.
I
NSTALLING THE CLIENT/SERVER VERSION ON SOLARIS SYSTEMS
Builder runs on a Sun SPARC workstation with these system requirements:
• Solaris 2. 6 operating system
Access Point QVPN Builder User Guide 9
Page 24

2
INSTALLING THE QVPN BUILDER
Installing Builder
• The JDK patches for Solaris SPARC 2.6 (5.6) with these patch IDs:
- 105490-05 (Linker Patch)
- 105568-13 (Libthread Patch)
- 105210-17 (LibC Patch)
- 105181-11 (Kernel Update Patch — socket close/hang)
- 105669-04 (CDE 1.2: libDTSvc Patch — dtmail)
To download the patches, start at http://www.sun.com/solaris/java and fol-
low the link s to download the JDK; the patche s are available on the same
page as the JDK. Follow the instructions to load the patch from the
README.sparc file.
• 200 MB disk, 256 MB RAM (client/server version)
NOTE
If you already have Builder V2.1 installed on your system, it is
recommended that you install V2.4 directly over it without
uninstalling the V2.1 software to ensure that the existing
databases are evolved properly.
If you install Builder V2.4 in a different directory than the one in
which V2.1 was installed, see Page 18 for information about
how to evolve the existing databases manually.
INSTALLING THE CLIENT/SERVER VERSION ON SOLARIS SYSTEMS FROM A CD-ROM
Builder is distributed on a CD-ROM. LUxavd, the database (client/server) version of the Builder application, comes as a directory package that is ready for
installation. The following procedure describes how to install Builder:
1 Make sure you are logged on as a superuser (root).
2 To install Builder, enter the following command:
pkgadd -d /cdrom/builder -R <desired-install-path> LUxavd
Answer “y” to the following prompt:
3
Do you want to install these as setuid/setgid files [y,n,?,q]
The installation asks if you want to create the installation directory if it
4
doesn't already exist.
5 Next, the installation asks if you want to run the included scripts as root.
Answer “y”.
10 Access Point QVPN Builder User Guide
Page 25

INSTALLING THE QVPN BUILDER
Installing Builder
6 You’ll be asked additional questions about how you want to configure
Builder , including whether you want to insta ll as a cl ie nt or a ser ver. After
you’ve answere d all the questions, the installation begins.
7 After the in stallation completes , you can check if the package is installed
or retrieve additional package i nformation by entering the follo wing command:
pkginfo -l -R <installed-package-path> LUxavd
To remove the Builder installation from the system, enter the following
command:
pkgrm -R <installed-package-path> LUxavd
NOTE Be sure to use the pkgrm command to delete the installation,
so files are removed in an orderly manner.
Solaris systems provide man pages for th e various pac kage commands jus t
mentioned.
. . . . .
8 After Builder is installed, you can go to the installation directory where
you will find the AccessView subdirectory. The QVPNBuilder script is
located in the bin subdirectory. You can include the path to Build er in your
shell initialization file. You can also create a soft link to the Builder using
the ln -s com mand.
Start Builder with the following command:
> QVPNBuilder
NOTE You must not be logged on as the superuser when starting the
application.
INSTALLING THE CLIENT/SERVER VERSION ON SOLARIS SYSTEMS FROM AN
E
XECUTABLE FILE
T o install the client/server version of Builder from an executable file, complete
the following steps:
NOTE
1
2 Copy the xavd2_4_R001.bin program to the appropriate directory.
Builder cannot be installed in an NFS mounted partition.
Make sure you are logged on as a superuser.
3 Use the chmod +x command (specifying your program file) to change the
privileges so you can execute the program.
Access Point QVPN Builder User Guide 11
Page 26

2
INSTALLING THE QVPN BUILDER
Installing Builder
4 Use the ./xavd2_4_R001.bin command to install the applicat ion as a se rver
or as a client.
To install the application as a server, use the -s option.
To install the application as a client, use the -c option.
If you install the app li cat i on as a client, you are ask ed t o provide the name
of the server and the full pathname for the master database. This information can be found in the DatabaseInfo.txt file located in the AccessView
installation directory of your database server. If your client is using a Windows NT server, you must specify the full pathname using escape characters. To represent a colon (:), a space, or a backslash (\), place a backslash
(\) in front of these special characters. For example, to represent the full
pathname of the master database in the default database directory on a
Windows NT server, enter:
c\:Program\ Files\\Lucent\\AccessView\\db\\AccessViewMaster.db
To represent the full pathname of the master database in the default database directory on a Solaris server, enter:
NOTE
/usr/AccessView/db/AccessViewMaster.db
The rest of the installation is the same for either the server or the client.
You are asked if you want to con figur e the QVPN Reques t Confi g daemon
to start at system boot as part of the installation procedure. If you reply
with yes, then the necessary boot script files are created and the installation procedure asks if you want to start the QVPN Reques t Config daemon
immediately. If you reply with yes, the Config daemon is started immediately. If you reply with no, you can start the daemon at any time with the
QVPNRequestConfigDaemon command.
The QVPNRequestConfigDaemon uses port 161. If another
application or service (such as snmpdx) is using port 161, the
QVPNRequestConfigDaemon might not start at system boot.
Refer to “Using the QVPN Request Config Daemon” on Page 32 fo r more
information.
Note that the Tunnel Status and Traffic Status applications were installed
and can be run. Refe r to “Usin g the Traffic Status and Tunnel Status Appli-
cations” on Page 29 for more information.
5 You can include the path to Builder in your shell in itializatio n file. You can
also create a so ft li nk to Buil der us ing the ln -s command. Th e Build er exe -
12 Access Point QVPN Builder User Guide
Page 27

INSTALLING THE QVPN BUILDER
Installing Builder
cutable file is located in the directory where you installed the application.
After installing Builder, you can start up the application with this command:
> QVPNBuilder
NOTE You must not be logged on as the superuser when starting the
application.
To uninstall the application, execute this command as the superuser:
# ./uninstall
This procedure keeps the AccessView directories for upgrade purposes. To
completely remove the application, delete the AccessView directory.
I
NSTALLING THE STANDALONE VERSION ON
Builder ru ns on PCs with these system requirements:
W
INDOWS
NT S
. . . . .
YSTEMS
• Windows NT 4.0 (Service Pack 5 or greater) operating systems
• 400 MHz system with 50 MB disk, 128 MB RAM (standalone ver-
sion)
Builder requires Java Runtime Environment version 1.2.2 software. If this
software is not already on your system, the installation procedure lets you add
it.
INSTALLING THE STANDALONE VERSION ON WINDOWS NT FROM A CD-ROM
Builder is distributed on a CD-ROM. The following procedure describes how
to install Builder.
1 Insert the CD into your CD-ROM drive.
2 Double click on the CD-ROM drive icon.
3 Double click on the Setup.exe file.
If you have a previous version of Builder installed, the installation procedure asks if you want to remove it. After the previous installation is
removed, double click on the Setup.exe file to restart the installation.
4 Follow the instructions on the screen.
Access Point QVPN Builder User Guide 13
Page 28

2
INSTALLING THE QVPN BUILDER
Installing Builder
INSTALLING THE STANDALONE VERSION ON WINDOWS NT FROM AN
E
XECUTABLE FILE
To install Builder from an executable file, complete the following steps:
1 Close down all Windows programs.
2 In Windows Explorer, double-click on the self-extracting executable pro-
gram (xavs_2.4.R001.exe) and follow the InstallShield prompts.
By default, Builder is installed in the
C:\Program Files\Lucent\AccessView directory.
3 Optionally, the icons for the applications can be placed on your desktop.
Start up the application by clicking on the icon on your desktop (if available)
or selecting Start → Programs → Lucent Access Point → QVPN Builder.
To uninstall the application, select Start → Settings → Control Panel →
Add/Remove Programs. Select AccessView from the list and click
Add/Remove. This procedure keeps the AccessView directories for upgrade
purposes. T o completely remove the application, delete the AccessView folder.
I
NSTALLING THE CLIENT/SERVER VERSION ON
Builder ru ns on PCs with these system requirements:
• Windows NT 4.0 (Service Pack 5 or greater) operating systems
• 400 MHz system with 270 MB disk, 256 MB RAM (client/server ver-
sion)
NOTE
Builder requires Java Runtime Environment version 1.2.2 software. If this
software is not already on your system, the installation procedure lets you add
it.
The installation requires 270 MB of disk space, including 180
MB in your system’s TEMP directory. Make sure you have
enough disk space, especially if your TEMP and installation
directories are on the same disk.
After installation, the system requires at least 100 MB to run
the application. Remember that the number of VPNs depends
on available disk space.
W
INDOWS
NT S
YSTEMS
14 Access Point QVPN Builder User Guide
Page 29

INSTALLING THE QVPN BUILDER
Installing Builder
INSTALLING THE CLIENT/SERVER VERSION ON WINDOWS NT FROM A CD-ROM
Builder is distributed on a CD-ROM. The following procedure describes how
to install Builder.
1 Insert the CD into your CD-ROM drive.
2 Double click on the CD-ROM drive icon.
3 Double click on the Setup.exe file.
If you have a previous version of Builder installed, the installation procedure asks if you want to remove it. After the previous installation is
removed, double click on the Setup.exe file to restart the installation.
4 Follow the instructions on the screen.
I
NSTALLING THE CLIENT/SERVER VERSION ON WINDOWS NT FROM AN
E
XECUTABLE FILE
. . . . .
If you have previously installed Builder, complete the following before installing a new version of the application:
1 Uninstall Builder (existing databases will remain after the uninstall)
2 Uninstall ObjectStore
Now you can reinstall Builder.
To install Builder from an executable file, complete the following steps:
1 Make sure you are logged on as an administrator.
2 Close down all Windows programs.
3 In Windows Explorer, double-click on the self-extracting executable pro-
gram (xavd_2.4.R001.exe) and follow the InstallShield prompts.
Install the application as a server or as a client by selecting the Object
Database Server (default) or Object Database Client radio button. If you
install the application as a client, you are asked to provide the name of the
server and the full pathname for the master database. If you install the
application as a client and you intend to communicate with a UNIX database server, you must set up access to the UNIX database server as
described on “Accessing UNIX Server Databases From Windows NT Cli-
ent Systems” on Page 19.
The installation procedure requests a destination path for Object Database
Access Point QVPN Builder User Guide 15
Page 30
2
INSTALLING THE QVPN BUILDER
Initial S tar tu p Tasks
Installation. The default installation destination path is C:\ODI.
By default, Builder is installed in C:\Program Files\Lucent\AccessView
directory. The C:\Program Files\Lucent\AccessView\db directory is the
default database destination path. Remember the destination path, as you
must use it when starting up the application.
Optionally, the icons for the applications can be placed on your desktop.
4 You must reboot after the installation.
Start up the application by clicking on the icon on your desktop (if available)
or selecting Start → Programs → Lucent Access Point → QVPN Builder.
NOTE
To uninstall the client/server version, you must uninstall the
application (by selecting Start
→ Add/Remove Programs) before you uninstall the
ObjectStore software.
Uninstall the ObjectStor e software by selecting Start →
Programs → ObjectStore Win32 → ObjectStore Uninstall.
This procedure keeps the AccessView directories for upgrade
purposes. To completely remove the application, delete the
AccessView folder.
→ Settings → Control Panel
INITIAL STARTUP TASKS
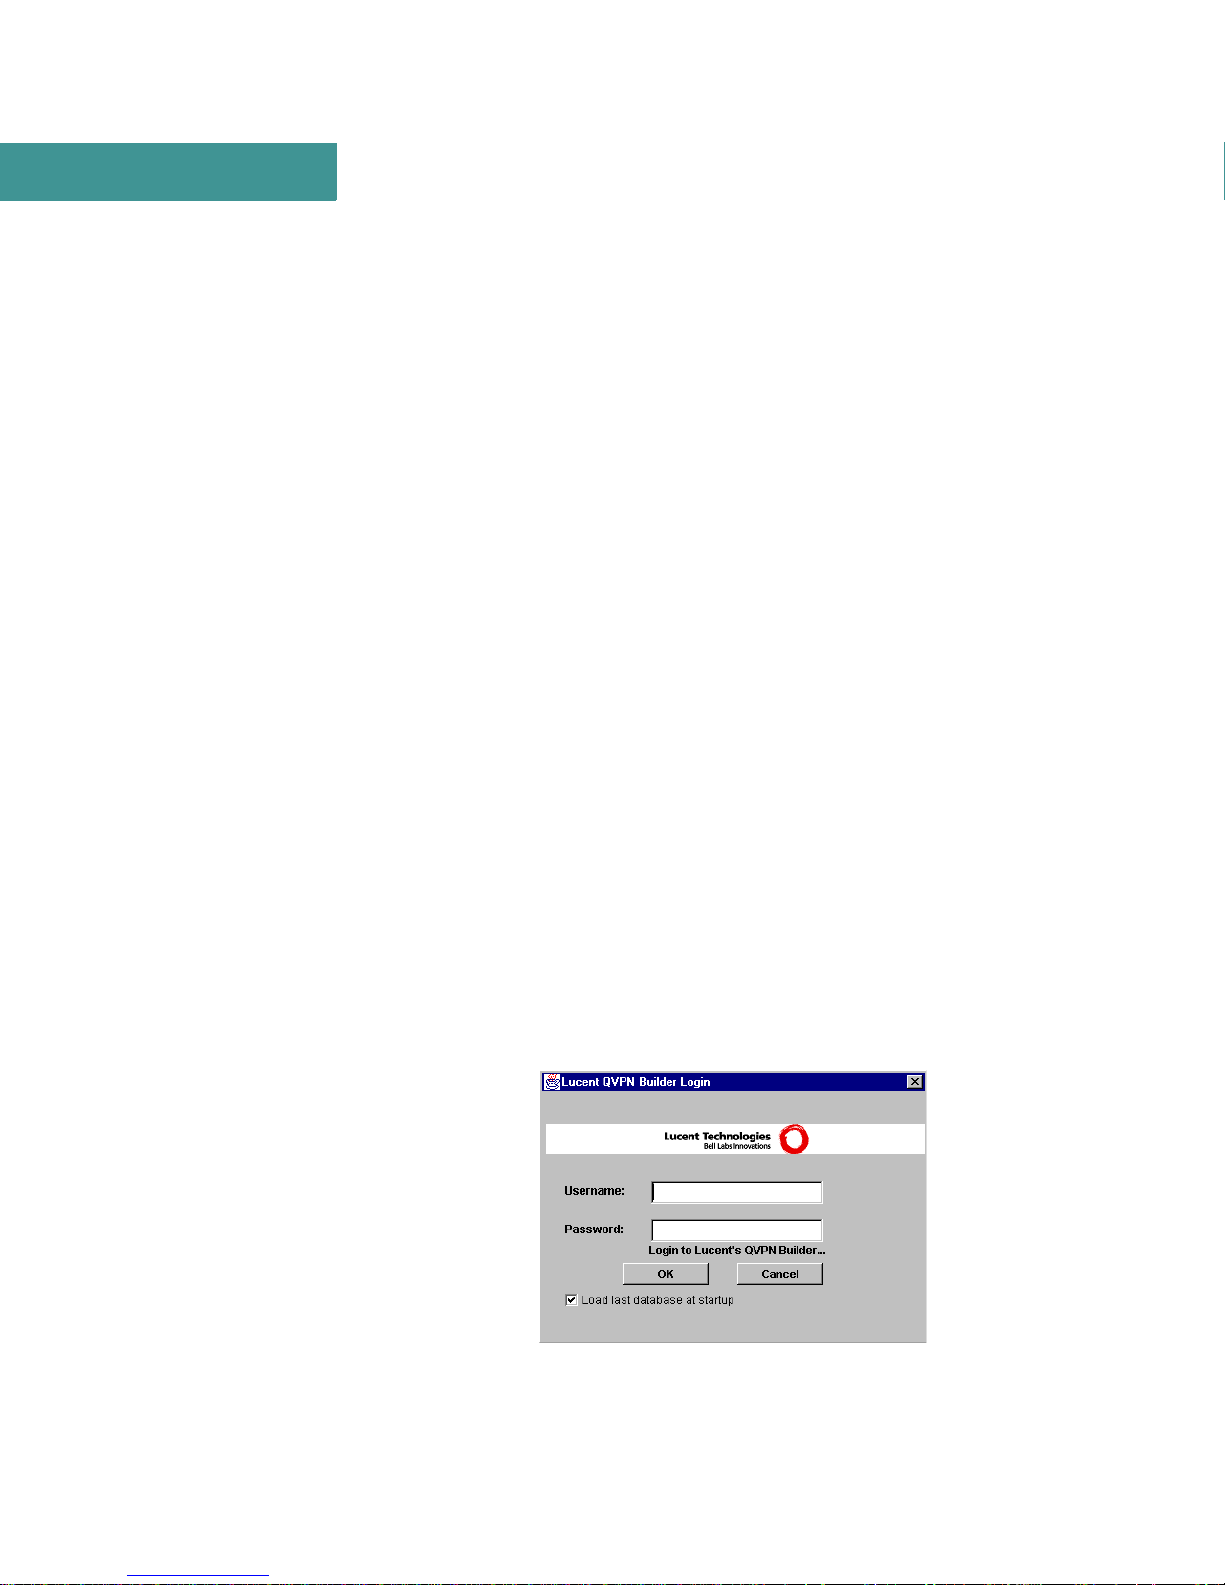
. . . . . . . . . . . . . . . . . . . . . . . . . . . . . . . . . . . . . . . . . . . . . . . . . . . . . . . . . . . . . . . . . . . . . . .
When you start up the app licati on, the QVPN Bui lder Lo gin windo w shown in
Figure 1 appears.
Figure 1 QVPN Builder Login Screen
16 Access Point QVPN Builder User Guide
Page 31

Before anyone else can use Builder:
• The user root must log in with the initial account information.
• The user root should modify the root account’s password. The user
root can also create other user profiles.
L
OGGING IN FOR THE FIRST TIME
To log in, y ou must ente r the following information for the initial account:
• Username — root
• Password — lucent
This initial account (root) is the only user s et up with superuser pr ivilege.
When the user root has logged in, this user can mod ify the password for the
root account to make it more secure. The user root can also create other user
profiles to provi de a ddi ti onal access to Builder. See “Managing User Profiles”
on Page 130 for more information about what functions can be performed by
users with different privileges.
INSTALLING THE QVPN BUILDER
Initial Startup Tasks
. . . . .
L
OGGING IN FOR THE FIRST TIME AS A CLIENT
If you are logging i n as a cl ient
and you did not enter the database information, you will not
see the initial login screen
(Figure 1) until you enter the
information in the Specify the
database server parameters
window shown at right.
You must enter the following information:
• Database Server — the database server to which you want to connect
Specify the IP address or the host name of the database server.
• Database Name — the database name
The database name is the file specification for the AccessViewMaster.db
file (located in the db directory). If you have installed the application on a
Solaris system or on the Windows NT server, then the db directory is
located in the directory where you installed the application. Specify this
Access Point QVPN Builder User Guide 17
Page 32

2
INSTALLING THE QVPN BUILDER
Initial S tar tu p Tasks
file using the naming convention of the server to which you are connecting.
For a PC with the application installed in the default directory:
c:\Program Files\Lucent\AccessView\db\AccessViewMaster.db
For a PC using the c:\AccessView installation directory:
c:\AccessView\db\AccessViewMaster.db
For a Solaris system using the /lucent installation directory:
/lucent/AccessView/db/AccessViewMaster.db
E
VOLVING VERSION
For Solaris systems, if you already have Builder V2.1 or V2.3 installed on
your system, first do a full deployment to all APs with V2.1 or V2.3. Then
install V2.4 directly over V2.1 or V2.3 without uninstalling the software. This
automatically evolves the existing databases properly. Now, do a full deployment of V2.4.
2.1
AND
2.3 D
ATABASES
NOTE
If you install Builder V2.4 in a different directory on the Solaris system than
the one in which V2.1 or V2.3 was installed, you should evolve the existing
databases manuall y with the f ollowi ng proc edure before us ing t hem in V2. 4 of
Builder.
For an NT system, you can evolve a V2.1 or V2.3 da tabase to a V2.4 databa se
manually with the following procedure.
1 Copy all the VPN databases from the 2.1 or 2.3 directory to the 2.4 instal-
lation database directory.
If you have already created VPN databases in V2.4 of Builder,
make sure you do not have conflicting file names before you
copy the files because the new files will be overwritten by those
being copied.
Do not copy the AccessViewMaster database
(AccessViewMaster.db) if you have already used V2.4 to
create rule sets. To copy the existing rule sets from V2.1 or
V2.3, expo rt t h e ru l e s ets from Bui ld er V2 . 1 o r V2 . 3 an d im po rt
them into V2.4. (See Page 85 for information about exporting
and importing rule sets.)
2
Change directory to the Access View database directory located under the
18 Access Point QVPN Builder User Guide
Page 33

INSTALLING THE QVPN BUILDER
Initial Startup Tasks
directory where you installed Builder using this command:
cd <dir>/AccessView/db
3
Manually run the evolve process on all of the copied databases using this
command:
For a Solaris system:
../bin/EvolveDatabase <database name>
For an NT system:
..\bin\EvolveDatabase.bat <database name>
NOTE When you open the VPN databases for the first time after
evolving them, you must know the file name and enter it
manually because they will not be listed in the VPN Open
Dialog box.
. . . . .
A
CCESSING
S
YSTEMS
UNIX S
If you are using the client/server version and you want to access a UNIX database from a Windows NT system, you must use the Windows NT registry editor (REGED T32 utility) to set up RP C authentication. Follow these st eps to
use RPC authentication:
1 Determine your UNIX user ID (UID) and group ID (GID) using the id
command on your UNIX system.
2 Run the registry editor on your Windows NT system.
3 Set up the following variables:
HKEY_LOCAL_MACHINE\Software\Object Design
Inc.\ObjectStore6.0\Remote\<username>\UNIX.UID
HKEY_LOCAL_MACHINE\Software\Object Design
Inc.\ObjectStore6.0\Remote\<username>\UNIX.GID
4
Set the values for UNIX.UID and UNIX.GID to the values you found in
step 1.
ERVER DATABASES FROM
W
INDOWS
NT C
LIENT
Access Point QVPN Builder User Guide 19
Page 34

2
S
ETTING UP THE
D
ATABASES
INSTALLING THE QVPN BUILDER
Initial S tar tu p Tasks
To set up the QVPN Reques t Conf ig dae mo n s er vic e o n Windows NT systems
to access UNIX databases, follow these steps:
1 With User Manager, create a local NT account specifying your machine
2 Add the UID and GID to the registry. See “Accessing UNIX Server Data-
3 From the Start menu, select Settings → Contr ol Pane l → Services. In the
QVPN R
name as the domain na me and the user who exists o n yo ur UNIX database
server as a local account.
bases From Windows NT Client Systems” on Page 19.
Services window, select QVPN Request Config Daemon and click the
Startup button. In the Log On As se ction of the Service wi ndow, select the
This Account radio button and click the button to the right of this field to
reconfigure the QVPN Request Config daemon service to run as the user
created in step 2. In the Add User win dow, select your machine name from
the List Names From drop-down list and the user created in step 2. Click
OK to return to the Service window. Click OK to return to the Services
window. Click Close to complete the procedure.
EQUEST CONFIG DAEMON TO ACCESS
UNIX
4 Activate the servi ce by r eboo ting the PC. If you have already r eb oote d t he
PC, click the Start button in the Services window to activate the service.
20 Access Point QVPN Builder User Guide
Page 35

G
ETTING
S
TARTED
W
ITH
B
UILDER
. . . . . . . . . . . . . . . . . . . . . . . . . . . . . . . . . . .
This section describes the Access Point QVPN Builder application
(Builder) graphical user interface. It also provides information about
application-wide tasks and associated applications. The following sections provide this information:
• About the Builder Window
• Getting Detailed Hel p Information
• Configuring SNMP Access Settings
• Managing Access Point Systems
• Using the Traffic Status and Tunnel Status Applications
• Using the QVPN Request Config Daemon
. . . . .
ABOUT THE BUILDER WINDOW
. . . . . . . . . . . . . . . . . . . . . . . . . . . . . . . . . . . . . . . . . . . . . . . . . . . . . . . . . . . . . . . . . . . . .
The Builder window (shown in Figure 2) appears when you start the
application and lets you specify the properties for the VPN and its APs.
The Definition View comprises three frames:
• Tree frame which displays VPN and AP relationship.
• Configuration and Deployment Frame which dis plays config ured and
deployed data.
• Log frame which displays log messages.
Access Point QVPN Builder User Guide 21
Page 36

3
Figure 2 QVPN Builder Definition View Window
Expand Frame Arrow
Tree Frame
Configuration and
Deployment Frame
Expand Frame Arrow
GETTING STARTED WITH BUILDER
About the Builder Window
Log Frame
Message Area
Note that if you make any changes t o the prop erties, a n asteri sk appears next to
the modifi ed item in the tree fram e. Once you s ave the VPN definition, the
asterisk disappears.
22 Access Point QVPN Builder User Guide
Page 37

T
HE TREE FRAME
The Tree frame shows the relationship
between the VPN and Access Point in a tree
format. You can expand or collap se the tree
at any time. The root of the tree (the global
VPN) contains four children: VPN,
Qos/Firewall, NAT, and APs. VPN,
Qos/Firewall, and NAT are configuration
types and appear as folders. The folders
represent collections of properties that
allow you to globally configure the VPN.
There can be multiple APs within a VPN.
Each AP also contains t he sa me thr ee types
of configurations — VPN, Qos/Firewall,
and NAT . Changes made at AP level pert ain
to that AP only. Before you can perform
many actions from the toolbar or main menu, you need to select an item in the
Tree fra me. For t he global VPN, APs, and configuration types you can use the
right mouse button menu for some tasks. These same menu items are also
available in the main menu.
GETTING STARTED WITH BUILDER
About the Builder Window
. . . . .
T
HE CONFIGURATION AND DEPLOYMENT TABS
Each property folder has configuration and deployment tabs. The Configuration tab displays data that reflects the item selected in the tree fr ame. You can
edit the information displayed in the Configuration frame. When you make a
change in the frame, the Apply button is enabled. Any edits you make, however, do not take effect until you click the Apply button.
Access Point QVPN Builder User Guide 23
Page 38

3
GETTING STARTED WITH BUILDER
About the Builder Window
THE DEPLOYMENT TAB
The Deployment tab provides details about the tunnels that will be generated.
As with the Configuration tab, the Deployment tab reflects the item selected in
the tree frame. The Deployment tab shows what actions will be taken when the
APs are configured according to the properties you’ve selected.
T
HE LOG FRAME
The Log frame displays log messages generated by certain events, including
changes, deployments, and deployment failures.
You can clear or purge (erase from disk) the log. For more information, see
“Configuring Logging” on Page 129.
24 Access Point QVPN Builder User Guide
Page 39

GETTING STARTED WITH BUILDER
About the Builder Window
Table 1 describes the tool bar buttons in the Definition View window.
. . . . .
Table 1.
Button Description
Create a new VPN
Creates a new VPN definition. Same as File → New.
Open an existing VPN
Opens a VPN definition that you choose from the dialog box.
Same as File
Removes the curren t VPN
Removes the open VPN definition. Same as File
Save the current VPN
Saves the open VPN definition. Same as File → Save.
Clear current entries from log table display
Clears the Log table display. Same as Edit → Log → Clear.
Delete all log entries from database and clear display
Clears the database and the Log table display. Same as
→ Log → Purge.
Edit
Apply All Configs to All APs, or Apply VPN, QoS/Firewall, and/or
NAT to all or selected APs
Same as Device
Definition View Tool Bar Buttons
→ Open.
→ Remove.
→ Apply → Apply Configuration popup.
Query VPN and/or QoS/Firewall, based on selected APs
Same as Device
Display Rule Set Editor
Brings up the QoS/Firewall Rule Set Editor. Same as Tools
Rule Set Editor....
View tunnel status
Brings up the Tunnel Status application. Same as Tools
Status Applications
View traffic status
Brings up the Traffic Status application. Same as Tools →
Status Applications
Launch telnet session to current selected AP
Same as Tools → Telnet.
Launch browser application of current selected AP
Same as Tools
→ Query → Query Configuration popup.
→
→ T un nel Status.
→ Traffic Status.
→ Browser.
Access Point QVPN Builder User Guide 25
→
Page 40

3
GETTING STARTED WITH BUILDER
Getting Detailed Help Information
Table 1. Definition View Tool Bar Buttons (Continued)
Button Description
Launch SSH session to current selected AP
Same as Tools
Display program information, version number and copyright
Displays program, version number, and copyright information.
Same as Help
→ SSH.
→ About....
GETTING DETAILED HELP INFORMATION
. . . . . . . . . . . . . . . . . . . . . . . . . . . . . . . . . . . . . . . . . . . . . . . . . . . . . . . . . . . . . . . . . . . . . . .
Builder provides Help when you select Help Topics from the Help menu. For
additional information about running online help on Solaris systems, see
“Troubleshooting” on Page 133.
CONFIGURING SNMP ACCESS SETTINGS
. . . . . . . . . . . . . . . . . . . . . . . . . . . . . . . . . . . . . . . . . . . . . . . . . . . . . . . . . . . . . . . . . . . . . . .
Builder do es not perform general AP router configuration. The APs must be
configured and reachable by means of SNMP for Builder to configure QVPN
tunnels, QoS/firewall, and NAT. The SNMP access settings for the connected
AP and Builder must match so that Builder can communicate with each AP.
With the root VPN selected, select Edit → SNMP Properties to specify how
Builder should set up SNMP access for the APs added to the VPN definition.
26 Access Point QVPN Builder User Guide
Page 41

GETTING STARTED WITH BUILDER
Configuring SNMP Access Settings
For the AP, select Edit → SNMP Properties to make changes to the SNMP
access info rmation.
. . . . .
The SNMP Properties Dial og let s you co nfigur e SNMP para meters for ea ch of
the following SNMP operations:
• Config — used when applying a configuration
• Query — used when making queries
• SLA Polling — used by the pol ler application. These SNMP para meters
are exported to a text file when you select Tools → Export → Probe List.
The different operations provide flexibility, allowing more security, such as
SNMPv3 and encryption, when applying configurations, and allowing faster
access, using SNMPv2 and no encryption, when making queries.
By default, the Use same parameters for all SNMP operations checkbox is
checked. When chec ked, the same pa rame ters are us ed for all thre e op erations .
If you uncheck the Use same parameters for all SNMP operations checkbox,
the drop-down list is enabled, and lets you specify individual parameters for
each of the three oper ations.
You can specify the SNMP version as V2 (for simple SNMP acces s) or V3 (fo r
Access Point QVPN Builder User Guide 27
Page 42

3
GETTING STARTED WITH BUILDER
Managing Access Point Systems
secure SNMP access). If you are using either SNMPv2 or SNMPv3, you
should specify the Community/user name.
If you are usin g SNMPv3, you can specify the aut henticat ion prot ocol (NONE,
MD5, or SHA) and its password. You can also specify the type of encryption
(NONE or DES) and its privacy password. Note that you must specify values
for authenticati on protocol (not NONE) and it s password, if you have sp ecified
the type of encryption.
When you have finished configuring SNMP, click on the ( ) button to the
right of the IP Address field to test the specified validity of SNMP access.
Refer to the Access Point Configuration Guide for more information about
configuring SNMPv3.
MANAGING ACCESS POINT SYSTEMS
. . . . . . . . . . . . . . . . . . . . . . . . . . . . . . . . . . . . . . . . . . . . . . . . . . . . . . . . . . . . . . . . . . . . . . .
You can add, modify, and remove APs for VPNs, QoS/Firewalls, and NAT
using Builder.
A
DDING ACCESS POINT SYSTEMS
T o add an Access Poin t system (AP) to the VPN defi nition, se lect Edit → Add
AccessPoint and change any settings in the Access Point Properties frame as
necessary. After making the necessary changes, you should verify the configuration and deploy the configuration to ensure that the configuration is updated.
M
ODIFYING ACCESS POINT SYSTEMS
Modify the Access Point entries in the VPN definition frame by selecting the
AP in the Tree frame and making the changes in the Access Point Properties
frame.
R
EMOVING ACCESS POINT SYSTEMS
Remove an AP from a VPN definition by selecting the AP in the Tree frame
and selecting Edit → Remove AccessPoint. The AP is removed from the
VPN definition frame.
28 Access Point QVPN Builder User Guide
Page 43

GETTING STARTED WITH BUILDER
Using the Traffic Status and Tunnel Status Applications
. . . . .
USING THE TRAFFIC STATUS AND TUNNEL STATUS APPLICATIONS
. . . . . . . . . . . . . . . . . . . . . . . . . . . . . . . . . . . . . . . . . . . . . . . . . . . . . . . . . . . . . . . . . . . . . . .
As part of Builder, you can use the Traffic Status and Tunnel Status applications. To use either application, select the AP for which you want to display
this status information and select the Traffic Status tool bar button ( ) or Tunnel Status tool bar button ( ) on the Definition View screen.
These app lications can also be i nstalled as standalone applications.
On Solaris systems, they are installed in the same directory as Builder. You can
include the path to Bui lder in your she ll initi alization file. You can create a soft
link to the applications using these commands:
> ln -s /<installation directory >/Ac ce ssView/bi n/TunnelStatus
/<dir>/bin/TrafficStatus
> ln -s /<installation directory>/AccessView/bin/TrafficStatus
/<dir>/bin/TunnelStatus
On Windows NT systems, you can install the standalone applications with
their own display icons on the deskto p. Click on the Lucent Traffic Status icon
on your desktop or select Start → Programs → Lucent Access Point →
Traffic Status to start up the Traffic Status application. Click on the Lucent
Tunnel Status icon on your desktop or select Start → Programs → Lucent
Access Point → Tunnel Status to start up the Tunnel Status application.
If you start up either application as standalone, then you must enter the appropriate information for your AP in the Enter the Host Name dialog box.
Access Point QVPN Builder User Guide 29
Page 44

3
T
RAFFIC STATUS APPLICATION
GETTING STARTED WITH BUILDER
Using the Tr af fic Status and T u nn el Status Applications
The Traffic Status application displays:
• A graphical representation of the CBQ tree running on the AP
• A pie chart showing the bandwidth allocated to each class as a percentage
of its parent (when you have selected the Allocated tab)
30 Access Point QVPN Builder User Guide
Page 45

GETTING STARTED WITH BUILDER
Using the Traffic Status and Tunnel Status Applications
• Bar charts showing the actual bandwidth usage by selected classes (when
you have selected the Equalizer tab)
. . . . .
The Traf fi c S tat us appli cati on also le ts you ch ange the bandwidth for a parti cular class. To change the bandwidth:
1 Select the class and then the Bandwidth field.
2 Enter the bandwidth (for example, 100 Kbps or 10 Mbps) and press the
Return key to make your change.
Note that the change is not permanent. The bandwidth changes only for the
session.
T
UNNEL STATUS APPLICATION
The Tunnel Status application displays:
• A graphical representation of the tunnels running on the AP
• Summary information about the selected tunnel or interface (when you
Access Point QVPN Builder User Guide 31
Page 46

3
GETTING STARTED WITH BUILDER
Using the QVPN Request Config Daemon
have selected the Summary tab)
• Bar charts showing the traffic rates on selected tunnels (when you have
selected the Traffic Rates tab)
USING THE QVPN REQUEST CONFIG DAEMON
. . . . . . . . . . . . . . . . . . . . . . . . . . . . . . . . . . . . . . . . . . . . . . . . . . . . . . . . . . . . . . . . . . . . . . .
Designed to be used with Builde r, the QVPN Request Config daemon (Config
daemon) allows an AP to request its own configuration (VPN, QoS/firewall,
and NAT) from Builder. The AP can request only information that is configured by Builder.
32 Access Point QVPN Builder User Guide
Page 47

If you are using the standalone version, the Config daemon runs on the same
machine as Builder. If you are using the client/server version, the Config daemon runs on the same machine as the ObjectStore server or client.
The Config daemon recei ves r equest s via SNMP f rom the AP f or it s conf igura tion information ba sed on it s rout er addr ess. Once the Confi g daemon r eceive s
the request, it l ooks up the VPN definitions as soci at ed with this AP in the mas ter database on the Ob jectStore serv er (client/server ver sion) or in Builder’s
database directory (standalone version). The Config daemon opens each associated VPN definitio n and sends the configuration info rmation to the AP that
originated the reques t.
S
TARTING UP THE DAEMON
The Config daemon is installed during the Builder installation.
On Windows NT sy stems, the Confi g daemon is star ted automatical ly. You can
verify that it is started by checking the Status for the QVPN Request Config
Daemon entry in the Services dialog box in the Control Panel.
GETTING STARTED WITH BUILDER
Using the QVPN Request Config Daemon
. . . . .
On Solaris systems, yo u are as ked if you want t o confi gure t he Con fig daemon
to start at system boot as part of the installation procedure. If you reply with
yes, the necessar y script files are create d to pe rform this op eration. If yo u reply
with no, you can start the Config daemon at any time by typing the
QVPNRequestConfigDaemon command at the system prompt.
NOTE
U
SING THE DAEMON
To use the Config daemon on the AP to reque st its conf igurat ion fr om Builder,
follow these steps:
1 Using Builder, configure the VPN definition to include the AP that will
use the Config daemon to request its configuration.
Make sure the VPN’s configuration method is set to accept configuration
requests from APs.
Make sure that the AP’s configuration method is Requested in the Access
Point Properties frame.
The QVPNRequestConfigDaemon uses port 161. If another
application or service (such as snmpdx) is using port 161, the
QVPNRequestConfigDaemon might not start at system boot.
Access Point QVPN Builder User Guide 33
Page 48

3
GETTING STARTED WITH BUILDER
Using the QVPN Request Config Daemon
NOTE You must close the VPN definition before using the daemon
from the AP to request a configuration.
2
Using the CLI, issue the following command from the AP to request the
configuration:
qvpn_BuilderConfigRequest <IP address> private
Replace <IP address> with the IP address of the daemon (usually the same
machine running the ODI server).
For help about the qvpn_BuilderConfigRequest command, use the
qvpn_BuilderConfigRequest help command.
S
HUTTING DOWN THE DAEMON
On Windows NT systems, you can shut down the Config daemon by selecting
the QVPN Request Config Daemon entry in the Services dialog box in the
Control Panel and clicking the Stop button.
On Solaris systems, shut down the Config daemon by entering the following
command on the machine running the daemon (where <dir> is the directory
where Builder was installed):
<dir>/AccessView/bin/remotecommand co nfi g shutdown
V
ERIFYING DAEMON OPERATION
If you want to verify the actions of the Config daemon, display the log file
located in the installation directory.
On Solaris systems, use this command:
tail -f ConfigDaemon.log
On Windows NT systems, use either of these commands:
type ConfigDaemon.log
more ConfigDaemon.log
34 Access Point QVPN Builder User Guide
Page 49

C
HANGING THE
GETTING STARTED WITH BUILDER
Using the QVPN Request Config Daemon
SNMP C
OMMUNITY NAME FOR THE DAEMON
You can change the SNMP Community name for the Config daemon as follows:
1 Stop the daemon with the following command:
/etc/rc2.d/S90rcd stop
2 Edit the following file as a superuser (root):
/var/prod/app/vpn/AccessView/bin/QVPNRequestConfigDaemon
Within this file, you’ll find a line that starts the daemon program and
resembles the following line:
eval exec $JAVA_HOME/bin/java -mx256m -oss2m -ss1m -D
xedia.builder.Daemon BASEDIR=$JAVA_HOME/ &
Change the line to pass in a -user option with the Community name you
want. In this example, community-name is a variable re presenting the
string you enter.
. . . . .
eval exec $JAVA_HOME/bin/java -mx256m -oss2m -ss1m -D
xedia.builder.Daemon -user community-name BASEDIR=$JAVA_HOME/
&
3
Restart the daemon with the following command:
/etc/rc2.d/S90rcd start
Check the l og entry for the changed community name with the following
4
command:
tail /var/prod/app/vpn/AccessView/ConfigDaemon.log
T
ROUBLESHOOTING THE DAEMON
If you need to troubleshoot the daemon, you can enter the following help command for a list of additional commands that provide more information about
the daemon.
bin/remotecommand help
Access Point QVPN Builder User Guide 35
Page 50

3
GETTING STARTED WITH BUILDER
Using the QVPN Request Config Daemon
The following table lists the daemon commands and provides a description:
Command Description
show version Shows the current version of the daem on
show debug Shows the debug mode
show database Shows the database path where the daemon
looks for VPNs
show snmp Shows the daemon’s SNMP configuration
show log Sh ow s the dae mo n’s log
show clients Shows the daemon’s remote command clients at
present
show stats Shows the daemon’s current statistics
config shutdown Shuts down the daemon
config debug Sets debug mode. Debug mode can be one of
(none, snmp, database, all)
36 Access Point QVPN Builder User Guide
Page 51

M
ANAGING
VPN
S
. . . . . . . . . . . . . . . . . . . . . . . . . . . . . . . . . . .
The Access Point QVP N Builder application (Builder) reduces the complexity of deploying large-scale virtual private networks (VPNs) by
enabling you to centrally define tunnel configurations and policies.
Instead of manua lly configuring each site, Builder centra li zes policy management tasks, reducing the time and cost needed to set up a VPN. Once
policies are established as part of a VPN definition, Builder securely distributes the configuration to the Access Point systems (APs) that make up
that VPN.
Builder ha s an easy-to-use interface that lets you quickly configure tunnels using VPN definitions. These VPN definiti ons are fil es that contai n
QVPN tunnel configuration information for the entire VPN and the individual APs, including:
• VPN and AP properties
. . . . .
• Probe settings
You can create, delete, open, and save these files. All users can display
VPN definitions, but users must have read-write privilege to add, modi fy,
or delete VPN definitions.
Access Point QVPN Builder User Guide 37
Page 52

4
MANAGING VPNS
Creating or Modifying VPN Definitions
CREATING OR MODIFYING VPN DEFINITIONS
. . . . . . . . . . . . . . . . . . . . . . . . . . . . . . . . . . . . . . . . . . . . . . . . . . . . . . . . . . . . . . . . . . . . . . .
This section describes how to create or change VPN settings for the VPN and
Access Point properties. It also describes how to add and remove APs from
your VPN configuration.
When you start Builder, the Tree and Configuration and Deployment frames
appear as shown below:
You’ll need to provide information for the following fields in the VPN General
Properties frame of the Configuration tab:
Field Description
QVPN Name Replace New VPN with the name. This name is an
identifier used by the application. It is not used by the AP.
Config Method Specify how the configuration is deployed to the APs; by
the Builder, the AP, or Mixed. By default, the Builder
pushes out the configuration to the APs. If you select
Mixed as the configuration method, select the appropriate
APs and change their configuration methods. See
“Selecting the Configuration Method” on Page 38.
S
ELECTING THE CONFIGURATION METHOD
You specify how the configuration is deployed to the APs by changing the
Config Method field in the VPN Properties frame. The possible values are:
• Builder Push (default) — The Builder pushes out the configuration to all
the APs when requested.
• AccessPoint Request — The AP must request the configuration using the
QVPN Builder Configuration daemon. See “Using the QVPN Request
38 Access Point QVPN Builder User Guide
Page 53

MANAGING VPNS
Creating or Modifying VPN Definitions
Config Daemon” on Page 32.
• Mixed — The configuration method must be selected for each AP.
If you have chosen the Mixed configuration method for the VPN, you must
select the configura tion metho d for ea ch AP (unless you acc ept the def ault) by
following these steps:
1 Select the AP for which you want to sp ecify a co nfigurat ion method to dis-
play its Access Point Properties frame.
2 Select the appropriate method from the Config Method drop-down list.
Builder (de fault) indic ates that the Builder pushes out the configuratio n to
the AP when requested.
Requested indicates that the AP will request the configuration using the
QVPN Builder Configuration daemon. See “Using the QVPN Request
Config Daemon” on Page 32.
3 Click Apply.
. . . . .
C
HANGING
VPN S
When defining the VPN settings for the VPN properti es, conside r your VPN’s:
ETTINGS FOR THE
VPN
• Probe Poller ID
• Security profile
• Use of wildcard tunnels (When setting up large VPNs, wildcards allow
you to quickly configure large numbers of tunnels.)
• Use of routing protocols for unnumbered interfaces
• IKE authentication method
• Type
• Use of SLA Probes without tunnels or in a probe-only setting
Access Point QVPN Builder User Guide 39
Page 54

4
MANAGING VPNS
Creating or Modifying VPN Definitions
On the Tree frame, click on VPN to display the VPN Properties frame.
The following table describes th e fields in th e VPN Prope rties frame:
Field Description
Poller ID A user-definable option for future expansion.
Security Profile Specify the security profile (default-strong is the default
value). The security profile is the security specification for
the entire VPN. Use one of the su ppl ied default profiles or
create a new one. See “Managing Security Profiles” on
Page 58 for more information.
Use Wildcard
Tunnels
Use Dyna mic Routing If this selection is checked, you can turn on RIP and OSPF
IKE Auth Method Specify the IKE authentication method for tunnel
If this selection is not checked, a tunnel is created from
each subnet on this AP to each subnet on the other APs.
In this case, the AP itself will create static routes for the
tunnels.
If this selection is checked, the application will create a
single (wildcarded) tunnel between each AP and static
routes for each su bnet s pecified in the AP. This provide s a
means of quickly scali ng to a large VPN.
routing protocols for the unnumbered interfaces of the
tunnels.
establishment; preshared key (default), DSA signature,
RSA signature, RSA encryption, or revised RSA
encryption.
40 Access Point QVPN Builder User Guide
Page 55

C
HANGING
MANAGING VPNS
Creating or Modifying VPN Definitions
Field Description
VPN Type Display the VPN topology. By default, a full mesh topology
is created. If you w ant to create a hu b-and-spoke t opology,
select the AP you want to use as the hub and change the
HUB Type in the Access Point Properties frame. See
“Configuring Hub-and-Spoke VPN Types” on Page 41.
Probe Only VPN If checked, only the SLA Probes for the VPN are created
when deploying the configuration to the APs.
VPN S
ETTINGS FOR THE ACCESS POINT SYSTEMS
For the AP, click on the VPN folder to display the Access Point Properties
frame. When defining the VPN settings for the APs, you must specify the following fields:
Field Description
. . . . .
Router Address The IP and router addresses are often the same. Builder
automatically fills in the router address field (if left blank)
with the IP address you entered in the Edit SNMP
Properties Dialog when you added the AP to the VPN.
HUB Type See “Configuring Hub-and-Spo ke VPN T ypes ” on Page 41
for more information.
Route Cost Route cost is applicable both to full mesh and hub-and-
spoke topologies. For full mesh topologies, you can
accept the default cost or configure an AP as a backup
node. To configure a primary or secondary (backup) hub,
see “Configuring Hub-and-Sp oke VPN Types” on Page 41
for more information.
IKE Keep Alive
Update
Security Profile Specify the security profile (default-strong is the default
Subnets Subnets indicate the networks that reside as protected
C
ONFIGURING HUB-AND-SPOKE VPN TYPES
See “Configuring IKE Keepalive Update” on Page 42 for
more information.
value).
VPN endpoints on this AP.
By default, the VPN type is a full mesh topology as shown in the VPN Properties frame. To create a hub-and-spoke topology:
1 Select the AP that you want to use as the hub to display its Access Point
Access Point QVPN Builder User Guide 41
Page 56

4
MANAGING VPNS
Creating or Modifying VPN Definitions
Properties frame.
2 Select Primary or Secondary from the HUB Type drop-down list.
Primary sets the AP as the prima ry hub . Route s to the pr ima ry hub are cre ated with a cost of 50.
Secondary sets the AP as the backup hub. Routes to the s econdary hub are
created with a higher cost of 60 so that the routes to the primary hub are
used first.
To use load balancing, set both hubs to be the same typ e (e ither primar y or
secondary).
Tunnels will be created between each AP designated as a hub and every
other AP that is not a hub.
NOTE
3
C
ONFIGURING IKE KEEPALIVE UPDATE
If you want to reset the VPN topology to full mesh, change the
HUB Ty pe field to Not a Hub.
Click Apply.
The IKE Keepalive update deter mines whether a remote gateway is reachable
by sending update messages to it at regular (configurable) interv als. When a
response is not received after a specified number of updates, Keepalive
assumes the gateway is unreacha ble. In this event, Keepalive places its IPSec
42 Access Point QVPN Builder User Guide
Page 57

MANAGING VPNS
Creating or Modifying VPN Definitions
subinterface in a down and then a testing state, and attempts to reestablish a
tunnel connection.
You can specify how often Keepalive update messages are sent. By default,
Keepalive update messages are sent every 10 seconds as shown in the Access
Point Properties frame.
To change the frequency:
1 Select the AP for which you want to change the frequency to display its
Access Po int Properties frame.
. . . . .
2 Change the IKE Keep Alive Update field.
When Keepalive is enabled, the possible values are 10 - 3600 (1 hour).
A value of 0 (zero) disables Keepalive.
3 Click Apply.
C
HANGING PROBE SETTINGS
The AP has the abi lity t o send p ropriet ary probe packets . For more in formation
about probes, see the Access Point Configuration Guide. You can specify
whether the APs respond to Probes and configure Probe parameters. By
default, the device (AP) manages probes and Builder does nothing.
For the root VPN, expand VPN and select Probe to specify Probe settings for
Access Point QVPN Builder User Guide 43
Page 58

4
MANAGING VPNS
Creating or Modifying VPN Definitions
the APs that you add to VPN definitions.
The following table explains the interaction of the checkboxes in the Probes
Properties frame:
Field Description
Device Manages
Probes
Builder Manages
Probes
Create Probe On
Remote APs
When checked, the AP creates probes for all APs to which it
has tunnels. If unchecked, the APs create no probes.
When checked (and Device Manages Probes is unchecked),
Builder manages probes. When used in conjunction with the
Create Probe On Remote APs checkbox, Builder can
configure probes for specific dev ices. If unchecked, Builder
will not create any more probes and removes any prob es it
previously created.
If checked here and checked on remote APs, Builder can
create a probe for each remote AP on this AP.
In order to delet e all probes from th e devic e us ing Buil der, uncheck the Device
Manages Probes and Builder Manages Probes checkboxes in the Probe Prop-
erties for that device in Builder and deploy to that device. Any previously created probes are removed.
After configuring you r set ti ngs , you can apply the changes to either all APs or
to selected APs by selecting the appropriate button for Apply Parameters To...
as shown below.
44 Access Point QVPN Builder User Guide
Page 59

MANAGING VPNS
Saving the VPN Definition
If you click on the Selected
AP(s) button, the Access-
Points Dialog appears which
allows you to select the APs to
which you want to apply the
probe settings.
For the AP you want, expand VPN and select Probe to make changes to the
Probe settings.
. . . . .
The Override Default Backlog? checkbox is for future expansion.
SAVING THE VPN DEFINITION
. . . . . . . . . . . . . . . . . . . . . . . . . . . . . . . . . . . . . . . . . . . . . . . . . . . . . . . . . . . . . . . . . . . . . . .
To save the VPN definition to the database, se lect File → Save As... or File →
Save.
Access Point QVPN Builder User Guide 45
Page 60

4
S
AVING THE
MANAGING VPNS
Opening VPN Definitions
VPN D
When using the stan dal one ver si on, the Save VPN As... dialog window shown
here appears.
EFINITION
W
ITH THE STANDALONE VERSION
Enter the n ame of the fi le to which you want to save the VPN definition and
click on the Save button.
S
AVING THE
VPN D
When using the client/server version, if you select File → Save to save the
VPN definition and th e VPN name is unique , the VPN defi nitio n is s aved with out any prompts.
If the VPN name is not unique or you select
File → Save As... , the Save As window shown
at right appears to prompt you for a name.
Enter the name of the VPN definition and
click OK.
EFINITION
W
ITH THE CLIENT/SERVER VERSION
OPENING VPN DEFINITIONS
. . . . . . . . . . . . . . . . . . . . . . . . . . . . . . . . . . . . . . . . . . . . . . . . . . . . . . . . . . . . . . . . . . . . . . .
To open a specific VPN definition, select File → Open.
If you want to use VPN definitions that were created with V ersion 1.1, refer to
“Importing VPN Definitions From Version 1.1” on Page 53.
46 Access Point QVPN Builder User Guide
Page 61

O
PENING THE
MANAGING VPNS
Opening VPN Definitions
VPN D
When using the standalone version, the Choose the VPN to be opened dialog
window shown here appears.
EFINITION
W
ITH THE STANDALONE VERSION
. . . . .
O
PENING THE
Select the VPN definition you want to open and click Open to open the VPN
definition. You can now modify the VPN or APs for this VPN definition.
VPN D
When using the client/server version,
the VPN Open dialog box shown at
right appears.
Select the VPN name you want to use
from the list of VPN names and click
on the Open butto n. Y ou c an also open
a VPN definition according to its file
name by entering the file name (for
example, vpn30.db) in the database
name field below the VPN name list.
You can now modify the VPN or APs
for this VPN definition. Note that the
file must re side in the server’s database (db) directory.
EFINITION
W
ITH THE CLIENT/SERVER VERSION
Access Point QVPN Builder User Guide 47
Page 62

4
A
CCESSING LOCKED FILES
MANAGING VPNS
Removing VPN Definitions
If the application was not shut down properly or if another user is actively
using the same VPN definiti on, the St eal the lock ? pop-up window shown he re
appears.
NOTE
You should steal the lock only if the application was not shut
down properly.
If someone else is actively using the VPN definition, you should
only open the VPN definition in read-only mode. Stealing the
lock while someone is using the VPN definition can corrupt the
definition.
REMOVING VPN DEFINITIONS
. . . . . . . . . . . . . . . . . . . . . . . . . . . . . . . . . . . . . . . . . . . . . . . . . . . . . . . . . . . . . . . . . . . . . . .
To remove a specific VPN definition, choose the appropriate method for the
standalone or client/server version.
R
EMOVING THE
VPN D
When using the standalone version, to remove VPN definitions:
1 Open the VPN definition or select the VPN definition you want to remove
from the Most Recently Used drop-down list. This drop-down list (found
above the tool bar) displays the last 10 VPN definitions.
2 Select File → Remove to delete the selected VPN.
EFINITION
W
ITH THE STANDALONE VERSION
3 Confirm that you really want to remove the VPN. The VPN is removed
from the drop-down list and from the database/log (db) directory.
48 Access Point QVPN Builder User Guide
Page 63

MANAGING VPNS
Using VPN Definitions
. . . . .
R
EMOVING THE
VPN D
When using the client/server version, to remove VPN definitions:
1 Select File → Remove to display the VPN Open dialog box.
2 Select the VPN name you want to remove and click Remove.
3 Confirm that you really want to remove the VPN. Once confirmed, you
cannot cancel th e operation. The VPN is re moved from the drop-down list
and from the database/log (db) directory.
EFINITION
W
ITH THE CLIENT/SERVER VERSION
USING VPN DEFINITIONS
. . . . . . . . . . . . . . . . . . . . . . . . . . . . . . . . . . . . . . . . . . . . . . . . . . . . . . . . . . . . . . . . . . . . . . .
After creating VPN definitions, you can:
• Export the VPN data (Probe list)
• Import the VPN data
E
XPORTING DATA
To export the Probe li st for a VPN definition to a text file, select Tools →
Export → Probe List to display the Choose the export file name window
where you can specify the export path for the Probe list file.
By default, the export file is placed in the export directory.
Access Point QVPN Builder User Guide 49
Page 64

4
I
MPORTING
F
ORMATTING VPN DATA FILES
MANAGING VPNS
Using VPN Definitions
VPN D
You can import V PN data text files for VPN definitions. To import this data,
select Tools → Import → VPN Text File. You create these text files using the
format described in the next section.
When creating a VPN data file, follow these general formatting guidelines:
ATA FILES
• Empty lines are allowed between lines or definition blocks.
• A pound sign (#) precedes comment lines.
• A space is allowed between commas or keywords.
• If the field i s empty, the word none must be included as the value.
• Each line that includes fields must start with one of these case-sensitive
keywords:
- VPN to indicate the VPN’s definition block
- SNMP to i ndicate the S NMP properties for the VPN o r AP
- ACCESSPOINT to indicate the AP’s definition block
- SUBNET to indicate the AP’s subnets
The following lines display the four keywords and their fields. The field
values must be specified in the order shown.
# VPN, QVPN name, VPN ID, Use Wildcard Tunnels
# SNMP, SNMP Version, Communit y/Us er, Auth Protocol , Auth Pas swor d,
# Encryption, Private Password, Retries, Timeout, Port
# ACCESSPOINT, IP Address, AP Name, Router Address
# SUBNET, IP Address, Mask
Follow these steps when creating the VPN data file:
1 The first line in the VPN data file that is not a comment li ne must start
with the VPN keyword. Each VPN data file can contain only one VPN
line.
The QVPN name field in the VPN line can be more than one word.
50 Access Point QVPN Builder User Guide
Page 65

MANAGING VPNS
Using VPN Definitions
2 The next line must start with the SNMP or ACCESSPOINT keyword.
If the next line is not the SNMP line, then the VPN uses the default SNMP
access parameters. Otherwise, these rules apply to the fields in the SNMP
line:
- The SNM P Vers ion field must be v2 or v3. These values are case-sen-
sitive.
- The Com munity/User, Auth Password, and Private Password fields
can be more than one word.
- The Auth Protocol field must be md5, sha, or none. These values are
case-sensitive.
- The Encryption field must be des or none. These val ue s are case- sensi -
tive.
Any lines containi ng the ACCESSPOI NT keyword ind icate th e start of the
AP definition block.
. . . . .
NOTE
- The AP name field in the ACCESSPOINT line can be more than one
word.
- The IP Address and Router Address fields must be in the IP address
format (X.X.X.X).
3 The next line following an ACCESSPOINT line must start with the SNMP
or SUBNET keyword.
The order is not import ant, but only one SNMP line is allo wed within each
AP definition block. There can be many SUBNET lines within each AP
definition block.
If there is no SNMP line, then the AP uses the default SNMP access
parameters specified for the VPN.
If you are specifying SUBNE T lines, the IP Addre ss and Ma sk fiel ds must
be in the IP address format (X.X.X.X).
If you import a text file with definitions for one or more APs and
they are not preceded by a VPN definition block, the AP
definitions are appended to the VPN that is open in Builder.
If you try to import AP definitions and there is no VPN open in
Builder, you will receive an error.
See the next section for a sample VPN data file.
Access Point QVPN Builder User Guide 51
Page 66

4
MANAGING VPNS
Using VPN Definitions
SAMPLE VPN DATA FILE
This sample file defines a VPN w ith three APs.
# ************ VPN definition block begins! *********************
# VPN,QVPN mame,VPN ID,Use Wildcard Tunnels
VPN,Xedia VPN,ID001,true
# SNMP,SNMP Version,Community/User,Auth Protocol,Auth Password,
# Encryption,Private Password,Retries,Timeout,Port
SNMP,v3,swnm,md5,swnmauth,des,swnmpriv,2,5,161
# ************ VPN definition block ends! ************************
# ************ AccessPoint definition block begins! *************
# ACCESSPOINT,IP Address,AP Name,Router Address
ACCESSPOINT,198.202.232.126,AP One,10.200.1.195
# SNMP,SNMP Version,Community/User,Auth Protocol,Auth Password,
# Encryption,Private Password,Retries,Timeout,Port
SNMP,v3,swnm,md5,swnmauth,des,swnmpriv,2,5,161
# SUBNET,IP Address,Mask
SUBNET,10.1.1.0,255.255.255.0
SUBNET,10.1.2.0,255.255.255.0
# ************ AccessPoint definition block ends! ****************
# More AccessPoint definitions
# ACCESSPOINT,198.202.232.127,AP Two,none -> When router addr
# specified as "none", router addr will use AP’s IP addr
ACCESSPOINT,198.202.232.127,AP Two,10.200.1.196
SNMP,v3,swnm,none,none,none,none,2,5,161
SUBNET,20.1.1.0,255.255.255.0
SUBNET,20.1.2.0,255.255.255.0
ACCESSPOINT,198.202.232.160,AP Three,10.200.1.197
SNMP,v2,swnm,none,none,none,none,2,5,161
SUBNET,30.1.1.0,255.255.255.0
SUBNET,30.1.2.0,255.255.255.0
52 Access Point QVPN Builder User Guide
Page 67

I
MPORTING
MANAGING VPNS
Verifying the Configuration
VPN D
To use VPN definitions created with Version 1.1, you must import the VPN
definitions.
1 Select Tools → Import → AV 1.1 VPN to display all VPN files in the
EFINITIONS FROM VERSION
Choose the VPN to be imported window.
1.1
. . . . .
2 Select the appropriate VPN definition (V1.1 only) and click Open.
NOTE
You can import only VPN definitions created with Version 1.1. If
your are running a later version of Builder, see “Evolving
Version 2.1 and 2.3 Databases” on Page 18.
VERIFYING THE CONFIGURATION
. . . . . . . . . . . . . . . . . . . . . . . . . . . . . . . . . . . . . . . . . . . . . . . . . . . . . . . . . . . . . . . . . . . . . . .
Click on the Deploymen t tab s for VPN and AP confi gurat ion typ es to vie w the
configuration that will be deployed to the APs. Refer to Page 54 for more
information about the VPN Deployment table.
DEPLOYING THE CONFIGURATION
. . . . . . . . . . . . . . . . . . . . . . . . . . . . . . . . . . . . . . . . . . . . . . . . . . . . . . . . . . . . . . . . . . . . . . .
To apply the configur atio n shown i n the VPN Depl oyment t able, s elect Device
→ Apply (or use the seventh tool bar button ( ) from the left). When the
Apply Configuration popup appears, adjust the selections if necessary and
click on the Start button.
Access Point QVPN Builder User Guide 53
Page 68

4
MANAGING VPNS
Using the VPN Deployment Tables
You also have the option of applying
all configurations to all APs by selecting All Configuration s. Click on the
Start button when you are finished. If
you have not saved t he VPN definition
yet, the application prompt s you to do
so before applying the configuration..
When you apply the VPN configuration to APs , Builder performs these
actions:
• Gets version information.
• Gets the VPN Deployment table,
the IPSec interface table, and the security profile table.
• Sets any security profiles used by this VPN, but does not remove the
defaults of other existing security profiles that might be used by other
VPNs going through this AP.
• Creates and conf igures al l neces sary IPSe c interf aces. Not e that k ey values
for shared keys are configured each time this step is done because shared
keys are not readable from the AP (for security reasons).
• Removes all tunnels that are marked as remove in the VPN Deployment
table.
• Creates all tunnels or modifies the tunnels in the tunnel list.
If any one of the above act io ns f ai ls , the appl y aborts. Note, however, that part
of the configuration might have been applied before the failure occurred.
To apply the VPN configuration to selected APs, select the APs in the Tree
frame, select Device → Apply, and in the Apply Configuration popup that
appears, a djust the selections if necessary, and click on the Start button.
USING THE VPN DEPLOYMENT TABLES
. . . . . . . . . . . . . . . . . . . . . . . . . . . . . . . . . . . . . . . . . . . . . . . . . . . . . . . . . . . . . . . . . . . . . . .
The application displays information about these tunnels using Deployment
tables. By selecting an item in the Tree and then clicking on the Deployment
tab in the Configura tion an d Deployment frame, you can obt ain st atus an d configuration information about VPNs.
54 Access Point QVPN Builder User Guide
Page 69

MANAGING VPNS
Using the VPN Deployment Tables
You can sort the VPN Deployment table in ascendin g or de scending order fo r a
specific field by sel ecting the hea der for the fi eld you want. The sort ing toggles
between ascending and descending order each time you click on the field’s
header.
. . . . .
VPN S
TATISTICS
Selecting the VPN root and then clicking on the Deployment tab displays the
following information:
• AP Name — the AP name
• Type — full mesh or hub
• VPN Update — when the VPN configuration was deployed
• CBQ Update — when CBQ configuration was deployed
• NAT Update — when NAT configuration was deployed
• Last Request — time of the last configuration request from the Config
daemon
The window resembles the following display:
VPN
OR
AP S
UMMARY INFORMATION
Selecting VPN at th e VPN r oot or an AP and then clicking on the Deployment
tab provides access to summary information about Tunnels, Routes, IPSec
Interfaces, and Probes.
Access Point QVPN Builder User Guide 55
Page 70

4
MANAGING VPNS
Using the VPN Deployment Tables
The window resembles the following display:
T
UNNEL
, R
OUTE, AND
Selecting VPN for an AP and then clicking on the Deployment tab provides
three views — Tunnels, Routes, and IPSec Interfaces:
The Tunnels tab displays th e followin g information:
IPSEC I
NTERFACE INFORMATION
• State — the tunnel’s current configuration state (Add — to be added,
Current — deployed, Remove — to be removed)
• C — configuration
• Q — query
• Tunnel Name — the tunnel name
• Remote AP — IP address of the remote gateway
• Mode — the tunnel’s mode (Enabled or Disabled)
• Security Profile — the tunnel’s security profile, which is determined b y
the weakest profile of the participating APs
You can select any tunnel with a mouse click to highlight the row.
56 Access Point QVPN Builder User Guide
Page 71

MANAGING VPNS
Using the VPN Deployment Tables
The Tunnels tab resembles th e following display:
The Routes tab displays the following information:
• State — the route’s current configuration state (Add — to be added,
Current — deployed, Remove — to be removed)
• C — configuration
. . . . .
• Destination — IP address of the remote gateway
• Mask — address mask
• Cost — route cost
• Router Address — IP address of the local or remote gateway
The Routes tab resembles the following display:
The IPSec Interfaces tab displays the following information:
• State — IPSec’s current configuration state (Add — to be added,
Current — deployed, Remove — to be removed)
• C — configuration
Access Point QVPN Builder User Guide 57
Page 72

4
MANAGING VPNS
Managing Security Profiles
• Remote Gateway — IP address of the remote gateway
The IPSec Interfaces t ab resembles the following display:
You can sort VPN Deployment tables in ascending or descending order for a
specific field by clicking on the header for the field you want to sort. The sorting toggles between ascending and descending order each time you click on
the field’s header.
MANAGING SECURITY PROFILES
. . . . . . . . . . . . . . . . . . . . . . . . . . . . . . . . . . . . . . . . . . . . . . . . . . . . . . . . . . . . . . . . . . . . . . .
Builder ha s three defa ult security profiles:
• default-weak
• default-strong
• default-auth
If you have read-write privilege, you can add, modify, or delete other security
profiles.
58 Access Point QVPN Builder User Guide
Page 73

A
DDING SECURITY PROFILES
To add security profiles:
1 Select Edit → Security
Profiles to display the
Security Profile Dialog
window.
2 Click Add to add the
new security profile.
3 Select <New Security
Profile> from the
Profile List as shown
here.
4 Replace <New Secu-
rity Profile > with the
correct name in the
Profile Parameters
section and set the other parameters as appropriate.
MANAGING VPNS
Managing Security Profiles
. . . . .
5 Click Apply to add the security profile.
6 Repeat steps 2 through 5 for each additional profile.
7 Click Done when you have finished adding profiles.
M
ODIFYING SECURITY PROFILES
To modify security profiles:
1 Select Edit → Security Profiles to display the Security Profile Dialog
window.
2 Select the profile from the Profile list.
3 Make any changes in the Profile Parameters section.
4 Click Apply to modify the profile.
5 Repeat steps 2 and 3 for each additional profile.
6 Click Done when you have finished modifying profiles.
Access Point QVPN Builder User Guide 59
Page 74

4
D
ELETING SECURITY PROFILES
MANAGING VPNS
Managing Security Profiles
To delete security profiles:
1 Select Edit → Security Profiles to display the Security Profile Dialog
window.
2 Click on the profile in the Profile List that you want to delete and click
Remove to delete the profile.
3 Repeat step 2 for each additional profile.
4 Click Done when you have finished deleting profiles.
60 Access Point QVPN Builder User Guide
Page 75

M
ANAGING
P
OLICIES
QOS/F
IREWALL
. . . . . . . . . . . . . . . . . . . . . . . . . . . . . . . . . . .
The Access Point system (AP) uses CBQ to provide firewall and QoS services by classifying and scheduling how traffic flows through the AP.
Traffic is classified by matching it against criteria configured for the interface. Traffic is scheduled by assigning it some portion of available bandwidth. In some cases, you might allow traffic to borrow additional
bandwidth or you might deny bandwid th based on availab ility. The goal is
to provide a guaranteed level of service to certain traffic classes. In addition, firewalls can be set up to drop specified traffic classes. In effect, the
QoS and firewall policies you establish provide the complementary benefits of bandwidth management and a higher level of security.
The Access Point QVPN Builder application (Builder) lets you set f irewall rules a nd QoS polic ies for an interface fro m a centralized location
when you configure your tunnels (see Chapter 4). As part of your VPN
definition, you can associate specific rule sets for a VPN or an AP. You
define generic rule sets for the VPN nodes. Each rule in the rule set can
have classification and application parameters. You set parameter values
to provide specific values for each AP in the VPN. Each rule set and its
parameters specify the QoS and firewall policy for a particular AP.
. . . . .
Each rule has these capabilities:
• Defines pa rameters for firewall or QoS services.
• Prioritizes itself by its order of appearance in the rule set’s hierarchi-
cal list.
Access Point QVPN Builder User Guide 61
Page 76

5
MANAGING QOS/FIREWALL POLICIES
Using the QoS/Fire wall Rule Set Edit or
• Supplies values for th e parameters from the rule set or the Access Point
properties.
The more specificity provided by the rule, the more secure the rule. You can
create, modify, save, and delete rule sets.
With Builder, you can implement QoS or firewall policies in four steps:
1 Define the rule set that specifies QoS or firewall policies using the
QoS/Firewall Rule Set Editor.
2 Associate the rule set with the VPN or AP.
3 Set parameter values for each AP.
4 Deploy the configuration to distribute the configuration to all or selected
APs in the VPN.
USING THE QOS/FIREWALL RULE SET EDITOR
. . . . . . . . . . . . . . . . . . . . . . . . . . . . . . . . . . . . . . . . . . . . . . . . . . . . . . . . . . . . . . . . . . . . . . .
Use the QoS/Firewall R ule Set Editor to create or modify a rule set. Figure 3
shows a sample window.
Figure 3 QoS/Firewall Rule Set Editor Window
Table 1 describes the tool bar buttons in the QoS/Firewall Rule Set Editor.
Table 1 QoS/Firewall Rule Set Editor Tool Bar Buttons
Button Description
Create a new rule set
Creates a new rule set. Same as File → New.
Open an existing rule set
Opens a rule set that you choose from the dialog box. Same as
→ Open.
File
62 Access Point QVPN Builder User Guide
Page 77

MANAGING QOS/FIREWALL POLICIES
Button Description
Save the active rule set
Saves the open rule set. Same as File
Set selected rule as a peer to current parent
Changes the exec ution orde r of the selected rule from a child to a
peer of the current parent.
Set preceding peer as parent for select ed rule
Changes the execution order of the selected rule to be a child to
preceding peer.
Move selected rule above a preceding peer
Changes the executi on order of the s elected ru le to be before the
preceding peer.
Move selected rule below a succeeding peer
Changes the execution order of the selected rule to be below the
succeeding peer.
Using the QoS/Firewall Rule Set Editor
. . . . .
→ Save.
The QoS/Firewall Rule Set Editor fields are described in the following table:
Field Description
Seq Indicates the execution order of the rule and the
hierarchy in the rule set. For example, child rule
1.1.
Rule Hierarchy Indicates the name of the rule in the form of a tree.
Src Indicates the source of the traffic. Specify host
ranges or domains if you want to be more specific
about the traffic to allow or deny.
Dst Indicates the destination of the traffic. Specify host
ranges or domains if you want to be more specific
about the traffic to allow or deny.
Service Specifies service classification. Classify a service
as stateful, stateless, ToS range, or datalink.
Interface Indicates the interface(s) where CBQ classes are
created. If the service classification is stateful, you
can specify a stateful interface.
Access Point QVPN Builder User Guide 63
Page 78

5
D
EFAULT TEMPLATE RULE SET DEFINITION AND MODIFICATION
MANAGING QOS/FIREWALL POLICIES
Using the QoS/Fire wall Rule Set Edit or
Field Description
Action Specifies the action to take for the selected traffic.
You can deny, permit, limit, or shape traffic. These
actions determine which tree (input or output) is
used and based upon this , which ad dition al actio ns
(such as forwarding policy or datalink marking) are
allowed.
Comment Indicates any comment s for the associa ted rule.
When you select File → New in t he Rule Set Editor, the current default tem -
plate rule set is duplicated as the current rule set definition. The default template provides a set of rules that allow, at a minimum, management of the AP
by means of SNMP, TELNET, or a web browser. Provid ing acc ess t o an AP b y
means of SNMP allows Builder to create Firewall/QoS classes with the Rule
Set Editor. In addition, Builder must be able to manage an AP over a WAN,
LAN, or VPN. By default, two rules (shown in Figure 3) are defined in the
template:
1 allowAPMgmt — permits management access o f the AP d evice. It has the
following flow definition:
• Destination ports: SNMP, SSH, TELNET, HTTP, ISAKMP, L2TP
• Source ports: SNMP
• Protocols: ESP
• Bandwidth allocation: 0
• Bounded: false
Note that allowAPMgmt uses an “or” operator wh ich affects filtering.
2 APMgmt-default — default rule that denies all other traffic to and
through the AP. It has the following flow definition:
• Bandwidth allocation: 0
• Bounded: true (any traffic not classified by rule 1 is filtered (denied))
64 Access Point QVPN Builder User Guide
Page 79

MANAGING QOS/FIREWALL POLICIES
Using the QoS/Firewall Rule Set Editor
Remember that the “-default” suffix has special meaning when appli ed
to a CBQ class on t he AP ( For more in form ation about defaul t cl asses ,
see the Access Point Configur ati on Guide).
. . . . .
NOTE
NOTE
These rules do not provide a default firewall.
Both of these rules are applied to the APMgmt interface which must be set it in
the definition of each AP to which this rule set is applied. If the AP will be
accessed across a LAN or WAN connection, you’ll nee d to se lect the appropriate CBQ interface (See “Sele cting or Editing Interface Parameters” on Page
73), so you don’t inadvertently prevent access to the AP during rul e s et c onf ig-
uration. VPN protocols are included in the default template, so an AP can be
managed across a VPN tunnel. You can modify or delete the allowAPMgmt
rule. However, when you attempt to edit it, Builder issues a warning and asks
if you wish to proceed. You can modify or delete the APMgmt-default.
The best way to modify the behavior of the default template is to add child
rules within the allowAPMgmt rule or to override the service classification
parameters for this rule for a particular AP.
Inappropriate modifications can prevent access to the AP.
The default template does not ensure management access of
an AP through an intermediate AP when this template is
applied to both APs.
To add an additional level of s ecuri ty for managemen t acc ess, you ca n defi ne a
child rule with a sourc e host address range that defin es t he IP addresses of systems that can le gitim atel y manage th e AP. To allow an AP to request it s conf iguration, you also need to add a child rule with a destination host range that
defines the IP address of the system running the Request Config daemon.
The previous example used child rules to modify the allowAPMgmt rule. An
acceptable override might prevent certain types of management access. For
instance, to deny browser access, you can override (See “Editing Service
Parameters” on Page 70) the APMgmtServices service classification by
removing http from the destination port ranges.
See “Modifying the D efault New Rule Set” on Page 78 for details about how
to edit/reset the default template.
If you would like to shape traf f ic withou t confi guring a firewal l, you can do so
as follows :
1 Delete the default rule set template.
Access Point QVPN Builder User Guide 65
Page 80

5
MANAGING QOS/FIREWALL POLICIES
Defining a Rule Set
2 Add the following rule: APAllowShaping-default. Configure this ru le
before setting up additional rules, so you don’t inadvertently prevent
access to th e AP. Give the rule the following flow shape action:
• Bandwidth allocation: 0
• Bounded: false
DEFINING A RULE SET
. . . . . . . . . . . . . . . . . . . . . . . . . . . . . . . . . . . . . . . . . . . . . . . . . . . . . . . . . . . . . . . . . . . . . . .
When defini ng rule sets, consider:
• The parameters used to specify the desired QoS or firewall polici es.
• The order in which to execute the rules.
After creating rule sets, you implement the QoS or firewall policies by specifying them as part of the VPN or AP definition.
To define a rule set:
1 Select Tools → Rule Set Editor... to bring up the QoS/Firewall Rule Set
Editor. If you had selected a VPN or an AP, its rule set appears in the
QoS/Firewall Rule Set Editor.
Refer to “Using the QoS/Firewall Rule Set Editor” on Page 62 for information about using the QoS/Firewall Rule Set Editor.
2 If you are defining a new rule set, select File → New to bring up the
default new rule set shown in Figure 3.
If you are modifying an existing
rule set, select File → Open in the
QoS/Firewall Rule Set
Editor to bring up the Open Rule
Set Dialog box shown at right.
Select the rule set you want to
modify and click Open Rule Set.
3 Add or modify the rules in your
rule set.
66 Access Point QVPN Builder User Guide
Page 81

MANAGING QOS/FIREWALL POLICIES
Defining a Rule Set
NOTE If you are modifying a rule set for an AP, make sure you set
parameter values so you can provide the correct values for a
specific AP. Refer to “Setting Parameter Values” on Page 80
for more information.
4
Save the rule set by selecting File → Save As... or File → Save.
A
DDING A RULE
When you add a rule, you must decide th e exe cution order of the rule . You can
add the rule as a child (Within), a preceding peer (Before), or a succeeding
peer (After) to a selected rule.
To add a rule:
1 Select a rule and select Rule → Insert → (Within, Before, or After) to
add the rule as a child, as a preceding peer, or as a succeeding peer for the
selected rule.
. . . . .
2 Save the rule set by selecting File → Save As... or File → Save.
S
PECIFYING PARAMETERS
The Classi fication pa rameters indicate the traffic flows affected by this rule.
Specify the source (Src), destination (Dst), and service (Service) that the traffic
must match.
The Apply parameters indicate where CBQ classes are created and the action
to take for th e selected traffic. That is, it defin es the allowed actions for the
specified interface — the LAN, the WAN, the DMZ (the demilitarized zone, or
public network, between the corporate LAN and the WAN), and the VPN.
To specify the parameters for a particular rule:
1 Select the field in the rule for which you want to add or change the param-
eter.
2 Click on the right mouse button a nd make a choi ce fro m the po p-up menu.
For Classification pa rameters (Src, Dst, or Service), choose one of these
options:
• Any as the parameter
• Select... to specify a parameter
Access Point QVPN Builder User Guide 67
Page 82

5
MANAGING QOS/FIREWALL POLICIES
Defining a Rule Set
• Edit... to add or change a parameter
For Apply parameters (Interface or Action), choose one of these options:
• A value as the parameter
• Edit... to add or change a parameter
NOTE
3
If a parameter doesn’t exist, first you need to create it. After
you’ve created it, select the parameter to specify it in the rule.
See “Editing Source or Destination Parameters” on Page 69 or
“Editing Servic e Para met ers” on Page 70 for information about
creating parameters.
Save the rule set by selecting File → Save As... or File → Save.
The parameters you set for the rule set can be fairly generic, so when associating a rule set with an AP, remember to set the appropriate values for the AP as
described in “Setting Parameter Values” on Page 80.
S
ELECTING CLASSIFICATION PARAMETERS
For Classification parameters, y ou can
select the appropriate parameter for your
rule. When you choose Select... from the
pop-up menu, a dialog box appears for you
to make a selection. The dialog box dis plays
the Classification parameter, the rule for
which you are making the sel ect io n, and the
available selections. The Select Source
Parameter dialog box is shown here.
Select the appropriate parameter for your
rule and click OK to make your selection.
68 Access Point QVPN Builder User Guide
Page 83

MANAGING QOS/FIREWALL POLICIES
EDITING SOURCE OR DESTINATION PARAMETERS
When you choose Edit... from the pop-up menu for source or destination
parameters, the Rule Source Definition Dialog or Rule Destination Definition
Dialog appears. The Rule Source Definition Dialog is shown here.
Defining a Rule Set
. . . . .
NOTE
A source or destination ca n be a range of host s, a single ho st, or a domain. Add
a new source or destination by specifying the name and the source or destination type (Host Ran ge or Do main) f rom the drop-d own lis t and c licki ng Add in
the New Source/Destination section. Remove a selected source or destination
by selecting the classification from the Source/Destination List and clicking
Remove Selected in the New Source/Destination section. If the source or destination you want to remove is referenced in a rule, a warning is displayed.
Edit the source or destination by adding or removing selected source or destination types. Add a type by entering the type and clicking Add in the
Source/Destination Edit section. Remove an application by selecting the type
from the list and clicking Remove in the Source/Destination Edit section.
Click OK to make your changes.
You can use an empty Source or Destination parameter as a
placeholder to allow overrides for all or a subset of APs.
Access Point QVPN Builder User Guide 69
Page 84

5
MANAGING QOS/FIREWALL POLICIES
Defining a Rule Set
EDITING SERVICE PARAMETERS
When you choose
Edit... from the
pop-up menu for service parameters, the
Rule Classification
Dialog appears.
Add a new service
classification by
specifying the name
and the classifi cati on
type (Stateful, Stateless, TOS Range, or
Datalink) from the
drop-down list and
clicking Add in the
New Classification
section.
Stateful cl as si fi cat ion lets you create a si ngl e c las s f o r aggr eg ati ng all possible
port pairings for a service, making it easier to classify traffic for well-known
services and to provide a firewall capability. Stateless classification requires
exact matching for specified packet characteristics (addresses and protocols).
TOS Range classifi cation let s you classi fy traf fic bas ed on the ToS values used
to implement Diff-Serv. Datalink classification lets you classify packets based
on datalink inf ormati on (s uch as p riori ties that you have s et u p for yo ur VLAN
traffic).
Remove a selected classif ication by selec ting the item in the Classif ication List
and clicking Remove Select ed in the Ne w Classification section.
Edit the classificati on by selecting the item in the Classification List and specifying the appropriate information on the right side of the dialog box.
70 Access Point QVPN Builder User Guide
Page 85

MANAGING QOS/FIREWALL POLICIES
Defining a Rule Set
For the Statef ul cl assif icati on type , in addi tion t o making i t easy t o creat e a sin gle class for aggregating all possible port pairings for a well-known service,
you can statefully classify TCP and UDP applications. To do so, select the
allTcp or allUdp type and click Add in the Stateful Classification Edit section.
. . . . .
To specify the port ranges for the applications, click Tcp/Udp Port Range... to
display the Port Classification dialog box. You can select the application or
port range from the Ports drop-down list. If you select port range, enter the
range. Click Add Src or Add dest as appropriate in either case and click OK.
For the TOS Range classification type, add the ToS Range by filling in the
Start and End fields (hex values that specify the start and end of the range of
bit patterns that the AP will match against the masked area of IP packets) in the
ToS Range Definition section. Fill in the Mask field (hex value that specifies
the bits in the ToS byte of IP packets that will be read and matched against by
the AP) in the ToS Mask Definition section. Click Apply.
Access Point QVPN Builder User Guide 71
Page 86

5
MANAGING QOS/FIREWALL POLICIES
Defining a Rule Set
For the Datalink class ificati on type, add the da tali nk index (r ange lis t of 16-bit
TCI value expressed in he x) by fil li ng i n the Add Da ta li nk In dices section and
clicking Add Indices. Add th e datalink mask (mas k that is app l ied to the TCI
and each value in the datalink index range expressed in hex) by filling in the
Datalink Mask section and clicking Apply.
72 Access Point QVPN Builder User Guide
Page 87

MANAGING QOS/FIREWALL POLICIES
Defining a Rule Set
For the Stateless classification type, add a type by selecting the appropriate
protocols and ports and clicking Add as shown here.
. . . . .
Remove a classification type by selecting the item in the list and clicking
Remove in the Classification Edit section.
Click OK to make your changes.
NOTE
You can use an empty Service parameter as a placeholder to
allow overrides for all or a subset of APs.
SELECTING OR EDITING INTERFACE PARAMETERS
Interfaces are pl aceholders fo r CBQ overrides which you must set for each AP.
Although the override names have meaning, there are no restrictions or verification to ensure that you’ve selected the proper overrides.
Access Point QVPN Builder User Guide 73
Page 88

5
MANAGING QOS/FIREWALL POLICIES
Defining a Rule Set
For interface parameters, select th e Interface field you want to change, click on the
right mouse button, and select the appropriate value from the pop-up menu. If you
select Edit..., then the Rule Set Interface
Association Dialog window appears.
If the Service classification type is stateful,
your interface should be stateful so you
can enter the two interfaces used for the
application’s traffic flow. If the interface is
stateful, you must also enter the From
Interface. If the interf ace is stateful, you
can also allow tr affic to flow in both di re ctions by checking the Bi- Dir ect i onal
Definition check box.
The bidirectiona l int erfa ce pai r is d ispla yed wit h a doub le -heade d arro w (<=>)
between the two interfaces and four separate classes are created with names
based on the rule name. For example, if you created a rule called test for a
LAN<=>WAN bidirectional interface, the test-R- est and test classes are created on the LAN inter fa ce and the test-est and test-R classes are c reated on the
WAN interface. Note that the established classes receive a peer classification
to ensure that they are c l assified b efore eithe r base class.
Click OK to make your changes.
S
ELECTING ACTION PARAMETERS
For action parameters, select the Action field
you want to change, click on the right mouse
button, and select Deny, Permit, Limit
(inbound traffic), or Shape (outbound traffic)
from the pop-up menu. If you select Limit or
Shape, then the Rule Action Definition Dial og
window appears so you can enter the rate, the
maximum bandwidth, and bounding information. Table 2 shows default action profiles and
associated CBQ trees.
If you select Limit, then you can specify a forwarding policy f or s ta tef ul or stateless cl as si fi cation (see Page 101 for information about
creating a forwar di ng po li cy). When you spec-
74 Access Point QVPN Builder User Guide
Page 89

MANAGING QOS/FIREWALL POLICIES
Defining a Rule Set
ify a forwarding policy for stateful classes, the forwarding policy is applied to
the From interface speci fied in the Rule Set Inter face Dialog box when edit ing
the Interfa ce field.
Table 2 Default Action Profiles and Associated CBQ Trees
CBQ Tree Stateful
Established
From
Action Bandwidth Bounded
Deny 0 True Input Input Input tree of
Permit 0 False Input Input Input tree of
Limit >=0 T rue/False Input Input Input tree of
Shape >=0 T rue/False Output Output Output tree of
Interface
To
Interface
Class
Returned To
To interface
To interface
To interface
To interface
. . . . .
If you select Shape, then you can specify the
datalink traffic index or flag. These values
map traffic classes to specific datalink selection param eters. These values differ between
datalinks (such as Ethernet, Frame Relay,
ATM, and ISDN) and should be specifie d only
for stateless classes. Note that you cannot
configure the datalink using Builder; the
datalink must already be configured.
Click OK to make your selections or changes.
C
HANGING THE RULE NAME
The rule names are listed in the Rule Hierarchy column. To change a name:
1 Select the name you want to change.
Access Point QVPN Builder User Guide 75
Page 90

5
MANAGING QOS/FIREWALL POLICIES
Defining a Rule Set
2 Click on the right mouse button
and select Rename... from the
pop-up menu (same as selecting
Rule → Rename...). Fill in the
new name when prompted.
3 Click OK to change the name.
4 Save the rule set by selecting File → Save As... or File → Save.
S
PECIFYING EXECUTION ORDER
The rules are executed in hierarchical order. Within a peer group, however,
rules are executed sequentially, except for default rules, so you m ust ensure
that your rules ar e sp ecified in the correct order. To mod if y th e order shown in
the Seq field use the arrows in the tool bar:
1 Select the rule for which you want to change the execution order.
2 To make the rule a child, click the right arrow ( ) button.
To make the rule a peer of the current parent, click the left arrow (
ton.
To move the rule up or down in the execution order as a peer, click on
either the up arrow (
3 Save the rule set by selecting File → Save As... or File → Save.
A
DDING OR CHANGING COMMENTS
The comments are listed in the Comment column. To change a comment:
1 Select the comment field for the appropriate rule.
2 Make your changes.
3 Save the rule set by selecting File → Save As... or File → Save.
) but-
) or down arrow ( ) buttons.
76 Access Point QVPN Builder User Guide
Page 91

R
EMOVING A RULE
To remove a rule:
1 Select the rule you want to delete.
2 Select Rule → Delete (or click on the right mouse button and select Delete
from the pop-up menu) to remove the selected rule from the rule set.
3 Save the rule set by selecting File → Save As... or File → Save.
P
URGING UNUSED PARAMETERS
To remove parameters that are not being used by a rule set:
1 Select the rule set from which you want to delete unused parameters.
2 Select File → Purge Unused Parameters to remove any unreferenced
parameters from the rule set.
MANAGING QOS/FIREWALL POLICIES
Modifying a Rule Set
. . . . .
A pop-up message appears to let you know that no unreferenced parameters were purged or to ask you to confir m the del et io n of any unreferenced
parameters.
3 Save the rule set by selecting File → Save As... or File → Save.
MODIFYING A RULE SET
. . . . . . . . . . . . . . . . . . . . . . . . . . . . . . . . . . . . . . . . . . . . . . . . . . . . . . . . . . . . . . . . . . . . . . .
To modify a rule set:
1 Select Tools → Rule Set Editor... to bring up the QoS/Firewall Rule Set
Editor. If you had selected a VPN or an AP, its rule set appears in the
QoS/Firewall Rule Set Editor.
Refer to “Using the QoS/Firewall Rule Set Editor” on Page 62 for information about using the QoS/Firewall Rule Set Editor.
Access Point QVPN Builder User Guide 77
Page 92

5
MANAGING QOS/FIREWALL POLICIES
Modifying the Default New Rule Set
2 Select File → Open in the
QoS/Firewall Rule Set Editor to
bring up the Open Rule Set Dialog box.
Select the rule set you want to
modify and click Open Rule Set.
3 Modify the rules in your rule set.
NOTE
4
If you are modifying a rule set for an AP, make sure you set
paramet er values so that you can provid e the corr ect value s for
a specific AP. Refer to “Setting Parameter Values” on Page 80
for more information.
Save the rule set by selecting File → Save As... or File → Save.
MODIFYING THE DEFAULT NEW RULE SET
. . . . . . . . . . . . . . . . . . . . . . . . . . . . . . . . . . . . . . . . . . . . . . . . . . . . . . . . . . . . . . . . . . . . . . .
To modify the default new rule set that is used whenever you create a new rule
set:
1 Select Tools → Rule Set Editor... to bring up the QoS/Firewall Rule Set
Editor.
2 Select File → Edit Template to bring up the DefaultRuleSetTemplate
shown below.
78 Access Point QVPN Builder User Guide
Page 93

MANAGING QOS/FIREWALL POLICIES
Removing a Rule Set
3 Make any changes to t he rule set and se lect File → Save to use this rule set
as the defau lt new rule set.
. . . . .
NOTE
If you decide you want to use the original default new rule set,
then select File
→ Reset Template.
REMOVING A RULE SET
. . . . . . . . . . . . . . . . . . . . . . . . . . . . . . . . . . . . . . . . . . . . . . . . . . . . . . . . . . . . . . . . . . . . . . .
To remove a rule set:
1 Select Tools → Rule Set Editor... to bring up the QoS/Firewall Rule Set
Editor.
2 Select File → Delete Ruleset... to
bring up the Remove Rule Set
Dialog box.
3 Select the rule set you want to
remove and click Remove Rule
Set.
ASSOCIATING A RULE SET
. . . . . . . . . . . . . . . . . . . . . . . . . . . . . . . . . . . . . . . . . . . . . . . . . . . . . . . . . . . . . . . . . . . . . . .
To use rule sets in your VPN, you must associate a rule set with an AP or a
VPN in the VPN definition as follows:
1 For either the global VPN or AP in Builder’s Tree frame, click on
QoS/Firewall.
2 If you are associating a rule set for an AP, the Use VPN Firewall Ruleset
Access Point QVPN Builder User Guide 79
Page 94

5
MANAGING QOS/FIREWALL POLICIES
Setting Parameter Values
box is checked by default as shown below.
Make sure the Use VPN Firewall Ruleset box is no t chec ked if y ou want to
use a differe nt rule set from the on e specified i n the VPN Prope rties fr ame.
3 Click Select Rule Set... to choose the rule set that you wa nt to associate
with this AP or VPN from the Select Rule Set Dialog box and click Select
Rule Set.
NOTE
4
5 Save the rule set association for this VPN definition by selecting File →
Be sure to set parameter overrides for each AP. Refer to
“Setting Parameter Values” on Page 80 for more information.
Click Apply in the upper left-hand corner of the Properties frame.
Save As... or File → Save.
SETTING PARAMETER VALUES
. . . . . . . . . . . . . . . . . . . . . . . . . . . . . . . . . . . . . . . . . . . . . . . . . . . . . . . . . . . . . . . . . . . . . . .
When you associate a rule set with an AP or a VPN, you must set values for
certain parameter s so th at y ou use th e approp ri ate par ameter values for th e AP.
You must set values for the Interface parameters. In many ca se s, you will modify the valu es for the source (Src) and destina tion (Dst) parameters as well.
You should check to see whether the Service parameter values must be modified.
To set parameter values for particular APs:
1 In Builder’s Tree frame, click on QoS/Firewall for the AP.
2 Make sure th at the specif ied rule set is the one you want to use. If it is not
80 Access Point QVPN Builder User Guide
Page 95

MANAGING QOS/FIREWALL POLICIES
Setting Parameter Values
the correct one, associate the correct rule set with this AP as described in
“Associating a Rul e Set” on Page 79.
3 A list of parameters for this rule set appears in the drop-down list below
the Set AP Parameter button. Select the parameter for this AP for which
you want to specify a value and click Set AP Parameter to modify the
parameter value.
4 Modify the parameter values in the Rule Source Definition D ialog, Rule
Destinatio n Definiti on Dialog, Rule Classification Dialog, or Interface
Dialog windows that appear (depending on the parameter you selected)
and click Apply.
When you set
classification
parameter
values, that
parameter is
marked with the
letters AP
enclosed in a
yellow circle as
shown at right.
. . . . .
Once you set
parameter values, the parameter is listed in the
Parameter Overrides list. Edit or
remove an override by selecting the parameter in the Parameter Ov errides
Access Point QVPN Builder User Guide 81
Page 96

5
MANAGING QOS/FIREWALL POLICIES
Verifying the QoS/Firewall Policies
list and clicking Edit Override or Remove Override.
5 Apply your changes t o the QoS/Fir ewall Proper ties and sa ve the defin itio n
so that these QoS/Firewall pol i cies are included as part of your VPN definition.
VERIFYING THE QOS/FIREWALL POLICIES
. . . . . . . . . . . . . . . . . . . . . . . . . . . . . . . . . . . . . . . . . . . . . . . . . . . . . . . . . . . . . . . . . . . . . . .
Click on the Deployment tab of the Configuration and Deployment frame to
view the configuration that will be deployed to the APs. You must still deploy
the config uration to th e APs. Refe r to Page 83 for more information about the
QoS/Firewall Deployment table.
DEPLOYING THE QOS/FIREWALL POLICIES TO APS
. . . . . . . . . . . . . . . . . . . . . . . . . . . . . . . . . . . . . . . . . . . . . . . . . . . . . . . . . . . . . . . . . . . . . . .
When you apply the QoS/firewall policies of the VPN definition to APs,
Builder pe rforms these actions:
• Gets version information.
• Gets forwarding policy definitions.
• Creates and configures all forwarding policies referenced in the rule set.
• Gets the QoS/Firewall Deployment table and the CBQ interface table.
• Creates and configures all necessary CBQ interfaces.
• Removes all CBQ clas ses t hat a re mar ked as removed in the QoS/Firewa ll
82 Access Point QVPN Builder User Guide
Page 97

MANAGING QOS/FIREWALL POLICIES
Using the QoS/Firewall Deployment Table
. . . . .
Deployment table.
• Creates or modifies all CBQ classes in the class list.
To apply the QoS/firewall policies to all the APs, select Device → Apply and
in the Apply Configuration popup that appears, adjust the selections if necessary, and click on the Start button.
To apply the QoS/firewall policies to selected APs, select the APs in the Tree
frame, select Device → Apply, and in the Apply Configuration popup that
appears, a djust the selections if necessary, and click on the Start button.
USING THE QOS/FIREWALL DEPLOYMENT TABLE
. . . . . . . . . . . . . . . . . . . . . . . . . . . . . . . . . . . . . . . . . . . . . . . . . . . . . . . . . . . . . . . . . . . . . . .
Builder displays in for mati on about the CBQ classes for the selec ted VPN defi nition in the QoS/Firewall Deployment table. The QoS/Firewall Deployment
table has two views:
• Definition View — Displays status when the application generates or
updates the QoS/Firewall Deployment table
• Apply/Query View — Displays status when the application deploys the
configuration to all APs or queries the APs for CBQ class status
You can sort the QoS/Firewall Deployment table in ascending or descending
order for a specific field by selecting the header for the field you want. The
sorting toggles between ascending and descending order each time you click
on the field’s header.
M
ODIFYING THE DEFINITION VIEW
The Definition View of the QoS/Firewall Deployment table displays the configuration that will be deployed to the APs. You must still deploy the configuration to the APs. The Definition View displays the following information
about the CBQ classes.
• If — the CBQ interface layer associated with this class
• Parent — the parent of the class
• Name — the class name
• Mode — the mode for this class (Enabled, Disabled). You can modify the
mode by clicking the mode field and usi ng the dro pdown box. This config -
Access Point QVPN Builder User Guide 83
Page 98

5
MANAGING QOS/FIREWALL POLICIES
Using the QoS/Firewall Deployment Table
ures the class but sets it to not in service.
• Definition — the definition fo r this class
• Comment — the comment associated with this class
To display the Definiti on View, cl ick on the QoS/ Firewal l Depl oyment ta b and
then the Definition View tab. All the classes for the VPN you have selected
should be displayed in a window resembling this figure:
Select any class with a mouse click to highlight the row.
Modify the Mode field in the QoS/Firewall Deployment table by selecting the
appropriate value from the drop-down list. Changes to the QoS/Firewall
Deployment table fields temporarily modify the VPN definition, but are not
saved until you deploy the configuration to all the APs.
U
SING THE APPLY/QUERY VIEW
The Apply/Query View of the QoS/Firewall Deployment table displays status
after you have depl oyed the confi guration. The Apply/Query View displays the
following information when you deploy the configuration to all APs by selecting Device → Apply () or Device → Query ( ) and make the appropriate
selections from the Apply Configuration or Query Configuration popups.
• If — the interface associated with this class
• Parent — the parent of the class
84 Access Point QVPN Builder User Guide
Page 99

MANAGING QOS/FIREWALL POLICIES
Using Rule Sets
• Name — the class name
• Message Stat us — the message status for this class
• State — the current state for this class (Modify, Add, Current, or Remove)
• C — configuration
• Q — query
To display the Apply/Query View, click on the QoS/Firewall Deployment tab
and then the Apply/Query View tab. Apply/Query V iew pro vides de tail s abou t
class status in a window resembling the following figure.
. . . . .
USING RULE SETS
. . . . . . . . . . . . . . . . . . . . . . . . . . . . . . . . . . . . . . . . . . . . . . . . . . . . . . . . . . . . . . . . . . . . . . .
After creating rule sets, you can:
• Export the rule set to a file
• Import the rule set file as a template or rule se t
E
XPORTING RULE SETS
To export the rule set to a file that can be imported as a template or rule set:
1 Select Tools → Rule Set Editor... to bring up the QoS/Firewall Rule Set
Editor.
Access Point QVPN Builder User Guide 85
Page 100

5
MANAGING QOS/FIREWALL POLICIES
Using Rule Sets
2 Select File → Open to open the rule set that you want to export to a file.
3 Select Tools → Export to specify the export path for the expo rt fil e in the
following dialog box and click Export.
By default, the export file is named after the rule set and has an .RDB file
extension. It is placed in the AccessView directory.
NOTE
I
MPORTING RULE SET FILES
You cannot edit this file, it can be imported only for use by
Builder.
To import the exported rule set fi les for use a s a rule set or template:
1 Select Tools → Rule Set Editor... to bring up the QoS/Firewall Rule Set
Editor.
2 For a rule set, select File → Open or File → New to open the rule set.
For a template, select File → Edit Template to open the default new rule
set template.
3 For a rule set, select Tools → Import → Rule Set.
For a template, select Tools → Import → Template.
NOTE
You must have previously selected File → Edit Template to
import a template.
Either action brings up the following dial og box so you can choose the rule
86 Access Point QVPN Builder User Guide
 Loading...