

Page 1

APS (Application Plus Server) 4.1
Users Guide
101-1830-001
Issue 1.0
June 1999
Page 2

Copyright 1999, Lucent Technologies
All Rights Reserved, Printed in U.S.A.
Notice
Every effort was made to ensure that the information in this book was
complete and accurate at the time of printing. Howev er, information is
subject to change.
Your Responsibility for Y our System’s Security
Toll fraud is the unauthorized use of you r te lecommunications system by
an unauthori zed party, for exampl e, persons othe r than your company’s
employees, agents, subcont ra ctors, or persons working on your com pany’s behalf. Note that th ere may be a risk of toll fraud associat ed with
your telecommunications system and, if toll fraud occurs, it can result in
substantial additional charges for yo ur te le c om munications services.
Y ou and your system manager are responsible for the security of your system, such as programming and configuring your equipm ent to prevent
unauthorized use. The system ma nager is also responsible for reading all
installation, instruction, and system admi nist ra ti on documents provided
with this product in order to f ully understand the features tha t c an int roduce risk of toll fraud and the steps th at can be t ake n t o r ed uce that risk.
Lucent Technologies does not warrant that this product is immune from or
will prevent unauthorized use of common-carrie r te le communication services or facilities accessed through or connected to it. Lucent Technologies will not be responsible for any charges th at resul t from such
unauthorized use.
Lucent Technologies Fraud Intervention
If you suspect you are being victimized by toll fraud and you need technical support or assistance, call the appropriate BCS National Custom er
Care Center telephone number. Users of the MERLIN®, PARTNER®,
and System 25 products should call 1 800 628 2888 . Users of the System
75, System 85, DEFINITY® Generic 1, 2 and 3, and DEFINITY® ECS
products should call 1 800 643 2353 . Cu stome rs outside the continental
United States should contact their local Lucent rep resentative, or call one
of the above numbers in the fol lowi n g manner:
• Dial the International Access Code; for example, 011.
• Dial the country code for the U.S., that is, 01.
• Lastly, dial eithe r of th e telephone numbers pr ovided above.
Lucent Technologies W eb Page
The world wide web home page for Lucent Technologies is:
http://www .lucent.com
Federal Communications Commission Statement
Part 15: Class A S t atement. This equipme nt has bee n tested a nd found
to comply with the limits for a Class A digital device, pursuant to Part 15
of the FCC Rules. These limits are designed to provide reasonable protection against harmful interference when the equipment is operated in a
commercial environment. This equipment generates, uses, and can radiate
radio-frequency energy an d, if not inst al le d and used in accordance with
the instructio ns, may cause h armful inter ference to ra dio comm unicat ions.
Operation of this equipment in a residential area is likely to cause harmful
interference, in whic h case the use r will be requir ed to corr ect th e inte rfe rence at his own expense.
Industry Canada (IC) Interference Information
This digital apparatus does not exc e ed t he Cla ss A lim its for ra dio noise
emissions set out in the radio interference regulations of Industry Canada.
Le Présent Appareil Nom
érique n’é
met pas de bruits radioélectriques
dépassant les limites app lic ables aux appareils numériques de la class A
préscrites dans le reglement sur le brouillage radioélectrique édicté par le
Industri e Canada.
Trademarks
See the preface of this document.
Ordering Information
Call: Lucent Technologies BCS Publications Cent er
Voice 1 800 457-1235 International Voice 317 322-6791
Fax 1 800 457-1764 International Fax 317 322-6699
Write: Lucent Technologies BCS Publications Center
2855 N. Franklin Road
Indianapolis, IN 46219
Order: Document No. 101-183 0-001
Issue 1, June 1999
For additional document s, re fe r to th e sec ti on in “About This Document”
entitled “Rel ated Resources.”
You can be placed on a standing order li st fo r thi s and other documents
you may need. For more information on standing orders, or to be put on a
list to receive future issues of th is document, contact the Luc en t Technologies Publications Center.
Obtaining Products
To learn more about Lucent Technologies products and to order products,
contact Lucent Direct, the direct-market organization of Lucent Technologies Business Communications Systems. Access their web site at
www.lucentdirect.com. Or call the following numbers: customers 1 800
451 2100, account executives 1 888 778 1880 (voice) or 1 888 778 1881
(fax).
Warranty
Lucent Technologies provides a limited warranty on this product. Refer to
the “Limited Use Software License Agreement” card provided with your
package.
European Union Declaration of Conformity
The “CE” mark affixed to the equipment means that it conforms to the
above directives. Lucent Technologies Business Communications Systems declares tha t APS equi pmen t spec ifi ed in this do cumen t conf orms to
the referenced European Union(EU) Directives and Harmonized Standards listed below:
EMC Directive 89/336/EEC
Low-Voltage Directive 73/23/EEC
Comments
To comment on this docu ment, retur n the co mment car d at t he back of thi s
document.
Acknowledgment
This document was prepared by the Product Documentation Development, Lucent Technologies, Denver, CO and Columbus, OH Middletown,
NJ.
Page 3

101-1830-001 Issue 1.0 iii101-1830-001 Issue 1.0
About This Book . . . . . . . . . . . . . . . . . . . . . . . . . . . . . . . . . . . . . . . . . . . . . . . . 17
Audience Statement. . . . . . . . . . . . . . . . . . . . . . . . . . . . .17
Purpose Statement . . . . . . . . . . . . . . . . . . . . . . . . . . . . . .18
Help and Technical Support. . . . . . . . . . . . . . . . . . . . . . .19
Conventions. . . . . . . . . . . . . . . . . . . . . . . . . . . . . . . . . . .20
Related Documents . . . . . . . . . . . . . . . . . . . . . . . . . . . . .21
Electronic Version. . . . . . . . . . . . . . . . . . . . . . . . . . .21
Other Manuals. . . . . . . . . . . . . . . . . . . . . . . . . . . . . .21
Informix Manuals . . . . . . . . . . . . . . . . . . . . . . . . . . .21
Sun Manuals . . . . . . . . . . . . . . . . . . . . . . . . . . . . . . .21
NewNet Manual . . . . . . . . . . . . . . . . . . . . . . . . . . . .21
ISSG Manuals . . . . . . . . . . . . . . . . . . . . . . . . . . . . . .21
Lucent and Octel Manuals . . . . . . . . . . . . . . . . . . . .21
Commenting on This Document . . . . . . . . . . . . . . . . . . .22
Trademarks and Registered Trademarks . . . . . . . . . . . . .22
Chapter 1 Overview
Overview of the APS Environment . . . . . . . . . . . . . . . . . . . .25
Components. . . . . . . . . . . . . . . . . . . . . . . . . . . . . . . . . . .25
Software Constructs. . . . . . . . . . . . . . . . . . . . . . . . . . . . .27
APS 4.1 Environment . . . . . . . . . . . . . . . . . . . . . . . . . . .28
APS 4.1 . . . . . . . . . . . . . . . . . . . . . . . . . . . . . . . . . . .28
ERP 2.0 . . . . . . . . . . . . . . . . . . . . . . . . . . . . . . . . . . .28
APS 4.1 New Features. . . . . . . . . . . . . . . . . . . . . . . . . . .29
Upgrade to Informix 7.3 . . . . . . . . . . . . . . . . . . . . . .29
TCP/IP Interface to Sierra/CA . . . . . . . . . . . . . . . . .29
TCP/IP Alarm Functionality. . . . . . . . . . . . . . . . . . .29
TCP/IP Connectivity Check . . . . . . . . . . . . . . . . . . .29
ERP 2.0 New Features. . . . . . . . . . . . . . . . . . . . . . . . . . .30
Inclusion of ERP as a Custom Application. . . . . . . .30
ERP Supports Multiple APSs . . . . . . . . . . . . . . . . . .30
Initialization on Reboot . . . . . . . . . . . . . . . . . . . . .30
APS 4.0 Features . . . . . . . . . . . . . . . . . . . . . . . . . . . . . . .32
SS7 Interface to HLR . . . . . . . . . . . . . . . . . . . . . . . .32
Upgrade to Solaris 2.6 . . . . . . . . . . . . . . . . . . . . . . .32
Software Packaging Improvements. . . . . . . . . . . . . .32
Initialization on Reboot . . . . . . . . . . . . . . . . . . . . .32
Page 4

APS (Application Plus Server) 4.1 Users Guide
iv 101-1830-001 Issue 1.0101-1830-001 Issue 1.0
Passive Alarm Monitoring Interface . . . . . . . . . . . . 32
System Heartbeat. . . . . . . . . . . . . . . . . . . . . . . . . . . 33
Communication Protocols. . . . . . . . . . . . . . . . . . . . . . . . . . . 34
OCL Versions. . . . . . . . . . . . . . . . . . . . . . . . . . . . . . 34
SMPP Protocol . . . . . . . . . . . . . . . . . . . . . . . . . . . 34
SS7, IS-41C, TCAP. . . . . . . . . . . . . . . . . . . . . . . . . 34
SMTP . . . . . . . . . . . . . . . . . . . . . . . . . . . . . . . . . . . 35
TCP/IP Interface . . . . . . . . . . . . . . . . . . . . . . . . . . . 35
PPP. . . . . . . . . . . . . . . . . . . . . . . . . . . . . . . . . . . . . . 35
Description of APS Hardware . . . . . . . . . . . . . . . . . . . . . . . 36
APS Sun System. . . . . . . . . . . . . . . . . . . . . . . . . . . . . . . 36
APS System Hardware Configuration. . . . . . . . . . . 36
ERP System Hardware Configuration. . . . . . . . . . . 37
Hardware Base for Small ERP Configuration. . . . . 38
Hardware Base for Large ERP Configur ation. . . . . 38
Description of APS Software . . . . . . . . . . . . . . . . . . . . . . . . 39
APS Software. . . . . . . . . . . . . . . . . . . . . . . . . . . . . . . . . 39
ERP Software. . . . . . . . . . . . . . . . . . . . . . . . . . . . . . . . . 39
VPM Software . . . . . . . . . . . . . . . . . . . . . . . . . . . . . . . . 40
License Information . . . . . . . . . . . . . . . . . . . . . . . . . . . . . . . 40
Chapter 2 Installing APS
Getting Started . . . . . . . . . . . . . . . . . . . . . . . . . . . . . . . . . . . 41
Routine Operations. . . . . . . . . . . . . . . . . . . . . . . . . . . . . . . . 42
Required Items and Information. . . . . . . . . . . . . . . . . . . . . . 43
Installing New Hardware Systems . . . . . . . . . . . . . . . . . . . . 45
Assembling the Sun Hardware. . . . . . . . . . . . . . . . . . . . 45
Setting Up APS Hardware . . . . . . . . . . . . . . . . . . . . . . . 45
Installing Circuit Cards . . . . . . . . . . . . . . . . . . . . . . 46
Installing the Second Hard Disk . . . . . . . . . . . . . . . 46
Installing the External Disks . . . . . . . . . . . . . . . . . . 46
Powering Up the A1000 . . . . . . . . . . . . . . . . . . . . . 47
Modem Connections . . . . . . . . . . . . . . . . . . . . . . . . 47
Assembling the ERP Hardware . . . . . . . . . . . . . . . . . . . 48
Cabling the ERP System . . . . . . . . . . . . . . . . . . . . . . . . 48
Setting Up the LAN Switch . . . . . . . . . . . . . . . . . . . . . . 48
Installing the Software . . . . . . . . . . . . . . . . . . . . . . . . . . . . . 50
Page 5

APS (Application Plus Server) 4.1 Users Guide
v 101-1830-001 Issue 1.0101-1830-001 Issue 1.0
Installing the APS Tape . . . . . . . . . . . . . . . . . . . . . . . . . 50
Installing the ERP Tape . . . . . . . . . . . . . . . . . . . . . . . . . 54
Installing the Application. . . . . . . . . . . . . . . . . . . . . . . . 54
Configuring the System Heartbeat File . . . . . . . . . . . . . 54
Configuring Communications . . . . . . . . . . . . . . . . . . . . 54
Cabling and Configuring TCP/IP
from the Sierra/CA Side . . . . . . . . . . . . . . . . . . . . . 55
Cabling and Configuring TCP/IP
from the APS Side. . . . . . . . . . . . . . . . . . . . . . . . . . 58
Cabling and Configuring
X.25 Links on the Sierra/CA Side. . . . . . . . . . . . . . 58
Cabling and Configuring
X.25 Links on the APS Side . . . . . . . . . . . . . . . . . . 61
Starting the X.25 Tool . . . . . . . . . . . . . . . . . . . . . . . 62
Using the Link Editor . . . . . . . . . . . . . . . . . . . . . . . 64
LAPB/WAN Parameters . . . . . . . . . . . . . . . . . . . . . 66
Addressing. . . . . . . . . . . . . . . . . . . . . . . . . . . . . . . . 67
CUG and Facilities . . . . . . . . . . . . . . . . . . . . . . . . . 68
Link Modes . . . . . . . . . . . . . . . . . . . . . . . . . . . . . . 69
Throughput . . . . . . . . . . . . . . . . . . . . . . . . . . . . . . 70
Timers and Counters . . . . . . . . . . . . . . . . . . . . . . . . 71
Special . . . . . . . . . . . . . . . . . . . . . . . . . . . . . . . . . . . 72
X32 Authentication . . . . . . . . . . . . . . . . . . . . . . . . . 73
Routing . . . . . . . . . . . . . . . . . . . . . . . . . . . . . . . . . . 74
Modifying the Profiles . . . . . . . . . . . . . . . . . . . . . . . . . . 76
Placing Test Calls. . . . . . . . . . . . . . . . . . . . . . . . . . . . . . 76
Generating Test Reports. . . . . . . . . . . . . . . . . . . . . . . . . 76
Soaking. . . . . . . . . . . . . . . . . . . . . . . . . . . . . . . . . . . . . . 76
Software Upgrades . . . . . . . . . . . . . . . . . . . . . . . . . . . . . . . . 77
Upgrading from APS 3.x to APS 4.1. . . . . . . . . . . . . . . 77
Upgrading from APS 4.0 to APS 4.1 . . . . . . . . . . . . . . 77
Required Items. . . . . . . . . . . . . . . . . . . . . . . . . . . . . 77
Check the External Disk Array . . . . . . . . . . . . . . . . 77
Procedure to Upgrade to APS 4.1 . . . . . . . . . . . . . . 79
Chapter 3 Menu Interface
Definitions . . . . . . . . . . . . . . . . . . . . . . . . . . . . . . . . . . . . . . 83
APS Menu Interface . . . . . . . . . . . . . . . . . . . . . . . . . . . . . . . 84
Page 6

APS (Application Plus Server) 4.1 Users Guide
vi 101-1830-001 Issue 1.0101-1830-001 Issue 1.0
Main Menu . . . . . . . . . . . . . . . . . . . . . . . . . . . . . . . . . . . . . . 85
Script Menu. . . . . . . . . . . . . . . . . . . . . . . . . . . . . . . . . . . . . . 86
New, Open, and Delete Items. . . . . . . . . . . . . . . . . . . . . 86
Print . . . . . . . . . . . . . . . . . . . . . . . . . . . . . . . . . . . . . . . . 87
Quit . . . . . . . . . . . . . . . . . . . . . . . . . . . . . . . . . . . . . . . . 87
View Menu . . . . . . . . . . . . . . . . . . . . . . . . . . . . . . . . . . . . . . 88
Gen Log . . . . . . . . . . . . . . . . . . . . . . . . . . . . . . . . . . . . . 88
Debug Log . . . . . . . . . . . . . . . . . . . . . . . . . . . . . . . . . . . 89
Script Information Log. . . . . . . . . . . . . . . . . . . . . . . . . . 89
Status Log. . . . . . . . . . . . . . . . . . . . . . . . . . . . . . . . . . . . 89
Application. . . . . . . . . . . . . . . . . . . . . . . . . . . . . . . . . . . 89
System Menu . . . . . . . . . . . . . . . . . . . . . . . . . . . . . . . . . . . . 90
Script Configuration . . . . . . . . . . . . . . . . . . . . . . . . . . . 91
The Profile Window. . . . . . . . . . . . . . . . . . . . . . . . . 91
Parts of the Profile Window. . . . . . . . . . . . . . . . . . . 92
Server/Protocol Enable Options . . . . . . . . . . . . . . . 94
TCP/IP Enable Option. . . . . . . . . . . . . . . . . . . . . . . 95
SMPP Options . . . . . . . . . . . . . . . . . . . . . . . . . . . . . 96
OSA Server Options . . . . . . . . . . . . . . . . . . . . . . . . 97
HLR Server Options . . . . . . . . . . . . . . . . . . . . . . . . 98
SS7 Enable Options. . . . . . . . . . . . . . . . . . . . . . . . . 99
Disable Option. . . . . . . . . . . . . . . . . . . . . . . . . . . . . 100
Auto Restart Option. . . . . . . . . . . . . . . . . . . . . . . . . 101
Type 40 Mailbox Number . . . . . . . . . . . . . . . . . . . . 101
Script Type Option. . . . . . . . . . . . . . . . . . . . . . . . . . 101
Buttons. . . . . . . . . . . . . . . . . . . . . . . . . . . . . . . . . . . 102
Scripts Control Manager . . . . . . . . . . . . . . . . . . . . . . . . 103
Configurable Parameters . . . . . . . . . . . . . . . . . . . . . . . . 103
Runtime Status . . . . . . . . . . . . . . . . . . . . . . . . . . . . . . . 103
Application Manager . . . . . . . . . . . . . . . . . . . . . . . . . . . 104
Logger Manager . . . . . . . . . . . . . . . . . . . . . . . . . . . . . . 104
Script Tracer . . . . . . . . . . . . . . . . . . . . . . . . . . . . . . . . . 104
RMPP Manager . . . . . . . . . . . . . . . . . . . . . . . . . . . . . . . 104
SS7 Gateway . . . . . . . . . . . . . . . . . . . . . . . . . . . . . . . . . 104
Utility Menu . . . . . . . . . . . . . . . . . . . . . . . . . . . . . . . . . . . . . 106
Export. . . . . . . . . . . . . . . . . . . . . . . . . . . . . . . . . . . . . . . 106
Import. . . . . . . . . . . . . . . . . . . . . . . . . . . . . . . . . . . . . . . 107
Wizard Backup. . . . . . . . . . . . . . . . . . . . . . . . . . . . . . . . 107
Page 7

APS (Application Plus Server) 4.1 Users Guide
vii 101-1830-001 Issue 1.0101-1830-001 Issue 1.0
Printer Configuration . . . . . . . . . . . . . . . . . . . . . . . . . . . 107
System Performance. . . . . . . . . . . . . . . . . . . . . . . . . . . . 107
Cron Tasks . . . . . . . . . . . . . . . . . . . . . . . . . . . . . . . . . . . 108
License . . . . . . . . . . . . . . . . . . . . . . . . . . . . . . . . . . . . . 108
Application. . . . . . . . . . . . . . . . . . . . . . . . . . . . . . . . . . . 109
Database Menu . . . . . . . . . . . . . . . . . . . . . . . . . . . . . . . . . . . 110
Dynamic SQL. . . . . . . . . . . . . . . . . . . . . . . . . . . . . . . . . 110
Select SQL . . . . . . . . . . . . . . . . . . . . . . . . . . . . . . . . . . . 110
Chapter 4 Procedures
APS System-wide Tasks . . . . . . . . . . . . . . . . . . . . . . . . . . . . 112
Starting the APS Interface . . . . . . . . . . . . . . . . . . . . . . . 112
Quitting the APS Interface. . . . . . . . . . . . . . . . . . . . 113
Starting the Informix Database . . . . . . . . . . . . . . . . 113
Closing an Informix Session . . . . . . . . . . . . . . . . . . 113
Setting the Status Log File Size. . . . . . . . . . . . . . . . 114
Stopping the Volume Manager . . . . . . . . . . . . . . . . 114
Using Sun’s X.25 Tool . . . . . . . . . . . . . . . . . . . . . . 114
Monitoring System Performance. . . . . . . . . . . . . . . 115
Administering Hostnames and TCP/IP Addresses . 115
Replacing a Hard Disk. . . . . . . . . . . . . . . . . . . . . . . 116
Application-specific Tasks . . . . . . . . . . . . . . . . . . . . . . . . . . 117
Working with Scripts, Script Groups,
and Applications. . . . . . . . . . . . . . . . . . . . . . . . . . . . . . . . . . 118
Managing Scripts, Script Groups, and Applications . . . 118
Creating Script Groups or Applications . . . . . . . . . 119
Starting an Application Automatically . . . . . . . . . . 121
Starting a Script Group or Application Manually . . 122
Stopping a Script Group or Application . . . . . . . . . 122
Starting a Single Script . . . . . . . . . . . . . . . . . . . . . . 123
Stopping a Single Script . . . . . . . . . . . . . . . . . . . . . 124
Deleting a Script from a Script Group. . . . . . . . . . . 125
Deleting a Script Group. . . . . . . . . . . . . . . . . . . . . . 125
Shutting Down All Active Sessions . . . . . . . . . . . . 126
Shutting Down a Script Group . . . . . . . . . . . . . . . . 126
Monitoring Scripts, Script Groups, and Applications . . 127
Creating, Opening, and Deleting Scripts. . . . . . . . . 127
Starting Scripts in Test Mode . . . . . . . . . . . . . . . . . 128
Page 8

APS (Application Plus Server) 4.1 Users Guide
viii 101-1830-001 Issue 1.0101-1830-001 Issue 1.0
Stopping a Script in Test Mode . . . . . . . . . . . . . . . . 128
Monitoring a Script Session. . . . . . . . . . . . . . . . . . . 129
Monitoring a Script with the X.25 Trace Tool. . . . . 129
Checking an Application’s Runtime Status. . . . . . . 129
Checking an Application’s Runtime Status
by Process Level . . . . . . . . . . . . . . . . . . . . . . . . . . . 131
Checking an Application’s Runtime Status
by Usage Level . . . . . . . . . . . . . . . . . . . . . . . . . . . . 132
Debugging Scripts . . . . . . . . . . . . . . . . . . . . . . . . . . 133
Working with Profiles. . . . . . . . . . . . . . . . . . . . . . . . . . . . . . 134
Viewing the Profile Window . . . . . . . . . . . . . . . . . . 134
Renaming Profiles . . . . . . . . . . . . . . . . . . . . . . . . . . 134
Modifying Profiles. . . . . . . . . . . . . . . . . . . . . . . . . . 135
Creating New Profiles . . . . . . . . . . . . . . . . . . . . . . . 136
Importing and Exporting Data . . . . . . . . . . . . . . . . . . . . . . . 138
Importing Application-specific Utilities . . . . . . . . . 138
Importing Scripts. . . . . . . . . . . . . . . . . . . . . . . . . . . 138
Copying Scripts to a Diskette . . . . . . . . . . . . . . . . . 139
Backing Up Data. . . . . . . . . . . . . . . . . . . . . . . . . . . . . . . . . . 140
Backing Up APS Files. . . . . . . . . . . . . . . . . . . . . . . 140
Regular Backup of APS. . . . . . . . . . . . . . . . . . . . . . 140
Registration and Licensing Tasks . . . . . . . . . . . . . . . . . . . . . 141
Registering APS Software. . . . . . . . . . . . . . . . . . . . 141
Checking the License. . . . . . . . . . . . . . . . . . . . . . . . 142
SS7 Gateway Tasks. . . . . . . . . . . . . . . . . . . . . . . . . . . . . . . . 144
Changing an SS7 Configuration File. . . . . . . . . . . . 145
Configuring the SS7 Gateway. . . . . . . . . . . . . . . . . 146
Starting and Stopping the SS7 Gateway . . . . . . . . . 147
Administering the Signaling Point Code. . . . . . . . . 148
Monitoring SS7 Gateway . . . . . . . . . . . . . . . . . . . . 150
Displaying the State of the SS7 Links. . . . . . . . . . . 151
Changing the State of the SS7 Links. . . . . . . . . . . . 151
Application Manager Tasks . . . . . . . . . . . . . . . . . . . . . . . . . 156
Starting and Stopping the Application Manager . . . 156
Checking the Application Manager’s
Runtime Status. . . . . . . . . . . . . . . . . . . . . . . . . . . . . 158
Logger Manager Tasks . . . . . . . . . . . . . . . . . . . . . . . . . . . . . 159
Starting and Stopping the Logger Manager. . . . . . . 159
Checking Logger Manager Status. . . . . . . . . . . . . . 159
Page 9

101-1830-001 Issue 1.0 ix101-1830-001 Issue 1.0
Cron Tasks . . . . . . . . . . . . . . . . . . . . . . . . . . . . . . . . . . . . . . .161
Starting and Stopping Cron Tasks. . . . . . . . . . . . . . .161
Modifying Cron Tasks. . . . . . . . . . . . . . . . . . . . . . . .161
Monitoring Cron Task Status . . . . . . . . . . . . . . . . . .163
Using SQL Commands. . . . . . . . . . . . . . . . . . . . . . . . . . . . . .164
Executing SQL Commands Without Output. . . . . . .164
Executing SQL Queries With Output . . . . . . . . . . . .165
Printing . . . . . . . . . . . . . . . . . . . . . . . . . . . . . . . . . . . . . . . . .167
Configuring Printers . . . . . . . . . . . . . . . . . . . . . . . . .167
Printing a Script . . . . . . . . . . . . . . . . . . . . . . . . . . . .168
Viewing Logs and Script Information . . . . . . . . . . . . . . . . . .169
Viewing the Status Log File . . . . . . . . . . . . . . . . . . .169
Viewing Script Information. . . . . . . . . . . . . . . . . . . .171
Viewing the Debug Log . . . . . . . . . . . . . . . . . . . . . .173
Chapter 5 Troubleshooting
Starting and Stopping the Sun System. . . . . . . . . . . . . . . . . .176
Starting the APS Sun System . . . . . . . . . . . . . . . . . . . . .176
Starting the ERP Sun System . . . . . . . . . . . . . . . . . . . . .177
Rebooting the Sun System. . . . . . . . . . . . . . . . . . . . . . . .177
Graceful Reboot . . . . . . . . . . . . . . . . . . . . . . . . . . . .178
Hard or Emergency Reboot. . . . . . . . . . . . . . . . . . . .178
Shutting Down the APS Sun System. . . . . . . . . . . . . . . .179
Shutting Down the ERP Sun System. . . . . . . . . . . . . . . .180
Shutting Down the X.25 Links . . . . . . . . . . . . . . . . . . . .180
Tracking APS Problems. . . . . . . . . . . . . . . . . . . . . . . . . . . . .181
General Troubleshooting . . . . . . . . . . . . . . . . . . . . . . . . .181
Keeping Records . . . . . . . . . . . . . . . . . . . . . . . . . . . . . . .181
Checking Connectivity . . . . . . . . . . . . . . . . . . . . . . . . . .181
Starting Two APS Sessions . . . . . . . . . . . . . . . . . . . . . . .182
Troubleshooting Connectivity Problems . . . . . . . . . . . . . . . .183
No Connectivity Between APS Machine and Sierra/CA 184
For Sites That Use X.25. . . . . . . . . . . . . . . . . . . . . . . . . .186
Check the X.25 Physical Connectivity . . . . . . . . . . .186
From the APS, Check the Link. . . . . . . . . . . . . . . . .186
From the Sierra/CA, Check the Link . . . . . . . . . . . .187
Place a Test Call Over the X.25 Link . . . . . . . . . . . .188
Page 10

APS (Application Plus Server) 4.1 Users Guide
x 101-1830-001 Issue 1.0101-1830-001 Issue 1.0
Escalate the Problem . . . . . . . . . . . . . . . . . . . . . . . . 189
For Sites That Use TCP/IP. . . . . . . . . . . . . . . . . . . . . . . 190
Check TCP/IP Physical Connectivity . . . . . . . . . . . 190
From the Sierra/CA, Check TCP/IP . . . . . . . . . . . . 190
From the APS, Check the TCP/IP. . . . . . . . . . . . . . 190
Check the Application’s Profiles . . . . . . . . . . . . . . . 191
Place a Test Call Over the TCP/IP Link . . . . . . . . . 191
Escalate the Problem . . . . . . . . . . . . . . . . . . . . . . . . 192
Remote User Cannot Connect to APS Machine. . . . . . . 193
APS Cannot Connect to LAN/WAN . . . . . . . . . . . . . . . 195
APS Cannot Communicate With HLR. . . . . . . . . . . . . . 196
No Prompt When Accessing APS Over the Modem . . . 198
Troubleshooting Software Problems. . . . . . . . . . . . . . . . . . . 200
Loss of System Heartbeat. . . . . . . . . . . . . . . . . . . . . . . . 200
Call Tracing TCAP Messages . . . . . . . . . . . . . . . . . . . . 201
Cannot Start Application Manager. . . . . . . . . . . . . . . . . 203
Cannot Load SS7 Drivers. . . . . . . . . . . . . . . . . . . . . . . . 205
Troubleshooting Hardware Problems. . . . . . . . . . . . . . . . . . 206
Sun Reboots Without Warning. . . . . . . . . . . . . . . . . . . . 206
Common Procedures. . . . . . . . . . . . . . . . . . . . . . . . . . . . . . . 207
General Notes about Replacing Cards . . . . . . . . . . . . . . 207
Replacing the NewNet Card. . . . . . . . . . . . . . . . . . . . . . 209
Replacing the X.25 Card . . . . . . . . . . . . . . . . . . . . . . . . 210
Replacing the TCP/IP Card . . . . . . . . . . . . . . . . . . . . . . 210
Cleaning the Tape Drive. . . . . . . . . . . . . . . . . . . . . . . . . 211
Chapter 6 Backing Up and Restoring Data
Backing Up and Restoring the Sun System . . . . . . . . . . 213
Automatic Backups . . . . . . . . . . . . . . . . . . . . . . . . . 214
Making Manual Backups. . . . . . . . . . . . . . . . . . . . . 214
Restoring a Full or Partial Image . . . . . . . . . . . . . . . . . 215
Full System Installation and Setup . . . . . . . . . . . . . 215
Full System Recovery (no setup). . . . . . . . . . . . . . . 216
Partial System Recovery and Setup. . . . . . . . . . . . . 216
Partial System Recovery (no setup). . . . . . . . . . . . . 216
APS Backup and Restore. . . . . . . . . . . . . . . . . . . . . . . . 216
Backing Up Only APS 4.1. . . . . . . . . . . . . . . . . . . . 216
Page 11

101-1830-001 Issue 1.0 xi101-1830-001 Issue 1.0
Restoring Only APS 4.1 Data . . . . . . . . . . . . . . . . .216
Informix Software Backup and Restore . . . . . . . . . . . . .217
Informix Database Backup and Restore . . . . . . . . . . . . .217
Example Output of a Database Restore . . . . . . . . . .217
Example Output of
install_fs:full recovery, (setup) . . . . . . . . . . . . . . . . .218
Example Output of
install_fs:full recovery (no setup) . . . . . . . . . . . . . . .221
Example Output of
install_fs:partial recovery (setup) . . . . . . . . . . . . . . .223
Example Output of
install_fs, partial recovery (no setup) . . . . . . . . . . . .226
Chapter 7 Errors
The Status Log File . . . . . . . . . . . . . . . . . . . . . . . . . . . . . . . .229
Description of the Status Log File. . . . . . . . . . . . . . . . . .229
File Formats . . . . . . . . . . . . . . . . . . . . . . . . . . . . . . . . . .230
Specifying an ASCII Format. . . . . . . . . . . . . . . . . . .230
What Makes Up an Alarm . . . . . . . . . . . . . . . . . . . . . . . . . . .231
Message Syntax for Alarms. . . . . . . . . . . . . . . . . . . . . . .231
Interpreting an Error with Status Log File Codes . . . . . .232
Status Types. . . . . . . . . . . . . . . . . . . . . . . . . . . . . . . . . . .233
Module Types . . . . . . . . . . . . . . . . . . . . . . . . . . . . . . . . .233
Error Code Ranges. . . . . . . . . . . . . . . . . . . . . . . . . . . . . .235
Errors . . . . . . . . . . . . . . . . . . . . . . . . . . . . . . . . . . . . . . . . . . .237
Development Alarms . . . . . . . . . . . . . . . . . . . . . . . .238
Error Summary . . . . . . . . . . . . . . . . . . . . . . . . . . . . .239
200001. . . . . . . . . . . . . . . . . . . . . . . . . . . . . . . . . . . .243
200005. . . . . . . . . . . . . . . . . . . . . . . . . . . . . . . . . . . .244
200008. . . . . . . . . . . . . . . . . . . . . . . . . . . . . . . . . . . .245
400000. . . . . . . . . . . . . . . . . . . . . . . . . . . . . . . . . . . .246
501001. . . . . . . . . . . . . . . . . . . . . . . . . . . . . . . . . . . .247
501002. . . . . . . . . . . . . . . . . . . . . . . . . . . . . . . . . . . .250
501006. . . . . . . . . . . . . . . . . . . . . . . . . . . . . . . . . . . .251
501012. . . . . . . . . . . . . . . . . . . . . . . . . . . . . . . . . . . .252
501013. . . . . . . . . . . . . . . . . . . . . . . . . . . . . . . . . . . .253
501020. . . . . . . . . . . . . . . . . . . . . . . . . . . . . . . . . . . .254
503001. . . . . . . . . . . . . . . . . . . . . . . . . . . . . . . . . . . .255
Page 12

APS (Application Plus Server) 4.1 Users Guide
xii 101-1830-001 Issue 1.0101-1830-001 Issue 1.0
505001 . . . . . . . . . . . . . . . . . . . . . . . . . . . . . . . . . . . 256
505002 . . . . . . . . . . . . . . . . . . . . . . . . . . . . . . . . . . . 257
505005 . . . . . . . . . . . . . . . . . . . . . . . . . . . . . . . . . . . 258
505011 . . . . . . . . . . . . . . . . . . . . . . . . . . . . . . . . . . . 259
506002 . . . . . . . . . . . . . . . . . . . . . . . . . . . . . . . . . . . 260
506003 . . . . . . . . . . . . . . . . . . . . . . . . . . . . . . . . . . . 261
506004 . . . . . . . . . . . . . . . . . . . . . . . . . . . . . . . . . . . 262
506005 . . . . . . . . . . . . . . . . . . . . . . . . . . . . . . . . . . . 263
506006 . . . . . . . . . . . . . . . . . . . . . . . . . . . . . . . . . . . 264
506007 . . . . . . . . . . . . . . . . . . . . . . . . . . . . . . . . . . 265
506011 . . . . . . . . . . . . . . . . . . . . . . . . . . . . . . . . . . . 266
508001 . . . . . . . . . . . . . . . . . . . . . . . . . . . . . . . . . . . 267
508002 . . . . . . . . . . . . . . . . . . . . . . . . . . . . . . . . . . . 268
508003 . . . . . . . . . . . . . . . . . . . . . . . . . . . . . . . . . . . 269
508004 . . . . . . . . . . . . . . . . . . . . . . . . . . . . . . . . . . . 270
508005 . . . . . . . . . . . . . . . . . . . . . . . . . . . . . . . . . . . 271
517003 . . . . . . . . . . . . . . . . . . . . . . . . . . . . . . . . . . . 272
518003 . . . . . . . . . . . . . . . . . . . . . . . . . . . . . . . . . . . 273
518004 . . . . . . . . . . . . . . . . . . . . . . . . . . . . . . . . . . . 274
518005 . . . . . . . . . . . . . . . . . . . . . . . . . . . . . . . . . . . 275
518006 . . . . . . . . . . . . . . . . . . . . . . . . . . . . . . . . . . . 276
518007 . . . . . . . . . . . . . . . . . . . . . . . . . . . . . . . . . . . 277
518010 . . . . . . . . . . . . . . . . . . . . . . . . . . . . . . . . . . . 278
523000 . . . . . . . . . . . . . . . . . . . . . . . . . . . . . . . . . . . 279
5230002 . . . . . . . . . . . . . . . . . . . . . . . . . . . . . . . . . . 280
5230003 . . . . . . . . . . . . . . . . . . . . . . . . . . . . . . . . . . 282
5230005 . . . . . . . . . . . . . . . . . . . . . . . . . . . . . . . . . . 283
5230008 . . . . . . . . . . . . . . . . . . . . . . . . . . . . . . . . . . 284
5230012 . . . . . . . . . . . . . . . . . . . . . . . . . . . . . . . . . . 285
524027 . . . . . . . . . . . . . . . . . . . . . . . . . . . . . . . . . . . 286
600000 . . . . . . . . . . . . . . . . . . . . . . . . . . . . . . . . . . . 288
600001 . . . . . . . . . . . . . . . . . . . . . . . . . . . . . . . . . . . 289
600002 . . . . . . . . . . . . . . . . . . . . . . . . . . . . . . . . . . . 291
600003 . . . . . . . . . . . . . . . . . . . . . . . . . . . . . . . . . . . 293
600004 . . . . . . . . . . . . . . . . . . . . . . . . . . . . . . . . . . . 294
600010 . . . . . . . . . . . . . . . . . . . . . . . . . . . . . . . . . . . 295
600011 . . . . . . . . . . . . . . . . . . . . . . . . . . . . . . . . . . . 296
600012 . . . . . . . . . . . . . . . . . . . . . . . . . . . . . . . . . . . 297
Page 13

101-1830-001 Issue 1.0 xiii101-1830-001 Issue 1.0
600013. . . . . . . . . . . . . . . . . . . . . . . . . . . . . . . . . . . .299
600014. . . . . . . . . . . . . . . . . . . . . . . . . . . . . . . . . . . .300
600015. . . . . . . . . . . . . . . . . . . . . . . . . . . . . . . . . . . .301
600016. . . . . . . . . . . . . . . . . . . . . . . . . . . . . . . . . . . .302
600017. . . . . . . . . . . . . . . . . . . . . . . . . . . . . . . . . . . .303
600018. . . . . . . . . . . . . . . . . . . . . . . . . . . . . . . . . . . .304
600019. . . . . . . . . . . . . . . . . . . . . . . . . . . . . . . . . . . .305
600020. . . . . . . . . . . . . . . . . . . . . . . . . . . . . . . . . . . .306
600021. . . . . . . . . . . . . . . . . . . . . . . . . . . . . . . . . . . .307
600022. . . . . . . . . . . . . . . . . . . . . . . . . . . . . . . . . . . .308
600023. . . . . . . . . . . . . . . . . . . . . . . . . . . . . . . . . . . .309
600024. . . . . . . . . . . . . . . . . . . . . . . . . . . . . . . . . . . .310
600025. . . . . . . . . . . . . . . . . . . . . . . . . . . . . . . . . . . .311
600026. . . . . . . . . . . . . . . . . . . . . . . . . . . . . . . . . . . .312
600027. . . . . . . . . . . . . . . . . . . . . . . . . . . . . . . . . . . .313
600028. . . . . . . . . . . . . . . . . . . . . . . . . . . . . . . . . . . .314
600029. . . . . . . . . . . . . . . . . . . . . . . . . . . . . . . . . . . .315
600030. . . . . . . . . . . . . . . . . . . . . . . . . . . . . . . . . . . .316
600031. . . . . . . . . . . . . . . . . . . . . . . . . . . . . . . . . . . .317
600032. . . . . . . . . . . . . . . . . . . . . . . . . . . . . . . . . . . .318
600033. . . . . . . . . . . . . . . . . . . . . . . . . . . . . . . . . . . .319
600034. . . . . . . . . . . . . . . . . . . . . . . . . . . . . . . . . . . .320
600035. . . . . . . . . . . . . . . . . . . . . . . . . . . . . . . . . . . .321
600037. . . . . . . . . . . . . . . . . . . . . . . . . . . . . . . . . . . .322
600038. . . . . . . . . . . . . . . . . . . . . . . . . . . . . . . . . . . .323
600039. . . . . . . . . . . . . . . . . . . . . . . . . . . . . . . . . . . .324
600040. . . . . . . . . . . . . . . . . . . . . . . . . . . . . . . . . . . .325
600041. . . . . . . . . . . . . . . . . . . . . . . . . . . . . . . . . . . .326
600042. . . . . . . . . . . . . . . . . . . . . . . . . . . . . . . . . . . .327
700001. . . . . . . . . . . . . . . . . . . . . . . . . . . . . . . . . . . .329
700002. . . . . . . . . . . . . . . . . . . . . . . . . . . . . . . . . . . .330
700003. . . . . . . . . . . . . . . . . . . . . . . . . . . . . . . . . . . .331
700004. . . . . . . . . . . . . . . . . . . . . . . . . . . . . . . . . . . .332
700005. . . . . . . . . . . . . . . . . . . . . . . . . . . . . . . . . . . .333
700006. . . . . . . . . . . . . . . . . . . . . . . . . . . . . . . . . . . .334
700007. . . . . . . . . . . . . . . . . . . . . . . . . . . . . . . . . . . .335
700008. . . . . . . . . . . . . . . . . . . . . . . . . . . . . . . . . . . .336
Passive Alarm Monitoring . . . . . . . . . . . . . . . . . . . . . . . . . . .337
Page 14

APS (Application Plus Server) 4.1 Users Guide
xiv 101-1830-001 Issue 1.0101-1830-001 Issue 1.0
EAP-related Errors . . . . . . . . . . . . . . . . . . . . . . . . . . . . . . . . 338
Interpreting EAP Errors . . . . . . . . . . . . . . . . . . . . . . . . . 338
Resolving EAP-related Errors . . . . . . . . . . . . . . . . . . . . 343
TCAP Errors. . . . . . . . . . . . . . . . . . . . . . . . . . . . . . . . . . . . . 345
TCAP Return Error Codes. . . . . . . . . . . . . . . . . . . . 345
TCAP Access Denied Reasons . . . . . . . . . . . . . . . . 346
TCAP Non-requested Specific Errors . . . . . . . . . . . 346
Appendix A Enhanced Reporting Platform
Overview. . . . . . . . . . . . . . . . . . . . . . . . . . . . . . . . . . . . . . . . 347
Advantages of ERP . . . . . . . . . . . . . . . . . . . . . . . . . 348
Connectivity. . . . . . . . . . . . . . . . . . . . . . . . . . . . . . . 348
Processing Cycle . . . . . . . . . . . . . . . . . . . . . . . . . . . 348
Administration. . . . . . . . . . . . . . . . . . . . . . . . . . . . . 349
Assembling the ERP Hardware . . . . . . . . . . . . . . . . . . . . . . 350
Cabling the ERP System. . . . . . . . . . . . . . . . . . . . . . . . . . . . 351
Installing and Administering ERP . . . . . . . . . . . . . . . . . . . . 352
Phase I Installation Procedures . . . . . . . . . . . . . . . . . . . 352
Required Items and Information . . . . . . . . . . . . . . . 352
Loading the ERP System. . . . . . . . . . . . . . . . . . . . . 353
Loading ERP . . . . . . . . . . . . . . . . . . . . . . . . . . . . . . 353
Installing the License Information. . . . . . . . . . . . . . 355
Phase II Installation Procedures. . . . . . . . . . . . . . . . . . . 358
Phase III Installation Procedures . . . . . . . . . . . . . . . . . . 360
Configuration File Description . . . . . . . . . . . . . . . . 360
Report Executables . . . . . . . . . . . . . . . . . . . . . . . . . 364
Administering Reports. . . . . . . . . . . . . . . . . . . . . . . 366
Uninstall Procedures . . . . . . . . . . . . . . . . . . . . . . . . . . . 368
Executing ERP Software . . . . . . . . . . . . . . . . . . . . . . . . . . . 369
Error Logging . . . . . . . . . . . . . . . . . . . . . . . . . . . . . . . . . . . . 370
Backup and Restore Procedures . . . . . . . . . . . . . . . . . . . . . . 372
Backing Up ERP . . . . . . . . . . . . . . . . . . . . . . . . . . . . . . 372
Full Backup . . . . . . . . . . . . . . . . . . . . . . . . . . . . . . . 372
Restoring ERP . . . . . . . . . . . . . . . . . . . . . . . . . . . . . . . . 372
Partial Restore . . . . . . . . . . . . . . . . . . . . . . . . . . . . . 372
Full Restore . . . . . . . . . . . . . . . . . . . . . . . . . . . . . . . 372
Troubleshooting ERP . . . . . . . . . . . . . . . . . . . . . . . . . . . . . . 375
Page 15

101-1830-001 Issue 1.0 xv101-1830-001 Issue 1.0
Developing Custom Reports . . . . . . . . . . . . . . . . . . . . . . . . .377
Relinking with Logging Stub . . . . . . . . . . . . . . . . . .377
Indexing on hr_int. . . . . . . . . . . . . . . . . . . . . . . . . . .377
Glossary, Abbreviations, and Acronyms . . . . . . . . . . . . . . . . . 379
Index . . . . . . . . . . . . . . . . . . . . . . . . . . . . . . . . . . . . . . . . . . . . . . . . 389
Page 16

APS (Application Plus Server) 4.1 Users Guide
xvi 101-1830-001 Issue 1.0101-1830-001 Issue 1.0
Page 17

101-1830-001 Issue 1.0 17
About This Book
This manual describes the Application Plus Server (APS) 4.1 software
platform. Use this manual with applications such as Inbound Call
Completion (ICC) 1.1.
Audience Statement
This documentation is written for the following audiences:
This guide is not intended for programmers developing custom
applications or fo r the end custo mer with th e exceptio n of the customer as
maintainer.
Software support staff Both onsite and remote. This
audience is familiar with
programming wizards, may or
may not be familiar with the
C programming language, and
has an intermediate un derstanding
of UNIX or SunOS. Specifically,
this audience incl udes appli cation
programmers, application
maintainers, and member s of RSC
(Regional S ervice Center).
Platform maintainers Lucent employees or customers
who mainta in the APS platform
software at APS sites
Lucent’s applications sales force Lucent employees who market
APS (Application Plus Server)
software and its applications
Page 18

APS (Application Plus Server) 4.1 Users Guide
18 101-1830-001 Issue 1.0
In general, the audience for this book should have the following
experience and expertise:
n Sun system administration
n Beginning-level Sierra and CA (Caller Applications)
maintenance knowledge
n X.25 networking experience
n TCP/IP networking experience
n Knowledge of SS7 (Signali ng System 7) pro tocol, inclu ding HLR
(Home Location Register)
n Beginning understanding of relational database commands
n Beginning understanding of C programming language
n Basic techniques for handling hardware and electrical
components
Purpose Statement
The purpose of this document is to:
n Help the onsite work force, syst em admi nis tr at or, or programmer
to use the AP S platform software
n Instruct an installer how to load new versions and upgrade
previous versions of APS in 2 hours or less
n Provide a reference to alarms generated by the APS platform
software
n Provide fault isolation and problem-solving procedures for
troubleshooting errors
This guide does not discuss the Sun hardware components of the APS
system. Please refer to the documentation that came with your hardware.
Page 19

101-1830-001 Issue 1.0 19
Help and Technical Support
You can reach Lucent Octel Messaging Division (OMD) by phone, fax,
e-mail, and the Internet.
For telephone assistance about APS software:
Call 408-922-1822.
This is the Lucent Technologies OMD help line.
Press 1 (Sierra menu option ) and then 4 (Direct Support menu
option) to navigate the phone menu.
Have ready:
n The serial number of the Sierra/CA
n Which Sierra/CA you are calling on
n The APS system’s serial number
For specific training information:
Call 1-800-OCTEL92 (1-800-628-3592), or 1-408-324-6572
To reach us by e-mail:
Address us at educational.services@octel.com
For documentation:
Call 1-800-41-OCTEL (US only)
Call 1-303-294-3735 (International)
To fax an order:
Dial 1-303-294-3737 (US and International)
If you have world wide web access go to:
http://merchant.hibbertco.com/octel/
To return to the APS help system, use the Back button in the
browser interface, or cl ick on the Company Stor e book icon in the
help system navigation pane.
Page 20

APS (Application Plus Server) 4.1 Users Guide
20 101-1830-001 Issue 1.0
Conventions
This book uses the following conventions:
n The term Sierra refers to a Sierra VPM (voice processing
module).
n The term CA stands for Caller Applications VPM and was
formerly known as IMA-CA (Intelligent Messaging
Architecture-Caller Applications).
n The term Sierra/CA means either a Sierra VPM or CA VPM.
n Keys on the keyboard are all capitals:
ENTER.
n When you must press two keys at th e same time, it looks like th is:
STOP+a
n When you are told to enter a command, it means type the
command on the command line and then press the ENTER key.
n Commands are bold, regular typeface, variables in a command
line are bold and italicized:
snoop -d hme0 -x 0 > /export/home0/issg/issg_main/test.ossg
n Menu names are capitalized
n Menu items are capitalized
n Field names use Courier type:
...the Script Name field...
n Menu selections look like this:
Utility
Export
Page 21

101-1830-001 Issue 1.0 21
Related Documents
Electronic Version An electronic version of this document is located inside the Lucent fire
wall in Adobe Acrobat format. Go to
http://info.dr.lucent.com/~bfthomas/aps/APS.html
Other Manuals In this manual, we may refer you to other documents. You may want to
locate them and have them at your site.
These documents are available from their vendors. You should have
received them with your hardware and software:
Informix Manuals
n Informix Error Messages, published by Informix Press
Sun Manuals
n Sun hardware docume nts
NewNet Manual This document comes with your hardware and additional copies are
available from ADC NewNet, Inc., 2 Enterprise Drive, Shelton, CT
06484:
n Connect7 Release Notes, Part No. D-0116-RN-110-001
ISSG Manuals These manuals are available from ISSG, Inc., ISSG 1580 Oakland Rc,
SWT #C210 San Jose, CA - 95131:
n Wizard Staging Guide, Volume 1, Version 1.0
n Wiz ard Sof tware 4.0
n Wizard Developer’s Guide
Lucent and Octel
Manuals
These documents are available through Lucent Technologies OMD:
n APS 4.1 Users Guide. You are reading it now.
n APS Config Note
n OCL Programmers Guide, by Octel, P/N 101-1069-001
n Release VIS 2.0 System Manager Manual
n Sierra/CA Peripheral Equipment Manual
n Sierra Enhanced Services Administrator Guide
n Sierra Octel Command Language Reference Manual
n Sierra Service Manual, Edition 5
n VIS Release 2.0 Release Guide
Page 22

APS (Application Plus Server) 4.1 Users Guide
22 101-1830-001 Issue 1.0
Commenting on This Document
To comment on this manual, please direct communications to:
Lucent Technologies
Octel Messaging Division
MS C5-04
1001 Murphy Ranch Road
Milpitas, California 95035-3912
email: octeltechpubs@lucent.com
telephone: 408-384-2000
Trademarks and Registered Trademarks
Adobe is a trademark of the Adobe Systems Incorporated, which may be
registered in certain jurisdictions.
APS 4.1 is copyrighted by Lucent Technologies and Innovative Systems
Services Group, Inc.
ICC 1.1 is a copyright of Lucent Technologies.
NewNet is a trademark of ADC New Net.
OpenWindows is a trademark of Sun Micro Systems, Inc.
Sierra is a trademar k of Octe l Mes saging Divisi on, a subsi diary o f Lucent
T ech nol ogies.
CA is a trademark of Octel Messaging Division, a subsidiary of Lucent
Technologies.
SMC is a registered trademark of Standard Microsystems Corporation.
Solaris is a trademark of Sun Micro Systems, Inc.
Solstice is a trademark of Sun Micro Systems, Inc.
ST is a registered trademark of Lucent Technologies.
StorEdge A1000 is a trademark of Sun Micro Systems, Inc.
SPA RC is a tradem ark of SPARC International, I nc.
Sun is a trademark of Sun Micro Systems, Inc.
SunOS is a trademark of Sun Micro Systems, Inc.
UNIX is a registered trademark in the United States and other countries,
licensed exclusively through X OPEN Company Limited.
Page 23

101-1830-001 Issue 1.0 23
Wizard is a copyright if ISSG, Inc.
x25tool is a trademark of Sun Micro Systems, Inc.
Page 24

APS (Application Plus Server) 4.1 Users Guide
24 101-1830-001 Issue 1.0
Page 25

101-1830-001 Issue 1.0 25
1
Overview
This chapter provides a high-level description of the APS 4.1
(Application Plus Server) environment, software, and hardware.
Overview of the APS Environment
The APS 4.1 platform software is the b ase software upon which other
APS application software resides. Currently, the APS 4.1 platform, the
ERP 2.0 report handling software, and the ICC 1.1 application are
designed to work with each other, but may be ordered separately.
APS 4.1 is backwardly compatible with APS 3.x and APS 4.0.
Components
The APS processing environment consists of:
n Sierra/CA (Caller Application) voice processing module
n Sun system, Ultra 2, for each APS machine
n NewNet card for each APS machine running SS7
n Sun system, Ultra 2, for large ERP configurations (optional)
or
Sun workstation, Ultra 5, for small ERP configurations (optional)
Page 26

APS (Application Plus Server) 4.1 Users Guide
26 101-1830-001 Issue 1.0
n Disk array - Sun A1000 disk array
or
Disk array - Sun MultiPack array
n HSI card for X.25 links, if X.25 protocol is used
n LAN switch to connect th e ERP system, APS system, and
Sierra/CAs
Figure 1 shows an example of hardware components at an APS site.
Figure 1. Example Topology of an APS/ERP Site
Lan Switch
PDN
(WAN)
Sierra/CA
APS
Ultra 2
Sierra/CA
Sierra/CA
Sierra/CA
APS
Ultra 2
APS
Ultra 2
ERP
Ultra 2
LAN/WAN
Alarm
OSS
SMSC
Sendmail
Sierra/CA
Other Sierra/CA’s
APS
Ultra 2
Page 27

Overview
101-1830-001 Issue 1.0 27
Software Constructs
APS 4.1 platform software uses the following softw are construc ts:
n Functional wizards
n Scripts
n Profiles
n Applications
n Cron tasks
n Sessions
Figure 2 shows how software constructs are used together to form an
application.
Figure 2. APS Programming Constructs
Script A Script B Script C
fccvwiz LJK 010699
Functional
wizard
Functional
wizard
Functional
wizard
Functional
wizard
Functional
wizard
Functional
wizard
Functional
wizard
Functional
wizard
Functional
wizard
Functional
wizard
Functional
wizard
Functional
wizard
Functional
wizard
Script A Script B Script C
Application
Profile
1
Profile
9
Profile
2
Profile
10
Profile
5
Page 28

APS (Application Plus Server) 4.1 Users Guide
28 101-1830-001 Issue 1.0
APS 4.1 Environment
The APS environment consists of:
n 1 to 4 Sun systems running APS 4.1 and any APS application
n 1 Sun system running ERP 2.0 (optional)
APS 4.1 APS is a Sun-based Service Creation Environment (SCE) system. APS
was created to provide an in frast ructu re for qu ic k creat ion of val ue-ad ded
applications. Applications are developed and run from the APS in
cooperation with a Sierra/CA voice processing module.
APS 4.1 connects to internal components and external systems via
n X.25
n Modems
n SS7
n TCP/IP
APS 4.1 uses an OCL (Octel command language) in terface to control the
actions performed by the Sierra/CA. APS can sign on to a VIS 2.0
machine, but does not use any of the newer 2.0 functionality. (The term
VIS 2.0 refers to Voice Information Software version 2.0 running on a
Sierra/CA hardware platform.)
In addition to providing call flow programming, APS also acts as a
gateway to external systems and networks requiring special signaling,
such as IS-41C (Interim Standard 41, version C).
ERP 2.0 ERP runs on a Sun system apart from the APS systems. ERP off-loads
billing and reporting functions from the APS to the ERP Sun system. In
order to run reports, an ERP system is required to compliment the APS
system.
ERP releases are tied to APS releases. In APS 4.1, the current ERP
version is 2.0 and, when ordered, is provided as part of the platform.
The ERP component supports one to four APS systems.
Reports currently running from APS will be moved to the ERP system.
New reports, as needed, will run from ERP.
ERP is installed with the standard ICC application reports.
Page 29

Overview
101-1830-001 Issue 1.0 29
APS 4.1 New Features
APS 4.1 introduces the following new features:
n Upgrade to Informix 7.3
n TCP/IP interface to Sierra/CA providing 432 virtual circuits
when using HLR
n TCP/IP alarm functionality
n TCP/IP connectivity checks
Upgrade to
Informix 7.3
APS 4.1 platform software uses Informix 7.3 database. This upgrade
provides the following advantages:
n New performance enhancements to its core server equates to
improved performance on key transactions
n Support for advanced data analysis
n Improved application migration
n Improved support from Informix for being on a current release
n Multithreaded architecture helps to improve performance of the
platform
TCP/IP Interface to
Sierra/CA
APS 4.1 platform software offers the option of using TCP/I P connectivi ty
between the APS Sun systems and the Sierra/CAs. When using HLR,
TCP/IP connectivity provides a maximum of 432 virtual circuits (144
virtual circuits per Sierra/CA).
TCP/IP Alarm
Functionality
In addition to TCP/ IP conne ctivity, APS 4.1 monitors the TCP/IP net work
and reports an error if con nectivity is lost.
TCP/IP Connectivity
Check
Connectivity of the TCP/IP network is checked every 15 minutes.
Connectivity checks are also performed during every reboot and at every
heartbeat measurement.
Page 30

APS (Application Plus Server) 4.1 Users Guide
30 101-1830-001 Issue 1.0
ERP 2.0 New Features
ERP 2.0 introduces the following new features:
n Compatibility of ERP 2.0 with the APS 4.1 platform
n ERP support of up to 4 APSs
n Capability to handle 2 mil li on re cor ds per APS, 8 million for one
ERP
Inclusion of ERP as
a Custom
Application
Prior to APS 4.1, ERP was considered a custom application for an
APS-based application. ERP currently provides reporting capabilities for
only the ICC application.
The advantages of using ERP are to:
n Minimize the potential performance impact on call processing
that may arise if reports are generated during a heavy call load
n Shorten the processing time requir ed for generating data-
intensive reports
n Allows the APS to dedicate its resources to application
processing
n Maximizes processing of its billing reports
ERP Supports
Multiple APSs
The APS 4.1/ERP 2.0 platform supports up to four APS systems.
Initialization on
Reboot
With the inclusion of TCP/IP, initialization on reboot occurs slightly
differently from APS 4.0. When the APS Sun system is rebooted, either
by hard boot or soft boot, all nec essary APS proce sses star t automatic ally.
Briefly, initialization on reboot operates as follows:
1. Checks that the logger manager is started.
2. Performs a file system check t o make sure of the drive s’ integr ity.
3. Checks the capacity of the file systems to make sure that there is
space enough to run.
4. Checks that the X.25 links are up, if X.25 is being used.
5. Starts I nformix and then makes su re it is online.
6. Checks that the cron process is running.
7. Checks to see if an SS7 card is present, then:
Page 31

Overview
101-1830-001 Issue 1.0 31
a. Installs the SS7 stack.
b. Checks that th e SS7 links co me into service.
c. Starts the issg_ss7alarm monitor.
d. Starts the SS7 gateway.
8. Checks that TCP/IP connectivity is up, if TCP/IP is being used.
9. Starts the APS applica tion ma nager , whi ch start s any appl ication s
that were running previously.
10. Logs informational alarm 600027 that a reboot occurred.
11. Logs informational alarm 600000 to begin system heartbeat.
Page 32

APS (Application Plus Server) 4.1 Users Guide
32 101-1830-001 Issue 1.0
APS 4.0 Features
The previous version of APS, APS 4.0, introduced these new features in
its release in January of 1999:
n NewNet card replaces MicroLegend interface to HLR
n Upgrade to Solaris 2.6
n Software package improvement
n Initialization on reboot
n Passive alarm monitoring interface
n System heartbeat
All these features are carried over to APS 4.1.
SS7 Interface to HLR APS 4.0 used only the SS7 protocol on a NewNet card to connect to the
HLR. The MicroLegend inte rface was dis conti nued. All new ins tall ation s
and upgrades from 3.x o r 4.0 use s the NewNet car d with t he SS7 pr otocol .
Upgrade to
Solaris 2.6
The APS 4.0 operating system is based on the Solaris 2.6 operating
system, which provided the following features:
n Year 2000 compliance without needing a patch to the operating
system.
n Better service from the Sun support organization, since they
prefer to work with the most current release.
n Solaris 2.6 includes changes to the kernel resulting in significant
performance improvements (20% faster). This translates into a
performance improvement at the application level.
Software Packaging
Improvements
In APS 4.0, a single installation package provides all of the software
using default configuration options.
Initialization on
Reboot
When the APS Sun system is rebooted, either by hard boot or soft boot,
all necessa ry APS processes start au tomatically.
Passive Alarm
Monitoring Interface
A procedure is defined to allow external alarm monitoring systems to log
into the APS and extract alarm information from log files. The procedure
involves locating the log files and formatting the alarm information
in them.
Page 33

Overview
101-1830-001 Issue 1.0 33
System Heartbeat The system heartbeat provides a way to continuously monitor the APS
platform. The system heartbeat is an informational alarm, alarm 600000,
that is logged in the st atus log file. This alarm i s lo gged every 15 minutes
on the quarter hour. If this alarm is not logged, it means that the APS
system has stopped functioning for some reason.
Page 34

APS (Application Plus Server) 4.1 Users Guide
34 101-1830-001 Issue 1.0
Communication Protocols
The communication protocols supported by APS 4.1 include:
n For Sierras, OCL version 1.2, VIS versions 1.2 and 2.0
n For CAs, OCL version 1.2, VIS version 2.0.05.08
n SMPP (Short message peer-to-peer) protocol
n SS7, IS-41C, TCAP (HLR integration)
n SMTP (E-mail interface)
n TCP/IP (Op erational Systems Suppo rt) interface
n PPP (Remote access interface)
Figure 3 shows these communication protocols as used in the APS
platform.
OCL Versions The OCL interface between the APS and the VPM uses the following
OCL and VIS versions
n For Sierras, OCL version 1.2, VIS versions 1.2 and 2.0
n For CAs, OCL version 1.2, VIS version 2.0.05.08
APS 4.1 now has the ability to talk in OCL to VIS 2.0 on the Sierra/CA
over an X.25 or TCP/IP interface using OCL version 1.2.
OCL version 2.0 communication to a VIS 2.0 is not supported in
APS 4.1.
SMPP Protocol The SMPP protocol running over TCP/IP continues to be supported in
APS 4.1 for the interface to an SMSC (short message service center).
SS7, IS-41C , TCAP APS 4.1 continues to provide an interface to an HLR.
APS 4.1 supports the NewNet c ard for communica ting with an HLR. New
customers use the SS7 method to talk to the HLR with an integrated
SS7 card.
Note that support for th e HLR gateway vi a MicroL egend is not s upport ed
in APS 4.1. It is important that current customers using MicroLegend
capability be upgraded to APS 4.1 and the integrated SS7 interface as
soon as possible.
Page 35

Overview
101-1830-001 Issue 1.0 35
Figure 3. APS 4.1 Interfaces
SMTP The e-mail interface provided via SMTP (Simple Mail Transfer Protocol)
is unchanged in APS 4.1.
TCP/IP Interface Communications with external OSS (Operational Systems Support)
systems using TCP/IP, modem, or X.25 interfaces are unchanged in
APS 4.1. Communications with agents performing passive monitoring of
alarm log informatio n is unchan ged in APS 4.1. Passiv e alarm moni toring
is accessible via TCP/IP or PPP.
A TCP/IP interface is now provided between the APS system and the
Sierra/CA. When using HLR, this interface permits a maximum of 432
virtual circuits, 144 per Sierra/CA.
PPP Remote access to APS using PPP- or TCP/IP-based methods are
unchanged in APS 4.1.
APS
Informix
DB
Alarm
Monitoring
System
Remote
Users
Passive Alarm
Monito r Interface
PPP
Sierra
VIS 1.2
CA
VIS 2.0
SS7
Network
HLR
OCL 1.2
OCL 1.2
TCAP/IS-41C
TCAP/IS-41C
LAN/WAN
Alarm
Monitoring
System
Passive Alarm
Monito r Inte r fa ce
OSS
ftp, etc
Remote
Users
SMSC
Sendmail
Server
SMPP
Rlogin, etc.
smtp
TCP/IP
SS7
X.25
modem
Legend
APS 4.1 Interfaces
Lan
Sierra or CA
VIS
2.05.08
OCL 1.2
ERP
Informix
DB
10 MB
100MB
10/100MB
100
MB
LAN Switch
Page 36

APS (Application Plus Server) 4.1 Users Guide
36 101-1830-001 Issue 1.0
Description of APS Hardware
The APS hardware platf orm consis ts of Sun syst ems for one or more APS
machines and one Sun system for the ERP machine. Please refer to the
configuration note for this release for more details, including product ID
numbers.
APS Sun System
The APS Su n systems reside at an APS site. Both platform and
application software at an APS site runs on the APS system. ERP
software resides on the E RP system.
APS System
Hardware
Configuration
The APS system is a SunOS operating system machine based on a
300-MHz dual CPU processor. The APS system is connected by either
X.25 or TCP/IP links to the Sierra/CA voice processing module (VPM).
Hardware Base
Sun Ultra Enterprise 2, Model 2300, 300 MHz Server with:
n Dual CPU
n 1 GB RAM
n 2 MB Ultra cache memory
n Internal Sun CD-ROM
n 3.5 inch 1.44 MB internal diskette drive
n Two 9.1 GB Ultra SCSI disks
n Type 5 Country kit for USA and Canada—keyboard and mouse
n 17 inch color monitor or better, keyboard, mouse
n On board Ethernet connection
Circuit Cards in an APS System
n One Turbo GX 8-bit graphics card and cables
n One ADC NewNet SS7, V.35 card and drivers (Lucent
Technologies provides this card)
n SCSI card
n HSI card
Page 37

Overview
101-1830-001 Issue 1.0 37
Other Components in the APS System
n One fast-wide, 68-68 pin SCSI cable with power cord
n One external modem, US Robotics Sportster
n RJ45 Ethernet cable
n If using X.25 links to the Sierra/CA:
— One high speed serial interface (HSI) pad to connect to the
Sierra/CA
— X.25 cable; 25 feet; 1 per VPM
— Synchronous Modem Eliminator (SME), 1 per VPM
— RS449 to RS232 converter, required if using HSI pad, 1 per
VPM
n If using TCP/IP connection to the Sierra/CA:
— Network LAN switch for TCP/IP connectivity to Sierra/CA
with VIS 1.2 or 2.0, or to CA with VIS 2.05.08
— Crossover cable for LAN switch to local LAN
— Dumb terminal and keyboard to attach to the LAN switch
Storage Components
n One 12 GB to 24 GB DAT (Digital Audio Tape) DDS-3 (Digital
Data Storage) 4 mm tape drive
n One StorEdge A1000, 16 GB, A-1000 with SCSI host adapte r for
A1000
or
One 16.8 GB 7200 RPM StorEdge MultiPack with SCSI host
adapter
ERP System
Hardware
Configuration
ERP is available for two sizes of APS sites:
n Small configuration - for 1 to 2 APS systems, uses a Sun Ultra 5
n Large configuration - for 1 to 4 APS systems, uses a Sun Ultra 2
The ERP machine is based on a single 300-MHz single CPU. The ERP
system is connected by a LAN to the APS. ERP uses Solaris 2.6.
Page 38

APS (Application Plus Server) 4.1 Users Guide
38 101-1830-001 Issue 1.0
Hardware Base for
Small ERP
Configuration
The small ERP configuration uses a Sun Ultra Enterprise 5, Model 2300,
300 MHz Server with:
n Single CPU
n 1 GB RAM
n 2 MB Ultra cache memory
n Internal Sun CD-ROM
n 3.5 inch 1.44 MB internal diskette drive
n One 9.1 GB Ultra SCSI disk
n Type 5 Country kit for USA and Canada—keyboard and mouse
n 17 inch color monitor, keyboard, mouse
n On board Ethernet connection
n DDS3 DAT tape drive
Circuit Cards in an ERP System
n TCP/IP card
n One Turbo GX 8-bit graphics card and cables
n SCSI card
Other Components in the ERP System
n RJ45 Ethernet cable
n 100Mbp Network LAN switch for TCP/IP connectivity to more
than one APS
n Dumb terminal and keyboard to attach to the LAN switch
Storage Components
n One 12 GB to 24 GB DAT (Digital Audio Tape) DDS-3 (Digital
Data Storage) tape drive
Hardware Base for
Large ERP
Configuration
Hardware needed for the large configuration of ERP differs from the
small configuration but matches the configur at ion f or the Ultra 2 systems
described in ‘‘APS System Hardware Configuration’’ on page 36.
Page 39

Overview
101-1830-001 Issue 1.0 39
Description of APS Software
An APS site requires software for the APS, provided by Lucent
Technologies, and software for the Sierra/CA VPM. To process reports,
an ERP machine loaded with ERP software is necessary.
APS Software
APS uses the following software components and provides them as part
of the APS 4.1 package.
n APS 4.1 software for A1000 storage
or
APS 4.1 software for Multipack storage
n One APS application software (i.e., ICC) with related support
n Solaris 2.6 operating system
n Informix 7.3 DBServer SQL, ESQL for 1 to 2 users, and related
support
n X.25 software license fee and media
n SS7 software
n HSI card software
n One block of 100 virtual circuits, 1 block per VPM
n Messaging server connectivi ty, 1 per VPM
n One APS 4.1 Users Guide, paper copy. (You are reading it now.)
ERP Software
ERP uses the following software components:
n ERP 2.0 software
n Logging stub for reports that will run on the ERP
n ICC standard reports, including a version of the standard Hourly
Report that is modified to improve performance
n Solaris operating system v 2.6
n Informix 7.30.UC6-1
Page 40

APS (Application Plus Server) 4.1 Users Guide
40 101-1830-001 Issue 1.0
n Informix ESQL/C 9.16.UC1
n Sun Workshop C/C++ compilers v 4.2
VPM Software
n Minimum of VIS 1.2 software for Sierra voice processing
systems
n Minimum of VIS 2.05.08 software for CA voice processing
systems
n Support for OCL versions 1.2 and 2.0
License Informa tion
APS softwa re requires a l icense to operate. The license is controlled by
means of a license key. APS performs validation and aut henticat ion of the
license key when it first starts up. Please see Chapter 2, ‘‘Installing
APS,’’for further details.
Page 41

101-1830-001 Issue 1.0 41
2
Installing APS
This chapter contains information about installing the APS 4.1 platform
software a nd the Solari s 2.6 operating system. Installation instruction s
found in this section discuss:
n Getting Started
n Routine Operations
n Required Items and Information
n Installing New Hardware Systems
n Software Upgrades
Getting Started
Preparing the APS platform for use con sists of the fo llowing steps:
1. Install the hardware and verify that it functions correctly.
2. Install the software.
a. Install the APS platform software.
b. If using an ERP s ystem, install the ERP software.
c. Install the application software.
3. Configure the system heartbeat file.
4. Configure the Sierra/CA for APS. See the System Managers
Manual and the configuration note for this software. Specific
Sierra/CA configuration activities include:
Page 42

APS (Application Plus Server) 4.1 Users Guide
42 101-1830-001 Issue 1.0
a. Setting up X.25 connectivity if applicable
b. Setting up Type 40 and Type 1 mail boxes
c. Adding a new line type to provide answer supervision for
RNA
d. Setting up application mailboxes if necessary
e. Setting up port monitoring tables on the Sierra/CA
f. Configuring outcalling ports on the Sierra /CA
5. Connect to the Sierra/CA.
6. Connect to the messaging center if necessary.
7. Connect to the SS7 network.
8. Place test calls
9. Test report generation using the application.
10. Soak the installation.
After these steps have been completed satisfactorily, your site can begin
live operation.
Routine Operations
After you install your hardware and software, routine operations may
consist of the following tasks:
n Monitoring the status log file daily and when necessary
n Monitoring the application using test calls and error logs
n Monitoring passive alarm collection
n Performing scheduled backups
Page 43

Installing APS
101-1830-001 Issue 1.0 43
Required Items and Information
Please have the following items and information available to complete the
installation procedures.
If you do not have the other information, enter place-holder data when
you are prompted for suc h th ings as IP addr ess an d lice nsing i nformat io n.
Apply the correct data when they become available.
You will need the following information and items:
n Boot CD, found in Solaris 2.6 Hardware:5/98 Server Limited
Expert Edition package
n Appropriate version APS 4.1 platform tape, 4 mm DDS (digital
data storage) format
n Appropriate version ERP 2.0 platform tape for either a small or
large configu r ation, 4 mm D DS (digital data storag e) format.
n Blank tapes for back ups
n Password for root
n Logical name of the APS machine
n Logical name of the ERP machine, if used
n IP address of the APS
n IP address of the ERP, if used
n IP address of the LAN switch, if used
n IP address of the LAN default gat eway, if used
n Netmask for the LAN, if used
n Ethernet connection to the LAN switch
n Name and IP address of the default router
n Time zone where t he APS resides
n License information for the X.25 soft ware (from Sun), if used
n License information for the Informix software
n License information for the APS 4.1 software
n PPP host address
n PPP peer address
Page 44

APS (Application Plus Server) 4.1 Users Guide
44 101-1830-001 Issue 1.0
n Netmask for TCP/IP
n Netmask for PPP
n Modem, dial-up line, and remote access procedures for remote
support personnel so they may dial in to the site
Page 45

Installing APS
101-1830-001 Issue 1.0 45
Installing New Hardware Systems
New systems require specific hardware to be installed and wired. Once
the hardware is set up, you are ready to install the software.
Assembling the Sun Hardware
Assemble the major hardware components of the APS platform:
n APS hardware
n ERP hardware, if using an ERP system
n LAN switch and cables, if using TCP/IP for OCL
communication or ERP
Setting Up APS Hardware
The first step in installing a new system is to assemble the hardware.
Assembling the Sun hardware consists of the foll owing steps:
1. Install the cards.
2. Install a second 9 giga byte hard drive in the Sun use d for the APS
systems.
3. Install the 9 gigabyte A1000 disk array drives.
4. Make the modem connections.
5. Cable and configure TCP/IP from the Sierra/CA side, if used.
6. Cable and configure TCP/IP from the APS side, if used.
7. Cable and configure X.25 links from the Sierra/CA side, if used.
8. Cable and configure the X.25 links from the APS side, if used.
9. Assemble and connect the ERP s ystem, if used
Page 46

APS (Application Plus Server) 4.1 Users Guide
46 101-1830-001 Issue 1.0
Installing Circuit
Cards
Check the Sun system to be loaded with APS to make sure that cards are
in the correct slot s. The correct arrangemen t of ca rds in the Sun system is
shown in Figure 4.
Figure 4. Rear Panel of the Sun Ultra 2 System
Installing the
Second Hard Disk
If you have a new Sun system, it has one internal hard disk in it. APS
requires two internal hard disks. Use t hese steps to a dd another hard dr ive.
Refer to your Sun hardware documentation as necessary. There are no
terminators to set on the second hard disk.
1. Exit all software programs. (There should be no software loaded
at this point.)
2. Power down the Sun system.
3. Remove the cover.
4. Insert a 9 gigabyte hard disk into the second drive bay.
5. Replace the housing.
6. Power up the Sun s ystem.
When the Sun reboots, the added drive is automatically numbered.
Installing the
External Disks
APS platform software requi res tha t the exte rnal dis ks fo r the Sun syst em
be in specific slots in the A1000. This is because the drives must have
certain SCSI target numbers assigned to them. Sun assigns SCSI
designations automatically, depending on which slot the disk is in. Sun
configures the drives the same way every time.
cpcvsun LJK 060399
Empty
slot
HSI
card
Second
SCSI
controller
Ethernet
connection
Video
card
NewNet
card
AB
Page 47

Installing APS
101-1830-001 Issue 1.0 47
There should be two disks installed. Figure 5 shows the arrangement of
disks in the A1000 disk array. Install the disks as shown.
Figure 5. Arrangement of Drives in the Sun A1000 Disk Array
Powering Up the
A1000
Use this procedure to power up the A1000. The A1000, tape drive, and
Sun system must be powered up in a specific sequence, otherwise the
system may be unreliable.
1. Power up the A1000.
Wait for it to initialize (green lights on the side stop blinking).
2. Power up the tape drive.
3. Power up the Sun s ystem.
Modem Connections The PPP configuration file is confi gured aut omatical ly at i nstallati on. The
PPP modem connection shoul d be made in port B. The /etc/uucp/Devices
file and the po rt confi guration are set up for the modem to be con nected to
serial port B. If you must connect to port A, change the Devices file and
port configuration using the Sun administration tool.
When setting modem connections, you will use the Sun Admintool.
Do the following:
1. At a # prompt enter
admintool&
2. Select
Browse
Serial Ports
Expert
cpcvsun1 LJK 09239
8
Page 48

APS (Application Plus Server) 4.1 Users Guide
48 101-1830-001 Issue 1.0
3. Set your screen to match Figure 6.
Figure 6. Example Sun Admin Tool Window
Assembling the ERP Hardware
If you have an ERP system at your site, see ‘‘Assembling the ERP
Hardware’’ on page 352.
Cabling the ERP System
If you have an ERP system at your site, see ‘‘Cabling the ERP System’’
on page 353.
Setting Up the LAN Switch
All sites that use TCP/IP c onne ct ivi ty to t he Si err a/ C A use a LAN switc h.
1. Position the switch on a rack or table and apply power according
to the installation instructions that accompany that hardware.
2. Hook up a dumb terminal and a keyboard to the LAN switch.
3. Press CTRL Y to display the main menu on the screen.
4. Press ENTER to go to the IP configuration /Setup menu.
Page 49

Installing APS
101-1830-001 Issue 1.0 49
5. Enter the IP address of the LAN switch.
6. Enter the IP address of the LAN default gateway.
7. Enter the netmask.
8.
Connect the local LAN to the APS’s LAN switch in slot 1. Use
the LAN crossover cable (flipped).
9. For /etc /hosts purposes, name t he LAN switch “swaps”.
Page 50

APS (Application Plus Server) 4.1 Users Guide
50 101-1830-001 Issue 1.0
Installing the Software
n Install the APS tape on all APS systems. This tape installs the
APS platform software on the Sun system.
n Install the ERP tape on the ERP Sun system if you have an ERP
system at your site. This step is not needed if your system is not
going to generate reports.
Installing the APS Tape
This procedure installs a full image of the APS software. Expect this
procedure to take about 1 hour and 15 minutes.
Note: The full image install is a destructive install. If you want to
make a backup of the Sun system you are about to install, do
so now. See
‘‘Backing Up and Restoring the Sun System’’
on page 213.
If you need to restore a Sun system afte r main tenance such as replacing a
hard drive, do not use this procedure. Use ‘‘Restoring a Full or Partial
Image’’ on page 215. That procedure instructs you to use a backup tape
that has administration and provisioning data included.
1. Comple te all the steps in ‘‘Assembling the Sun Hardware’’ on
page 45.
2. Insert the Solaris CD -ROM into th e CD drive.
This disk is labeled Solaris 2.6 S oft ware SPARC Platform Edition
5/98.
3. Boot fr om the CD-ROM:
a. Press the STOP+a keys to display the OK prompt.
b. From the OK prompt enter boot cdrom
4. Insert the APS 4.1 platform tape into the drive.
The system boots into OpenWindows and starts the normal
Solaris install.
5. Ignore the Solaris Installation Program dialogue box.
Instead, right click to display a menu of choices.
Page 51

Installing APS
101-1830-001 Issue 1.0 51
6. Choose
Utilities
Command Tool
7. From the # prompt, enter t ar xvf /dev/rm t/ 0
This command extracts the scripts needed to load the software.
8. Enter ./install__fs
This command displays the following messages:
n Date, time, and machine from which this tape was created
n File system layout
n Warning about hardware and file system compatibility
n A warning that you are about to begin a destructive install.
n The prompt “Proceed with the installation?”
9. Answer the prompt with the letter y or n.
The install_fs menu displays:
____________________________________________________________________________
1. Full system installation and setup
2. Full system recovery (no setup)
3. Partial system recovery and setup
4. Partial system recovery (no setup)
5. Help
6. Quit
Please Enter the operation to be performed:
____________________________________________________________________________
10. Answer the prompt “Pleas e en ter the operation to be perf orme d.”
by pressing the number 1, “Full system installation and setup”.
11. Confirm by entering y.
This script runs for approximately 75 minutes.
12. Remove the boot CD-ROM at a convenient time.
13. Answer the prompts to remove the database tables associated
with messages or calls. Confirm by entering y or n.
14. Answer the time zone prompt by typing the number that
corresponds to your location. Confirm by entering y.
15. When prompted to change the date, accept the default if it is
correct. Otherwise, en ter y and st ep throu gh the month, day, year,
hour, and minute prompts.
16. Enter the root password, then re-enter it to confirm.
Page 52

APS (Application Plus Server) 4.1 Users Guide
52 101-1830-001 Issue 1.0
17. Enter the new machine name. Confirm by entering y.
Your network administrator shou ld be abl e to provide some of the
information regarding network addressing used in the next steps.
18. Enter the IP address. Confirm by entering y.
19. Enter the netmask address. Confirm by entering y.
20. Enter the LAN gateway name. Confirm by entering y.
21. Enter the LAN gateway IP address. Confirm by entering y.
22. Enter the host PPP host address. Confirm by entering y.
Typically, you would use the TCP/IP address of the host, but
check with the network administrator.
23. Enter the peer PPP IP address. Confirm by entering y.
This address uses a unique fourth octet, but the first three octets
are the same as the IP address. Check with your network
administrator.
24. Enter the host PPP netmask. Confirm by entering y.
25. At the keyboard, press the STOP+a keys.
An OK prompt displays.
26. Enter boot –r
The Sun system reboots.
The machine resets, and boot s up. Boot message s display, and the
Sun Console login displays welcoming you to the new host
machine.
The SunOS banner page displays.
27. Log in as root.
28. Open a terminal window by selecting Program and then
Terminal from the Sun desktop.
A # prompt displays.
29. In a terminal window enter
cd /var/restore_files
./informix_lic
30. Enter the Informix DBServer serial number.
This is available on the Informix software package.
Page 53

Installing APS
101-1830-001 Issue 1.0 53
31. Enter the Informix DBServer key number.
This is available on the Informix software package.
32. Enter the ESQL (embedded system query language) serial
number.
This is available on the Informix software package.
33. Enter the ESQL key number.
This is available on the Informix software package.
34. If you are using X.25 connectivity to the Sierra/CA:
a. Procure the X.25 license information (from Sun
Microsystems).
b. Create an X.25 license file in the /opt/SUNWconn/x25
directory.
c. From a cmdtool window, run the X.25 license tool: Enter
cd /var/restore_files
./x25_lic
The X.25 license install begins. Information displays stating that
the X.25 license tool will now run. These screens inform you of
what to do if you don’t cur rentl y have the X.25 licen se passwo rd.
The License Install Tool (lit) window displays.
d. In the X.25 lit tool window, click on License from file...
e. In the License File Location GUI, enter the full path name to
the X.25 license file created in step b above.
f. Click on the Read button.
g. An infor mational pop-up appears that identifies l icenses to be
installed. Click on the Continue button.
h. Another information pop-up appears that indicates license
installation will proceed. Click the OK button.
i. Click on Exit - Install Licenses.
j. From a cmdtool window, run the license configuration script:
cd /etc/opt/licenses
./LIC_CONFIG_SCRIPT
Page 54

APS (Application Plus Server) 4.1 Users Guide
54 101-1830-001 Issue 1.0
Installing the ERP Tape
If your site uses an ERP s ystem, s ee ‘‘Installing and Administe ring ERP’’
on page 354.
Installing the Application
Every application needs speci fic admi nistrat ion and s etup per formed. See
the documentation that came with your application for these procedures.
When you finish installing the application, return to this point and
continue.
Configuring the System Heartbeat File
The configuration file is an ASCII flat file having a single entry. This
entry is the number of script processes the heartbeat function should look
for.
To determine the number of script processes:
1. Start up the application, including all scripts and the maximum
virtual circuits that will be running.
2. On a SunOS command line enter
ps -ef | grep srunnertest | grep -v grep | wc -l
The number that returns is the one that should be in the
configuration file.
To update the configuration file:
1. On a SunOS command line enter
vi /export/home0/issg/issg_main/issg_
lib/libheartbeat/heartbeat.config
2. Input the number from step 2 above, or change the existing entry.
To turn off this check for script processes, put 0 (zero) in the
configuration file.
Configuring Communications
The next installation step is to configure and administer communications
between th e APS system and the Sierra/CA.
Page 55

Installing APS
101-1830-001 Issue 1.0 55
If your site uses TCP/IP protocol to the Sierra/CA, perform these two
procedures:
n ‘‘Cabling and Configuring TCP/IP from the Sierra/CA Side’’ on
page 55
n ‘‘Cabling and Configuring TCP/IP from the APS Side’’ on page
58
If your site uses an X.25 protocol to the Sierra/CA perform these two
procedures:
n ‘ ‘Cabl ing and Co nfiguring X.25 Links on the Sie rra/CA Sid e’’ on
page 58
n ‘ ‘ Cabli ng and Co nfigur ing X.25 Links on the APS Side’’ on page
61
Cabling and
Configuring TCP/IP
from the S ie r ra /CA
Side
Use this procedure to set up the TCP/IP connection on the Sierra/CA.
Before beginning, contact the LAN administrator at the site and find out
n The IP address for the Sierra/CA
n The netmask for the Sierra/CA
n Host name for the Sierra/CA
n Broadcast Address
n Gateway IP address
n Host name for the LAN switch (name this “swaps”)
n IP address for the LAN sw itch
1. Connect the TCP/IP cabl e fr om the Sierra/CA
to the LAN switch.
2.
At the
Sierra/CA
, display the Main Menu and select menu item
21 - LAN Interface.
The LAN Interface Management menu displays.
In this menu, you will go into these forms:
n 1 - IP Address and Net Mask Configuration
n 2 - TCP/IP Parameter Configuration
n 5 - Add/Edit Host - IP Entrie s
n 6 - Review Host - IP Entries
Page 56

APS (Application Plus Server) 4.1 Users Guide
56 101-1830-001 Issue 1.0
_________________________________________________________
Menu 21 - LAN Interface Management IMA-CA
1 - IP Address and Net Mask Configuration
2 - TCP/IP Parameter Configuration
3 - SNMP Parameter Configuration
4 - NAC Card API Status
5 - Add/Edit Host - IP Entries
6 - Review Host - IP Entries
7 - File Transfer
Enter Option:
_____________________________________________________________________
3. From menu 21, choose item 1 to set the STORED IP address and
IP net mask for the Sier ra/CA.
Change the IP and netmask in the rightmost column. These changes will
take effect the after the network access card in the Sierra/CA is uploaded
or the Sierra/CA is rebooted.
_____________________________________________________________________
Menu 21.1 - LAN Interface Management IMA-CA
- IP Address and Net Mask Configuration -
This Server’s Ethernet Address: 00:C0:94:20:0A:F9
ACTIVE (DISPLAY ONLY) STORED(FOR NEXT UPLOAD)
This Server’s IP Address: 999.16.2.83 999.16.2.83
IP Net Mask: 999.255.0.0 999.255.0.0
.
.
.
_____________________________________________________________________
4. From menu 21, choose item 2.
Change the values in Broadcas t Addr ess and Gateway IP address.
Page 57

Installing APS
101-1830-001 Issue 1.0 57
_____________________________________________________________________
Menu 21.2 - LAN Interface Management IMA-CA
- TCP/IP Parameter Configuration -
This Server’s Ethernet Address:......... 00:C0:94:20:0A:F9
This Server’s IP Address:............... 172.16.2.83
IP Net Mask:............................ 255.255.0.0
Broadcast Address:...................... 999.16.255.255
Gateway IP Address:..................... 999.16.0.1
.
.
.
_____________________________________________________________________
5. From menu 21, choose item 5.
In this form, add the host name and IP address for the Sierra/CA
and the LAN switch.
_____________________________________________________________________
Menu 21 - LAN Interface Management
Host Name IP Address
Sierra_1 999.3.123.10
Sierra_2 999.3.123.12
swaps 999.3.123.12
.
.
.
_____________________________________________________________________
6. From menu 21, choose item 6.
Use this form to review the host names and IP addresses of the
Sierra/CA and LAN switch.
_____________________________________________________________________
Menu 21 - LAN Interface Management
Host Name IP Address
Sierra_1 999.3.123.10
Sierra_2 999.3.123.12
Enter Option - P(revious) N(ext) E(xit):
_____________________________________________________________________
Page 58

APS (Application Plus Server) 4.1 Users Guide
58 101-1830-001 Issue 1.0
Cabling and
Configuring TCP/IP
from the APS Side
Using this procedure from t he APS system, set up the TCP/ IP connecti on.
Perform this procedure for every APS system at the site.
Perform this procedure after loading the APS tape and after installing the
ICC application.
1. Connect the TCP/IP cable from the APS system to the LAN
switch.
2. Enter
vi /etc/hosts
3. Using vi, add just the host names and IP addresses of the
Sierra/CA.
The IP address and hostname for every VPM at the site must be
entered in to the /etc/hosts file. The word “sierra” or “imaca”
must be part of the machin e name entered there.
Cabling and
Configuring
X.25 Links on the
Sierra/CA Side
This procedure explains how to configure and connect cables and
connectors between the APS and the Sierra/CA when they communicate
via X.25 links.
To configure the Sierra/CA side of the X.25 links,
1. Log in to the Sierra/CA.
2. From the main menu of the Sierra/CA, go to menu 18 - 1.
3.
If you are connecting to the
Sierra/CA
via modem because it is
not co-loc ated with the APS,
make your Sierra/CA menu 18-1
screen look like Figure 7, a modem connection.
Page 59

Installing APS
101-1830-001 Issue 1.0 59
Figure 7. Sierra/CA Configuration for a Remotely Located Sierra/CA
____________________________________________________________________________
Menu 18 - X.25 Interface Management MODEM CONNECTION
- Interface Configuration -
Physical Interface Number: 0
Network Type: 1 - Telnet Connection Type: 3 - Network
Interface Terminal Type: 1 - DCE Interface Type: 1 - Synchronous
- LCI Configuration -
- Level 1 Physical - Number of LCIs Allowed: 49
Interface Speed: O - 19200bps First PVC Number: 0
Clocking Source: 2 - External Total PVCs: 0
First 1-way Incoming SVC: 0
- Level 2 Frame - Total 1-way Incoming SVCs: 0
Frame Window Size: 7 First 2-way SVC: 1
T1 Timer: 60 x 50ms Total 2-way SVCs: 49
N2 Repetition Rate: 20 First 1-way outgoing SVC: 50
Total 1-way outgoing SVCs: 0
- Level 3 Packet - - DTE Time Limits -
Packet Size: 128 bytes T20: 180 sec T22: 180 sec
Network ID: 3110 T21: 200 sec T23: 180 sec
X.25 Physical Interface Status must be STOPPED before changes are allowed.
Press “Break” to return to previous screen or enter another interface number
to change the interface configuration.
____________________________________________________________________________
If you have a direct connection to a Sierra/CA that is co-located
with the APS, make your Sierra/CA menu 18-1 screen look like
Figure 7, a direct connection.
Figure 8. Sierra/CA Configuration for a Co-located Sierra/CA
____________________________________________________________________________
Menu 18 - X.25 Interface Management DIRECT CONNECT
- Interface Configuration -
Physical Interface Number: 0
Network Type: 1 - Telnet Connection Type: 1 - Direct
Interface Terminal Type: 1 - DCE Interface Type: 1 - Synchronous
- LCI Configuration -
- Level 1 Physical - Number of LCIs Allowed: 101
Interface Speed: O - 19200bps First PVC Number: 0
Clocking Source: 1 - Internal Total PVCs: 0
First 1-way Incoming SVC: 0
- Level 2 Frame - Total 1-way Incoming SVCs: 0
Frame Window Size: 7 First 2-way SVC: 1
T1 Timer: 60 x 50ms Total 2-way SVCs: 101
N2 Repetition Rate: 20 First 1-way outgoing SVC: 102
Total 1-way outgoing SVCs: 0
- Level 3 Packet - - DTE Time Limits -
Packet Size: 128 bytes T20: 180 sec T22: 180 sec
Network ID: 3110 T21: 200 sec T23: 180 sec
X.25 Physical Interface Status must be STOPPED before changes are allowed.
Press “Break” to return to previous screen or enter another interface number
to change the interface configuration.
____________________________________________________________________________
4. Set the number of LCIs (logical channel identifiers) to the
number of ports used by the APS plus 1. In the example in
Figure 8, the APS uses 100 ports, and the LCI is set to 101.
5. Open the RS232 end of the connector on the cable coming from
the HSI pad.
6. Turn the resistor around so that DCE points to the HSI pad.
Page 60

APS (Application Plus Server) 4.1 Users Guide
60 101-1830-001 Issue 1.0
7. Connect the SME (synchronous modem eliminator) connector.
The SME connector is labeled VPS on one end and Data Mod on
the other end. The VPS end points toward the APS machine and
the Data Mod end points to the Sierra/CA.
Figure 9 shows the cable connections between the APS machine
and the Sierra/CA when using an HSI pad.
Figure 9. Cable Connections for an HSI Connection
Figure 10 shows the cable connections betwe en the APS machi ne
and the Sierra/CA when an HSI pad is not used and the
connection is direct.
Figure 10. Cable Connections for a Direct Connection
APS
HSI Sierra
SME
(P/N 003-1074-000)
VPS
side
Data
module
side
cycvsier LJK 102198
HSI cable with terminator
resistor is turned the
opposite way. Open up
connector to change.
J48
link 0
P/N
057-1174-000
APS
Sierra
SME
(P/N 003-1074-000)
VPS
side
Data
module
side
cycvsie2 LJK 121898
J48
link 0
P/N
057-1174-000
Page 61

Installing APS
101-1830-001 Issue 1.0 61
Cabling and
Configuring
X.25 Links on the
APS Side
This section outlin es the con figur ation procedur e for X.25 pr otocol stack.
It contains detailed step-by-step instructions along with screen examples
showing configuration settings.
1. Decide how many links you will be configuring. The first link
is 0. Determine how many more you will have. The maximum
is 4.
Table 1 shows you what values you need when setting up the
X.25 links.
Table 1. Link Nu mbering
Table 2 shows other setting you need to change in other fields in
the Link Editor screen.
Table 2. Other Fields
Table 3 shows the addresses of subsequent links you will need to
configure in the Link Editor screen.
Table 3. Link Addressing
Physical Link Link Number
10
21
32
43
Device Choose HSI for use with an HSI pad.
Choose ZHS for a serial port with a direct
connection.
TxClock 19,200
Physical
Link
Link
Address
Link 1 10000
Link 2 20000
Link 3 30000
Link 4 40000
Page 62

APS (Application Plus Server) 4.1 Users Guide
62 101-1830-001 Issue 1.0
Starting the
X.25 Tool
2. Log in as super user. Enter
su
and enter the correct password.
3. Enter
x25tool&
The X.25 tool main menu displays, as shown in Figure 11.
Figure 11. X25tool 9.1, Main Menu
Note that the first link, link 0, has already been configured.
4. From the main menu choose
Edit
Add Link
Page 63

Installing APS
101-1830-001 Issue 1.0 63
A list of link types displays as shown in Figure 12.
Figure 12. Link Types
5. Click on link type dte84.
An example Link Editor window for an HSI connection displays
as in Figure 13. A Link Editor window for a direct connection
shows in Figure 14.
Page 64

APS (Application Plus Server) 4.1 Users Guide
64 101-1830-001 Issue 1.0
Using the
Link Editor
Use the Link Editor to set up the subsequent links.
Figure 13 shows the correct setti ngs for the second link, link 1, of
an HSI connection. Figure 14 shows the correct settings for the
second link of a direct connection.
Use Table 1 to determine the Link Number and Local X.121
Address for other links. Otherwise, fill in your window to
match the one in Figure 13 or Figure 14.
Figure 13. Link Editor Window for a Co-located Sierra/CA
Page 65

Installing APS
101-1830-001 Issue 1.0 65
Use Figure 14 to enter sett ings for a Sierra/CA not in the same facility as
the APS system.
Figure 14. Link Editor Window for a Remotely-located Sierra/CA
6. When finished, click Apply.
When you click Apply, the buttons you need to use on the right
become available.
In the next steps, you will click on each one of these buttons and
match your screen to the ones in the following steps.
Page 66

APS (Application Plus Server) 4.1 Users Guide
66 101-1830-001 Issue 1.0
LAPB/WAN
Parameters
7. From the Link Editor wi ndow, choose LAPB/WAN Parameters.
The LAPB/WAN Parameters window displays, as shown in
Figure 15.
Figure 15. LAPB and WAN Parameters
8. Click OK. This window needs no modifications.
Page 67
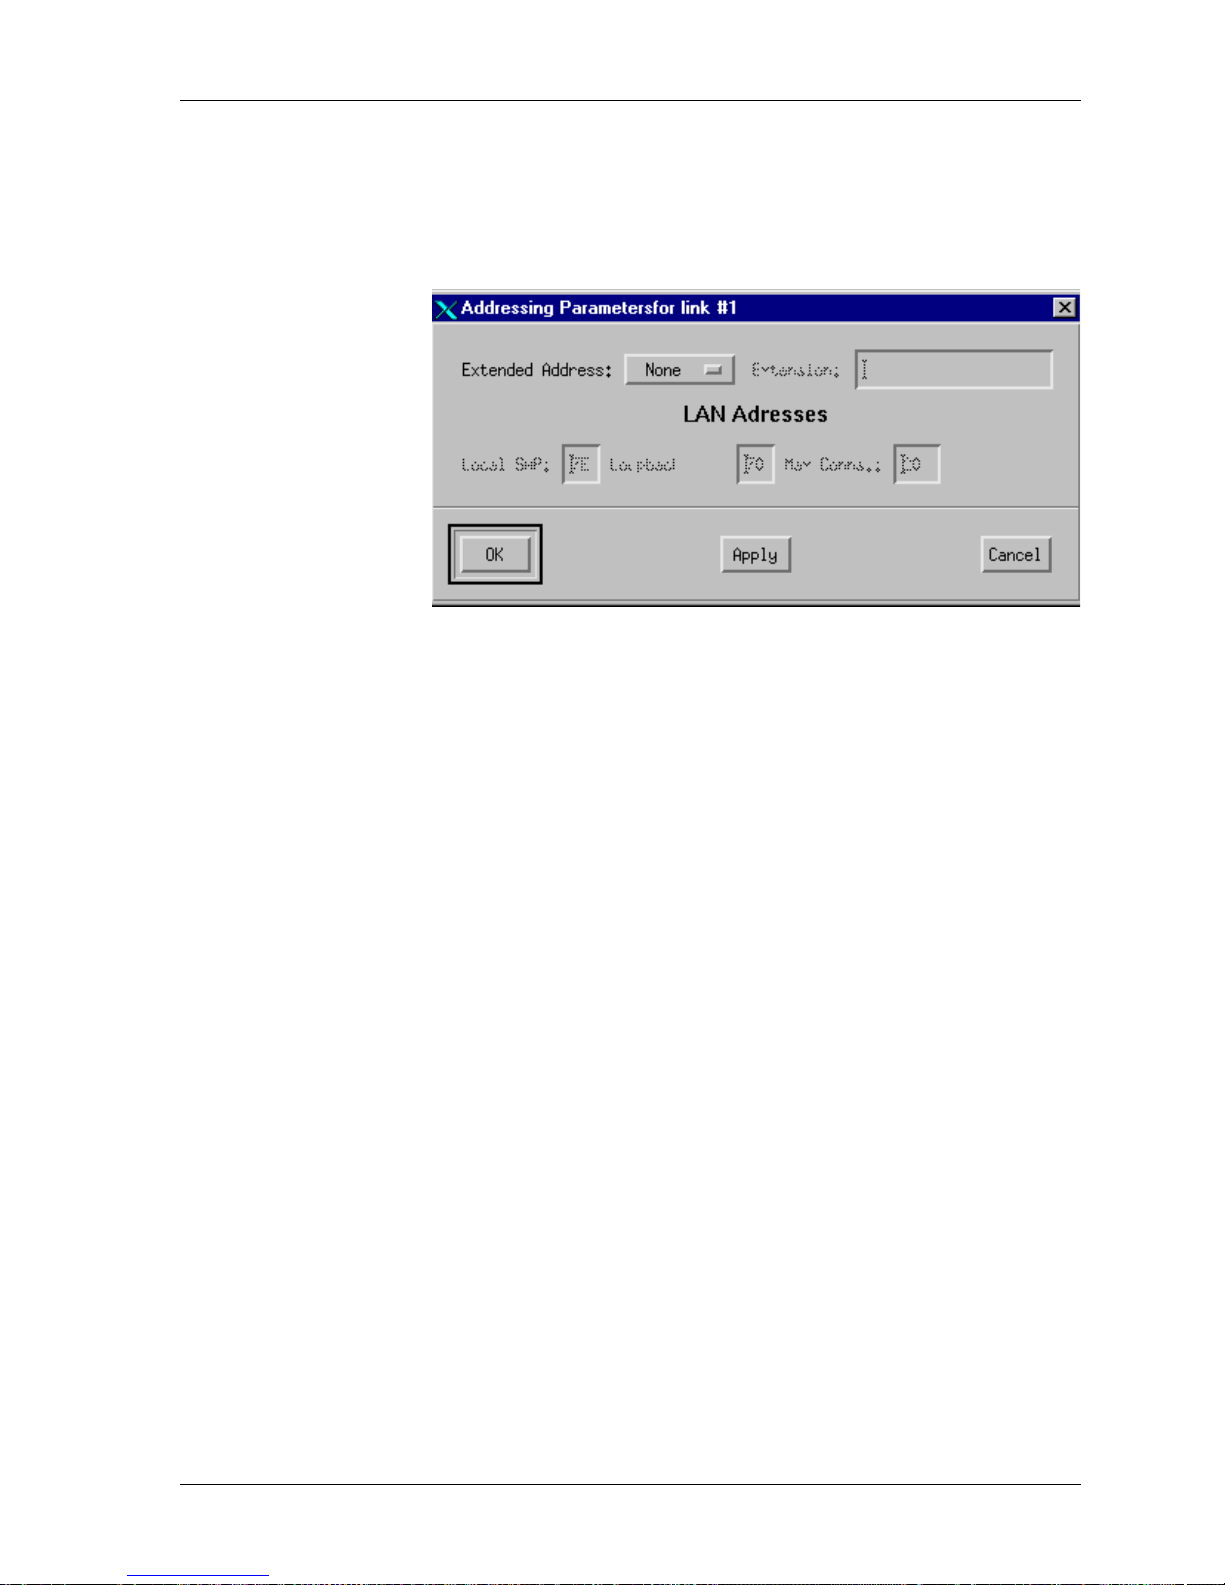
Installing APS
101-1830-001 Issue 1.0 67
Addressing 9. From the Link Editor window click Addressing.
10. The Addressing Parameters window displays, as shown in
Figure 16.
Figure 16. Addressing Parameters Window
11. Click OK. This window needs no modifications.
Page 68

APS (Application Plus Server) 4.1 Users Guide
68 101-1830-001 Issue 1.0
CUG and Facilities 12. From the Link Editor window, click CUG and Faci lities.
The CUG (closed user group) and Facilities window displays, as
shown in Figure 17.
Figure 17. CUG and Facilities Parameters Window
13. Click OK. This window needs no modification.
Page 69

Installing APS
101-1830-001 Issue 1.0 69
Link Modes 14. From the Link Editor window, click Link Modes.
The Link Mode Parameters window displays, as shown in
Figure 18.
Figure 18. Link Mode Parameters Window
15. Click OK. This window needs no modification.
Page 70

APS (Application Plus Server) 4.1 Users Guide
70 101-1830-001 Issue 1.0
Throughput 16. From the Link Editor window, click Throughput.
The Throughput window displays, as shown in Figure 19.
Figure 19. Throughput Window
17. Change your screen to match the values in Figure 19.
18. Click Apply.
19. Click OK.
Page 71

Installing APS
101-1830-001 Issue 1.0 71
Timers and
Counters
20. From the Link Editor window, click Timers and Counters.
The Timers and Counters window displays, as in Figure 20.
Figure 20. Timers and Counters Window
21. Click OK. This window needs no modification.
Page 72

APS (Application Plus Server) 4.1 Users Guide
72 101-1830-001 Issue 1.0
Special 22. From the Link Editor, click Special.
The Special Parameters window displays, as in Figure 21.
Figure 21. Special Parameters Window
23. Click OK. This window needs no modification.
Page 73

Installing APS
101-1830-001 Issue 1.0 73
X32 Authentication 24. From the Link Editor, click X32 Authorization.
The X32 Authorization window displays, as in Figure 22.
Figure 22. Special Parameters Window
25. Click OK. This window needs no modification.
26. From the Link Editor, click OK to leave the Link Editor window.
Page 74

APS (Application Plus Server) 4.1 Users Guide
74 101-1830-001 Issue 1.0
Routing 27. From the X25 tool main menu choose
Services
Routing
The Routing Parameters window displays, as in Figure 23.
Figure 23. Routing Parameters Window
28. Click Add, and then click Top.
29. Change your screen to match the values shown in Figure 23,
except for the X.12 1 address. The X.121 address may be diff erent
at different sites.
30. Click Apply, and then click OK.
Page 75

Installing APS
101-1830-001 Issue 1.0 75
Your new link has been correctly configured, as shown in Figure 24.
Figure 24. New Link Configured
Configure the rest of the X.25 lin ks at you r site. Repeat steps 4 throug h 30
to configure the rest of the links.
Page 76

APS (Application Plus Server) 4.1 Users Guide
76 101-1830-001 Issue 1.0
Modifying the Profiles
Open the APS interface to modify the profiles to use the correct
connectivity. Modify profiles to use a particular server or protocol. The
profiles you must modify and how to change them are specified in the
application’s users guide.
Placing Test Calls
Once the hardware, software, and connectivity tasks have been
completed, try placing some test calls using the procedure ‘‘Place a Test
Call Over the X.25 Link’’ on page 188.
Generat i ng Test Reports
If the site you are installing uses ERP on a separate Sun system, you
should generate some generic reports from the ERP machine to confirm
that the site is cabled and working together.
Soaking
Soaking a new installation means having the software run but under a
watchful eye. Do no t cons ider th e sof tware package succe ssful ly inst alled
unless it has run without error for a week or so. After that you may
consider the software reliable.
Part of the soak period includes monitoring the automatic backups. The
APS system is backed up every night at 11:00 p.m. Change tapes every
day so that as you fine tune your system, your backups will be accurate.
Page 77

Installing APS
101-1830-001 Issue 1.0 77
Software Upgrades
The procedures in this section upgrade your APS system to:
n APS 4.1
n Informix 7.3
This section does not upgrade the Sierra/CA VPM (voice processing
module) in any way.
Upgrading from APS 3.x to APS 4.1
Upgrading from APS 3.x to APS 4.1 is a custom task. Upgrade teams
from Lucent Technologies will accomplish the upgrade for you.
Upgrading from APS 4.0 to APS 4.1
Upgrading from APS 4.0 to APS 4.1 consists of checking the current
hardware setup and backing up information you want to save. Then the
upgrade is performed and the backups are applied.
Required Items You will require these items for the upgrade:
n 3 blank tapes for backing up
n APS 4.1 4mm DAT tape
04.01.00 GA MultiPak 05/21/1999
or
04.01.00 GA A1000 05/21/1999
n Application currently loaded
IP addresses and other provisioning data will not be affected and so will
not have to be restored.
Check the External
Disk Array
APS platform software requires tha t the external disks for the Sun
workstation be in specific slots in the MultiPack. This is because the
drives must have certain SCSI target numbers assigned to them. Sun
assigns SCSI designations automatically, depending on which slot the
disk is in. Sun configures the drives the same way every time. There
should be two disks installed.
Page 78

APS (Application Plus Server) 4.1 Users Guide
78 101-1830-001 Issue 1.0
Figure 25 shows the disks that occupy them the MultiPack disk array.
Install disks as shown.
Figure 25. Arrangement of Drives in the MultiPack Disk Array
Figure 26 shows the arrangement of disks in the A1000 disk array. Install
the disks as shown.
Figure 26. Arrangement of Drives in the A1000 Disk Array
2
3
4
5
8
9
10
11
12
13
14
15
SCSI ID
cpcvsun2 LJK 06039
9
cpcvsun1 LJK 060399
Page 79

Installing APS
101-1830-001 Issue 1.0 79
Procedure to
Upgrade to APS 4.1
Expect this procedure to take about 2 hours.
Use this procedure to upgrade your system to APS 4.1.
Upgrading from 4GB to 9GB Drives
If you are moving to either internal or external 9 gigabyte hard drives, do
a full install at this point as described in ‘‘Installing the APS Tape’’ on
page 50. Complete the entire procedure there, and come back to this
procedure and begin at step 17.
Overwriting File Systems
If overwrit ing all the file systems, follow the full installation i nstructions
on ‘‘Installing the APS Tape’’ on page 50.
Complete the entire pro cedure
there, and come back to this procedure and begin at step 17.
Upgrade Procedure
1.
Make sure that your hardware is configure d correctly for
APS 4.1
. See ‘‘Assembling the Sun Hardware’’ on page 45.
2. Test any applications and verify basic functionality by placing a
few test calls. See ‘‘Place a Test Call Over the X.25 Link’’ on
page 188.
3. Backup any data you want to use after the upgrade is complete,
for example, the database, application, system administration
data, and custom work.
In particular, save:
n Application profiles
The directories flags, profiles, and profiles_data under the
issg_scripts directory for each script
n ISSG license file
n SS7 configuration file
n Database data
4. Move th is data to a temporary directory and en ter
cd <temp dir>
tar cvf /dev/rmt/0 .
The period signifies the current directory.
Page 80

APS (Application Plus Server) 4.1 Users Guide
80 101-1830-001 Issue 1.0
5. Save any other applications that may be present on the APS
system to tape. Alternatively, at least verify that you can reinstall
applications from the original medium.
6. Gather the informat ion needed by the installation scripts setup
phase:
— IP addresses, netmasks
— X.25 license information
— Informix license information.
7. Insert the APS 4.1 tape into the drive.
8. Log in as root.
9. Enter cd /var/restore_files
tar xvf /dev/rmt/0
10. Enter restore_homes and load home0.
You will see the restore_homes menu:
1. Restore home0
2. Restore home1
3. Restore home2
4. Restore the three above
5. Exit
Please enter your selection:
11. Choose menu option 1 to restore home0.
When it’s finished, the menu displays again.
12. Choose menu option 5 to exit.
13. Enter pkgrm aps
14. Enter pkgadd -d /var/temp/APS aps
15. Enter restore_homes and load home1, and home2.
You will see the restore_homes menu again:
1. Restore home0
2. Restore home1
3. Restore home2
4. Restore the three above
5. Exit
16.
Choose menu option 2, and when it’s finished, choose menu
option number 3.
17. Make sure you are root.
Page 81

Installing APS
101-1830-001 Issue 1.0 81
18. Open a terminal window by selecting Program and then
Terminal from the Sun desktop.
A # prompt displays.
19. In a terminal window enter
cd /var/restore_files
./informix_lic
20. Enter the Informix DBServer serial number.
This is available on the Informix software package.
21. Enter the Informix DBServer key number.
This is available on the Informix software package.
22. Enter the ESQL (embedded system query language) serial
number.
This is available on the Informix software package.
23. Enter the ESQL key number.
This is available on the Informix software package.
24. If you are using X.25 connectivity to the Sierra/CA:
a. Procure the X.25 license information (from Sun
Microsystems).
b. Create an X.25 license file in the /opt/SUNWconn/x25
directory.
c. From a cmdtool window, run the X.25 license tool: Enter
cd /var/restore_files
./x25_lic
The X.25 license install begins. Information displays stating that
the X.25 license tool will now run. These screens inform you of
what to do if you don’t cur rentl y have the X.25 licen se passwo rd.
The License Install Tool (lit) window displays.
d. In the X.25 lit tool window, click on License from file...
e. In the License File Location GUI, enter the full path name to
the X.25 license file created in step b above.
f. Click on the Read button.
g. An infor mational pop-up appears that identifies l icenses to be
installed. Click on the Continue button.
Page 82

APS (Application Plus Server) 4.1 Users Guide
82 101-1830-001 Issue 1.0
h. Another information pop-up appears that indicates license
installation will proceed. Click the OK button.
i. Click on Exit - Install Licenses.
j. From a cmdtool window, run the license configuration script:
cd /etc/opt/licenses
./LIC_CONFIG_SCRIPT
25. After the APS portion of the upgrade, if appropriate, install the
ICC application from CD-ROM.
26. Copy in the data that was saved as outlined in steps 3, 4, and 5.
27. Configure the sy stem heartbeat file. See ‘ ‘Conf iguring the System
Heartbeat File’’ on page 54. Return here and continue on.
28. Install the ERP tape on the ERP system if present. See ‘‘Installing
and Administering ERP’’ on page 354.
29. Make a full image backup tape. See ‘‘Making Manual Backups’’
on page 214.
Page 83

101-1830-001 Issue 1.0 83
3
Menu Interface
This chapter describes the APS (Application Plus Server) 4.1 menu
interface. It disc usses eac h menu and men u item. To reference proced ures
for using the interface to perform specific tasks, see Chapter 4,
‘‘Procedures.’’
Definitions
The list below will familiarize you with the terms used in this chapter.
Term Definition
Application session Running an application for test or real time
purposes
Application A collection of one or more scripts and their
set of profiles that are to be stopped and
started together.
Applications add sp ecific functi onality to t he
APS platform. Applications can be
custom-made by an appl ications programmer
for a customer, or can be purchased from the
OMD (Octel Messaging Division) of Luce nt
Technologies.
APS environment The APS 4.1 platform software, APIs
(application-programming interface), and
user tools.
APS interface The graphical user interface you use to
manipulate the APS platform software
Page 84

APS (Application Plus Server) 4.1 Users Guide
84 101-1830-001 Issue 1.0
APS Menu Interface
The APS interface is a graphical user interface that enables the
programmer or system administrator to operate, administer, maintain and
provision the system.
APS platform software Th e software ba se all APS applications run
upon.
Functional wizard See wizard below.
Profile Controls how the script runs. Different
profiles are needed to direct the same script
to run differently because of different X.25
addresses, different number of sessions
limits, and different OCL version IDs on the
VPM.
Script A collection of one or more functional
wizards. One or more scripts and their
profiles comprise an application, sometimes
referred to as a script group.
Script group Often refers to an application.
Script session Running a script for test or real time
purposes. An application can have many
sessions open of the same script.
Sierra/CA A Sierra/CA VPM (voice processing syst em)
or an CA (Intelligent Messaging
Architecture-Caller Application)
wizard A functional object in a script
Term Definition
Page 85

Menu Interface
101-1830-001 Issue 1.0 85
Main Menu
The APS interface contains five drop-down menus:
Figure 27 shows the GUI of the APS main menu.
Figure 27. APS GUI, Main Menu
Menu Purpose
Script Use this menu to develop and manage scripts.
View Use this menu to view log files.
System Use this menu to
n
Administer scripts
n
Configure parameters
n
Create and modify profiles
n
Manage applications
n
Manage the logger tasks
n
Script Tracer
n
RMPP (Remote Mai lbox Provisio ning Protocol)
n
SS7 (Signaling System 7) gateway
Utility Use this menu to copy and back up files, define a
printer, monitor system performance, perform cron
tasks, reg ister your software license, and use an
application’s utilities.
Database Use this menu to query th e Informix database.
Page 86

APS (Application Plus Server) 4.1 Users Guide
86 101-1830-001 Issue 1.0
Script Menu
The script menu contains items for programming scripts, deleting old
scripts, and printing scripts. Figure 28 shows the Script menu and its
menu items.
The following list describes the purpose of each menu item.
Figure 28. Script Menu
New, Open, and Delete Items
These menu items are discussed fully in Programmer’s Guide to the
Wizard Environment and in Wizard Environment Operations Guide, both
published by Innovative Systems Services Group, Inc.
Menu Item Purpose
New Create new scripts
Open Manage and manipulate existing scripts
Delete Delete scripts
Print Print scripts
Quit Exit the APS interface gracefully
Page 87

Menu Interface
101-1830-001 Issue 1.0 87
Print
Use the Print item in the Script menu t o print scripts.
A script is composed of a collection of functional wizards. Each
functional wizard acts a s a logical fun ction in the flow of the script. To
examine the logic flow, examine the script.
Quit
This item closes the APS interface window but allows the scripts and
applications to continue running.
To close the APS interface window, from the Script menu, select Quit.
Always select Quit from the Script menu, rather than exiting the window
from the window manager.
Quitting the APS interface is not the same as closing an applic ation.
Applications continue to run even if you choose the Quit item.
Note: Do not exit the APS shell or type any command in that shell.
Exiting in this manner causes you to exit APS and stop all
running processes, applications, and scripts.
Exiting the APS interface by closing the APS shell shuts down all scripts
and applications. If selecting Quit fails to close the interface gracefully,
only then exit the APS console shell. Start another APS shell and restart
applications as soon as possible.
Page 88

APS (Application Plus Server) 4.1 Users Guide
88 101-1830-001 Issue 1.0
View Menu
The View utility provi des information useful for system maintenance,
troubleshooting, and general status checks of the APS system.
The following list describes the purpose of each menu item.
Figure 29 shows the items available in the View menu.
Figure 29. View Menu
Gen Log
The Gen log file contains compile errors from script generation.
When a programmer compil es an applica tion, a Gen log file is created.
Use the Gen Log menu item to review compilation errors.
Menu Item Purpose
Gen Log Displays the log file created when a script is
compiled
Debug Log Displays the log file created when a script is
run in test mode.
Script Information Displays the comment lines inside a script
Status Log Displays all errors and events
Application Displays application-specific reports
Page 89

Menu Interface
101-1830-001 Issue 1.0 89
Debug Log
An application is built by connecting one or more scripts. The functional
wizards that comprise the scripts determine the call flow. The Debug log
file provides a trace of the call flow for applications.
Script Information Log
The Script Information log file contains the comment lines of a script.
From the View menu select Script Information to display the Script
Information log on the screen.
Status Log
The status log file records all alarms and events. Trace an error by
viewing the Script Information log file first.
The status log file e xists in two forms . One is a ri ng buf fer and t he other i s
an ASCII flat file. This file keeps adding the entries into the end of the file
and is deleted hourly. The ASCII file resides in: /export/home0/issg/issg_
main/issg_lib/liblogger/issg_logger_seq_file.
The status log file uses EBCDIC format by default, but can be set to be
written as both EBCDIC and ASCII format. Passive alarm monitoring
systems use the ASCII ve rsion. See Ch apter 7, ‘‘Errors,’’ for spec ific
information on how to write the status log file in both file formats.
Sometimes an error is not obvious. For ex ampl e, if an X.25 virtual ci rcuit
drops, the network packet from VPM to EAP (external application
processor ) is corrupted. Such infor mation is stored in the status log file.
Application
The Application item in the View menu displays application-specific
reports and log files. See the application’s documentation for a complete
discussion of this menu item.
Page 90
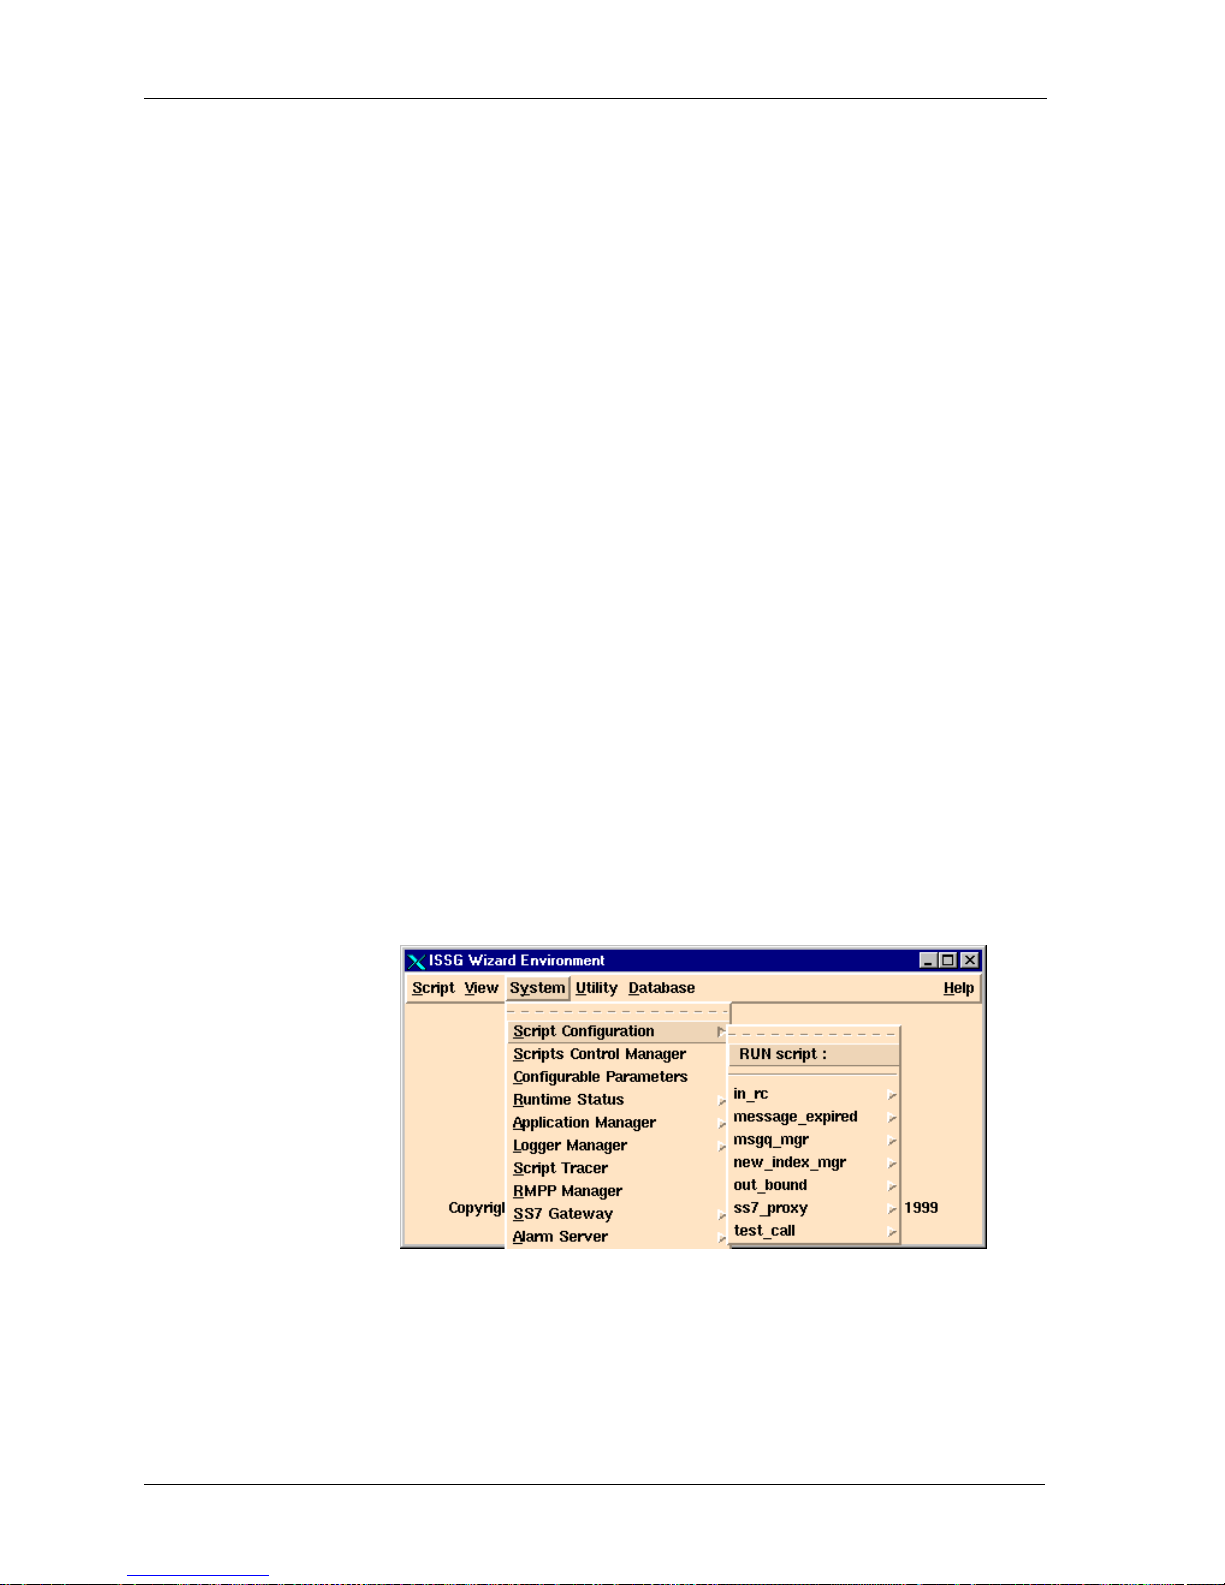
APS (Application Plus Server) 4.1 Users Guide
90 101-1830-001 Issue 1.0
System Menu
The following list de scribes the purpose of ea ch me nu i te m in t he Syst em
menu.
Figure 30 shows the System menu.
Figure 30. System Menu
Menu Item Purpose
Script Configuration Run, test, create, save and manage prof il es
and scripts
Scripts Control Manager Control scripts as a group
Configurable Parameters Configure parameters for applications
Runtime Status Check an application’s runtime status
Application Manager Start and stop the application manager
Logger Manager Enable a logger system to log events and
alarms
Script Tracer Trace selected script sessions real-time
RMPP Manager This item is specifi c to an APS applic ation.
Please see your application document.
SS7 Gateway Connect and disconnect to the SS7
gateway
Page 91

Menu Interface
101-1830-001 Issue 1.0 91
Script Configuration
Use the menu item Script Configuration to delete, create, rename, and
manage profiles.
Before you run an application, each script that comprises it must have at
least one profile. The profile must correspond to the OCL configuration
of a standalone Sierra/CA or a Sierra/CA cluster. The profile the defines
the Sierra/CA’s X.25 address or TCP/IP address.
For example, you need to define a profile for each Sierra/CA so that the
script or application can find and differentiate between Sierra/CAs .
The Profile Window The many options of the Profile window are discussed in this section in a
general way. Refer to your application documentation for specific
information on how to define and use a profile.
Page 92

APS (Application Plus Server) 4.1 Users Guide
92 101-1830-001 Issue 1.0
Figure 31 shows a Profile window with all server options disabled.
Figure 31. Example Script Profile Window
Parts of the Profile
Window
Table 4 describes each element in he Profile window. This example
discussed a current profile, one that is already defined, not how to define
one
Table 4. Parts of the Profile Window
Field Description
Status: Start - Script is running
or
Stop - Script is not running
The user is not able to access this fiel d.
Host Name Name of host machine where the script is
running.
Scheduler Host Name Name of host machine where the scheduler is
running
Network Address Either the IP address or the X.25 address (i.e.,
10,000 or 20,000) of the Sierra/CA.
When using TCP/IP, the IP address for the
Sierra/CA must be added to the /e tc/ho sts fi le.
The naming convention of the Sierra/CA
hostname is to use either the string “si er ra” or
“imaca”.
Page 93

Menu Interface
101-1830-001 Issue 1.0 93
Network Port
Number
Network port number being used
TCP/IP Enable En ables TCP/IP protocol to the Sierra/CA to
be used
Logger Host Name Name of the host machine where the logger is
running
Logger Port Number Port number of the host machine where logger
is running
Password Password used by the Sierra/CA for the
application
Application ID Unique identification number used by the
Sierra/CA to specify the designated
application
Encryption ID Identification number used by the Sierra/CA
for encryption, always 0
Version ID Decimal value of the OCL version ID on the
Sierra/CA
Start by.....Options Identifies how the script may be restarted,
automatically or manually
Number of sessions Number of script sessions that will start
Max allowed
Sessions
Maximum number of scripts allowed to run
Server/Protocol
enable options
Reflects w hat protocol or server t he script
uses. The display of these options is different
for each Server/Protocol enable option.
See ‘‘Server/Protocol Enable Options’’ on
page 94 for a discussion of each
Server/protocol option.
Script-type option Identifies the script as system, incoming,
outcall, or administrative
Auto Restart Permits auto restart or not
Type 40 mailbox Provides the Type 40 mailbox number
Buttons Manipulates the script that this profile
influences
Table 4. Parts of the Profile Window
(Continued)
Field Description
Page 94

APS (Application Plus Server) 4.1 Users Guide
94 101-1830-001 Issue 1.0
Server/Protocol
Enable Options
When assigning a profile to a script, you must choose one of the
Server/Protocol Enable buttons. What button you choose depends on the
script this profile influences. For example, if the script accesses an OSA
server, choose the OSA Server Enable button.
Different Enable buttons display different parameters when chosen.
Once you have selected a Ser ver/Protoc ol enable butto n, fill in the opt ions
that display on the screen. If no server or protocol is used, choose the
Disable option.
There are currently six Server/Protocol Enable buttons:
n TCP/IP Enable
n SMPP (short message peer-to-peer protocol) Enable
n OSA (Octel system administration) Enable
n HLR Enable (not used)
n SS7 Enable
n Disable
Page 95

Menu Interface
101-1830-001 Issue 1.0 95
TCP/IP Enable
Option
When selected, the TCP/IP Enable option lets the application use TCP/IP
protocol instead of X.25. Figure 32 shows a profile window with
TCP/IP Enable selected and its options.
Figure 32. Profile Window with TCP/IP Enable Chose
If TCP/IP Enable is selected, the following options display:
SNDBUF - sets the send buffer size (in bytes). The size of this buffer
affects the size of the chunks of data that can be sent. The operating
system sets the defaults for these fields. The default value should be
sufficient.
RCVBUF - sets the receive buffer size (in bytes). The size of this buffer
affects the size of the chunks of data that can be received. The operating
system sets the defaults for these fields. The default value should be
sufficient.
KEEPALIVE - keeps connections active by enabling the periodic
transmission of messages. Default is ON.
LINGER - Lingers on the close() call if data is prese nt. If this fie l d is set
to zero, the LINGER time will be turned off. Any positive nonzero value
will turn LINGER on an d set it to t hat v alue. LINGER might have a val ue
of 10 seconds.
Page 96

APS (Application Plus Server) 4.1 Users Guide
96 101-1830-001 Issue 1.0
SMPP Options The SMPP (Short Message Peer-to-Peer Protocol) Enable option enables
the script to open the connection to specific customer.
Figure 33 shows an example of this profile with SMPP selected.
Figure 33. Profile Window with SMPP Options
When the SMPP Enable option is selected, the following options display
on the Profile window. The customer assigns the following parameters:
n SMPP Port Number
n SMPP System ID
n SMPP System Type
n SMPP Password
n SMPP MSISDN
n SMPP Address Ton
n SMPP Address Npi
n SMPP IP Address
The customer provides the values for these parameters.
Page 97

Menu Interface
101-1830-001 Issue 1.0 97
OSA Server Options Choose this option if the script uses OSA (Octel System Administration)
server wizards. OSA assigns the following parameters:
n OSA SERVER HOSTNAME - Name of the host running OSA
server.
n OSA SERVER PORT ID - Port number for the OSA server.
Figure 34 shows an example of an OSA profile window.
Figure 34. OSA Enable Options
Page 98

APS (Application Plus Server) 4.1 Users Guide
98 101-1830-001 Issue 1.0
HLR Server Options
APS 4.1 does not support this Protocol/ Server Enable option because it
no longer supports connections to the HLR through a Microlegend.
Page 99

Menu Interface
101-1830-001 Issue 1.0 99
SS7 Enable Options Choose the SS7 Enable option when the script uses a NewNet card and
IS-41 messages. IS-41 messages sit o n th e SS7 prot ocol. F igure 35 shows
the SS7 Enable options.
The following parameters are assigned by the SS7 protocol:
n SS7 Proxy Domain Path
n SS7 Proxy Domain Host Name
n SS7 Proxy Domain Port Number
Figure 35. SS7 Options
Page 100

APS (Application Plus Server) 4.1 Users Guide
100 101-1830-001 Issue 1.0
Disable Option Use the Disable option for scripts that use none of the other
Server/Protocol e nable op tions . Figure 36 shows an example of a prof ile
with no servers or protocols enabled. Note that no additional options are
available with Disable chosen.
Figure 36. Disable Option
 Loading...