

Page 1

6400 Series Multi-line Telephones
User ’s Guide
Contents
6400 Series Multi-line Telephones . . . . . . . . . . . . . . . . . . . 1
Headsets. . . . . . . . . . . . . . . . . . . . . . . . . . . . . . . . . . . . . . . . 3
Headpieces . . . . . . . . . . . . . . . . . . . . . . . . . . . . . . . . . . . . 4
Using the Softkeys. . . . . . . . . . . . . . . . . . . . . . . . . . . . . . . . 5
Entering Softkey Mode and Viewing the
Three Feature Menu Screens. . . . . . . . . . . . . . . . . . . . .5
Othe r S o ftkey Features Th at M ay Be On
Your Display . . . . . . . . . . . . . . . . . . . . . . . . . . . . . . . . . .7
Using the Softkeys to Activate a Feature
(an Example) . . . . . . . . . . . . . . . . . . . . . . . . . . . . . . . . . .8
Call-Handling Features . . . . . . . . . . . . . . . . . . . . . . . . . . . . 9
Getting Messages . . . . . . . . . . . . . . . . . . . . . . . . . . . . . . . 14
Selecting a Personalized Ring . . . . . . . . . . . . . . . . . . . . . 14
Voice Features . . . . . . . . . . . . . . . . . . . . . . . . . . . . . . . . . . 15
Display Features . . . . . . . . . . . . . . . . . . . . . . . . . . . . . . . . 27
Time and Date. . . . . . . . . . . . . . . . . . . . . . . . . . . . . . . . .27
Call Information . . . . . . . . . . . . . . . . . . . . . . . . . . . . . . .27
Installation . . . . . . . . . . . . . . . . . . . . . . . . . . . . . . . . . . . . . 32
Desktop Installation . . . . . . . . . . . . . . . . . . . . . . . . . . . .33
Wall Installation . . . . . . . . . . . . . . . . . . . . . . . . . . . . . . . 33
Removing the Telephone Tray . . . . . . . . . . . . . . . . . . .36
Installing the Designation Card. . . . . . . . . . . . . . . . . . . 38
Tones and Their Meaning . . . . . . . . . . . . . . . . . . . . . . . . . 39
Line and Feature Button Lights . . . . . . . . . . . . . . . . . . . . 40
555-230-739
Comcode108138801
Issue 2
September 1997
Page 2

NOTICE
While reasonable efforts were m ade to ensure that the information in this
document was complete and accurate at the tim e of printing, Lucent
Technologies can assume no res ponsibility for any errors. Changes or
corrections to the information contained in this document may be incorporated
into fu ture issues.
TO ORDER COPIES OF THIS DOCUMENT
Contact: Lucent Technologies Publications Center
P.O. Box 4100
Crawfordsville, IN 47933
Domestic: 1 800 457-1235 International: 1 765 361-5353
Domestic Fax: 1 800 457-1764 International Fax: 1 765 361-5355
Order: Document No. 555-230-739
Issue 2, September 1997
HEARING AID COMPATIBILITY
The 6400-Seri es voice terminals are Hear ing Aid Compatible (HAC). In
addition, some units have “HAC” printed on them.
YOUR RESPONSIBILITY FOR YOUR SYSTEM’S SECURITY
You are responsible for the sec uri ty of your system. Lucent Technol ogies does
not warrant that this product is immune from or will prevent unauthorized use
of common-ca rrier telecommu nication services or facilities accessed through
or connected to it. Lucent Technologies wil l not be responsi bl e for any charges
that result f rom such unauthorize d use. Product administr ation to prevent
unauthori zed use is your responsi bility and your syst em manager should read
all document s provided with this product to fully understand the features
available that may reduce your ri sk of incurring charges.
TRADEMARKS
DEFINITY and AUDIX are regist ered trademarks of Lucent Technologies.
Mirage, Star Set, and Supra are registered tr ademarks of Plantronics, Inc.
OBTAINING PRODUCTS
To learn more about Lucent Technologies products and to order any of these
products, contact Lucent Direct, the direct-market organization of Lucent
Technologies Business Communications Syste m. Access their web site at
www.lucentdirect.com or call the foll owing numbers: custo mers should call
1 800 451-2100 or account executives can cont act Lucent Direct at
1 800 778 1880 (voice) or 1 800 778-1881 (fax).
THE “CE” MARK
If the “CE” mark is af fixed to this equipm ent. it means that it conforms to the
European Union Electromagnetic Compati bil ity Directive (89/ 336/EEC) and
the Low Voltage Directive (73/23/EEC).
Prepared by © 1997 Lucent Technologies
BCS Product Documentation Development All Rights Reserved
Middletown, New Jers ey 07748-9972 Printed in USA
Page 3

IMPORTANT USER SAFETY
INSTRUCTIONS
The most careful attention has been devoted to quality standards in the
manufacture of your new telephone. Safet y is a major factor in the design of
every set. But, safety is YOUR responsibility too.
Please re ad carefully the helpful tips list ed below and on t he next page. These
suggesti ons will enable you to take full advantage of your new voice ter m inal.
Then, retain these tips for later use.
!
CAUTION:
This telep hone is NOT for resident ial use. It is for business systems
applications ONLY. Use in a resident ial environment coul d result in
an electrical short circuit when the telephone wirin g is set up to
provide oth er applications, for example, for appliance control or
power transformers. The AC power used in these applications may
create a safet y hazard by placing a direct short circuit across the
telephone wiri ng.
Use
When using your tel ephone equipment, the fol lowing safety precautions
should al ways be f oll owed t o reduc e the r is k of f ire, elect ric shock, and i njur y to
persons.
• Read and understand all instructions.
• Follow all warnings and instructions marked on the telephone.
• This telephone can be hazardous if immer sed in water . To avoid the
possibi li ty of electric shoc k, do not use it while you are wet. If you
accident ally drop the tel ephone int o water, do not retri eve it until you hav e
first unplugged the line cord from the modular jack. Then, call service
personnel to ask about a replacement.
• Avoid us ing t he t elephone durin g elect rica l s torms i n your immedi ate ar ea.
There is a risk of electric shock from li ghtning. Urgent calls should be
brief. Even though protective measures may have been insta ll ed to limit
electr ical surges from enter ing your business, absolute protection from
lightning is impossible.
• If you suspect a natural gas leak, report it immediately, but use a
telephone away from the area in question. The telephone’s electrical
contacts could generate a tiny spark. While unli kely, it is poss ibl e that this
spark could ignite heavy concentrations of gas.
Page 4

• Never push objects of any kind into the equipment through housing slots
since they may tou ch hazardous voltag e point s or short out parts that
could resul t i n a ris k of electric shock. Never spill liqu id of any kind on the
telephone. If liquid is spill ed, however , refer servicin g to pro per service
personnel.
• To reduce the risk of electric shock, do not disassemble this telephone.
There are no user serviceable parts. Openi ng or removing covers may
expose you to hazardous voltages . Incorrect reassemb ly can cause
electric shock when the telephone is subsequently used.
Service
1. Before cleaning, unplug the telephone from the modular wall jack. Do
not use liquid cl eaners or aerosol cleaners. Use a damp cloth for
cleaning.
2. Unplug the telephone from the modular wall jack. Be sure to refer
servicing to qualified service personnel when these conditions exist:
— If liquid has been spilled into the tel ephone.
— If the telephone has been exposed to rain or water.
— If the telephone has been dropped or the housing has been
damaged.
— If you note a distinct change in the perf ormance of the telephone.
SAVE THESE INSTRUCTIONS
When you see thi s warni ng sy mbol on the prod uct, r efer
to this instructions bookle t packed with the product f or
!
more infor ma ti on before proceeding.
Page 5
6400 Series Multi-line Telephones
The 6400 Series multi-line telephon es include the following:
• The 6408 and 6408 Plus Telephones — Both of these telephones have
eight call ap pearance/ feat ure butto ns. The 640 8 ha s a one- way list en-onl y
speaker. The 6408 Plus has a two-way speakerphone.
• The 6408D and 6408D Plus Telephones — Both of these telephones
have eight call appearance/feature buttons and a 2-line by 24-character
display. The 6408D has a one-way listen-only speaker. The 6408D Plus
has a two-way speaker phone.
• The 6416D Plus Telephone — This telephone has 16 call appearance/
feature buttons, a 2-line by 24-character display, and a two- way
speakerphone.
• The 6424D Plus Telephone — This telephone has 24 call appearance/
feature buttons, a 2-line by 24-character display, and a two- way
speakerphone.
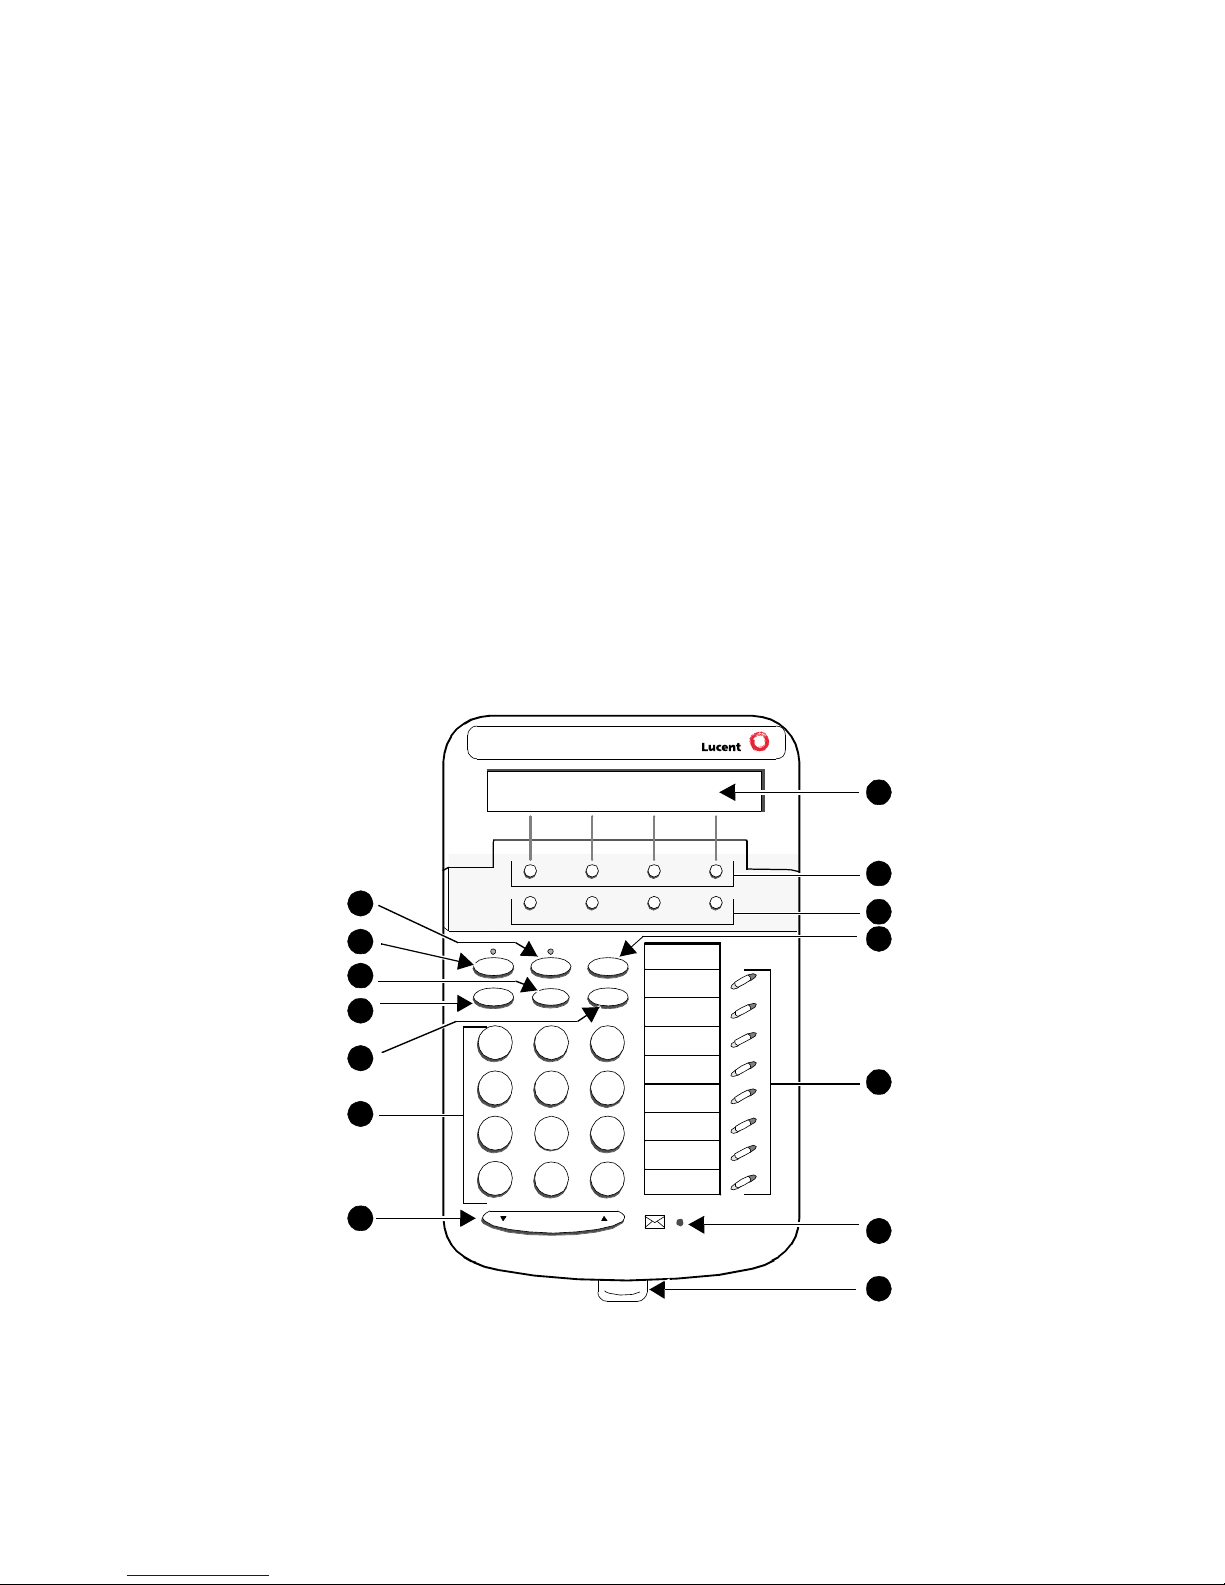
Familiarize yourself with your 6400 Series multi-line telephone, shown in
Figure 1 and described on the next page.
14
13
12
11
10
9
Menu Exit Prev Next
Spkr Mute Hold
Redial Trnsfr Conf
GHI
PQRS
1
4
7
Test Ring
ABC
2
56
TUV WX YZ
8
O #
Tel #
DEF
3
MNOJKL
9
*
8
FIGURE 1 The 6400 Series Multi-Li ne Telephone
Volume
1
2
3
4
5
6
7
1
Page 6

The following features correspond to the numbers in Figure 1.
1) Display — The 2-line by 24-character display is available onl y on the
6408D, 6408D Plus, 6416D Plus, and the 6424D Plus.
2) Softkeys — The four ro und unlabeled buttons located directly below the
display cor respond to words on the di splay screen. You can use the softkeys
along with displ ay control keys to access up to 12 features on your voic e
terminal
in addition to
those features adm inistered on the call appearance/
feature b utt ons. For more i nformation on the softkey and s oftkey features, see
“Using the Softkeys” later in this gui de.
3) Display control buttons — These four buttons on the 6400 Series
multi-li ne telephones are labeled Menu, Exit, Prev, and Next. For a
description of their uses, see “Us ing the Softkeys” later in this guide.
4) Hold — A red button for putting a call on hold.
5) Call appearance/f eature buttons — Usual ly, at least thr ee of t hes e bu ttons
are devoted t o incomin g and outgoi ng call s (cal l appeara nces) and are la beled
with an extension number; the remaining buttons access features (feature
buttons) and are labeled with a feature name. Each has a red light telling you
this is the line you are using or this is the lin e you wil l get when you lift your
handset. The gr een status light next to each call appearance and feature
button tells you the line or feature is being used.
Note: The 6408 tel ephones have eight buttons that can be used for call
appearances or features. The 6416D Pl us tel ephone has 16 call
appearance/feature butt ons. The 6424D Plus has 24 call appearance/
feature buttons.
6) Message light — A red light which goes on steadily when a message has
been left for you. This light is labeled .
7) Tray handle — Five qui ck reference cards are pro vided in the tray located
under the base of eve ry 6400 Series telephone:
Card 1: Quick reference pro cedures for using Conference, Hold, and
Transfer;
Card 2: Quick reference pro cedures for using Test, Speaker and
Speakerphone, and Redial;
Card 3: Quick reference pro cedures for using the dis play, softkeys, and
display control buttons;
Card 4: A l ist on which you can write the 2- or 3-d igit feature acces s codes
for your telephone system;
Card 5: A l ist on which you can write number s or names associated with
Abbreviat ed Dialing personal lists , and on which you can list trunk codes and
frequently-used extens ions in your telephone sys tem such as the number for
AUDIX
®
(or other voice mail system) or your system attendant.
Note: You may wish to rem ove the tray from the telephone , especially i f you
are wall-mounting the telephone. For this purpose, use the di rections
titled “ Removi ng the Telephone T ray ” in t he In stallati on se ction o f t his
guide.
2
Page 7

8) Volume control button — For adjusting the volume of the following:
• The speaker volume whenever the speaker is on
• The handset receiver level while a cal l is in progress using the handset
• The tone ringe r when th e telephone is on-hook or when the telephone is
ringing and the speaker is off.
9) Dial pad — The standard 12-button pad for dialing phone num bers and
accessing features. The letters “Q” and “Z” have been added to the
appropri ate dial pad keys for directory access, and the “5” button on your dial
pad has raised bars for visually-impaired users.
10) Conf/Ring button — For setting up conference calls. (Use this feature
while
off-hook.)
while on-hook, you can select a personalized ringing pattern for your
telephone. You can choose from among eight possible ringing patterns.
11) Redial button — For redialing the last number that you dialed using the
dial pad.
12) Transfer/ Test button — For transferring a call to another t elephone. (Use
this featu re whil e off -h ook.)
pressing while on-hook, you can test the button lights and t he display
(if the tele phone has one).
Ring
is printed below to remind y ou t hat by pressi ng
Trnsfr
Conf Conf
Test
is printed b elow to remind you that by
Trnsfr
13) Speaker butt on — For accessing either the one-way, listen-only speaker
or the built- in two-way Speakerpho ne feat ure.
Note: Your voice terminal can be set for either the Speaker (listen-only)
feature
system manager to see how your Speaker button is to be used.
14) Mu te b u tton — For turning off the microphone associated with the
handset or the speaker, whichever is active, so the other person on the call
cannot hear you.
Handset (not shown here) — A handset is provided for placing and receiving
calls. In most ca ses, you mus t lift the handse t (go of f-h ook) bef ore you can use
a feature.
or
the Speakerphone (listen and talk) feature. Check with your
Headsets
Headsets for 6400 Seri es telephones allow one-touch hands-free operation.
To answer a call, press (if administered on your telephone). Press the
button again to disconnect. (The Headset feature must be administered for
your telep hone.)
Headset
Headsets consi st of a headpiece and modular base unit. The base unit plugs
into the Handset jack. See Figure 2.
3
Page 8
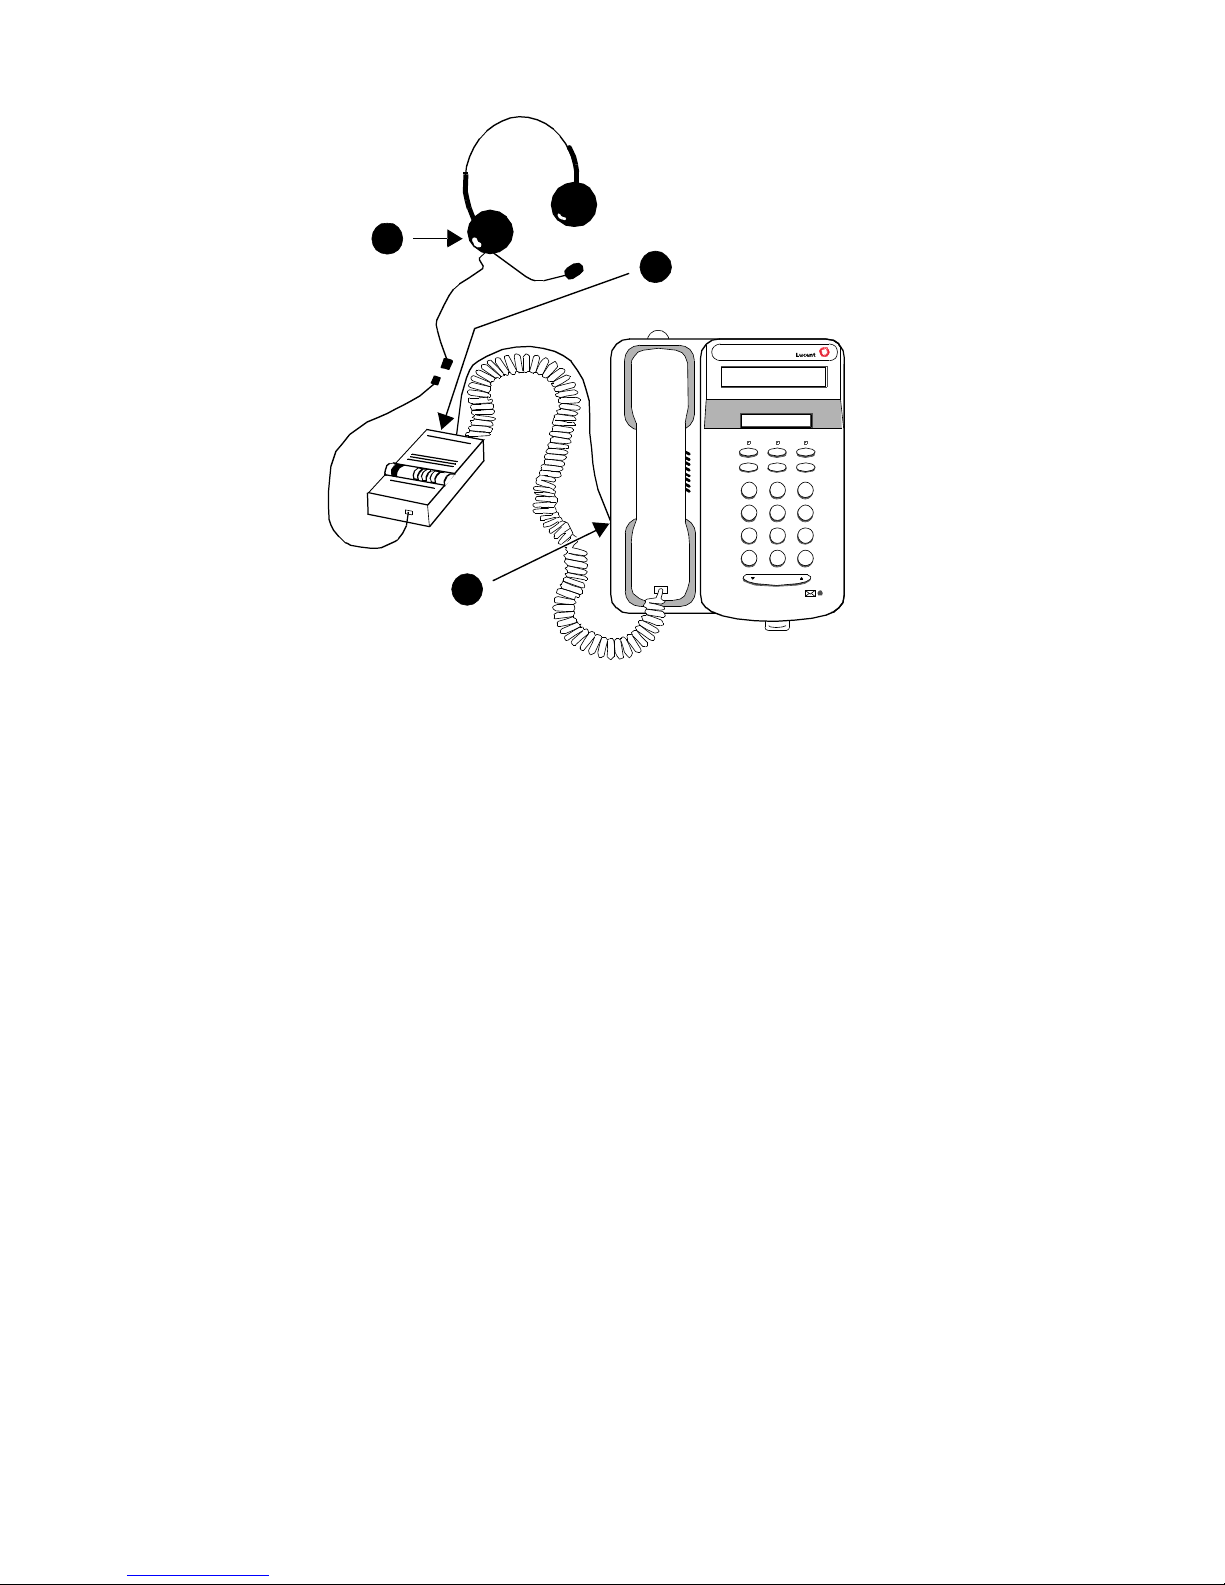
1
2
321
4*56
89
7
O#
3
Vol um e
FIGURE 2 The Headset Attached to a 6400 Series Telephone
Headpieces
The following headpieces can be used with thes e telephones:
®
— Mirage
— StarSet
— Supra
— Receiver fits over eit her ear. Not for noisy environment s.
®
— Eartip fits in ear canal.
®
Monaural — Adjustable headband and soft ear cushion.
— Supra Monaural Noise-Canceling (NC) — Same as above with
noise-canceling microphone that reduces background noise transmission
by up to 75 percent.
— Supra Binaural — Sound in both ears.
— Supra Binaural Noise-Canceling (NC) — Same as above with
noise-canceling microphone on flexible boom; features windscreen and
reduces background noise transmission by up to 75 percent.
Note: The pri vacy of the Whisper Page announcem ent cannot be
guaranteed when telephones have headset adapters other than the
M10L-8400 plugged into the Handset ja ck. The M10L-8400
(Comcode : 407639715; PEC: 3122-022) is the onl y headset adapter
for the Hands et j ack that should be used for the 640 0 Series
telephones.For more information, see the Whisper Page instructions
in the Voice Features sectio n.
4
Page 9
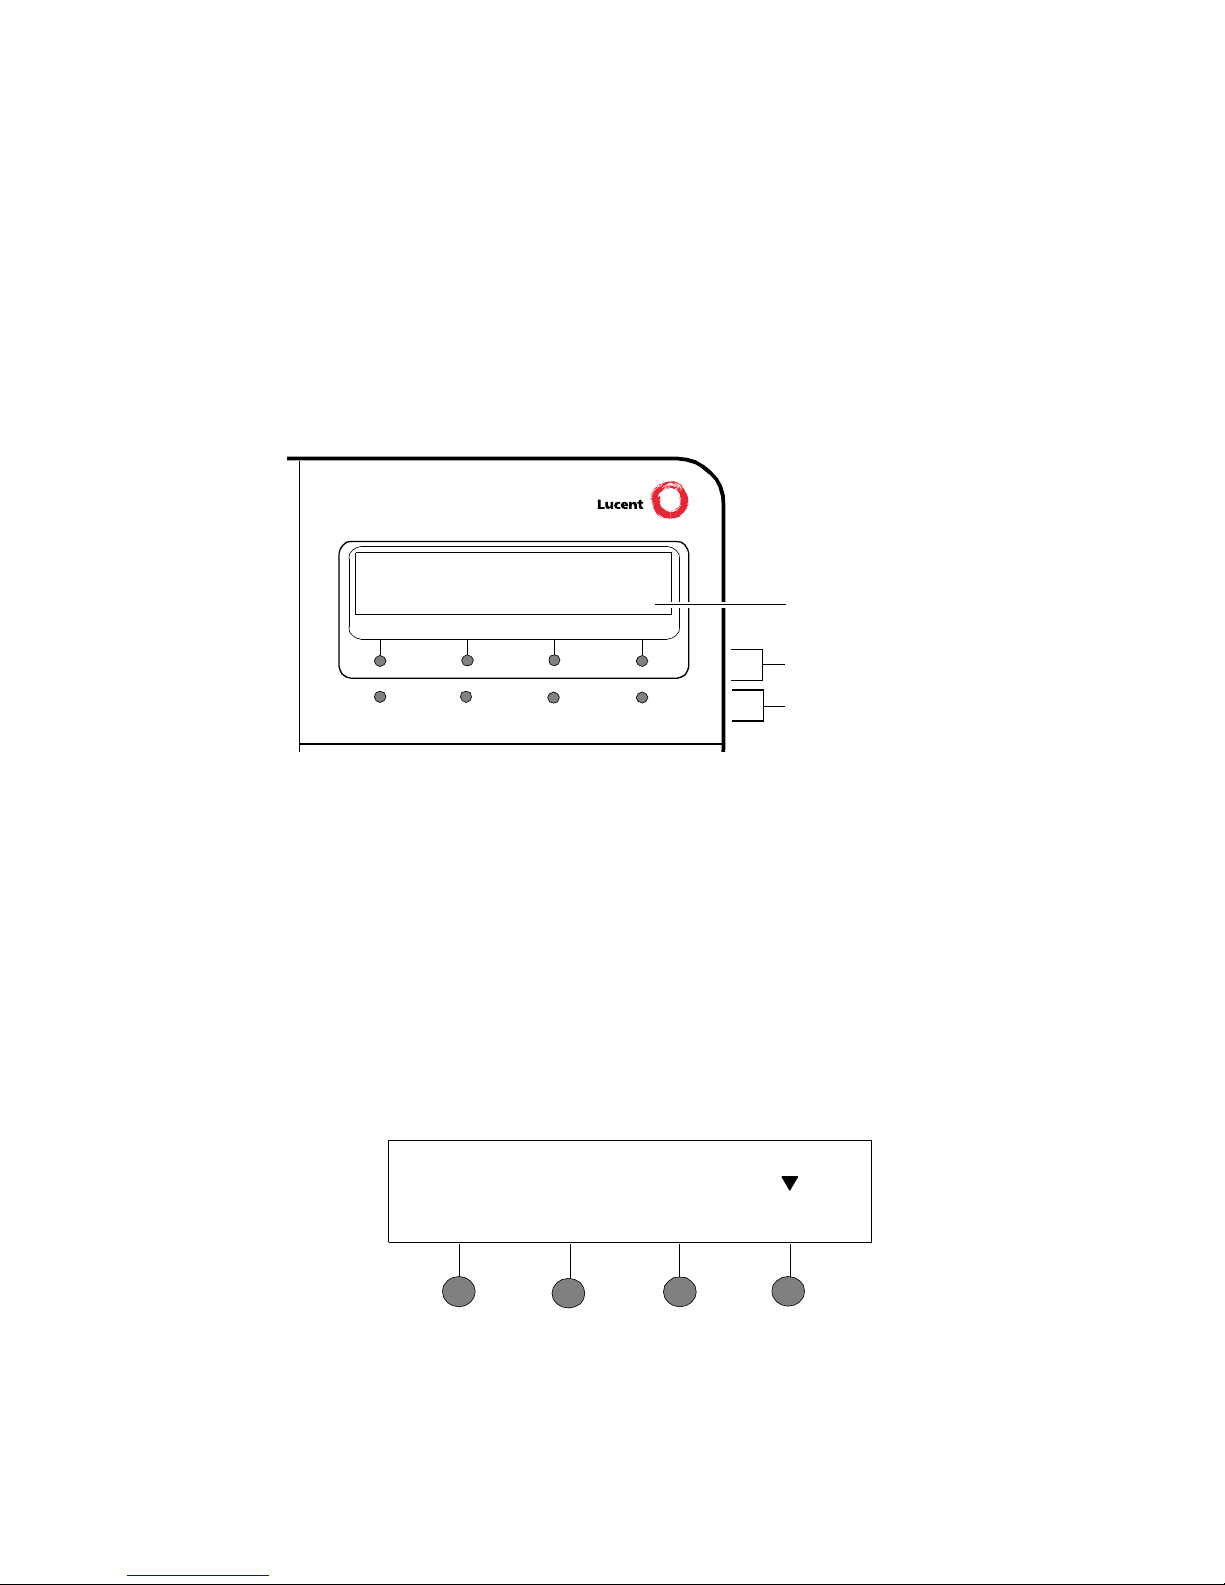
Using the Softkeys
If you are using a multi-line telephone with a display, the following information
will help you use t he display, the softke ys, and the display contr ol buttons.
The softkey s are the four unlabeled rou nd keys located directl y below the
display . The four round display control buttons, labeled Menu, Exit, Prev, and
Next are located under the softkeys. Fi gure 3 shows the location of the
softkeys in relation to the display above the sof tkeys and the display control
buttons below them.
Display
Softkey s
NextPrevMenu Exit
FIGURE 3 The Display, Softkeys, and Control Buttons
Display
control buttons
Entering Softkey Mode and Viewing the Three Feature
Menu Screens
There are t hree separ ate fe atu re option sc ree ns. Each of these s cre ens all ows
you to select from four differ ent features.
You can enter Sof tkey Mode by pressing the Displ ay Control button lab eled
Menu. The following is an exa mp le of a softkey feature menu screen.
Dir Drop HFAns Timer
The top li ne of each sof tkey f eature menu scr een sh ows you the sta tus of ea ch
of the four featur es. An arrow a ppears above the feature name or abbrevi ation
if that feature is act ive. If ther e is no arrow above the feature , the feature is not
active. In the above example, the Timer feature is act ive because there is an
arrow above tha t feature abbreviat ion.
5
Page 10
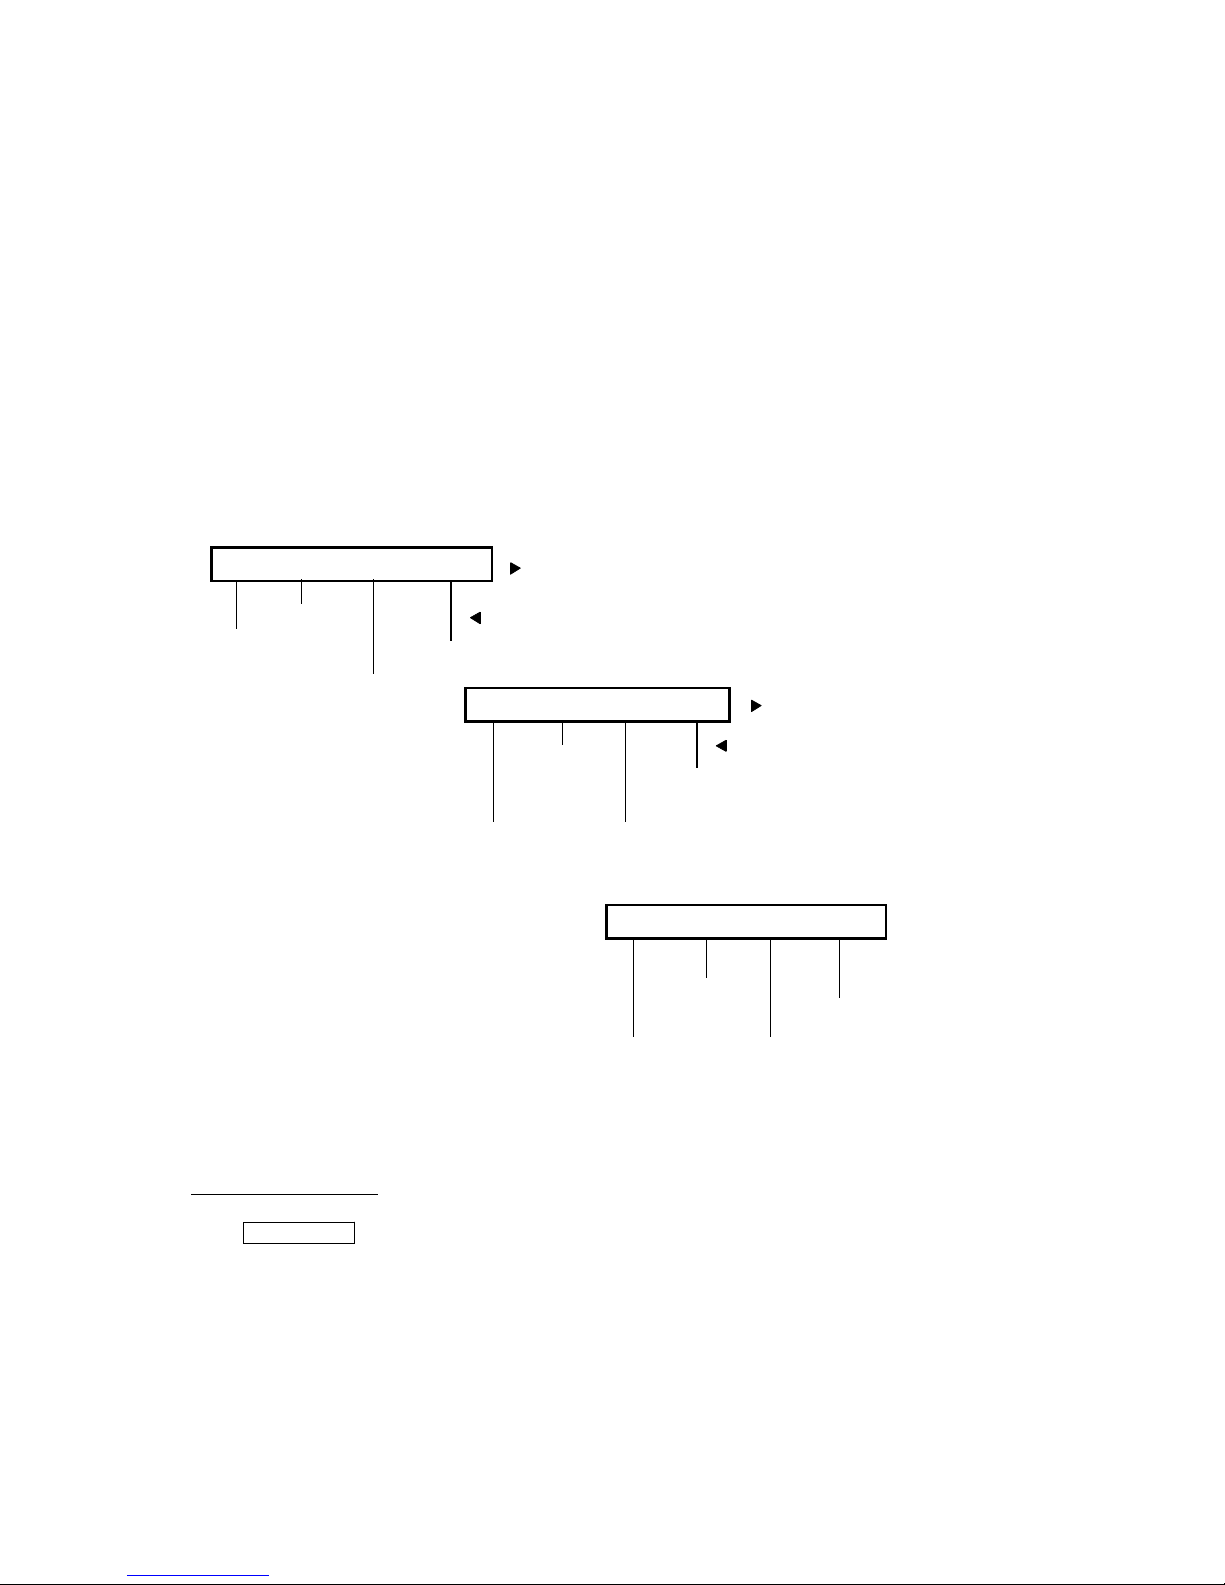
The second lin e on each softkey feature menu screen shows the f eatures you
can access. To use any of these features, you must press the softkey below
the feature name or abbreviation. For example, on the feature option screen
shown on the pr evious page, y ou c an ac cess t he Sy stem Dir ector y by pressi ng
the softkey below Dir (the System Directory feature). If you want to drop the
last person added to a conference call, press the softkey below Drop.
To see the next set of four features, press the display con trol button labeled
Next; to move back a screen, press the display control button labeled Prev.
Press th e Next or Prev button unt il t he featur e you want to use appe ars on the
second line. The fol lowing flowchart (Figure 4) shows the defaul t features for
the three feature option screens. These are the 12 softkey featur es available
when the telephone (wit h display) is shipped from the fact ory. Also, see “Other
Softkey Feat ures That May Be On Your Display” lat er in this guide.
1st Screen
Dir Drop HFAns Timer
Drop
System
Directory*
Internal
Auto Ans wer
Timer
2nd Scr een
PCall AutCB Prog Pause
Automatic
Priority
Calling
Callback
Abbreviated
Dialin g Program
Abbreviated
Dialin g Pause
3rd Screen
LWC RngOf BtnVu Admin
Leave Word
Calling
Ringer Off
Stored
Number/View
Self-
Administration
FIGURE 4 The Three Default Softkey Feature Menu Screens
*
Call Display
A butto n should be administered, if access to System Directory is
provided.
†
For a full description of th is feature (which a llows you to administer s ome features o n
your own telephone), s ee “Self-Administration” in the section titled Voice Features.
†
6
Page 11

Note: An error tone (on e beep) sounds when you have made a mistake i n
your softkey entries.
Press the Exit button at any t ime to exit softkey mod e and return to
Normal (call-handling) Mode.
Other Softkey Features That May Be On Your Display
Figure 4 on the previous page shows the 12 default softkey features, those
feature s that can be accessed with the softkeys when the 6400 Series
telephone is initially i nstalled. Howeve r, the sys tem m anager may substitut e
other softkey features in their place. The following table is a list of some of
these alternate features and the feature abbreviation associated with each.
Note: The switch release to which your telephone is c onnected may provide
additional al ternate softkey features.
Alter n ate Softkey Featu re s
Abbreviation Feature
Acct Account Code Entry
AD Abbreviated Dialing buttons (can be multiple buttons)
CFrwd Call Forwarding All Calls
CPark Call Park
CPkUp Call Pickup
CnLWC Cance l Le av e Wor d Calling
Cns lt Consu lt
Count ACD Stroke Count (can be up to 10 buttons)
Dpkup Directed Call Pickup
Excl Manual Exclusion
GrpPg Group Pagi ng
IAuto Automatic Intercom
IDial Dial Intercom
Inspt Inspect
Mark AD Special Function Mark
Park Call Park to other Extensions
SAC Send All Cal ls
SFunc Ab breviated Dialed Special Function
Spre s Abbrev i ate d D ia lin g Sup press
Stats ACD Agent Statistics
Stop Abbreviation Dialing Stop/Indefinite Wait
Wait A D Special Function Wait
7
Page 12
Using the Softkeys to Activate a Feature (an Example)
Y o ur displ ay and soft keys all ow you to ac cess up to 12 swi tch-r elate d featur es.
For example, you may want to use the Priority Calli ng feature to call another
extension with a priority ring. You can activate this feature with the softkeys in
the following way:
To access a feature with the softkeys (Priority Calling is used in this
example)
1. Press the Menu button.
The display shows the initial softkey feature menu screen:
Dir Drop HFAns Timer
2. Press the Next button.
The display shows the second softkey feature menu screen:
PCall AutCB Prog Pause
3. To use the Priority Calling feature, press the softkey below PCall and
then dial the extension.
Note: When the feature is activat ed, after the displ ay screen shows
you the digits you are dialing, an arrow appears above the
feature, as in the example below. If there is not an arrow above
the feature, the feature is off.
PCall AutCB Prog Pause
Note: When both parties hang up from the call, the arrow above PCall
(showing feature status indicat ion) disappears.
8
Page 13
Call-Handling Features
Conference
The Conference feature allows you to conference up to six parties
(including yourself) on a call.
To add another party t o a call (for a total of six parties )
1. Press . [dial ton e ]
Conf
Present call is put on hold; you are given a new call appearance.
2. Dial the number of the new party and wait for an answer.
3. When you want to add the new person, press again.
4. Repeat Steps 1 through 3 for additional conferenc e connections.
To add a call you have put on hold to another cal l you are connected
to
1. Press . [dial ton e ]
Conf
Conf
Held call light and the current call appearance light flutter.
2. Press the call appeara nce button of the call on hold (fi rst call).
3. Press again.
Conf
All parties are now connected.
To drop the last person added to the conference call
1. If your telephone has a display, press the Menu button and then
press the sof tkey below Drop.
If you do not have the Drop feature on your displ ay, press
(if administered).
Drop
Hold
The Hold feature puts a call on hold until you can return to it.
To keep a call on hold while you answe r another call or perform
another task
1. Press .
Green light next to the held call blinks .
To answer a new call while active on another
1. Press .
Green light next to the held call blinks .
2. Press the call appeara nce button of the incoming cal l.
Yo u are connected to the incoming call.
Hold
Hold
continued on next page
9
Page 14
Hold
(continued)
To return to the held call
1. Press the call appearanc e butt on of the held call.
Redial
The Redial (or Last Number Dialed) feature automatically redials the last
extension or outside number you dialed.
To redial the last number that you dialed
1. Press .
Redial
The last number you dialed is automatically redialed.
Note: The redialed num ber can be an outside num ber (up to 24 digits), an
extension, or a trunk or featu re access code.
Speaker (Listen-Only) and Group Listen
The Speaker feat ure al lows you to place calls or access other features
without lif ti ng the handset. However, in order to speak to the other party,
you must use the handset. With the Group Listen feature , the handset and
speaker are active at the same time.
Note: The 6408 and 6408D are equipped with a one-way, listen-only
speaker. The 6408 Plus, 6408D Plus, 6416D Plus, and 6424D Plus
can be option ed for either a two-way
listen-only
speaker
. Check with your system manager to see which
featur e you can use on your telephone.
To place a call without lifting the handset or for any listening-only
feature (such as monitoring a call on which you have been put on
hold or for group listening)
speakerphone
or a one-way,
1. Press .
Spkr
Red lights next to and go on.
2. Place a call or access the selected feature.
3. Adjust speaker volume if necessary:
To raise the volume, press the right half of the Speaker Volume
control button labeled ; to lower the volume, press the left half
of the Speaker Volume control button labeled .
Spkr Mute
continued on next page
10
Page 15

Speaker (Listen-Only) and Group Listen
If you have a display, it shows the volume level: (There are eight
volume levels.)
->>>>>> +
To turn off the speaker and return to handset
1. Pick up the handset.
(continued)
Speaker goes off and the red lights next to and go
Spkr Mute
off.
To end a call (while the handset is on-hook and only the speaker is
active)
1. Press .
Red lights next to and go off.
Spkr
Spkr Mute
To activate the speaker while using the handset (the Group Listen
feature) so that both are active at the same time
1. Press .
Red light next to goes on.
Spkr
Spkr
The speaker is active, and the handset is also on.
Note: If you hang up the handset within 10 seconds after pressing
Spkr
If you hang up the handset more than 10 seconds after pressing
Spkr
To mute the microph one associated with the handset (while on the
handset or in Group Li sten) so the other party cannot hear you
, the call rem ains active on the speaker.
, the speaker will also turn off, and the call is dis connected.
1. Press .
Mute
Red light next to goes on, and the other perso n canno t hear
you.
2. Press again to resume talking wit h the ot her person through
the handset.
Mute
Red light next to goes off, and the other person can hear you
again.
Mute
Mute
11
Page 16

Speakerphone
The two-way built-in speakerphone allows you to place and answer calls
without lif ti ng your handset.
Note: Your telephone ma y be set for the two-way
one-way, listen-only
speaker
. Check with your system manager to
speakerphone or
for the
see which of these features you can use.
Note: Some locations may wish to use the speakerphone for the Group
Listen feature. With this fea ture you can hear the other pers on
through the handset and speakerphone, but in order to speak to t he
other per son, you must use t he handset. Ask your system manager
if the Group Listen feature has been administered for your
telephone.
To place or answer a call without lifting the handset, or to use the
speakerphone with any feature
1. Press .
Red light next to goes on.
Spkr
Spkr
2. Place or answer the call, or acc ess the selected feature.
3. Adjust speakerphone volume if necessary:
To raise the volume, press the right half of the V olume control button
labeled ; to lower the volume, press the left half of the Volum e
control button labeled . If you have a display, it shows:
(There are eight vol um e levels.)
->>>>>> +
To prevent the other person on the call from hearing you
1. Press .
Red light next to goes on, and the other person cannot hear
Mute
Mute
you.
2. Press again to resume talking with the other person.
Red light next to goes off, and the other person can hear
Mute
Mute
you again.
To change from the speakerphone to the handset
1. Pick up the handset and talk.
Red light next to goes off.
To change from the handset to t he speakerphone
1. Press .
Spkr
Red light next to goes on.
2. Within 10 seconds, hang up the handset.
Spkr
Spkr
continued on next page
12
Page 17

Speakerphone
(continued)
To use the Group Listen featur e in which the handset and the
speakerphone are active at the same time
1. While you are active on the han dset, press
Red light next to goes on.
Spkr
Spkr
.
People in your office can hear the conversation on the speakerphone,
but you must use the handset in order to speak to the other p arty.
Note: If you hang up the handset within 10 seconds after pressing
Spkr
, the call rem ains active on the speaker.
If you hang up the handset more than 10 seconds after pressing
Spkr
, the speaker will also turn off, and the call is dis connected.
To end a call
1. Press again.
Red light nex t to goes off.
Spkr
Spkr
Test
The Test f eature al lows you to t est the light s and displ ay on your tel ephone.
To test the lights and display on your telephone
1. While on-hook, press and hold down .
Trnsfr
Lights go on in columns, and if there is a display on the telephone,
all the dis play segments fill in.
2. To end test, release .
Trnsfr
Lights return to normal operation.
Note: If the lights or the display segments do not respond during the test ,
see your system ma nager.
T ransfer
The Transfer feature al lows you to transfer a call fr om your telephone to
another extension or outside number.
To send the present call to anot her extension or outside number
1. While on a call, press . [dial ton e]
Present call is put on hold, and the green light next to the held call
blinks.
You are given a new call appearance.
Trnsfr
continued on next page
13
Page 18

Transfer
2. Dial the number to which the call is to be transferred. [ringbac k to n e]
3. Remain on the line and anno unce the ca ll ; if the line i s busy or i f ther e
(continued)
is no answer, return to the held call by pressing its cal l appearance
button.
4. Press again.
Trnsfr
Call is sent to the dialed extension or number.
5. Hang up.
Getting Messages
Message
Your Messa ge li ght goes on when a caller has left a mes sage for you.
For directions on retrieving your messages, see your system manager.
Note: If your telephone has a display, you may also be able to use the
Message Retri eval display feature.
Selecting a Personalized Ring
Select Ring
The Select Ring feature allows you to choose you r own personalized
ringing pattern for your telephone from among eight different patterns.
To select a personalized ringing pattern
1. While on-hook, press .
Conf
Current ringing pattern plays and repeats every three seconds.
2. Continue to press (and then release) to cycle through all
eight ringing patterns.
3. If you want to save the ringing pat tern currently being played, do not
press anymore. You will hear the selected ringing pattern
two more times, and then it will be automatically saved.
Conf
Conf
You hear confirmation tone (two rising tones), and your new
ringing pattern is set.
Note: If you go o ff-hook, receive a call, or lose power during se lection, the
process is interrupted and you must start again.
14
Page 19

Voice Features
In many of the following procedures, you can use a 2- or 3-digit code to
access a featu re. For that purpose, a spac e (________) is provided so t hat
you can write in the appropriate code. You may also write feature codes on
the Featur e Access Code quick reference list on the cards in the tr ay located
under the base of the te lephone.
Another way of acc essing features is by using feature buttons administered
on your telep hone by your system manager. These buttons are represented
in the following procedures by a box labeled with the feature name, such as
Send Calls
appearance/feature butto n.
Abbreviated Dialing (AD)
The Abbreviated Dialing (AD) feature allows you to store sele cted
telephone numb ers for quick and easy dial ing. Each number can be a
complete or par tial telephone number, an extension number , or a trunk or
feature access code. Abbreviated Dialing offers four possible types of li sts
— Personal, Group, System, and Enhanced, and you can have a total of
three l ists . (Of these t hree l ists , you c an ha ve on ly one Syst em List and one
Enhanced List .) You program numbers on a Pers onal List; numbers on
Group Lists are programmable by the controller of the list; System Lists
and Enhanced Lists are programmable only by the system manager.
to represent the Send All Calls feature administered on a call
You can also program a number on an AD button that is
not
stored on an
AD list. This Autom atic Dialing number can be up t o 16 digi ts and
characters.
Note: You may also be able to program a 1.5-second pause in an AD
number such as between an access code and the telephone
number. (Press the Menu button and then press the softkey bel ow
Pause.)
Note: There is a 10-second time limit between your going off-hook and
entering the fi rst digit of an AD button, and the n a 10-second time
limit between each di git. If you hear intercept tone while you are
programming the button, you have exceeded the time limit and you
must begin again.
To program/reprogram an AD button
1. On a separate sheet of paper, write down th e outside numbers,
extensio ns, and/or feature access codes you want to program.
Note: Each AD button will hold one complete phone number or
feature access code.
2. Pick up handset or press .
Spkr
Note: If you are using the bui lt -in speakerphone , you must press a
call appearance button before you begin Step 3.
continued on next page
15
Page 20

Abbreviated Dialing (AD)
(continued )
3. If you are using a telephone with a display, press the Menu button
and then press the soft key below Prog.
If your telephone does
on your display, press the button (if admini stered)
not
have a display or if Prog i s not available
Program
OR, Dial the AD Program access code __________. [dial tone]
4. Press the AD button to be programmed.
5. Dial an outside number, extension, or feature access code you want
to store.
Note: If the programmed number is associ ated with a list, it can be
up to 24 di gits. If the stored number i s NO T associated with a
list (that is, an Automatic Dialing button), it can be up to 16
digits. See your system manager if you need help.
Note: If your telephone has a display, you may be able to use the
softkeys t o add special functions such as Pause, Mark, or
Wait i nto the telephone numbers programmed on the AD
button.
If you are programmi ng an outsid e number, be sure to include
a trunk code, if appl icable.
6. Press . [confirmation tone]
#
Number is stored.
7. Repeat Steps 4 through 6 to program addit ional buttons.
8. Hang up to end programming.
To place an AD call
1. Press the selected AD button.
Call is automatically dialed.
To program or reprogram an outside number, extension, or feature
access code into an AD personal list
1. On a separate sheet of paper, write down the outside numbers,
extensions, and/or feature access codes you want to program as
items on your per sonal list(s).
Note: Each phone number or feature access code is stored as a
separate item .
2. Pick up the handset or press .
Note: If you are using the built-in speakerphone, you must press a
call appearance button before you begin Step 3.
Spkr
continued on next page
16
Page 21

Abbreviated Dialing (AD)
Pers List
(continued)
3. If you are using a telephone with a display, press th e Menu button
and then press the softkey below Prog.
If your telephone does
on your display, press the button (if administered)
not
have a display or if Pro g is not available
Program
OR, Dial the AD Program access code __________. [dial tone]
4. Dial the Personal List number (1, 2, or 3).
5. Dial the list item (1, 2, 3.. .) .
6. Dial the number you want to store (up to 24 digits).
Note: You may also be able to use the softkeys to add AD speci al
functions such as Pause, Mark, Suppre ss, or Wait into the
programmed telephone numbers.
If you are programming an out side number , be sure to incl ude
a trunk code, if applicable.
7. Press . [con firmation tone]
#
Number is stored.
8. Repeat Steps 5 through 7 if you want to program additional items on
the same list; hang up and begin again at Step 1 if you want to
program items on another list.
9. Hang up to end programming.
Note: Record your personal list items on the Abbreviated Dialing list on
the cards in the tray under the telephone; group, system, and
enhanced list can be obtained from your system manager.
To place a call using an AD list button or code
1. Press the or or buttons (if administered)
Grp List Sys List
OR, Dial the appropriate AD List code:
List 1 __________
List 2 __________
[dial to ne]
List 3 __________.
Note: An (Enhanced List ) may also be available; see
Enhcd List
your system m anager.
2. Dial the desired list item (1, 2, 3...).
Call is automatically dialed.
17
Page 22

Automatic Callback
The Automatic Callback feature sends you a priority ring indi cating a
previously busy or unanswered exte nsion you dialed is now available.
To automaticall y place another call to an extensi on that was busy, did
not answer, or returned call waiting ringback tone
1. If you are using a telephone with a display, press the Menu button
and then press the soft key below AutCB during call attempt.
If your telephone does
on your display, press the button (if admini stered) during
not
have a displ ay or i f AutCB is not available
AutoCallBk
the call attempt.
Note: If you send your calls to coverage after activating Automatic
Callback, yo ur c allba ck c alls will st ill ring at your ex tensi on and
will
not
be redirected to coverage.
2. Hang up.
Yo u will get a priority ring when both you and the called extensi on
are idle; when you answer, regular ringing is sent to the called party.
3. Lift the handset when you hear priority ring.
Note: Automatic Callback is automatically canceled after 30 minutes.
To cancel Automatic Callback
1. If you are using a telephone with a display, press the Menu button
and then press the soft key below AutCb again (while on-hook).
not
If your telephone does
on your display, press the button again (whil e on-hook).
have a displ ay or i f AutCB is not available
AutoCallBk
Call Forwarding All Calls
The Call Forwarding feature temporarily forwards all your calls to another
extension or to an out side number, depending on your system.
To temporarily redirect all calls to an ext ension or outside number of
your choice
1. If you are using a telephone with a display, press the Menu button
and then press the soft key below CFrwd (while on-hook or off-hook).
If your telephone does
on your disp lay, press the button (if adm inistered) ( w hil e onhook or off-hook)
OR, Dial the Call Forward access code __________
(while off-hook). [dial to n e]
not
have a display or if CFrwd is not available
Call Fwd
continued on next page
18
Page 23

Call Forwarding All Calls
(continued)
Note: If you have consol e permission, next, di al the extension
number whose calls are to be forwarded; receive dial tone.
2. Dial the extension or num ber where calls will be sent.
Note: Some telephones have restrictio ns on where calls can be
forwarded (see your system manager).
3. Hang up.
You may hear a ring-ping tone fro m your te lephone as each call is
forwarded.
To cancel Call Fo rwarding
1. If you are using a telephone with a display, press th e Menu button
and then press the softkey below CFrwd (while on-hook).
not
If your telep hone does
on your display, press the button (while on-hook)
have a display or if CFrwd is not avail able
Call Fwd
OR, Dial the Call Forward cancel code __________
(while off-hook). [confirmation tone]
Yo ur calls will now ring at your own telephone.
Call Park
The Call Pa rk feature allo ws you to put a cal l on hold at your telephone, for
retrieval at any extension.
To park a call at your extension (for retrieval at any extension)
Note: To use the Call Park featur e on a telephone with di splay (i f Call Park
is one of your softkey featur es), press t he Menu button and then the
softkey below CPark. Then hang up.
OR, i f a button has been assi gne d to your t elephon e, press
the button (if administered) and hang up.
Otherwise, follow the instructions below.
1. Press . [dial ton e]
2. Dial the Call Park access code __________. [confirmation tone]
3. Press again.
Call is parked at your extension.
4. Hang up.
Call Park
Call Park
Trnsfr
Trnsfr
continued on next page
19
Page 24

Call Park
DirCall PkUp
To retrieve a parke d call from another extension
(continued)
1. Pick up the handset or press .
2. Dial the Call Park access code __________. [confirmation tone]
3. Dial the extension where the cal l is parked. [confirmation tone]
Spkr
If returning to a call parked at your telephone, dial your own
extension.
Note: If you receive intercept tone, the parked call has been
disconnect ed or retrieved by someone else.
Call Pickup and Directed Call Pickup
The Call Pick up f eature lets you answer a c al l at y our te lephone for ano the r
extension in your pickup group. If you can use the Directed Call Pickup
feature, you can pick up a call ringing at a specific extensio n wit hout the
person’ s being a member of your pickup group.
To answer a call placed to a member of your pi ckup group when y our
telephone is i d le
1. If you are using a telephone with a display, press the Menu button
and then press the soft key below CPkUp.
If your tel epho ne does
on your display, press the button (if administered)
OR, Dial the Call Pickup access code __________.
not
have a displ ay or if CPkUp is not avail able
CallPickup
Called t elepho ne sto ps rin ging, a nd you a re co nn ected to th e ri nging
call.
To pick up a call directly for someone else in your office
Note: Again, the Direc ted Call Pickup feat ure is d esigned f or cov ering cal ls
for someone whi le they are away from their des k. In this case, you
do
not
have to be a member of the same pic kup group.
1. Pr ess the but to n
OR, Dial the Directed Call Pickup access code __________.
2. Dial the extension of the ringing telephone.
Called t elepho ne sto ps rin ging, a nd you a re co nn ected to th e ri nging
call.
20
Page 25

Internal Auto Answer
The intern al Aut o Answer (or Hands-Free Answer on Int ercom) feature
allows you to answer incoming internal calls automatically, that is, without
lifting the handset. This feature is intended for telephones with built-in
speakerphones.
To answer incoming internal calls automatically
1. If you are using a telephone with a display, press th e Menu button
and then press the softkey below HFAns.
not
If your telephone d oes
on your display, press the button (if administered).
have a display or if HF Ans i s not avail able
IAA
You will hear a 3-tone warble befor e your telephone goes off-ho ok on
each internal call.
2. When you no longer want to have inter nal calls answered
automatically, press the softkey below HFAns, or press .
IAA
Leave Word Calling (LWC)
The Leave Word Calling (LWC) feature l eaves a message for a person at
another ext ension to call you back. The call ed party will be able to dial
message service (for example, an at tendant, AUDIX or other voice mail
system, a covering user, etc.) to retrieve a shor t, standard message which
gives your name and extension, the date and time you called, and the
number of times you called.
To leave a message
after dialing an extension (when your call is not
answered, you hear a covera ge or busy tone, or you have been pu t on
hold)
1. If you are using a telephone with a display, press th e Menu button
and then press the softkey below LWC before hanging up.
not
If your telephone does
on your display, press the button (if admini stered) before
have a display or if LWC is not avail able
LWC
hanging up.
[confirmation tone]
Message light goes on at the called telephone (if so equipped).
Note: If reorder tone i s heard, message is not stored; try again.
To leave a message without ringi ng an extension
1. If you are using a telephone with a display, press th e Menu button
and then press the softkey below LWC.
not
If your telephone does
on your display, press the button
OR, Dial the Leave Word Calling access code __________
(while off-hook).
have a display or if LWC is not avail able
LWC
[dial to ne]
continued on next page
21
Page 26

Leave Word Calling (LWC)
(continued)
2. Dial the extension.
[confirmation tone]
Message light goes on at the called telephone (if so equipped).
3. Hang up.
To cancel a Leave Word Calling message
Note: You cannot cancel a message left for an AUDIX subscriber.
1. While on-hook or of f-hook , press the Menu but ton and t hen press t he
softkey below CnLWC.
If CnLWC is not availab le on your display, press the
Cancel LWC
button
(while on-hook or off-hook)
OR, Dial the Leave Word Cal ling cancel code ________
(while off-hook). [dial tone]
2. Dial the extension. [con fi rmation ton e]
Note: If reorder tone is heard, the message is not canceled; try again.
Priority Calling
The Priority Cal ling feature allows you to place an internal call with a
distincti ve ring (usually a 3-bu rst ring) to indicate your call requires
immediate attention.
To place a priority call
1. If you are using a telephone with a display, press the Menu button
and then press the soft key below PCall.
If your telephone does
on your display, press the button (if administered)
not
have a display or if PCall is not available
Priority
OR, Dial the Priorit y Calling access code __________. [dial tone]
2. Dial the extension. [confirmation tone]
Wait for the called party to answer.
Note: If your call is not answered and you wish to redirect it to
coverage, pr ess the button while the call is ringing.
To change a regular call into a priority call (when you hear a call
waiting ringback tone)
1. If you are using a telephone with a display, press the Menu button
and then press the soft key below PCall.
Go to Cvr
If your telephone does
on your display, press the button.
not
have a display or if PCall is not available
Priority
continued on next page
22
Page 27

Priority Calling
(continue d)
2. Wait for the cal led party to answer.
Note: If you st ill re c e iv e a call w a iting ringback tone, wait a few
minutes and tr y again.
Self-Administrat ion
If your telephone has a display and the Self -Administrati on feature has
been activ ated, you will be abl e to add (or to remove) the following feature
buttons on your own tel ephone using the softkeys and the display control
buttons:
1st Screen
Expl? Acct AutoD Blank
Account
Code Entr y
Automatic
Dialing
View the full
name of each
of these selfadministrable
features.
You can also
Note:
administer these features
onto individual but tons
from the Expl? screens.
buttons
This button
should be
left blank
Call Forwarding
2nd Screen
CFrwd CPark CPkUp DPkUp
Call Park
Call Pickup
Directed
Call Pickup
3rd Screen
GrpPg SAC WspPg WspAn
Send
All Calls Whisper Page
Group Whisper
Page
Page
WsOff
Whisper Page Off
Answer
4th Scre en
FIGURE 5 Self-Administration Features and Display Screens
continued on next page
23
Page 28

Self-Administration
To administer any of the above fea tures on available buttons on your
telephone
1. Press the Menu button and then the softkey below Admin.
Note: The tel ephone must be idle; that i s, t here must NOT be any
active or held calls.
2. If necessary, enter your security code at the te lephone dial pad.
When you have entered the security code, pr ess the softkey below
Done.
(continued)
The display shows the first SELECT FEATURE screen which lists
the first set of four self-administrable features. To see the second set
of four features, press the Next button. To go back one menu screen,
press the Prev button.
3. Press the softkey bel ow the feature you want t o place on an avail able
feature b utt on such as CPkUp (Call Pickup) or SAC (S end Al l Calls).
Note: If you choose the Automatic Dialing or Group Paging feature,
the disp lay pr ompt s you t o add a nu mber such as a tel ephone
number, extension, or trunk code that will be associated with
this particular button. When you see t he correct number on
the screen, press the softkey below Done.
Note: If you wish t o see the full name of any of the features on the
feature menu scr eens (called LongMode ), press the softkey
below Expl?. The display, such as the one below, provides
the full name of the f eature and allows you to sele ct that
feature for an available button. (Press t he softkey be low Selct
and go on to Step 4.):
CALL PICK UP
ShortMode? Next Selct
Y ou can admini st er this fea ture f rom t his (LongMode ) s creen wi th t he
feature’s full name OR you can return to the (ShortM ode) screens,
shown in Figure 5, which have the feat ure’s abbr eviation rather than
its full name.
4. Press the button on which you wish to assign this feature.
If the feature is successfully administered on the feature button, the
display shows: “Button Programmed!” Go on to Step 5.
continued on next page
24
Page 29

Self-Administration
(continued)
Note: If there is already a fea tur e programmed on that button, you see the
following screen:
XXXXX FEATURE ON BUTTON
Replace Keep Delete
if you want to replace the current feature on that button, press either
of the softkeys below Replace. (The display returns to the first
SELECT FEATURE screen.)
If you want to keep the feature on that button, press the softkey
below Keep.T he display confirms the button has not been changed.
If you want to delete the feature from the button and leave that
button blank, press the softkey below Delete.
5. When you see the “BUTTON PROGRAMMED!” screen on th e
display, do one of the following:
— If you want to administer another button on your telephone, press
the softk ey below Cont (Continue) on the second line of the
“BUTTON PROGRAMMED” screen. The display returns to the
feature list. Repeat Steps 3 and 4 to administer other buttons.
— To end sel f-adm ini stratio n and retur n to Norm al call- handli ng mode,
press the Exit button.
Note: Be sure to write the name of the self-administered feature(s) on the
appropriate button on the telephone button designation cards.
Send All Calls
Temp orarily sends all your calls to the extension of a person des ignated by
your system manager to answer them when you canno t (perhaps a
secretary or receptioni st).
To send all calls (except priority call s) immediately to covera g e (i f
your system manage r has provided a coverage path for your
extension)
1. If you are using a telephone with a display, press th e Menu butt on
and then press the softkey below SAC (while on-hook).
If your telephone does
your display, press the button (while on-hook)
OR, Dial the Send All Calls access code __________
(while on-hook).
Note: You may hear a ring-ping (half-r ing) tone from your telephone
as each call is for w arded.
not
have a dis play or if SAC i s not a vaila ble on
Send Calls
[confirmation tone]
continued on next page
25
Page 30

Send All Calls
(continued)
To can c e l S en d A ll Ca lls
1. If you are using a telephone with a display, press the Menu button
and then press the soft key below SAC again (while on-hook).
not
If your tel ephone do es
your display, press the button agai n (while on-hook)
have a di sp lay or if SAC is not avai lable on
Send Calls
OR, Dial the Send All Calls cancel code __________ (whil e off-
hook). [conf irmation tone]
Whisper Page
The Whisper Page f eatur e all ows you, i f you ha ve a ppropri ate pe rmissi ons,
to make an announcement to a person at another extension currently on
another call. Only the person at the other extension hears the
announcement; the other person on the call cannot hear the message.
Note: The M10L-8400 is th e only headset adapter that should be plugged
into the Handset jack on the 6400 Series telephones. If other
headset adapters are used, the Whisper Page announcement may
be overheard by the other person on the call.
To make an important anno uncem ent (such as an incoming call) to
someone at another extension busy on another call
1. Press the button
Whisper Page
OR, Dial the Whisper Page access code __________.
Both p eople on the other call hear a beep .
The person whom you have called can press the
Whisper Answer
button which forms a two-party speaking path with your telephone.
The other call is put on hold and that person cannot hear your
conversation.
2. Speak with the person you have called.
Note: Any person in the system wit h the
Whisper Answer
button
administered on the telephone can block Whisper Page calls
by pressing the
Whisper Off
button.
26
Page 31

Display Features
Note: To ensure easier display vis ibility, the display on the 6408D and
6408D Plus, 6416D Plus, and 6424D Plus can be left in its horizontal
position or can be raised to a 45 degree angle. Check which viewing
angle is best for your workstation.
Time and Date
Ordinarily, the time and the date will appear on the upper line of your display.
(Only the 6408 D, 6 408D Plus, 641 6D Plus, and 6424D Pl us telephones have a
display.) The time and date are set at the switch, so if there is an error, contact
your system m anager.
Note: On initially plugging in a 6400 Series display telephone or af ter a
power outage, it may take approximately 15 minutes before the time
and date appear on the screen.
Call Information
You may have as many as 24 cal l appearance buttons. (The 6408 telephones
have eight call appearance buttons; the 6416D Plus has 16; the 6424D Plus
has 24 butt ons.) Beginning wit h the first button in the upper left hand corner of
your facepl ate and going down, the display identifies the buttons in the left
column as a th rough h. The buttons in the right column begin with i and then
go through p (on the 6416D Plus) and through x (on the 6424D Plus). When
the display shows , it repre sents call informat ion for the first call
appearance button. The next butt on down would be shown as , and
so on.
a=
b=
When you dial an exte nsion, that number is shown and t hen replaced by the
called party’s name and extens ion. When a call is receive d fro m ano ther
extension, the caller’s name is shown; when a call is received from outside,
“OUTSIDE CALL” or a trunk identi fier is shown.
The display remains in Normal (call-handling) Mode until you activate one of
the other display or softkey features. After using any of these features, return
to Normal Mode by pressing the Exit button.
27
Page 32

Directory
*
The Directory (di splay) feature al lows you to search for the ext ension of
another user in your location by keying in the user’s name at the dial pad.
To search the directory for a name
1. Press the Menu button and then pres s the softkey below Dir
OR, if Dir is not available on your display, press the button
Directory
(if administered)
2. Key in the selected name with dial pad keys:
last name, comma (use ), first nam e o r initial.
3. Press the Next but ton for each successive directory name you wish
to see.
4. To search for a new name, press the softkey below Dir or press the
Directory
button and go through the above sequence agai n.
5. When you are ready to exit the directory, press the Exit button.
To place a call to the name shown on the display
1. Pick up the handset.
2. While the name is shown, press the button (if
Call Disp
administered)
OR, if you do not have a button on your set, press t he Exit
Call Disp
button and then dial the number using the dial pad.
Note: You can also leave your ha ndset on-hook. The speaker phon e
will turn on auto ma ti cally when you press .
Call Disp
Exit
Use the Exit featur e to leave Display Mode (aft er using any display or
softkey fe ature) and return to Normal Mo de. You can then use the display
to view the time and date and to identify call appearance, calling/called
party, and calling/called number.
To exit a display feature and return to Normal (displ ay) Mode
1. Press the Exit button.
Display will sho w the time and date or, when applicab le , call/caller
information.
28
Page 33

Inspect
The Inspect (display) feature shows you call-related information for an
incoming cal l when you are already acti ve on a call .
To see who is on hold while on a call
1. Press the Menu button and then press the softkey below Inspt
OR, if Insp t is not available on your display,
press the button (if administered).
Inspect
2. Press the call appeara nce button of the held call.
Information is shown on the display screen;
you remain connected to the present call
3. To return to the hel d call, press the Exit button and then the call
appearance button of the held call.
Messa g e R etrieva l
The Message Retri eval (display) fe ature allows you to retrieve messages
left for you when your Message light is on. This feature will also le t you
retrieve m essages for other tele phones not equipped with a displ ay (if you
are authorized as a system-wide message retriever by your system
manager).
T o see your messages when your M essage ligh t is on (while on-hook,
off-hook, or on a call)
1. Press the button (if administered).
Msg Rtrv
2. Press the Next button to see the first message (and then for each
following message).
To return a call to the message sender
1. Pick up the handset.
2. Press the button while any part of t he me ssage is shown.
Call Disp
Note: You can also leave your hands et on-hook . The speakerph one
will turn on aut om ati cally when you press .
Call Disp
To erase a message
1. Press the button (if administered) while any part of the
Delete
message is shown.
continued on next page
29
Page 34

Message Retrieval
CvrMsgRtrv
(continued)
To see a coworker’s messages (can be during a call with your
coworker)
Note: You must first be de si gnated as a syst em-wide m essage r et riever by
your system manager.
1. Press the button.
2. Dial your coworker’s extensi on.
3. Press the Next but ton to see the first message
(and then for each following message).
To return a call for a coworker to the displayed extension (while on
call with the cowor ker)
1. Press .
Trnsfr
Coworker is put on hold.
2. Press the button while any part of the messag e is shown.
3. Press .
Coworker is connected to the call attempt.
4.
Call Disp
Trnsfr
Stored Number/View
The Stored Number or V iew (display) feat ure allows you to check 1) the
number stored as an i tem on an Abbreviated Diali ng li st, 2) the number you
last dialed (via Last Number Dialed feature), or 3) the name of the feature
that has been prog ramm ed on any of your telephone’s call appearance/
feature buttons.
To view the number stored as a li st it em
1. Press the Menu button and then pres s the softkey below BtnVu
OR, Press the button.
2. Press the selected or or button
View
Pers List Grp List Sys List
OR, Dial the appropriat e AD List code:
List 1 __________
List 2 __________
List 3 __________.
Note: An (Enhanced Li st) may also be available; see
En hc d Li st
your system ma nager.
3. Dial the selected list item (1, 2, 3...).
Stored number is shown.
4. Hang up.
continued on next page
30
Page 35

Stored Number/View
(continued)
5. To return to the Normal (di splay) Mode, pres s the Exit button or
begin again at Step 2 to see another stored number.
T o vi ew the featur e sto red on a call app earance/ featur e butt on OR the
last number you dialed OR a number stored on an AD button
1. Press the Menu button and then press the softkey below View
OR, if View is not availabl e on your display, press the bu tt on.
View
2. Press the selected fea ture button.
Note: To view the last number y ou dialed, press , or to view
Redial
the number stored on an AD button, press the selected AD
button.
Feature assignment on the button or telephone numb er is shown.
3. To return to the Normal (call-handling) Mode display, press the Exit
button or repeat Step 2 to see another store d numb er.
Timer
The Timer (display) fea ture allows you to measure ela psed time. You can
use this feature in order to keep track of ti me spent on a call or task.
To see elapsed time (hour s, minutes, seconds)
1. Press the Menu button and then press the softkey below
Timer (which exits you from softkey mode)
OR, if Timer is not available on your display, press the button
(if administered).
Timer
Elapsed time is shown.
2. To stop the timer and clear the display, press the Menu button and
then press th e soft key below Timer again
OR, if Timer is not available on your display, press again.
Timer
Elapsed tim e is display ed for about three secon ds and then
disappears.
31
Page 36

Installation
The 6408, 6416D Plus, and 6424D Plus telephones can be either deskmounted or wall-mounted. Use the followi ng directions for inst alling any of
these telephones. Figure 6 below shows the back of the 6400 Series Multi-line
telephones .
1
2
LINE
3
EX MOD
4
567
FIGURE 6 The Bottom of the 6400 Series Multi-Line Telephones
32
Page 37

Desktop Installation
Note: You may use the 6400 Ser ies telephones
In this case it is sugges ted that you pla ce small ro und feet (inc lud ed in
a plastic bag in the box in which the telephone was packed) on each
corner of the bottom of the telephone housi ng.
1. Turn the telephone face down on a flat surface.
2. Snap one end of the line cord into the “LINE” jack (See 3 in Figure 6)
on the bottom of the tel ephone.
3. If you are installing a 6416D Plus or 6424D Pl us with a connected
expansion module, snap one end of the expansi on m odule cord into
the EX MOD jack (4 in the figure above).
4. Thread the line cord (and expansion module cord, if appropriate)
through the routing channel leading to the top of the desktop stan d (2
in the figu re ab ove). Mak e sur e that each cord is placed se curel y unde r
the square ta bs in t he routing channel.
5. Snap one end of the coiled handset cord into the Handset jack (6 in
Figure 6) . This jack is labeled . Thread t he handset cord into the
channel leading to the side edge of the telephone (5 in Figure 6).
6. Turn the telephone right side up, with t he front facing you.
7. Snap the free end of the handset cord i nto the handset and place the
handset in the cradle.
without
the desktop st and.
8. If appropriate, snap the f ree end of the expansion module cord into the
TEL SET jack on the expans ion module.
9. Snap the free end of the line cord i nto the modular wall jack.
10. Lift the handset and listen for dial tone. If there is no di al tone, chec k all
wire connect ions to make sure they are secure.
Wall Installation
Note: For wall-mounting, you will need a 1-foot line cord. This cord is
supplied with the telephone, but can be ord ered by using this
comcode: 103786760.)
If you are wall-mounting the telephone, you should remove the
tray from the base of th e telephone. For this pur pose, use the
instructions listed under “Removing the Telephone Tray” later in this
guide.
1. Make sure the 8-conductor wall mount plate is in place.
2. Do the following to reverse the handset hook. (a in Figure 7 shows the
handset ret ainer located under th e handset.)
— In order to release the handset retainer hook, press down on the
hook and sli de it toward the top of the telephone. (See b in the figure
below.)
— Rotate the hook 180 degrees (as in c below) and then slide it back
into its slot so the bottom part now sticks out from the top. (See d in
the figure below.) Snap the hook firmly into place.
not
33
Page 38

a.
b.
c.
d.
¾
FIGURE 7 Removing, Rotating, and Replacing the Handset Retainer
3. Place the telephone fa ce down on a flat sur fac e and turn t he teleph one
face down.
4. Remove the desktop stand which i s attached to the base of the
telephone by tabs on the top and back of the stand. (T hese tabs are
shown as 1 and 7 in Figure 6. Figure 8 on the next page shows the
removal of the desktop stand. The upper tabs ar e labeled 1 and 2 in
the figure below.)
— Press inward on the top of the stand until you can lift the top of the
stand
out of the tab slot on the tel ephone.
— Lift the bott om of the st and out of the lower tab slot(s).
34
Page 39

FIGURE 8 Removing the Desktop Sta nd
5. Reverse the desktop stand so that the larger end is facing down.
6. Snap the line cord into the “LI NE” jack in the bottom of the telephone
and coil the excess cord in the back of the deskstand.
1
2
7. Snap one end of the coil ed hand set cord into t he Handset j ack (l abeled
). Thread the handset cord into the chann el l eading to the side
edge of the telephone
8. Slowly lower the reversed deskstand onto the bott om of the telephone
until the tabs at the top and bottom of the deskstand snap into the
appropriate slots on the bottom of the telephone.
9. Place the free end of the line cord through t he opening in the m iddle of
the desksta nd and then snap the free end of the line cord into the wall
jack.
10. Place the base of the telephone on the wall-jack mounting studs, and
pull dow n w a rd until it is sec ur e . (S e e Figu re 9. )
35
Page 40

FIGURE 9 Placing the Telephone on the Wall Jack Mounting Studs
11. Snap the free end of the handset cord into the handset and place t he
handset in the cradle.
Note: The handset hook you repositioned will hold the handset in place.
12. Lift the handse t and li sten for dial tone. If ther e is no dia l tone, check all
wire connect ions to make sure they are secure.
Removing the Telephone Tray
You may wish to remove the tray from the base of the telephone, especially if
you are wall-mounting the telephone. See Figure 10 for further hel p.
1. Pull the tray from the base of the telephone as far as it will go.
2. Using your thumb, press down on the center of the tray.
3. Continue to pull the tray unt il it is completely separated from the base.
36
Page 41

FIGURE 10Removing the Tr ay from the Base of the Telephone
37
Page 42

Installing the Designation Card
Included in t he front of thi s user ’ s manua l is a but ton des ign ation card on wh ich
you can write the telepho ne number, extension, name, or fe atu re that each call
appearance/feature button can access. In order to help you mat ch the
designation cards with the call appe arance/feature buttons on the voice
terminal, the columns of button labels are marked with the 6400 Series multiline telephone model with which the label can be used.
Below the perforat ed bottom edge of each desig nation card is a telephon e
number card on which yo u can write your telephone number or extension.
To label and install the designation card and telephone number card
1. Print the numbers/features on the button desig nation card that
corresponds with the telephone you are using, and type or write your
phone number or extension on the telephone numb er card (labeled
Tel no.).
2. Crease the perforated edges of the cards you have filled out and then
tear the button designation strips and the station number card along
the perforations.
3. Place the button designa ti on card and telephone number card under
the plastic card cover on the telephone by doing the following:
— The transpar ent designation card cover is attached to the fra me of
the telephon e by ta bs on t he top and bot tom of th e cover. Remove the
cover by pulling the top tab forward and th en li ft ing the bottom of the
transpare nt cover from the voice term inal.
— Place the designation card(s) on the telephone and then replace the
transparent cover over the card by inserting the tabs at the bottom
and then pressi ng the top down until it clic ks.
Note: You can order additional designation cards in quantities of 25 cards
and 100 cards per package. Use the following comcodes when you
place your order.
25 sheets of des ignation and telephone number cards:
Comcode: 847984614
100 sheets of designation and telephone number cards:
Comcode: 847984622
38
Page 43

Tones and Their Meaning
Note: The tables below describe the defaults for each ringing and feedback
tone. Check with your system manager to verify if the descriptions in
the Meaning column are accurate for your system.
Ringing Tones are produced by an incoming call.
Ringing Tones
Rings Meaning
1 ring A call from another extension.
2 rings A call from outside or from the attendant
3 rings A pr iority call from another extension, or
from an Automati c Callback call you
placed.
◆
Feedback tones are those which you hear through the handset (recei ver) or
the speaker.
ring-ping
(half-ri ng)
A call redirected from your telep hone to
another beca use Send All Calls or Call
Forwardi ng All Call s is active.
Feedback T one s
Tones Meaning
busy A low-pitc hed tone repeated 60 times a
minute; indicates the number dialed is in
use.
call waiting
ringback
confirmation Three short bursts of tone; indicates a
A ringbac k tone wi th l ower-pi tched si gnal at
the end; indi cates the e xtension ca ll is bus y ,
and the called party has been given a call
waiting tone. If you hear this tone, you may
wish to activate A u tomatic Ca llback
feature activation or cancellation has been
accepted.
continued on next page
39
Page 44

Feedback Tone s
Tones Meaning
(continued)
coverage One short burst of ton e; indicat es your
call will be sen t to another extension
to be answered by a covering user.
dial A continuous tone; indicates dial ing
can begin.
intercept/
time-out
recall dial Three short bur sts of t one followed by
reorder A fast busy tone rep eated 120 t i mes a
ringback A low-pitched tone repeated 15 times
An alternating high and low tone;
indicates a dialing error, a denial of
the service requested, or a failure to
dial within a preset interval (usually
10 seconds) after listing the handset
or dialing the previous digit.
a steady dial tone; indicates the
feature request has been accepted
and dialing can begin.
minute; indicates all trunks are busy.
a minute; indicates the number dialed
is being rung.
Line and Feature Button Lights
Line and Feature Button Lights
Light Meaning
Stead y red The li ne yo u ar e usi n g o r w ill u se w h en you lift
Steady green The line is in use, or the feature programmed
Blinking green You have put a call on hold on this
the handset or press the Speaker button.
on this button is on.
line button.
40
 Loading...