

Page 1

Lifestyle DECT Cordless Phone
with Mirror Display
Model: LS328
EN
USER MANUAL
MANUALE D’USO
MANUAL DE USO
MANUAL DO UTILIZADOR
Page 2

EN
Page 3

Lifestyle DECT Cordless Phone with Mirror Display
Model: LS328
USER MANUAL
CONTENTS
Introduction ........................................................................................ 1
Key Features ........................................................................................ 3
Handset – Front View ..................................................................... 3
Base Unit – Front View ................................................................... 5
Base Unit – Wall Mount .................................................................. 5
Safety and Care ................................................................................... 6
Safety Precautions ......................................................................... 6
Caring for your Product .................................................................. 6
Caution ............................................................................................ 7
Getting Started .................................................................................... 7
Connecting AC Adaptor / Phone Line ............................................ 7
Installing Handset Batteries ........................................................... 8
Charging Handset Batteries ........................................................... 8
Low Battery Warning ....................................................................... 9
Handset Reception ......................................................................... 9
Handset LCD Symbols ................................................................. 10
Electrical Safety ........................................................................... 10
Basic Functions ............................................................................... 10
Making a Call ................................................................................. 10
Answering a Call ............................................................................ 11
Ending a Call .................................................................................. 11
Call Waiting .................................................................................... 11
Message Waiting ............................................................................ 11
Adjusting the Speaker Volume ...................................................... 12
Redialling a Call ............................................................................ 12
EN
EN
Page 4

Redialling from the Last 10 Numbers .......................................... 12
EN
Fast Redial .................................................................................... 12
Deleting a Redial Number ............................................................ 12
Saving Dialled Numbers into Memory ......................................... 13
Phonebook ........................................................................................ 13
Storing Numbers in the Phonebook ............................................. 13
Keys to Use .................................................................................. 13
Deleting Numbers from Phonebook ............................................. 14
Editing Numbers in the Phonebook .............................................. 15
Calling Numbers from Phonebook ............................................... 15
Quick Browsing of Phonebook ...................................................... 15
Caller ID Display .............................................................................. 15
Viewing Caller ID Records ............................................................ 16
Saving Caller ID Records in Phonebook ..................................... 16
Deleting Caller ID Records........................................................... 16
No Caller ID .................................................................................. 17
Missed Calls .................................................................................. 17
During a Call ..................................................................................... 17
Using the Mute Function .............................................................. 17
Using Speakerphone During a Call .............................................. 18
Handset Settings .............................................................................. 18
Setting the Ring Tone .................................................................... 18
Setting the Ring Tone Volume ...................................................... 18
Setting the Display Language ...................................................... 19
Setting the Dial Mode .................................................................... 19
Setting the Time / Date Format .................................................... 19
Conference Call ................................................................................ 19
Operating the Base Unit .................................................................. 20
Paging the Handset ...................................................................... 20
Setting the Base Unit Time ........................................................... 20
Setting the Base Unit Time Format ............................................. 21
Page 5

Setting the Base Unit Date........................................................... 21
Setting the Base Unit Date Format ............................................. 21
Setting the Base Unit Alarm ......................................................... 21
Snooze / Turning the Alarm Off .................................................... 22
Setting the Base Unit Language ................................................... 22
Call Log ......................................................................................... 22
Deleting Caller ID Records........................................................... 22
Special Features ............................................................................... 23
Setting the Rainbow Pattern On / Off .......................................... 23
Setting the Base Unit to Mirror Mode ........................................... 23
Using Multiple Base Units .............................................................. 23
Using Multiple Handsets ................................................................. 24
Intercom Calling Between Handsets ............................................ 24
Answering Intercom Calls ............................................................. 24
Call Waiting ................................................................................... 24
Call Transfer Between Handsets .................................................. 24
Registering Handsets to Base Unit ............................................... 25
De-Registering Handsets ................................................................ 25
Resetting your System ..................................................................... 26
Troubleshooting ............................................................................... 27
Handset / Base Unit ..................................................................... 27
Multi-Handset Use ........................................................................ 29
Warning ............................................................................................. 29
Specifications ................................................................................... 29
About Oregon Scientific .................................................................. 30
EC-Declaration of Conformity ........................................................ 31
EN
Page 6

INTRODUCTION
EN
Thank you for selecting the Oregon Scientific™ Lifestyle DECT Cordless
Phone with Mirror Display as your product of choice.
The cordless phone provides the freedom to communicate from anywhere in your home. The powerful base unit gives you time, date, dual
alarm, call information, phone charger, mirror, and rainbow-pattern screen
display that can be changed to suit your mood.
When you unpack your phone, make sure you keep all the packing
materials in a safe place, in case you later need to transport it or return
it for servicing. In the box, you will find:
• Handset
• Rechargeable Handset Battery
• Base Unit
• AC / DC Adaptor for Base Unit
• Phone Line for Base Unit
• Wall Mount
• User Manual
The Lifestyle DECT Cordless Phone with Mirror Display features:
• 14 Rainbow Patterns
• Mirror Mode
• Real Time Clock
• Dual Alarms with Snooze Function
• Graphic Handset Display
• Caller ID Display on Base Unit and Handset
• 50 Phonebook Records with Search and Edit Function
• 40 Caller ID Memory (24 Digits + 15 Characters)
• 10 Last Number Redial Records
• 10 Polyphonic Melodies plus 4 Standard Ring Tones
• Phonebook Access During a Conversation
• Handset Speakerphone
1
Page 7

• Backlight on Display and Keypad
• Mute / Redial Functions
• Supports Multiple Handsets and Base Units
• Intercom / Call Transfer / Conference Call Capability
• Multiple Language Display
• Wall Mountable
• Standby Time – 5 Days
• Talk Time – 7 Hours
NOTE: Keep this manual handy as you use your new product. It contains
practical step-by-step instructions, as well as technical specifications
and warnings you should know.
EN
2
Page 8

KEY FEATURES
EN
HANDSET – FRONT VIEW
1. Receiver
2. LCD Display
Talk button
3.
• Press to begin and end a phone call.
• Press to callback a number.
Arrow buttons
4.
• Press to move up and down menu options.
• Press to increase or decrease the speaker volume.
• Press to browse Caller ID records.
3
Page 9
5. Keypad
• Keypad 0-9, A-Z buttons.
• Press the number to dial the call or use for text input when editing
the phonebook or caller identification.
6.
/ ‘C’ Cancel button
• Press to cancel an operation and return to standby mode.
• Press to use * in text.
7.
Redial / ‘D’ Delete button
• Press to browse redial list.
• Press to redial a phone number.
• Press to delete digits when dialling a phone number.
8.
Intercom button
• Press to make an intercom call.
• Press to make a conference call.
• Press to transfer a call.
9.
10.
11. Mute button
12.
13.
14. Microphone
/ ‘R’ button
• Press to access main menu.
• Press to confirm a selected option.
• Press to move from a current call, to call waiting.
Conference Call / # button
• Press to make a conference call.
• Press to use # in text.
• Press to mute the microphone during a call.
Phonebook button
• Press to view the phonebook.
Speakerphone button
• Press to turn the speakerphone on or off.
EN
4
Page 10

BASE UNIT – FRONT VIEW
EN
1. Handset in Handset
Cradle
2. Rainbow Pattern
3. Menu button
4. Handset Battery
Compartment
5. Screen Display
with Mirror
6. Up and Down buttons
BASE UNIT – WALL MOUNT
To use the base unit wall mount:
1. Thread the power and phone line cables through the rectangular hole on
the wall mount. Then insert them into the sockets on the base unit.
2. Slide the two hooks at the top of the wall mount into the hook holes
at the top of the base unit.
3. Push the base of the wall mount towards the base unit so the two
hooks at the bottom click and the wall mount feels securely locked
in place.
5
Page 11

4. Place a nail or hook where you want to position your base unit and
simply hang the wall mount on it.
SAFETY AND CARE
SAFETY PRECAUTIONS
Please observe the following safety precautions when setting up and
using this product.
• LCD panel – The LCD panel is made of glass, and may break if the
unit is dropped.
• Heat sources – Keep the product away from heat sources, such as
radiators, stoves, heaters, and other heat-generating products.
• Water and moisture – Do not use the product in or near water or in
high moisture areas, such as a bathroom.
CARING FOR YOUR PRODUCT
To ensure you receive the maximum benefit from using this product,
please observe the following guidelines.
• Do not clean any part of your phone with benzene, thinner or other
solvent chemicals – this may cause permanent damage that is not
covered by the guarantee. When necessary, clean it with a damp
cloth.
• Keep your phone away from hot, humid conditions or strong sunlight.
• Every effort has been made to ensure the highest standards of
reliability for your phone. However, if something does go wrong,
please do not try to repair it yourself – consult your supplier.
• Do not use your phone outdoors in the rain, or handle it with wet
hands – water can damage electrical equipment.
• Clean the unit with a damp cloth and mild detergent. Avoid dropping
the unit or placing it in a high-traffic location.
• Never immerse the unit in water. This can cause electrical shock and
damage the unit.
• Do not subject the base unit to extreme force, shock, or fluctuations in
humidity.
• Do not tamper with the internal components.
• Do not mix new and old batteries or batteries of different types.
EN
6
Page 12
• Remove the batteries if storing this product for a long period of time.
• Do not scratch the LCD display.
EN
• Do not make any changes or modifications to this product. Unauthorized changes may void your right to use this product.
CAUTION
• To avoid risk of fire or injury, do not attempt to charge non-rechargeable batteries.
• Replace only batteries with the same or equivalent type recommended
by the manufacturer.
• Please dispose of old, defective batteries in an environmentally friendly
manner in accordance with the relevant legislation.
• No naked flames, such as lighted candles, should be placed near the
apparatus.
• Never use your phone in the open air during a thunderstorm – unplug
the base unit from the phone line and the main socket when there are
storms in your area.
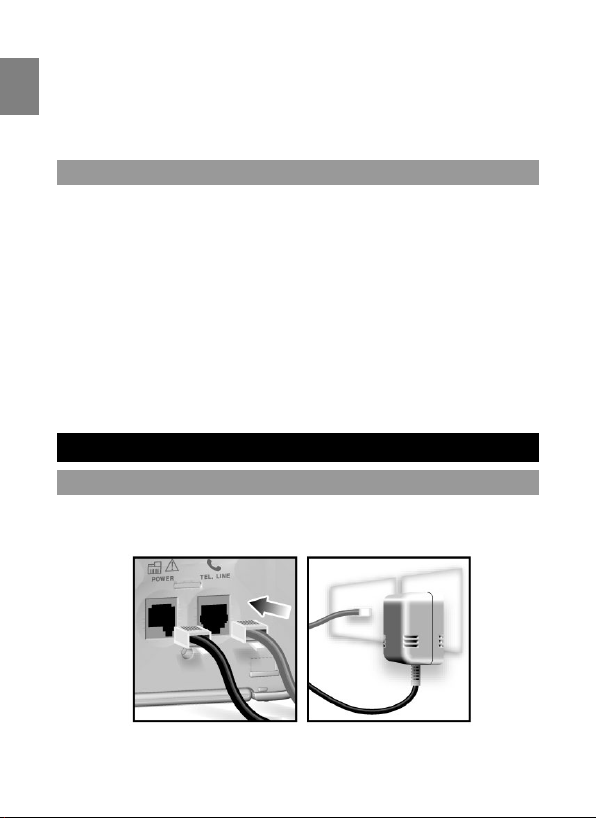
GETTING STARTED
CONNECTING AC ADAPTOR / PHONE LINE
Connect the AC adaptor and phone line to the base unit and wall sockets
as shown below.
7
Page 13
Rest the handset in the handset cradle on the base unit to charge. Once
plugged in, allow the handset to charge for 15 hours before using.
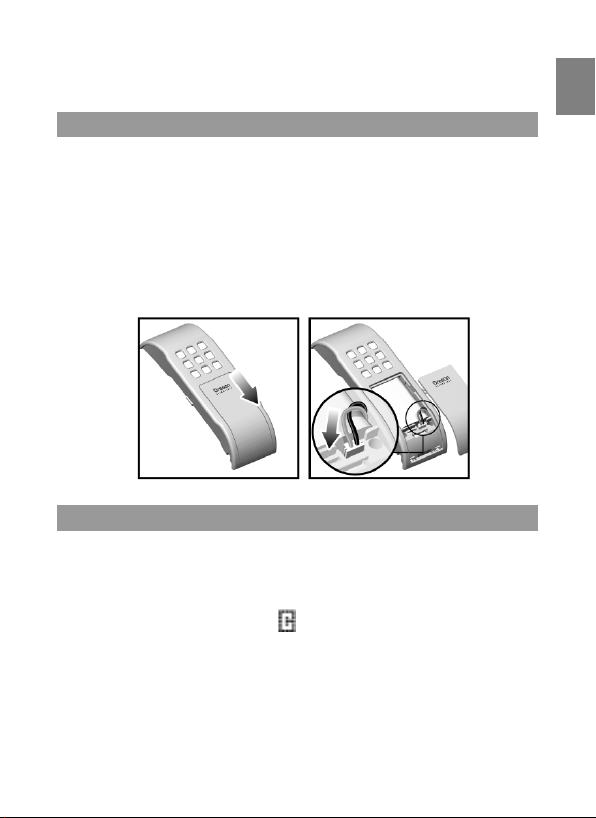
INSTALLING HANDSET BATTERIES
Your handset uses a 3.6V 750mAh Nickel Metal Hydride rechargeable
battery, which will already be installed in your handset.
If you need to replace the handset battery, simply:
1.Slide the cover off.
2. Insert the rechargeable battery by putting the piece at the end of the
wire into the bottom right of the battery indention on the handset.
3. Slide the cover up so that it clicks firmly into place.
CHARGING HANDSET BATTERIES
Before using the handset, charge it for at least 15 hours.
To charge the handset:
1. Place the handset in the base unit cradle with the keypad facing down.
2. The base unit charge symbol
handset is charging.
When the battery is fully charged, the handset battery indicator will show
the battery full symbol in the top right of the LCD display.
will come on to indicate the
EN
8
Page 14

EN
NOTE: If you charge the battery for longer than the specified time or let
it run too low, too often, you will reduce the battery life.
LOW BATTERY WARNING
When the battery is low and has only 15 minutes of talk time left, the
handset will beep a warning tone and the LCD display will flash “Low
Battery”, please:
• End the call as soon as possible.
• Don’t use the Speakerphone Mode for conversation since this will
further reduce the talk time.
• Put the handset back on the charger until the battery symbol returns to
high level.
HANDSET RECEPTION
Usually, a loss of reception means you are too far from the base unit, or
there is interference between the two units. Make sure to:
• Stay within a range of 300 metres (984 feet) from the base unit while
using the handset.
• Avoid interference such as TV or other electrical appliances.
If your handset is out of range of the base unit, or the signal is interrupted
due to electrical interference, the range symbol
the handset will return to Standby Mode.
IMPORTANT: Due to radio interference in the environment, occasional
loss of synchronization between the handset and base may occur for a
very short duration. The base will very quickly change to another channel
automatically to overcome the interference and restore synchronization.
starts flashing and
9
Page 15
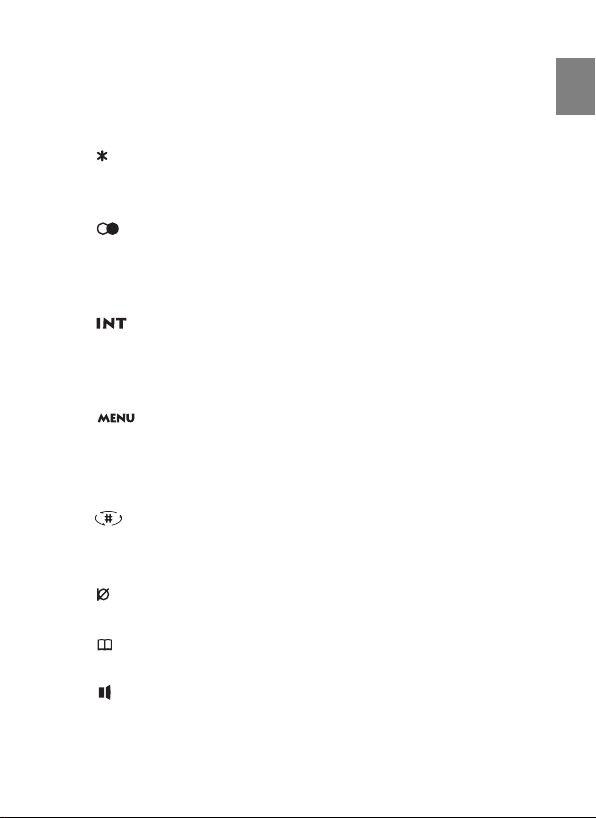
HANDSET LCD SYMBOLS
SYMBOL MEANING
- Within range indicator
- Flashing when out of range
Ringer is set to off
Line-in-use
Missed call
- Battery (5 levels)
- Flashing when battery is low (level 1
)
ELECTRICAL SAFETY
Do not install the base unit near a sink, bath or shower, or anywhere else
where it could get wet. Electrical equipment can cause serious injury if
used while you are wet or standing in water.
• If the base unit ever falls into water, do not retrieve it until you have
unplugged the power lead from the mains and the phone line plug from
the phone socket; then pull it out by the unplugged cables.
• Never use your phone in the open air during a thunderstorm – unplug
the base unit from the phone line and the main socket when there are
storms in your area. Damage caused to your phone by lightning is not
covered by the guarantee.
BASIC FUNCTIONS
MAKING A CALL
Using the button:
• Press
to get the dial tone, and dial the number. If you make a
mistake, press
OR
again to cancel the whole number.
EN
10
Page 16

• Dial the number then press .
EN
Using the Speakerphone (
• Press to get the dial tone, and dial the number.
OR
• Dial the number then press
NOTE: If you are in Speakerphone Mode and you want to use the handset,
press
to switch off the speakerphone.
) button:
.
ANSWERING A CALL
The handset will ring when there is an external call.
• Press
OR
• Press
NOTE: If the handset is placed in the recharge cradle of the base unit
when it is in Talk Mode, it will automatically enter the Standby Mode.
.
. (This will enable the speakerphone function.)
ENDING A CALL
• Press
OR
• Press
.
in Speakerphone Mode.
CALL WAITING
You will hear a call waiting tone:
• Press R to switch from an existing call, to call waiting.
MESSAGE WAITING
• “Message Waiting” will appear on the screen. Follow the voice
message commands to enter your phone network operator’s message
service.
11
Page 17
ADJUSTING THE SPEAKER VOLUME
To adjust the speaker volume:
• Press , then press or to adjust the speaker volume
accordingly.
REDIALLING A CALL
• Press , then press .
REDIALLING FROM THE LAST 10 NUMBERS
1. Press to see your last call record.
2. Use or to select a number.
3. Press
If you want to edit the phone number before redialling:
1. Press .
2. Press
3. Use
4. Use D and 0-9 buttons to edit the number.
5. Press
to dial the number.
.
or to select “Edit for Call”, then press .
to dial the number.
FAST REDIAL
When you make a call and hear the busy tone, press . The phone will
quickly redial the number within 3 seconds.
DELETING A REDIAL NUMBER
1. Press
2. Use
3. Select “Delete Record” to delete 1 number, or “Delete All” to delete
all numbers.
4. Press
5. Select “Yes”, then press
to see your last call record.
or to select a number, then press .
.
to confirm.
EN
12
Page 18
SAVING DIALLED NUMBERS INTO MEMORY
EN
The handset will automatically save the last 10 numbers you dialled. To
save dialled numbers into your Phonebook:
1. Press
2. Use or to select a phone number, then press .
3. Select “Save Phonebook” to save number, then press .
“SAVED” will appear on the screen to confirm the action.
. (The last number is listed).
PHONEBOOK
• The phone can store 50 phone numbers in the phonebook of up to 24
digits.
• The name of the phone number can be stored with a maximum of 15
characters.
STORING NUMBERS IN THE PHONEBOOK
1. Press
2. Press .
3. Use or to select “Add Record”, then press .
4. The handset display shows “<Enter name>” and “<Enter number>”.
5. Enter the name (see key guide below) and then press
6. Enter the number and then press to confirm.
7. The handset will beep twice indicating that the record has been stored.
NOTE: If only a phone number and no name is input, then the record can
still be saved.
KEYS TO USE
When entering a name, “B” will be entered by pressing the “2” button once,
followed by pressing “2” again within 1 second. If pressed beyond 1
second, “A” is entered and the second press of “2” will give the entry of
“AA”.
.
.
13
Page 19
The list of characters is shown below:
CAPITAL LETTERS SMALL LETTERS
1 SPACE 1 _ - + = ^ ~ . , ; : ? ! SPACE 1 _ - + = ^ ~ . , ; : ? !
2 ABC2ДЖЕАБВГЗ abc2джеабвгз
3 DEF3ИЙКЛР def3ийклр
4 GHI4ÌÍÎÏ ghi4ìíîï
5 JKL5 jkl5
6 MNO6ЦШТУФХС mno6цштуфхс
7 PQRS7 pqrs7
8 TUV8ÙÚÛÜ tuv8ùúûü
9 WXYZ9ÝÞ wxyz9ýþ
0 0 * # $ & % / \ | ( ) [ ] < > 0 * # $ & % / \ | ( )[ ] < >
* Press when editing a name to return to Standby Mode.
Press when editing a number to get “*”.
# Press to change between capital and small letters.
DELETING NUMBERS FROM PHONEBOOK
To delete 1 record:
1. Press
2. Use or to select the number you want to remove, then press
3. Select “Delete Record” and then press
4. When asked to confirm the deletion, select “Yes”.
5. Press
6. The handset will beep twice indicating that the record has been deleted.
.
.
.
to remove the number.
EN
To delete all records:
1. Follow steps 1-3 above and select “Delete All?”
2. Now follow steps 4-6 above.
14
Page 20
EDITING NUMBERS IN THE PHONEBOOK
EN
1. Press .
or to select the number you want to edit, then press
2. Use
.
3. Select “Edit Record” and then press
4. Edit the name if needed, then press .
5. Edit the phone number if needed, then press .
6. You will hear a double beep from the handset indicating that the task is
complete.
.
CALLING NUMBERS FROM PHONEBOOK
1. Press
2. Use or to select a number, then press to dial the number.
whilst on an active call.
QUICK BROWSING OF PHONEBOOK
1. Press
2. Use
letter of the person’s name you are looking for. E.g. Press key 7, 4
times to get quick access to a name beginning with ‘S’.
3. Press to dial.
NOTE: You can use the Phonebook function whilst on an active call.
.
or to select a phonebook entry, or press the key with the 1
CALLER ID DISPLAY
If you have subscribed to this service from your phone network operator,
the caller’s phone number will be shown on the handset and base unit
display when there is an incoming call. The phone can store the Caller
ID’s of up to 40 different call numbers.
NOTE: If the caller’s phone number was stored in the phonebook, the
associated name will be displayed with the phone number.
st
15
Page 21
Each entry in the caller list has the:
• Caller number (up to 24 digits).
• Caller name (up to 15 characters) if this is stored in the phonebook or
supplied from the phone network.
• Date and time of the call.
• Number of calls made to this number (up to 40).
VIEWING CALLER ID RECORDS
1. When the phone is in Standby Mode use
Caller ID records.
2. If you need to edit the phone number before making the call press
.
3. Use
or to select “Edit for Call”.
4. Use D and 0-9 buttons to edit the number.
5. Press
NOTE: If “NO CALLS” appears on the screen then no records are stored
in the Caller ID memory.
to dial the number.
or to browse through
SAVING CALLER ID RECORDS IN PHONEBOOK
When you have a Caller ID record on your screen:
1. Press
2. Press
action.
NOTE: When the Caller ID memory is full it will automatically delete your
st
1
Caller ID record.
, then use or to select “Save Phonebook”.
, “SAVED” will appear on the screen to confirm the
DELETING CALLER ID RECORDS
To delete 1 record:
1. Press
2. Select “Delete Record”, then press
3. Select “Yes”, then press
or whilst in Standby Mode and select the number you want
to delete. Then, press
.
.
to confirm.
EN
16
Page 22
To delete all records:
1. Press
EN
2. Select “Delete All”, then press
3. Select “Yes”, then press
or whilst in Standby Mode. Then, press .
.
to confirm.
NO CALLER ID
If a caller has withheld their Caller ID name and / or number, one of the
following messages will appear on your screen:
• “Blocked Number”
• “Unknown Number”
• “Blocked Name”
• “Unknown Name”
• “Unknown Caller”
• “Blocked Call”
MISSED CALLS
If you miss a call, the handset will display this symbol
view the Caller ID of your missed calls the following notifications will
appear on the screen:
• “NEW” – This is the first missed call from this particular Caller ID.
• “REPT” – This is not the first missed call from this particular Caller
ID.
DURING A CALL
USING THE MUTE FUNCTION
To mute the handset:
• Press
• Press
NOTE: If the phone is muted, you cannot dial any digits until the mute
button is released.
.
again to un-mute the handset and return to the normal mode.
. When you
17
Page 23
USING SPEAKERPHONE DURING A CALL
During a call:
• Press
• Press
to turn the speakerphone on.
again to end the call, or press to turn the speakerphone off
and use the handset again.
HANDSET SETTINGS
IMPORTANT
• If you press the
• If you press the
• You cannot enter the Menu Mode when the phone is in Talk Mode. To exit
the Talk Mode press
• When you have completed a setting 2 beeps will sound to indicate that
the task is complete.
• To leave a setting at any time and return to Standby Mode, press C.
SETTING THE RING TONE
You have a choice of 10 polyphonic melodies and 4 tones for incoming
calls. To select a ring tone:
1. Press
2. Press
3. Select “Ringtone”, then press
4. Select the melody or tone you prefer, then press
NOTE: If the ring volume is turned off, you will not hear the ring melody
while adjusting the ring tone.
SETTING THE RING TONE VOLUME
1. Press , then use or to select “Ringer Volume”.
2. Press
volume.
3. Press
button you will enter Talk Mode.
button you will enter Menu Mode.
.
, then use or to select “Handset Setting”.
.
.
to confirm.
, then use or to increase or decrease the
to confirm.
EN
18
Page 24
SETTING THE DISPLAY LANGUAGE
EN
To change language:
1. Press
press
2. Select “Language”, then press
3. Select the language you want, then press
NOTE: The default language for the handset display is English. You can
also change the language to French, Spanish, German, Italian, Dutch,
Portuguese and Swedish.
, use or to select “Handset Setting”, then
.
.
to confirm.
SETTING THE DIAL MODE
In order to provide compatibility with other phone systems, your phone
can be set to either Pulse dialling (same as rotary dial phones), or Tone
dialling (DTMF).
To set the Dial Mode:
1. Press
2. Press
3. Select “Dialling”, then press
4. Select either “Tone” or “Pulse” mode, then press
, then use or to select “Handset Setting”.
.
.
SETTING THE TIME / DATE FORMAT
1. Press
2. Press
3. Select “Time & Date”, then press
4. Select either “Time Format” or “Date Format”, then press
5. Then select your chosen format and press
, then use or to select “Handset Setting”.
.
.
to confirm.
CONFERENCE CALL
You can have a conference conversation with an external call party and
2 internal calling parties.
1. First establish the call with the external party by either making an
to confirm.
.
19
Page 25

external call or answering an incoming call.
2. Press
party will be on hold.
3. The internal party answers your intercom call by pressing
4. Then you press
confirmation key tone).
5. Then the external party, the other internal party and you can talk
together.
NOTE: You cannot have an intercom conversation between a handset
and the base unit.
to make an intercom call to another handset. The external
.
and hold for about 2 seconds (you will hear a
OPERATING THE BASE UNIT
IMPORTANT
• When you have completed a setting, 2 beeps will sound to indicate that
the task is complete.
• To exit menu options, scroll through the options using
select “Exit”, then press
to confirm.
PAGING THE HANDSET
This feature is very useful if you can’t remember where you put your
handset.
• To look for your handset, press the PAGE button in the cradle of the
base unit.
• To stop the paging, press any button once.
SETTING THE BASE UNIT TIME
1. Press
2. Press
3. Select “SET TIME”, then press
4. The hour digits will flash. Use
5. Press
the minutes.
, then use or to select “SET TIME & DATE”.
.
.
or to change the hourly time.
to make the minute digits flash. Use or to change
or and
EN
20
Page 26

6. Press to make the AM / PM option flash. Select AM / PM, then
EN
press
be asked to select AM / PM.)
to set the time. (When using the 24 hour clock you will not
SETTING THE BASE UNIT TIME FORMAT
1. Follow steps 1 and 2 above, then select “TIME FORMAT” and press
.
2. Select “12 or 24 Hour Format” and press
to confirm.
SETTING THE BASE UNIT DATE
1. Press
press
2. Select “SET DATE”, and press
3. Use
between the days, months and years.
, then use or to select “SET TIME & DATE”, then
.
.
or to scroll through the numbers and to move
SETTING THE BASE UNIT DATE FORMAT
1. Follow steps 1 and 2 above, then select “DATE FORMAT” and press
.
2. Select “dd/mm/yy” or “mm/dd/yy” and press
SETTING THE BASE UNIT ALARM
1. Press , then use or to select “ALARMS”.
2. Press
3. Select “Alarm 1” or “Alarm 2”, then press
next to a previously enabled alarm.)
4. Select “Yes” and press
5. Use
or minutes. (If you are using a 12-hour clock format you will need to
select AM or PM using the arrow buttons.)
6. When the time is set, press
appear.
7. Select 1 of the 4 available tones, then press
next to your selected tone and the phone will go to Standby Mode.
21
.
. (A tick will appear
.
or to set the time of the alarm and to select hours
and “Alarm Tone” options will
. A tick will appear
to confirm.
Page 27

NOTE: If your clock is in 24-hour format, you will not be required to select
AM / PM at step 5.
NOTE: Your base unit has 2 daily crescendo alarms. If both are set, the
alarms will sound daily at the set time.
SNOOZE / TURNING THE ALARM OFF
Once an alarm sounds, you may:
1. Press the base unit
snooze for 8 minutes.
OR
2. Press and hold
NOTE: If no button is pressed for 2 minutes the alarm will turn itself off.
or or lightly and the alarm will
to stop the alarm.
SETTING THE BASE UNIT LANGUAGE
To change the language:
1. Press
2. Press
3. Select the language you want, then press
NOTE: The default language for the base unit display is English. You can
also change the language to French, Spanish, German, Italian, Dutch,
Portuguese and Swedish.
then use or to select “LANGUAGE”.
.
to confirm.
CALL LOG
To view the total number of calls and new calls received:
1. Press
2. Press
OR
3. Press
, then use or to select “CALL LOG”.
.
or when in Standby Mode.
EN
DELETE CALLER ID RECORDS
To delete all Caller ID records:
1. Press
, then use or to select “ERASE ALL CID”, then
22
Page 28

press
2. Select “Yes” or “No”, then press
EN
.
.
SPECIAL FEATURES
SETTING THE RAINBOW PATTERN ON / OFF
You can set the rainbow pattern in 4 different states and choose from 14
different patterns:
1. Press
2. Press
3. Select the state you wish the rainbow pattern to feature in, press
4. Use
next to the option you wish to select, press
5. A tick will appear next to your selected tone and the phone will go to
Standby Mode.
6. You will hear a double beep indicating that the task is complete.
To turn the rainbow pattern off, follow steps 1-4 above but select “OFF”
instead of a pattern at step 4.
NOTE: When the phone is in Talk Mode, the rainbow pattern will turn off.
SETTING THE BASE UNIT TO MIRROR MODE
To use the base unit as a mirror:
1. Make sure the base unit is in Standby Mode, then press
seconds.
2. The display will say, “Going to off for 1 minute” and will then turn off
for 1 minute.
3. After 1 minute the display will return to normal Standby Mode, or you
can press any button to exit Mirror Mode.
, then use or to select “SET RAINBOW”.
.
.
or to preview and select a pattern. Once you have the arrow
.
for 3
USING MULTIPLE BASE UNITS
Your handset can select 1 of 4 base units:
1. Press
23
, then use or to select “Handset Settings”.
Page 29

2. Press
3. Use
4. Use
press
NOTE: When “Automatic” is selected, the handset will select a free base
unit for you.
.
or to select “Select Base”, then press .
or to choose automatic selection or base unit 1-4, then
.
USING MULIPLE HANDSETS
Your base unit can synchronize with up to 6 handsets.
INTERCOM CALLING BETWEEN HANDSETS
1. Press
2. Type in the number of the handset (1-6) that you want to reach.
3. The paged handset will ring. The display of the paged handset will show
“INT CALL”.
NOTE: To cancel the intercom call, press
ANSWERING INTERCOM CALLS
1. Press
2. Press
CALL WAITING
If an external call comes in during an intercom conversation, you will hear
a call waiting tone.
1. To end an intercom call, press
2. The external line will ring. Press
CALL TRANSFER BETWEEN HANDSETS
You can transfer an external call from one handset to another.
1. During an external phone conversation, press
put on hold.
2. Type in the handset number (1-6) to which you want the call transferred.
on your handset.
.
to answer an intercom call.
again to end the intercom call.
.
again to answer the external call.
. Your caller will be
EN
24
Page 30

3. The paged handset will ring and “INT CALL” will appear on the display.
4. To answer the call on the paged handset, press .
EN
5. Press
NOTE: If the other handset does not answer, press
intercom call and get back to the external line. Pressing
the intercom call and the external call.
on the paging handset to transfer the call.
REGISTERING HANDSETS TO BASE UNIT
The handset and base unit are factory pre-registered with each other.
Therefore, the unit should be in full working order out of the box.
When you purchase an additional handset, you have to register it to the
base unit in order to make and answer calls.
You can register up to 5 more handsets to make and answer calls via the
same base unit. Handsets are numbered 1 to 6.
To register a new handset:
1. Press and hold the PAGE button on the cradle of the base unit to enter
Registration Mode.
2. On the handset, press
3. Use
4. Select “Registration”, then press
5. Use
6. Enter the default Pin Code “0000” then press
7. You will see the message: “REGISTERING”.
8. When the registration is complete “Registration Success” will appear
NOTE: The base unit will then send a signal to the handset registering the
handset to the base unit. Once the registration function has been completed,
the handset will return to Standby Mode.
and to select “Handset Setting”, then press .
and to select “Base 1, 2, 3 or 4”, then press .
on the screen.
.
.
to end the
will end both
.
DE-REGISTERING HANDSETS
To de-register a handset from the Base Unit:
1. On the handset, press
25
.
Page 31

2. Use
and to select “Handset Setting”, then press .
3. Select “Remove HS”, then press
4. Use
and to select handset number, then press .
5. “Confirm?” appears on the screen. Press
Removed” appears to confirm de-registration.
NOTE: You cannot de-register the handset you are using.
.
and “Handset
RESETTING YOUR SYSTEM
If you need to reset your system, you will lose any information you have
stored and all settings will return to their default settings.
To reset your system to the default settings:
1. Press
2. Press
3. Select “Set Default”, then press .
4. When prompted, select “Yes”. You will then hear the double beep to
indicate the default settings have been restored.
Your default settings are:
Language: English
INT melody: Melody 1
Handset name: Handset
Ring volume: 3
Dial mode: Tone
Battery indicator: On
Ear volume: 1
Range indicator: On
Phonebook: Empty
CID list: Empty
Redial list: Empty
, then use and to select “Handset Setting”.
.
EN
26
Page 32

TROUBLESHOOTING
EN
If your phone is not working correctly, check the points here before
returning it for repair. Whatever the problem, you should first check that:
• You have installed the base unit correctly, and it is plugged into the
phone line and the main power socket.
• The main power is switched on at the socket.
• You have installed the batteries into the handset.
If the problem persists, please contact your local stockist.
Never attempt any repairs or adjustments yourself – you could make the
problem worse and invalidate your guarantee.
HANDSET / BASE UNIT
Problems with making and answering calls:
“I cannot make or answer calls.”
• Try moving the handset closer to the base unit.
• If this doesn’t work, try a different position for the base unit – perhaps
higher up if possible.
• The battery charge level may be low – place the handset in the charging
cradle of the base unit to recharge the battery.
• Switch off the power at the main socket, wait a few seconds and then
switch the power back on, this may solve the problem.
“When I press the buttons on my handset, digits appear on the
display but I cannot make an outside call.”
• Try moving the handset closer to the base unit.
• If this doesn’t work, try a different position for the base unit. Make sure
it is not near any electrical equipment, such as another phone, TV,
radio, washing machine, fridge, etc. If possible, position the base unit
higher up.
• If any other handsets are registered to the same base unit, make sure
they are not already on a call – you would see
handset.
on your own
27
Page 33

• You may need to change the dial type setting to Pulse dialling if your
local phone exchange does not support Tone dialling.
“My call was cut off when I went out of range of the base unit. Now
I cannot use my handset.”
• Please move the handset closer to the base unit.
“I hear a tone while I am using my handset, and the battery symbol
on the display is “empty.”
• The battery needs to be recharged. Put the handset into the charger; it
will take up to 15 hours to be fully charged.
“I’ve tried recharging the batteries, but I still get a warning that it is
not charged.”
• The batteries probably need to be replaced.
“The handset does not ring when a call comes in.”
• Check that you have not set the ringing volume to “Off” (see section
Setting the Ring Tone Volume).
“The Caller Display function is not working.”
• Please check if you have subscribed to the Caller Display service with
your network provider.
“The Caller Display function is working but the Caller’s Name from
the phonebook is not displayed even if the same phone number
calls in.”
• You need to store the full phone number including the STD code into
your phonebook memory.
“I have tried several times to press
• Your phone may not be registered. See section Registering Handset
to Base Unit.
“The Within Range Symbol is flashing on the handset display.”
• Due to radio interference in the environment, occasional loss of
synchronization between the handset and base unit may have occurred
for a very short period. The base unit will quickly change to another
channel automatically to overcome the interference and restore the
synchronization. You can also move the handset near the base unit to
reduce the interference.
but I cannot make a call.”
EN
28
Page 34

MULTI – HANDSET USE
EN
“I’m having problems registering a new handset.”
• Unplug and plug in again the main power cord of the base unit to
activate the registration procedure.
• Make sure you have selected a base number that is not already
assigned, and ensure you choose from the base numbers that are not
flashing.
• The base unit may have already registered all 6 handsets. You need to
de-register one of them before registering a new handset.
• If you are replacing a faulty handset, make sure you have de-registered the faulty one before registering the new one.
“I cannot make a call.”
• Only one outside call and one intercom call can take place at once.
Make sure no other handset user is already on a call.
• Please check if another handset has engaged the line already. If this is
the case you will see
on your handset.
WARNING
• The contents of this manual and technical specification are subject to
change without notice.
• Due to printing limitations, pictures and displays showed in this manual
may be slightly different from the real one.
• The contents of this manual may not be reproduced without the permission of the manufacturer.
• In case a Ni-Cadmium rechargeable battery is used, the draining of its
contents should be done in accordance to the law re: special waste
material.
SPECIFICATIONS
TYPE DESCRIPTION
Standard Digital Enhanced Cordless Telecommunications
29
(DECT)
Page 35
Frequency range 1880 to 1990 MHz
Channel bandwidth 1.728MHz
Modulation GFSK
Communication range Up to 300 metres (984 feet) in open space
Base power supply 220V-230V / 150Hz
Handset power supply 1 rechargeable battery, NiMH 750mAh
Handset battery 15 hours
charging time
Operating time Standby: Approximately 5 days
Talk: Approximately 7 hours
Operating temperature 0°C to 45°C
Storage temperature -20°C to 60°C
Weight Dimension
Handset: 89 g (1.96 lbs) without battery
Handset: 142 x 46 x 28mm (5.6 x 1.82 x 1.1 inches) L x W x D
ABOUT OREGON SCIENTIFIC
Visit our website (www.oregonscientific.com) to learn more about Oregon
Scientific products such as digital cameras; MP3 players; children’s
electronic learning products and games; projection clocks; health and
fitness gear; weather stations; and digital and conference phones. The
website also includes contact information for our customer care department in case you need to reach us, as well as frequently asked questions
and customer downloads.
We hope you will find all the information you need on our website,
however if you’d like to contact the Oregon Scientific Customer Care
department directly, please visit:
www2.oregonscientific.com/service/support
OR
Call 949-608-2848 in the US.
For international enquiries, please visit:
http://www2.oregonscientific.com/about/international/default.asp
EN
30
Page 36

EC- DECLARATION OF CONFORMITY
EN
This product contains the approved transmitter module that complies with
the essential requirements of Article 3 of the R&TTE 1999 / 5 / EC
Directive, if used as intended and the following standards have been
applied:
Safety of information technology equipment
(Article 3.1.a of the R&TTE Directive)
Applied Standard
EN 60950-1: 2001
Electromagnetic compatibility
(Article 3.1.b of the R&TTE Directive)
Applied Standards
ETSI EN 301 489-1-3 (Ver.1.4.1) : 2002-08
Efficient use of radio frequency spectrum
(Article 3.2 of the R&TTE Directive)
Applied Standards
ETSI EN 300 220-3 (Ver1.1.1) : 2000-09
Additional information:
The product herewith complies with the requirements of the Low Voltage
Directive 73 / 23 / EC, the EMC Directive 89 / 336 / EC and carries the
CE marking accordingly.
Carmelo Cubito
Agrate Brianza (MI) / Italy January 2004
Manufacturer’s EU R&TTE Representative
COUNTRIES RTTE APPROVAL COMPLIED
All EC countries, Switzerland
and Norway
31
Page 37

Telefono Cordless DECT Lifestyle con
Display a Specchio
Modello: LS328
MANUALE D’USO
CONTENUTI
Introduzione........................................................................................ 1
Caratteristiche principali .................................................................. 3
Unità mobile – Vista frontale .......................................................... 3
Unità base – Vista frontale ............................................................. 5
Unità base – Kit per montaggio a parete ........................................ 5
Sicurezza e manutenzione ................................................................ 6
Precauzioni per la sicurezza ............................................................ 6
Cura del prodotto ............................................................................ 6
Avvertenze ...................................................................................... 7
Per iniziare .......................................................................................... 7
Collegare Adattatore AC/DC / Cavo telefonico ............................ 7
Installare batterie unità mobile ....................................................... 8
Caricare batterie unità mobile ......................................................... 8
Avviso batteria scarica .................................................................. 9
Ricezione unità mobile .................................................................... 9
Simboli LCD unità mobile ............................................................. 10
Sicurezza ....................................................................................... 10
Funzioni di base ............................................................................... 10
Effettuare una chiamata ............................................................... 10
Rispondere a una chiamata ........................................................... 11
Terminare una chiamata ................................................................. 11
Chiamata in attesa ......................................................................... 11
Messaggio in attesa ....................................................................... 11
Regolare il volume dell’ altoparlante ............................................. 11
I T
Page 38

Richiamare ......................................................................................11
I T
Richiamare gli ultimi 10 numeri .................................................... 12
Chiamata Rapida ........................................................................... 12
Cancellare un numero ................................................................... 12
Salvare i numeri chiamati in memoria .......................................... 12
Rubrica telefono ............................................................................... 13
Memorizzare numeri in rubrica ...................................................... 13
Tasti da usare ................................................................................ 14
Cancellare numeri dalla rubrica .................................................... 14
Modificare numeri in rubrica ......................................................... 15
Chiamare numeri dalla rubrica ...................................................... 15
Consultazione rapida della rubrica ................................................ 15
Identificativo di chiamata ................................................................ 15
Dati identificativo di chiamata ...................................................... 16
Salvare dati identificativo di chiamata in rubrica ........................ 16
Cancellare dati identificativo di chiamata .................................... 16
Identificativo di chiamata non disponibile .................................... 17
Chiamate perse ............................................................................. 17
Durante una chiamata ...................................................................... 17
Usare la funzione Mute ................................................................. 17
Usare il vivavoce ......................................................................... 18
Impostazioni Unità mobile ............................................................. 18
Impostazione tono suoneria .......................................................... 18
Impostazione volume tono suoneria ............................................ 19
Impostazione lingua display ......................................................... 19
Impostazione modalità chiamata .................................................. 19
Impostazione formato data/ ora ................................................... 20
Impostazione prefisso ................................................................... 20
Chiamata in conferenza ................................................................... 20
Utilizzare l’unità base ...................................................................... 21
Cerca unita' mobile ....................................................................... 21
Page 39

Impostazione ora ........................................................................... 21
Impostazione formato ora ............................................................ 21
Impostazione data ......................................................................... 22
Impostazione formato data ........................................................... 22
Impostazione sveglia .................................................................... 22
Snooze / Spegnere la sveglia ....................................................... 23
Impostazione lingua ...................................................................... 23
Registro chiamate ......................................................................... 23
Cancellare dati identificativo di chiamata .................................... 23
Caratteristiche speciali ................................................................... 24
Impostazione arcobaleno On / Off ............................................... 24
Impostazione unità base in modalità specchio ............................. 24
Usare unità base multiple ............................................................... 25
Usare unità mobili multiple ............................................................ 25
Chiamata intercomunicazione tra unità mobili .............................. 25
Rispondere a chiamate in intercomunicazione ............................. 25
Chiamata in attesa ........................................................................ 25
Trasferimento di chiamata tra unità mobili ................................... 26
Registrazione unità mobili a unità base ....................................... 26
Annullamento registrazione unità mobili ..................................... 27
Reset del sistema ............................................................................. 27
Ricerca guasti ................................................................................... 28
Unità mobile / Unità base ............................................................. 28
Utilizzo con unità mobili multiple .................................................. 30
Avviso ................................................................................................. 31
Specifiche .......................................................................................... 31
Informazioni su Oregon Scientific ................................................ 32
Dichiarazione di conformità ........................................................... 33
I T
Page 40

INTRODUZIONE
I T
Grazie per aver scelto il telefono Cordless DECT Lifestyle con Display a
specchio Oregon Scientific™.
Il telefono cordless vi consentira di di comunicare ovunque nella vostra
casa. La potente unità base visualizza sullo schermo dati relativi a ora,
data, sveglia, informazioni di chiamata, e può essere personalizzata secondo
i vostri desideri.
Quando togliete il telefono cordless dal suo imballo originale, assicuratevi
di conservare tutto il materiale, in caso di necessità successive di trasporto
o restituzione per riparazione. Nella scatola, troverete:
• Unità mobile
• Batteria unità mobile ricaricabile
• Unità base
• Adattatore AC / DC per unità base
• Cavo telefonico per unità base
• Kit per montaggio a parete
• Manuale d’uso
Caratteristiche del Telefono Cordless DECT Lifestyle:
• 14 motivi arcobaleno
• Display a specchio
• Orologio
• Doppia sveglia con funzione Snooze
• Display grafico unità mobile
• Display identificativo di chiamata su unità base e unità mobile
• 50 numeri in rubrica telefonica con funzioni Cerca e modifica
• Memoria 40 identificativi di chiamata
• Registrazioni richiamata ultimi 10 numeri
• 10 melodie polifoniche
• Accesso alla rubrica telefonica durante la conversazione
1
Page 41

• Vivavoce
• Retroilluminazione su display e tastiera
• Funzioni Mute / Richiama
• Supporta unità mobili e unità base multiple
• Funzione Intercom / Trasferimento chiamata / Chiamata in conferenza
• Display multilingue
• Montabile a parete
• Standby – 5 giorni
• Tempo di conversazione – 7 ore
NOTA Tenere il presente manuale a portata di mano durante l’utilizzo del
prodotto. Contiene utili istruzioni, oltre a specifiche tecniche e nozioni di
cui dovete essere informati.
I T
2
Page 42

CARATTERISTICHE PRINCIPALI
I T
UNITÀ MOBILE – VISTA FRONTALE
1. Ricevitore
2.
Display LCD
3. Tasto Conversazione
• Premere per iniziare e terminare una telefonata.
• Premere per richiamare un numero.
4.
Frecce
• Premere per spostarsi tra le opzioni del menu.
• Premere per aumentare o diminuire il volume dell’altoparlante.
• Premere per consultare identificativi di chiamata.
3
Page 43

5. Tastiera
• Tastiera tasti 0-9, A-Z.
• Premere i numeri per chiamare o usare per inserire testi.
/ ‘C’ Tasto Esci
6.
• Premere per terminare un’operazione e tornare in modalità standby.
• Premere per inserire * nel testo.
7.
Tasto Richiama / Elimina
• Premere per consultare la lista delle chiamate ricevute
• Premere per richiamare un numero telefonico.
• Premere per cancellare cifre.
8.
Tasto Teleconferenza
• Premere per effettuare una chiamata in intercomunicazione.
• Premere per effettuare una chiamata in conferenza.
• Premere per trasferire una chiamata.
9.
10.
11.
12.
13.
14. Microfono
Tasto Menu / R
• Premere per accedere al menu principale.
• Premere per confermare una opzione selezionata.
• Premere per spostarsi dalla chiamata in corso alla chiamata in
attesa.
Tasto CONF / #
• Premere per effettuare una chiamata in conferenza.
• Premere per inserire # nel testo.
Tasto Mute
• Premere per silenziare il microfono durante una chiamata.
Rubrica telefono (PHBK)
• Premere per visualizzare la rubrica telefonica.
Tasto Vivavoce (SPK)
• Premere per accendere/ spegnere il Vivavoce
I T
4
Page 44

UNITÀ BASE – VISTA FRONTALE
I T
1. Unità mobile sulla
base di appoggio
2. Motivo arcobaleno
3. Tasto Menu
4. Vano batterie unità
mobile
5. Display schermo VFD
a specchio
6. Tasti Su e Giù
UNITÀ BASE – KIT PER MONTAGGIO A PARETE
Per utilizzare il kit per il montaggio a parete dell’unità base:
1. Inserire il cavo di alimentazione e il cavo telefonico attraverso il foro
rettangolare sul kit per il montaggio. Quindi inserirli nelle prese sulla
unità base.
2. Far scivolare i due ganci sulla parte alta del kit nei fori sull’unità base.
3. Spingere la parte inferiore del kit di montaggio verso l’unità base in
modo che i due ganci si incastrino e il kit per il montaggio a parete sia
fissato saldamente in posizione.
5
Page 45

4. Posizionare un chiodo dove si vuole appendere l’unità base ed appenderla
semplicemente.
SICUREZZA E MANUTENZIONE
PRECAUZIONI PER LA SICUREZZA
Prego osservare le seguenti precauzioni per la sicurezza durante l’utilizzo
di questo prodotto.
• Display LCD – Il Display LCD è in vetro, e si può rompere in caso di
cadute.
• Fonti di calore – Tenere il prodotto lontano da fonti di calore, come
radiatori, stufe, elementi riscaldanti e altri prodotti che generano calore.
• Acqua e umidità – Non utilizzare il prodotto in presenza o in prossimità
di acqua o in zone molto umide, ad es. in bagno.
CURA DEL PRODOTTO
Per trarre i massimi benefici dall’utilizzo del presente prodotto, prego
osservare le seguenti linee guida.
• Non pulire parti del telefono digitale con benzene, diluenti o
altri solventi chimici– ciò può causare danni permanenti non coperti da
garanzia. Se necessario, pulire con un panno umido.
• Tenere il telefono lontano da fonti di calore o umidità e al riparo dalla
luce del sole.
• Se si rilevano malfunzionamenti, si prega di non procedere
autonomamente ad alcuna riparazione – consultare il fornitore.
• Non utilizzare il telefono digitale all’aperto sotto la pioggia, o con
le mani bagnate – l’acqua può danneggiare le apparecchiature elettriche.
• Pulire l’unità con un panno umido e un detergente delicato.
• Non immergere mai l’unità in acqua. Può provocare scosse elettriche e
danneggiare l’unità.
• Non sottoporre l’unità base a forti pressioni, colpi o sbalzi di umidità.
• Non manomettere i componenti interni.
• Non mescolare batterie vecchie e nuove o batterie di tipo diverso.
I T
6
Page 46

• Rimuovere le batterie se il prodotto viene riposto per un lungo periodo.
• Non graffiare il display LCD.
I T
• Non apportare cambiamenti o modifiche al presente prodotto. Modifiche
non autorizzate possono far decadere il diritto di garazia.
AVVERTENZE
• Per evitare il rischio di incendi o infortuni, non tentare di ricaricare
batterie non ricaricabili.
• Sostituire solo batterie dello stesso tipo o di tipo equivalente raccomandate
dal costruttore.
• Prego smaltire batterie vecchie o difettose nel rispetto dell’ambiente e
• accordo alla normativa applicabile.
• Non usare mai il telefono all’aria aperta durante un temporale – scollegare
l’unità base dalla linea telefonica e dalla presa principale in presenza di
temporali.
PER INIZIARE
COLLEGARE ADATTATORE AC/DC/ CAVO TELEFONICO
Collegare l’adattatore AC/ DC e il cavo telefonico all’unità base e alle
prese a muro come illustrato di seguito.
Posare l’unità mobile sulla base di appoggio a ricaricare. Una volta inserita,
lasciare caricare per circa 15 ore prima dell’utilizzo.
7
Page 47

INSTALLARE BATTERIE UNITÀ MOBILE
L’unità mobile utilizza batterie ricaricabili Ni Mh 3.6V 750mAh, già installate
nell’unità.
Se occorre sostituire le batterie dell’unità mobile, semplicemente:
1. Far scivolare il coperchio verso il basso.
2. Inserire la batteria ricaricabile inserendo il connettore nella parte in
basso a destra della scanalatura della batteria sull’unità mobile.
3. Reinserire il coperchio fissandolo saldamente in posizione.
CARICARE BATTERIE UNITÀ MOBILE
Prima di utilizzare l’unità mobile, caricarla per almeno 15 ore. Se questo
passaggio non viene eseguito, la durata delle batterie sarà ridotta.
Per caricare l’unità mobile:
1. Posizionare l’unità mobile sulla base di appoggio con la tastiera rivolta
verso il basso.
2. Il simbolo di carica sulla base
mobile si sta caricando.
Quando la batteria è completamente carica, l’indicatore di batteria dell’unità
mobile mostrerà il simbolo di batteria carica in alto a destra sul display
LCD.
si accenderà per indicare che l’unità
I T
8
Page 48

I T
BATTERY
Carica
Scarica
NOTA Se la batteria viene caricata per un tempo più lungo di quanto
specificato o viene fatta scaricare troppo, la durata della batteria sarà
ridotta.
AVVISO BATTERIA SCARICA
Quando la batteria è scarica e rimangono solo 15 minuti di conversazione,
l’unità mobile emetterà un tono di avviso e sul display LCD lampeggerà
“Batteria scarica”.
• Terminare la chiamata il prima possibile.
• Non utilizzare la Modalità Vivavoce per la conversazione poiché questo
ridurrebbe ulteriormente il tempo di conversazione.
• Mettere l’unità mobile sul caricabatterie fino a che il simbolo della
batteria ritorna al livello alto.
RICEZIONE UNITÀ MOBILE
Di solito, una perdita di ricezione significa che si è troppo lontani dall’unità
base, o che esiste una interferenza tra le due unità. Accettarsi di:
• Restare entro un raggio di 300 m dall’unità base durante l’utilizzo dell’unità
mobile.
• Evitare interferenze da parte di TV o altri elettrodomestici.
Se l’unità mobile è fuori portata dall’unità base, o se il segnale è interrotto
a causa di una interferenza elettrica, il simbolo della portata
lampeggiare e l’unità mobile ritorna in Modalità Standby.
IMPORTANTE A causa di interferenze radio nell’ambiente, si possono
verificare perdite di sincronizzazione tra l’unità mobile e l’unità base di
durata molto breve. La base si sposterà rapidamente su un altro canale
automaticamente per superare l’interferenza e ripristinare la
sincronizzazione.
inizia a
9
Page 49
SIMBOLI LCD UNITÀ MOBILE
SIMBOLO SIGNIFICATO
- Indicatore di portata
- Lampeggia se fuori portata
Suoneria disattivata
Linea in uso
Chiamata persa
- Batteria (5 livelli)
- Lampeggia quando la batteria è scarica (livello
1
)
SICUREZZA
Non installare l’unità di base vicino a lavandino, vasca, doccia o altri
luoghi in cui può bagnarsi. Le apparecchiature elettriche possono essere
causa di gravi infortuni se utilizzati quando si è bagnati o in acqua.
• Se l’unità base dovesse cadere in acqua, non recuperarla prima di aver
scollegato il cavo di alimentazione dalla presa di corrente e il cavo
telefonico dalla presa telefonica; quindi tirarla fuori utilizzando i cavi
stessi.
FUNZIONI DI BASE
EFFETTUARE UNA CHIAMATA
Utilizzando il tasto :
1. Premere
premere nuovamente
OPPURE
2. Comporre il numero quindi premere
Utilizzando il tasto Vivavoce (
1. Premere
OPPURE
per avere la linea e comporre il numero. In caso di errore,
per cancellare l’intero numero.
.
):
per avere la linea e comporre il numero.
I T
10
Page 50

2. Comporre il numero quindi premere .
NOTA Se si desidera utilizzare l’unità mobile in Modalità Vivavoce premere
I T
er spegnere l’altoparlante.
RISPONDERE A UNA CHIAMATA
L’unità mobile suonerà in occasione di una chiamata esterna.
• Premere
OPPURE
• Premere
.
. (Ciò abiliterà la funzione Vivavoce).
TERMINARE UNA CHIAMATA
• Premere
OPPURE
• Premere
.
in Modalità Vivavoce.
CHIAMATA IN ATTESA
Si sentirà il tono della chiamata in attesa:
• Premere R per passare dalla chiamata in corso alla chiamata in
attesa.
MESSAGGIO IN ATTESA
•“Messaggio in Attesa” comparirà sullo schermo. Seguire i comandi
vocali per il servizio messaggi del vostro operatore telefonico.
REGOLARE IL VOLUME DELL’ALTOPARLANTE
Per regolare il volume dell’altoparlante:
• Premere
come desiderato.
, poi premere o per regolare il volume dell’altoparlante
RICHIAMARE
Premere
11
, poi premere .
Page 51
RICHIAMARE GLI ULTIMI 10 NUMERI
1. Premere per vedere i dati dell’ultima chiamata.
2. Usare le
3. Premere
Se si desidera modificare il numero prima di richiamare:
1. Premere
2. Premere
3. Usare le
premere
4. Usare i tasti D e 0-9 per modificare il numero.
5. Premere
o per selezionare un numero.
per comporre il numero.
.
.
o per selezionare “Edita chiamata”, quindi
.
per comporre il numero.
CHIAMATA RAPIDA
Se durante una chiamata si sente il tono di occupato, premere
telefono richiamerà automaticamente il numero entro 3 secondi.
. Il
CANCELLARE UN NUMERO
1. Premere per vedere i dati dell’ultima chiamata.
2. Usare le
3. Selezionare “Elimina voce” per cancellare 1 numero, o “Elimina
tutto” per cancellare tutti i numeri.
4. Premere
5. Selezionare “Sì”, quindi premere
o per selezionare un numero, quindi premere .
.
per confermare.
SALVARE I NUMERI CHIAMATI IN MEMORIA
L’unità mobile salva automaticamente gli ultimi 10 numeri chiamati. Per
salvare i numeri chiamati nella Rubrica telefonica:
1. Premere
2. Usare le
. (Viene visualizzato l’ultimo numero dell’elenco).
o per selezionare un numero telefonico, quindi premere
.
I T
12
Page 52

3. Selezionare “Salva Rubrica telefono” per salvare il numero, quindi
I T
premere
quanto eseguito.
. Comparirà sullo schermo “SALVATO” per confermare
RUBRICA TELEFONO
• Il telefono può memorizzare 50 numeri telefonici in rubrica lunghi fino a
24 cifre.
• Il nome relativo al numero telefono può essere memorizzato fino ad un
massimo di 15 caratteri.
MEMORIZZARE NUMERI IN RUBRICA
1. Premere
2. Premere
3. Usare le
premere
4. Sul display dell’unità mobile compariranno “<Inserisci nome>” e
“<Inserisci numero >”.
5. Inserire il nome (utilizzare la guida tasti di seguito) quindi premere
6. Inserire il numero quindi premere
7. L’unità mobile emetterà un doppio beep per indicare che la voce è stata
memorizzata.
NOTA Se viene inserito solo il numero e non il nome, la voce può essere
salvata comunque.
.
.
o per selezionare “Aggiungi voce”, quindi
.
per confermare.
.
13
Page 53
TASTI DA USARE
Quando si inserisce un nome, “B” viene inserita premendo il tasto “2” due
volte, seguito da “2” di nuovo entro 1 secondo. Se premuto per oltre 1
secondo, viene inserita “A” e premendo “2” la seconda volta si avrà “AA”.
The list of characters is shown below:
MAIUSCOLE MINUSCOLE
1 SPACE 1 _ - + = ^ ~ . , ; : ? ! SPACE 1 _ - + = ^ ~ . , ; : ? !
2 ABC2ДЖЕАБВГЗ abc2джеабвгз
3 DEF3ИЙКЛР def3ийклр
4 GHI4ÌÍÎÏ ghi4ìíîï
5 JKL5 jkl5
6 MNO6ЦШТУФХС mno6цштуфхс
7 PQRS7 pqrs7
8 TUV8ÙÚÛÜ tuv8ùúûü
9 WXYZ9ÝÞ wxyz9ýþ
0 0 * # $ & % / \ | ( ) [ ] < > 0 * # $ & % / \ | ( )[ ] < >
* Premere quando si modifica un nome per tornare in Modalità Standby.
Premere quando si modifica un numero per inserire “*”.
# Premere per passare da maiuscole a minuscole e vice versa.
CANCELLARE NUMERI DALLA RUBRICA
Per cancellare 1 voce:
1. Premere
2. Usare le
premere
3. Selezionare “Elimina voce” quindi premere
4. Alla richiesta di confermare la cancellazione, selezionare “Sì”.
5. Premere
6. L’unità mobile emetterà un doppio beep per indicare che la voce è stata
cancellata.
.
o per selezionare il numero che si vuole eliminare, quindi
.
.
per eliminare il numero.
I T
14
Page 54
Per cancellare tutte le voci:
1. Seguire i passaggi 1-3 di cui sopra e selezionale “Elimina tutto?”.
I T
2. Ora seguire i passaggi 4-6 di cui sopra.
MODIFICARE NUMERI IN RUBRICA
1. Premere
2. Usare le o per selezionare il numero che si desidera modificare,
quindi premere
3. Selezionare “Edita voce” quindi premere
4. Modificare il nome se necessario, quindi premere
5. Modificare il numero se necessario, quindi premere
6. L’unità mobile emetterà un doppio beep per indicare che l’operazione è
stata eseguita.
.
.
.
CHIAMARE NUMERI DALLA RUBRICA
1. Premere
2. Usare le o per selezionare un numero, quindi premere per
comporre il numero.
con chiamata attiva.
CONSULTAZIONE RAPIDA DELLA RUBRICA
1. Premere
2. Usare le o per selezionare una voce della rubrica, o premere il
tasto con la prima lettera della persona che si sta cercando. Ad es.
premere il tasto 7, 4 volte per avere accesso rapido ad un nome che
comincia per ‘S’
3. Premere
NOTA Si può utilizzare la funzione Rubrica telefono durante una chiamata.
.
per comporre.
.
.
IDENTIFICATIVO DI CHIAMATA
Se abbonati al servizio con il vostro gestore telefonico, il numero
identificativo del chiamante comparirà sul display dell’unità mobile e
dell’unità base quando è in arrivo una chiamata. Il telefono può memorizzare
l’identificativo di chiamata fino ad un un massimo di 40 numeri diversi.
15
Page 55

NOTA Se il numero del chiamante è memorizzato in rubrica, insieme al
numero viene visualizzato il nome associato.
Ogni voce dell’elenco comprende:
• Numero chiamata ricevuta (fino a 24 cifre).
• Nome di chi ha chiamato (fino a 15 caratteri) se memorizzato in rubrica
o fornito dal gestore telefonico.
• Data e ora della chiamata.
• Numero di chiamate effettuate a questo numero (fino a 40).
DATI IDENTIFICATIVO DI CHIAMATA
1. Quando il telefono è in Modalità Standby usare le
i dati relativi agli identificativi di chiamata.
2. Se occorre modificare un numero prima di effettuare la chiamata premere
.
3. Usare le
4. Usare i tasti D e 0-9 per modificare il numero.
5. Premere
NOTA Se sullo schermo compare “NESSUNA CHIAMATA” nessuna voce
è stata memorizzata nella memoria degli identificativi di chiamata.
o per selezione “Edita chiamata”.
per comporre il numero.
o per consultare
SALVARE DATI IDENTIFICATIVO DI CHIAMATA IN RUBRICA
Quando compare un identificativo di chiamata sullo schermo:
1. Premere
2. Premere
l’azione.
NOTA Quando la memoria degli identificativi di chiamata è piena, verrà
automaticamente cancellata la prima voce dell’identificativo di chiamata.
, quindi usare le o per selezionare “Salva rubrica”.
. “SALVATO” comparirà sullo schermo per confermare
I T
CANCELLARE DATI IDENTIFICATIVO DI CHIAMATA
Per cancellare 1 voce:
1. Premere le
vuole cancellare. Quindi premere
2. Selezionare “Elimina voce”, quindi premere
o in Modalità Standby e selezionare il numero che si
.
.
16
Page 56
3. Selezionare “Sì”, quindi premere per confermare.
I T
Per cancellare tutte le voci:
1. Premere le
2. Selezionare “Elimina tutto”, quindi premere
3. Selezionare “Sì”, quindi premere
o in Modalità Standby. Quindi premere .
.
per confermare.
IDENTIFICATIVO DI CHIAMATA NON DISPONIBILE
Se un chiamante ha nascosto il proprio nome e/o numero, comparirà sullo
schermo uno dei seguenti messaggi:
• “Numero Bloccato”
• “Numero Sconosciuto”
• “Nome Bloccato”
• “Nome Sconosciuto”
• “Chiamante Sconosciuto”
• “Chiamata Bloccata”
CHIAMATE PERSE
Se si perde una chiamata, l’unità mobile visualizzerà il simbolo
Quando si visualizza l’identificativo di chiamata delle chiamate perse,
compaiono sullo schermo le seguenti note:
• “NUOVO” – Si tratta della prima chiamata persa da questo identificativo
di chiamata.
• “RPT” – Non si tratta della prima chiamata persa da quanto identificativo
di chiamata.
DURANTE UNA CHIAMATA
USARE LA FUNZIONE MUTE
Per eliminare il microfono dell' unità mobile:
• Premere
• Premere nuovamente
normale.
17
.
per deselezionare e ritornare alla modalità
.
Page 57
NOTA Se il telefono è in Mute, non si possono comporre numeri fino a che
il tasto Mute non viene deselezionato.
USARE IL VIVAVOCE
Durante una chiamata:
• Premere
• Premere nuovamente
per accendere il Vivavoce.
per terminare una chiamata, oppure premere
per spegnere l’altoparlante e utilizzare nuovamente l’unità mobile.
IMPOSTAZIONI UNITÀ MOBILE
IMPORTANTE
• Premendo il tasto
• Premendo il tasto
• Non si può entrare in Modalità Menu quando il telefono è in Modalità
Conversazione. Per uscire dalla Modalità Conversazione premere
• Al termine di una impostazione verrà emesso un doppio beep per
indicare che l’operazione è stata eseguita.
• Per abbandonare l’impostazione in qualunque momento e tornare in
Modalità Standby, premere C.
IMPOSTAZIONE TONO SUONERIA
Si possono scegliere 10 melodie e 4 toni di chiamate in arrivo. Per
selezionare un tono suoneria:
1. Premere
Unità mobile”.
2. Premere
3. Selezionare “Tono suoneria”, quindi premere
4. Selezionare la melodia o il tono preferiti, quindi premere
confermare.
NOTA Se il volume della suoneria è spento, non si sentirà la melodia
durante la regolazione del tono suoneria.
si entra in Modalità Conversazione.
si entra in Modalità Menu.
, quindi usare le o per selezionare “Impostazione
.
.
per
I T
.
18
Page 58

IMPOSTAZIONE VOLUME TONO SUONERIA
I T
1. Premere , quindi usare le o per selezionare “Volume
suoneria”.
2. Premere
volume.
3. Premere
, quindi usare le o per aumentare o diminuire il
per confermare.
IMPOSTAZIONE LINGUA DISPLAY
1. Premere
Unità mobile”, quindi premere
2. Selezionare “Lingua”, quindi premere
3. Selezionare la lingua che si desidera, quindi premere
confermare.
NOTA La lingua predefinita sul display dell’unità mobile è l’inglese. Si può
anche modificare la lingua con francese, spagnolo, tedesco, italiano,
olandese, portoghese e svedese.
, usare le o per selezionare “Impostazione
.
.
per
IMPOSTAZIONE MODALITÀ CHIAMATA
Per assicurare la compatibilità con altri sistemi telefonici, il telefono può
essere impostato sia in modalità Impulso (come i telefoni a disco), che in
modalità Toni (DTMF).
Per impostare la Modalità Chiamata:
1. Premere
Unità mobile”.
2. Premere
3. Selezionare “Comporre”, quindi premere
4. Selezionare la modalità “Toni” oppure “Impulso”, quindi premere
19
, usare le o per selezionare “Impostazione
.
.
per confermare.
Page 59

IMPOSTAZIONE FORMATO DATA/ ORA
1. Premere , usare le o per selezionare “Impostazione
Unità mobile”.
2. Premere
3. Selezionare “Ora & Data”, quindi premere
4. Selezionare “Formato Ora” o “Formato Data”, quindi premere
5. Quindi selezionare il formato scelto e premere
.
.
.
IMPOSTAZIONE PREFISSO
1. Premere
Unità mobile”.
2. Premere
3. Selezionare “Prefisso”, quindi premere
4. Inserire il prefisso a 3 cifre, quindi premere
, usare le o per selezionare “Impostazione
.
.
per confermare.
CHIAMATA IN CONFERENZA
Potete effettuare una conversazione in conferenza con un numero esterno
e due numeri interni.
1. Prima stabilire la comunicazione con il numero esterno sia effettuando
una chiamata che rispondendo ad una chiamata in arrivo.
2. Premere
mobile. La chiamata esterna verrà messa in attesa.
3. L’interno risponderà alla chiamata premendo
4. Quindi premere
tono di conferma).
5. Quindi l’esterno, l’altro interno e voi stessi potrete parlare.
OPPURE
Un secondo interno si può unire alla conversazione tra un interno e un
esterno semplicemente premendo CONVERSAZIONE.
NOTA Non è possibile effettuare alcuna chiamata interna tra unità mobile
e unità base.
per effettuare una chiamata interna verso un’altra unità
.
e tenere premuto per circa 2 secondi (si sentirà un
I T
.
20
Page 60

UTILIZZARE L’UNITÀ BASE
I T
IMPORTANTE
• Al termine di una impostazione verrà emesso un doppio beep per
indicare che l’operazione è stata eseguita.
• Per uscire dal menu opzioni, spostarsi tra le opzioni utilizzando le
e selezionare “Esci”, quindi premere per confermare.
CERCA UNITA' MOBILE
Questa caratteristica è molto utile se si dimentica dove e stata posizionata
l’unità mobile.
• Per cercare l’unità mobile, premere il pulsante PAGE sulla base di
appoggio.
• Per interrompere la ricerca, premere qualsiasi tasto.
IMPOSTAZIONE ORA
1. Premere
DATA”.
2. Premere
3. Selezionare “IMPOSTA ORA”, quindi premere
4. Le cifre dell’ora lampeggeranno. Usare le
relativa all’ora.
5. Premere
o per cambiare i minuti.
6. Premere
/ PM, quindi premere
orologio a 24 ore non verrà richiesto di selezionare AM / PM.)
, usare le o per selezionare “IMPOSTA ORA &
.
o per cambiare la cifra
per far lampeggiare le cifre relative ai minuti. Usare le
per far lampeggiare l’opzione AM / PM. Selezionare AM
per impostare l’ora. (Quando si utilizza un
o
.
IMPOSTAZIONE FORMATO ORA
1. Seguire i passaggi 1e 2 di cui sopra, quindi selezionare “FORMATO
ORA” e premere
2. Selezionare “Formato Ora 12 o 24” e premere
21
.
per confermare.
Page 61

IMPOSTAZIONE DATA
1. Premere , usare le o per selezionare “IMPOSTA ORA &
DATA”, quindi premere
2. Selezionare “IMPOSTA DATA” e premere
3. Usare le
spostarsi tra giorni, mesi e anni.
o per spostarsi attraverso i numeri e il tasto per
.
.
IMPOSTAZIONE FORMATO DATA
1. Seguire i passaggi 1e 2 di cui sopra, quindi selezionare “FORMATO
DATA” e premere
2. Selezionare “gg/mm/aa” o “mm/gg/aa” e premere
confermare.
.
per
IMPOSTAZIONE SVEGLIA
1. Premere , usare le o per selezionare “SVEGLIE”.
2. Premere
3. Selezionare “Suoneria 1” o “Suoneria 2”, quindi premere
(Comparirà un segno di spunta accanto alla suoneria abilitata in
precedenza.)
4. Selezionare “Sì” e premere .
5. Usare le
ore o minuti. (Se si utilizza il formato orologio a 12 ore occorre selezionare
AM o PM usando le frecce.)
6. Quando l’ora è impostata, premere e comparirà l’opzione “Tono
suoneria”.
7. Selezionare 1 dei 4 toni disponibili, quindi premere
segno di spunta accanto al tono selezionato e il telefono andrà in
modalità Standby.
NOTA Se l’orologio è in formato 24 ore, non occorre selezionare AM / PM
al punto 5.
NOTA L’unità base è dotata di due sveglie giornaliere in crescendo. Se
entrambe le sveglie sono puntate, suoneranno giornalmente all’ora
impostata.
.
.
o per impostare l’ora della sveglia e per selezionare
. Comparirà un
I T
22
Page 62

SNOOZE / SPEGNERE LA SVEGLIA
I T
Quando la sveglia suona, è possibile:
1. Premere delicatamente
andrà in snooze per 8 minuti.
OPPURE
2. Tenere premuto
NOTA Se entro 2 minuti non viene premuto nessun tasto la sveglia si
spegne da sola.
o o sull’unità base e la sveglia
per spegnere la sveglia.
IMPOSTAZIONE LINGUA
Per modificare la lingua:
1. Premere
2. Premere
3. Selezionare la lingua desiderata, quindi premere
NOTA La lingua predefinita sul display dell’unità di base è l’inglese. Si può
anche modificare la lingua con francese, spagnolo, tedesco, italiano,
olandese, portoghese e svedese.
, quindi usare le o per selezionare “LINGUA”.
.
REGISTRO CHIAMATE
Per vedere il numero totale di chiamate e di nuove chiamate ricevute:
1. Premere
CHIAMATE”.
2. Premere
OPPURE
Premere le
, poi usare le o per selezionare “REGISTRO
.
o in modalità Standby.
CANCELLARE DATI IDENTIFICATIVO DI CHIAMATA
Per cancellare tutti i dati identificativi di chiamata:
1. Premere , poi usare le o per selezionare “ELEMINA TUTTI
CID”, quindi premere
2. Selezionare “Sì” o “No”, quindi premere
.
.
per confermare.
23
Page 63

CARATTERISTICHE SPECIALI
IMPOSTAZIONE ARCOBALENO ON / OFF
Si può impostare il motivo arcobaleno tra 14 motivi diversi:
1. Premere
ARCOBALENO”.
2. Premere
3. Selezionare lo stato in cui si desidera appaia il motivo arcobaleno,
premere
4. Usare le
freccia è accanto all’opzione che si desidera scegliere, premere
5. Apparirà un segno di spunta accanto al tono selezionato e il telefono
andrà in Modalità Standby.
6. Verrà emesso un doppio beep per indicare che l’operazione è stata
eseguita.
Per deselezionare il motivo arcobaleno, seguire i passaggi 1-4 di cui sopra
ma selezionare “OFF” invece del motivo al passaggio 4.
NOTA Quando il telefono è in Modalità Conversazione, il motivo arcobaleno
si spegne.
IMPOSTAZIONE UNITÀ BASE IN MODALITÀ SPECCHIO
Per utilizzare l’unità base come mirror:
1. Assicurarsi che l’unità base sia in Modalità Standby, quindi premere
2. Sul display comparirà, “Su off per 1 minuto” e quindi si spegnerà per
1 minuto.
Dopo 1 minuto il display tornerà alla modalità normale Standby, oppure si
può uscire dalla Modalità specchio premendo un tasto qualsiasi.
, quindi usare le o per selezionare “IMPOSTA
.
.
o per l’anteprima e selezionare un motivo. Quando la
per 3 secondi.
I T
.
24
Page 64
USARE UNITÀ BASE MULTIPLE
I T
L’unità mobile può selezionare da 1 a 4 unità base
1. Premere
unità mobile”.
2. Premere
3. Usare
4. Usare
quindi premere
NOTA Quando si seleziona “Automatico”, l’unità mobile sceglierà un’unità
base libera.
, quindi usare le o per selezionare “Impostazione
.
o per selezionare “Seleziona Base”, quindi premere .
o per scegliere la selezione automatica o l’unità base 1-4,
.
USARE UNITÀ MOBILI MULTIPLE
L’unità base può sincronizzare fino a 6 unità mobili.
CHIAMATA INTERCOMUNICAZIONE TRA UNITÀ MOBILI
1. Premere
2. Inserire il numero dell’unità mobile (1-6) che si vuole raggiungere.
3. L’unità mobile chiamata suonerà. Il display dell’unità mobile chiamata
visualizzerà “CHIAMATA INT”.
NOTA Per annullare la chiamata interna, premere
RISPONDERE A CHIAMATE IN INTERCOMUNICAZIONE
1. Premere
2. Premere
CHIAMATA IN ATTESA
Se arriva una chiamata esterna durante una conversazione in
intercomunicazione, sentirete il tono della chiamata in attesa.
1. Per terminare la chiamata in intercomunicazione, premere
2. La linea esterna suonerà. Premere
chiamata esterna.
sull’unità mobile.
.
per rispondere a una chiamata in intercomunicazione.
nuovamente per terminare la chiamata in intercomunicazione.
nuovamente per rispondere alla
.
25
Page 65
TRASFERIMENTO DI CHIAMATA TRA UNITÀ MOBILI
È possibile trasferire una chiamata esterna da una unità mobile ad un’altra.
1. Durante una conversazione telefonica esterna, premere
chiamante verrà messo in attesa.
2. Inserire il numero dell’unità mobile (1-6) cui si vuole trasferire la chiamata.
3. L’unità mobile chiamata suonerà e sul display comparirà “CHIAMATA
INT”.
4. Per rispondere alla chiamata sull’unità mobile, premere
5. Premere
conversazione.
NOTA Se l’altra unità mobile non rispondere, premere
la chiamata in intercomunicazione e riprendere la linea esterna. Premendo
si termineranno sia la chiamata in intercomunicazione che la chiamata
esterna.
sull’unità mobile che ha chiamato per trasferire la
. Il
.
per terminare
REGISTRAZIONE UNITÀ MOBILI A UNITÀ BASE
L’unità mobile e l’unità base sono preregistrate in fabbrica. Perciò l’unità
dovrebbe essere perfettamente funzionante nella configurazione
predefinita.
Quando si acquista una unità mobile aggiuntiva, questa deve essere
registrata alla unità base per poter effettuare chiamate e rispondere.
Possono essere registrate fino a 5 unità mobili aggiuntive per effettuare
chiamate e rispondere attraverso la stessa unità base. Le unità mobili
sono numerate da 1 a 6.
Per registrare una nuova unità mobile:
1. Tenere premuto il pulsante CERCAPERSONE sull’unità base per entrare
in Modalità Registrazione.
2. Sull’unità mobile, premere
3. Usare le
quindi premere
4. Selezionare “Registrazione”, quindi premere
5. Usare
o per selezionare “Impostazione Unità mobile”,
.
o per selezionare “Base 1, 2, 3 o 4”, quindi premere .
.
.
I T
26
Page 66

6. Inserire il Pin Code predefinito “0000” quindi premere
7. Comparirà il messaggio: “REGISTRAZIONE”.
I T
8. Quando la registrazione è completa sullo schermo comparirà
“Registrazione Riuscita”.
NOTA L’unità base invierà quindi un segnale all’unità mobile, registrando
l’unità mobile all’unità base. Una volta che la funzione di Registrazione è
stata completata, l’unità mobile ritornerà in Modalità Standby.
ANNULLAMENTO REGISTRAZIONE UNITÀ MOBILI
Per annullare la registrazione di una unità mobile dalla unità base:
1. Sull’unità mobile, premere
2. Usare le
quindi premere
3. Selezionare “Remove HS”, quindi premere
4. Usare le
premere
5. Sullo schermo compare “Conferma?”. Premere
“Unità mobile eliminata” confermare l’annullamento della registrazione.
NOTE Non è possibile annullare la registrazione dell’unità mobile che si
sta utilizzando..
e per selezionare “Impostazione Unità mobile”,
.
e per selezionare il numero dell’unità mobile, quindi
.
.
.
RESET DEL SISTEMA
Se è necessario procedere al reset del sistema, verranno perse tutte le
informazioni memorizzate e le impostazioni torneranno alla modalità
predefinita.
Per resettare il sistema alle impostazioni predefinite:
1. Premere
Unità mobile”.
2. Premere
3. Selezionare “Imposta Predefinito”, quindi premere
4. Quando viene richiesto, selezionare “Sì”. Verrà emesso un doppio
beep ad indicare che sono state ripristinate le impostazioni predefinite.
, quindi usare le o per selezionare “Impostazione
.
.
e compare
.
27
Page 67

Le impostazioni predefinite sono:
Lingua: inglese
Melodia INT: Melodia 1
Nome unità mobile: Unità mobile
Volume suoneria: 3
Modalità Chiamata: Toni
Indicatore Batteria: On
Volume all’orecchio: 1
Prefisso: Nessuno
Indicatore di campo: On
Rubrica: Vuota
Elenco CID: Vuoto
Elenco richiamata: Vuoto
RICERCA GUASTI
Se il telefono non funziona correttamente, verificare i punti seguenti
prima di inviarlo in riparazione.
Qualunque sia il problema, verificare prima che
• l’unità base sia stata installata correttamente e collegata alla linea
telefonica e alla presa di corrente.
• le batterie siano installate nell’unità mobile.
Se il problema persiste, si prega di contattare il numero 199112277
Non tentare mai riparazioni o regolazioni autonomamente – potreste
aggravare il problema e invalidare la garanzia.
UNITÀ MOBILE / UNITÀ BASE
Problemi nell’effettuare chiamate e nel rispondere:
“Non posso effettuare chiamate o rispondere.”
• Provare a spostare l’unità mobile più vicina all’unità base.
• Se non funziona, provare una posizione diversa per l’unità base – forse
più in alto, se possibile.
I T
28
Page 68

• Il livello di carico batteria può essere basso – mettere l’unità mobile a
I T
ricaricare sulla base di appoggio.
• Staccare corrente alla presa principale, attendere qualche secondo
quindi ridare corrente, questo potrebbe risolvere il problema.
“Quando premo tasti sull’unità mobile, compaiono i numeri sul
display ma non posso chiamare all’esterno.”
• Provare a spostare l’unità mobile più vicina all’unità base.
• Se non funziona, provare una posizione diversa per l’unità base.
Assicurarsi che non sia vicino ad apparecchiature elettriche, quali un
altro telefono, TV, radio, lavatrice, frigorifero, ecc... se possibile
posizionare l’unità base più in alto.
• Se altre unità mobili sono registrate alla stessa unità base, verificate
che non siano già in conversazione – se sì, comparirà
unità mobile.
• Potrebbe essere necessario modificare la modalità di chiamata
impostando Impulsi se la linea locare non supporta i Toni.
“La chiamata è stata interrotta quando sono andato fuori portata
della unità base. Ora non posso usare l’unità mobile.”
• Provare a spostare l’unità mobile più vicina all’unità base.
“Sento un tono quando sto usando l’unità base e il simbolo della
batteria sul display è “vuoto”.
• La batteria deve essere ricaricata. Mettere l’unità mobile sul
caricabatterie. Occorrono fino a 15 ore perché sia completamente carica.
“Ho tentato di ricaricare le batterie, ma ho ancora l’avviso di batterie
scariche.”
• Le batterie devono probabilmente essere sostituite.
“L’unità mobile non suona quando arriva una chiamata.”
• Verificare di non avere impostato il volume della suoneria su “Off”
(vedere sezione Impostazione volume tono suoneria).
“La funzione Identificativo di chiamata non funziona.”
• Prego verificare di essere abbonati a tale servizio con il vostro provider
telefonico.
sulla vostra
29
Page 69

“La funzione identificativo di chiamata funziona ma il nome del
chiamante da rubrica non viene visualizzato anche se chiama dallo
stesso numero.”
• Occorre memorizzare il numero completo incluso di prefisso in rubrica.
“Ho tentato parecchie volte di premere il tasto CONVERSAZIONE ma
non riesco ad effettuare chiamate.”
• il telefono potrebbe non essere registrato. Vedere la sezione
Registrazione unità mobili a unità base.
“L’indicatore della portata lampeggia sul display dell’unità mobile ”
• A causa di interferenze radio nell’ambiente, occasionalmente viene
persa la sincronizzazione tra l’unità mobile e l’unità base per un periodo
molto breve. L’unità base si sposterà automaticamente su un altro
canale per superare l’interferenza e ripristinerà la sincronizzazione. Si
può anche spostare l’unità mobile vicino all’unità base per ridurre
l’interferenza.
UTILIZZO CON UNITÀ MOBILI MULTIPLE
“Ho problemi nel registrare una nuova unità mobile.”
• Disinserire e reinserire la spina del cavo principale dell’unità base per
attivare la procedura di registrazione.
• Assicurarsi di aver selezionate un numero che non sia già assegnato, e
assicurarsi di scegliere da numeri non lampeggianti.
• L’unità base può aver già registrato tutte e 4 le unità mobili. Occorre
annullare (eliminare) una delle registrazioni prima di registrare una nuova
unità mobile.
• Se si deve sostituire una unità mobile difettosa, assicurarsi di aver
annullato la registrazione di quella difettosa prima di registrare quella
nuova.
“Non riesco a effettuare una chiamata.”
• Possono essere effettuate contemporaneamente solo una chiamata
interna e una chiamata esterna. Assicurarsi che nessun altro utente sia
già in conversazione.
• Prego verificare se un’altra unità mobile ha già impegnato la linea. Se è
così comparirà
.
I T
30
Page 70
AVVISO
I T
• Il contenuto del presente manuale e le specifiche tecniche sono soggetti
a modifiche senza preavviso.
• A causa dei limiti della stampa, le foto e le schermate mostrate sul
manuale possono essere leggermente diverse da quelle reali.
• I contenuti del presente manuale non possono essere riprodotti senza il
permesso del costruttore.
• Nel caso si utilizzi una batteria ricaricabile al Ni-Ca, lo smaltimento
deve essere effettuato a termini di legge, vale a dire con i rifiuti
speciali.
SPECIFICHE
TIPO
Standard
Gamma di frequenza
Larghezza banda
canale
Modulazione
Portata
comunicazione
Alimentazione unità
base
Alimentazione unità
mobile
Tempo di carica
batteria unità mobile
Tempo di
funzionamento
Temperatura di
funzionamento
Temperatura di
immagazzinaggio
31
DESCRIZIONE
Digital Enhanced Cordless Telecommunications (DECT)
1880 to 1990 MHz
1.728MHz
GFSK
Fino a 300 m all’aperto
220 – 230V / 150Hz
1 batteria ricaricabile, NiMH 750mAh
15 ore
Standby: Circa 5 giorni
Conversazione: Circa 7 ore
da 0°C a 45°C
da -20°C a 60°C
Page 71

Peso e dimensioni
Unità mobile: 89g (senza batteria)
Unità mobile: 142 x 46 x 28mm (L x L x P)
INFORMAZIONI SU OREGON SCIENTIFIC
Per avere maggiori informazioni sui nuovi prodotti Oregon Scientific,
come le fotocamere digitali, i lettori MP3, i computer didattici per ragazzi,
gli orologi con proiezione dell’ora, le stazioni barometriche, gli orologi da
polso multifunzione, gli strumenti per la cura della persona ed il fitness, ed
altro ancora, visita il nostro sito internet www.oregonscientific.it
Puoi trovare anche le informazioni necessarie per contattare il nostro
servizio clienti, le risposte ad alcune domande più frequenti (FAQ) o i
software da scaricare gratuitamente.
Sul nostro sito internet potrai trovare tutte le informazioni di cui hai
bisogno, ma se desideri contattare direttamente il nostro Servizio
Consumatori puoi visitare il sito www.oregonscientific.it oppure chiamare
al nemero 199112277. Per ricerche di tipo internazionale puoi visitare
invece il sito www.oregonscientific.com
I T
32
Page 72

DICHIARAZIONE DI CONFORMITÀ
I T
Questo prodotto contiene il modulo di trasmissione approvato ed è conforme
ai requisiti essenziali dell’articolo 3 della Direttiva 1999 / 5 / CE di R&TTE
se utilizzato per l’uso previsto e se vengono applicati i seguenti standard:
Requisiti essenziali sulla sicurezza dell’apparecchio
(Articolo 3.1.a della direttiva R&TTE)
Standard applicati
EN 60950-1: 2001
Compatibilità Elettromagnetica
(Articolo 3.1.b della direttiva R&TTE)
Standard applicati
ETSI EN 301 489-1-3 (Ver.1.4.1) : 2002-08
Uso corretto delle spettro delle radiofrequenze
(Articolo 3.2 della direttiva R&TTE)
Standard applicati
ETSI EN 300 220-3 (Ver1.1.1) : 2000-09
Informazioni aggiuntive:
L’apparecchio è inoltre conforme alla Direttiva sulla Bassa Tensione 73 /
23 / EC, alla Direttiva sulla Compatibilità Elettromagnetica 89 / 336 / EC,
alla Direttiva R&TTE 1999 / 5 / EC (appendice II) e recante i rispettivi
marchi CE.
Carmelo Cubito
Agrate Brianza (MI) / Italia January 2004
Rappresentante EU del Produttore per la R&TTE
Paesi conformi alla direttiva R&TTE
Tutti i Paesi Europei, Svizzera
33
e Norvegia
 Loading...