

Page 1
Installation Instructions
SKU 200290/200291 Date: 2015-12-14 Version 1.0
LEDLUX EXHAUST FAN AND LIGHT
SKU# 200280, 200281
Rated Voltage 220-240V~ 50Hz
Thank you for purchasing this quality Lucci product. To ensure correct function and safety, please read and follow
all instructions carefully before using the product. Please keep instructions for future reference.
Warranty
This light fitting is covered by a 3 year warranty. Please retain proof of purchase and evidence of installation
by a licensed electrician.
Warranty will be void if there is any damage due to improper usage or modification to the fitting.
Failure to comply with the instructions in this manual may increase the risk of damage or injury and will void
warranty.
General Safety Warnings!
This product must be installed by a licensed and qualified electrician to comply with Australian and New
Zealand regulations relating to AS/NZS 3000:2007/Amendment 2:2012 Electrical installations.
WARNING: FOR SAFE USE OF THIS APPLIANCE, MEANS FOR ALL-POLE DISCONNECTION MUST
BE INCORPORATED IN THE FIXED WIRING IN ACCORDANCE WITH THE WIRING RULES. This is a
requirement of clause 7.12.2 of the household appliance Standard AS/NZS 60335.1-2011 or the latest
standard* Please note warranty will be void if installed without a mean for all-pole disconnection included
in the wiring.
Use this exhaust fan in accordance to instructions outlined in this manual.
Ensure power is turned off before installation.
The appliance is not to be used by persons, including children, with reduced physical, mental or sensory
capabilities, or lack of knowledge and understanding, unless they are supervised and or given instruction
concerning the use of the appliance by someone responsible for their safety.
This appliance is not a toy. Children should be supervised to ensure that they do not play with the appliance.
Installation WARNING
1. This exhaust fan is not intended or mounting in outside windows or walls.
2. The unit should be mounted outside the shower cubicle.
3. Installation is to be no less than 2.1 metres from the floor.
4. Appliance must be installed in a flat ceiling. Do not install on a sloped ceiling, or vertically.
5. This appliance shall, under no circumstances, be covered with insulating material or similar material.
6. Before commencing any cutting, check in the ceiling space that there are no obstructions such as ceiling joists
and that there is sufficient height clearance for the housing.
7. Check that the electrical wiring can be routed from the wall switches to the mounting location.
8. Precautions must be taken to avoid the back-flow of gases into the room from the open flue of gas or other
fuel-burning appliances
Page 2
Installation Instructions
SKU 200290/200291 Date: 2015-12-14 Version 1.0
Performance Notes
1. For exhaust fan optimum performance, volume of air being extracted should be equal to amount of air
entering the room. Air is drawn mostly from under a door, or an open window. If the bathroom or room is air
tight (door and windows shut), the exhaust will not perform well.
2. LED lighting of the appliance is designed to provide directional lighting only. While it may be sufficient for most
common tasks, others such as shaving or applying make-up may require additional lighting.
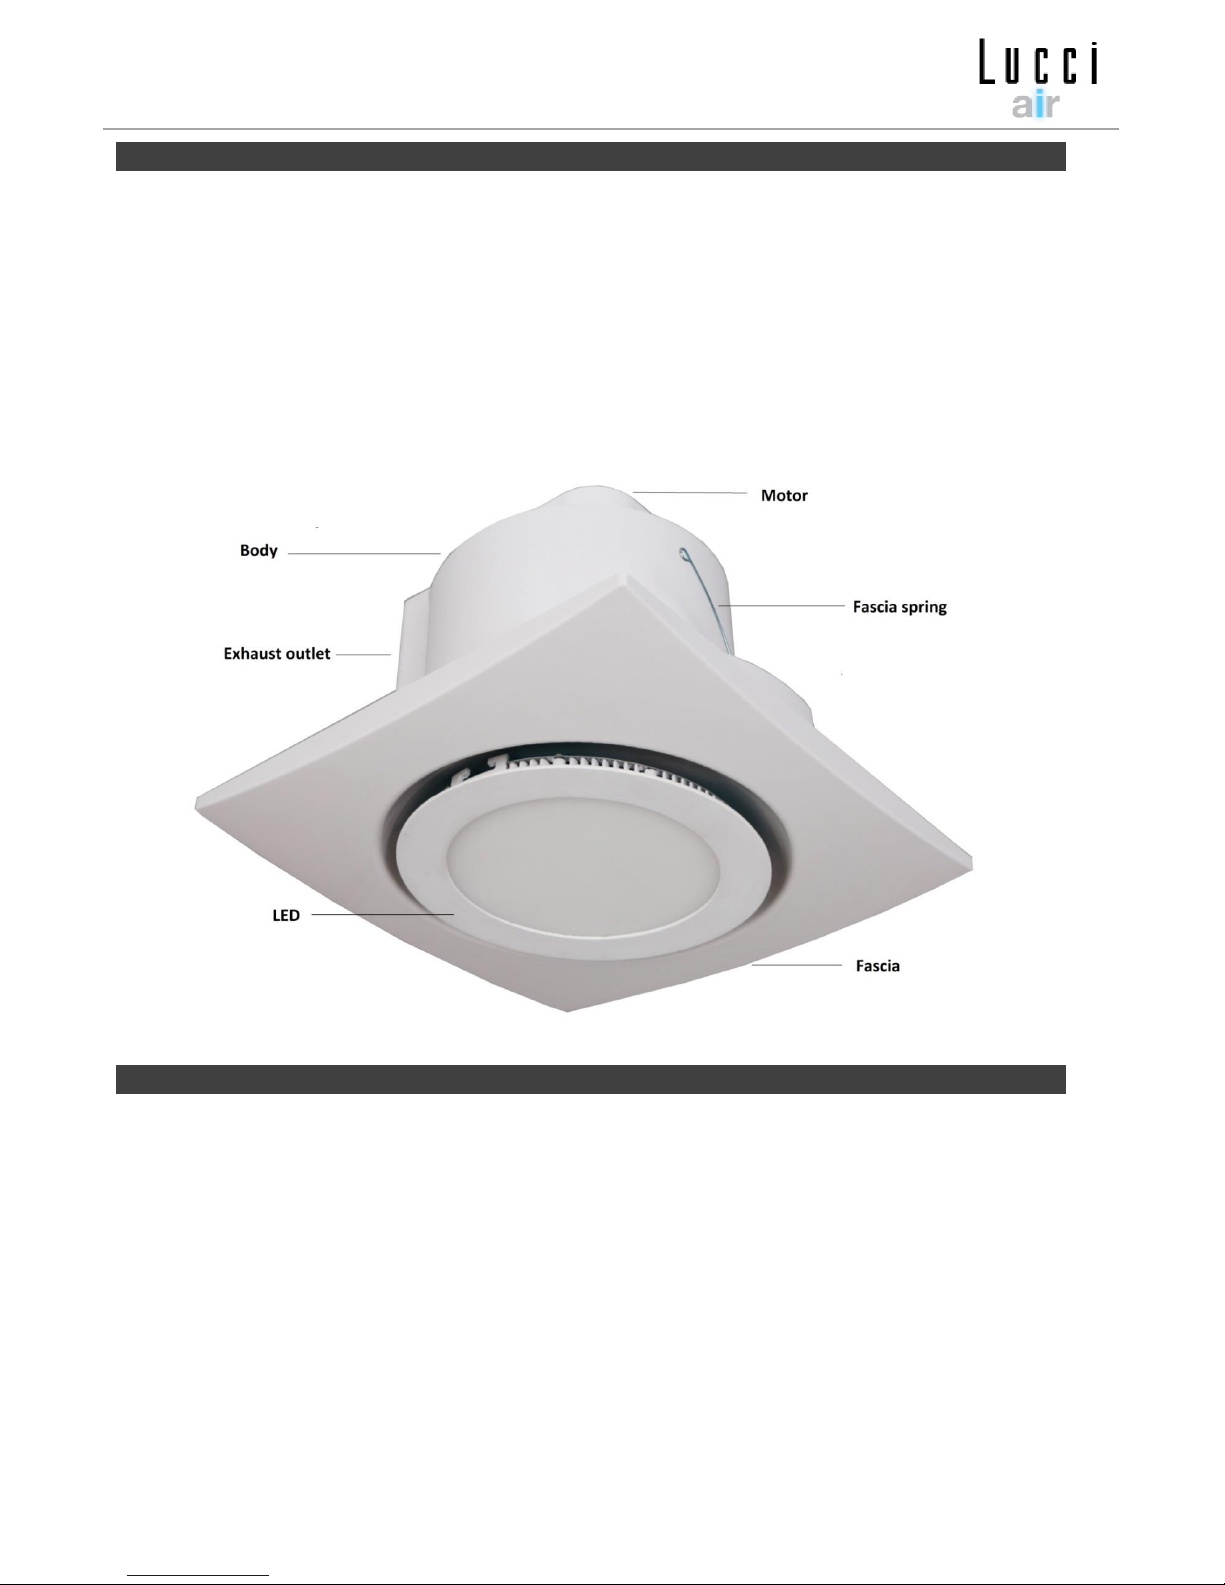
PARTS
Installation Instructions
1. Locate a suitable position in which you wish to install the fan. Note it should not be where it may come in
contact with water for example above a shower or bath. Centre of room is ideal. If not, at least 250mm from a
wall.
2. Ensure the appliance is mounted and installed at least 2.1 metres from floor
3. Ensure area above chosen location of exhaust fan is clear of impeding objects such as joists, beams etc.
4. Cut a round hole in the ceiling to 230mm in diameter;
5. Remove the fascia and twist to disconnect the LED power cable;
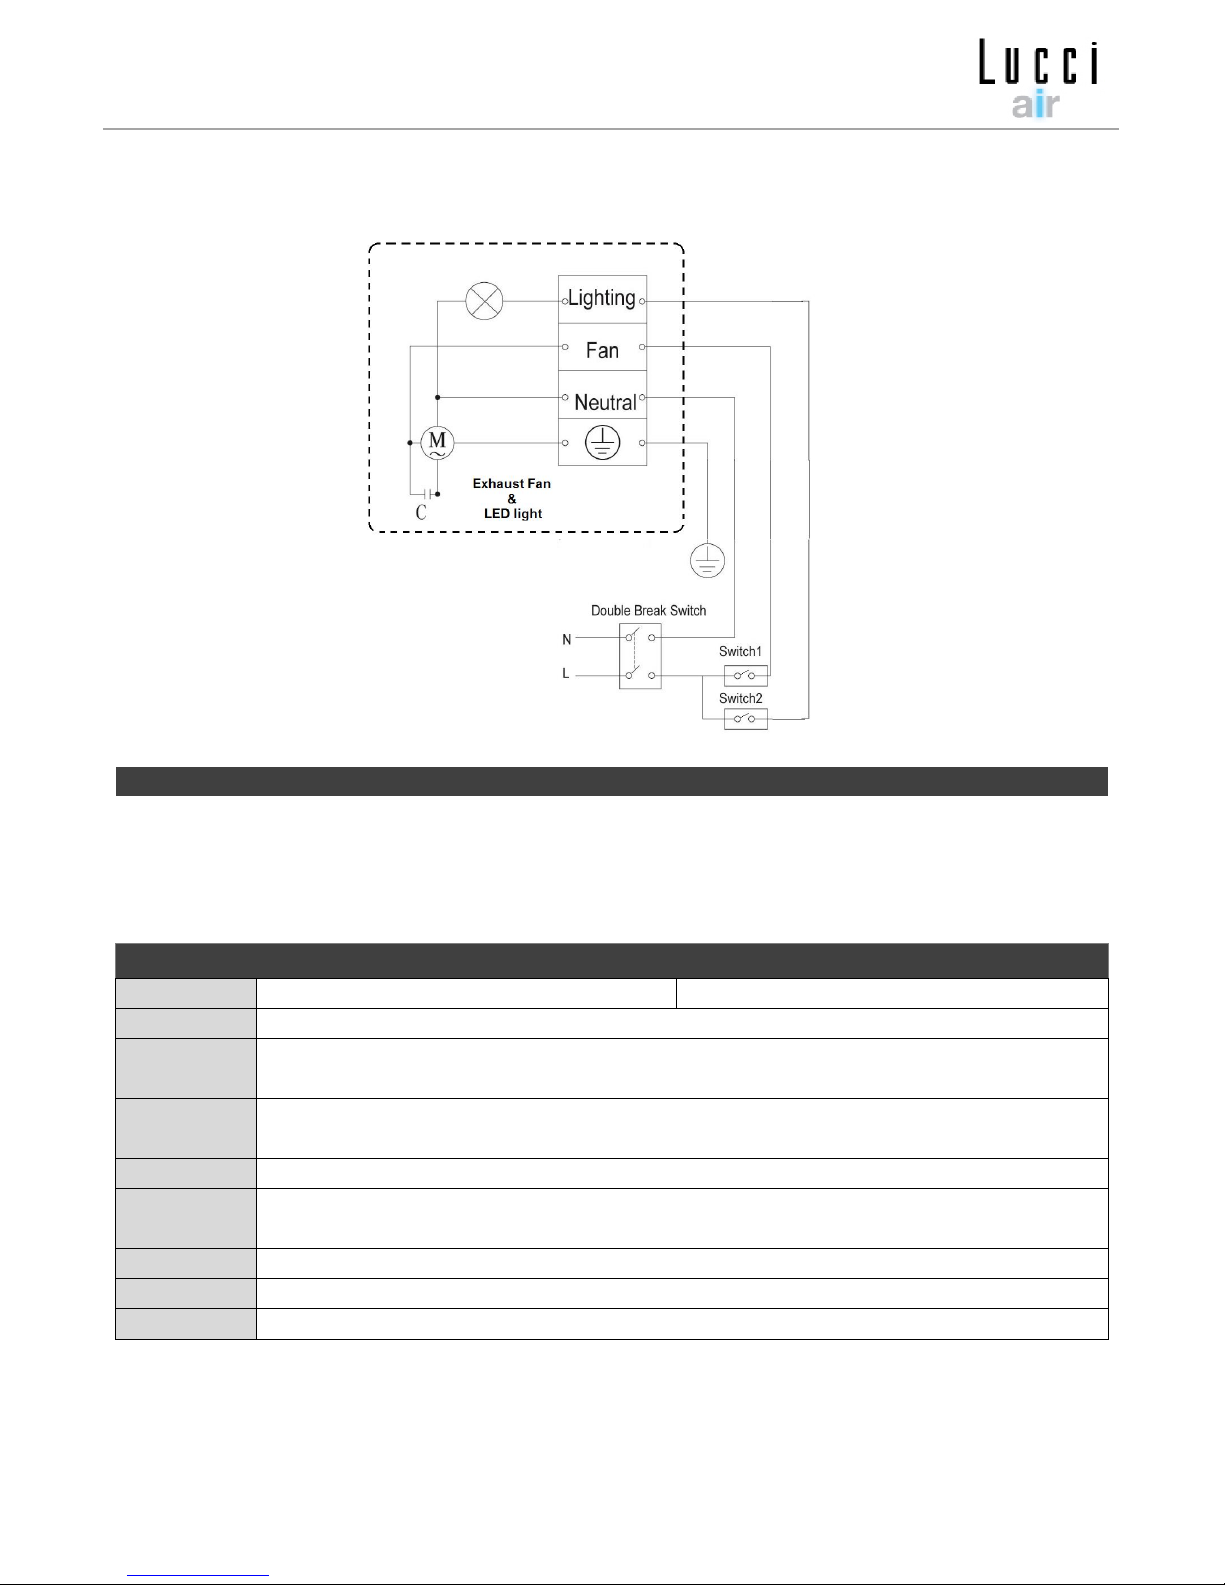
6. Make the wire connection from exhaust terminal fan to wall switch in accordance to wiring diagram. Replace
terminal box cover after wiring is complete.
7. Carefully insert exhaust fan into newly created hole in ceiling. Using a secure by tightening the 3 screw
(clockwise) of mounting clips to secure the exhaust fan into the ceiling.
Page 3
Installation Instructions
SKU 200290/200291 Date: 2015-12-14 Version 1.0
8. Replace the LED connector and then secure the fascia into the fan body via the 2 springs.
9. Switch on Exhaust fan and LED light to check and use.
Maintenance
Always ensure the power is switched OFF and the lamp has cooled down before performing any maintenance
and cleaning.
LED Light source cannot be replaced.
Ensure that the fitting does not come in contact with corrosive chemicals, etc.
To clean, wipe with a warm soapy damp clean cloth. Never soak the fitting with water.
Specifications
SKU #
200280 (White)
200281 (Silver)
Rated Voltage
220-240V AC
Fan Rated
Wattage
30 Watts
Light Globe
Wattage
Max. 12W LED TYPE
(not replaceable)
Cutout Size
230mm Diameter
Duct Fan
Outlet
100mm Diameter
IP Rating
IP20 (ordinary)
Dimensions
270mm X 270mm X 175mm (L X W X H)
Weight 1.6 Kg (With Fascia)
Page 4

Installation Instructions
SKU 200290/200291 Date: 2015-12-14 Version 1.0
BATHROOM HEATER WARRANTY CARD
Our goods come with guarantees that cannot be excluded under the Australian Consumer Law. You are entitled to a
replacement or refund for a major failure and compensation for any other reasonably foreseeable loss or damage. You are
also entitled to have the goods repaired or replaced if the goods fail to be of acceptable quality and the failure does not
amount to a major failure.
Every Lucci Air Exhaust fan & Light (2 in 1) is thoroughly inspected and tested before being released for sale. In addition to any warranties
or conditions implied by applicable Statue or Regulation, Lucci Design warrants all of it’s bathroom heaters against defective workmanship
and faulty materials for thirty six (36) months from the original date of purchase. Lucci Design undertakes, at it’s option, to repair or replace,
free of charge, each product or part thereof subject to the below warranty conditions;
1) The fan or relevant part has not been modified, subjected to misuse, neglect, or been involved in an accident.
2) The repairs are not required as a result of normal wear and tear.
3) The product was installed by a licenced electrical contractor in accordance with this instruction manual.
4) No solid state speed control device has been used with the appliance.
5) A copy of the original receipt of purchase is presented.
6) Globes supplied are not covered by this warranty
Lucci Design cannot be held responsible for any repair other than those carried out by it or one of it’s Authorised Service Agents.
Please keep this warranty form in a safe place. This form must be produced in the event of service being required.
IN THE EVENT OF SERVICE BEING REQUIRED, PLEASE CALL
THE LUCCI FAN WARRANTY HOTLINE ON 1800 602 243 BETWEEN
9AM & 5PM (E.S.T) MONDAY TO FRIDAY ENSURING THAT YOU
HAVE THE FOLLOWING DETAILS ON HAND:
MODEL (SKU) NUMBER: __________________________________________________________
DATE OF PURCHASE: ____________________________________________________________
RETAILER: _____________________________________________________________________
RECEIPT NUMBER: ______________________________________________________________
INSTALLED BY: _________________________________________________________________
LICENCE # : ______________________________ PH: __________________________________
DESCRIPTION OF FAULT: _________________________________________________________
______________________________________________________
 Loading...