

Page 1

Lubitel 166B
www.orphancameras.com
This camera manual library is for reference and historical purposes, all rights reserved.
This page is copyright by [email protected], M. Butkus, NJ.
This page may not be sold or distributed without the expressed permission of the producer
I have no connection with any camera company
On-line camera manual library
Back to main on-line manual page
If you find this manual useful, how about a donation of $3 to: M. Butkus, 29 Lake Ave.,
High Bridge, NJ 08829-1701 and send your e-mail address so I can thank you. Most other
places would charge you $7.50 for a electronic copy or $18.00 for a hard to read Xerox
copy.
This will allow me to continue to buy new manuals and pay their shipping costs. It'll make
you feel better, won't it?
If you use Pay Pal, use the link below. Use the above address for a check, M.O. or cash.
CAMERA LUBITEL I66 B"
Page 2

ATTENTION
Camera Lubitel 166B is rated for work in temperature range from minus 15 to +45°C, without
direct effect of solar radiation and atmospheric precipitation.
1. GENERAL INSTRUCTIONS
LUBITEL 166B is an up-to-date and simple in operation camera intended for the widest range of
amateurs
The camera incorporates a coated lens, two viewfinders (optical and frame one), diaphragm
shutter with wide range of speeds, self-timer and flash synchronizer. It assures precise focusing,
daylight film changing and exterior shooting on tripod and hand-held shooting.
It is enough to raise a little reflex viewfinder cover to see deep between the light protective hoods
large and for any illumination distinct clear image according to which it is easy to fit frame limits
when the object is already found or to find a new scene.
Image focusing is performed by slight rotation of a lens knurled mount.4www.butkus.org
Scales of distances, diaphragms and exposures and all the control units are located to assure speed
and convenient operation.
Frame counting is performed through the window according to values on light protective paper of
the film.
Due to reflex viewfinder it is possible to take pictures at high level holding the camera over the
head as well as turning it horizontally at the right angle. Viewfinder lens has f/2.8, i. e.
considerably higher than the photographic lens and thus the higher sensitivity to focusing.
For taking pictures at eye level (shots have then more natural perspective) the frame viewfinder is
used that is more convenient when there is experience in estimating distances by eye and in
correct focusing according to distance scale.
It is daylight loaded camera. For convenience the back is hinged.
Page 3

2. TECHNICAL DATA
www.orphancameras.com
Film accepted, mm ....................................................................... 61.5
Frame size, mm ........................................................................... 60X60
Picture number ............................................................................ 12
Photographic lens--coated three-element anastigmatic T-22:
focal length, mm ........................................................................ 75
relative aperture .......................................................................... f/4.5 to f/22
Viewfinder lens relative aperture ....................................................... f/2.8
Automatic shutter speeds, s . ............................................................ 1/250, 1/125, 1/60,-1/30, 1/15
With shutter set to <B> any manual-control shutter speeds are obtainable.
Distance scale, m ........................................................................ 1.4 to °° (infinity)
Self-timer operation time, s ........................................................... 7--12
Thread dimensions for the light filter mount, mm ......................... 40.5X0.5
3. DELIVERY SET
3.1. Camera <Lubitel 166B>......................... 1
3.2. Film rewinding spool ............................... I
3.3. Cable release ......................................... 1
3.4. Shoulder strap ......................................... 1
Page 4
35. Lens cap .................................................. 1
3.6. Case ........................................................ I
3.7. Packing box .............................................. 1
3.8. Operation manual ....................................... I
4. CAMERA DESIGN AND OPERATION
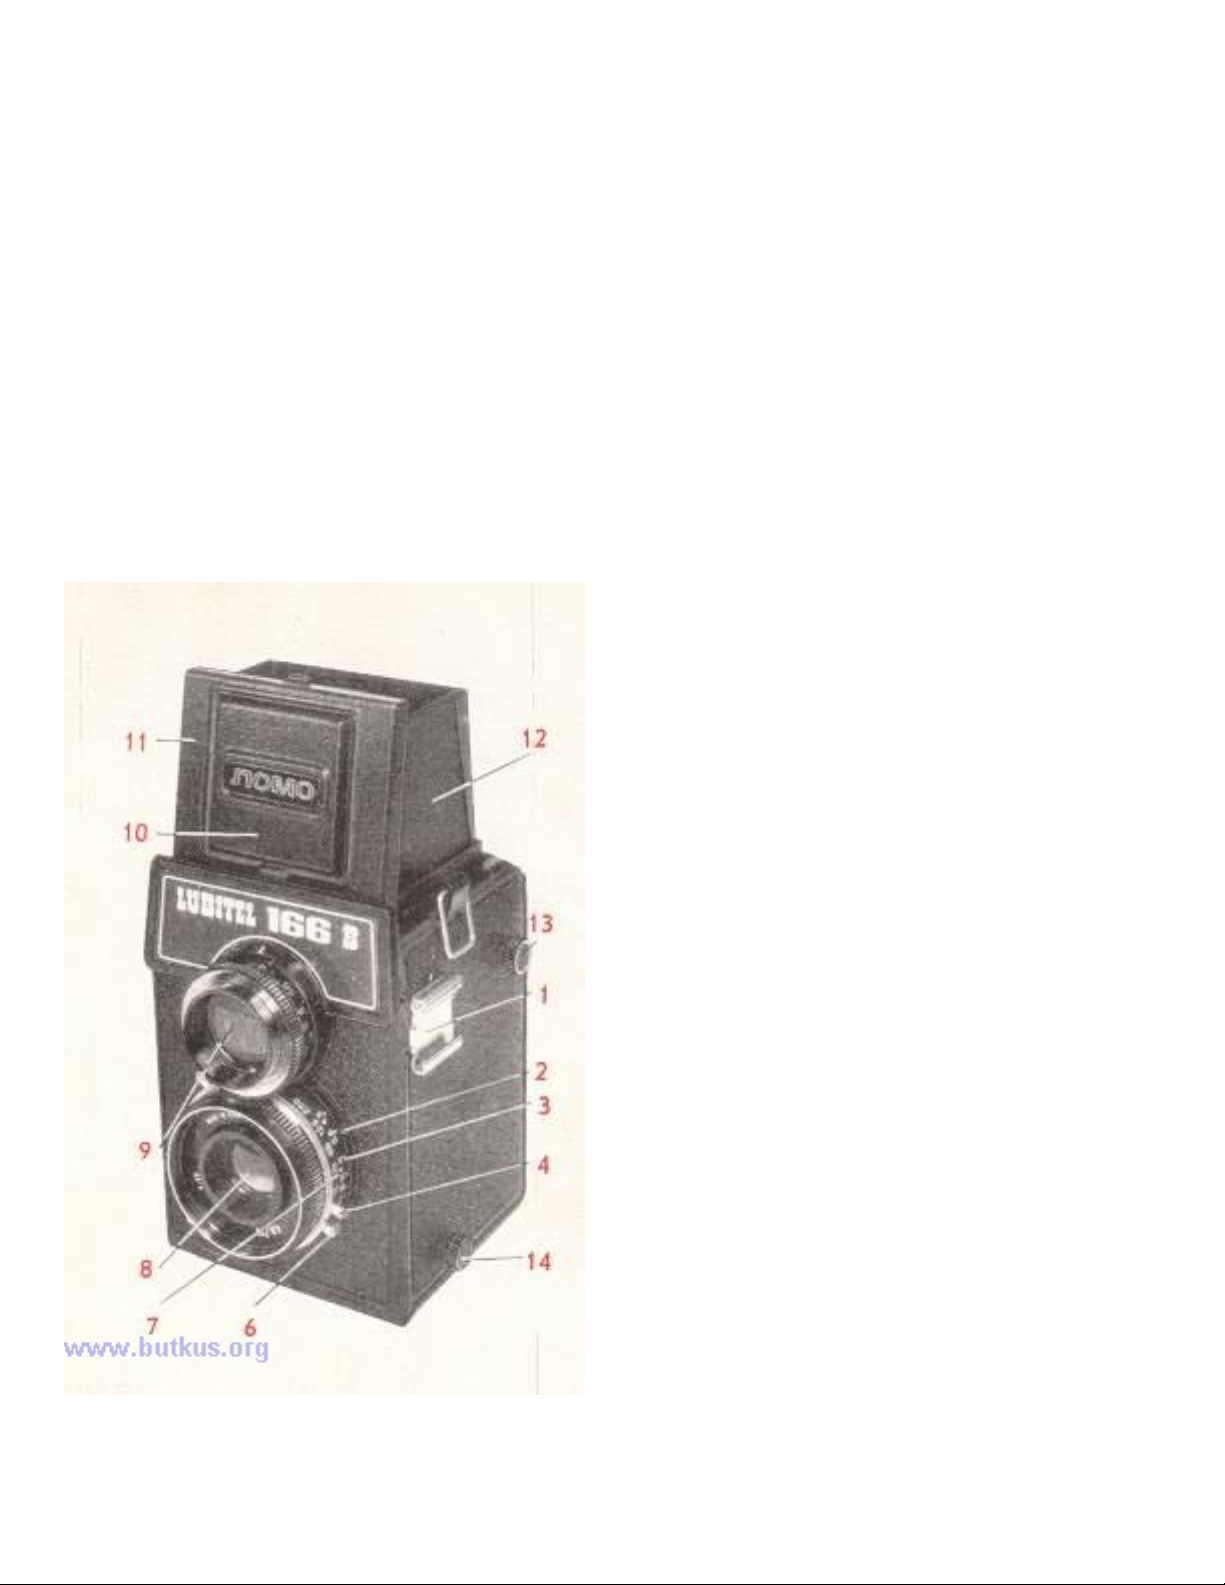
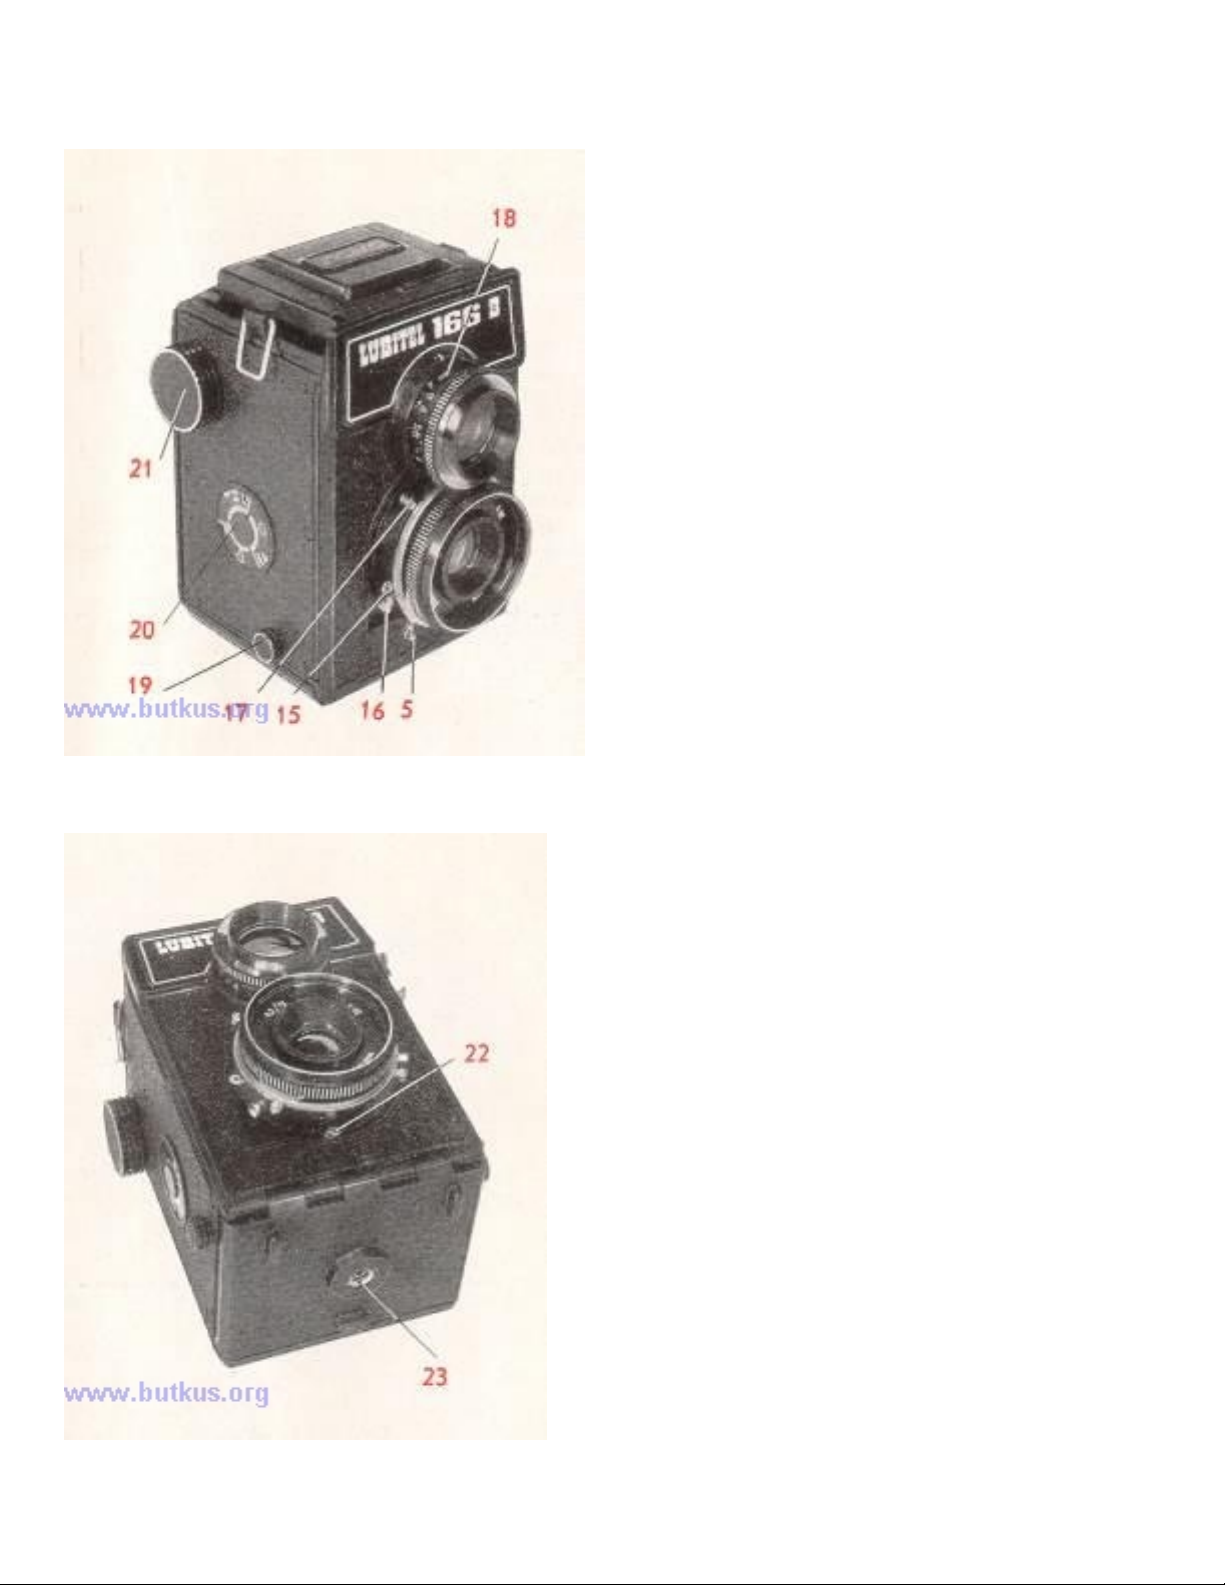
Figs I--5 show main camera parts.
1--block for fixing accessories;
2--diaphragm scale indicator;
3--diaphragm scale;
4--flash shoe;
5--lever of the shutter speed adjusting ring;
6--self timer lever;
7--exposure scale;
8--photographic lens;
9--viewfinder lens;
10--plate;
11--front frame;
12--light protective hood;
Page 5
www.orphancameras.com
13--take-up spool spindle head;
14--supply spool spindle head;
15--shutter release lever;
4www.butkus.org
16--cable release socket;
17 --shutter cocking lever;
18 --distance scale;
19 --supply spool spindle head;
20 --reminder dial;
21 --film rewinding knob;
22 --diaphragm control lever;
23 --tripod nut;
24 --field lens;
Page 6
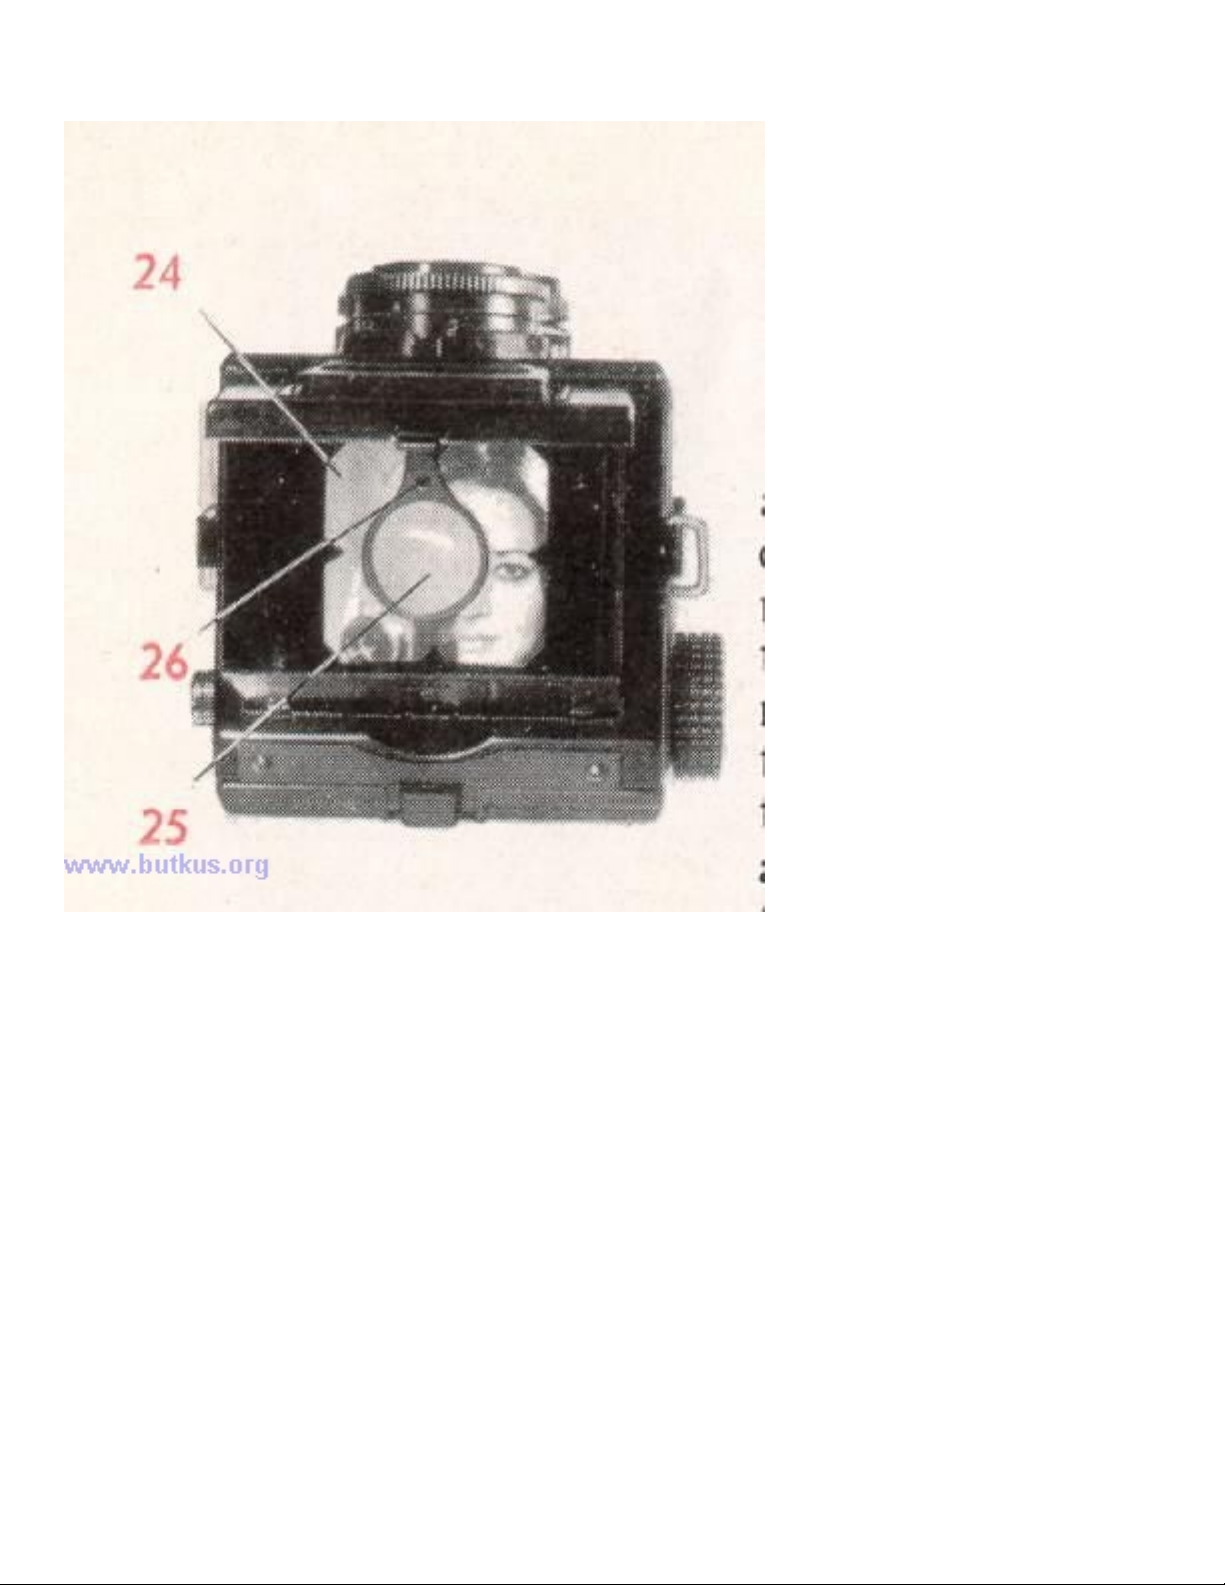
25 --ground glass circle;
26 --folding focusing magnifier;
27 --veiwfinder cover lock;
4www.butkus.org
Page 7
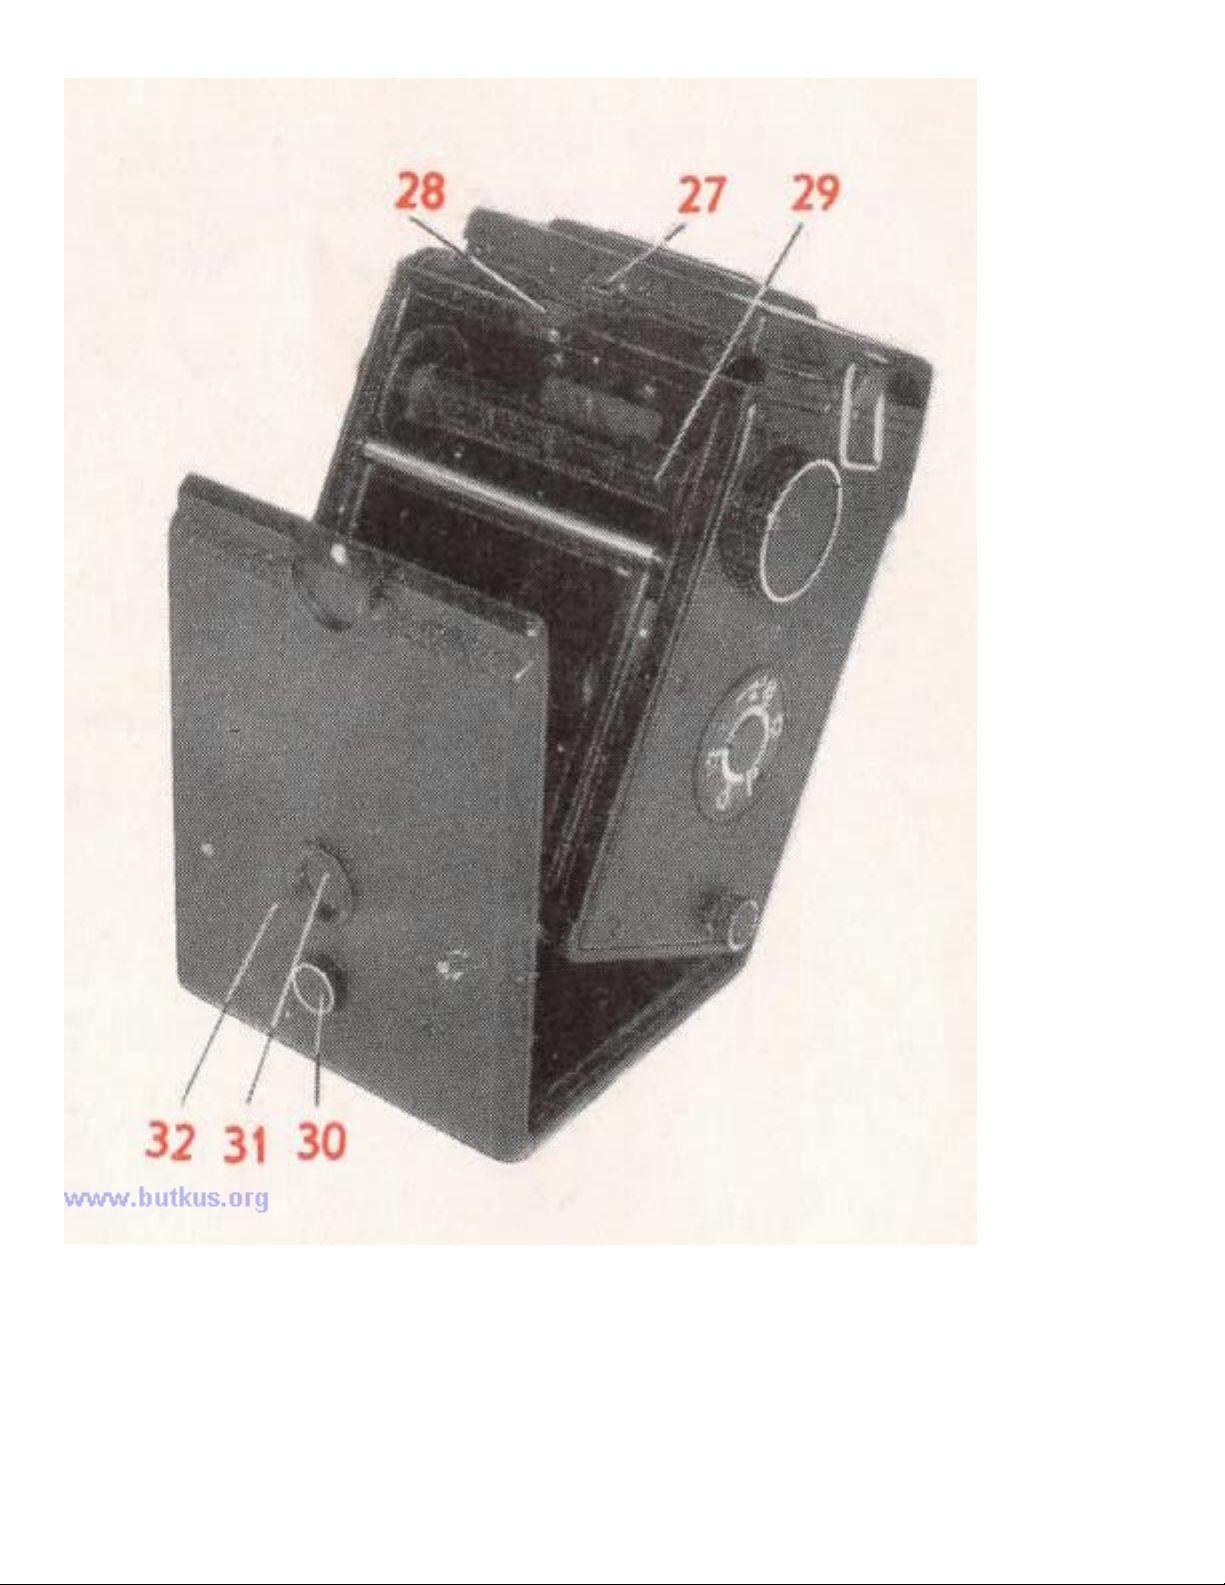
28 --camera
www.orphancameras.com
back lock
29 --take-up
spool;
30 --window
cover plate
head
31 --window;
32 --back.
The reflex viewfinder consists of the viewfinder itself and a ground glass representing a small
circle in the center of field lens with a folding focusing magnifier mounted above it. The
viewfinder is provided with metal light protective hoods that open simultaneously with raising the
cover. The viewfinder should be closed by the following procedures: first close the magnifier,
Page 8

then the side hoods, the rear hood with a square window and at last the cover until its front frame
lug catches with the viewfinder case lock catch.4www.butkus.org
Focusing the images on the ground glass circle and in film plane is performed simultaneously as
both lenses are coupled with each other with knurled mounts.
The focusing magnifier is attached to the panel from inside. The magnifier is set to operation by
pulling it up from the cover.
The frame viewfinder is formed by the front frame and rear light protective hood with a square
window. To open the viewfinder it is necessary to tilt the panel inside so that it catches the rear
hood lug. Slightly pulling out the rear hood is enough to close the viewfinder.
4www.butkus.org
To determine frame limits the camera should be held at eye level, the object should be observed
through the square window in the Tear hood keeping the camera at the distance when the window
edges coincide with those of the square opening in front frame. In this case the limits of the
viewfinder field will be the frame limits.
The distance scale is graduated at viewfinder lens mount in meters.
Diaphragm shutter is automatically giving the following speeds: 1/250, 1/125, 1/60, 1130, 1/15 s.
With shutter set to B
any manual-control shutter speeds are obtainable. Selected exposure time is set by rotating the
adjusting ring lever 5
(fig. 2) to coincide the ring edge index with required exposure value (mean exposure is not
obtainable with index intermediate positions).
Before shooting it is necessary to cock the shutter-rotating the cocking lever fully downward.
Shutter is released with smooth
pressing the release lever or the cable release the camera is provided with the socket for it. With
shutter set to B index
it remains opened from the moment of pressing the release lever to its releasing.
To activate the self timer it is necessary to set the selected automatic exposure, cock the shutter,
turn the self-timer lever 6 (fig. 1) fully downward and to press the release lever 5 (fig. 2). In 7--12
seconds the shutter will operate and the picture will be taken.
Remember that with shutter set to B and release lever pressed it is impossible to cock the selftimer lever.
Flash synchronizer is intended for matching the flashing moment with complete shutter opening.
Page 9

With electronic flash used the shutter may be set to any automatic exposure. With flash bulb used
www.orphancameras.com
the shutter should be set to 1/15 or B. On releasing the shutter the synchronizer will act
automatically.4www.butkus.org
Distance corresponding to
scale division, m
1.4
2
2.8
4
5.6
8
Depth of field in meters with diaphragms
I . 4:5 1: 5.6 1: 8 1: 11 1: 16
1.24 -
1.33 - 1.48
1.86 - 2.17
2.53 - 3.15
1.32 - 1.51
1.28 - 1.56
1.83 - 2.22
1.77 - 2.33
2.48 - 3.25
2.36_ 3.49
1.62
1.19 - 1.75
1.69 - 2.48
1.58 - 2.79
2.23 -
2.04 - 4.60
3.84
3.47 - 4.75
3.37 - 4.97
3.15 - 5.55
2.61 - 8.99
2.92 -
4.62 - 7.17
4.43 - 7.70
6.48
4.06 - 9.16
6.13 -
11.62
5.80 -
5.19 -
13.06
17.90
3.69 -
12.00
3.85--00
3.20 -
24.68
11
7.74 -
7.22 -
4.58--00
6.29--00
19.21
00
23.48
5.43--00
14.53 - 00
25.83-- 00
20.76--00
10.57 - 00
The diaphragm serves for the control of light opening diameter. The stopping down is performed
by moving the lever 22 (fig. 8) with pointer 2 (fig. 1)
The lens is stopped down when increase of the depth of field is desirable or when the available
light is too intensive. Photographic lens depth of fields with different diaphragms and distances
are given in the table.
4.42--00
7.26 - 00
Page 10

At exposure scale every following value is two times proceeding one. The diaphragm is fnumbered in such a manner that the pointer moving to a stop two times increase or decrease the
amount of light for exposure. For instance the exposure time is 1/60 second at f 5.6 and if the lens
has been stopped down to f/8 in other equivalent conditions the shutter should be set to 1/30
second.44www.butkus.org
Exposures and renumbers carry the denominators only, as all instead of 1/15, a4.5~ instead of
1/4.5 and so on.
The diaphragm and distance scales between figures 8 and 11 are marked with white dots. With
diaphragm scale pointer and distance scale index set to these dots all the images of objects at a
distance of 45 m to infinity arc obtained share.
4www.butkus.org
5. CAMERA OPERATION PROCEDURES
5.1. Loading the Camera
Taking the camera in your left hand, open the camera back pulling off preliminarily the lock
spring.
Turning the film rewinding knob 21 (fig. 2), bring the spool slot at position convenient for
loading the film protective paper end.
Fully pull off the both heads of the supply spool spindles. Break the seal of the film protective
paper and insert the spool with the film into the body receptacle between the spring and the body
wall having pressed the flat spring with your finger. Pressing the supply spool with your finger
insert to it both spindles by pressing their heads.
Unwind the end of the protective paper and on folding it down for about 10 mm insert in the slot
of the take-up spool. Then holding the spool with the film with your left finger and rotating the
film rewinding knob wind 2--3 layers of the protective paper to the take-up spool. Close the
camera back assured that the paper tension is good.
Having turned anticlockwise the window cover plate head 30 (fig. 5) rotate the film rewinding
knob 21 (fig. 2) until first the signal marks on protective paper and then c1~ appear in the
window. Close the cover plate.
5.2. Taking Pictures
Page 11

Before taking pictures, set the required exposure time and diaphragm. Exposure is set on
www.orphancameras.com
exposure scale by rotating exposure adjusting ring dog 5 (fig. 2). The required diaphragm value is
set by moving the lever 22 (fig. 3) with index along the scale.
Looking to the viewfinder determine the frame limits and with the focusing reach the required
sharpness at the ground glass circle. If the object image that is required to get most sharp should
be located at the picture edge turn the camera while focusing so that the object image was in the
center find prior to the shutter release return the camera to the initial position.
With the cocking lever I7 (fig. 2) cock the shutter and release it smoothly.
Pull the film at a frame length (immediately after taking picture not to forget). To do that open the
window cover plate and rotate the film rewinding knob 21 till the following figure appears in the
window, then close the cover plate.
5.3. Unloading the Camera
After the twelfth exposure has been made rewind at the take-up spool the film protective paper.
Sometimes when the winding is almost completed the turning of the knob is detained due to the
paper jammed in the supply spool slit. However this should not prevent the daylight unloading the
camera.
Open the camera back.
Fully pull off the film rewinding knob and take-up spool head.
44www.butkus.org
Carefully take but the spool with the exposed film, seal the protective paper end and keep the film
until it is developed.
Having pulled off the heads of the supply spool spindles as far as they will go, take the spool out
of its receptacle and insert into that of the take-up spool. Further slightly turning the film
rewinding knob, press it and the head of the take-up spool spindle up to the stop.
Close the camera back.
Handle the camera with care.
6. MAINTENANCE
Page 12

Contaminated lenses deteriorate pictures sharpness, so it is necessary to keep lenses always clean.
The objective lenses could be wiped from the outside only using a clean cambric or linen cloth or
cotton wool, on having breathed on them.
Never disassemble the camera.
Never wipe the plastic parts of the camera and the field lens with alcohol, acetone and other
active solvents.
7. ACCEPTANCE CERTIFICATE
The camera Lubitel 166B of serial number xxxx meets the technical requirements and is found fit
for operation.
Production date 08/09/1980
 Loading...