

Ltl Acorn Electronics LTL 5310MG User Manual
Ltl Acorn
Mobile Scouting Camera
Ltl-5310 Series
SMS remote control
720P video

USER’S MANUAL
TABLE OF CONTENTS
General Information
1.1 Features.................................................................................................1
1.2 Application............................................................................................. 2
1.3 Illustration.............................................................................................. 2
Quick Start
2.1 Insert SIM Card..................................................................................... 5
2.2 Load Batteries........................................................................................5
2.3 Insert SD Card.......................................................................................6
2.4 Enter Test Mode.....................................................................................6
2.5 Enter Live Mode.....................................................................................7
2.6 Advantages of Prep Sensors................................................................. 8
Advanced Settings
3.1 Parameter Settings.............................................................................. 9
3.2 File Format........................................................................................... 12
3.3 Set up Camera on PC......................................................................... 12
3.4 Set up MMS Function on PC............................................................... 15
3.5 SMS remote control............................................................................. 17
3.6 Camera Working with MMS................................................................. 21
3.7 View Local MNOP Name and Signal Strength on TFT display........... 22
Ltl-5310 Series Products
4.1 Parts.................................................................................................... 24
4.2 Models for Purchase............................................................................ 24
Important Information
5.1 Prevent From Short-Circuits................................................................ 24
5.2 Power Supply and Battery Box............................................................ 25
5.3 SD Card............................................................................................... 25
5.4 AutoAdjustment on Video Length........................................................ 25
5.5 850nm and 940nm IR LED.................................................................. 26
5.6 Mount on Tripod................................................................................... 26
5.7 FAQs on MMS Function...................................................................... 27
Firmware Upgrades
6.1 Firmware Upgrades............................................................................. 28
Warranty Information
Appendix I Technical Specifications
Appendix II Package Contents
Appendix III Instruction on Installing Battery Box
........................................................................................................
.........................................................................................
......................................................................................... 9
...............................................................................
....................................................................................
.......................................................................................
..................................................................................... 29
............................................................ 30
.....................................................................
.....................................
1
5
24
24
28
31
32

Introduction
GENERAL INFORMATION
This manual applies to model: Ltl-5310A
WA
Ltl-5310WMC Ltl-5310WMG.
The Ltl Acorn 5310 Series (Model Ltl-5310A/MC and Ltl-5310MM) is the third
generation of our Ltl acorn scouting camera. Bundled with the MMS-module
(Multimedia Messaging Service) battery box (Part # LTL-MM1)standard
scouting camera (Part # Ltl-5310MC) can be upgraded to work as a remote
cellular camera. With its highly sensitive Passive Infra-Red (PIR) sensor the
camera detects the sudden change of ambient temperature caused by
moving game in a region of interest (ROI), triggers to take pictures/videos,
and sends the images via GSM network to the user’s cell phone or email
account. With newly added SMS remote control feature you can change the
related menu of the camera by sending SMS order to the camera in the
specific form of the SMS content.
1.1 Features:
Programmable 5 or 12-Megapixel high-quality resolution.
With SMS RCP (remote control program) parameters of camera can
be changed by SMS sending. If in request, the camera can take
picture and send back simultaneously.
No-glow Infrared 940nm LEDs flash range as far as 65 feet, luminance
as bright as 850nm.
In “Cam + Video” mode, camera takes both pictures and video at every
trigger event
Ultra low standby power consumption. Extremely long in-field life (in
standby mode, up to 6 months with 8 x AA batteries)
Unique side Prep Sensor design provides wider sensing angle and
enhances camera’s response speed
Perform in the most extreme temperatures from -22°F to 158°F
Compact size (5 ½ x 3 ½ x 2 ½ inches). Well designed to deploy
covertly
Impressively quick trigger time (0.8 second)
In Time Lapse setting, the camera automatically and constantly takes
pictures/videos at specified interval. This is very useful when observing
plants flowering, birds building nest, or when monitoring unattended
properties such as parking lots
With Timer setting on, the camera can be programmed to only work in
specified period every day. This feature can work together with Time
Lapse feature
Backpack-looking tree grabber makes mounting and aiming a snap
Ltl-5310MC Ltl-5310MG Ltl-5310
1

x Serial Number setting enables you to code locations in the photos. This
helps multi-camera users identify the location when reviewing the
photos
x Built-in 2 ¼” TFT color display to review images and videos
x Date, time, temperature and moon phase can be stamped in the
pictures
x Lockable and password protected
x MMS image sizes: 640 x 480
x Users can configure the Camera and MMS function either by running
the enclosed CD on the computer, or directly on the built-in TFT display.
x Separation of the Camera and the MMS module provides users
flexibility: starting with the value model as a standard scouting camera,
and upgrading to the premium model with MMS function.
x
If local area mobile signal is bad , Could not send MMS, Also can choose to
send a text message(SMS).
Camera serial number.
x Our Advanced Remote Cellular Technology transmits images to your
cell phone and email account constantly at lower battery consumption
and shorter transmission time, compared to products of its kind on the
market.
x Automatically send text alert when battery power level goes low
x Check cellular signal information on the built-in TFT display in the field
x All MMS pictures saved in SD card as well as the original ones
x Internal antenna design makes the camera portable while still emitting
strong signal
x Operates globally via GSM/GPRS network. Supports four bands: 850 /
900 / 1800 / 1900MHz.
Message content is taking pictures time and
1.2 Application
x Trail camera for hunting
x Animal or event observation
x Motion-triggered security camera, for home, office and community
x All other indoor/outdoor surveillance where invasion evidence needed
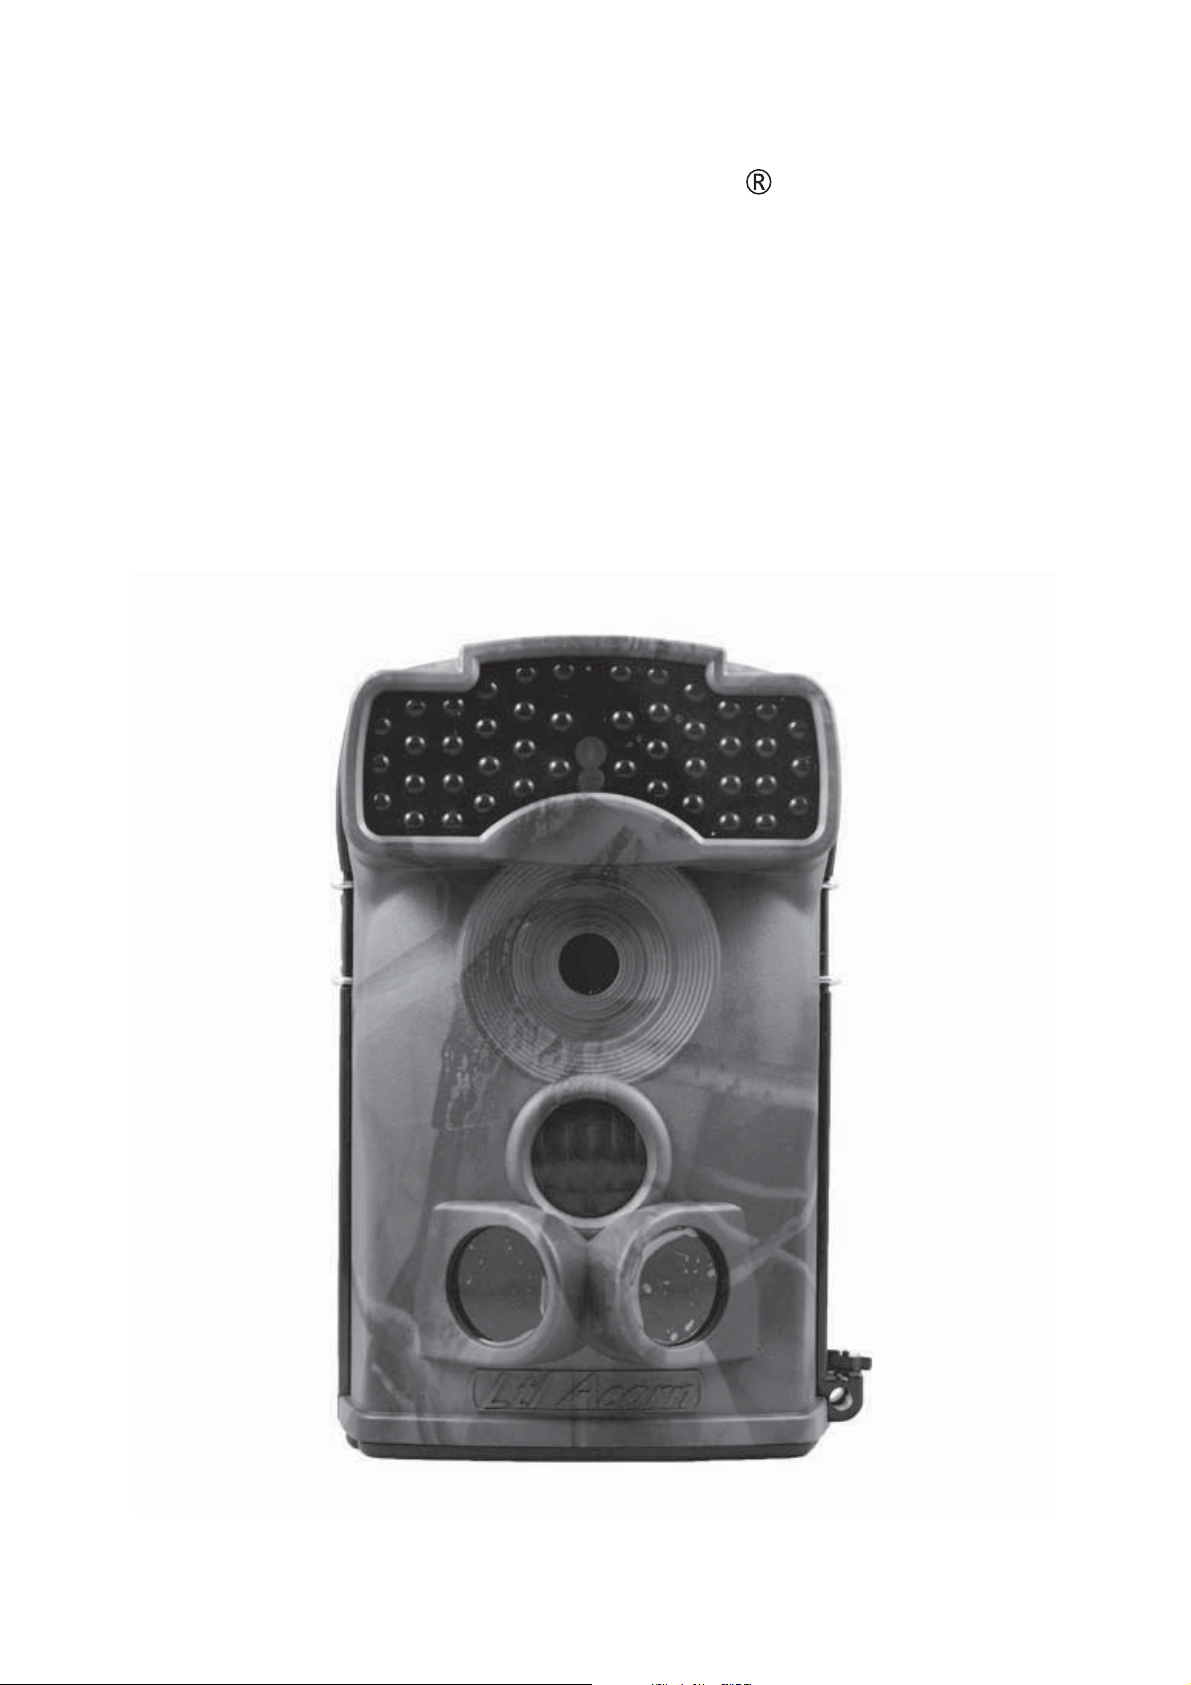
1.3Illustration
x Figure 1.1 shows the front view of the camera (Part # Ltl-5310M)
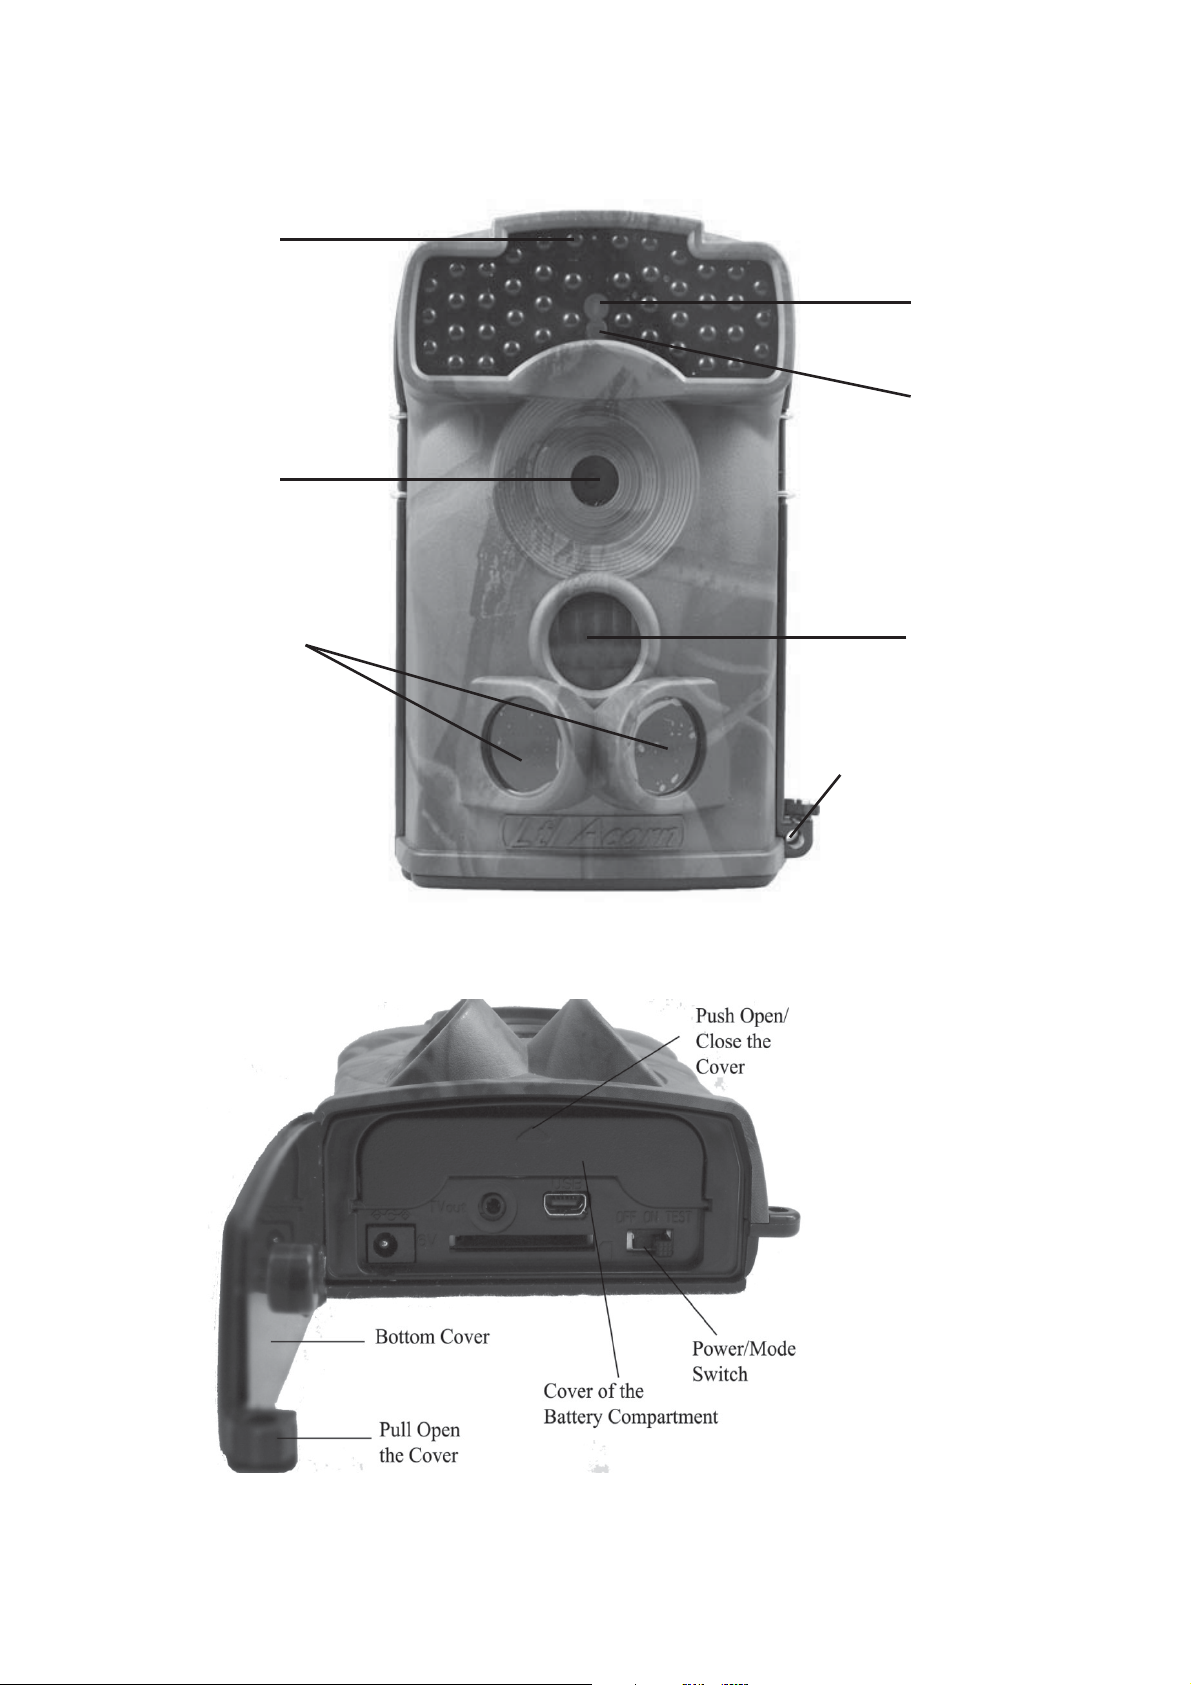
x Figure 1.2 shows the bottom view of the camera (Part # Ltl-5310M)
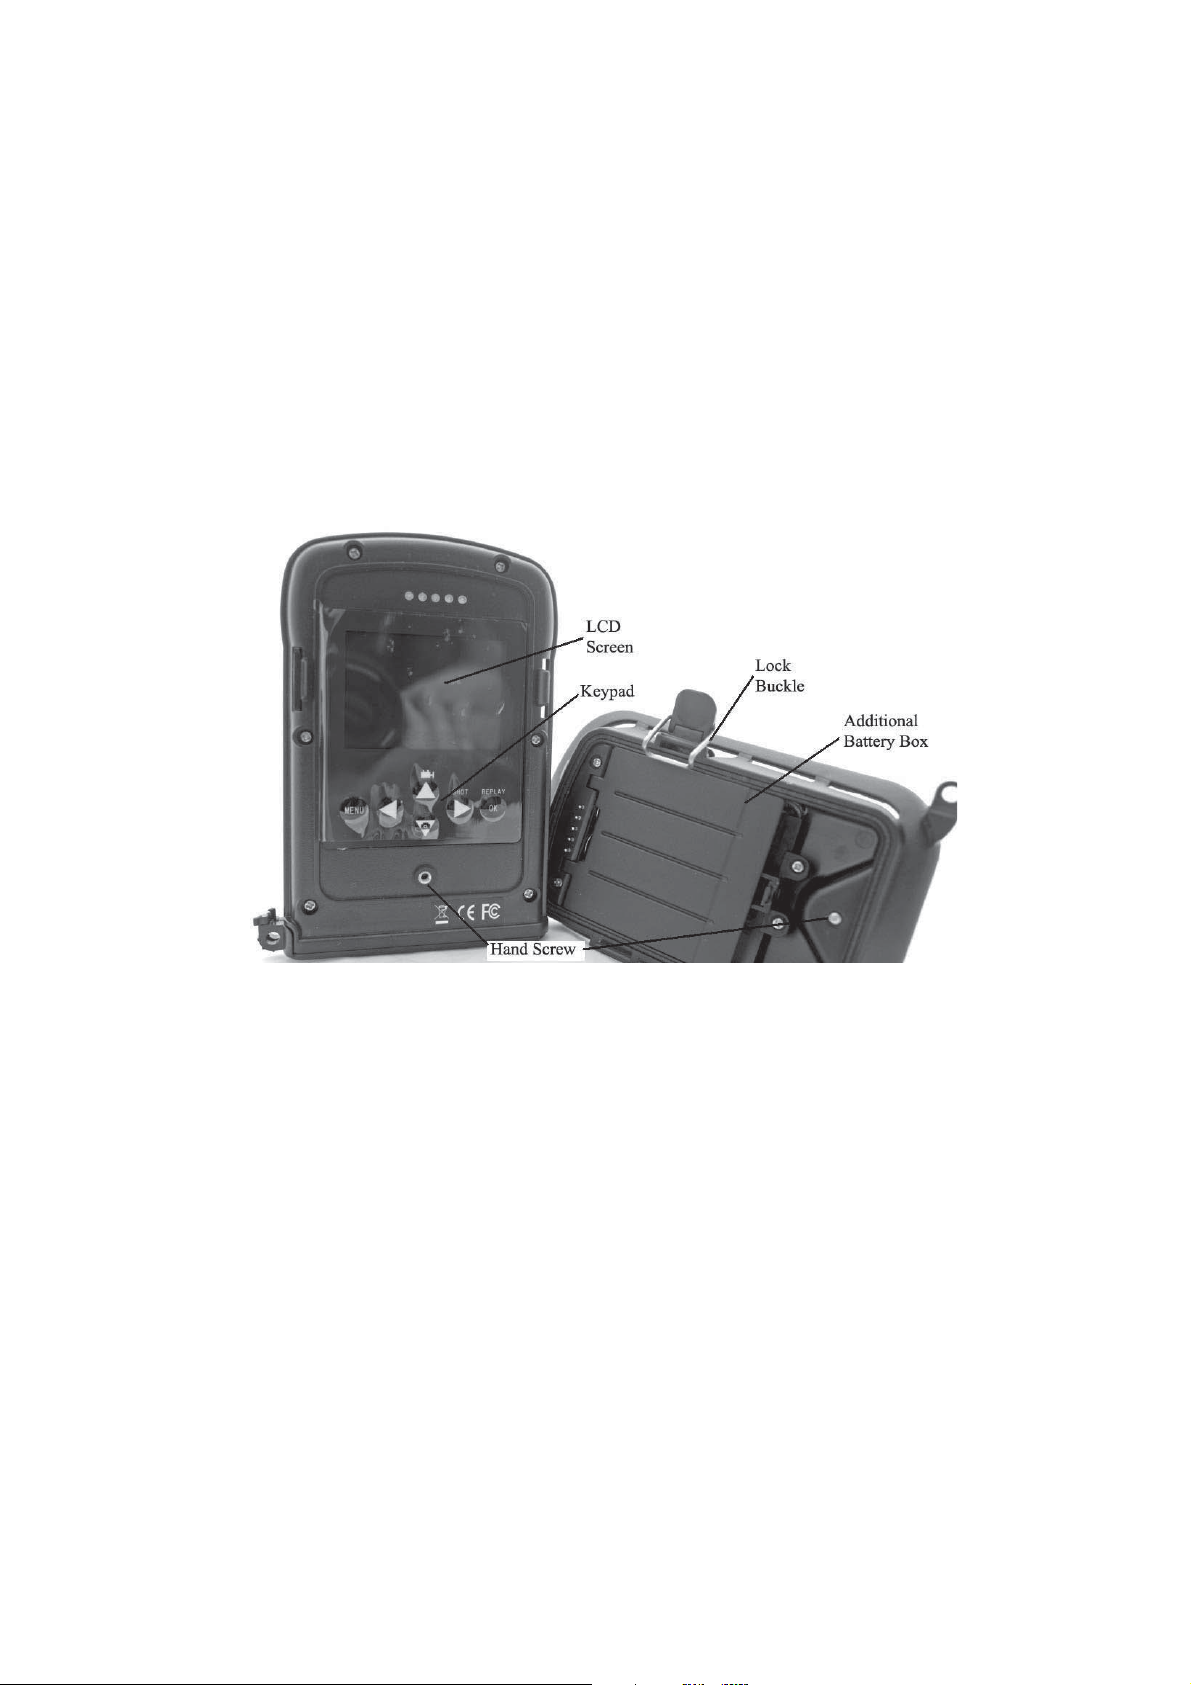
x Figure 1.3 shows the back view of the camera (Part # Ltl-5310M) and
front view of the battery box (Part # LTL-BM1 or LTL-MM1)
2
LED IR
Flash
Lens
Light
Sensor
Motion
Indicator
Prep
PIR
Sensor
Main
PIR
Sensor
Lock
Hole
Figure 1.1: Front View of Ltl-5310M
Figure 1.2: Bottom View of Ltl-5310M
3
The camera provides the following connections for external devices: USB 2.0
port, SD card slot, TV out jack, and external DC power in jack. The 3-way
Power/Mode Switch is used to select the main operation modes: OFF, ON
and TEST.
To power up the camera, install four NEW high-performance alkaline or
lithium AA batteries in the camera. FOR BETTER PERFORMANCE, WE
RECOMMEND USING ENERGIZER LITHIUM AA BATTERIES. To achieve
longer in-field life, always install the additional battery box which contains four
more AA batteries. (Please reference Appendix III: Instruction on Installing
Battery Box)
Figure 1.3: Back View of Ltl-5310M and Front View of Battery Box
CAUTION: If you are not using the camera for an extended period of
time, it is highly recommended that you remove the batteries from the
camera to avoid possible acid leak that may damage the camera which
would void the warranty.
4
QUICK START
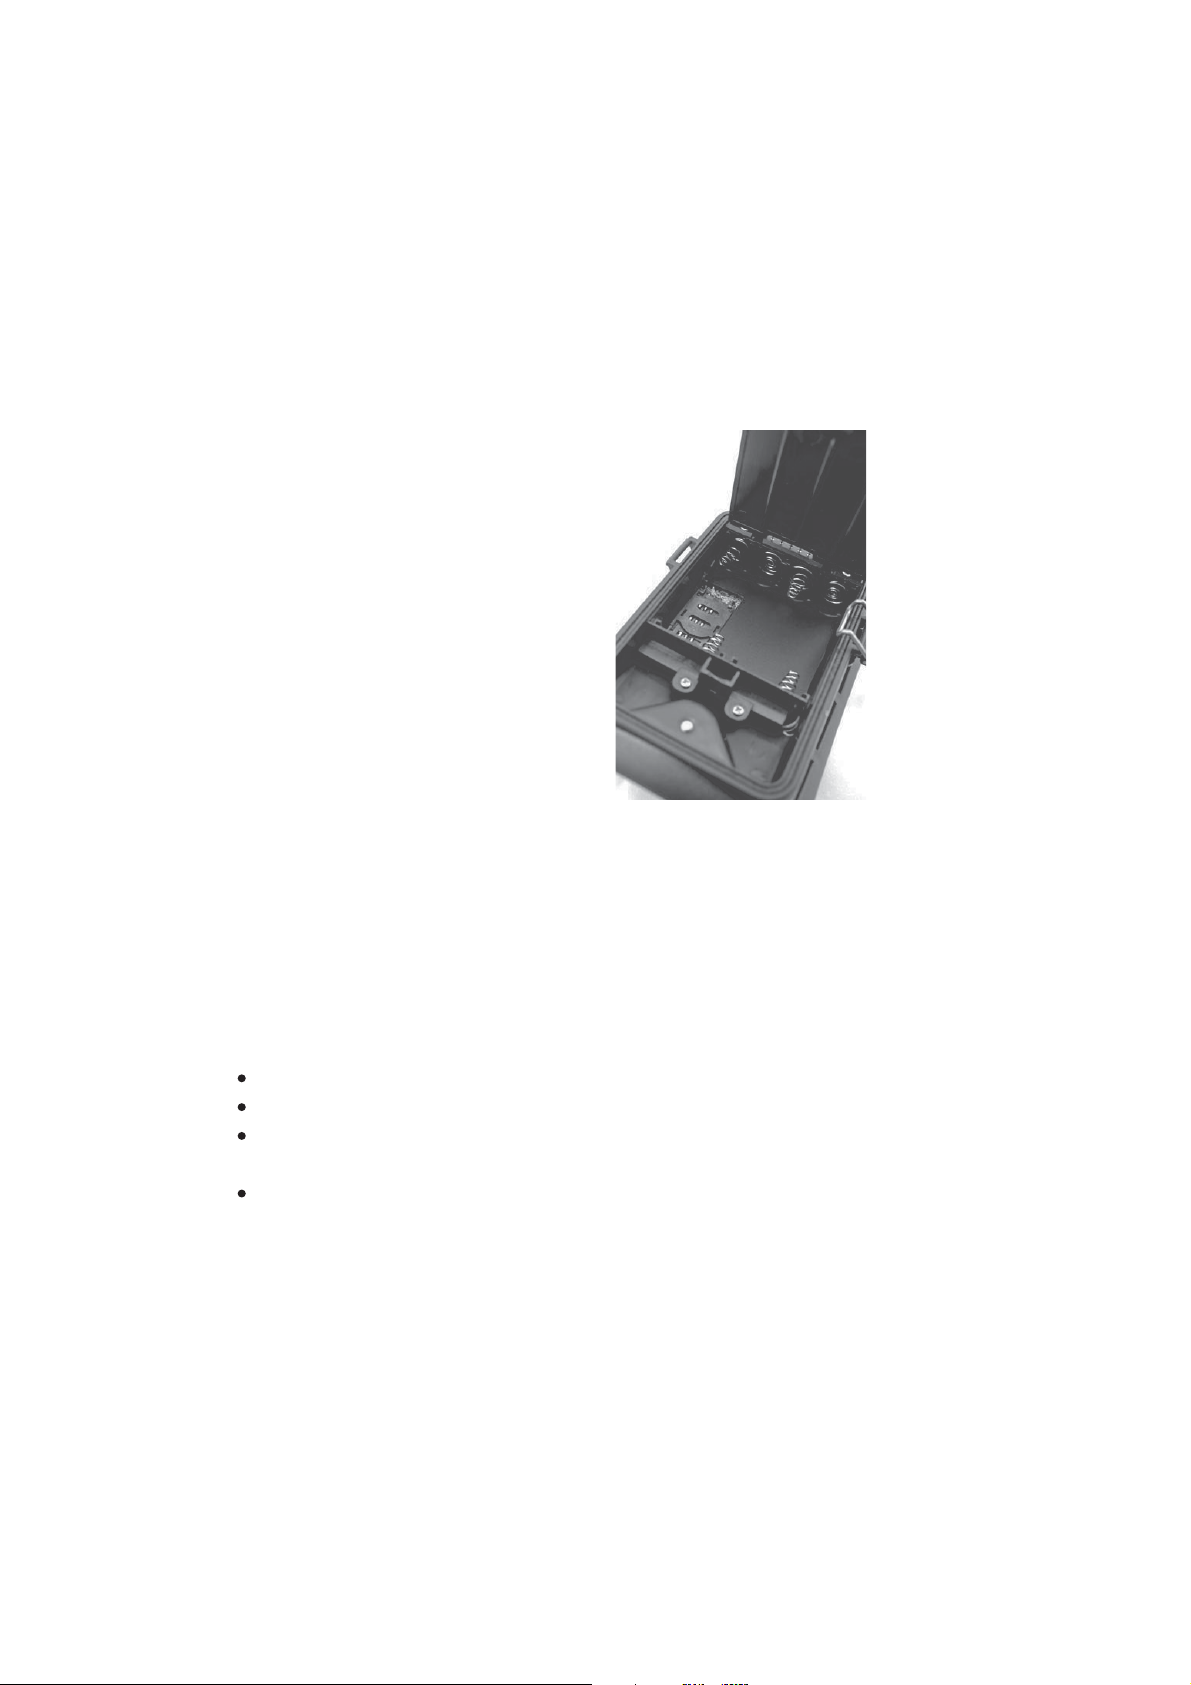
2.1 Insert SIM Card (Only for Model Ltl-5310MM)
You need to purchase the SIM card
from your local Mobile Phone
Network Operators(MPNO),
making sure they provide
Multimedia Messaging Service
(MMS). Ask them for the relevant
information to configure the MMS
settings on your camera.(Please
reference 3.4 Set up MMS
Function on PC in the Advanced
Operation section.)
Open the battery compartment
cover, slide the SIM card in the slot
and lock it.
Figure 2-1 MMS-module Battery
Box
2.2 Load Batteries
To install batteries on the camera (Part # Ltl-5310M), please follow the
instructions below.
Open the bottom cover by pulling down the lock hole.
Push the cover of the battery compartment and release. It will pop out.
Install 4 AA batteries. Make sure the polarity matches the sign on the
cover.
Replace the cover.
To install the additional battery box (Part # LTL-BM1 or LTL-MM1), please
reference Appendix III: Instructions on Installing Battery Box)
Alternatively the camera can run on an external 6V~12V DC power source
(optional). When both external power and batteries are connected, the
camera will be powered by the external one preferentially. Bundled with our
external solar power supply (purchased separately), the camera can work in
the field over one year without changing batteries.
5
When battery level gets low, the Motion Indicator in the LED array will flash
blue. On Model Ltl-5310MM, a “Battery Low” text alert will be sent
automatically to the user’s cell phone or email account.
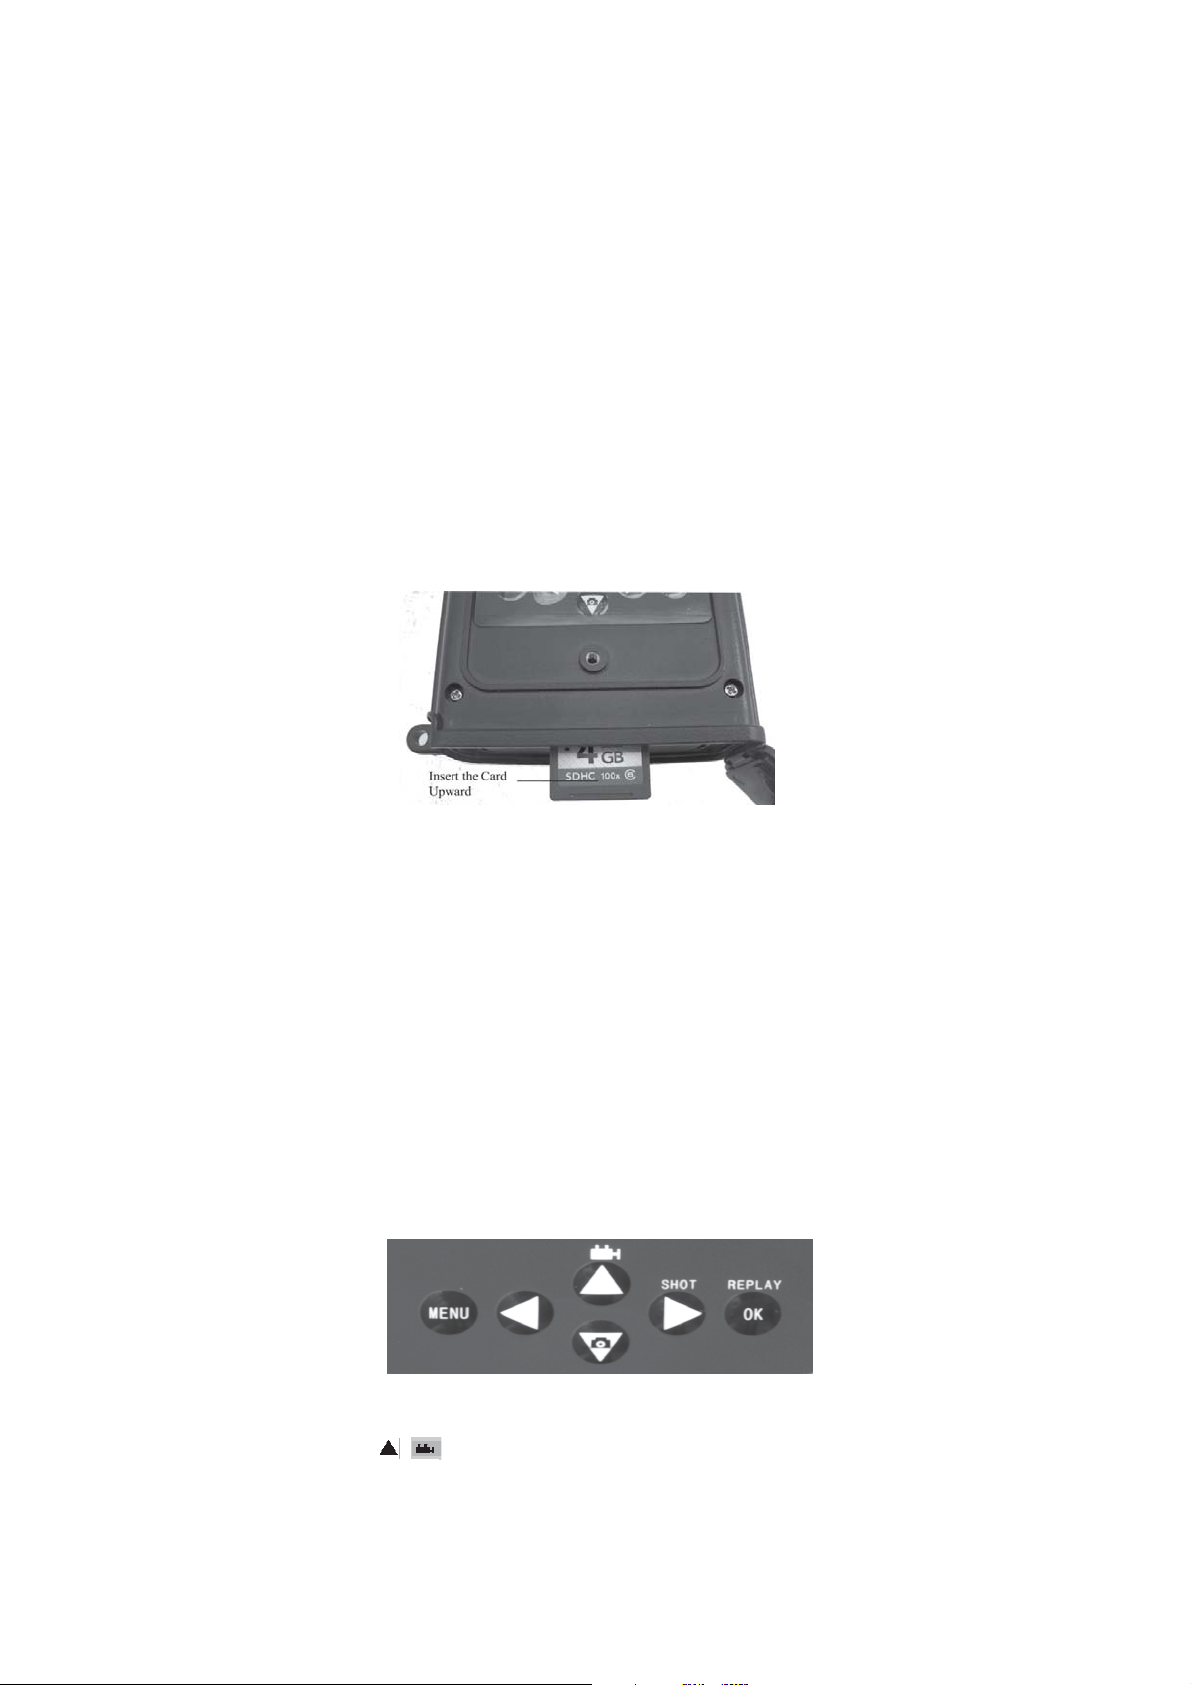
2.3 Insert SD Card
The camera does not come with internal memory. So it will not work without
a SD (Secure Digital) memory card or SDHC (High Capacity) card. Before
inserting the SD card into the card slot, please make sure the write-protect
switch on the side of the SD card is “off” (NOT in the “Lock” position). The
supported memory capacity is up to 16GB. If you use a card capable of
above 16GB, make sure you test it before putting the camera in use.
Figure 2-2
CAUTION: ALWAYS SWITCH THE CAMERA TO OFF MODE BEFORE
YOU INSTALL OR REMOVE THE BATTERIES OR THE SD CARD.
2.4 Enter Test Mode
Switch to the TEST position to enter the Test mode. In this mode you can
take pictures or video clips like a regular digital camera, or enter the Menu to
set up parameters. On the keypad there are four “shortcut” functional keys
(see Figure 2-3) working as below:
Figure 2-3
x Press the key to set the camera to shoot video clips.
6

x Press the key to set the camera to take still pictures.
x Press the SHOT key to manually trigger the shutter. A photo or
video (depending on the camera setting) will be taken and saved to
the SD card. If the display shows “CARD PROTECTED” when you
press the SHOT key, switch the power OFF, remove the SD card and
slide its write-protect switch to off.
x Press the REPLAY key to review/playback photos/videos on the
LCD screen, or a connected TV monitor. Use and key to
navigate.
There is another key, MENU, on the keypad that allows you to program the
camera to work the way you want. Please make reference to 3.1 Parameter
Settings in the Advanced Operation section.
Under the test mode, one useful function you would like is testing the work
area of the PIR (Passive Infrared) sensor, specifically the sensing angle and
distance. To perform the test:
x First strap the camera on a tree aiming the region of interest (ROI).
x Walk slowly from one side of the ROI to the other parallel to the
camera. Try different distances and angles from the camera.
x If the Motion Indicator flashes blue, it indicates the position from
where you are detected by one of the side Prep PIR sensors. If the
Motion Indicator flashes red, it indicates the position from where you
are captured by the main PIR sensor.
By doing this test, you can find the best placement when mounting and
aiming the Ltl Acorn camera. In general, you are recommended to place the
camera 3 to 6 feet (1 to 2 meters) above the ground.
To avoid potential false triggers due to temperature and motion disturbances,
please do not aim the camera at a heat source (i.e. the sun) or nearby tree
branches and limbs. The ideal direction to aim at is North or South. Also,
remove any limbs close to the front of the camera.
2.5 Enter Live Mode
Switch to the ON position to enter the live mode. The Motion Indicator will
flash red for about 10 seconds and the camera starts working by itself
without any manual handling. It will at once shoot pictures or record videos
when game or other objects enter the PIR area of the main sensor directly. If
the game enters the PIR area of the prep sensors from the side, the prep
sensors detect the movement and activate the camera. While the game
keeps moving into the PIR area of the main sensor, the camera takes
photos/videos immediately. If the game roams away after entering the PIR
7

area of the prep sensors, the camera will power off and enter standby mode.
2.6 Advantages of Prep Sensors
In general, to save battery power, an Infer-Red camera is in “sleep” mode,
with only the PIR sensor working. When game is detected by the PIR sensor,
the camera is powered on and starts shooting pictures. The time period from
being activated to starting firing is called trigger time. The trigger time varies
among different scouting camera brands in the market, generally from 1 to 5
plus seconds. Our Ltl Acorn scouting camera has an impressive 0.8 second
trigger time. However, when game passes across very quickly, the picture
may only capture the rear part of the body, and possibly nothing at all.
With the unique side prep PIR sensors design, our Ltl Acorn solves this issue.
The combination of the two side prep sensors and the main sensor comes
up with a 100 to 120° angle of induction, a very wide scope far outweighing
the 50 ° angle of the camera lens. When game first crosses the PIR area of
the prep sensor, the camera is activated and ready to shoot after 1 second. If
the game continually enters into the PIR area of the main sensor, the camera
takes pictures immediately, therefore catching the whole body of the game.
This split-second process could be as short as 0.2 second.
In the case the game browses only in the PIR area of the prep sensors, to
avoid the camera being powered on constantly, the system is designed to
work in the following way: If the game does not enter the PIR area of the
main sensor and therefore not trigger the main sensor, the camera will power
off after 3 seconds. If the trigger events consecutively happened twice only in
the PIR area of the prep sensors, the camera will not be activated by the
side prep sensors, but only by the main sensor. So later on when the game
enters the PIR area of the main sensor eventually, since it is not in fast
movement, the picture will by all means capture the whole body of the game
based on our standard 0.8 second response time.
8

ADVANCED SETTINGS
The Ltl Acorn trail camera comes with preset manufacturer settings. You can
change the settings to meet your requirements. Please make sure the camera
is in the test mode.
3.1 Parameter Settings
Press “MENU” key to enter/exit the menu. Press , to move the marker,
,to
change the setting, and to confirm the change. Always remember to press
to save
the change. Otherwise you will lose your new setting.
Parameter Settings
(Bold = default)
Mode Camera,
Video,
Cam+Video
Format Enter All files will be deleted after
Photo Size (affects
still photos only)
Video Size (affects
video clips only)
5MP, 12MP, 1.3MP Select desired resolution for still
1280x720
640×480
320×240
Select whether still photos or video
clips are taken. In Camera+Video
mode, camera first takes photos and
then shoots videos immediately.
formatting the SD card. Highly
recommend you format the SD card
if it has been used previously on
other devices. Caution: make sure
wanted files on the SD card have
been backed up first!
photos from 1.3 to 12 megapixels.
Higher resolution produces better
quality photos, but creates larger
files that take more of the SD card
capacity. Besides, larger files require
longer time to write to the SD card,
which will slightly slow the shutter
speed. 5MP is recommended.
Select video resolution (pixels per
frame). Higher resolution produces
better quality videos, but creates
larger files that take more of the SD
card capacity. 640×480 is VGA mode
in standard 4:3 format.
Description
9
 Loading...