

Page 1
LTECH
LTECH
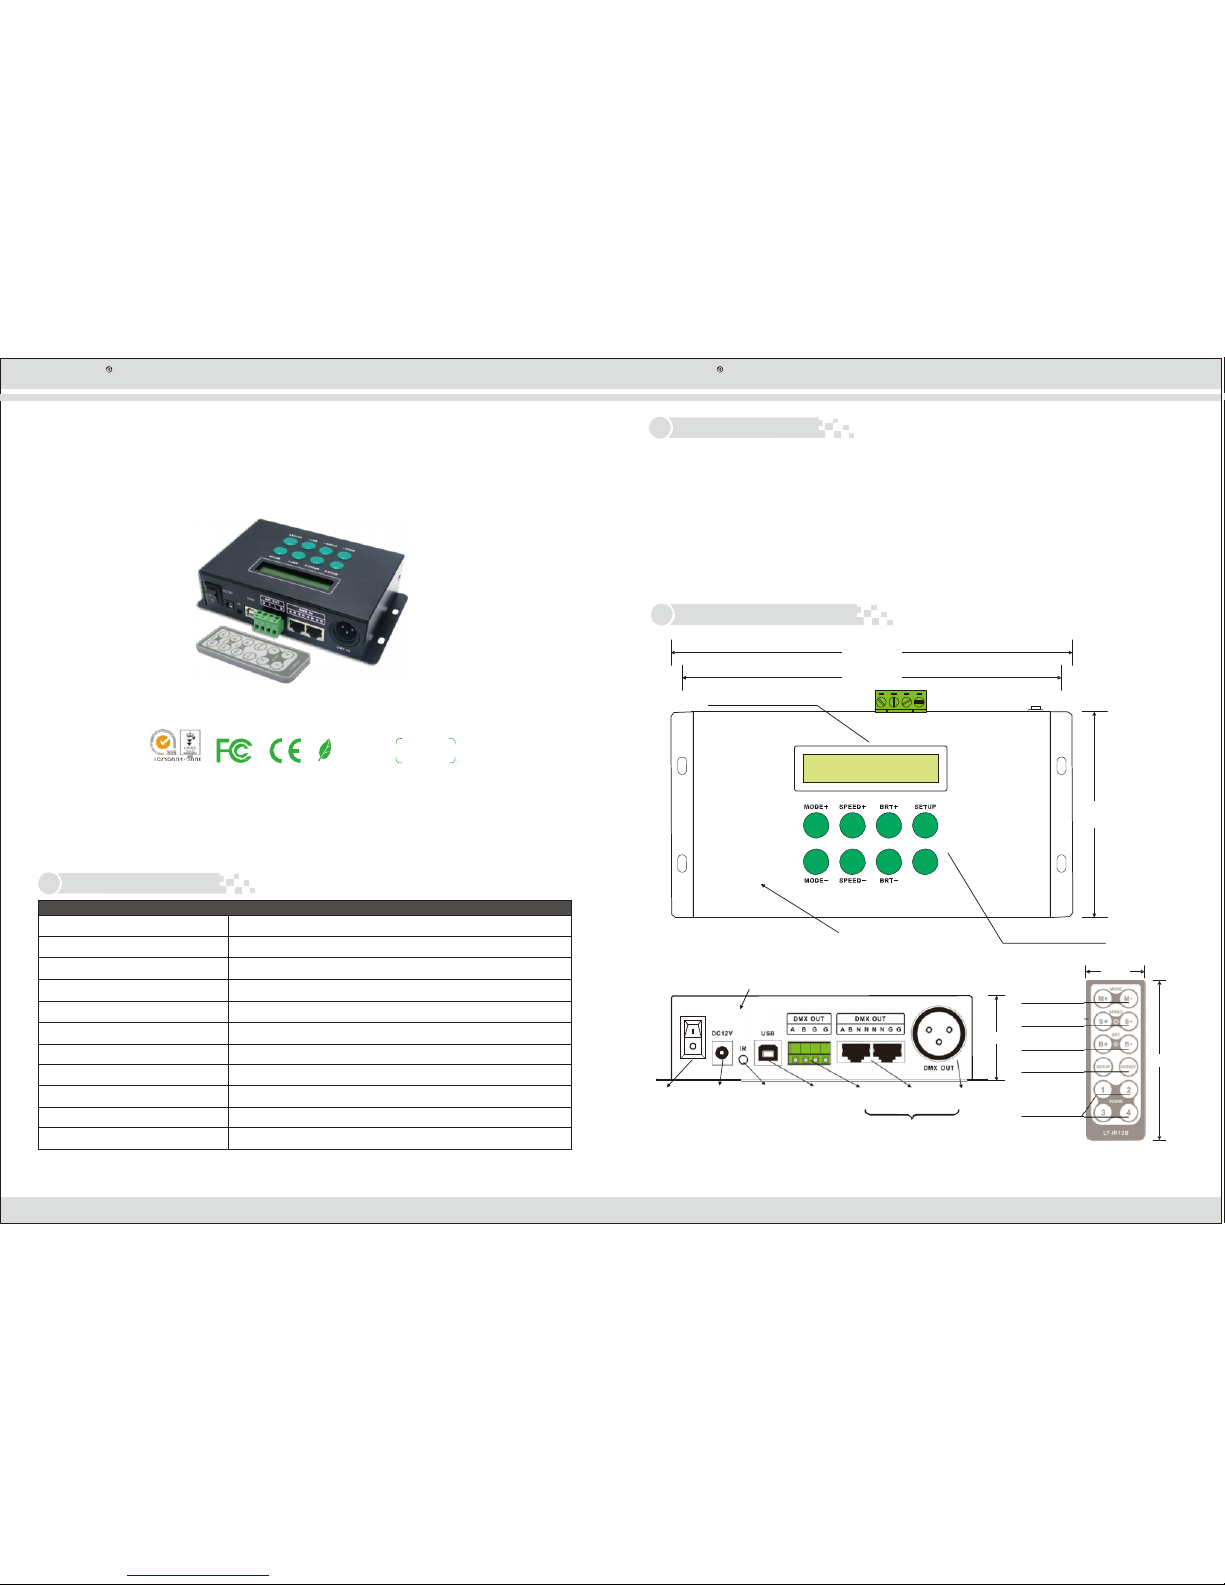
LT-800DMX controller
LT-800DMX controller
1
2
LT@LTECHONLINE.COM
ZHUHAI LTECH ELECTRONICTECHNOLOGYCO., LTD.
Tel: +86 756 620 8823
Fax: +86 756 620 8833
WWW.LTECHONLINE.COM
LT-800
Working Voltage
DC12 (with an adapterto convert AC100-240Vto DC12V)
Power Consumption
<2W
Output Signal
DMX512/1990
Output Loop
1 Port
Transmission Speed
250Kbps
Function Mode
39 modes
Control Quantity
51 2 DM X channels ( 17 0
pixels)
Working Temperature
-30℃~65℃
ProductDimensions
L163×W108×H40mm
PackageDimensions
L260×W132×H46mm
Weight(G.W)
760g
LT-800
DMX controller
2.
Function
features
1.
Wit h
LCD
sc ree n, ea s ytoope ra t einsho win g
all fun ction s.
2.
Bui l t-in pe rpetua l cal enda r, re al -tim e dis pla y sy ste mclock
, can be set up to
pla y dif fe ren t p rogra m s
in any tim e,
Mo nda ytoSu nda y
or hol iday.
3. 30
lig htin g mo des .
Suc has ,7
col or, s kippi n g syn ch ron ism , sm oot h s ynch r onism , co lo r fl ow , colo r cha sing ,
col or
smo ot h
and
flo w
and
Met eo r sho we r tr ailin g ,
etc.
4.
Mul tile v el c hang in g spee d , b righ tnes s
and
RG B g rey s cal e a djust men t for yo ur
cho ices.
5. Feel
fr eetodef in e man y chan gin g m ode s i nt oaste p,8ind epen den t c ycl e s tep s
max imum.
6.
Out pu t wi th in terna tiona l St anda r d s igna l DM X512/1 990 ,
can
con t rol
512
DM X cha nnel s ( 17 0 ful l co lo r R GB
pix els)
7.
Su pportdif fe ren t ou tpu t portsli ke st anda rd XLR -3 , R J45
and
Eu rop ea n te rmi nals .
Etc.
8.
wit h
the
fun ctio n sofanti-interfe ren ce
and
au to mati c b rea kd ow nrec overy.
3.
Construction
drawing
163mm
LCD screen
153mm
ISO9001:2008
R o H S
COM PLIA N T
warranty
3
years
LT-
800
WEL
C OME
2012-01-0
1
12:00
LT-800 DMX512 c ontroller is the output signal of interna tional standard DMX/1990.It not only can control all the LED lights in
the market as long as can rec eive the standard DMX signal, but also can work wi th our DMX Dec oder to control general LED
lights withoutDMX512.
LT-800 DMX512 Controller is easy to operate with a LCD screen. Available with wireless control and keying control on the
changing modes , speed and brightness , automatic timing and more than 30 modes for your choices, Supporting pause in
Changingmodes and very easy to keep the specific color.
108mm
1. Product
parameter
HOT KEY
Upper surface
Control button
Front
Mode+/Mode
33mm
40mm
Spee d +/Speed –
BRT +/ BRT–
Setu p
85mm
Pow er
switch
Power
input
Infrared
inte rface
Manufacturers
spar eUSB
inte rface
Green
terminal
RJ45
inte rface
XLR-3
DIY Scene
Prov ide threekinds of interface,
connect one of the m
IR
rem ote
con trol
Page 2
LTECH
LTECH
LT-800DMX controller
LT-800DMX controller
3
4
LT@LTECHONLINE.COM
ZHUHAI LTECH ELECTRONICTECHNOLOGYCO., LTD.
Tel: +86 756 620 8823
Fax: +86 756 620 8833
WWW.LTECHONLINE.COM
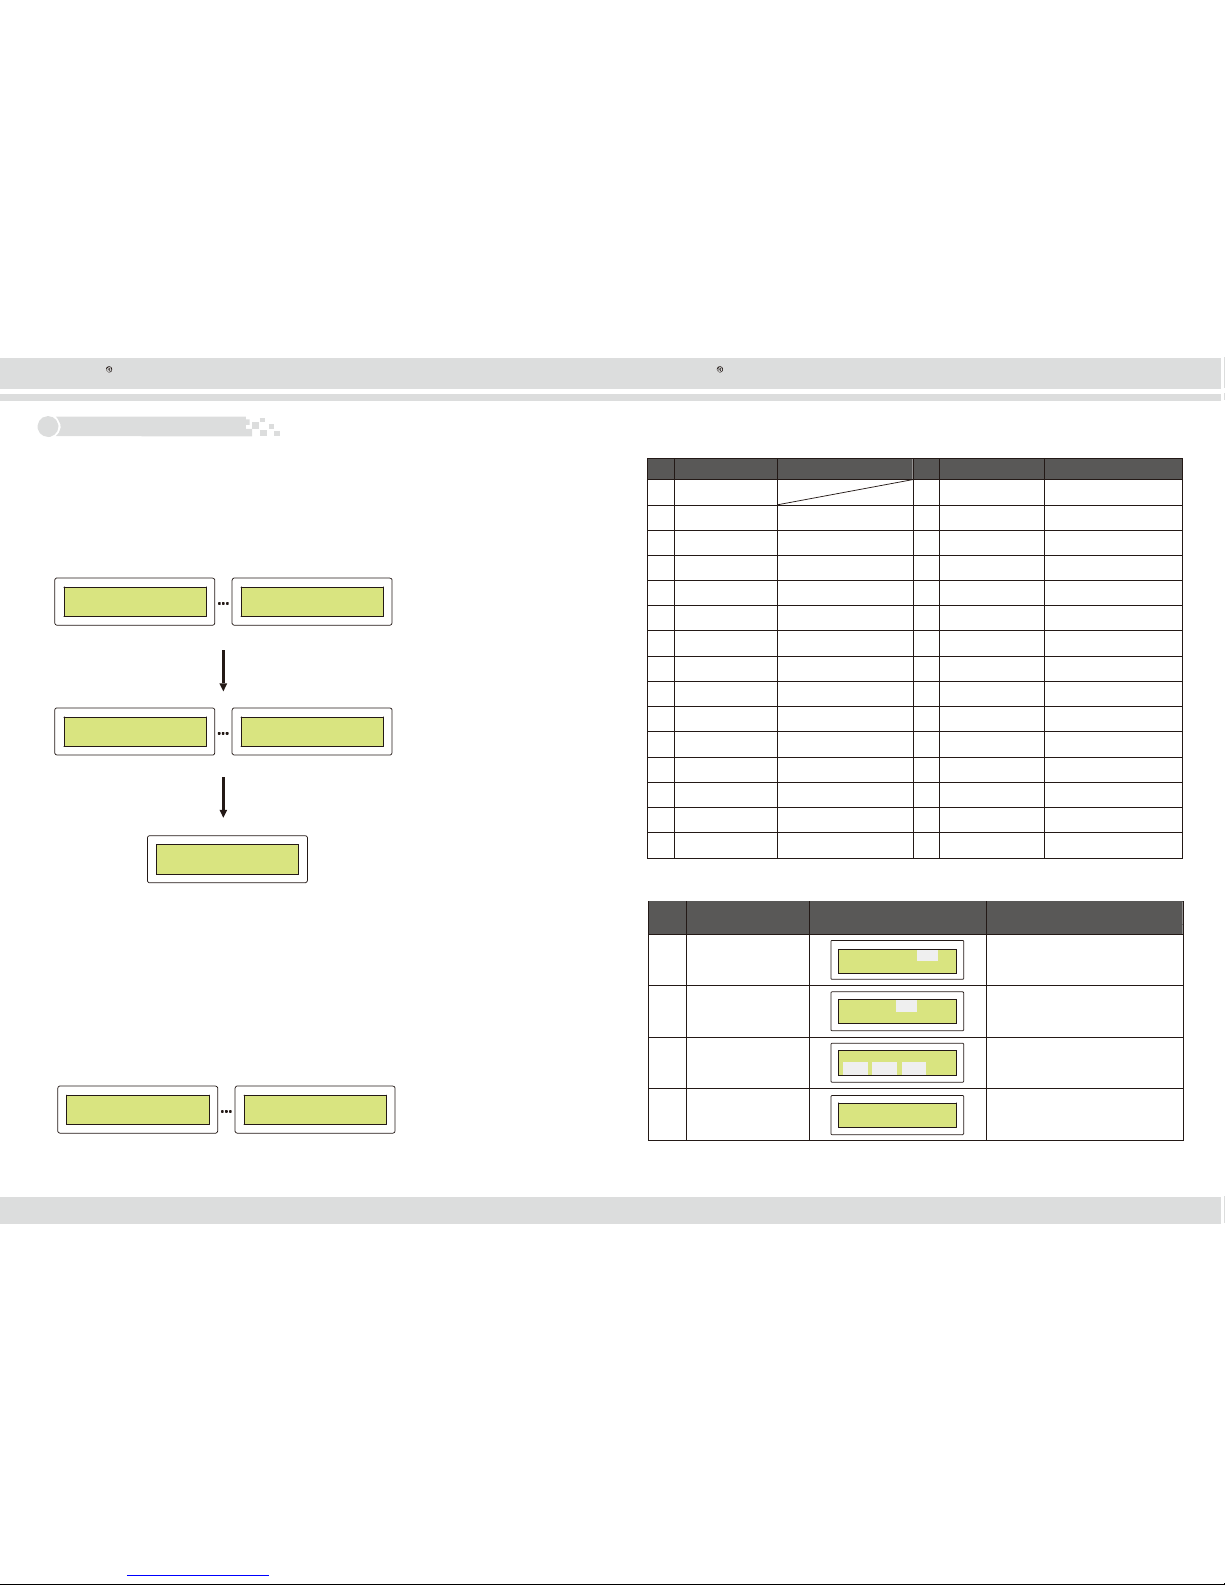
No.
DisplayInstruction
Instruction
No.
DisplayInstruction
Instruction
1
BL
ACK
16
WHI T E
FADE
SPEED/BRIGHTNESS
ADJUSTMENT
2
STATIC R ED
SPEED/BRIGHTNESS
ADJUSTMENT
17
COLO RFAD E
SPEED/BRIGHTNESS
ADJUSTMENT
3
STATIC G REEN
SPEED/BRIGHTNESS
ADJUSTMENT
18
COLO RCO VER
SPEED/BRIGHTNESS
ADJUSTMENT
4
STATIC BL UE
SPEED/BRIGHTNESS
ADJUSTMENT
19
COLO RSP LIT
SPEED/BRIGHTNESS
ADJUSTMENT
5
STATIC Y ELLOW
SPEED/BRIGHTNESS
ADJUSTMENT
20
COLO RCL OSE
SPEED/BRIGHTNESS
ADJUSTMENT
6
STATIC PU RPLE
SPEED/BRIGHTNESS
ADJUSTMENT
21
RGB CH ASE
F
SPEED/BRIGHTNESS
ADJUSTMENT
7
STATIC CYAN
SPEED/BRIGHTNESS
ADJUSTMENT
22
RGB CH ASE
R
SPEED/BRIGHTNESS
ADJUSTMENT
8
STATIC W HITE
SPEED/BRIGHTNESS
ADJUSTMENT
23
COLO R
CHA SE
F
SPEED/BRIGHTNESS
ADJUSTMENT
9
RGB
CHA NGE
SPEED/BRIGHTNESS
ADJUSTMENT
24
COLO R
CHA SE
R
SPEED/BRIGHTNESS
ADJUSTMENT
10
COLO RCH ANGE
SPEED/BRIGHTNESS
ADJUSTMENT
25
WHIT E METE O
F
SPEED/BRIGHTNESS
ADJUSTMENT
11
RG SMO OTH
SPEED/BRIGHTNESS
ADJUSTMENT
26
WHIT E METE O
R
SPEED/BRIGHTNESS
ADJUSTMENT
12
RB
SMO OTH
SPEED/BRIGHTNESS
ADJUSTMENT
27
COLO R
ME TEO
F
SPEED/BRIGHTNESS
ADJUSTMENT
13
GB SMO OTH
SPEED/BRIGHTNESS
ADJUSTMENT
28
COLO R
ME TEO
R
SPEED/BRIGHTNESS
ADJUSTMENT
14
RGB
SMO OTH
SPEED/BRIGHTNESS
ADJUSTMENT
29
COLO R
FLO W
F
SPEED/BRIGHTNESS
ADJUSTMENT
15
COLO RSM OOTH
SPEED/BRIGHTNESS
ADJUSTMENT
30
COLO R
FLO W
R
SPEED/BRIGHTNESS
ADJUSTMENT
PIXEL
NUMBE R
:
03
2
RANG E:4-170
RU NTIME
S
:
2
55
000=NO T R UNNIN
G
RG BBRIGHT ADJ
R255G255B255
No.
Submenu function
(Press MODE+/-
to change menu below)
LCD display condition
Sett ing
met hods
1
PIXEL QUANTITY
ADJUSTMENT
Press BRT+/- increase or
decrease pixel quantity
2
OPERATION TIMES
ADJUSTMENT
Press BRT+/- increase or decrease
operation times (only work between
mode 31-38)
3
RGB OUTPUT GREY
LEVELADJUSTMENT
Pr ess B RT+/ -toadj us t
eac h RGB
lev el, pr ess S PEED+ / -
to
cha ng e
R, G, or B
4
MODE RECOVER
DEFAULT
LOA D DEFAUL T SET
PRES S BRT +-KEY
Pre ss
BRT +/-
to rec ove rd afau lt
4.
Operating
instructions
8 function keys on the controller, MODE+/MODE-(mode),SPEED+/SPEED-(speed),
BRT+/BRT-(brightness),SETUP(setup),HOTKEY(function)
Following form is general change functional modes.
Note: For mode 2-8, static color will be showed when minimum speed 1 and maximum speed 8,
and speed 2-7 is strobe speed.
1. Basic Control
1) Pressing MODE+/MODE- button, to switch general change modes1-30, automatic change
modes 31-38 and automatic timing runchange modes 39.
01BLAC
K
:
30
COLO RFLOW
R
SPEE D:8
BR T:8
(general change
modes1-30
)
2012-01-0114 17
31 PLAY1OFF
2012-01-0112:00
38 PLAY8OFF
2012-01-0112:00
(Automatic combination change
modes
31-38)
39PLAY1-PLAY
8
2012-01-0112:00
(automatic timing run change mo des
39)
At status of Mode 1-30, press button SETUP for 3 seconds to enter submenu,
see the form below.
2) Underthe generalchange modes, pressing SPEED+/SPEED- button to adjust the speed of the change
modes; Pressing BRT+/BRT- button to adjust the brightness of the change modes.
3) Pressing SETUP button for 3 seconds, then enter into the submenu setting surface of general change
modes orautomatic change modes .Pressing MODE+/MODE-button to switch the submenu page.
Pressing SPEED+/SPEED- button to sway the configuration item .Pressing BRT+/BRT- to change the
parameter values of the configuration item. Pressing SETUP button to Exit thesubmenuof setting surface.
4) Pressing HOTKEY buttonfor 3 seconds, enter into the submenu of address operation, pressing HOTKEY
to Exit the submenu of address operation.
2. Submenu operational approach of general change modes 1-30
01BLAC
K
2012-01-0114:17
30
COLO RFLOW
R
SPEE D:8
BR T:8
(general change
modes1-30
)
Finish each parameter setting, then press button SETUP to exit.
Page 3
LTECH
LTECH
LT-800DMX controller
LT-800DMX controller
5
6
LT@LTECHONLINE.COM
ZHUHAI LTECH ELECTRONICTECHNOLOGYCO., LTD.
Tel: +86 756 620 8823
Fax: +86 756 620 8833
WWW.LTECHONLINE.COM
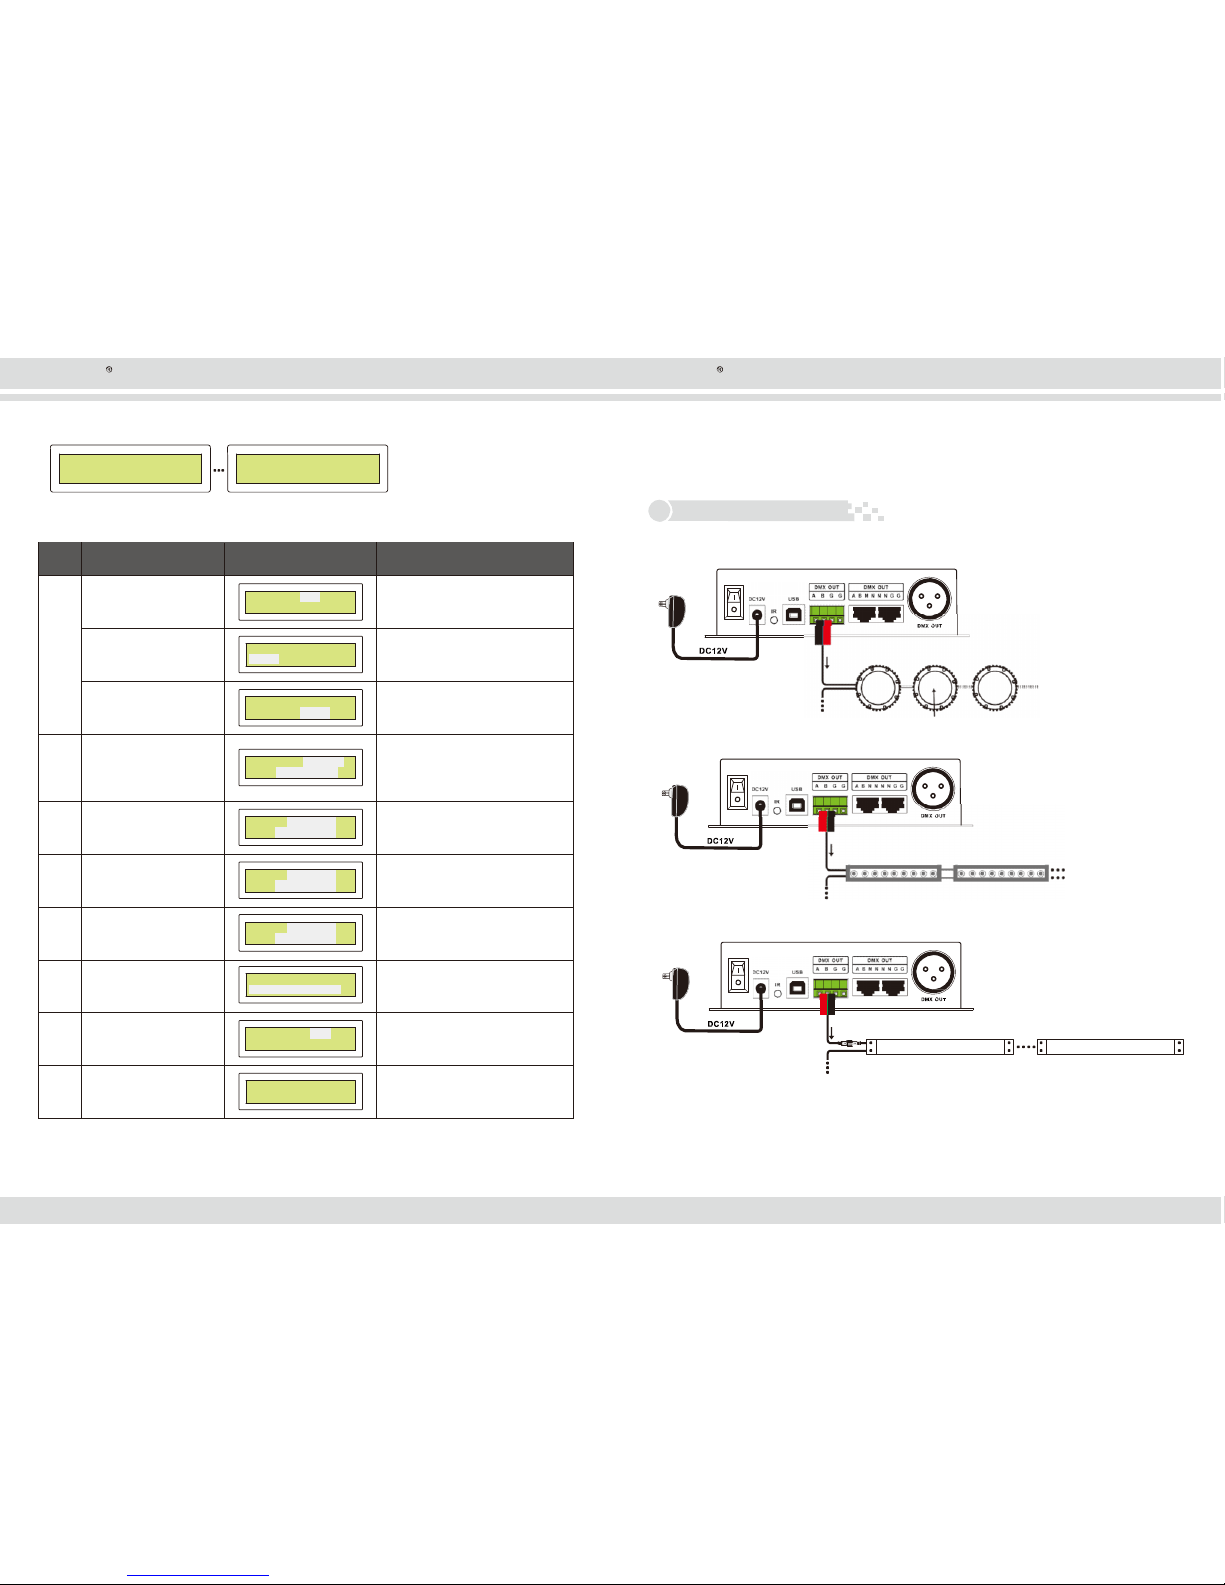
31PLAY1
O
F F
OPEN 1
SAV
E 1
31 PLAY 1OFF
O
P EN 1
SAV
E 1
RU NWEE
K
:
MTW
TF S S
TIM
E:18:00-0
6:00
DAT E0 1
:
0101-01
03
TIM
E:00:00-00:00
RG B ORDE R
:
RGB
No.
1
setting switch state
Press “BRT+/-”toset the switch state,
Select “ON”to 39 automatic
circle modes
store the times of operating
(it is convenient to set basic
on the last time setting)
31 PLAY 1OFF
OPEN 1
SAV
E 1
Press ” SPEED+/- ” enter into “OPEN”
(turn out the operation times of 1-30
modes ), then Press “BRT+” to confirm.
save the setting about the
operation time
Press “SPEED+/-” enter into “SAVE”
(save the setting about the operation
time), Press “BRT+/-” to confirm.
2
Setting operation week
Press “SPEED+/-” then youcan see the
“MTWTFSS”(Monday to Sunday)and
00:00 00:00(time), press “BRT+/-” to
choose(if you do not choose the Monday
to Sunday, the screen willappear _ the
one mark)
3
Operate time and date 1
Press “SPEED+/-” you can press
“BRT+/-” choose 0101-0103(date)and
00:00-00:00(time) to adjust date and
time.
4
Operate time and date 2
Press “SPEED+/-” you can press
“BRT+/-” choose 0101-0103(date)and
00:00-00:00(time) to adjust date and
time.
5
Operate time and date 3
Press “SPEED+/-” you can press
“BRT+/-” choose 0101-0103(date)and
00:00-00:00(time) to adjust date and
time.
6
System clock setting
DATE/TIMESET
U P
2012-01-01
12:00
Press “SPEED+/-” to choose
“2012- 01 01”(date), 12:00(time),
press ”BRT+/-” toadjust date and time.
7
RGB sequence setting
Press “BRT+/-” to adjust the RGB
brightness sequence, for example:
RGB, RBG, GRB, GBR, BRG, BG.
8
Modes restore default
value
LOA D DEFAUL T SET
PRES S BRT +-KEY
Press “BRT+/-” restore the
automatic default value.
DMX spot
light
3. Sub Menu of Automatic change modes 31-38
4. Automatic timing run mode 39
When set tothe39th mode, according to the preset switchcondition and running time of
automatic change modes 31-38 to runthe corresponding mode. The submenu only has the
31 PLAY1OFF
2012-01-0112:00
38 PLAY8OFF
2012-01-0112:00
(Automatic combination
change
modes
31-38)
items that restore to default status (Please Carefully Choose this item)
When you in the situation of 31-38 modes, press set upkeyfor 3seconds entering into the
Submenu, such as below:
5. Connection
schemes
1. Connect to the LED Lamps with DMX chip inside
ada pte
r
AC100 -240V
DMX signal
output
connect to the power supply
ada pte
r
AC100 -240V
DMX signal
output
DMX wall
washe r
DMX wall
washe r
DAT E0 1
:
0101-01
03
TIM
E:00:00-00:00
connect to the power supply
DAT E0 1
:
0101-01
03
TIM
E:00:00-00:00
ada pte
r
AC100 -240V
DMX signal
output
LED DMX digital
tube
LED DMX digitaltube
connect to the power supply
Finish each parameter setting, then press button SETUP toexit.
【Note】pleaseconfirm the LED lamp you connectedcan receivestandard DMX512 signal, otherwise, itcan’t work properly
Page 4
LT-800DMX controller
LT-800DMX controller
7
8
DMX signa
l input
Outpu t
Input
Out pu t
Input
Out pu t
Input
Out pu t
IN
RI R
R
104
R
OUT IN
RI R
R
104
R
OUT
RS
RS
+VC
B
R
G
+VC
B
R
G
+12V
GNDCIDI
+12V
+12V
GND
GND
DGNG
DGNG
DO D I
+12V
GND
DGNG
DO
CI
RI
UI
CI
RI
UI
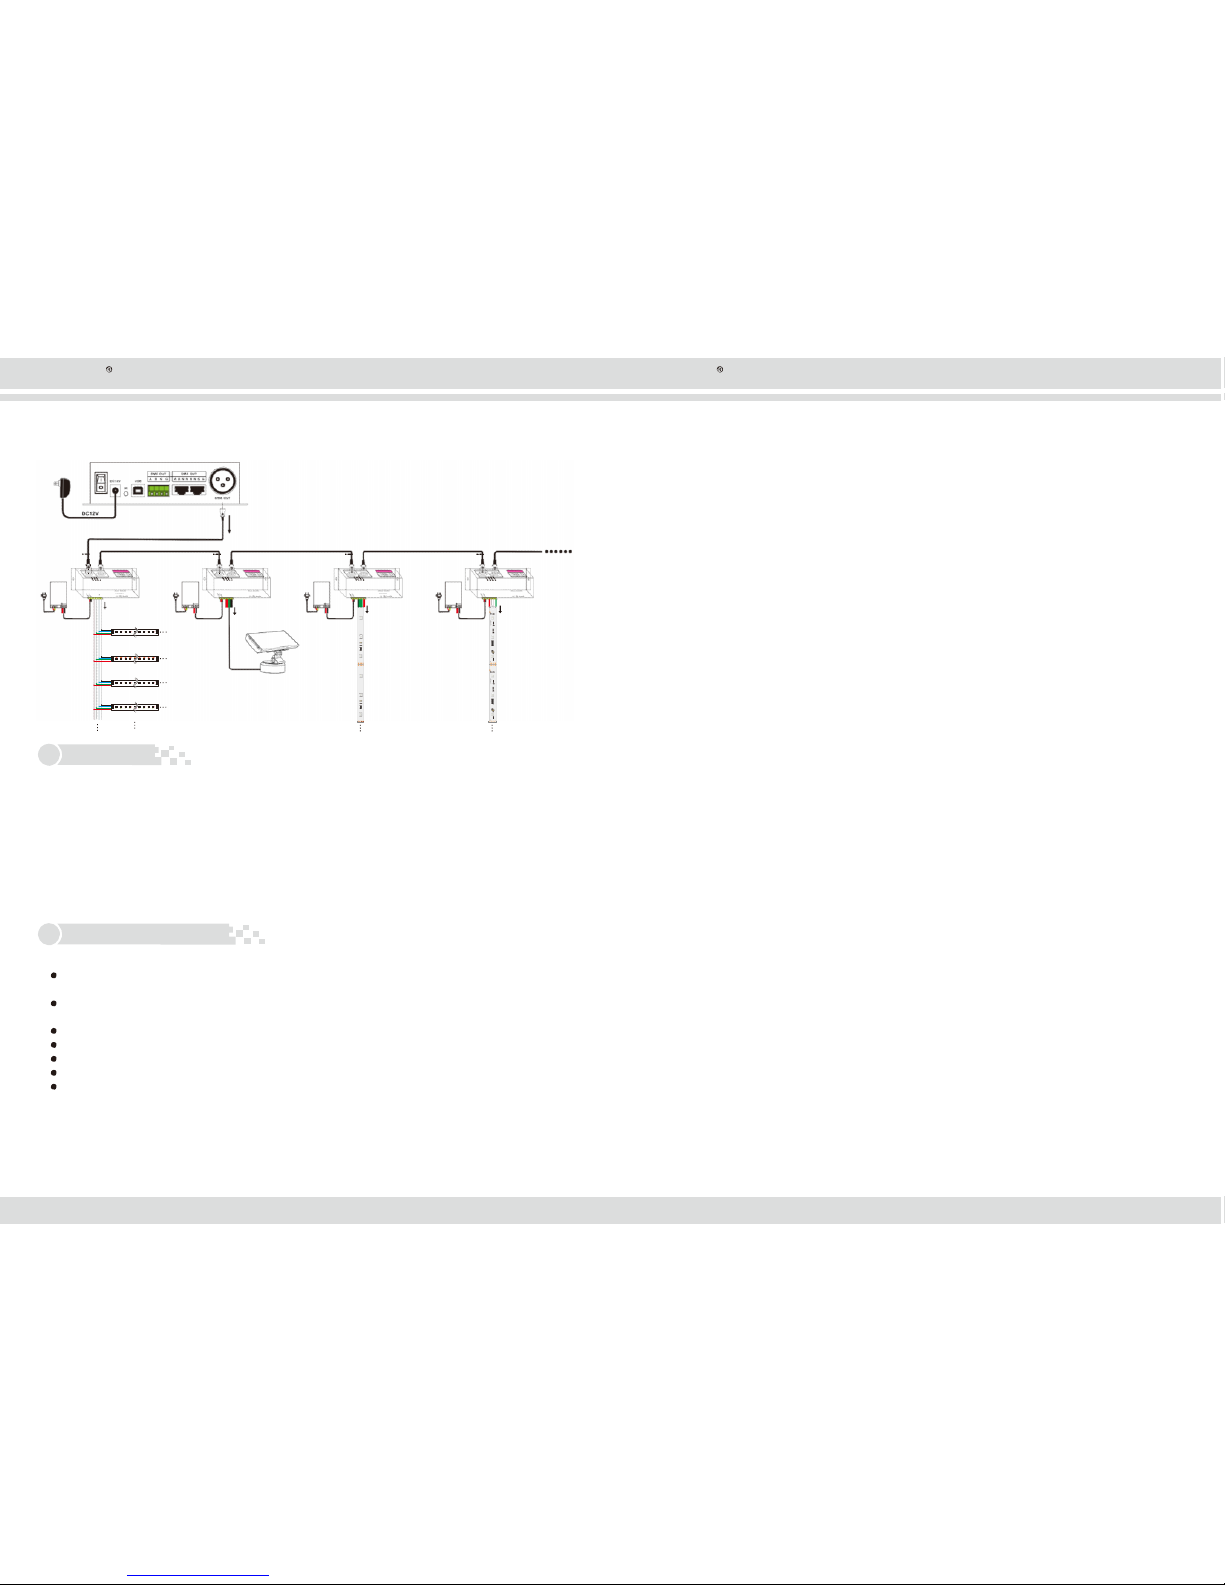
2. connect to the DMX driver
ada pte
r
AC100- 240V
DMX signa lou tput
pow er
DMX-P WMCV dri ver
3A X3CH
power
supply
DMX-P WMCC dri ver
DC12V-DC48V
350mA x3CH
power
supply
DMX-SPI s ignal driver
512 CHANNEL
power
supply
DMX-SPI s ignal driver
DC12V-24V
512CHANNEL
AC
DC
L
N
DC12V
CVP WMout put
AC DC
L
N
DC48V
CC PWMout put
AC DC
L
N
DC12V
SPI signal output
AC DC
L
N
电源输入
DC5V-24V
GND
SPI signal output
LEDSMD RGBstri p
hi –power projection lamp
511
471
511
471
511
471
471
LDP6 80 3 d rivi n g
ICL EDstr i
p
(DAT
A,C LK tw o si gna l c ables
)
GND
GND
TM1809 dri ving IC L ED s trip
511
471
511
471
511
471
471
RGB
GND
5.
Attention
1. The product shallbeinstalled and serviced by a qualified person.
2. This product is non-waterproof. Please avoid the sun and rain. When installed outdoors please
ensure it is mounted in a waterproof enclosure.
3. Good heat dissipation will prolong the working life of the controller.Pleaseensure good ventilation.
4. Please check if the output voltage of any LED powersuppliesused comply with the workingvoltage of the product.
5. Please ensure that adequate sized cable is used from the controllerto the LED lights to carry the current.
Please also ensure thatthe cable is secured tightly in the connectorto avoid the accidentsdueto overheat and
poor contact on the wire.
6. Ensure all wire connections and polarities arecorrect before applying power to avoid any damages to the LED lights.
7. If a fault occurs please returnthe product to your supplier. Donot attempt to fix this product by yourself.
6.
Warranty
Agreement
1. We provide lifelong technical assistance with this product:
A 3 year warranty is given from the date of purchase. The warranty is for free repair or replacement and covers
manufacturing faults only.
For faults beyond the 3 year warranty we reserve the right to charge for time and parts.
2. Warranty exclusions below:
Any man-made damages caused from improper operation, or connecting to excess voltage and overloading.
The product appears to have excessive physical damage.
Damage due to natural disasters and force majeure.
Warranty label, fragile label and unique barcode label have been damaged.
The product has been replaced by a brand new product.
3. Repair or replacement as provided under this warranty is the exclusive remedy to the customer.
Ltech shall not be liable for any incidental or consequential damages for breach of any stipulation in this warranty.
4. Any amendment or adjustment to this warranty must be approved in writing by Ltech only.
★ This manual only applies to this model. Ltech reserves the right to make changes without prior notice.
 Loading...