

Page 1
!
CAUTION
MegaRAID® iBBU05 LiON Battery
Backup Unit
Quick Installation Guide
Thank you for purchasing the LSI MegaRAID LiON (lithium
ion) intelligent Battery Backup Unit 05 (iBBU05). The iBBU05
is designed for use on MegaRAID SAS RAID controllers.
It protects the integrity of the cached data on a MegaRAID
controller for up to 72 hours in the event of a complete AC
power failure or a brief power outage.
LSI provides a family of MegaRAID intelligent Battery
Backup Units for use with its high-performance MegaRAID
RAID controllers. The LSI MegaRAID iBBUs provide an
inexpensive alternative to using an uninterruptible power
supply and a second level of fault tolerance when used in
conjunction with an uninterruptible power supply.
This Quick Installation Guide explains how to install the
iBBU05 on the following RAID controllers:
• MegaRAID SAS 8704ELP
• MegaRAID SAS 8708ELP
• MegaRAID SAS 8888ELP
Please take a few minutes to read this guide before you
install the iBBU05. For more information about any topic
covered in this guide, refer to the Intelligent Battery Backup
Units for 1078-based MegaRAID Products User’s Guide on
your MegaRAID Universal Software Suite CD.
OVERVIEW OF THE INTELLIGENT
BATTERY BACKUP UNIT
An intelligent BBU has built-in functionality to charge the
battery pack automatically and to communicate battery
status information such as voltage, temperature, and current,
to the host computer system.
You can connect the iBBU05 directly to the MegaRAID SAS
8704ELP and SAS 8708ELP RAID controllers.
The iBBU05 does not mount directly to the MegaRAID SAS
8888ELP RAID controller. Instead, you can use the supplied
12-inch cable to connect the iBBU05 to the RAID controller.
The iBBU05 is mounted inside the chassis within 10 inches
of the controller.
Note
: The LSI part number for the daughtercard is
25125.
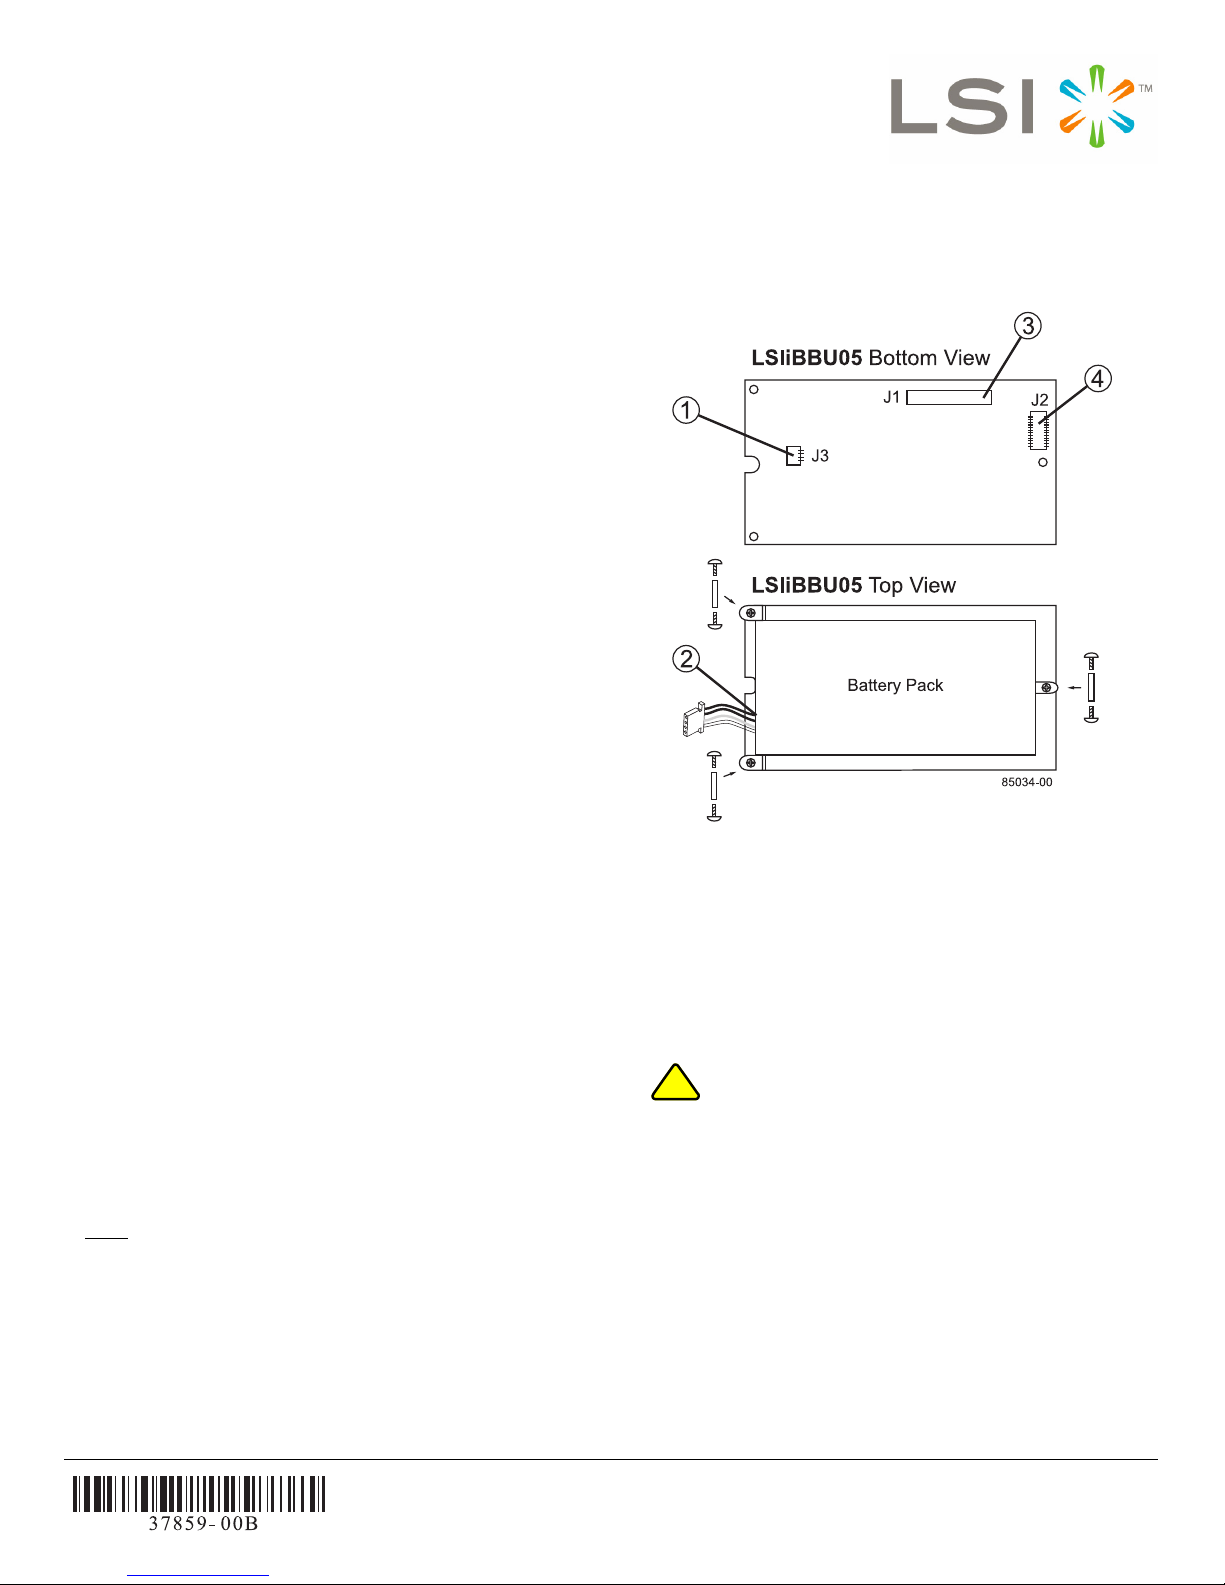
Figure 1 shows the top view and the bottom view of the
iBBU05, the M2.50-0.45 x 5mm screws, and the 6mm
standoffs. (The “top” side is the side that you can see after
you install the iBBU05 on the RAID controller.) The iBBU05
combines a battery pack with a daughtercard.
Figure 1 Intelligent Battery Backup Unit 05
1 - J3 Battery Pack Harness Connector
2 - Battery Pack Harness
3 - J1 Connector
4 - J2 Board-to-board Connector
Installing the iBBU05 on the SAS
8704ELP or SAS 8708ELP RAID Controller
Electrostatic discharge can damage the iBBU05
and the MegaRAID SAS RAID controller. Make
sure that you install the iBBU05 at an ESD-safe
workstation that meets the requirements of EIA625 – “Requirements For Handling Electrostatic
Discharge Sensitive Devices.” When you install
the iBBU05, follow the ESD-recommended
practices in the latest revision of IPC-A-610.
If the SAS 8704ELP or SAS 8708ELP RAID controller is
already installed in a computer, follow these steps to remove
it before you install the iBBU05.
Step 1 Shut down the computer, turn off the power, and
unplug the power cords.
Page 2

Step 2 Remove the cover from the computer according
85008-05
Edge of Motherboard
LSIiBBU05 (Top View)
Bracket Screw
Edge of
Motherboard
Press Here
Press Here
to the instructions in the system user’s manual to
allow access to the controller.
Step 3 Unplug all cables from the controller, remove the
screw attaching the bracket to the computer case,
and carefully remove the controller from the slot.
Step 4 Place the controller on a flat, clean, static-free
surface, and continue with the next section.
Perform the following steps to mount the iBBU05 directly to
the RAID controller using the daughtercard. (All components
are installed on the bottom of the card. The battery is
installed on the top. The maximum height of components
installed on the iBBU05 is 0.125”.)
Step 1 Insert the battery pack harness into the 5-pin J3
connector on the backside of the iBBU05.
Step 2 With the RAID controller on a flat, clean, static-
free surface, hold the iBBU05 daughtercard so
that the battery side is up, and the J2 board-toboard connector lines up with the J7 BBU
connector on the RAID controller, as shown in
Figure 2.
Figure 2 Installing the LiON iBBU05 on the SAS
8708ELP RAID Controller
Step 5 Install the controller in the computer in the PCI
Express slot, as shown in Figure 3.
Important
: Never apply pressure to the iBBU05 when you
insert the controller. Instead, press down only on
the top edge of the controller, as shown in
Figure 3.
Press down gently but firmly to seat the card
correctly in the slot. The bottom edge of the
controller must be flush with the slot. Secure the
controller to the computer chassis with the
bracket screw.
Figure 3 Installing the SAS 8708ELP RAID
Controller
Step 3 Carefully press the iBBU05 onto the controller, so
Step 4 Use the Phillips-head screws that are provided to
Important
that the two connectors are firmly joined.
secure the iBBU05 to the controller with the
M2.50-0.45 x 5mm screws, and the 6mm
standoffs in the three screwholes.
The standoffs are threaded at both ends and a
6mm screw goes into each end.
: Center the screwdriver carefully to avoid stripping
the screwhead. Do not over-tighten the screws.
Step 6 Attach the controller to the computer chassis with
the bracket screw.
Step 7 Attach the cables, as needed, to the connectors
on the controller.
Step 8 Replace the computer cover and reattach the
power cords.
Step 9 Turn on the power to the computer.
Important
: Refer to the MegaRAID SAS Software User’s
Guide for information about running the RAID
configuration utilities and to the MegaRAID SAS
Device Drivers Installation User’s Guide for
information about installing software drivers.
Installing the iBBU05 on the MegaRAID
SAS 8888ELP RAID Controller
The iBBU05 does not mount directly to the SAS 8888ELP
RAID controller. Instead, use the supplied 12-inch cable to
connect the iBBU05 to a RAID controller. The battery backup
2 of 4
Page 3

unit must be mounted inside the chassis within 10 inches of
WAR N I NG
!
the RAID controller.
Because server and workstation chassis vary from vendor to
vendor, there is no standard mounting option that is
compatible with the various system configurations.
Therefore, the iBBU05 battery kit contains only the battery
and the cable, allowing VAR’s and chassis manufacturers to
customize the location of the remote battery to provide the
most flexibility within various environments.
Follow these steps to install the iBBU05 remotely.
Step 1 Ground yourself, and remove the iBBU05 from
the package.
Step 2 Use the three Phillips-head screws that are
provided to secure the iBBU05 to the
motherboard or to the server chassis.
Step 3 Insert the battery pack harness connector at the
end of the 5-pin cable into the J2 connector on
the bottom side of the iBBU05.
Note
: The cable connector is polarized and can be
inserted into the J10 board battery connector only
if the rails on the harness connector align with the
slots on the J10. Do not force the cable into the
20-pin in-line connector. The cable end inserts
into the connector with minimal resistance.
Step 4 Connect the J1 connector on the iBBU05 to the
J10 battery backup connector on the backside of
the SAS 8888ELP RAID controller, as shown in
Figure 4.
The iBBU05 does not connect directly to the
MegaRAID controllers. Instead, it uses the
supplied 20-pin, 10-inch cable to connect to a
controller. There are black triangles on the
connectors to help you install them properly.
Insert the cable connectors into the controller
connector and the iBBU connector so that the
black triangles are aligned, as shown in the
example in Figure 4.
Figure 4 Connecting the iBBU05 on the SAS
8888ELP RAID Controller
Disposing of Battery Backup Units
Warning: If the iBBU05 is damaged in any way, toxic
chemicals may be released.
The material in the battery pack contains heavy metals that
can contaminate the environment. Federal, state, and local
regulations prohibit the disposal of rechargeable batteries in
public landfills. Be sure to recycle the old battery packs
properly. Comply with all applicable battery disposal and
hazardous material handling laws and regulations in the
country or other jurisdiction where you are using the iBBU05.
There is danger of an explosion if the battery is
incorrectly replaced. Replace it only with the
same or equivalent type recommended by the
manufacturer. Dispose of used batteries
according to the manufacturer’s instructions.
3 of 4
Page 4

TECHNICAL SUPPORT
For assistance in installing, configuring, or running your SAS
RAID controller, contact LSI Customer and Technical
Support.
Phone Support:
1-800-633-4545 (North America)
Web Site:
http://www.lsi.com/support
37859-00, Rev. B, July 2008
Find a list of LSI Corporation’s U.S. distributors, international distributors, sales
offices, and design resource centers on the LSI web site at:
http://www.lsi.com
LSI, the LSI logo design, and MyStorage are trademarks or registered trademarks
of LSI Corporation. All other brand and product names may be trademarks of their
respective companies.
Copyright © 2008 by LSI Corporation. All rights reserved.
LSI Corporation reserves the right to make changes to any products and services
herein at any time without notice. LSI does not assume any responsibility or liability
arising out of the application or use of any product or service described herein,
except as expressly agreed to in writing by LSI; nor does the purchase, lease, or
use of a product or service from LSI convey a license under any patent rights,
copyrights, trademark rights, or any other of the intellectual property rights of LSI
or of third parties.
 Loading...