

Page 1

MegaRAID® Express 500
Hardware Guide
MAN-475
6/13/2001
Page 2

© Copyright 2001 LSI Logic Corporation
All rights reserved.
LSI Logic Corporation
6145-D Northbelt Parkway
Norcross, GA 30071
This publication contains proprietary information which is protected by copyright. No part of this publication can be reproduced,
transcribed, stored in a retrieval system, translated into any language or computer language, or transmitted in any form whatsoever
without the prior written consent of the publisher, LSI Logic Corporation. LSI Logic Corporation acknowledges the following
trademarks:
Intel is a registered trademark of Intel Corporation
Sytos 300 is a registered trademark of Sytron Corporation.
MS-DOS, and Microsoft are registered trademarks of Microsoft Corporation. Windows 95, Microsoft Windows and Windows NT are
trademarks of Microsoft Corporation.
SCO, UnixWare, and Unix are registered trademarks of the Santa Cruz Operation. Inc.
Novell NetWare is a registered trademark of Novell Corporation.
IBM, AT, VGA, PS/2, and OS/2 are registered trademarks and XT and CGA are trademarks of International Business Machines
Corporation.
NEC is a registered trademark of Nippon Electric Corporation.
Sony is a registered trademark of Sony Corporation.
Toshiba is a registered trademark of Toshiba America Corporation.
Archive and Python are registered trademarks of Archive Corporation.
Quantum is a registered trademark of Quantum Corporation.
Seagate is a registered trademark of Seagate Corporation.
SyQuest is a trademark of SyQuest Corporation.
Panasonic is a registered trademark of Panasonic Corporation.
Hewlett-Packard is a registered trademark of Hewlett-Packard Corporation.
Amphenol is a trademark of Amphenol Corporation.
Siemens is a registered trademark of Siemens Corporation.
AMP is a trademark of AMP Corporation.
.
Revision History
4/14/00 Initial release.
4/11/01 Corrected RAID 0 graphic, and Array Configuration Planner table.
6/13/01 Make corrections, such as cache size (16 MB is smallest option), and the number of physical disk drives
supported at various RAID levels.
MegaRAID Express500 Hardware Guide
ii
Page 3

Table of Contents
1 Overview .................................................. 1
Single Ended and Differential SCSI Buses....................... 2
Maximum Cable Length for SCSI Standards....................2
Documentation..................................................................3
MegaRAID Express 500 Block Diagram..........................4
2 Introduction to RAID................................ 5
RAID Benefits.................................................................. 5
In This Chapter................................................................. 6
MegaRAID Express 500 – Host-Based RAID Solution ... 7
RAID Overview................................................................ 8
Fault Tolerance................................................................. 8
Consistency Check............................................................ 8
Disk Rebuild..................................................................... 9
Hot Spares ......................................................................10
Hot Swap ........................................................................ 10
Parity ..............................................................................11
Disk Striping................................................................... 12
Disk Mirroring................................................................ 13
Disk Spanning.................................................................14
Logical Drive.................................................................. 15
Logical Drive States .......................................................15
SCSI Drive States ........................................................... 15
Disk Array Types............................................................16
Enclosure Management................................................... 16
3 RAID Levels............................................ 17
Selecting a RAID Level.................................................. 18
RAID 0 ........................................................................... 19
RAID 1 ........................................................................... 20
RAID 3 ........................................................................... 21
RAID 5 ........................................................................... 23
RAID 10 ......................................................................... 24
RAID 30 ......................................................................... 25
RAID 50 ......................................................................... 26
Preface
iii
Page 4

Table of Contents,
Continued
4 Features ................................................. 27
Hardware Requirements .................................................28
Configuration Features ................................................... 28
Hardware Architecture Features..................................... 29
Array Performance Features ........................................... 29
RAID Management Features ..........................................30
Fault Tolerance Features.................................................30
Software Utilities............................................................ 31
Operating System Software Drivers................................31
MegaRAID Express 500 Specifications .........................32
PCI Bridge/CPU ............................................................. 32
Cache Memory................................................................33
MegaRAID BIOS ...........................................................33
Onboard Speaker ............................................................ 33
Serial Port ....................................................................... 33
SCSI Bus ........................................................................34
SCSI Connectors.............................................................34
SCSI Termination........................................................... 34
SCSI Firmware ...............................................................34
RAID Management......................................................... 35
Fault-Tolerance Features ................................................ 35
Compatibility.................................................................. 36
Summary.........................................................................36
5 Configuring MegaRAID Express 500 ... 37
Configuring SCSI Physical Drives..................................37
Current Configuration..................................................... 38
Logical Drive Configuration........................................... 38
Physical Device Layout ..................................................40
Configuring Arrays......................................................... 42
Configuration Strategies ................................................. 43
Assigning RAID Levels.................................................. 45
Configuring Logical Drives ............................................45
Optimizing Data Storage ................................................ 46
Planning the Array Configuration................................... 46
Array Configuration Planner........................................... 47
MegaRAID Express500 Hardware Guide
iv
Page 5

Table of Contents,
Continued
6 Hardware Installation ............................ 49
Checklist......................................................................... 49
Installation Steps.............................................................50
Step 1 Unpack.................................................................51
Step 2 Power Down ........................................................ 51
Step 3 Configure Motherboard....................................... 51
Step 4 Install Cache Memory..........................................52
Step 5 Set Jumpers.......................................................... 53
MegaRAID Express 500 Card Layout............................ 53
Step 6 Set Termination ................................................... 56
SCSI Termination........................................................... 57
Step 7 Install MegaRAID Express 500........................... 60
Step 8 Connect SCSI Cables...........................................61
Step 9 Set Target IDs...................................................... 62
Device Identification on MegaRAID Express 500 .........63
Step 10 Power Up........................................................... 64
Step 11 Run MegaRAID BIOS Setup.............................64
Step 12 Install the Operating System Driver................... 65
Summary.........................................................................66
7 Cluster Installation and Configuration 67
Software Requirements................................................... 67
Hardware Requirements .................................................68
Installation and Configuration ........................................69
Driver Installation Instructions under Microsoft
Windows 2000 Advanced Server ...................................70
Network Requirements ................................................... 75
Shared Disk Requirements.............................................. 75
Cluster Installation.......................................................... 76
Installing the Windows 2000 Operating System............. 77
Setting Up Networks.......................................................77
Configuring the Cluster Node Network Adapter ............ 79
Configuring the Public Network Adapter ....................... 80
Verifying Connectivity and Name Resolution................ 80
Verifying Domain Membership...................................... 81
Setting Up a Cluster User Account................................. 82
Setting Up Shared Disks................................................. 83
Configuring Shared Disks............................................... 84
Assigning Drive Letters .................................................. 84
Verifying Disk Access and Functionality .......................85
Cluster Service Software Installation.............................. 86
Configuring Cluster Disks ..............................................89
Validating the Cluster Installation ..................................95
Configuring the Second Node......................................... 95
Verify Installation........................................................... 96
SCSI Drive Installations .................................................97
Configuring the SCSI Devices........................................ 97
Terminating the Shared SCSI Bus.................................. 97
Preface
v
Page 6

Table of Contents,
Continued
8 Troubleshooting .................................... 99
BIOS Boot Error Messages .......................................... 101
Other BIOS Error Messages......................................... 103
DOS ASPI Driver Error Messages ............................... 104
Other Potential Problems.............................................. 105
A SCSI Cables and Connectors ............. 107
SCSI Connectors...........................................................107
68-Pin High Density SCSI Internal Connector ............. 107
High-Density 68-Pin SCSI Connector Pinout............... 113
68-Pin SCSI Connector Pinout, Continued................... 114
68-Pin Connector Pinout for LVD SCSI ...................... 115
B Audible Warnings ................................ 117
C Cluster Configuration with a Crossover Cable...119
Solution.........................................................................120
Glossary.......................................................... 121
Index................................................................ 131
MegaRAID Express500 Hardware Guide
vi
Page 7

Preface
The MegaRAID Express 500 PCI RAID Controller supports all single ended and low-voltage
differential (LVD) SCSI devices on a 160M Ultra and Wide SCSI channel with data transfer rates
up to 160 MB/s (Megabytes per second). This manual describes MegaRAID Express 500.
Limited Warranty
Limitations of Liability
The buyer agrees if this product proves to be defective, that LSI Logic is obligated only to repair or
replace this product at LSI Logic’s discretion according to the terms and conditions of the warranty
registration card that accompanies this product. LSI Logic shall not be liable in tort or contract for
any loss or damage, direct, incidental or consequential resulting from the use of this product. Please
see the Warranty Registration Card shipped with this product for full warranty details.
any kind whatsoever, whether direct, indirect, incidental, or consequential (whether arising from
the design or use of this product or the support materials provided with the product). No action or
proceeding against LSI Logic Corporation may be commenced more than two years after the
delivery of product to Licensee of Licensed Software.
Licensee agrees to defend and indemnify LSI Logic Corporation from any and all claims, suits, and
liabilities (including attorney’s fees) arising out of or resulting from any actual or alleged act or
omission on the part of Licensee, its authorized third parties, employees, or agents, in connection
with the distribution of Licensed Software to end-users, including, without limitation, claims, suits,
and liability for bodily or other injuries to end-users resulting from use of Licensee’s product not
caused solely by faults in Licensed Software as provided by LSI Logic to Licensee.
LSI Logic Corporation shall in no event be held liable for any loss, expenses, or damages of
Cont’d
Preface
vii
Page 8

Preface,
Continued
Package Contents
Technical Support
Web Site
You should have received:
• a MegaRAID Express 500 PCI RAID Controller
• a CD with drivers, utilities, and documentation
• a MegaRAID Express 500 Hardware Guide (on CD)
• a MegaRAID Configuration Software Guide (on CD)
• a MegaRAID Operating System Drivers Guide (on CD)
• software license agreement (on CD)
• a warranty registration card (on CD)
If you need help installing, configuring, or running the MegaRAID Express 500 PCI
RAID Controller, call your LSI Logic OEM Technical Support representative at 678-728-
1250. Before you call, please complete the MegaRAID Problem Report form on the next
page.
We invite you to access the LSI Logic world wide web site at:
http://www.lsil.com.
MegaRAID Express500 Hardware Guide
viii
Page 9

MegaRAID Problem Report Form
Customer Information MegaRAID Information
Name Today’s Date
Company Date of Purchase
Address Invoice Number
City/State Serial Number
Country
email address Cache Memory
Phone Firmware Version
Fax BIOS Version
System Information
Motherboard: BIOS manufacturer:
Operating System: BIOS Date:
Op. Sys. Ver.: Video Adapter:
MegaRAID
Driver Ver.:
Network Card: System Memory:
Other disk controllers
installed:
Description of problem:
Steps necessary to re-create problem:
1.
2.
3.
4.
CPU Type/Speed:
Other adapter cards
installed:
Logical Drive Configuration
Logical
Drive
RAID
Level
LD0
LD1
LD2
LD3
LD4
LD5
LD6
LD7
LD8
LD9
LD10
LD11
LD12
LD13
LD14
LD15
LD16
LD17
LD18
LD19
Stripe
Size
Logical Drive
Size
Cache
Policy
Read
Policy
Write
Policy
# of Physical
Drives
Preface
ix
Page 10

Logical
Drive
LD20
LD21
LD22
LD23
LD24
LD25
LD26
LD27
LD28
LD29
LD30
LD31
LD32
LD33
LD34
LD35
LD36
LD37
LD38
LD39
RAID
Level
Stripe
Size
Logical Drive
Size
Cache
Policy
Read
Policy
Write
Policy
# of Physical
Drives
MegaRAID Express500 Hardware Guide
x
Page 11

Physical Device Layout
Target ID
Device Type
Logical Drive Number/ Drive Number
Manufacturer/Model Number
Firmware level
Target ID
Device Type
Logical Drive Number/ Drive Number
Manufacturer/Model Number
Firmware level
Target ID
Device Type
Logical Drive Number/ Drive Number
Manufacturer/Model Number
Firmware level
Target ID
Device Type
Logical Drive Number/ Drive Number
Manufacturer/Model Number
Firmware level
Target ID
Device Type
Logical Drive Number/ Drive Number
Manufacturer/Model Number
Firmware level
Target ID
Device Type
Logical Drive Number/ Drive Number
Manufacturer/Model Number
Firmware level
Target ID
Device Type
Logical Drive Number/ Drive Number
Manufacturer/Model Number
Firmware level
Target ID
Device Type
Logical Drive Number/ Drive Number
Manufacturer/Model Number
Firmware level
Target ID
Device Type
Logical Drive Number/ Drive Number
Manufacturer/Model Number
Firmware level
Target ID
Device Type
Logical Drive Number/ Drive Number
Manufacturer/Model Number
Firmware level
Target ID
Device Type
Channel 1
Preface
xi
Page 12

Logical Drive Number/ Drive Number
Manufacturer/Model Number
Firmware level
Target ID
Device Type
Logical Drive Number/ Drive Number
Manufacturer/Model Number
Firmware level
Target ID
Device Type
Logical Drive Number/ Drive Number
Manufacturer/Model Number
Firmware level
Target ID
Device Type
Logical Drive Number/ Drive Number
Manufacturer/Model Number
Firmware level
Target ID
Device Type
Logical Drive Number/ Drive Number
Manufacturer/Model Number
Firmware level
Channel 1
MegaRAID Express500 Hardware Guide
xii
Page 13

Preface,
Continued
Disclaimer
This manual describes the operation of the LSI Logic MegaRAID Express 500 Disk Array
Controller. Although efforts have been made to assure the accuracy of the information contained
here, LSI Logic expressly disclaims liability for any error in this information, and for damages,
whether direct, indirect, special, exemplary, consequential or otherwise, that may result from such
error, including but not limited to the loss of profits resulting from the use or misuse of the manual
or information contained therein (even if LSI Logic has been advised of the possibility of such
damages). Any questions or comments regarding this document or its contents should be addressed
to LSI Logic at the address shown on the cover.
LSI Logic Corporation provides this publication “as is” without warranty of any kind, either
expressed or implied, including, but not limited to, the implied warranties of merchantability or
fitness for a specific purpose.
Some states do not allow disclaimer of express or implied warranties or the limitation or exclusion
of liability for indirect, special, exemplary, incidental or consequential damages in certain
transactions; therefore, this statement may not apply to you. Also, you may have other rights which
vary from jurisdiction to jurisdiction.
This publication could include technical inaccuracies or typographical errors. Changes are
periodically made to the information herein; these changes will be incorporated in new editions of
the publication. LSI Logic may make improvements and/or revisions in the product(s) and/or the
program(s) described in this publication at any time.
Requests for technical information about LSI Logic products should be made to your LSI Logic
authorized reseller or marketing representative.
Preface
xiii
Page 14

FCC Regulatory Statement
This device complies with Part 15 of the FCC Rules. Operation is subject to the following two conditions: (1) this device may not
cause harmful interference, and (2) this device must accept any interference received, including interference that may cause undesired
operation.
Warning
:
void the user's authority to operate the equipment.
Note:
the FCC Rules. These limits are designed to provide reasonable protection against harmful interference in a residential installation.
This equipment generates, uses and can radiate radio frequency energy and, if not installed and used in accordance with the
instructions, may cause harmful interference to radio communications. However, there is no guarantee that interference will not occur
in a specific installation. If this equipment does cause harmful interference to radio or television reception, which can be determined
by turning the equipment off and on, try to correct the interference by one or more of the following measures:
1) Reorient or relocate the receiving antenna.
2) Increase the separation between the equipment and
3)
4) Consult the dealer or an experienced radio/TV technician
Shielded interface cables must be used with this product to ensure compliance with the Class B FCC
limits.
Changes or modifications to this unit not expressly approved by the party responsible for compliance could
This equipment has been tested and found to comply with the limits for a Class B digital device, pursuant to Part 15 of
the receiver.
Connect the equipment into an outlet on a circuit different from
that to which the receiver is connected.
for help.
LSI Logic MegaRAID Express 500 PCI RAID Controller
Model Number:
FCC ID Number:
Series 475
IUESER475
Disclaimer
LSI Logic certifies only that this product will work correctly when this
product is used with the same jumper settings, the same system
configuration, the same memory module parts, and the same
peripherals that were tested by LSI Logic with this product. The
complete list of tested jumper settings, system configurations,
peripheral devices, and memory modules are documented in the LSI
Logic Compatibility Report for this product. Call your LSI Logic sales
representative for a copy of the Compatibility Report for this product.
MegaRAID Express500 Hardware Guide
xiv
Page 15

1Overview
The MegaRAID® Express 500 PCI RAID controller is a high performance intelligent
PCI-to-SCSI host adapter with RAID control capabilities. The MegaRAID Express 500
provides reliability, high performance, and fault-tolerant disk subsystem management.
The MegaRAID Express 500 is part of the LSI Logic Intel i960RM/RS-based MegaRAID
controller family. The MegaRAID Express 500 is an entry level-to mid-range RAID
controller solution. MegaRAID Express 500 offers a cost-effective way to implement
RAID in a server.
The MegaRAID Express 500 has a 160M Ultra and Wide SCSI channel supporting data
transfer rates up to 160 megabytes per second (MB/s) per channel. The SCSI channel
supports up to fifteen non-Ultra SCSI devices. MegaRAID Express 500 includes
MegaRAID features and performance.
Features
SCSI Channel
MegaRAID Express 500:
provides a high performance I/O migration path while preserving existing PCI-SCSI software
•
performs SCSI data transfers up to 160 MB/s
•
performs synchronous operation on a wide LVD SCSI bus
•
allows up to 15 LVD SCSI devices on the wide bus
•
includes an Intel® i960RM that performs RAID calculations and routing
•
supports 8, 16, 32, 64, or 128 MB of SDRAM cache memory in a DIMM socket used for read
•
and write-back caching and RAID 5 parity generation
The MegaRAID Express 500 upgrade card includes one Ultra3 SCSI channel. The
channel is powered by a Q-Logic ISP10160A 160M SCSI processor.
NVRAM and Flash ROM
MegaRAID Express 500 firmware is stored in flash ROM for easy upgrade.
SCSI Connectors
MegaRAID Express 500 has one ultra high density 68-pin external connector for
external storage subsystem and one high density 68-pin internal connector.
A 32 KB x 8 NVRAM stores RAID system configuration information. The
Chapter 1 Overview
1
Page 16

Single Ended and Differential SCSI Buses
The SCSI standard defines two electrical buses:
• a single ended bus
• low-voltage differential bus
Maximum Cable Length for SCSI Standards
Standard Single ended LVD Maximum Number of
SCSI I 6 m 12 m 7
Fast SCSI 6 m 12 m 7
Fast Wide SCSI 6 m 12 m 15
Ultra SCSI 1.5 m 12 m 7
Ultra SCSI 3 m 12 m 3
Wide Ultra SCSI 12 m 15
Wide Ultra SCSI 1.5 m 12 m 7
Wide Ultra SCSI 3 m 12 m 3
Ultra 2 SCSI 25 m 1
Ultra 2 SCSI 12 m 7
Wide Ultra 2 SCSI 25 m 1
Wide Ultra 2 SCSI 12 m 15
Ultra3 SCSI 25m 1
Ultra3 SCSI 12m 7
Wide Ultra3 SCSI 25m 1
Wide Ultra3 SCSI 12m 15
Drives
SCSI Bus Widths and Maximum Throughput
SCSI Standard SCSI Bus Width SCSI Throughput
SCSI I 8 bits 5 MB/s
Fast SCSI 8 bits 10 MB/s
Fast Wide SCSI 16 bits 20 MB/s
Ultra SCSI 8 bits 20 MB/s
Wide Ultra SCSI 16 bits 40 MB/s
Ultra 2 SCSI 8 bits 40 MB/s
Wide Ultra 2 SCSI 16 bits 80 MB/s
Ultra3 SCSI 8 bits 80 MB/s
Wide Ultra3 SCSI 16 bits 160 MB/s
MegaRAID Express 500 Hardware Guide
2
Page 17

Documentation
The MegaRAID Express 500 technical documentation set includes:
• the MegaRAID Elite 1600 Hardware Guide
• the MegaRAID Configuration Software Guide
• the MegaRAID Operating System Drivers Guide
MegaRAID Configuration Hardware Guide This manual contains the RAID overview, RAID planning,
and RAID system configuration information you will need first. Read the MegaRAID
Express 500 Hardware Guide first.
MegaRAID Configuration Software Guide This manual describes the software configuration utilities that
configure and modify RAID systems.
MegaRAID Operating System Drivers Guide This manual provides detailed information about installing
the MegaRAID Express 500 operating system drivers.
Chapter 1 Overview
3
Page 18
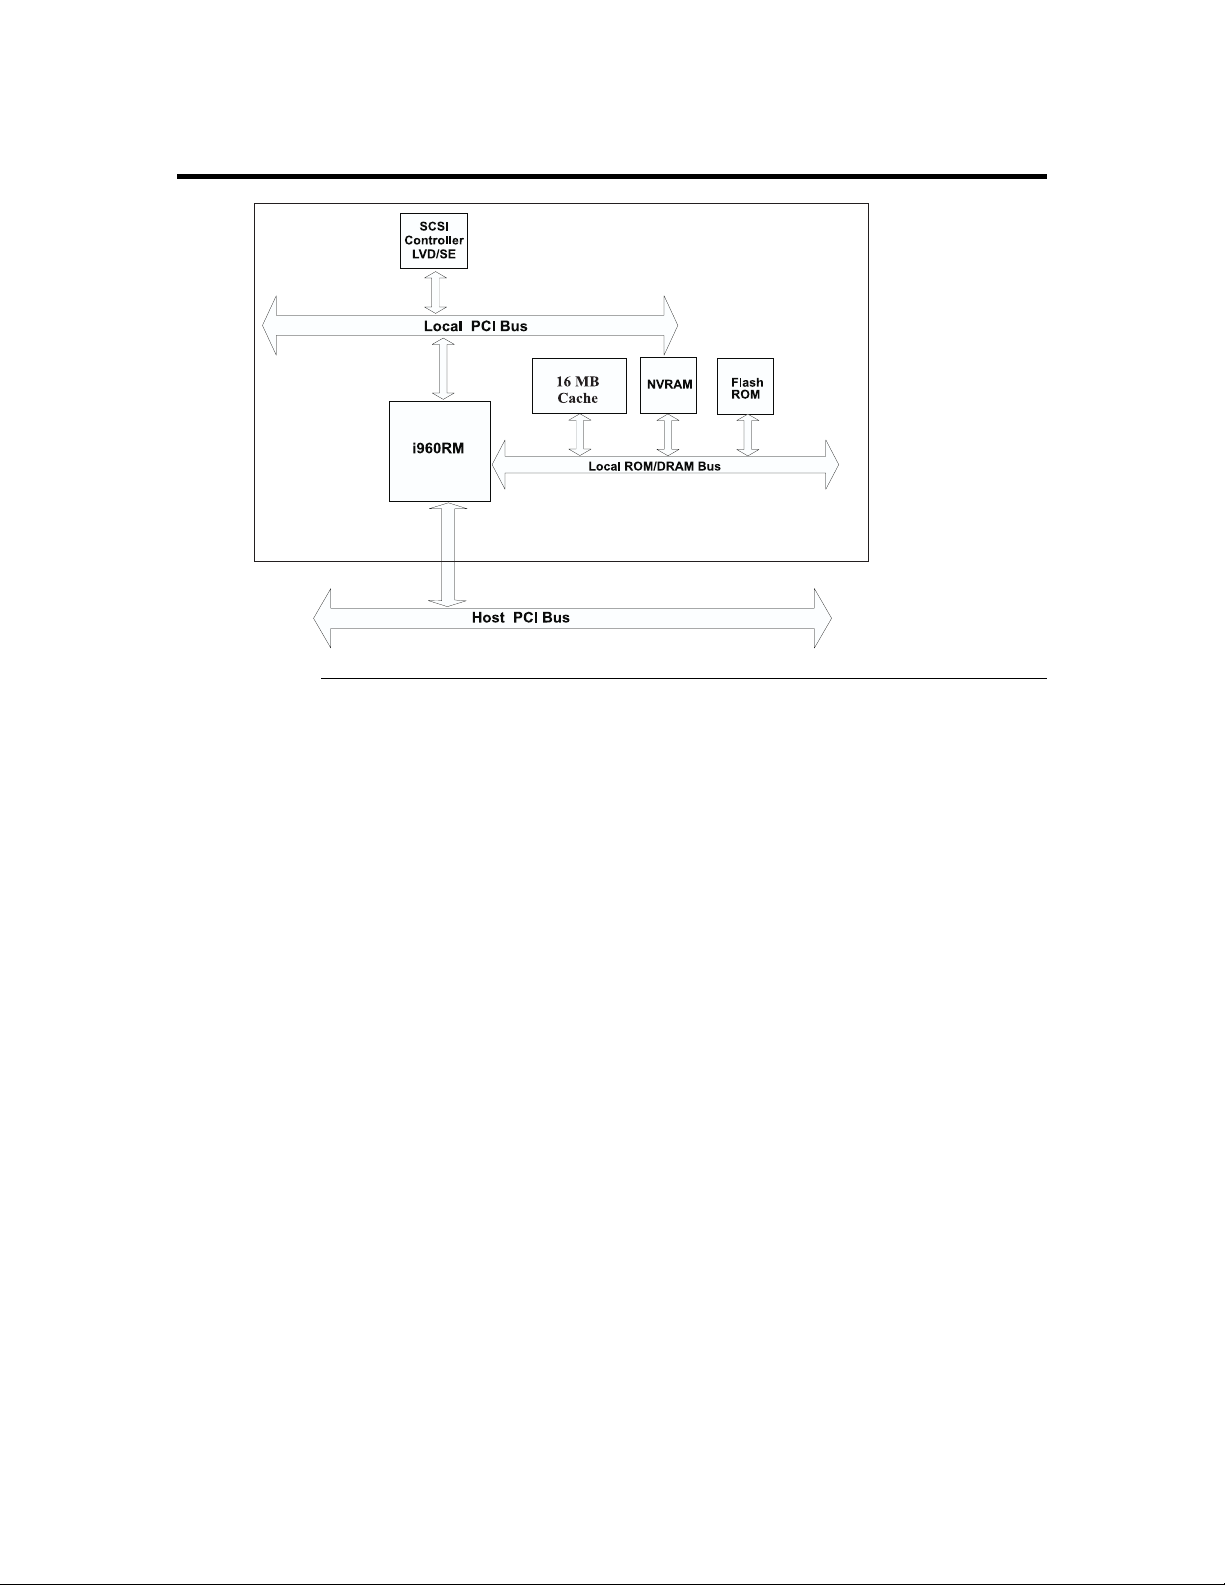
MegaRAID Express 500 Block Diagram
MegaRAID Express 500 Hardware Guide
4
Page 19

2 Introduction to RAID
RAID (Redundant Array of Independent Disks) is an array of multiple independent hard
disk drives that provide high performance and fault tolerance. A RAID disk subsystem
improves I/O performance over a computer using only a single drive. The RAID array
appears to the host computer as a single storage unit or as multiple logical units. I/O is
expedited because several disks can be accessed simultaneously. RAID systems improve
data storage reliability and fault tolerance compared to single-drive computers. Data loss
because of a disk drive failure can be recovered by reconstructing missing data from the
remaining data and parity drives.
RAID Benefits
RAID has gained popularity because it improves I/O performance and increases storage
subsystem reliability. RAID provides data security through fault tolerance and redundant
data storage. The MegaRAID Express 500 management software configures and monitors
RAID disk arrays.
Improved I/O
Increased Reliability
Although disk drive capabilities have improved drastically, actual performance has been
improved only three to four times in the last decade. Computing performance has been
improved over 50 times during the same time period.
more power, and generate more noise and vibration than electronic devices. These factors
reduce the reliability of data stored on disks.
The electromechanical components of a disk subsystem operate more slowly, require
Chapter 2 Introduction to RAID
5
Page 20

In This Chapter
The following topics are discussed:
Host-based RAID solution page 7
RAID overview page 8
Major Topic Subtopic turn to
Consistency check page 8
Fault tolerance page 8
Disk rebuild page 9
Hot spares Page 10
Hot swaps page 10
Parity page 11
Disk striping page 12
Disk mirroring page 13
Disk spanning page 14
Logical drive page 15
Logical drive states page 15
SCSI drive states page 15
Disk array types page 16
Enclosure management page 16
MegaRAID Express 500 Hardware Guide
6
Page 21

MegaRAID Express 500 – Host-Based RAID Solution
RAID products are either:
• host-based or
• SCSI-to-SCSI
The MegaRAID Express 500 controller is a host-based RAID solution. MegaRAID
Express 500 is a PCI adapter card that is installed in any available PCI expansion slot in a
host system.
Host-Based
SCSI-to-SCSI
A host-based RAID product puts all of the RAID intelligence on an adapter card that is
installed in a network server. A host-based RAID product provides the best performance.
MegaRAID Express 500 is part of the file server, so it can transmit data directly across
the computer’s buses at data transfer speeds up to 132 MB/s.
The available sequential data transfer rate is determined by the following factors:
• the sustained data transfer rate on the motherboard PCI bus
• the sustained data transfer rate on the i960RM PCI to PCI bridge
• the sustained data transfer rate of the SCSI controller
• the sustained data transfer rate of the SCSI devices
• the number of SCSI channels
• the number of SCSI disk drives
Host-based solutions must provide operating system-specific drivers.
A SCSI-to-SCSI RAID product puts the RAID intelligence inside the RAID chassis and
uses a plain SCSI Host Adapter installed in the network server. The data transfer rate is
limited to the bandwidth of the SCSI channel. A SCSI-to-SCSI RAID product that has
two wide SCSI channels operating at speeds up to 160 MB/s must squeeze the data into a
single wide SCSI (160 MB/s) channel back to the host computer.
In SCSI-to-SCSI RAID products, the hard drive subsystem uses only a single SCSI ID,
which allows you to connect multiple drive subsystems to a single SCSI controller.
Chapter 2 Introduction to RAID
7
Page 22

RAID Overview
RAID (Redundant Array of Independent Disks) is a collection of specifications that
describe a system for ensuring the reliability and stability of data stored on large disk
subsystems. A RAID system can be implemented in a number of different versions (or
RAID Levels). The standard RAID levels are 0, 1, 3, and 5. MegaRAID Express 500
supports all standard RAID levels and RAID levels 10, 30, and 50, special RAID versions
supported by MegaRAID Express 500.
Fault Tolerance
Fault tolerance is achieved through cooling fans, power supplies, and the ability to hot
swap drives. MegaRAID Express 500 provides hot swapping through the hot spare
feature. A hot spare drive is an unused online available drive that MegaRAID Express
500 instantly plugs into the system when an active drive fails.
After the hot spare is automatically moved into the RAID subsystem, the failed drive is
automatically rebuilt. The RAID disk array continues to handle request while the rebuild
occurs.
Consistency Check
In RAID, check consistency verifies the correctness of redundant data in an array. For
example, in a system with dedicated parity, checking consistency means computing the
parity of the data drives and comparing the results to the contents of the dedicated parity
drive.
MegaRAID Express 500 Hardware Guide
8
Page 23

Disk Rebuild
You rebuild a disk drive by recreating the data that had been stored on the drive before
the drive failed.
Rebuilding can be done only in arrays with data redundancy such as RAID level 1, 3, 5,
10, 30, and 50.
Standby (warm spare) rebuild is employed in a mirrored (RAID 1) system. If a disk drive
fails, an identical drive is immediately available. The primary data source disk drive is the
original disk drive.
A hot spare can be used to rebuild disk drives in RAID 1, 3, 5, 10, 30, or 50 systems. If a
hot spare is not available, the failed disk drive must be replaced with a new disk drive so
that the data on the failed drive can be rebuilt.
The MegaRAID Express 500 controller automatically and transparently rebuilds failed
drives with user-definable rebuild rates. If a hot spare is available, the rebuild starts
automatically when a drive fails. MegaRAID Express 500 automatically restarts the
system and the rebuild if the system goes down during a rebuild.
Rebuild Rate
Physical Array
The rebuild rate is the fraction of the compute cycles dedicated to rebuilding failed drives.
A rebuild rate of 100 percent means the system is totally dedicated to rebuilding the failed
drive.
The MegaRAID Express 500 rebuild rate can be configured between 0% and 100%. At
0%, the rebuild is only done if the system is not doing anything else. At 100%, the rebuild
has a higher priority than any other system activity.
A RAID array is a collection of physical disk drives governed by the RAID management
software. A RAID array appears to the host computer as one or more logical drives.
Chapter 2 Introduction to RAID
9
Page 24

Hot Spares
Hot Swap
A hot spare is an extra, unused disk drive that is part of the disk subsystem. It is usually in
standby mode, ready for service if a drive fails. Hot spares permit you to replace failed
drives without system shutdown or user intervention.
MegaRAID Express 500 implements automatic and transparent rebuilds using hot spare
drives, providing a high degree of fault tolerance and zero downtime. The MegaRAID
Express 500 RAID Management software allows you to specify physical drives as hot
spares. When a hot spare is needed, the MegaRAID Express 500 controller assigns the
hot spare that has a capacity closest to and at least as great as that of the failed drive to
take the place of the failed drive.
Important
Hot spares are employed only in arrays with redundancy, for
example, RAID levels 1, 3, 5, 10, 30, and 50.
A hot spare connected to a specific MegaRAID Express 500
controller can be used only to rebuild a drive that is
connected to the same controller.
A hot swap is the manual replacement of a defective physical disk unit while the computer
is still running. When a new drive has been installed, you must issue a command to
rebuild the drive.
MegaRAID Express 500 Hardware Guide
10
Page 25
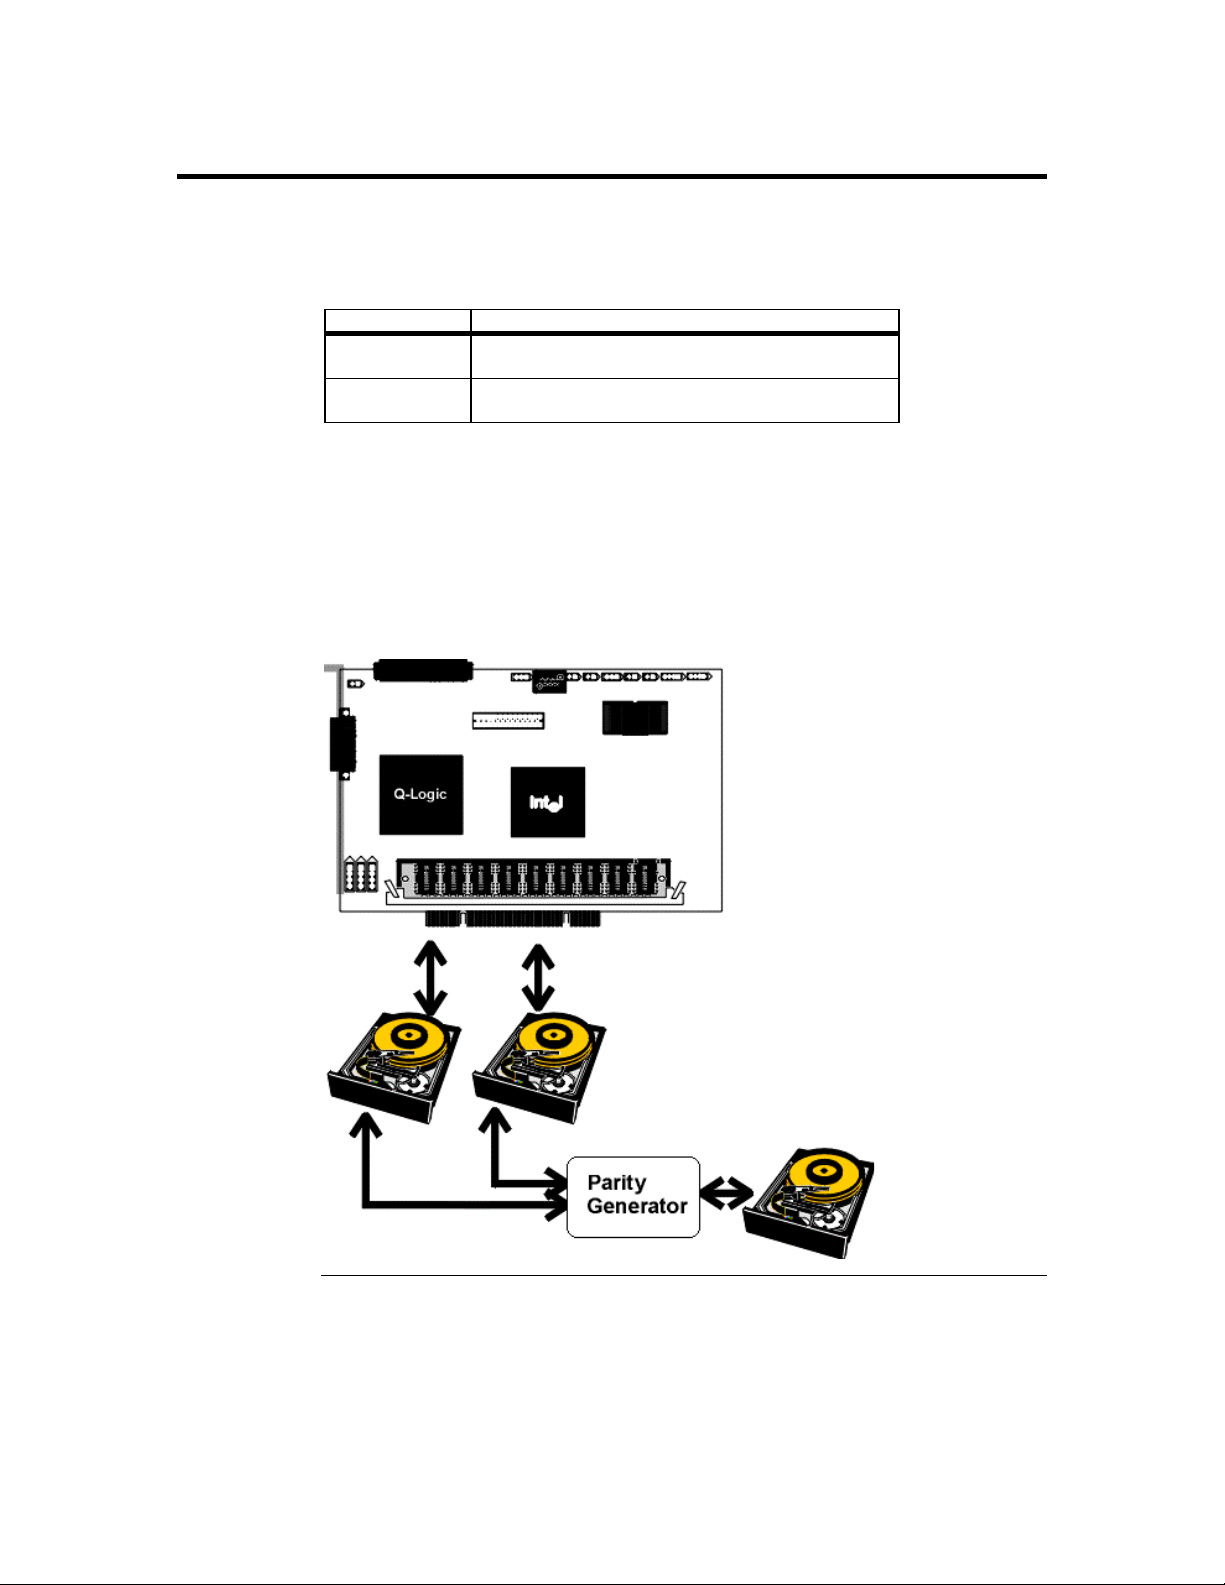
Parity
Parity generates a set of redundancy data from two or more parent data sets. The
redundancy data can be used to reconstruct one of the parent data sets. Parity data does
not fully duplicate the parent data sets. In RAID, this method is applied to entire drives or
stripes across all disk drives in an array. The types of parity are:
Type Description
Dedicated Parity The parity of the data on two or more disk drives is
stored on an additional disk.
Distributed
Parity
The parity data is distributed across all drives in the
system.
If a single disk drive fails, it can be rebuilt from the parity and the data on the remaining
drives.
RAID level 3 combines dedicated parity with disk striping. The parity disk in RAID 3 is
the last logical drive in a RAID set.
RAID level 5 combines distributed parity with disk striping. Parity provides redundancy
for one drive failure without duplicating the contents of entire disk drives, but parity
generation can slow the write process. A dedicated parity scheme during normal
read/write operations is shown below:
Chapter 2 Introduction to RAID
11
Page 26
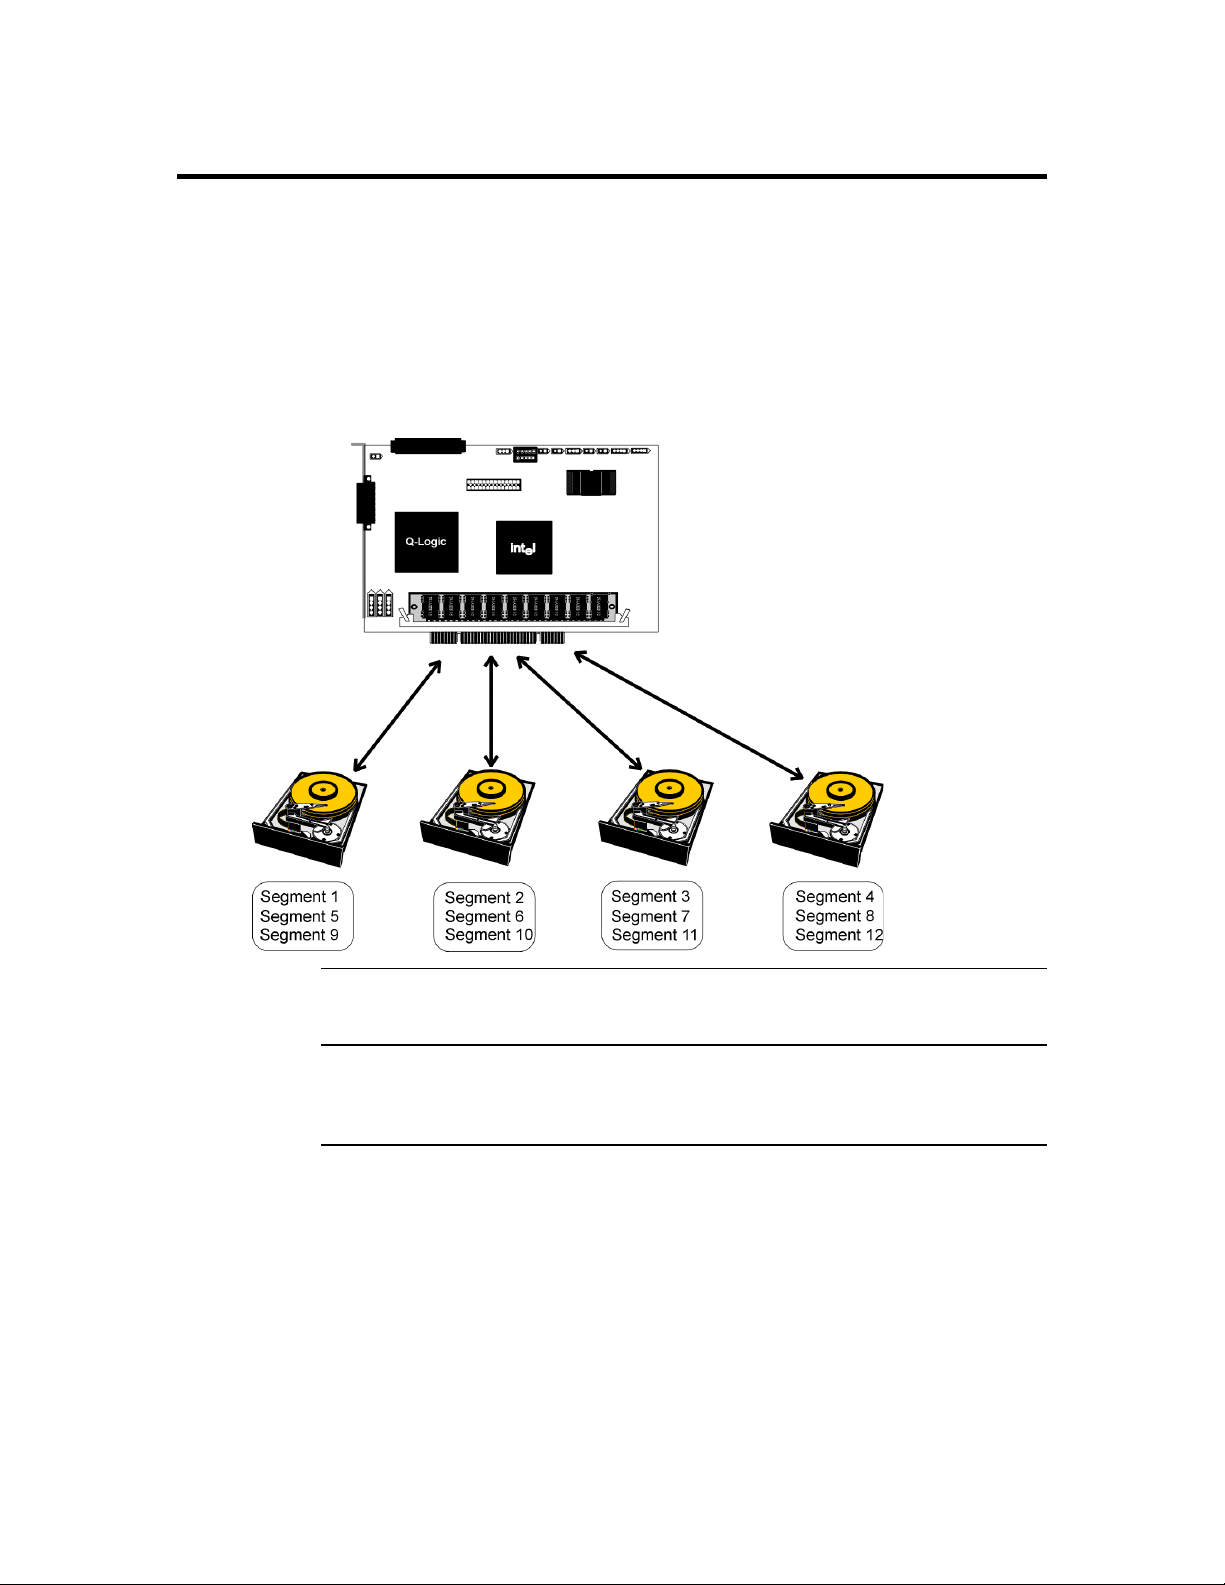
Disk Striping
Disk striping writes data across multiple disk drives instead of just one disk drive. Disk
striping involves partitioning each drive storage space into stripes that can vary in size
from 2 KB to 128 KB. These stripes are interleaved in a repeated sequential manner. The
combined storage space is composed of stripes from each drive. MegaRAID Express 500
supports stripe sizes of 2 KB, 4 KB, 8 KB, 16 KB, 32 KB, 64 KB, or 128 KB.
For example, in a four-disk system using only disk striping (as in RAID level 0), segment
1 is written to disk 1, segment 2 is written to disk 2, and so on. Disk striping enhances
performance because multiple drives are accessed simultaneously; but disk striping does
not provide data redundancy.
Stripe Width
Stripe width is a measure of the number of disks involved in an array where striping is
implemented. For example, a four-disk array with disk striping has a stripe width of four.
Stripe Size
The stripe size is the length of the interleaved data segments that MegaRAID Express 500
writes across multiple drives. MegaRAID Express 500 supports stripe sizes of 2 KB, 4
KB, 8 KB, 16 KB, 32 KB, 64 KB, or 128 KB.
MegaRAID Express 500 Hardware Guide
12
Page 27
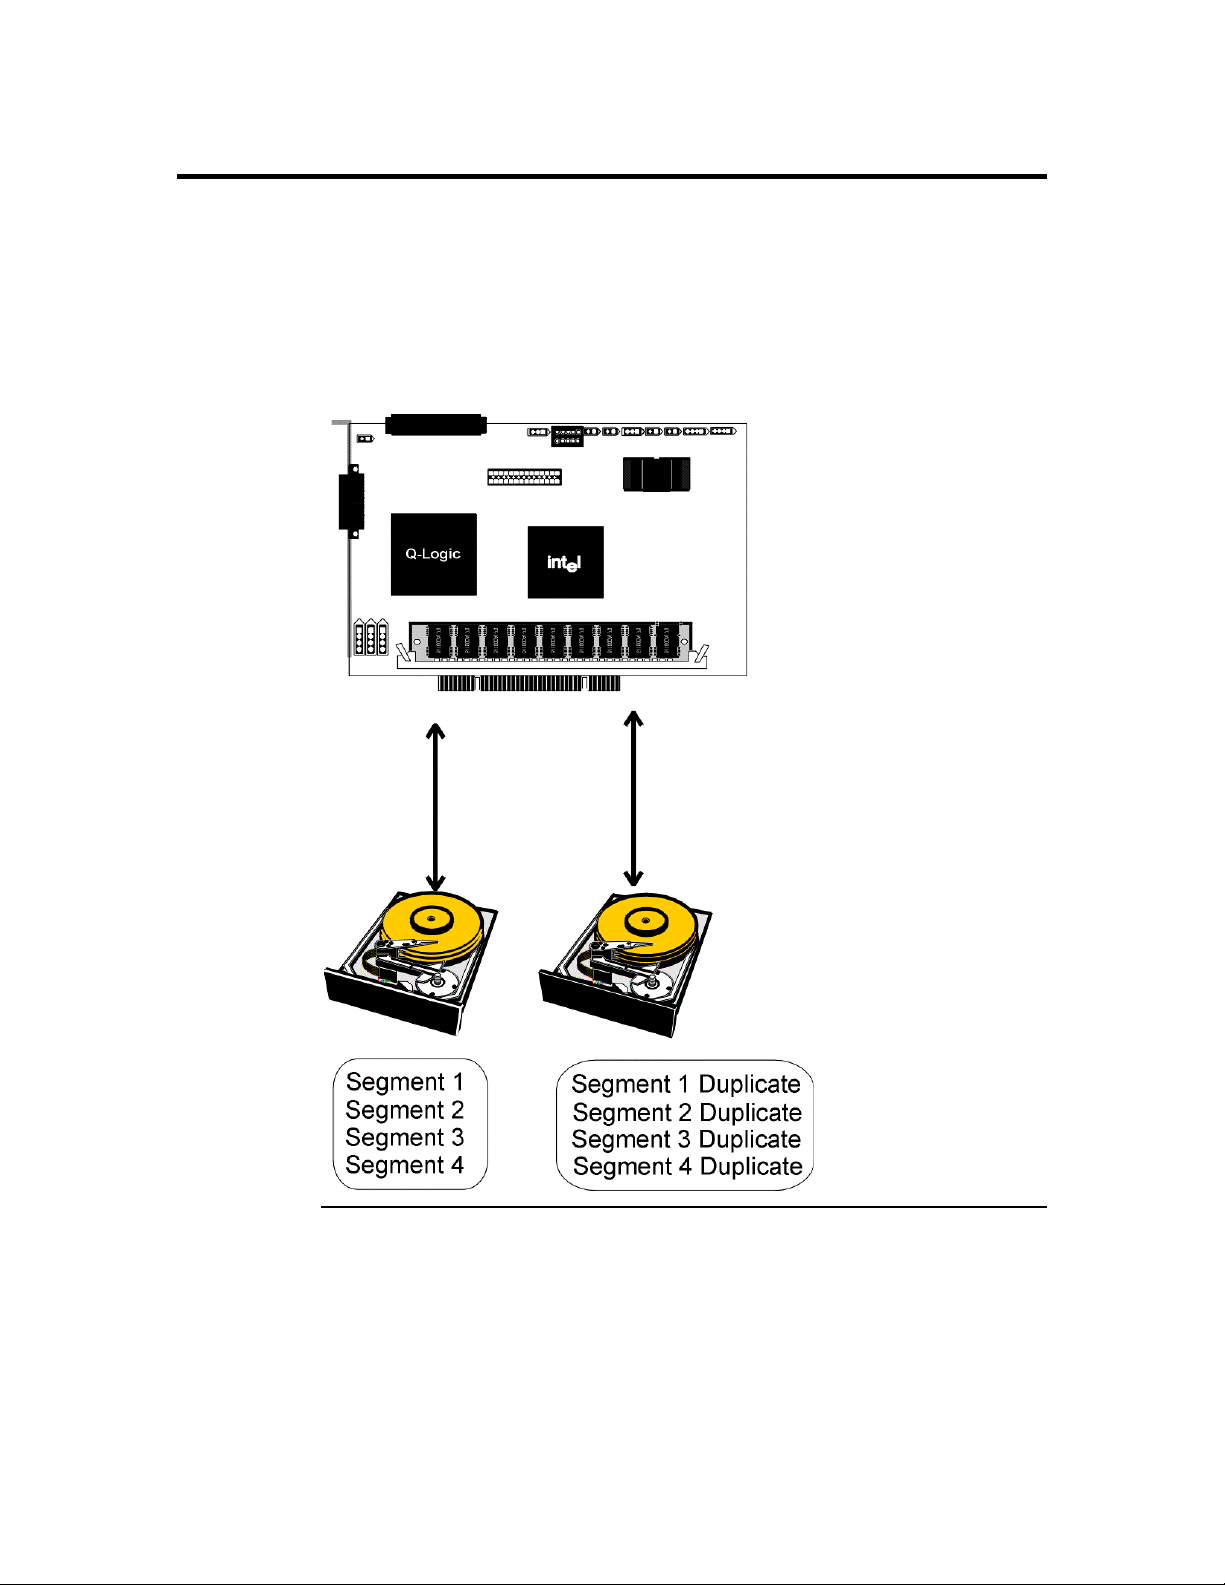
Disk Mirroring
With mirroring (used in RAID 1), data written to one disk drive is simultaneously written
to another disk drive. If one disk drive fails, the contents of the other disk drive can be
used to run the system and reconstruct the failed drive. The primary advantage of disk
mirroring is that it provides 100% data redundancy. Since the contents of the disk drive
are completely written to a second drive, it does not matter if one of the drives fails. Both
drives contain the same data at all times. Either drive can act as the operational drive.
Disk mirroring provides 100% redundancy, but is expensive because each drive in the
system must be duplicated.
Chapter 2 Introduction to RAID
13
Page 28
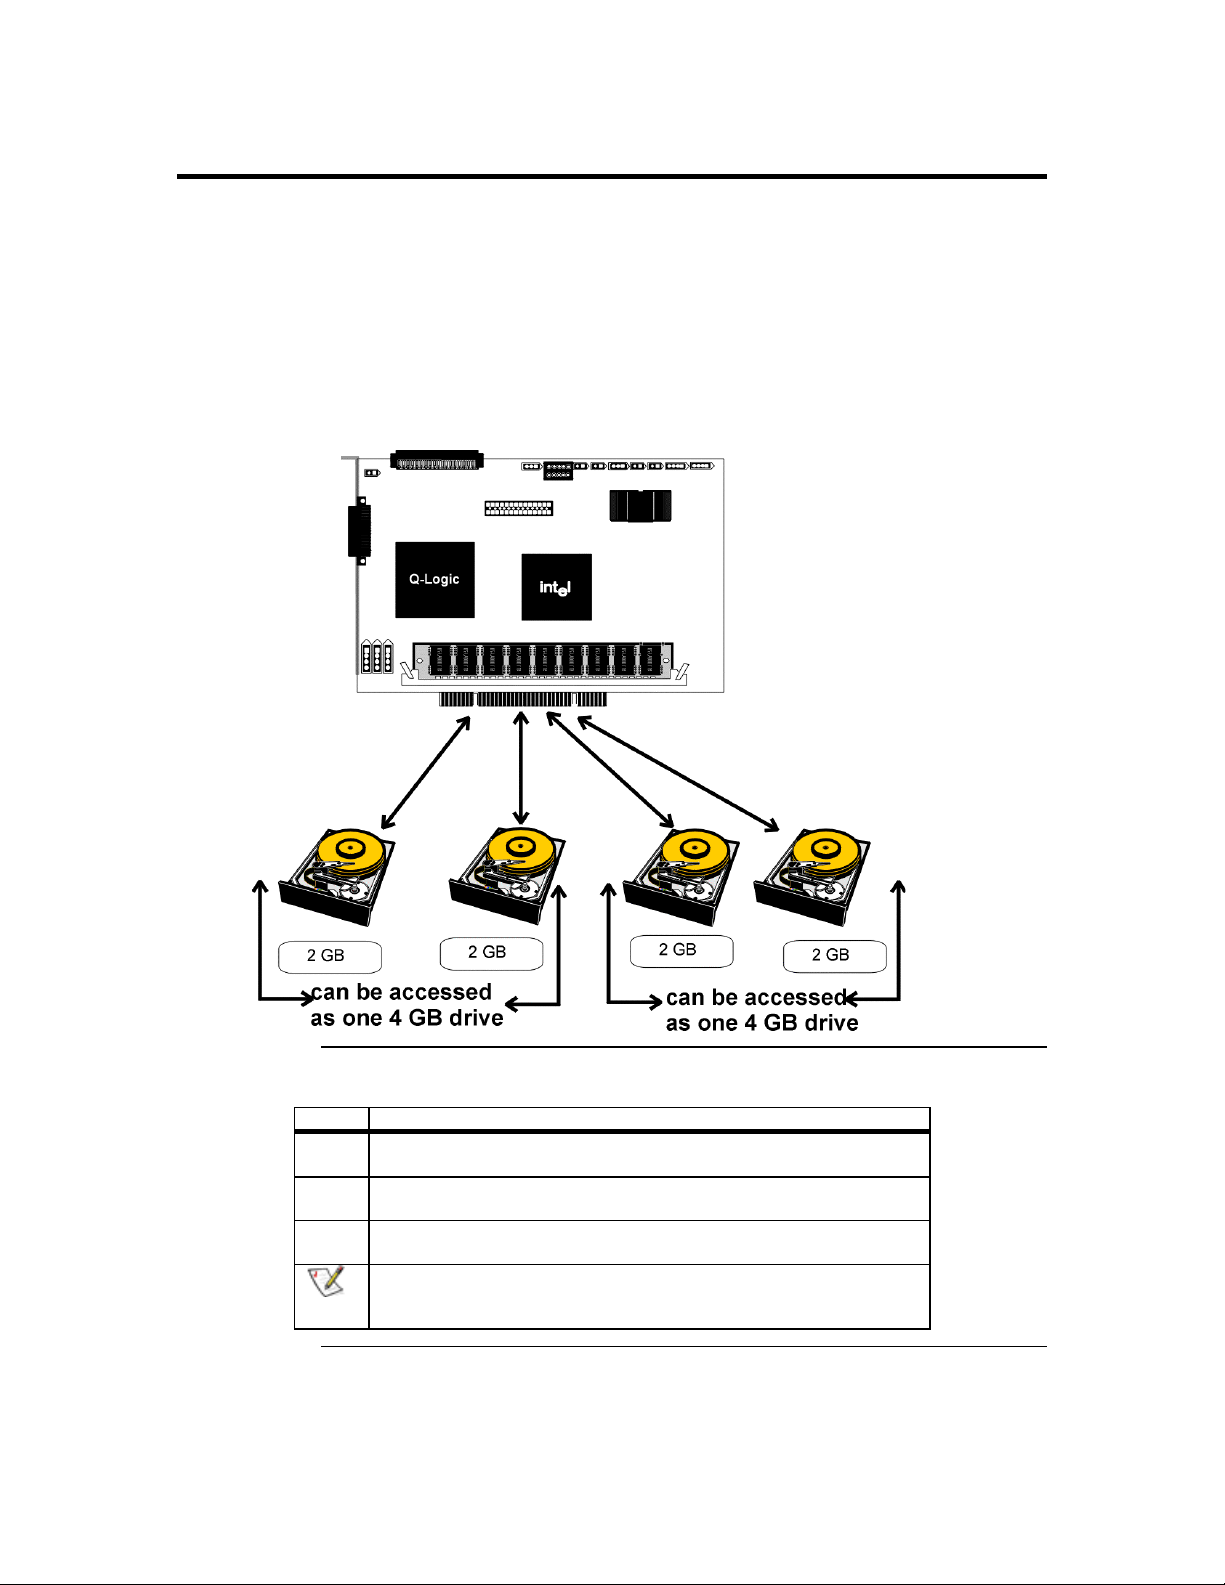
Disk Spanning
Disk spanning allows multiple disk drives to function like one big drive. Spanning
overcomes lack of disk space and simplifies storage management by combining existing
resources or adding relatively inexpensive resources. For example, four 400 MB disk
drives can be combined to appear to the operating system as one single 1600 MB drive.
Spanning alone does not provide reliability or performance enhancements. Spanned
logical drives must have the same stripe size and must be contiguous. In the following
graphic, RAID 1 array is turned into a RAID 10 array.
This controller supports a span depth of eight. That means that eight RAID 1, 3 or 5
arrays can be spanned to create one logical drive.
Spanning for RAID 10, RAID 30, or RAID 50
Level Description
10 Configure RAID 10 by spanning two contiguous RAID 1 logical drives.
The RAID 1 logical drives must have the same stripe size.
30 Configure RAID 30 by spanning two contiguous RAID 3 logical drives.
The RAID 3 logical drives must have the same stripe size.
50 Configure RAID 50 by spanning two contiguous RAID 5 logical drives.
The RAID 5 logical drives must have the same stripe size.
Spanning two contiguous RAID 0 logical drives does not produce a new
Note:
MegaRAID Express 500 Hardware Guide
14
RAID level or add fault tolerance. It does increase the size of the logical
volume and improves performance by doubling the number of spindles.
Page 29

Logical Drive
A logical drive is a partition in a physical array of disks that is made up of contiguous
data segments on the physical disks. A logical drive can consist of:
• an entire physical array
• more than one entire physical array
• a part of an array
•
parts of more than one array, or
•
a combination of any two of the above conditions
Logical Drive States
State Description
Optimal The drive operating condition is good. All configured drives are
Degraded The drive operating condition is not optimal. One of the configured
Failed The drive has failed.
Offline The drive is not available to MegaRAID Express 500.
SCSI Drive States
online
drives has failed or is offline.
A SCSI disk drive can be in one of these states:
State Description
Online
(ONLIN)
Ready
(READY)
Hot Spare
(HOTSP)
Fail
(FAIL)
Rebuild
(REB)
The drive is functioning normally and is a part of a configured
logical drive.
The drive is functioning normally but is not part of a configured
logical drive and is not designated as a hot spare.
The drive is powered up and ready for use as a spare in case an
online drive fails.
A fault has occurred in the drive placing it out of service.
The drive is being rebuilt with data from a failed drive.
Chapter 2 Introduction to RAID
15
Page 30

Disk Array Types
The RAID disk array types are listed in the following table:
Type Description
Software-
Based
SCSI to SCSI The array controller resides outside of the host computer and
Bus-Based The array controller resides on the bus (for example, a PCI or
The array is managed by software running in a host computer using
the host CPU bandwidth. The disadvantages associated with this
method are the load on the host CPU and the need for different
software for each operating system.
communicates with the host through a SCSI adapter in the host.
The array management software runs in the controller. It is
transparent to the host and independent of the host operating
system. The disadvantage is the limited data transfer rate of the
SCSI channel between the SCSI adapter and the array controller.
EISA bus) in the host computer and has its own CPU to generate
the parity and handle other RAID functions. A bus-based controller
can transfer data at the speed of the host bus (PCI, ISA, EISA, VLBus) but is limited to the bus it is designed for. MegaRAID
Express 500 resides on a PCI bus, which can handle data transfer
at up to 132 MB/s. With MegaRAID Express 500, the channel can
handle data transfer rates up to 160 MB/s per SCSI channel.
Enclosure Management
Enclosure management is the intelligent monitoring of the disk subsystem by software
and/or hardware.
The disk subsystem can be part of the host computer or separate from it. Enclosure
management helps you stay informed of events in the disk subsystem, such as a drive or
power supply failure. Enclosure management increases the fault tolerance of the disk
subsystem.
MegaRAID Express 500 Hardware Guide
16
Page 31

3 RAID Levels
There are six official RAID levels (RAID 0 through RAID 5). MegaRAID Express 500
supports RAID levels 0, 1, 3, and 5. LSI Logic has designed three additional RAID levels
(10, 30, and 50) that provide additional benefits. The RAID levels that MegaRAID
Express 500 supports are:
RAID Level Type turn to
0 Standard page 19
1 Standard page 20
3 Standard page 21
5 Standard page 23
10 MegaRAID Express 500 only page 24
30 MegaRAID Express 500 only page 25
50 MegaRAID Express 500 only page 26
Select RAID Level
To ensure the best performance, you should select the optimal RAID level when you
create a system drive. The optimal RAID level for your disk array depends on a number
of factors:
• the number of drives in the disk array
• the capacity of the drives in the array
• the need for data redundancy
• the disk performance requirements
Selecting a RAID Level
next page.
The factors you need to consider when selecting a RAID level are listed on the
Chapter 3 RAID Levels
17
Page 32

Selecting a RAID Level
Level Description and
Use
0 Data divided in
blocks and
distributed
sequentially (pure
striping). Use for
non-critical data
that requires high
performance.
1 Data duplicated on
another disk
(mirroring). Use
for read-intensive
fault-tolerant
systems.
3 Disk striping with a
dedicated parity
drive. Use for noninteractive apps
that process large
files sequentially.
5 Disk striping and
parity data across
all drives. Use for
high read volume
but low write
volume, such as
transaction
processing.
10 Data striping and
mirrored drives.
30 Disk striping with a
dedicated parity
drive.
50 Disk striping and
parity data across
all drives.
Pros Cons Maximum
Physical
High data
throughput
for large
files
100% data
redundancy
Achieves
data
redundancy
at low cost
Achieves
data
redundancy
at low cost
High data
transfers,
complete
redundancy
High data
transfers,
redundancy
High data
transfers,
redundancy
No fault
tolerance. All
data lost if
any drive
fails.
Doubles disk
space.
Reduced
performance
during
rebuilds.
Performance
not as good as
RAID 1
Performance
not as good as
RAID 1
More
complicated
More
complicated
More
complicated
One to 15 No
Three to 15 Yes
Three to 15 Yes
Four to 14
(must be a
multiple of
Six to15 Yes
Six to 15 Yes
Fault
Tolerant
Drives
2Yes
Yes
two)
Note:
MegaRAID Express 500 Hardware Guide
18
The maximum number of physical drives supported by the Express 500 controller is 15.
Page 33

RAID 0
Uses
Strong Points
Weak Points
Drives
RAID 0 provides disk striping across all drives in the RAID subsystem. RAID 0 does not
provide any data redundancy, but does offer the best performance of any RAID level.
RAID 0 breaks up data into smaller blocks and then writes a block to each drive in the
array. The size of each block is determined by the stripe size parameter, set during the
creation of the RAID set. RAID 0 offers high bandwidth. By breaking up a large file into
smaller blocks, MegaRAID Express 500 can use several drives to read or write the file
faster. RAID 0 involves no parity calculations to complicate the write operation. This
makes RAID 0 ideal for applications that require high bandwidth but do not require fault
tolerance.
RAID 0 provides high data throughput, especially for large
files. Any environment that does not require fault tolerance.
Provides increased data throughput for large files. No capacity
loss penalty for parity.
Does not provide fault tolerance. All data lost if any drive
fails.
One to 15
The initiator takes one ID per channel. This leaves 15 IDs
available for one channel.
Chapter 3 RAID Levels
19
Page 34

RAID 1
Uses
Strong Points
Weak Points
Drives
In RAID 1, MegaRAID Express 500 duplicates all data from one drive to a second drive.
RAID 1 provides complete data redundancy, but at the cost of doubling the required data
storage capacity.
Use RAID 1 for small databases or any other environment
that requires fault tolerance but small capacity.
RAID 1 provides complete data redundancy. RAID 1 is
ideal for any application that requires fault tolerance and
minimal capacity.
RAID 1 requires twice as many disk drives. Performance is
impaired during drive rebuilds.
Two
MegaRAID Express 500 Hardware Guide
20
Page 35

RAID 3
Uses
Strong Points
Weak Points
Drives
RAID 3 provides disk striping and complete data redundancy though a dedicated parity
drive. The stripe size must be 64 KB if RAID 3 is used. RAID 3 handles data at the block
level, not the byte level, so it is ideal for networks that often handle very large files, such
as graphic images. RAID 3 breaks up data into smaller blocks, calculates parity by
performing an exclusive-or on the blocks, and then writes the blocks to all but one drive
in the array. The parity data created during the exclusive-or is then written to the last
drive in the array. The size of each block is determined by the stripe size parameter,
which is set during the creation of the RAID set.
If a single drive fails, a RAID 3 array continues to operate in degraded mode. If the failed
drive is a data drive, writes will continue as normal, except no data is written to the failed
drive. Reads reconstruct the data on the failed drive by performing an exclusive-or
operation on the remaining data in the stripe and the parity for that stripe. If the failed
drive is a parity drive, writes will occur as normal, except no parity is written. Reads
retrieve data from the disks.
Best suited for applications such as graphics, imaging, or
video that call for reading and writing huge, sequential
blocks of data.
Provides data redundancy and high data transfer rates.
The dedicated parity disk is a bottleneck with random I/O.
Three to 15
Chapter 3 RAID Levels
Cont’d
21
Page 36

RAID 3,
Continued
RAID 5 vs RAID 3
You may find that RAID 5 is preferable to RAID 3, even for applications characterized
by sequential reads and writes, because MegaRAID Express 500 has very robust caching
algorithms.
The benefits of RAID 3 disappear if there are many small I/O operations scattered
randomly and widely across the disks in the logical drive. The RAID 3 fixed parity disk
becomes a bottleneck in such applications. For example: The host attempts to make two
small writes and the writes are widely scattered, involving two different stripes and
different disk drives. Ideally both writes should take place at the same time. But this is not
possible in RAID 3, since the writes must take turns accessing the fixed parity drive. For
this reason, RAID 5 is the clear choice in this scenario.
MegaRAID Express 500 Hardware Guide
22
Page 37

RAID 5
Uses
Strong Points
Weak Points
Drives
RAID 5 includes disk striping at the byte level and parity. In RAID 5, the parity
information is written to several drives. RAID 5 is best suited for networks that perform a
lot of small I/O transactions simultaneously.
RAID 5 addresses the bottleneck issue for random I/O operations. Since each drive
contains both data and parity numerous writes can take place concurrently. In addition,
robust caching algorithms and hardware based exclusive-or assist make RAID 5
performance exceptional in many different environments.
RAID 5 provides high data throughput, especially for large
files. Use RAID 5 for transaction processing applications
because each drive can read and write independently. If a
drive fails, MegaRAID Express 500 uses the parity drive to
recreate all missing information. Use also for office
automation and online customer service that requires fault
tolerance. Use for any application that has high read request
rates but low write request rates.
Provides data redundancy and good performance in most
environments
Disk drive performance will be reduced if a drive is being
rebuilt. Environments with few processes do not perform as
well because the RAID overhead is not offset by the
performance gains in handling simultaneous processes.
Three to 15
Chapter 3 RAID Levels
23
Page 38

RAID 10
Uses
Strong Points
Weak Points
Drives
RAID 10 is a combination of RAID 0 and RAID 1. RAID 10 has mirrored drives. RAID
10 breaks up data into smaller blocks, and then stripes the blocks of data to each RAID 1
raid set. Each RAID 1 raid set then duplicates its data to its other drive. The size of each
block is determined by the stripe size parameter, which is set during the creation of the
RAID set. RAID 10 can sustain one to four drive failures while maintaining data integrity
if each failed disk is in a different RAID 1 array.
RAID 10 works best for data storage that must have 100%
redundancy of mirrored arrays and that also needs the
enhanced I/O performance of RAID 0 (striped arrays).
RAID 10 works well for medium-sized databases or any
environment that requires a higher degree of fault tolerance
and moderate to medium capacity.
RAID 10 provides both high data transfer rates and
complete data redundancy.
RAID 10 requires twice as many drives as all other RAID
levels except RAID 1.
Four to 14 (must be a multiple of two)
MegaRAID Express 500 Hardware Guide
24
Page 39

RAID 30
Uses
Strong Points
Weak Points
Drives
RAID 30 is a combination of RAID 0 and RAID 3. RAID 30 provides high data transfer
speeds and high data reliability. RAID 30 is best implemented on two RAID 3 disk arrays
with data striped across both disk arrays. RAID 30 breaks up data into smaller blocks, and
then stripes the blocks of data to each RAID 3 raid set. RAID 3 breaks up data into
smaller blocks, calculates parity by performing an exclusive-or on the blocks, and then
writes the blocks to all but one drive in the array. The parity data created during the
exclusive-or is then written to the last drive in each RAID 3 array. The size of each block
is determined by the stripe size parameter, which is set during the creation of the RAID
set.
RAID 30 can sustain one to four drive failures while maintaining data integrity if each
failed disk is in a different RAID 3 array.
Use RAID 30 for sequentially written and read data, prepress and video on demand that requires a higher degree of
fault tolerance and medium to large capacity.
Provides data reliability and high data transfer rates.
Requires 2 – 4 times as many parity drives as RAID 3.
Six to 15
The initiator takes one ID per channel. This leaves 15 IDs
available for one channel.
Chapter 3 RAID Levels
25
Page 40

RAID 50
Uses
Strong Points
Weak Points
Drives
RAID 50 provides the features of both RAID 0 and RAID 5. RAID 50 includes both
parity and disk striping across multiple drives. RAID 50 is best implemented on two
RAID 5 disk arrays with data striped across both disk arrays. RAID 50 breaks up data
into smaller blocks, and then stripes the blocks of data to each RAID 5 raid set. RAID 5
breaks up data into smaller blocks, calculates parity by performing an exclusive-or on the
blocks, and then writes the blocks of data and parity to each drive in the array. The size of
each block is determined by the stripe size parameter, which is set during the creation of
the RAID set.
RAID 50 can sustain one to four drive failures while maintaining data integrity if each
failed disk is in a different RAID 5 array.
RAID 50 works best when used with data that requires high
reliability, high request rates, and high data transfer and
medium to large capacity
RAID 50 provides high data throughput, data redundancy,
and very good performance.
Requires 2 to 4 times as many parity drives as RAID 5.
Six to 15
The initiator takes one ID per channel. This leaves 15 IDs
available for one channel.
.
MegaRAID Express 500 Hardware Guide
26
Page 41

4 Features
MegaRAID is a family of high performance intelligent PCI-to-SCSI host adapters with
RAID control capabilities. MegaRAID Express 500 has a SCSI channel that supports
160M Ultra and Wide SCSI at data transfer rates up to 160 MB/s. The SCSI channel
supports up to 15 Wide devices and up to seven non-Wide devices.
In This Chapter
SMART Technology
Topics described in this chapter include:
new features
•
configuration features
•
hardware architecture features
•
array performance features
•
RAID management features
•
fault tolerance features
•
utility programs
•
software drivers
•
The MegaRAID Express 500 Self Monitoring Analysis and Reporting Technology
(SMART) detects up to 70% of all predictable drive failures. SMART monitors the
internal performance of all motors, heads, and drive electronics.
Configuration on Disk
NVRAM on MegaRAID Express 500 and on the disk drives connected to MegaRAID
Express 500. If MegaRAID Express 500 is replaced, the new MegaRAID Express 500
controller can detect the actual RAID configuration, maintaining the integrity of the data
on each drive, even if the drives have changed channel and/or target ID.
Configuration on Disk (drive roaming) saves configuration information both in
Chapter 4 Features
27
Page 42

Hardware Requirements
MegaRAID Express 500 can be installed in an IBM AT®-compatible or EISA computer
with a motherboard that has 5 volt/3.3 volt PCI expansion slots. The computer must
support PCI version 2.1 or later. The computer should have an Intel Pentium, Pentium
Pro, or more powerful CPU, a floppy drive, a color monitor and VGA adapter card, a
mouse, and a keyboard.
Configuration Features
Specification Feature
RAID Levels 0, 1, 3, 5, 10, 30, and 50.
SCSI Channels One
Maximum number of drives per channel 15
Array interface to host PCI 2.1
Drive interface Fast and Wide, Ultra 160M SE and
Upgradable cache size 16 MB, 32 MB, 64 MB, or 128 MB
Cache Function Write-through, write-back, ARA,
Multiple logical drives/arrays per
controller
Maximum number of MegaRAID Express
500 controller per system
Online capacity expansion Yes
Dedicated and pool hot spare Yes
Flashable firmware Yes
Hot swap devices supported Yes
Non-disk devices supported Yes
Mixed capacity hard disk drives Yes
Number of 16-bit internal connectors One
Number of 16-bit external connectors One
Support for hard disk drives with
capacities of more than 8 GB.
Clustering support (Failover control) No
Online RAID level migration Yes
RAID remapping Yes
No reboot necessary after expansion Yes
More than 200 Qtags per physical drive Yes
Hardware clustering support on the board Yes
User-specified rebuild rate Yes
LVD
NRA, RA
Up to 40 logical drives per controller
12
Yes
MegaRAID Express 500 Hardware Guide
28
Page 43

Hardware Architecture Features
The hardware architecture features include:
Specification Feature
Processor Intel i960RM 100
SCSI Controller Q Logic ISP10160A
Size of Flash ROM 1 MB
Amount of NVRAM 32 KB
Hardware XOR assistance Yes
Direct I/O Yes
Removable cache memory module Yes
SCSI bus termination Active, single-ended or LVD
Double-sided DIMMs Yes
Auxiliary TermPWR source No
Direct I/O bandwidth 132 MB/s
Array Performance Features
The array performance features include:
Specification Feature
Host data transfer rate 132 MB/s
Drive data transfer rate 160 MB/s
Maximum Scatter/Gathers 26 elements
Maximum size of I/O requests 6.4 MB in 64 KB stripes
Maximum Queue Tags per drive 211
Stripe Sizes 2 KB, 4 KB, 8 KB, 16 KB, 32 KB, 64
Maximum number of concurrent
commands
KB, or 128 KB
255
Chapter 4 Features
29
Page 44

RAID Management Features
The RAID management features include:
Specification Feature
Support for SNMP Yes
Performance Monitor provided Yes
Remote control and monitoring Yes
Event broadcast and event alert Yes
Hardware connector RS232C
Drive roaming Yes
Support for concurrent multiple stripe
sizes
Web-based management tools Not released yet
Windows NT and NetWare server
support via GUI client utility
SCO Unix, OS/2, and UnixWare
server support via GUI client utility
DMI support Yes
Management through an industry-
standard browser
Fault Tolerance Features
The fault tolerance features include:
Yes
Yes
Yes
Not released yet
Specification Feature
Support for SMART Yes
Enclosure management SAF-TE compliant
Drive failure detection Automatic
Drive rebuild using hot spares Automatic
Parity Generation and checking Software
MegaRAID Express 500 Hardware Guide
30
Page 45

Software Utilities
The software utility features include:
Specification Feature
Graphical user interface Yes
Management utility Yes
Bootup configuration via MegaRAID Manager Yes
Online Read, Write, and cache policy switching Yes
Internet and intranet support through TCP/IP Yes
Operating System Software Drivers
Operating System Drivers
drivers for:
• Windows NT V4.0
• Novell NetWare 4.x
• OS/2
• SCO UnixWare 2.1x
• SCO Open Server R5.0x
The DOS drivers for MegaRAID Express 500 are contained in the firmware on
MegaRAID Express 500 except the DOS ASPI and CD-ROM drivers. Call your LSI
Logic OEM support representative for information about drivers for other operating
systems.
MegaRAID Express 500 includes a DOS software configuration utility and
Chapter 4 Features
31
Page 46

MegaRAID Express 500 Specifications
Parameter Specification
Card Size 5.875" x 4.2" (half length PCI)
Processor Intel i960RM™ 32-bit RISC processor @ 100 MHz
Bus Type PCI 2.1
PCI Controller Intel i960RM
Bus Data Transfer Rate Up to 132 MB/s
BIOS AMIBIOS MegaRAID BIOS
Cache Configuration 16, 32, 64, or 128 MB ECC through a 66MHz 72-
bit unbuffered 3.3V SDRAM.
Firmware 1 MB × 8 flash ROM
Nonvolatile RAM 32 KB × 8 for storing RAID configuration
Operating Voltage 5.00 V ± 0.25 V
SCSI Controller One SCSI controller for 160 M Ultra and Wide
support.
SCSI Data Transfer
Rate
SCSI Bus LVD or single-ended
SCSI Termination Active
Termination Disable Automatic through cable and device detection
Devices per SCSI
Channel
SCSI Device Types
Supported
RAID Levels Supported 0, 1, 3, 5,10, 30, and 50
SCSI Connectors One 68-pin internal high-density connector for 16-
Serial Port 3-pin RS232C-compatible berg
Up to 160 MB/s
Up to 15 wide or seven non-wide SCSI devices. Up
to 6 non-disk SCSI drives per MegaRAID Express
500 controller.
Synchronous or Asynchronous. Disk and non-disk.
bit SCSI devices. One ultra-high density 68-pin
external connector for Ultra and Wide SCSI.
PCI Bridge/CPU
MegaRAID Express 500 uses the Intel i960RM PCI bridge with an embedded 80960JX
RISC processor running at 100 MHz. The RM bridge handles data transfers between the
primary (host) PCI bus, the secondary PCI bus, cache memory, and the SCSI bus. The
DMA controller supports chaining and unaligned data transfers. The embedded 80960JX
CPU directs all controller functions, including command processing, SCSI bus transfers,
RAID processing, drive rebuilding, cache management, and error recovery.
MegaRAID Express 500 Hardware Guide
32
Page 47

Cache Memory
MegaRAID Express 500 cache memory resides in a memory bank that uses 2 M x 72 (16
MB), 4 M x 72 (32 MB), 8 M x 72 (64 MB) or 16 M x 72 (128 MB) unbuffered 3.3V
SDRAM . Possible configurations are 16, 32, 64, or 128 MB. The maximum achievable
memory bandwidth is 528 MB/s.
MegaRAID supports write-through or write-back caching, which can be selected for each
logical drive. To improve performance in sequential disk accesses, MegaRAID does not
use read-ahead caching for the current logical drive. The default setting for the read
policy is Normal, meaning no read-ahead caching. You can disable read-ahead caching.
Warning!
Write caching is not recommended for the physical drives. When write cache is enabled, loss
of data can occur when power is interrupted.
MegaRAID BIOS
The BIOS resides on a 1 MB × 8 flash ROM for easy upgrade. The MegaRAID BIOS
supports INT 13h calls to boot DOS without special software or device drivers. The
MegaRAID BIOS provides an extensive setup utility that can be accessed by pressing
<Ctrl> <M> at BIOS initialization. MegaRAID BIOS Setup is described in the
MegaRAID Configuration Software Guide.
Onboard Speaker
The MegaRAID Express 500 controller has an onboard tone generator for audible
warnings when system errors occur. Audible warnings can be generated through this
speaker. The audible warnings are listed on page 117.
Serial Port
MegaRAID Express 500 includes a 3-pin RS232C-compatible serial port berg connector,
which can connect to communications devices.
Chapter 4 Features
33
Page 48

SCSI Bus
MegaRAID Express 500 has a Fast and Wide Ultra 160M SCSI channel that supports
both LVD and single-ended devices with active termination. Synchronous and
asynchronous devices are supported. MegaRAID Express 500 provides automatic
termination disable via cable detection. The SCSI channel supports up to 15 wide or
seven non-wide SCSI devices at speeds up to
160 MB/s. MegaRAID Express 500 supports up to
SCSI Connectors
MegaRAID Express 500 has two types of SCSI connectors:
• a 68-pin high density internal connector
• a 68-pin external ultra-high-density connector
Both connector types can be used for the SCSI channel.
SCSI Termination
MegaRAID Express 500 uses active termination on the SCSI bus conforming to
Alternative 2 of the SCSI-2 specifications. Termination enable/disable is automatic
through cable detection.
six non-disk devices per controller.
SCSI Firmware
The MegaRAID Express 500 firmware handles all RAID and SCSI command processing
and also supports:
Feature Description
Disconnect/
Reconnect
Tagged Command
Queuing
Scatter/Gather Multiple address/count pairs
Multi-threading Up to 255 simultaneous commands with elevator sorting and
Stripe Size Variable for all logical drives: 2 KB, 4 KB, 8 KB, 16 KB, 32
Rebuild Multiple rebuilds and consistency checks with user-
Optimizes SCSI Bus seek.
Multiple tags to improve random access
concatenation of requests per SCSI channel
KB, 64 KB, or 128 KB.
definable priority.
MegaRAID Express 500 Hardware Guide
34
Page 49

RAID Management
RAID management is provided by software utilities that manage and configure the RAID
system and MegaRAID Express 500, create and manage multiple disk arrays, control and
monitor multiple RAID servers, provide error statistics logging, and provide online
maintenance. They include:
MegaRAID BIOS Setup
•
Power Console 500
•
MegaRAID Manager
•
• General Alert Module
MegaRAID BIOS Setup
BIOS Setup configures and maintains RAID arrays, formats disk drives, and
manages the RAID system. It is independent of any operating system. See the MegaRAID
Configuration Software Guide for additional information.
Power Console 500
Power Console 500 runs in Windows NT. It configures, monitors, and maintains
multiple RAID servers from any network node or a remote location. See the MegaRAID
Configuration Software Guide for additional information.
MegaRAID Manager
This is a character-based utility that works in DOS, SCI Unix SVR3.2 R4.2, SCO
UnixWare, OS/2 2.x, OS/2 Warp, Linux Red Hat 6.x, and Novell NetWare 3.x and 4.x.
See the MegaRAID Configuration Software Guide for additional information.
Fault-Tolerance Features
The MegaRAID Express 500 fault-tolerance features are:
• automatic failed drive detection
• automatic failed drive rebuild with no user intervention required
• hot swap manual replacement without bringing the system down
• SAF-TE compliant enclosure management
Detect Failed Drive
The MegaRAID Express 500 firmware automatically detects and rebuilds failed
drives. This can be done transparently with hot spares.
Hot Swap
MegaRAID Express 500 supports the manual replacement of a disk unit in the RAID
subsystem without system shutdown.
Chapter 4 Features
35
Page 50

Compatibility
MegaRAID Express 500 compatibility issues include:
• server management
• SCSI device compatibility
• software compatibility
Server Management
SCSI Device Compatibility
Software
As an SNMP agent, MegaRAID Express 500 supports all SNMP managers and
RedAlert from Storage Dimensions.
drives, optical drives, DAT drives and other SCSI peripheral devices.
All SCSI backup and utility software should work with MegaRAID Express 500.
Software that has been tested and approved for use with MegaRAID Express 500 includes
Cheyenne®, CorelSCSI®, Arcserve®, and Novaback®. This software is not provided
with MegaRAID Express 500.
Summary
MegaRAID Express 500 Features were discussed in this chapter.
Configuring MegaRAID Express 500 is discussed in Chapter 5.
MegaRAID Express 500 supports SCSI hard disk drives, CD-ROMs, tape
MegaRAID Express 500 Hardware Guide
36
Page 51

5 Configuring MegaRAID Express 500
Configuring SCSI Physical Drives
SCSI Channel
Basic Configuration Rules
Physical SCSI drives must be organized into logical drives. The arrays and logical drives
that you construct must be able to support the RAID level that you select.
Your MegaRAID Express 500 adapter has one SCSI channel.
SCSI devices in a RAID array:
• attach non-disk SCSI devices to a single SCSI channel that does not have any disk
drives
• you can place up to 15 physical disk drives in an array, depending on the RAID level
• include all drives that have the same capacity to the same array
• make sure any hot spare has a capacity that is at least as large as the largest drive that
may be replaced by the hot spare
• when replacing a failed drive, make sure that the replacement drive has a capacity
that is at least as large as the drive being replaced
You should observe the following guidelines when connecting and configuring
Chapter 5 Configuring MegaRAID Express 500
37
Page 52

Current Configuration
SCSI ID Device Description Termination?
0
1
2
3
4
5
6
8
9
10
11
12
13
14
15
Logical Drive Configuration
SCSI Channel 1
Logical
Drive
LD0
LD1
LD2
LD3
LD4
LD5
LD6
LD7
LD8
LD9
LD10
LD11
LD12
LD13
LD14
LD15
LD16
LD17
LD18
LD19
LD20
LD21
LD22
LD23
LD24
LD25
LD26
LD27
LD28
RAID
Level
Stripe
Size
Logical Drive
Size
Cache
Policy
Read
Policy
Write
Policy
# of Physical
Drives
MegaRAID Express 500 Hardware Guide
38
Page 53

Logical
Drive
LD29
LD30
LD31
LD32
LD33
LD34
LD35
LD36
LD37
LD38
LD39
RAID
Level
Stripe
Size
Logical Drive
Size
Cache
Policy
Read
Policy
Write
Policy
# of Physical
Drives
Cont’d
Chapter 5 Configuring MegaRAID Express 500
39
Page 54

Physical Device Layout
Target ID
Device Type
Logical Drive Number/ Drive Number
Manufacturer/Model Number
Firmware level
Target ID
Device Type
Logical Drive Number/ Drive Number
Manufacturer/Model Number
Firmware level
Target ID
Device Type
Logical Drive Number/ Drive Number
Manufacturer/Model Number
Firmware level
Target ID
Device Type
Logical Drive Number/ Drive Number
Manufacturer/Model Number
Firmware level
Target ID
Device Type
Logical Drive Number/ Drive Number
Manufacturer/Model Number
Firmware level
Target ID
Device Type
Logical Drive Number/ Drive Number
Manufacturer/Model Number
Firmware level
Target ID
Device Type
Logical Drive Number/ Drive Number
Manufacturer/Model Number
Firmware level
Target ID
Device Type
Logical Drive Number/ Drive Number
Manufacturer/Model Number
Firmware level
Target ID
Device Type
Logical Drive Number/ Drive Number
Manufacturer/Model Number
Firmware level
Target ID
Device Type
Logical Drive Number/ Drive Number
Manufacturer/Model Number
Firmware level
Target ID
Device Type
Channel 1
MegaRAID Express 500 Hardware Guide
40
Page 55

Logical Drive Number/ Drive Number
Manufacturer/Model Number
Firmware level
Target ID
Device Type
Logical Drive Number/ Drive Number
Manufacturer/Model Number
Firmware level
Target ID
Device Type
Logical Drive Number/ Drive Number
Manufacturer/Model Number
Firmware level
Target ID
Device Type
Logical Drive Number/ Drive Number
Manufacturer/Model Number
Firmware level
Target ID
Device Type
Logical Drive Number/ Drive Number
Manufacturer/Model Number
Firmware level
Channel 1
Chapter 5 Configuring MegaRAID Express 500
41
Page 56

Configuring Arrays
Organize the physical disk drives in arrays after the drives are connected to MegaRAID
Express 500, formatted, and initialized. An array can consist of up to 15 physical disk
drives, depending on the RAID level.
MegaRAID Express 500 supports up to eight arrays. The number of drives in an array
determines the RAID levels that can be supported.
Arranging Arrays
You must arrange the arrays to provide additional organization for the drive array. You
must arrange arrays so that you can create system drives that can function as boot devices.
You can sequentially arrange arrays with an identical number of drives so that the drives
in the group are spanned. Spanned drives can be treated as one large drive. Data can be
striped across multiple arrays as one logical drive.
You can create spanned drives by using the MegaRAID BIOS Setup utility or the
MegaRAID Manager.
Creating Hot Spares
Any drive that is present, formatted, and initialized but is not included in a array or
logical drive is automatically designated as a hot spare.
You can also designate drives as hot spares via MegaRAID BIOS Setup, the MegaRAID
Manager, or Power Console 500.
Creating Logical Drives
system. You must create one or more logical drives.
The logical drive capacity can include all or any portion of an array. The logical drive
capacity can also be larger than an array by using spanning. MegaRAID Express 500
supports up to 40 logical drives.
Logical drives are arrays or spanned arrays that are presented to the operating
MegaRAID Express 500 Hardware Guide
42
Page 57

Configuration Strategies
The most important factors in RAID array configuration are: drive capacity, drive
availability (fault tolerance), and drive performance. You cannot configure a logical drive
that optimizes all three factors, but it is easy to choose a logical drive configuration that
maximizes one factor at the expense of the other two factors, although needs are seldom
that simple.
Maximize Capacity
Maximum drive capacity for each RAID level is shown below. OEM level firmware that
can span up to 4 logical drives is assumed.
RAID
Level
0 Striping
1 Mirroring 2 (Capacity of smallest disk) X (1)
3 Striping with
5 Striping with
10 Mirroring and
30 RAID 3 and
50 RAID 5 and
RAID 0 achieves maximum drive capacity, but does not provide data redundancy.
Description Drives
Required
1 – 15 (Number of disks) X capacity of
without parity
3 – 15 (Number of disks) X (capacity of
fixed parity
drive
3 – 15 (Number of disks) X (capacity of
floating parity
drive
4 – 14 (Must
Striping
Striping
Striping
be a multiple
of 2)
6 – 15 (Must
be a multiple
of arrays)
6 – 15 (Must
be a multiple
of arrays)
smallest disk) - (capacity of 1 disk)
smallest disk) - (capacity of 1 disk)
(Number of disks) X (capacity of
(Number of disks) X (capacity of
smallest disk) – (capacity of 1 disk X
(Number of disks) X (capacity of
smallest disk) – (capacity of 1 disk X
Capacity
smallest disk
smallest disk) / (2)
number of Arrays)
number of Arrays)
Note:
The maximum number of physical drives supported per controller is 15.
Chapter 5 Configuring MegaRAID Express 500
Cont’d
43
Page 58

Configuration Strategies,
Continued
Maximizing Drive Availability
logical array by maximizing the level of fault tolerance. The levels of fault tolerance
provided by the RAID levels are:
RAID Level Fault Tolerance Protection
0 No fault tolerance.
1 Disk mirroring, which provides 100% data redundancy.
3 100% protection through a dedicated parity drive.
5 100% protection through striping and parity. The data is
10 100% protection through data mirroring.
30 100% protection through data striping. All data is striped
50 100% protection through data striping and parity. All data is
Maximizing Drive Performance
configuration for one type of application will probably not be optimal for any other
application. A basic guideline of the performance characteristics for RAID drive arrays at
each RAID level is:
RAID Level Performance Characteristics
0 Excellent for all types of I/O activity, but provides no data
1 Provides data redundancy and good performance.
3 Provides data redundancy.
5 Provides data redundancy and good performance in most
10 Provides data redundancy and excellent performance.
30 Provides data redundancy and good performance in most
50 Provides data redundancy and very good performance.
You can maximize the availability of data on the physical disk drive in the
striped and parity data is written across a number of physical
disk drives.
across all drives in two or more arrays.
striped and parity data is written across all drives in two or
more arrays.
You can configure an array for optimal performance. But optimal drive
security.
environments.
environments.
MegaRAID Express 500 Hardware Guide
44
Page 59

Assigning RAID Levels
Only one RAID level can be assigned to each logical drive. The drives required per RAID
level is:
Note:
RAID
Level
01 15
12 2
33 15
53 15
10 4 14
30 6 15
50 6 15
The maximum number of physical drives supported by the controller is 15.
Minimum Number of
Physical Drives
Configuring Logical Drives
After you have installed the MegaRAID Express 500 controller in the server and have
attached all physical disk drives, perform the following actions to prepare a RAID disk
array:
Step Action
1 Optimize the MegaRAID Express 500 controller options for your system.
See Chapter 6 for additional information.
2 Perform a low-level format the SCSI drives that will be included in the
array and the drives to be used for hot spares.
3 Press <Ctrl> <M> to run the MegaRAID Manager.
4 Define and configure one or more logical drives. Select Easy Configuration
in MegaRAID Manager or select New Configuration to customize the
RAID array.
5 Create and configure one or more system drives (logical drives). Select the
RAID level, cache policy, read policy, and write policy.
6 Save the configuration.
7 Initialize the system drives. After initialization, you can install the
operating system.
Maximum Number of Physical
Drives
Chapter 5 Configuring MegaRAID Express 500
45
Page 60

Optimizing Data Storage
Data Access Requirements
Each type of data stored in the disk subsystem has a different frequency of read
and write activity. If you know the data access requirements, you can more successfully
determine a strategy for optimizing the disk subsystem capacity, availability, and
performance.
Servers that support Video on Demand typically read the data often, but write data
infrequently. Both the read and write operations tend to be long. Data stored on a generalpurpose file server involves relatively short read and write operations with relatively
small files.
Array Functions
You must first define the major purpose of the disk array. Will this disk array increase the
system storage capacity for general-purpose file and print servers? Does this disk array
support any software system that must be available 24 hours per day? Will the
information stored in this disk array contain large audio or video files that must be
available on demand? Will this disk array contain data from an imaging system?
You must identify the purpose of the data to be stored in the disk subsystem before you
can confidently choose a RAID level and a RAID configuration.
Planning the Array Configuration
Answer the following questions about this array:
Question Answer
Number of physical disk drives in the array
Purpose of this array. Rank the following factors:
Maximize drive capacity
Maximize the safety of the data (fault tolerance)
Maximize hard drive performance and throughput
How many hot spares?
Amount of cache memory installed on MegaRAID Express 500
Are all of the disk drives and the server protected by a UPS?
MegaRAID Express 500 Hardware Guide
46
Page 61

Array Configuration Planner
Using the Array Configuration Planner
tolerance, and effective capacity for all possible drive configurations for an array
consisting of one to seven drives. This table does not take into account any hot spare
(standby) drives. You should always have a hot spare drive in case of drive failure. RAID
1 requires two physical drives. RAID 3 and RAID 5 require at least three drives. RAID 10
requires at least four drives, while RAID 30 and RAID 50 require at least six drives.
Number of
Drives
1 None Excellent No 100%
1 RAID 0 Excellent No 100%
2 None Excellent No 100%
2 RAID 0 Excellent No 100%
2 RAID 1 Good Yes 50%
3 None Excellent No 100%
3 RAID 0 Excellent No 100%
3 RAID 3 Good Yes 67%
3 RAID 5 Good Yes 67%
4 None Excellent No 100%
4 RAID 0 Excellent No 100%
4 RAID 3 Good Yes 75%
4 RAID 5 Good Yes 75%
4 RAID 10 Good Yes 50%
5 None Excellent No 100%
5 RAID 0 Excellent No 100%
5 RAID 3 Good Yes 80%
5 RAID 5 Good Yes 80%
6 None Excellent No 100%
6 RAID 0 Excellent No 100%
6 RAID 3 Good Yes 83%
6 RAID 5 Good Yes 83%
6 RAID 10 Good Yes 50%
6 RAID 30 Good Yes 67%
6 RAID 50 Good Yes 67%
7 None Excellent No 100%
7 RAID 0 Excellent No 100%
7 RAID 3 Good Yes 86%
7 RAID 5 Good Yes 86%
8 None Excellent No 100%
8 RAID 0 Excellent No 100%
8 RAID 3 Good Yes 87%
8 RAID 5 Good Yes 87%
8 RAID 10 Good Yes 50%
8 RAID 30 Good Yes 75%
8 RAID 50 Good Yes 75%
Possible
RAID Levels
The following table lists the possible RAID levels, fault
Relative
Performance
Fault
Tolerance
Effective
Capacity
Chapter 5 Configuring MegaRAID Express 500
47
Page 62

MegaRAID Express 500 Hardware Guide
48
Page 63

6 Hardware Installation
Requirements
You must have the following:
•
a host computer with an available PCI expansion slot
•
the MegaRAID Express 500 Installation CD
•
the necessary SCSI cables and terminators (this depends on the number and type of SCSI
•
an Uninterruptible Power Supply (UPS) for the entire system
•
160M, Ultra, Fast SCSI 2 or Wide SCSI hard disk drives
•
Optional Equipment
external SCSI devices.
Checklist
Check Step Action
a MegaRAID Express 500 Controller
devices to be attached)
You may also want to install SCSI cables that connect MegaRAID Express 500 to
1 Turn all power off to the server and all hard disk drives,
enclosures, and system, components.
2 Prepare the host system. See the host system technical
documentation.
3 Determine the SCSI ID and SCSI termination requirements.
4 Make sure the jumper settings on the MegaRAID Express 500
controller are correct. Install the cache memory.
5 Install the MegaRAID in the server and attach the SCSI cables
and terminators as needed. Make sure Pin 1 on the cable matches
Pin 1 on the connector. Make sure that the SCSI cables you use
conform to all SCSI specifications.
6 Perform a safety check. Make sure all cables are properly
attached. Make sure the MegaRAID card is properly installed.
Turn power on after completing the safety check.
7 Install and configure the MegaRAID software utilities and drivers.
8 Format the hard disk drives as needed.
9 Configure system drives (logical drives).
10 Initialize the logical drives.
11 Install the network operating system drivers as needed.
Chapter 6 Hardware Installation
49
Page 64

Installation Steps
MegaRAID Express 500 provides extensive customization options. If you need only basic
MegaRAID Express 500 features and your computer does not use other adapter cards
with resource settings that may conflict with MegaRAID Express 500 settings, even
custom installation can be quick and easy.
Step Action Additional Information
1 Unpack the MegaRAID controller and
2 Turn the computer off and remove the
3 Make sure the motherboard jumper settings
4 Install cache memory on the MegaRAID
5 Check the jumper settings on the
6 Set SCSI termination.
7 Install the MegaRAID Express 500 card.
8 Connect the SCSI cables to SCSI devices.
9 Set the target IDs for the SCSI devices.
10 Replace the computer cover and turn the
11 Run MegaRAID BIOS Setup. Optional.
12 Install software drivers for the desired
inspect for damage. Make sure all items are
in the package.
cover.
are correct.
Express 500 card.
MegaRAID Express 500 controller.
power on.
operating systems.
If damaged, call your LSI
Logic OEM support
representative.
16 MB minimum cache
memory is required.
See page 52 for the
MegaRAID Express 500
jumper settings.
Be sure the SCSI devices
are powered up before or at
the same time as the host
computer.
Each step is described in detail below.
Cont’d
MegaRAID Express 500 Hardware Guide
50
Page 65

Step 1 Unpack
Unpack and install the hardware in a static-free environment. The MegaRAID Express
500 controller card is packed inside an anti-static bag between two sponge sheets.
Remove the controller card and inspect it for damage. If the card appears damaged, or if
any item listed below is missing, contact LSI Logic or your MegaRAID OEM support
representative. The MegaRAID Express 500 Controller is also shipped with the following
on CD:
• the MegaRAID Configuration Software Guide
• the MegaRAID Operating System Drivers Guide
• the MegaRAID Express 500 Hardware Guide
• the software license agreement
• the MegaRAID Express 500 Configuration Utilities for DOS
• the warranty registration card
Step 2 Power Down
Turn off the computer and remove the cover. Make sure the computer is turned off and
disconnected from any networks before installing the controller card.
Step 3 Configure Motherboard
Make sure the motherboard is configured correctly for MegaRAID Express 500.
MegaRAID Express 500 is essentially a SCSI Controller. Each MegaRAID Express 500
card you install will require an available PCI IRQ; make sure an IRQ is available for each
controller you install.
Chapter 6 Hardware Installation
51
Page 66

Step 4 Install Cache Memory
Use 72-bit 3.3V unbuffered SDRAM only. The maximum memory bandwidth is 528
MB/s with an SDRAM DIMM.
A minimum of 16 MB of cache memory is required. The cache memory
must be installed before MegaRAID Express 500 is operational.
Important
SDRAM
SDRAM specifications are specified below.
Memory
Type
SDRAM 3.3 V PC-100 Yes Single-sided Yes 2M x 72 16 MB
SDRAM 3.3 V PC-100 Yes Single-sided Yes 4M x 72 32 MB
SDRAM 3.3 V PC-100 Yes Double-sided Yes 4M x 72 32 MB
SDRAM 3.3 V PC-100 Yes Single-sided Yes 8M x 72 64 MB
SDRAM 3.3 V PC-100 Yes Double-sided Yes 8M x 72 64 MB
SDRAM 3.3 V PC-100 Yes Double-sided Yes 16M x 72 128 MB
Volt Speed Parity Type BBU
Support
Bank I Total Memory
Important
If the DIMM SDRAM is not installed when you receive your MegaRAID Express
500 RAID controller, you must call the manufacturer for a list of approved DIMM
vendors. You must use an approved DIMM only. Call LSI Logic Technical Support
at 678-728-1250 for the latest list of approved memory vendors.
Install cache memory on the MegaRAID Express 500 card in the DIMM socket. This
socket accepts a 168-pin DIMM.
Lay the controller card component-side up on a clean static-free surface to install the
DIMM. The memory socket is a right-angle connector and is mounted flush with the
MegaRAID card. The DIMM card, when properly installed, will be parallel to the
MegaRAID card.
The DIMM clicks into place, indicating proper seating in the socket, as shown below. The
MegaRAID card is shown laying on a flat surface in the illustration below.
MegaRAID Express 500 Hardware Guide
52
Page 67

Step 5 Set Jumpers
Make sure the jumper settings on the MegaRAID Express 500 card are correct. The
jumpers and connectors are:
Connector Description Type
J1 SCSI bus termination enable control 3-pin header
J2 CPLD programming 10-pin header
J3 NVRAM clear 2-pin header
J4 Serial EPROM 2-pin header
J5 Serial port 3-pin header
J6 Write Pending 2-pin header
J7 BIOS enable 2-pin header
J8 User activity LED 4-pin connector
J9 I2C connector 4-pin header
J10 SCSI bus termination power 2-pin header
J11 Internal straddle-mount connector 68-pin connector
J13 External SCSI connector 68-pin connector
J15 RUBI slot interrupt steering 3-pin header
J16 RUBI slot interrupt steering 3-pin header
J17 RUBI slot interrupt steering 3-pin header
MegaRAID Express 500 Card Layout
Chapter 6 Hardware Installation
Cont’d
53
Page 68

Step 5 Set Jumpers,
Continued
J1 Termination Enable
J1 is a three-pin header that specifies hardware or software control of SCSI
termination.
Software control of SCSI termination via drive detection. Short Pins 1-2
Permanently disable all onboard SCSI termination. Short Pins 2-3
Permanently enable all onboard SCSI termination. OPEN
J9 I2C Interface Connector
master and slave device that resided on the I2C bus when used with the I2C Bus Interface
Unit. Attach a four-wire cable from J9 to the I2C Bus Interface Unit.
J5 Serial Port
J5 is a 3-pin berg that attaches to a serial cable. The pinout is:
Pin Signal Description Pin Signal Description
1 RXD 2 TXD
3GND
Type of SCSI Termination J10 Setting
J9 is a four-pin header that allows the i960JX core processor to serve as a
Pin Description
1SDA
2GND
3SCL
4VCC
Cont’d
MegaRAID Express 500 Hardware Guide
54
Page 69

Step 5 Set Jumpers,
Continued
J8 Hard Disk LED
J8 is a four-pin connector that attaches to a cable that connects to the hard disk LED
mounted on the computer enclosure. The LED indicates data transfers.
Pin Description
1 VCC through pullup
2 SCSI Activity Signal
3 SCSI Activity Signal
4 VCC through pullup
J10 Term Power
J10 is a 2-pin jumper. The factory setting is Pins 1-2 shorted. Pins 1-2 should always be
shorted for J10 to enable onboard term power.
J15 RUBI Slot Interrupt Steering
J15 is a 3-pin jumper. You can short the pins for a standard PCI slot or
a PCI RUBI slot.
Short… For…
Pins 1-2 Standard PCI slot
Pins 2-3 PCI RUBI slot
J16, J17 RUBI Slot Interrupt Steering
channel or two-channel motherboard.
Short… For…
Pins 1-2 on both jumpers 2-channel motherboard RAID
Pins 2-3 on both jumpers 1-channel motherboard
J16 and J17 are 3-pin jumpers. You can short them for a one-
Chapter 6 Hardware Installation
55
Page 70

Step 6 Set Termination
You must terminate the SCSI bus properly. Set termination at both ends of the SCSI
cable. The SCSI bus is an electrical transmission line and must be terminated properly to
minimize reflections and losses. Termination should be set at each end of the SCSI
cable(s), as shown below.
For a disk array, set SCSI bus termination so that removing or adding a SCSI device does
not disturb termination. An easy way to do this is to connect the MegaRAID Express 500
card to one end of the SCSI cable and to connect an external terminator module at the
other end of the cable. The connectors between the two ends can connect SCSI devices.
Disable termination on the SCSI devices. See the manual for each SCSI device to disable
termination.
MegaRAID Express 500 Hardware Guide
56
Page 71
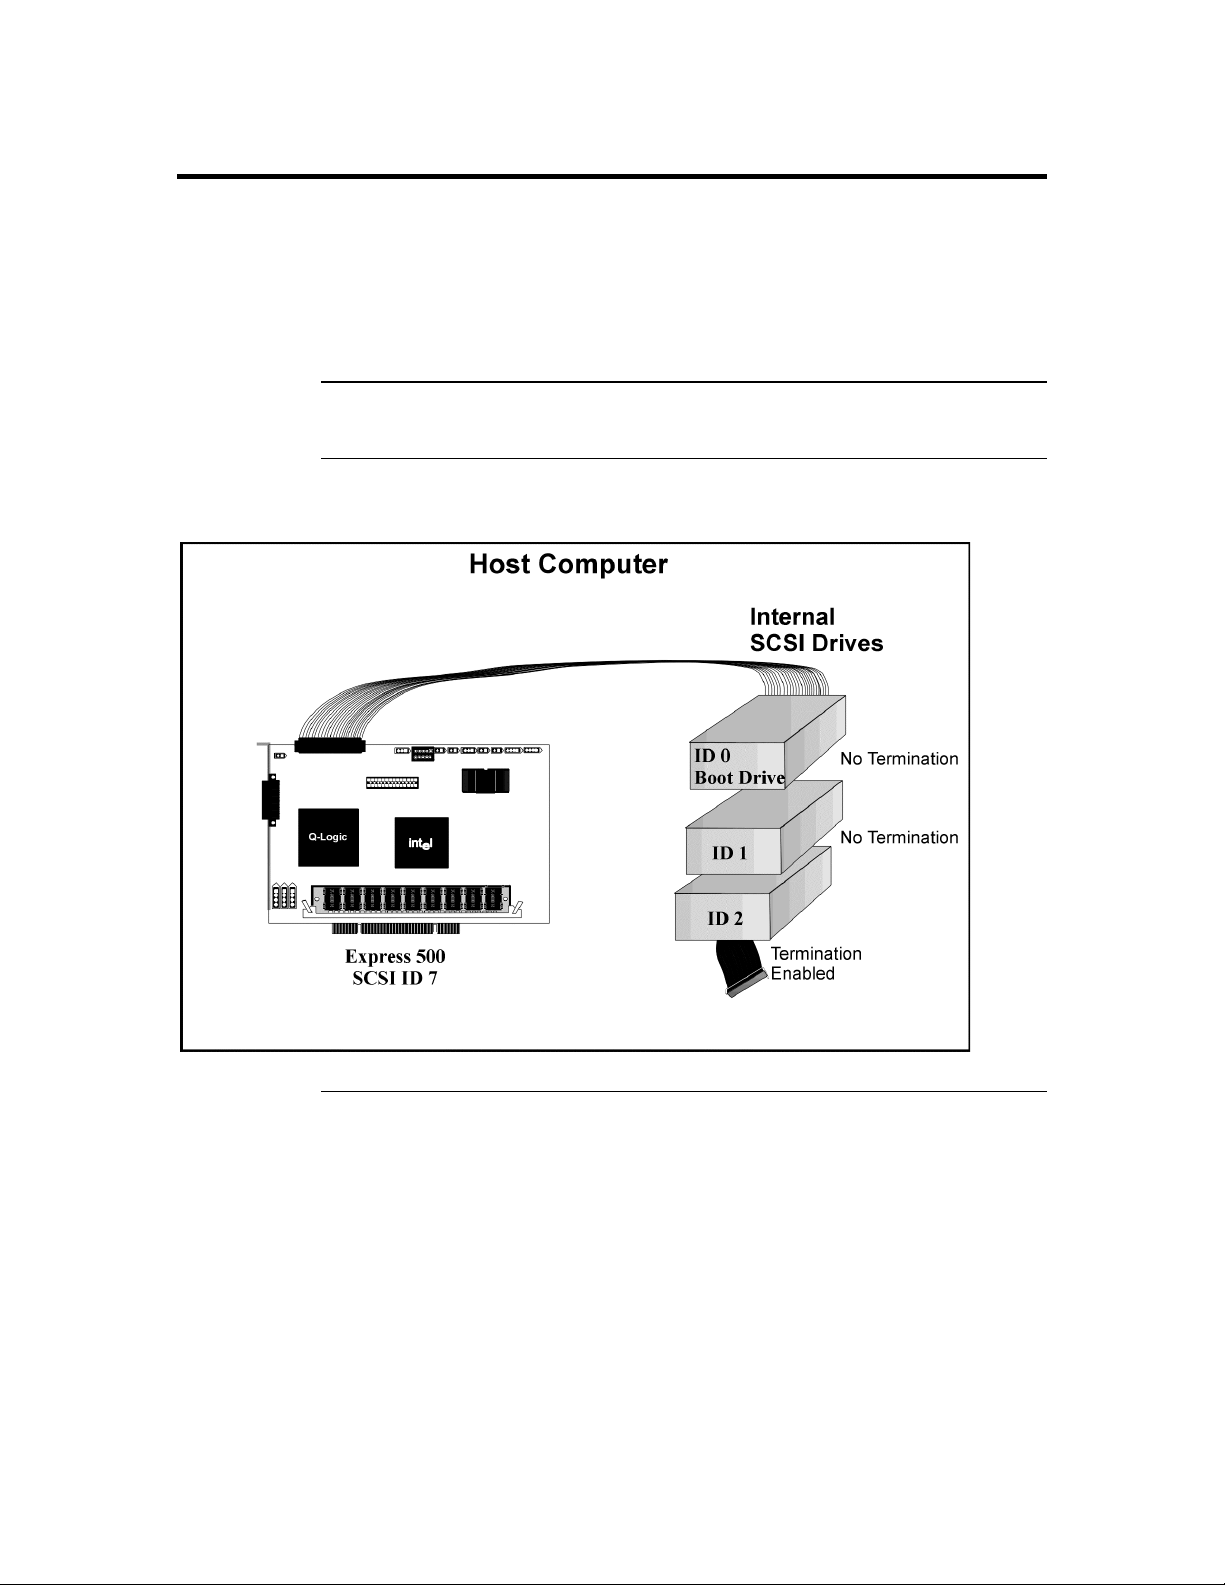
SCSI Termination
The SCSI bus is an electrical transmission line and it must be terminated properly to
minimize reflections and losses. You complete the SCSI bus by setting termination at
both ends.
You can let MegaRAID Express 500 automatically provide SCSI termination at one end
of the SCSI bus. You can terminate the other end of the SCSI bus by attaching an external
SCSI terminator module to the end of the cable or by attaching a SCSI device that
internally terminates the SCSI bus at the end of the SCSI channel.
Selecting a Terminator
Use standard external SCSI terminators on a SCSI channel operating at 10 MB/s
or higher synchronous data transfer.
Terminating Internal SCSI Disk Arrays
power are intact when any disk drive is removed from a SCSI channel, as shown below:
Set the termination so that SCSI termination and termination
Chapter 6 Hardware Installation
Cont’d
57
Page 72

SCSI Termination,
Continued
Terminating External Disk Arrays
In most array enclosures, the end of the SCSI cable has an
independent SCSI terminator module that is not part of any SCSI drive. In this way, SCSI
termination is not disturbed when any drive is removed, as shown below:
Terminating Internal and External Disk Arrays
MegaRAID Express 500. You still must make sure that the proper SCSI termination and
termination power is preserved, as shown below:
You can use both internal and external drives with
MegaRAID Express 500 Hardware Guide
58
Cont’d
Page 73

SCSI Termination,
Continued
Connecting Non-Disk SCSI Devices
drive devices must each have a unique SCSI ID regardless of the SCSI channel they are
attached to. The general rule for Unix systems is:
• tape drive set to SCSI ID 2
• CD-ROM drive set to SCSI ID 5
Make sure that no hard disk drives are attached to the same SCSI channel as the non-disk
SCSI devices. Drive performance will be significantly degraded if SCSI hard disk drives
are attached to this channel.
Since all non-disk SCSI devices are single ended, it is not
advisable to attach a non-disk device to a MegaRAID Express
500 RAID controller if LVD disk drives are also attached because
the SCSI bus will then operate in single ended mode.
SCSI Tape drives, scanners, CD-ROM drives, and other non-disk
Warning
Chapter 6 Hardware Installation
59
Page 74
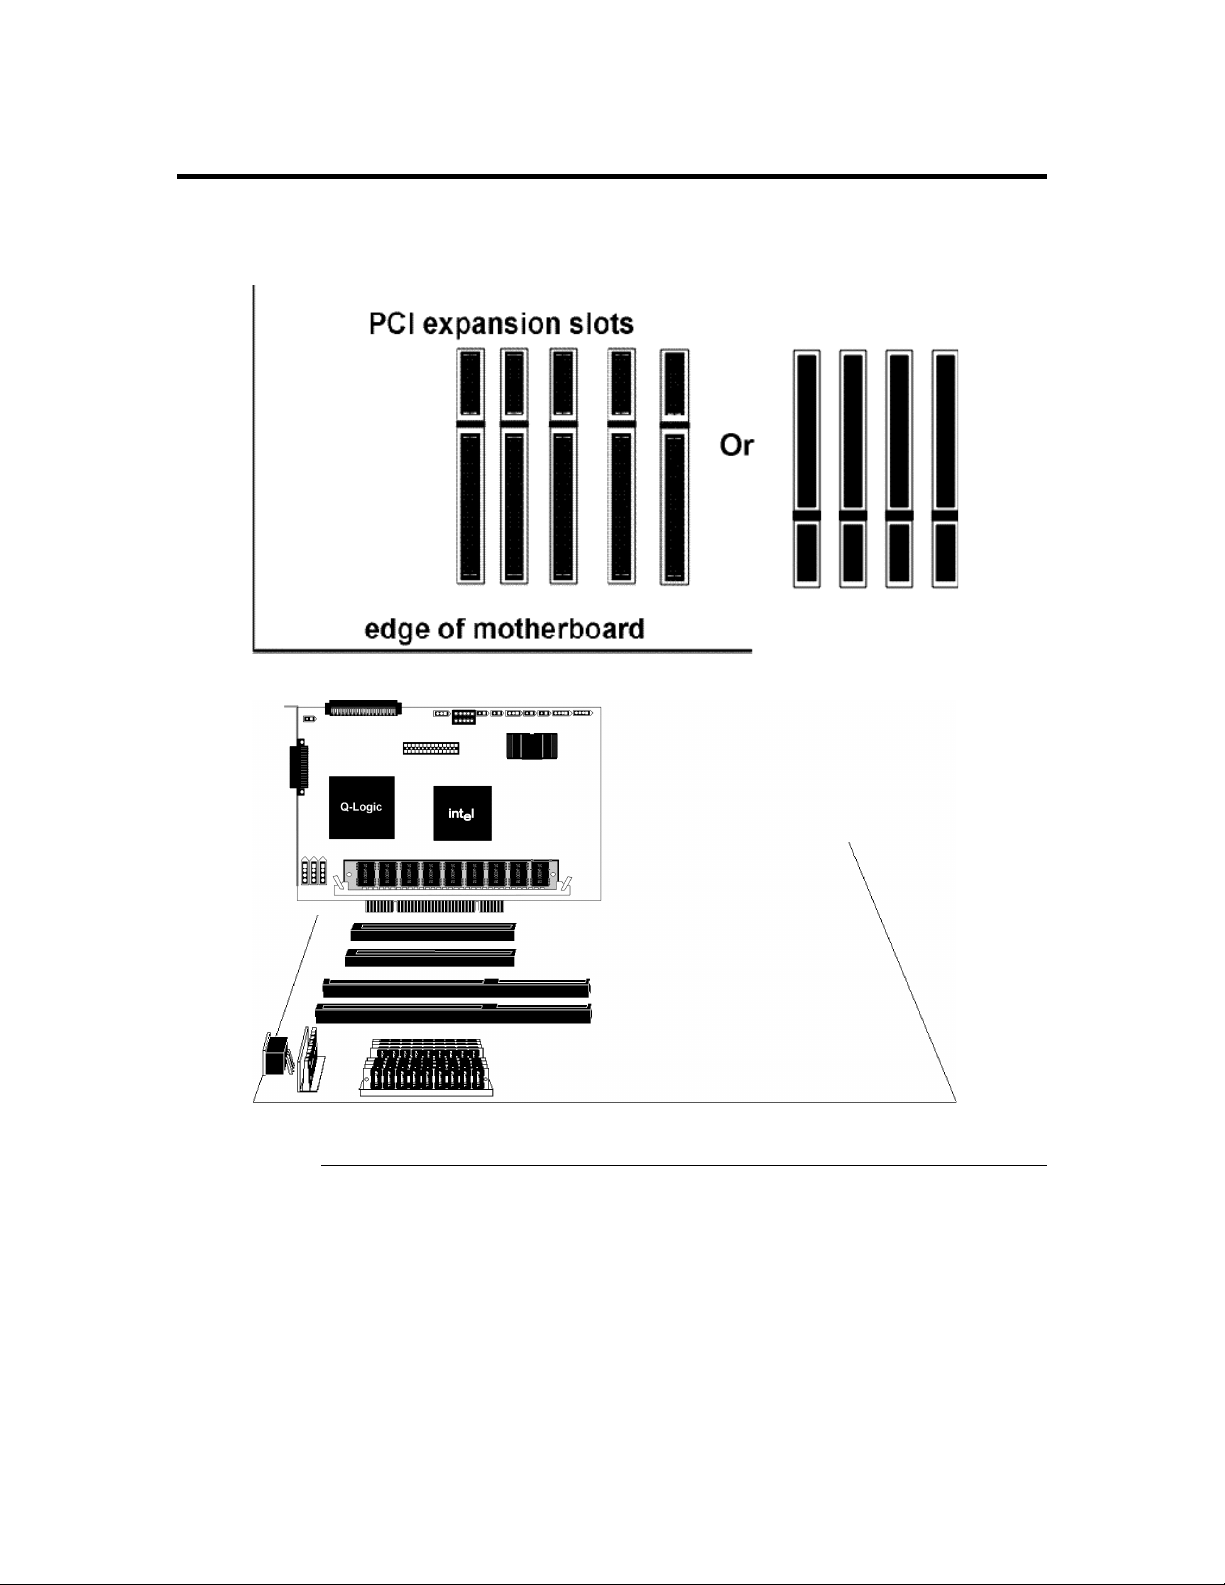
Step 7 Install MegaRAID Express 500
Choose a 3.3 V or 5 V PCI slot and align the MegaRAID Express 500 controller card bus
connector to the slot. Press down gently but firmly to make sure that the card is properly
seated in the slot. The bottom edge of the controller card should be flush with the slot.
Insert the MegaRAID Express 500 card in a PCI slot as shown below:
Screw the bracket to the computer frame.
MegaRAID Express 500 Hardware Guide
60
Page 75

Step 8 Connect SCSI Cables
Connect SCSI cables to SCSI devices. MegaRAID Express 500 provides two SCSI
connectors: J11, the SCSI channel internal high-density 68-pin connector for Wide (16bit) SCSI and J13, the SCSI channel external ultra high-density 68-pin connector for
Wide (16-bit) SCSI.
Connect SCSI Devices
Step Action
1 Disable termination on any SCSI device that does not sit at the end of the
2 Configure all SCSI devices to supply TermPWR.
3 Set proper target IDs (TIDs) for all SCSI devices.
4 The cable length should not exceed three meters for Fast SCSI (10 MB/s)
5 The cable length should not exceed six meters for non-Fast SCSI devices.
Use the following procedure to connect SCSI devices:
SCSI bus.
devices or single ended 1.5 meters for Ultra SCSI devices. The cable length
can be up to 12 meters for LVD devices.
Chapter 6 Hardware Installation
Cont’d
61
Page 76

Step 8 Connect SCSI Cables
, Continued
Cable Suggestions
System throughput problems can occur if SCSI cable use is not maximized. You should:
you can use cables up to 12 meters for LVD devices
•
for single ended SCSI devices, use the shortest SCSI cables (no more than 3 meters for Fast
•
SCSI, no more than 1.5 meters for an 8-drive Ultra SCSI system and no more than 3 meters
for a 6-drive Ultra SCSI system)
use active termination
•
avoid clustering the cable nodes
•
cable stub length should be no more than 0.1 meter (4 inches)
•
route SCSI cables carefully
•
use high impedance cables
•
do not mix cable types (choose either flat or rounded and shielded or non-shielded)
•
ribbon cables have fairly good cross-talk rejection characteristics
•
Step 9 Set Target IDs
Set target identifiers (TIDs) on the SCSI devices. Each device in a specific SCSI channel
must have a unique TID in that channel. Non-disk devices (CD-ROM or tapes) should
have unique SCSI IDs regardless of the channel where they are connected. See the
documentation for each SCSI device to set the TIDs. The MegaRAID Express 500
controller automatically occupies TID 7 in the SCSI channel. Eight-bit SCSI devices can
only use the TIDs from 0 to 6. 16-bit devices can use the TIDs from 0 to 15. The
arbitration priority for a SCSI device depends on its TID.
Priority
Highest Lowest
TID
765
2101514…98
…
Important
Non-disk devices (CD-ROM or tapes) should have unique SCSI
IDs regardless of the channel they are connected to.
ID 0 cannot be used for non-disk devices because they are limited
to IDs 1 through 6. There is a limit of six IDs for non-disk devices
per controller.
MegaRAID Express 500 Hardware Guide
62
Page 77

Device Identification on MegaRAID Express 500
Example of MegaRAID Express 500 ID Mapping
ID Channel 1
0A1-1
1A2-1
2CD
3A2-5
4CD
5A4-1
6 Optical
7 Reserved
8A5-2
9A5-6
10 A6-1
11 A6-4
12 A6-7
13 A7-2
14 A7-5
15 A7-8
As Presented to the Operating System
ID LUN Device ID LUN Device
0 0 Disk (A1-X) 1 0 Scanner
01Disk (A2-X)20 CD
02Disk (A3-X)30 Tape
03Disk (A4-X)40 CD
04Disk (A5-X)50 Tape
05Disk (A6-X)60 Optical
06Disk (A7-X)
07Disk (A8-X)
Chapter 6 Hardware Installation
63
Page 78

Step 10 Power Up
Replace the computer cover and reconnect the AC power cords. Turn power on to the
host computer. Set up the power supplies so that the SCSI devices are powered up at the
same time as or before the host computer. If the computer is powered up before a SCSI
device, the device might not be recognized.
During boot, the MegaRAID Express 500 BIOS message appears:
MegaRAID Express 500 Disk Array Adapter BIOS Version x.xx date
Copyright (c) LSI Logic Corporation
Firmware Initializing... [ Scanning SCSI Device
...(etc.)...
]
The firmware takes several seconds to initialize. During this time the adapter will scan the
SCSI channel. When ready, the following appears:
Host Adapter-1 Firmware Version x.xx DRAM Size 4 MB
0 Logical Drives found on the Host Adapter
0 Logical Drives handled by BIOS
Press <Ctrl><M> to run MegaRAID Express 500 BIOS Configuration Utility
The <Ctrl> <M> utility prompt times out after several seconds. The MegaRAID Express
500 host adapter (controller) number, firmware version, and cache DRAM size are
displayed in the second portion of the BIOS message. The numbering of the controllers
follows the PCI slot scanning order used by the host motherboard.
Step 11 Run MegaRAID BIOS Setup
Press <Ctrl> <M> to run the MegaRAID BIOS Setup utility. See the MegaRAID
Configuration Software Guide for information about running MegaRAID BIOS Setup.
MegaRAID Express 500 Hardware Guide
64
Page 79

Step 12 Install the Operating System Driver
Important
When booting the system from a drive connected to a MegaRAID controller
and using EMM386.EXE, MEGASPI.SYS must be loaded in CONFIG.SYS
before EMM386.EXE is loaded. If you do not do this, you cannot access the
boot drive after EMM386 is loaded.
DOS ASPI Driver
ASPI Driver
The ASPI driver is MEGASPI.SYS. It supports disk drives, tape drives, CD-ROM drives,
Parameters
Parameter Description
The MegaRAID Express ASPI driver can be used under DOS, Windows 3.x, and
Windows 95. The DOS ASPI driver supports:
up to six non-disk SCSI devices (each SCSI device must use a unique SCSI ID regardless of
•
the SCSI channel it resides on. SCSI IDs 1 through 6 are valid
up to six MegaRAID Express adapters (you should configure only one MegaRAID adapter per
•
system if possible)
etc. You can use it to run CorelSCSI, Novaback, PC Tools, and other software that
requires an ASPI driver. CorelSCSI, Novaback, and PC Tools are not provided with
MegaRAID Express. Copy MEGASPI.SYS to your hard disk drive. Add the following
line to CONFIG.SYS. MEGASPI.SYS must be loaded in CONFIG.SYS before
EMM386.EXE is loaded.
device=
\MEGASPI.SYS
<path>
/v
The MEGASPI.SYS parameters are:
/h INT 13h support is not provided.
/v Verbose mode. All message are displayed on the screen.
/a Physical drive access mode. Permits access to physical drives.
/q Quiet mode. All message except error message are suppressed.
Cont’d
Chapter 6 Hardware Installation
65
Page 80

Step 12 Install Operating System Driver,
Continued
CD-ROM Driver
Summary
A device driver is provided with MegaRAID Express 500 for CD-ROM drives operating
under DOS, Windows 3.x, and Windows 95. The driver filename is AMICDROM.SYS.
The MEGASPI.SYS ASPI manager must be added to the CONFIG.SYS file before you
can install the CD-ROM device driver. See the instructions on the previous page for
adding the MEGASPI.SYS driver. Copy AMICDROM.SYS to the root directory of the
C: drive. Add the following line to CONFIG.SYS, making sure it is preceded by the line
for MEGASPI.SYS:
DEVICE=C:\AMICDROM.SYS
Add the following to AUTOEXEC.BAT. Make sure it precedes the SMARTDRV.EXE
line.
MSCDEX /D:MSCD001
MSCDEX is the CD-ROM drive extension file that is supplied with MS-DOS® and PCDOS® Version 5.0 or later. See your DOS manual for the command line parameters for
MSCDEX.
This chapter discussed hardware installation. Configure the RAID system via software
configuration utilities. See the MegaRAID Configuration Software Guide for all
information about MegaRAID Express 500 software utilities. The utility programs for
configuring MegaRAID Express 500 are:
Configuration Utility Operating System
MegaRAID BIOS Setup independent of the operating system
MegaRAID Manager DOS
Linux Red Hat 6.x
OS/2 2.x, OS/2 Warp
SCO UNIX SVR3.2
SCO UnixWare
Novell NetWare 3.x, 4.x
Power Console 500 Microsoft Windows NT
Windows 95
MegaRAID Express 500 Hardware Guide
66
Page 81

7 Cluster Installation and Configuration
Overview
Clusters
The Benefits of Clusters
This chapter contains the procedures for installing Cluster Service for servers running the
Windows 2000 server operating system.
Physically, a cluster is a grouping of two independent servers that can access the same
data storage and provide services to a common set of clients. With current technology,
this usually means servers connected to common I/O buses and a common network for
client access.
Logically, a cluster is a single management unit. Any server can provide any available
service to any authorized client. The servers must have access to the same data and must
share a common security model. Again, with current technology, this generally means that
the servers in a cluster will have the same architecture and run the same version of the
same operating system.
Clusters provide three basic benefits:
• improved application and data availability
• scalability of hardware resources
• simplified management of large or rapidly growing systems
Software Requirements
The software requirments for cluster installation are:
• MS Windows 2000 Advanced Server or Windows 2000 Datacenter Server must be
installed.
• You must use a name resolution method, such as Domain Naming System (DNS),
Windows Internet Naming System (WINS), or HOSTS.
• Using a Terminal Server for remote cluster administration is recommended.
Chapter 7 Cluster Installation and Configuration
67
Page 82

Hardware Requirements
The hardware requirements for the Cluster Service node can be found at the following
web site: http://www.microsoft.com/windows2000/upgrade/compat/default.asp.
• The cluster hardware must be on the Cluster Service Hardware Compatibility List
(HCL). To see the latest version of the Cluster Service HCL, go to the following web
site:
http://www.microsoft.com/hcl/default.asp
and search using the word “Cluster.”
• Two HCL-approved computers, each with the following:
• A boot disk that has Windows 2000 Advanced Server or Windows 2000
Datacenter Server installed. You cannot put the boot disk on the shared storage
bus described below.
• A separate PCI storage host adapter (SCSI or Fibre Channel) is required for the
shared disks. This is along with the boot disk adapter.
• Each machine in the cluster needs two PCI network adapters.
• An HCL-approved external disk storage unit connected to all the computers in
the cluster. This is used as the clustered disk. RAID (redundant array of
independent disks) is recommended for this storage unit.
• Storage cables are needed to attach the shared storage device to all the
computers in the cluster.
• Make sure that all hardware is identical, slot for slot, card for card, for all nodes.
This will make it easier to configure the cluster and eliminate potential
compatibility problems.
MegaRAID Express 500 Hardware Guide
68
Page 83

Installation and Configuration
Use the following procedures to install and configure your system as part of a cluster.
Step Action
1 Unpack the controller following the instructions on page 51.
2 Set the hardware termination for the controller as “always on”. Refer to the J1
Termination Enable jumper settings on page 54 for more information.
3 Configure the IDs for the drives in the enclosure. See the enclosure
configuration guide for information.
4 Install one controller at a time. Press <Ctrl> <M> at BIOS initialization to
configure the options in the steps 5 – 11. Do not attach the disks yet.
5 Set the controller to Cluster Mode in the Objects > Adapter > Cluster Mode
menu.
6 Disable the BIOS in the Objects > Adapter > Enable/Disable BIOS menu.
7 Change the initiator ID in the Objects > Adapter > Initiator ID menu.
8 Power down the first system.
9 Attach the controller to the shared array.
10 Configure the first controller to the desired arrays using the Configure > New
Configuration menu.
11
Follow the on-screen instructions to create arrays and save the
configuration. Initialize the logical drives before powering off the system.
12 Power down the first system.
13 Repeat steps 4 – 7 for the second controller.
Note:
Do not have the cables for the second controller attached to the
shared enclosure yet.
14 Power down the second server.
15 Attach the cables for the second controller to the shared enclosure and power
up the second system.
16 If a configuration mismatch occurs, enter the <Ctrl> <M> utility. Go to the
Configure > View/Add Configuration > View Disk menu to view the disk
configuration. Save the configuration.
17 Proceed to the driver installation for a Microsoft cluster environment.
Chapter 7 Cluster Installation and Configuration
69
Page 84

Driver Installation Instructions under Microsoft Windows 2000 Advanced Server
After the hardware is set up for the MS cluster configuration, perform the following
procedure to configure the driver.
Step Action
1 When the controller is added to an existing Windows 2000 Advanced Server
installation, the operating system detects the controller.
2 The following screen displays the detected hardware device. Click on Next.
3 The following screen appears. This screen is used to locate the device driver
for the hardware device. Select Search for a suitable driver… and click on
Next.
MegaRAID Express 500 Hardware Guide
70
Page 85

Step Action
4 The following screen displays. Insert the floppy diskette with the appropriate
driver disk for Windows 2000. Select Floppy disk drives in the screen below
and click on Next.
5 The Wizard detects the device driver on the diskette and the "Completing the
upgrade device driver" wizard displays the name of the controller. Click on
Finish to complete the installation.
6 Repeat steps 1 – 5 to install the device driver on the second system.
7 After the cluster is installed, and both nodes are booted to the Microsoft
Windows 2000 Advanced Server, installation will detect a SCSI processor
device. The following screen displays. Click on Next.
Chapter 7 Cluster Installation and Configuration
71
Page 86

Step Action
8 On the screen below, choose to display a list of the known drivers, so that you
can choose a specific driver. Click on Next.
9 The following screen displays. Select Other devices from the list of hardware
types. Click on Next.
MegaRAID Express 500 Hardware Guide
72
Page 87

Step Action
10 The following screen displays. Select the driver that you want to install for the
device. If you have a disk with the driver you want to install, click on Have
Disk.
11 The following window displays. Insert the disk containing the driver into the
selected drive and click on OK.
Chapter 7 Cluster Installation and Configuration
73
Page 88

Step Action
12 The following screen displays. Select the processor device and click on Next.
13 On the final screen, click on Finish to complete the installation. Repeat the
process on the peer system.
MegaRAID Express 500 Hardware Guide
74
Page 89

Network Requirements
The network requirements for clustering are:
• A unique NetBIOS cluster name
• Five unique, static IP addresses:
• two are for the network adapters on the internal network
• two are for the network adapters on the external network
• one is for the cluster itself
• A domain user account for Cluster Service (all nodes must be part of the same
domain.)
• Two network adapters for each node—one for connection to the external network and
the other for the node-to-node internal cluster network. If you do not use two network
adapters for each node, your configuration is unsupported. HCL certification requires
a separate private network adapter.
Shared Disk Requirements
Disks can be shared by the nodes. The requirements for sharing disks are as follows:
• Physically attach all shared disks, including the quorum disk, to the shared bus.
• Make sure that all disks attached to the shared bus are seen from all nodes. You can
check this at the setup level in <Ctrl> <M> (the BIOS configuration utility.) See page
69 for installation information.
• Assign unique SCSI identification numbers to the SCSI devices and terminate the
devices properly. Refer to the storage enclosure manual about installing and
terminating SCSI devices.
• Configure all shared disks as basic (not dynamic.)
• Format all partitions on the disks as NTFS.
It is best to use fault-tolerant RAID configurations for all disks. This includes RAID
levels 1, 5, 10, 30 or 50.
Chapter 7 Cluster Installation and Configuration
75
Page 90

Cluster Installation
Installation Overview
During installation, some nodes are shut down, and other nodes are rebooted. This
is necessary to ensure uncorrupted data on disks attached to the shared storage bus. Data
corruption can occur when multiple nodes try to write simultaneously to the same disk, if
that disk is not yet protected by the cluster software.
The table below shows which nodes and storage devices should be powered on during
each step.
Step Node 1 Node 2 Storage Comments
Set Up Networks On On Off
Set up Shared Disks On Off On
Verify Disk Configuration Off On On
Make sure that power to all storage devices on
the shared bus is turned off. Power on all nodes.
Power down all nodes. Next, power on the shared
storage, then power on the first node.
Shutdown the first node. Power on the second
node.
Configure the First Node On Off On Shutdown all nodes. Power on the first node.
Configure the Second
Node
On On On
Power on the second node after the first node was
successfully configured.
Post-installation On On On All nodes should be active.
Before installing the Cluster Service software you must follow the steps below:
• Install Windows 2000 Advanced Server or Windows 2000 Datacenter Server on each
node
• Setup networks
• Setup disks
Note:
These steps must be completed on every cluster node before proceeding with the
installation of Cluster Service on the first node.
To configure the Cluster Service on a Windows 2000-based server, you must be able to
log on as administrator or have administrative permissions on each node. Each node must
be a member server, or be domain controllers inside the same domain. A mix of domain
controllers and member servers in a cluster is not acceptable.
MegaRAID Express 500 Hardware Guide
76
Page 91

Installing the Windows 2000 Operating System
Install Microsoft Windows 2000 to each node. See your Windows 2000 manual on how
to install the Operating System.
Log on as administrator before you install the Cluster Services.
Setting Up Networks
Note
: Do not allow both nodes to access the shared storage device before the Cluster Service is
installed. In order to prevent this, power down any shared storage devices and then power
up nodes one at a time. Install the Clustering Service on at least one node and make sure it
is online before you power up the second node.
Install at least two network card adapters per each cluster node. One network card
adapter card is used to access the public network. The second network card adapter is
used to access the cluster nodes.
The network card adapter that is used to access the cluster nodes establishes the
following:
• Node to node communications
• Cluster status signals
• Cluster Management
Check to make sure that all the network connections are correct. Network cards that
access the public network must be connected to the public network. Network cards that
access the cluster nodes must connect to each other.
Cont’d
Chapter 7 Cluster Installation and Configuration
77
Page 92

Setting Up Networks,
Verify that all network connections are correct, with private network adapters connected
to other private network adapters only, and public network adapters connected to the
public network. View the Network and Dial-up Connections screen to check the
connections.
Continued
Note:
Use crossover cables for the network card adapters that access the cluster nodes. If you
do not use the crossover cables properly, the system will not detect the network card
adapter that accesses the cluster nodes. If the network card adapter is not detected, then
you cannot configure the network adapters during the Cluster Service installation.
However, if you install Cluster Service on both nodes, and both nodes are powered on,
you can add the adapter as a cluster resource and configure it properly for the cluster node
network in Cluster Administrator.
MegaRAID Express 500 Hardware Guide
78
Page 93

Configuring the Cluster Node Network Adapter
Note:
Which network adapter is private and which is public depends upon your wiring. For the
purposes of this chapter, the first network adapter (Local Area Connection) is connected
to the public network, and the second network adapter (Local Area Connection 2) is
connected to the private cluster network. This may not be the case in your network.
Renaming the Local Area Connections
In order to make the network connection more clear, you can
change the name of the Local Area Connection (2). Renaming it will help you identify the
connection and correctly assign it. Follow the steps below to change the name:
Step Description
1 Right-click on the Local Area Connection 2 icon.
2 Click on Rename.
3 Type Private Cluster Connection into the textbox, then press Enter.
4 Repeat steps 1-3 to change the name of the public LAN network adapter to Public
Cluster Connection.
5 The renamed icons should look like those in the picture above. Close the Networking and
Dial-up Connections window. The new connection names automatically replicate to
other cluster servers as the servers are brought online.
Setting up the First Node in your Cluster
Step Description
1 Right-click on My Network Places, then click on Properties.
2 Right-click the Private Connection icon.
3 Click on Status. The Private Connection Status window shows the connection status, as
well as the speed of connection.
If the window shows that the network is disconnected, examine cables and connections
to resolve the problem before proceeding.
4 Click on Close.
4 Right-click Private Connection again.
5 Click on Properties.
6 Click on Configure.
7 Click on Advanced. The network card adapter properties window displays.
8 You should set network adapters on the private network to the actual speed of the
network, rather than the default automated speed selection.
Follow the steps below to setup the first node in your cluster:
Select the network speed from the drop-down list. Do not use “Auto-select” as the setting
for speed. Some adapters can drop packets while determining the speed.
Set the network adapter speed by clicking the appropriate option, such as Media Type or
Speed.
9 Configure identically all network adapters in the cluster that are attached to the same
network, so they use the same Duplex Mode, Flow Control, Media Type, and so on.
These settings should stay the same even if the hardware is different.
10 Click on Transmission Control Protocol/Internet Protocol (TCP/IP).
11 Click on Properties.
12 Click on the radio-button for Use the following IP address.
13 Enter the IP addresses you want to use for the private network.
14 Type in the subnet mask for the network.
15 Click the Advanced radio button, then select the WINS tab.
16 Select Disable NetBIOS over TCP/IP.
17 Click OK to return to the previous menu. Perform this step for the private network
adapter only.
Chapter 7 Cluster Installation and Configuration
79
Page 94

Configuring the Public Network Adapter
Note
: It is strongly recommended that you use static IP addresses for all network adapters in the
cluster. This includes both the network adapter used to access the cluster nodes and the
network adapter used to access the LAN (Local Area Network). If you must use a
dynamic IP address through DHCP, access to the cluster could be terminated and become
unavailable if the DHCP server goes down or goes offline.
The use of long lease periods is recommended to assure that a dynamically assigned IP
address remains valid in the event that the DHCP server is temporarily lost. In all cases,
set static IP addresses for the private network connector. Note that Cluster Service will
recognize only one network interface per subnet.
Verifying Connectivity and Name Resolution
In order to verify that the network adapters are working properly, perform the following
steps.
Note:
Before proceeding, you must know the IP address for each network card adapter in the
cluster. You can obtain it by using the IPCONFIG command on each node.
Step Description
1 Click on Start.
2 Click on Run.
3Type
4 Click on OK.
5 Type ipconfig /all and press Enter. IP information displays for all network adapters in the
machine.
6 If you do not already have the command prompt on your screen, click on Start.
7 Click on Run.
8Type
9 Click on OK.
10 Type
in the text box.
cmd
in the text box.
cmd
ping ipaddress
where ipaddress is the IP address for the corresponding network adapter in the other
node. For example, assume that the IP addresses are set as follows:
In this example, you would type
Ping 192.168.0.172
and
Ping 10.1.1.1
from Node 1.
MegaRAID Express 500 Hardware Guide
80
Node Network Name Network Adapter IP Address
1 Public Cluster Connection 192.168.0.171
1 Private Cluster Connection 10.1.1.1
2 Public Cluster Connection 192.168.0.172
2 Private Cluster Connection 10.1.1.2
Page 95

They you would type
Ping 192.168.0.172
and
10.1.1.1
from Node 2.
To confirm name resolution, ping each node from a client using the node’s machine
name instead of its IP number.
Verifying Domain Membership
All nodes in the cluster have to be members of the same domain and capable of accessing
a domain controller and a DNS Server. You can configure them as either member servers
or domain controllers. If you plan to configure one node as a domain controller, you
should configure all other nodes as domain controllers in the same domain as well.
Chapter 7 Cluster Installation and Configuration
81
Page 96

Setting Up a Cluster User Account
The Cluster Service requires a domain user account that the Cluster Service can run
under. You must create the user account before installing the Cluster Service. The reason
for this is that setup requires a user name and password. This user account should not
belong to a user on the domain.
Step Description
1 Click on Start.
2 Point to Programs, then point to Administrative Tools.
3 Click on Active Directory Users and Computers.
4 Click the plus sign (+) to expand the domain name (if it is not already expanded.)
5 Click on Users.
6 Right-click on Users.
7 Point to New and click on User.
8 Type in the cluster name and click on Next.
9 Set the password settings to User Cannot Change Password and Password Never Expires.
10 Click on Next, then click on Finish to create this user.
Note:
If your company’s security policy does not allow the use of
passwords that never expire, you must renew the password on
each node before password expiration. You must also update
the Cluster Service configuration
11 Right-click on Cluster in the left pane of the Active Directory Users and Computers
snap-in.
12 Select Properties from the context menu.
13 Click on Add Members to a Group.
14 Click on Administrators and click on OK. This gives the new user account administrative
privileges on this computer.
15 Close the Active Directory Users and Computers snap-in.
MegaRAID Express 500 Hardware Guide
82
Page 97

Setting Up Shared Disks
Warning
: Make sure that Windows 2000 Advanced Server or Windows 2000 Datacenter Server and
the Cluster Service are installed and running on one node before you start an operating
system on another node. If the operating system is started on other nodes before you
install and configure Cluster Service and run it on at least one node, the cluster disks will
have a high chance of becoming corrupted.
To continue, power off all nodes. Power up the shared storage devices. Once the shared
storage device is powered up, power up node one.
Quorum Disk
The quorum disk stores cluster configuration database checkpoints and log files that help
manage the cluster. Windows 2000 makes the following quorum disk recommendations:
• Create a small partition [Use a minimum of 50 megabytes (MB) as a quorum disk.
Windows 2000 generally recommends a quorum disk to be 500 MB.]
• Dedicate a separate disk for a quorum resource. The failure of the quorum disk would
cause the entire cluster to fail; therefore, Windows 2000 strongly recommends that
you use a volume on a RAID disk array.
During the Cluster Service installation, you have to provide the drive letter for the
quorum disk.
Note:
For our example, we use the letter E for the quorum disk drive letter.
Chapter 7 Cluster Installation and Configuration
83
Page 98

Configuring Shared Disks
Perform the following procedure to configure the shared disks.
Step Description
1 Right-click on My Computer.
2 Click on Manage, then click on Storage.
3 Double-click on Disk Management.
4 Make sure that all shared disks are formatted as NTFS and are designated as Basic. If you
connect a new drive, the Write Signature and Upgrade Disk Wizard starts automatically.
If this occurs, click on Next to go through the wizard. The wizard sets the disk to
dynamic, but you can uncheck it at this point to set it to basic.
To reset the disk to Basic, right-click on Disk # (where # identifies the disk that you are
working with) and click on Revert to Basic Disk.
5 Right-click on unallocated disk space.
6 Click on Create Partition…
7 The Create Partition Wizard begins. Click on Next twice.
8 Enter the desired partition size in MB and click on Next.
9 Accept the default drive letter assignment by clicking on Next.
10 Click on Next to format and create a partition.
Assigning Drive Letters
After you have configured the bus, disks, and partitions, you must assign drive letters to
each partition on each clustered disk.
Note
: Mountpoints is a feature of the file system that lets you mount a file system using an
existing directory without assigning a drive letter. Mountpoints is not supported on
clusters. Any external disk that is used as a cluster resource must be partitioned using
NTFS partitions and have a drive letter assigned to it. Use the procedure below to assign
driver letters.
Step Description
1 Right-click on the desired partition and select Change Drive Letter and Path.
2 Select a new drive letter.
3 Repeat steps 1 and 2 for each shared disk.
4 Close the Computer Management window.
MegaRAID Express 500 Hardware Guide
84
Page 99

Verifying Disk Access and Functionality
Perform the steps below to verify disk access and functionality.
Step Description
1 Click on Start.
2 Click on Programs. Click on Accessories, then click on Notepad.
3 Type some words into Notepad and use the File/Save As command to save it as a test file
called test.txt. Close Notepad.
4 Double-click on the My Documents icon.
5 Right-click on test.txt and click on Copy.
6 Close the window.
7 Double-click on My Computer.
8 Double-click on a shared drive partition.
9 Click on Edit and click on Paste.
10 A copy of the file should now exist on the shared disk.
11 Double-click on test.txt to open it on the shared disk.
12 Close the file.
13 Highlight the file and press the Del key to delete it from the clustered disk.
14 Repeat the process for all clustered disks to make sure they can be accessed from the first
node.
After you complete the procedure, shut down the first node, power on the second node
and repeat the procedure above. Repeat again for any additional nodes. After you have
verified that all nodes can read and write from the disks, turn off all nodes except the first,
and continue with this guide.
Chapter 7 Cluster Installation and Configuration
85
Page 100

Cluster Service Software Installation
Before you begin the Cluster Service Software installation on the first node, make sure
that all other nodes are either powered down or stopped and that all shared storage
devices are powered on.
Cluster Configuration Wizard
Cluster Configuration Wizard will allow you to input this information.
Step Description
1 Click on Start.
2 Click on Settings, then click on Control Panel.
3 Double-click on Add/Remove Programs.
4 Double-click on Add/Remove Windows Components. The following window displays.
To create the cluster, you must provide the cluster information. The
5 Select Cluster Service, then click on Next.
6 Cluster Service files are located on the Windows 2000 Advanced Server or Windows
2000 Datacenter Server CD-ROM.
Enter x:\i386 (where x is the drive letter of your CD-ROM). If you installed Windows
2000 from a network, enter the appropriate network path instead. (If the Windows 2000
Setup flashscreen displays, close it.)
7 Click on OK. The following screen displays.
MegaRAID Express 500 Hardware Guide
86
 Loading...