

Page 1

™
L-Gate
CEA-709/BACnet Gateway
User Manual
LOYTEC electronics GmbH
Page 2

Contact
LOYTEC
Blumengasse 35
A-1170 Vienna
AUSTRIA/EUROPE
http://www.loytec.com
Version 3.2
Document 88072407
LOYTEC MAKES AND YOU RECEIVE NO WARRANTIES OR CONDITIONS,
EXPRESS, IMPLIED, STATUTORY OR IN ANY COMMUNICATION WITH YOU,
AND
LOYTEC SPECIFICALLY DISCLAIMS ANY IMPLIED WARRANTY OF
MERCHANTABILITY OR FITNESS FOR A PARTICULAR PURPOSE. THIS
PRODUCT IS NOT DESIGNED OR INTENDED FOR USE IN EQUIPMENT
INTENDED FOR SURGICAL IMPLANT INTO THE BODY OR OTHER
APPLICATIONS INTENDED TO SUPPORT OR SUSTAIN LIFE, FOR USE IN
FLIGHT CONTROL OR ENGINE CONTROL EQUIPMENT WITHIN AN
AIRCRAFT, OR FOR ANY OTHER APPLICATION IN WHICH IN THE FAILURE
OF SUCH PRODUCT COULD CREATE A SITUATION IN WHICH PERSONAL
INJURY OR DEATH MAY OCCUR.
No part of this publication may be reproduced, stored in a retrieval system, or transmitted,
in
any form or by any means, electronic, mechanical, photocopying, recording, or otherwise,
without the prior written permission of LOYTEC.
LC3020™, L-Chip™, L-Core™, L-DALI™, L-GATE™, L-INX™, L-IOB™, L-IP™,
LPA™, L-Proxy™, L-Switch™, L-Term™, L-VIS™, L-WEB™, and ORION™ stack are
trademarks of LOYTEC electronics GmbH.
LonTalk
®
, LONWORKS®, Neuron®, LONMARK®, LonMaker®, i.LON®, and LNS® are
trademarks of Echelon Corporation registered in the United States and other countries.
Page 3

L-Gate User Manual 3 LOYTEC
Contents
1 Introduction ................................................................................................11
1.1 Overview ............................................................................................................11
1.2 Scope...................................................................................................................12
2 Quick-Start Guide ......................................................................................13
2.1 Hardware installation ....................................................................................... 13
2.2 Configuration of the L-Gate.............................................................................14
2.2.1 IP Configuration on the Console .............................................................14
2.2.2 IP Configuration via the Web Interface...................................................15
2.2.3 BACnet Configuration.............................................................................16
2.3 Gateway Configuration with LNS-based Tools.............................................. 17
3 Hardware Installation................................................................................18
3.1 Enclosure ...........................................................................................................18
3.1.1 LGATE-900.............................................................................................18
3.2 Product Label .................................................................................................... 19
3.3 Mounting............................................................................................................ 19
3.4 LED signals........................................................................................................19
3.4.1 Power LED ..............................................................................................19
3.4.2 Status LED...............................................................................................19
3.4.3 MSTP Activity LED................................................................................19
3.4.4 FT Activity LED......................................................................................19
3.4.5 Ethernet Link LED...................................................................................20
3.4.6 Ethernet Activity LED.............................................................................20
3.4.7 CN/IP LED ..............................................................................................20
3.4.8 BACnet/IP LED.......................................................................................20
3.4.9 Wink Action.............................................................................................21
3.4.10 Network Diagnostics................................................................................21
3.5 Status Button ..................................................................................................... 21
3.6 DIP Switch Settings........................................................................................... 21
3.7 Terminal Layout and Power Supply ............................................................... 22
3.8 Wiring ................................................................................................................22
4 Web Interface .............................................................................................24
4.1 Device Information and Account Management .............................................24
4.2 Device Configuration ........................................................................................ 26
4.2.1 System Configuration..............................................................................26
4.2.2 Backup and Restore.................................................................................27
Version 3.2 LOYTEC electronics GmbH
Page 4

L-Gate User Manual 4 LOYTEC
4.2.3 Port Configuration................................................................................... 28
4.2.4 IP Configuration...................................................................................... 28
4.2.5 CEA-709 Configuration.......................................................................... 30
4.2.6 CEA-852 Device Configuration.............................................................. 30
4.2.7 BACnet Configuration ............................................................................ 32
4.2.8 BACnet/IP Configuration........................................................................ 32
4.2.9 MS/TP Configuration.............................................................................. 33
4.2.10 BACnet BDT (Broadcast Distribution Table)......................................... 34
4.2.11 E-Mail Configuration.............................................................................. 34
4.2.12 Data Points .............................................................................................. 35
4.2.13 Trend ....................................................................................................... 37
4.2.14 Scheduler................................................................................................. 37
4.2.15 Calendar .................................................................................................. 39
4.2.16 Alarm....................................................................................................... 40
4.3 Device Statistics ................................................................................................ 41
4.3.1 System Log.............................................................................................. 41
4.3.2 IP Statistics.............................................................................................. 42
4.3.3 CEA-852 Statistics.................................................................................. 43
4.3.4 Enhanced Communications Test............................................................. 43
4.3.5 CEA-709 Statistics.................................................................................. 44
4.3.6 BACnet MS/TP Statistics........................................................................ 45
4.3.7 Scheduler Statistics Page......................................................................... 46
4.3.8 Alarm Log Page ...................................................................................... 46
4.4 Reset, Contact, Logout ..................................................................................... 47
5 Concepts ...................................................................................................... 48
5.1 CEA-709/BACnet Gateway ............................................................................. 48
5.2 Data Points ........................................................................................................ 48
5.2.1 Overview................................................................................................. 48
5.2.2 Timing Parameters .................................................................................. 49
5.2.3 Default Values......................................................................................... 49
5.2.4 Persistency............................................................................................... 50
5.2.5 Behavior on Value Changes.................................................................... 50
5.2.6 Custom Scaling ....................................................................................... 50
5.2.7 System Registers ..................................................................................... 51
5.2.8 User Registers ......................................................................................... 51
5.2.9 Math Objects........................................................................................... 51
5.3 Connections ....................................................................................................... 51
5.4 AST Features .................................................................................................... 52
5.4.1 Alarming.................................................................................................. 52
Version 3.2 LOYTEC electronics GmbH
Page 5

L-Gate User Manual 5 LOYTEC
5.4.2 Historical Alarm Log...............................................................................53
5.4.3 Scheduling ...............................................................................................53
5.4.4 Trending...................................................................................................56
5.4.5 E-Mail......................................................................................................56
5.5 CEA-709 Technology ........................................................................................ 57
5.5.1 CEA-709 Data Points...............................................................................57
5.5.2 Static Interface Changes ..........................................................................58
5.5.3 Limitations for Local CEA-709 Schedulers.............................................58
5.5.4 Limitations for CEA-709 Alarm Servers.................................................58
5.5.5 Limitations for Local CEA-709 Trends...................................................59
5.6 BACnet Technology .......................................................................................... 59
5.6.1 BACnet Data Points.................................................................................59
5.6.2 BACnet Alarming....................................................................................59
5.6.3 BACnet Schedulers and Calendars..........................................................60
5.6.4 BACnet Trend Logs.................................................................................60
5.7 Automatic Generation of Connections ............................................................ 61
6 The L-Gate Configurator ..........................................................................62
6.1 Installation ......................................................................................................... 62
6.1.1 Software Installation................................................................................62
6.1.2 Registration as a Plug-In..........................................................................62
6.1.3 Operating Modes .....................................................................................64
6.2 Data Point Manager.......................................................................................... 64
6.2.1 Folder List................................................................................................65
6.2.2 Network Port Folders...............................................................................66
6.2.3 Data Point List.........................................................................................66
6.2.4 Property View..........................................................................................67
6.2.5 Managing Multistate Maps......................................................................68
6.2.6 CEA-709 Properties.................................................................................69
6.2.7 BACnet Properties...................................................................................70
6.3 Project Settings.................................................................................................. 71
6.3.1 General.....................................................................................................71
6.3.2 Data Point Naming Rules.........................................................................72
6.3.3 CEA-709 Settings....................................................................................72
6.3.4 AST Settings............................................................................................73
6.3.5 BACnet Settings ......................................................................................75
6.4 Workflows for the L-Gate ................................................................................ 75
6.4.1 Involved Configuration Files...................................................................76
6.4.2 Configure with LNS ................................................................................76
6.4.3 Configure without LNS ...........................................................................77
Version 3.2 LOYTEC electronics GmbH
Page 6

L-Gate User Manual 6 LOYTEC
6.4.4 Configure without LNS Using Bindings................................................. 77
6.4.5 Replace an L-Gate................................................................................... 79
6.4.6 Configure from BACnet .......................................................................... 79
6.5 Adding L-Gate .................................................................................................. 80
6.6 Replace an L-Gate ............................................................................................ 83
6.7 Using the L-Gate Configurator ....................................................................... 86
6.7.1 Starting as an LNS Plug-In...................................................................... 86
6.7.2 Starting Stand-Alone............................................................................... 86
6.7.3 Uploading the Configuration................................................................... 87
6.7.4 Scanning for Network Variables............................................................. 88
6.7.5 Importing Network Variables.................................................................. 89
6.7.6 Scanning NVs online from the Network................................................. 90
6.7.7 Select and Use Network Variables.......................................................... 92
6.7.8 Change the NV Allocation...................................................................... 92
6.7.9 Create Static NVs.................................................................................... 93
6.7.10 Create External NVs................................................................................ 94
6.7.11 Generate BACnet Objects ....................................................................... 96
6.7.12 Create User Registers.............................................................................. 97
6.7.13 Configuration Download......................................................................... 98
6.7.14 Build XIF for Port Interface.................................................................... 99
6.7.15 Enable Legacy NM Mode ....................................................................... 99
6.7.16 Upload Dynamic NVs from Device...................................................... 100
6.7.17 Upload the System Log......................................................................... 100
6.8 Advanced CEA-709 Configuration ............................................................... 101
6.8.1 Working with Configuration Properties................................................ 101
6.8.2 Install Unconfigured Devices................................................................ 103
6.8.3 Using Feedback Data Points.................................................................. 103
6.8.4 Working with UNVTs, UCPTs............................................................. 104
6.9 Connections ..................................................................................................... 104
6.9.1 Create a New Connection...................................................................... 104
6.9.2 Create Connections from a CSV File.................................................... 105
6.9.3 Modify Connections.............................................................................. 106
6.9.4 Connection Overview............................................................................ 106
6.10 BACnet Configuration ................................................................................... 107
6.10.1 Scan for BACnet Objects...................................................................... 107
6.10.2 Import from EDE File ........................................................................... 108
6.10.3 Use Imported BACnet Objects.............................................................. 108
6.10.4 Edit a Client Mapping ........................................................................... 109
6.10.5 Create Server Object ............................................................................. 109
Version 3.2 LOYTEC electronics GmbH
Page 7

L-Gate User Manual 7 LOYTEC
6.10.6 Map other Properties than Present_Value..............................................110
6.10.7 Enable International Character Support.................................................111
6.11 E-Mail Templates............................................................................................112
6.11.1 Create an E-Mail Template....................................................................112
6.11.2 Trigger E-Mails......................................................................................113
6.11.3 Attachments...........................................................................................114
6.11.4 Limit E-Mail Send Rate.........................................................................115
6.12 Local Schedule and Calendar ........................................................................115
6.12.1 Create a Calendar...................................................................................115
6.12.2 Create Calendar Pattern .........................................................................116
6.12.3 Create a Local Scheduler.......................................................................116
6.12.4 Configure Scheduled Data Points..........................................................117
6.12.5 Configure Daily Schedules....................................................................118
6.12.6 Configure Exception Days.....................................................................120
6.12.7 Configure Embedded Exceptions ..........................................................121
6.12.8 Configure Control Data Points ..............................................................122
6.12.9 Using the SNVT_tod_event...................................................................122
6.12.10 Using the Local Scheduler ...............................................................123
6.13 Local Alarming................................................................................................ 123
6.13.1 Create an Alarm Server..........................................................................123
6.13.2 Create an Alarm Condition....................................................................124
6.13.3 Deliver Alarms via E-Mail.....................................................................126
6.13.4 Create an Alarm Log..............................................................................126
6.14 Local Trending ................................................................................................ 127
6.14.1 Create a Local Trend..............................................................................127
6.14.2 Configure Trended Data Points .............................................................128
6.14.3 Trend Triggers .......................................................................................129
6.14.4 Download Trend Data in CSV Format ..................................................130
6.14.5 Deliver Trend Data via E-Mail ..............................................................130
6.15 Remote AST Objects....................................................................................... 131
6.15.1 Remote Scheduler and Calendar............................................................131
6.15.2 Alarm Clients.........................................................................................132
6.16 Math Objects ...................................................................................................133
6.16.1 Create a Math Object.............................................................................133
6.16.2 Editing a Math Object............................................................................134
6.17 Mapping CEA-709 and BACnet Schedules ..................................................135
6.17.1 Mapping and Limitations.......................................................................135
6.17.2 Map from CEA-709 to BACnet.............................................................136
6.17.3 Map from BACnet to CEA-709.............................................................137
Version 3.2 LOYTEC electronics GmbH
Page 8

L-Gate User Manual 8 LOYTEC
6.17.4 Create One-Way Mappings................................................................... 138
7 Operating Interfaces ................................................................................ 139
7.1 Common Interface.......................................................................................... 139
7.1.1 Schedule and Calendar XML Files ....................................................... 139
7.1.2 Trend Log CSV File.............................................................................. 139
7.1.3 Alarm Log CSV File ............................................................................. 141
7.2 CEA-709 Interface.......................................................................................... 141
7.2.1 NV Import File...................................................................................... 141
7.2.2 Node Object .......................................................................................... 142
7.2.3 Extended Node Object Interface ........................................................... 143
7.2.4 Real-Time Keeper Object...................................................................... 144
7.2.5 Calendar Object..................................................................................... 144
7.2.6 Scheduler Object................................................................................... 144
7.2.7 Clients Object........................................................................................ 144
7.2.8 Gateway Objects ................................................................................... 144
7.3 BACnet Interface............................................................................................ 144
7.3.1 Device Object........................................................................................ 144
7.3.2 Client Mapping CSV File...................................................................... 147
7.3.3 EDE Export of BACnet Objects............................................................ 148
8 Network Media ......................................................................................... 149
8.1 FT..................................................................................................................... 149
9 L-Gate Firmware Update ........................................................................ 150
9.1 Firmware Update via the Configurator........................................................ 150
9.2 Firmware Update via the Console................................................................. 152
10 Troubleshooting........................................................................................ 154
10.1 Technical Support .......................................................................................... 154
10.2 Statistics on the Console................................................................................. 154
10.2.1 Connecting to the Console .................................................................... 154
10.2.2 Reset Configuration (factory defaults).................................................. 155
10.2.3 Device Statistics Menu.......................................................................... 155
11 Application Notes .....................................................................................157
11.1 The LSD Tool.................................................................................................. 157
11.2 Use of Static, Dynamic, and External NVs on a Device .............................. 157
12 Firmware Versions................................................................................... 158
13 Specifications ............................................................................................159
13.1 LGATE-900..................................................................................................... 159
13.1.1 Physical Specifications.......................................................................... 159
13.1.2 Resource Limits..................................................................................... 159
Version 3.2 LOYTEC electronics GmbH
Page 9

L-Gate User Manual 9 LOYTEC
14 Revision History .......................................................................................161
Version 3.2 LOYTEC electronics GmbH
Page 10

L-Gate User Manual 10 LOYTEC
Abbreviations
100BaseT............................ 100 Mbps Ethernet network with RJ-45 plug
Aggregation ........................ Collection of several CEA-709 packets into a single CEA-852
packet
AST .................................... Alarming, Scheduling, Trending
BACnet...............................Building Automation and Control Network
CC.......................................Configuration Client, also known as CN/IP Device
CEA-709.............................Protocol standard for L
CEA-852.............................Protocol standard for tunneling CEA-709 packets over IP
channels
CN ...................................... Control Network
CN/IP.................................. Control Network over IP
CN/IP Channel ................... logical IP channels that tunnels CEA-709 packets according
CEA-852
CN/IP packet ...................... IP packet that tunnels one or multiple CEA-709 packet(s)
COV ...................................change-of-value
CR.......................................Channel Routing
CS....................................... Configuration Server that manages CEA-852 IP devices
DHCP ................................. Dynamic Host Configuration Protocol, RFC 2131, RFC 2132
DNS....................................Domain Name Server, RFC 1034
DST .................................... Daylight Saving Time
GMT................................... Greenwich Mean Time
IP ........................................ Internet Protocol
LSD Tool............................LOYTEC System Diagnostics Tool
MAC...................................Media Access Control
MD5 ................................... Message Digest 5, a secure hash function, see Internet RFC
1321
MS/TP ................................ Master/Slave Token Passing (this is a BACnet data link layer)
NAT.................................... Network Address Translation, see Internet RFC 1631
NV......................................Network Variable
RTT .................................... Round-Trip Time
SMTP .................................Simple Mail Transfer Protocol
SNTP..................................Simple Network Time Protocol
SNVT .................................Standard Network Variable Type
SSL..................................... Secure Socket Layer
TLS.....................................Transport Layer Security
UI........................................ User Interface
UNVT.................................User-Defined Network Variable Type
UTC....................................Universal Time Coordinated
XML................................... eXtensible Markup Language
ONWORKS networks
Version 3.2 LOYTEC electronics GmbH
Page 11

L-Gate User Manual 11 LOYTEC
1 Introduction
1.1 Overview
The L-Gate is a high performance, reliable and secure network infrastructure component
that provides data access to a defined set of data points, which are mapped from one
control network technology to another control network technology. In particular, the CEA709/BACnet Gateway (LGATE-900) implements mappings between a set of CEA-709
network variables (NVs) and a set of standard BACnet server objects. Which NVs are
mapped to BACnet objects can be configured by an LNS plug-in or stand-alone
configuration software. Easy to understand diagnostic LEDs allow installers and system
integrators to install and troubleshoot this device without expert knowledge and dedicated
troubleshooting tools. The LGATE-900 is equipped with a 100-BaseT Ethernet port (IP),
an FT-10 port (CEA-709), and an RS-485 port (MS/TP). The device is fully compliant with
ANSI/CEA-709 and ENV14908, ANSI/ASHRAE-135-2004 and ISO 16484.
On the CEA-709 side of the L-Gate, there can be up to 1000 NVs. The NVs can be bound
in the CEA-709 network or operated as “external NVs”. External NVs are polled or
explicitly written to without allocating static or dynamic NVs on the L-Gate. In this case,
address information is supplied by the configuration software by importing e.g. a CSV file.
As communications media on the CEA-709 side, the L-Gate supports either the FT-10
channel or an CEA-852 channel (IP channel over the Inranet/Internet). Which of the two
interfaces is used is configurable. The CEA-852 interface can be used behind NAT routers
and firewalls, which allows seamless integration in already existing Intran et networks. It
supports DHCP even with changing IP addresses in an Intranet environment.
The BACnet objects on the L-Gate can be of the type analog input/output, binary
input/output, and multistate input/output. There can be up to 750 of such objects. They are
mapped to NVs as configuraed by the Gateway configuration software. This software is
able to automatically create BACnet object as counterparts to NVs. In particular, BACnet
properties such as Object_Name, Description, Units, Max_Pres_Value, Min_Pres_Value,
Resolution, Number_Of_States, and State_Text are derived from the Standard Network
Variable Types (SNVTs)
in the configuration software. BACnet properties updated during run-time by the gateway
are Present_Value, Status_Flags, Reliability, Out_Of_Service. Structured NVs are mapped
to one BACnet object per structure member. The BACnet server objects are accessible
from the BACnet network. In addition, the L-Ggate also includes BACnet client
functionality. For each server object a “client mapping” can be defined. These mappings
specify other BACnet objects on the network where the L-Gate can read values from (poll
or COV subscribe) or write updates to.
1
. Further, the automatically assigned default values can be edited
1
This is based on the recommendation in CEN/TS 15231:2006.
Version 3.2 LOYTEC electronics GmbH
Page 12

L-Gate User Manual 12 LOYTEC
The built-in Web server allows convenient device configuration through a standard Web
browser such as the Internet Explorer or Firefox. The Web interface also provides statistics
information for system installation and network troubleshooting.
In firmware 1.2 and up, the L-Gate supports user-defined network variable types (UNVTs)
as dynamic or external NVs, and can access configuration properties (CPs) on other
devices through file transfer. To transfer CPs it supports both the LonMark file transfer and
the read memory access method. For CPs, the standard (SCPTs) and user-defined (UCPTs)
are supported. All of those new CEA-709 data points can be mapped automatically to
BACnet objects.
In firmware versions from 3.0 and up, the L-Gate also supports Trendlog, Schedule and
Notification Class objects. These objects can be used to operate on any of the basic
BACnet objects, which are mapped to CEA-709 NVs. This allows the L-Gate to provide
trend data of one or more NVs, schedule NVs and BACnet objects, and report alarms based
on NV conditions directly in BACnet. There can be up to 100 scheduler and calendar
objects, up to 32 notification class objects, and up to 100 trend log objects with an
aggregated total log buffer size of 2MB.
Furthermore, the L-Gate provides LonMark scheduler/calendar objects, which can directly
schedule NVs or be translated to BACnet schedules/calendars. For alarm conditions, the LGate can be configured to send E-Mails to pre-defined addresses.
1.2 Scope
The L-Gate is used for:
• connecting BACnet and CEA-709 networks,
• communicating on BACnet with either BACnet/IP or BACnet/MSTP,
• communicating on CEA-709 with either FT-10 or CEA-852 (IP channel on the
Intranet/Internet),
• accessing ANSI/CEA-709 network variables (NVs) and configuration properties (CPs)
in BACnet,
• supporting standard (SNVT, SCPT) and user-defined (UNVT, UCPT) types,
• accessing BACnet objects in ANSI/CEA-709 networks,
• scheduling BACnet objects and ANSI/CEA-709 network variables,
• translating BACnet schedules/calendars to LonMark schedules/calendars,
• trending BACnet objects,
• generating alarms using intrinsic reporting on BACnet objects,
• sending E-Mails on alarms or scheduled events.
This document covers L-Gate devices with firmware version 3.2 and the L-Gate
Configurator Software version 3.2. See Chapter 12 for differences between the different
L-Gate firmware versions.
Version 3.2 LOYTEC electronics GmbH
Page 13
L-Gate User Manual 13 LOYTEC
2 Quick-Start Guide
This Chapter shows step-by-step instructions on how to configure the L-Gate for a simple
network architecture, mapping CEA-709 network variables to BACnet server objects.
2.1 Hardware installation
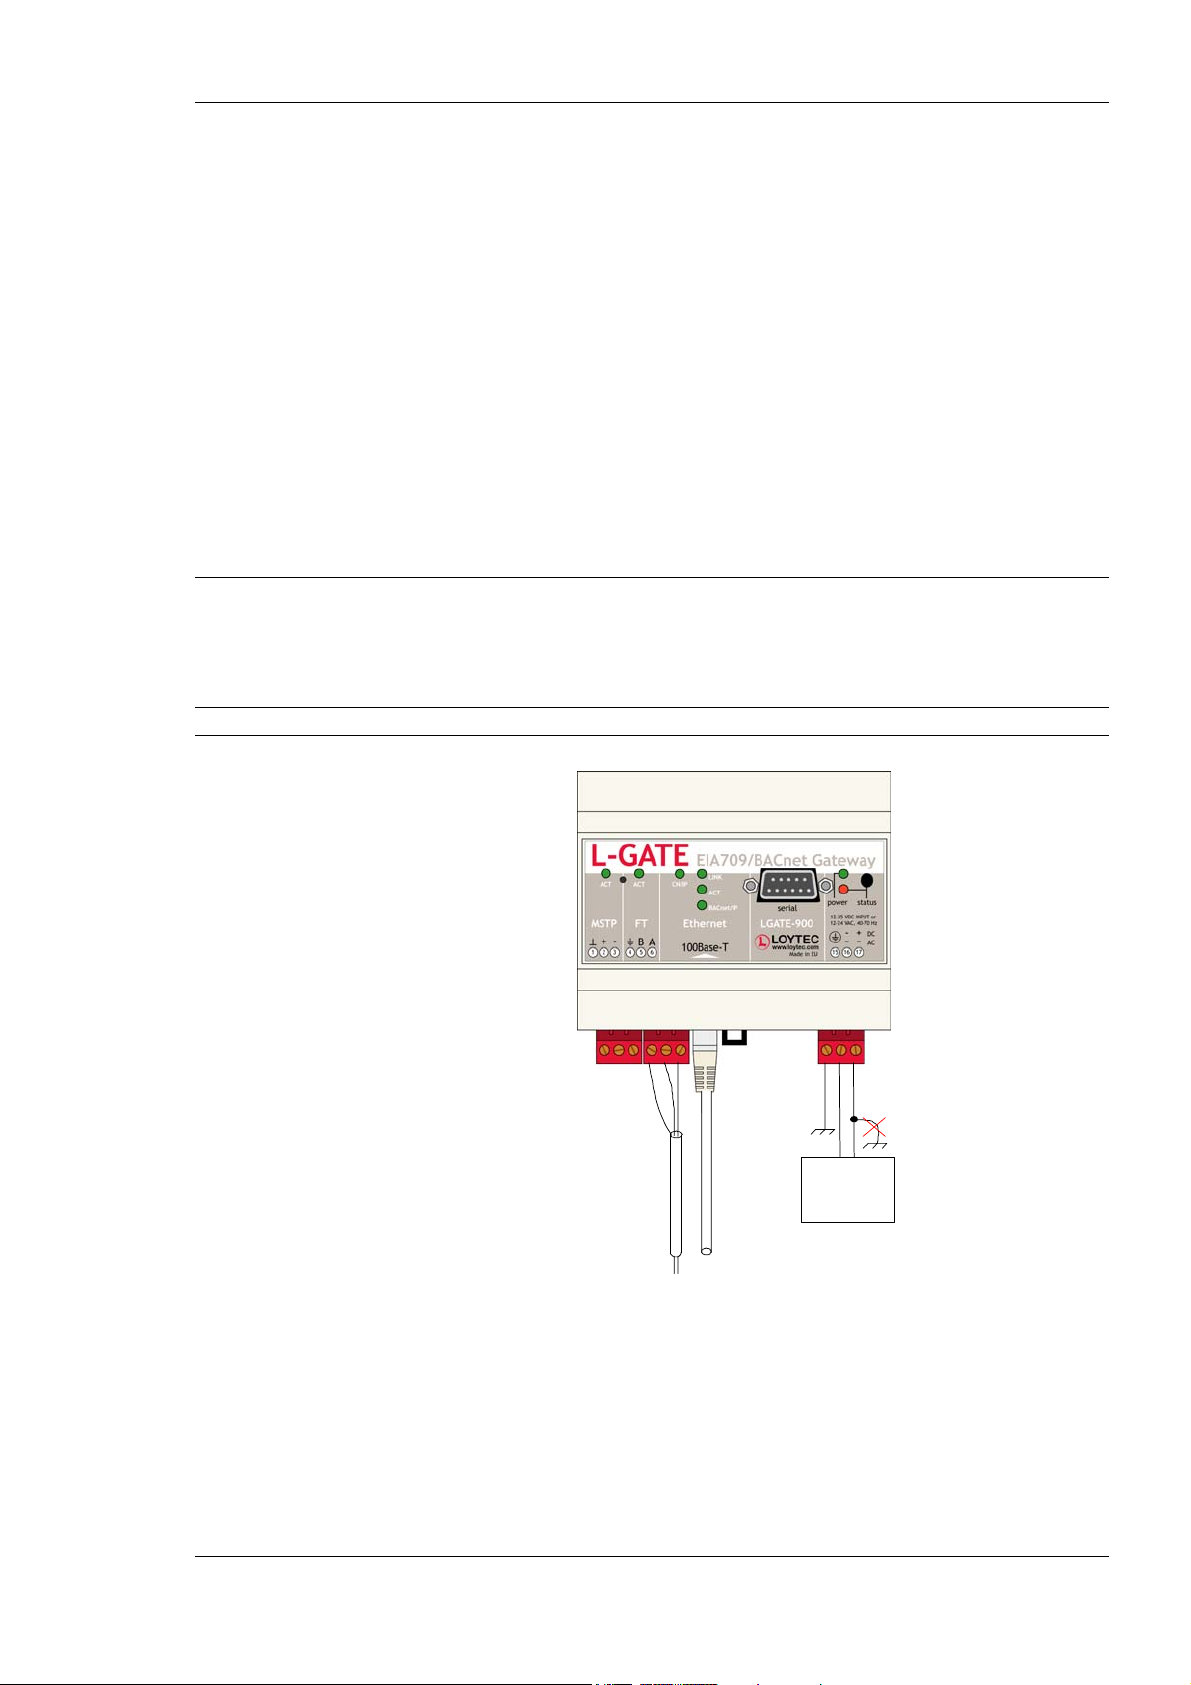
Connect power (12-35 VDC or 12-24 VAC), the CEA-709 network, and the Ethernet cable
as shown in Figure 1. More detailed instructions are shown in Chapter 3.
Important: Do not connect terminal 17 to earth ground!
Ethernet
Power Supply
Figure 1: Basic Hardware Installation
If the L-Gate is connected to a BACnet MS/TP network, the MS/TP network segment must
be properly terminated with an LT-04 network terminator connected at each of the two
ends of the segment media.
Version 3.2 LOYTEC electronics GmbH
Page 14

L-Gate User Manual 14 LOYTEC
2.2 Configuration of the L-Gate
The L-Gate can be configured via a console interface or via the Web interface. To
configure the L-Gate, the following steps have to be performed:
1. Setup IP configuration (see Sections 2.2.1 and 2.2.2).
2. Setup BACnet configuration (see Section 2.2.3).
3. Setup gateway configuration (see Section 2.3).
Note: This setup procedure assumes the use of the IP interface.
2.2.1 IP Configuration on the Console
Use a PC terminal program with the communication settings set to 38,400 bps / 8 data bits /
no parity / 1 stop bit / no handshake. To connect COM1 of the PC to the Console on the
device, use a standard null-modem cable with full handshaking. Power up the device or
press Return if the device is already running. The following menu should appear on the
terminal:
Device Main Menu
================
[1] Show device information
[2] Serial firmware upgrade
[3] System configuration
[4] CEA-709 configuration
[5] IP configuration
[6] CEA-852 device configuration
[7] BACnet configuration
[8] Reset configuration (factory defaults)
[9] Device statistics
[a] Data Points
[0] Reset device
Please choose:
Figure 2: Device Main Menu
Select ‘5’ from the device main menu and enter the IP address, netmask, and gateway
address. Note that you must use different IP addresses if you are using multiple IP devices
in your setup.
IP Configuration Menu
=====================
[1] DHCP : disabled
[2] IP Address : 192.168.1.254
[3] IP Netmask : 255.255.255.0
[4] IP Gateway : 192.168.1.1
[5] Hostname : new
[6] Domainname : <unset>
[7] DNS Servers : <unset>
[9] MAC Address : 00:0A:B0:01:0C:9F (factory default)
[0] NTP Servers : <unset> (out-of-sync)
[b] Link Speed & Duplex : Auto Detect
[q] Quit without saving
[x] Exit and save
Please choose:
Figure 3: Enter basic IP settings.
Press ‘x’ to save the IP settings and reset the device with the main menu item ‘0’ in order to
let the new IP settings take effect.
Version 3.2 LOYTEC electronics GmbH
Page 15
L-Gate User Manual 15 LOYTEC
Important! The default IP address 192.168.1.254 is only set for configuration access. It must be
changed in order to make the device functional.
2.2.2 IP Configuration via the Web Interface
Optionally to using the console interface one can also use the Web interface to configure
the client device. In a Web browser enter the default IP address 192.168.1.254 of the
L-Gate. Note that if your PC has an IP address in a subnet other than 192.168.1.xxx please
open a command tool and enter the following route command to add a route to the L-Gate.
To Add a Route to the Device
1. Windows START Æ Run
2. Enter ‘cmd’ an click OK.
3. In the command window enter the command line
route add 192.168.1.254 %COMPUTERNAME%
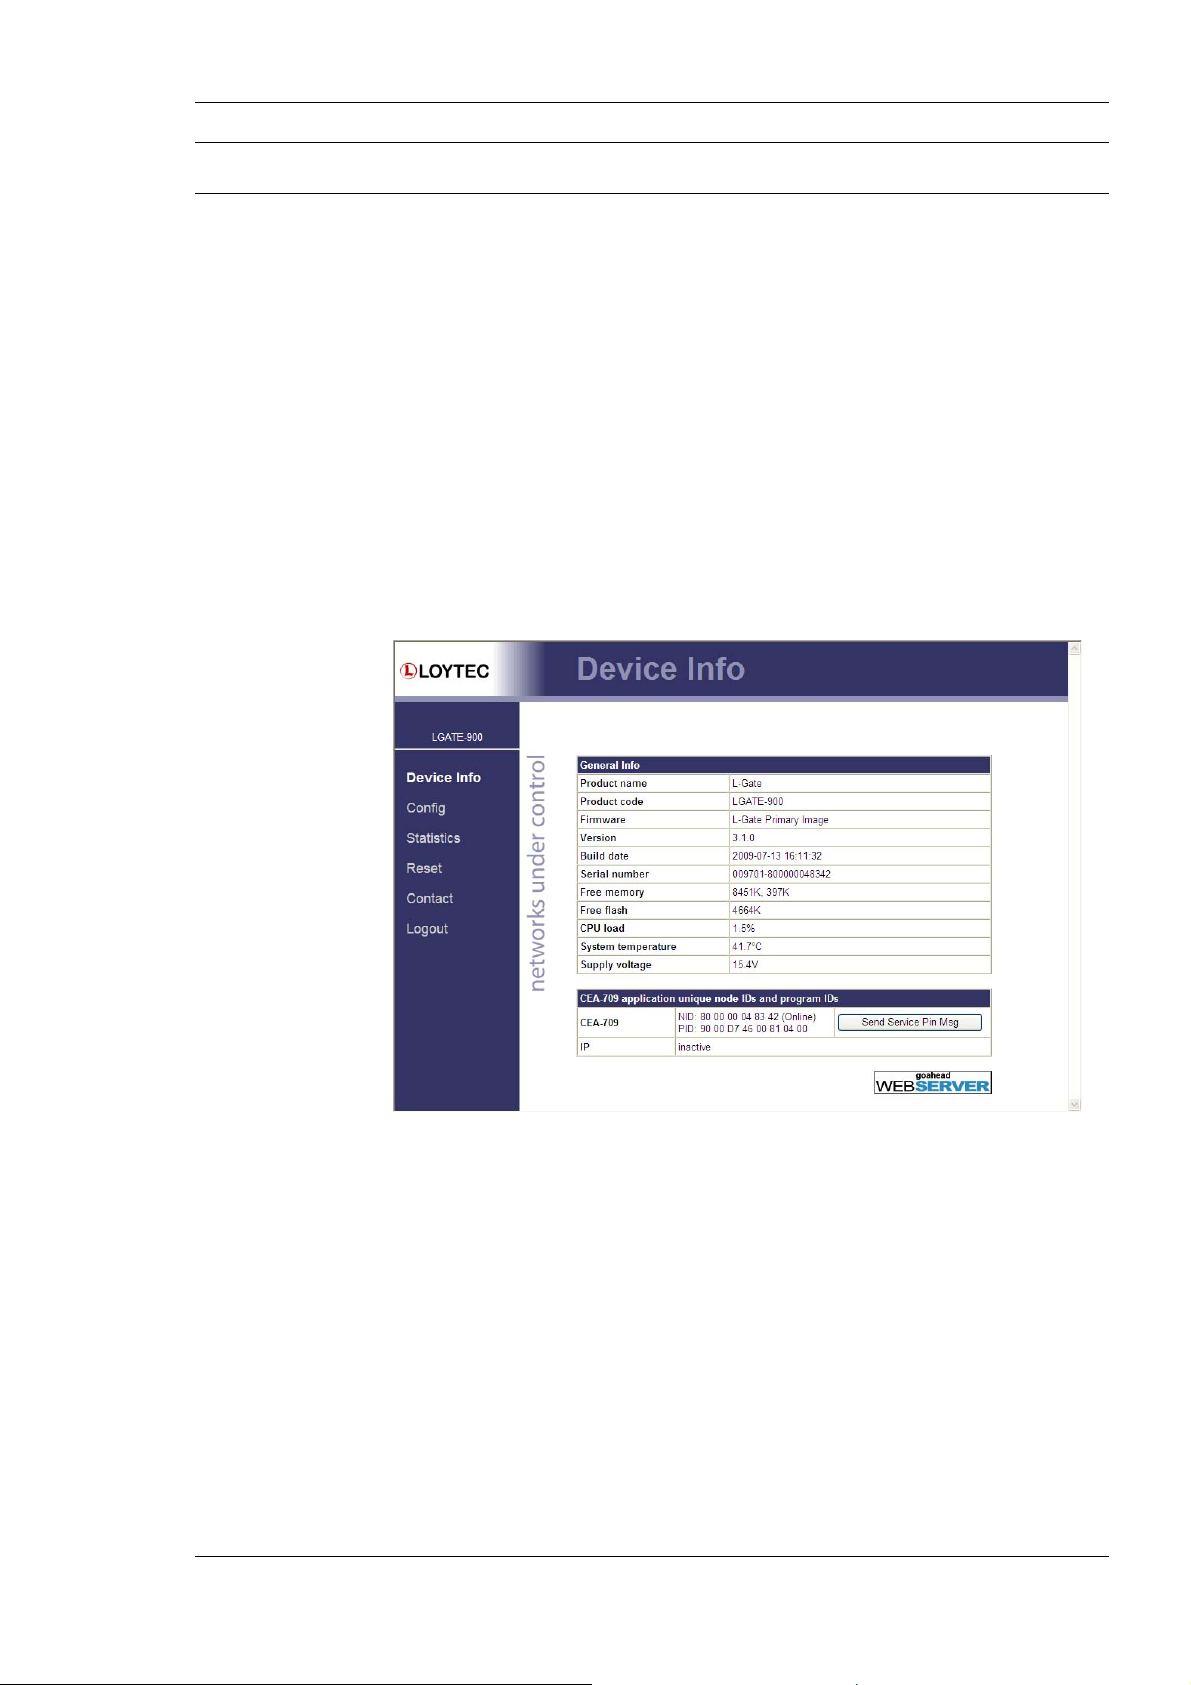
4. Then open your Web browser and type in the default IP address 192.168.1.254.
Figure 4: Example Start Screen
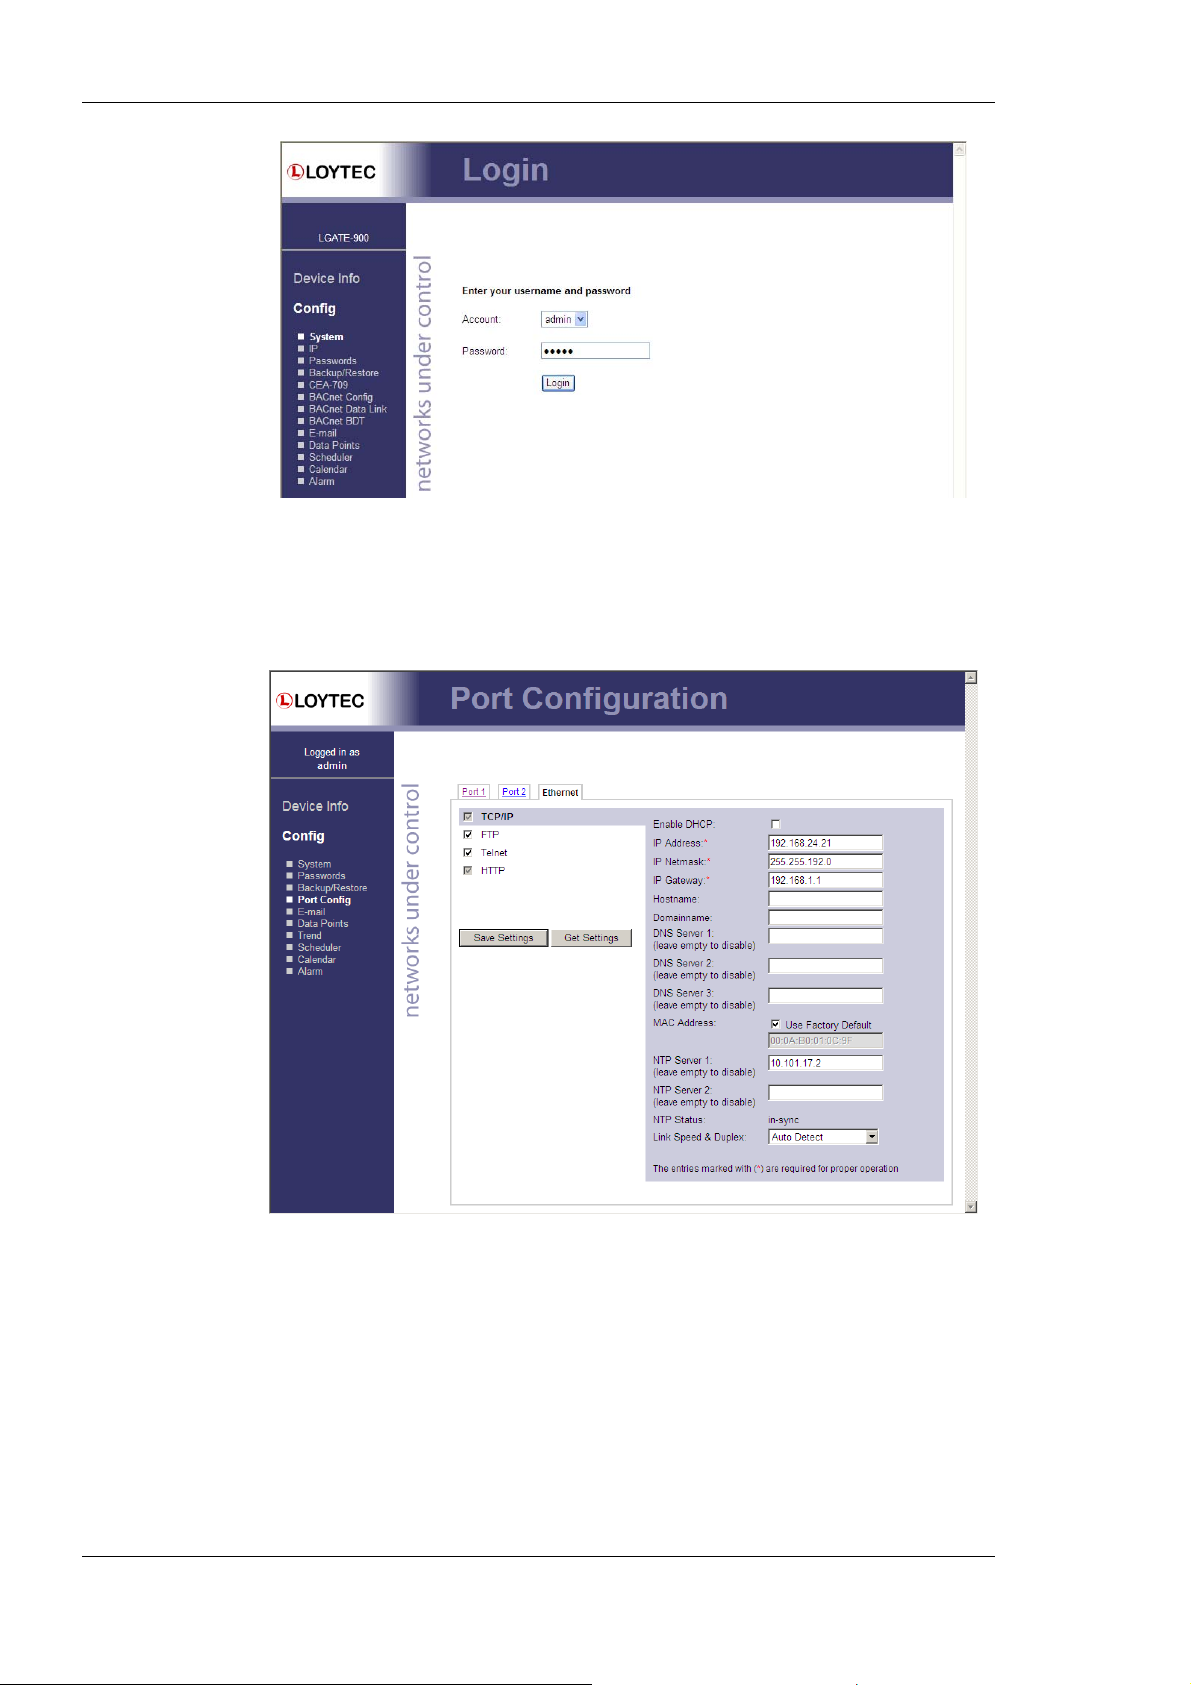
5. Click on Config in the left menu. You will be asked to enter the administrator
password in order to change the IP settings. Enter ‘admin’ and select Login.
Version 3.2 LOYTEC electronics GmbH
Page 16
L-Gate User Manual 16 LOYTEC
Figure 5: Enter admin as the default administrator password.
6. The Config menu opens. Click on Port Config and change to the tab Ethernet. The
TCP/IP settings are selected as shown in Figure 6. Enter the IP address, the IP
netmask, and IP gateway for this device.
Figure 6: Enter IP address and gateway.
7. Press Save Settings and then reset the device by selecting Reset in the highlighted
text. This changes the IP settings of the device.
2.2.3 BACnet Configuration
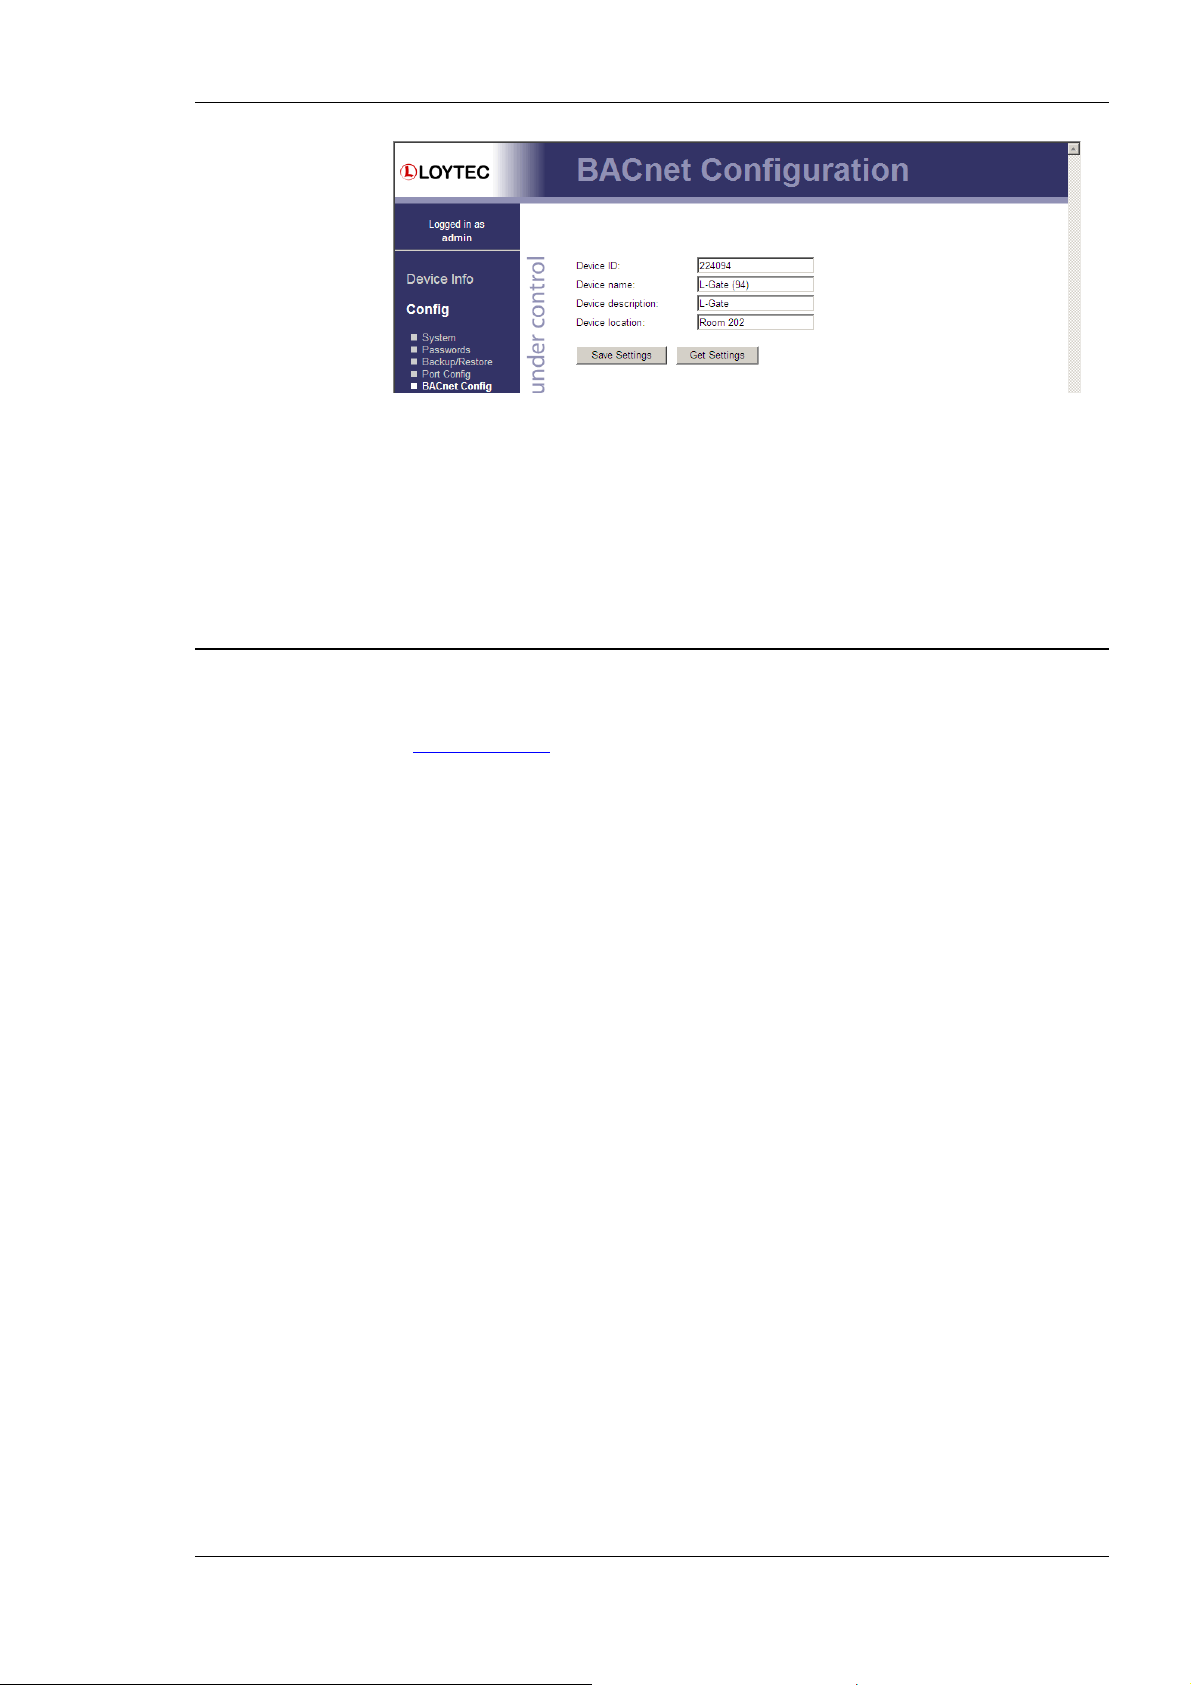
To configure the BACnet interface, at least the Device ID and the Device Name must be
configured (see Figure 7).
Version 3.2 LOYTEC electronics GmbH
Page 17
L-Gate User Manual 17 LOYTEC
Figure 7: BACnet Device Configuration
The device ID corresponds to the instance number of the BACnet device object. It must be
a unique ID on the BACnet internetwork. Also the Device Name must be a unique name on
the BACnet internetwork.
By default the BACnet/IP data link layer is used. If the L-Gate shall be used with the
BACnet MS/TP data link layer, please refer to Section 4.2.7 for further information.
2.3 Gateway Configuration with LNS-based Tools
Install the L-Gate Configurator software from the setup.exe. This file can be downloaded
from www.loytec.com
plug-in.
The detailed guide to configuring the L-Gate and downloading the configuration can be
found in section 6.4.2 (Configure with LNS).
. In your LNS-based tool register the L-Gate Configurator as an LNS
Version 3.2 LOYTEC electronics GmbH
Page 18
L-Gate User Manual 18 LOYTEC
0
3 Hardware Installation
3.1 Enclosure
3.1.1 LGATE-900
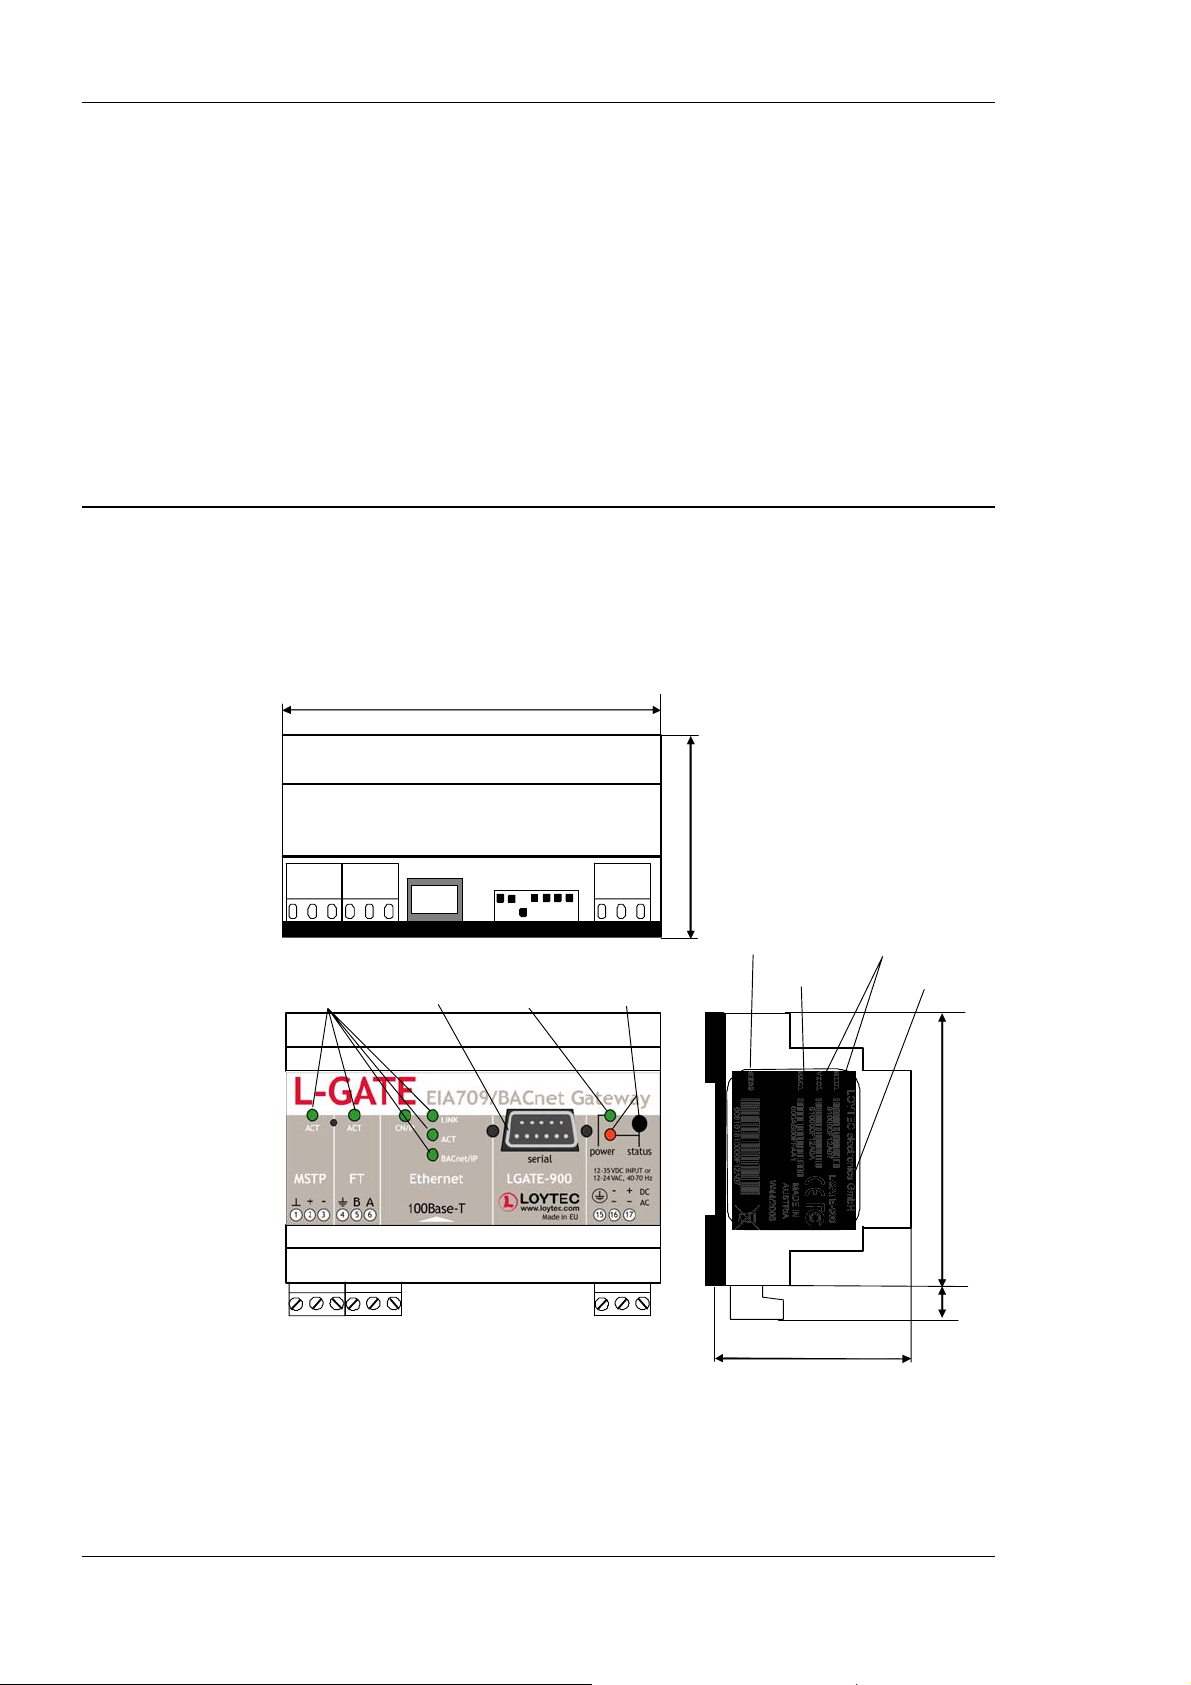
The L-Gate enclosure is 6 TE (1 TE = 17.5 mm) wide for DIN rail mounting, following
DIN 43 880 (see Figure 8).
Ethernet/EIA709
BACnet Stat us
LEDs
105
Ethernet
Console
Connector
DIP Switch
off
on
1 2 3 4 5 6 7
Power LED
Status Button
and LED
6
Seria l Nu m ber
Unique Node IDs
MAC Address
Order Number
85
1 2 3
4 5 6
Ethernet
100Base-T
15 16 17
55
11
Figure 8: L-Gate Enclosure (dimensions in mm)
Version 3.2 LOYTEC electronics GmbH
Page 19
L-Gate User Manual 19 LOYTEC
3.2 Product Label
The product label on the side of the L-Gate contains the following information (see Figure
8):
• L-Gate order number with bar-code (e.g., LGATE-900),
• serial number with bar-code (Ser#),
• unique node ID and virtual ID of each port (NID1, VID1) with bar-code,
• Ethernet MAC ID with bar-code (MAC1).
Unless stated otherwise, all bar codes are encoded using “Code 128”. An additional label is
also supplied with the L-Gate for documentation purposes. A virtual ID (VID) is a Node ID
on the IP channel.
3.3 Mounting
The device comes prepared for mounting on DIN rails following DIN EN 50 022. The
device can be mounted in any position. However, an installation place with proper airflow
must be selected to ensure that the L-Gate’s temperature does not exceed the specified
range (see Chapter 13).
3.4 LED signals
3.4.1 Power LED
The L-Gate power LED lights up green when power is supplied to terminals 15, 16, and 17.
3.4.2 Status LED
The L-Gate is equipped with a red status LED (see Figure 8). This LED is normally off.
During boot-up the status LED is used to signal error conditions (red). If the fall-back
image is executed the status LED flashes red once every second.
3.4.3 MSTP Activity LED
The MS/TP port has a three-color MSTP Activity LED (see Figure 8). Table 2 shows the
different LED patterns of the port and their meaning. A permanent color reflects a state.
Flicker is for 25 ms when there is activity on the MS/TP data link layer.
Behavior Description Comment
GREEN permanently,
flicker off
ORANGE flicker Sole master, flicker when traffic Normal condition on a single-master
RED permanent, flicker
GREEN
RED flash fast Transmission or receive errors. This hints at bad cabling.
Multi-Master, token ok, flicker when traffic Normal condition on a multi-master
MS/TP network
MS/TP network
Token lost state, flicker when transmit attempt Cable might be broken.
Table 1: MS/TP Activity LED Patterns
3.4.4 FT Activity LED
The FT port on the L-Gate has a three-color LED (green, red, and orange, see Figure 8).
Table 2 shows different LED patterns of the port and their meaning.
Version 3.2 LOYTEC electronics GmbH
Page 20

L-Gate User Manual 20 LOYTEC
Behavior Description Comment
GREEN flashing fast Traffic
GREEN flashing at 1Hz L-Gate is unconfigured
RED permanent Port damaged
RED flashing fast Traffic with high amount of errors
RED flashing at 1 Hz
(all ports)
ORANGE permanent Port disabled e.g. using LSD Tool
ORANGE flashing fast Traffic on port configured as management port e.g. using LSD Tool
Firmware image corrupt
Table 2: CEA-709 Activity LED Patterns
Please upload new firmware.
3.4.5 Ethernet Link LED
The Ethernet Link LED lights up green whenever an Ethernet cable is plugged-in and a
physical connection with a switch, hub, or PC can be established.
3.4.6 Ethernet Activity LED
The Ethernet Activity LED lights up green for 6 ms whenever a packet is transmitted or
received or when a collision is detected on the network cable.
3.4.7 CN/IP LED
The CNIP LED is a three color LED that indicates different operating states of the LGate’s CEA-852 device.
Green: The CEA-852 device is fully functional and all CEA-852 configuration data
(channel routing info, channel membership list, send list) are up-to-date.
Green flicker: If a valid CEA-709 packet is received or transmitted over the IP channel, the
CNIP LED turns off for 50 ms. Only valid CEA-709 IP packets sent to the IP address of
the L-Gate can be seen. Stale packets or packets not addressed to the L-Gate are not seen.
Yellow: The CEA-852 device is functional but some configuration data is not up-to-date
(device cannot contact configuration server but has configuration data saved in Flash
memory)
Red: The CEA-852 device is non-functional because it was rejected from the CEA-852 IP
channel or shut-down itself due to an internal error condition.
Off: The CEA-852 device is non-functional because it has not been started. This can be the
case if the L-Gate uses DHCP and it has not received a valid IP configuration (address)
from the DHCP server.
Flashing Red at 1 Hz: The CEA-852 device is non-functional because it is started but has
not been configured. Please add the device to a CEA-852 IP channel (register in
configuration server).
Flashing green or orange at 1 Hz: The L-Gate’s CEA-709 side of the gateway has not been
commissioned yet. The color indicates the CEA-852 IP channel status as described above.
3.4.8 BACnet/IP LED
The BACnet/IP LED flashes green for 25 ms when BACnet packets are transmitted or
received over the BACnet/IP interface.
Version 3.2 LOYTEC electronics GmbH
Page 21

L-Gate User Manual 21 LOYTEC
3.4.9 Wink Action
If the L-Gate receives a wink command on any of its network ports, it shows a blink pattern
on the CNIP and the CEA-709 activity LEDs. The CEA-709 activity and the CNIP LED
turn green/orange/red (each 0.15 s). This pattern is repeated six times. After that, the
CNIP LED flashes orange six times if the wink command was received on the IP channel
or the CEA-709 activity LED flashes orange six times if the wink command was received
on the CEA-709 channel. After that the L-Gate LEDs resume their normal behavior.
3.4.10 Network Diagnostics
The L-Gate provides simple network diagnostics via its CEA-709 activity LED:
If the LED does not light up at all, this port is not connected to any network segment or the
connected network segment currently shows no traffic.
If the LED is flashing green, the network segment connected to this port is ok.
If the LED is flashing red, a potential problem exists on the network segment connected to
this port. This state is referred to as overload condition.
A port overload condition occurs if
• the average bandwidth utilization of this port was higher than 70% or
• the collision rate was higher than 5% or
• more than 15% CRC errors have occurred on a port with a power-line transceiver or
more than 5% on a port with a transceiver other than power-line or
• the L-Gate was not able to process all available messages.
For a deeper analysis of the reason for the overload condition, it is recommended to use a
protocol analyzer (e.g. LOYTEC’s LPA) or a similar tool. The exact reason of the
overload condition can also be determined with the LSD Tool.
3.5 Status Button
The L-Gate is equipped with a status button (see Figure 8). When pressing the status button
shortly during normal operation of the L-Gate, it sends a “Service Pin Message” on the
active CEA-709 network port (FT-10 or CEA-852). It also sends a BACnet “I-Am”
message on all active BACnet data link layers. As an alternative to pressing the status
button, a service pin message can be sent via the Web interface (see Section 4.1).
The status button can also be used to switch the device back to factory default state. Press
the service button and power-cycle the device. Keep the bu tton pressed until the po rt LEDs
illuminate orange permanently. Release the button within five seconds from that time on to
reset the device to factory defaults. Alternatively, the device can be switched back to
factory defaults over the console UI (see Section 10.2.2).
3.6 DIP Switch Settings
The DIP switch assignment for the L-Gate is shown in Table 3. Please leave all switches at
default state.
Version 3.2 LOYTEC electronics GmbH
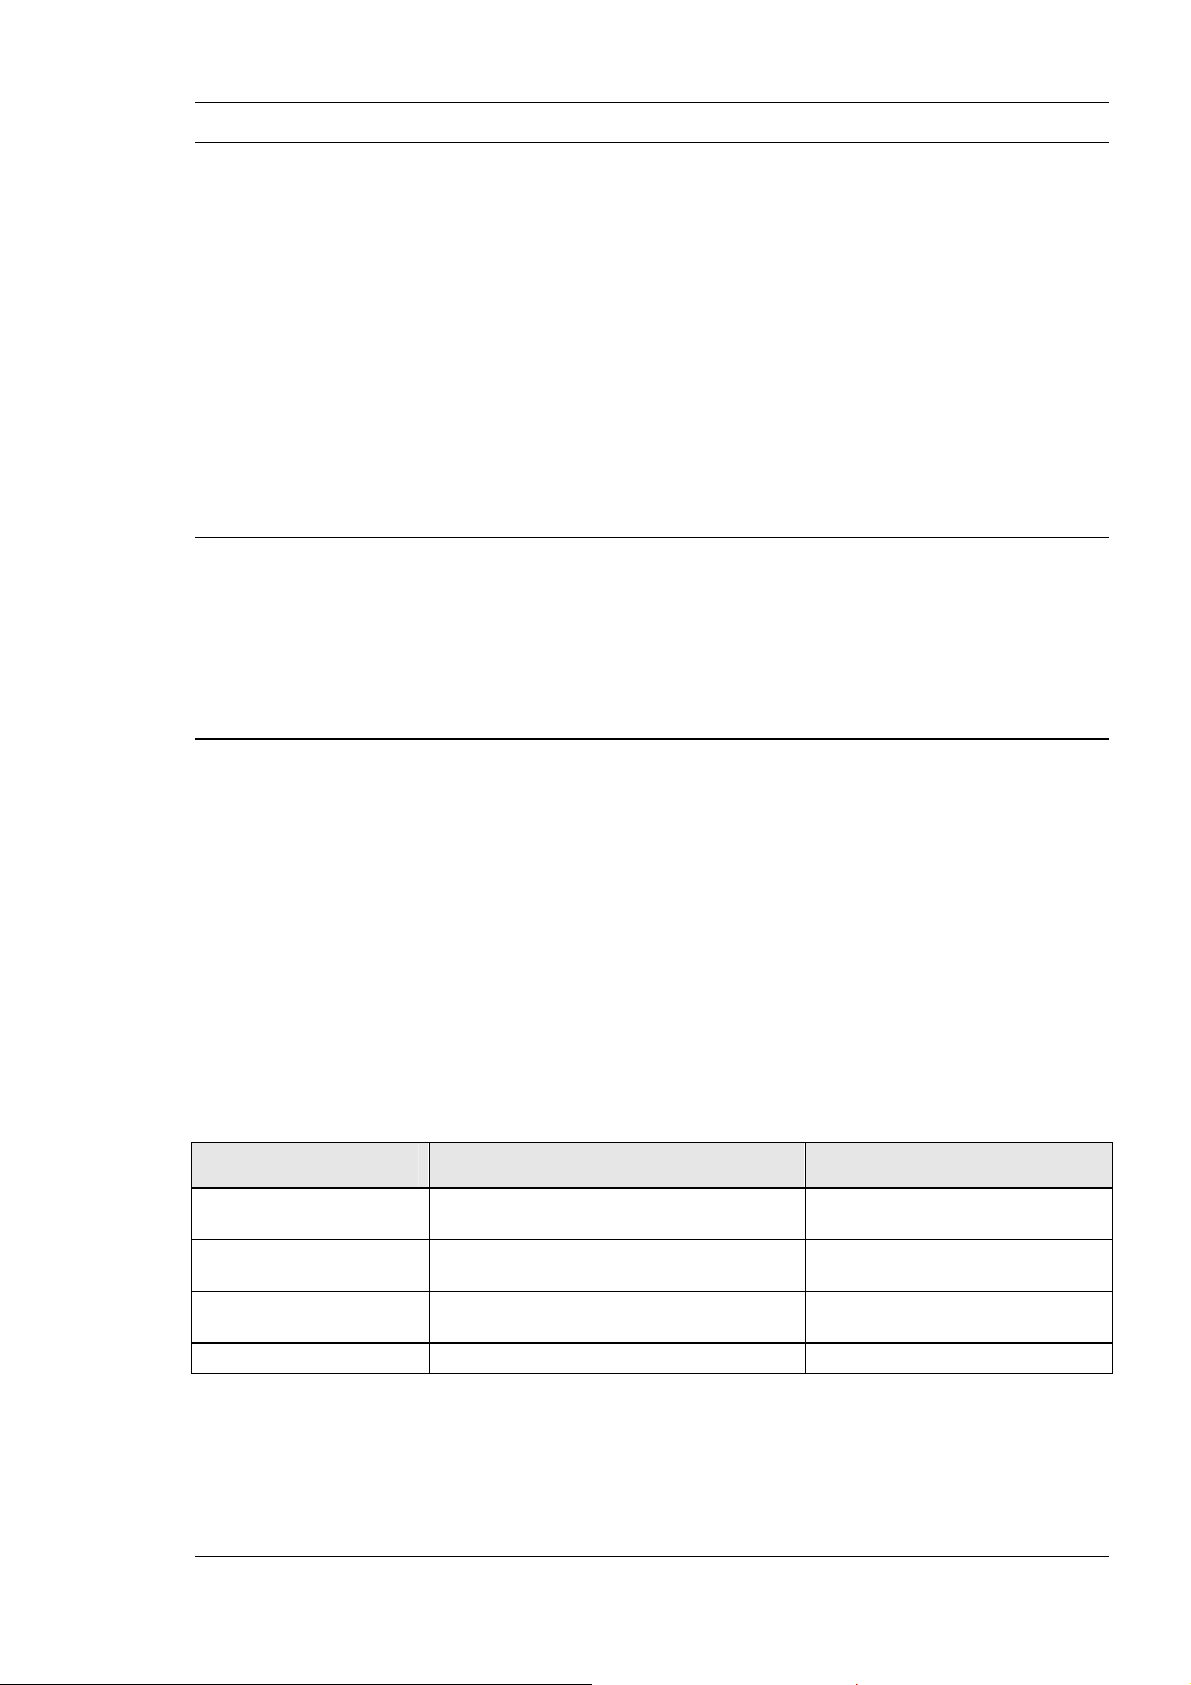
Page 22

L-Gate User Manual 22 LOYTEC
DIP Switch # Function Factory Default
1 Must be OFF OFF
2 Must be OFF OFF
3 Must be ON ON
4 Must be OFF OFF
5 Must be OFF OFF
6 Must be OFF OFF
7 Must be OFF OFF
Table 3: DIP Switch Settings for L-Gate
3.7 Terminal Layout and Power Supply
The L-Gate provides screw terminals to connect to the network as well as to the power
supply. The screw terminals can be used for wires of a maximum thickness of 1.5
2
/AWG12. The device can either be DC or AC powered.
mm
Terminal Function
1 BACnet MS/TP Ground
2 BACnet MS/TP Non-Inverting Input
3 BACnet MS/TP Inverting Input
4 Earth Ground
5, 6 CEA-709 A, B of FT-10 Channel Port
8 Ethernet 100BaseT
15 Earth Ground
16, 17 Power Supply 12-35 VDC or 12-24 VAC ± 10%
Do not connect terminal 17 to earth ground!
Table 4: L-Gate Terminals LGATE-900.
3.8 Wiring
The CEA-709 network segment connected to the L-Gate needs to be terminated according
to the rules found in the specification of the transceiver (see Section 8.1). If BACnet is
configured to run over MS/TP, the MS/TP network segment must be properly terminated
with an LT-04 network terminator connected at each of the two ends of the segment media.
Important: When using shielded network cables, only one side of the cable should be connected to
earth ground. Thus, the shield must be connected to earth ground either at the L-Gate
terminals or somewhere else in the network.
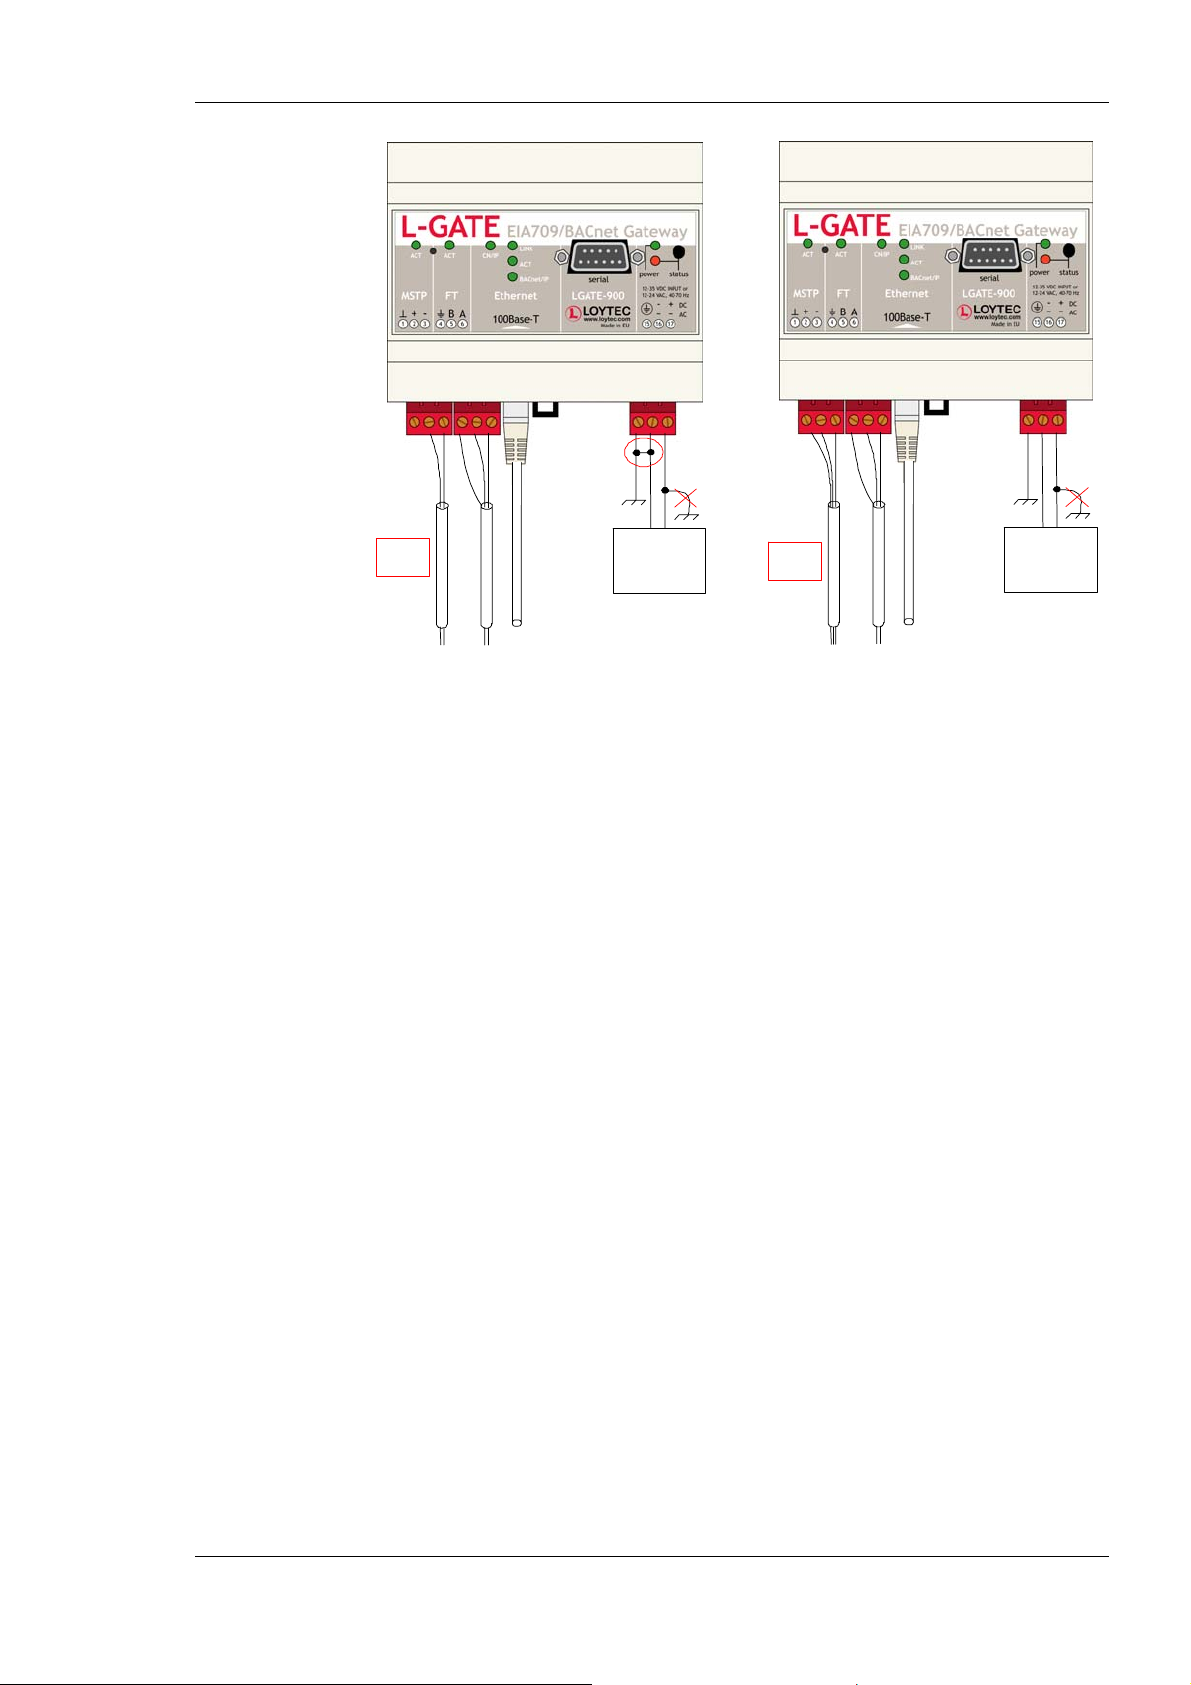
Important: When using 2-wire MS/TP, earth ground must be connected to both terminal 15 and 16
(see Figure 9a). Never connect terminal 17 to earth ground!
Version 3.2 LOYTEC electronics GmbH
Page 23
L-Gate User Manual 23 LOYTEC
2-wire
MS/TP
Ethernet
Power Supply
3-wire
MS/TP
Ethernet
Power Supply
(a) (b)
Figure 9: Connecting the L-Gate: (a) 2-wire MS/TP, (b) 3-wire MS/TP
Version 3.2 LOYTEC electronics GmbH
Page 24

L-Gate User Manual 24 LOYTEC
4 Web Interface
The L-Gate comes with a built-in Web server and a Web interface to configure the L-Gate
and extract statistics information. The Web interface allows configuring the IP settings,
CEA-852 and CEA-709 settings, and the BACnet settings. This interface is very simple to
use and has an intuitive, self-explanatory user interface.
4.1 Device Information and Account Management
In a Web browser enter the default IP address 192.168.1.254 of the device. Note that if
your PC has an IP address in a subnet other than 192.168.1.xxx you must open a command
tool and enter the following route command to add a route to the device:
To Add a Route to the Device
1. Windows START Æ Run
2. Enter ‘cmd’ an click Ok.
3. In the command window enter the command line
route add 192.168.1.254 %COMPUTERNAME%
4. Then open your Web browser and type in the default IP address 192.168.1.254.
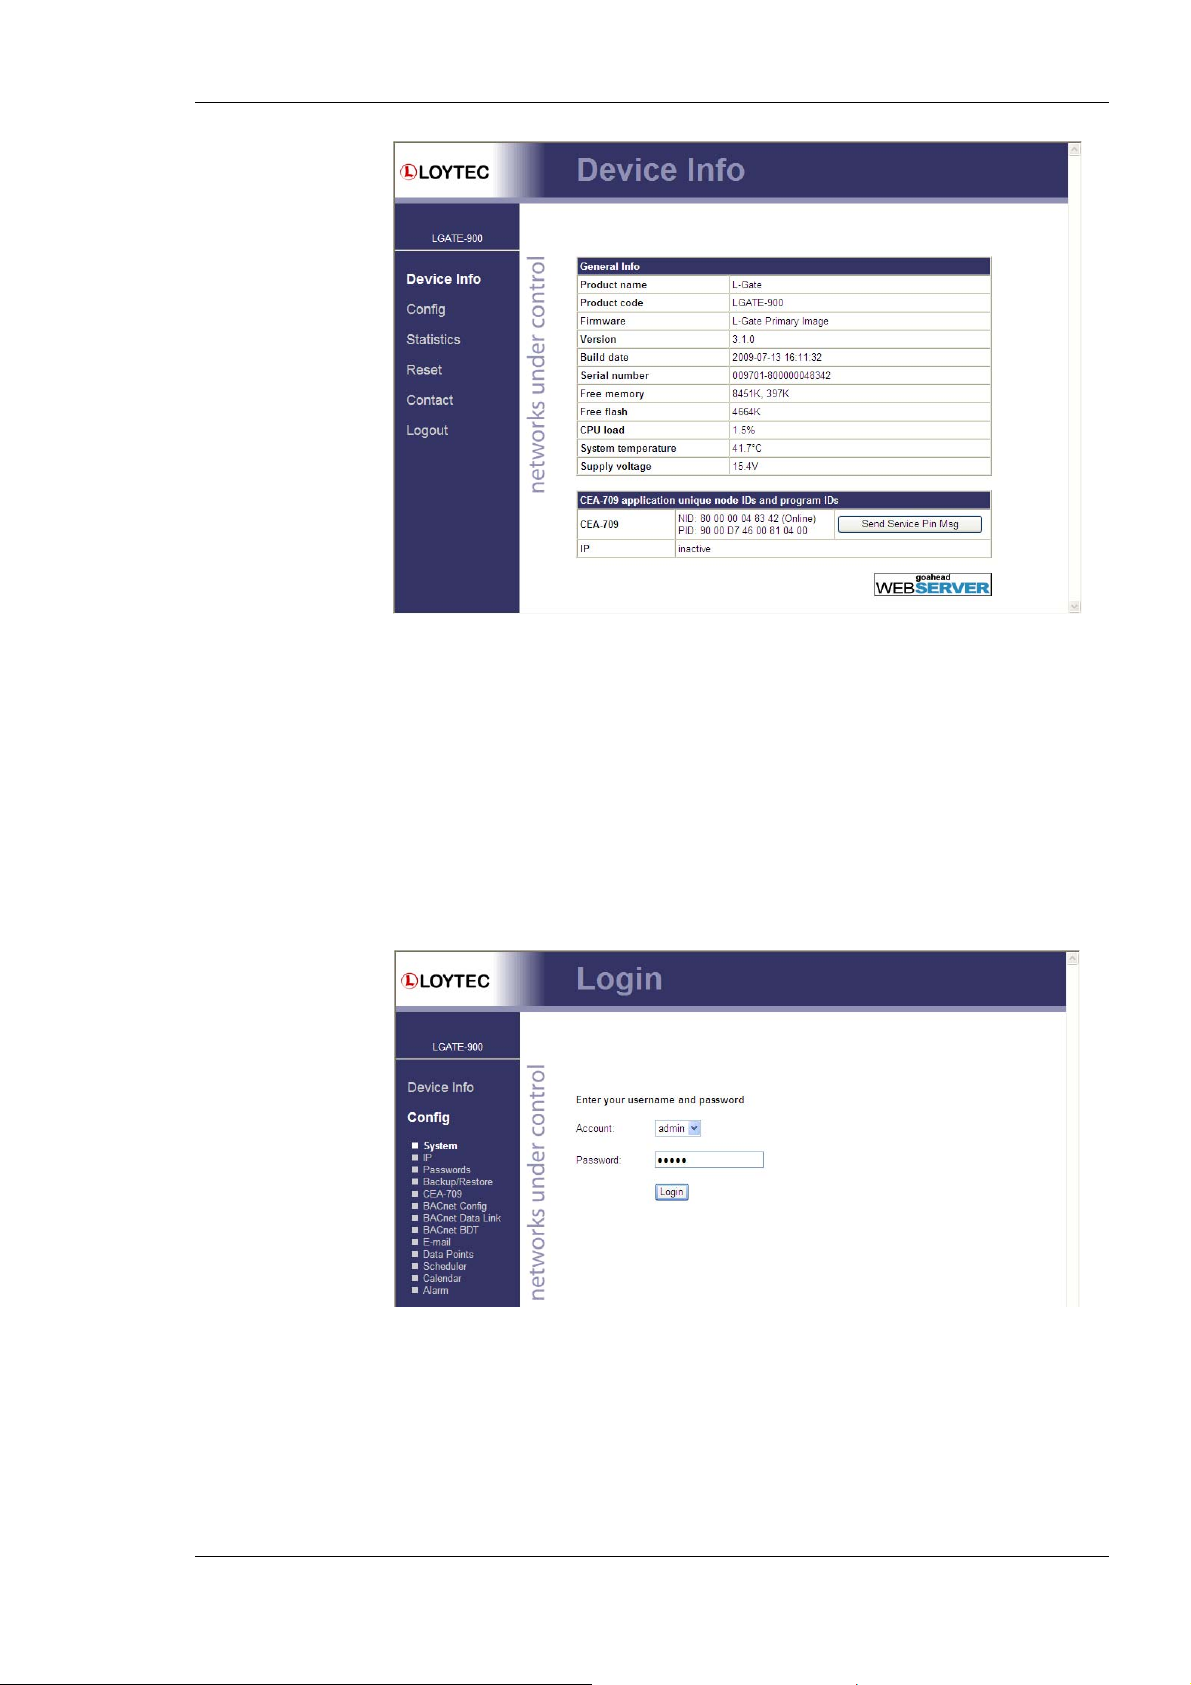
5. The device information page should appear as shown in Figure 10.
Version 3.2 LOYTEC electronics GmbH
Page 25
L-Gate User Manual 25 LOYTEC
Figure 10: Device Information Page
The device information page shows information about the L-Gate and the current firmware
version. It includes the unique node IDs (“Neuron IDs”) of the CEA-709 network
interfaces. This page can also be used to send the CEA-709 service pin messages. This is a
useful feature when commissioning the L-Gate, since it is not necessary to be on-site to
press the device’s status button.
Click through the menus on the left hand side to become familiar with the different screens.
If you click on Config in the left menu you will be asked to enter the administrator
password in order to make changes to the settings as shown in Figure 11. Enter the default
administrator password ‘admin’ and select Login.
Figure 11: Enter admin as the default administrator password.
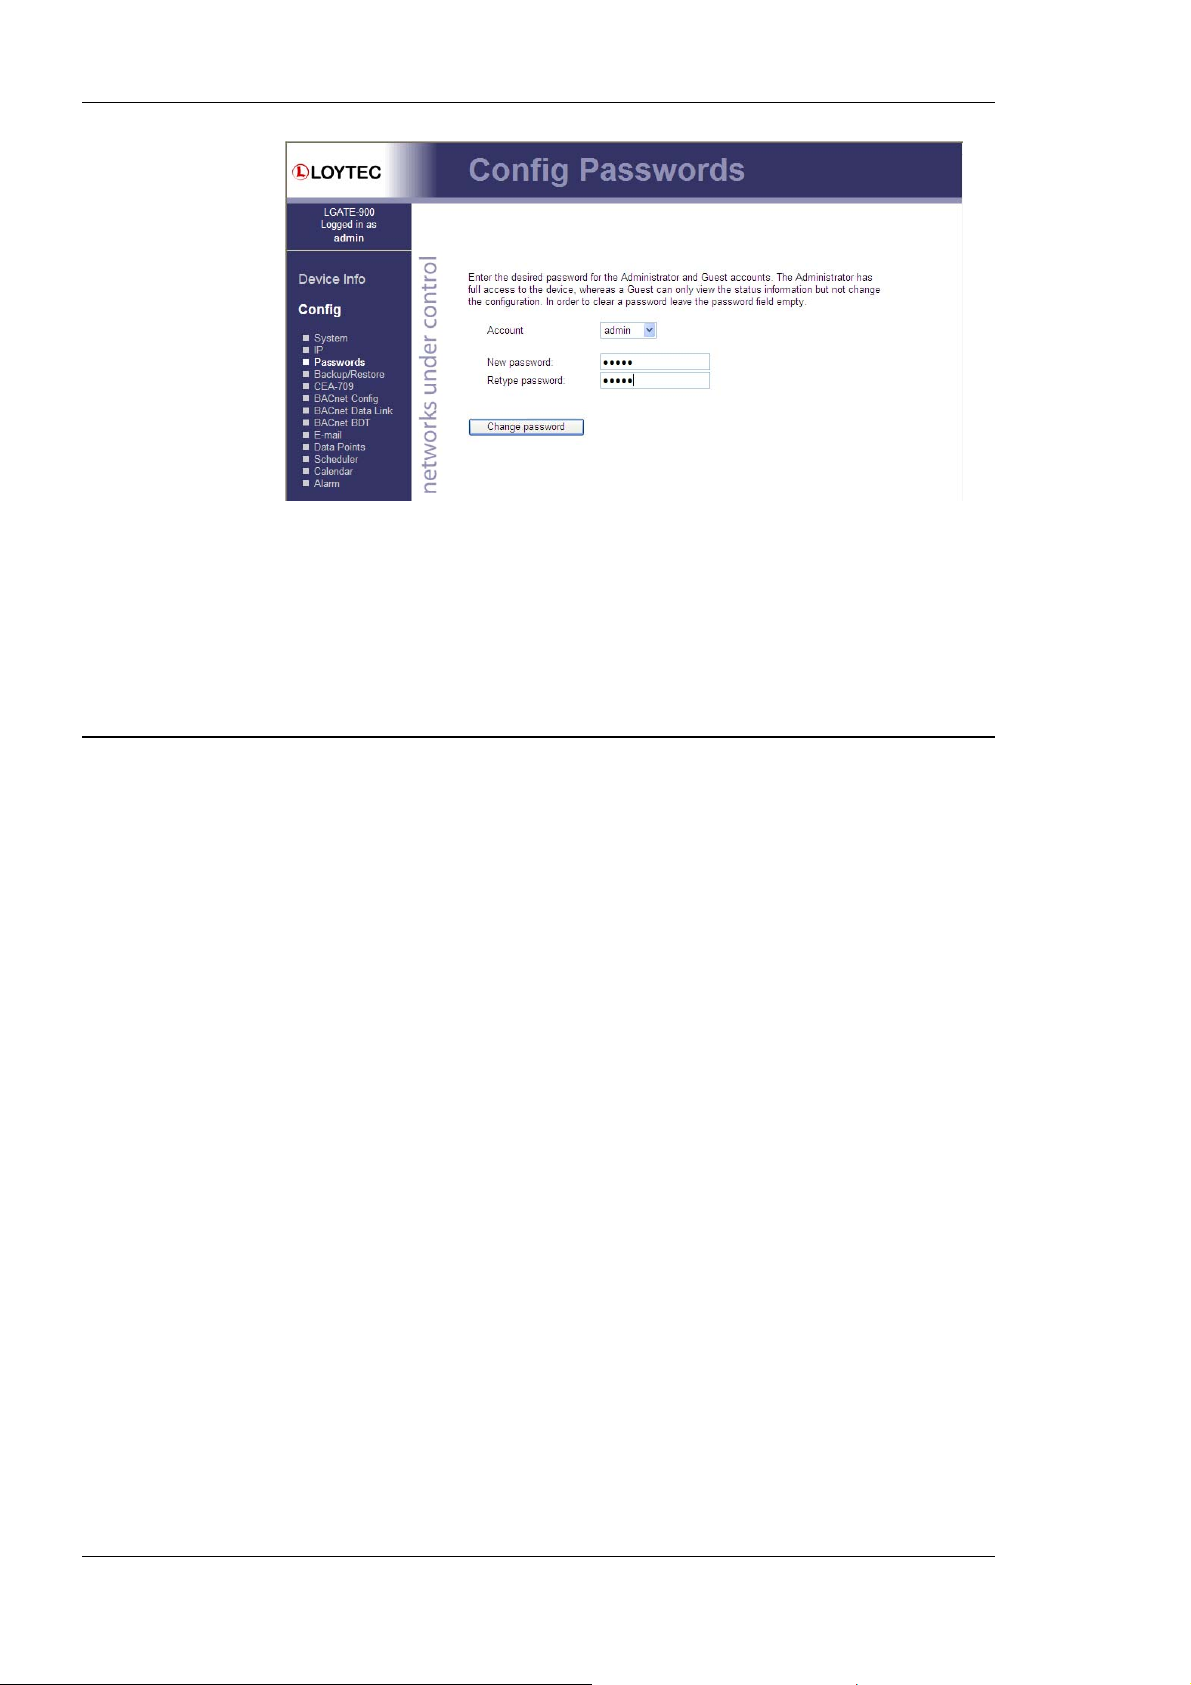
The Config menu opens. Click on Passwords in the Config menu, which opens the
password configuration page as shown in Figure 12. The L-Gate has three user accounts:
(1) guest allows the user to view certain information only, e.g., the device in fo page. By
default the guest user has no password. (2) operator is able to read more sensible
information such as calendar data. (3) admin has full access to the L-Gate and can make
changes to its configuration. Note that the user accounts are also used to log on to the FTP
and Telnet server.
Version 3.2 LOYTEC electronics GmbH
Page 26
L-Gate User Manual 26 LOYTEC
Figure 12: Password Configuration Screen
Please change the administrator password in order to protect yourself from unwanted
configuration changes by anyone else. To do so, select the admin account in the dropdown box and enter the new password. If the administrator password is left empty,
password protection is turned off and everyone can access the L-Gate without entering a
password. Click on Change password to activate the change.
4.2 Device Configuration
The device configuration pages allow viewing and changing the device settings of the
L-Gate. Here are some general rules for setting IP addresses, port numbers, and time
values:
• An empty IP address field disables the entry.
• An empty port number field sets the default port number.
• An empty time value field disables the time setting.
4.2.1 System Configuration
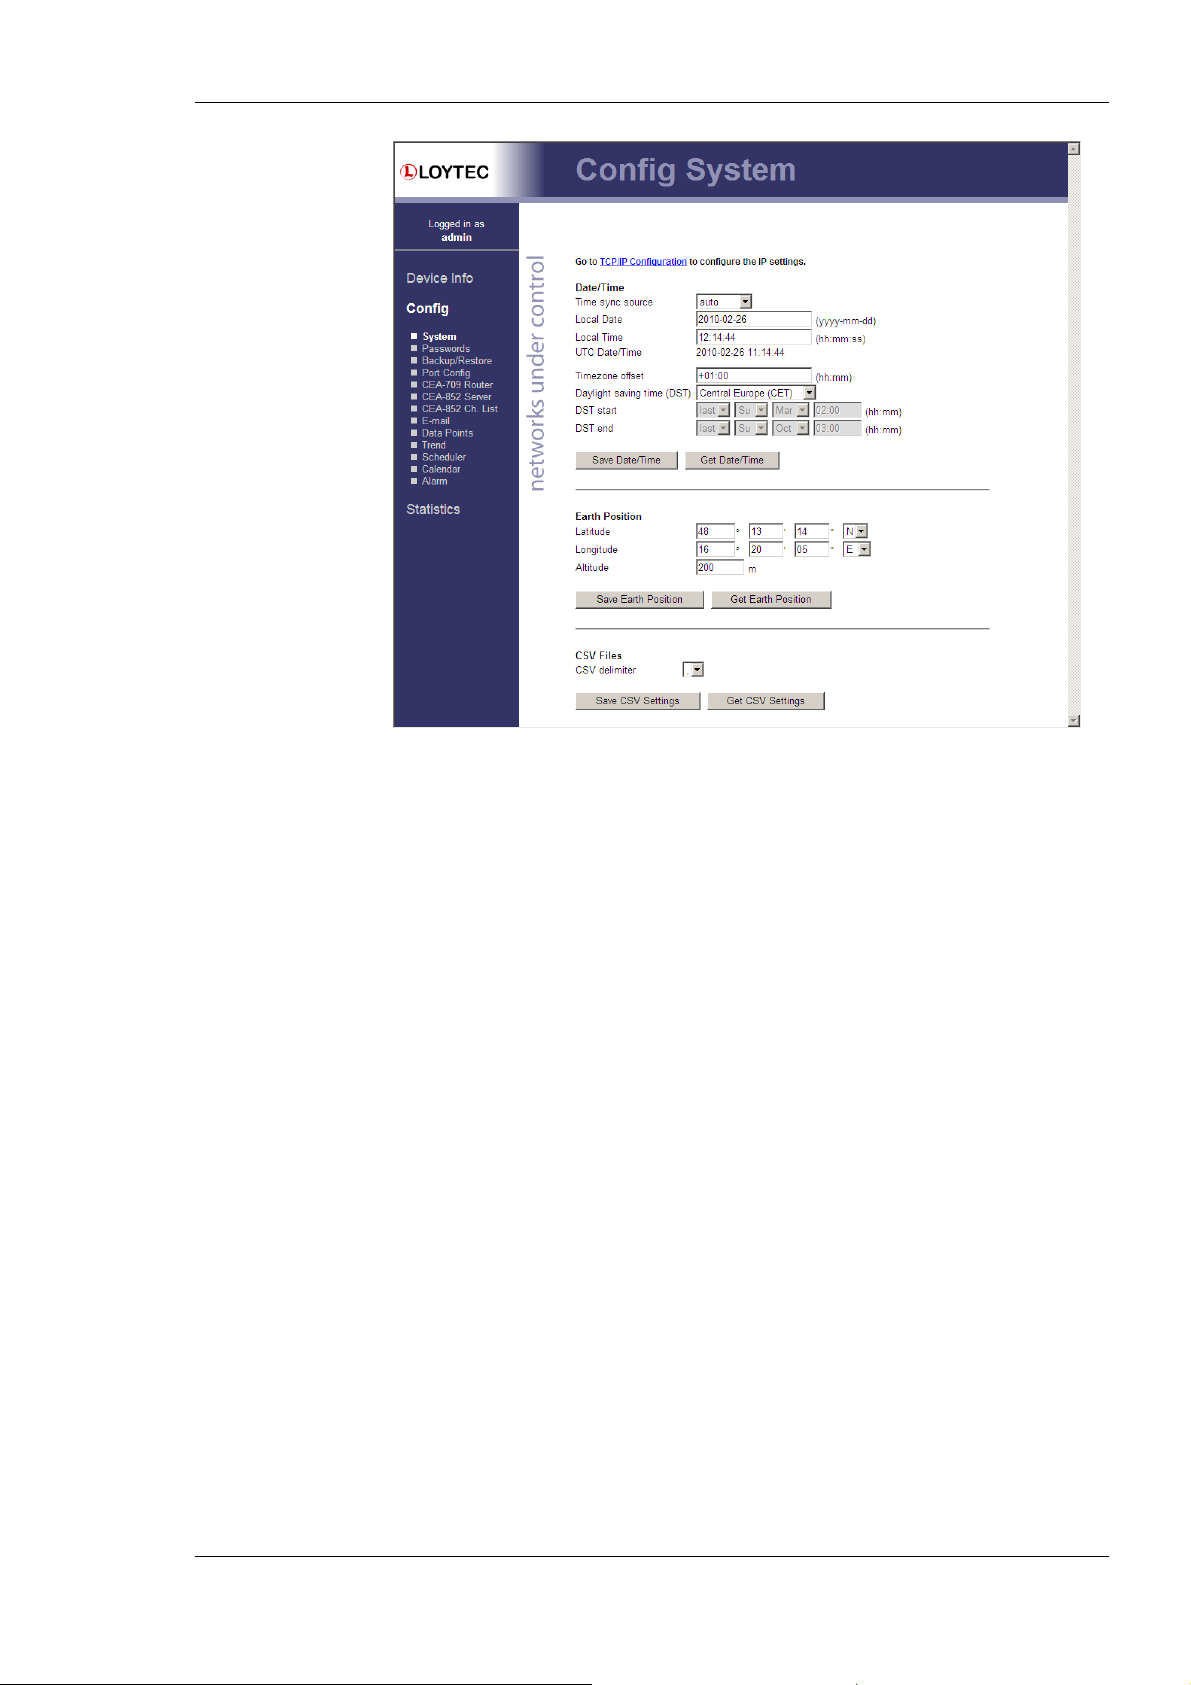
The system configuration page is shown in Figure 13. This page allows configuring the
device’s system time and other system settings. The TCP/IP Configuration link is a
shortcut to the Ethernet port configuration. Follow that link to change the IP settings of the
device
The time sync source can be set to auto, manual, NTP, BACnet, or LonMark. In the
auto mode, the device switches to the first external time source that is discovered. Possible
external time sources are NTP, BACnet. The option manual allows setting the time
manually in the fields Local Time and Local Date. In manual mode, the device does not
switch to an external time source. Note, that if NTP is selected, the NTP servers have to be
configured on the IP Configuration page (see Section 4.2.4).
The time zone offset must be defined independently of the time source. It is specified as the
offset to GMT in hours and minutes (e.g., Vienna/Austria is +01:00, New York/U.S.A. is
-06:00). For setting the daylight saving time (DST) pre-defined choices are offered for
Europe and U.S.A./Canada. DST can be switched off completely by choosing none or set
manually for other regions. In that case, start and end date of DST must be entered in the
fields below.
Version 3.2 LOYTEC electronics GmbH
Page 27
L-Gate User Manual 27 LOYTEC
The next section on the page allows configuring the L-Gate’s earth position. This setting
defines the longitude, latitude and elevation of the device. The latitude and longitude are
entered as degrees, minutes, and seconds. The altitude (or elevation) is entered in meters
from sea level. This setting is used for an astronomical clock. For fixed locations such as a
building, the position can be entered on this page. For moving locations, this setting can be
updated over the network using the network variable nciEarthPos (see Section 7.2.3).
For generating CSV files for trend logs, alarm logs, etc. the delimiter for those CSV files
can be configured. This setting can be changes between a comma ‘,’ and a semi-colon ‘;’.
The change takes effect immediately for all files generated by the device.
4.2.2 Backup and Restore
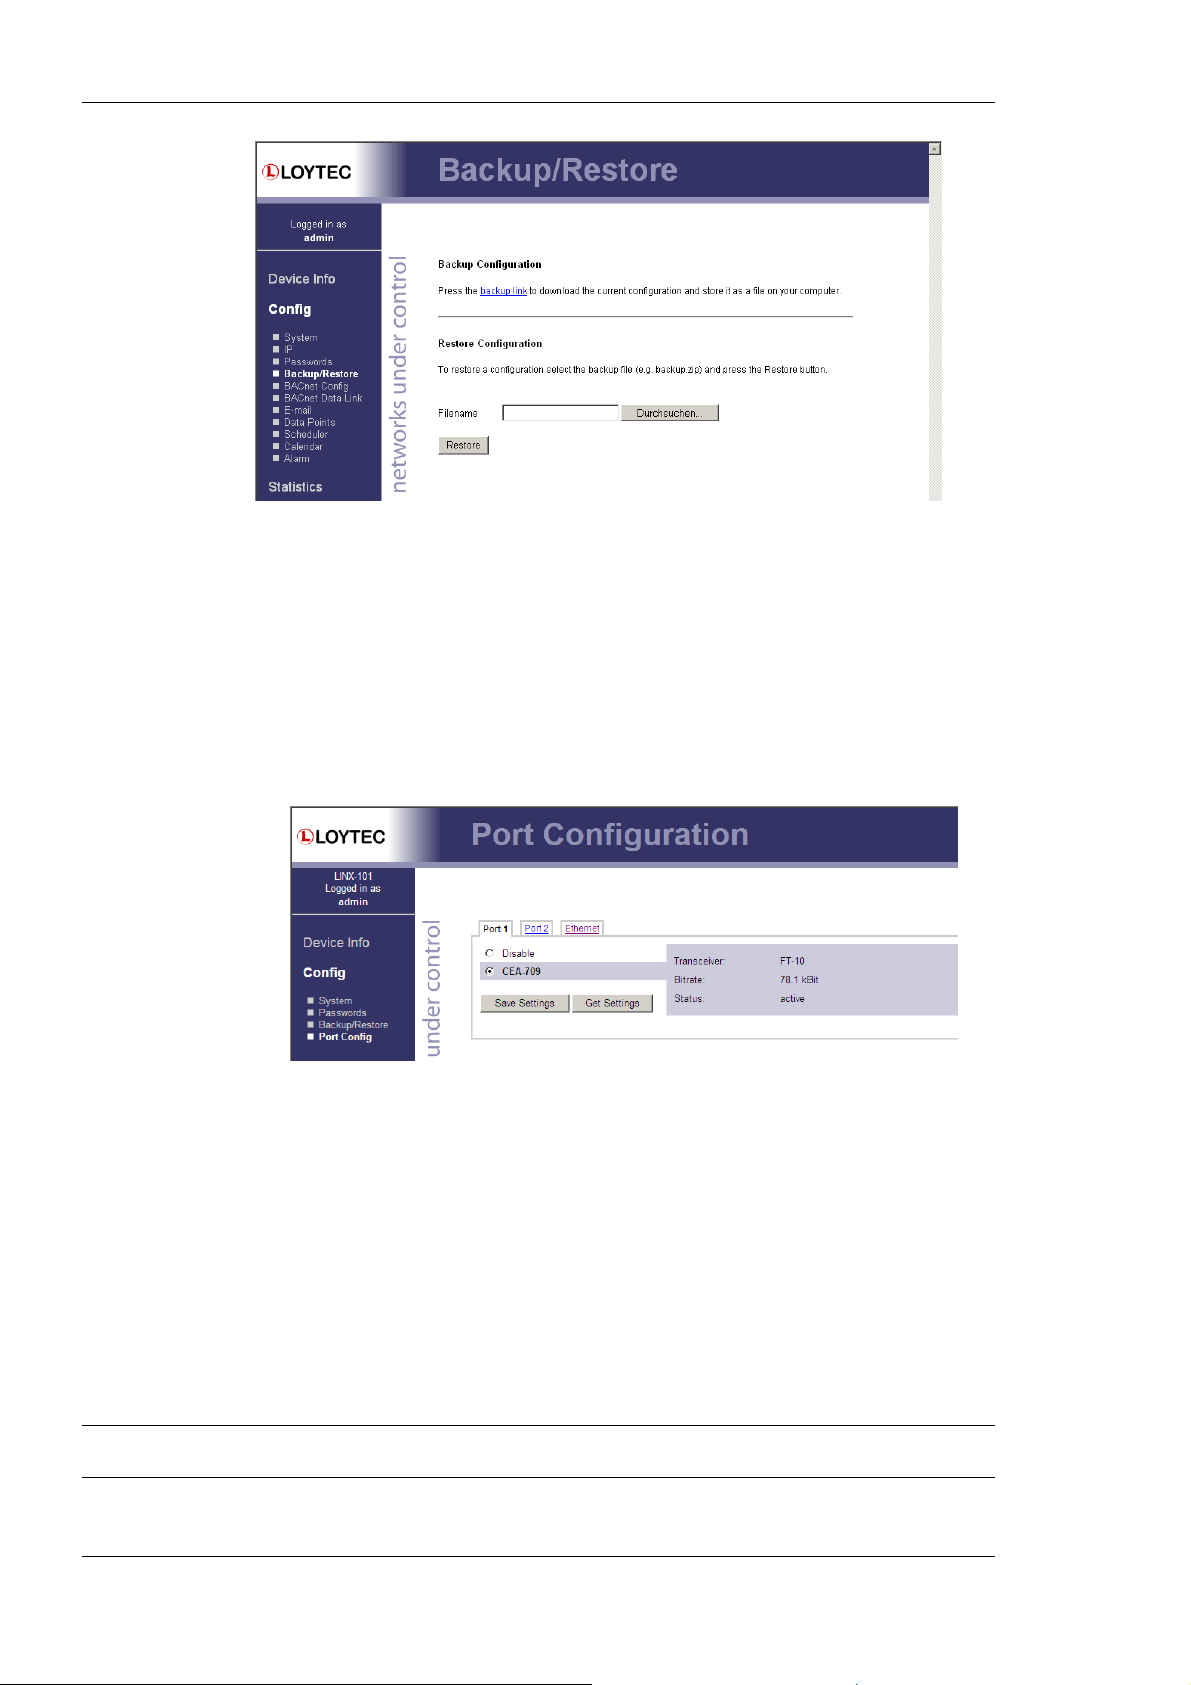
A configuration backup of the L-Gate device can be downloaded via the Web interface.
Press the Backup/Restore link as shown in Figure 14 to start the download. The L-Gate
device assembles a single file including all required files. A file requestor dialog allows
specifying the location where the backup file shall be stored.
To restore the device settings, simply select a previously generated backup file in the
Restore Configuration section of the page by clicking the button next to the Filename
field. Then press the Restore button.
Figure 13: System Configuration Page
The backed up configuration data consists of:
• Device settings (Passwords, IP settings, e-mail config, etc.),
• Data point configuration,
• CEA-709 binding information,
• BACnet server objects and client mappings,
• AST settings.
Version 3.2 LOYTEC electronics GmbH
Page 28
L-Gate User Manual 28 LOYTEC
Figure 14: Backup/Restore page.
4.2.3 Port Configuration
This menu allows configuring the device’s communications ports. For each communication
port, which is available on the device and shown on the label (e.g., Port 1, Port 2,
Ethernet), a corresponding configuration tab is provided by the Web UI. An example is
shown in Figure 15. Each port tab contains a selection of available communication
protocols. By selecting a checkbox or radio button the various protocols can be enabled or
disabled on the communication port. Some ports allow exclusive protocol activation only,
other ports (e.g., the Ethernet port) allow multiple protocols bound to that port.
Figure 15: Port Configuration Page.
When selecting a protocol on a communication port, the protocol’s communication
parameters are displayed in a box on the right-hand side. To save the settings of the
currently opened protocol, click the Save Settings button. Pressing Get Settings retrieves
the current settings from the device.
4.2.4 IP Configuration
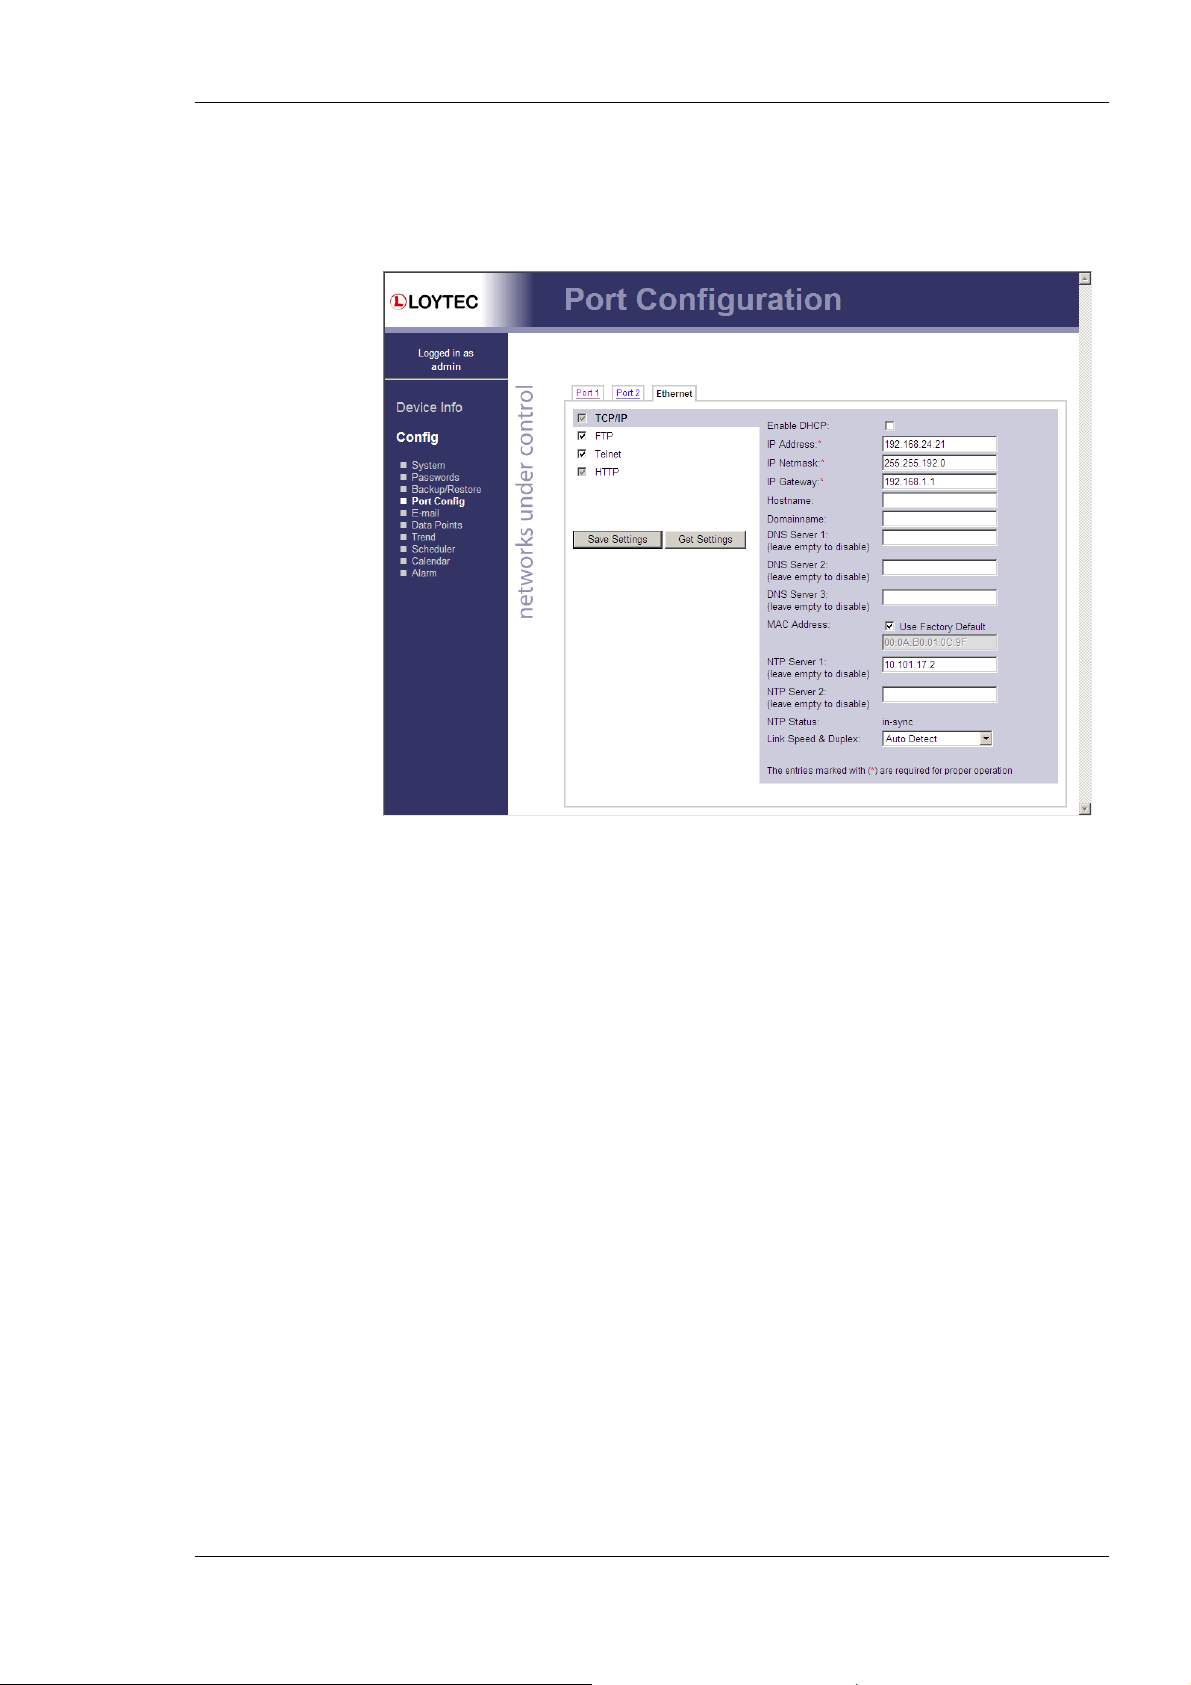
The TCP/IP configuration is done under the Ethernet port tab as shown in Figure 16. The
mandatory IP settings, which are needed to operate the device, are marked with a red
asterisk (IP address, netmask, gateway). The Enable DHCP checkbox switches between
manual entry of the IP address, netmask, and gateway address, and automatic configuration
from a DHCP server.
Important! The default IP address 192.168.1.254 is only set for configuration access. It must be
changed in order to make the device functional.
Version 3.2 LOYTEC electronics GmbH
Page 29
L-Gate User Manual 29 LOYTEC
Hostname and Domainname are optional entries and can be left empty. For some DHCP
configurations it may be necessary to enter a hostname. Please contact your system
administrator on how to configure DHCP to acquire an IP address. Further, you can
configure up to 3 Domain Name Servers.
Figure 16: IP Configuration Page with DHCP disabled
The device comes configured with a unique MAC address. This address can be changed in
order to clone the MAC address of another device. Please contact your system
administrator to avoid MAC address conflicts.
The device can be configured to synchronize its clock with NTP time. Enter the IP address
of a primary and, optionally, a secondary NTP server. The L-Gate will use NTP as a time
source if the time sync source in the system configuration page is set to NTP (see Section
4.2.1). The field NTP status below the NTP server settings displays the current NTP
synchronization status (out-of-sync, or in-sync).
If the L-Gate is operated with a 10Mbit/s-only hub, the link speed should be switched from
Auto Detect to 10Mbps/Half-Duplex. With modern 100/10Mbit/s switches this setting
can be left at its default.
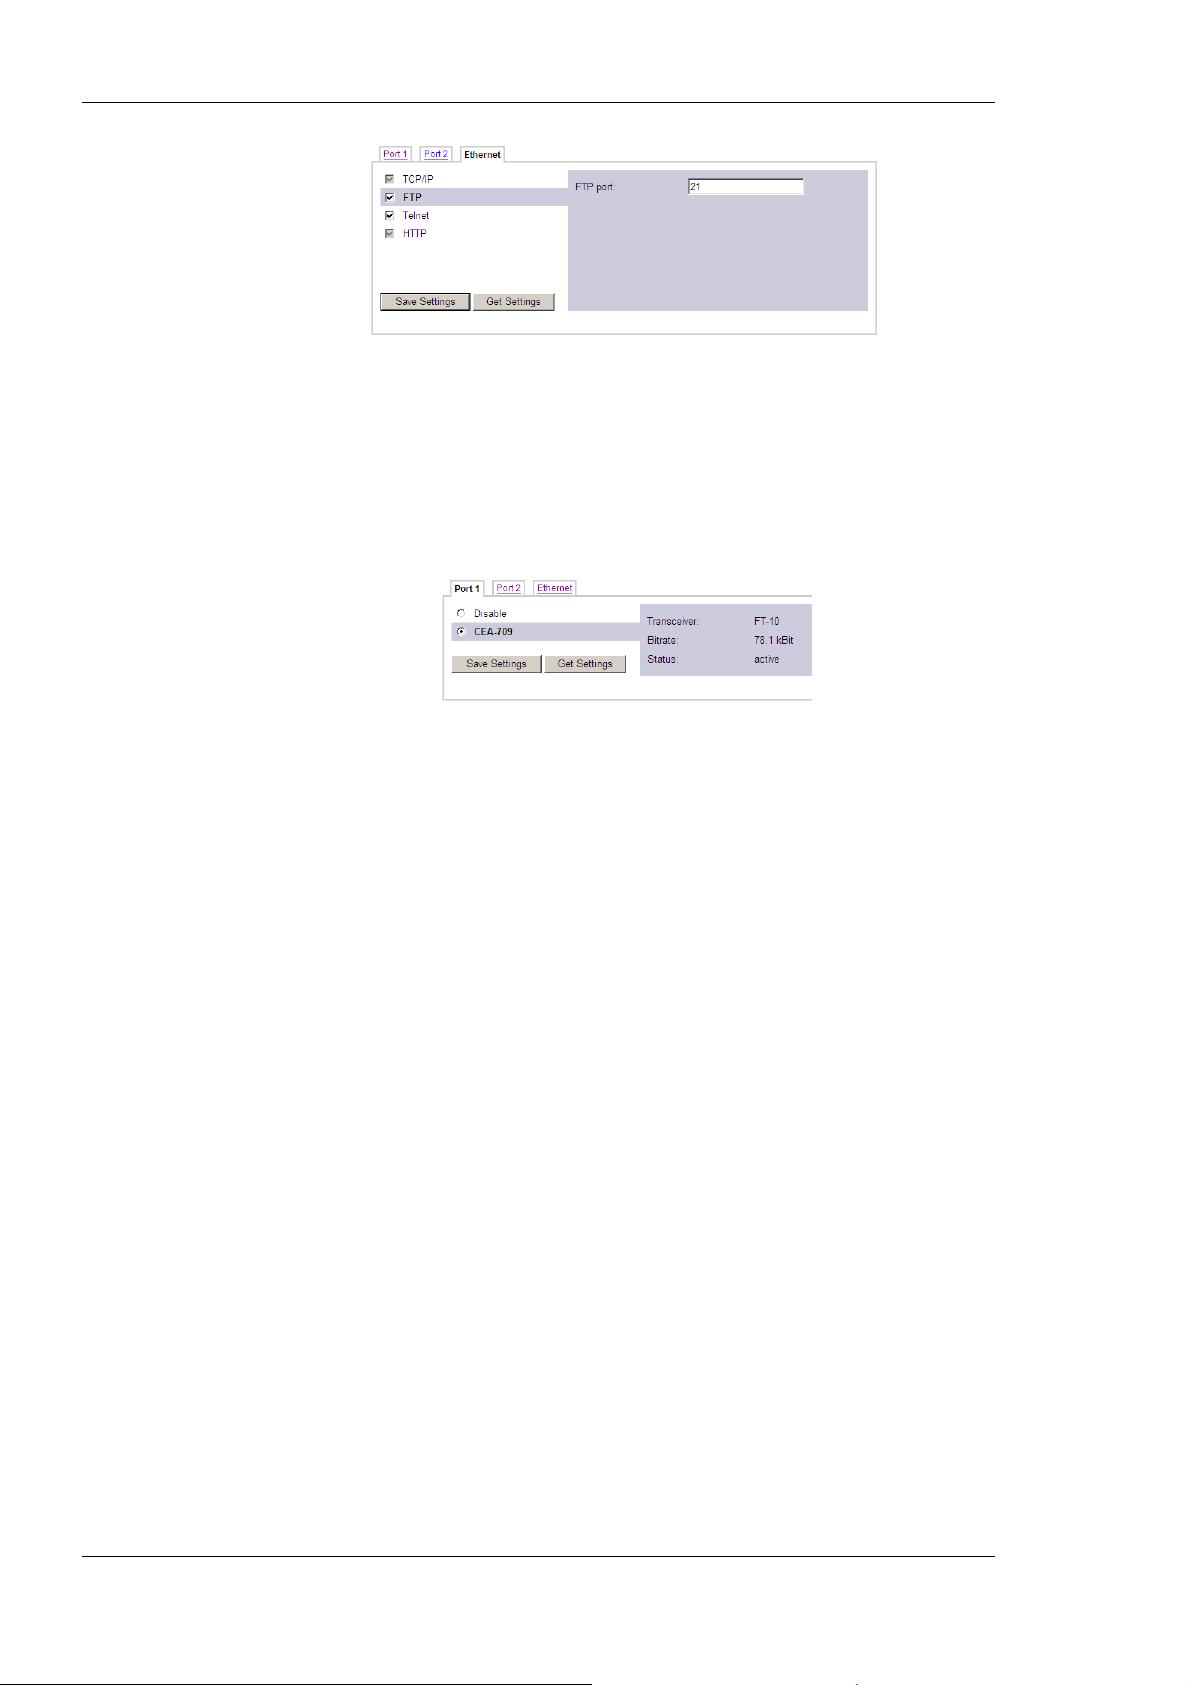
Other standard protocols that are bound to the Ethernet interface are FTP, Telnet, and
HTTP (Web server). By deselecting the checkbox, those protocols can be individually
disabled. The standard UDP/TCP ports can be changed in the respective protocol settings.
An example for the FTP server is shown for FTP in Figure 17. The FTP server is used for
instance to update the firmware (see Section 9.1) or to upload a new data point
configuration. Note that HTTP for the Web server can only be disabled on the console
interface or by using the device configuration of the Configurator.
Version 3.2 LOYTEC electronics GmbH
Page 30
L-Gate User Manual 30 LOYTEC
Figure 17: FTP server configuration on the Ethernet port.
4.2.5 CEA-709 Configuration
The CEA-709 protocol can be enabled on the device’s ports Port1, Port2, etc. if available.
To enable it, click the CEA-709 radio button as shown in Figure 18. Note, that depending
on the device model, other protocols on the same port will be disabled in this case. The
protocol settings box on the right-hand side displays the current transceiver settings.
Figure 18: CEA-709 Configuration Page.
4.2.6 CEA-852 Device Configuration
The CEA-852 protocol is only available on the Ethernet port. To enable CEA-852 on the
device, select the CEA-852 (CEA-709 over IP) checkbox on the Ethernet tab of the port
configuration page. Please note that on device models without a router or a proxy, the
CEA-709 protocol on other ports will be disabled (e.g., LINX-100, L-Gate).
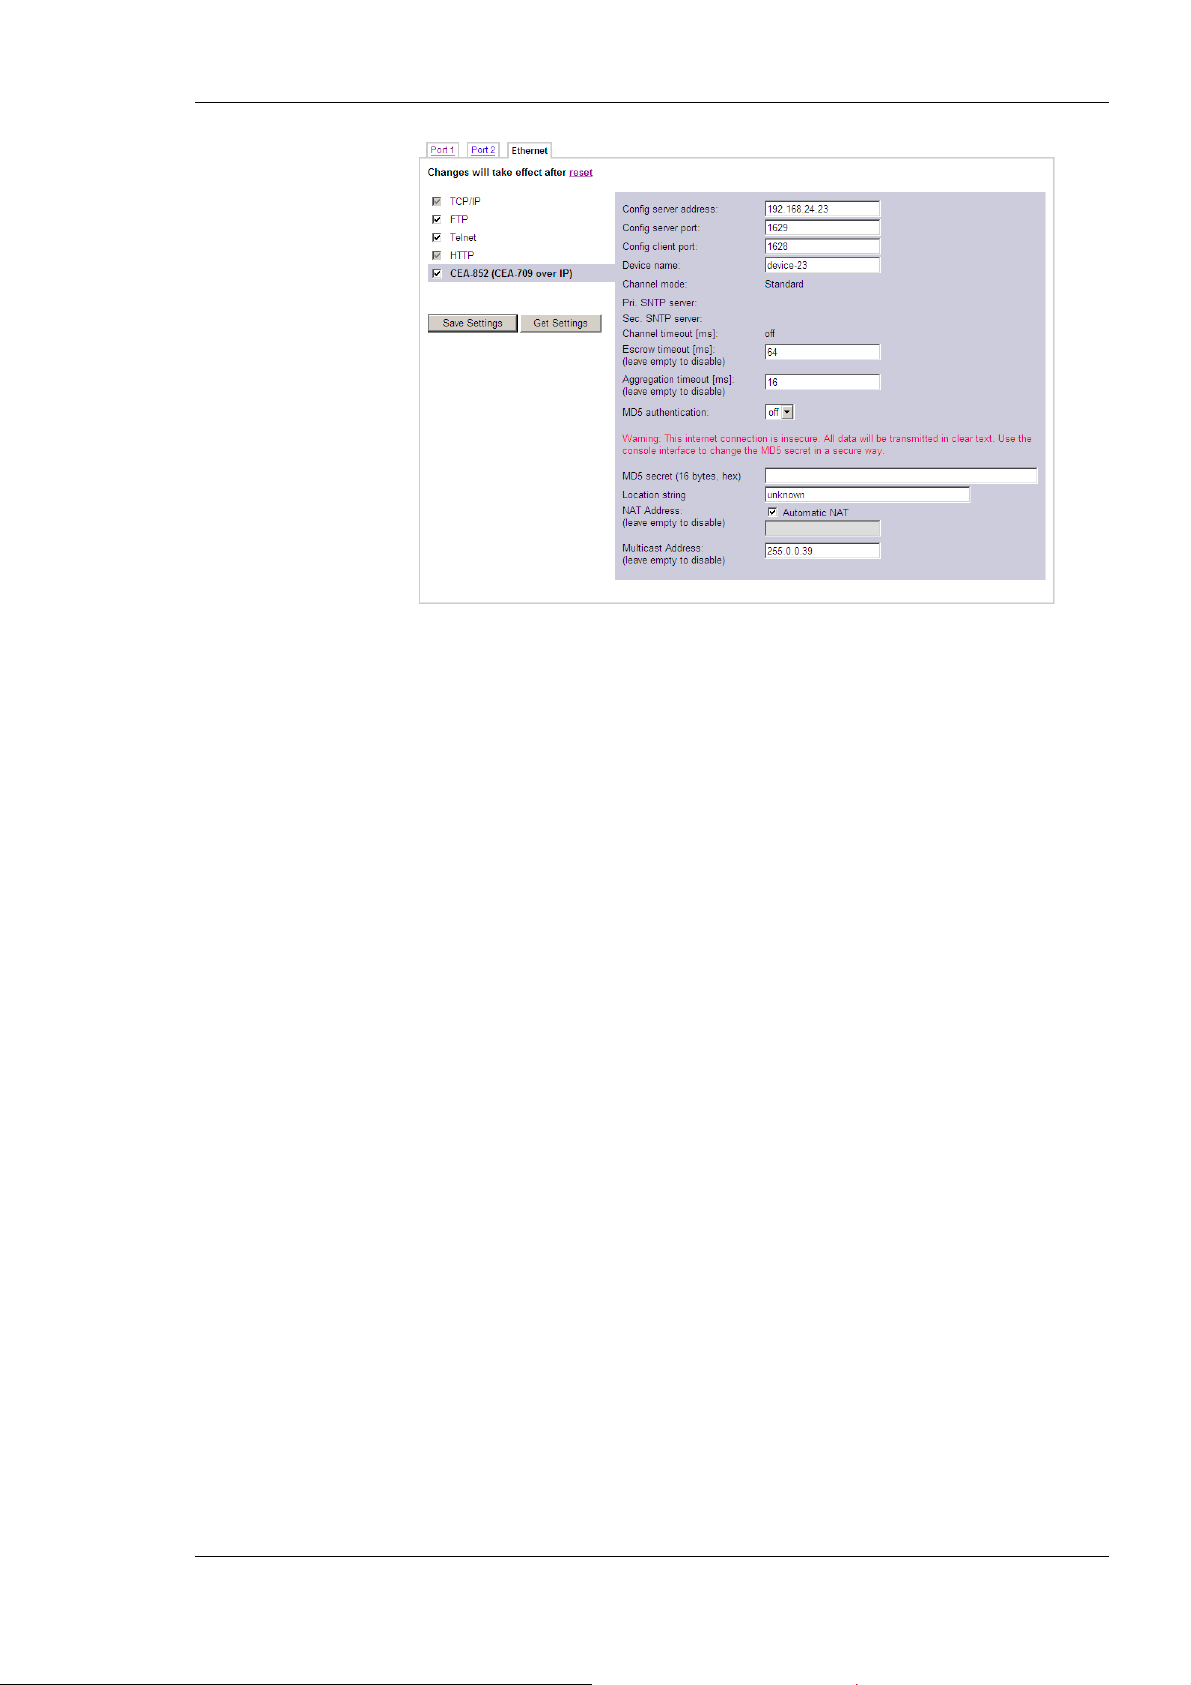
The CEA-852 protocol settings are displayed in the settings box on the right-hand side as
shown in Figure 19. Typically, the device is added to an IP channel by entering the relevant
information on a configuration server. The configuration server then contacts the CEA-852
device of the L-Gate and sends its configuration.
Version 3.2 LOYTEC electronics GmbH
Page 31
L-Gate User Manual 31 LOYTEC
Figure 19: CEA-852 Device Configuration Page
The field Config server address and Config server port display the IP address and port of
the configuration server, which manages the L-Gate and the IP channel. The field Config
client port represents the IP port of the L-Gate’s CEA-852 device. This setting should be
left at its default (1628) unless there are more than one CEA-852 devices operating behind
a single NAT router. Please refer to the L-IP User Manual [1] to learn more about NAT
configuration.
In the field Device name the user can enter a descriptive name for the L-Gate, which will
appear in the IP channel to identify this device. You can enter a device name with up to 15
characters. It is recommended to use unique device names throughout the IP channel.
The Channel mode field reflects the current channel mode of the CEA-852 device. It is
configured by the configuration server. If there are any two devices in the channel which
use the same IP address but different ports (e.g., multiple L-Gate behind one NAT router)
the channel switches to Extended NAT mode. Please refer to the L-IP User Manual [1] to
learn more about configuring the Extended NAT mode in the configuration server.
The configuration server sets the SNTP server addresses and the Channel timeout.
The filed Escrow timeout defines how long the CEA-852 device on the L-Gate waits for
out-of-sequence CEA-852 data packets before they are discarded. Please enter the time in
ms or ‘0’ to disable escrowing. The maximum time is 255 ms.
The field Aggregation timeout defines the time interval in which multiple CEA-709
packets are combined into a single CEA-852 data packet. Please enter the time in ms or ‘0’
to disable aggregation. The maximum time is 255 ms. Note that disabling aggregation will
negatively affect the performance of the CEA-852 device of the L-Gate.
The field MD5 authentication enables or disables MD5 authentication. Note that MD5
authentication cannot be used together with the Echelon’s i.LON 1000 since the
i.LON 1000 is not fully compliant with the CEA-852 authentication method. MD5 can be
used with the i.LON 600. In the following field MD5 secret enter the 16-byte MD5 secret.
Note that for security purposes the active MD5 secret is not displayed. You may enter the
16 bytes as one string or with spaces between each byte, e.g., 00 11 22 33 44 55 66 77 88
99 AA BB CC DD EE FF.
Version 3.2 LOYTEC electronics GmbH
Page 32
L-Gate User Manual 32 LOYTEC
Also note that entering the MD5 secret on the Web interface may pose a security risk.
Since the information is transmitted over the network it can be subject for eavesdroppers on
the line. It is recommended to either use a cross-over cable.
In the field Location string the user can enter a descriptive test which identifies the
physical location of the L-Gate. A location string can have a maximum length of 255
characters. This is optional and for informational purposes only.
If the CEA-852 device on the L-Gate is used behind a NAT router, the public IP address of
the NAT router or firewall must be known. To automatically detect the NAT address leave
the Auto-NAT checkmark enabled.
The Multicast Address field allows the user to add the CEA-852 device of the L-Gate into
a multi-cast group for the CEA-852 IP channel. Enter the channel’s IP multi-cast address
here. Please contact your system administrator on how to obtain a valid multi-cast address.
To learn when it is beneficial to use multi-cast addresses in your channel please refer to the
L-IP User Manual [1].
4.2.7 BACnet Configuration
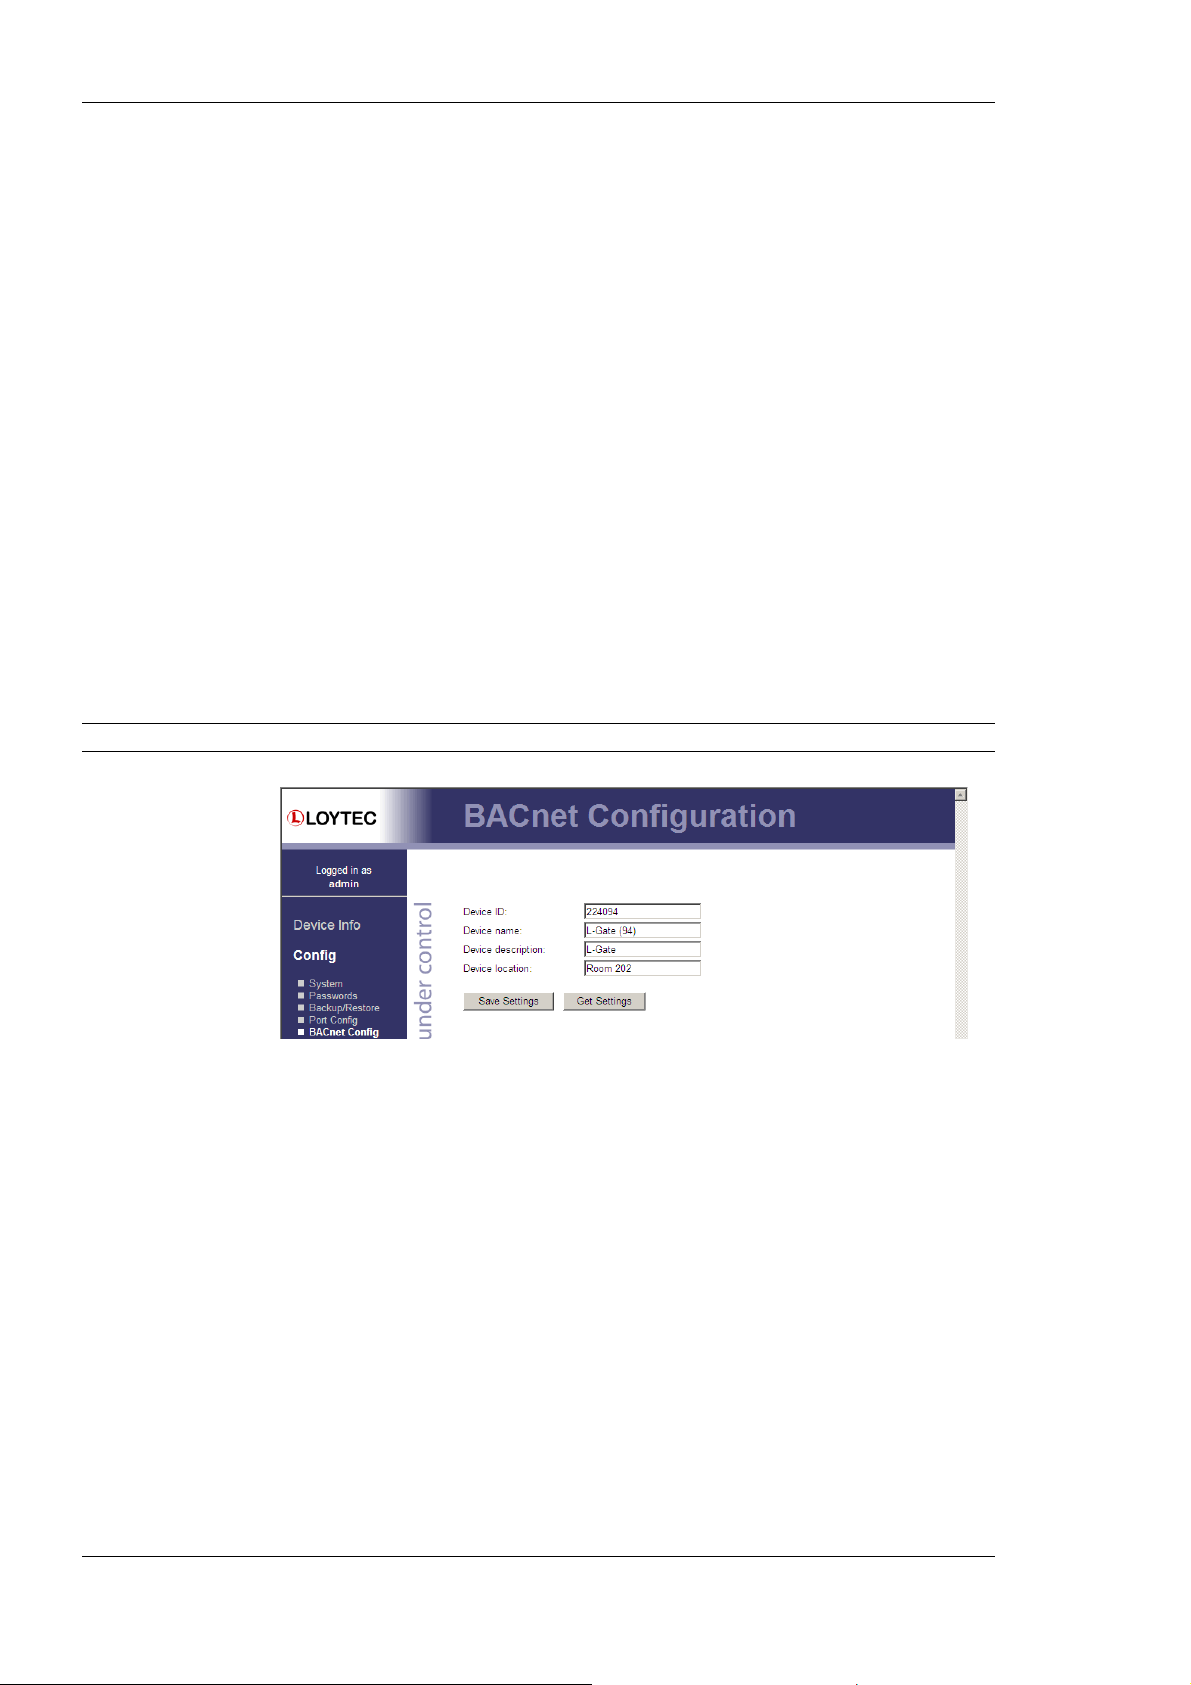
Figure 20 shows the BACnet device configuration page. This configuration page allows
setting the Device ID, which is the instance part of the Object_Identifier property of the
BACnet Device object. The field Device name holds the name of the BACnet device
object (property Object_Name).
Important: The device ID and device name must be unique within the BACnet internetwork.
Figure 20: BACnet Device Configuration.
Further, the description and location can be configured. These configuration items
correspond to the properties Description, and Location respectively of the BACnet Device
object.
On the settings for BACnet/IP refer to Section 4.2.8. For configuring the MS/TP data link
refer to Section 4.2.9.
4.2.8 BACnet/IP Configuration
The BACnet/IP protocol is available on the Ethernet port. To enable BACnet/IP on the
device, select the BACnet/IP checkbox on the Ethernet tab of the port configuration page.
Please note that on device models without a router, the BACnet MS/TP protocol on other
ports will be disabled (e.g., LINX-200, L-Gate).
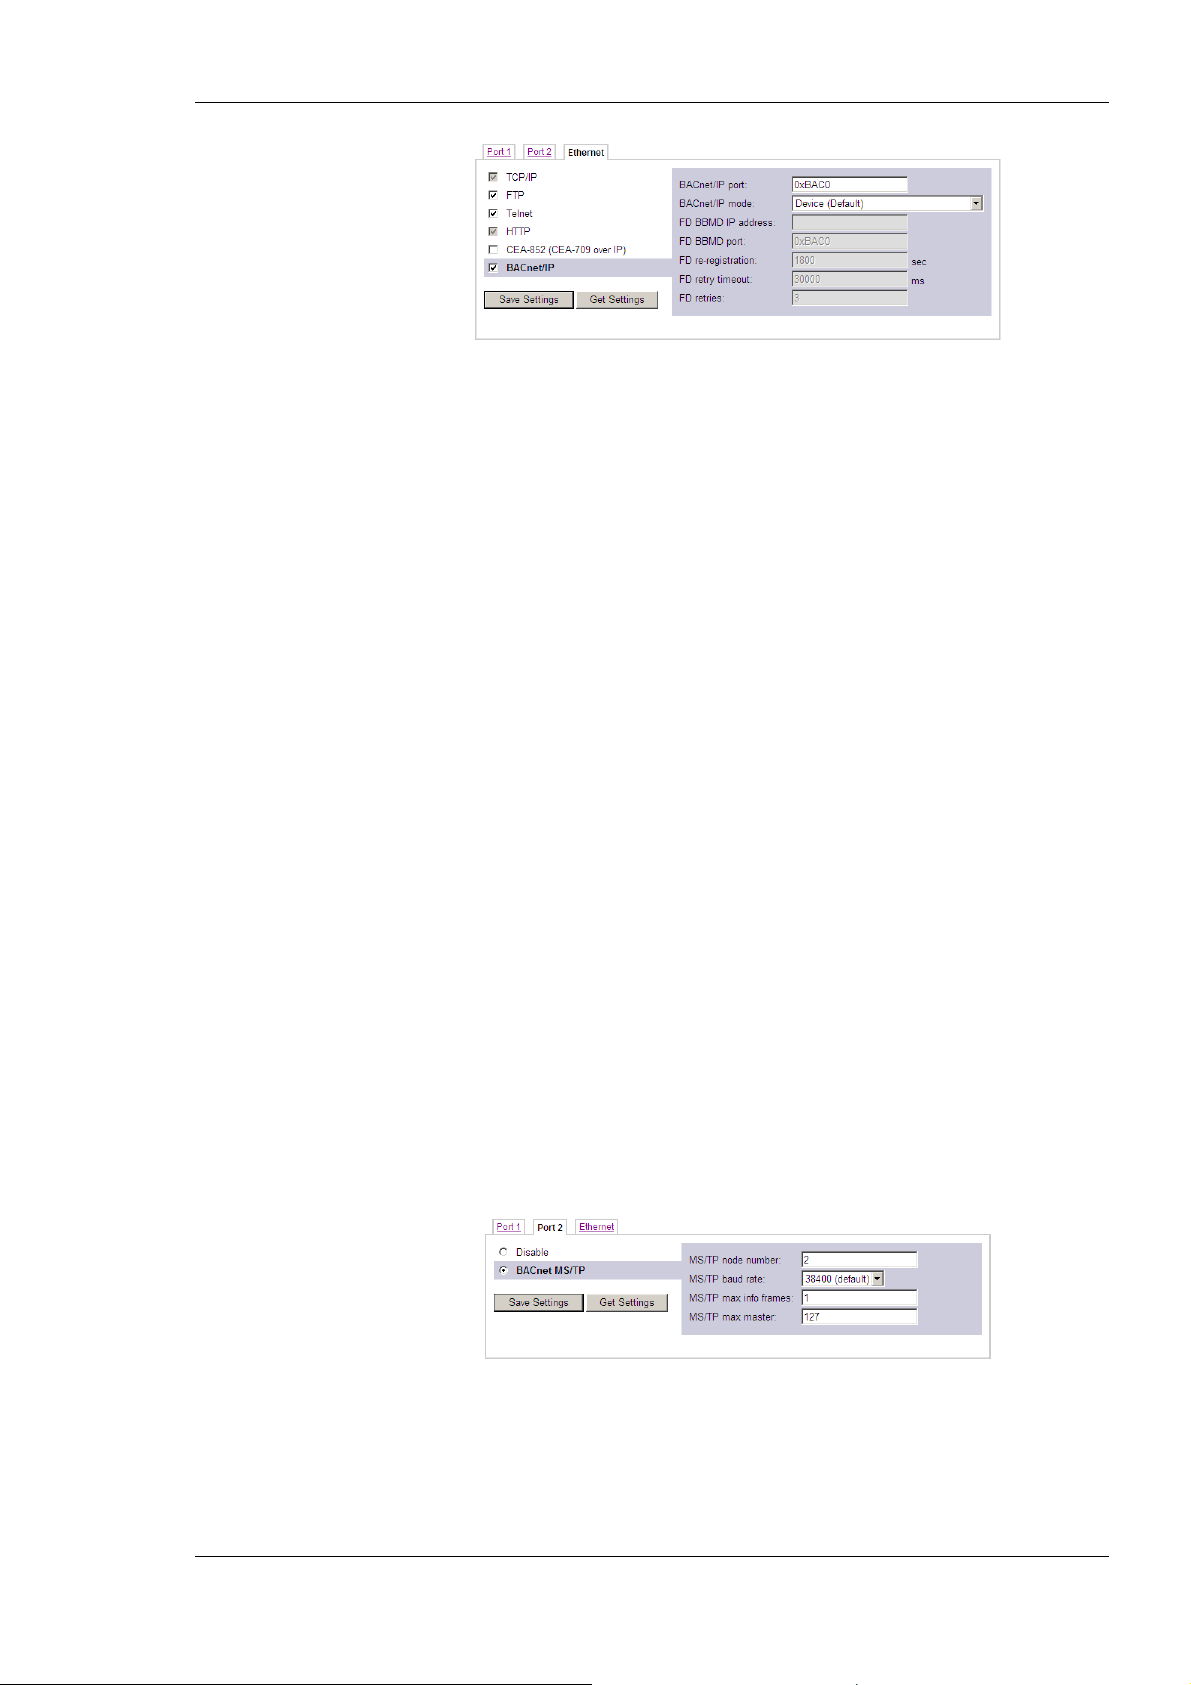
The BACnet/IP protocol settings are displayed in the settings box on the right-hand side as
shown in Figure 21. If the BACnet/IP network uses a non-default UDP port number other
than 47808/0xBAC0, enter this port in the BACnet/IP port field. Enter ‘0’ in this field for
switching back to the default setting.
Version 3.2 LOYTEC electronics GmbH
Page 33
L-Gate User Manual 33 LOYTEC
Figure 21: BACnet/IP Configuration.
In the field BACnet/IP mode the operation mode of the device is selected:
• Device (Default): In this mode the device operates as a regular BACnet/IP device on
the local network without other advanced features.
• Foreign Device (FD): In this mode, the device registers at an existing BBMD in the
BACnet/IP network as a foreign device. It is used, if the device is located as a single
BACnet/IP device on a remote IP subnet or behind a NAT router. If operated as a
foreign device behind a NAT router, port forwarding to the BACnet/IP port (UDP,
default port 0xBAC0) and optionally to the Web server and FTP server port (TCP,
default port 80 and 21) must be setup in the NAT router. If foreign device is selected,
the following, additional settings must be made:
o FD BBMD IP address and FD BBMD port: IP address and port of the
remote BBMD the device registers at as a foreign device.
o FD re-registration: A foreign device must periodically re-register at a
BBMD. Here you can setup the corresponding interval. The default is 1800
seconds.
o FD retry timeout and FD retries: Here you can specify the behavior, if
registration does not work instantly. These values should be left at default:
30000ms / 3 retries.
• Broadcast Management Device (BBMD): This option is available on the L-Gate. It is
the same as Device but the BBMD function is enabled (see Section 4.2.10).
4.2.9 MS/TP Configuration
The BACnet MS/TP protocol can be enabled on the device’s port Port2 if available. To
enable it, click the BACnet MS/TP radio button as shown in Figure 22. Note, that
depending on the device model, other protocols o n the same port will be disabled in this
case. On the L-Gate the MS/TP port is not enabled by default.
Figure 22: MS/TP Configuration.
The MS/TP protocol settings are displayed in the settings box on the right-hand side as
shown in Figure 22. Mandatory settings that have to be made are the MS/TP node number
and the MS/TP baud rate. The MS/TP node number determines the physical address of
the device on the MS/TP channel and must be in the range from ‘0’ to the number
Version 3.2 LOYTEC electronics GmbH
Page 34
L-Gate User Manual 34 LOYTEC
configured with the MS/TP max master configuration option. It must be unique within the
MS/TP channel. The baud rate on the MS/TP channel can be set to 9600, 19200, 38400,
and 76800 baud. It is strongly recommended to leave the MS/TP max info frames and the
MS/TP max master configuration options at their default settings.
4.2.10 BACnet BDT (Broadcast Distribution Table)
The BBMD function is only available on the L-Gate. The BBMD function is needed when
a BACnet/IP network spans over several IP subnets separated by IP routers. If the device is
configured as a BBMD (see Section 4.2.7), the BDT (Broadcast Distribution Table)
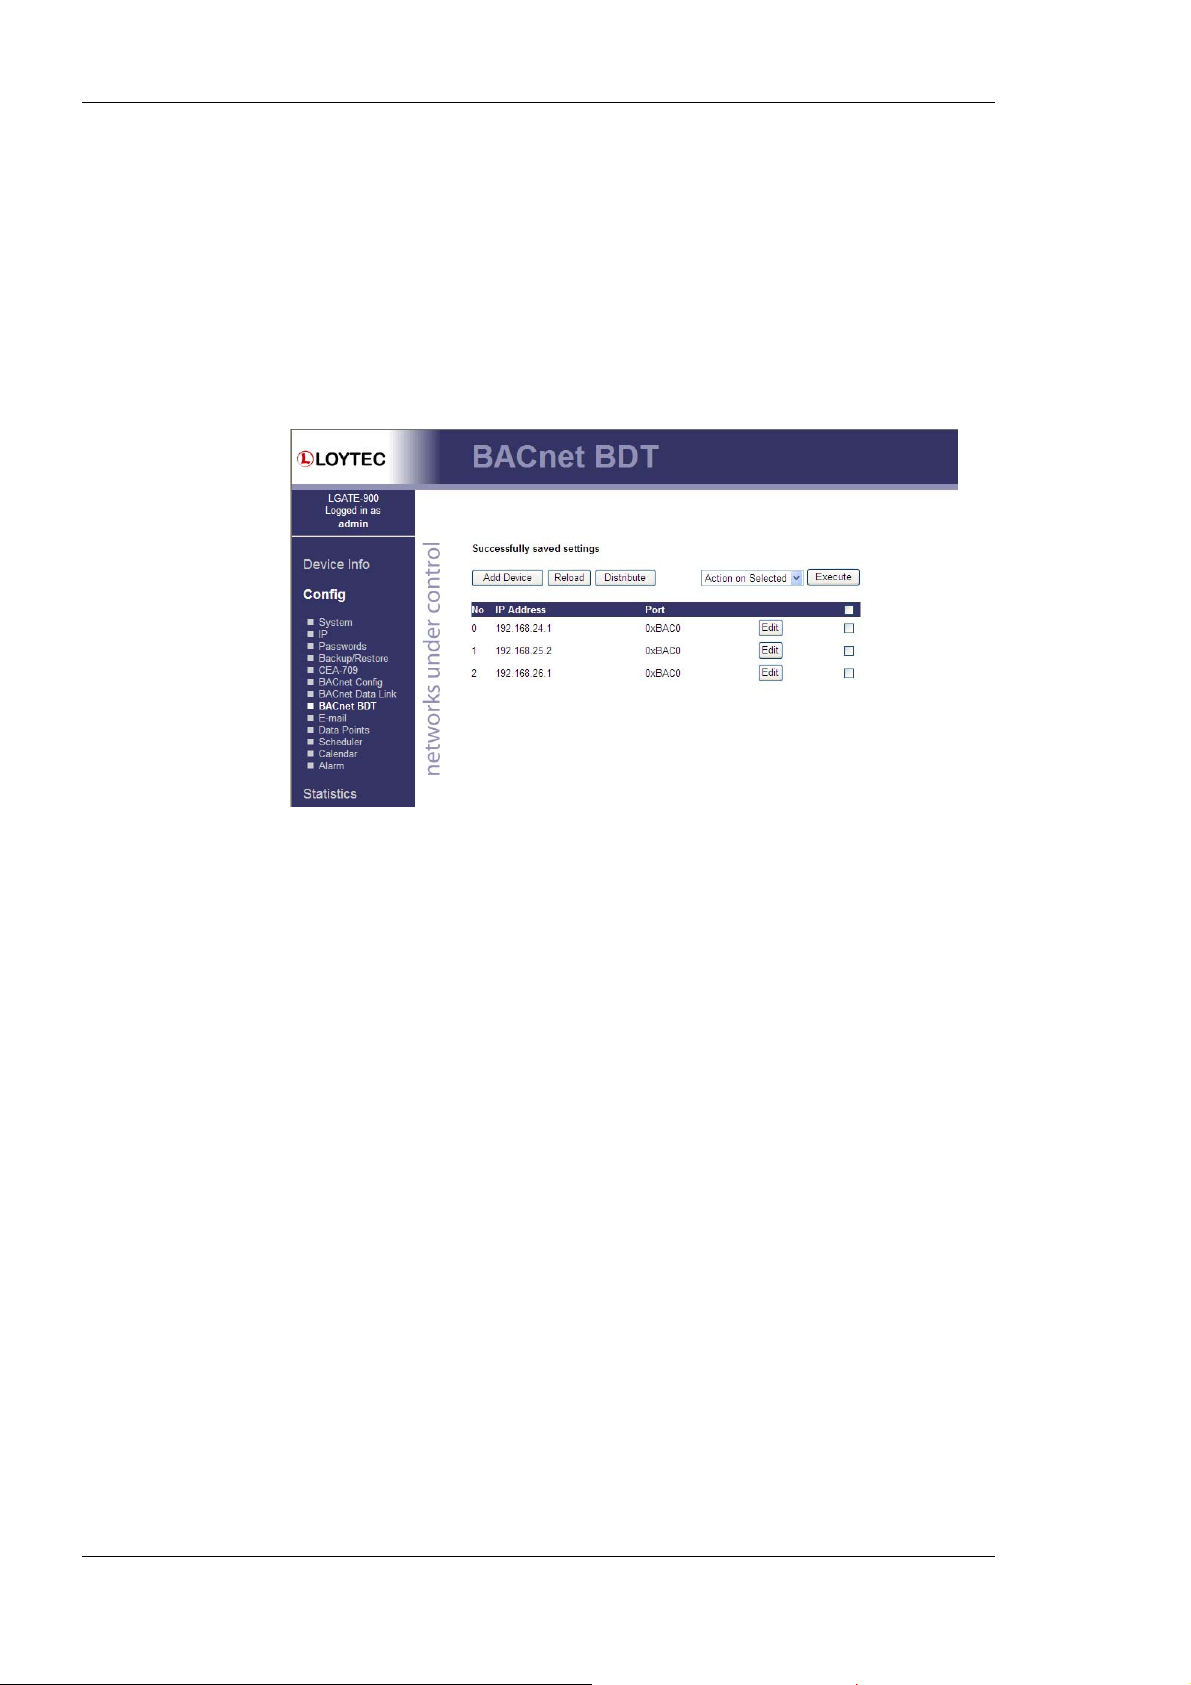
specifies all other BBMDs of the BACnet/IP network. The BDT is shown in Figure 23.
By clicking Add Device new BBMDs (IP address and port) can be added. With Action on
Selected and selecting existing entries, certain BBMDs can be deleted again from the table.
To commit the finished table, device must be rebooted (see Section 4.4).
4.2.11 E-Mail Configuration
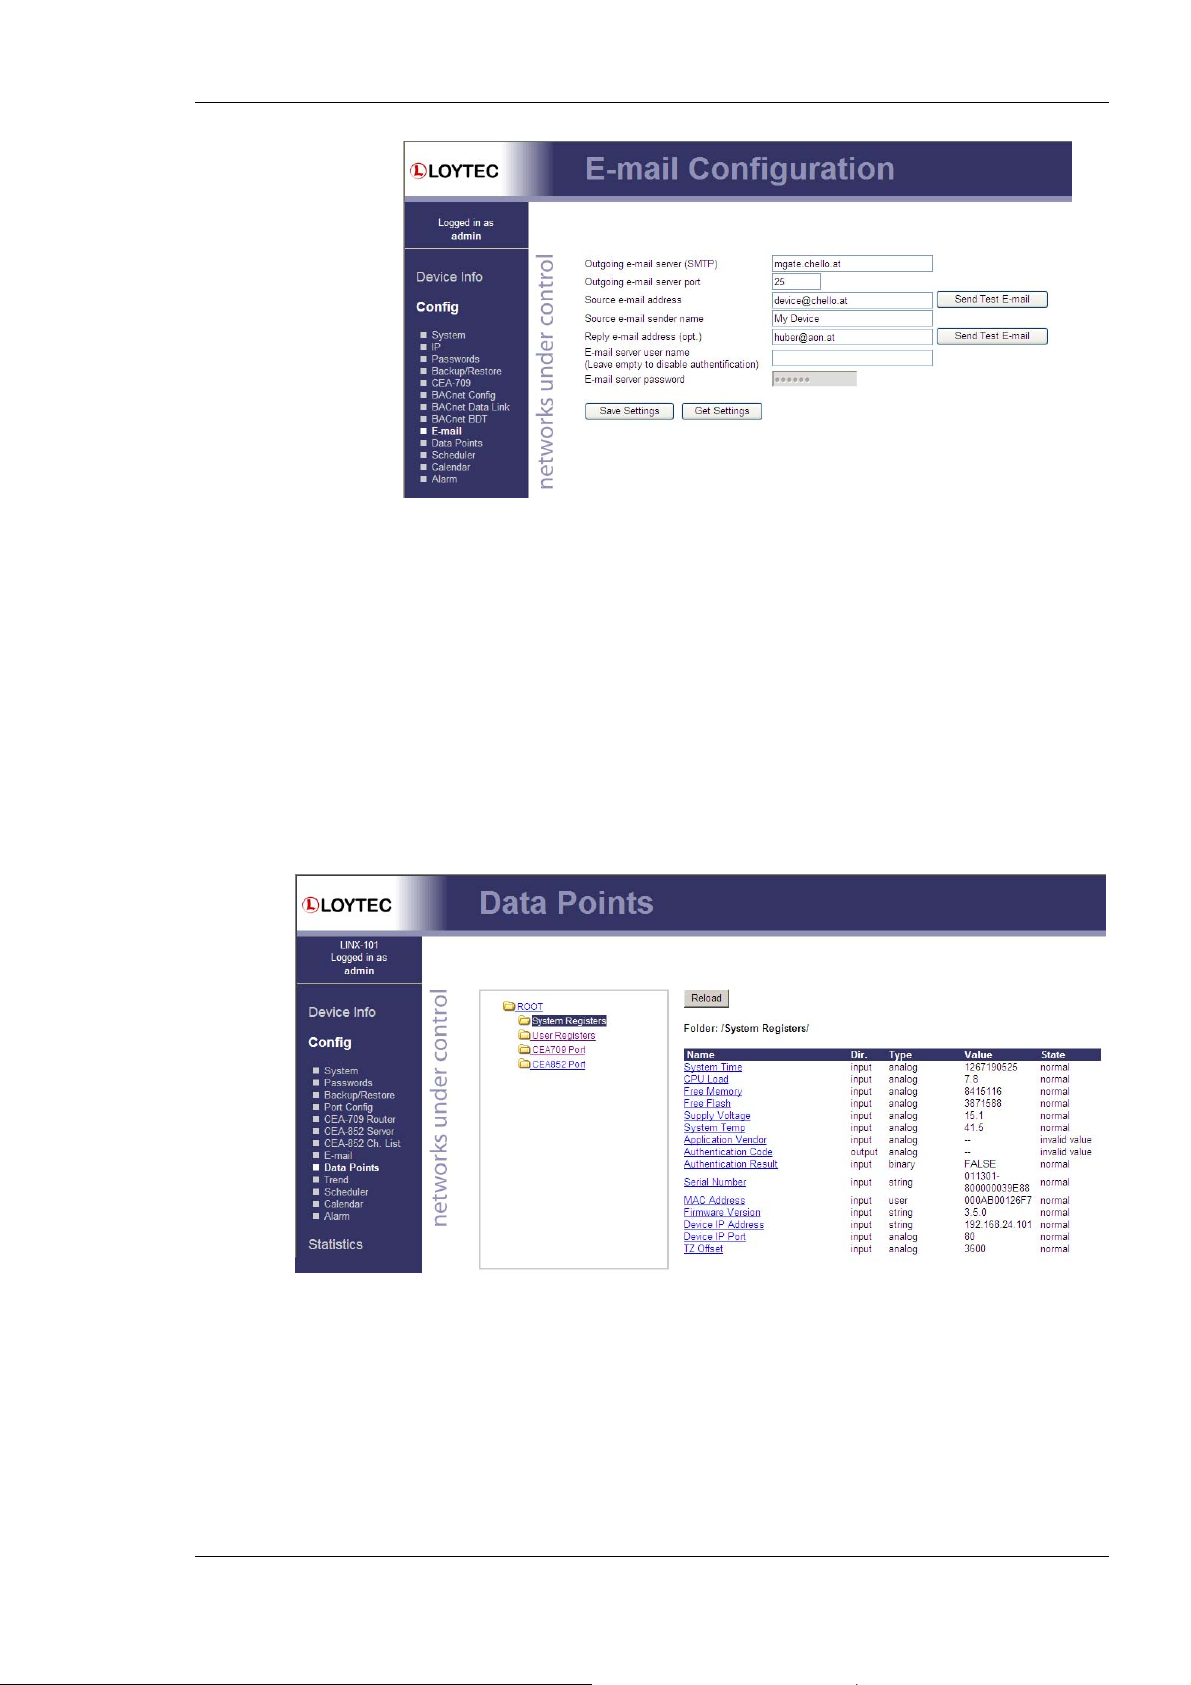
The Web interface provides the e-mail configuration page to set up an e-mail account,
which is used to send e-mails. The content and time when E-mails are sent is configured
through the Configurator software (see Section 6.11). The E-Mail configuration page is
shown in Figure 24.
In the field for the outgoing e-mail server, enter the SMTP server of your Internet provider.
Typically, the SMTP server port can be left at 25. In the field Source E-mail Address,
enter the e-mail address of the device’s e-mail account. In the field Source E-mail Sender
Name enter a name that the e-mail will display as the source name. Note, that only ASCII
characters are allowed in the name. If replies shall be sent to another e-mail address,
specify this in the Reply E-mail Address.
If the provider’s SMTP server requires authentication, enter the required user name and
password. Note, that only username/password is supported. SSL/TLS authentication is not
supported by the L-Gate (e.g., Hotmail, gmail cannot be used).
Figure 23: BACnet Broadcast Distribution Table.
To verify the E-Mail configuration, reboot the device to let the changes take effect and
return to the E-Mail configuration page. Then press one of the Send Test E-Mail buttons.
Note, that a DNS server must be configured in the IP settings (see Section 4.2.4) to resolve
the E-Mail server host name. The Web UI displays a warning message at the top of the
page, if the DNS configuration is missing. Results of sending the test E-Mail are logged in
the system log for further analysis of an existing problem (see Section 4.3.1).
Version 3.2 LOYTEC electronics GmbH
Page 35
L-Gate User Manual 35 LOYTEC
Figure 24: E-Mail Configuration Page
4.2.12 Data Points
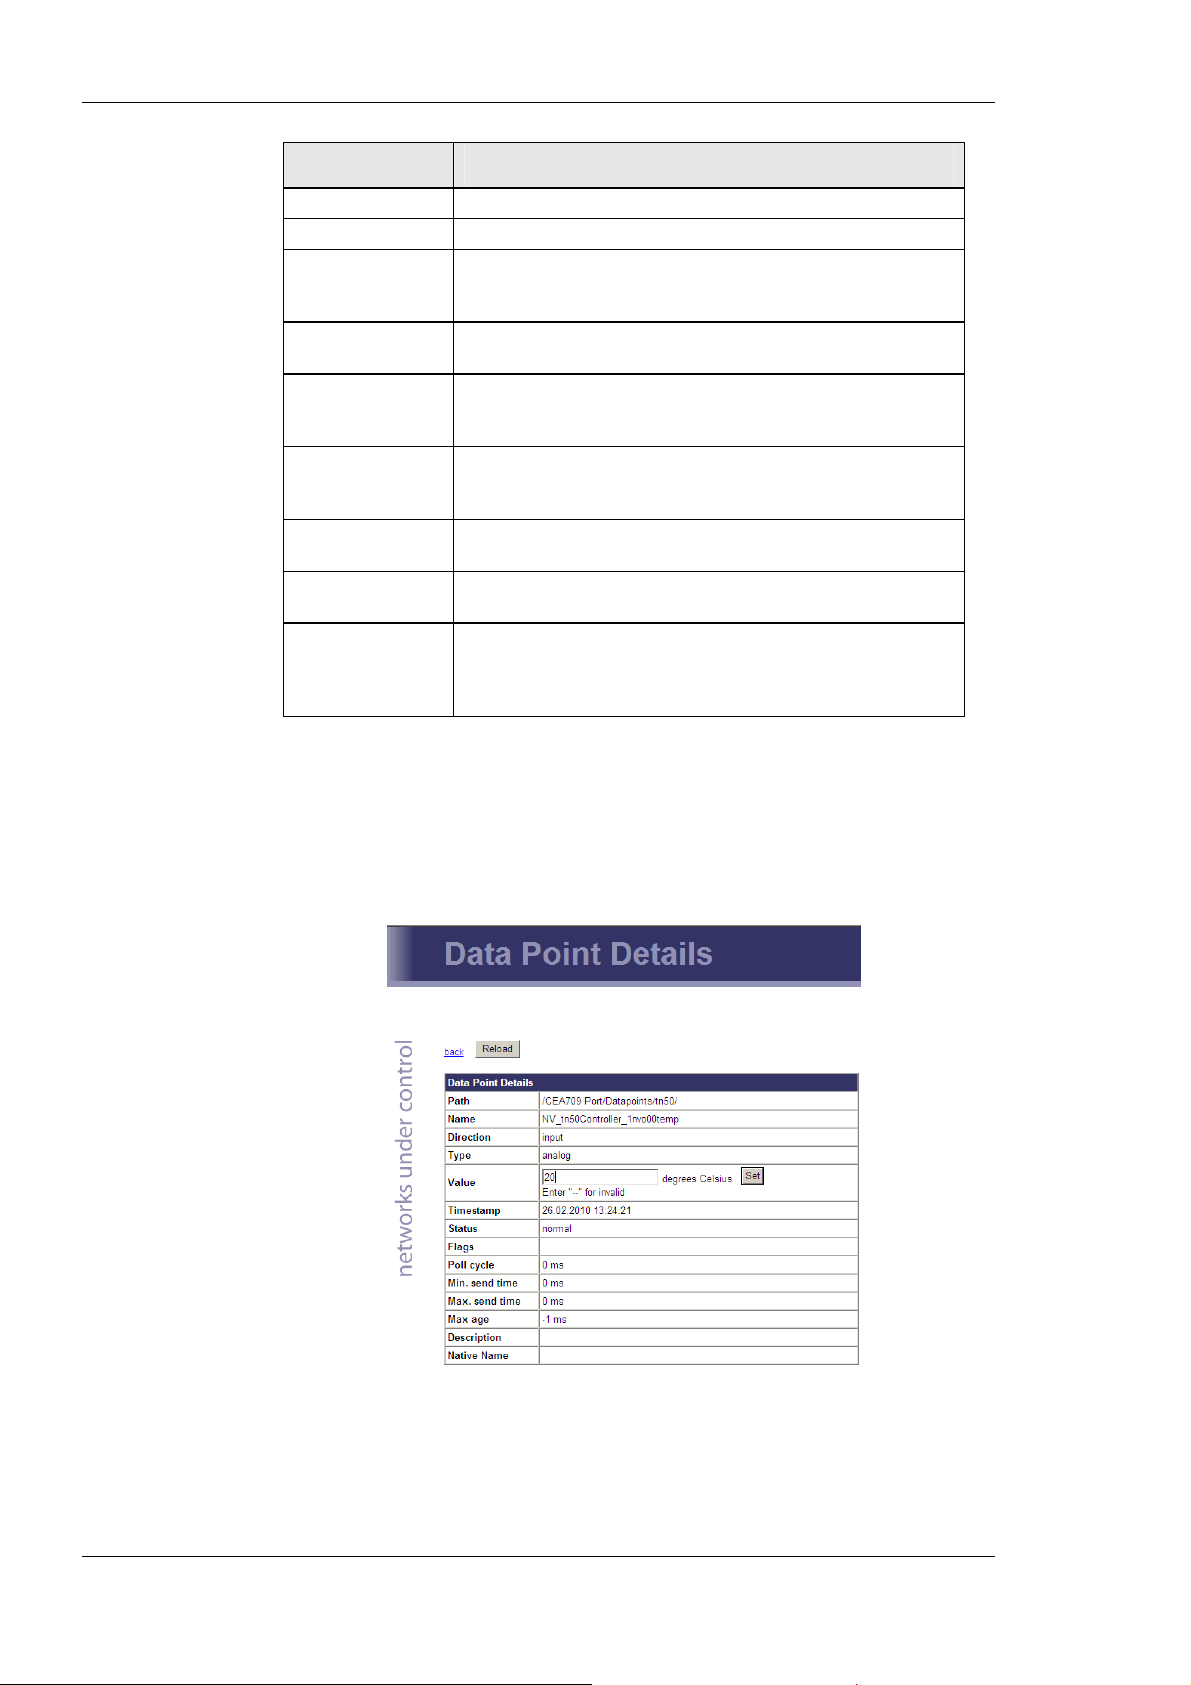
The device’s Web interface provides a data point page, which lists all configured data
points on the L-Gate. An example is shown in Figure 25. The data point page contains a
tree view. Clicking on a particular tree item fills the right part of the page with a data point
list of that tree level and all levels below. Thus, one can get an easy overview of all data
points.
The data point list displays the data point name, direction, type, current value, and data
point state. Inactive points are displayed in gray. If the data point list does not fit on one
page, there are page enumerator links at the bottom. Important data point states and their
implications are listed in Table 5.
Figure 25: Data point page
Version 3.2 LOYTEC electronics GmbH
Page 36
L-Gate User Manual 36 LOYTEC
Data Point Status Description
normal The data point is in normal operation state and possesses a value.
invalid value The data point has no valid value.
offline (config) The data point has a value but it is not reflected on the network
due to a configuration error (not commissioned, no binding, no
client mapping, etc.)
offline The data point has a value but it is not reflected on the network
due to a communication error (e.g., the peer node is not online).
unreliable
(offline)
unreliable (range) The data point has a value but it is considered unreliable because
unreliable The data point has a value but it is considered unreliable for an
not configured The data point is mapped to a port, which is not configured (e.g.,
Line grayed-out The data point is inactive. Values can be written but no network
The data point has a value but it is considered unreliable because
it was derived from a source, which was offline (e.g., the value
was fed from a connection, where the source is offline).
the value source specified an out-of-range value. The value is
limited to the supported range.
unspecified reason.
the port is disabled).
communication is triggered. This can be the case, if a data point
is not used in the configuration or it is connected to a BACnet
server object, which is not present on the device.
Table 5: Data Point States.
The data point names are links. Clicking on such a link opens a detailed page on that data
point. If the data point supports it, the user can also enter a new data point value as
depicted in Figure 26. The Status field is discussed in Table 5. The Flags, Poll cycle,
Min/Max send time and Max age fields are the common timing parameters for the data
point. See Section 5.2.2 for a closer discussion on timing parameters.
Figure 26: Data point details page
Clicking on the Set button writes the new value to the device’s data server. When setting a
value, the Web page displays the status of the action:
• Successfully set value: The new value has been successfully set in the data point and
the update has been sent on the network, if it is a network data point.
Version 3.2 LOYTEC electronics GmbH
Page 37
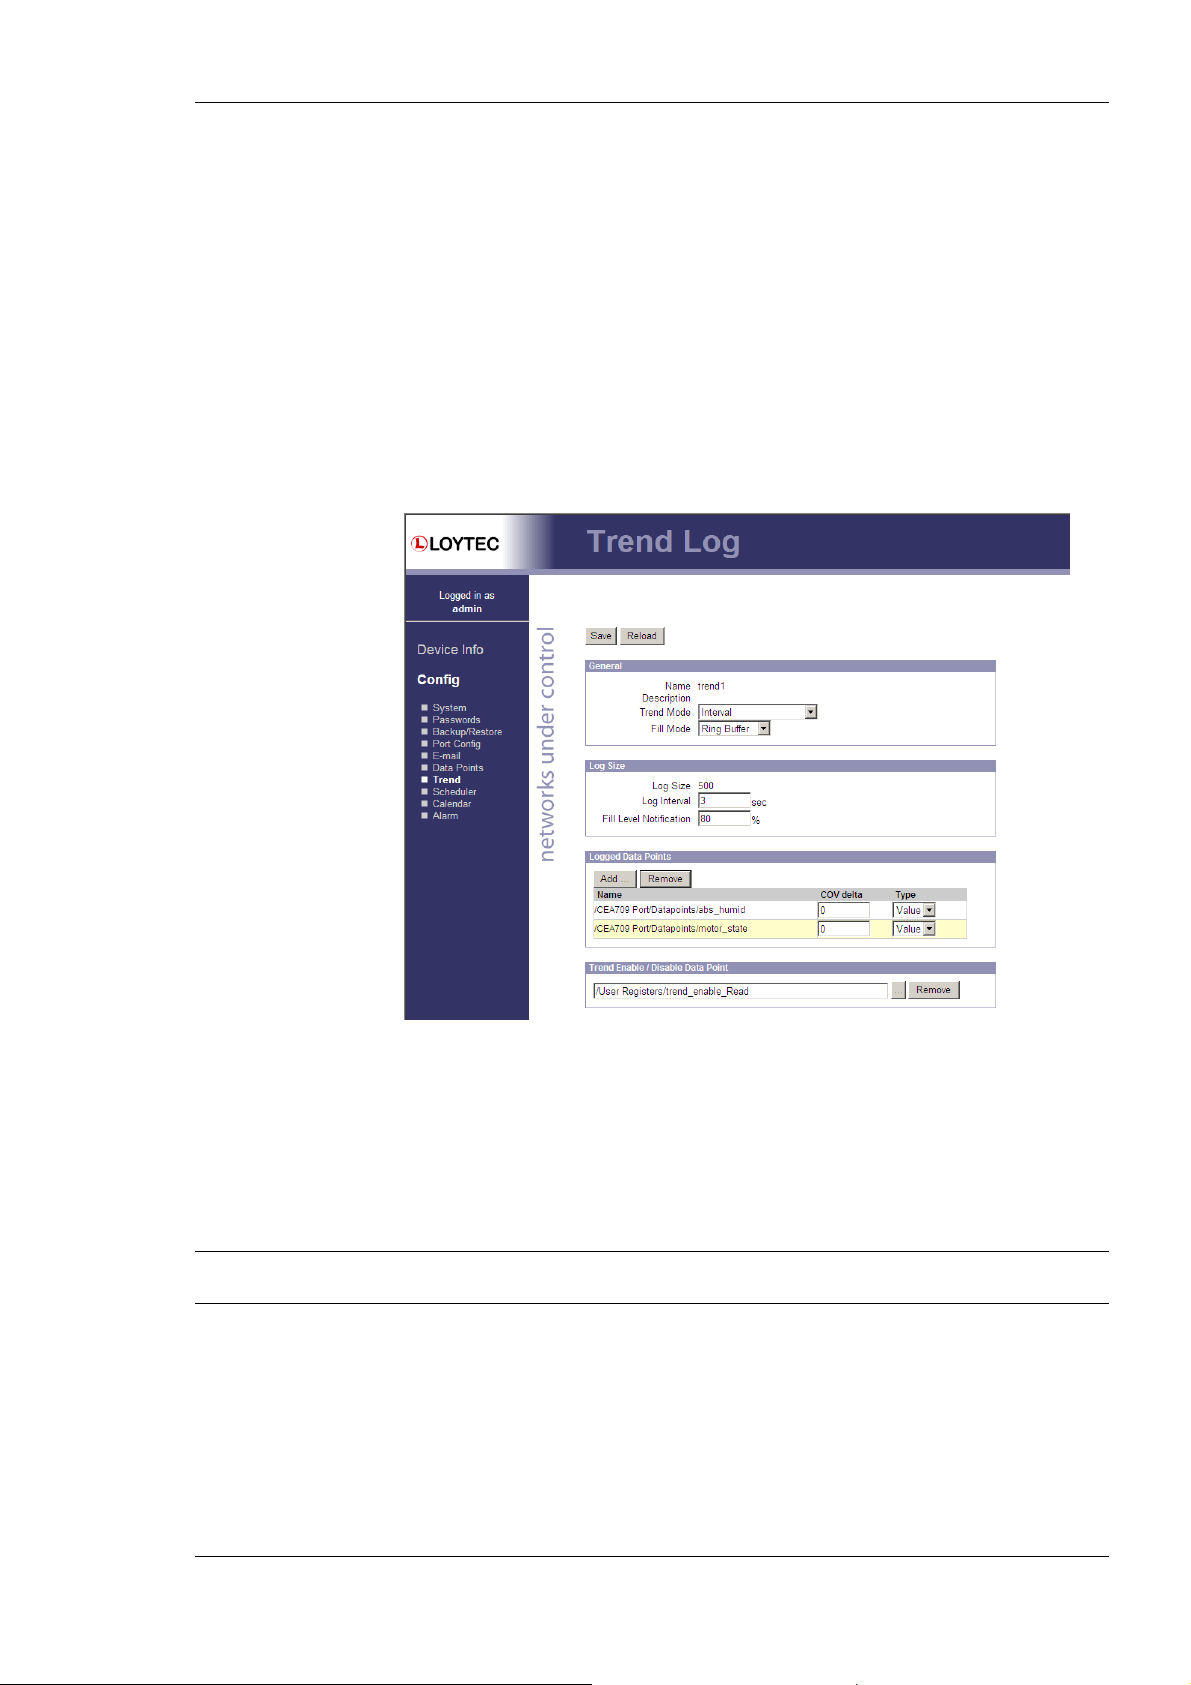
L-Gate User Manual 37 LOYTEC
• Could not send value update: The new value has been set but it has not been sent out
on the network. The reason can be that the peer node is currently offline or there is a
configuration error. The data point status reflects this error.
• Could not set value (error code): The new value has not been set because of an
internal error. Please contact LOYTEC with the error code.
4.2.13 Trend
The Web interface provides a configuration page to re-configure trend logs at run-time.
The changes made to the trend logs take effect immediately without the needs for a reboot
of the device. Allocating new trend logs can only be done in the configuration software
(see Section 6.14.1). The trend log main page displays all available trend logs. Click on the
trend log to be edited. This opens the trend log configuration page. An example is shown in
Figure 27.
Figure 27: Trend log configuration page.
The user can change the Trend Mode, the Fill Mode, the Log Interval and the Fill Level
Notification. Furthermore, data points can be added to the trend log by clicking the Add…
button. A data point selector dialog opens. Click on a data point for adding it. For removing
a data point from the trend log, click on it in the Logged Data Points list and hit the
Remove button. Save the changes made by clicking the Save button. For more information
on how a trend log can be configured please refer to the Configurator Section 6.14.
Note: This firmware version does not allow configuring trended data points on local BACnet
trend logs. The feature is currently limited to CEA-709 trend logs.
4.2.14 Scheduler
The Web interface provides the scheduler page to edit its schedules at run-time, i.e., change
the times and values that shall be scheduled. Allocating new schedules can only be done in
the configuration software (see Section 6.12). The scheduler main page displays all
available schedules. Click on the schedule to be edited. This opens the scheduler page. An
example is shown in Figure 28.
Version 3.2 LOYTEC electronics GmbH
Page 38
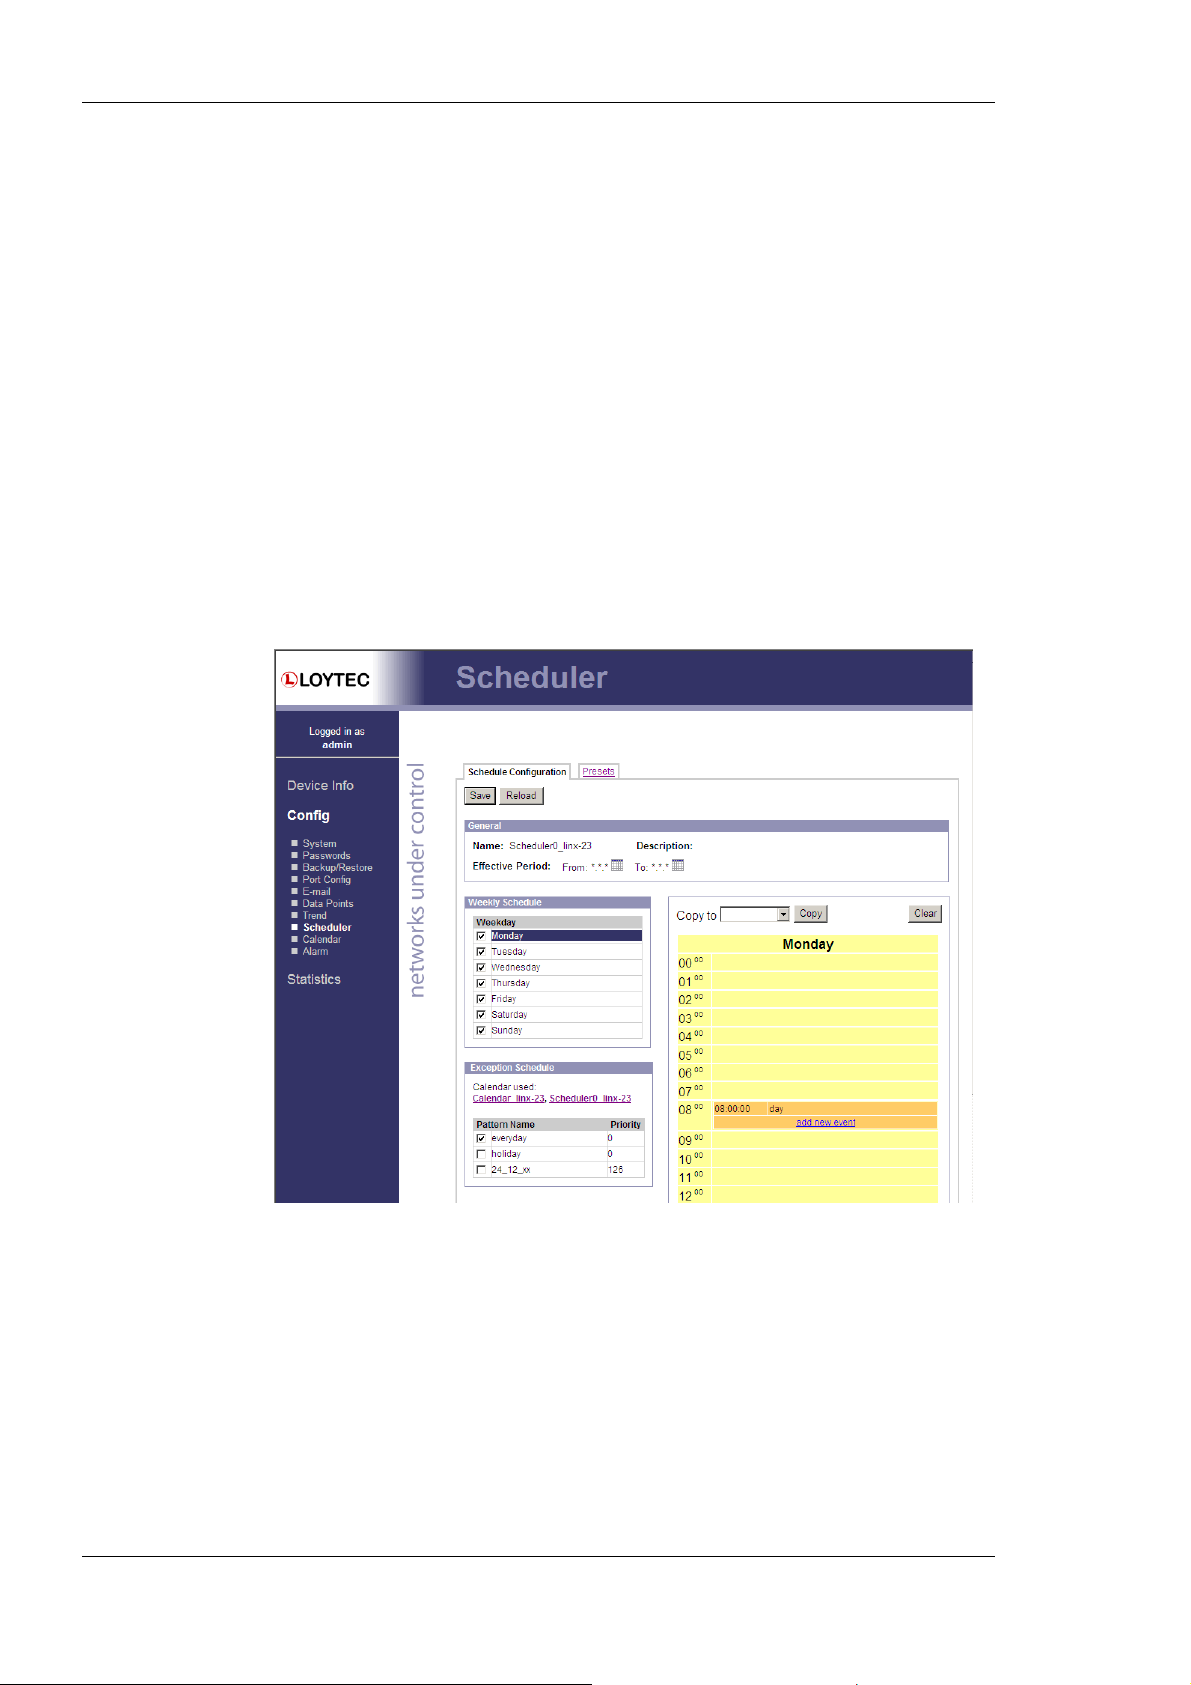
L-Gate User Manual 38 LOYTEC
The effective period defines when this schedule shall be in effect. Leave From and To at
‘*.*.*’ to make this schedule always in-effect. Otherwise enter dates, such as ’30.1.2000’.
To entirely disable a scheduler de-select the Enable Schedule check box.
Schedules are defined per day. On the left-hand side, the weekdays Monday through
Sunday can be selected, or exception days from the calendar, e.g. Holidays. Once a day is
selected, the times and values can be defined in the daily planner on the right-hand side. In
the example shown in Figure 28, on Monday the value day is scheduled at 8:00am. The
same principle applies to exception days. Exception days override the settings of the
normal weekday. Put a check mark on those exception days from the calendar, which shall
be used in the schedule. To edit the date ranges of exception days click on the links to the
used calendars, e.g., ‘calendar’ or ‘Scheduler_1’. The ‘Scheduler_1’ is a calendar, which is
embedded into the schedule and not accessible by other schedulers. For more information
on how to set up schedules and calendars refer to Section 6.12.
To define actual values for the names such as day click on the tab Presets as shown in
Figure 29. To define a new value, click on the button Add Preset. This adds a new column.
Enter a new preset name (e.g., ‘day’). Then enter values for the data points in the preset
column. The data point description column displays the short-hand name defined in the
configuration software. This description can also be changed on the Web UI.
Figure 28: Schedule Configuration Page
Version 3.2 LOYTEC electronics GmbH
Page 39
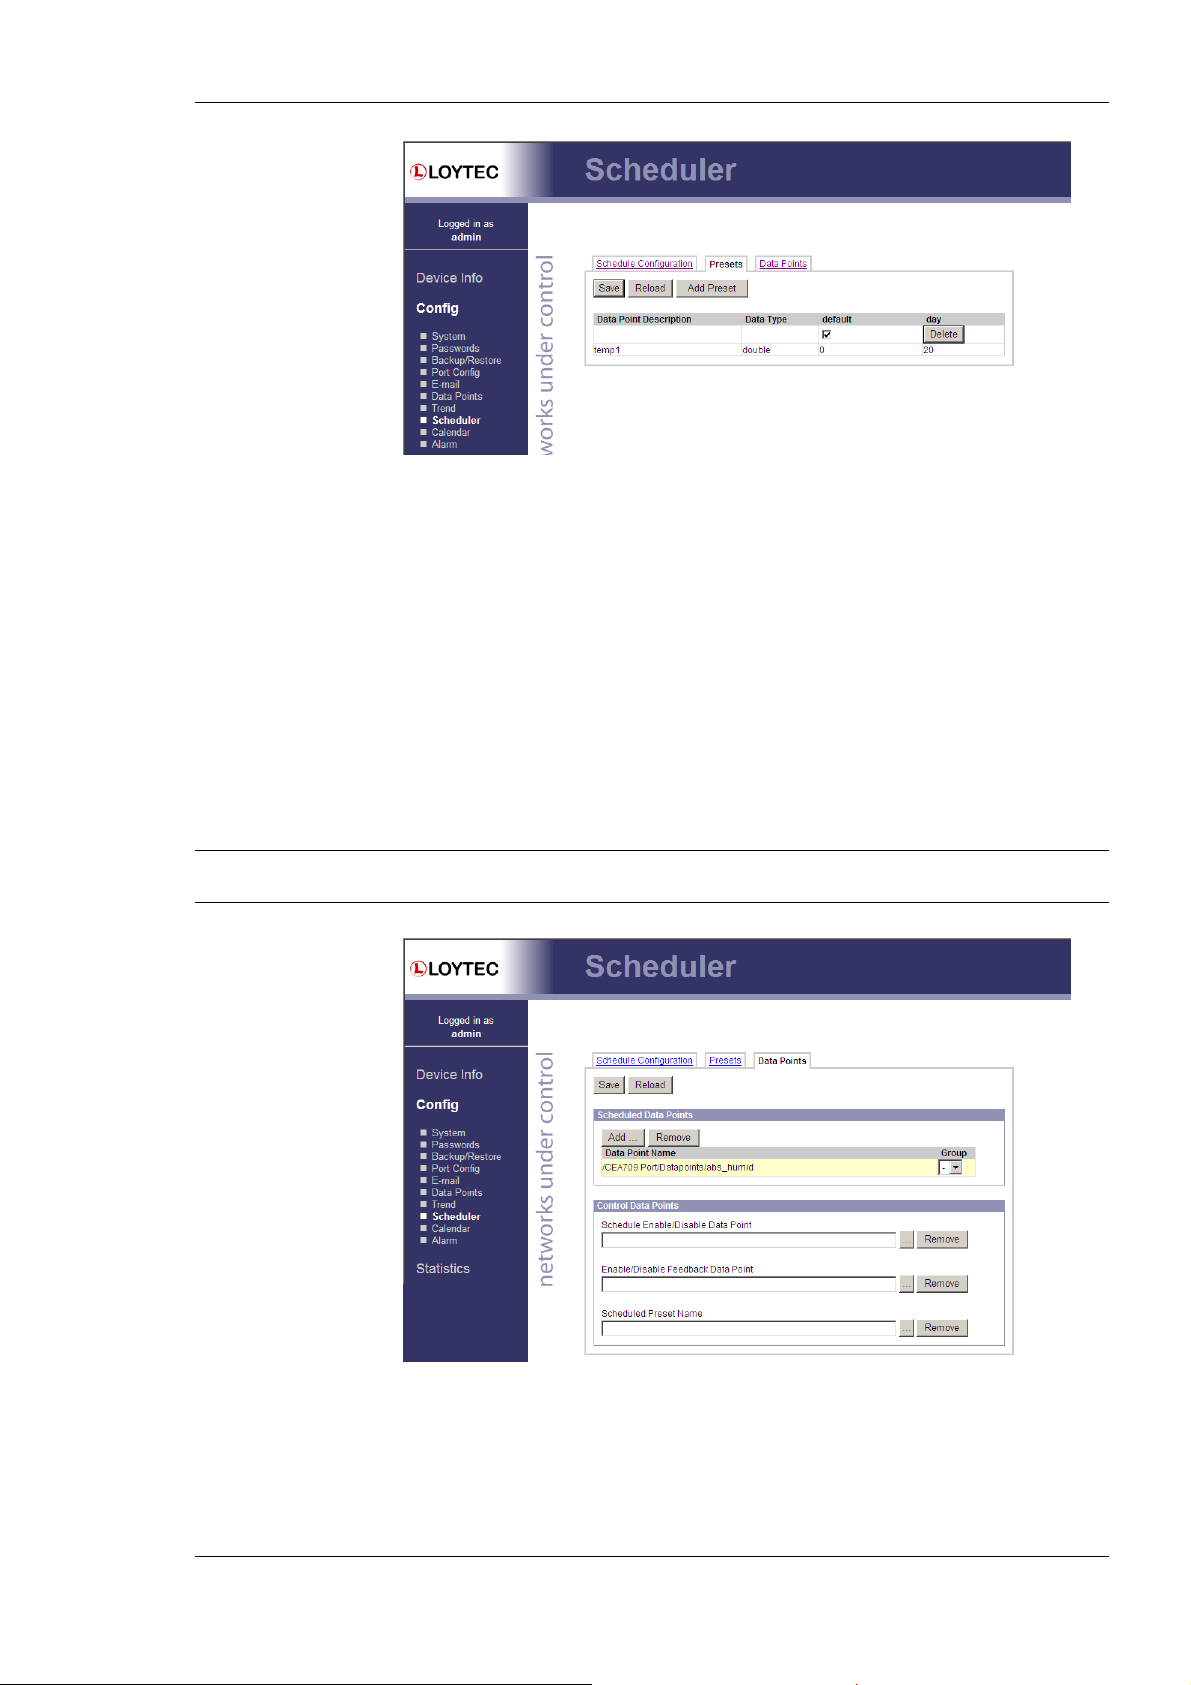
L-Gate User Manual 39 LOYTEC
Figure 29: Scheduled Data Point Value Configuration Page
You can switch back and forth between the two tabs. Once the configuration is complete,
click on the Save button. This updates the schedule in the device. Any changes made
become effective immediately.
On local schedulers the Web UI also allows to reconfigure the scheduled data points. This
change takes effect immediately without a reboot of the device. To add and remove data
points to the scheduler, go to the Data Points tab. The configuration page is depicted in
Figure 30. To add a new data point, click the Add… button. To remove a data point, select
the data point in the list Scheduled Data Points by clicking on it and then press the
Remove button. Finally, store the changes by clicking the Save button. After modifying the
scheduled data points, go back to the Presets tab and enter descriptive value label names.
For more information on how to configure a scheduler please refer to the Configurator
Section 6.12.4.
Note: This firmware version does not allow configuring scheduled data points on local BACnet
schedulers. The feature is currently limited to CEA-709 schedulers.
Figure 30: Re-configure scheduled data points on the Web UI.
4.2.15 Calendar
The Web interface provides the calendar page to edit its calendars at run-time, i.e., change
the exception days. The calendar main page displays all available calendars. Click on the
Version 3.2 LOYTEC electronics GmbH
Page 40
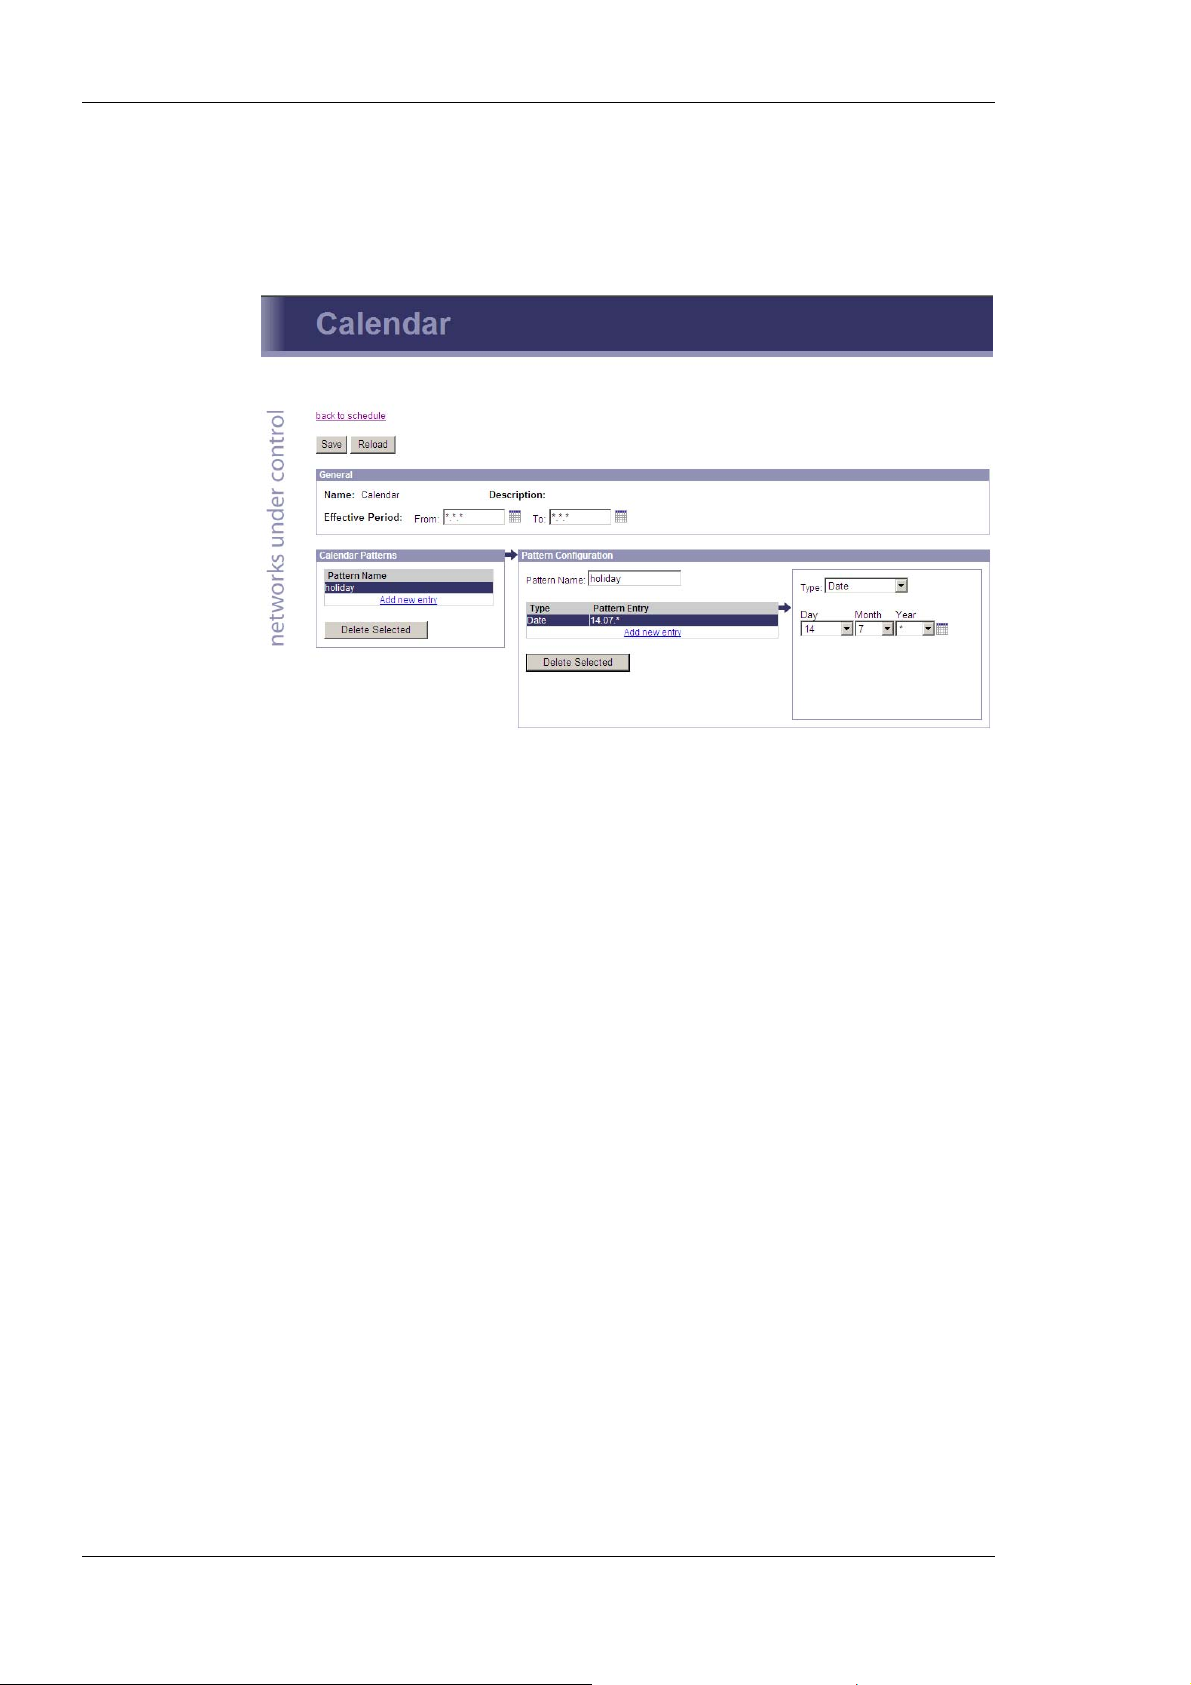
L-Gate User Manual 40 LOYTEC
calendar to be edited. This opens the calendar configuration page. An example is shown in
Figure 31.
The effective period defines when this calendar shall be in effect. Leave From and To at
‘*.*.*’ to make this calendar always in-effect. Otherwise enter dates, such as ’30.1.2000’.
4.2.16 Alarm
Figure 31: Calendar Configuration Page
On the remainder of this page work from left to right. Click on a calendar pattern or create
a new calendar pattern by clicking Add new entry. A calendar pattern defines a set of
pattern entries, which defines the actual dates or date ranges. In the example in Figure 31
the calendar pattern Holidays is selected.
In the Pattern Configuration box, the calendar pattern’s name can be edited. It also lists
the entries. New entries can be added by clicking Add new entry. Existing entries can be
selected and edited in the box on the right-hand side. In the example in Figure 31 the date
14.7.* is selected, which means “The 14.7. of every year”. Other entry types such as Date
Range and Week-and-Day can be selected. See Section 5.4.3 for more information about
defining exception dates.
The Web interface provides the alarm page to view the currently pending alarms of its
alarm data points. The alarm main page displays all available alarm data points. Alarm
objects which have active alarms are displayed in red. Click on the alarm object to be
viewed. This opens the alarm summary page. An example is shown in Figure 31.
Version 3.2 LOYTEC electronics GmbH
Page 41
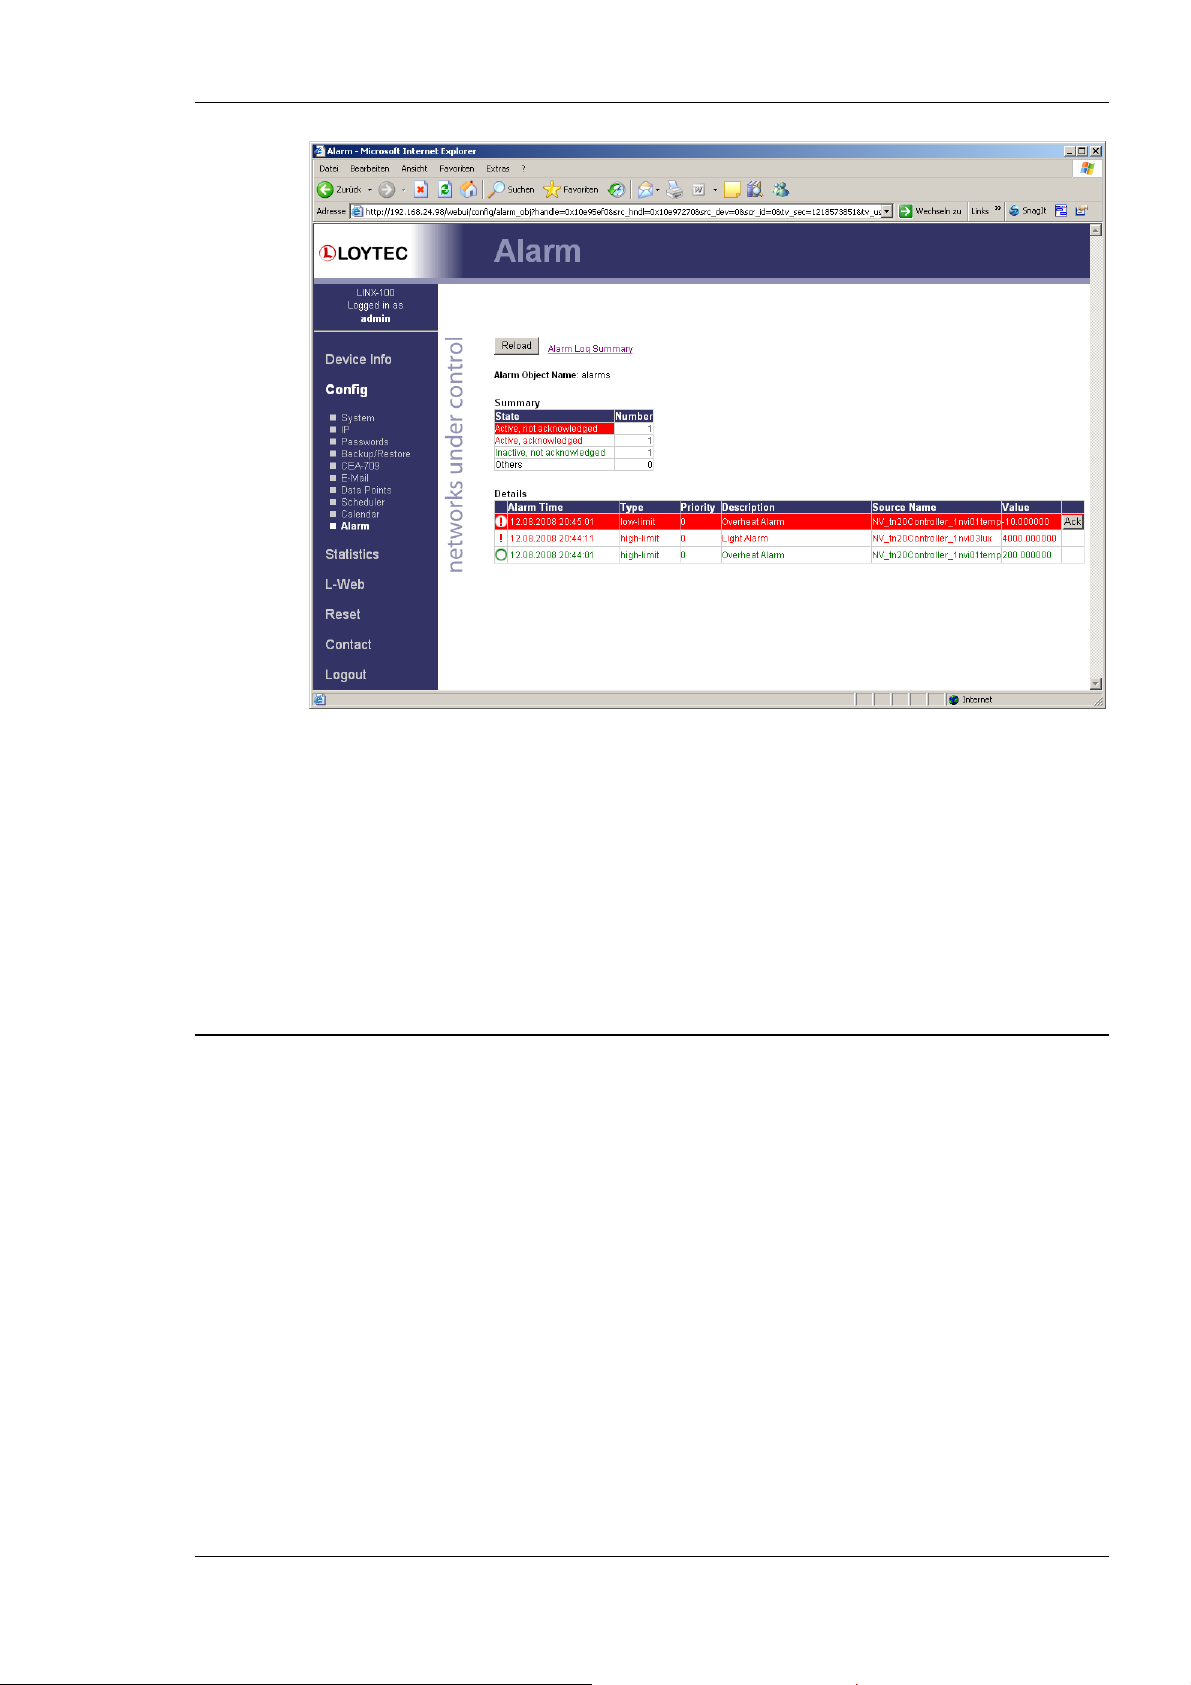
L-Gate User Manual 41 LOYTEC
Active alarms are highlighted red. Inactive alarms which have not been acknowledged are
rendered in green. Alarms that can be acknowledged have an Ack button. Press on the Ack
button to acknowledge the alarm. Depending on the technology, this and older alarm
records will be acknowledged. Acknowledged, active alarms are rendered in red. Click on
Reload to refresh your alarm list.
Inactive alarms that have been acknowledged disappear from the list. To record historical
information about those alarms, the alarm log must be used. See Section 4.3.8 for the alarm
log Web interface.
4.3 Device Statistics
The device statistics pages provide advanced statistics information about the CEA-852
device, BACnet device, and the Ethernet interface.
4.3.1 System Log
The System Log page prints all messages stored in the system log of the device. An
example is shown in Figure 38. This log data is important for trouble-shooting. It contains
log entries for reboots and abnormal operating conditions. When contacting LOYTEC
support, have a copy of this log ready.
Figure 32: Alarm Summary Page
Version 3.2 LOYTEC electronics GmbH
Page 42
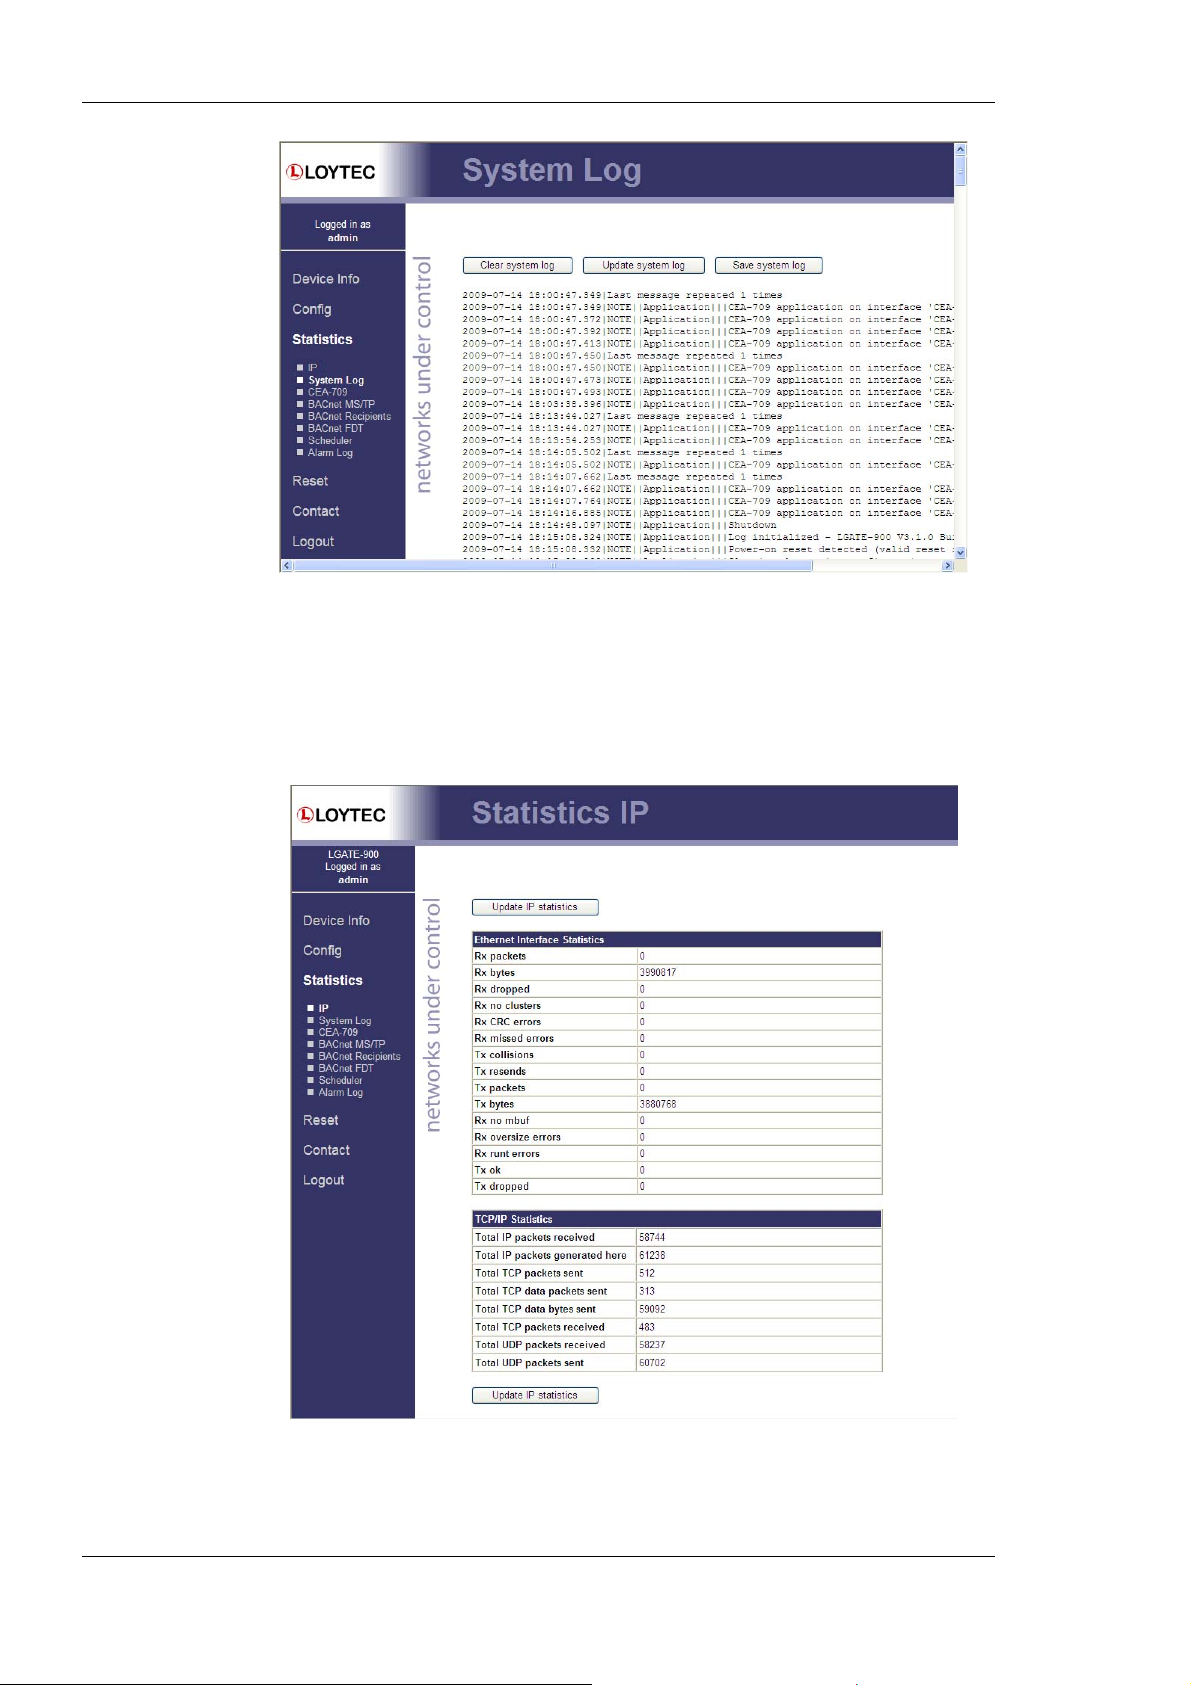
L-Gate User Manual 42 LOYTEC
Figure 33: System Log Page.
4.3.2 IP Statistics
Figure 34 shows the IP statistics page. It allows finding possible problems related to the IP
communication. Specifically any detected IP address conflicts are displayed (if the
L-Gate’s IP address conflicts with a different host on the network).
Figure 34: IP Statistics Page
Version 3.2 LOYTEC electronics GmbH
Page 43
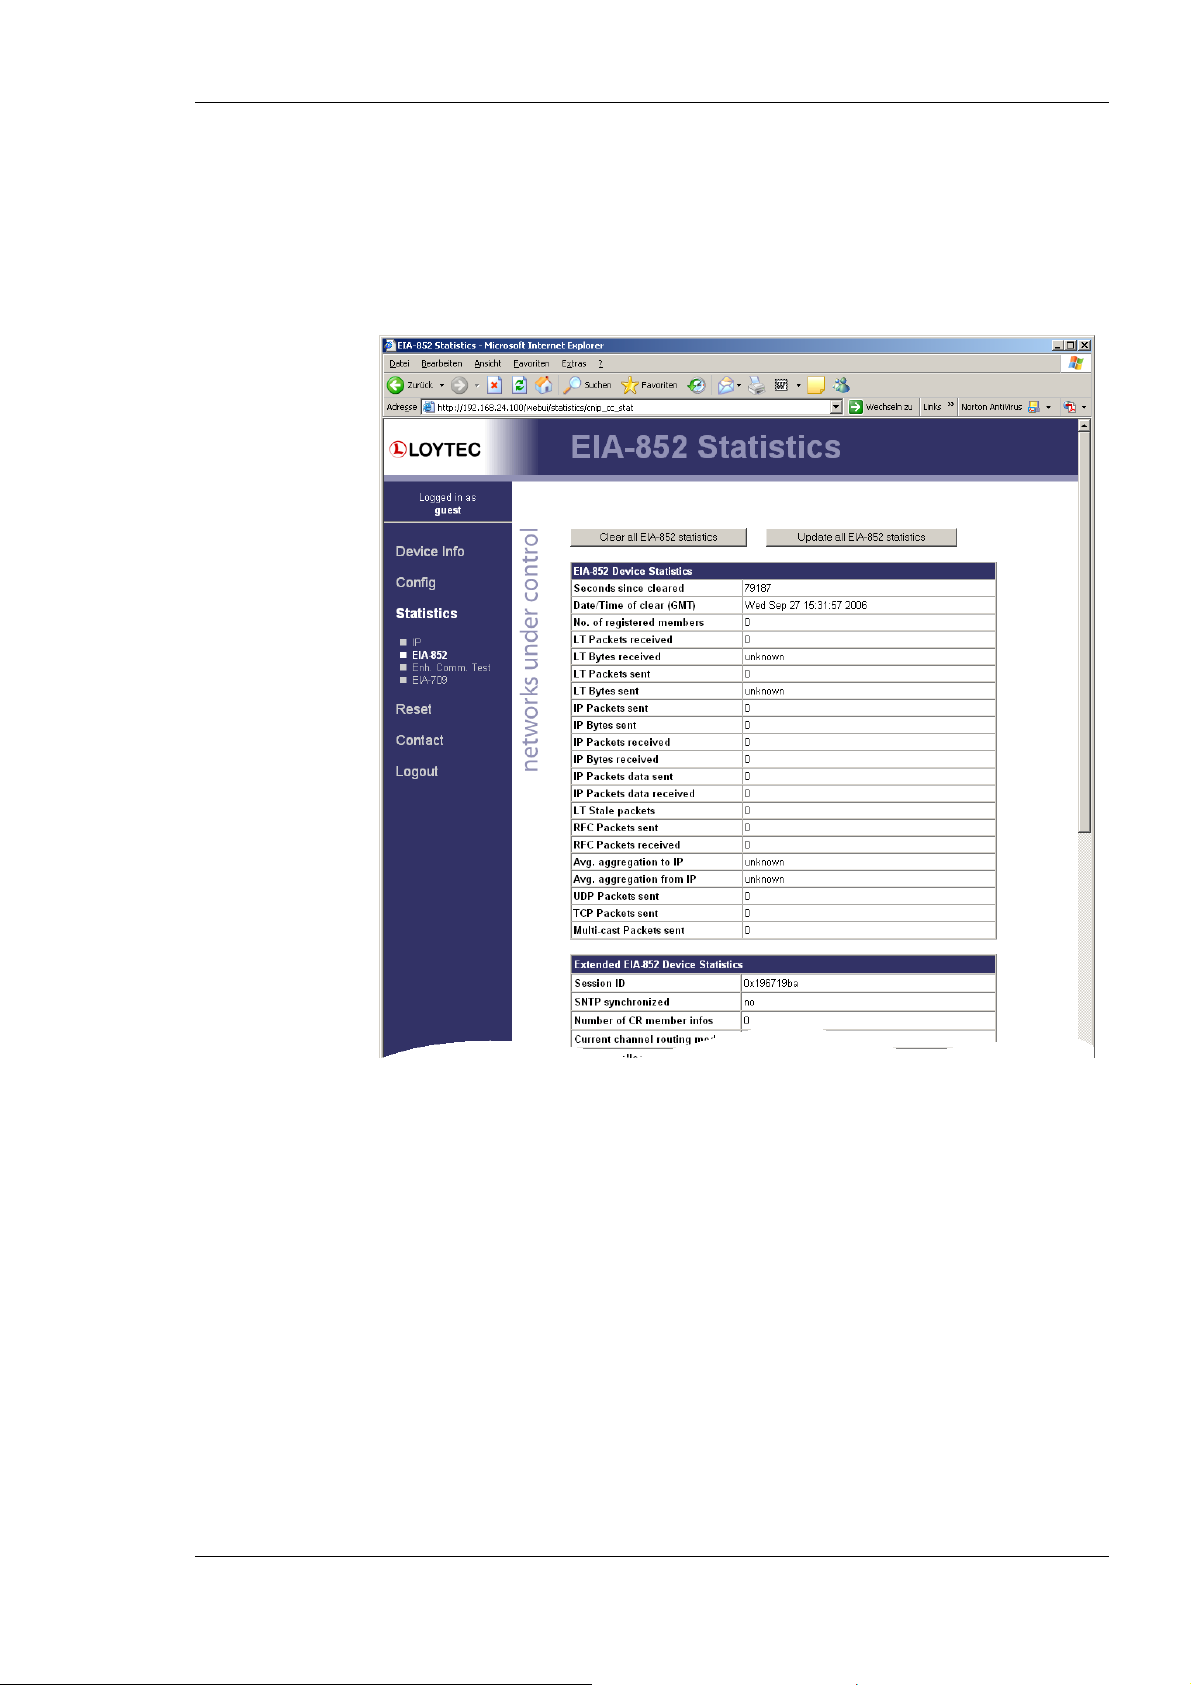
L-Gate User Manual 43 LOYTEC
4.3.3 CEA-852 Statistics
The CEA-852 statistics page displays the statistics data of the CEA-852 device on the
device. The upper part of the CEA-852 statistics page is depicted in Figure 35. To update
the statistics data press the button Update all CEA-852 statistics. To reset all statistics
counters to zero, click on the button Clear all CEA-852 statistics. The field Date/Time of
clear will reflect the time of the last counter reset.
Figure 35: Part of the CEA-852 Statistics Page
4.3.4 Enhanced Communications Test
The Enhanced Communications Test allows testing the CEA-852 communication path
between the CEA-852 device on the L-Gate and other CEA-852 devices as well as the
configuration server. The test thoroughly diagnoses the paths between individual members
of the IP channel and the configuration server in each direction. Port-forwarding problems
are recognized. For older devices or devices by other manufacturers, which do not support
the enhanced test features, the test passes as soon as a device is reachable, but adds a
comment, that the return path could not be tested. A typical output is shown in Figure 36.
Version 3.2 LOYTEC electronics GmbH
Page 44
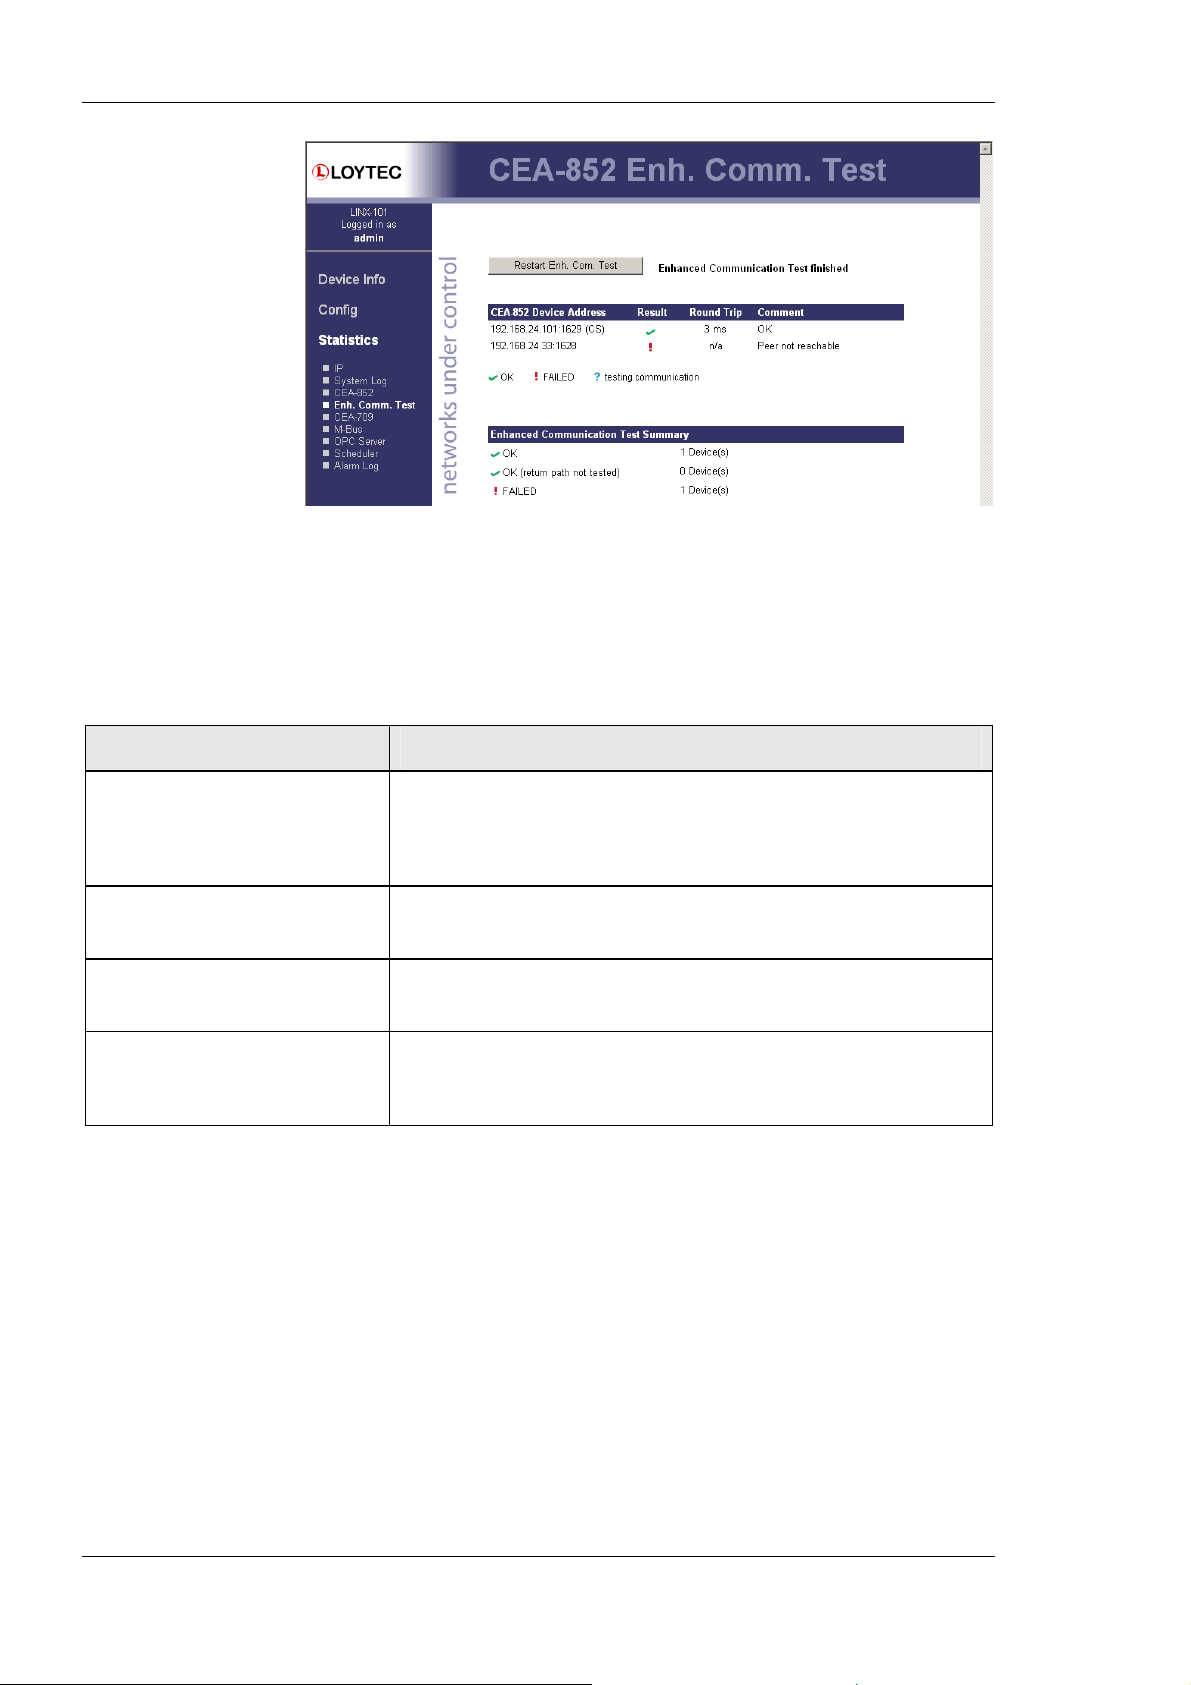
L-Gate User Manual 44 LOYTEC
Figure 36: Enhanced Communication Test Output
The Round Trip Time (RTT) is measured as the time a packet sent to the peer device needs
to be routed back to the device. It is a measure for general network delay. If the test to a
specific member fails, a text is displayed to describe the possible source of the problem.
The reasons for failure are summarized in Table 6.
Text displayed (Web icon) Meaning
OK, Return path not tested (green
checkmark)
Not reachable/not supported
(red exclamation)
Local NAT config. Error
(red exclamation)
Peer not reachable
(red exclamation)
Displayed for a device which is reachable but which does not support the
feature to test the return path (device sending to this CEA-852 device).
Therefore a potential NAT router configuration error cannot be detected. If
the tested device is an L-IP, it is recommended to upgrade this L-IP to 3.0 or
higher.
This is displayed for the CS if it is not reachable or the CS does not support
this test. To remove this uncertainty it is recommended to upgrade the L-IP to
3.0 or higher.
This is displayed if the CEA-852 device of the LINX-10X is located behind a
NAT router or firewall, and the port-forwarding in the NAT-Router (usually
1628) or the filter table of the firewall is incorrect.
Displayed for a device, if it is not reachable. No RTT is displayed. The device
is either not online, not connected to the network, has no IP address, or is not
reachable behind its NAT router. Execute this test on the suspicious device to
determine any NAT configuration problem.
Table 6: Possible Communication Problems.
4.3.5 CEA-709 Statistics
The CEA-709 statistics page displays statistics data of the CEA-709 port on the L-Gate as
shown in Figure 37. This data can be used to troubleshoot networking problems. To update
the data, click on the button Update CEA-709 statistics.
Version 3.2 LOYTEC electronics GmbH
Page 45
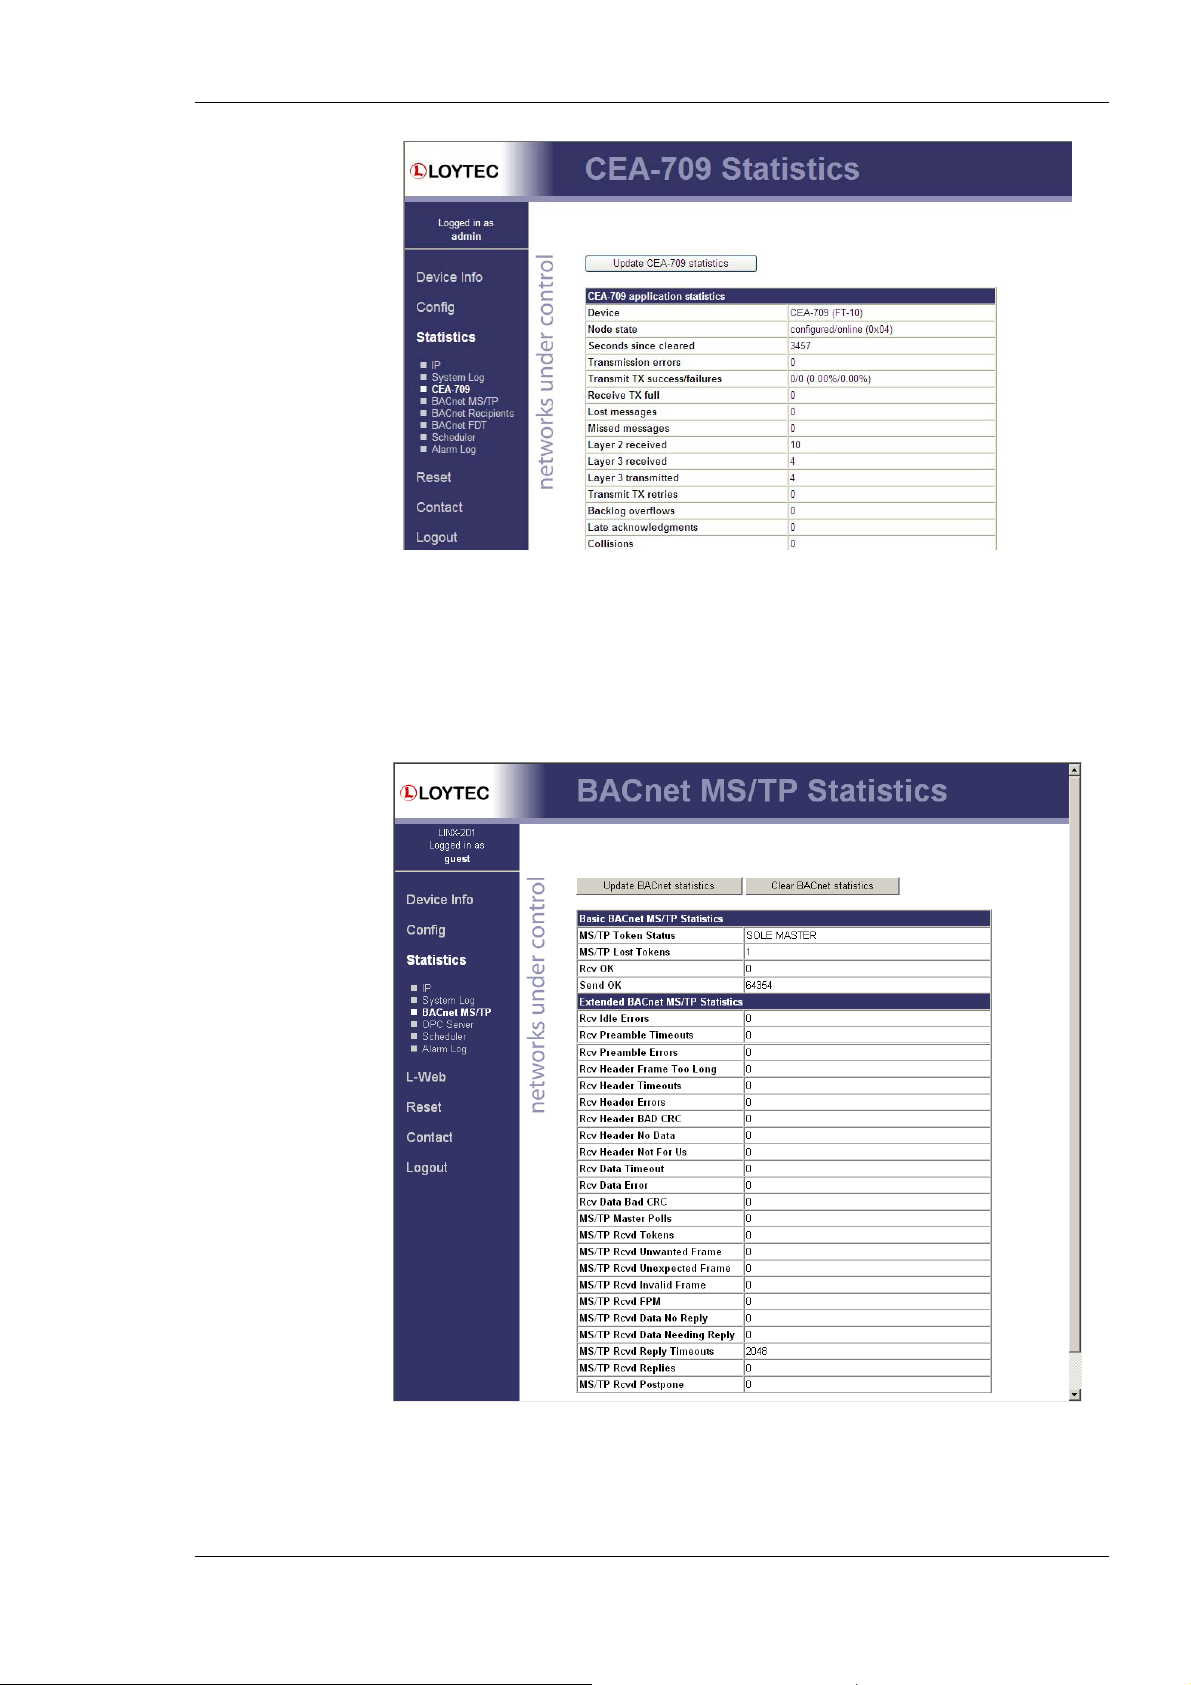
L-Gate User Manual 45 LOYTEC
Figure 37: CEA-709 Statistics Page
4.3.6 BACnet MS/TP Statistics
The BACnet MS/TP statistics page is only available, when the BACnet port is co nfigured
for the MS/TP data link layer (see Section 4.2.7). An example is shown in Figure 38. The
separated part on the top of the table contains the most important statistics data.
Figure 38: BACnet MS/TP Statistics Page
The MS/TP token status reports the current token passing state. In state OK, the token is
circulating between the masters. This is the normal state, when multiple masters are on the
MS/TP network. The state SOLE MASTER is the normal state when the device is the only
Version 3.2 LOYTEC electronics GmbH
Page 46
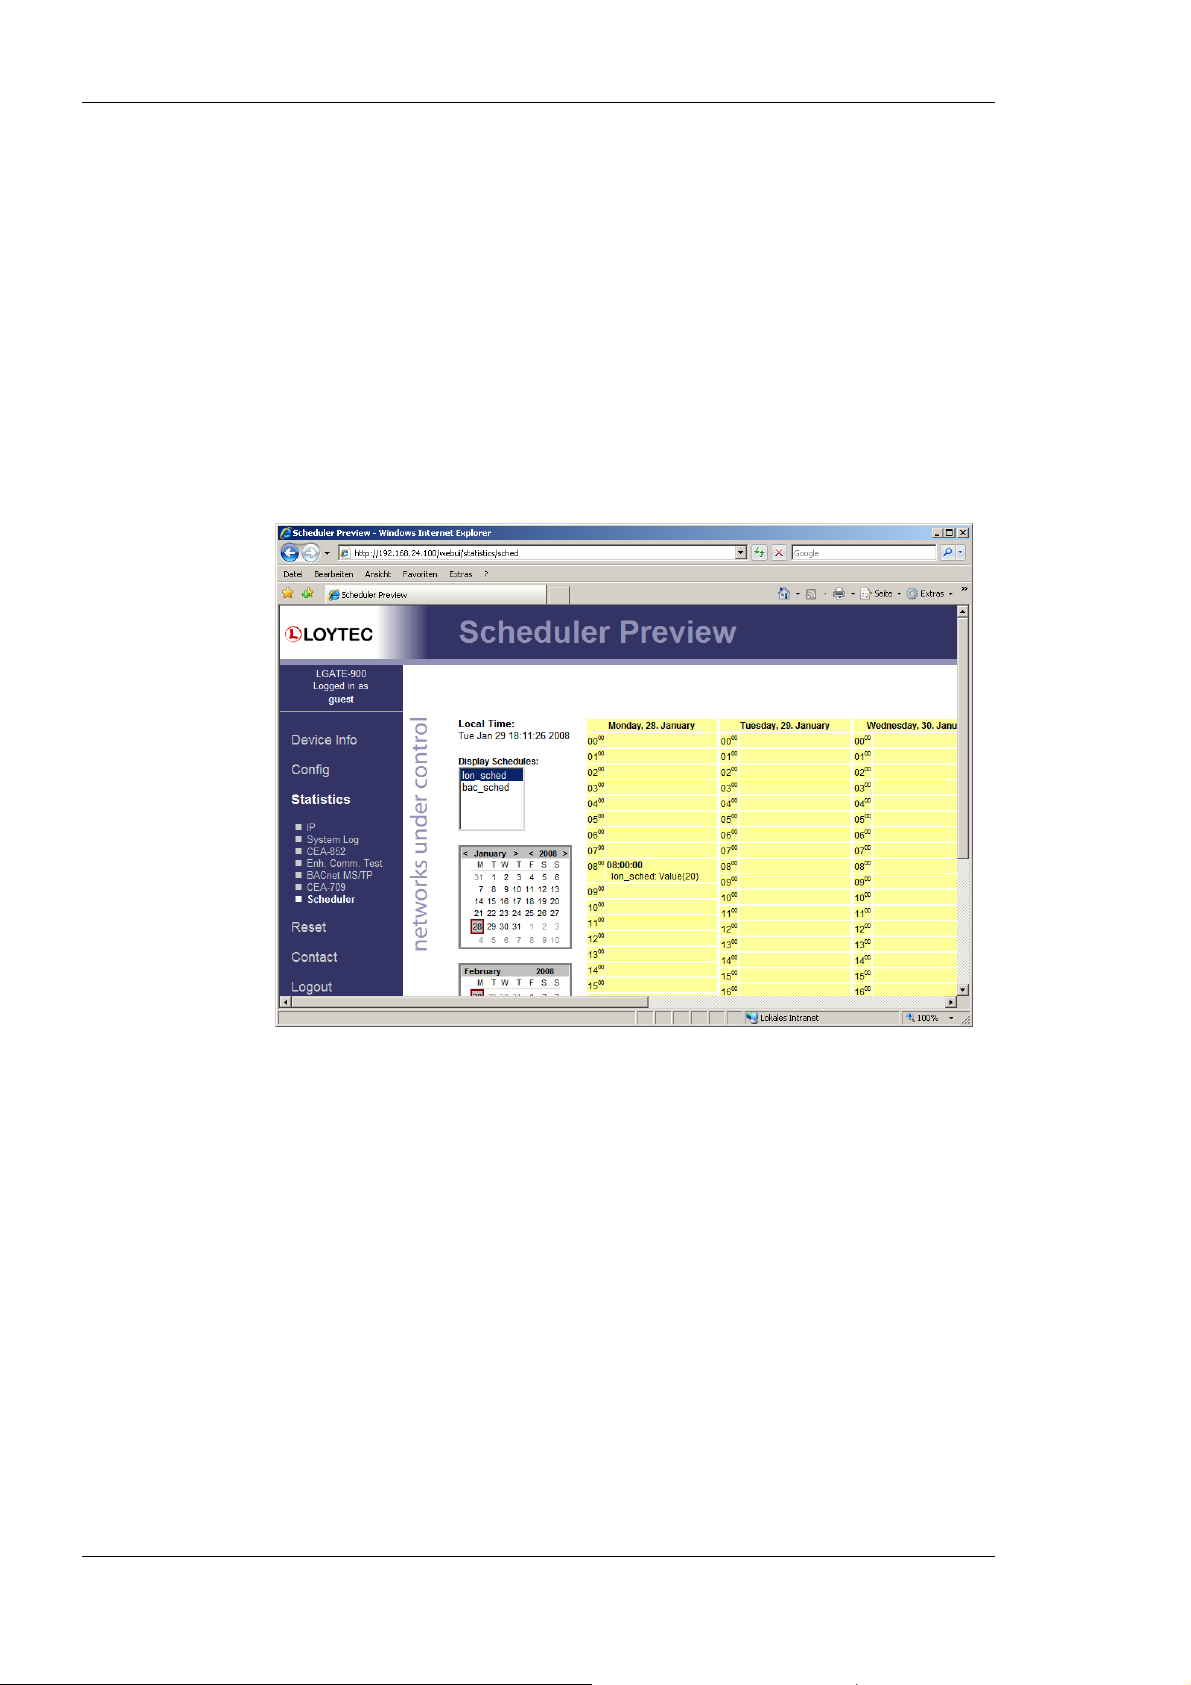
L-Gate User Manual 46 LOYTEC
master on the network. If there are multiple masters on the network, this state is a hint to a
broken cable. In state TOKEN LOST, the token is currently not circulating.
The counter MS/TP lost tokens is an indicator for communication problems on the
MST/TP network. If it increases, there is a cabling, ground, or termination problem. The
counters Rcv OK and Send OK reflect the number of successfully received or transmitted
MS/TP frames. Check these counters to verify that communication is flowing on the
MS/TP segment.
4.3.7 Scheduler Statistics Page
The scheduler statistics page provides an overview of what is scheduled at which day and
which time. In the Display Schedules list select a single schedule to view its scheduled
values and times. Use the multi-select feature to get the overview of more schedules. An
example is shown in Figure 39.
Figure 39: Scheduler Statistics Page
4.3.8 Alarm Log Page
The alarm log page provides an overview of all alarm logs on the system. Click on one of
the links to view a specific alarm log. Each alarm log contains a historical log of alarm
transitions. When an inactive and acknowledged alarm disappears from the alarm summary
page (live list), the alarm log contains this last transition and maintains it over a reboot. An
example is shown in Figure 40.
To refresh the alarm log contents click on the Reload button. Currently active alarms
cannot be acknowledged in this historical view. Follow the link to the attached alarm
objects to get to the respective live lists, where alarms can be acknowledged on the Web
interface (see Section 4.2.16).
The alarm log contents can be uploaded from the device in a CSV formatted file. Click on
the button Upload Alarm Log to upload the current log. To clear the log, press the button
Clear Alarm Log. Please note, that this permanently purges all historical alarm log data of
this alarm log.
Version 3.2 LOYTEC electronics GmbH
Page 47
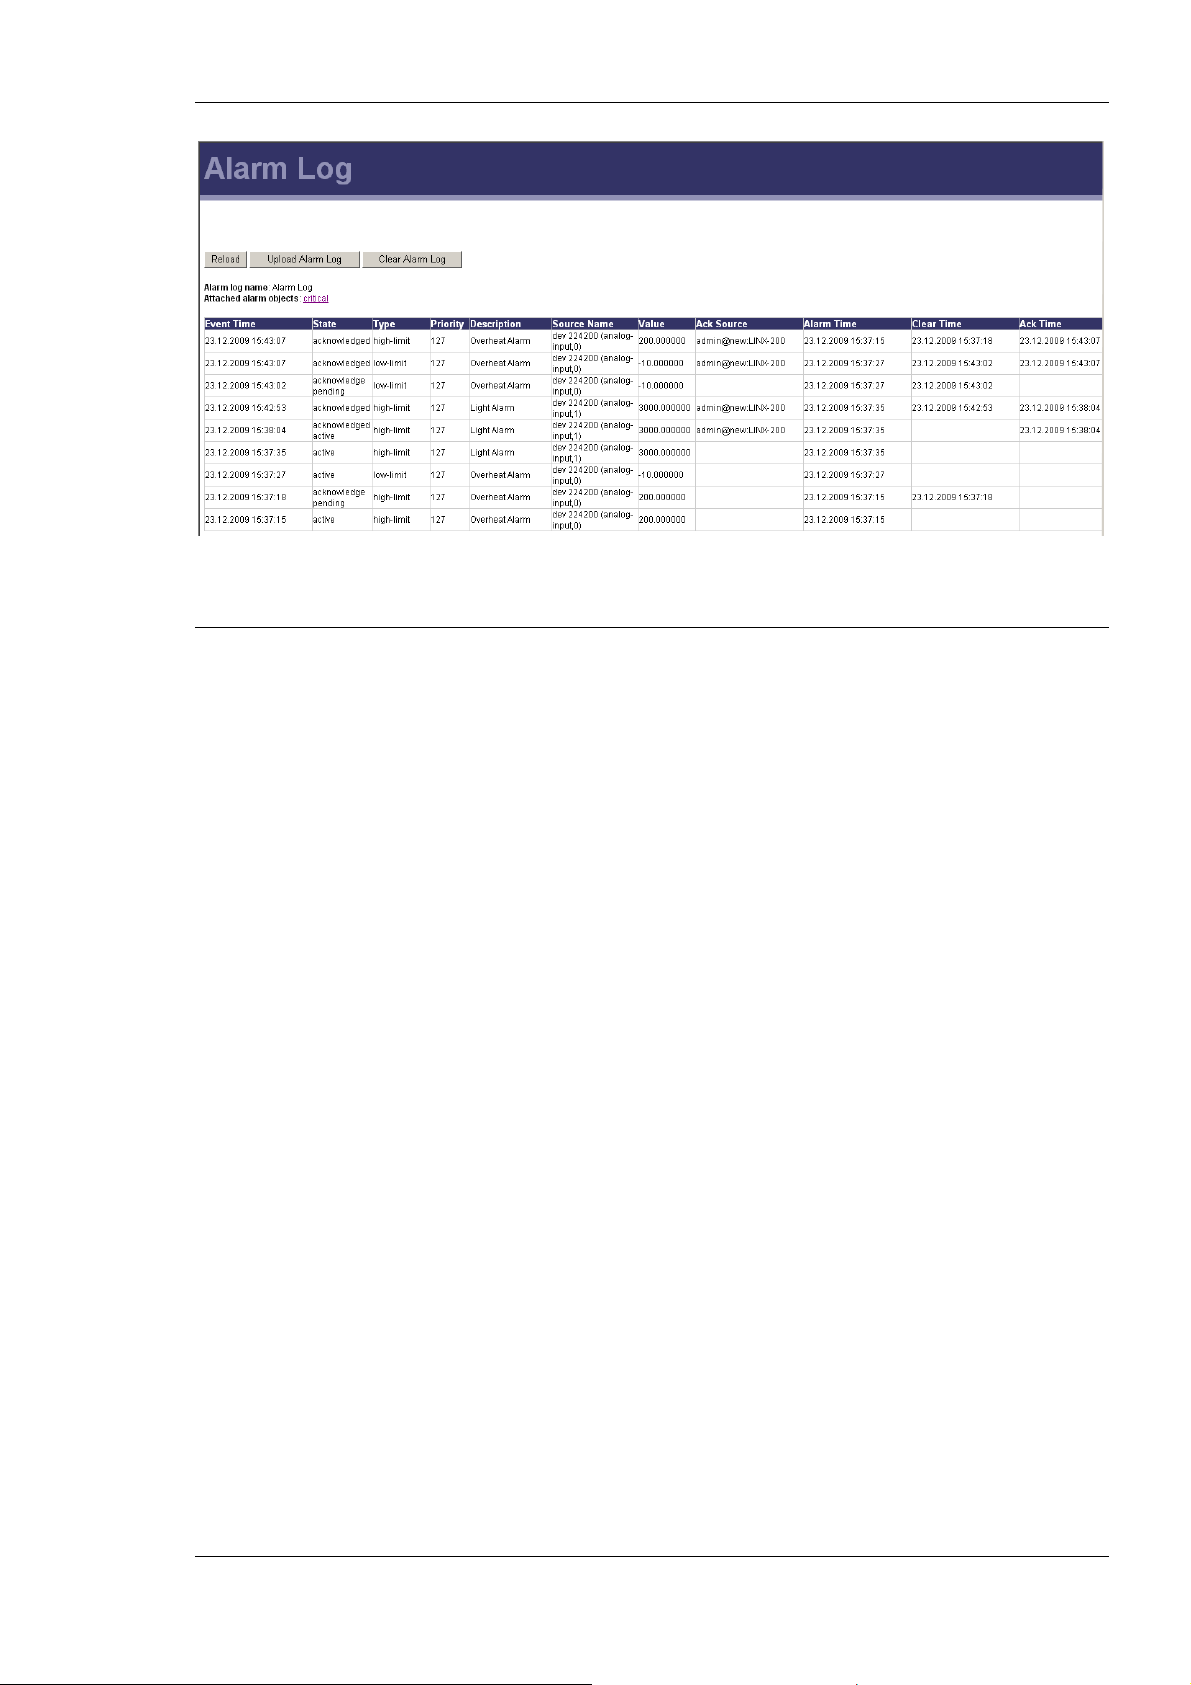
L-Gate User Manual 47 LOYTEC
Figure 40: Alarm Log Page.
4.4 Reset, Contact, Logout
The menu item Reset allows two essential operations:
• Rebooting the L-Gate from a remote location, or
• resetting the data point configuration from a remote location. This option clears all
data points and the entire port configuration. It leaves the IP settings intact.
The Contact item provides contact information and a link to the latest user manual and the
latest firmware version.
The Logout item closes the current session.
Version 3.2 LOYTEC electronics GmbH
Page 48

L-Gate User Manual 48 LOYTEC
5 Concepts
5.1 CEA-709/BACnet Gateway
The operating principle of the L-Gate is to connect data points of one network technology
to data points of another technology. Data points in the CEA-709 network are known as
network variables (NVs). For more information on this technology refer to Section 5.5.
Data points in the BACnet technology are known as BACnet server objects. They have a
specific type (e.g. analog input or binary output) and a set of properties, which describe the
data point more closely. The actual value is stored in the “Present_Value”. For more
information on this technology refer to Section 5.6.
The typical task in configuring the L-Gate consists of the fo llowing steps:
1. Selecting the data points of the network to be mapped (e.g., select the NVs in the
CEA-709 network nodes or create new NVs)
2. Select or create matching counterparts of the other technology (e.g., create matching
BACnet objects)
3. Create connections between the data points (e.g. connect NVs and BACnet objects).
The connection is the central part of the gateway functionality. It d efines, wh ich data points
are mapped to which data points. Refer to Section 5.3 about the nature of connections in
the device.
5.2 Data Points
5.2.1 Overview
Data points are part of the fundamental device concept to model process data. A data point
is the basic input/output element on the device. Each data point has a value, a data type, a
direction, and a set of meta-data describing the value in a semantic context. Each data point
also has a name and a description. The entire set of data points is organized in a hierarchy.
At the data point level, the specific technological restrictions are abstracted and hidden
from the user. Working with different technologies at this level involves common workflows for all supported technologies.
The direction of a data point is defined as the “network view” of the data flow. This means,
an input data point obtains data from the network. An output data point sends data to the
network. This is an important convention to remember as different technologies may define
other direction semantics.
Version 3.2 LOYTEC electronics GmbH
Page 49

L-Gate User Manual 49 LOYTEC
The basic classes of data points are:
• Analog: An analog data point typically represents a scalar value. The associated data
type is a double precision machine variable. Meta-data for analog data points include
information such as value range, engineering units, precision, and resolution.
• Binary: A binary data point contains a Boolean value. Meta-data for binary data
points includes human-readable labels for the Boolean states (i.e., active and inactive
texts).
• Multi-state: A multi-state data point represents a discrete set of states. The associated
data type is a signed integer machine variable. Each state is identified by an integer
value, the state ID. State IDs need not be consecutive. Meta-data of a multi-state data
point includes human-readable descriptions for the individual states (state texts) and
the number of available states.
• String: A string data point contains a variable-length string. The associated data type
is a character string. International character sets are encoded in UTF-8. A string data
point does not include any other meta-data.
• User: A user data points contains un-interpreted, user-defined data. The data is stored
as a byte array. A user data point does not include any other meta-data. This type of
data point also serves as a container for otherwise structured data points and represents
the entirety of the structure.
5.2.2 Timing Parameters
Apart from the meta-data, data points can be configured with a number of timing
parameters. The following properties are available to input or output data points,
respectively:
• Pollcycle (input): The value is given in seconds, which specifies that this data point
periodically polls data from the source.
• Receive Timeout (input): This is a variation on the poll cycle. When receive timeout
is enabled, the data point actively polls the source unless it receives an update. For
example, if poll cycle is set to 10 seconds and an update is received every 5 seconds,
no extra polls are sent.
• Poll-on-startup (input): If this flag is set, the data point polls the value from the
source when the system starts up. Once the value has been read, no further polls are
sent unless a poll cycle has been defined.
• Minimum Send Time (output): This is the minimum time that elapses between two
consecutive updates. If updates are requested more often, they are postponed and the
last value is eventually transmitted after the minimum send time. Use this setting to
limit the update rate.
• Maximum Send Time (output): This is the maximum time without sending an update.
If no updates are requested, the last value is transmitted again after the maximum send
time. Use this setting to enable a heart-beat feature.
5.2.3 Default Values
Default values can be defined for data points when needed. The value of a data point will
be set to the defined default value, if no other value source initializes the data point.
Default values are beneficial, if certain input data points are not used by the network and
need a pre-defined value, e.g., for calculations. Default values are overridden by persistent
values or values determined by poll-on-startup.
Version 3.2 LOYTEC electronics GmbH
Page 50

L-Gate User Manual 50 LOYTEC
5.2.4 Persistency
Data point values are by default not persistent. This means that their value is lost after a
power-on reset. There exist different strategies for initializing data points with an
appropriate value after the device has started.
For input data points, the value can be actively polled from the network when starting up.
Use the Poll-on-Startup feature for this behavior. Polling the network values has the
advantage that intermediate changes on the network are reflected. An input data point can
be made persistent, if the last received value shall be available after a power-on reset before
a poll-on-startup completes. This can be beneficial, if the remote device is temporarily
offline and the last value is considered usable.
For output data points, the value can be restored after starting up by the application. For
example, if the output data point’s value is determined by an input data point and a math
object, or the output data point is in a connection with an input, the input can poll its value
on startup. If the output data point has no specific other value source, e.g., it is a
configuration parameter set by the user, it can be made persistent.
To make a data point persistent, enable the Persistent property of the respective data point.
The persistency option is only available for the base data point classes analog, binary,
multi-state, string and user. More complex objects such as calendars, sch edules, etc., have
their own data persistency rules.
For structured data points, only all or none of the structure members can be made
persistent. The configuration of the top-level data point, which represents the entire
structure, serves as a master switch. Setting the top-level data point to be persistent enables
persistency for all sub-data points. Clearing it disables persistency for all sub-data points.
5.2.5 Behavior on Value Changes
The value of a data point can change, if it is written by the ap plication or o ver the netwo rk.
For all data points (input and output) the application (connection, user control, etc.) can be
notified, when the value is written to. The property Only notify on COV defines, whether
the notification is done with each write or only if the value changes (change-of-value,
COV). If only notify on COV is disabled, writing the same value multiple times will result
in multiple notifications.
When the value of an output data point is updated, an update is usually sent out onto the
network. The property Send-On-Delta decides how the update is reflected on the network.
If send-on-delta is inactive, each update of the value is sent. If send-on-delta is active,
value changes only are sent. The send-on-delta property is only valid for output data points.
For analog data points, the COV or send-on-delta takes an extra argument, which specifies
by what amount the value must change to regard it as a change for action. Both, COV and
send-on-delta for analog data points check the Analog Point COV Increment property. A
change is detected, if the value increment is bigger or equal to the specified increment. If
the property is zero, all updates are considered.
5.2.6 Custom Scaling
Custom scaling is applied to all analog data points when they communicate values to or
from the network. This feature can be used, if a network data point has engineering units
not suitable for the application (e.g., grams instead of kilograms). The scaling is linear and
applied in the direction from the network to the application as:
A = k N + d,
where N is the network value, k the custom scaling factor, d the custom scaling offset, and
A the application value. When sending a value to the network, the reverse scaling is
Version 3.2 LOYTEC electronics GmbH
Page 51

L-Gate User Manual 51 LOYTEC
applied. If this property is enabled, the analog values are pre-scaled from the technology to
the data point. The custom scaling is in addition to any technology-specific scaling factors
and can be applied regardless of the network technology.
5.2.7 System Registers
The L-Gate provides a number of built-in system registers. They are present without a data
point configuration. The system registers, such as the System time or the CPU load, can be
exposed to the OPC server. By default, all system registers are checked for being exposed
to OPC. To reduce the number of needed OPC tags, you may deselect certain system
registers, which are not useful in a specific project.
System register can also serve as a testing setup for the OPC XML-DA communication
without a network data point configuration. The System Time register is updated every
second and may serve for testing subscriptions. The Authentication Code register can be
used to verify writing to OPC tags.
5.2.8 User Registers
The L-Gate can be configured to contain user registers. In contrast to system registers,
these are only available as a part of the data point configuration. User registers are data
points on the device that do not have a specific technological representation on the control
network. Thus, they are not accessible over a specific control network technology.
A register merely serves as a container for intermediate data (e.g., results of math objects).
The register can have the following, basic data types:
• Double: A register of base type double is represented by an analog data point. It can
hold any scalar value. No specific scaling factors apply.
• Signed Integer: A register of base type signed integer is represented by a multi-state
data point. This register can hold a set of discrete states, each identified by a signed
stats ID.
• Boolean: A register of base type Boolean is represented by a binary data point. This
register can hold a Boolean value.
Since a register has no network direction, it can be written and read. Therefore, two data
points are generated for each register, one for writing the register (output) and one for
reading the register (input). A suffix is added to the register name to identify the respective
data point. For example, the register MyValue will have two data points generated for:
MyValue_Read and MyValue_Write.
5.2.9 Math Objects
Math objects are advanced application objects that can execute mathematical operations on
data points. A math object takes a number of input data points (variables v
calculates a result value according to a specified formula. The result is written to a set of
output data points. The formula is calculated each time one of the input data points updated
its value. The formula is only evaluated if all of the input data points have a valid value
(i.e., don’t show the invalid value status).
, v2, …, vn) and
1
5.3 Connections
With the use of connections, data points can interact with each other. Connections specify
which data points exchange values with each other. Both types of connections – “1:n” and
“m:1” connections – are supported. The single data point is referred to as the hub data
point, whereas the other data points are the target data points.
This means, the following connections are possible:
Version 3.2 LOYTEC electronics GmbH
Page 52

L-Gate User Manual 52 LOYTEC
• 1 input data point is connected to n output data points,
• m inputs data points are connected to 1 output data point.
The most common connection will be the 1:1 connection. This is the type of connection
that is auto-generated by the Configurator software. Other types must be created manually
in the Configurator.
In the 1:n connection the input value is distributed to all n output data points. In the m:1
connection, the most current input value is written to the output data point. When polling
the output data point in poll-through mode (maximum cache age is set on the output), the
value from the first input data point is polled.
Connections can connect data points of different technologies with each other (also mixed
among the target data points) but are restricted to the same class of data points. This means
only data points of class analog can exchange values within a connection.
For certain classes of data points, additional restrictions exist:
• Analog: The value range is capped on the output data points. This means, if the input
value in the hub does not fit into the range of an output data point, the value is capped
to the biggest or smallest allowed value.
• Binary: No special restrictions exist.
• Multi-state: Only multi-state data points of an equal number of states can be placed
into a connection. The actual state Ids need not be equal. They are ordered and the n-th
state is propagated over a connection. For example, the 2nd state on the hub has the
state ID ‘2’, while on the target the 2nd state has the state ID ‘0’.
• String: No special restrictions exist.
• User: Only user data points of the same length can be placed in a connection.
5.4 AST Features
5.4.1 Alarming
The alarming architecture comprises a number of entities. Objects that monitor values of
data points and generate alarms depending on an alarm condition are called alarm sources.
The alarms are reported to an alarm server on the same device. The alarm server maintains
a list of alarm records, called the alarm summary. The alarm server is the interface to
access the local alarms. This can be done over the network or the Web UI.
An alarm record contains the information about the alarm. This includes information about
the alarm time, the source of the alarm, an alarm text, an alarm value, an alarm type, an
alarm priority, and an alarm state. An alarm record undergoes a number of state changes
during its life-cycle. When the alarm occurs, it is active. When the alarm condition
subsides, the alarm becomes inactive. Active alarms can be acknowledged by an operator.
Then they become active acknowledged. Active alarms can also become inactive, but an
acknowledgement is still required. Then they become ack-pending. When an alarm is
inactive and was acknowledged it disappears from the alarm summary.
Other devices can access the alarm information of an alarm server. These devices are alarm
clients. They register with the alarm server and get notified about changes to the alarm
summary. Alarm clients can be used to display the current alarm summary and
acknowledge alarms.
Depending on the underlying technology, some restrictions to the available alarm
information and acknowledgement behavior may exist.
Version 3.2 LOYTEC electronics GmbH
Page 53

L-Gate User Manual 53 LOYTEC
5.4.2 Historical Alarm Log
The alarm summary of the alarm objects contains a live list of currently active and
acknowledge-pending alarms. As soon as an alarm becomes inactive and has been
acknowledged, it disappears from the alarm summary. To store a historical log of alarm
transitions an alarm log is utilized. An alarm log can log transitions of one or more alarm
objects.
The alarm log is always local and stored as a file on the device. The size of an alarm log is
configurable. The alarm log operates as a ring buffer. As soon as its size limit is reached,
the oldest alarm log records are overwritten by newer alarm transitions. The alarm log is
available on the Web UI or can be uploaded from the device as a CSV file. The CSV file
can also be used as an e-mail attachment.
5.4.3 Scheduling
Schedulers are objects that schedule values of data points on a timely basis. A scheduler
object is configured by which data points it shall schedule. This configuration is done by
the system engineer once when the system is designed. The configuration of the times and
values that shall be scheduled is n ot part of that initial configuration and may be changed
later. This distinction has to be kept in mind.
A scheduler object sets its data points to pre-defined values at specified times. The function
of the scheduler is state-based. This means, that after a value is scheduled, the scheduler
maintains its state for this value. It can re-transmit the scheduled values as appropriate
(e.g., when rebooting). The pre-defined values are called /value presets/. A value preset
contains one or more values under a single label (e.g., "day" schedules the values {20.0,
TRUE, 400}).
Which value preset is scheduled at what time is defined through a daily schedule. The daily
schedule defines the times and value presets in a 24-hour period. A schedule typically
contains daily schedules for the weekdays Monday through Sunday. See Figure 41 for an
example of a daily schedule.
Version 3.2 LOYTEC electronics GmbH
Page 54
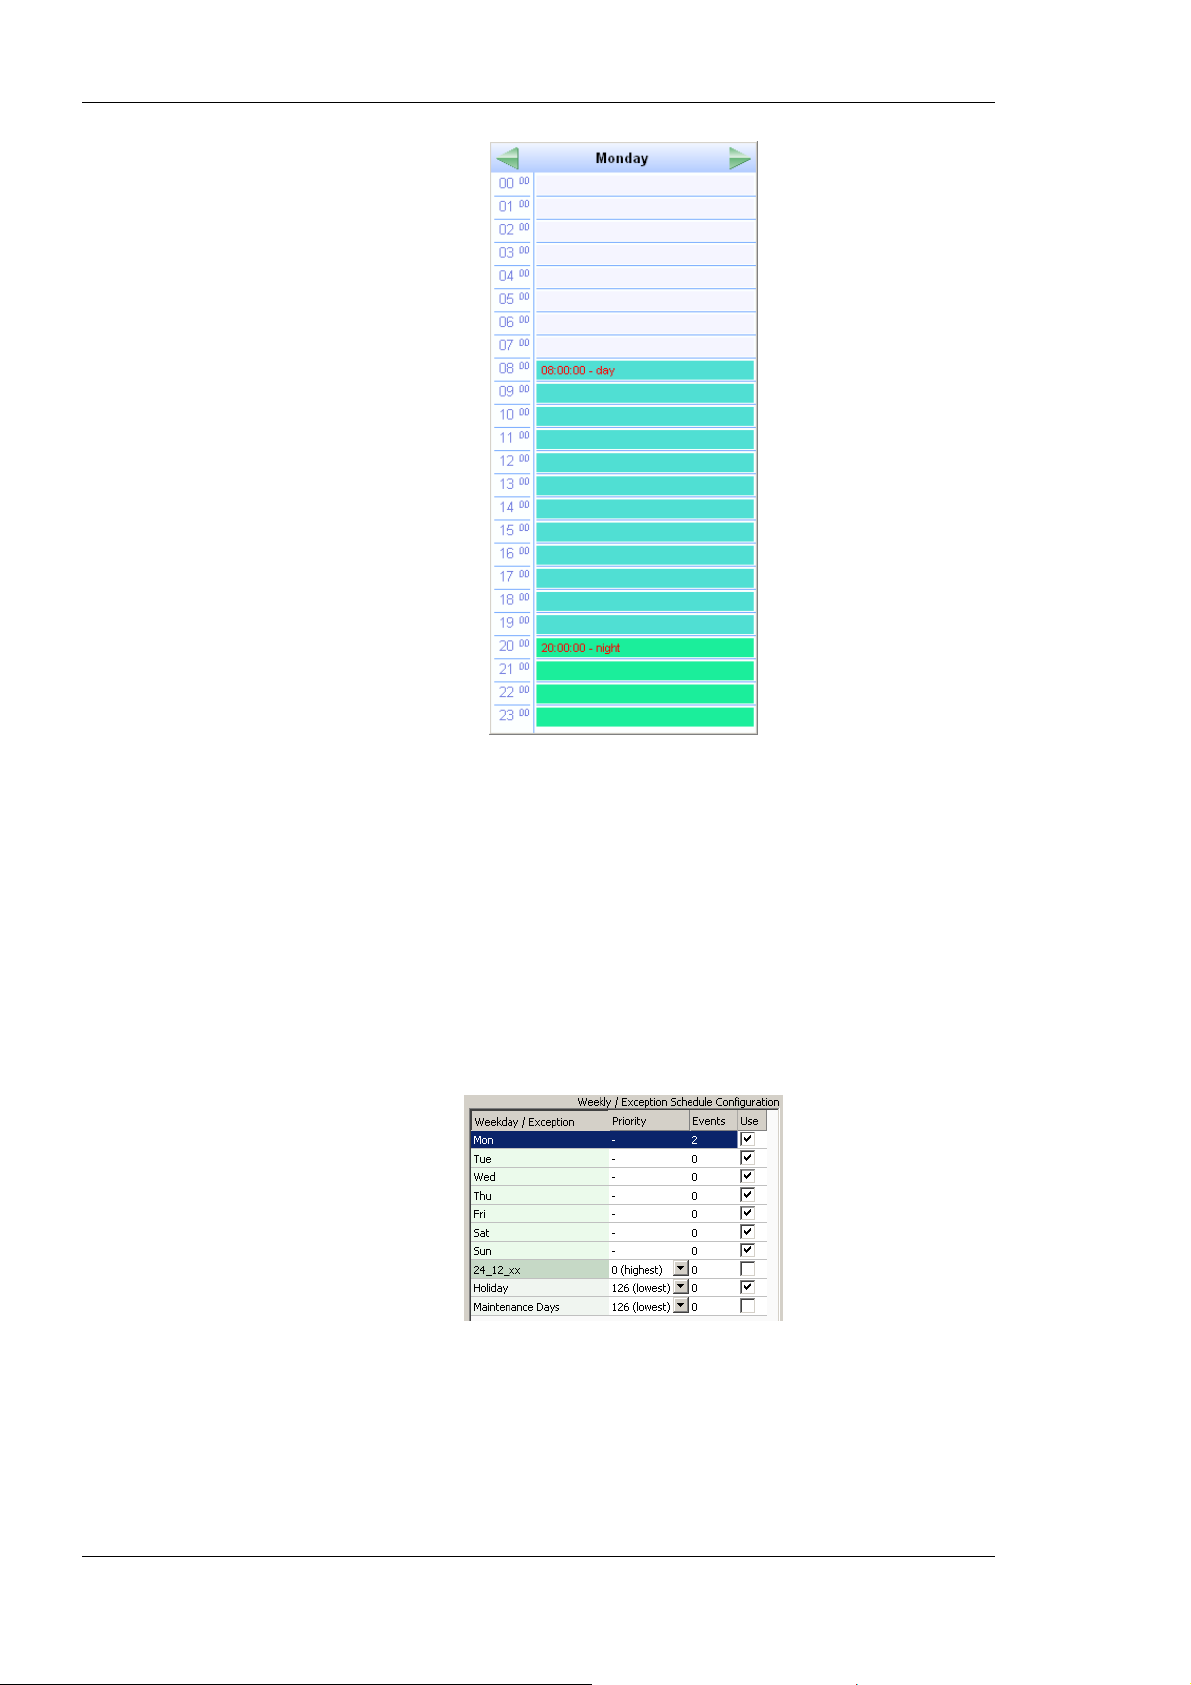
L-Gate User Manual 54 LOYTEC
Figure 41: Example of a Daily Schedule.
For some tasks the daily schedules on weekdays is sufficient. However, on some specific
dates, there may be exceptions to the regular week. This can be implemented by defining
daily schedules for exception days. For instance, there may be a separate daily schedule for
Holidays. The exception days are defined through a calendar. The calendar contains a
number of calendar patterns. Each calendar pattern describes a pattern of dates that define
the class of an exception, e.g., Holidays.
When a calendar is defined on a system, the exception days are available in all schedules.
When a schedule wants to define daily schedules for some of the available exception days,
they need to be enabled in the schedule. See Figure 42 for an example where Holidays is
used.
Figure 42: Example of on used Exception Day.
The function of the exception is simple. The daily schedule of a regular weekday is
overridden by the daily schedule of the exception, when one of the specified date patterns
is in effect (e.g., July 14
th
in Holidays overrides the regular weekday). If more than one
exception days are in use, there may be conflicts on specific dates. These conflicts are
resolved by defining priorities for the different exceptions. The daily schedule of the
exception with the higher priority is eventually in effect. If two ex ceptions with the same
Version 3.2 LOYTEC electronics GmbH
Page 55
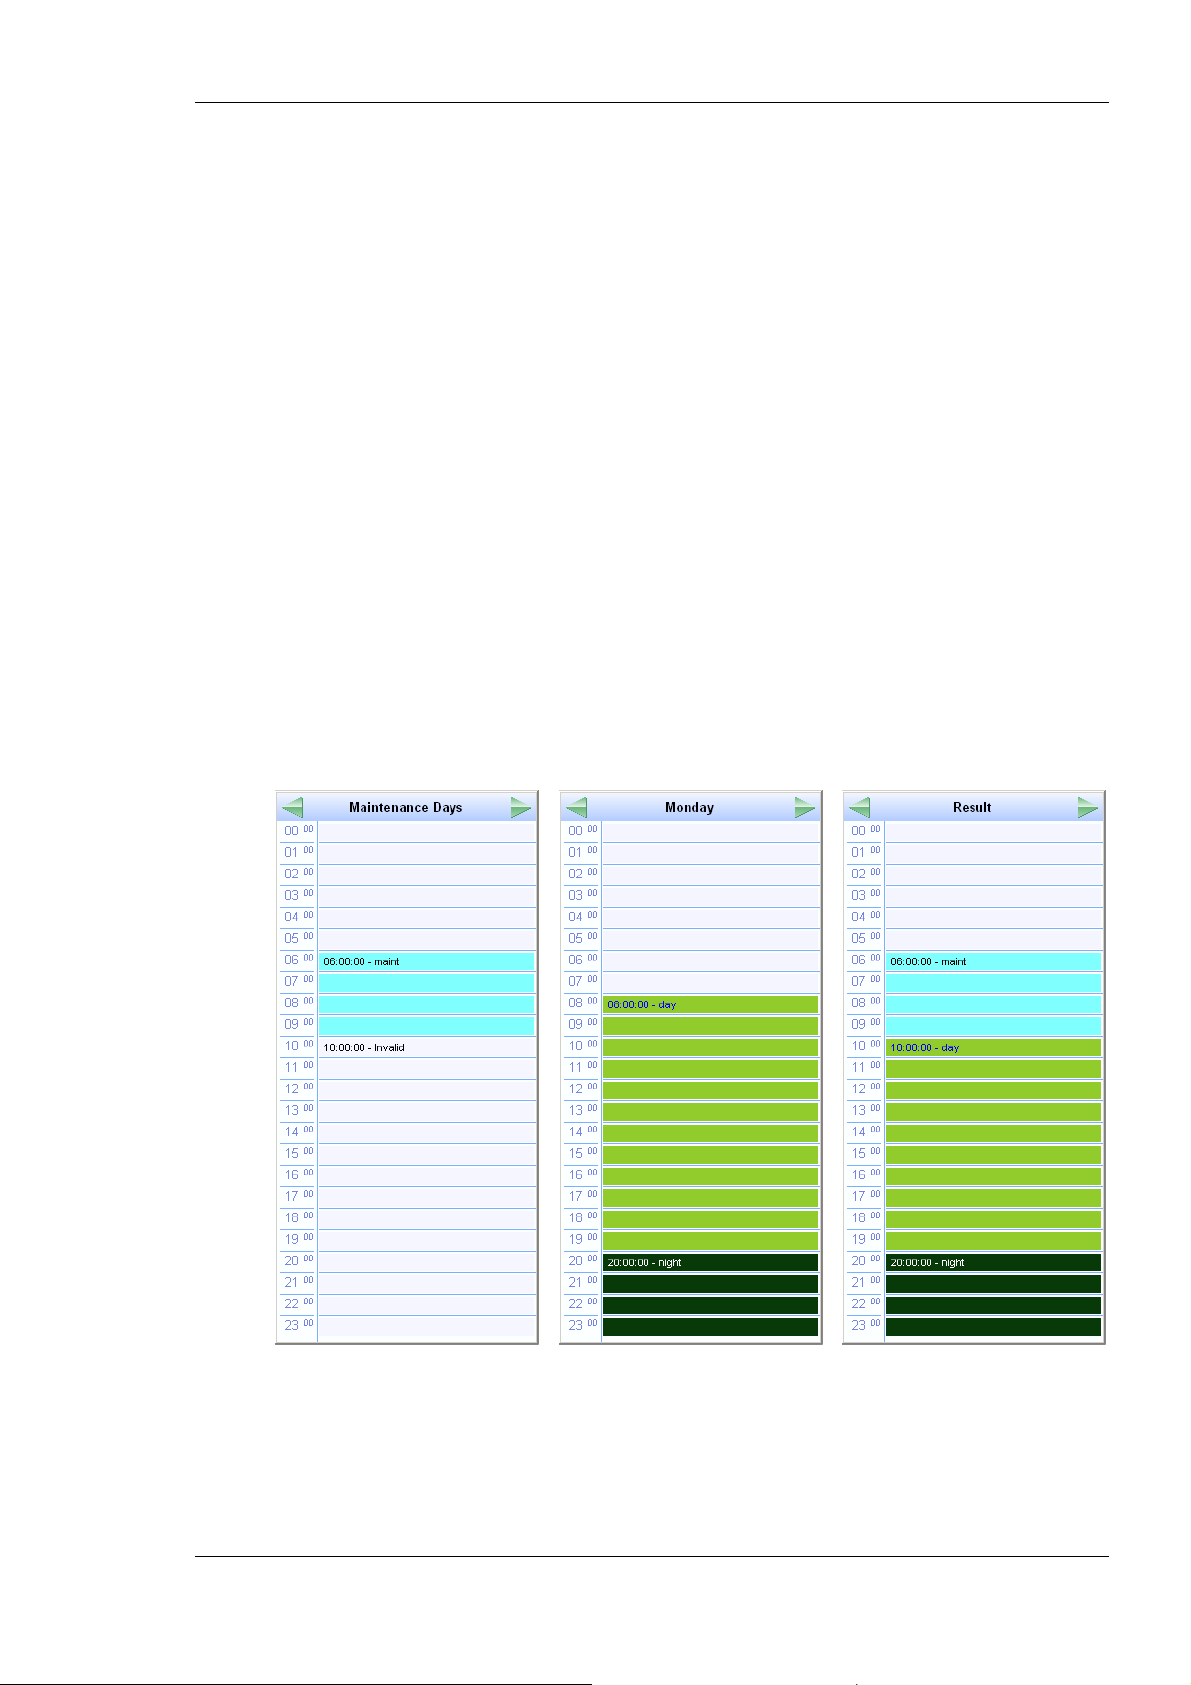
L-Gate User Manual 55 LOYTEC
priority exist, it is not defined, which one is in effect. Therefore, always use distinct
priorities.
Apart from the defined value presets, there exist special events that can be scheduled in a
daily schedule. They affect how the scheduler behaves and which exception is active:
• Invalid: If this value is scheduled, the scheduler transmits the invalid value. The
numeric representation of that invalid value is defined by the underlying data point and
is technology-specific.
• Withdraw: If this value is scheduled, the scheduler takes the previously value preset
out of effect. This means that the daily schedule with the next lo wer priority becomes
effective. If no daily schedule with lower priority ap plies, th e sched uler beh aves as if it
was disabled. Figure 43 presents an example of the Maintenance exception day, which
schedules the maint value at 6 am and goes out of effect at 10 am. If the maintenance
day falls on a Monday, the regular schedule for Monday will be overridden by the
Maintenance schedule at 6 am and become effective again at 10 am sending the day
value.
• Temporary Disable: If this value is scheduled, the entire scheduler is disabled until a
new event is scheduled in a daily schedule of the same or higher priority than the one
that has the temporary disable event. This type of event can be used to define periods
for manual override.
Please also refer to the technology-specific limitations described in Section 6.12 to learn
about special behavior of the respective networking technology.
Figure 43: Example using withdraw in an exception schedule.
The configuration of exceptions is done by calendar patterns in the calendar. Each calendar
pattern contains a number of pattern entries. These entries can define the following:
• A single date: This defines a singe date. Wildcards may be used in the year to specify
July 14
th
of every year.
Version 3.2 LOYTEC electronics GmbH
Page 56

L-Gate User Manual 56 LOYTEC
• A date range: This defines a range. Starting with a start date and ending with the end
date. No wildcards should be used.
• A Week-and-Day definition: This defines dates based on a week, such as every 1st
Friday in a month, every Monday, every last Wednesday of a month.
While exception days of a calendar are accessible to all schedules on a device, specific
exceptions can be defined, which are embedded into a specific schedule. These are referred
to as an embedded calendar. In contrast to a regular calendar each calendar pattern of an
embedded calendar can hold exactly one date entry. This can be a single date or a date
range. The embedded exception days are only visible to the schedule they are defined in.
Apart from these restrictions, embedded calendars behave like the regular calendar. Figure
42 shows an example for an embedded exception day named ‘24_12_xx’.
A schedule defines at which time instants certain states of the scheduled data points are
maintained. The next-state feature allows to look ahead into the future and predict when the
next scheduled state will occur. There are two data points involved: the time-to-next-state
is a counter in minutes to the next scheduled event, and the next-state data point is the state
of the next scheduled event. This information can be used by controllers to optimize their
algorithms (e.g., pre-heat a room for the scheduled occupancy state). Use the
SNVT_tod_event in CEA-709 to accomplish this task.
When a scheduler is executing the schedule on the local device, it is called a local
scheduler. Such a scheduler is configured to schedule data points and later its daily
schedules can be modified. When accessing the daily schedules of a scheduler, which
executes on a remote device, the object is called a remote scheduler. A remote scheduler
has the same interface to the user to modify daily schedules. A remote scheduler object can
be used as a user-interface for schedulers that execute on different devices.
5.4.4 Trending
Trending refers to the ability to log valu es of data points over time. A trend log object is
responsible for this task. It is configured, which data points shall be trended. Log records
are generated either in fixed time intervals, on change-of-value conditions, or when a
trigger is activated. Trend log objects can trend either local or remote data points.
The trend data is stored in a binary format on the device. The capacity of a given trend log
is configured. The trend log can be operated in one of two modes: (1) In linear mode the
trend file fills up until it reaches its capacity. It then stops logging. (2) In ring buffer mode.
In this mode the oldest log records are overwritten when the capacity is reached.
Trended data points can be logged as their actual values at given time instants or as an
aggregated value over the defined log interval. Aggregation can be calculated as minimum,
maximum, or average. Aggregation can be beneficial, if the trended value changes more
frequently than the selected log interval. Using aggregation, the log interval can be chosen
to limit the amount of logged data while preserving information of the trended value.
How many data points can be trended in one trend log is limited by the underlying
technology. So are some of the log modes. Refer to the technology sections for more
information.
5.4.5 E-Mail
The e-mail function can be combined with the other AST features. The format of an e-mail
is defined through e-mail templates. An e-mail template defines the recipients, the e-mail
text, value parameters inserted into the text and triggers, which invoke the transmission of
an e-mail. An e-mail template can also specify one or more files to be sent along as an
attachment.
Version 3.2 LOYTEC electronics GmbH
Page 57

L-Gate User Manual 57 LOYTEC
A prerequisite to sending E-Mails is the configuration of an E-Mail account on the L-Gate.
This can be done on the Web UI (see Section 4.2.11). It is recommended to use the e-mail
server of your Internet provider. For public mailers enable the required authentication.
Please note that the L-Gate does currently not support the SSL/TLS E-Mail authentication
mechanism. Therefore, Hotmail and gmail cannot be used.
The amount of generated e-mails can be limited using a rate limit algorithm. The
transmission of e-mails can be disabled altogether by using a special data point. That data
point can be scheduled or driven over the network.
If an E-Mail cannot be sent (e.g. the mail server is not reachable), the mail delivery is
retried up to 24 times every 30 minutes.
5.5 CEA-709 Technology
5.5.1 CEA-709 Data Points
Data points in the CEA-709 network are known as network variables (NVs). They have a
direction, a name, and a type, known as the standard network variable type (SNVT) or
user-defined network variable type (UNVT). In addition to NVs, also configuration
properties (CPs) in the CEA-709 network can be accessed as data points. Both standard CP
types (SCPTs) and user-defined CP types (UCPTs) are supported.
The CEA-709 NVs on the L-Gate can be created in three different ways:
• Static NV: For each selected NV on the network there is a static NV created on the L-
Gate. This NV can be bound to the NV on the network. Note that adding static NVs to
the L-Gate results in a change to the default XIF file. The L-Gate is assigned a new
“model number” to reflect this change (see Section 5.5.2). Static NVs are the way to
use NVs in non-LNS systems, where NVs shall be bound instead of using polling.
• Dynamic NV: For each selected NV on the network there is a dynamic NV created on
the L-Gate. Compared to static NVs, dynamic NVs do not change the XIF interface of
the L-Gate. The dynamic NVs are created by the network management tool. Currently,
only LNS-based tools can manage dynamic NVs. As for static NVs, with dynamic
NVs it is possible to use bindings instead of polling.
• External NV: The selected NVs on the network are treated as external NVs to the L-
Gate. The L-Gate doesn’t create any NVs on the device, but instead uses polling to
read from those NVs and explicit updates to write to the NVs. Therefore, no bindings
are necessary for external NVs. For input data points using external NVs however, a
poll cycle must be configured. If not con figured explicitly, a default poll cycle of 10
sec. is chosen. The default poll cycle can be changed in the project settings menu.
Based on the NV the data point is derived from, the following kinds of data points are
created:
• Simple NVs that hold only one scalar value, e.g., SNVT_amp: Those kinds on NVs are
represented as analog data points. The data points holds the current value, NV scaling
factors are applied.
• Simple NVs based on an enumeration, e.g., SNVT_date_day: Enumeration types result
in multi-state data points. They represent the state of the NV.
• Structured NVs that consists of a number of fields, e.g., SNVT_switch: All structured
NVs are represented as user point. That is, the data point is structured similar to the
NV it is based on. Beneath the user data point, the individual structure fields are
presented as “sub-data points”.
Version 3.2 LOYTEC electronics GmbH
Page 58
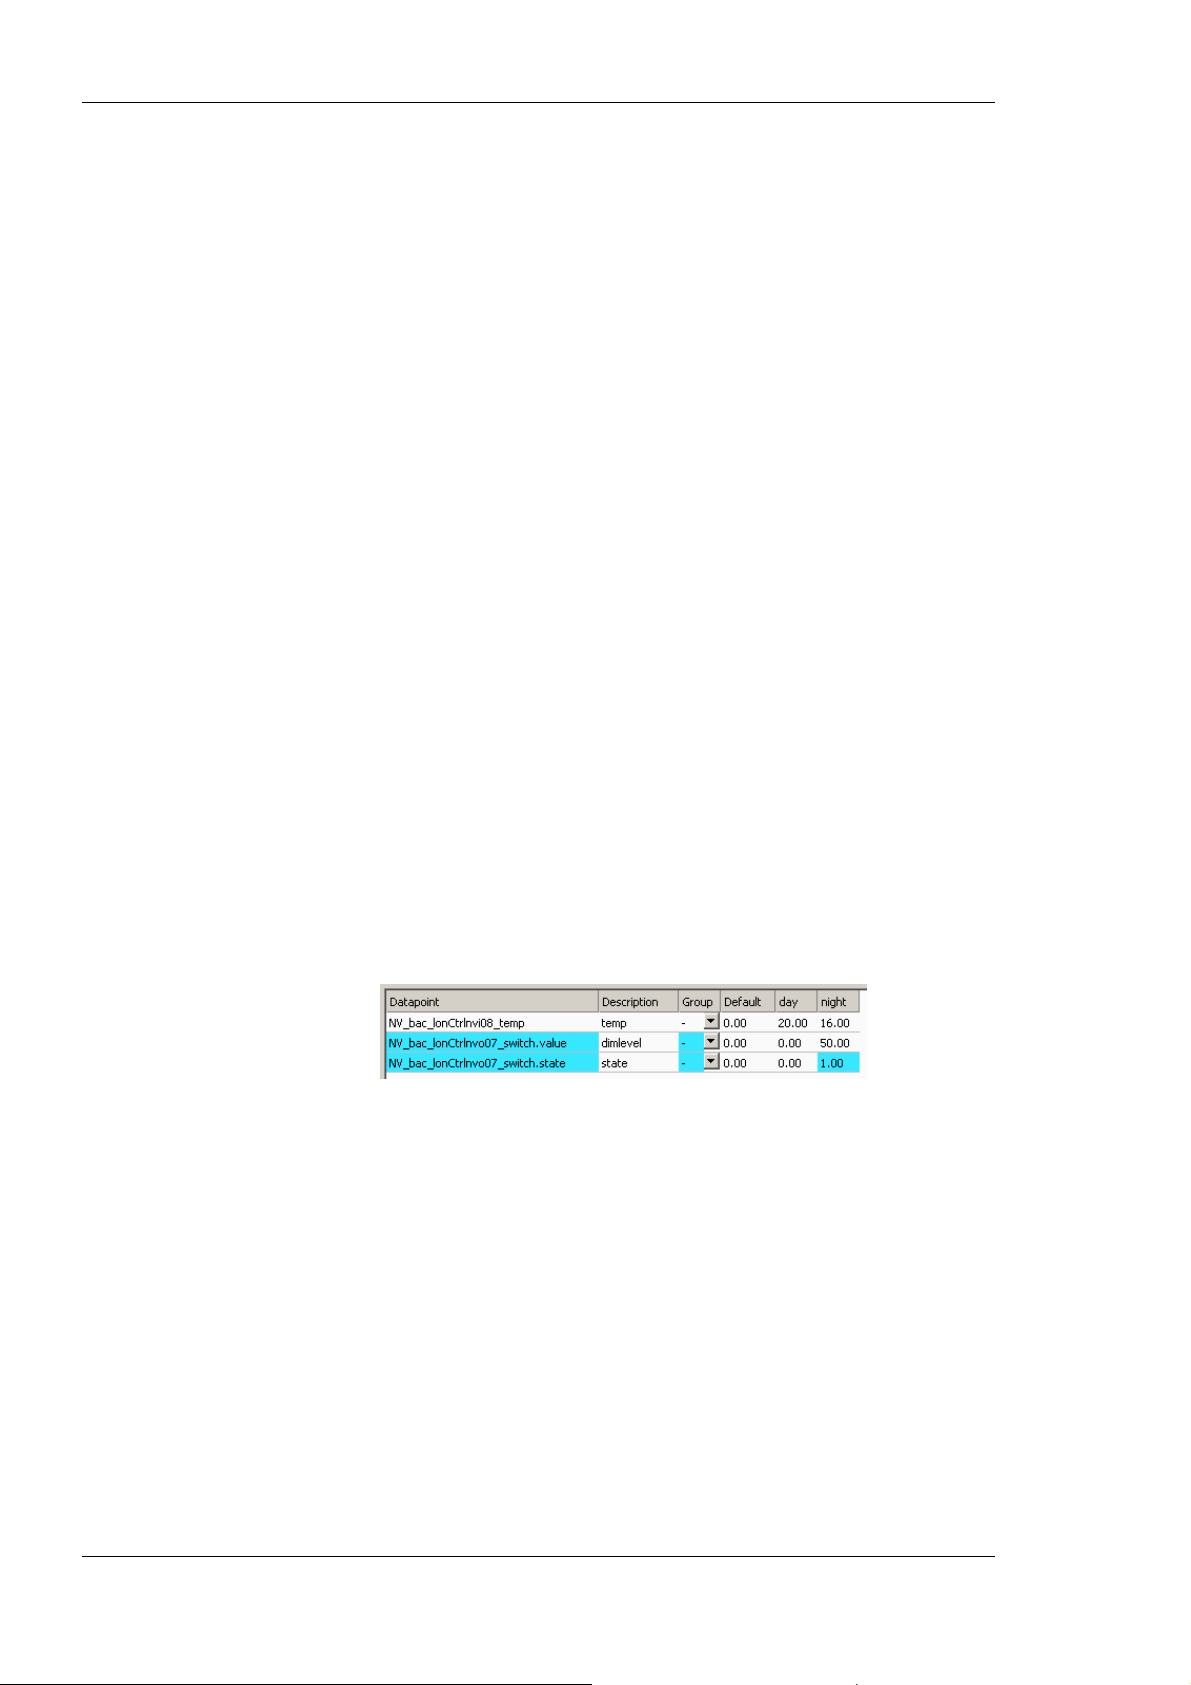
L-Gate User Manual 58 LOYTEC
For more information on the different types of network variables and their implications
please refer to the application note in Section 11.2. For CPs the allocation type “File” is
used.
5.5.2 Static Interface Changes
The L-Gate can be configured to use static NVs. Unlike dynamic NVs, static NVs cannot
be created in the network management tool. They are part of the static interface and are
usually compiled into the device. W hen static NVs are used, the L-Gate changes its static
interface and boots with a new one.
Each time the static interface of the L-Gate changes (i.e., static NVs are added, deleted, or
modified), the model number is changed. The model number is the last byte of the program
ID. Thus, a change in the static interface results in a change of the program ID and a new
device template needs to be created in the network management tool. A new device
template usually means that the device has to be deleted and added again in the database.
All bindings and dynamic NVs have to be created again for the new device.
When the L-Gate Configurator is connected via LNS, it supports the process of changing
the device template for the new static interface. It automatically upgrades the device
template of the L-Gate device in the LNS database and restores the previous bindings and
dynamic NVs. If the L-Gate is not configured with an LNS-based tool, this support is not
available. The new static interface is only available in a new XIF file or by uploading the
new device template into the database. For more information on the static interface and
device templates please refer to the application note in Section 11.2.
5.5.3 Limitations for Local CEA-709 Schedulers
CEA-709 schedulers and the CEA-709 calendar adhere to the LONMARK standard objects.
For CEA-709, certain restrictions exist that need to be kept in mind. Attached data points
can either represent an entire NV or individual elements of a structured NV. CEA-709
schedulers may have several different groups of data points attached, i.e., the value preset
may consist of more than one element. For example, a CEA-709 scheduler might schedule
a SNVT_temp and a SNVT_switch and have 3 elements in each value preset as depicted in
Figure 44.
Figure 44: Example value presets in CEA-709 schedulers.
Priorities of exception days in a CEA-709 scheduler range from 0 (the highest) to 126 (the
lowest). The value 127 is reserved as a default for weekdays.
Further, the implementation as L
configuration properties. If the number of CEA-709 schedulers or their capacities for daily
schedules and value presets is changed, the resource and static interface of the CEA-709
port changes. The resources reserved for L
changed in the project settings (see Section 6.3.4). When downloading a project, the
software verifies if sufficient resources have been configured. If it detects a problem, the
user is notified to update the project settings. The Auto-Set feature automatically selects the
right amount of resources.
ONMARK standard objects requires the use of
ONMARK calendar and scheduler objects can be
5.5.4 Limitations for CEA-709 Alarm Servers
Local CEA-709 alarming supports only one alarm server object. This alarm server object is
represented by the device’s L
ONMARK node object and facilitates the SNVT_alarm2 output
Version 3.2 LOYTEC electronics GmbH
Page 59

L-Gate User Manual 59 LOYTEC
network variable. Acknowledging alarms in the alarm server is adhering to the LONMARK
specification and relies on the RQ_CLEAR_ALARM mechanism.
5.5.5 Limitations for Local CEA-709 Trends
Local CEA-709 trend objects support trending multiple data points in all trend modes,
interval, COV, and trigger. The enable data point is also supported. All data points can be
NVs, registers or of any other technology. There is no L
object. Consequently, trend data cannot be accessed over a L
ONMARK object linked to the trend
ONMARK mechanism.
5.6 BACnet Technology
5.6.1 BACnet Data Points
Data points in the BACnet technology are known as BACnet objects. They have a specific
type (e.g. analog input or binary output) and a set of properties, which describe the data
point more closely. The actual value is stored in the “Present_Value”.
On the device, there exist two classes of BACnet data points:
• BACnet server objects (SO): These BACnet objects configured by the Configurator
software to be allocated locally on the device. These objects can be accessed by the
BACnet building control system or operating workstations. They support COV
subscriptions to deliver value changes in an event-driven way.
• BACnet client mappings (CM): For certain applications, it is necessary that the
device acts as a BACnet client. This functionality can be con figured by activating a
client mapping. Client mappings can be of the type Poll, COV, Write, or Auto. This
specifies how the BACnet client accesses other BACnet objects on the BACnet
network. The Auto method determines the best way (poll, COV, or write) to talk with
other server objects. Poll is used for objects that need to read data from other BACnet
objects in a periodic manner. COV is used to subscribe for COV at other BACnet
objects in order to get updates in an event-driven fashion. Write is used to send updates
to other BACnet objects.
The direction of BACnet server objects deserves a closer look. The direction specified for
data points in the Configurator software always refers to the network view of the
communication. The definition of input and output objects in BACnet, however, refers to
the process view, which is opposite to the network. Therefore, a BACnet analog input (AI)
object is modeled as an analog output data point. The direction of client mappings naturally
refers to the network communication. Therefore, a write client mapping is represented as an
analog output data point.
In BACnet commandable objects can be written with values at a certain priority. The v alue
with the highest priority is in effect. When revoking a written value, the NULL value is
written. This takes back the value. When all written values are withdrawn, the
Relinquish_Default value is in effect.
The default value feature of a data point is mapped to the Relinquish_Default property for
commandable objects. For BACnet objects, which are not commandable, the
Present_Value is initialized with the specified default value.
5.6.2 BACnet Alarming
BACnet alarming on the device is based on the intrinsic reporting mechanism. Currently,
algorithmic reporting is not supported. Alarm conditions can only be applied to data points,
which map to BACnet server objects. If defined, the intrinsic reporting properties of the
underlying BACnet objects are enabled. Alarm conditions can be specified for analog
Version 3.2 LOYTEC electronics GmbH
Page 60
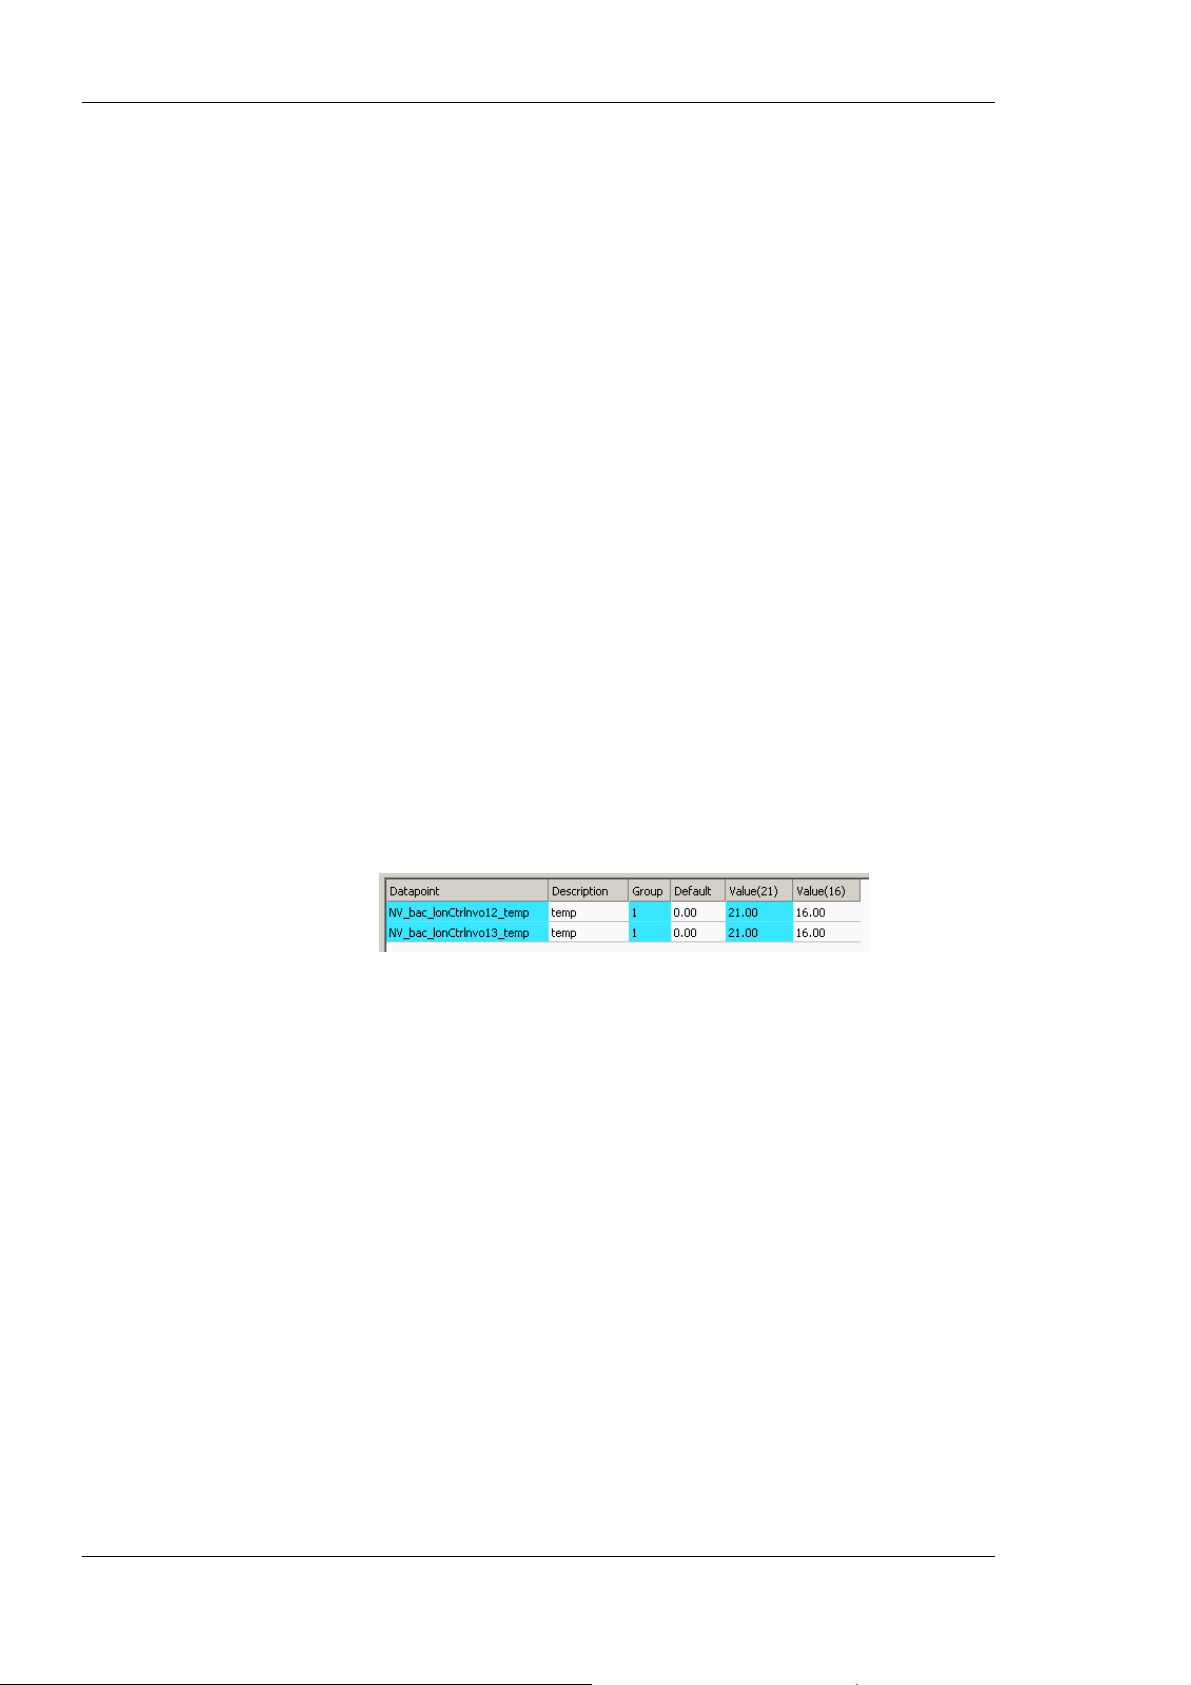
L-Gate User Manual 60 LOYTEC
input, output, value objects (AI, AO, AV), for binary input, value objects (BI, BV), and for
multi-state input, value objects (MSI, MSV). To define alarm conditions for binary output
(BO) and multi-state output (MSO) objects map the Feedback_Value property of the
respective server objects to a data point. This data point must be used to supply the
feedback value to the server object.
Alarm servers in the BACnet technology are mapped to BACnet Notification Class (NC)
objects. Each alarm server is mapped to one NC. The notification class number can be
configured in the object instance number property of the alarm server object.
Remote alarms in the BACnet technology refer to a remote NC object. When the device
starts up, the remote alarm object reads out the current alarm state of the remote NC and
reporting objects. To get notified about alarm transitions during run-time, the device
registers in the Recipient_list of the remote NC object.
5.6.3 BACnet Schedulers and Calendars
BACnet schedulers and the BACnet calendar adhere to the standard schedule and calendar
object in BACnet. For each scheduler a BACnet Schedule object is created. The calendar
deserves a closer look. For each calendar pattern a BACnet Calendar object is created. The
visible calendar on the Web UI is therefore a collection of BACnet calendar objects. Each
calendar pattern therefore is associated with a BACnet object instance number. The
calendar pattern “Holidays” is for example visible as CAL,1 on the BACnet port.
The BACnet schedule object allows only objects of one selected data type to be scheduled.
Therefore, schedulers on BACnet can only schedule one class of data points (e.g., only one
group of analog data points). As a consequence, the value preset in BACnet always has
only one element. The name of the value preset is not stored in BACnet. It is not accessible
over the BACnet network, either. Therefore, a default name is created, such as ‘Value(22)’
for an analog value. An example of two scheduled BACnet objects is shown in Figure 45.
Priorities of exception days in a BACnet schedu ler range from 1 (the highest) to 16 (the
lowest). Weekdays in BACnet have no priority.
Changing the number of calendar patterns in a BACnet calendar can only be done through
the configuration software and not during run-time. The individual calendar pattern entries
in the calendar patterns can be changed at run-time. Therefore, it is advisable to reserve a
suitable number of calendar patterns in a BACnet calendar and leave them empty if not
needed immediately.
5.6.4 BACnet Trend Logs
A number of restrictions apply to trend log objects in BACnet. Trend log objects must be
created by the Configurator software. These objects are accessible over the BACnet
network for other BACnet devices and operator workstations (OWS). All configuration
properties can be modified by the Configurator software as well as an OWS. The number
of trend log objects cannot be changed at run-time. Therefore, if it is intended that an OWS
configures the trend logs, a suitable number of empty trend log objects (i.e., without
attached data points) must be created in the Configurator software.
Figure 45: Example value presets in BACnet schedulers.
In BACnet trend logs, only one data point can be trended per trend log object. The trended
data point can be either a local BACnet server object or a remote BACnet object accessed
Version 3.2 LOYTEC electronics GmbH
Page 61

L-Gate User Manual 61 LOYTEC
through a client mapping. Data points of other technologies and the min/max/avg
algorithms cannot be trended in this firmware version.
BACnet trend logs are limited to interval and COV logs. The trigger mode is not supported
in BACnet. The setting linear and ring-buffer logging is mapped to the Stop_When_Full
property of the underlying BACnet trend log object. This setting in the Configurator
software is a default and can be overridden by writing to the Stop_When_Full property by
the OWS.
If an enable data point is configured by the Configurator software, the Log_Enable
property is written with the value of that data point. If no enable data point is configured,
the Log_Enable is TRUE as a default and can be modified over the network.
The fill-level action is mapped to generating a buffer event notification in the BACnet
trend log object. The fill-level trigger can still be used for e-mails even if no notification
class is configured in the BACnet trend log object. The fill-level percentage maps to the
Notification_Threshold property. The percentage setting in the Configurator software is a
default and can be changed by the OWS over the network.
5.7 Automatic Generation of Connections
When generating matching counter parts to NVs, there are two types of NVs to be
considered: Simple NVs that hold only one value (scalar or enumeration), and structured
NVs, that consist of a number of fields. For simple NVs only one BACnet object per NV is
generated. For structured NVs, one BACnet object is generated for each structure member.
Which type of BACnet object is created depends on the type of the simple NV or of the
structure member. For scalar types, analog objects are created. The scaling factors are
applied to the NV to get the resulting scalar value for the Present_Value property. Other
properties of analog objects are derived from the SNVT, including the engineering units,
min and max present value. Multi-state objects are created for NV enumeration types. The
CEA-709 state IDs are sorted and renumbered to start at ‘1’ in BACnet (i.e., a ‘-1’ of
MOTOR_NUL in CEA-709 maps to a ‘1’ of MOTOR_NUL in BACnet). This is necessary
as the SNVT states ‘-1’ and ‘0’ cannot be represented in BACnet as a raw value, because
allowed BACnet multi-states start at 1. Which state IDs exist is documented in the BACn et
multi-state texts array. Optionally, binary objects are created for enumerated NVs with
three states, excluding the ‘-1’ state.
In BACnet commandable objects can be written with values at a certain priority. The v alue
with the highest priority is in effect. When revoking a written value, the NULL value is
written. This takes back the value. When all written values are withdrawn, the
Relinquish_Default value is in effect. In CEA-709 there is no notion of taking a value back.
To model this behavior, a distinctive invalid value can be written to an NV. Most SNVTs
have such an invalid value. For those that do not an invalid value, it can be specified when
editing the data point. To make a BACnet object convey that invalid value to the CEA-709
side, enable the property “Relinquish to Invalid”.
Version 3.2 LOYTEC electronics GmbH
Page 62

L-Gate User Manual 62 LOYTEC
6 The L-Gate Configurator
This Chapter gives step-by-step instructions on how to commission the device, create a
data point configuration with input and output network variables, and how to map those
data points to BACnet and vice-versa. We show the configuration steps using
LonMaker TE but other LNS-based network management tools can be used as well to
install and configure the device. We also show how to configure the device without LNS.
6.1 Installation
6.1.1 Software Installation
The L-Gateway Configuration software must be used to setup the data point configuration
of the L-Gate. This configuration utility is installed as a plug-in tool for all LNS-based
network management tools as well as a stand-alone tool (for systems without LNS).
System requirements:
• LNS 3.1, Service Pack 8 or LNS TE SP5 or higher (for LNS mode),
• Windows XP, Windows 2003 Server, Windows Vista, Windows 7, or Windows 2008
Server.
The L-Gate Configurator can be downloaded from the LOYTEC Web site
http://www.loytec.com. When asked for the type of installation, there are two options to
choose from. Select Typical to install the required program files. Select Full to install the
ONMARK resource files along with the software. This option is useful, when the system
L
does not have the newest resource files.
6.1.2 Registration as a Plug-In
If the L-Gate shall be configured using LNS-based tools (e.g., NL200 or LonMaker), the
L-Gate Configurator needs to be registered as an LNS plug-in. In the following, the process
is described for LonMaker TE. Otherwise, please refer to the documentation of your
network management tool on how to register an LNS plug-in.
To Register in LonMaker TE
1. Open LonMaker and create a new network.
2. Click Next until the plug-in registration tab appears in the Network Wizard. Select the
LOYTEC L-Gate Configurator (Version X.Y) from the list of Not Registered (see
Figure 46).
Version 3.2 LOYTEC electronics GmbH
Page 63
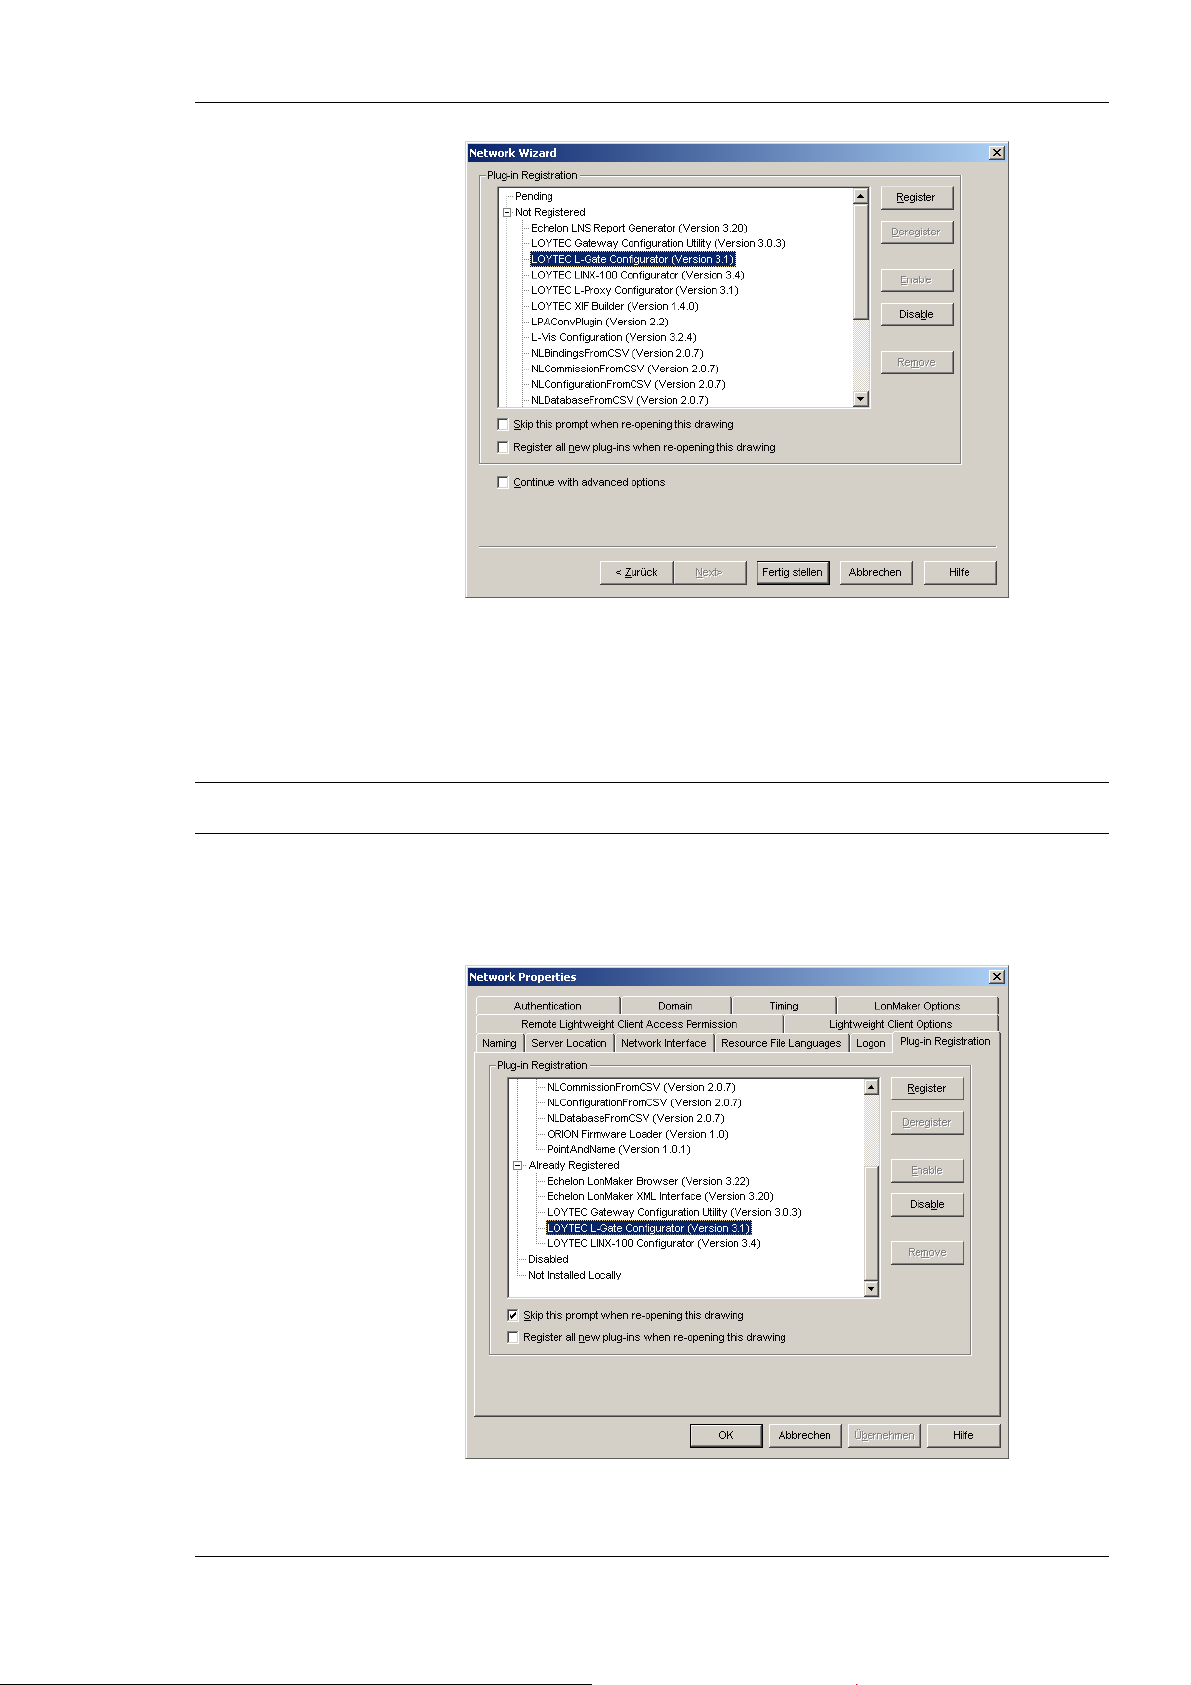
L-Gate User Manual 63 LOYTEC
Figure 46: Select the Plug-in to be registered.
3. Click Register. The Configurator now appears in the Pending list.
4. Click Finish to complete the registration. Device templates for the L-Gate are added
automatically and XIF files are copied into the LNS import directory.
Note: If you are using multiple databases (projects) make sure you have registered the plug-in in
each project.
5. Under LonMaker Æ Network Properties Æ Plug-In Registration mak e sure that
the LOYTEC L-Gate Configurator (Version X.Y) shows up under Already
Registered.
Figure 47: Check that the L-Gate Configurator is properly registered.
Version 3.2 LOYTEC electronics GmbH
Page 64
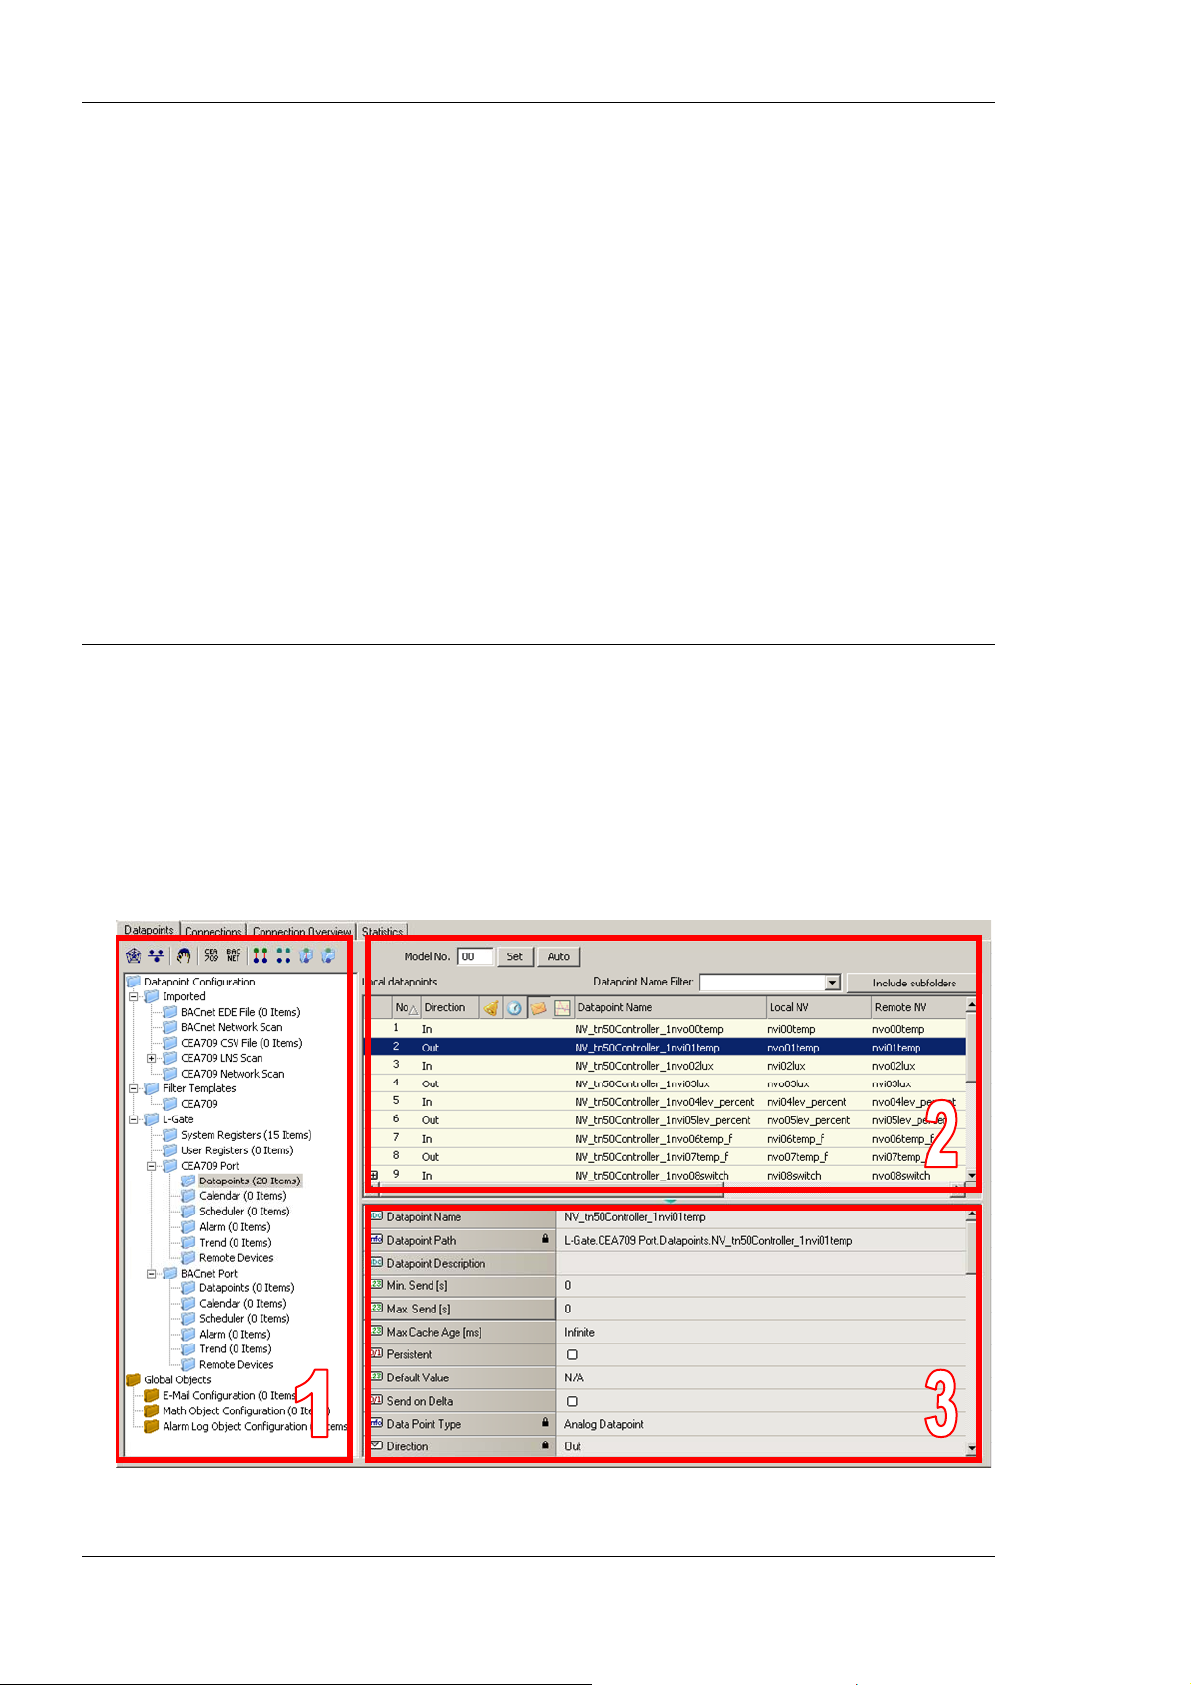
L-Gate User Manual 64 LOYTEC
6.1.3 Operating Modes
The Configurator can be used in on-line, off-line, and stand-alone mode. On-line and offline mode refers to the 2 operating modes of your LNS network management software.
• On-line Mode: This is the preferred method to use the configuration utility. The
network management tool is attached to the network and all network changes are
directly propagated into the network. This mode must be used to add the device,
commission the device, extract the port interface definition, and download the
configuration into the device.
• Off-line Mode: In off-line mode, the network management software is not attached to
the network or the device is not attached to the network, respectively. This mode can
be used to add the device using the device templates, create the port interface
definition and to make the internal connections.
• Stand-alone Mode: The Configurator can also be executed as a stand-alone program.
This mode is useful for the engineer who doesn’t want to start the configuration
software as a plug-in from within network management software (e.g., NL-220,
LonMaker or Alex). Instead the engineer can work directly with the device when
online or engineer it offline.
6.2 Data Point Manager
The configuration software uses a central concept to manage data points. The data point
manager as shown in Figure 48 is used to select, create, edit and delete data points. The
dialog is divided into three sections:
• The folder list (number 1 in Figure 48),
• The data point list (number 2 in Figure 48),
• And a property view (number 3 in Figure 48).
Figure 48: Datapoint Manager Dialog.
Version 3.2 LOYTEC electronics GmbH
Page 65

L-Gate User Manual 65 LOYTEC
6.2.1 Folder List
At the left is a list of folders which is used to sort the available data objects by their
category. There are a number of predefined folders available:
• Imported: This folder has a number of sub-folders for different import methods:
o BACnet Network Scan: This folder is used to display data points retrieved
by an online scan of the BACnet network.
o BACnet EDE File: This folder is used to display data points imported from
an EDE file.
o CEA-709 CSV File: This folder is used to display data poin ts imported from
CSV files.
o CEA-709 LNS Scan: This folder is used to hold data retrieved from a
network database scan.
o CEA709 Network Scan: This folder holds NVs scanned online from an
attached CEA-709 network.
Data objects in the import folder are not stored on the device when the project is
downloaded. They represent data objects which are available on remote devices
and are shown here as templates to create suitable data objects for use on the
device by selecting the Use on Device option.
• Filter Templates: This folder contains the created data point templates. They contain a
set of properties, which are applied to data points, when they are created on the device.
There is a sub-folder for filter templates specific to different technologies, e.g. CEA-
709.
• L-Gate: This is the device folder of the L-Gate. It contains all the necessary data
points which constitute to the L-Gate’s port interface definition. These data points are
created on the L-Gate when the configuration is downloaded. The three subfolders
represent
o System Registers: This folder contains system registers, which provide
information on the device itself.
o User Registers: This folder holds user-defin able registers. These registers are
not visible on the underlying network and are intended for internal usage.
o CEA-709 Port: This folder contains data points, schedulers, calendars, trend
logs, statistics, and remote data points of the CEA-709 network technology.
See Section 6.2.2.
o BACnet Port: This folder contains data points, schedulers, calendars, trend
logs, statistics, and remote data points of the BACnet network technology.
See Section 6.2.2.
• Global Objects: This top-level folder contains sub-folders that organize specific
application objects that operate on data points.
o E-mail Configuration: This folder contains e-mail templates. An e-mail
template defines the destination address and text body of an e-mail, which is
triggered by data points and may contain data point values or file attachments.
To create an e-mail template, select the folder and use the context menu.
o Math Objects Configuration: This folder contains math objects. Math
objects are used to perform a predefined calculation on a number of input data
points and write the result to a defined set of output data points. Each math
object contains one formula. To create a math object, select the folder and use
the context menu.
o Alarm Log Configuration: This folder contains the alarm log objects. Each
alarm log object creates a historical log of alarm transitions of one or more
Version 3.2 LOYTEC electronics GmbH
Page 66

L-Gate User Manual 66 LOYTEC
alarm objects (alarm server or client). To create an alarm log, select the folder
and use the context menu.
Using the context menu on a folder, sub-folders may be created to organize the available
objects. If new objects are created automatically, they are usually placed in the base folder
and can then be moved by the user to any of his sub-folders. Note, that the folder structure
described above cannot be changed by adding or deleting folders at that level.
6.2.2 Network Port Folders
Each network port folder on the device has the same structure of sub folders. These sub
folders are:
• Datapoints: This folder holds all data points, which are allocated on the network port.
To create a data point, select the folder and use the context menu.
• Calendar: This folder is used to hold a locally available calendar object with its
calendar patterns (definitions of day classes like holiday, maintenance day, and so on).
Current devices allow one local calendar object. To create a calendar, select the folder
and use the context menu.
• Scheduler: This folder is used for local scheduler objects. Each of these objects will
map to a local scheduler on the device’s network port. Configuring schedules through
these objects actually transfers schedule configuration data to the underlying scheduler
objects on the network port. To create a scheduler, select the folder and use the context
menu.
• Alarm: This folder is used for local alarm server objects. Each of these alarm server
objects represent an alarm class, which other objects can report alarms to. Other
devices can use the alarm server object to get notified about alarms. To create an alarm
server object, select the folder and use the context menu.
• Trend: This folder is used for local trend log ob jects. Each of these objects will be
able to trend data points over time and store a local trend log file. To create a trend log
object, select the folder and use the context menu.
• Statistics: This folder contains registers, which provide communication statistics
specific to the network port.
• Remote Devices: This folder is used to collect all remote calendars, schedulers, trend
logs, and alarm client objects, which were created from network scan data. For each
remote device, a subfolder will be created where the ob jects referen cing th is dev ice are
collected.
6.2.3 Data Point List
At the top right, a list of all data objects which are available in the selected folder is shown.
From this list, objects may be selected (including multi-select) in order to modify some of
their properties. Click on the Include Subfolders button to show all data points of the
selected data point folder and all its sub-folders. This can be a convenient way for multiselect across folders. To filter for data point names, enter a search text into the Datapoint
Name Filter text box and hit Enter. A drop-down list holds the previously used filters
available.
The list can be sorted by clicking on one of the column headers. For example, clicking on
the Direction column header will sort the list by direction. Other columns display data
point name, NV name, and SNVT. To apply the current sort order as the new data point
order on the device, right-click on the column header and select Renumber Datapoints.
Alternatively, select from the menu Tools Æ Renumber Datapoints.
New objects may be created in the selected folder by pressing the New button to the right
of the list or via the New command in the context menu. A plus
sign in the list indicates
Version 3.2 LOYTEC electronics GmbH
Page 67
L-Gate User Manual 67 LOYTEC
that the data point contains sub-points. These can be structure members for structured
SNVTs. Clicking on the plus
For the alarming, scheduling, trending (AST) features, there are columns, which display
icons for data points that are attached to an AST function. See Table 7 for details.
Icon Data Point Usage
sign expands the view.
6.2.4 Property View
When one or multiple data points are selected, the available prop erties are displayed in the
property view. Properties which are read-only are marked with a lock
applying multi-select, only those properties common to all selected data points are
displayed. Depending on the network technology and data point class, different properties
may exist.
Data point properties common to all technologies:
• Datapoint Name: This is the technology-independent data point name. This name may
be longer than and different to the name of the native communication object (i.e.,
network variable). Data point names must be unique within a given folder. The
maximum length is limited to 64 ASCII characters.
• Datapoint Path: This informational property specifies the entire path of the data point
within the data point hierarchy. The maximum length is limited to 64 ASCII
characters.
Data point is scheduled
Data point has an active alarm condition
Data point has an inactive alarm condition.
Data point is a trigger for E-Mails
Table 7: Icons for used data points in the data point list view.
sign. When
• Datapoint Description: This is a human-readable description of the data point. There
are no special restrictions for a description.
• Use Pollcycle value as: For input data points, this property defines whether the input
shall use a receive timeout or be constantly polling. See Section 5.2.2.
• Poll on Startup: For input data points this property defines, whether the data point
shall be polled once at start-up. Poll-on-startup can be enabled independently of the
poll cycle. See Section 5.2.2.
• Pollcycle: For input data points, this property defines the poll cycle in seconds. Set this
property to 0 to disable polling. See Section 5.2.2.
• Receive Timeout: For input data points, this property defines the receive timeout in
seconds. Set this property to 0 to disable polling. See Section 5.2.2.
• Min Send: For output data points, this property defines the min send time in seconds.
See Section 5.2.2.
• Max Send: For output data points, this property defines the max send time in seconds.
See Section 5.2.2.
• Send-on-delta: For output data points this property defines, if value updates shall be
sent only once they meet the COV condition of the data point. For analog data points
the analog COV increment is used. If not checked, updates are always transmitted
according to min and max send times. See Section 5.2.6.
• Use Linear Scaling: If this property is enabled, the analog values are pre-scaled from
the technology to the data point. This scaling is in addition to any technology-specific
Version 3.2 LOYTEC electronics GmbH
Page 68

L-Gate User Manual 68 LOYTEC
scaling factors. If enabled, the properties Custom Scaling Factor and Custom
Scaling Offset accept the scaling factors. See Section 5.2.6.
• Custom Scaling Factor, Custom Scaling Offset: These properties only exist, if linear
scaling is enabled. They apply to analog data points only. See Section 5.2.6.
• Only notify on COV: This property assists for binary and multi-state input data
points. It defines, if a data point shall trigger an update only when the value changes or
on every write. If this is enabled, consecutive writes with the same value do n ot trigger
an update. If you want to convey every write, disable COV on the data point.
• Persistent: This property defines, if the last written value shall be stored as a persistent
value. Persistent data points restore that value after a restart from the persistent
storage. See Section 5.2.4.
• Default Value: This property defines a default value (see Section 5.2.3). Enter a
default value to enable this feature in the data point. Delete the value entirely to
remove the default value. If no default value is defined, this property reads “N/A”. The
default is no default value.
• Point Type: This is the base data point type, e.g., “Analog Datapoint”.
• Direction: This is the data point direction. Use input or output as directions.
• Unit Text: For analog data points this property contains a human-readable text for the
engineering units of the scalar value, e.g., “kilogram”.
• Analog Datapoint Max Value: For analog data points this property contains the upper
limit of the supported value range. Note that this does not define an alarm limit.
• Analog Datapoint Min Value: For analog data points this property contains the lower
limit of the supported value range. Note that this does not define an alarm limit.
• Analog Datapoint Precision: For analog data points this property defines the number
of decimals. ‘0’ specifies an integer value. Display units may use this to format the
floating point value accordingly.
• Analog Datapoint Resolution: For analog data points this property defines the
smallest possible value increment.
• Analog Point COV Increment: This property is valid for analog input data points. It
specifies by which amount the value needs to change, before an update is generated. If
every write shall generate an update even when the value does not change, specify 0 as
the COV increment. If any value change shall generate an update, delete the value,
which results in Any.
• Active Text: For binary data points this property defines a human-readable text for the
active state (true).
• Inactive Text: For binary data points this property defines a human-readable text for
the inactive state (false).
• State Count: For multi-state data points this property defin es the number of discrete
states.
• State Text: For multi-state data points this property defines a human-readable state
label for each state.
6.2.5 Managing Multistate Maps
Multistate data points have a descriptive set of state texts for their state IDs. To manage
those state IDs and state texts among many multistate data points, they refer to multistate
maps. Some technologies have a fixed set of such multistate maps others have freely
configurable multistate maps (e.g, user registers). Editing a multistate map affects all
multistate data points, which are using that particular map. It is not necessary to edit each
data point individually.
Version 3.2 LOYTEC electronics GmbH
Page 69
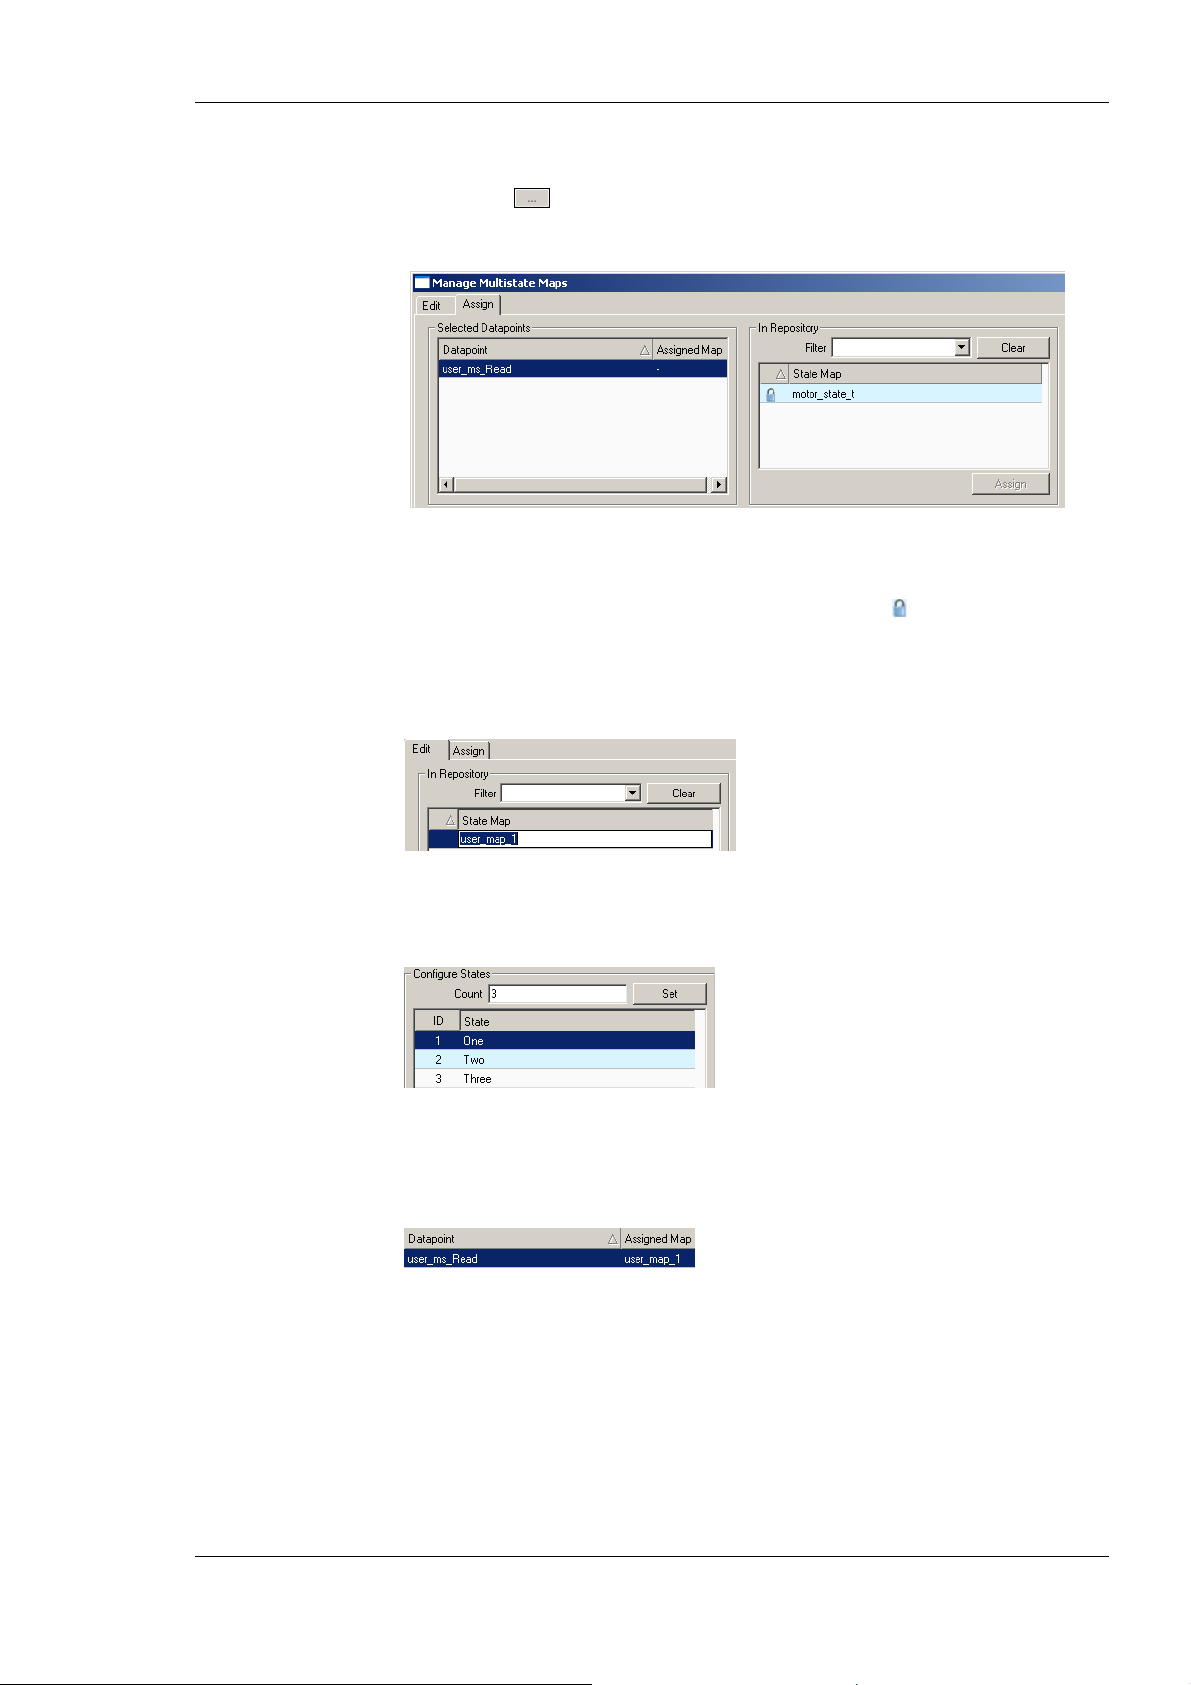
L-Gate User Manual 69 LOYTEC
To Edit a Multistate Map
1. Click on the
opens the multistate map manager as shown in Figure 49.
2. Select an existing state map in the State Map list and click on Assign. Maps that are
fixed and cannot be changed are marked with a lock symbol
3. If a new multistate map shall be created, change to the Edit tab.
4. Click on the Create button and enter a new multistate map name. Then hit Enter.
button in the State Count property of a multistate data point. This
Figure 49: Assign multistate maps in the multistate map manager.
.
5. In the Configure States box enter the desired number of states and click Set.
6. Edit the state texts as needed.
7. Change back to the Assign tab.
8. Select the newly created multistate map and click the Assign button. The assigned map
is now displayed next to the data point.
6.2.6 CEA-709 Properties
Apart from the common data point properties discussed in Section 6.2.4 the data points of
the CEA-709 technology have additional properties. Depending on if a NV is local or
external (remote), the properties may vary.
• NV Allocation: This property defines how a data point shall be allocated on the
device. Choices are “Static NV”, “Dynamic NV”, and “External NV”. If the allocation
type cannot be changed, this property is locked.
• SNVT: This property defines the SNVT of the NV, e.g., “lux (79)”.
Version 3.2 LOYTEC electronics GmbH
Page 70

L-Gate User Manual 70 LOYTEC
• Invalid Value: This property defines the “invalid value” for the NV. If set, this
specific value will be interpreted as “invalid” in the data point. If known by the SNVT,
the invalid value is filled in. Otherwise, the user can specify an invalid v alue.
• CEA-709 Mapping Information: This information is derived from the SNVT. It
defines how the NV contents are mapped to the data point.
• NV Scaling A, B, C: These are the scaling factors known from the SNVT table. The
scaling factors are applied to translate a raw NV value into the scalar representation of
the data point.
• Data Type: This is the basic NV data type. This is usually filled in from the SNVT
definition.
• Local NV Member Index: This property specifies the NV member index within a
given functional block. This must be a unique index in the functional block, which
identifies the NV after other NVs have been added or removed from the interface.
• Local/Remote NV Index: This property specifies the NV index. For local, static NVs
this is the NV index of the static NV. For external NVs, this is the NV index of the NV
on the remote device.
• Local/Remote NV Name: This property specifies the programmatic name of the NV.
For local, static NVs this is the programmatic name of the static NV. For external NVs,
this is the programmatic name of the NV on the remote device.
• Local/Remote Functional Block: This property specifies the programmatic name of
the NV. For local, static NVs, one of the reserved functional blocks can be selected.
• Local/Remote NV Flags: This property specifies the NV flags. For local (static or
dynamic) NVs, the flags can be configured. For external NVs, these flags are only
informational.
• Remove NV Information: For external NVs, this property contains the information
on the remote device and the NV selector on that device.
• Remote Device ID: For external NVs, this property contains information on the
remote device by listing the program ID and location string.
• Remote Device Address: For external NVs, this property contains the CEA-709
network addressing information to access the node, i.e., subnet, node, and NID.
• Retry Count: For external NVs, this property defines the retry count. The default is 3.
• Repeat Timer: For external NVs, this property defines the repeat timer in
milliseconds. The default is 96 ms.
• Transmit Timer: For external NVs, this property defines the transmit timer in
milliseconds. The default is 768 ms.
• LNS Network Path: If available from an LNS scan, this property specifies the LNS
network path of the device where the given NV exists.
• LNS Channel Name: If available from an LNS scan, this property specifies the LNS
channel name of the device where the given NV exists.
6.2.7 BACnet Properties
Apart from the common data point properties discussed in Section 6.2.4 the data points of
the BACnet technology have additional properties. Depending on if a NV is local or
external (remote), the properties may vary,
• Engineering Units: For analog BACnet server objects, this property defines the
engineering units from the BACnet standard. One of those units can be chosen from a
drop-down box, if this property is not locked.
Version 3.2 LOYTEC electronics GmbH
Page 71

L-Gate User Manual 71 LOYTEC
• Server Object Type: This property defines the BACnet object type of the underlying
BACnet server object. It can be changed within the class, i.e., for an analog data point,
the server object type analog input, analog output, or analog value can be chosen.
• Commandable: This property defines, if the underlying BACnet server object is
commandable. For BACnet value objects (AV, BV, MSV) this property can be edited
to create commandable or non-commandable BACnet value objects.
• Relinquish to invalid value: This property defines whether the data point maintains
the Relinquish_Default value, if the priority array is empty or assumes the invalid
value. By default, this property is false and the Relinquish_Default value is used.
Setting this property to true can be beneficial when used in a connection to withdraw a
value in another technology.
• Server Object Name: This property defines the object name of the underlying
BACnet server object. It must be unique among all server objects. It can be up to 64
characters.
• Server Object Instance No: This property defines the object instance number of the
underlying BACnet server object.
• Server Object Description: This property defines the object description of the
underlying BACnet server object. It can be left blank.
• Server Object Device Type: This property defines the object device type of the
underlying BACnet server object. It can be left blank.
• Allocate Server Object: This Boolean property defines, if a server object shall be
allocated for the data point. This option is useful, when a local server object shall be
allocated for a client mapping.
• Allocate Client Mapping: This Boolean property defines, if a client mapping shall be
allocated for the data point. This option is always set, if at least on client mapping is
attached.
• Client Map Count: This property defines the number of client mappings attached to a
data point. A data point can have one read client map or n write client mappings.
• Client Map [n]: This is a list of client mappings. The property shows a summary of
the client mapping parameters. To edit a client mapping click on the … button.
• Confirmed COV: This Boolean property defines, if a client map subscribes with the
confirmed COV service. If not enabled, the unconfirmed COV is used.
6.3 Project Settings
The project settings allow defining certain default behavior and default settings used
throughout the project. To access the project settings go to the menu Settings Æ Project
Settings… . This opens the project settings dialog, which provides several tabs as
described in the following sections.
6.3.1 General
The general tab of the project settings as shown in Figure 50 contains settings independent
of the technology port. The settings are:
• Project Name: This setting allows entering a descriptive name for the project.
• Default FTP Connection Settings: Enter a user name and password for the default
FTP access. This access method is used implicitly when connected via LNS and the
device is accessible over IP. For this implicit connection, there is no dialog to ask for a
username and password and the username and the default password from the project
settings are used.
Version 3.2 LOYTEC electronics GmbH
Page 72
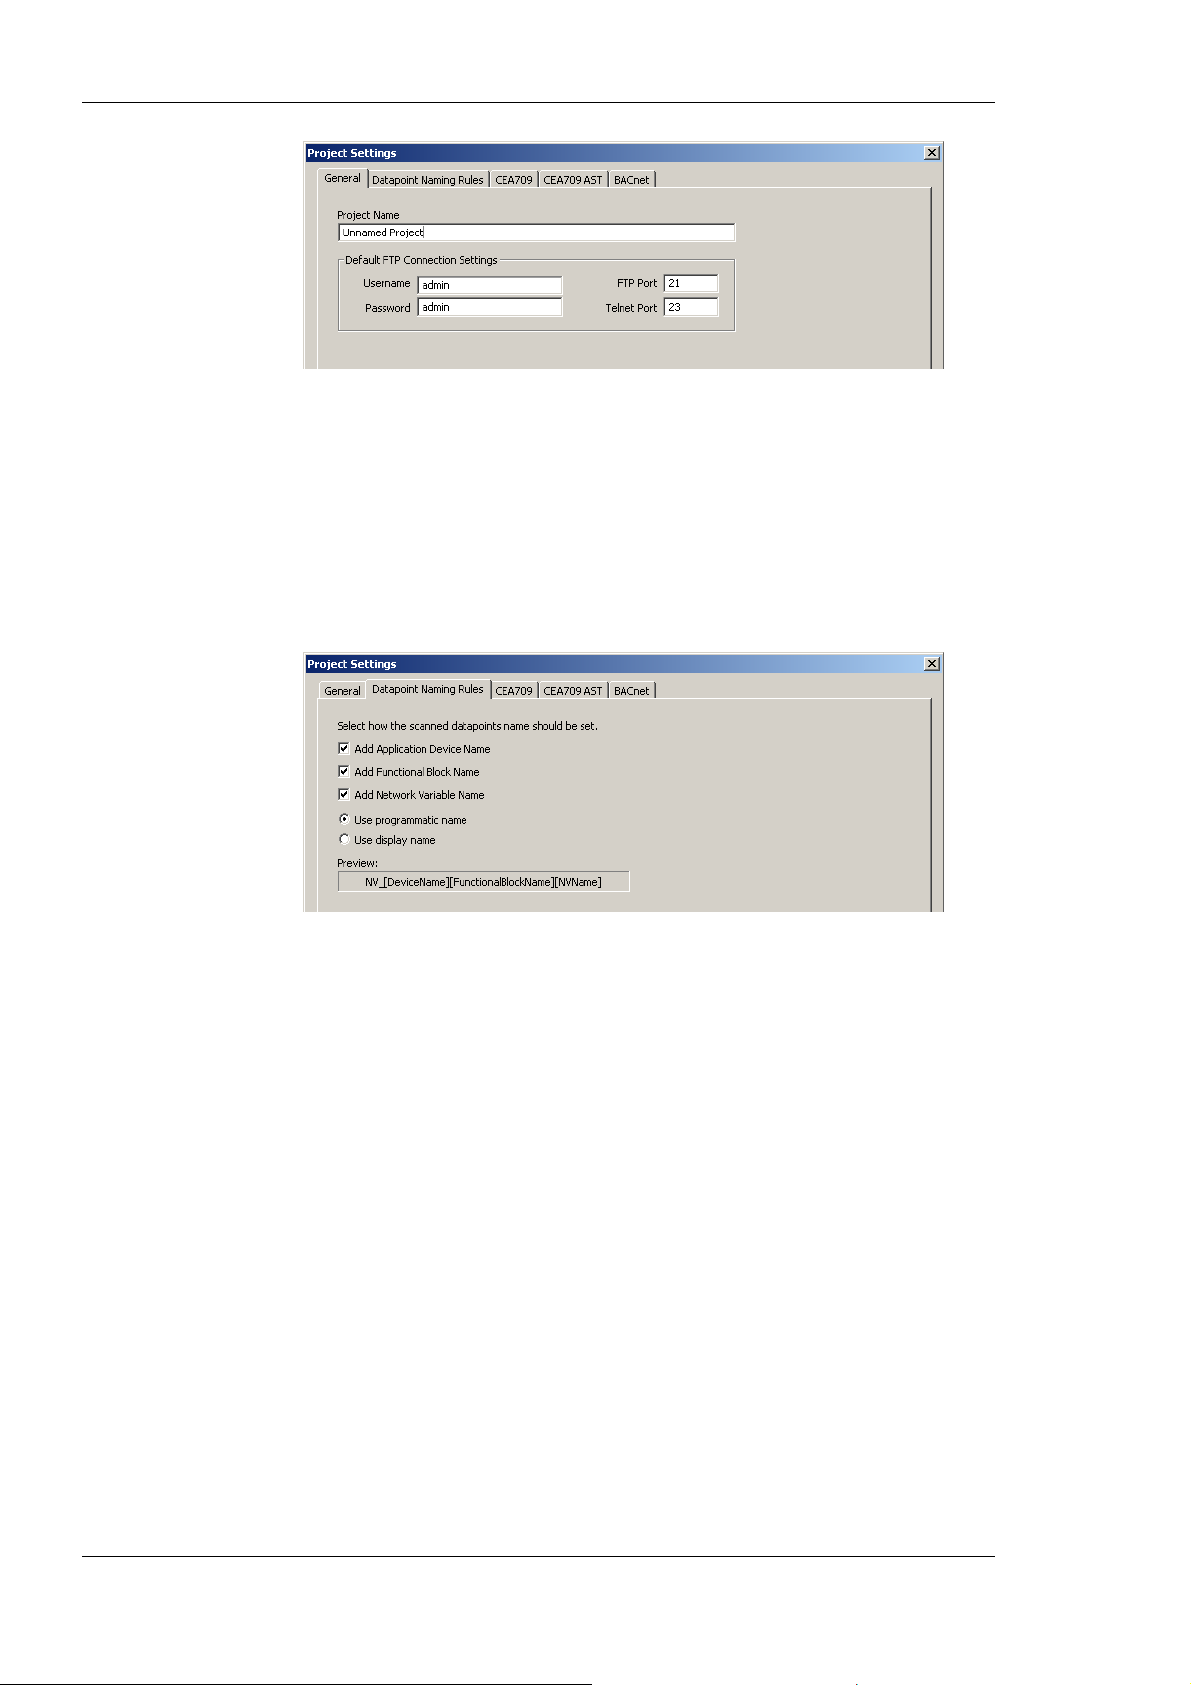
L-Gate User Manual 72 LOYTEC
Figure 50: General Project Settings.
6.3.2 Data Point Naming Rules
The data point naming rules tab (see Figure 51) allows specifying, how data point names
are automatically derived from scanned network variables. The preview shows how names
would look like, when the check marks are modified.
The option Use programmatic name and Use display name decides whether the data
point name is assembled of the programmatic NV name or the LNS display name.
6.3.3 CEA-709 Settings
The CEA-709 configuration tab as shown in Figure 52 allows configuring properties of the
device’s CEA-709 port. The options are:
• Enable Legacy Network Management Mode: This group box contains check boxes
for each CEA-709 port of the device. Put a check mark on the port, if this port shall be
operated in the legacy network management mode. In that mode, the port does not use
the extended command set (ECS) of network management commands. This can be
necessary to operate the device with some network management tools, that do not
support the ECS. See Section 6.4.3 for more information on how to configure such a
system.
• Default Pollcycle for External NVs: When using external NVs, this poll cycle is set
as a default for input data points. The poll cycle can be edited individually in the
properties view of the data point manager.
• Use state-member of SNVT_switch as: This setting defines how the state member of
the SNVT_switch shall be mapped to a data point. Depending on how the data point
shall be used, it can be binary or multi-state. The multi-state setting allows setting th e
UNSET state explicitly. As a binary point the UNSET state is implicitly chosen , if the
value is invalid.
• Configuration Download: This group box contains self-configuration settings for the
CEA-709 ports. This is necessary, when the device shall be used without being
commissioned by a network management tool. Set the check mark and enter the CEA-
Figure 51: Data Point Naming Rules Project Settings.
Version 3.2 LOYTEC electronics GmbH
Page 73
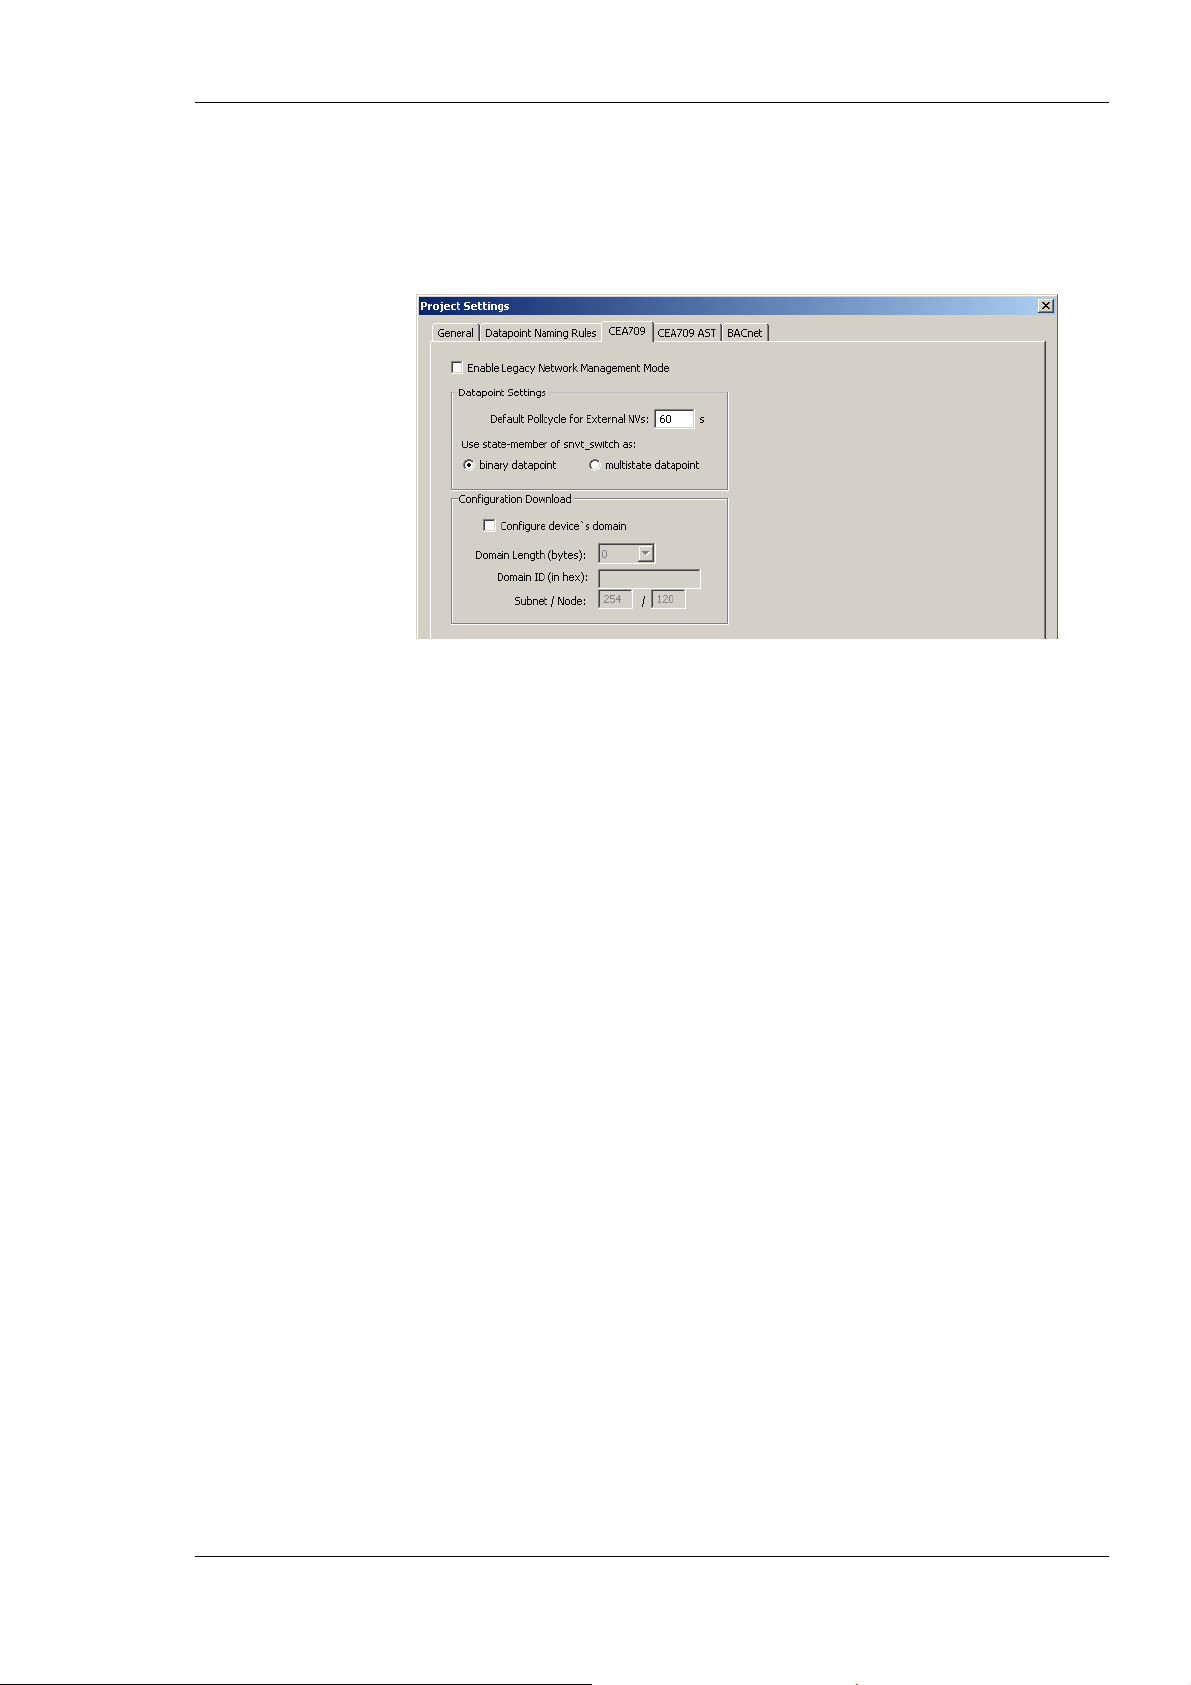
L-Gate User Manual 73 LOYTEC
709 domain and subnet/node information. If operated in self-configured mode, the
CEA-709 network can be scanned using the network scan (see Section 6.7.6) and
external NVs can be used on the device. Note, that the domain must match the nodes’
domain on the network and the subnet/node address must not be used by another
device.
Figure 52: CEA-709 Project Settings.
6.3.4 AST Settings
For CEA709 devices, the use of alarming, scheduling, trending (AST) features requires
additional resources (functional objects and NVs). The dialog is shown in Figure 53.
Changes made there affect the static interface. Since the number of used resources also
influences the performance, the CEA-709 AST tab allows configuring those resources for
the project. In this tab the required number of scheduler units that may be instantiated and
their capacity may be configured (how many time/value entries, value templates, bytes per
value template, and so on). It contains the following options and settings, which are
relevant to calendar and scheduler functionality of the device:
• Enable Calendar Object: This checkbox enables a L
object on the device. It is automatically enabled together with local schedulers, since
the two are always used together.
• Enable Scheduler Objects: This checkbox enables local L
scheduler objects on the device. Checking this box will automatically enable the
calendar as well.
• Enable Remote AST Objects: This checkbox enables the functional object for NVs,
which are used to access remote AST objects. If this box is checked, the Clients
functional block is included in the static interface.
• Enable AST v2: This checkbox enables the AST interface version 2 for local
CEA-709 schedulers on the device. This interface is not compatible with older devices.
The new interface provides access to the value label descriptions in schedule presets
for remote schedulers.
ONMARK compliant calendar
ONMARK compliant
• Number of calendar patterns: Specifies the maximum number of different exception
schedules (day classes like holiday, maintenance day) supported by this calendar
object.
• Total number of date entries: Specifies the maximum number of date definitions
which may be stored by the calendar. This is the sum of all date definitions from all
calendar entries. A date definition is for example a single date, a date range, or a week
and day pattern (every last Friday in April).
• Number of local schedulers: This is the number of local scheduler objects which
should be available on the device. Each local scheduler data point created in the data
Version 3.2 LOYTEC electronics GmbH
Page 74
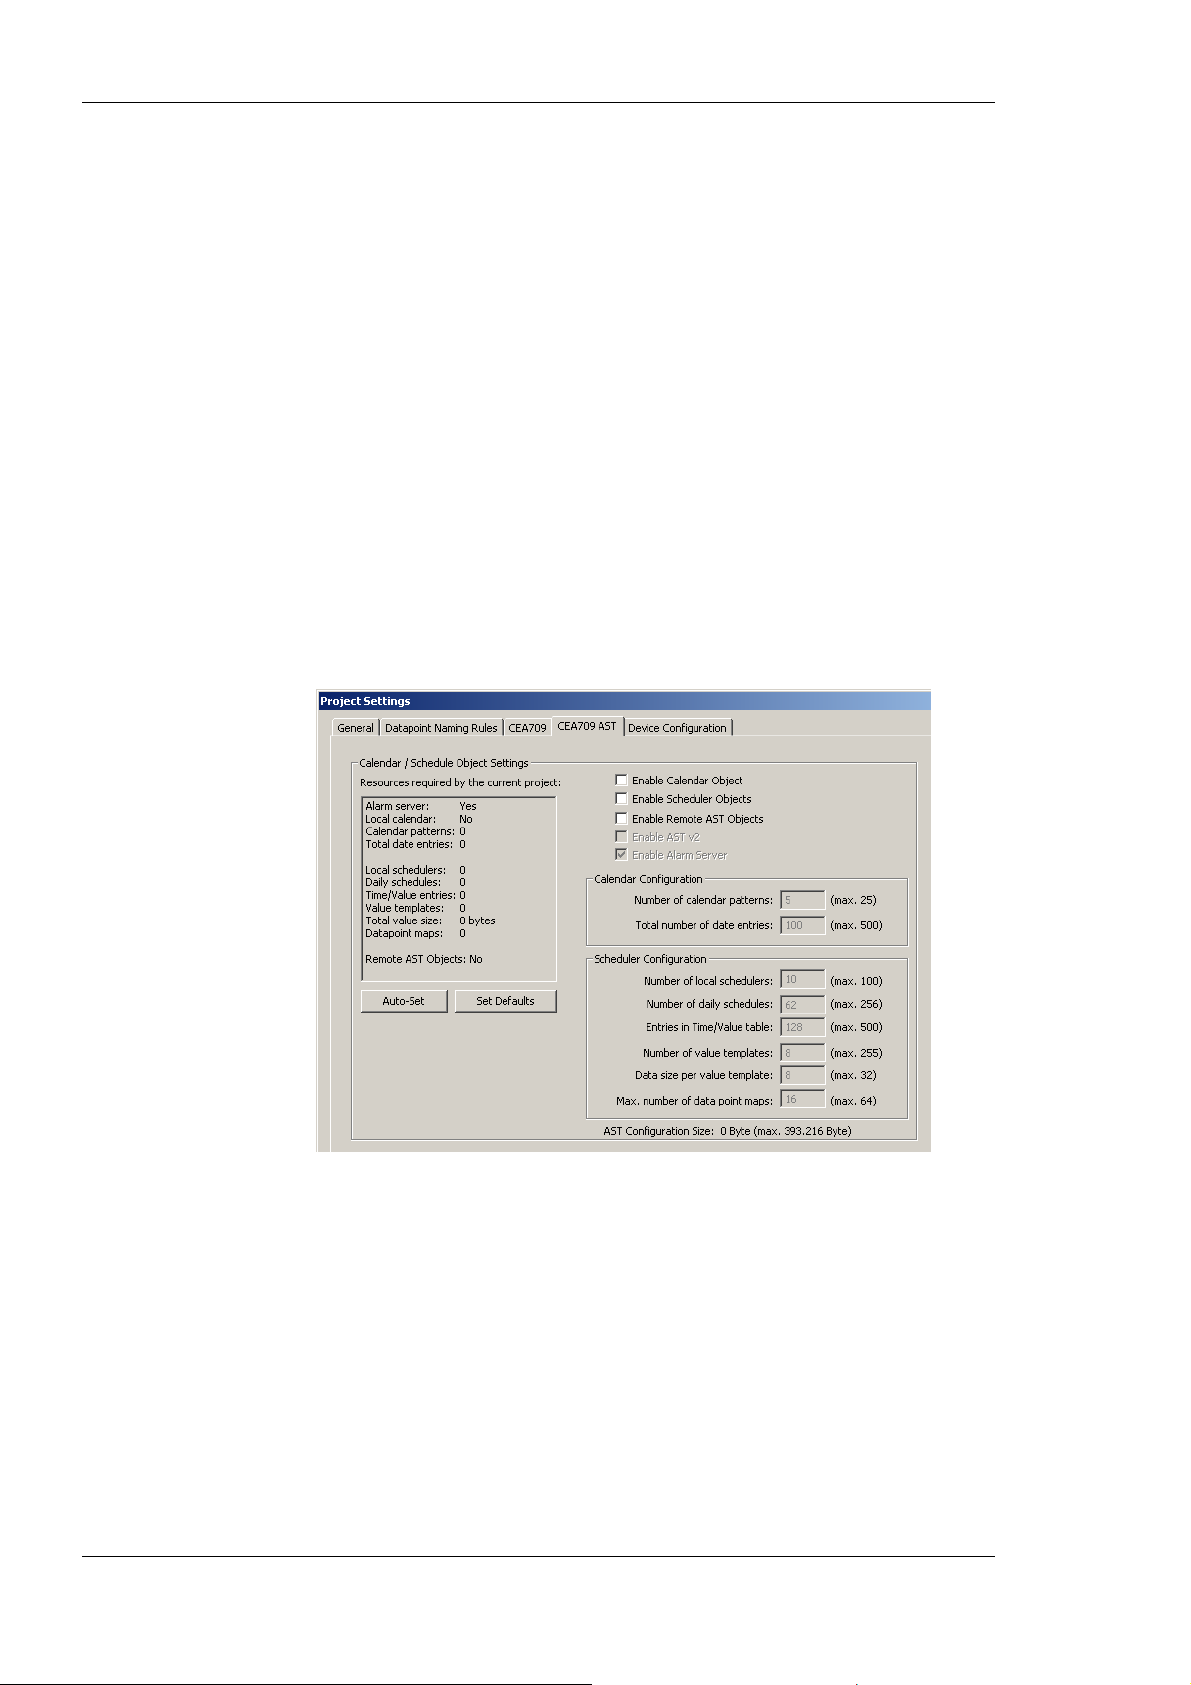
L-Gate User Manual 74 LOYTEC
point manager will connect to one of these scheduler objects. There may be more
scheduler objects available on the device than are actually used at a certain time. It is a
good idea to have some spare scheduler objects ready, in case another scheduler is
needed.
• Number of daily schedules: This is the maximum number of schedules supported by
each scheduler object. This number must at least be 7, since a scheduler always needs
to provide one schedule for each day of the week (default weekly schedule). For each
special day defined by the calendar or embedded exception day, an additional daily
schedule is required to support it.
• Entries in Time/Value table: This is the total number of entries in each scheduler
defining a value template that should apply on a specific day starting at a specific time
(the time table).
• Number of value templates: This is the maximum number of value templates
supported by each scheduler.
• Data size per value template: This specifies the buffer size reserved to hold the data
for each value template. More data points or bigger data structures require a bigger
value buffer.
• Max. number of data point maps: Specifies the maximum number of individual data
points that this scheduler is able to control.
Figure 53: CEA-709 AST Project Settings.
As can be seen from the above list, it is not easy to configure a LONMARK scheduler object.
There are many technical parameters which need to be set and which require some
knowledge of how these scheduler objects work internally. Therefore, the configuration
software provides the following mechanisms to help in choosing the right settings:
• Resources required by the current project: The absolute minimum settings required
by the current project are shown in a table at the left side of the window. This data may
be used to fill in the values at the right side, but some additional resources should be
planned to allow for configuration changes which need more resources.
• Auto-Set: This button may be used to let the configuration software decide on the best
settings to use, based on the current project. Since the current projects resource usage
is taken as a starting point, all schedulers and calendar patterns in the project should
first be configured as required before this button is used.
Version 3.2 LOYTEC electronics GmbH
Page 75
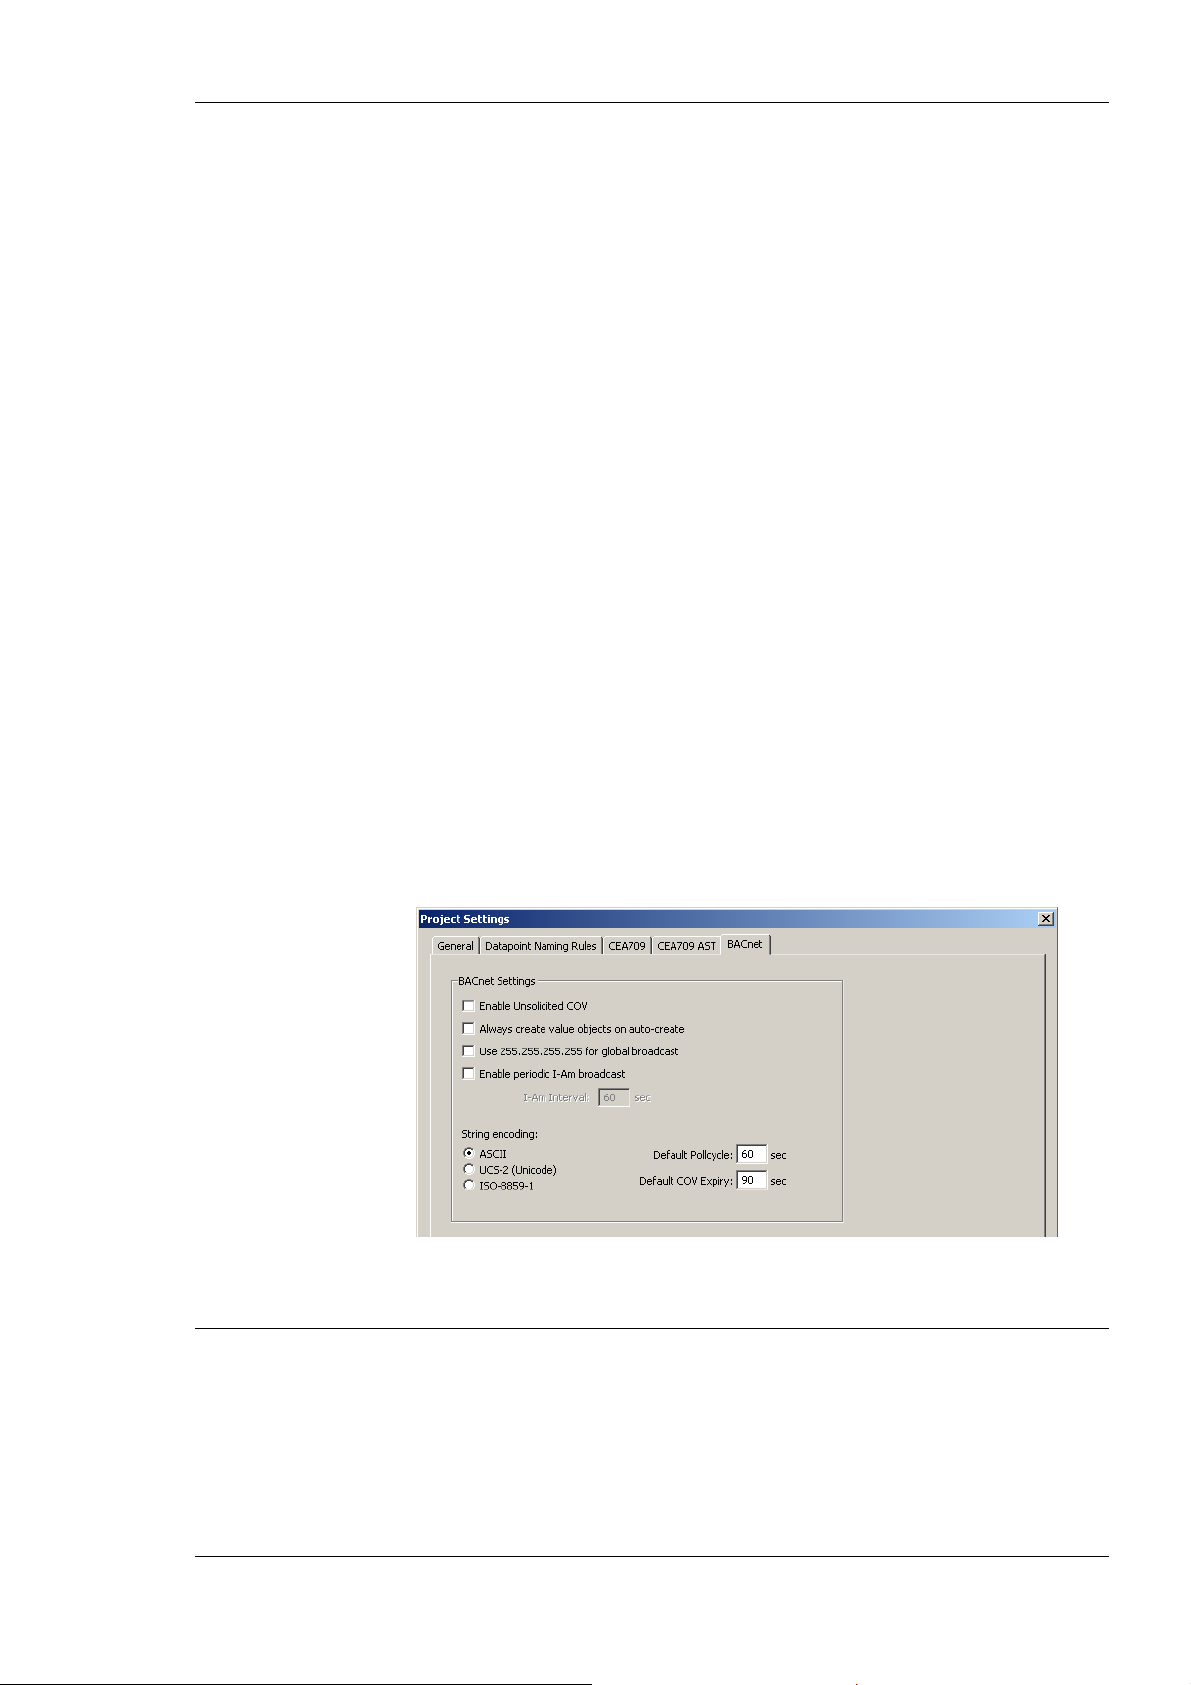
L-Gate User Manual 75 LOYTEC
• Set Defaults: This button will choose standard values for all settings. In most cases,
these settings will provide more resources than necessary.
6.3.5 BACnet Settings
The BACnet configuration tab as shown in Figure 54 allows configuring properties of the
device’s BACnet port. The options are:
• Enable Unsolicited COV: Put a check mark on this option to enable COV-U on the
BACnet port. When active, the device sends unsolicited COV broadcast on all BACnet
objects, when their value changes in accordance to the respective COV rules.
• Always create value objects on auto-create: If activated, the auto-create BACnet
points function of the configuration software creates commandable value objects (AV,
BV, MV) instead of output objects (AO, BO, MO) and non-commandable value
objects (AV, BV, MV) instead of input objects (AI, BI, MI). This feature can be
activated if the regular input/output model is not desired.
• Use 255.255.255.255 for global broadcast: This setting overrides the standard
behavior of BACnet to send broadcasts as global IP broadcasts. This can solve
scanning problems with some BACnet devices.
• Enable periodic I-Am broadcast: This setting enables the periodic transmission of I-
Am broadcasts. Specify the interval in seconds. If disabled, the device sends an I-Am
only when starting up. This is the default behavior of BACnet devices.
• Encode all strings: This setting defines how strings in BACnet objects are encoded.
By default it is ASCII, which is compatible with most BACnet software. To support
characters of Western European languages, choose ISO-8859-1. To support Unicode
character sets (e.g., Japanese) select UCS-2.
• Default Poll cycle, Default COV Expiry: This setting defines the default values that
are used when creating new client mappings. Changing this option does not affect
already existing client mappings.
Figure 54: BACnet Project Settings.
6.4 Workflows for the L-Gate
This section discusses a number of work flows for configuring the L-Gate in different use
cases in addition to the simple use case in the quick-start scenario (see Section 2.3). The
description is intended to be high-level and is depicted in a flow diagram. The individual
steps refer to later Sections, which describe each step in more detail. In principle, the
L-Gate Configurator supports the following use cases:
• Network Management Tool based on LNS 3.x (see Section 6.4.2)
Version 3.2 LOYTEC electronics GmbH
Page 76
L-Gate User Manual 76 LOYTEC
• Non-LNS 3.x network management tool with polling (see Section 6.4.3)
• Non-LNS 3.x network management tool with bindings (see Section 6.4.4)
6.4.1 Involved Configuration Files
In the configuration process, there are a number of files involved:
• XIF file: This is the standard file format to exchange the static interface of a device.
This file can be used to create a device in the database without having the L-Gate online. There exists a standard XIF file for the FT port (L-Gate-900 FT-10.xif) and one
for the IP-852 port (L-Gate-900 10L.xif).
• L-Gate Configurator project file: This file contains all ports, data points, and
connections of a project. These files end with “.gtw”. It stores all relevant
configuration data and is intended to be saved on a PC to backup the L-Gate’s data
point configuration.
6.4.2 Configure with LNS
The flow diagram in Figure 55 shows the steps that need to be followed in order to
configure the L-Gate in a network with LNS 3.x. In this scenario the L-Gate will use
dynamic NVs and bindings.
First, the L-Gate device must be added to LNS (see Section 6.4.6). Then the L-Gate
Configurator must be started in plug-in mode to configure the L-Gate (see Section 6.7.1).
In the Configurator scan for the data points in the LNS database (see Section 6.7.4). Select
the NVs that the L-Gate shall expose to BACnet (see Section 6.7.7). Generate BACnet
objects and connections from the used NVs (see Section 6.7.11). Finally, the configuration
needs to be downloaded onto the L-Gate (see Section 6.7.13). It is recommended to save
the complete configuration to a disk file for being able to replace an L-Gate in the network.
START
Add L-Gate
Section 6.5
Start the Confi g urator as a plug-in
Section 6.7.1
Scan network variables
Section 6.7.4
Select NVs and use on L-Gate
Section 6.7.7
Generate BACnet objects
Section 6.7.11
Download configuration to L-Gate
Section 6.7.13
DONE
Figure 55: Basic design-flow with LNS.
Version 3.2 LOYTEC electronics GmbH
Page 77
L-Gate User Manual 77 LOYTEC
To add more NVs when all bindings are in place and the L-Gate is being used simply
repeat the steps described above. The Configurator software will back up the bindings,
create or delete the dynamic NVs, and re-create the bindings again.
6.4.3 Configure without LNS
The flow diagram in Figure 56 shows the steps that need to be followed in order to
configure the L-Gate without LNS 3.x. In this scenario the L-Gate will use external NVs
and polling. The advantage of this solution is that no bindings in the non-LNS tool (or selfbinding nodes) need to be changed. This comes at the cost of a constant network load
caused by polling.
Start the Configurator in stand-alone mode and connect to the L-Gate via the FTP method
(see Section 6.7.2). If changing an existing configuration upload the current configuration
from the L-Gate (see Section 4). In the Configurator import data points from a CSV import
file (see Section 6.7.5) or scan an CEA-709 network online (see Section 6.7.6). Select the
NVs that the L-Gate shall expose to BACnet (see Section 6.7.7). Alternatively, you can
create external NVs manually (see Section 6.7.10). Generate BACnet objects and
connections from the used NVs (see Section 6.7.11). Finally, the configuration needs to be
downloaded onto the L-Gate (see Section 6.7.13). It is recommended to save the complete
configuration to a disk file for being able to replace an L-Gate in the network.
Start the Configurator stand-alone
Import network variables from file
Section 6.7.5
Select NVs and use on L-Gate
Create other external NVs manually
Download configuration to L-Gate
START
Section 6.7.2
Upload configuration
Section 6.7.3
Section 6.7.7
Section 6.7.10
Generate BACnet objects
Section 6.7.11
Section 6.7.13
Scan NVs online from network
Section 6.7.6
DONE
Figure 56: Basic design-flow without LNS.
6.4.4 Configure without LNS Using Bindings
The flow diagram in Figure 57 shows the steps that need to be followed in order to
configure the L-Gate without LNS 3.x. In this scenario the L-Gate will use static NVs and
bindings. The advantage of this solution is that the network load is minimized. However,
the non-LNS management tool must create bindings for the L-Gate and update an existing
network.
Version 3.2 LOYTEC electronics GmbH
Page 78
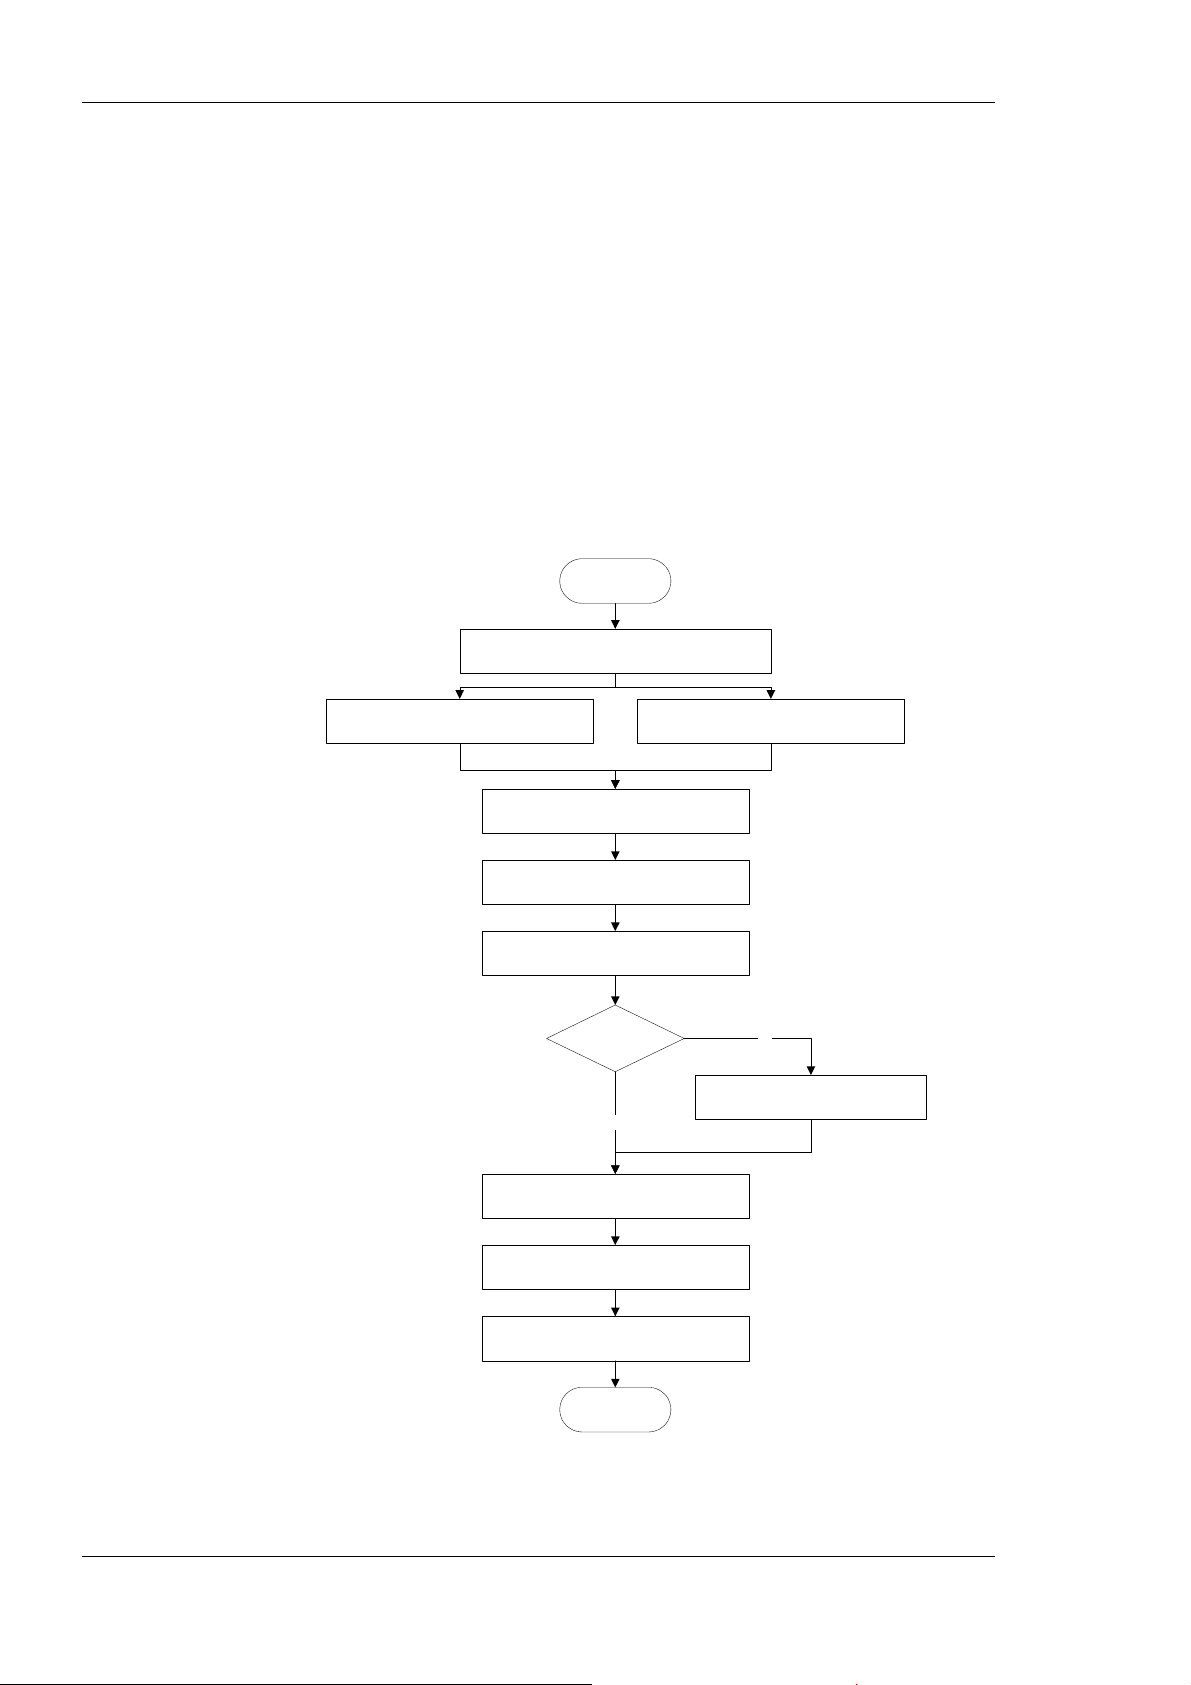
L-Gate User Manual 78 LOYTEC
Start the L-Gate Configurator in stand-alone mode and connect to the L-Gate via the FTP
method (see Section 6.7.2). In the Configurator import data points from a CSV import file
(see Section 6.7.5) or scan a CEA-709 network online (see Section 6.7.6). Select the NVs
that the L-Gate shall expose to BACnet (see Section 6.7.7). For the NVs used on the
L-Gate select the “static NV” allocation type (see Section 6.7.8). Alternatively, you can
create static NVs manually (see Section 6.7.9).
For network management tools, which do not support the ECS (enhanced command set)
network management commands, the legacy network management mode must be
configured (see Section 6.7.15). Please contact the tool’s vendor for information whether
ECS is supported or not.
Generate BACnet objects and connections from the used NVs (see Section 6.7.11).
Download the configuration onto the L-Gate (see Section 6.7.13). Finally, export a XIF file
(see Section 6.7.14). It is recommended to save the complete configuration to a disk file for
being able to replace an L-Gate in the network.
START
Start the Configurator stand-alone
Section 6.7.2
Import network variables from file
Section 6.7.5
Select NVs and use on L-Gate
Create other static NVs manually
Download configuration to L-Gate
Section 6.7.7
Switch NVs to „static“
Section 6.7.8
Section 6.7.9
Tool supports
ECS ?
yes
Generate BACnet objects
Section 6.7.11
Section 6.7.13
Scan NVs online from network
Section 6.7.6
no
Enable Legacy NM Mode
Section 6.7.15
Export XIF file
Section 6.7.14
DONE
Figure 57: Basic design-flow without LNS using bindings.
Version 3.2 LOYTEC electronics GmbH
Page 79
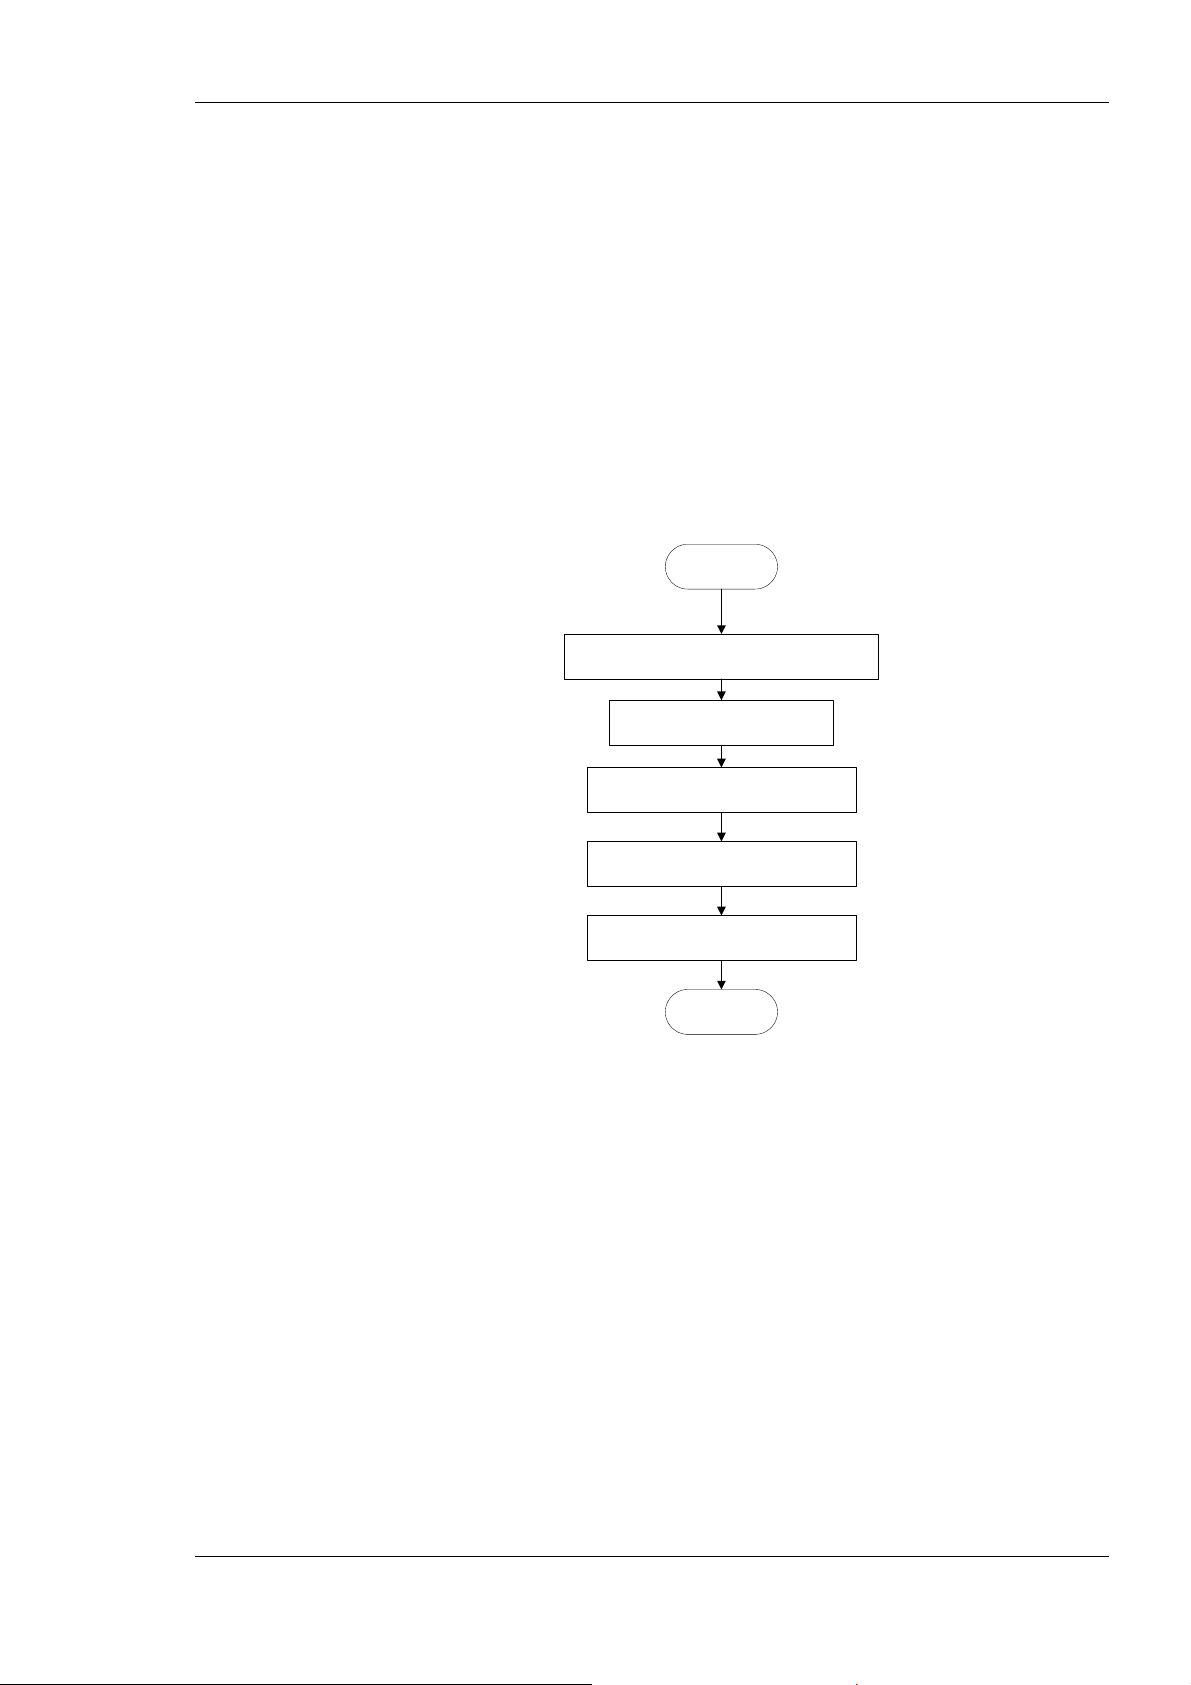
L-Gate User Manual 79 LOYTEC
To use the L-Gate in the non-LNS management tool, commission the L-Gate using the
exported XIF file and create the bindings.
When changing a running L-Gate configuration with existing bindings, it is recommended
to create additional data points as external NVs with polling as described in Section 6.4.3.
Otherwise, a new XIF file needs to be exported and replacing the L-Gate in the non-LNS
tool requires the user to create all bindings again from scratch (see Section 5.5.2).
6.4.5 Replace an L-Gate
An L-Gate can be replaced in the network by another unit. This might be necessary, if a
hardware defect occurs. First of all, the replacement L-Gate needs to be configured with the
appropriate IP settings, including all relevant BACnet device settings. The remainder of
this section focuses on the L-Gate data point configuration. The work flow is depicted in
Figure 58.
START
Start the Configurator st a nd- alone
Section 6.7.2
Load a saved L-Gate project file
Download configuration to L-Gate
Section 6.7.13
Replace L-Gate
Section 6.6
Reboot the L-Gate
Section 4.4
DONE
Figure 58: Basic work flow to configure a replacement device.
Start the L-Gate Configurator software stand-alone and connect via the FTP method (see
Section 6.7.2). Then load the L-Gate configuration project file from disk, which has been
saved when the original L-Gate has been configured or modified. Double-check, if the data
point configuration seems sensible. Then download the configuration to the L-Gate (see
Section 6.7.13).
If using an LNS-based tool, the L-Gate device needs to be replaced in that tool (see Section
6.6). If you are not using LNS, then refer to your network management tool’s reference
manual on how to replace a device. After replacing the device in the network management
tool, reboot the L-Gate (see Section 4.4)
6.4.6 Configure from BACnet
The flow diagram in Figure 59 shows the steps that need to be followed in order to
configure the L-Gate from the BACnet side. In this scenario the L-Gate will be configur ed
with BACnet data points from the BACnet network. The CEA-709 side of the gateway has
to be engineered as described in the previous section, but without automatic BACnet object
Version 3.2 LOYTEC electronics GmbH
Page 80
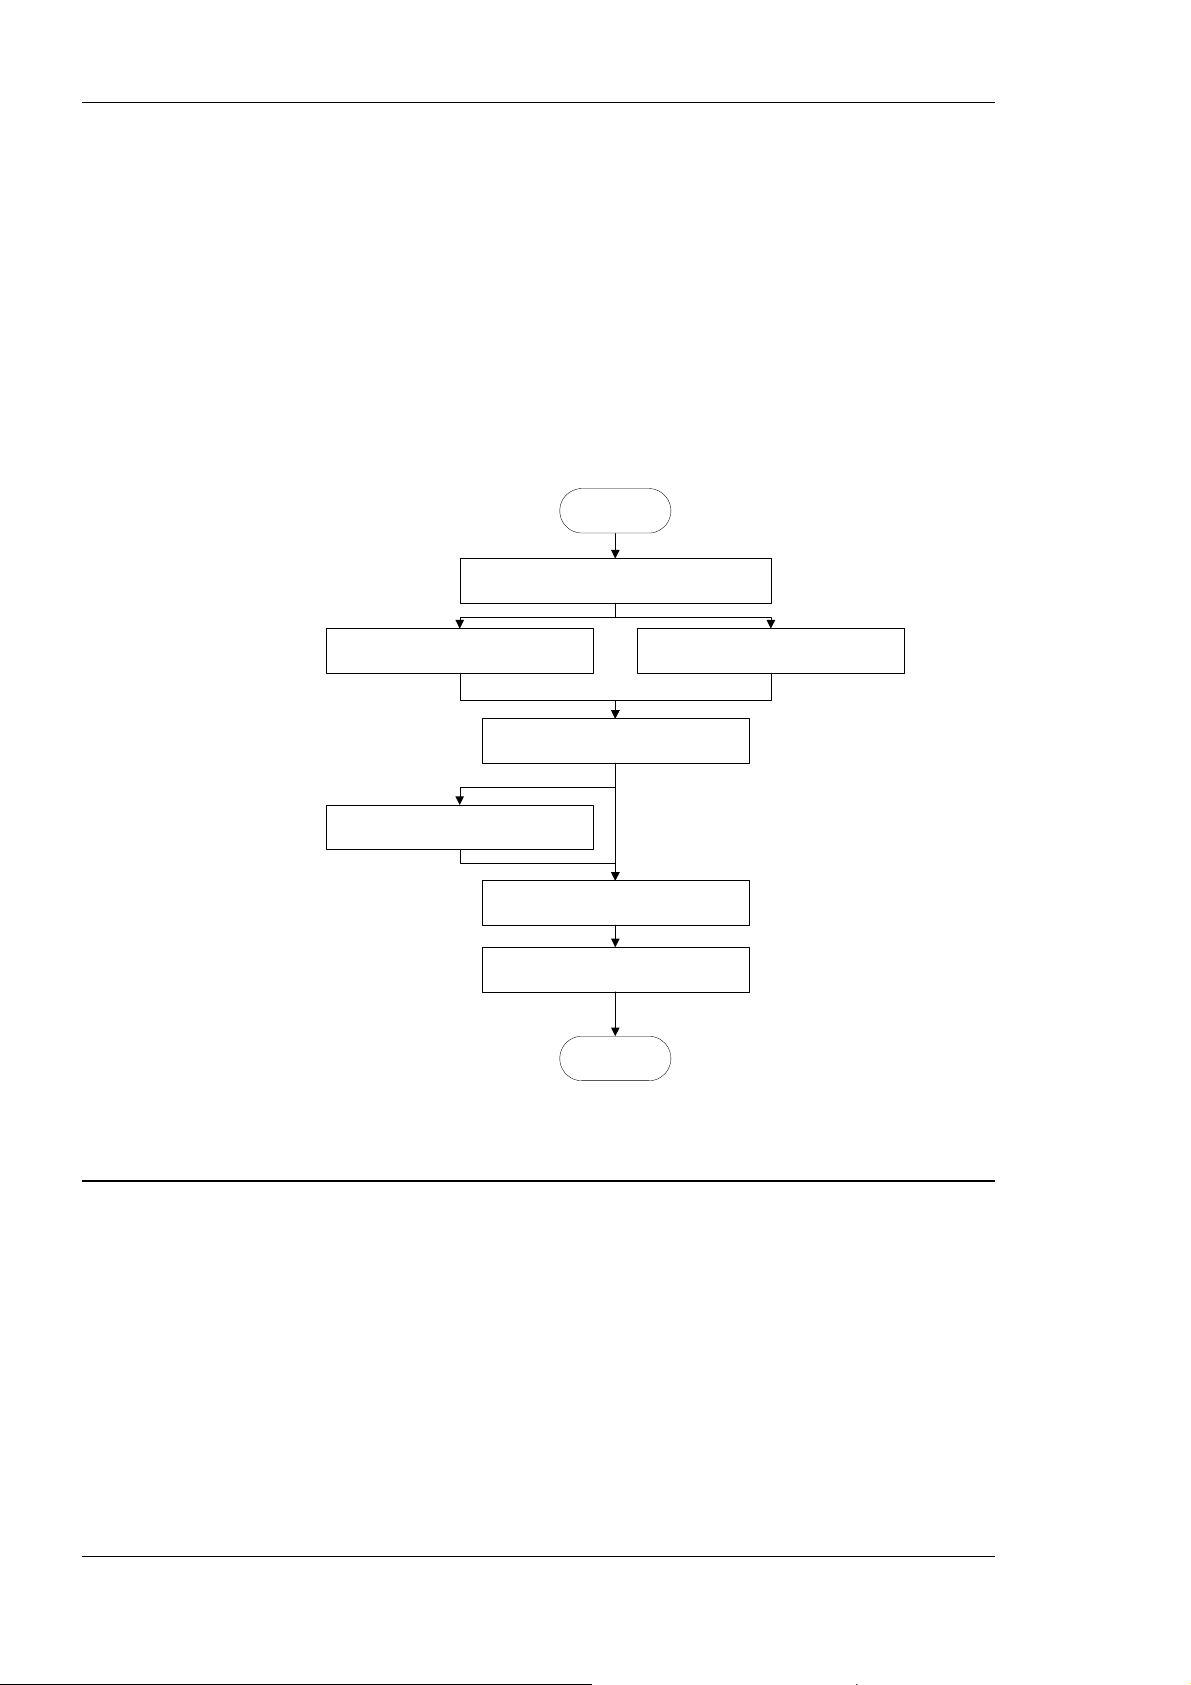
L-Gate User Manual 80 LOYTEC
creation. The remainder of this section assumes that NVs and the static interface have been
configured already.
Start the L-Gate Configurator in stand-alone mode and connect to the L-Gate via the FTP
method (see Section 6.7.2). In the Configurator use the BACnet network scan to find
BACnet objects in the network (see Section 6.10.1) or import BACnet objects from an
EDE file (see Section 6.10.2). Select the remote BACnet objects, that the L-Gate shall
access and use them on the device to create client mappings on the L-Gate (see Section
6.10.3). Alternatively, you can create BACnet server objects manually (see Section 6.10.5).
Once the BACnet client mappings or server objects have been created on the BACnet port,
connections need to be created (see Section 6.9.1). This has to be done manually by
selecting the BACnet object and the NV, where this BACnet object shall be exposed to.
START
Start the Configurator stand-alone
Section 6.7.2
6.5 Adding L-Gate
Import BACnet objects from EDE file
Optional: Create BACnet server objects
Section 6.10.2
Select BACnet objects and use on L-Gate
Section 6.10.5
Create Connections Manually
Download configuration to L-Gate
Figure 59: Basic design-flow from BACnet.
Section 6.10.3
Section 6.9.1
Section 6.7.13
DONE
Scan BACnet online from network
Section 6.10.1
To configure an L-Gate in your LonMaker drawing, the device needs to be added to the
LNS database and commissioned. This Section refers to LonMaker TE and describes how
to add an L-Gate to your database.
To Add a Device to LonMaker TE
1. In your LonMaker drawing, drag a device stencil into the drawing. Enter an
appropriate name as shown in Figure 60.
Version 3.2 LOYTEC electronics GmbH
Page 81
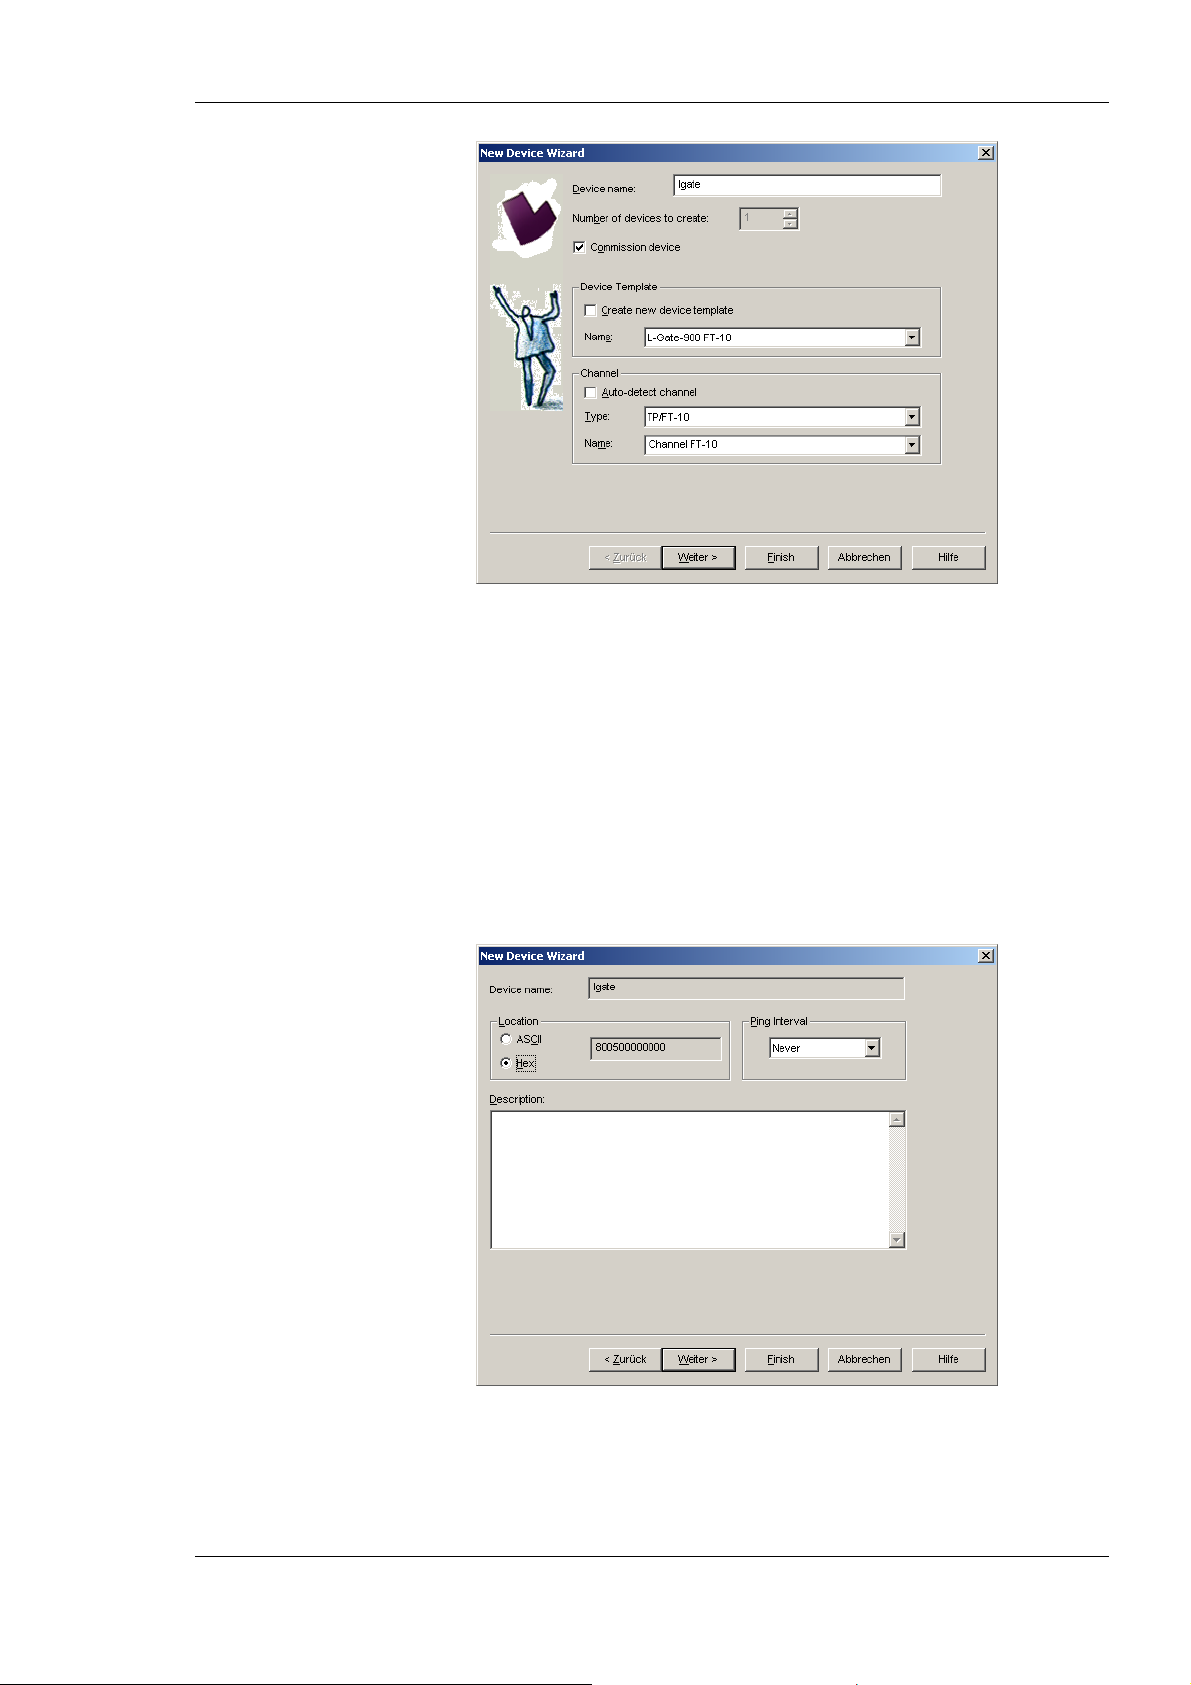
L-Gate User Manual 81 LOYTEC
Figure 60: Create a new device in the drawing.
2. Select Commission Device if the device is already connected to the network.
3. In the Device Template group box select the existing device template of the L-Gate.
Select “L-Gate-900 FT-10”, if the L-Gate is configured to use the FT-10 interface, or
“L-Gate-900 IP-10L”, if the L-Gate is configured to be on the IP channel. For
information on how to configure which port to use, refer to Section 4.2.5 for the Web
UI.
4. Select the channel, which the device is connected to and click Next.
5. The following dialog shown in Figure 61 appears, click Next.
Figure 61: Leave defaults for Location.
6. Check Service Pin as the device identification method as shown in Figure 62 and click
Next.
Version 3.2 LOYTEC electronics GmbH
Page 82
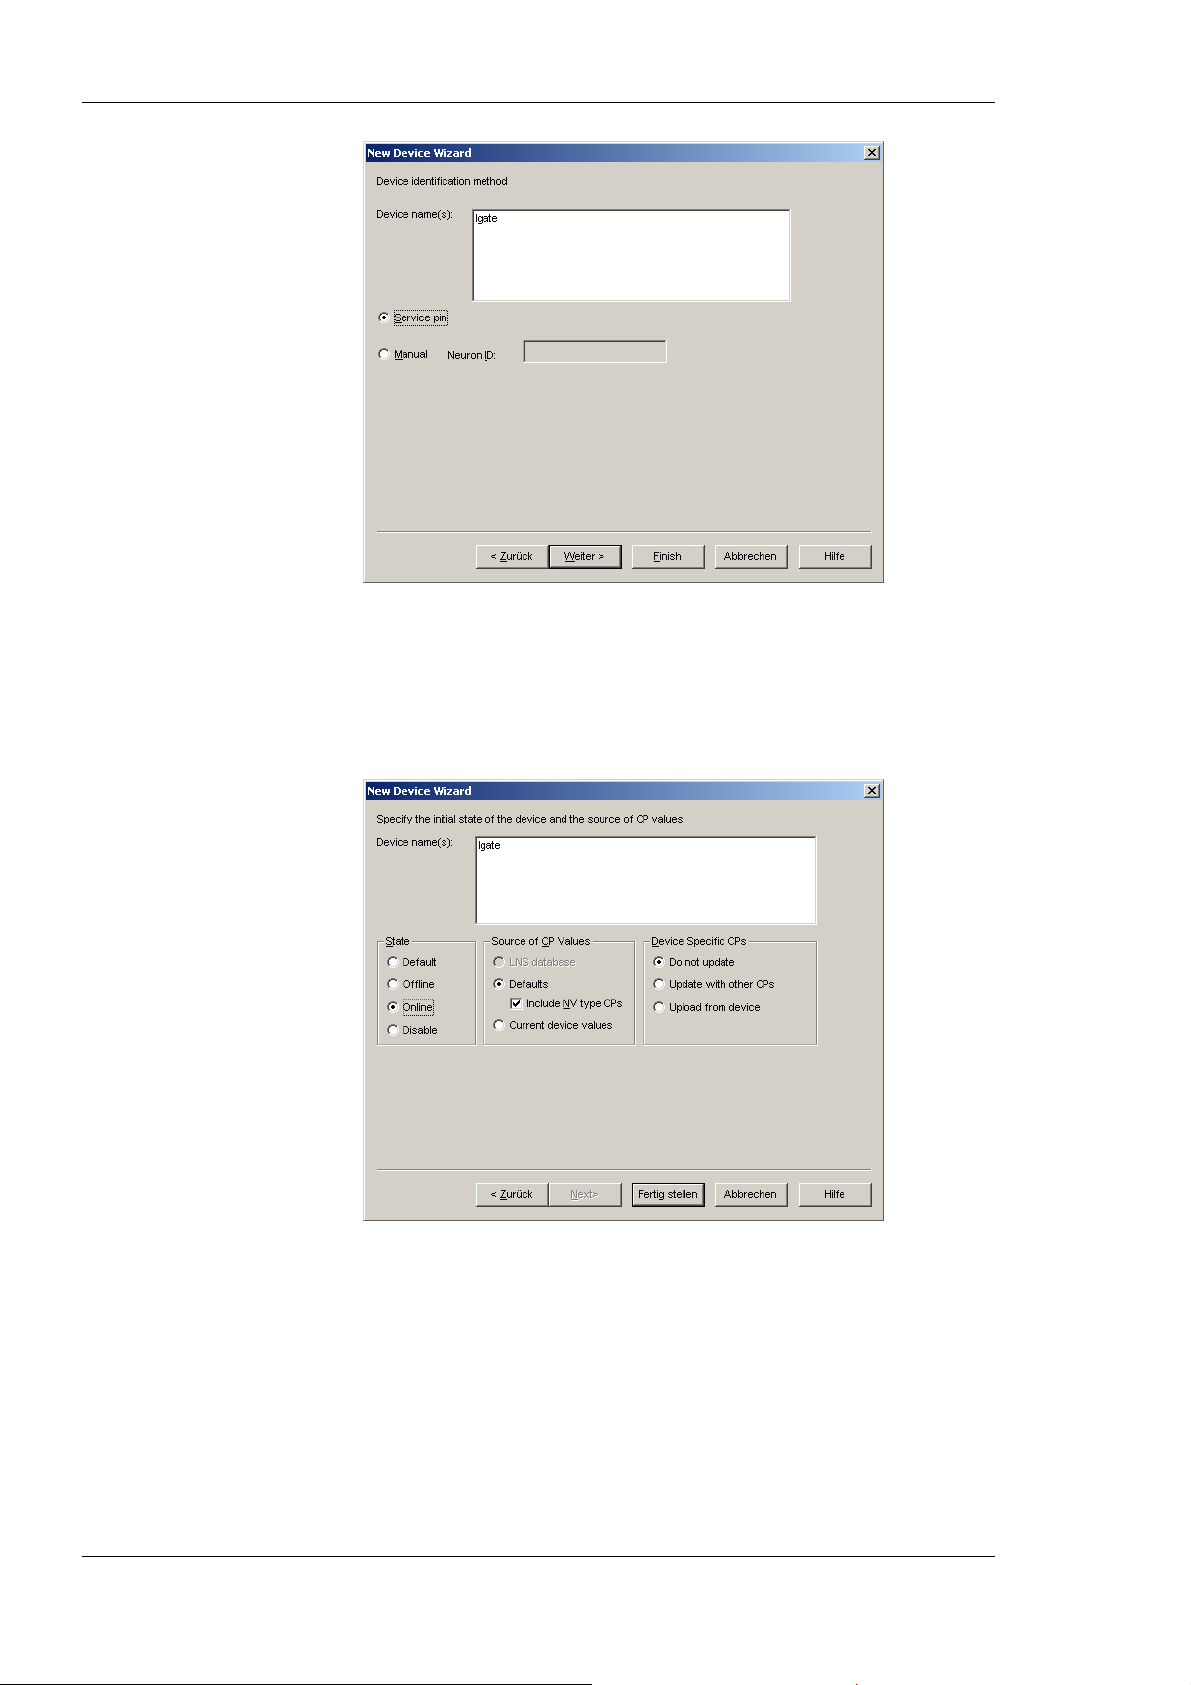
L-Gate User Manual 82 LOYTEC
Figure 62: Use Service Pin.
7. Click Next in the following screens until you get to the final dialog shown in Figure
63.
8. If the device is already on-net, select Online.
Figure 63: Final dialog.
9. Click Finish. A dialog will prompt to press the service pin.
Version 3.2 LOYTEC electronics GmbH
Page 83
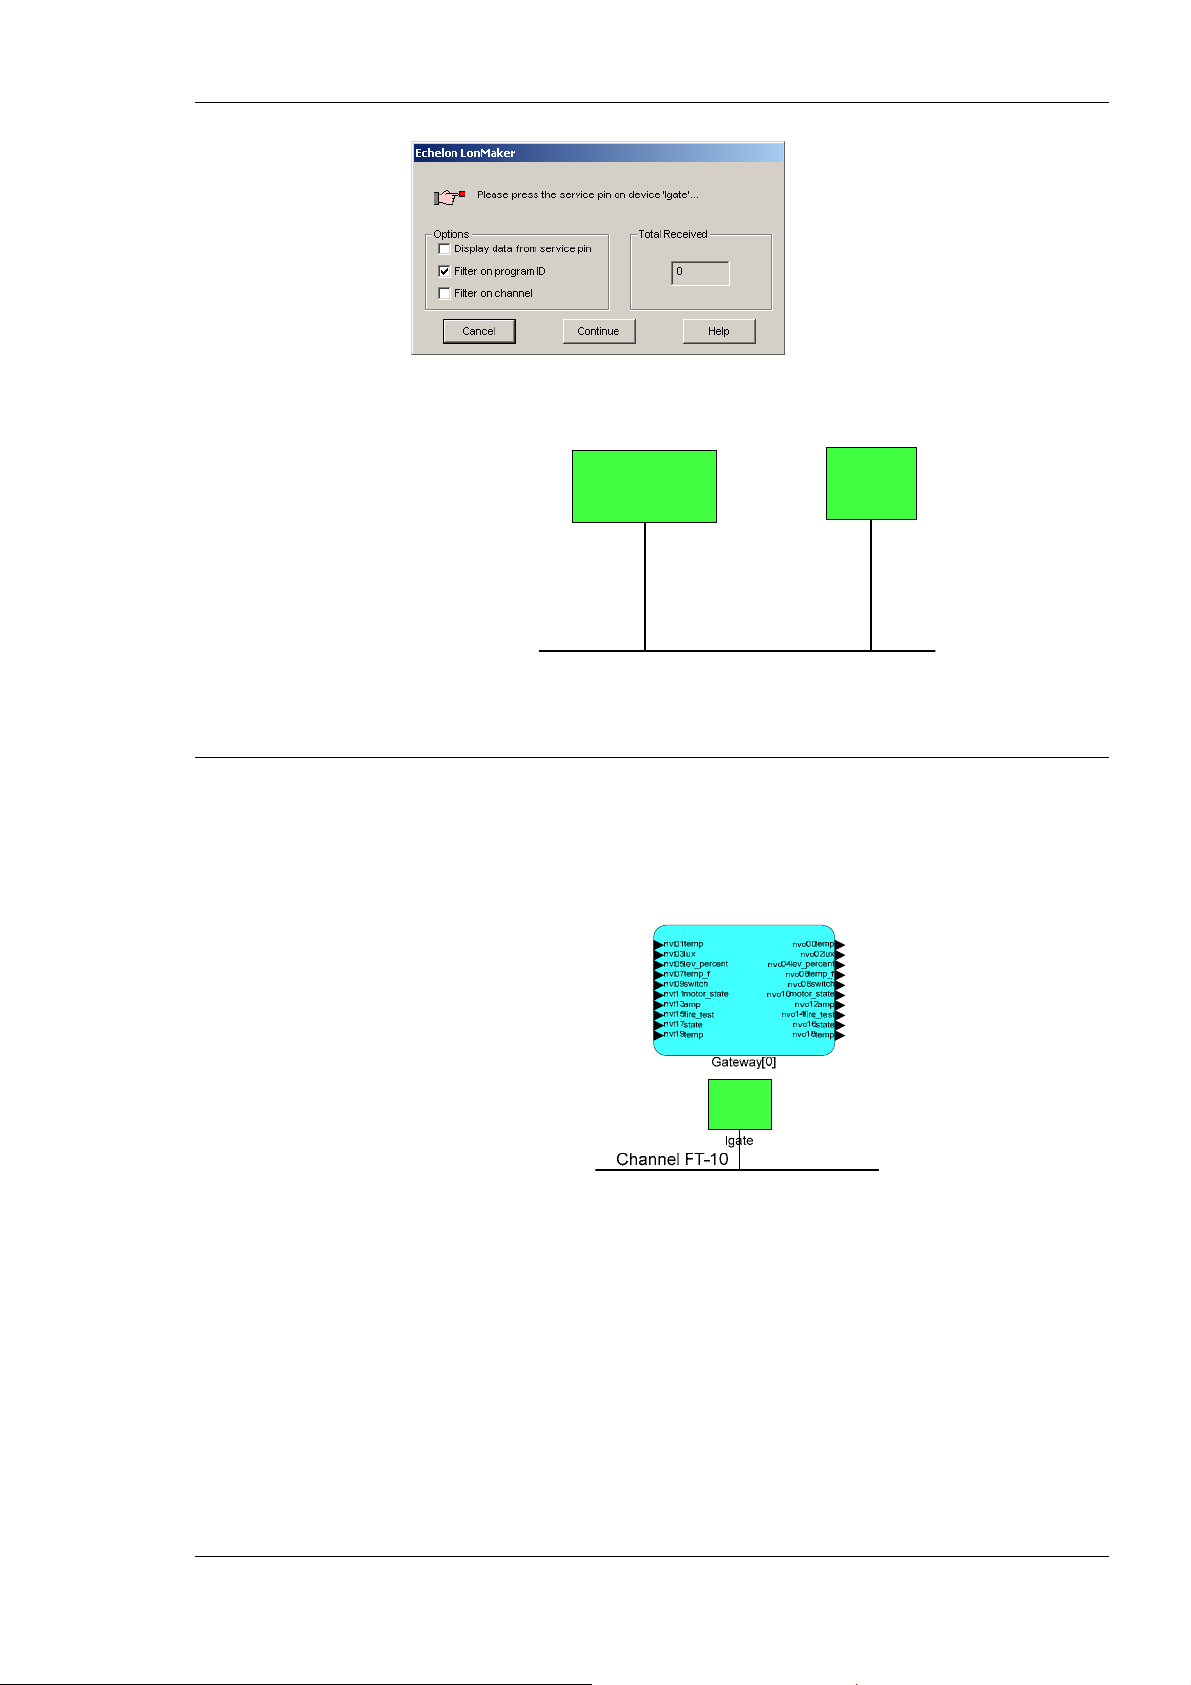
L-Gate User Manual 83 LOYTEC
10. Finally, you should get the device added to your drawing as depicted in Figure 64.
LNS Network Interface
lgate
Channel FT-10
6.6 Replace an L-Gate
This Section describes how to replace an L-Gate in your LNS database. The description
refers to LonMaker TE. Let’s assume there is a device ‘lgate’ in the LNS database as
shown in Figure 65.
To Replace a Device in LonMaker TE
Figure 64: The L-Gate has been added to the drawing.
Figure 65: LonMaker drawing with one L-Gate.
1. Select the device and right-click on the device shape.
2. Select Commissioning Æ Replace…. This opens the LonMaker Replace Device
Wizard as shown in Figure 66.
Version 3.2 LOYTEC electronics GmbH
Page 84
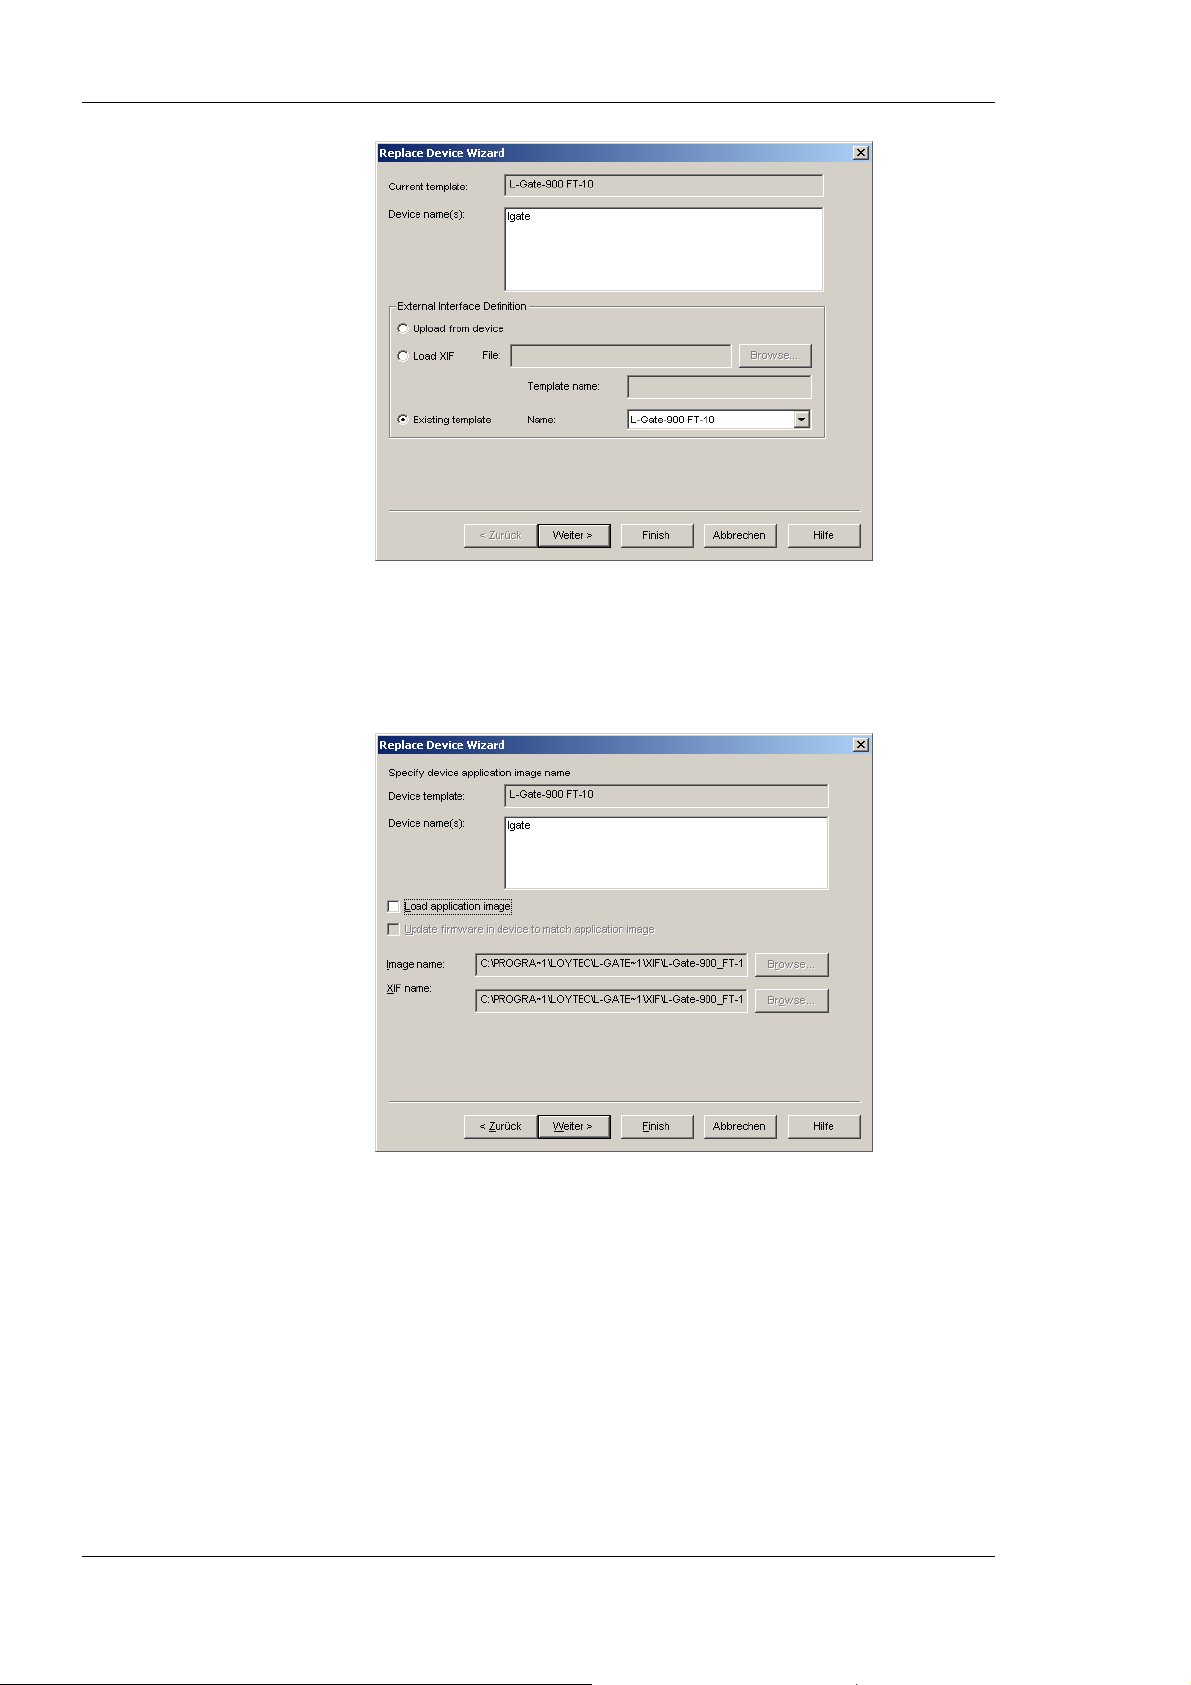
L-Gate User Manual 84 LOYTEC
Figure 66: LonMaker replace device wizard.
3. Choose the existing device template and click Next.
4. In the following window shown in Figure 67 click Next.
Figure 67: Click Next without loading an application image.
5. Then select Online as shown in Figure 68 and click Next.
Version 3.2 LOYTEC electronics GmbH
Page 85
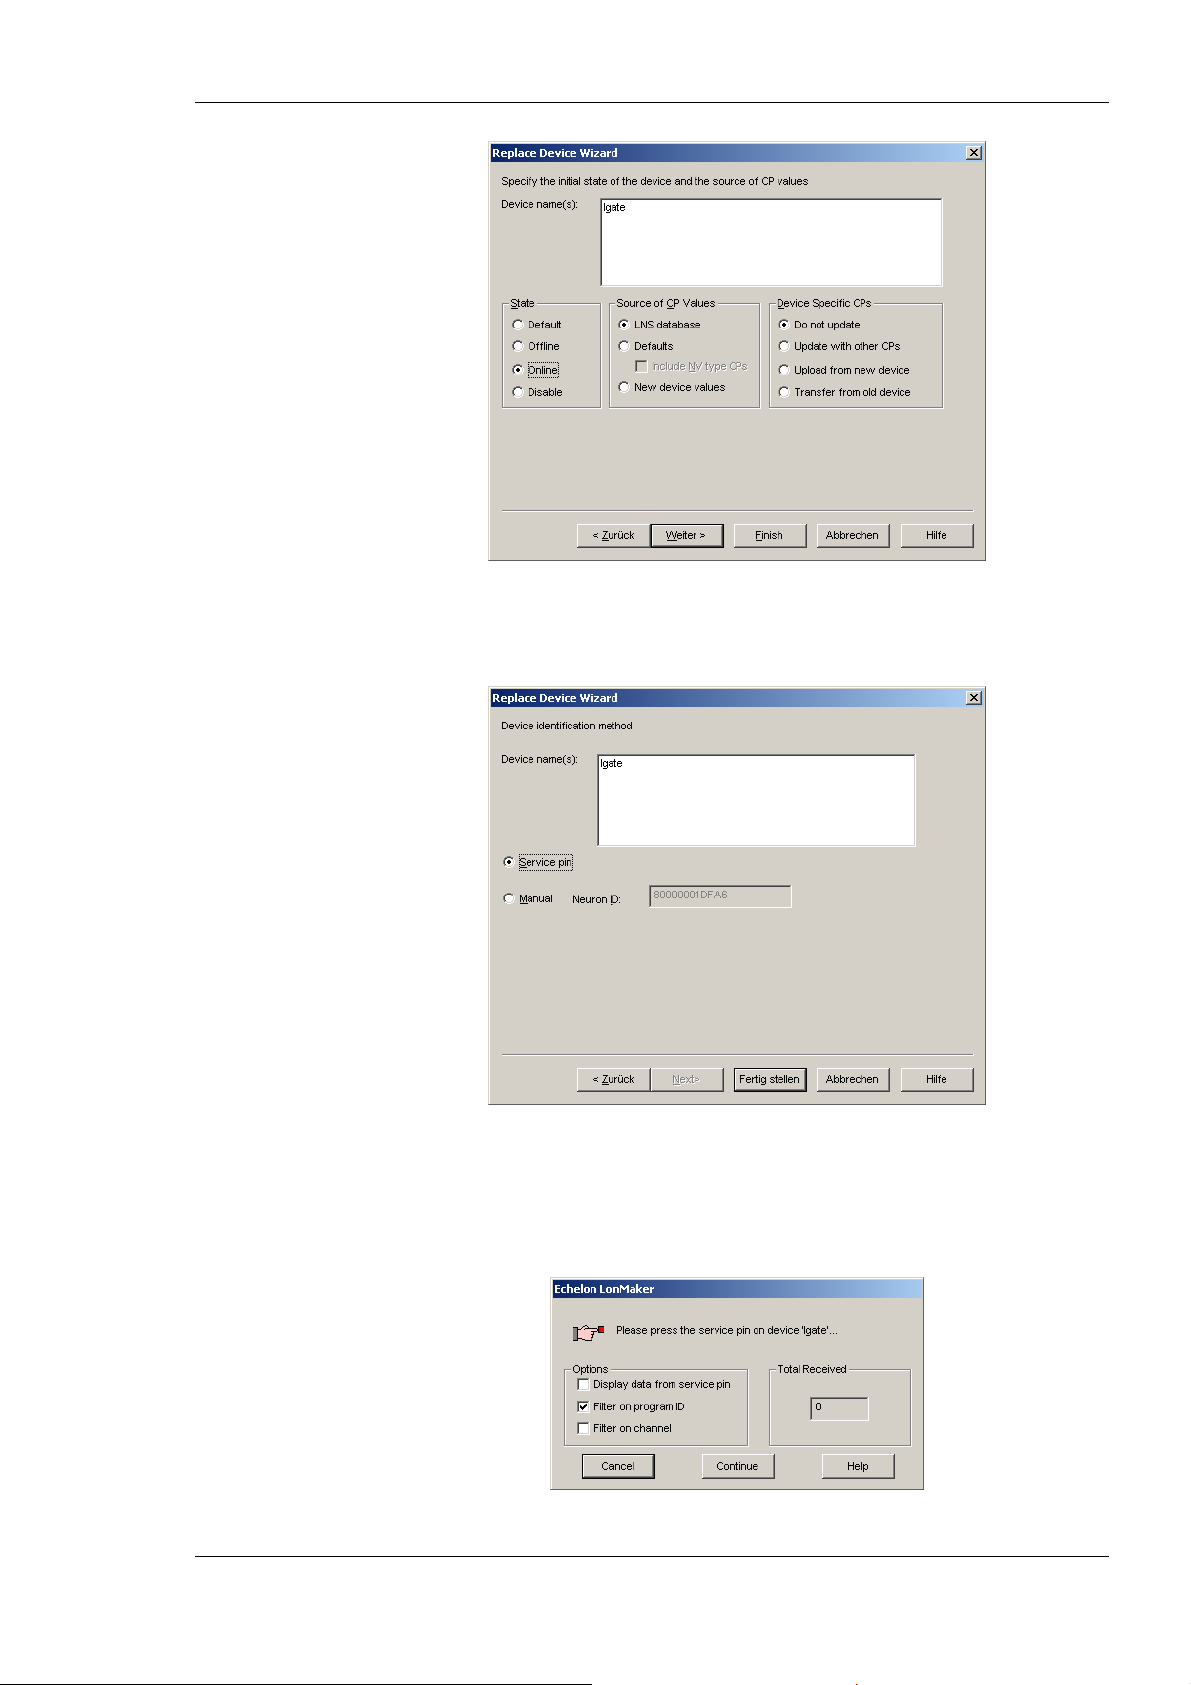
L-Gate User Manual 85 LOYTEC
Figure 68: Select online state.
6. Select the Service pin method and click on Finish as shown in Figure 69.
Figure 69: Select Service Pin and click Finish.
7. Then the service pin requestor opens as shown in Figure 70. Press the service pin on
the replacement L-Gate on the correct port. You can also send the service pin using the
Web interface (see Section 4.1).
Figure 70: Wait for the service pin from the device.
Version 3.2 LOYTEC electronics GmbH
Page 86
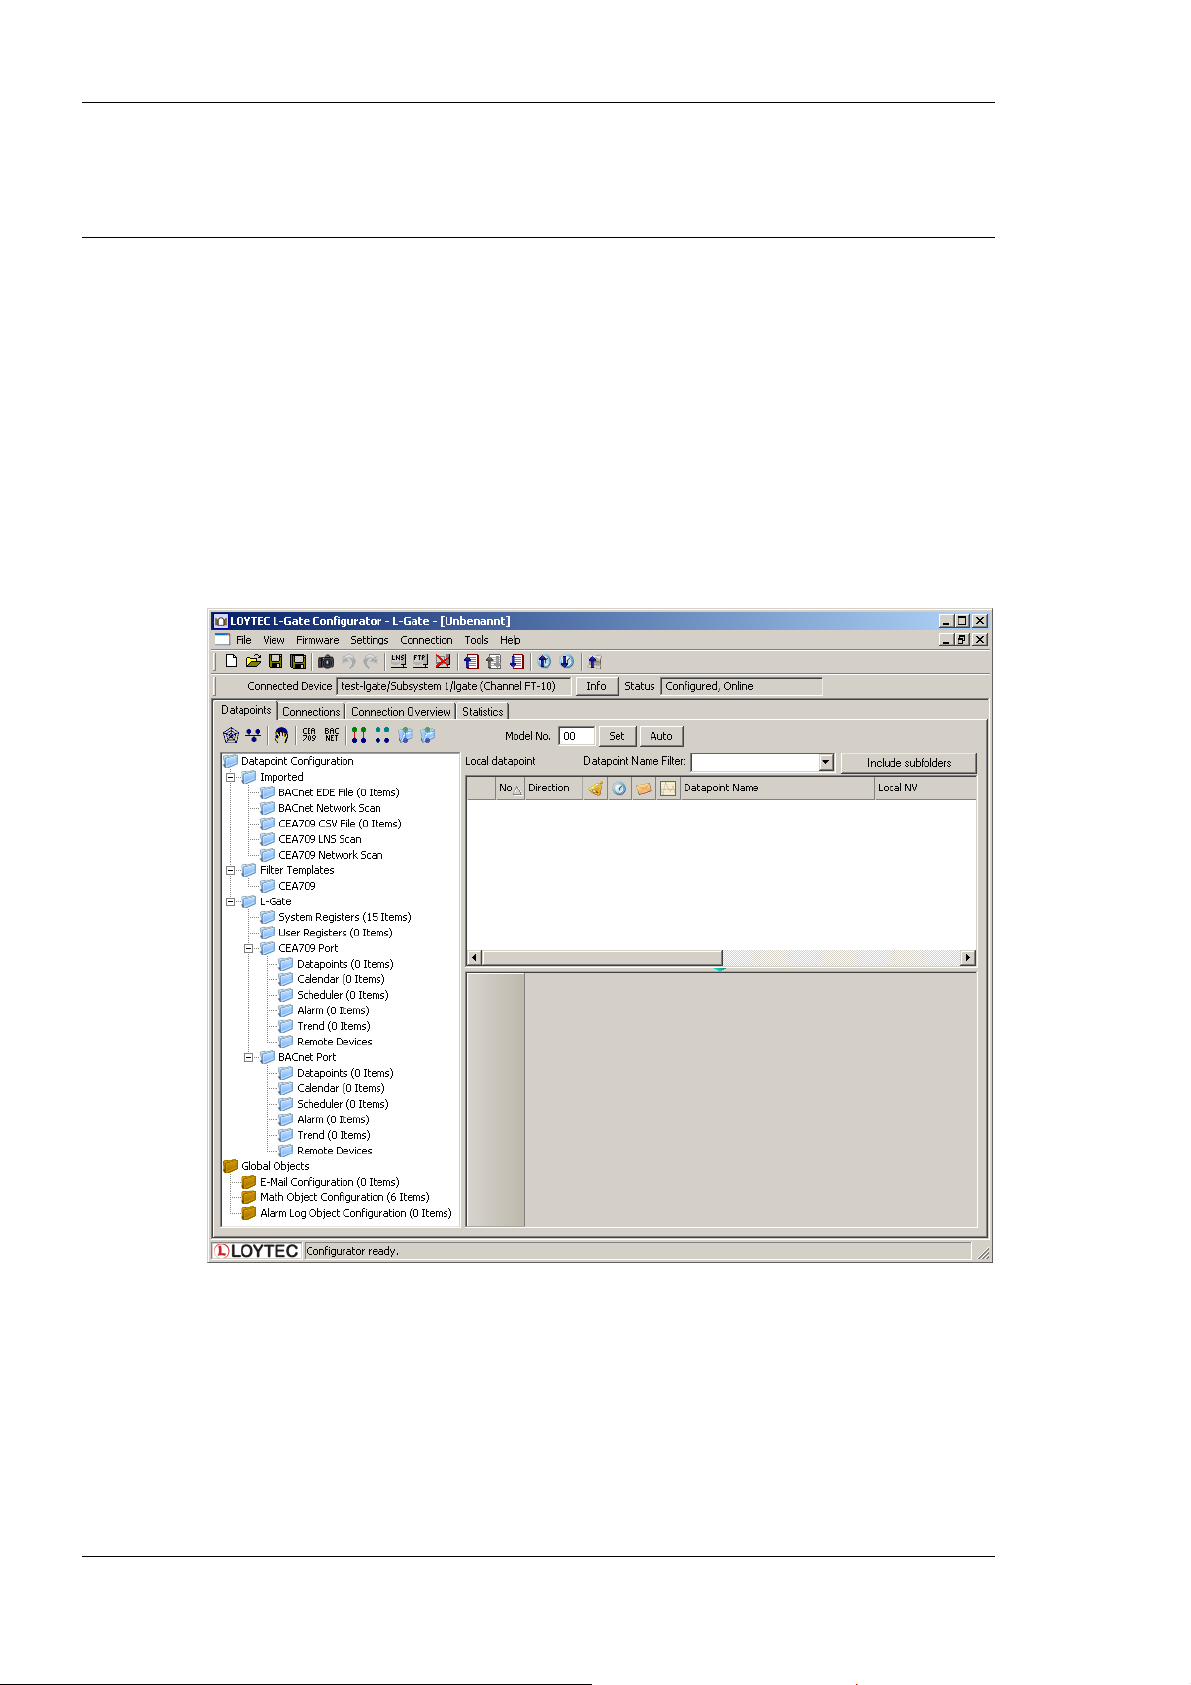
L-Gate User Manual 86 LOYTEC
8. After the service pin has been received, LonMaker commissions the replacement
device, creates the dynamic NVs again (if any), and installs the bindings.
6.7 Using the L-Gate Configurator
6.7.1 Starting as an LNS Plug-In
In LonMaker the plug-in is started by right-clicking on the L-Gate device shape or the
Gateway functional block and selecting Configure… from the pop-up window.
In NL-220 the Plug-in is started by right clicking on the L-Gate node, then selecting the
Option LOYTEC L-Gate Configurator in the PlugIns sub menu.
In Alex the Plug-in is started by right-clicking on the L-Gate device and selecting the
LOYTEC L-Gate Configurator in the Starte PlugIn sub menu.
A window similar to what is shown in Figure 71 should appear.
Figure 71: L-Gate Configurator main window.
6.7.2 Starting Stand-Alone
The L-Gate can also be used without LNS-based tools. In this case, the L-Gate
Configurator needs to be started as a stand-alone application. Go to the Windows Start
menu, select Programs, LOYTEC L-Gate Configurator and then click on Configure
L-Gate. This starts the L-Gate Configurator and the main connections screen is displayed.
Version 3.2 LOYTEC electronics GmbH
Page 87
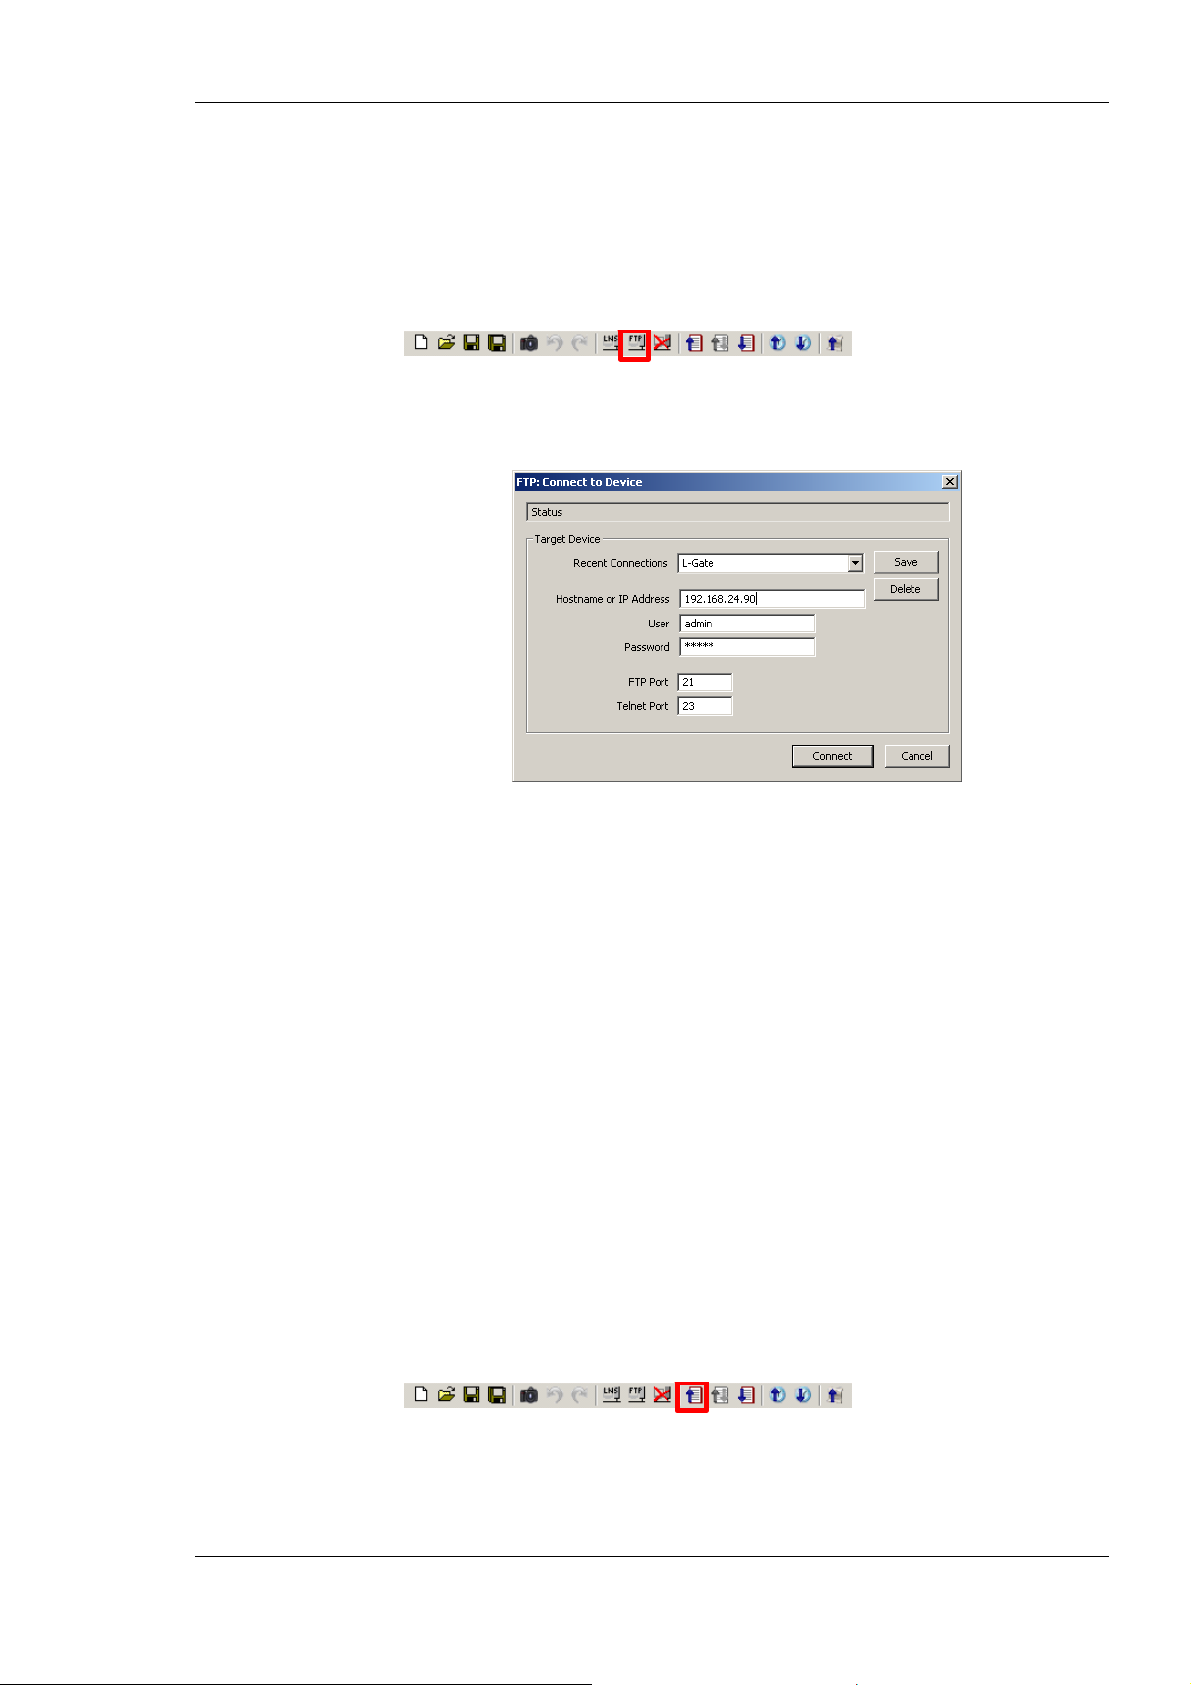
L-Gate User Manual 87 LOYTEC
If the L-Gate is not yet connected to the network, go to th e Firmware menu and select the
firmware version of the L-Gate to be configured. If the L-Gate is already connected to the
network it is recommended to connect the configuration software to the L-Gate.
To Connect to an L-Gate Stand-Alone
1. Select the FTP connection method by clicking on the FTP connect button
in the tool bar of the main connections window. The FTP connect dialog as shown in
Figure 72 opens.
2. Enter the IP address of the L-Gate, the user and password. The default user is ‘admin’
and the default password is ‘admin’.
3. Optionally, click into the Recent Connections field and enter a user-defined name for
this connection. That name can be selected later to connect. Click on Save to store that
connection.
4. If your device is located behind a NAT router of firewall, you may change the FTP and
Telnet ports to your needs for accessing the device. Clicking Save also stored these
settings.
5. Click on Connect. This establishes the connection to the device.
6.7.3 Uploading the Configuration
To get the current network variable configuration of the L-Gate, the port interface needs to
be uploaded. This will upload the entire configuration from the L-Gate, including data
points, dynamic NVs and schedules.
To Upload a Configuration
1. Click on the Upload Configuration button
in the tool bar. The configuration upload dialog opens up as shown in Figure 73.
Figure 72: FTP connection dialog.
2. If the check-box Automatically sync local dynamic NVs is marked, any manually
created dynamic NVs will be uploaded and merged into the data point configuration.
Version 3.2 LOYTEC electronics GmbH
Page 88
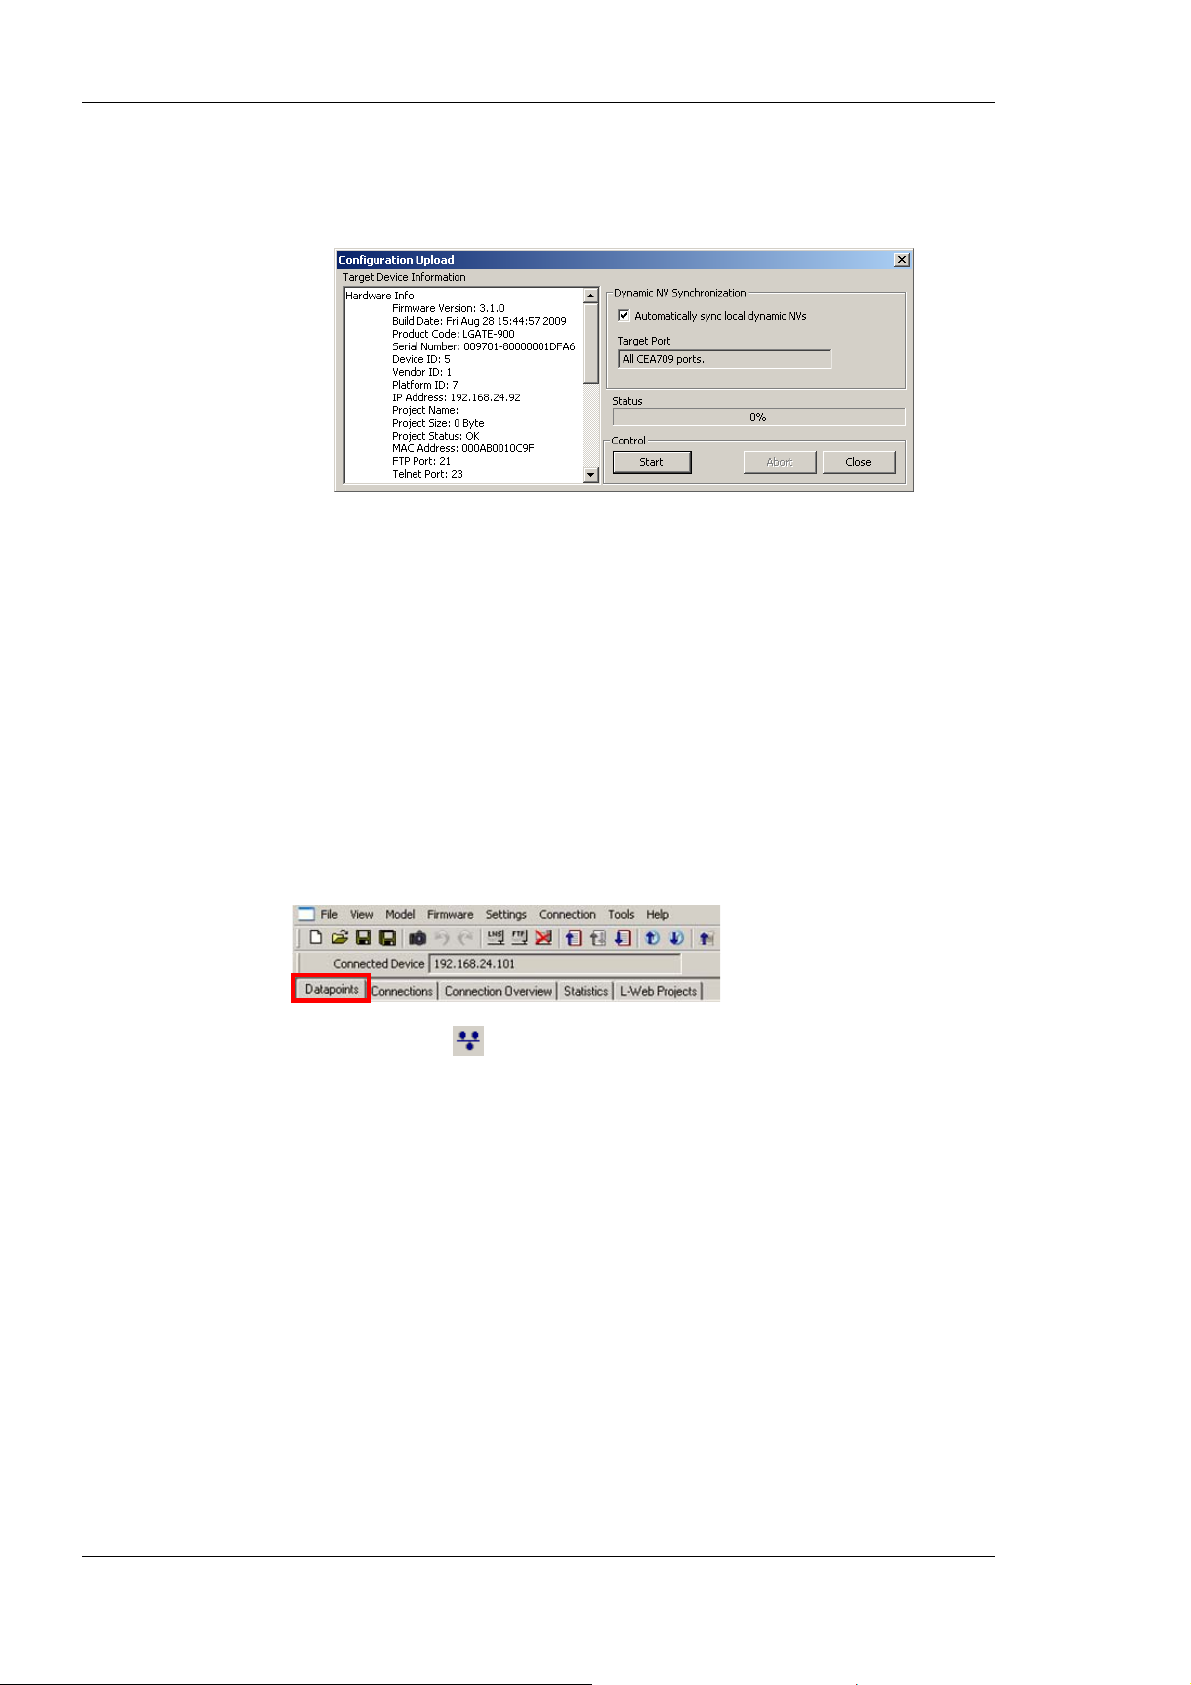
L-Gate User Manual 88 LOYTEC
3. Click on the button Start to start the transfer. This will upload the configuration of all
ports, if the software is connected stand-alone via FTP or the network variable
interface, for which the LNS plug-in was started for.
Figure 73: Configuration upload dialog.
4. When asked, if schedules shall be uploaded also, click Yes, if you want the current
schedule configuration be extracted from the device. Note, that when doing so, the
original schedules in the project are replaced by the uploaded schedules.
5. If dynamic NVs were synchronized, click on Finish.
6.7.4 Scanning for Network Variables
When the Configurator software is connected to an LNS database, network variables can
be scanned in from that data base.
To scan network variables from the LNS database
1. Click on the Datapoints tab.
2. Click on the button
to the CEA-709 channel of the device.
3. After the scan has completed, the folder LNS Database Scan is populated with the
found NVs. Data point names for those NVs are automatically generated, following the
data point naming rules defined in the project settings (see Section 6.3.2). By default
the name is generated from node name, object name, and NV name. These names are
ensured to be unique by adding a counter for multiple occurrences of the same name.
Scan channel. This scans in all NVs on all devices connected
Version 3.2 LOYTEC electronics GmbH
Page 89
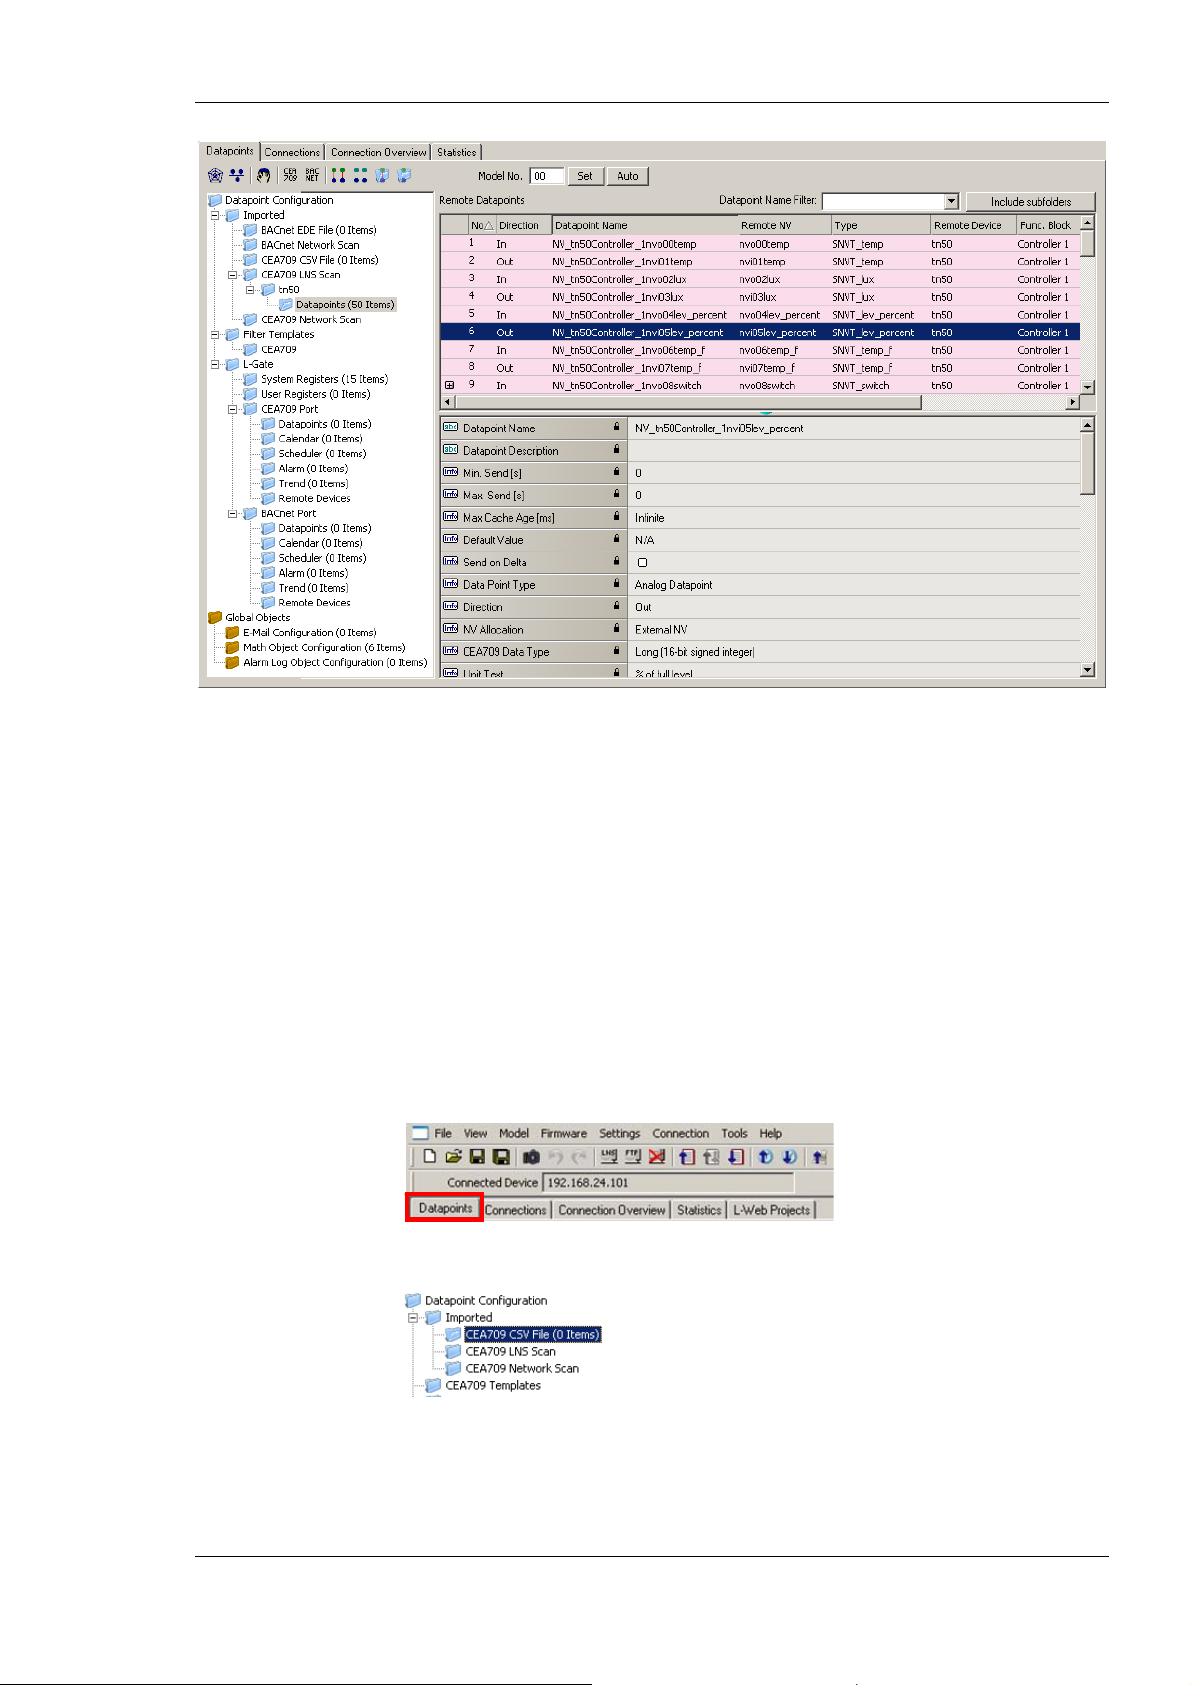
L-Gate User Manual 89 LOYTEC
Figure 74: Scanned NVs in the LNS Database Scan Folder
Figure 74 shows an example result of the database scan. The list can be sorted by each
column. Selecting a line will display a number of asso ciated p ro perties in th e pr op erty view
below. Multiple items can be selected by usin g th e <Ctrl> key an d clickin g with the mouse.
All items can be selected by pressing <Ctrl-A>.
6.7.5 Importing Network Variables
Without LNS, the tool cannot connect to an LNS database, where it scans for network
variables (NVs). Therefore, the list of NVs to be used on the L-Gate has to be available in a
CSV file. This file can be produced by external software or created by hand. The CSV
format for importing NVs is defined in 7.2.1.
To Import NVs from a File
1. Click on the Datapoints tab.
2. Select the folder CEA709 CSV File
3. Right-click and select Import File. In the following file selector dialog, choose the
CSV import file and click Ok.
Version 3.2 LOYTEC electronics GmbH
Page 90
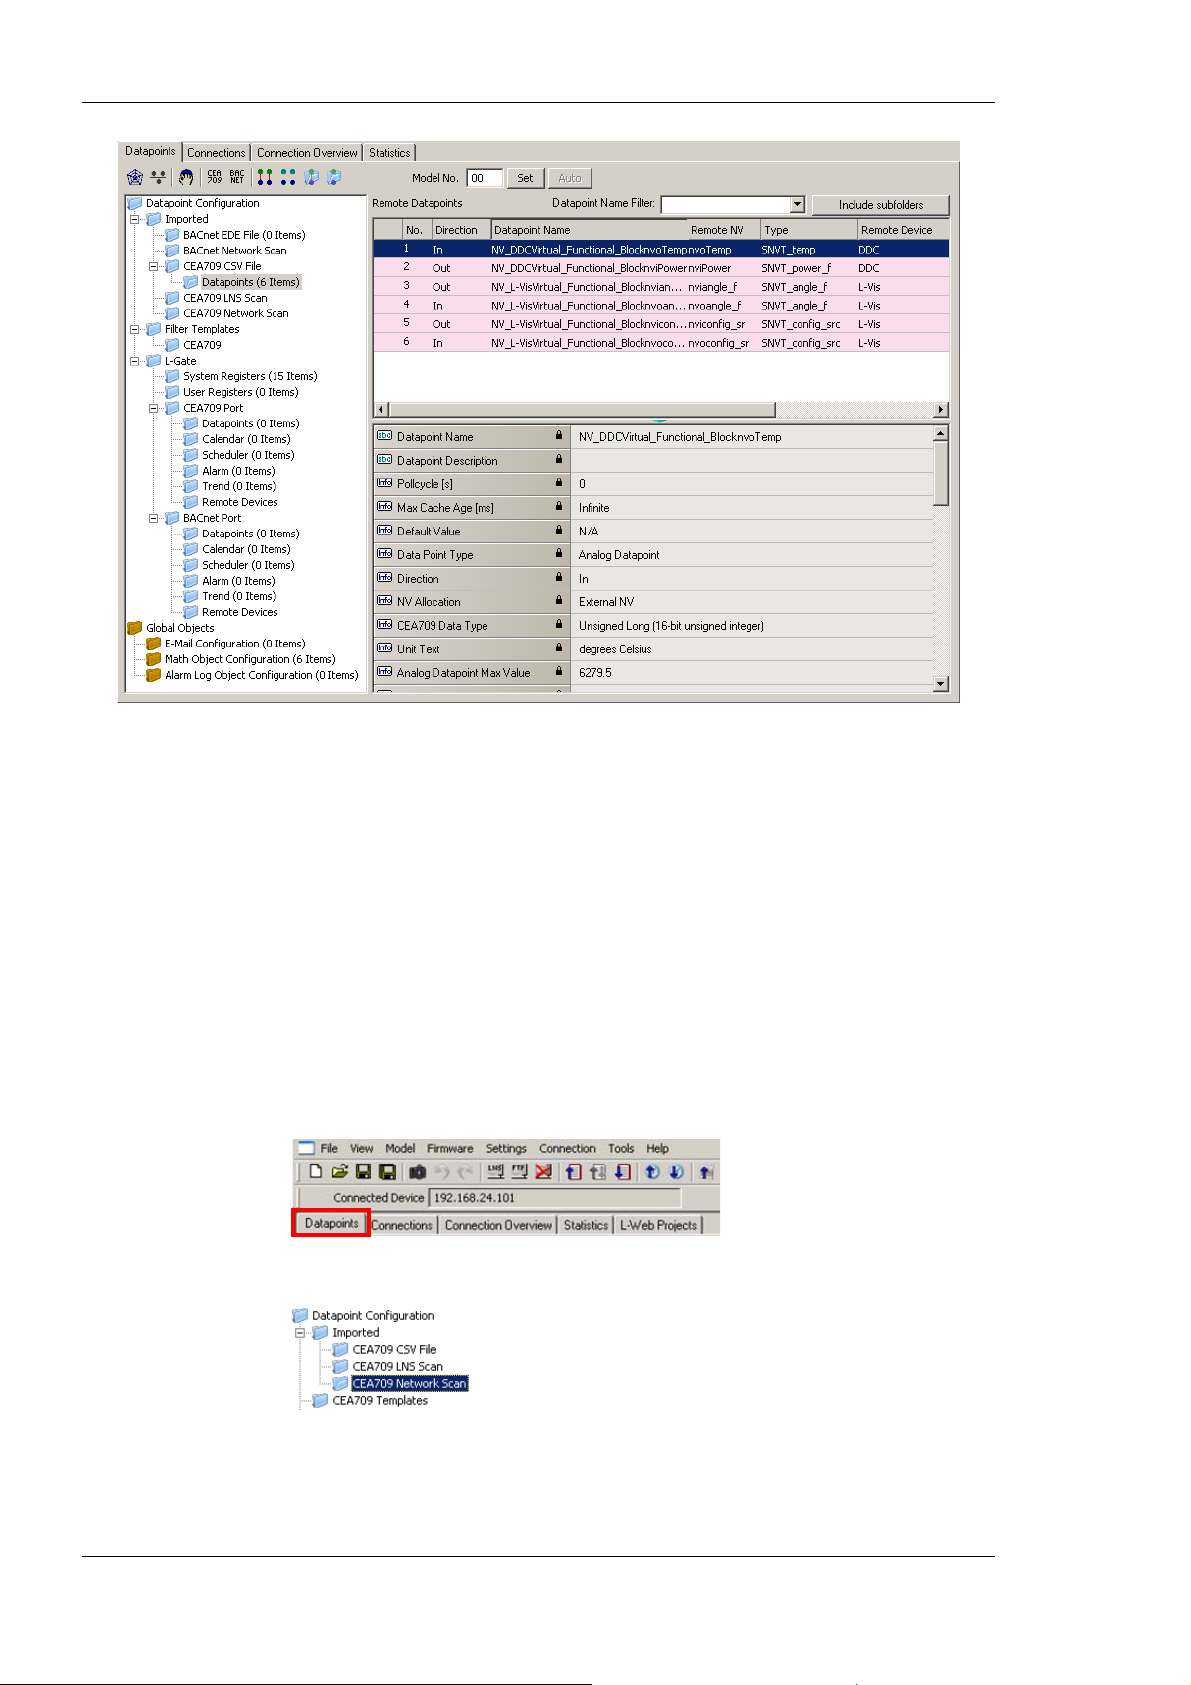
L-Gate User Manual 90 LOYTEC
Figure 75: Imported NVs
4. Now the CSV File folder is populated with the imported NVs as shown in Figure 75.
The list can be sorted by each column. Selecting a line will display a number of associated
properties in the property view below. Multiple items can be selected by using the <Ctrl>
key and clicking with the mouse. All items can be selected by pressing <Ctrl-A>.
6.7.6 Scanning NVs online from the Network
L-Gate devices also support an online network scan on the CEA-709 network. In this scan
the device searches for other devices on the CEA-709 network and pulls in NV information
of these devices. These NVs can then be used instead of importing them from a CSV file.
To scan NV online of the CEA-709 network
1. Click on the Datapoints tab.
2. Select the folder CEA709 Network Scan.
3. Right-click on that folder and select Scan CEA709/852 Network…. This opens the
CEA709/852 Network Scan dialog as shown in Figure 76.
Version 3.2 LOYTEC electronics GmbH
Page 91
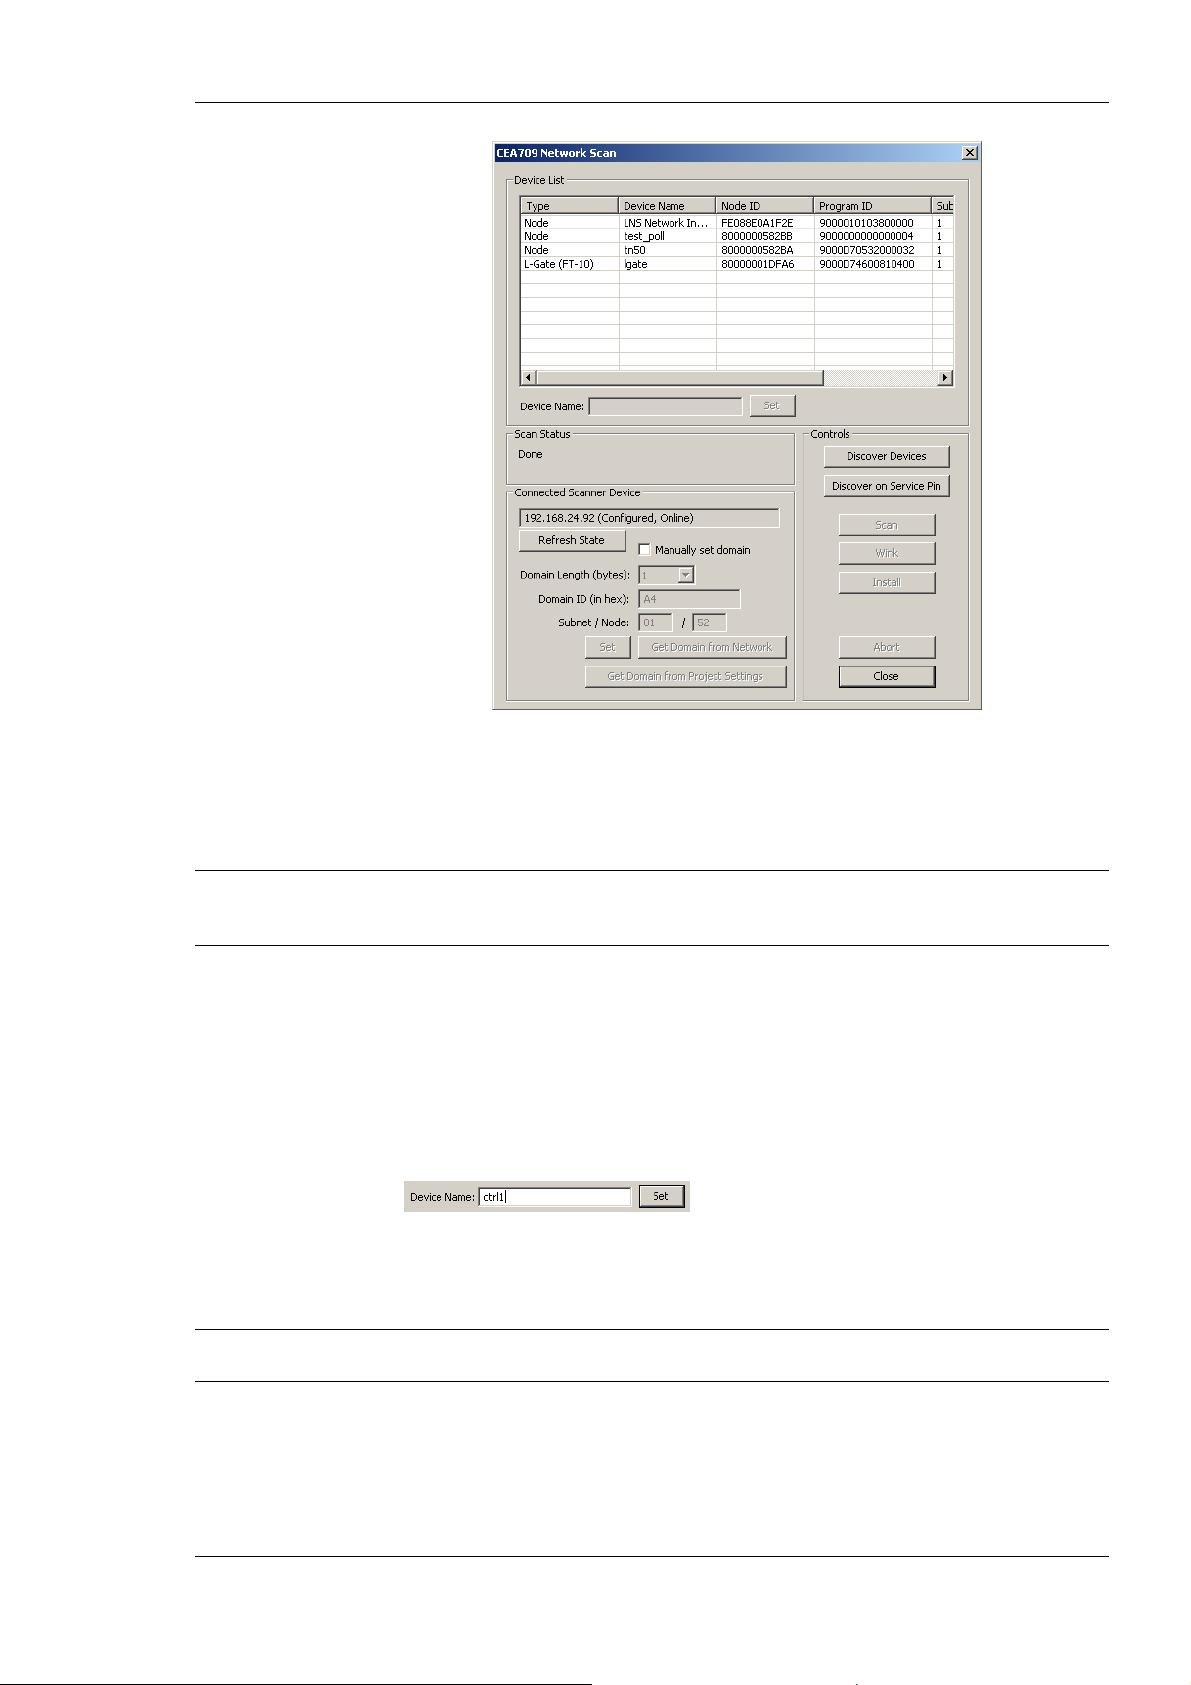
L-Gate User Manual 91 LOYTEC
Figure 76: CEA-709 network scan dialog.
4. If the device has not been installed with a network management tool (e.g. LNS-based
tool), select the Manually set domain check-box and click the Set button. This sets
the device configured, online to start the scan.
Note: You need to set the same domain as the devices to be scanned. Click Get Domain from
Network and press a service pin on some other, already installed device to retrieve the
domain information before setting the device online.
5. Click on the button Discover Devices. This starts a network scan. The results are put
in the device list box.
6. Alternatively, click the button Discover on Service Pin. Then press the service pin of
a particular device on the network. This device will be added to the device list.
7. Select a device in the device list. To give the device a usable name, enter the name
below and click on the Set button.
8. Then click the button Scan. This scans the NVs on the selected device and adds them
to the CEA709/852 Network Scan folder as a separate sub-folder for the device as
shown in Figure 77.
Tip! If you are not sure, which device you have selected, click on Wink Device. The selected
device will execute its wink sequence.
Version 3.2 LOYTEC electronics GmbH
Page 92
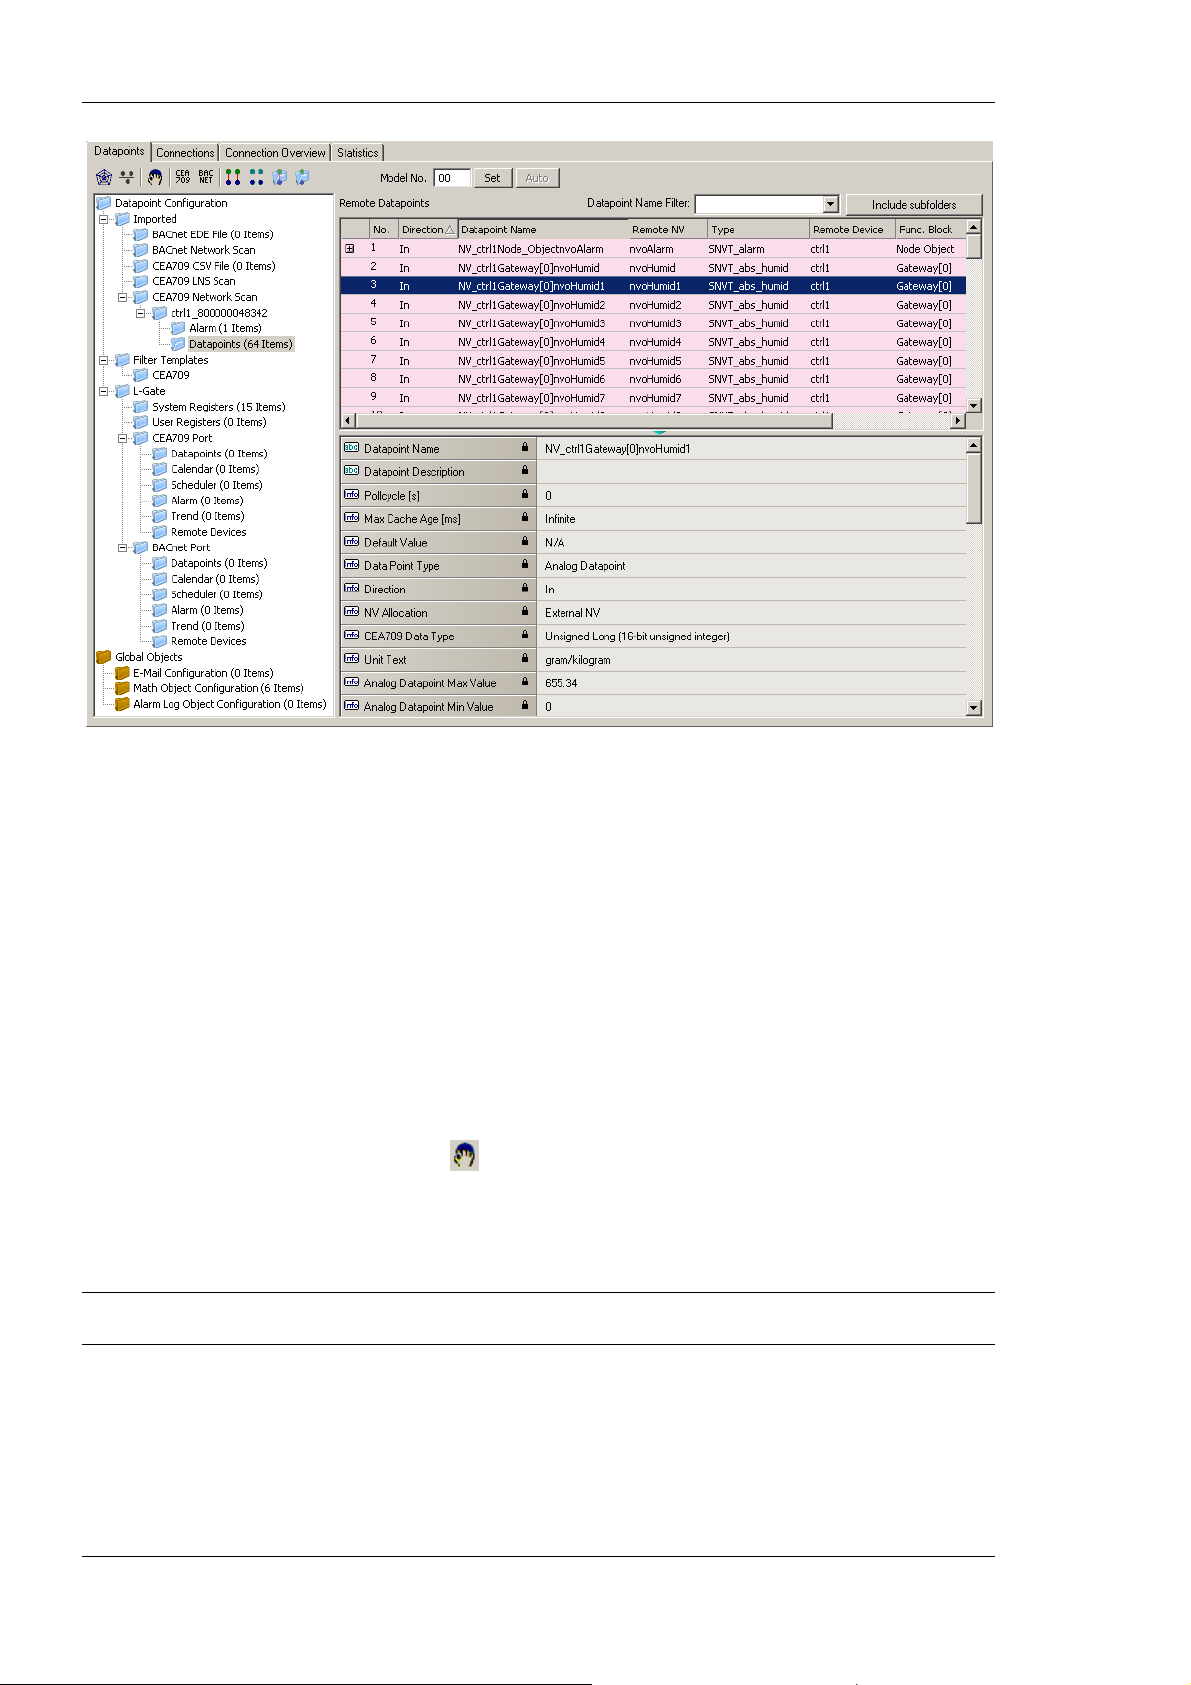
L-Gate User Manual 92 LOYTEC
Figure 77: CEA-709 network scan results.
9. Click Close when all devices needed have been scanned.
6.7.7 Select and Use Network Variables
Data points in the CEA709 LNS Scan folder, the CEA709 Network Scan folder or in the
CEA709 CSV File folder can be selected for use on the device. Select those NVs, which
shall be exposed to BACnet objects.
To Use NVs on the Device
1. Go to any of the CEA709 LNS Scan, CEA709 Network Scan or the CEA709 CSV
File folder.
2. Use the multi-select feature by holding the Shift or Ctrl keys pressed.
3. Click on the button
4. This creates data points in the L-Gate/CEA709 Port folder. All data points in that
folder will actually be created on the L-Gate device after downloading the
configuration.
Use on Device in the tool bar.
Tip! Data points can be edited by selecting a single point or using multi-select. The available
properties to be edited are displayed in the property view below.
6.7.8 Change the NV Allocation
After selecting the Use on device action on scanned or imported NVs they are assigned a
default NV allocation in the L-Gate/CEA709 port folder. This default allocation can be
changed, e.g., for imported NVs when they shall be allocated as static NVs on the L-Gate.
Version 3.2 LOYTEC electronics GmbH
Page 93
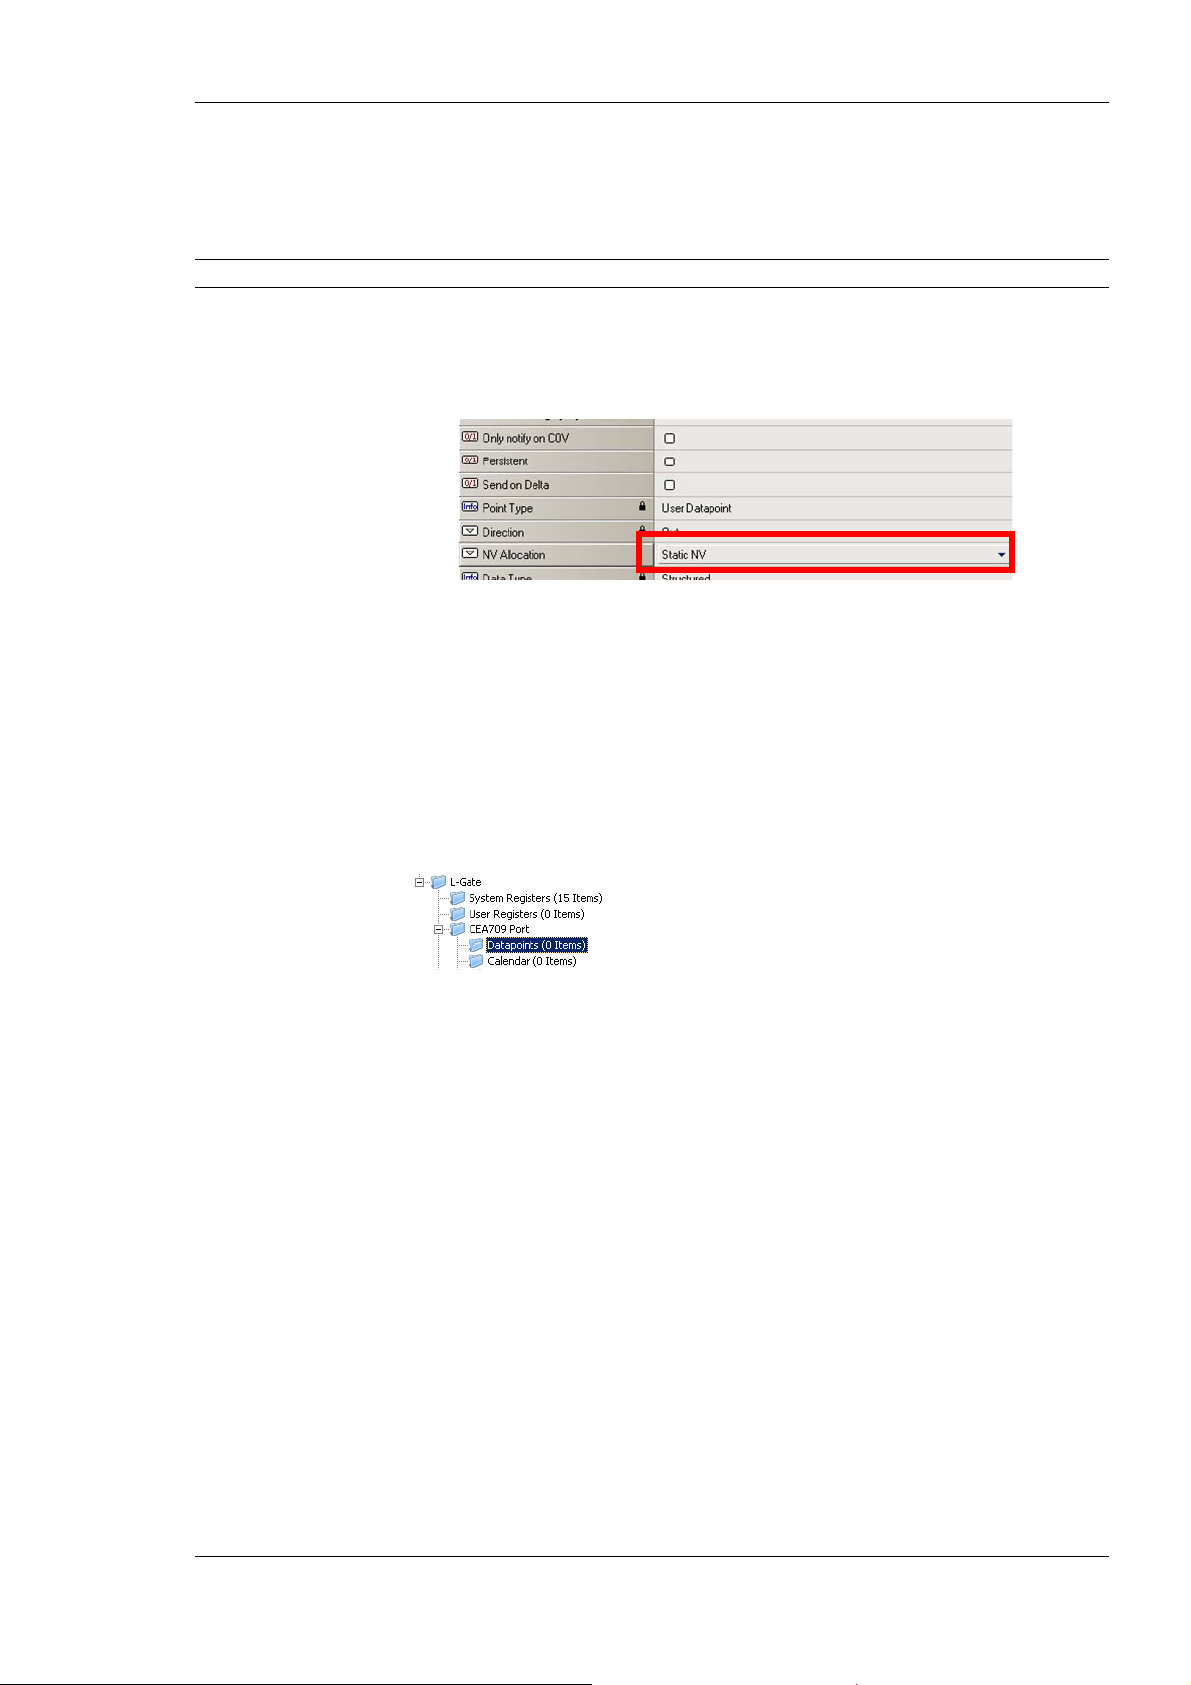
L-Gate User Manual 93 LOYTEC
To Change the NV Allocation Type
1. In the data point view select the NVs in the L-Gate/CEA709 port folder, for which the
NV allocation shall be changed.
Tip! By using Ctrl-A all NVs can be selected.
2. Select the NV allocation property as indicated by the red rectangle in Figure 78.
3. To make the data points static NVs on the L-Gate, select Static NV.
Figure 78: Change the NV allocation type.
6.7.9 Create Static NVs
The L-Gate can be configured to change its static interface and boot with a new one. Apart
from creating static NVs from scanned or imported data points, static NVs can also be
created manually in the L-Gate/CEA-709 folder.
To Create Static NVs Manually
1. Select the L-Gate/CEA-709 Port/Datapoint folder
2. Right-click in the data point list and select New Datapoint… in the context menu.
This opens the NV creation dialog as shown in Figure 79.
Version 3.2 LOYTEC electronics GmbH
Page 94
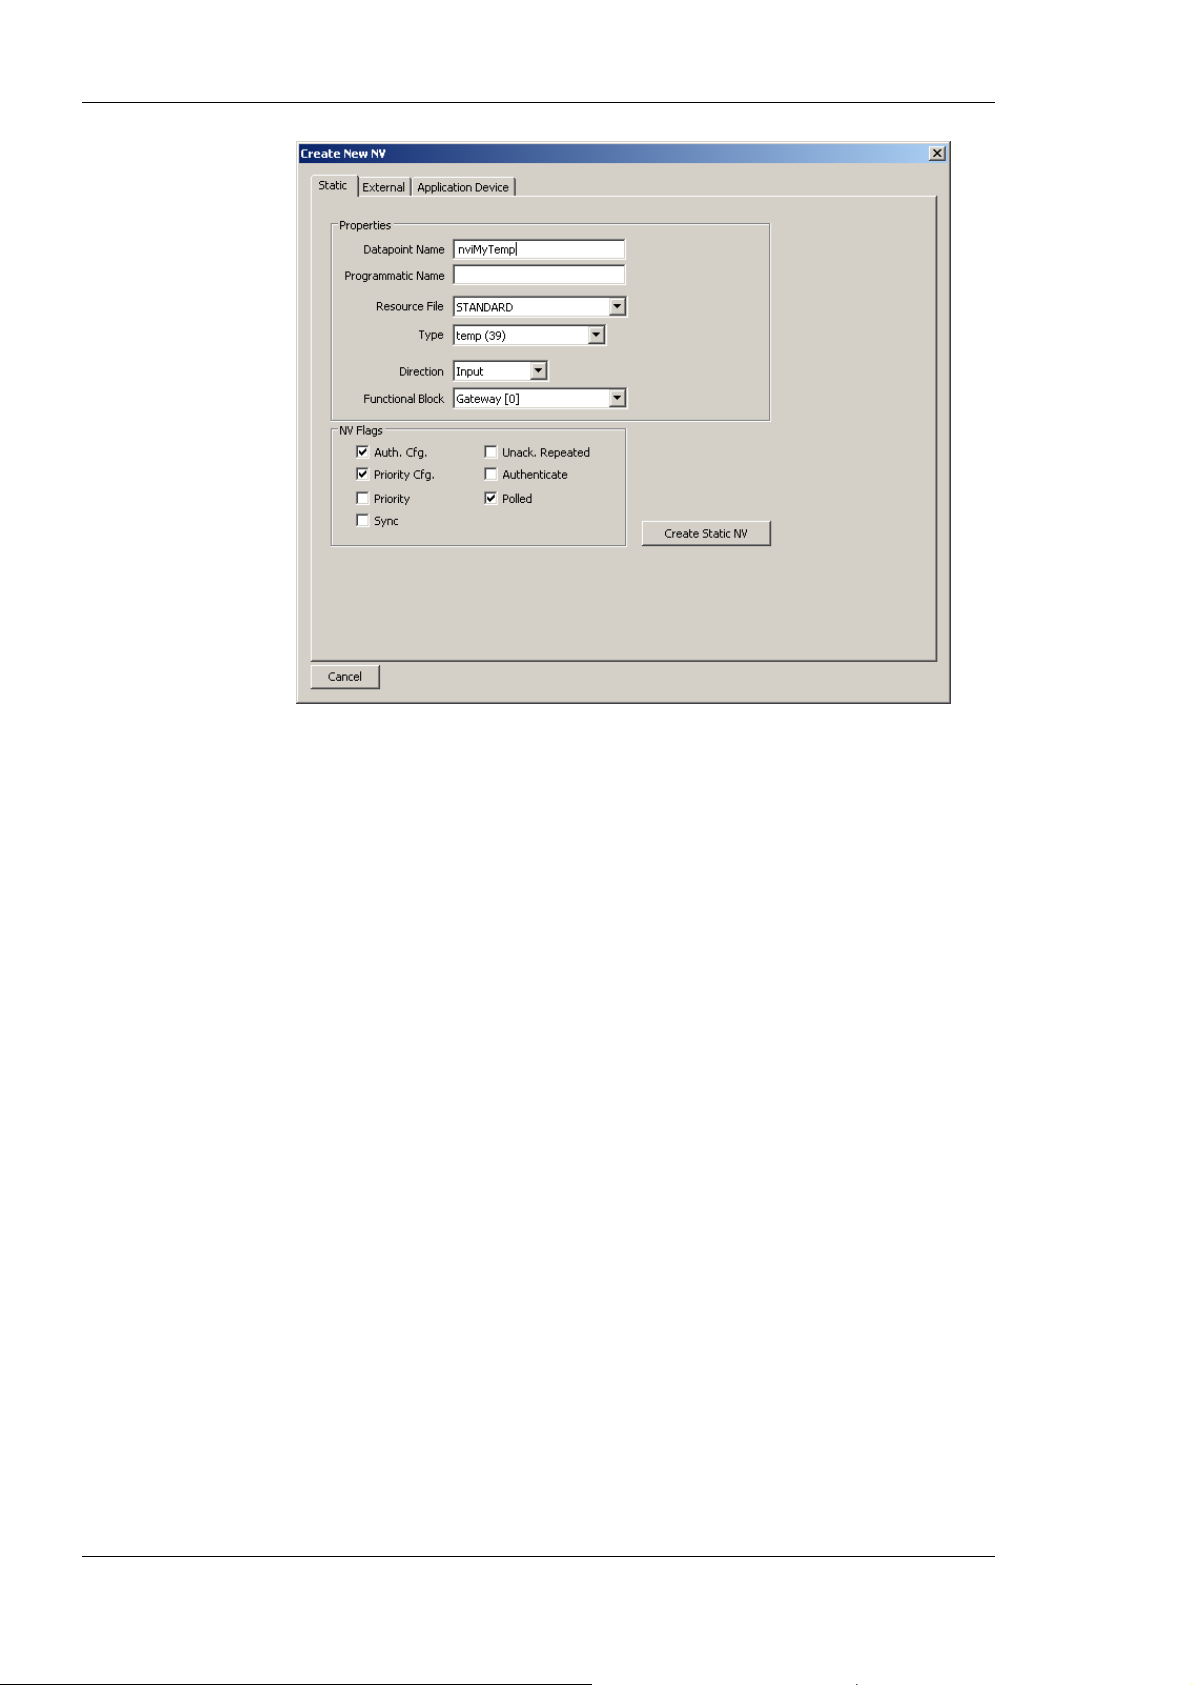
L-Gate User Manual 94 LOYTEC
3. Enter a data point name and a programmatic name. The programmatic name is the
name of the static NV, which is being created, while the data point name is used for
exposing the NV as a BACnet object.
4. Select a resource file. To create a SNVT let the STANDARD resource file be selected.
5. Select a SNVT and a direction. If a non-standard resource file has been selected,
choose from one of the UNVTs.
6. Choose a functional block where this static NV shall be located in.
7. Click Create Static NV. The static NV is created and appears in the data point list.
8. Note, that the static interface of the L-Gate will change as soon as static NVs are added
or modified in the data point manager. This change is reflected in a new model
number, which the L-Gate will have after the configuration download (see Section
5.5.2). Also note that the manually created static NVs are not bound automatically by
the L-Gate Configurator. They simply appear on the device and need to be bound in
the network management tool.
6.7.10 Create External NVs
Figure 79: Create a static NV manually.
External NVs are not actually allocated NVs on the L-Gate. Instead, the L-Gate uses
polling to read data from and explicit updates to write data to external NVs. Since external
NVs are not affecting the static NV interface of the L-Gate, they can be used to extend an
L-Gate’s interface configuration at run-time, when no LNS with dynamic NVs is available.
Version 3.2 LOYTEC electronics GmbH
Page 95
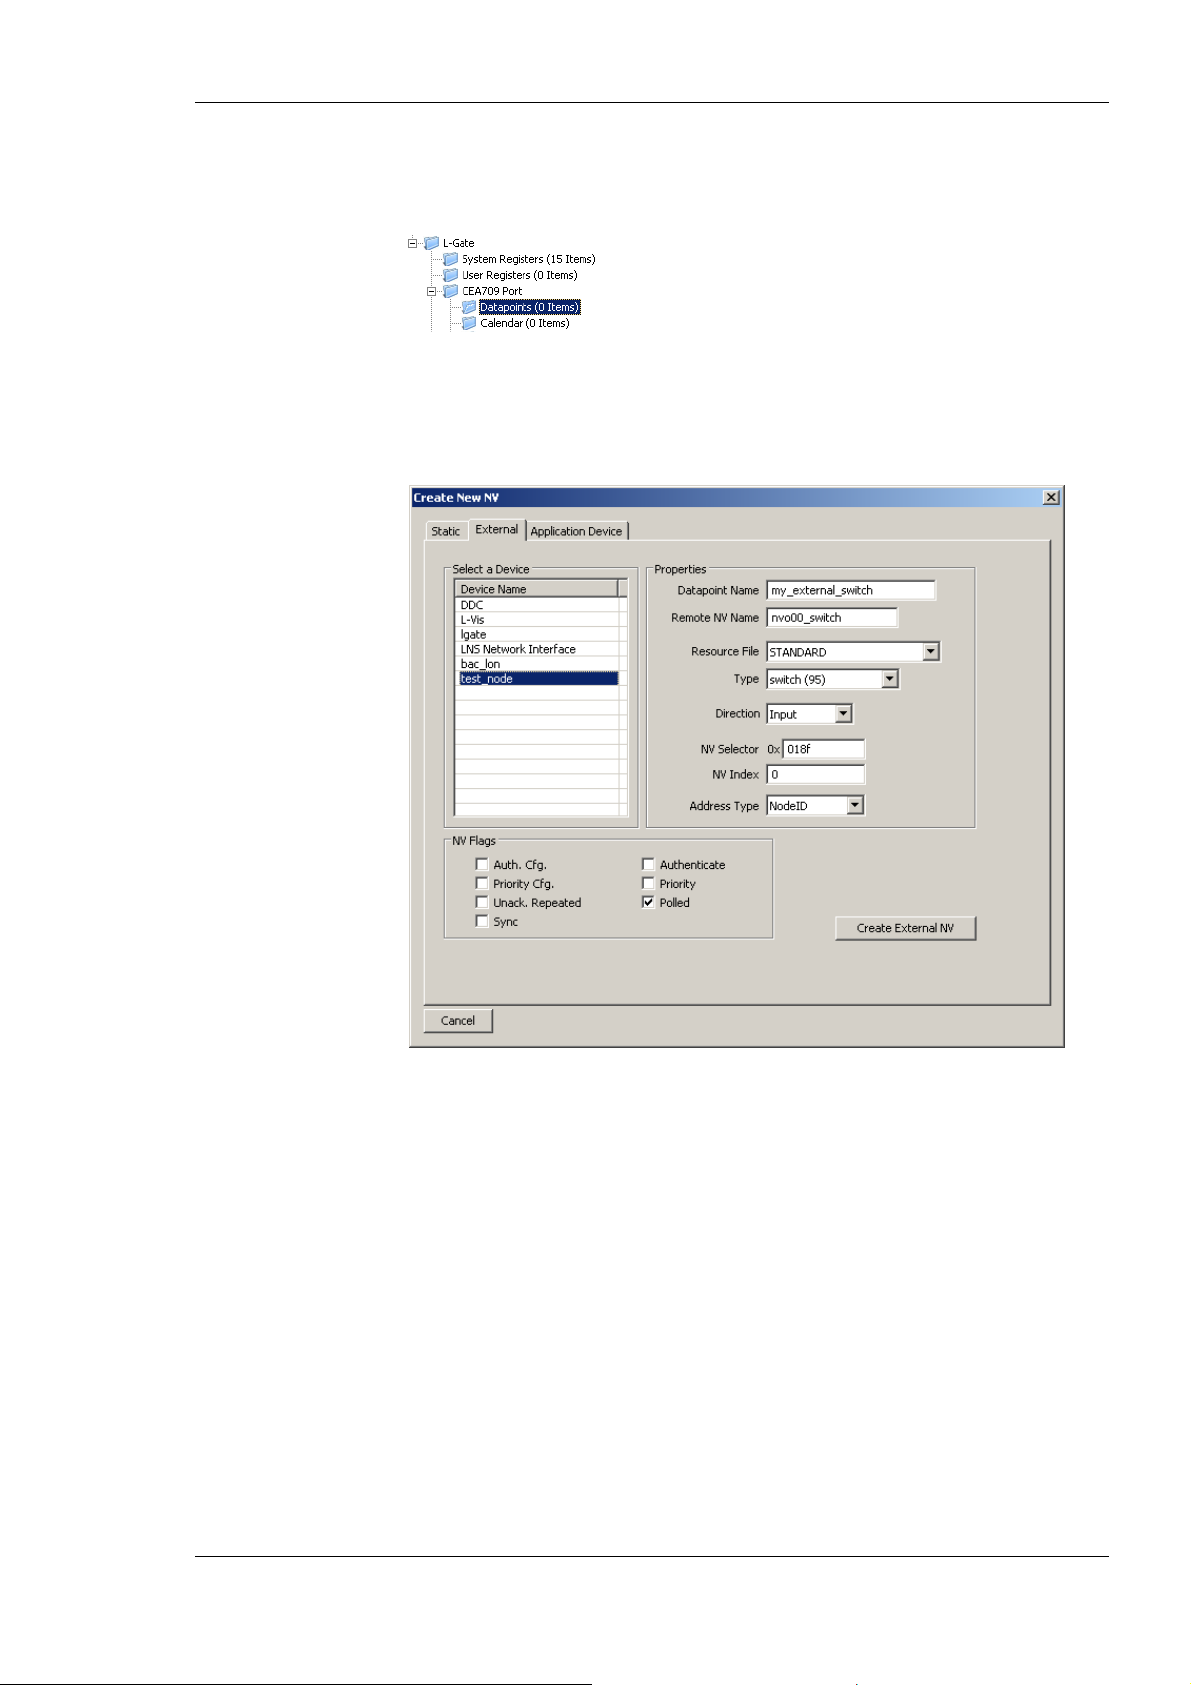
L-Gate User Manual 95 LOYTEC
To Create an external NV manually
1. Select the L-Gate/CEA-709 Port/Datapoints folder
2. Right-click in the data point list and select New Datapoint… in the context menu.
This opens the NV creation dialog.
3. Click on the tab External as shown in Figure 80.
Figure 80: Create a new external NV.
4. Select the device in the box Select a Device on the left-hand side.
5. Enter the properties of the external NV on that device, starting with the local data point
name, the remote programmatic NV name, the NV type (SNVT) and direction. Note,
that the direction is the direction of the external NV on the L-Gate. Therefore, the
remote output NV nvo00_switch becomes an input on the L-Gate. Also enter the NV
selector in hexadecimal and the NV index in decimal. Choose the preferred addressing
mode, e.g., Node ID.
6. Click Create External NV to add this NV to the data point list.
7. The external NV now appears in the data point list as shown in Figure 81. For external
NVs which are inputs to the L-Gate, adapt the poll cycle property to your needs.
Version 3.2 LOYTEC electronics GmbH
Page 96
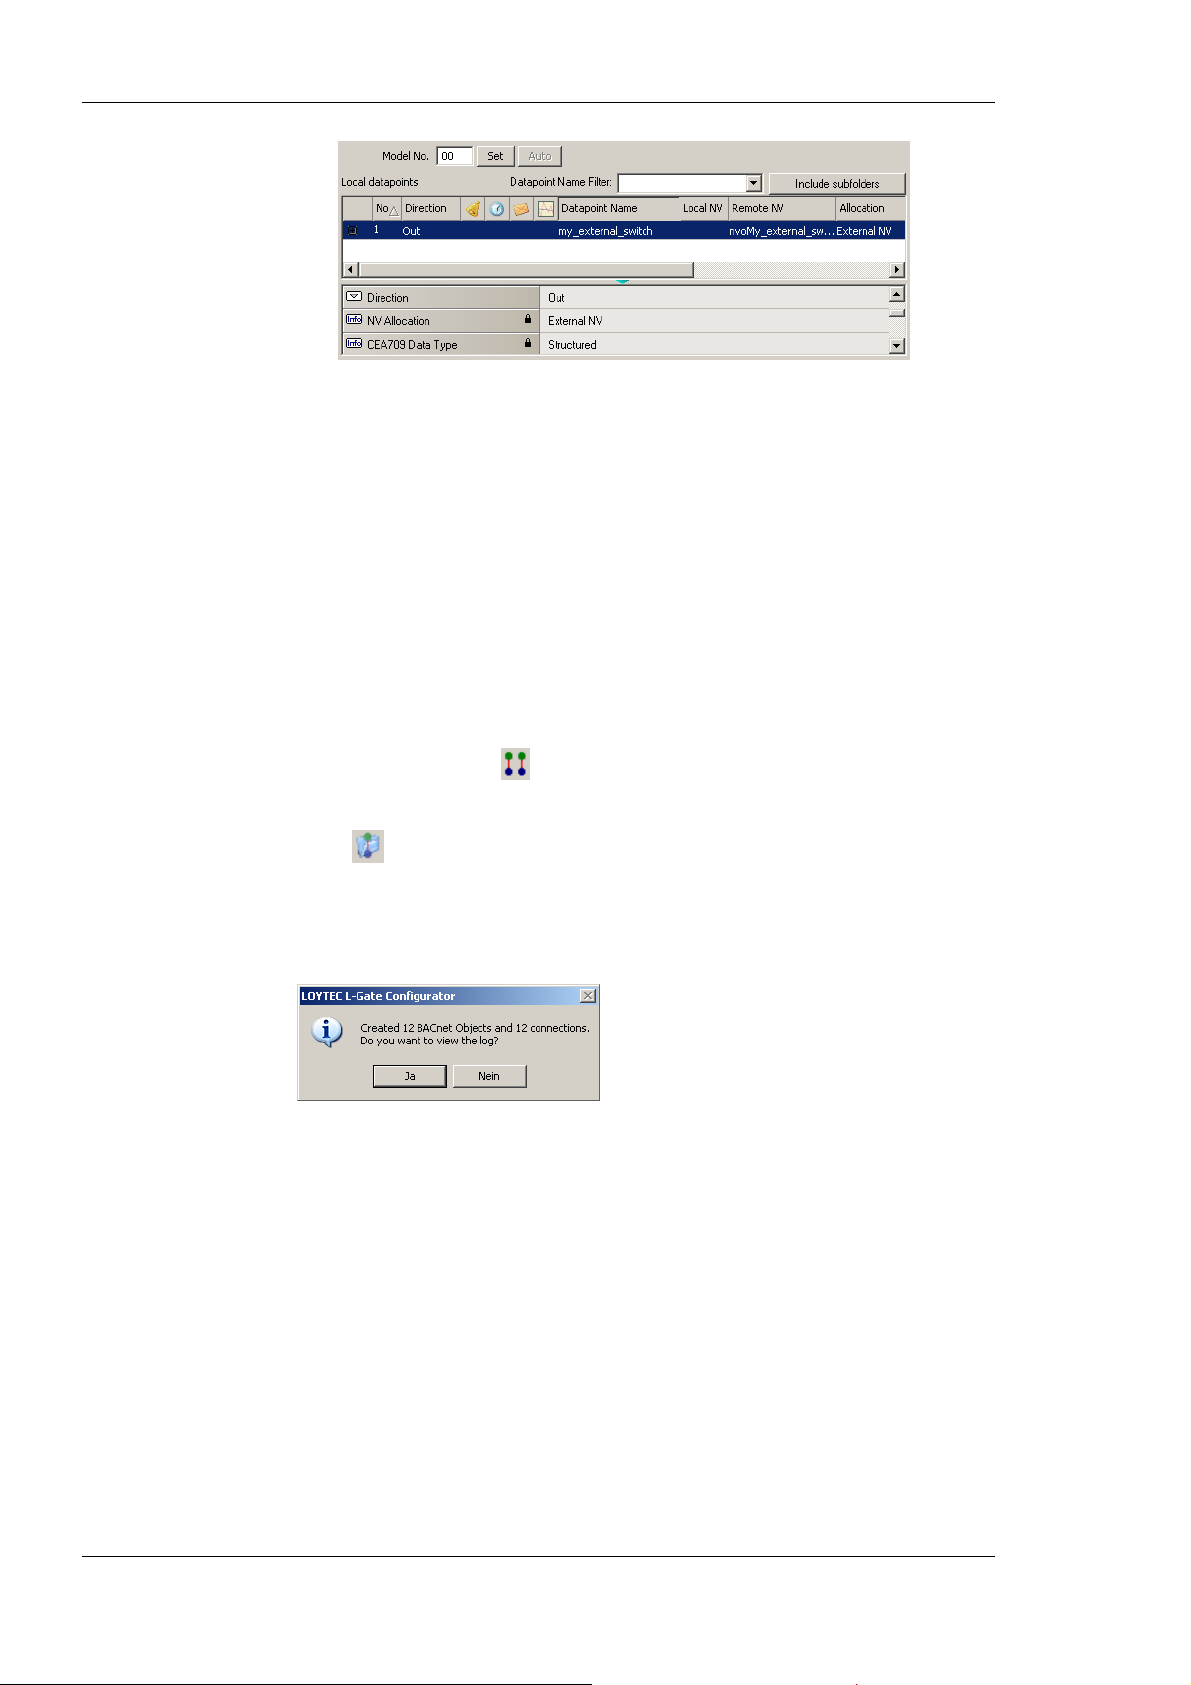
L-Gate User Manual 96 LOYTEC
Figure 81: Manually created external NV in the port interface definition.
6.7.11 Generate BACnet Objects
To actually create BACnet mappings from the used NVs on the L-Gate, use the data point
manager tab. This section describes how to automatically generate BACnet objects from
NVs. The auto-generation method also adds the NV and the BACnet object to a new
connection.
To generate BACnet objects and connections from NVs on the L-Gate
1. Go to the data point manager tab.
2. In the L-Gate/CEA-709 folder select all the NVs, which shall be mapped. The multi-
select feature or <Ctrl-A> may be used for doing this.
3. Click on the speed button
4. Alternatively, you can select the L-Gate/CEA-709 Port folder and click the speed
button
generates BACnet objects and connections for all NVs in the folder.
5. When the generation is complete, a dialog reports how many connections have been
created. Click No to skip the report.
6. The generated BACnet objects appear in the L-Gate/BACnet Port/Datapoints folder as
shown in Figure 82.
Folder-wide Generate points and auto-connect in the tool bar. This
Generate Points and auto-connect in the tool bar.
Version 3.2 LOYTEC electronics GmbH
Page 97
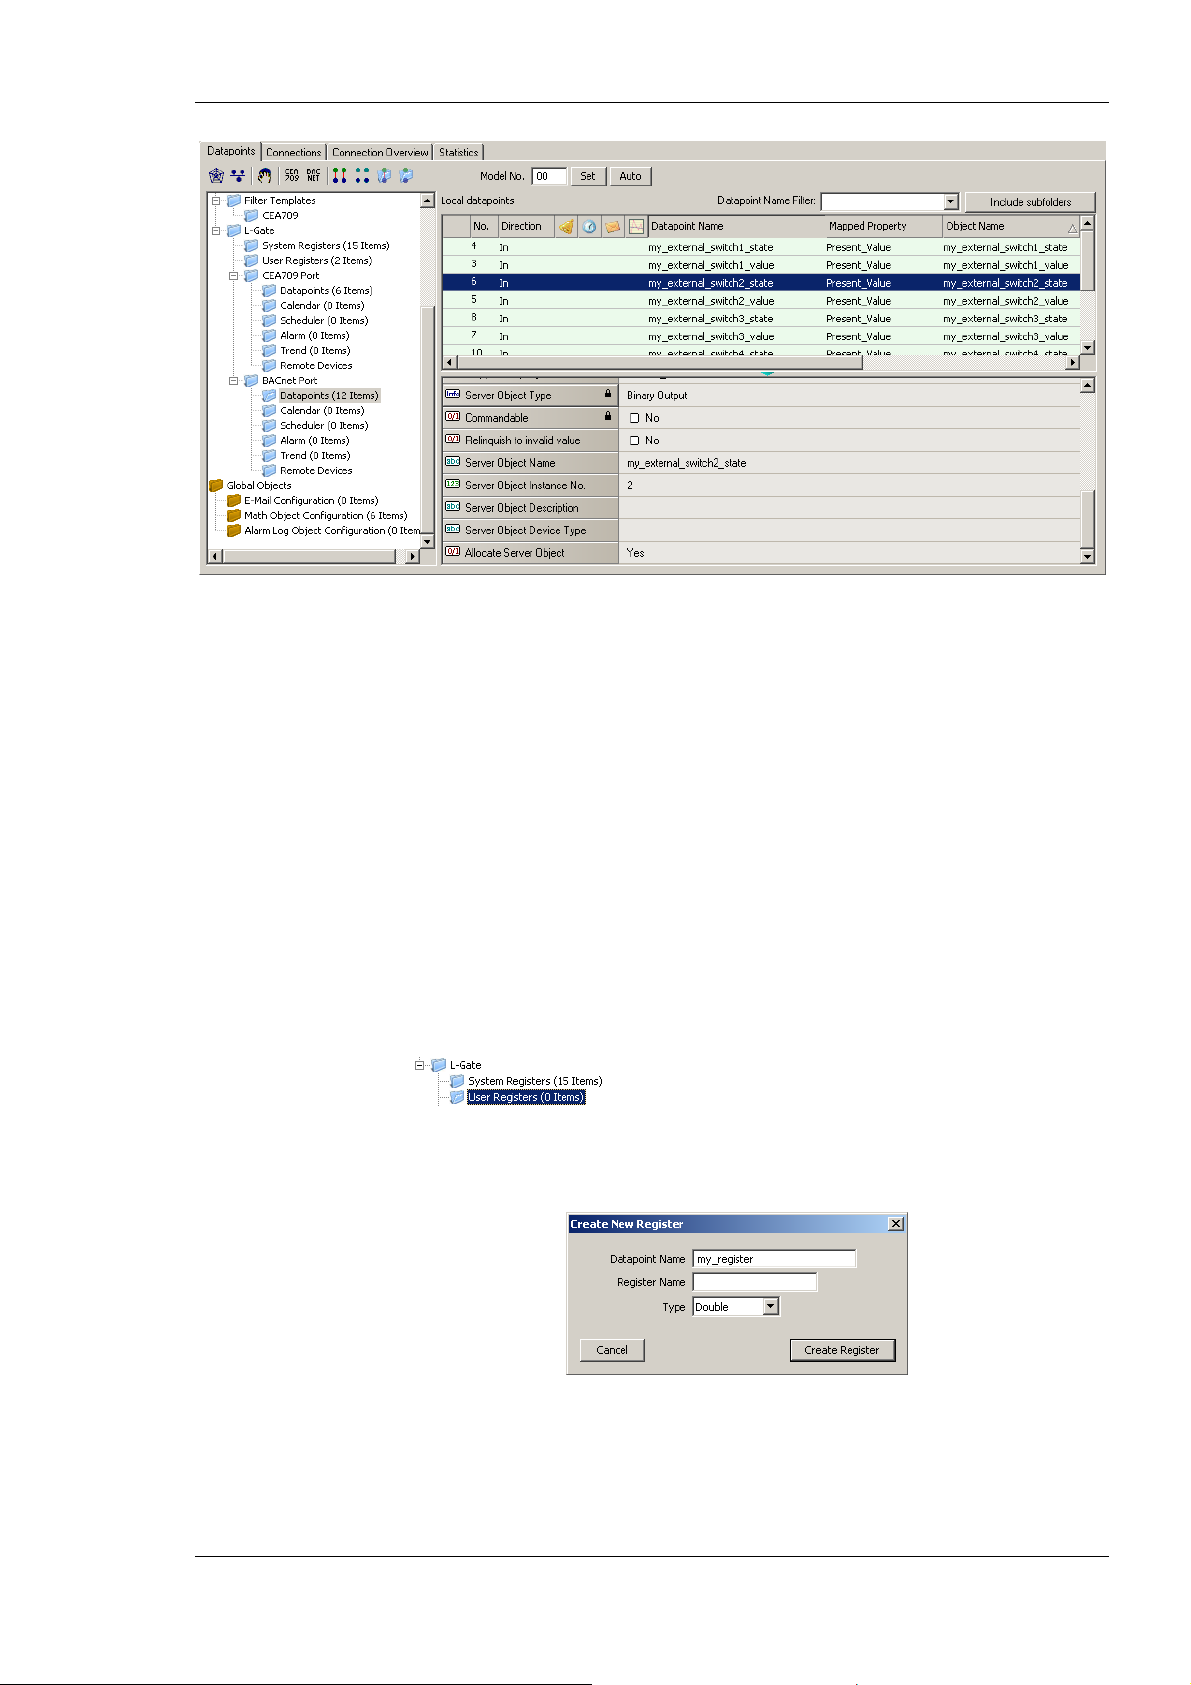
L-Gate User Manual 97 LOYTEC
Figure 82: Auto-created BACnet Points in the BACnet Folder
Note, when auto-creating the BACnet objects, the L-Gate Configurator initializes the
BACnet properties with default values derived from the properties of the CEA-709 NVs. In
particular, the object name, description, minimum and maximum present value, and
engineering units are generated. If the default properties do not have the desired values, the
user can edit them in the BACnet folder.
6.7.12 Create User Registers
User registers are data points on the device that do not have a representation on the
network. Thus, they are not accessible over a specific technology. A register merely serves
as a container for intermediate data (e.g., results of math objects). Since a register has no
network direction, it can be written and read. Therefore, two data points are generated for
each register, one for writing the register (output) and one for reading the register (input).
To Create a User Register
1. Select the L-Gate/User Registers folder
2. Right-click in the data point list and select New Datapoint… in the context menu.
This opens the register creation dialog as shown in Figure 83.
Figure 83: Create a user register.
3. Enter a Datapoint Name for the register. You may leave the Register Name blank to
give the underlying register the same name as the data point.
4. Select a Type. Available are “Double”, “Boolean”, or “Signed Integer”.
Version 3.2 LOYTEC electronics GmbH
Page 98
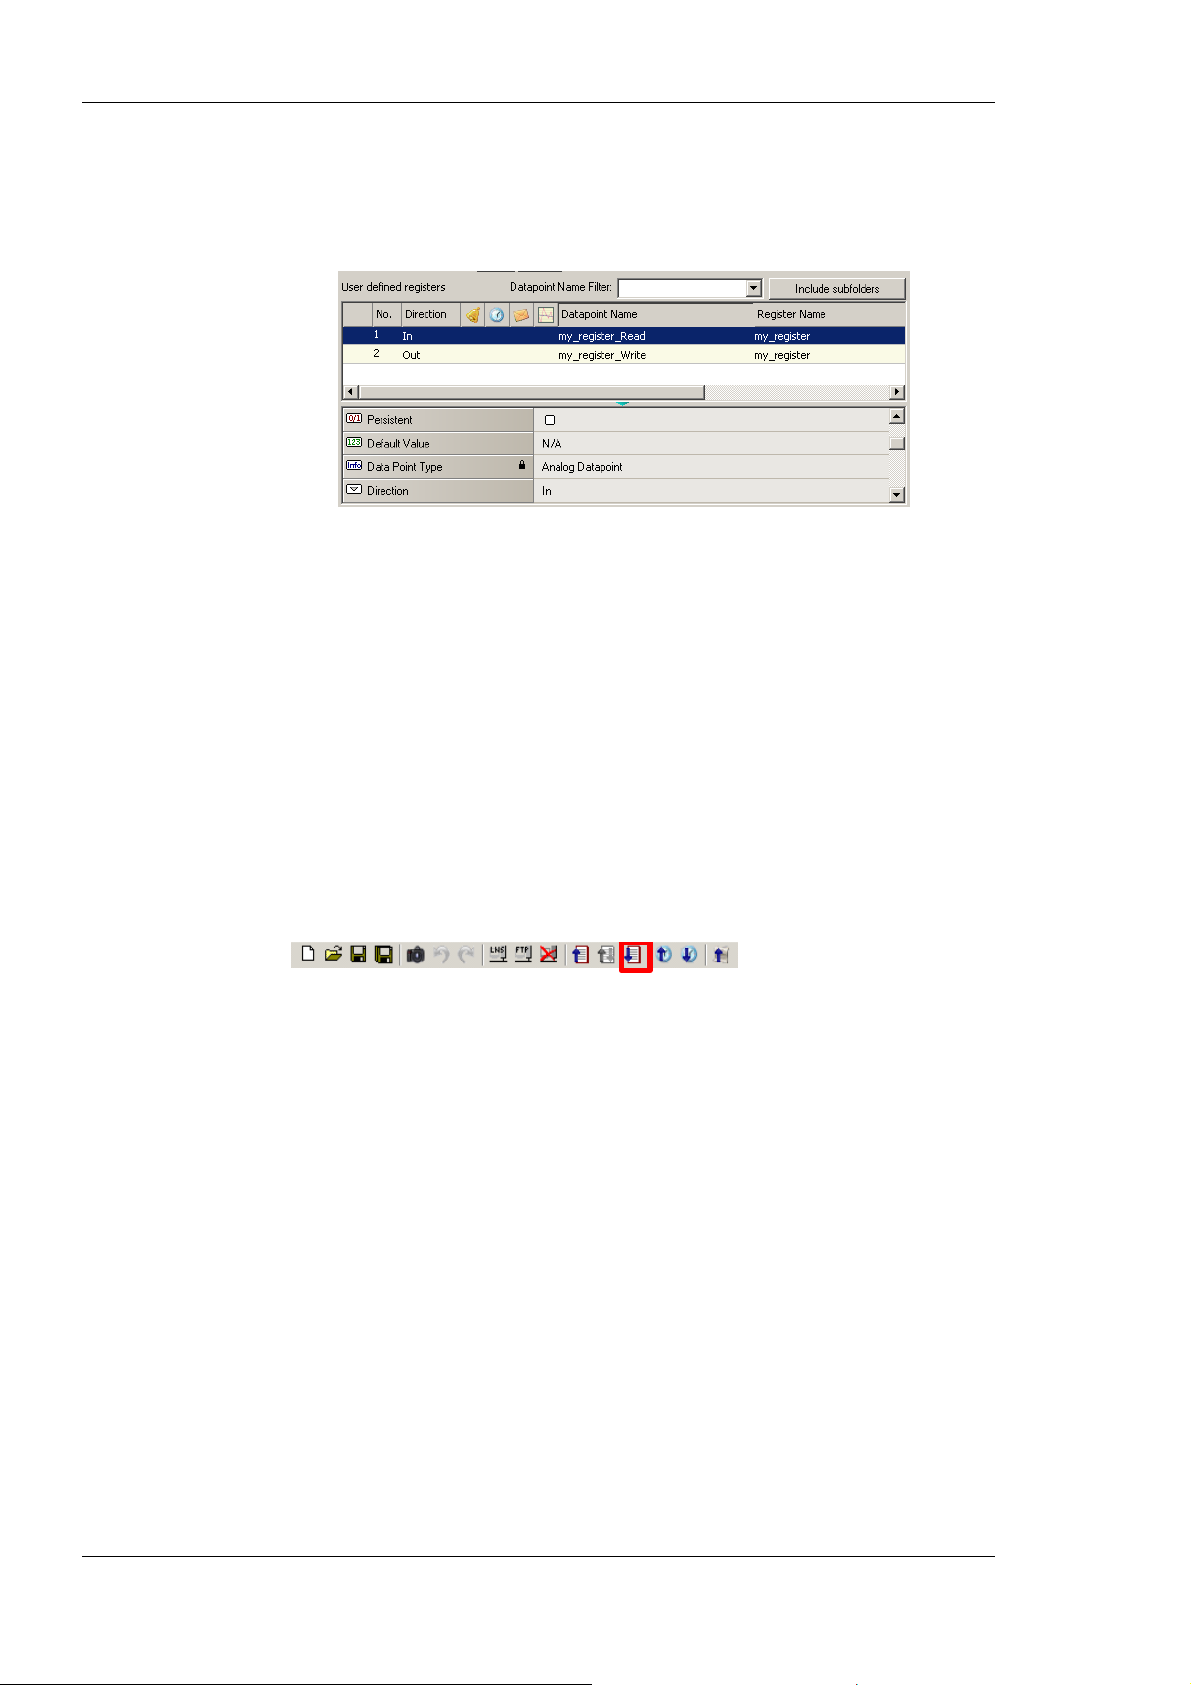
L-Gate User Manual 98 LOYTEC
5. Click Create Register.
6. Two data points now appear for the register, one for writing the register and one for
reading the register as shown in Figure 84.
Figure 84: Manually created user register.
6.7.13 Configuration Download
After the data points have been configured, the configuration needs to be downloaded to
the L-Gate. For doing so, the L-Gate must be onlin e. If the L-Gate is not yet connected to
the network, the configuration can be saved to a project file on the local hard drive.
If connected via LNS, and the NVs on the L-Gate are “Static NV” or “Dynamic NV”, the
Late Configurator can create the bindings automatically. This behavior can be influenced
by the download dialog. When connected via LNS, the download procedure also manages
the device template upgrade in the LNS database, if the static NV interface has been
changed.
To Download a Configuration
1. Click on the Download Configuration button
in the tool bar. The configuration upload dialog opens up as shown in Figure 85.
2. If no bindings shall be generated, deselect the Automatically create bindings
checkbox indicated by the red circle in Figure 85.
3. If the static NV interface has been changed, a new model number for the L-Gate needs
to be selected. This is necessary, as the static network interface of the L-Gate changes
on the CEA-709 network. The L-Gateway configuration software automatically selects
a usable value, which can be overridden in the field Model Number marked by the
blue rectangle in Figure 85.
4. Click Start to start the download. Each of the actions is displayed in the Task List
section of the dialog. The current progress is indicated by the progress bar below.
5. When the download process has finished, a notification window appears, which has to
be acknowledged by clicking Ok.
Version 3.2 LOYTEC electronics GmbH
Page 99
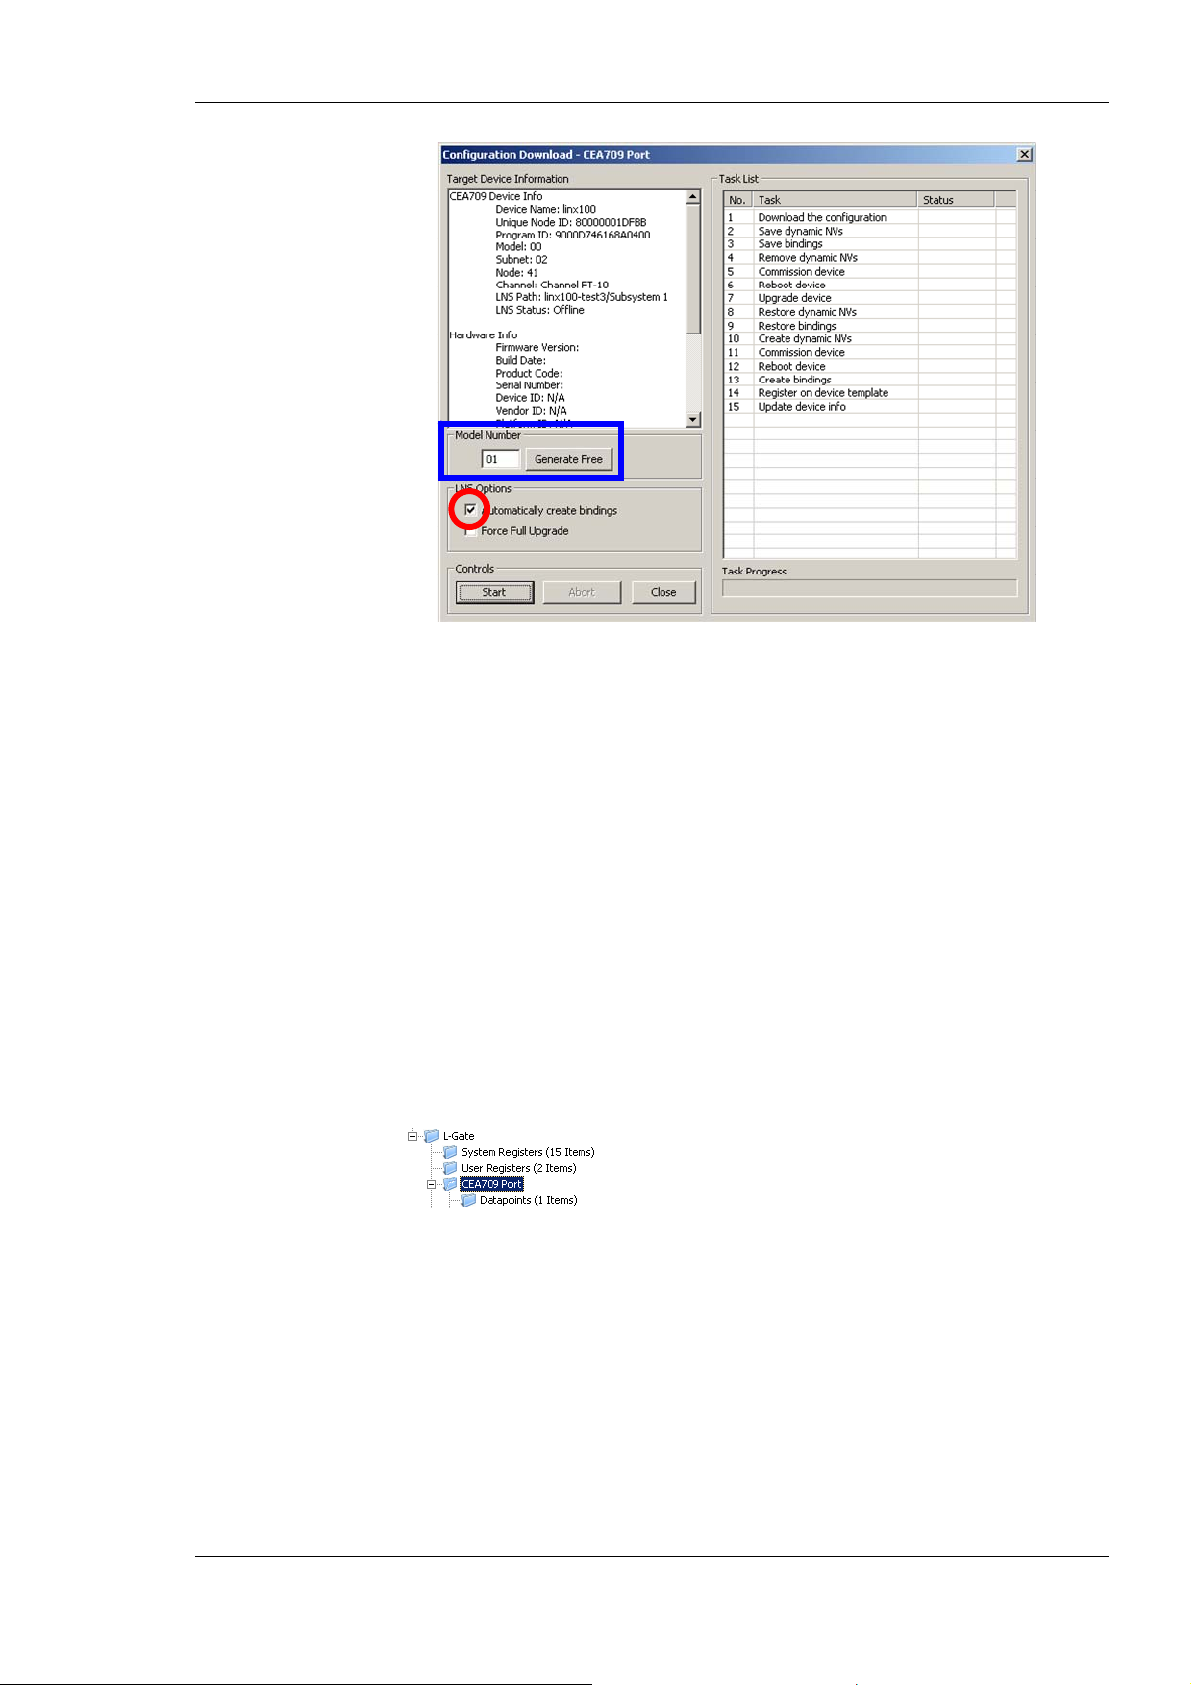
L-Gate User Manual 99 LOYTEC
Figure 85: Configuration Download Dialog
Note, that after the download is complete, the interface changes become active on the
L-Gate (i.e., the static NV interface has changed). Refresh the network management tool to
synchronize the tool with the changes to the LNS database made by the L-Gate
Configurator (e.g., use the menu “LonMaker|Refresh” in LonMaker or hit F5 in NL-220).
Normally, the Configurator software optimizes the download process by not executing
certain LNS operations, if not necessary. For example, only those bindings and dynamic
NVs are deleted and re-created, which correspond to real changes in the interface. The user
can check the Force Full Upgrade option to clean and re-do all steps.
6.7.14 Build XIF for Port Interface
When using static NVs on the L-Gate, the L-Gateway configuration software can export a
new XIF file for the changed static interface.
To Create a XIF File
1. Select the CEA-709 Port folder
2. Right-click on that folder and in the context menu select Build XIF ….
3. This opens a file requestor where the XIF file name needs to be entered. Select a useful
name to identify the L-Gate, e.g. as “lgate1.xif”.
6.7.15 Enable Legacy NM Mode
For network management tools, which do not support the ECS (enhanced command set)
network management commands, the legacy network management mode must be
configured. Please contact the tool’s vendor for information whether ECS is supported or
not. Note, that changing to legacy network management mode changes the static interface
of the device.
Version 3.2 LOYTEC electronics GmbH
Page 100
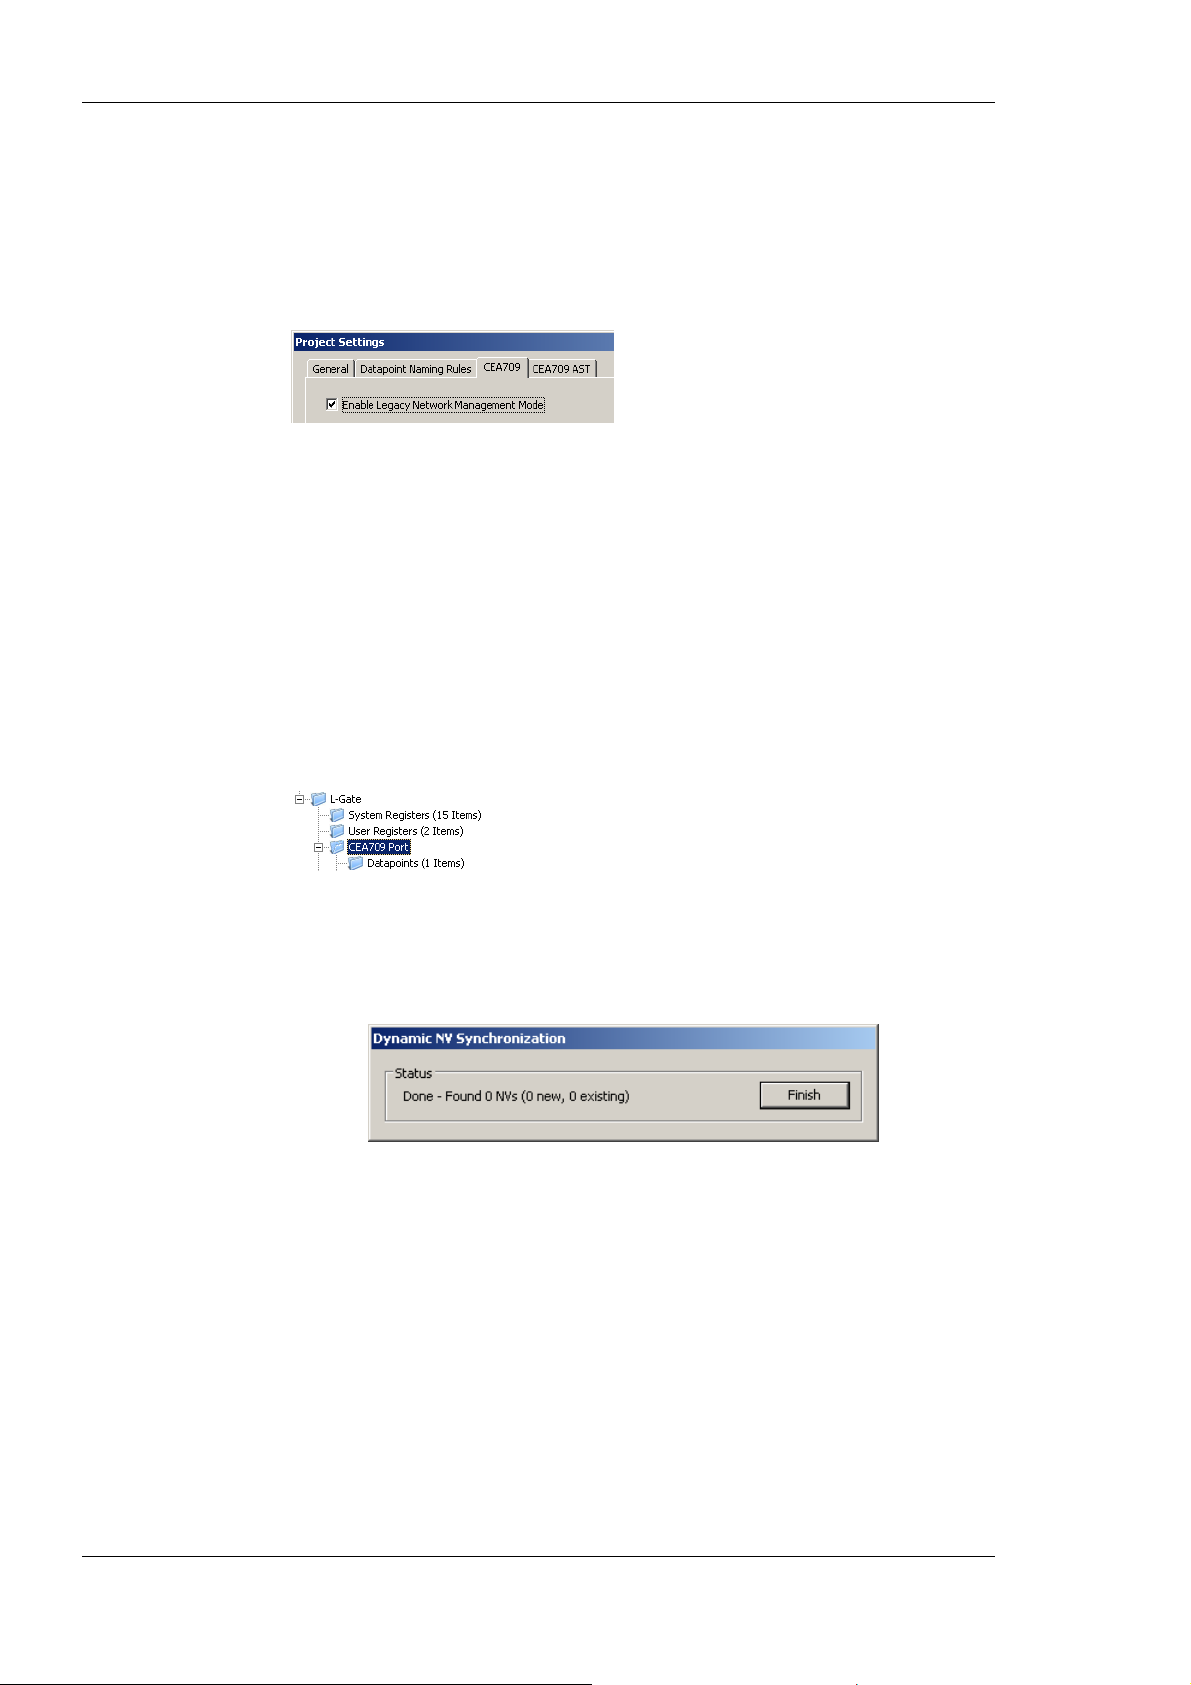
L-Gate User Manual 100 LOYTEC
To Enable Legacy NM Mode
1. In the L-Gate Configurator menu go to Settings Æ Project settings …
2. Click on the tab CEA709.
3. Put a check mark in Enable Legacy Network Management Mode.
4. Click OK.
5. Download the configuration to activate the change.
6.7.16 Upload Dynamic NVs from Device
In LNS-based tools it is possible to create dynamic NVs on the device manually. This is a
possible workflow to engineer the NV interface of the device in the LNS database. To use
those manually created dynamic NVs, the L-Gateway configuration software must
synchronize its dynamic NV information with the port.
To Upload Dynamic NVs
1. Select the CEA-709 Port folder.
2. Right-click and select Sync Dynamic NVs in the context menu. The L-Gateway
configuration software then loads any new dynamic NVs, which have been created and
are not yet part of the port interface definition. The process completes when the dialog
shown in Figure 86 appears.
Figure 86: Synchronizing dynamic NVs from the device.
3. Click on Finish. The new dynamic NVs now appear in the data point list and can be
edited and used for creating BACnet objects and connections.
6.7.17 Upload the System Log
The system log on the device contains important log messages. Log messages are generated
for important operational states (e.g., last boot time, last shutdown reason) or errors at runtime. This file is important for trouble-shooting and is available on the Web UI (see Section
4.3.1). The file can also be uploaded from the device with the L-Gate Configurator.
To Upload the System Log
1. Connect to the device via the FTP or LNS method (see Section 6.7.2).
Version 3.2 LOYTEC electronics GmbH
 Loading...