

Page 1

TURBOWASH
TM
. . . Pot and Pan Sink
MODEL
TW ML-110644
701 S. RIDGE AVENUE
TROY, OHIO 45374-0001
FORM 33800 Rev. A (4-98)
Page 2
Installation, Operation, and Care of
TurboWash
TM
Pot and Pan Sink
SAVE THESE INSTRUCTIONS
GENERAL
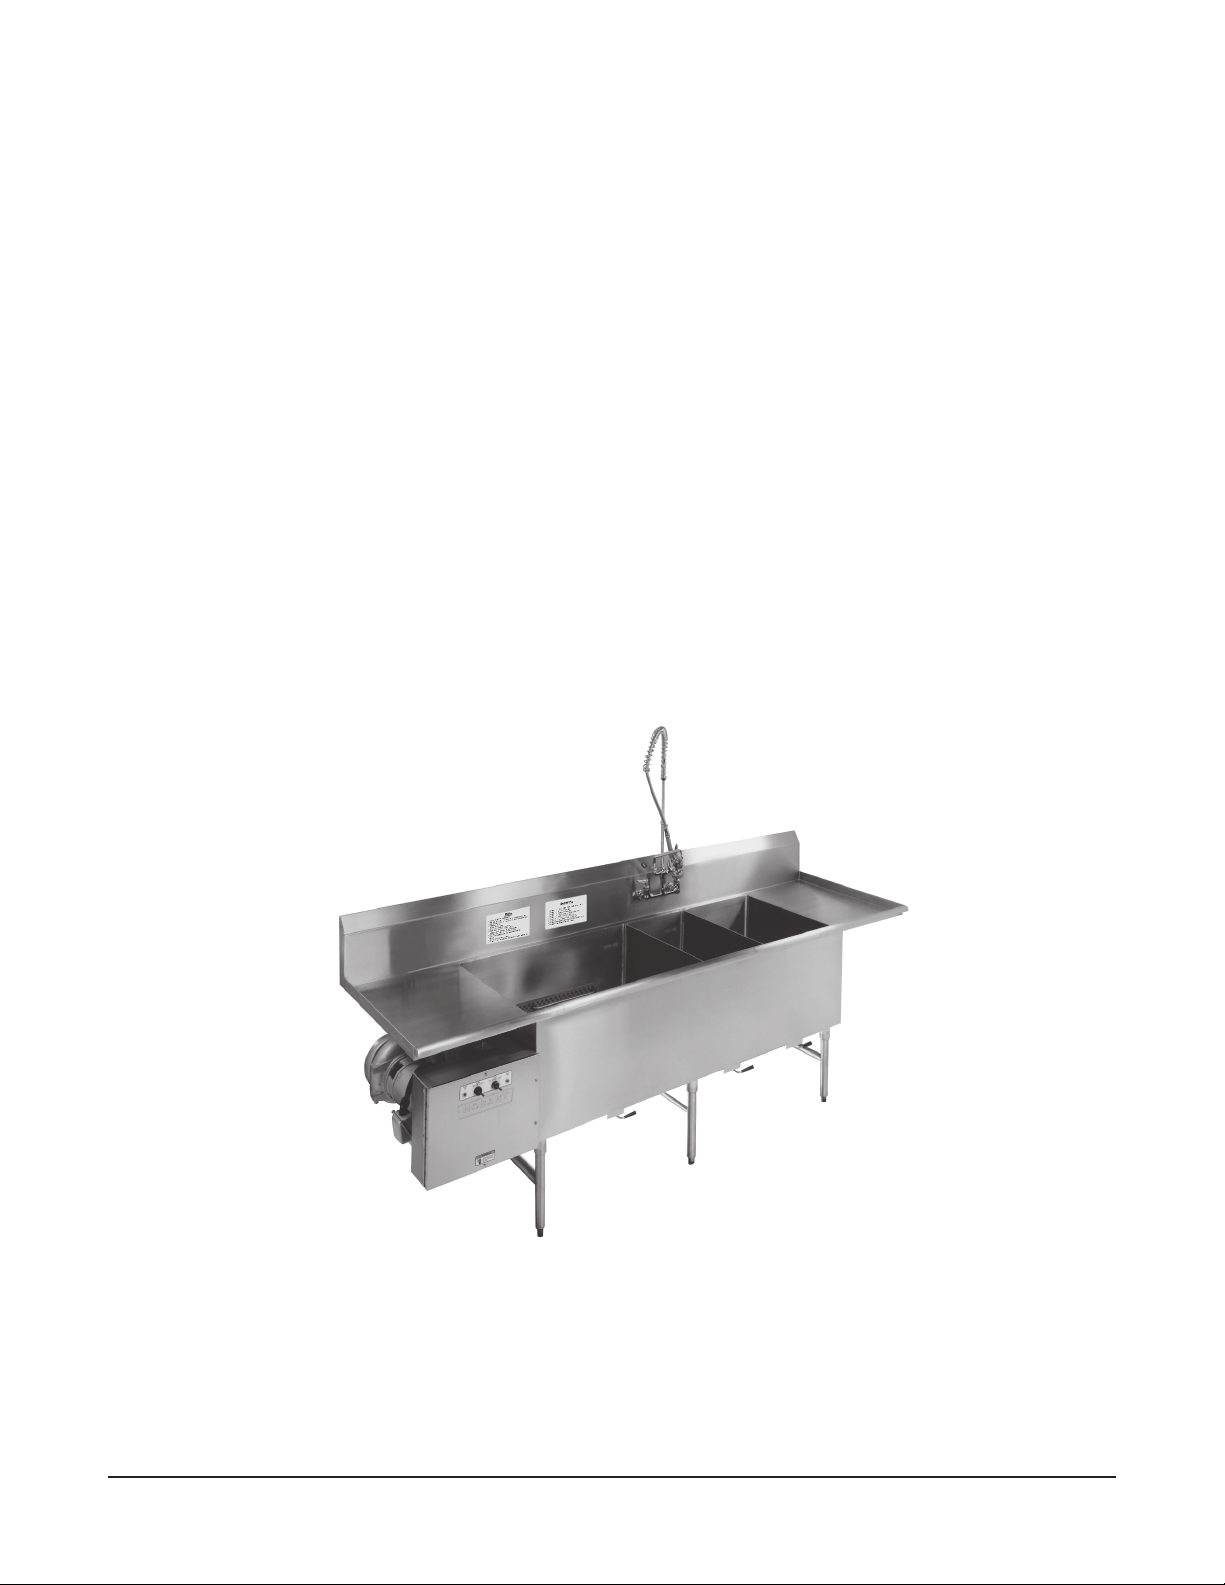
The TurboWash pot and pan sink is the scullery manager's dream. Soiled pots, pans and utensils can
be cleaned in swirling hot water for as long as necessary until soil-adhesion is eliminated. Significantly
less manual effort is required on difficult to clean items. Once washed, the pots, pans and utensils can
be moved to the optional rinse and sanitizer sinks.
• The wash pump motor is rated 2 H.P. and has permanently sealed bearings.
• Sinks can be specified for left-to-right or right-to-left wash/rinse/sanitize flow.
• A scrapper sink is optional between soiled end and wash sink and may be equipped with- or
without-disposer.
• The AutoFill option provides an automatic timed initial fill for the wash sink.
• The utensil basket accessory allows small items to be washed in the wash sink.
Nominal Dimensions
Front-to-back 34" overall. Sink depth 18"; to water level mark 14". Sink front-to-back 28". Counter
height 34". Height to counter rim 36"; to top of backsplash 45". Optional end styles (hemmed, rolled,
end splash, or dishwasher connection) add incrementally to the overall length. See table, next page.
© HOBART CORPORATION, 1997
– 2 –
Page 3
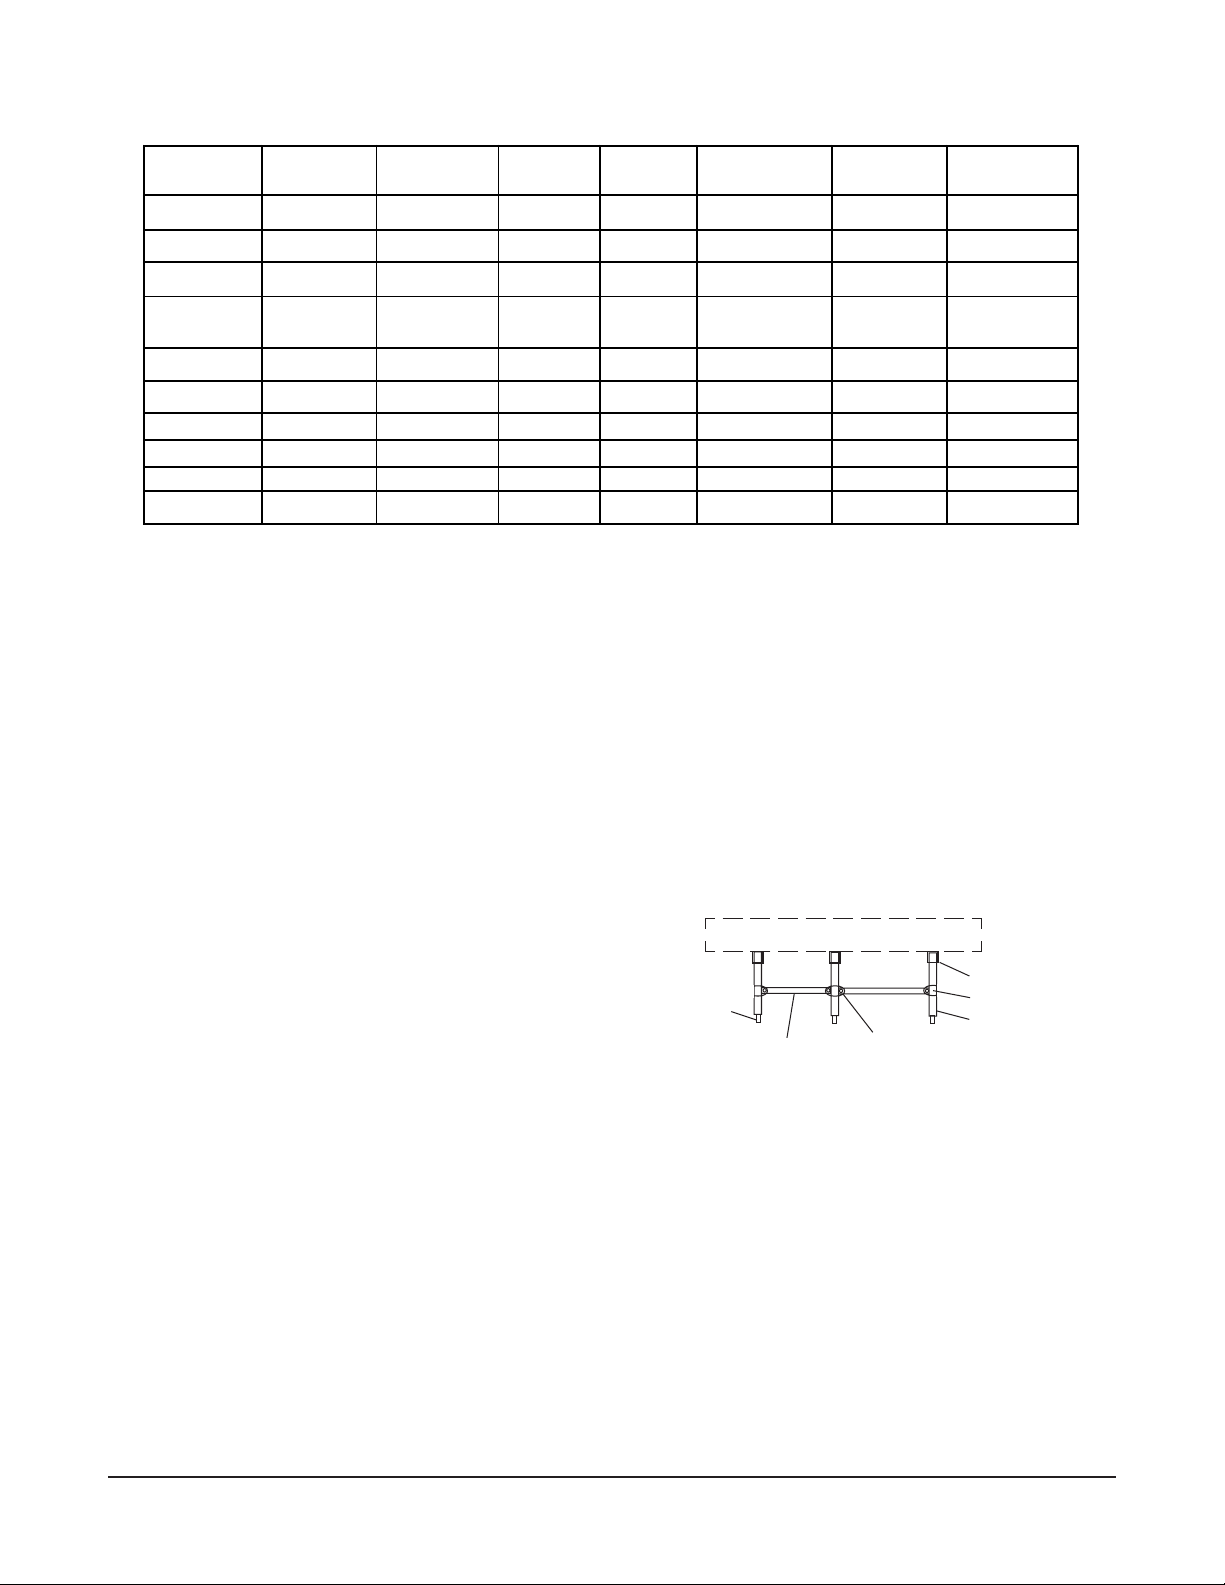
Available Section Lengths in Inches
SOILED END
EDGE
Hemmed = 0" 0" 0" 30" 0" 0" 0" Hemmed = 0"
Rolled = 1
End Splash =
1
2
/2"
Dishwasher
Connection
36" minimum
SOILED END
DRAIN BOARD
(Optional)
1
/2" 12" 20" w/o disposer 32" 15" 18.5" 12" Rolled = 11/2"
20" 36" w/o disposer 36" 18" 20" 18.5" End Splash = 2
24" 36" with disposer 42" 20" 24" 24"
30" 48" 24" 30" 30"
36" 54" 30" 36" 36"
42" 60" 36" 42"
48" 48"
54" 54"
60" 60"
SCRAPPER
SINK
(Optional)
WASH SINK
(Standard)
RINSE SINK
(Optional)
SANITIZER SINK
(Optional)
CLEAN END
DRAIN BOARD
(Optional)
INSTALLATION
UNPACKING
CLEAN END
EDGE
Dishwasher
Connection
20" minimum
1
/2"
Immediately after unpacking, check for possible shipping damage. If the TurboWash is found to be
damaged, save the packaging material and contact the carrier within 15 days of delivery.
Prior to installation, verify that the electrical service agrees with the specifications on the data plate(s).
ASSEMBLY
Assemble the H-frame leg sets into the front-rear
leg sockets and tighten the set screws. Fill set
screw heads with silicone sealant (NSF approved).
Allow space for the drain connection and assemble
the frame crossmembers between the rear legs
using clamps and
5
⁄16"-18 Screws, Washers,
Leveling Foot
TURBOWASH SINK
Frame Crossmember
Middle-Clamp - Bolts
Leg Socket - Set Screw
End-Clamp - Bolt
Rear Leg
Lockwashers and Nuts, provided (Fig. 1).
Fig. 1
Location
Provide necessary space for proper operation of the TurboWash, including faucet head clearance and
turning diameter so each sink can be filled. Place the TurboWash so it does not interfere with the
operation of other equipment in the area. Place the TurboWash backsplash several inches from the
wall to allow room for leveling.
Leveling
Turn feet in or out to level the unit front-to-back and side-to-side. Slide the TurboWash flush against
the wall so the backsplash can be sealed with silicone sealant.
– 3 –
Page 4

PLUMBING CONNECTIONS
WARNING: PLUMBING CONNECTIONS MUST COMPLY WITH APPLICABLE SANITARY, SAFETY,
AND PLUMBING CODES.
Drains
Drains underneath the TurboWash should be properly connected to a suitable drain (use 2" dia. pipe).
Recommended drain height is 10 inches above finished floor.
If a grease trap is required by code, it should have a minimum flow capacity of 42 gallons per minute.
Hot Water Connections
Hot water should be connected as required (temperature range 120 – 140°F). Total water hardness
of 4 – 6 grains per gallon is recommended.
Cold Water Connections
Cold water should be connected as required (temperature range 45 – 80°F). Total water hardness of
4 – 6 grains per gallon is recommended.
PLUMBING FITTINGS and Other Options
Temperature mix is provided by faucet(s), optional. Pre-rinse spray is optional. Manual, twist-handleoperated drains (optional) with-or without-overflow (optional) can be provided for installation on each
wash, rinse, and sanitizer sink. A free-flow drain (optional) is available for the scrapper sink when it
is not equipped with a disposer. A wash sink sump with strainer basket is optional — when so equipped,
the recommended drain height is 7 inches above finished floor. A wash sink separater is optional when
the wash sink is at least 42 inches long. Dishwasher connectability (optional) requires a drainboard
with minimum length of 36 inches at the soiled end or 20 inches at the clean end. Over-shelves
(optional) can be installed on the wall above the sink. Under-shelves (optional) can be provided for
installation on frame crossmembers underneath clean-end drainboards that are at least 30 inches long.
ELECTRICAL CONNECTION
WARNING: ELECTRICAL AND GROUNDING CONNECTIONS MUST COMPLY WITH THE
APPLICABLE PORTIONS OF THE NATIONAL ELECTRICAL CODE AND/OR OTHER LOCAL
ELECTRICAL CODES.
WARNING: DISCONNECT ELECTRICAL POWER SUPPLY AND PLACE A TAG AT THE
DISCONNECT SWITCH INDICATING THAT YOU ARE WORKING ON THE CIRCUIT.
WARNING: IF MORE THAN ONE ELECTRICAL SUPPLY CONNECTION IS PRESENT, ALL SUCH
CONNECTIONS MUST BE DISCONNECTED BEFORE SERVICING.
– 4 –
Page 5
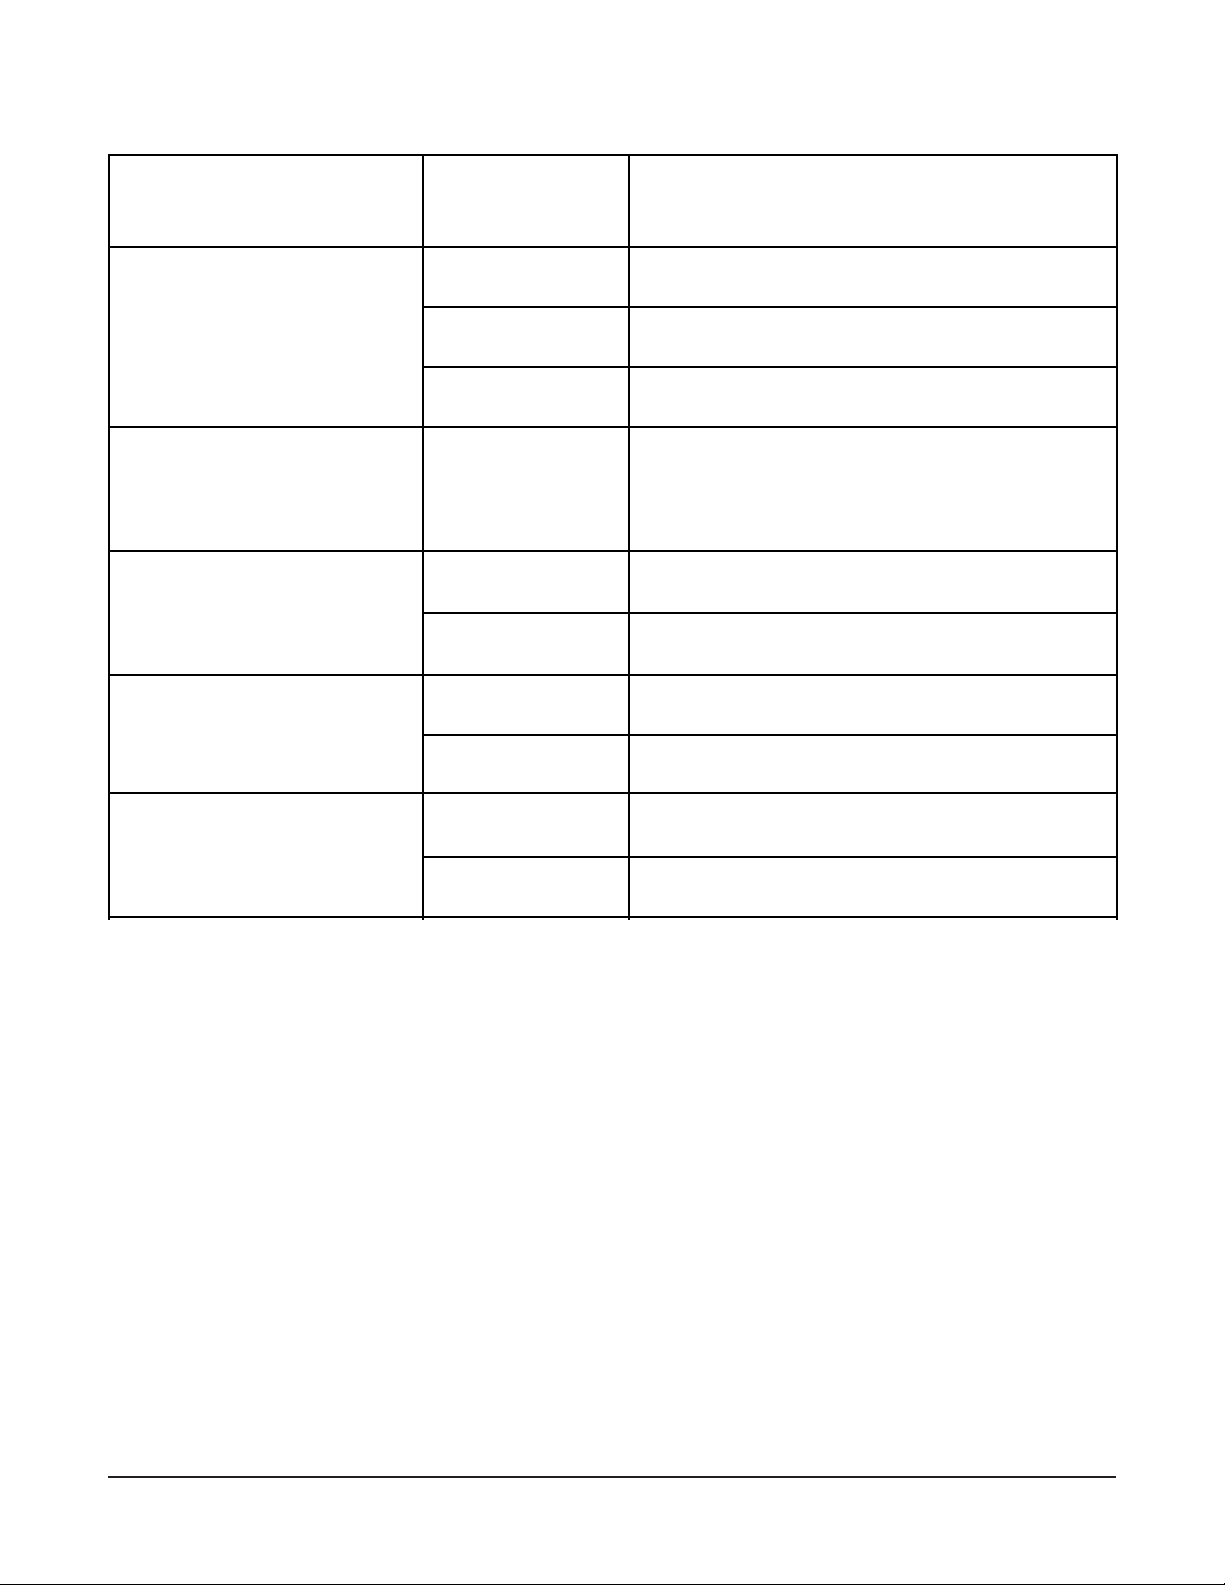
ELECTRICAL DATA
Model Volts / Hertz / Phase
Minimum Circuit Ampacity
Maximum Protective Device
AMPS
TW without disposer
TW with Disposer Model FD3-50,
FD3-75, FD3-125, FD3-150, or
FD3-200 and Single-Point
Electrical Connection
TW with Disposer Model FD3-50,
FD3-75, FD3-125, FD3-150,
FD3-200 or FD3-300 and
Single-Point Electrical Connection
Separate Electrical Connection
Disposer ONLY
Models FD3-50, FD3-75,
FD3-125, FD3-150, or FD3-200
Separate Electrical Connection
Disposer ONLY
Models FD3-50, FD3-75,
FD3-125, FD3-150,
FD3-200, or FD3-300
208 - 240 / 60 / 1
208 - 240 / 60 / 3
480 / 60 / 3
208 - 240 / 60 / 1
208 - 240 / 60 / 3
480 / 60 / 3
120 / 60 / 1 25 Amps
208 - 240 / 60 / 1 15 Amps
208 - 240 / 60 / 3 15 Amps
480 / 60 / 3 15 Amps
15 Amps Without Electric Heater in Wash Sink
30 Amps With Electric Heater in Wash Sink
15 Amps Without Electric Heater in Wash Sink
20 Amps With Electric Heater in Wash Sink
15 Amps Without Electric Heater in Wash Sink
15 Amps With Electric Heater in Wash Sink
25 Amps Without Electric Heater in Wash Sink
40 Amps With Electric Heater in Wash Sink
20 Amps Without Electric Heater in Wash Sink
35 Amps With Electric Heater in Wash Sink
15 Amps Without Electric Heater in Wash Sink
20 Amps With Electric Heater in Wash Sink
Compiled in accordance with the National Electrical Code, ANSI/NFPA 70, latest edition.
NOTE: Connections to the TW control box are made through a 3⁄4" conduit hole provided in the bottom.
Use copper wire, only.
Replace only with same type and rating of fuse, 0.6 A, 250 Volt, Type 3AG Time Delay.
CHECK ROTATION (Three-Phase Motors Only)
Three-phase motors must rotate in the direction of the arrow on the pump or disposer housing. In order
to check rotation, observe the direction of the impeller shaft between the motor and pump housing.
Switch the pump on for a few seconds and then switch it off.
If the rotation is incorrect, DISCONNECT ELECTRICAL POWER SUPPLY and interchange any two
of the incoming power supply leads. Reconnect the electrical power supply and verify correct rotation.
Disposer motor protection, when the TW is equipped with a disposer, is provided by the disposer motor.
Finish Sealant
After installation, apply a bead of silicone sealant (NSF approved) around the backsplash and wall.
– 5 –
Page 6
OPERATION
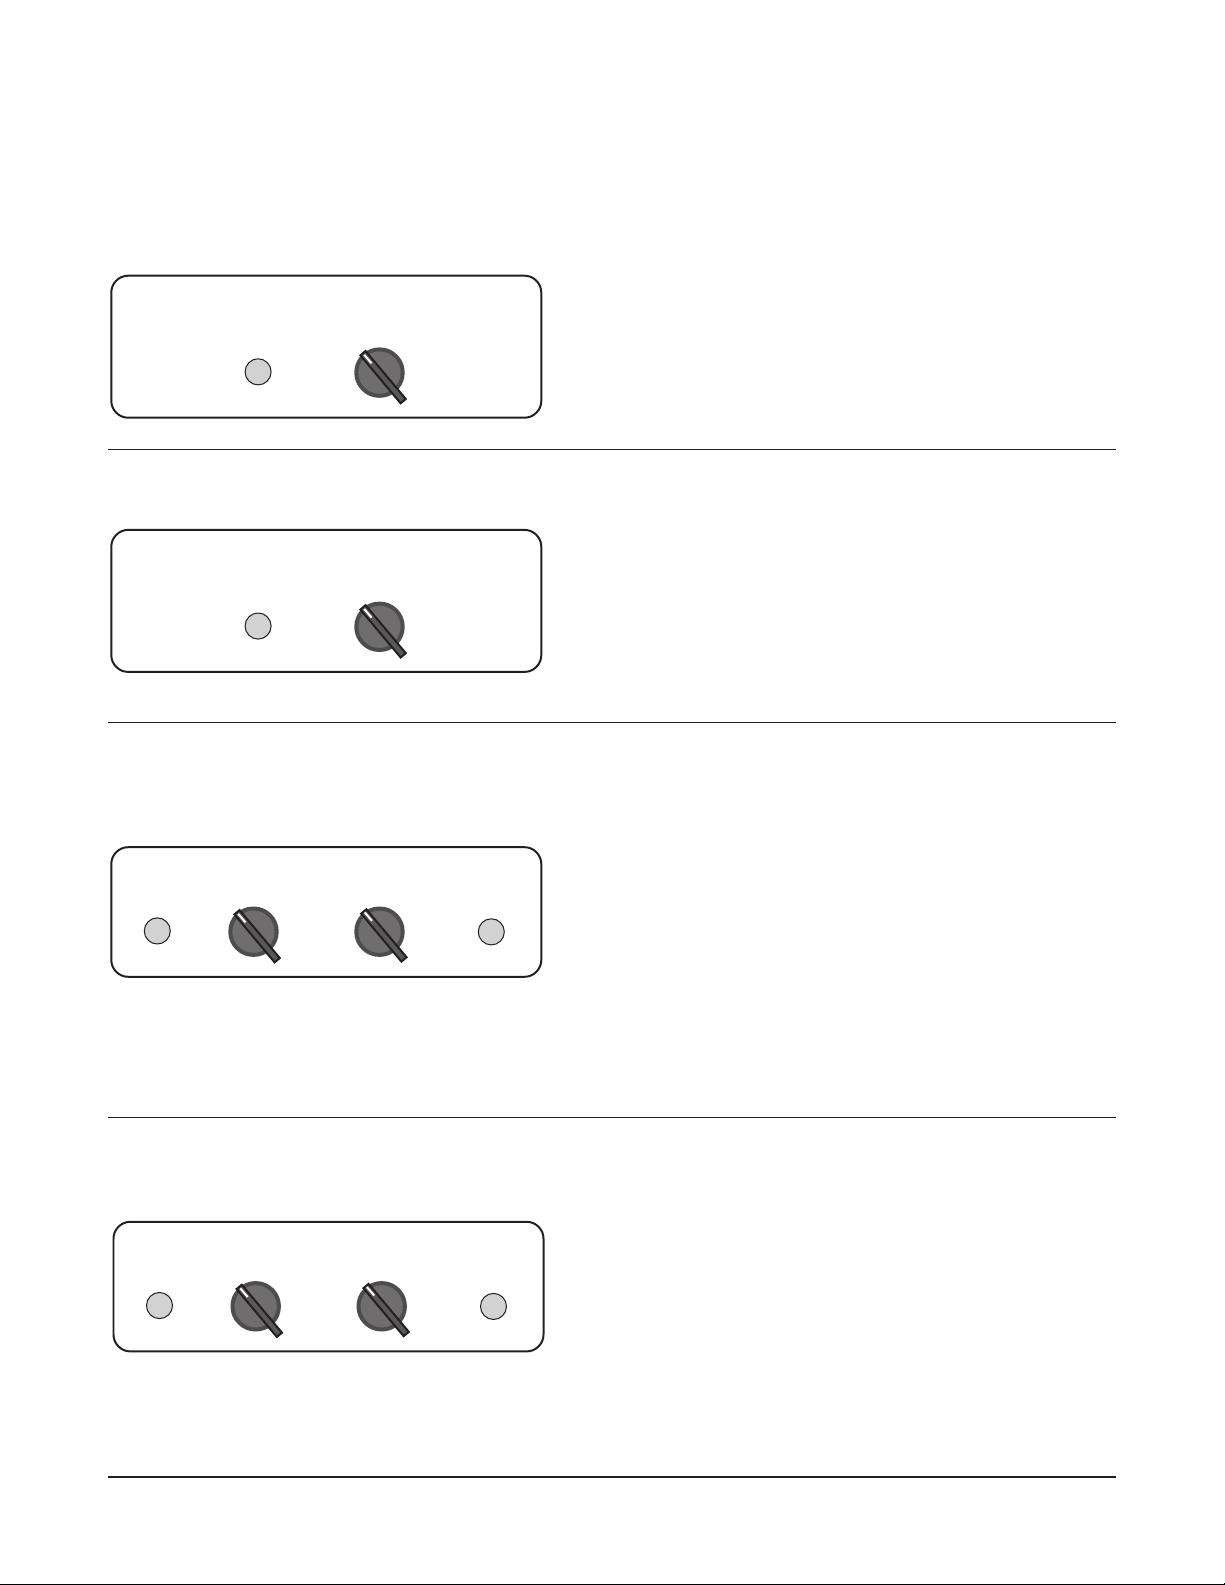
CONTROLS
Manual Pump Control and No Wash Sink Heat.
PUMP [ On - Off ] Switch.
PUMP PUMP
ON OFF ON
Pump Control with Auto Shutoff and No Wash Sink Heat.
PUMP ON Indicator Light is lit when the pump is On.
PUMP PUMP
ON OFF ON START
O START: Turn the switch to the Start position and
T
then release it to the On position. Pump automatically
shuts off after the preset time counts down.
PUMP ON Indicator Light is lit when the pump is On.
PUMP [ Off - On - Start ] Switch.
Manual Pump Control with Dual-Setting Wash Sink Heat Control.
PUMP [ OFF - ON ] Switch.
PUMP ON Indicator Light is lit when the pump is On.
PUMP
ON
PUMP / TIMER
OFF ON
HEAT
NORMAL USE
OFF OVERNIGHT
SOAKING
HEAT
ON
HEAT [ O
ORMAL USE: 110°F wash sink water temperature.
N
VERNIGHT SOAKING: 140°F wash sink water
O
temperature — for overnite soaking only. See
Washing for an Extended Time, page 10.
HEAT ON Indicator Light is lit when the Heat Switch is
on Normal Use or Overnight Soaking (unless low
water is indicated by the float switch).
FF - NORMAL USE - OVERNIGHT SOAKING ] Switch
Manual Pump Control with Timed Fill and No Wash Sink Heat.
PUMP [ OFF - ON ] Switch.
PUMP ON Indicator Light is lit when the pump is On.
PUMP
ON
PUMP
OFF ON
FILL
OFF ON
FILL
ON
FILL [ O
preset amount of time until the water level is sensed.
FILL ON Indicator Light is lit when the FILL Switch is
On.
To conserve water, close Drain before turning FILL
Switch O
– 6 –
FF - ON ] Switch — Fills the wash sink for a
N.
Page 7
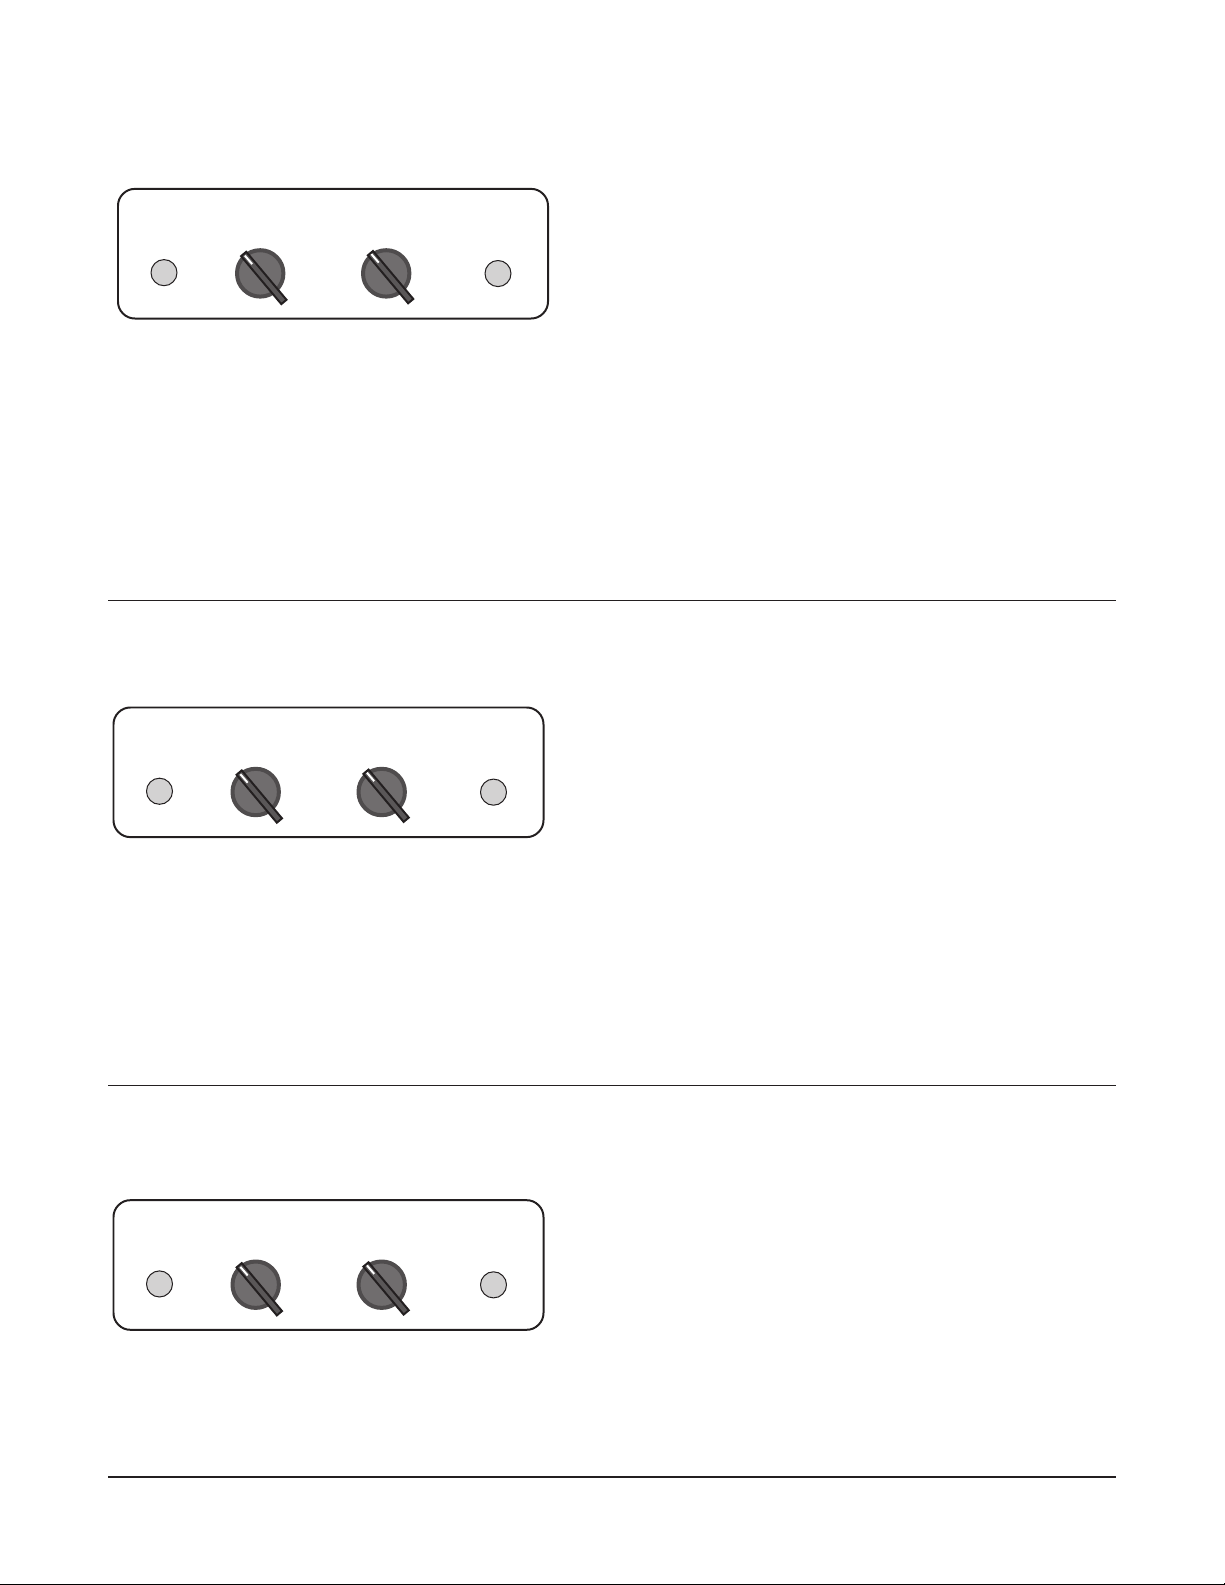
Manual Pump Control and Timed Fill with Dual Setting Wash Sink Heat Control.
PUMP [ OFF - ON ] Switch.
PUMP ON Indicator Light is lit when the pump is On.
PUMP
ON
PUMP
OFF ON
FILL / HEAT
NORMAL USE
OFF OVERNIGHT
SOAKING
HEAT
ON
FILL / HEAT [ O
FF - NORMAL USE - OVERNIGHT SOAKING ]
Switch — Fills the wash sink for a preset amount of
time until the water level is sensed.
N
ORMAL USE: 110°F wash sink water temperature.
VERNIGHT SOAKING: 140°F wash sink water
O
temperature — for overnite soaking only. See
Washing for an Extended Time, page 10.
HEAT ON Indicator Light is lit when the FILL / HEAT
Switch is on N
ORMAL USE or OVERNIGHT SOAKING (unless
low water is indicated by the float switch).
To conserve water, close Drain before turning FILL /
HEAT Switch to NORMAL USE or OVERNIGHT SOAKING.
Pump Control with Auto Shutoff and Dual-Setting Wash Sink Heat Control.
PUMP [ OFF - ON - START ] Switch.
O START: Turn the switch to the Start position and
T
PUMP
ON
PUMP / TIMER
OFFONSTART
HEAT
NORMAL USE
OFF OVERNIGHT
SOAKING
HEAT
ON
then release it to the On position. Pump automatically
shuts off after the preset time counts down.
PUMP ON Indicator Light is lit when the pump is On.
Pump Control with Auto Shutoff and Timed Fill.
PUMP
ON
PUMP / TIMER
OFFONSTART
FILL
OFF ON
FILL
ON
HEAT [ O
N
O
FF - NORMAL USE - OVERNIGHT SOAKING ] Switch
ORMAL USE: 110°F wash sink water temperature.
VERNIGHT SOAKING: 140°F wash sink water
temperature — for overnite soaking only. See
Washing for an Extended Time, page 10.
HEAT ON Indicator Light is lit when the Heat Switch is
on Normal Use or Overnight Soaking (unless low
water is indicated by the float switch).
PUMP [ OFF - ON - START ] Switch.
O START: Turn the switch to the Start position and
T
then release it to the On position. Pump automatically
shuts off after the preset time counts down.
PUMP ON Indicator Light is lit when the pump is On.
FILL [ O
FF - ON ] Switch — Fills the wash sink for a
preset amount of time until the water level is sensed.
FILL ON Indicator Light is lit when the FILL Switch is
On. To conserve water, close Drain before turning
FILL Switch O
N .
– 7 –
Page 8
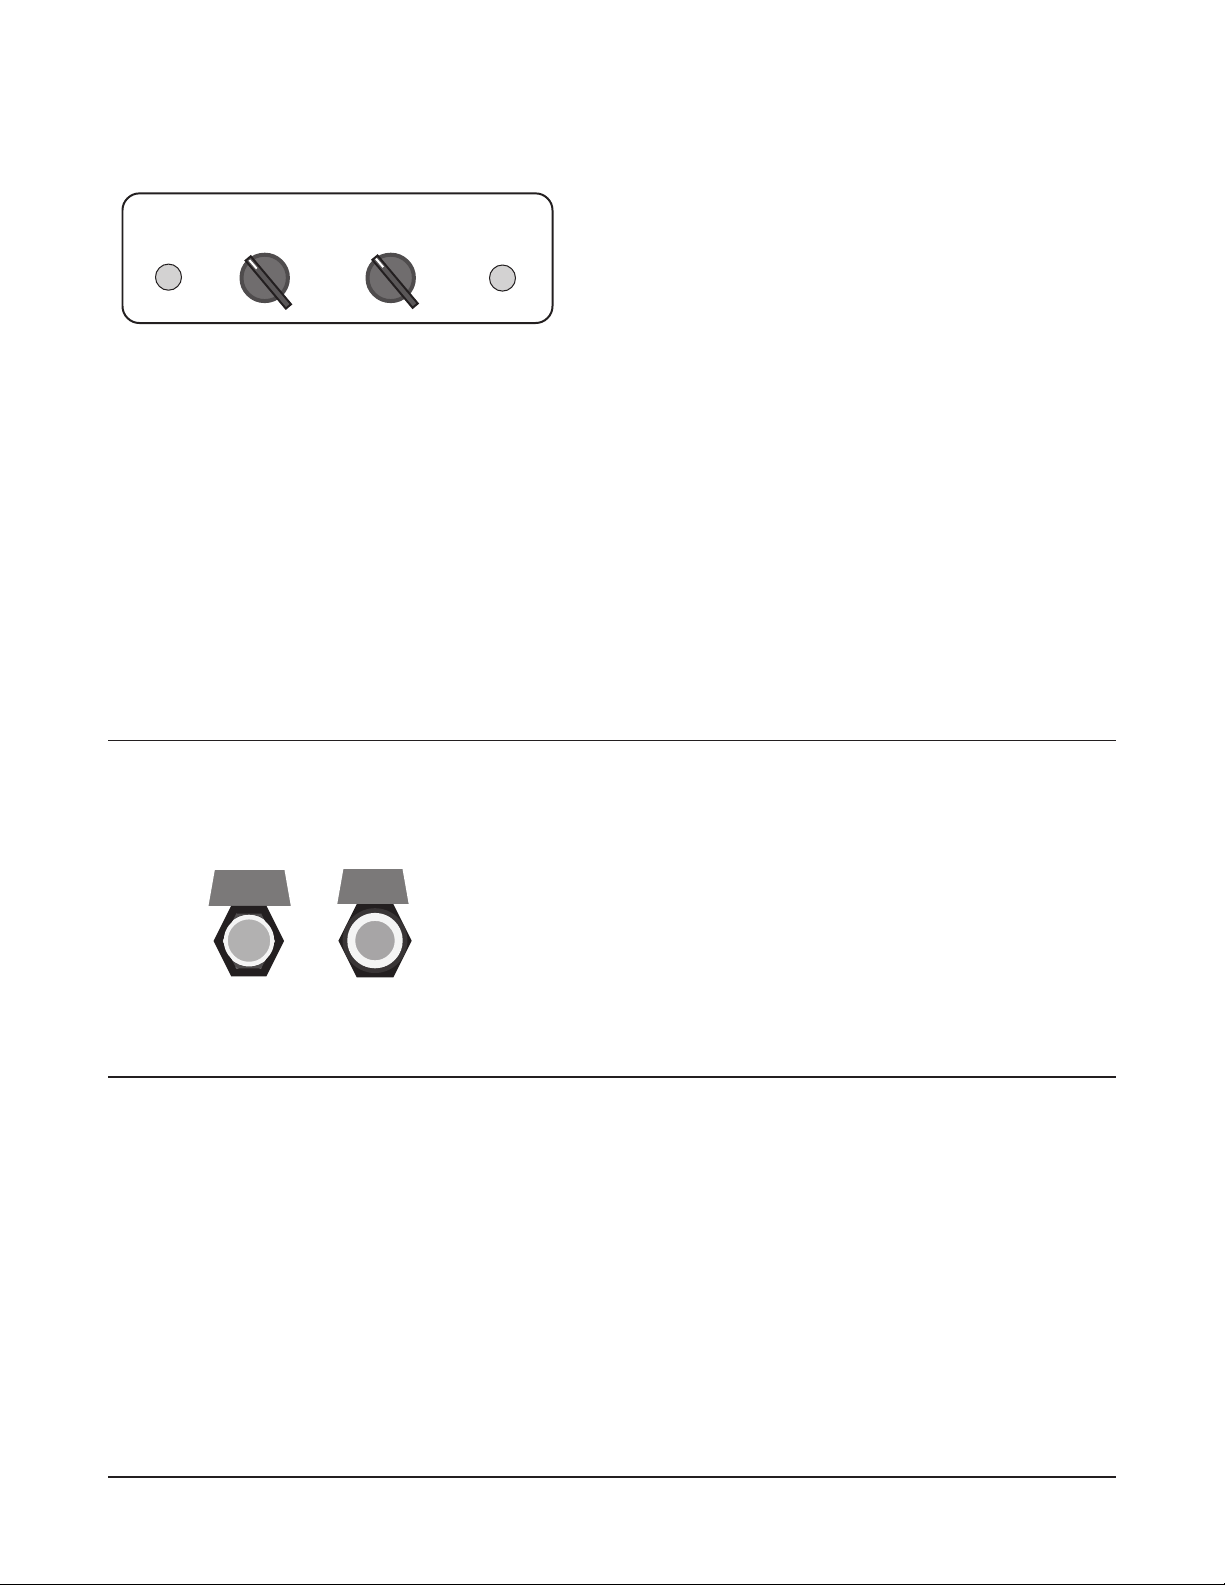
Pump Control with Auto Shutoff and Timed Fill with Dual Setting Wash Sink Heat Control.
PUMP [ OFF - ON - START ] Switch.
T
O START: Turn the switch to the Start position and
PUMP
ON
PUMP / TIMER
OFFONSTART
FILL / HEAT
NORMAL USE
OFF OVERNIGHT
SOAKING
HEAT
ON
then release it to the On position. Pump automatically
shuts off after the preset time counts down.
PUMP ON Indicator Light is lit when the pump is On.
Disposer Controls.
START
DISPOSER
STOP
FILL / HEAT [ O
FF - NORMAL USE - OVERNIGHT SOAKING ]
Switch — Fills the wash sink for a preset amount of
time until the water level is sensed.
N
ORMAL USE: 110°F wash sink water temperature.
O
VERNIGHT SOAKING: 140°F wash sink water
temperature — for overnite soaking only. See
Washing for an Extended Time, page 10.
HEAT ON Indicator Light is lit when the FILL / HEAT
Switch is on N
ORMAL USE or OVERNIGHT SOAKING (unless
low water is indicated by the float switch).
To conserve water, close Drain before turning FILL /
HEAT Switch to NORMAL USE or OVERNIGHT SOAKING.
START DISPOSER Push-Button Switch (green).
STOP Push-Button Switch (red).
O START: Push the START DISPOSER Switch. If
T
either the Disposer Cone Swirl option or Disposer
Scrapper Sink Swirl option is included, water will begin
flowing into the disposer (via the electrically controlled
solenoid valve).
T
O STOP: Push the STOP Switch.
– 8 –
Page 9

Chemical Supplies
Ask your chemical supplies representative for a recommendation on the type and amount of lowsudsing detergents and chemical sanitizers to use with your TurboWash sink. Your chemical supplier
should provide instructions, time and temperature requirements, concentrations, and safety information
for the chemicals used. Test kits or disposable color swabs for verification of chemical concentrations
should also be available from your chemical supplier. Refer to the table, below, for Volume
Requirements for Wash and Sanitizer Sinks (by size).
VOLUME REQUIREMENTS FOR WASH SINK AND SANITIZER SINK
Wash Sink Length
(side-to-side)
Inches
30"
32"
36"
42"
48"
54"
60"
Wash Procedure
FILL: Wash Sink
FILL: Sanitizer Sink
Wash Sink Volume
in U.S.Gallons
61 gal.
64 gal.
71 gal.
81 gal.
91 gal.
102 gal.
112 gal.
Fill wash sink with warm water (110°F) to Water Level mark on back
wall of sink. Do not overfill. After wash sink is filled with water, add
detergent to wash sink (detergent, quantity, and instructions should
be provided by your Chemical supplier).
Fill sanitizer sink with warm water to Water Level mark on back wall
of sink. After sanitizer sink is filled, add sanitizer to sanitizer sink
(sanitizer, quantity, minimum temperature, and instructions should
be provided by your Chemical supplier).
Sanitizer Sink Length
(side-to-side)
Inches
18.5"
20.0"
24.0"
30.0"
36.0"
Sanitizer Sink Volume
in U.S.Gallons
31 gal.
34 gal.
41 gal.
51 gal.
61 gal.
FILL: Rinse Sink
(optional)
• WASH
If immersion rinse is required by local code or health department, fill
rinse sink with warm water (120°F minimum per National Restaurant
Association) to the Water Level mark on back wall of sink. Some
localities may allow the rinse sink to be used for spray - rinsing at
some minimum temperature.
Start wash pump. Turn wash sink Heat Switch to Normal Use
[ 110°F ].
Pre-scrap all items — scrape loose food soil into trash receptacle
and pre-spray ware. Do not allow soiled ware to dry out.
Place large items in wash sink. Place small items in utensil basket.
Put utensil basket in wash sink. Do not nest or stack pans together
as this would inhibit wash action. Most items can be loaded or
unloaded while the pump is on. Sheet pans can be loaded or
unloaded easier with the pump turned off. Alternate sheet pans'
lengths and widths so they don't nest and inhibit washing action.
Wash items in wash sink for 3 – 10 minutes or as long as necessary
to obtain clean ware.
– 9 –
Page 10

• RINSE
Move items to rinse sink. Rinse items by immersing in rinse
sink or spraying with water.
• SANITIZE
CHANGE WATER
GENERAL
Washing for an Extended Time
TurboWash can clean extremely hard soils by soaking in the wash sink for an extended time or
overnight. The AutoShutoff timer will turn the pump off after the preset time lapses (4 hours is preset
at the factory). The heater will remain on Normal Use or Overnight Soaking setting until shut off. NOTE:
Overnight Soaking [140°F] Heater setting is recommended for overnite use only. The next morning,
drain the wash sink before reaching in. Spray off or cool hot items before handling. Rinse, sanitize,
stack, and allow clean ware to dry as normal.
Sanitize items by immersing in sanitizer sink for the required amount
of time which should be specified by your chemical supplier. Remove
items from sanitizer sink. Stack and allow clean ware to dry as per
local health codes and recommendations. If ware is not completely
clean, put it back in wash sink.
Change water at least every 4 hours or when it feels greasy or has
excessive floating debris. See Cleaning the TurboWash, page 11.
DO NOT put knives, sharp tools, towels, mops, scrub pads, plastic
bags, plastic wrap, or any small items in wash sink.
DO NOT run wash pump without 'pump-inlet' strainers in place.
DO pre-scrap all items before putting them in the wash sink.
DO skim any floating food particles from the wash sink to keep water
clean.
DOs and DON'Ts for Your New Hobart TurboWash
DO assure proper water hardness (4 – 6 grains per gallon is recommended).
DO pre-scrap pots and pans thoroughly — scrape loose food soil into trash receptacle and pre-spray
ware.
DO use only detergent and sanitizer recommended by your chemical professional.
DO at the end of the day, thoroughly clean the TurboWash. Rinse and allow to dry.
DO closely follow your chemical professional's prescribed deliming schedule.
DO use only products formulated to be safe on stainless steel.
DO NOT over soften water (recommended water hardness is 4 – 6 grains per gallon).
DO NOT allow food soil to accumulate on the sink bottom.
DO NOT exceed chemical manufacturer's recommended concentrations for detergent, sanitizer, or
lime scale remover.
DO NOT use steel wool to clean ware or TurboWash.
DO NOT allow objects such as knives and other sharp items in the wash sink.
DO NOT overload wash sink — keep all items below the surface.
NOTE: Failure to follow use, care, and maintenance instructions may void your Hobart warranty.
– 10 –
Page 11

MAINTENANCE
CLEANING THE TURBOWASH
WARNING: DISCONNECT ELECTRICAL POWER AND PLACE A TAG AT THE DISCONNECT
SWITCH BEFORE CLEANING THE TURBOWASH.
Maintain your TurboWash in a clean condition at all times. Clean before using, at least every four hours
during use or at a frequency necessary to maintain clean conditions, and at least once daily, if used.
Turn pump and heater Off.
Open drains and empty all sinks. Wipe out and remove any soil residues to a trash receptacle.
Release the latch and lift out the outer 'pump-inlet' strainer at the rear wall of the wash sink. Release
the latch and lift up the hinged 'inner pump-inlet' strainer at the rear of the wash sink. Lift up the hinged
heater cover on the side wall of the wash sink. Flush out any remaining food soil. Remove food soil
from sink bottom and dispose in trash receptacle. Clean sinks or components using a detergent
solution mixed according to the chemical manufacturer's instructions and a clean brush or cloth. Use
care when cleaning around heater compartment, temperature probes, and low water float — flush with
a gentle spray. Clean heater cover and both 'pump-inlet' strainers and replace in their original
positions. When necessary, wipe the wash, rinse, and sanitizer sinks with clean sanitizer diluted per
the chemical supplier's instructions and allow to air dry.
When needed, clean the exterior of the TurboWash as you would any appliance. If grease accumulates
around the pump motor fan cover, clean as necessary.
If lime or calcium scale accumulates in the sink area or as often as recommended by your chemical
supplier, delime the sink(s) using a deliming agent. Follow the chemical supplier's instructions for
proper concentration; and rinse sinks after deliming.
– 11 –
Page 12

TROUBLESHOOTING
Symptom Possible Cause Suggested Corrective Action
Pump and heat off. Circuit breaker tripped. Reset circuit breaker at electrical panel. Turn
pump switch off and then restart.
Low water caused float
switch to turn off.
Float switch clogged. Refer to Cleaning the TurboWash, page 11.
Pump off and
heat on.
Auto Shutoff Timer Adjustment
The Auto Shutoff Timer is preset at the factory to turn the wash sink pump off 4 hours after being turned
on. Contact Hobart service to adjust the AutoShutoff timer setting — up to 500 minutes, if needed.
SERVICE
AutoShutoff occurred after
the preset time lapsed.
Thermal overload protector
tripped.
Make sure drain is closed. Add water to wash
sink. Turn pump switch off and then restart.
Check cleaning procedure. Turn pump switch
off and then restart.
Wait a few minutes for thermal overload
protector to cool and automatically reset. Then
turn pump switch off and restart.
If pump is jammed or clogged, call for service.
Rely on your plumbing contractor for repairs to standard fittings, faucets, and drains. Contact your local
Hobart service office for repairs or adjustments needed on the TurboWash equipment.
FORM 33800 Rev. A (4-98) PRINTED IN U.S.A.
– 12 –
 Loading...