


040-00066-01 REV 4
slither.io
TM
Operator’s Manual
© Copyright 2018, Lowtech Studios, LLC. All Rights Reserved
Software™ & © 2019 Raw Thrills, Inc. All Rights Reserved.

This Page Left
Blank
Intentionally

slither.io
TM
Table of Contents
Safety .................................................................................................................................................................... 5
Operation ................................................................................................................................................ 5
Transporting ............................................................................................................................................ 5
Handling Components ............................................................................................................................. 5
Disconnect Power ................................................................................................................................... 5
Grounding ............................................................................................................................................... 5
Electrical Shocks ...................................................................................................................................... 5
Monitor ................................................................................................................................................... 5
Power Cord .............................................................................................................................................. 5
Surge Suppressor..................................................................................................................................... 5
Water and Other Liquid Sources ............................................................................................................. 6
Connectors .............................................................................................................................................. 6
Computer ................................................................................................................................................ 6
Tempered Glass Warning ...................................................................................................................... 6
Hazard to Epileptics ................................................................................................................................. 6
Manual .................................................................................................................................................... 6
Specifications .......................................................................................................................................... 6
Product Specifications .......................................................................................................................................... 7
Electrical Power ............................................................................................................................................ 7
Temperature ................................................................................................................................................. 7
Humidity........................................................................................................................................................ 7
Dimensions ................................................................................................................................................... 7
Fuse Replacement Guide ...................................................................................................................................... 7
Setup ..................................................................................................................................................................... 8
Unpack Materials .................................................................................................................................... 8
55” Cabinet Assembly ............................................................................................................................. 9
Card Reader Installation and Setup ....................................................................................................... 10
Check Electrical Settings ........................................................................................................................ 16
Startup Game ........................................................................................................................................ 16
Diagnostics and Adjustments .............................................................................................................................. 17
Basic Functional Test on Initial Power Up ............................................................................................. 17
3| Page

slither.io
Test Menus ............................................................................................................................................ 18
Choosing the Right Pricing Adjustments for Your Location .................................................................. 26
PC Hardware ....................................................................................................................................................... 27
PC Hard Drive Recovery ........................................................................................................................ 29
Troubleshooting .................................................................................................................................................. 30
Technical Support ............................................................................................................................................... 34
Electrical and Mechanical Illustrations ............................................................................................................... 35
TM
4| Page

slither.io
TM
Safety
Operation
Before operating game, read this manual. Failure to properly install and operate this game could result in
malfunction or accident. Operate the game in accordance with the manual.
Transporting
The cabinet is very heavy. Because the monitor is high, the cabinet is also very top-heavy. Use appropriate
care when moving or transporting cabinet. It contains fragile glass and electronic components. Avoid rough
handling.
Handling Components
Many components are extremely sensitive to handling, environmental and Electrostatic Discharge (ESD)
events—especially the computer. Do not handle it roughly. Before servicing, call your distributor and inquire
about the PC warranty. Use proper ESD procedures when servicing. Protect components from harmful
environmental conditions, such as extreme temperatures, excessive moisture or other damaging effects.
Disconnect Power
Always turn the power off and unplug the unit before servicing or making adjustments unless otherwise
instructed. Installing or repairing components while power is on can damage the components and void the
warranty.
Grounding
Avoid electrical shock. Do not plug in AC power until you have inspected and properly grounded the unit.
Only plug into a grounded, three-wire outlet. Do not use a “cheater” plug or cut off the ground pin on the line
cord.
Electrical Shocks
There is no isolation transformer in the cabinet. Disconnect AC power before servicing. However, be aware
that lethal voltages can remain in the electronic components even when AC power is disconnected. Use
extreme caution when servicing. Verify that there is a working ground connection. If the unit sustains water
damage, cease using it immediately and unplug AC power.
Monitor
The monitor contains no user serviceable parts. Do not attempt to service the monitor.
Power Cord
If the power cord is damaged or lost, replace it with an identical cord as supplied by the manufacturer or an
authorized service agent.
Surge Suppressor
It is recommended that you plug your game’s power cord into a surge suppressor to help protect from power
surges that may damage sensitive electronic components.
5| Page

slither.io
TM
Water and Other Liquid Sources
Do not install game near sprinkler or other water jet sources. Do not use water jet to clean game. Keep
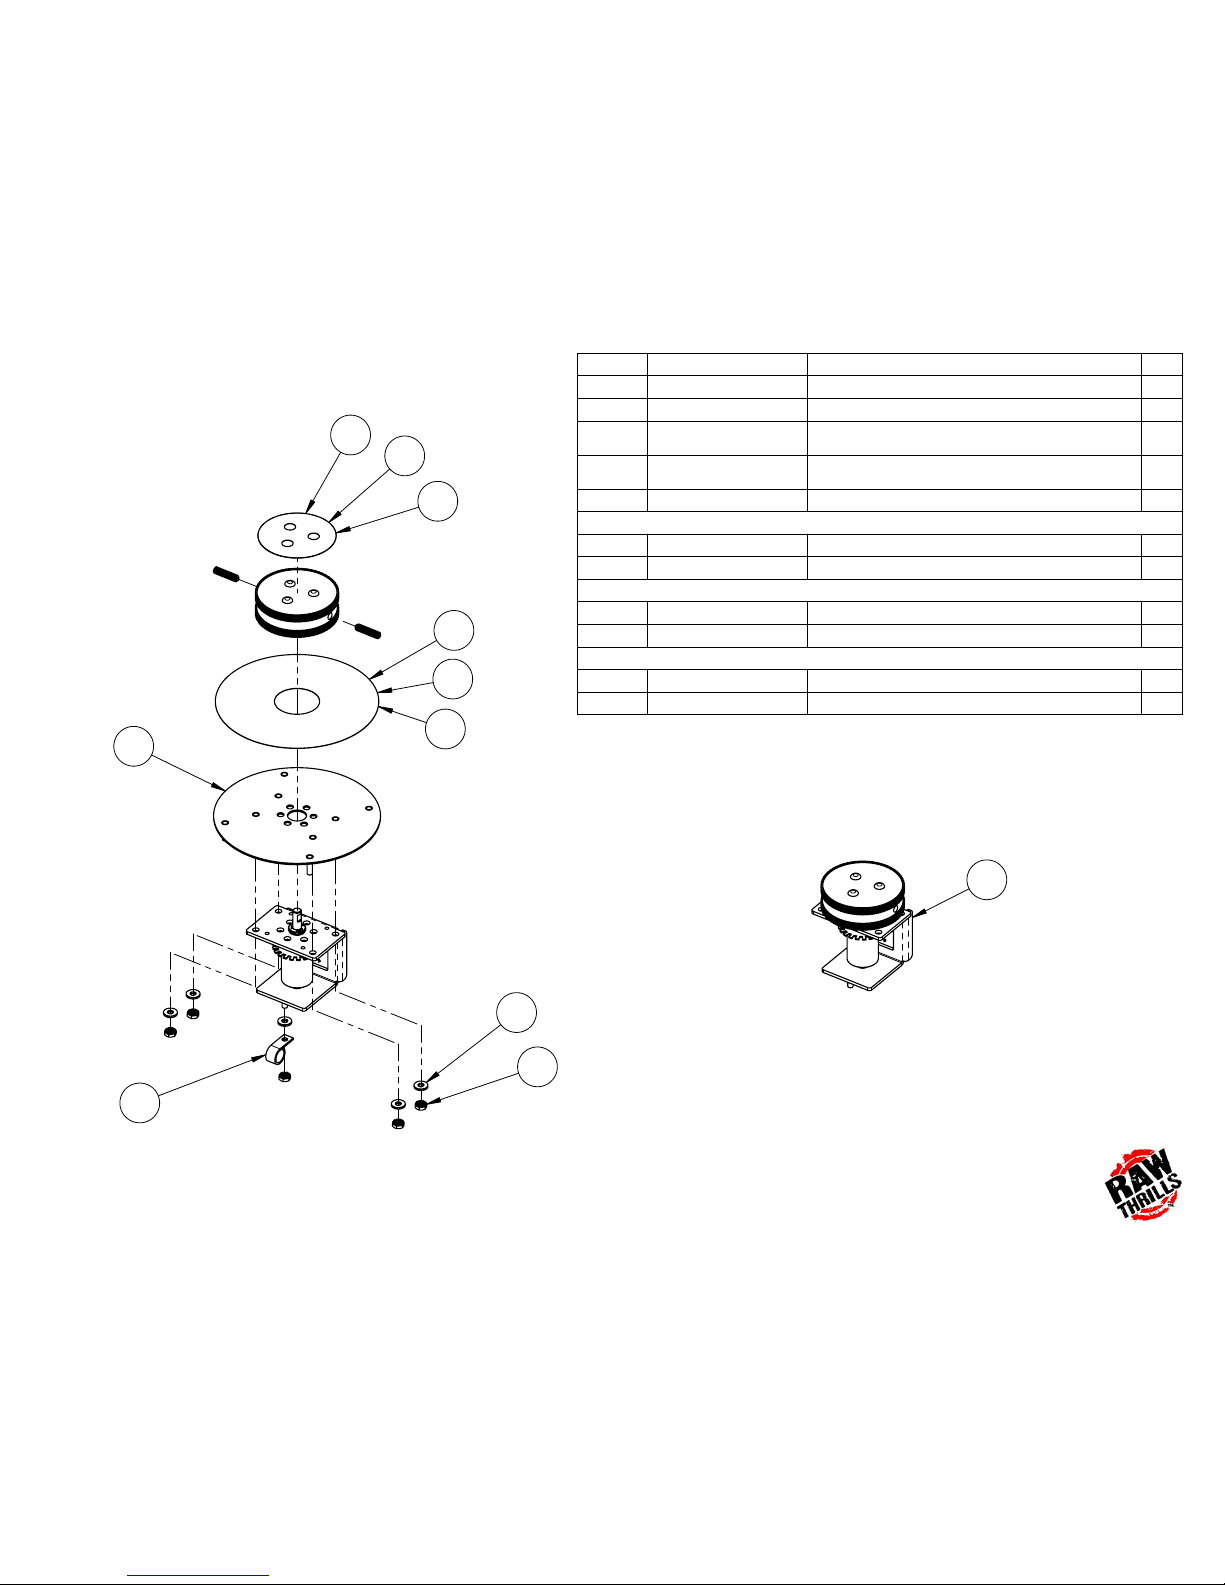
minimum clearance behind game and wall for proper ventilation but also prevent access of liquid from spills
and sprays from entering ventilation holes.
Connectors
When servicing machine, ensure all connectors mate properly. If connectors do not slip in easily, do not force
them. Connectors are often keyed and only connect one way. Check for correct orientation.
Computer
The computer contains sensitive components, including a hard drive. Do not handle it roughly. Call your
distributor before servicing its internal components. Ask about warranty information as it relates to the PC.
Cycle AC power on or off with the cabinet power switch.
A dongle has been inserted into one of the USB ports. This is required for game play.
Do not remove the dongle except for troubleshooting purposes.
Tempered Glass Warning
When handling the LCD display glass cover take special care and set the glass down softly on a flat surface
free of debris. The edge of the glass is sensitive to hard impact. Shattered glass from the monitor can travel
long distances and cause bodily injury. Use proper procedures when handling broken materials.
Hazard to Epileptics
A small portion of the population has an epileptic condition that may cause seizures. Affected persons
experience seizure while watching some television pictures or playing certain video games. People who have
not had seizures may still have an undetected epileptic condition. If anyone in your family has experienced
epilepsy symptoms (seizures or loss of awareness), consult your physical before using video games. While
children play video games, a parent should observe. Be alert to the following symptoms: dizziness, altered
vision, eye or muscle twitching, involuntary movements, loss of awareness, disorientation or convulsions. If
you or your child experiences these symptoms, discontinue use immediately and consult your physician.
Manual
Keep this manual available and ready for use. If the game fails to function properly, turn off the machine and
unplug the AC line cord. Contact your local distributor. Your warranty, when applicable, lasts 60 days from
your purchase date. You may not reproduce this document or any of its contents without written
authorization from Raw Thrills, Inc.
Specifications
For reasons such as performance, this product’s specifications may change without notice. Federal patent,
copyright and other intellectual property laws protect the content, devices and design of the game and its
equipment.
6| Page

slither.io
7x
5A 250V
5A, 250VAC Fast Acting 3AG Fuse
Littlefuse 0312005.MXP (or equivalent)
Product Specifications
Electrical Power
United States, International and Japan
Operating AC Current: 5/2.5 Amps
Voltage: 120/230 ~ VAC 50/60Hz
Temperature
50° F to 104° F
(10° C to 40° C)
Humidity
Must not exceed 95% relative humidity
Dimensions
Assembled
Height: 107.00” (2.72 meters)
Width: 54.75” (1.39 meters)
Depth: 32.50” (0.83 meters)
TM
Fuse Replacement Guide
NOTE: FOR CONTINUED PROTECTION AGAINST
FIRE AND ELECTRICAL DAMAGE, USE ONLY
SPECIFIED FUSE TYPE AND VALUE.
12V Power Distribution:
Please see unit for specified fuse labeling. Abbreviations:
7| Page

slither.io
TM
Setup
Unpack Materials
1. Place the shipping crates on a flat, stable surface.
2. Cut the banding straps and remove the cardboard lids.
3. Lift off the large cardboard containers surrounding the cabinet assembly and remove any shipping
cleats.
4. Remove the coin door key from the coin return slot.
5. Open the top coin door.
6. Locate the keys for the back doors, the cash box door, and the ticket doors.
7. Open the cash box door and remove the cash box.
8. Check for shipping damage to the following:
• Marquee and monitor
• Cabinet decals
9. Check the AC line cord for visible signs of damage.
Pay particular attention to the plug and line cord insulation.
Marquee Assembly can tip forward and cause damage. Take care when removing assembly from box and
when installing atop cabinet to ensure that the assembly doesn’t fall forward. Tighten all screws securely.
8| Page

slither.io
TM
55” Cabinet Assembly
Note: 2 people are required, and ladders are recommended. Marquee assembly is top heavy and can tip
over!
1. Place cabinet in desired floor location. Remove upper back door and carefully place such that it will not fall
over or be damaged. Set up ladders next to the cabinet for marquee installation.
2. Locate the marquee assembly as well as the following hardware:
a. (6) black tamper proof Torx machine screws, ¼ - 20 thread, 1-1/2” long
b. (6) ¼” black split lock washers
c. (6) ¼” black flat washers
3. Using a T-27 bit, securely mount the marquee assembly atop the cabinet as shown in the assembly setup
diagram, avoiding any pinching/crushing of the wire harness which should pass through the access hole.
Connect marquee harness to cabinet harness, accessible through upper door.
9| Page

slither.io
TM
Card Reader Installation and Setup
Due to the rising popularity of aftermarket debit card systems (i.e. Embed, Intercard, Semnox, etc.) for
cashless/coinless operation of amusement machines in addition to E-Ticket payouts on redemption games,
this slither.io cabinet is equipped with UCL compatible harnessing to ensure that the installation process is
easier and less prone to miswiring.
PAPER TICKETS NOTE: If your location utilizes paper tickets, contact your distributor to purchase “Ticket Door
Completion Kit” as the game cabinet is not equipped with ticket dispensers or ticket bins in default
configuration. Follow instructions on page 12 to install kit contents.
UCL, or Universal Card Link, is a debit card standard established by the American Amusement Machine
Association. Visit https://coin-op.org/standardization/
The UCL connections on the game use pins 1, 2, 6, 8, and 9. The other pins are unused. Each UCL connector
can supply up to 1A at 12VDC.
for the latest UCL standard and manual information.
10| Page

slither.io
You can choose to use 1 or 3 card readers in the pricing adjustments section of the test menu. It is
recommended to use 3 card readers for best results and player access.
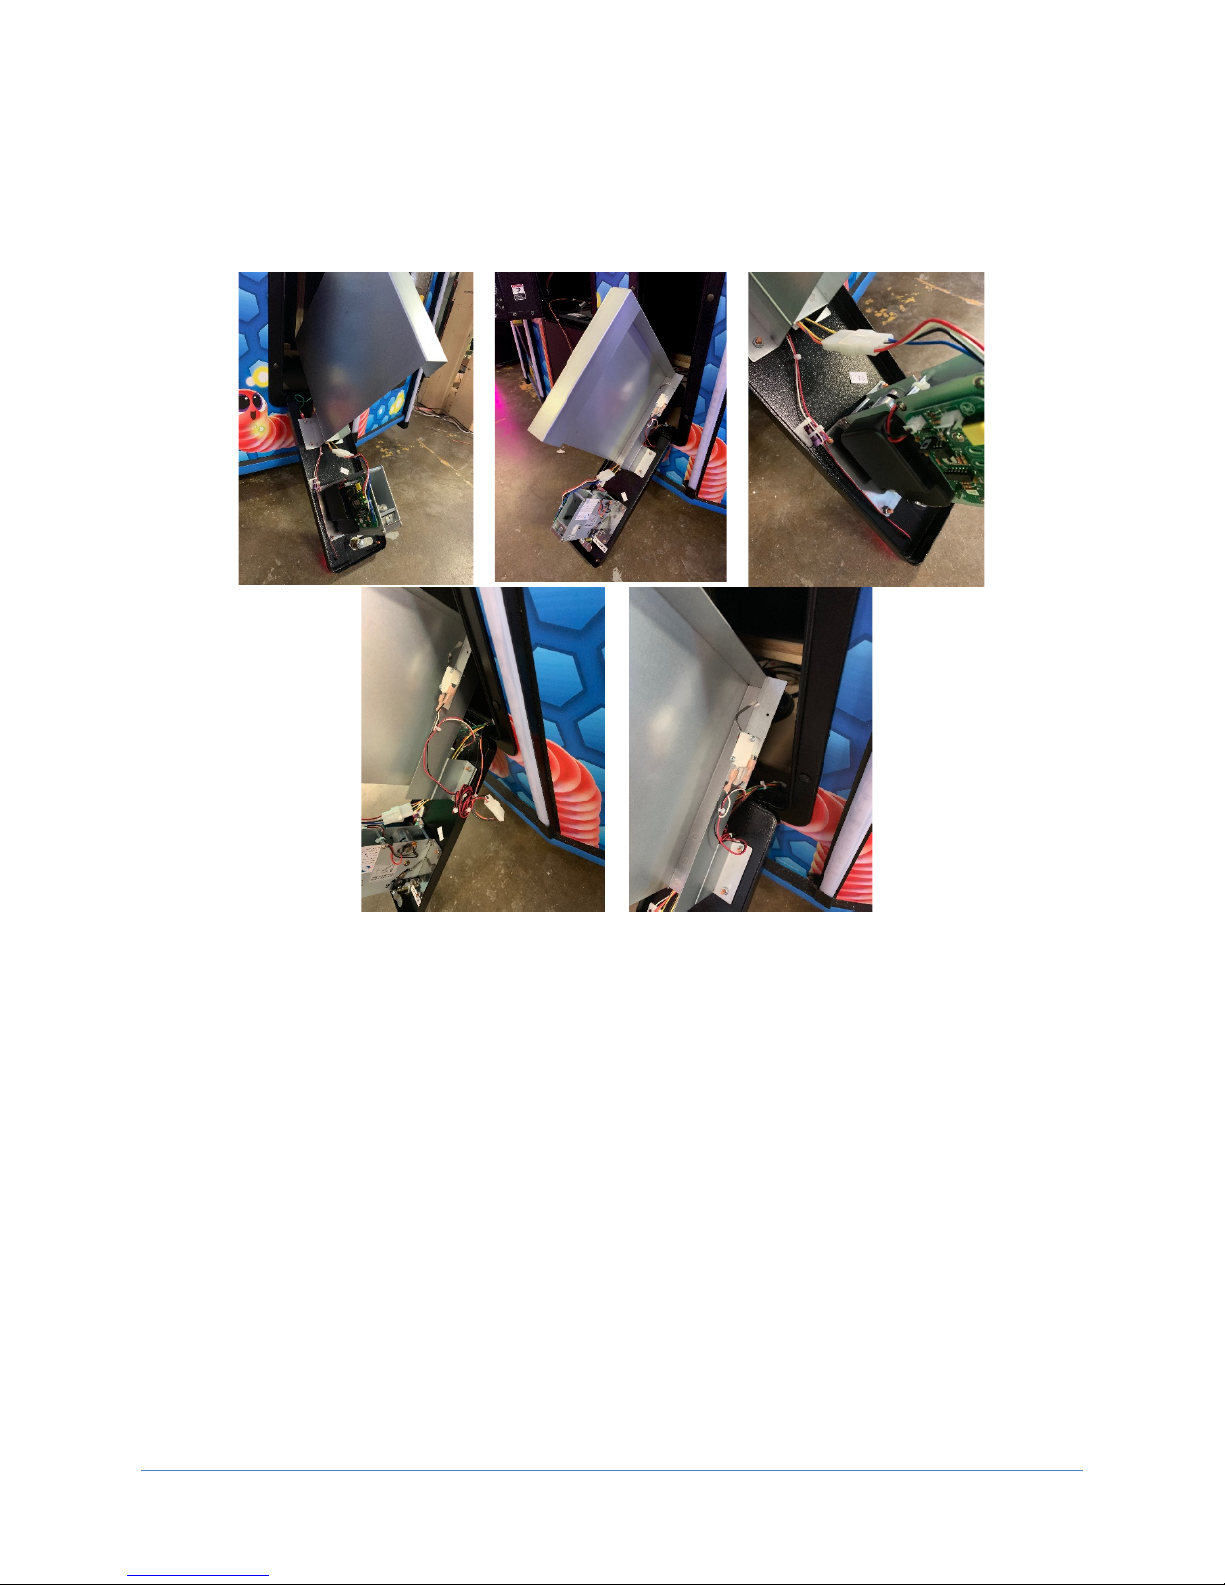
There are (3) supplied UCL connections, each located under the control panel near the player positions. There
is enough slack to accommodate mounting (3) card readers on the control panel, as shown below, or on the
front panels, as each operator desires.
TM
If only (1) card reader will be used, it is recommended that the card reader be mounted to the coin door as
shown below, using Player 2 UCL connector due to its proximity to coin door, although any UCL connector
can be used.
11| Page

slither.io
Ticket Door Completion Kit Installation for Paper Tickets Usage
NOTE: If your location will use E-Tickets, skip this section.
The ticket door completion kit for slither.io contains all additional parts required to support dispensing paper
tickets from all 3 player positions on cabinet. After completing installation (including all harness connections),
continue with the remainder of setup process, specifically choosing optimal settings for your location.
Locate keys and open all 3 ticket doors, being careful not to let doors slam to the floor.
Locate and secure the ticket bins (low ticket indicator switch attached) on lower studs on inner surface of
ticket doors with (4) M4 keps nuts using 7mm nut driver (or wrench). Green ground wire ring terminals from
main cabinet harness will need to be removed from each door to mount bin, however they must be reinstalled under nut when tightening nuts on bin.
TM
12| Page

slither.io
Locate ticket dispensers (boxed in kit) and attach to upper studs on inner surface of ticket doors with (4) M4
keps nuts using 7mm nut driver (or wrench), being sure to not crush dispenser wires or wires from bundles
attached to ticket door.
TM
Route wire bundle attached to ticket door through the space between ticket bin mounts, as most of the wires
will be tucked into this wireway during operation. From this bundle, locate (2) FASTON terminals and (1) 2
position male connector in this bundle. Locate ticket door related cabinet harness (can be identified by
tracing previously mentioned ground wire ring terminals from mounting ticket bin). Locate the following
connectors on cabinet harness: (1) 2 position female connector and (1) 4 position female connector.
13| Page

slither.io
Feed 4 position female connector from main cabinet harness through wireway and connect to mating 4
position male connector wired to ticket dispenser. Connect mating 2 position connectors from ticket door
bundle and main harness. Install FASTON terminals to switch terminals as shown below; take note of WHITE
and BLACK wire designations.
TM
14| Page
slither.io
After all connections are made, place adhesive-backed cable tie mount on inner surface of door just below
dispenser as shown in photos below. Using wire ties, secure wires to mount such that they will not be
damaged or prevent door closing or obstruct operation of dispenser. Excess slack of wires can be
conveniently tucked behind ticket bin. Check that doors close properly and continue with setup.
TM
15| Page

slither.io
TM
Check Electrical Settings
1. Verify the voltage in the nearest AC outlet.
2. Verify the AC outlet ground connection is present and working.
Startup Game
1. Plug the line cord into an AC outlet.
2. Turn the main cabinet power switch on.
3. Verify the game and all components are operating normally. See Basic Functional Test on Initial
Power Up in the Diagnostics and Adjustments section for the recommended procedure.
16| Page

slither.io
SERVICE/Start Buttons (Not on Main
Menu)
TEST
SERVICE
Volume
UP
Volume
TM
Diagnostics and Adjustments
The Service Button Panel has four buttons, three of which can navigate the menu system.
The control panel buttons and spinners can also advance through test menu screens.
DOWN
Navigating the Test Menu
Button Action
TEST (Not in Test Menu) Enters Test Menu
TEST (In Test Menu) Selects Highlighted Option
SERVICE (On Main Menu) Exits Test Menu
Cancels Selection
VOLUME UP Move Up
VOLUME DOWN Move Down
TEST/Boost Buttons Selects Highlighted Option
An on-screen message acknowledges changes or when you exit a selection without making a change.
Basic Functional Test on Initial Power Up
See the Diagnostic Section for further information.
1. Enter the Input Test menu and verify all switches function.
2. Enter the Audio Test menu and verify the audio works and is not distorted.
3. Enter the Meter Test menu and verify the operation of the coin meter.
4. Enter the Cabinet Lights Test menu and verify that all cabinet lights work correctly.
5. Enter the Watchdog Test menu, which reboots the game.
6. Upon a successful reboot, you are ready to adjust pricing, volume and other functions found in the
Adjustments, Audits, and Diagnostics section.
17| Page

slither.io
MAIN MENU
DIAGNOSTICS
PRICING ADJUSTMENTS
PAYOUT ADJUSTMENTS
GAME SETTINGS
SYSTEM SETTINGS
AUDITS
RESETS
VOLUME
UTILITIES
SYSTEM INFORMATION
EXIT
DIAGNOSTICS
INPUT TEST
VIDEO TEST
AUDIO TEST
CABINET LIGHTS TEST
METER TEST
TICKET TEST
WATCHDOG TEST
EXIT
TM
Test Menus
Main Menu
Choose from all available operator settings and menus here. You can use the test menu bracket and volume
buttons to navigate.
CALIBRATION
Diagnostics
This menu allows all game functions to be verified or diagnosed. You can improve collections by periodically
verifying proper game function and operation. This includes periodic Hard Drive checks to verify that
software has not been corrupted or reporting an error.
• Input Test: Test all the switches on the game
• Video Test: Checks color pattern of monitor
• Audio Test: Tests audio from speakers
• Cabinet Lights Test: Test all cabinet lighting
• Meter Test: Tests functionality of “hard meter”
• Ticket Test: Tests functionality of ticket mech
• Watchdog Test: Tests functionality of watchdog
(if working properly, game will reboot)
18| Page

slither.io
PRICING ADJUSTMENT
(COINS)
FREE PLAY
CURRENCY INPUT
CURRENCY TYPE
COIN VALUE
COINS TO PLAY
MAX CREDITS
EXIT
PRICING ADJUSTMENT
(SWIPES)
FREE PLAY
CURRENCY INPUT
CURRENCY TYPE
SWIPE VALUE
SWIPES TO PLAY
NUMBER OF CARD READERS
EXIT
TM
Pricing Adjustments
This allows customization of coin values, currency denominations, bill pulse, and swipe value.
Pricing Adjustments: Coins Active
• Free Play: No coins or swipes needed to play
• Currency Input: Choose between: Cash,
Tokens, or Card Swipes
• Currency Type: Choose between: US Dollars,
Euros, etc
• Coin Value: Money value of a coin
• Coins To Play: Number of coins per credit
• Max Credits: Adjust the maximum number of
credits
Pricing Adjustments: Swipes Active
MAX CREDITS
• Free Play: No coins or swipes needed to play
• Currency Input: Choose between: Cash,
Tokens, or Card Swipes
• Currency Type: Choose between: US Dollars,
Euros, etc
• Swipe Value: Money value of a swipe
**THIS IS AN IMPORTANT SETTING NEEDED
FOR ACCURATE PAYOUT**
• Swipes To Play: Number of swipes per credit
(Locked setting at 1 swipe per play)
• Max Credits: Adjust the maximum number of
credits
• Number Of Card Readers: Sets 1 or 3 card
readers
19| Page

Pricing Adjustments: Tokens Active
FREE PLAY
CURRENCY INPUT
CURRENCY TYPE
COIN VALUE
COINS TO PLAY
MAX CREDITS
EXIT
PRICING ADJUSTMENT
(TOKENS)
slither.io
• Free Play: No coins or swipes needed to play
• Currency Input: Choose between: Cash,
• Currency Type: Choose between: US Dollars,
• Coin Value: Money value of a token.
• Coins To Play: Number of tokens per credit
• Max Credits: Adjust the maximum number of
TM
Tokens, or Card Swipes
Euros, etc
credits
20| Page

slither.io
PAYOUT ADJUSTMENTS
PAYOUT PERCENT
TICKET VALUE
JACKPOT
TWO POINT TICKETS
E-TICKET MODE
EXPRESS PAYOUT
EXIT
Payout Adjustments
This menu allows for customization of redemption settings.
TM
• Payout Percent: Set targeted payout
percentage.
• Ticket Value: Set the value of your tickets.
• Jackpot: Set the value of the games jackpot
reward.
• Two Point Tickets: Allows a single ticket
dispensed to worth 2 points.
• E-Ticket Redemption Mode: Three (3) card
readers required. Activate paperless E-Ticket
mode.
• Express Payout: Sets whether tickets are
dispensed as they are earned (ON) or at the
end of game (OFF).
21| Page

slither.io
GAME SETTINGS
TARGET CYCLE TIME
AMUSEMENT MODE
ATTRACT MUSIC FREQUENCY
EXIT
SYSTEM SETTINGS
CABINET LED BRIGHTNESS
QR CODE
DATE & TIME
LANGUAGE
EXIT
This menu allows for customizations of various system settings.
Game Settings
This menu allows for customization of game settings.
TM
• Target Cycle Time: Set your targeted cycle
time. Game defaults to 40 seconds which is
the recommended setting. (Cycle time is the
time it takes from the beginning of a player’s
credit to the end of the player’s credit.
• Amusement Mode: Points based mode with
no tickets payouts and longer gameplay for
non-redemption locations. Audits will be
reset.
System Settings
TRADESHOW MODE
• Attract Music Frequency: Set how frequently
the attract music plays (Always, Never,
Occasionally).
• Cabinet LED Brightness: Adjust the
brightness of the cabinet lighting.
• Tradeshow Mode: Turn this setting on
when operating on a trade show floor,
sales floor, or demo floor. Game will
default to free play and ticket payout will
not pulse in Tradeshow Mode.
• QR Code: Turn on/off the QR code
highscore sharing feature, set venue and
location.
• Date & Time: Set date & time.
• Language: Set game language (default:
English).
22| Page

slither.io
AUDITS
SYSTEM AUDITS
COIN AUDITS
GAME AUDITS
EXIT
RESETS MENU
RESET CREDITS
RESET PLAYER 3 TICKETS
RESET PRICING ADJUSTMENTS
RESET GAME AUDITS
RESET SYSTEM AUDITS
FACTORY RESTORE
EXIT
Audit screens help assess game performance, find intermittent problems, decide whether to
Resets menu allows for resetting of various settings and adjusments.
TM
Audits
adjust game difficulty and help maximize game earnings.
Resets Menu
• System Audits: Logged information
including boots, resets, game times, and
more
• Coin Audits: Tracks income related
information, coin slot usage, dollar bill
usage, and more
• Game Audits: Tracks the gameplay habits
of your customers. Average scores,
bonuses, and more.
RESET PLAYER 1 TICKETS
RESET PLAYER 2 TICKETS
RESET COIN AUDITS
RESET ALL AUDITS
• Reset Credits: Reset credits to zero (0)
• Reset Player 1 Tickets: Clears all tickets
owed on the game.
• Reset Player 2 Tickets: Clears all tickets
owed on the game.
• Reset Player 3 Tickets: Clears all tickets
owed on the game.
• Reset Pricing Adjustments: Resets pricing
to default settings
• Reset Game Audits: Clears the game
audits log file
• Reset System Audits: Clears the system
audits log file
• Reset Coin Audits: Clears the coin audits
log file
• Reset All Audits: Clears the all audits log
files
• Factory Restore: Resets system to original
factory settings and defaults
23| Page

slither.io
VOLUME
GAME VOLUME 17/30
ATTRACT VOLUME 17/30
CREDIT VOLUME 17/30
MINIMUM VOLUME 17/30
EXIT
CALIBRATION
SPINNER CALIBRATION
EXIT
TM
Volume
Calibration
• Game Volume: Adjusts the volume level
during gameplay
• Attract Volume: Adjusts the volume
during the attract mode sequences
• Credit Volume: Adjusts the volume level
of the credit chime only (Independent
setting of game and attract volume)
• Minimum Volume: Adjusts the minimum
floor the volume can be lowered
• Spinner Calibration: Calibrate the
spinners.
24| Page

slither.io
UTILITIES MENU
COPY AUDITS, LOGS, & SCORES TO USB
VIEW MESSAGE LOG
VIEW ERROR LOG
QR CODE SERVICE INFO
EXIT
Allows for copying and viewing of audits and system/error logs.
TM
Utilities Menu
System Information
This screen allows you to see various information
about the software and hardware.
• Copy Audits, Logs, & Scores to USB:
Allows you to download your audits to an
easy to read text file (.TXT) on a USB flash
drive
• View Message Log: Allows you to view
the audits without having to save them to
USB
• View Error Log: Allows you to view the
error log without having to save it to USB
• QR Code Service Info: Send diagnostics
info to Raw Thrills via cell phone QR
scanner.
• Serial Number
• Software Revision
• Build Date
• RIO PCB
• RIO Firmware
• Dongle Version
• Cabinet Type
• Game Template
25| Page

slither.io
TM
Choosing the Right Pricing Adjustments for Your Location
Card Swipe Locations
• Make Sure Your Game is Set to Swipes Mode:
1. Hold the Test Button for 2 seconds to enter the Test Menu.
2. Select “Pricing Adjustments” from the menu.
3. Select “Currency Input” from the menu.
4. Select “Swipes to Play” from the menu.
5. Set “Swipe Value” to the currency equivalent of your swipe, or the payout will be incorrect. THIS
SETTING IS EXTREMELY IMPORTANT! (Example: If the card swipe is worth $1.50 in your card
system, set the swipe value to $1.50 as well).
Coin Locations
• Make Sure Your Pricing & Coin Value are Correct:
1. Hold the Test Button for 2 seconds to enter the Test Menu.
2. Select “Pricing Adjustments” from the menu.
3. Select “Coins to Play” and set the desired amount of coins per game of slither.io.
4. After setting the coins per play, set “Coin Value” to the currency equivalent of your coin, or the
payout will be incorrect. THIS SETTING IS EXTREMELY IMPORTANT! (Example: If your coin is
worth $0.25, set “Coin Value” to $0.25 as well).
26| Page

slither.io
TM
PC Hardware
Your slither.io™ uses a HP Elitedesk 705 G3 MT computer with a GeForce GTX 1050 graphics card.
Listed below are the recommended BIOS settings for the computer.
NOTE 1
The computer shipped with the correct BIOS settings. Making changes to the BIOS different from the settings
listed below may adversely affect the game’s functionality.
NOTE 2
In the event your video card needs to be replaced, any brand of GeForce GTX 1050 will work.
(HP Elitedesk 705 G3 MT)
27| Page

slither.io
TM
HP Elitedesk 705 G3 MT BIOS
To Access BIOS Settings:
With the computer powered off, plug a USB keyboard into an open USB slot. Hold the ‘F10’ key and turn the
computer on. Continue holding the F10 key until the BIOS Setup screen appears.
Note: All settings not listed should remain their default values.
Advanced
• Boot Options
o After Power Loss ................................. [POWER ON]
o UEFI Boot Order: ...................................... [DISABLE]
o Legacy Boot Order (defaults):
USB
SATA CD
STAT0
NETWORK BOOT
• Built-in Device Options
o Integrated Video: ..................................... [DISABLE]
28| Page

slither.io
WARNING!
CRC File Missing! Reinstall Software!
File Damaged! Reinstall Software!
File Missing! Reinstall Software!
PC Hard Drive Recovery
Symptoms requiring PC hard drive recovery include
• File Test reports bad or missing files.
• Game fails to finish loading during startup.
• After resetting the AC power, an error is reported.
• Erratic Game or Attract Mode.
• The following screen:
TM
The only way to repair corrupt files is to reinstall the software as described below:
COMPUTER
The computer contains sensitive components. Do not handle roughly. Call your distributor before servicing its
internal components. Ask about warranty information as it relates to the PC.
Do not use the PC on/off switch. Turn AC power on or off with the cabinet power switch.
Steps to Re-install the software:
(NO DVD Restoration. USB Thumb Drive is used on the HP Elitedesk 705 G3 MT)
1. With game and PC on, verify that the RIO board has power. If not, see Troubleshooting.
2. Open the coin door.
3. Insert the recovery USB thumb drive (included in your game) into the USB port on the Test button
bracket inside the coin door.
4. Turn cabinet power switch to OFF. Wait 30 seconds.
5. Turn cabinet power switch to ON.
6. Select the slither.io restore version from the menu and follow on screen instructions.
7. If recovery does not begin, check to ensure USB Drive is inserted correctly and is not damaged.
8. Initial software loading may take several minutes. Check progress periodically.
Do not interrupt power or reset the game during recovery.
9. When software has been loaded, a message indicates that restore is complete. When instructed to
remove USB Drive, wait 15 seconds to remove the drive from the PC.
10. Turn cabinet power switch off and then turn the cabinet on again. Your game will now be restored.
29| Page

slither.io
Problem
Possible Cause
Solution
Game not plugged in.
Plug game into AC outlet.
Game not turned on.
Turn on main power switch.
Check and replace fuse. See
values.
Test AC outlet and plug game
into powered outlet.
PC BIOS set incorrectly.
See BIOS Settings section.
Flash Drive Installer is left
Disconnect Flash Drive Installer
Replace the micro switch on the
switch.
Disconnect the cabinet from AC
switches.
Ensure all connections to PCB
are secure. Replace PCB if faulty.
TM
Troubleshooting
Warning: Review safety chapter before making any adjustments to game.
Game will not power up.
Buttons or spinners do not
work.
Game fuse is blown.
No power to receptacle.
connected to PC.
Faulty micro switch.
Faulty wiring.
Specification section for fuse
and power cycle the game.
button and re-test. Verify that
the wires are connected to the
correct spades on the micro
power. Verify that all wires are
firmly connected to each button
and the PCB. Verify that no
wires are frayed or improperly
shorting to ground. Verify that
wires are connected to the
correct spades on the micro
Faulty PCB.
30| Page

Problem
Possible Cause
Solution
Neither buttons nor audio
To test a USB port, turn off the
Check connection to speakers.
Verify 1/8” audio cable is fully
audio amplifier
Use VOL UP button on Test
Verify all wires are firmly
Remove the grill and inspect
each speaker for visible damage.
Run the Sound Test from System
To verify audio is working at the
Check external DC supply and
the PC supply.
Check all ground wires in
properly grounded
work.
slither.io
PCB connected to faulty USB
port (boot message may
indicate not detected).
TM
game, disconnect the device
from the port, and then connect
the game dongle to the port.
Reboot the game. A No Dongle
message indicates the port is
bad. If the game starts, the port
is working. After the test,
reconnect all devices to the
correct USB ports and reboot.
No sound or bad sound.
Bad connection.
Volume set too low.
Faulty wiring.
Blown speakers.
Faulty PCB.
inserted in both the PC and the
panel to raise volume.
connected to the speakers, PCB,
and green computer audio port.
Verify that each wire is
connected to the correct port
and no wires are frayed or
improperly shorting to ground.
Tests in the Operator Menu to
verify each speaker is working.
computer, connect stereo
headphones to the green
computer audio port.
Constant low audio hum.
Faulty power supply.
Open ground.
cabinet. Ensure AC wall outlet is
31| Page

slither.io
Problem
Possible Cause
Solution
Game does not load.
PC Drive test reports “bad” or
“missing” files.
Game fails to finish loading.
After resetting, game still
reports an error.
Erratic game mode or attract
WARNING!
Mode and Run “File Test.”
Game Resets.
Bad file.
Run Flash Installer.
Faulty meter.
Replace coin meter.
Replace 12VDC fuse(s) in
cabinet.
Check wiring from meter to PCB
board.
Find dongle cable and reseat in
Insert dongle cable in different
USB port.
Incorrect setting in Pricing
Disconnect cabinet from AC
Verify coin mech is not jammed.
TM
mode.
Data files Corrupted.
(Game Operation May Become
Unstable.)
Use “Test” Switch to Enter Test
Coin meter does not click
during test.
Dongle Not Present.
PC hard drive failure.
Blown fuse(s) on PCB.
No pulse to meter.
Dongle missing or disconnected.
Faulty USB port.
Recover hard drive.
See Flash Installer Document or
contact your distributor for the
latest software revision.
USB port.
Improper number of credits
given when coins or bills are
inserted.
Adjustments.
Faulty wiring.
Faulty coin mech.
Adjust pricing settings.
power. Verify wires are firmly
connected to coin mech and bill
validator and ground wires are
properly connected. Verify no
wires are frayed or shorting to
ground.
Ensure coin mech is properly
aligned and latched to coin
door.
32| Page

slither.io
Problem
Possible Cause
Solution
Turn PC power switch on.
Check and secure DVI connector
connector to PC.
Connect RIO Board or RIO Board
Missing.
Check USB connection from PC
TM
PC not turned on.
No Video
Video cable not secure.
USB cable disconnected.
Ensure IEC cable tightly plugged
in. Trace cable back to source to
ensure continuity.
to LED controller card. Check
and secure DVI or HDMI
to RIO board.
33| Page

slither.io
TM
Technical Support
For an authorized distributor near you, check the Raw Thrills website at www.rawthrills.com
Raw Thrills Technical Support Hotline
Phone: 1-800-753-2513
FAX: 1-201-438-5019
Email: rtsupport@betson.com
34| Page

slither.io
TM
Electrical and Mechanical Illustrations
35| Page

5
4
7
6
8
1
2
3
slither.io
Game Assembly (55")
ITEM NO.
PART NUMBER
DESCRIPTION
QTY.
1
Slither-Main_Assy_55
Main Cabinet Assembly
1
2
Slither-Marquee_Assy
Marquee Assembly
1
3
McMaster-Carr 97416A119
Black-Oxide Steel SAE Flat Washer for
1/4" Screw Size, 0.281" ID, 0.625" OD
6
4
McMaster-Carr 93711A500
Black-Oxide 18-8 Stainless Steel Split
Lock Washer for 1/4" Socket Head
Screws, 0.26" ID, 0.363" OD
6
5
McMaster-Carr 96075A231
Black-Oxide Alloy Steel Tamper-
Resistant Torx Rounded Head Screws,
1/4"-20 Thread Size, 1-1/2" Long
6
6
SlitherLower_Back_Door_Assy
Lower Back Door Assembly
1
7
SlitherUpper_Back_Door_Assy
Upper Back Door Assembly
1
8
McMaster-Carr 90190A201
Phillips Rounded Head Screws for
Sheet Metal, Zinc-Plated Steel,
Number 8 Size, 1-1/4" Long
12

9
10
11
12
13
14
17
16
15
18
19
20
21
22
23
24
28
27
26
25
29
30
31
32
34
33
35
29
36
37
39
40
41
42
15
38
43
44
45
46
47
12
48
49
50
51
53
52
55
53
54
56
57
39
58
60
59
61
62
63
64
65
66
69
67
68
70
72
71
slither.io
Main Cabinet Assembly
(BOM on next page)
NOT SHOWN:
> Selective Hardware
> 500-00131-01 - RGB LED Strip Reel
- 2X 70CM / 42 LEDs (installed in #24)
- 2X 75CM / 45 LEDs (installed in #20)
- 2X 140CM / 84 LEDs (installed in #18)
CABINET DECALS:
> 606-01544-01 - Right Side Panel Decal
> 606-01545-01 - Left Side Panel Decal
> 606-01546-01 - Front Panel Decal
> 606-01547-01 - Front Right Decal
> 606-01548-01 - Front Left Decal
> 606-01550-01 - Speaker Panel Decal

ITEM NO.
PART NUMBER
DESCRIPTION
QTY.
9
601-00852-01
Slither.io Cabinet
1
10
600-02055-01
Marquee Front Bracket
1
11
606-01617-01
Marquee Front Decal
1
12
McMaster-Carr 90126A514
Zinc-Plated Steel SAE Washer for Number 10 Screw Size, 0.219" ID, 0.5"
OD
23
13
McMaster-Carr 90675A195
Steel Locknut with External-Tooth Lock Washer, Zinc-Plated, 10-32
Thread Size
5
14
SlitherMarquee_LED
_Light_Assy
Marquee Uplighting LED Sub-Assembly
1
15
McMaster-Carr 90054A196
Flanged Hex Head Screws for Sheet Metal, Zinc-Plated Steel, Number
8 Size, 5/8" Long
8
16
McMaster-Carr 90126A512
Zinc-Plated Steel SAE Washer for Number 8 Screw Size, 0.188" ID,
0.438" OD
3
17
McMaster-Carr 90675A009
Steel Locknut with External-Tooth Lock Washer, Zinc-Plated, 8-32
Thread Size, 11/32" Wide
3
18
603-00718-01
(55.625in)
LED T-Molding Extrusion - 55.625"
2
19
600-01942-01
LED T-Molding Clip
6
20
603-00718-01
(29.75in)
LED T-Molding Extrusion - 29.75"
2
21
600-02039-01
LED T-Molding Corner Clip
2
22
600-02037-01
LED T-Molding Angled Plate Right
1
23
600-02038-01
LED T-Molding Angled Plate Left
1
24
603-00718-01
(27.5in)
LED T-Molding Extrusion - 27.5"
2
25
2-1-10-00-00-000
5.25" Speaker, 8 Ohm, Full Range (Goldwood)
2
26
McMaster-Carr 90935A194
Phillips Rounded Head Screws for Sheet Metal, Black-Oxide Steel,
Number 8 Size, 1/2" Long
8
27
SlitherSpeaker_Bezel_
Sub-Assy
Speaker Bezel Sub-Assembly
2
28
600-02362-01
Speaker Grill
2
29
McMaster-Carr 97416A115
Black-Oxide Steel SAE Washer for Number 10 Screw Size, 0.219" ID, 0.5"
OD
14
30
McMaster-Carr 93711A400
Black-Oxide 18-8 Stainless Steel Split Lock Washer for Number 10
Socket Head Screws, 0.2" ID, 0.294" OD
8
31
McMaster-Carr 96075A203
Alloy Steel Tamper-Resistant Button Head Torx Screws, 10-32 Thread,
1-1/2" Long
8
32
SlitherMini_Marquee_
Backlight_Assy
Mini Marquee LED Sub-Assembly
1
33
606-01543-01
Mini Marquee Translite
1
34
600-02354-01
Mini Marquee Lens PETG
1
35
McMaster-Carr 90133A025
Oil-Resistant Neoprene Rubber Sealing Washer for Number 12 Screw
Size, 0.195" ID, 0.562" OD
6
36
McMaster-Carr 96075A195
Alloy Steel Tamper-Resistant Button Head Torx Screws, 10-32 Thread,
1" Long
6
37
600-01482-01
LCD Mounting Strut
2
38
809-00012-01
55" Open Frame LCD (with glass)
1
39
McMaster-Carr 90126A029
Zinc-Plated Steel SAE Washer for 1/4" Screw Size, 0.281" ID, 0.625" OD
6
ITEM NO.
PART NUMBER
DESCRIPTION
QTY.
40
McMaster-Carr 91102A750
Zinc-Plated Steel Split Lock Washer for 1/4" Screw Size, 0.26" ID, 0.487"
OD
4
41
McMaster-Carr 91280A326
Medium-Strength Class 8.8 Steel Hex Head Screw, Zinc-Plated, M6 x 1
mm Thread, 16 mm Long
4
42
600-02091-01
Bottom Monitor Bracket
1
43
600-02092-01
Left Monitor Frame Bracket
1
44
600-02093-01
Right Monitor Frame Bracket
1
45
Stafast BB142035UHD
BO
Black Oxide Type BB Partial Threaded Steel Bolt, Hex Drive, 1/4"-20
Thread Size, 1-3/8" Long
4
46
800-00071-01
Single Door Ticket Assembly (NO DISPENSER OR BIN)
3
47
McMaster-Carr 93548A117
Zinc-Plated Steel Square-Neck Carriage Bolt, Low-Strength, 10-24
Thread Size, 1-1/4" Long, PAINT BLACK
18
48
McMaster-Carr 90675A011
Steel Locknut with External-Tooth Lock Washer, Zinc-Plated, 10-24
Thread Size
18
49
800-00005-01
Mid-Width Coin Door Assembly (Suzo-Happ)
1
50
600-02143-01
Hinge Mount Bracket
1
51
Slither-CP_Assy
Control Panel Sub-Assembly
1
52
McMaster-Carr 96075A219
Black-Oxide Alloy Steel Tamper-Resistant Torx Rounded Head Screws,
1/4"-20 Thread Size, 3/4" Long
5
53
McMaster-Carr 93711A500
Black-Oxide 18-8 Stainless Steel Split Lock Washer for 1/4" Socket
Head Screws, 0.26" ID, 0.363" OD
7
54
McMaster-Carr 96075A231
Black-Oxide Alloy Steel Tamper-Resistant Torx Rounded Head Screws,
1/4"-20 Thread Size, 1-1/2" Long
2
55
McMaster-Carr 97416A119
Black-Oxide Steel SAE Flat Washer for 1/4" Screw Size, 0.281" ID, 0.625"
OD
2
56
McMaster-Carr 90185A550
Grade 5 Steel Square-Neck Carriage Bolt, Medium-Strength, 1/4"-20
Thread Size, 2" Long, PAINT BLACK
2
57
McMaster-Carr 90675A029
Steel Locknut with External-Tooth Lock Washer, Zinc-Plated, 1/4"-20
Thread Size
2
58
2-1-18-00-00-000
8” Woofer, 4 Ohm, Poly-Mica Cone (Goldwood)
1
59
800-00001-00
120mm Wire Fan Guard
5
60
820-00001-00
Cooling Fan (120mm x 120mm x 25mm): 12VDC, 120CFM
2
61
AC_Plate_Assy
AC Power Plate Sub-Assembly
1
62
Slither-RIO2_Assy
RIO2 Assembly w/ Mounting Plate
1
63
500-00193-01
RSP-320-12: 320W, 12V PFC Dual Voltage Power Supply
1
64
330-00004-01
LRS-150F-12: 150W, 12V Dual Voltage Power Supply
1
65
800-00040-01
6210AXXSZS-DC3 / 6210DSX-1: Solid State Relay
1
66
442-00001-01
Power Line Filter (Corcom 6MV1)
1
67
McMaster-Carr 87425K76 (56in)
Nylon Fabric Strip, Black, 1" Wide, .08" Thick, 56" Long
2
68
McMaster-Carr 29705T86
Plastic Buckle, Black, Squeeze-Release, NO-Sew for 1" Webbing
2
69
600-00891-01
Securing Nylon Strap Plate
2
70
Partec - 7-195
PC Foam Pad
1
71
850-00025-01
HP 705 G3 MT (310-00002-01: GT 1030 Video Card)
1
72
601-00580-01
PC Wood Cleat
2

73
74
75
76
slither.io
Speaker Bezel Sub-Assembly
77
78
slither.io
Mini Marquee LED Sub-Assembly
80
79
slither.io
Marquee Uplighting LED Sub-Assembly
ITEM NO.
PART NUMBER
DESCRIPTION
QTY.
73
600-02144-01
Marquee LED Bracket
1
74
500-00162-01 (55 CM)
White Flexible LED Tape, w/ FOAM
8
75
600-02057-01
Marquee Front Light Lens PETG
1
76
McMaster-Carr 91249A194
Black-Oxide 18-8 Stainless Steel Pan Head
Phillips Screws, 8-32 Thread, 1/2" Long
8
ITEM NO.
PART NUMBER
DESCRIPTION
QTY.
77
603-00954-01
Speaker Bezel
1
78
500-00189-01 (45 CM)
Blue Flexible LED Tape, w/ FOAM
1
ITEM NO.
PART NUMBER
DESCRIPTION
QTY.
79
600-02042-01
Mini Marquee LED Panel
1
80
500-00162-01 (45 CM)
White Flexible LED Tape, w/ FOAM
3

81
82
83
84
85
90
91
94
87
88
89
93
92
86
slither.io
Control Panel Sub-Assembly
ITEM NO.
PART NUMBER
DESCRIPTION
QTY.
81
601-00843-01
Control Panel
1
82
600-02145-01
Control Panel Access Hinge
1
83
Partec - 31-CB250-03005
Flat Head Carriage Bolt, 1/4"-20 Thread Size, 1-
1/4" Length
4
84
McMaster-Carr 90126A029
Zinc-Plated Steel SAE Washer for 1/4" Screw Size,
0.281" ID, 0.625" OD
4
85
McMaster-Carr 90675A029
Steel Locknut with External-Tooth Lock Washer,
Zinc-Plated, 1/4"-20 Thread Size
4
86
606-01536-01
Control Panel Decal
1
87
Slither-Spinner_Assy_P1
P1 Spinner Sub-Assembly
1
88
Slither-Spinner_Assy_P2
P2 Spinner Sub-Assembly
1
89
Slither-Spinner_Assy_P3
P3 Spinner Sub-Assembly
1
90
McMaster-Carr 97416A115
Black-Oxide Steel SAE Washer for Number 10
Screw Size, 0.219" ID, 0.5" OD
12
91
McMaster-Carr 90631A411
Low-Strength Steel Nylon-Insert Locknut, Zinc-
Plated, 10-32 Thread Size, 3/8" Wide, 15/64" High
12
92
702-00101-01
Large Round Green IPB (.187 Gold MS, 6V White
LED) w/ "BOOST!" legend
3
93
702-00102-01
Large Rectangular White IPB (.187 Gold MS, 6V
White LED) w/ "START!" legend
3
94
Screw-in Ring Nut
included with IPBs
6
95
101
100
97
98
99
103
105
102
104
96
slither.io
Spinner Sub-Assembly
(unique decals for P1 & P2 & P3)
ITEM NO.
PART NUMBER
DESCRIPTION
QTY.
95
600-02289-01
Spinner Plate
1
96
800-00070-01
Spinner Assembly
1
97
McMaster-Carr 90126A514
Zinc-Plated Steel SAE Washer for Number 10
Screw Size, 0.219" ID, 0.5" OD
5
98
McMaster-Carr 90675A195
Steel Locknut with External-Tooth Lock Washer,
Zinc-Plated, 10-32 Thread Size
5
99
AEH - 04-12-500
Wire Harness Clip (for 1/2" Bundle Diameter)
1
P1 Decals - YELLOW
100
606-01537-01
P1 Spinner Plate Decal
1
101
606-01540-01
P1 Spinner Top Decal
1
P2 Decals - BLUE
102
606-01538-01
P2 Spinner Plate Decal
1
103
606-01541-01
P2 Spinner Top Decal
1
P3 Decals - RED
104
606-01539-01
P3 Spinner Plate Decal
1
105
606-01542-01
P3 Spinner Top Decal
1

106
107
108
109
110
111
112
113
114
115
116
117
118
119
120
121
slither.io
Spinner Assembly
(800-00070-01)
ITEM NO.
PART NUMBER
DESCRIPTION
QTY.
106
600-02320-01
Main Bushing Bracket
1
107
McMaster-Carr 94639A330
Off-White Nylon Unthreaded Spacer, 5/16" OD,
1/8" Long, for Number 6 Screw Size
2
108
500-00242-01
LED Spinner PCB
1
109
McMaster-Carr 98019A309
18-8 Stainless Steel Mil. Spec. Washer, Passivated,
Number 4 Screw Size, MS/NASM 15795-803
4
110
McMaster-Carr 90480A005
Low-Strength Steel Hex Nut, Zinc-Plated, 4-40
Thread Size
4
111
McMaster-Carr 6338K453
Oil-Embedded Flanged Sleeve Bearing for 5/16"
Shaft Diameter and 7/16" Housing ID, 3/8" Long
2
112
600-02324-01
Spinner Shaft
1
113
McMaster-Carr 5906K563
Oil-Embedded Thrust Bearing, 5/16" Inside
Diameter, 5/8" OD, 1/16" Thickness
2
114
McMaster-Carr 99620A615
Heavy Duty Side-Mount External Retaining Rings
for 5/16" OD, Black-Phosphate 1060-1090 Spring
Steel
2
115
600-02323-01
Spinner Weight
1
116
600-02322-01
Opto Disc
1
117
McMaster-Carr 91249A144
Black-Oxide 18-8 Stainless Steel Pan Head Phillips
Screws, 6-32 Thread, 1/4" Long
1
118
McMaster-Carr 92311A194
18-8 Stainless Steel Cup-Point Set Screw, 8-32
Thread, 1/2" Long
1
119
500-00241-01
USB Spinner PCB
1
120
608-00235-01
Spinner Knob Assembly
1
121
McMaster-Carr 90251A541
Thread-Locking Cup-Point Set Screws, 18-8
Stainless Steel, 1/4"-20 Thread, 1" Long
2

125124
123
122
126
127
128
129
130
131
slither.io
RIO2 Assembly w/ Mounting Plate
132
133
slither.io
AC Power Plate Sub-Assembly
ITEM NO.
PART NUMBER
DESCRIPTION
QTY.
122
600-01681-01
AC Electronics Plate
1
123
Marquardt - 1832.3312
Rocker Switch (DPST): 250VAC, 16A
1
124
Schurter - T9-611P-6A
Thermal Circuit Breaker: 240VAC, 6A, Snap-in,
Fuseholder, 1 Pole
1
125
Qualtek - 703W-00/08
AC Receptacle: 250V, 15A
1
126
McMaster-Carr 90272A146
Steel Phillips Rounded Head Screws, 6-32 Thread Size,
3/8" Long
2
127
McMaster-Carr 90675A195
Steel Locknut with External-Tooth Lock Washer, Zinc-
Plated, 10-32 Thread Size
1
ITEM NO.
PART NUMBER
DESCRIPTION
QTY.
128
600-02049-01
RIO2 Mounting Plate
1
129
500-00199-05
RIO2 PCB
1
130
500-00212-03
RIO2 Audio Amplifier PCB
1
131
McMaster-Carr 90316A192
Stainless Steel Flanged Hex Head Screws with
Slotted Drive, 8-32 Thread Size, 3/8" Long
8
132
AEH - 04-12-750
Wire Harness Clip (for 3/4" Bundle Diameter)
6
133
McMaster-Carr 90675A009
Steel Locknut with External-Tooth Lock Washer,
Zinc-Plated, 8-32 Thread Size, 11/32" Wide
6
134
135
136
137
138
139
140
141
142
143
139
144
145
139
146
139
140
slither.io
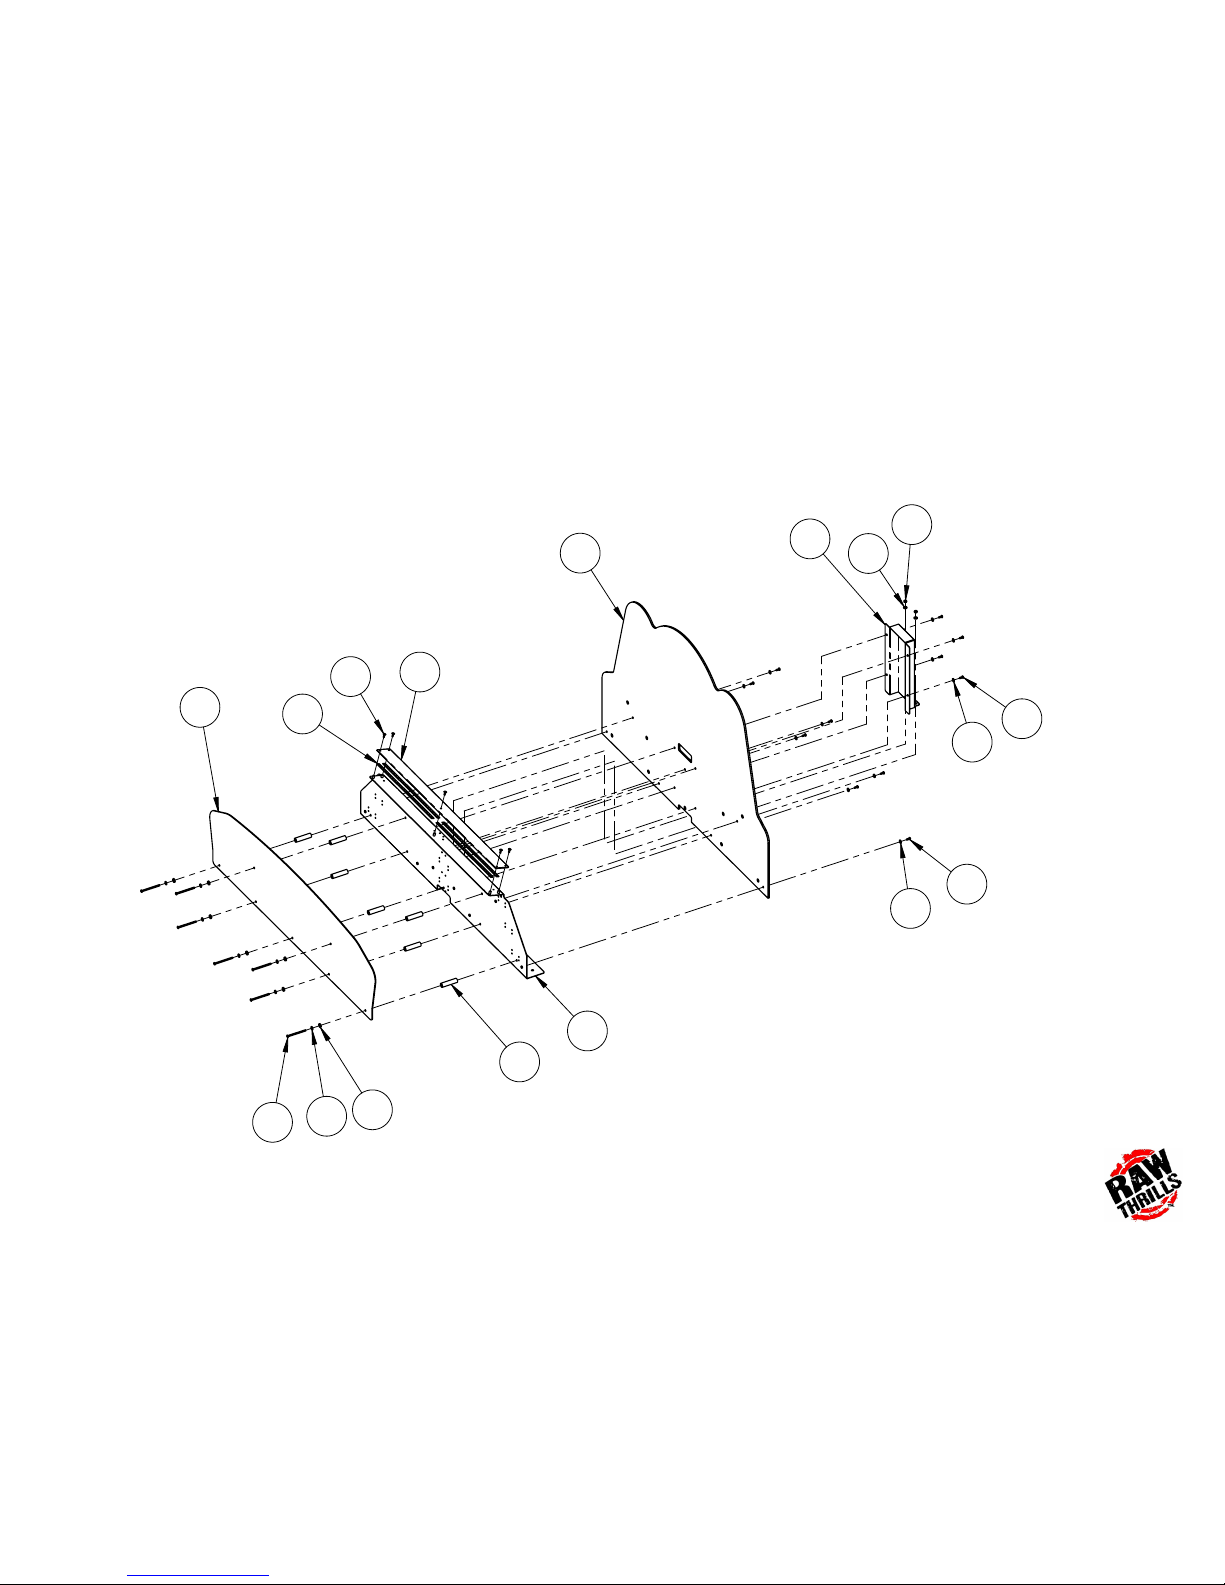
Marquee Assembly
(BOM on next page)

slither.io
Marquee Assembly BOM
ITEM NO.
PART NUMBER
DESCRIPTION
QTY.
134
600-02363-01
Marquee Mounting Bracket
1
135
500-00162-01 (40 CM)
White Flexible LED Tape, w/ FOAM
4
136
600-02414-01
Marquee Upper Light Lens PETG
1
137
McMaster-Carr 94779A580
18-8 Stainless Steel Extra-Wide Truss Head Phillips Screws, Black-Oxide, 8-32 Thread
Size, 1/2" Long
5
138
606-01615-01
Printed Marquee Backboard
1
139
McMaster-Carr 97416A115
Black-Oxide Steel SAE Washer for Number 10 Screw Size, 0.219" ID, 0.5" OD
20
140
McMaster-Carr 96075A187
Alloy Steel Tamper-Resistant Button Head Torx Screws, 10-32 Thread, 1/2" Long
11
141
McMaster-Carr 94639A611
Nylon Unthreaded Spacer, 5/8" OD, 2-1/2" Length, for Number 10 Screw Size
7
142
606-01616-01
Printed Marquee Logo Panel
1
143
McMaster-Carr 90133A025
Oil-Resistant Neoprene Rubber Sealing Washer for Number 12 Screw Size, 0.195" ID,
0.562" OD
7
144
McMaster-Carr 91255A030
Button Head Hex Drive Screw, Black-Oxide Alloy Steel, 10-32 Thread, 3" Long
7
145
600-02364-01
Marquee Harness Bracket
1
146
McMaster-Carr 90675A195
Steel Locknut with External-Tooth Lock Washer, Zinc-Plated, 10-32 Thread Size
2

147
148
153
151
152
150
154
149
slither.io
Lower Back Door Assembly
ITEM NO.
PART NUMBER
DESCRIPTION
QTY.
147
601-00808-01
Lower Back Door
1
148
800-00001-00
120mm Wire Fan Guard
2
149
McMaster-Carr 90272A201
Steel Phillips Rounded Head
Screws, 8-32 Thread Size, 1-1/4"
Long
8
150
McMaster-Carr 90631A009
Low-Strength Steel Nylon-Insert
Locknut, Zinc-Plated, 8-32
Thread Size
8
151
600-00043-01
Lock Retainer Plate
1
152
McMaster-Carr 90054A196
Flanged Hex Head Screws for
Sheet Metal, Zinc-Plated Steel,
Number 8 Size, 5/8" Long
3
153
150-00001-00
Standard Door Lock Assembly
(for 3/4" Panels)
1
154
McMaster-Carr 90126A512
Zinc-Plated Steel SAE Washer for
Number 8 Screw Size, 0.188" ID,
0.438" OD
8

155
156
161
159
160
158
162
157
slither.io
Upper Back Door Assembly
ITEM NO.
PART NUMBER
DESCRIPTION
QTY.
155
601-00809-01
Upper Back Door
1
156
800-00001-00
120mm Wire Fan Guard
2
157
McMaster-Carr 90272A201
Steel Phillips Rounded Head
Screws, 8-32 Thread Size, 1-1/4"
Long
8
158
McMaster-Carr 90631A009
Low-Strength Steel Nylon-Insert
Locknut, Zinc-Plated, 8-32
Thread Size
8
159
600-00043-01
Lock Retainer Plate
1
160
McMaster-Carr 90054A196
Flanged Hex Head Screws for
Sheet Metal, Zinc-Plated Steel,
Number 8 Size, 5/8" Long
3
161
150-00001-00
Standard Door Lock Assembly
(for 3/4" Panels)
1
162
McMaster-Carr 90126A512
Zinc-Plated Steel SAE Washer for
Number 8 Screw Size, 0.188" ID,
0.438" OD
8
 Loading...