

Lowrance electronic 10761001, 10766001, 10776001, 10771001, 10772001 user guide
...
HDS Gen2 Touch
Operator manual
ENGLISH
lowrance.com

Copyright © 2013 Navico
All Rights Reserved
Lowrance® and Navico® are registered
trademarks of Navico.
Fishing Hot Spots® is a registered trademark
of Fishing Hot Spots Inc. Copyright© 2013
Fishing Hot Spots.
Navionics® is a registered trademark of
Navionics, Inc.
NMEA 2000® is a registered trademark of the
National Marine Electronics Association.
Additional mapping data: Copyright© 2013
NSI, Inc.: Copyright© 2013 by Richardson’s
Maptech.
Warning: It is your sole responsibility
to install and use the instrument and
transducer(s) in a manner that will not
cause accidents, personal injury or property
damage. Always observe safe boating
practices.
Sonar performance: The accuracy of the
sonar depth display can be affected by many
factors, including the type and location of the
transducer and water conditions. Never use this
instrument to gauge depth or other conditions
for swimming or diving.
The choice, location, and installation of
transducers and other components of the system
are critical to the performance of the system as
intended. If in doubt, consult your local dealer.
To reduce the risk of misusing or misinterpreting
this unit, you must read and understand all
aspects of this Installation and Operation
Manual. We also recommend that you practice
all operations using the built-in simulator before
using this unit on the water.
Global Positioning System: The Global
Positioning System (GPS) is operated by the US
Government which is solely responsible for its
operation, accuracy and maintenance. The GPS
is subject to changes which could affect the
accuracy and performance of all GPS equipment
anywhere in the world, including this instrument.
Electronic Chart: The electronic chart used by
this instrument is an aid to navigation designed
to supplement, not replace, official government
charts. Only official government charts
supplemented by notices to mariners contain
the information required for safe and prudent
navigation. Always supplement the electronic
information provided by this instrument with
other plotting sources such as observations,
depth soundings, radar and hand compass
bearings. Should the information not agree, the
discrepancy must be resolved before proceeding
any further.
Navico may nd it necessary to change or
end our policies, regulations and special
oers at any time. We reserve the right
to do so without notice. All features and
specications subject to change without
notice.
IMPORTANT NOTE ABOUT RESTRICTED
OPERATION OUTSIDE OF THE AMERICAS
Units designed for sale in the Americas will have
limited Language and Units functionality outside
of a zone defined as 30 degrees West longitude
on the East and the International Date Line on
the West. Language options will be restricted to
English (US) only and Units will be restricted to
non-metric measures.
Units sold with Enhanced US Basemap, Nautic
Insight, Lake Insight or Insight USA units are
impacted and will not have this functionality
outside of the defined region. Units sold with
WorldWide Basemap will function without these
restrictions.

Preface
As Navico is continuously improving this product, we retain the
right to make changes to the product at any time which may not
be reflected in this version of the manual. Please contact your
Lowrance dealer if you require any further assistance.
It is the owner’s sole responsibility to install and use the instrument
and transducers in a manner that will not cause accidents, personal
injury or property damage. The user of this product is solely
responsible for observing safe boating practices.
NAVICO HOLDING AS AND ITS SUBSIDIARIES, BRANCHES AND
AFFILIATES DISCLAIM ALL LIABILITY FOR ANY USE OF THIS PRODUCT
IN A WAY THAT MAY CAUSE ACCIDENTS, DAMAGE OR THAT MAY
VIOLATE THE LAW.
Governing Language: This statement, any instruction manuals,
user guides and other information relating to the product
(Documentation) may be translated to, or has been translated from,
another language (Translation). In the event of any conflict between
any Translation of the Documentation, the English language
version of the Documentation will be the official version of the
Documentation.
This manual represents the product as at the time of printing.
Navico Holding AS and its subsidiaries, branches and affiliates
reserve the right to make changes to specifications without notice.
Copyright
Copyright © 2013 Navico Holding AS.
Warranty
The warranty card is supplied as a separate document.
In case of any queries, refer to the brand web site of your display or
system: www.lowrance.com
Declarations and conformance
This equipment is intended for use in international waters as well as
inland waters and coastal sea areas administered by countries of the
USA, E.U. and E.E.A. For more information refer to the separate HDS
Gen 2 Touch Installation manual.
| 1
About this manual
This manual is a reference guide for operating the Lowrance HDS
Gen 2 Touch system. It assumes that all equipment is installed and
configured, and that the system is ready to use.
The manual does not cover basic background information
about how equipment such as radars, sonars and AIS work. Such
information is available from our web site:
www.lowrance.com/en-US/Support/Video-Library/.
Important text that requires special attention from the reader is
emphasized as follows:
¼ Note: Used to draw the reader’s attention to a comment or some
important information.
Warning: Used when it is necessary to warn personnel that
they should proceed carefully to prevent risk of injury and/or
damage to equipment/personnel.
The software
This manual is written for Lowrance HDS Gen2 Touch Release to
Market 2 (RTM2). Please check web site for details on release version.
2 |
Touchscreen calibration
If your screen is unresponsive to the touch, or the onscreen
response does not align with your touch, you need to calibrate the
touchscreen. Refer to “Touchscreen Calibration” on page 123.

Contents
7 Introduction
7 HDS Gen2 Touchscreen and keys
8 The HDS Gen2 Touch home screen
9 Basic operation
9 The power key
9 First time startup
9 Using the touchscreen
10 Menus
12 Dialog boxes
13 Positioning a Man Overboard waypoint
14 Screen capture
15 Pages
15 Page overview
15 Selecting pages, quick splits
16 Selecting Active panel
16 Customizing pages
18 Data Overlay
19 Chart
19 The Chart page
19 Vessel symbol
20 Chart scale
20 Panning the chart
20 Zooming
22 Chart options
26 Chart overlay
27 Chart Settings
28 Navionics chart options
31 Navionics settings
32 Waypoints, routes & trails
32 The waypoints, route and trails screens
34 Routes
36 Trails

37 Navigating
37 Goto cursor
37 Navigating on the chart
38 Navigation settings panel
40 Steer page
41 Sonar
42 Zooming
43 Viewing sonar history
45 Log sonar data
47 View
49 Measuring distance
50 Sonar settings
52 Installation settings
54 StructureScan HD™
54 SideScan
55 DownScan
56 Zooming
56 Viewing StructureScan history
58 Log sonar
59 Stop sonar
59 Network StructureScan
59 Structure settings
60 StructureMap™
60 Turning on StructureMap overlay
60 Selecting Structure Source
62 Structure options
63 Logging Structure data
64 Using StructureMaps with mapping cards
65 Scanning Fishing areas
66 The Instruments panels
66 The dashboards
66 Customizing the Instrument panel
68 Using Video (9” and 12” units only)
68 The video page
68 Setting up the video page
4 | | 5
Contents | Lowrance HDS Gen2 Touch Contents | Lowrance HDS Gen2 Touch

69 The Alarm system
69 The alarms dialog
71 Acknowledging an alarm
72 Utilities
72 Vessels
73 Sun/moon
73 Trip Calculator
73 Find
73 Alarms
73 Waypoints/routes/trails
74 Tid es
74 Satellites
74 Files
76 Settings
77 System Settings
77 Changing system settings
78 Units
79 Using the simulator
79 Simulator mode
79 Demo mode
79 Selecting simulator source files
81 Using the radar (optional)
81 Radar operation modes
82 Adjusting range
83 Measuring range and bearing to a target
85 EBL/VRM
86 Setting a guard zone around your vessel
88 Radar orientation
89 MARPA
92 Radar overlay
95 Using AIS
95 Target symbols
96 Viewing information about AIS targets
97 Vessel alarms
97 The vessel settings panel

99 Networking
99 Auto configuration
99 Data sources
101 Damping
102 Device list
102 Diagnostics
103 NMEA 2000
103 NMEA 0183
104 GoFree wireless
104 Setting HDS device name
104 Setting up the WIFI-1
106 Operating the HDS with a wireless device
107 Point 1 antenna
107 Point 1 configuration
108 Disabling the heading sensor
110 Fuel
110 Vessel setup
111 Fu e l us ed
111 Fi n d f uel
112 SIRIUS™ weather
113 Weather symbology
115 Weather alarms
116 Weather reports
117 Animating SIRIUS™ weather graphics
118 Audio
118 Enabling audio
119 Audio controls
120 Using the AM/FM radio
121 Using SIRIUS radio
123 Maintenance
124 Backing up your system data
127 Index
6 | | PB
Contents | Lowrance HDS Gen2 Touch Contents | Lowrance HDS Gen2 Touch
1
Introduction
HDS Gen2 Touchscreen and keys
2
1 Touchscreen
2 SD Card reader
Used for optional InsightHD, Navionics, other compatible third-party
cartography, software updates, transfer of user data and system
backup.
1
4
5
3
6
3 Waypoint key
A short press opens the waypoint menu. A long press opens the
Find menu. Press the key twice to quickly save a waypoint.
4 Pages key
A short press displays the home screen. Repeated short presses
toggles through favorite pages.
5 IN / OUT / MOB key
Zoom key for chart, radar and sonar pages. A simultaneous press
on both keys will position a Man Overboard (MOB) waypoint at the
vessel’s position.
6 Power key
A long press turns the unit ON/OFF.
A short press brings up the backlight and power dialog. Repeated
short presses toggles between preset brightness levels.
Introduction | Lowrance HDS Gen2 Touch
| 7
The HDS Gen2 Touch home screen
76
5
1
3
¼ Note: video is only available on HDS Gen2 Touch 9” and 12” units.
The radar option will only be shown when the unit is connected to
a radar.
1 Utilities panel
Tap an icon to access utility data.
2 Favorites panel
Used to display Favorite pages, save new Favorites or clear
previously configured pages.
3 Pages
Tap a page icon to view the page full screen. Press and hold a page
icon to view quick split combo page options.
4 More
Tap to see the full menu.
2
44
8 |
5 Back button
Tap to exit the home screen and return to the previous page.
6 Local time
7 Water depth
Introduction | Lowrance HDS Gen2 Touch
2
Basic operation
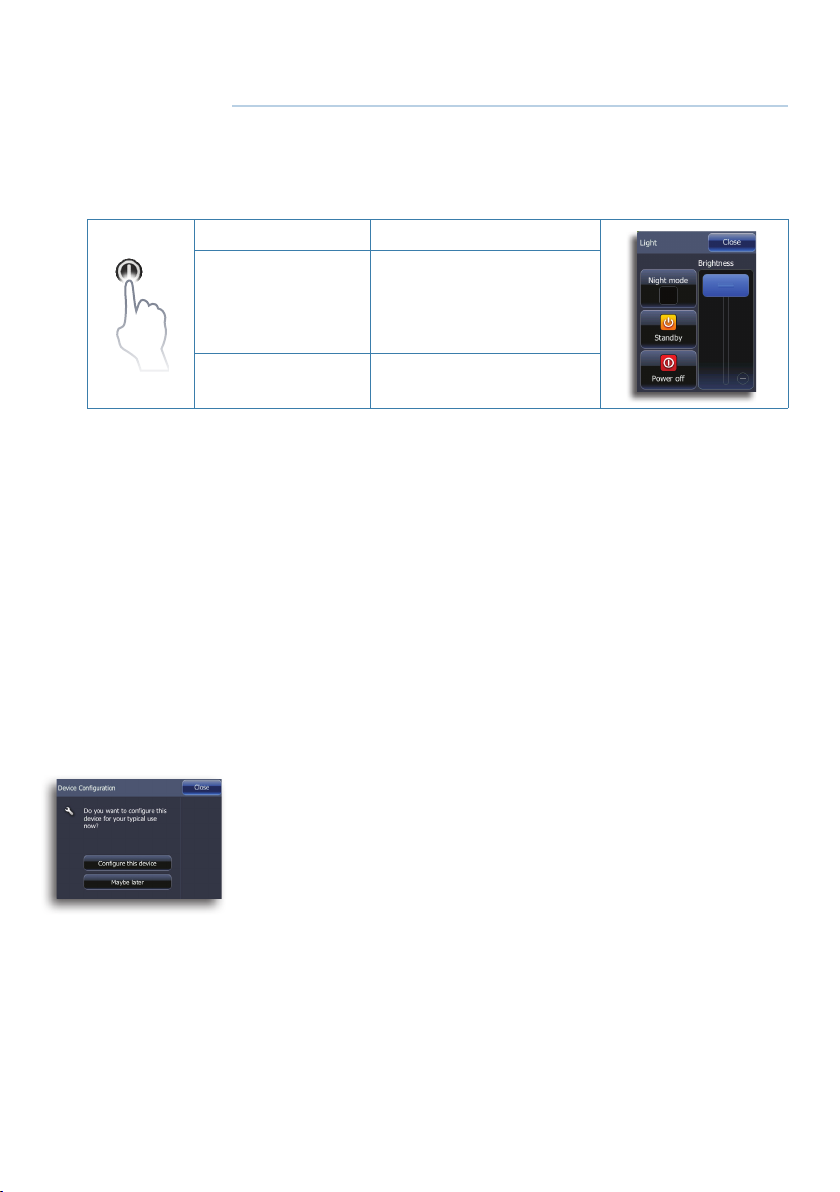
The power key
• Press and hold: Turn unit on/off
Display dialog for
• Single press:
• Repeated
presses:
¼ Note: If the power key is released before shut-down is completed,
the power off is cancelled.
A night mode which optimizes the color palette for low light conditions, is included.
¼ Note: Details on the chart may be less visible when Night mode is
selected!
When in Standby mode, the sonar and the backlight for touchscreen and keys are turned off to save power. The system will
continue to run in the background. To switch from Standby mode to
normal operation, press the power key.
brightness adjustment,
night mode, standby
mode and power off
Toggle preset brightness
levels (10 - 6 - 3- 1)
First time startup
The device configuration dialog appears when you start up the
unit for the first time. It will reappear at the next restart if you select
Maybe later. Tap Close to manually configure settings.
Using the touchscreen
Basic touchscreen operation on the different pages is shown in the
table.
The Pages section later in this manual has more information about
page-specific touchscreen operation.
Basic Operation | Lowrance HDS Gen2 Touch
| 9
Operation Menu/Dialogs
Tap
Press and
hold
Drag
Select/toggle
item
n/a Activate cursor assist mode
Adjust slider
value
Scroll dialog
Hide page menu
(Drag right)
Menus
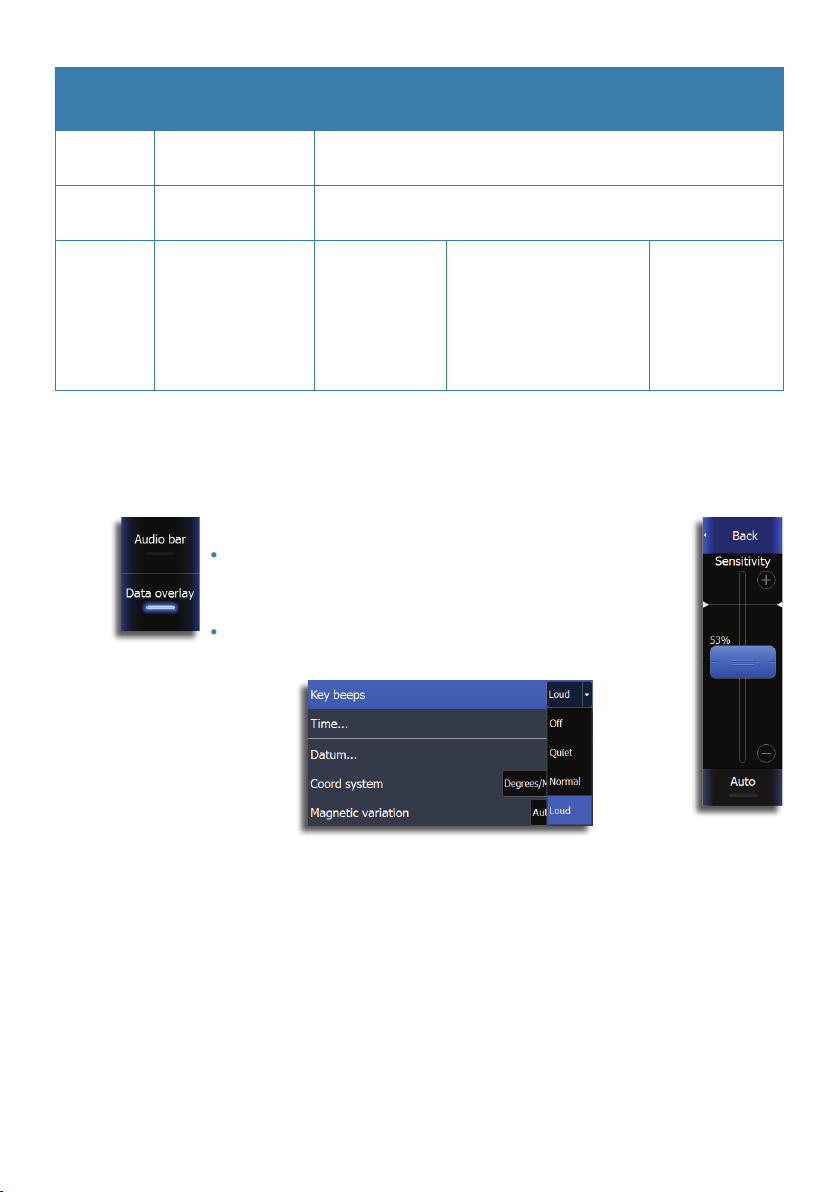
Menus are used to operate the system and to adjust settings.
• You select a menu item and toggle on/off menu check boxes by
tapping the selected item.
• You adjust slider bar values by dragging your finger
on the slide bar. Minor adjustments can be made by
tapping above or below the slider bar.
Toggle menu
• Drop-down menu items are selected by tapping the
item and then the selected value.
Pages
Chart Sonar Radar
Activate cursor
Pan chart
(any direction)
Pan water column
(any direction)
Pan sonar history
(horizontal movement)
Move cursor
10 |
Dropdown menu
Slide bar
Page menus
Page menus for each operation mode are on the right side of the
screen.
Page menus can be hidden to allow pages to be displayed full
screen. Drag the menu to the right to hide the menu.
¼ Note: When the cursor is active, some features on page menus will
be replaced with cursor mode features.
Basic Operation | Lowrance HDS Gen2 Touch

Back button
You can return to the previous screen or menu by pressing the Back
button.
Page menu
Hiding page menu
Hidden system menu
The page menu for each operation mode has a hidden system
menu. To access the hidden system menu, place your finger on the
top menu item and drag down.
Basic Operation | Lowrance HDS Gen2 Touch
| 11
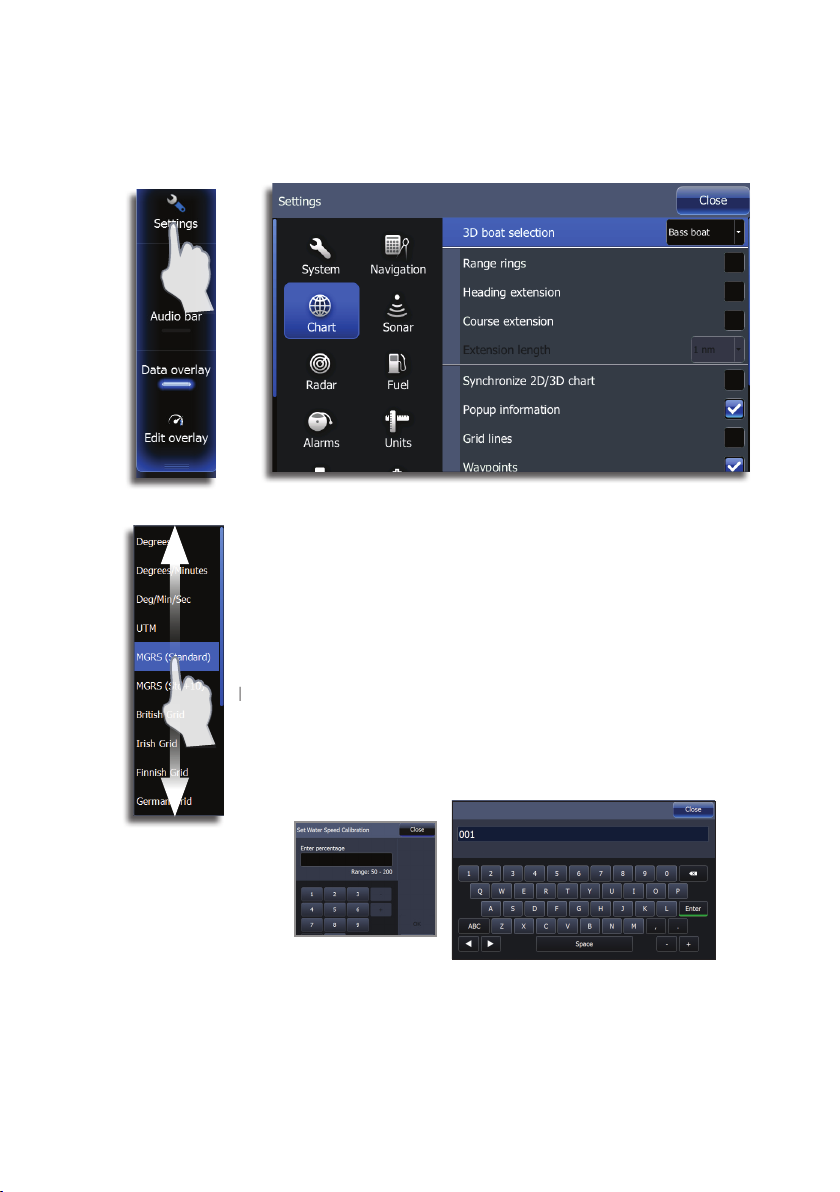
Settings dialog
You can access the settings dialog for each operation mode from
the hidden system menu or from the Utilities panel on the home
screen.
Dialog boxes
You select entry fields and keys in a dialog box by tapping the
screen. You can only enter information when a field is selected and
highlighted.
Some dialog listings might extend beyond the screen area. These
dialogs will include a scroll indicator, and you scroll by dragging the
list. A dialog is closed by tapping the Close button.
Numeric and alphanumeric keyboards will automatically be
displayed when required for entering user information in dialogs.
A virtual keyboard is operated by tapping the virtual keys.
12 |
Basic Operation | Lowrance HDS Gen2 Touch
Using the cursor
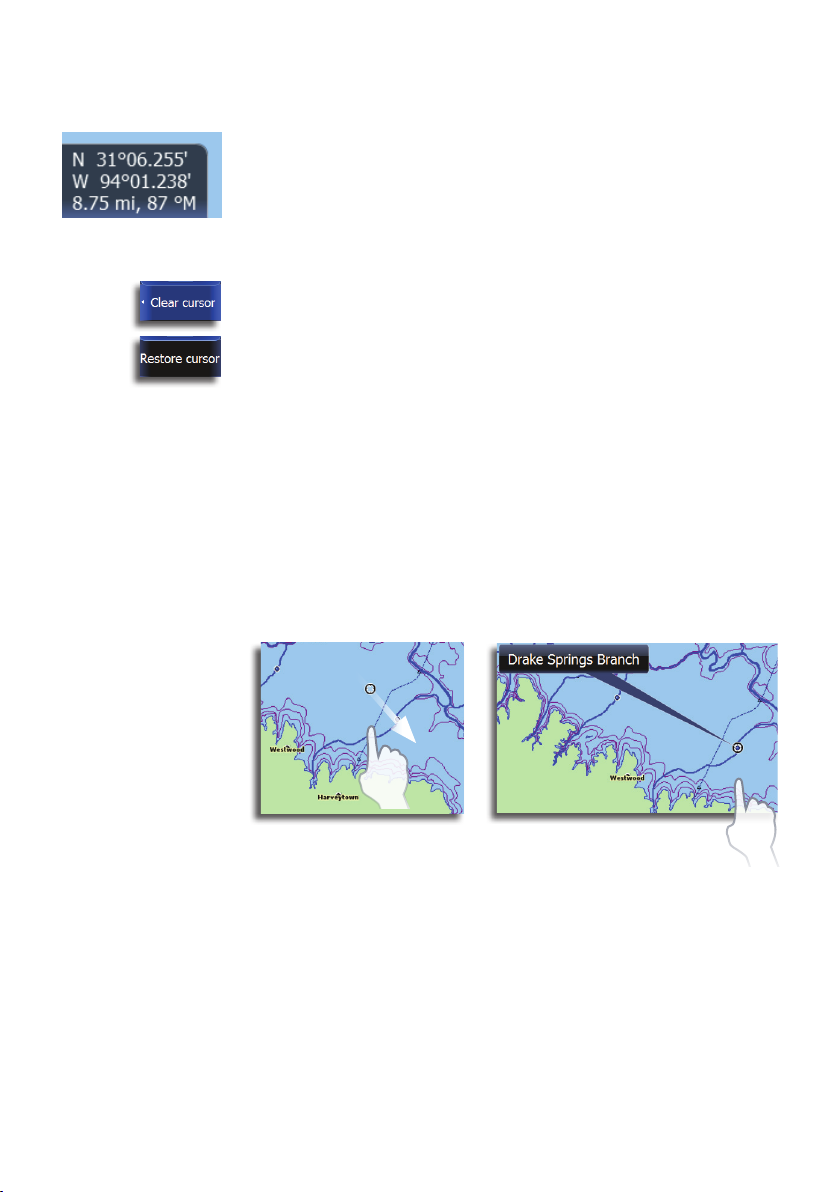
The cursor is by default not shown on any page. Tap the screen to
activate the cursor on the chart, sonar, structure and radar pages.
The cursor information window will show position coordinates at
the cursor position and range and bearing to the vessel.
On the Sonar page, the cursor information window will include the
corresponding surface temperature and the depth at the cursor
position.
To remove the cursor and cursor window from the page, tap the
Clear cursor button.
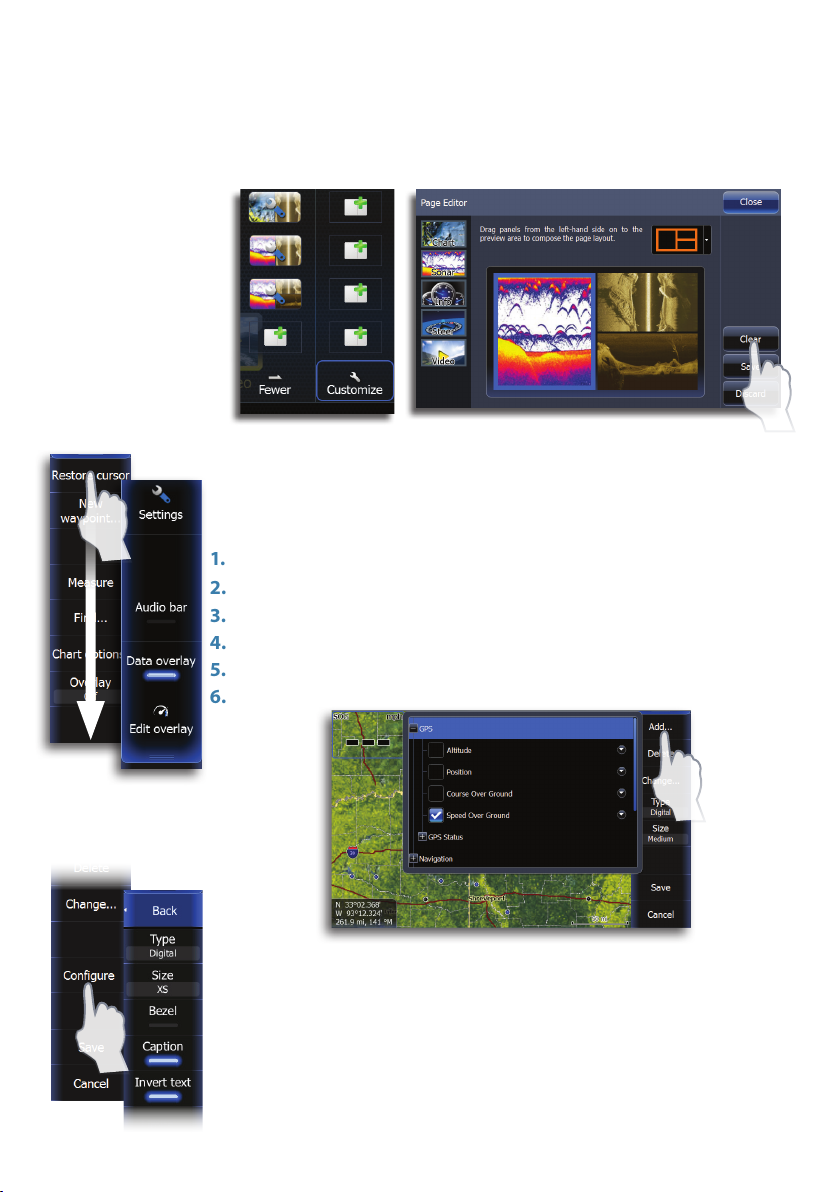
On the Chart page, tap Restore cursor to display the cursor in
its previous location. Restore cursor is a useful feature for toggling
between your current boat location and the cursor position.
Panning
You can pan the chart, sonar and structure screens by dragging your
finger in any direction.
Cursor assist mode
Press and hold your finger on the screen to switch the cursor to
selection mode. The selection tool will appear above your finger.
Drag the selection tool over the desired item.
Positioning a Man Overboard waypoint
If an emergency man overboard situation should occur, you can
position a Man Overboard waypoint at the vessel’s current position
by pressing both zoom keys simultaneously.
When you activate the MOB function the following actions are
automatically performed:
• a MOB waypoint is positioned at the vessel’s position
• the display switches to a zoomed chart page, centered on the vessel
position
• the unit displays navigation information back to the MOB waypoint
Basic Operation | Lowrance HDS Gen2 Touch
| 13
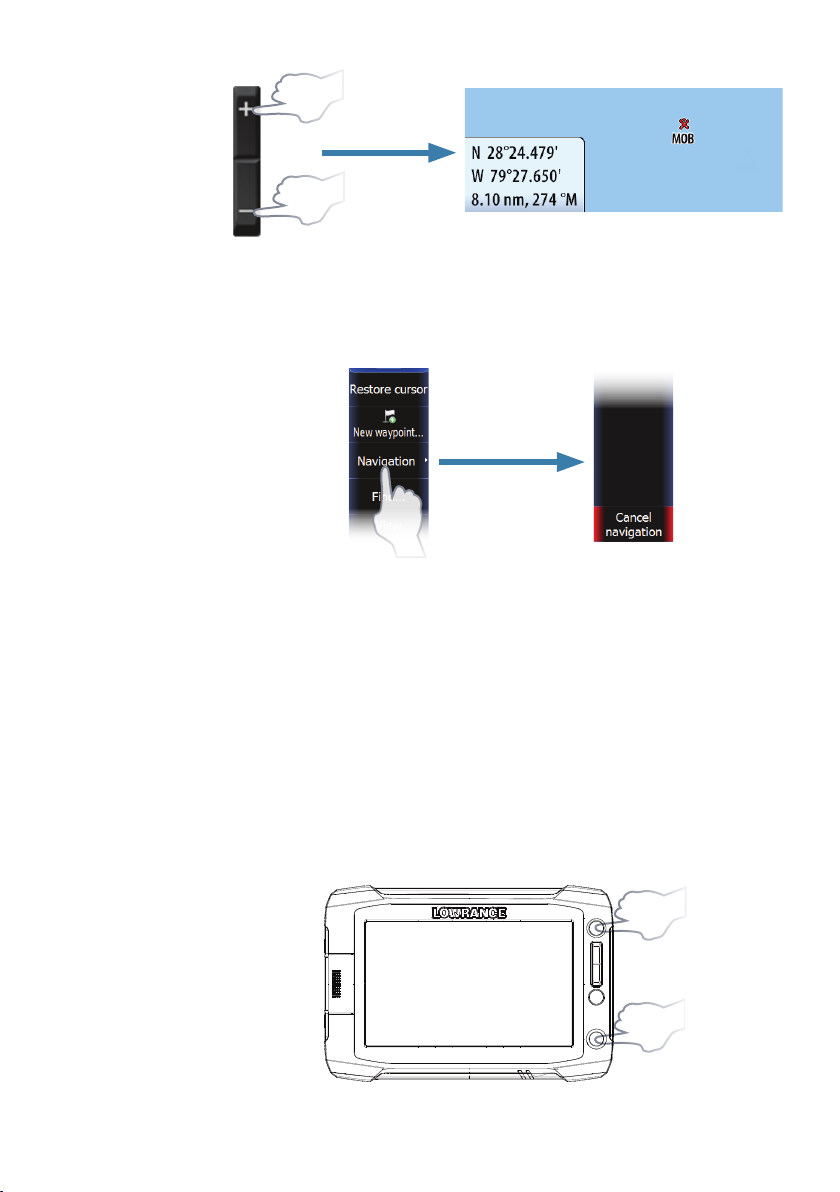
+
Cancel navigation
The unit will continue navigating toward the MOB waypoint until
the waypoint is reached or until you cancel navigation.
Delete a MOB waypoint
1. Cancel navigation.
2. Tap Waypoint MOB on the page menu.
3. Tap Delete.
14 |
Screen capture
Simultaneously press and hold the PAGES and POWER keys to
take a screenshot. By default, screen captures are saved to internal
memory.
Refer to the Utilities section of this manual for information on
viewing screen captures and saving files to a SD card.
+
Basic Operation | Lowrance HDS Gen2 Touch
3
Pages
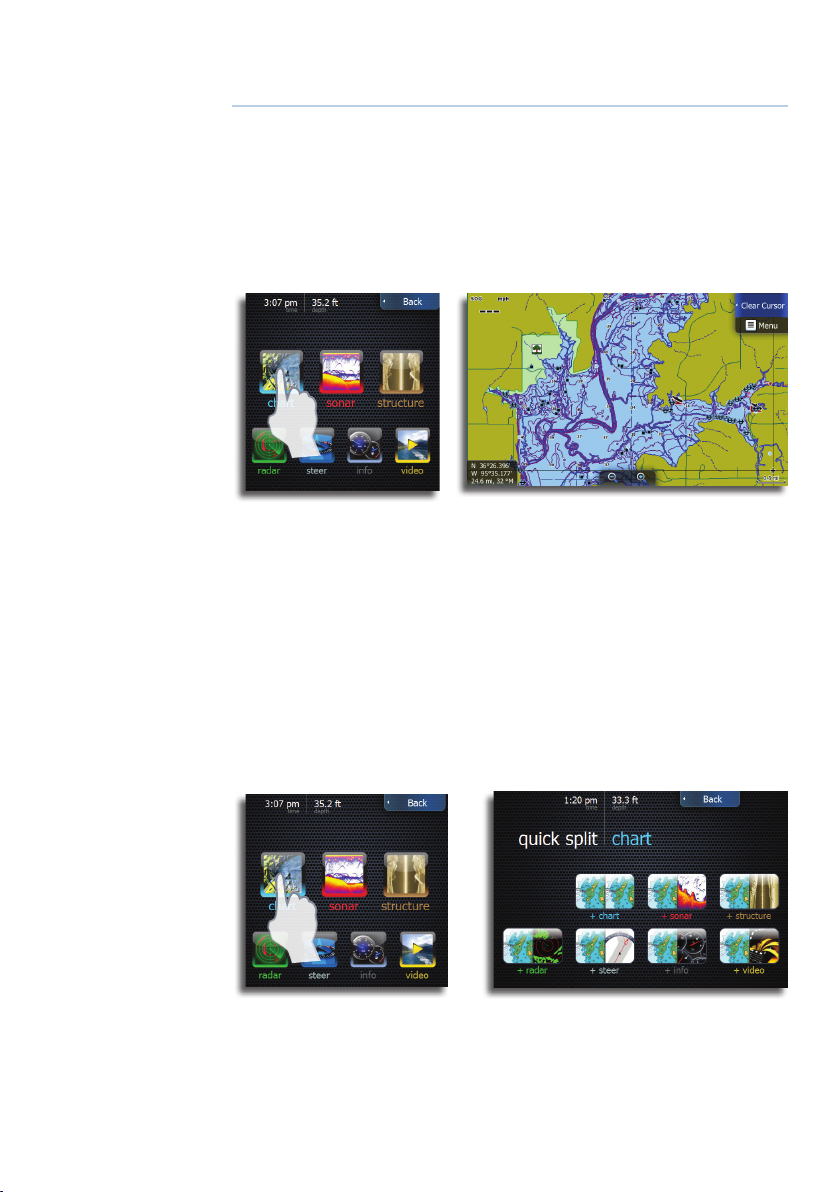
Page overview
This unit supports up to 7 page types. Each has a corresponding
group of preconfigured quick split combo pages.
¼ Note: Video is available only on 9” and 12” units. The radar option
will only be shown when the unit is connected to a radar.
Quick splits are two-panel combination pages featuring the selected
page combined with each of the other pages. Quick splits can not
be modified, but you can select/save your own page combination
using the Favorites feature. You can save up to 10 favorites. Pages,
quick splits and favorites are all accessed from the homescreen.
Selecting pages, quick splits
Tap a page icon to view the page full screen. Press and hold a page
icon to view quick split combo page options.
Pages | Lowrance HDS Gen2 Touch
| 15
Selecting Active panel
You can change active panels by tapping the desired panel. The
active panel will have an orange border.
Adjusting splits
The size of panels can be adjusted by tapping Adjust splits on the
hidden system menu. Drag the adjustment button horizontally to
resize the panels. Tap Save to confirm changes.
16 |
Customizing pages
Saving Favorites
You can save and edit Favorite pages from the page editor screen.
1. Tap an empty Favorites icon on the Favorites panel or tap
Customize to modify an existing favorite
- The Page editor panel will be displayed
2. Drag and drop page icons to set up your custom screen
3. Select a panel configuration
4. Save the page layout by tapping Save.
¼ Note: Tap Clear to cancel changes and select a new panel
configuration. Tap Discard to cancel changes and return to the
homescreen.
Pages | Lowrance HDS Gen2 Touch
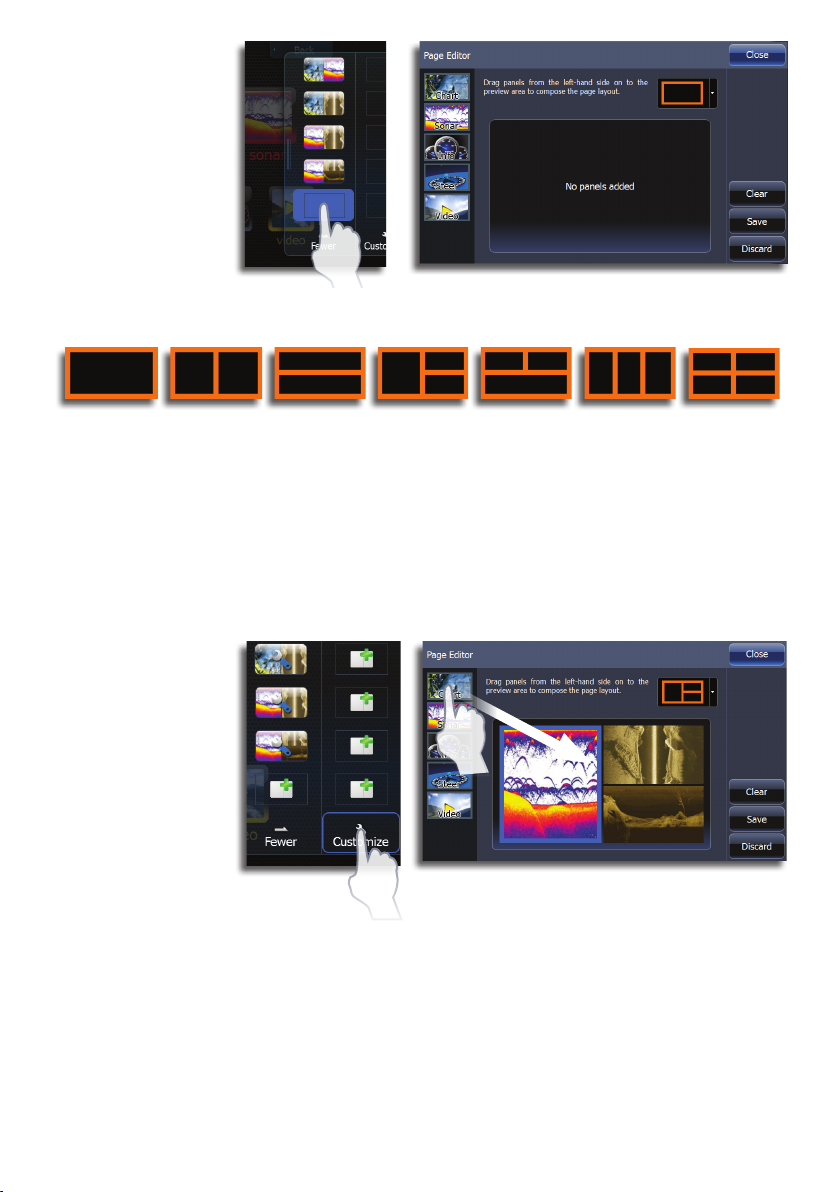
You can select from seven different panel configurations as illustrated below.
¼ Note: You can cycle through favorite pages by pressing the PAGES
key.
Editing favorites
1. Tap Customize on the Favorites panel
2. Tap an existing favorite
3. Drag a page icon from the preview
4. Tap Save
Pages | Lowrance HDS Gen2 Touch
| 17
Deleting favorites
1. Tap Customize on the Favorites panel
2. Tap the page icon for the page you want to remove
3. Tap Clear and tap Save
Data Overlay
Allows you to overlay information on the active page. You can
turn on/off viewing of overlay data and edit/add overlay data by
accessing the hidden system menu from any page screen.
1.
Access the hidden system menu
2. Tap Edit overlay and tap Add
3. Select a data category
4. Tap the data you want to overlay
5. Drag the overlay data into the desired position on the page
6. Tap Save
18 |
Customizing overlay data
You can toggle the overlay data type between an analog and digital
display, select data size, and change previously configured data
from the Edit overlay configuration menu.
Pages | Lowrance HDS Gen2 Touch
4
Chart
The chart page displays your position relative to land and other
chart objects. On the page you can plan and navigate routes,
place waypoints, overlay a radar image, a StructureMap image and
weather information, and display AIS targets.
¼ Note: This unit has different embedded cartography depending on
the region.
The first part of this section describes how to use the charts, and is
common to both Insight and Navionics. Chart options depend on
which cartography is in use on the unit.
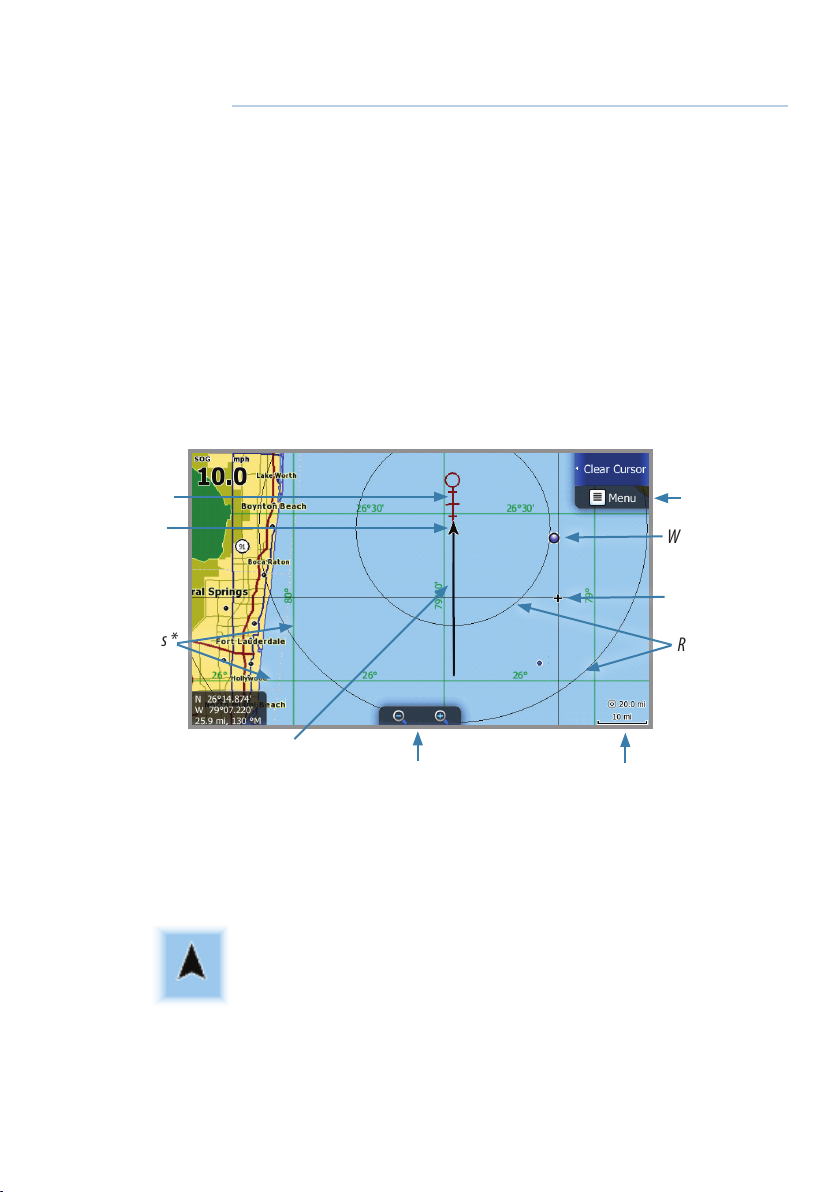
The Chart page
* Optional chart items
Extension line *
Vessel
Grid lines *
Opens page menu
Waypoint *
Cursor
Range rings *
Trail*
Zoom keys
¼ Note: You turn the optional images on/off individually. Refer to Chart
settings later in this section.
Chart range scale
Vessel symbol
When a GPS and a suitable heading sensor are connected to the
system, the vessel symbol indicates vessel position and heading.
Without a heading sensor installed, the icon will position itself using
COG (Course over Ground). If no GPS is available the vessel symbol
will include a question mark.
Chart | Lowrance HDS Gen2 Touch
| 19
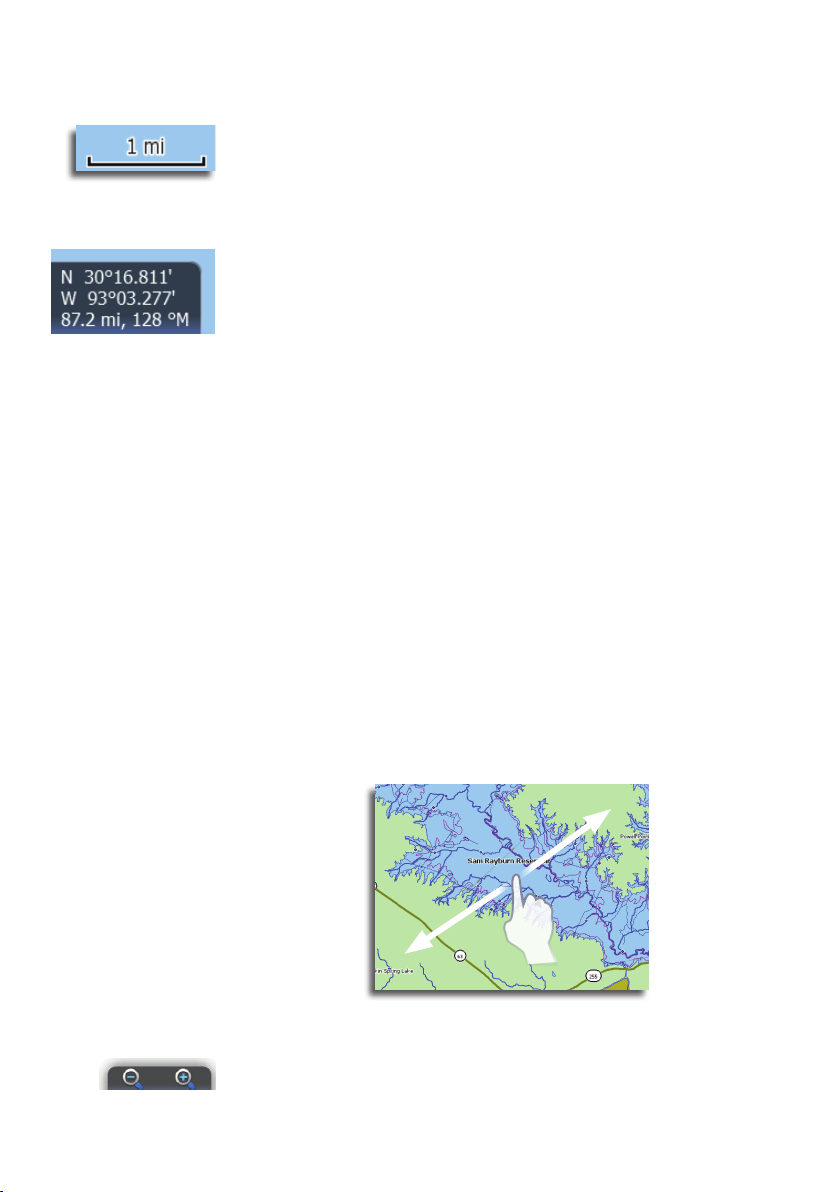
Chart scale
You zoom in and out on the chart by using the ZOOM keys.
Chart range scale and range rings interval (when turned on) will be
shown in the lower right corner of the chart panel.
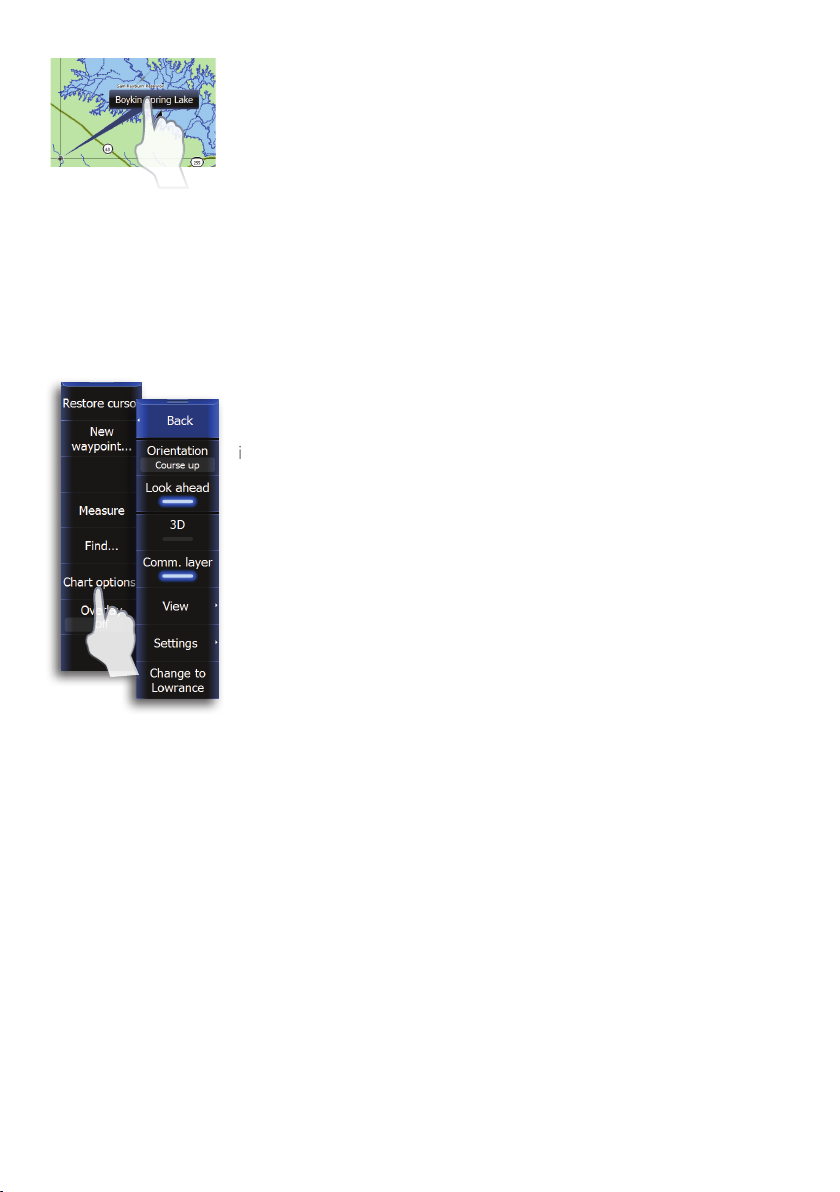
Using the cursor on the chart page
The cursor is by default not shown on the chart page.
When you tap the screen, the cursor will become visible and the
cursor position window will be activated. When the cursor is active,
the chart will not follow the vessel.
Press and hold the screen to activate cursor assist mode. Cursor
assist places the cursor above your finger and stops chart scrolling
to allow for accurate placement of waypoints.
To remove the cursor and cursor window from the chart, tap Clear
cursor. Tap the Restore cursor button to reactivate the cursor and
cursor window.
Goto cursor
You can navigate to the cursor by tapping Goto cursor on the
menu.
Panning the chart
You can move the chart in any direction by dragging your finger in
any direction.
Tapping Clear Cursor will remove the cursor from the page, and
the chart center will be positioned at the vessel.
20 |
Zooming
You zoom in/zoom out the chart by tapping the onscreen Zoom
keys. You Zoom in to see less of the map with more detail; zoom
out to see more of the map with less detail. You can also use the
dedicated +/- keys to zoom.
Chart | Lowrance HDS Gen2 Touch
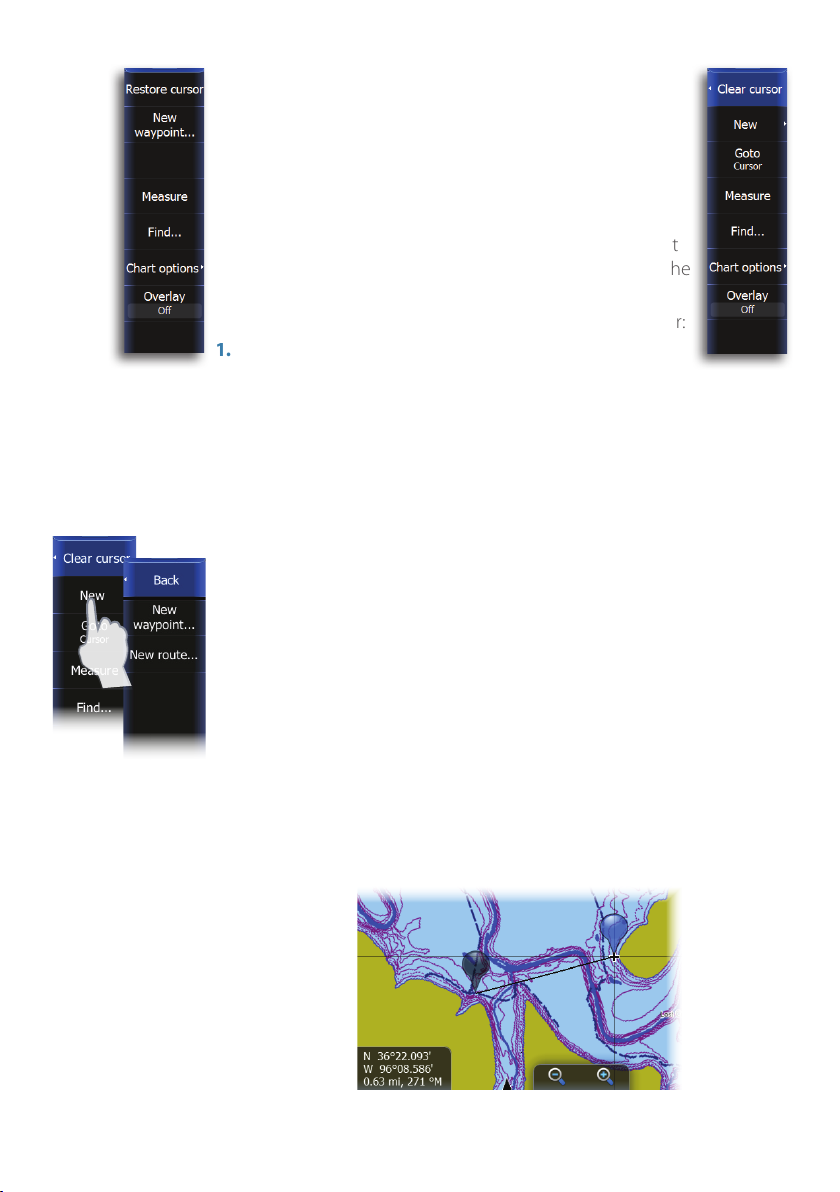
Chart menu
When the cursor is active, some features on the chart
menu will be replaced with cursor mode features.
Tap Clear cursor to return to the normal chart menu.
Saving waypoints
When the cursor is not active, you can save a waypoint
at the vessel position by tapping New waypoint on the
chart menu.
Using the touchscreen to save a waypoint at the cursor:
1.
No cursor Active cursor
Tap the desired location on the screen
2. Tap New on the chart menu
3. Tap New waypoint and tap Save
¼ Note: You can also save a waypoint by pressing the dedicated
WAYPOINT key twice. With the cursor active, the waypoint will
be saved at the cursor position. When the cursor is inactive, the
waypoint will be saved at the vessel position.
Creating routes
You can quickly create routes on the chart page.
1.
Tap the screen to activate the cursor
2. Tap New on the menu
3. Tap New route
4. Tap the screen to position the first routepoint. Tap the screen to place more
routepoints
5. Save the route by tapping Save on the menu
Measuring distance
The cursor can be used to measure the distance between your
vessel and a selected position, or between two points on the chart.
Chart | Lowrance HDS Gen2 Touch
| 21
¼ Note: To measure distance from your vessel, tap the desired location
on the map and the distance to that location will be shown in the
info box in the lower left corner of the screen.
Tap the screen and then tap Measure on the menu
1.
• The measuring icons will appear with a line drawn from the vessel
center to the cursor position, and the distance will be listed in the
info box.
2.
Drag one of the map pins to the desired point. The distance between the
two points will be shown in the info box.
You can turn off the measuring function by tapping Finish
measuring on the menu.
¼ Note: You can use the measure function in conjunction with cursor
assist mode to accurately position the map pins.
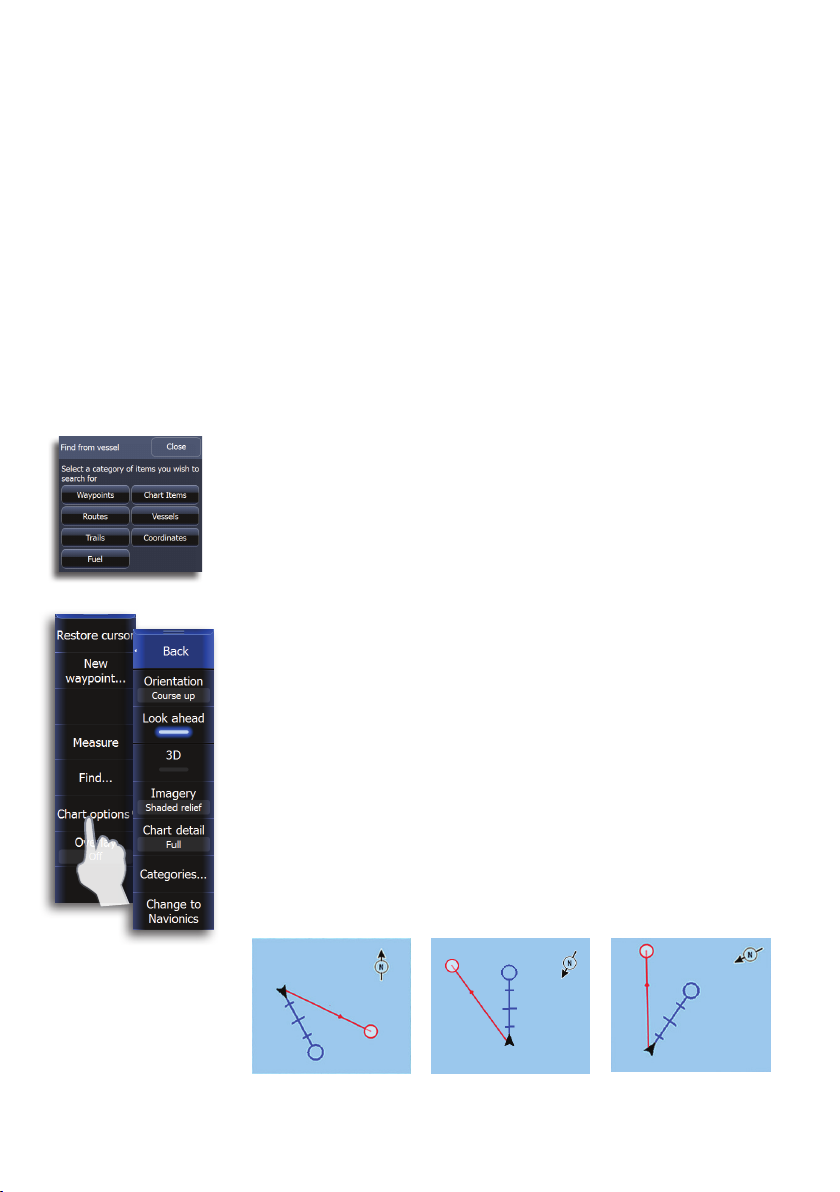
Find
You can search for items on the chart by using the Find feature.
Tap the desired location on the screen to search from the cursor
position. Clear the cursor from the screen to search from the vessel
position.
¼ Note: You must have a SIRIUS data package subscription to search
for Fueling stations and an AIS receiver to search for vessels.
22 |
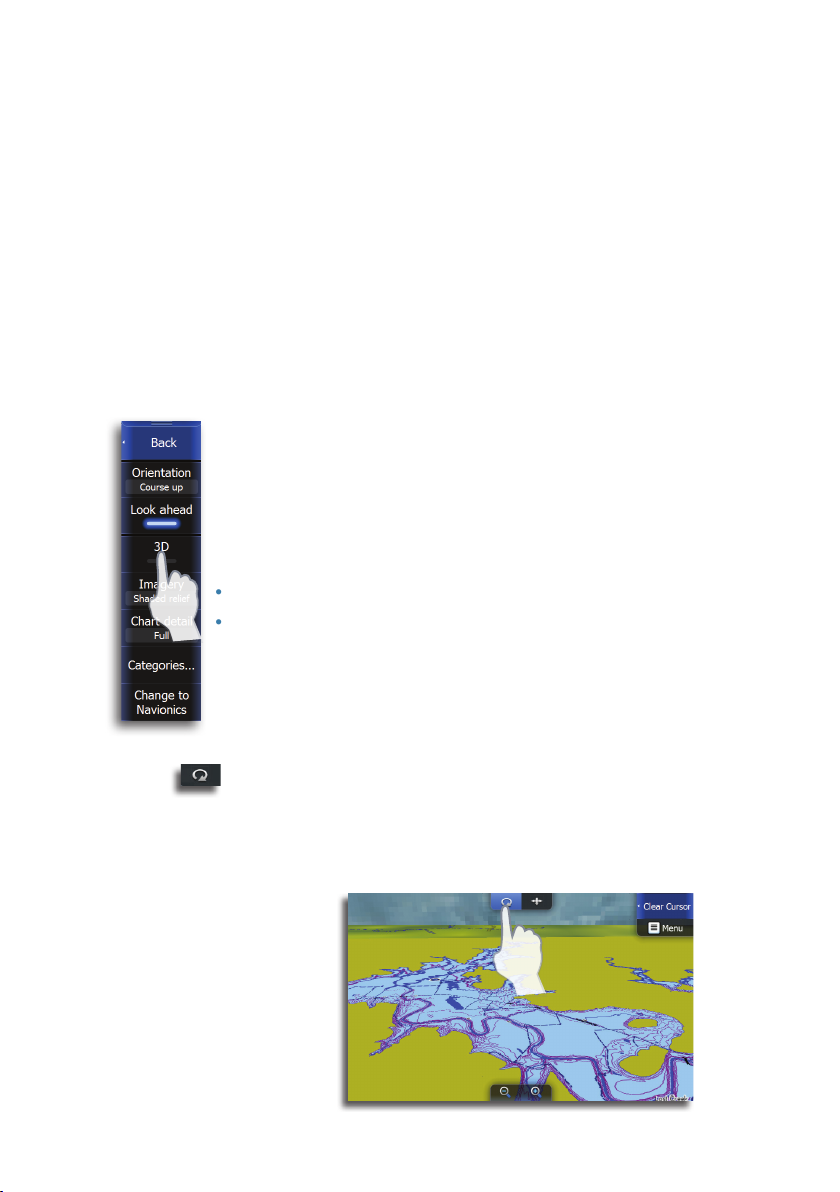
Chart options
Orientation
Several options are available for how the chart is rotated on the
page. The chart orientation symbol in the upper right corner of the
page indicates the north direction.
North up
Displays the chart with the north direction upward. Corresponds to
the usual orientation of nautical charts.
North up Heading up Course up
Chart | Lowrance HDS Gen2 Touch
Heading up
Displays the chart with the vessel’s heading directly up on the chart
image. Heading information is received from a compass. If heading
is not available, then the COG from the GPS will be used.
Course up
Rotates the chart in the direction of the next point when in
navigation mode. If the unit is not in navigation mode the heading
up orientation will be used until you start navigating
Look ahead
This option centers the chart slightly forward of your vessel so you
can maximize your view ahead.
3D
You can toggle the view on the chart between 2D and 3D by
tapping the 3D button.
3D chart view options
There are two 3D views available:
• Rotate - default mode keeping the boat in center on the chart panel
• Pan - allows you to move the 3D chart view away from the vessel
You toggle between these two modes by pressing Camera on
the menu or by tapping the pan and rotate icons at the top of the
screen.
Rotate mode
In this mode the camera follows the vessel. The vessel’s position will
be in center if Look Ahead is not selected.
The camera angle is by default as seen from your eye position, looking toward the vessel. The vessel’s rotation on the chart is defined by
the chart orientation settings.
Chart tilted in rotate mode
Chart | Lowrance HDS Gen2 Touch
| 23
You can change the camera tilt angle and rotate the camera around
the vessel by dragging your finger on the screen.
¼ Note: When in rotate mode, use horizontal motions to rotate the
vessel. Use vertical motions to change the viewer perspective.
When rotate is selected the camera position is fixed, and the camera
can only be rotated and tilted. You rotate and tilt the camera by
tapping and dragging your finger on the screen.
Pan mode
You switch from Rotate mode to Pan mode by tapping Camera on
the menu or by tapping the rotate icon at the top of the screen.
The Rotate mode allows you to view the entire 3D chart, regardless
of vessel position.
You can rotate and move the camera (pan) away from your vessel.
You switch between panning and rotating camera motion by
tapping the icons on the right side of the chart panel.
When pan is selected, you move the camera away from the vessel
and around in the chart by tapping and dragging on the screen.
When you remove your finger from the chart the view will remain in
the selected position.
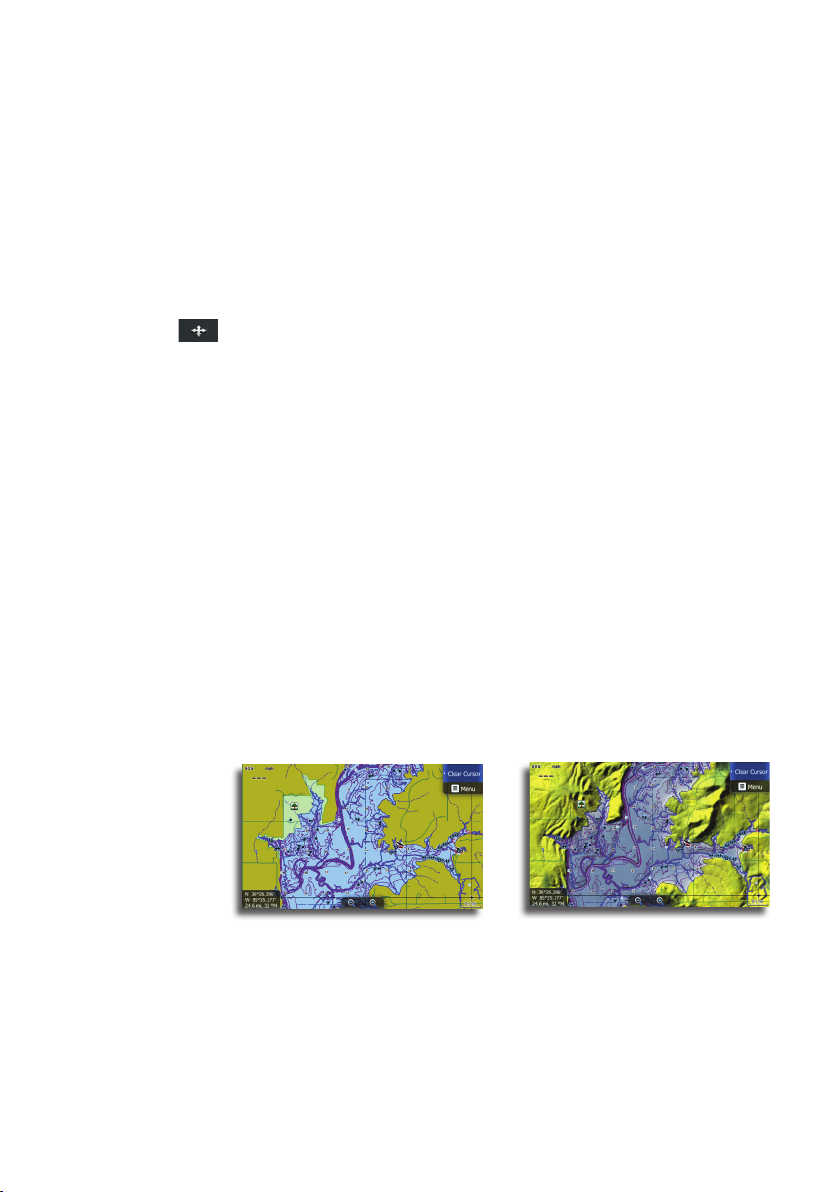
Imagery
Lowrance mapping can be displayed in two different imagery styles,
either as 2D basic mapping style, or with shaded relief presenting
chart including terrain imaging.
24 |
2D mapping Shaded relief
Chart detail
Low
This is the basic level of information that includes information that is
required in all geographic areas. It is not intended to be sufficient for
safe navigation.
Chart | Lowrance HDS Gen2 Touch
Medium
This is the minimum information sufficient for navigation
Full
This is all available information for the chart in use
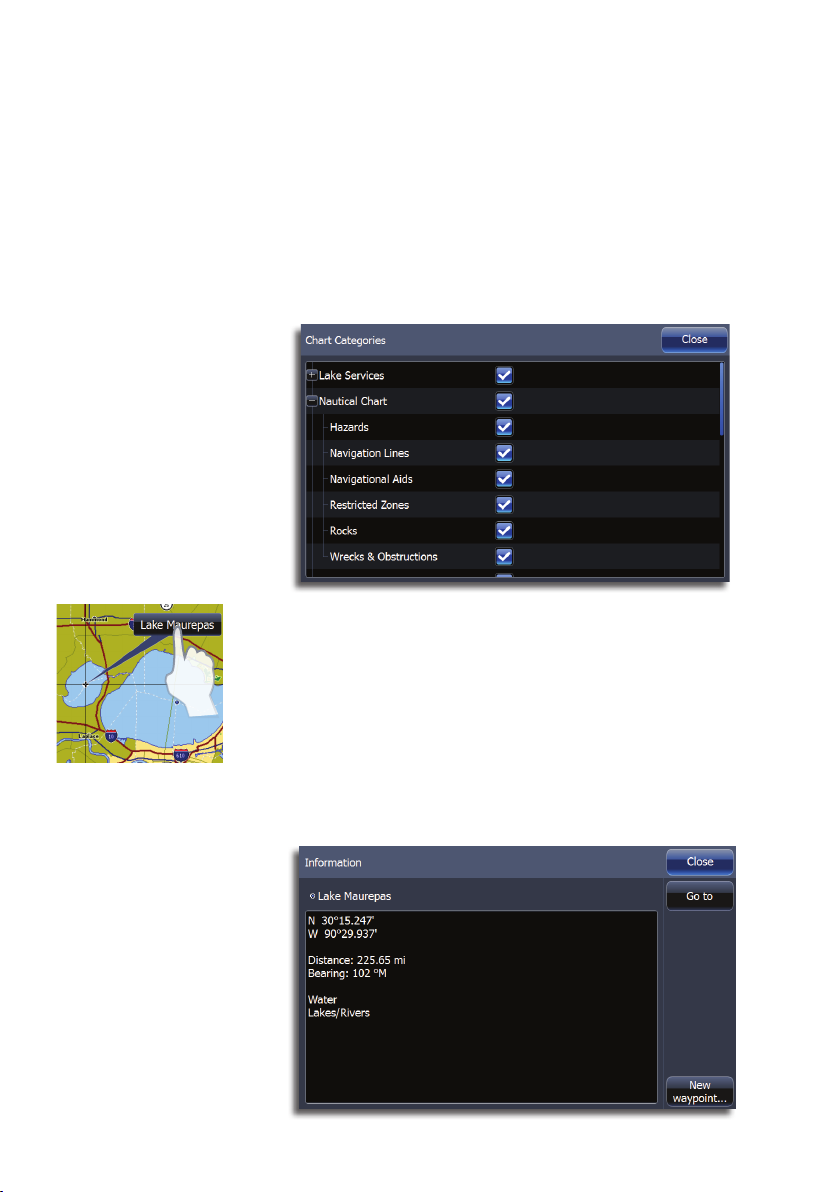
Categories
Insight charts includes several categories and sub-categories that
you can turn on/off individually depending on which information
you want to see on your display.
Displaying information about chart and chart objects
When you tap a chart item, a waypoint, a route or a target, basic
information about the item will appear on the screen and an Info
button will appear on the page menu.
Tap the onscreen basic information display or tap the Info button to
view all available information for the item.
¼ Note: Popup information has to be enabled to see basic item
information.
Chart | Lowrance HDS Gen2 Touch
| 25
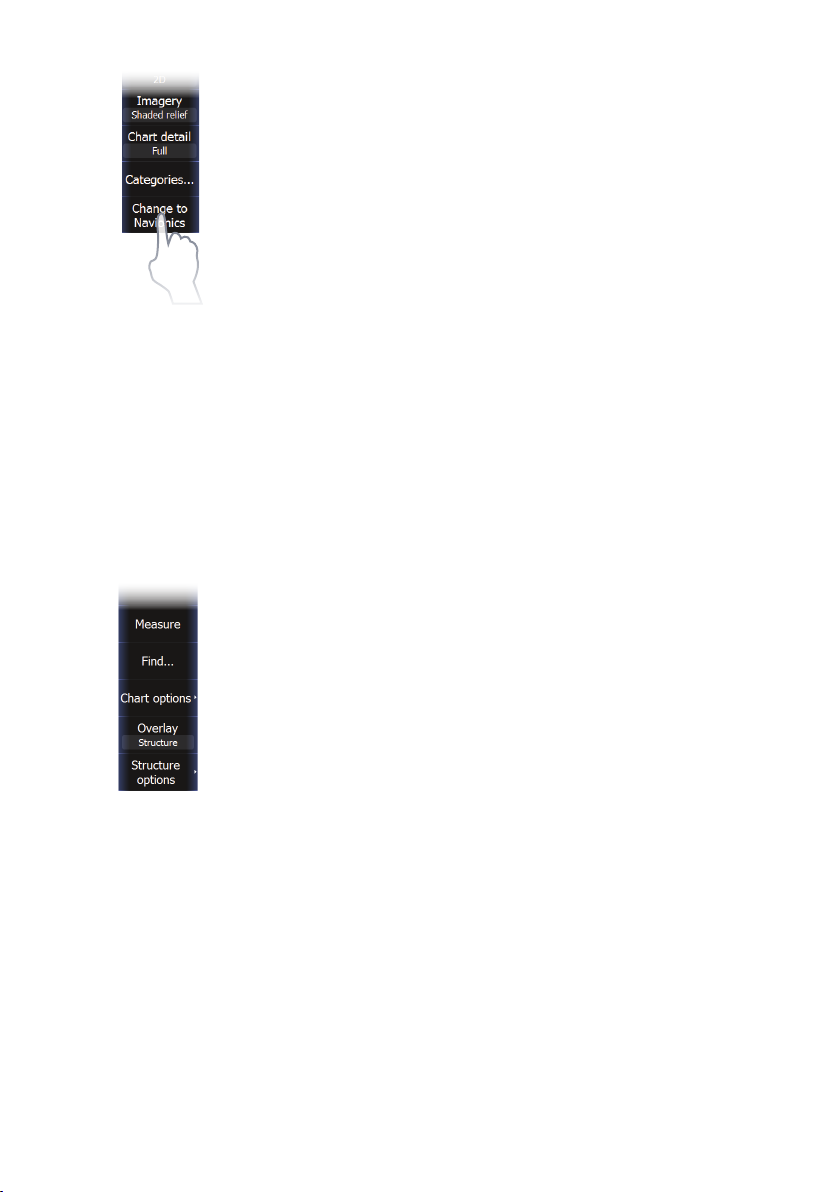
Selecting chart data
This unit can use built-in Lowrance map data as well as Navionics,
Fishing Hotspots, Jeppesen and other third-party mapping cards.
Tap Change to Navionics or Change to Lowrance to switch chart
data the unit is using.
¼ Note: The system will not automatically switch to embedded
cartography if the SD card is removed. A low-resolution chart will
be displayed until you re-insert the SD card or manually switch
back to embedded cartography. When a third-party mapping
card is inserted, the system will prompt you to switch to SD card
cartography, if the unit is not in the correct chart mode.
Sharing Chart data
You can share charts across the Ethernet network. Chart Sharing
allows a user to insert a compatible chart card from Lowrance,
Navionics, Jeppesen or other provider into a display on the Ethernet
network and view the chart information on any other compatible
display on the network.
Chart overlay
Radar, StructureMap and weather information can be displayed as
overlay on the chart page.
¼ Note: Weather overlay currently is only available in the United States.
When radar, weather or StructureMap overlay is selected, the chart
context menu will be expanded to include basic functions for the
selected overlay.
Radar, StructureMap and SIRIUS weather functions are described in
separate sections in this manual.
26 |
Chart | Lowrance HDS Gen2 Touch
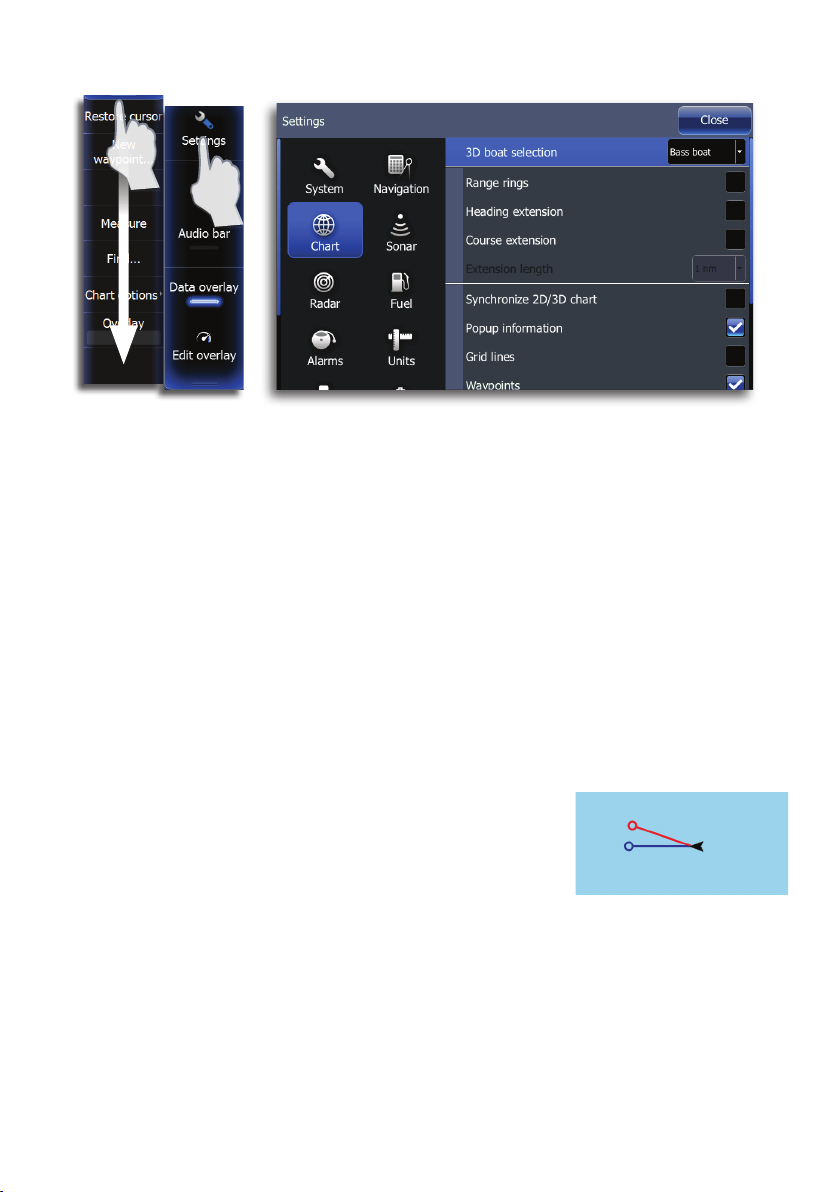
Chart Settings
3D boat selection
You can select different boat icons that will be used as the current
position symbol when the chart is in 3D mode.
Range Rings
You can turn on/off range rings from the chart settings menu.
The range rings can be used to show the distance from your vessel
to other chart objects. The range scale is set automatically by the
system to suit the chart scale.
Heading and Course extension
The length of the extension lines are either set as a fixed distance,
or to indicate the distance the vessel will move in the selected time
period.
Vessel heading extension is aligned with
direction the vessel’s bow is pointing.
COG extension points the direction the
vessel is moving. If there is no heading
sensor, heading will default to the COG
value.
For other vessels COG data is included in the message received from
the AIS system.
Chart | Lowrance HDS Gen2 Touch
COG
Heading
| 27
Pop-up information
Selects whether basic information for chart items shall be displayed
when you tap the item.
Grid lines
Turns on/off viewing of longitude and latitude grid lines on the
chart.
Waypoints, routes and trails
You can turn on/off viewing of waypoints, routes and trails on the
chart.
Navionics chart options
To view Navionics data, you must insert a Navionics mapping card
into the SD card slot on the front of the unit. The system will prompt
you to switch to SD card cartography when a card is inserted.
You can share Navionics charts with other units on your Ethernet
network. Refer to “Sharing Chart data” on page 26.
Orientation
Several options are available for how the chart is rotated on the
page. The chart orientation symbol in the upper right corner of the
page indicates the north direction.
28 |
Look ahead
This option centers the chart slightly forward of your vessel so you
can maximize your view ahead.
3D
The Navionics chart database provides you with detailed coastal
cartography, with 2D and 3D view options.
• 2D presents chart information in a basic mapping mode with
Navionics details
• 3D provides a three dimensional graphical view of land and sea
contours
Synchronize 2D/3D chart
Links the position shown on one chart with the position shown on
the other chart when a 2D and a 3D chart are shown side by side.
You can turn on/off Synchronize 2D/3D from the chart settings
menu when Navionics is the selected chart data.
Chart | Lowrance HDS Gen2 Touch
 Loading...