

Page 1
HDS Series
Installation manual
Page 2

Preface
Disclaimer
As Navico is continuously improving this product, we retain the right to make changes to the
product at any time which may not be reected in this version of the manual. Please contact
your nearest distributor if you require any further assistance.
It is the owner’s sole responsibility to install and use the instrument and transducers in a
manner that will not cause accidents, personal injury or property damage. The user of this
product is solely responsible for observing safe boating practices.
NAVICO HOLDING AS AND ITS SUBSIDIARIES, BRANCHES AND AFFILIATES
DISCLAIM ALL LIABILITY FOR ANY USE OF THIS PRODUCT IN A WAY THAT MAY
CAUSE ACCIDENTS, DAMAGE OR THAT MAY VIOLATE THE LAW.
Governing Language: This statement, any instruction manuals, user guides and other
information relating to the product (Documentation) may be translated to, or has been
translated from, another language (Translation). In the event of any conict between any
Translation of the Documentation, the English language version of the Documentation will be
the ofcial version of the Documentation.
This manual represents the product as at the time of printing. Navico Holding AS and its
subsidiaries, branches and afliates reserve the right to make changes to specications
without notice.
Copyright
Copyright © 2010 Navico Holding AS.
Feedback from you
Your feedback is important and helps Navico ensure that this manual is a valuable resource
for all marine technicians. E-mail your comments or suggestions about this manual to the
following address: tech.writing@navico.com
Warranty
• The warranty card is supplied as a separate document.
• It is shipped with the product registration card.
• In case of any queries, refer to the brand web site of your display or system.
www.lowrance.com
1
Page 3

Declaration of Conformity
GB
FI
NL
FR
SE
DK
DE
GR
IT
ES
PT
Hereby, Navico Holding AS declares that this HDS is in compliance
with the essential requirements and other relevant provisions of Directive
1999/5/EC.
Navico Holding AS vakuuttaa täten että HDS tyyppinen laite on
direktiivin 1999/5/EY oleellisten vaatimusten ja sitä koskevien
direktiivin muiden ehtojen mukainen.
Hierbij verklaart Navico Holding AS dat het toestel HDS in
overeenstemming is met de essentiële eisen en de andere relevante
bepalingen van richtlijn 1999/5/EG.
Par la présente, Navico Holding AS déclare que ce HDS est conforme
aux exigences essentielles et aux autres dispositions de la directive
1999/5/CE qui lui sont applicables.
Härmed intygar Navico Holding AS att denna HDS står i
verensstämmelse med de väsentliga egenskapskrav och övriga relevanta
bestämmelser som framgår av direktiv 1999/5/EG.
Undertegnede Navico Holding AS erklærer herved, at følgende udstyr
HDS overholder de væsentlige krav og øvrige relevante krav i direktiv
1999/5/ EF.
Hiermit erklärt Navico Holding AS, dass sich dieses SE8, in
Übereinstimmung mit den grundlegenden Anforderungen und den
anderen relevanten Vorschriften der Richtlinie 1999/5/EG bendet.
(BMWi)
Με την παρουσα Navico Holding AS δηλωνει οτι HDS συμμορφωνεται
προς τις ουσιωδεις απαιτησεις και τις λοιπες σχετικες διαταξεις της
οδηγιας 1999/5/ΕΚ.
Con la presente Navico Holding AS dichiara che questo HDS è
conforme ai requisiti essenziali ed alle altre disposizioni pertinenti
stabilite dalla direttiva 1999/5/CE.
Por medio de la presente Navico Holding AS declara que el HDS cumple
con los requisitos esenciales y cualesquiera otras disposiciones aplicables
o exigibles de la Directiva 1999/5/CE.
Navico Holding AS declara que este HDS está conforme com os
requisitos essenciais e outras provisões da Directiva 1999/5/CE.
The equipment named in this declaration, is intended for use in international waters as well as
coastal sea areas administered by countries of the E.U. and E.E.A. A full Declaration can be
obtained from www.lowrance.com
Disposal
Waste Electrical and Electronic Equipment (WEEE) The use of the WEEE
Symbol indicates that this product may not be treated as household waste.
By ensuring this product is disposed of correctly, you will help protect the
environment. For more detailed information about the recycling of this
product, please contact your local authority, your household waste disposal
service provider or the shop where you purchased the product.
2
Page 4

Contents
Preface .....................................................................................................1
Declaration of Conformity .............................................................................................2
Disposal .........................................................................................................................2
Introduction ........................................................................................... .5
About this Manual .........................................................................................................5
Important Safety and Warning Information ...................................................................5
Check the Parts ..............................................................................................................6
Overview ........................................................................................................................7
Display Installation ................................................................................9
Mounting location ..........................................................................................................9
Panel Mount ...................................................................................................................11
Bracket Mount ...............................................................................................................12
Transducer Installation .........................................................................14
Recommended Tools and Supplies ................................................................................14
Skimmer Installation Instructions ..................................................................................15
System Architecture ...............................................................................28
Wiring the HDS ..................................................................................... .29
Wiring Guidelines ..........................................................................................................29
Power/Data Cable ..........................................................................................................30
NMEA 0183 Wiring Table .............................................................................................31
NMEA 0183 wiring ......................................................................................................31
NMEA 2000 wiring .......................................................................................................32
Ethernet ..........................................................................................................................33
HDS-8 & HDS-10 Data Bridging ..................................................................................34
Single Station .................................................................................................................35
Dual & Multi Station .....................................................................................................36
Connecting HD Radar ....................................................................................................37
Connecting BR24 Radar ...............................................................................................38
Commissioning Check List ............................................................................................39
Sonar ..............................................................................................................................41
3
Page 5

Dimensional Drawings .......................................................................... .43
HDS5 .............................................................................................................................43
HDS7 .............................................................................................................................44
HDS8 .............................................................................................................................45
HDS10 ...........................................................................................................................46
NMEA Information ................................................................................47
NMEA 2000 PGN List ...................................................................................................47
Supported NMEA 0183 sentences .................................................................................49
4
Page 6
Introduction
About this Manual
• This manual is a reference guide for installing a Lowrance HDS System.
• The information in this manual at the time of printing is correct to the best of our
knowledge. Navico can not be liable for any inaccuracies or missing information.
• Due to the constant improvement of Navico’s products. Navico cannot be liable for
changes between the product and the manual. Refer to www.lowrance.com for
the latest manuals and addendum’s.
Important Safety and Warning Information
Please read carefully before use.
When navigating the vessel, use the Lowrance HDS system only as a
navigational aid. Proper navigation of the vessel is the sole responsibility of the
vessel operator.
The electronic chart used by the HDS System is an aid to navigation only and
is designed to supplement, not replace, ofcial government charts. Only ofcial
government charts supplemented by notices to mariners contain the information
required for safe and prudent navigation. Always supplement the electronic
information provided by the Lowrance HDS with other plotting sources such
as observations, depth soundings, radar and hand compass bearings. Should the
information not agree, the discrepancy must be resolved before proceeding any
further.
Never operate the HDS in Simulate Mode while you are underway. It is the
user’s responsibility to ensure that Simulate Mode is used only in safe situations
such as when you are moored in a marina.
The Global Positioning System (GPS) is operated by the US Government which
is solely responsible for its operation, accuracy and maintenance. The GPS
system is subject to changes which could affect the accuracy and performance
of all GPS equipment anywhere in the world.
The accuracy of the Sonar depth display can be limited by many factors,
including the type of transducer, the location of the transducer, and water
conditions. Ensure that the transducer is installed correctly and the Sonar is used
correctly.
HDS units intended for sale and operation in the America’s region DO NOT
include full functionality outside of the America’s, dened as 30 degrees west
longitude and 180 degrees west longitude. Units are restricted to operate in
English language only with imperial (non-metric) units only.
For full use around the globe an International unit must be purchased from
outside of the America’s region.
5
Page 7
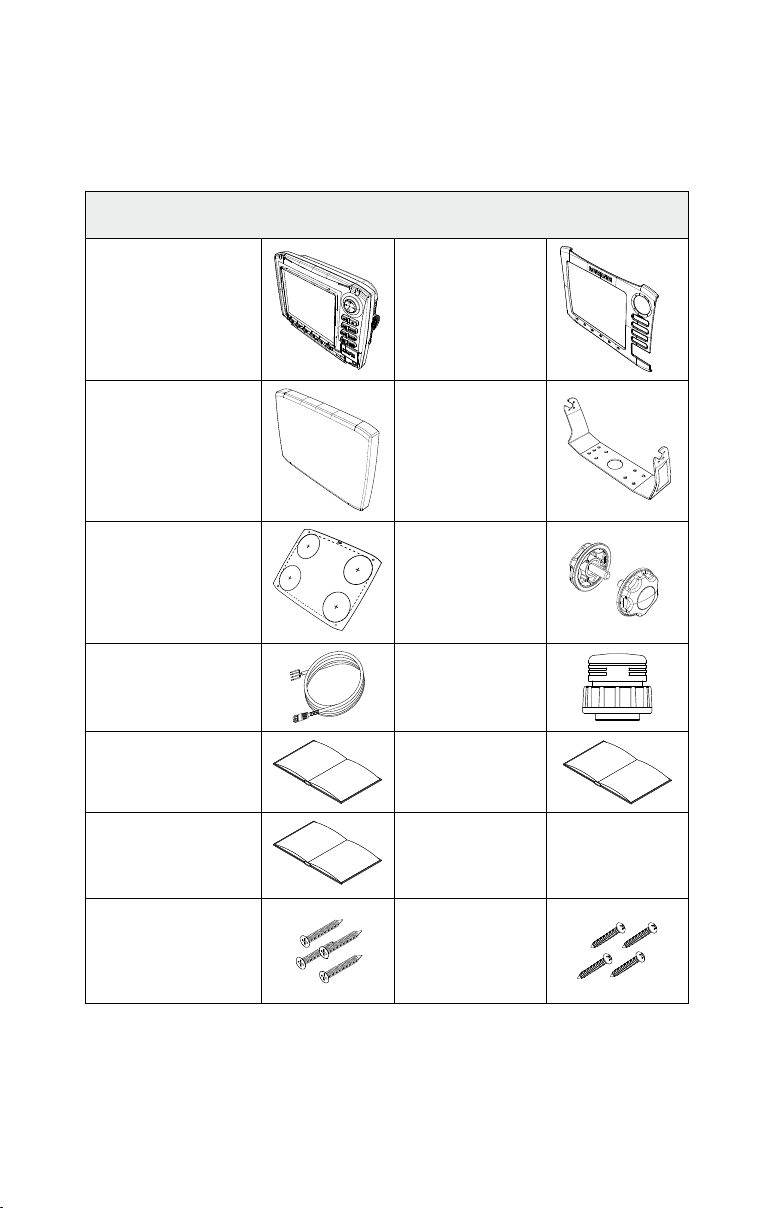
Check the Parts
ISO 30 Degree with Perspective
HDS Head Unit
Models: 5”, 7”, 8”
or 10”
Packaged Parts List
HDS Bezel
HDS Dust Cover
HDS Cut-out
Template
HDS
Power/Data Cable
HDS
Installation Manual
HDS
Quick start guide
HDS
4 x SCREW #10
3/4 PAN HEAD SS
SELFTAP
HDS Mounting
Bracket
HDS Bracket Knobs
HDS
Connector Caps
HDS
Operation Manual
HDS
4 x SCREW NO.
6X1.5 PANHEAD
PHILLIPS TP1
6
Page 8
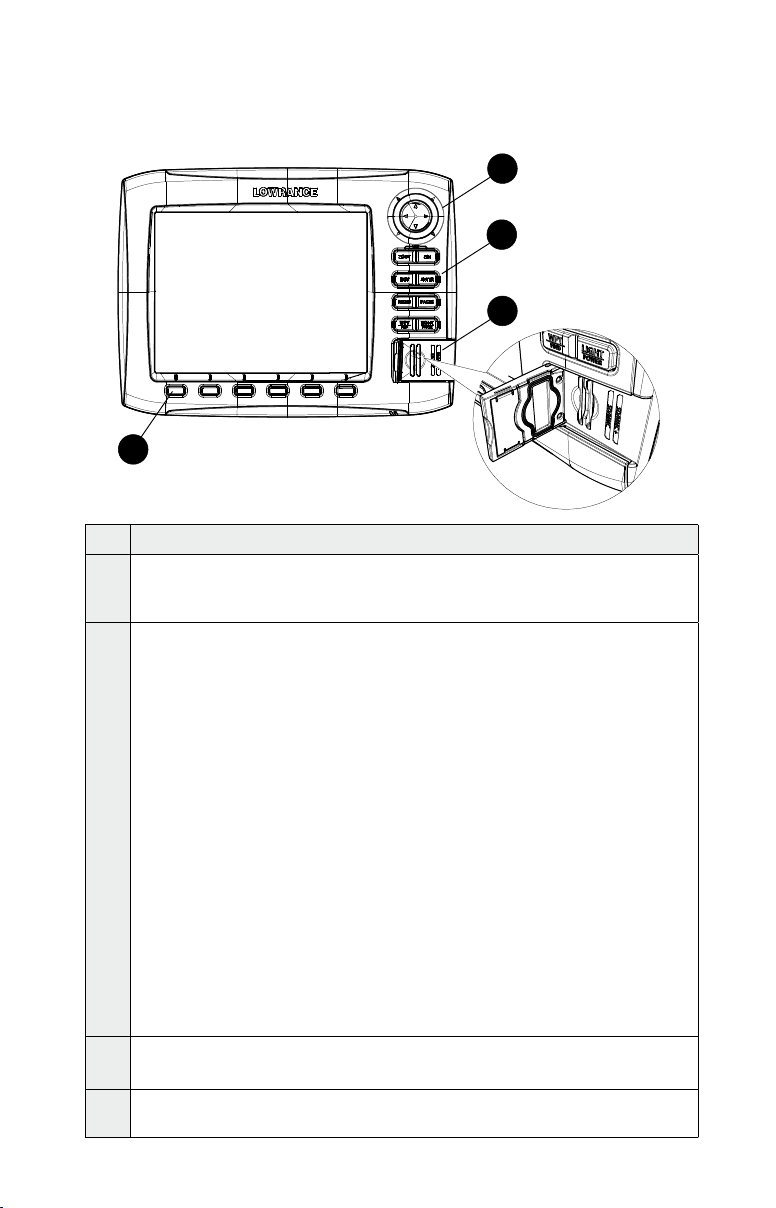
Overview
4
3
2
1
Key Description
CURSOR CONTROL: Move the cursor, scroll through menus, adjust
1
features, view sonar/GPS history. 8 & 10 models also have a y wheel to aid
scrolling.
CONTROL KEYS
ZOUT:
Zoom out to see more of the map with less detail
ZIN: Zoom in to see less of the map with more detail.
Pressing ZOUT & ZIN at the same time will activate Man Overboard mode.
ENTER: Finalize menu selections; shortcut key for functions like saving a
waypoint at cursor position.
2
MENU: Opens Content & Settings menu.
LIGHT/POWER: Controls backlight level & turns the unit on/off.
EXIT: Cancels entries, closes menus & windows; toggles between cursor position
and chart location on Chart page.
PAGES: Press to open Pages menu; press and hold to select the active panel of the
display.
WPT/FIND: Saves a waypoint at current position; accesses searching tools.
3
MMC/SD Card slot: Insert MMC/SD and high-detail mapping cards here.
SOFT KEYS: Controls commonly used features and functions. Only available on
4
8 & 10” units.
7
Page 9
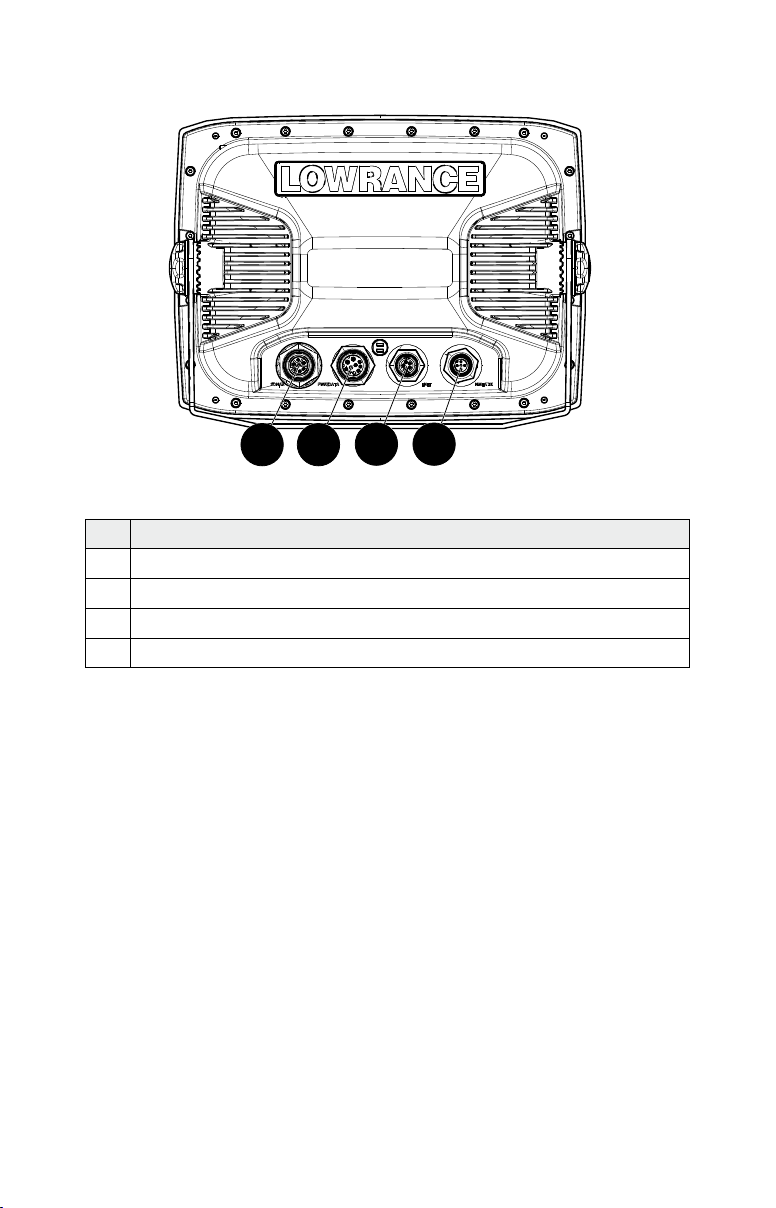
2
3 4
1
Key Description
1 Sonar (Not available on HDS5M, 7M, 8M or 10M units)
2 Power/Data
3 ENET (Ethernet)
4 NMEA2K (NMEA2000) Network
8
Page 10

Display Installation
Mounting location
Choose the mounting locations carefully before you drill or cut. The display should be
mounted so that the operator can easily use the controls and clearly see the display screen.
Be sure to leave a direct path for all of the cables. The display screen is high-contrast and antireective, and is viewable in direct sunlight, but for best results install the display out of direct
sunlight. The chosen location should have minimal glare from windows or bright objects.
Ensure that any holes cut are in a safe position and will not weaken the boat’s structure. If in
doubt, consult a qualied marine electronics installer.
The mounting location should be at least 100 mm (4”) away from the compass, at least 300
mm (12”) away from any radio transmitter and at least 1.2 m (4 ft) away from any antenna.
Before cutting a hole in a panel, make sure that there are no hidden electrical wires or other
parts behind the panel.
Do not mount any part where it could be used as a hand hold, where it might be submerged or
where it will interfere with the operation, launching or retrieving of the boat.
If bracket mounting, chose a at area where the display will not be subjected to excessive
vibration.
Leave sufcient clearance space behind the display to connect all relevant cables.
Good ventilation is required behind the mounting panel. Poor ventilation may cause the
display to overheat. The display is designed to operate in temperatures from -15° C to +55° C
(+5° F to +131° F).
For overall width and height requirements, please see the drawings at the back of this manual.
9
Page 11
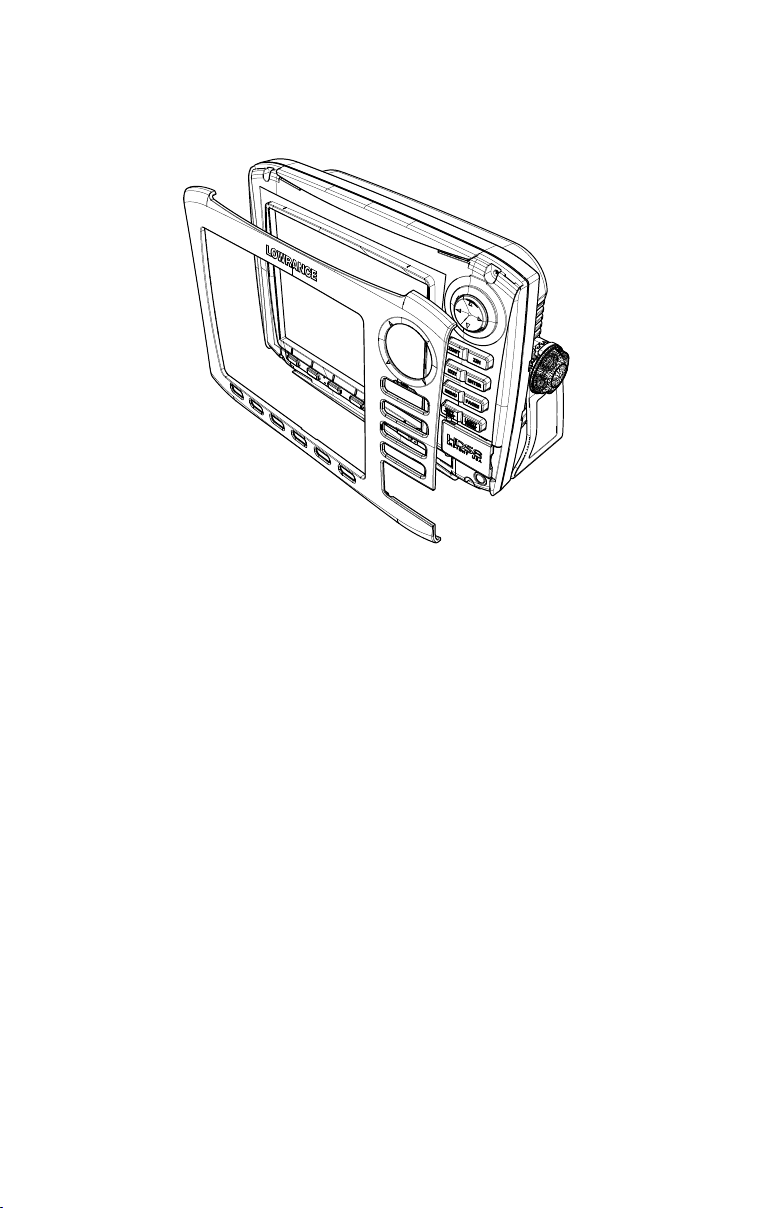
Bezel Removal
1: To removing the bezel from the 5 and 7-inch models the card slot door must be open
2: To remove the bezel use a at head screwdriver.
3: Insert screwdriver into the bezel release slots and pry out and away from the unit. The
bottom of the bezel will release from the unit. Push up to release the top bezel catches.
For 8 and 10-inch models
1: While pulling the lower left or right corner of the bezel toward the outside of the unit
2: Push up towards the top of the unit to release the top bezel catches.
Note: All models have four adhesive strips behind the bezel. These strips should be kept free
of dust and other foreign material when the bezel is not attached to the unit.
10
Page 12
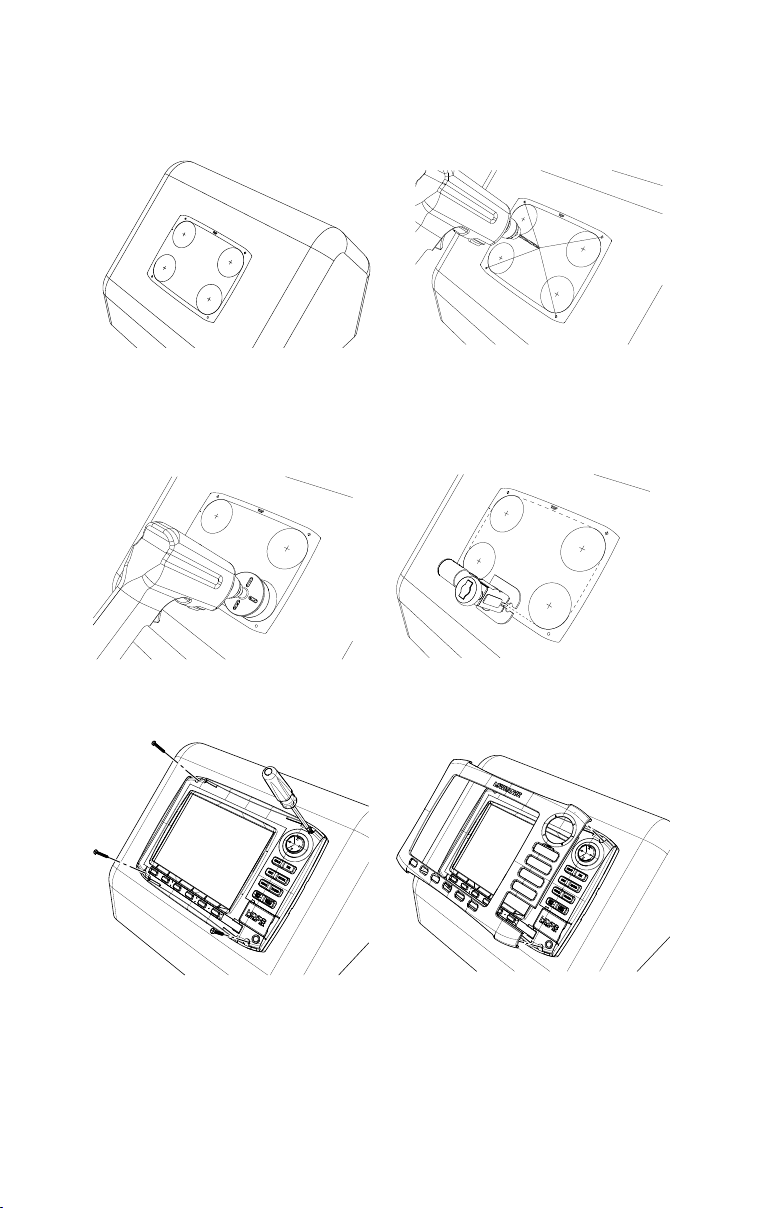
Panel Mount
1: Attach the ush mounting template
to the selected mounting position
using adhesive tape.
3: Use a hole saw to cut the four corner
radius
2: Drill pilot holes for the four hole saw
cuts and for the four self tapping
screws used to secure the display.
4: Cut along the dotted line and remove
the shaded area.
5: Connect all cables to the rear of
the unit before placing the unit
into the console. Secure using the four
provided #6-20 x 1-1/2” screws
6: To nish off the installation rmly
clip the front bezel in place
11
Page 13
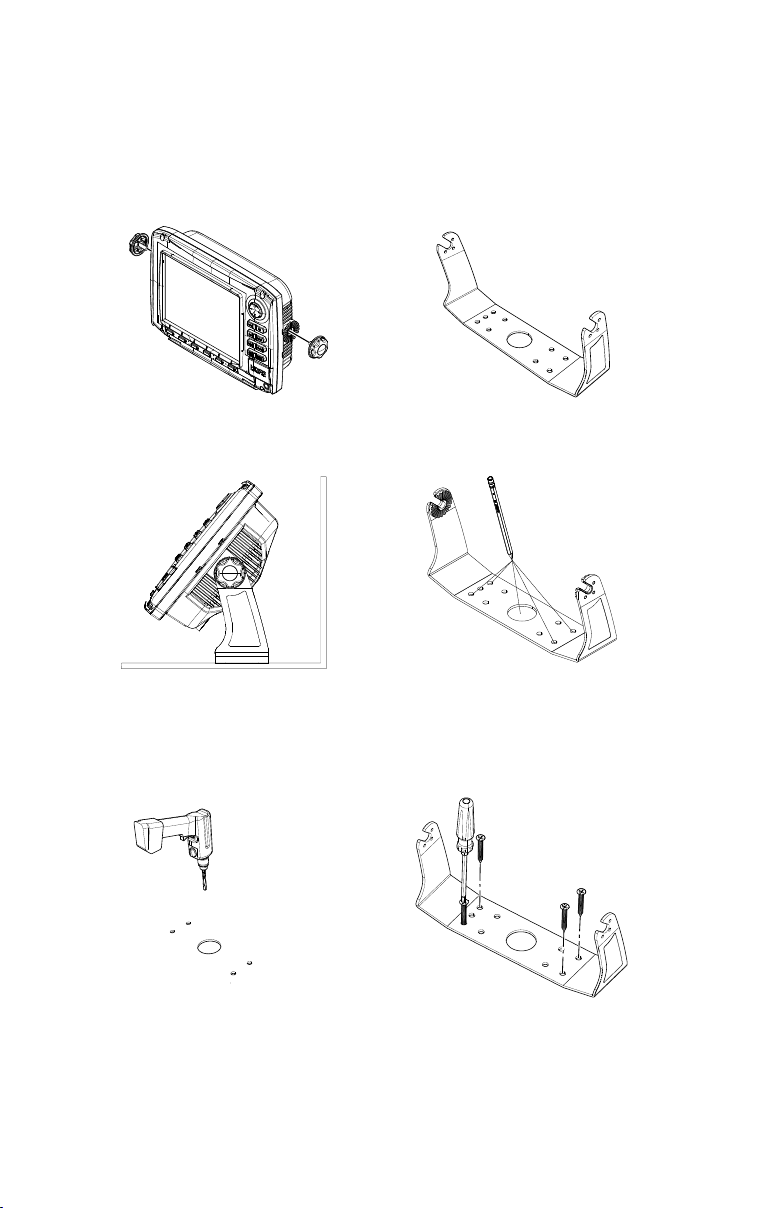
Bracket Mount
An alternative to ush mounting the HDS display is to bracket mount the unit. This method
has the advantage that the display can be easily removed when not in use and may be tilted to
achieve the best possible viewing angle.
1: Loosely screw securing knobs to the
Display unit.
3: Make sure the display can be
adjusted to the correct angle without
interfering with the surrounding.
Allow space for cables attached to
the rear of the unit
2: Temporarily mount the display unit
in the bracket
4: Remove the display unit and use the
mounting bracket as a template to
mark the four positions of the screw
holes and optional center cable hole.
5: Drill a pilot hole for the four screws
and an optional hole large enough
for the cables to emerge from.
6: Secure the bracket to the surface
7: Connect the cables.
12
Page 14
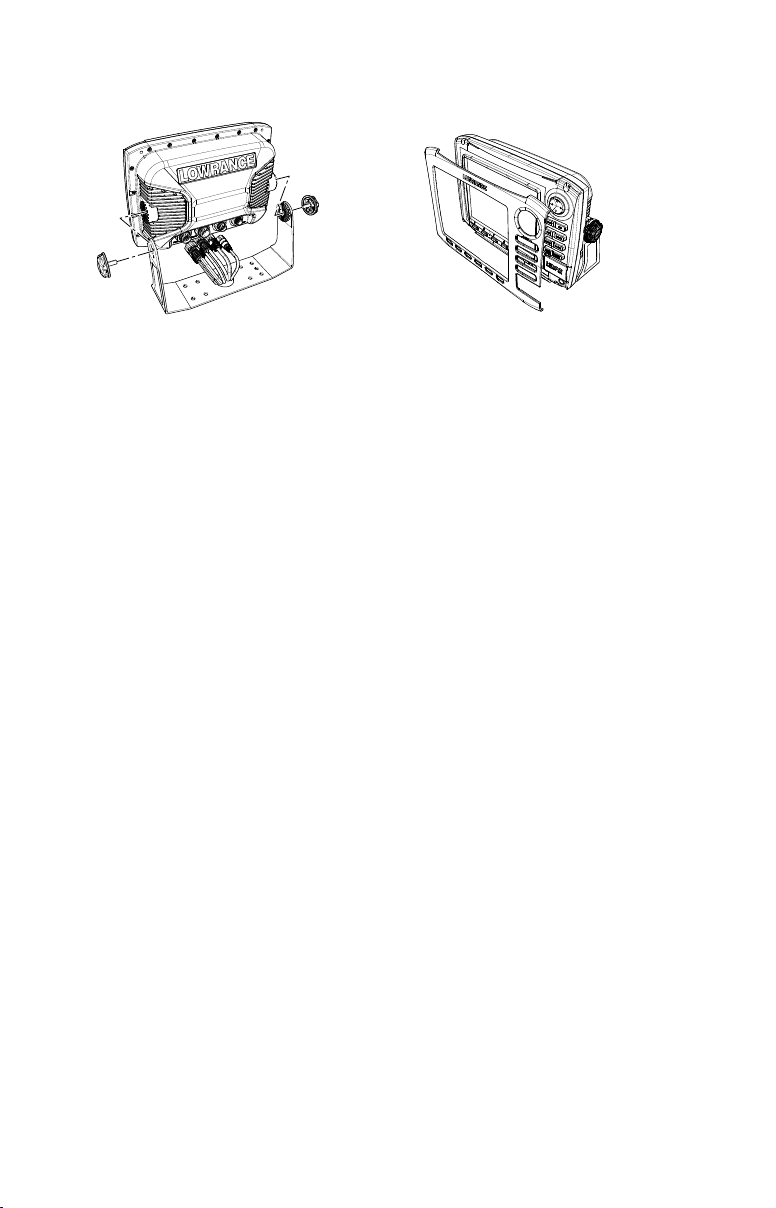
8: Slide the display into the mounting
bracket and secure in place with the
bracket knobs.
9: Attach the bezel. Firmly clip the
front bezel in place.
13
Page 15

Transducer Installation
Recommended Tools and Supplies
Tools and Supplies (not included)
If you plan to route the transducer cable through the transom, you will need either a 1” drill
bit or a 5/8” drill bit depending on the size of the transducer cable connector. Each transom
mount requires a high quality, marine grade above- or below-waterline sealant/adhesive
compound. The following installations also call for these recommended tools and supplies.
One-piece Bracket Transom Installation
Tools: two adjustable wrenches or socket wrench, drill, #29 (0.136”) drill bit, screwdriver.
Supplies: none.
Two-piece Bracket Transom Installation
Tools: two adjustable wrenches or socket wrench, drill, #20 (0.161”) drill bit, screwdriver.
Supplies: four, 1” long, #12 stainless steel wood screws.
TMB-S Bracket Trolling Motor Installation
Tools: two adjustable wrenches or socket wrench, screwdriver. Supplies: plastic cable ties.
Skimmer Transducer Shoot-through Hull Installation
Supplies: alcohol wipes, 60 and 160 grit sandpaper, and marine grade above- or below-
waterline epoxy adhesive.
Pod Transducer Shoot-through Hull Installation
Supplies: alcohol wipes, 60 and 160 grit sandpaper, and marine grade above- or below-
waterline epoxy adhesive.
14
Page 16
Skimmer Installation Instructions
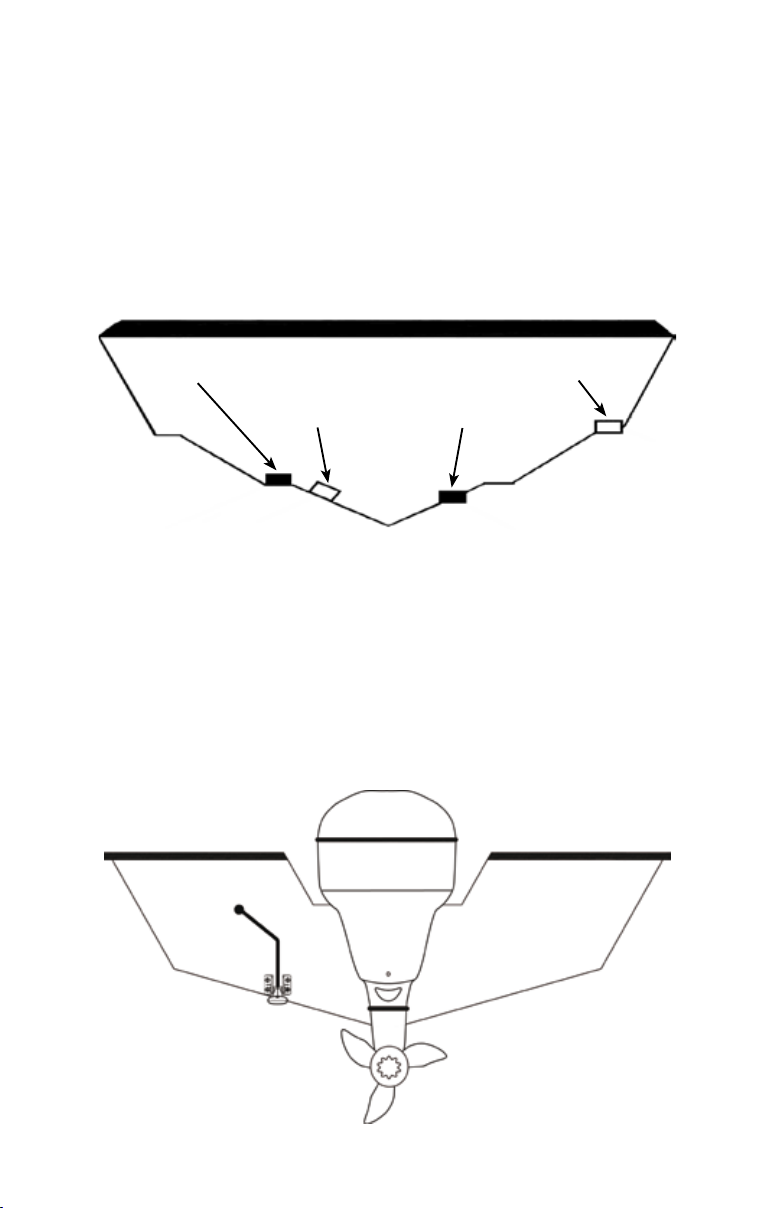
Transducer location and installation is one of the most critical steps in sonar installation.
Select a transducer location
To function properly the Skimmer transducer must be in the water at all times and in a
location that has a smooth ow of water when the boat is moving.
Good location
Poor location
Good location
Poor location
Note: Aluminum boats with strakes or ribs on the hull can create large amounts of
turbulence at higher speeds. A good transducer location on these types of boats is between the
ribs closest to the engine.
If the transducer is not placed in a smooth ow of water, interference caused by bubbles and
turbulence may show on-screen in the form of random lines or dots. The unit also could lose
bottom signal when the boat is on plane.
Note: When mounting the transducer, make sure it does not interfere with the hauling of the
boat.
Do not mount the transducer
closer than approximately one
foot from the engine’s lower
unit. This will prevent cavitation
interference from the prop.
15
Page 17

Aligning Ratchets on Transducer bracket
Aligning ratchets on one-piece bracket:
The one-piece bracket assembly includes two black plastic ratchets. The ratchets are used to
align the transducer with the boat hull. Each ratchet has the letters A-E molded into it.
1: Insert the ratchets in the bracket with the
Ratchet
Bracket
letter "A" aligned with the dot stamped on the
outside of the transducer bracket, as shown in
the following series of diagrams.
Align dot and
letter "A".
2: Slide the transducer in the
bracket and temporarily
slide the bolt through the
transducer bracket, as
shown in the image at
right.
Transom
3: Hold the transducer assembly against the
transom. Look at the transducer from the
side.Try to adjust the transducer so its face
is parallel to the ground. If it does, then the
"A" position is correct.
If the transducer will not adjust with its face parallel to the ground, remove the transducer and
ratchets from the bracket. Reinsert the ratchets into the bracket, this time with the letter “B”
aligned with the dot stamped in the bracket.
Reassemble the transducer and bracket and place it against the transom. Again, check to see if
the transducer will adjust so its face is parallel with the ground. Repeat this process until the
transducers face will adjust so that it is parallel with the ground.
16
Page 18

Aligning ratchets on two-piece bracket
The two-piece bracket includes four black plastic ratchets. The ratchets are
used to align the transducer with the boat hull. Each ratchet has the letters A-F
molded into it.
If the transducer will not adjust with its face parallel to the ground.
1: Place two of the ratchets
in each side of the bracket
with the letter "A" aligned with
the alignment mark molded
Alignment mark
into each bracket.
2: Now place the other two
Bracket
ratchets on the transducer with
the letter "A" aligned in the
12 o'clock position on the
transducer stem.
3: Slide the transducer in the bracket
and temporarily slide the bolt through
the transducer bracket.
4: Hold the transducer assembly
against the transom. Look at
he transducer from the side. Try
to adjust the transducer so its
face is parallel to the ground.
If it does, then the
"A" position is correct.
Ratchet
Transom
5: Remove the transducer and ratchets
from the bracket. Reinsert the ratchets
into the bracket, this time with the
letter “B” aligned with the dot stamped
in the bracket. Reassemble the
transducer and bracket and place it against the transom. Again, check to see if the
transducer will adjust so its face is parallel with the ground. Repeat this process until the
transducers face will adjust so that it is parallel with the ground.
17
Page 19

Assembling the Transducer bracket
After determining the correct position for the ratchets, loosely assemble the transducer and
bracket assembly as shown in one of the two diagrams below.
One-piece bracket assembly
Metal washer
Lock nut
Rubber washers
Ratchets
Note:
Do not tighten the transducer bracket assembly until you have aligned the transducer
and bracket on the transom.
Two-piece bracket assembly
Ratchets
Bolt
Small at
washer
Metal washer
Bolt
Large at
washer
Lock nut
Thick rubber
washer
Note:
Do not tighten the transducer bracket assembly until you have aligned the transducer
and bracket on the transom.
18
Page 20

Aligning and Attaching the Transducer
Adjust the transducer so that its "face" is parallel with the ground and its center line is even
with the bottom of the boat hull.
Transducer bracket
mounted too low.
Transom Transom
Transducer bracket
mounted too high.
Bottom of hull.Bottom of hull.
Note: When mounting the transducer to the transom, there are two extremes you should
avoid, rst, do not let the edge of the mounting bracket extend below the bottom of the hull,
left image, above. Second, do not let the bottom of the transducer rise above the bottom of
the hull, right image, above.
The center line of the transducer
should be level with the bottom of
the boat hull and its "face" parallel
with the ground.
Transom
Transducer face
Do not over tighten
the transducer bracket
lock nut. If you do,
the transducer may not
"kick-up" if it strikes an
object in the water.
Bottom of hull.
For single frequency
transducers, with a
one-piece bracket,
assemble it with the
cable passing over the
bolt and through the
bracket, as shown here.
19
Page 21

1: Hold the transducer and bracket
assembly against the transom.
When the transducer and bracket
are properly aligned mark its
position on the hull.
2: Drill the mounting holes for the
transducer bracket. For the one piece bracket use a #29 bit (for
the #10 screws). For the two-piece
bracket use a #20 bit (for the #12
screws).
Note: Use the provided screws to secure the transducer assembly to the transom.
Be sure to use a below-waterline
marine grade sealant on all of the
transducer bracket screw holes.
When mounting a Skimmer
transducer to a boat with a veehull,
make sure the transducer center
line is aligned to the bottom of the
boat hull, as shown here.
Water line
Clamp the transducer cable to the
transom near the transducer. This
will help keep the cable secure.
If you drill a hole in the transom for
the transducer cable, make sure it
is located above the waterline. Seal
the hole with an above- or belowwaterline marine grade sealant.
20
Page 22

If you drill a hole in the transom for the transducer cable, make sure it is located above
the waterline. Seal the hole with an above or below waterline marine grade sealant. Route
the transducer cable to the sonar unit. Make sure to leave some slack in the cable near the
transducer.
Use caution when routing the transducer cable near other wiring and cables. If you need to
drill a hole in the transom to pass the connector through, the hole size will depend on the
connector on the end of the transducer’s cable.
Make a test run to determine the results
At times you may need to adjust the transducer higher or lower. The slots in the mounting
brackets allow you to loosen the screws and slide the transducer up or down.
Improper transducer
angles
Partial sonar
sh arches
Full sonar sh arch
If the sonar screen is displaying partial sh arches, as shown in the previous top two images,
the transducer could be at an improper angle. Check the transducer and make sure its face is
parallel with the bottom, as shown in the bottom example. If you frequently lose bottom signal
lock the transducer may be coming out of the water as the boat crosses waves or wakes.
Move the transducer a little lower in the water to see if that improves sonar performance.
When shing around underwater structure the transducer may be kicked up from object
strikes. If the transducer is being kicked up too often, try moving it a little higher for more
protection.
Transducer face parallel
with the bottom.
21
Page 23

TMB-S Trolling Motor Bracket Installation
Note: The TMB-S bracket is designed for one-piece bracket transducers only.
The TMB-S trolling motor bracket (Part No. 51-45) is an optional accessory and is available
through LEI Extras at www.lei-extras.com.
The TMB-S bracket is used to attach a one-piece bracket transducer to a trolling motor. If you
regularly sh in water with a lot of underwater structure, such as rocks, stumps and trees, you
may consider using a Pod transducer for trolling motor installation. Pod transducers cannot be
“kicked up” by underwater structure.
Internal tooth washer
Bolt
Using the components supplied with the TMB-S bracket (adjustable strap, internal tooth
washer and plastic bracket) attach it to the transducer as shown in the diagram above.
Adjustable strap
Plastic bracket
Lock nut
Flat washer
Route the transducer cable
along the trolling motor
shaft. Use plastic ties (not
included) to secure the
cable to the shaft.
Slide the adjustable strap through the plastic bracket as shown above, left, then slip the strap
around the trolling motor as shown in the image, at right. Position the transducer so its “face”
is pointing straight down when the trolling motor is in the water. Tighten the adjustable strap
securely to the trolling motor. Make sure there is enough slack in the transducer cable for the
trolling motor to turn freely.
22
Page 24

Skimmer Transducer Shoot-thru-hull Installation
Before attempting any installation on boats with otation material sandwiched within the hull,
consult the boat manufacturer. In a shoot-thru-hull installation the transducer is epoxied to the
inside of the boat hull.
WARNING: Do not remove any material from the inner hull. Careless grinding or cutting
on the hull could damage the integrity of the hull. Contact the boat dealer or manufacturer to
conrm hull specications.
Transducer
Transducer epoxied
to hull.
Epoxy
Hull
Note: The previous image shows a Skimmer transducer epoxied to a at, solid portion of the
boat hull near the transom. The circled image is a close-up view of the transducer epoxied to
the hull.
On vee hulls try to place the transducer
where the dead rise is 10° or less.
Note: While you can epoxy a Skimmer transducer to the inside of a boat hull, we
recommend using a Pod transducer for this type of installation. Use care when mounting a
transducer inside a boat hull. Once epoxied into position, the transducer can be very difcult
to remove.
23
Page 25

A transducer can not shoot through wood or metal hulls. Wood and metal hulls require either
a transom mount or "thru-hull" installation. For shoot-thru-hull applications many boat hulls
have a at keel pad that offers a good transducer mounting surface.
If you are using a Skimmer transducer versus a Pod transducer for this installation, make sure
the Skimmer transducer is oriented so the nose of the transducer is facing the bow (front) of
the boat. Also, if the transducer has a built in temp sensor, it will only show the temperature of
the hull, not the water temp.
Before you epoxy the transducer to the hull, make sure the area is clean, dry and free of oil or
grease. The surface of the hull must be at so the entire transducer face is in contact with the
hull. Also, make sure the cable is long enough to reach the sonar unit.
1: Sand face of
transducer
and bottom
of hull.
2.: Apply
epoxy to the
face of
transducer
and bottom
of hull.
3: Epoxy transducer to hull.
Epoxy
Hull
To bow
Apply pressure to hold the transducer in place while the epoxy sets. Be careful not to move
the transducer while the epoxy is setting. Allow the epoxy to set before moving the boat.
When nished, the face of the transducer should be parallel with the hull with a minimum
amount of epoxy between the hull and transducer. After the epoxy has set, route the transducer
cable to the sonar unit.
Sand both the inside surface of the hull,
where the transducer is to be epoxied,
and the face of the transducer.
Start with a rougher grit sandpaper, such
as 60 grit, and nish with a smoother
grit, such as 160 grit, sandpaper. Sand
the inside surface of the hull until it is
smooth to the touch.
The sanded area should be about 1-1/2
times the diameter of the transducer.
After sanding, clean the hull and face of
the transducer with an alcohol wipe to
remove any sandpaper grit and dust.
Apply a thin layer of epoxy (about
1-16" or 1.5 mm) on the face of the
transducer and the sanded area on the
hull. Make sure there are no air pockets
in the epoxy layers.
Press the transducer into the epoxy,
twisting and turning it to force any air
bubbles out from under the transducer
face. Stop pressing when it bottoms out
on the hull.
24
Page 26

Pod Transducer Installation Instructions
The following instructions explain how to install a Pod transducer inside a hull or on a trolling
motor. Read the following instructions carefully before attempting any installation. Use
extreme care when mounting a transducer inside a boat hull. Once epoxied into position, the
transducer can be very difcult to remove.
Note: Transducer location and installation is one of the most critical steps in sonar
installation.
Pod Transducer shoot-thru-hull installation
Before attempting any installation on boats with otation material sandwiched within the hull,
consult the boat manufacturer.
WARNING: Do not remove any material from the inner hull. Careless grinding or cutting
could damage the integrity of the hull. Contact the boat dealer or manufacturer to conrm hull
specications.
A transducer can not shoot through wood or metal hulls. Wood and metal hulls require either
a transom mount or “thru-hull” installation. For shoot-thru-hull applications many boat hulls
have a at keel pad that offers a good transducer mounting surface.
Transducer
Transducer epoxied to hull.
Epoxy
Hull
Note: The previous image shows a Pod transducer epoxied to a at, solid portion of the boat
hull near the transom. The transducer should be installed as close to the transom as possible,
close to the center line.
Before you epoxy the transducer to the hull, make sure the area is clean, dry and free of oil or
grease. The surface of the hull must be at so the entire transducer face is in contact with the
hull. Also, make sure the cable is long enough to reach the sonar unit before the transducer is
epoxied into place.
25
Page 27

On vee hulls try to place the transducer where
the deadrise is 10° or less.
1: Sand
face of
transducer
and bottom
of hull.
2: Apply
epoxy to
face of
transducer
and bottom
of hull.
Sand both the inside surface of the hull, where
the transducer is to be epoxied, and the face of
the transducer.
You may want to start with a rougher grit
sandpaper, such as 60 grit, and nish with a
smoother grit, such as 160 grit, sandpaper.
Sand the inside surface of the hull until it is
smooth to the touch.
The sanded area should be about 1-1/2 times
the diameter of the transducer. After sanding,
clean the hull and face of the transducer with
an alcohol wipe to remove any sandpaper grit
and dust.
Apply a thin layer of epoxy (about 1-16" or
1.5 mm) on the face of the transducer and the
sanded area on the hull. Make sure there are
no air pockets in the epoxy layers.
3: Epoxy transducer to hull.
Epoxy
Hull
Note: After the epoxy has set, route
the transducer cable to the sonar unit.
Press the transducer into the epoxy, twisting
and turning it to force any air bubbles out
from under the transducer face. Stop pressing
when it bottoms out on the hull.
Apply pressure to hold the transducer in place
while the epoxy sets. Be careful not to move
the transducer while the epoxy is setting.
Allow the epoxy to set before moving the
boat.
When nished, the face of the transducer
should be parallel with the hull with a
minimum amount of epoxy between the hull
and transducer.
26
Page 28

Pod Transducer Trolling Motor Installation
The top of the transducer is curved to t the contour of the trolling
motor.
You will need a hose clamp large enough to t over the
trolling motor. The hose clamp is NOT included with the Pod
transducer.
Before you attach the transducer to the trolling motor, make sure there is enough
slack in the transducer cable for the trolling motor to turn freely.
1: Slide the hose
clamp through the Pod
transducer brackets, as
shown below.
2: Slip the clamp around the trolling motor, as shown
below. Tighten the hose clamp securely to
the trolling motor.
Note: The transducer should be mounted ahead of the trolling motor n. Position the
transducer to so its face is pointing straight down when the trolling motor is in the water.
Cable ties Cable ties
Hose
clamp
Hose
clamp
Transducer
Route the transducer cable along the trolling motor shaft. Use plastic ties (not included) to
secure the cable to the shaft.
27
Page 29

System Architecture
This section explains how the HDS connects to other devices as part of a system. The
HDS has a highly scalable system architecture. A system can consist of a basic stand alone
shnder or chart plotter, or expand to a networked, multi-display system connected to a wide
range of accessories.
Networking, Data Interfacing
The HDS display can connect to other devices in the system by Ethernet, NMEA 2000 or
NMEA 0183.
Ethernet: (NETWORK Ports)
HDS uses an Ethernet network for the transfer of high bandwidth data between other HDS
displays and from network modules such as Radar and weather modules.
Each HDS display has an Ethernet network port.
Ethernet does not transfer navigation data such as position, heading etc. This is handled either
by NMEA 0183 or NMEA 2000. However navigation and display settings are synchronized
over Ethernet.
NMEA 2000
NMEA 2000 is an industry standard for marine communications for transfer of navigation
data such as wind, Position, AIS, etc between all NMEA 2000 devices on a network.
NMEA 2000 is lower bandwidth than the Ethernet network, but is 50 times faster than NMEA
0183
NMEA 0183
NMEA 0183 is a point to point connection using RS422 or RS232 protocol.
HDS5” & 7” displays have one NMEA 0183 port enabling them to output to one NMEA 0183
“Listener” and receive from one NMEA 0183 “Talker”, (RS422)
HDS8” & 10” displays have two NMEA 0183 ports enabling them to output to two NMEA
0183 “Listeners” and receive from two NMEA 0183 “Talkers” This can be congured to
either 1 x RS422 port or 2x RS232,
Note: The Baud rate setting for transmit and receive is xed for each port. ie. 38400 in,
38400 out.
28
Page 30

Wiring the HDS
Wiring Guidelines
Most installation problems are caused by shortcuts taken with system cables. When wiring the
HDS follow the guidelines below.
Don’t do this Do this
Don’t make sharp bends in the cables Do make drip and service loops
Don’t run cables in a way that allows water
to ow down into the connectors
Don’t route the data cables in areas adjacent
to radar, transmitter, or large current
carrying cables
Before starting the installation, be sure to turn electrical power off. If power is
left on or turned on during the installation, re, electrical shock, or other serious
injury may occur. Be sure that the voltage of the power supply is compatible
with the HDS display.
The HDS has a voltage rating of 10-19V DC.
The red wire should always be connected to (+) DC V using a fuse or thermal
breaker (10 Amp)
Do tie-wrap all cables to keep them secure
Do leave room at the back to install and
remove cables
29
Page 31

Power/Data Cable
12 V DC
Red (FUSE)
Black
Yellow
(Accessory Wake Up)
+
_
Yellow TX (+)
Data cable (5 wire)Power (3 wire)
NMEA0183 Wiring
RS-422 All HDS Units
Alternative NMEA0183 Wiring
RS-232 HDS 8 & HDS 10
Com 1
Power / Data cable
BLUE TX (-)
Orange (RX+)
Green (RX-)
Shield (ground)
Yellow (TX)
Com 1
Common
BLUE (TX)
Orange (RX)
Green (RX-)
Shield (ground)
Com 2
The power cable from each device contains a yellow wire. The yellow wire is the accessory
wake up line. Connect the yellow wires together. When the accessory wake up line is used to
connect units with the accessory wake up feature, you can power up certain connected devices
from one location, including StructureScan and expansion ports.
The Data cable wires are used for the NMEA 0183 and RS-422 hook up; also, RS-232 and
RS-422 for HDS-8 and HDS-10 models.
30
Page 32

NMEA 0183 Wiring Table
RS-422
HDS Device
Green RX (-) Transmit (-)
Orange RX (+) Transmit (+)
Shield (Ground) Ground
Yellow TX (+) Receive (+)
Blue TX (-) Receive (-)
RS-232 HDS-8 & 10 Only — (COM 1)
HDS Device
Yellow TX Receive
Orange RX Transmit
Shield (Ground) Ground
RS-232 HDS-8 & 10 Only — (COM 1)
HDS Device
Blue TX Receive
Green RX Transmit
Shield (Ground) Ground
NMEA 0183 wiring
HDS-5 & HDS-7 Data Cable
To exchange NMEA 0183 data, the HDS-5 and HDS-7 units have a NMEA 0183 version 2.0
(RS-422) communication port. Serial Communications Port one can be used to transmit or
receive NMEA format data. The ve wires for the serial communications ports (Data cable)
are combined with the Power cable to form the Power/Data cable.
HDS-8 & HDS-10 Data Cable
To exchange NMEA 0183 data, the HDS-8 and HDS-10 units have either one NMEA0183
version 2.0 (RS-422) communication port, or two NMEA 0183 (RS-232) communication
ports. The ve wires for the serial communications ports (Data cable) are combined with the
Power cable to form the Power/Data cable.
31
Page 33

NMEA 2000 wiring
All NMEA 2000 systems must consist of 12V power, two (2) 120 Ohm terminators (one on
each end of the network), T joiners and NMEA 2000 Devices.
Lowrance offers a NMEA 2000 starter kit (000-0124-69) that includes two (2) terminators,
two (2) T connectors, one (1) 2ft extension/drop cable, one (1) 15ft extension cable and one
(1) power node.
32
Page 34

Ethernet
1
5
4
3
2
The HDS system uses an Ethernet network to interconnect high bandwidth devices such as
other HDS displays, radar and sonar. Each HDS display has one network port with 5 pin
connector. Ethernet network has orange connectors that are retained by a bayonet type locking
collar.
If more than two network devices need to be connected, use the optional Network Expansion
Port (NEP). which will allow for the connection of up to ve ethernet devices or a
StructureScan module which will allow for the connection of up to three ethernet devices.
Ethernet connector
Pin Function
1 TX +
2 TX -
3 RX +
4 RX -
5 GND
The Ethernet connection carries sonar, Structurescan and radar data between two or more
displays. Sonar data (water,speed, depth and temperature) is bridged onto the Ethernet bus.
Sonar data is only bridged if network sonar is turned on. Below is an example of sonar data
being shared between two displays.
33
Page 35

HDS-8 & HDS-10 Data Bridging
Power / Data cable
Power / Data cable
NMEA 2K
NMEA 2K Network NMEA 2K Network
HDS HDS
NMEA 2K
Yellow TX (+)
NMEA0183 Talker NMEA0183 Listner
BLUE TX (-)
Orange (RX+)
Green (RX-)
Shield (ground)
Yellow TX (+)
BLUE TX (-)
Orange (RX+)
Green (RX-)
Shield (ground)
0183 0183
N2K N2K
A
B
C
Supported NMEA0183 sentences entering the system are bridged (converted) to NMEA2000
and distributed on the Lowrance backbone for all other displays to use.
Certain NMEA2000 PGNs (messages/sentences) are bridged across to NMEA0183 to be
available as an output from any HDS display.
Refer to the NMEA 0183 table in the back of this manual to view bridgable sentences.
34
Page 36

Single Station
10 - 17 V DC
Red (FUSE)
Black
Y
ellow
+
_
Blue
No Connect
Single station configuration possibilities
Supplied
with display
Optional
accessory
HDS Display
POWER
NMEA0183
Wake up wire
Used to turn on
accessories
Power/Data Cable
NMEA2000
OR
RADAR
StructureScan
LSS-1*
BR24 BroadBand Radar
Pulse Radar
LRA-1800 or LRA-2400
Sirius Weather Module
LWX-1
LNK/ACT
NMEA2000 Devices
LGC-4000 GPS Receiver
Temperature Sensor
Fluid Level Sensor
Fuel Flow Sensor
Pressure Sensor
Heading Sensor/Compass
Engine Interface
SonicHub Audio Server
LMF Gauges
VHF Radio
12v
* Radar interface box not included
with US version of BR24
RS-422
HDS Device
Green RX (-) Transmit (-)
Orange RX (+) Transmit (+)
Shield (ground) Ground
Yellow TX (+) Receive (+)
Blue TX (-) Receive (-)
RS-232 HDS-8/10 only
HDS Device
Orange RX Transmit
Shield (ground) Ground
Yellow TX Receive
Blue TX Receive
GroundShield (ground)
Com 1
Com 2
Green RX Transmit
HDS Device
Skimmer
transducer included
with most HDS
LOWRANCE StructureScan™
*To use more than one Ethernet
accessory you need either a LSS-1
StructureScan module or a NEP-2
Expansion port.
35
Page 37

Dual & Multi Station
NMEA0183
Power/Data Cable
RS-422
HDS Device
Green RX (-) Transmit (-)
Orange RX (+) Transmit (+)
Shield (ground) Ground
Yellow TX (+) Receive (+)
Blue TX (-) Receive (-)
RS-232 HDS-8/10 only
HDS Device
Orange RX Transmit
Shield (ground) Ground
Yellow TX Receive
Blue TX Receive
GroundShield (ground)
Com 1
Com 2
Green RX Transmit
HDS Device
Supplied
with display
Optional
accessory
Dual station configuration possibilities
OR
BR24 BroadBand Radar
Pulse Radar
LRA-1800 or LRA-2400
* Radar interface box not included
with US version of BR24
NMEA2000
12v
Sirius Weather
Module
LWX-1
StructureScan
LSS-1*
LNK/ACT
LOWRANCE StructureScan™
LNK/ACT
Network Expansion
Port
NEP-2
NMEA2000 Devices
LGC-4000 GPS Receiver
Temperature Sensor
Fluid Level Sensor
Fuel Flow Sensor
Pressure Sensor
Heading Sensor/Compass
Engine Interface
SonicHub Audio Server
LMF Gauges
VHF Radio
Network Expansion Port -2
36
Page 38

Connecting HD Radar
12 V DC ONLY
+
_
B
C
D
D
E
G
G
LL
J
KK
H
I
A
Ethernet
Scanner
HEADING In
F
Key Description
A
B
HDS Display.
LRA1800 &LRA2400 HD radar system for HDS. Includes parts C,D and E. 2kw &
4 kW Radome.
C
Scanner cable. 15 m (50 ft) An Optional 20 m (65ft) cable is available
D
HD Radar Processor
E
Ethernet cable RJ45 (male/male). Available in 2, 5 and 10 m, (6.5, 16.5 & 33 ft)
F
Ethernet Adapter cable. Yellow 5 pin (Male) to RJ45 (female) 2 m (6 ft). The HD
radar can be connected directly to HDS or via a Network Expansion Port (H).
G
HDS and Radar Power. Make sure a fuse is used. See radar installation manual for
radar fuse size
H
Optional NEP (Network Expansion port) (000-0132-031)
For Chart overlay or MARPA the following are required:
I
AT10HD Fast heading NMEA2000 to NMEA0183 converter. (24006694)
J
RC42 Compass (Heading)
K
SimNet to NMEA2000 adapter kit (000-0127-45)
L
NMEA 2000 Backbone
37
Page 39

Connecting BR24 Radar
+
_
D
F
F
J J
G
I I
H
A
E
B
C
D
Power
Scanner cable
SimNet
Network
Key Description
A HDS Display.
B BR24 BroadBand™ Radar system for HDS. Includes parts B, C and D (not included
in US) and E (2 m 6ft)
C Scanner cable. 10 m (33 ft) : Optional 20 m (65 ft) and 30 m (98 ft).
D RI10 Radar interface box (Used with MARPA) (Not included with US version)
E Ethernet cable. BR24 comes with a 2 m (6.5 ft) 5 pin cable and a RJ45 cable (US
F Power control bus: In this case BR24 is connected to Power Control Bus. BR24 is
G RC42 Compass
H LSS1 - StructureScan black box
I SimNet drop cable: (0.3 m 1ft, 2 m 6ft or 5 m 15ft ) The RI10 interface box and
J SimNet to NMEA2000 adapter kit (000-0127-45)
K NMEA2000 Backbone
only) The BR24 can be connected directly to HDS or via a Network Expansion Port
(G)
turned on when the HDS is powered on. Note the yellow wire must be connected to
either the power control bus or to 12 V DC supply)
HDS are connected to the NMEA2000 backbone. BR24 requires heading at 10 hz
to calculate MARPA
38
Page 40

Commissioning Check List
Commissioning your system will improve the functionality and operation of your unit.
The following pages will give you an overview of the minimum settings we recommend you
set up before you start operating your HDS.
Please refer to the HDS operations guide for more information on how to change these
settings.
Language
Select the language used on menus and dialog boxes. The default language is English.
Units
Select which unit type you would like the HDS to display data in.
Time
Change local time to offset differences in time zone and to select the way time and date will
be displayed.
Note: The time and date will automatically set itself via the internal GPS antenna upon
initial startup, or reset.
Data Source
An advanced feature that allows you to use data from a network data source or data from a
sensor connected to your unit.
If, for example, you do not want to use your unit’s internal GPS antenna, you could use an
external GPS antenna connected to an ethernet or NMEA 2000 network.
Sonar Setup
To ensure proper sonar operation you need to select the proper transducer from the sonar
installation menu. This helps the HDS determine what settings and features will be available
in order to properly work with your transducer. To do this press Menu-Menu-InstallationTransducer type- then select the appropriate transducer.
The HDS comes with either a 83/200kHz HST-WSBL, 50/200kHz HST-DFSBL, or if you
purchased a unit with no transducer select the appropriate one off of the drop down list.
The next step to ensure that your sonar is set up properly is to select the appropriate shing
mode for the depth of water you operate in and the type of shing that you are doing. These
shing modes set the HDS to use different ping speeds, bottom search ranges and color pallets
to optimize it for your type of shing.
39
Page 41

Selecting a Fishing Mode
Fishing modes enhance the performance of your unit by providing preset packages of sonar
settings geared to specic shing conditions.
To select a shing mode: Press Menu twice. Select Sonar and press enter. Highlight Fishing
Mode and press enter. Select the desired shing mode and press enter.
Fishing Mode Depth Settings Palette
General Use ≤1,000 ft 50% Ping speed
Shallow Water ≤ 60 ft 75% Ping speed
Fresh Water ≤ 400 ft 50% Ping speed
Deep Water ≥ 1,000 ft 50% Ping speed Deep Blue
Slow Trolling ≤ 400 ft 50% Ping speed
Fast Trolling ≤ 400 ft Lower chart speed
Clear Water ≤ 400 ft 50% Ping speed
Brackish
Water
≤ 400 ft
Higher ASP;
Lower chart speed
Bottom brown/ blue
background
bottom brown/white
background
bottom brown/white
background
Bottom brown/white
background
Bottom brown/white
background
Bottom brown/white
background
Bottom brown/blue
background
Entering Letters in Text Boxes
This unit has some features and functions that may require you to enter data in a text box.
To enter data in a text box:
Highlight the text box and press ENTER. A keyboard will appear on the screen.
Use the keypad to highlight the rst character and press ENTER. Repeat this step until all
characters have been entered. Highlight OK and press enter.
Datum
A model of the earth’s surface based on a network of surveyed ground features (points). This
unit’s default datum is WGRS-84.
Coord System
Controls the coordinate system used when position coordinates are entered and displayed.
40
Page 42

Magnetic Variation
A B C
Converts magnetic north data to true north, increasing the accuracy of navigation information.
The Magnetic Variance Auto setting, automatically converts magnetic north to true north.
Note: When using manual mode, you will have to input the magnetic variance.
Satellites
Monitors the location of satellites in view and the quality of the unit’s satellite lock-on. The
Satellite page has two display options.
The Satellite screen displays a circular graphic that shows where satellites are located and a
bar graph that monitors the strength of satellites within range of your unit. Your unit is locked
on to satellites shown with blue bars.
Sonar
Depth offset
Is a value that can be entered to make the depth on the Sonar page represent either depth
below the transducer or depth below the surface.
The depth offset can be found via Menu, Settings, Sonar, Installation.
A: Depth below Keel value: Is the distance from transducer to the keel.
Enter a negative value.
B: Depth Below Transducer: no offset required.
C: Depth Below Surface (waterline) value: Is the distance from transducer to the surface.
Enter a positive value.
41
Page 43

Water speed off set
Water speed calibration is used to adjust the speed value from the paddle wheel to match
the actual speed. This can be measured either from the GPS speed over ground (SOG) or by
timing the boat over a known distance. Water speed calibration should be performed with as
little wind and current movement as possible.
Select Auto correct to match water speed to ground speed
Manual calculation. If in average the water speed reads 8.5 knots and SOG records 10 knots.
Increase the offset to 117%. The calculation is:
Difference in speed
Paddle wheel speed
If water speed is lower than SOG then increase the calibration value.
Default is 100 % with ability to calibrate to +/-20%.
x 100.
42
Page 44

Dimensional Drawings
184 mm (7.24")
145.4 mm (5.72")
151.8 mm (5.97")
30 mm (1.18") 58 mm (2.28")
56.9 mm (2.24")
HDS5
43
Page 45

HDS7
223 mm (8.78")
163.9 mm (6.45")
196.9 mm (7.75")
30.79 mm (1.21")
57.5 mm (2.26")
60 mm (2.36")
44
Page 46

HDS8
1
1
269 mm (10.59")
197.2 mm (7.76")
205.9 mm (8.11")
31.4 mm (1.24")
61 mm (2.4")
64 mm (2.52")
45
Page 47

HDS10
311.8 mm (12.28")
34.3 mm (1.35")
229.3 mm (9.03")
64 mm (2.52")
58 mm (2.28")
224.9 mm (8.85")
46
Page 48

NMEA Information
NMEA 2000 PGN List
NMEA 2000 PGN Transmit
126208 ISO Command Group Function
126992 System Time
126996 Product Info
127237 Heading/Track Control
127250 Vessel Heading
127258 Magnetic Variation
128259 Speed, Water referenced
128267 Water Depth
128275 DistanceLog
129025 Position, Rapid Update
129026 COG & SOG, Rapid Update
129029 GNSS Position Data
129283 Cross Track Error
129284 Navigation Data
129539 GNSS DOPs
129540 GNSS Sats in View
130074 Route and WP Service - WP List
- WP Name & Position
130306 Wind Data
130310 Environmental Parameters
130311 Environmental Parameters
130312 Temperature
130577 Direction Data
61184 Parameter Request/Command
130840 Data User Group Conguration
130845 Parameter Handle
130850 Event Command
65287 Congure Temperature IHDScts
65289 Trim Tab IHDSct Calibration
65290 Paddle Wheel Speed
Conguration
65292 Clear Fluid Level Warnings
65293 LGC-2000 Conguration
130818 Reprogram Data
130819 Request Reprogram
130828 Set Serial Number
130831 Suzuki Engine and Storage
Device Cong
130835 Set Engine And Tank
Conguration
130836 Fluid Level IHDSct
Conguration
130837 Fuel Flow Turbine Conguration
130839 Pressure IHDSct Conguration
130845 “Weather and Fish Prediction and
Barometric Pressure History”
130850 Evinrude Engine Warnings
47
Page 49

NMEA 2000 PGN Receive
59392 ISO Acknowledgement
59904 ISO Request
60928 ISO Address Claim
60928 ISO Address Claim
126208 ISO Command Group Function
126992 System Time
126996 Product Info
127237 Heading/Track Control
127245 Rudder
127250 Vessel Heading
127251 Rate of Turn
127257 Attitude
127258 Magnetic Variation
127488 Engine Parameters, Rapid Update
127489 Engine Parameters, Dynamic
127493 Transmission Parameters,
Dynamic
127505 Fluid Level
127508 Battery Status
128259 Speed, Water referenced
128267 Water Depth
128275 DistanceLog
129025 Position, Rapid Update
129026 COG & SOG, Rapid Update
129029 GNSS Position Data
129033 Time & Date
129038 AIS Class A Position Report
129039 AIS Class B Position Report
129040 AIS Class B Extended Position
Report
129283 Cross Track Error
129284 Navigation Data
129539 GNSS DOPs
129540 GNSS Sats in View
129794 AIS Class A Static and Voyage
Related Data
129801 AIS Addressed Safety Related
Message
129802 AIS Safety Related Broadcast
Message
129808 DSC Call Information
130074 Route and WP Service - WP List
WP Name & Position
130306 Wind Data
130310 Environmental Parameters
130311 Environmental Parameters
130312 Temperature
130313 Humidity
130314 Actual Pressure
130576 Small Craft Status
130577 Direction Data
61184 Parameter Request/Command
65323 Data User Group Request
65325 Reprogram Status
65341 Autopilot Mode
65480 Autopilot Mode
130840 Data User Group Conguration
130842 SimNet DSC Message
130845 Parameter Handle
130850 Event Command
130851 Event Reply
65285 Temperature with Instance
65292 Clear Fluid Level Warnings
65293 LGC-2000 Conguration
130817 Product Info
130820 Reprogram Status
130831 Suzuki Engine and Storage
Device Cong
130832 Fuel Used - High Resolution
130834 Engine and Tank Conguration
130835 Set Engine And Tank
Conguration
130838 Fluid Level Warning
130839 Pressure IHDSct Conguration
130843 Sonar Status, Frequency and DSP
Voltage
48
Page 50

Supported NMEA 0183 sentences
TX / RX GPS
Receive GGA GLL GSA GSV VTG ZDA
Transmit GGA GLL GSA GSV VTG ZDA
Navigation
Receive RMC
Transmit AAM APB BOD BWC BWR RMC RMB XTE
Echo
Receive DBT DPT MTW VLW VHW
Transmit DBT DPT MTW VLW VHW
Compass
Receive HDG HDT HDM
Transmit HDG
Wind
Receive MWV MWD
Transmit MWV
AIS / DSC
Receive DSC DSE VDM
Transmit TLL TTM These are only out put sentences
AIS sentences are not bridged
MARPA
49
Page 51

Page 52

Visit our website:
www.lowrance.com
*988-10043-001*
© Copyright 2011
All Rights Reserved
Navico Holding AS
 Loading...