

R1722 14 CHANNEL REMOTE CONTROL
FOR USE WITH R1710 MOTOR
programming instuctions
SET-UP AND OPERATION
technical data
BATTERY SPECIFICATION: Li-ion battery, 2000mAH, 7.4V.
MOTOR TORQUE/SPEED: 1.1Nm/25rpm
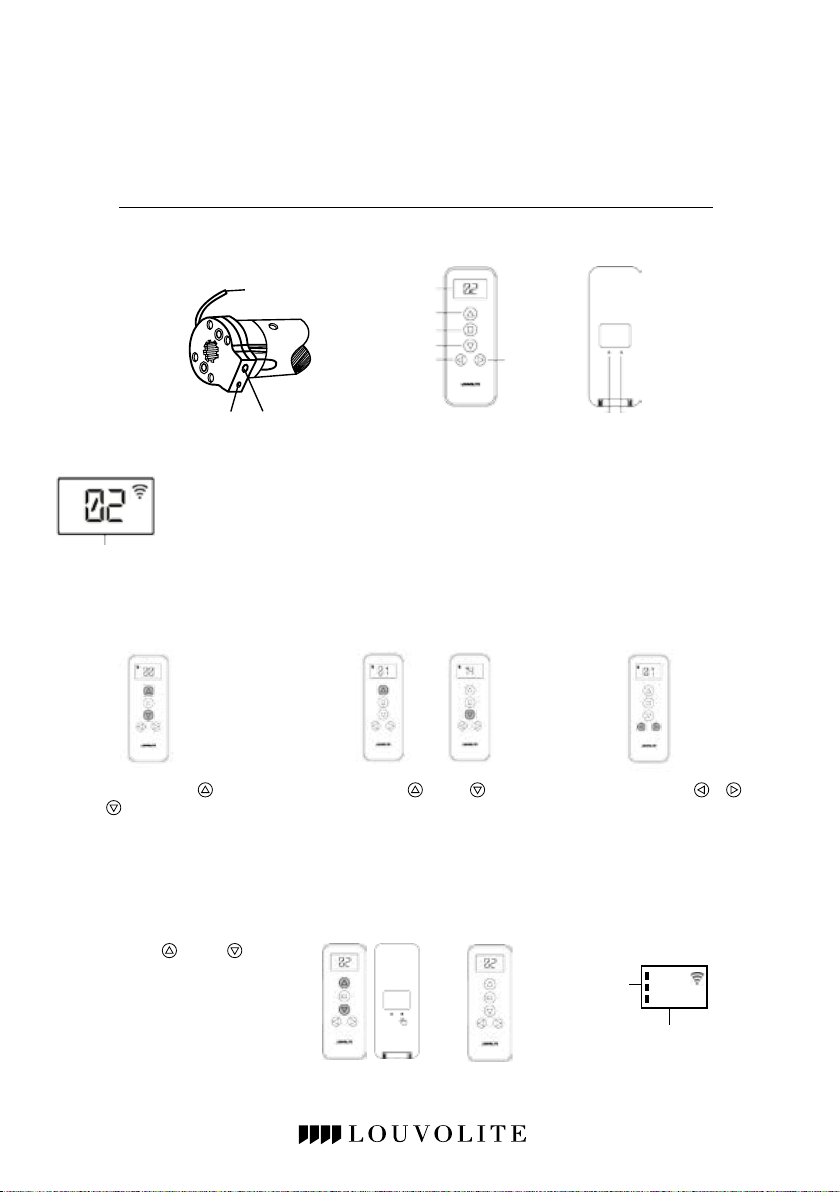
Antenna
LCD Screen
Up
Stop
Down
- Channel +
Channel
Charge port
LCD SCREEN ILLUSTRATION
Remote is for use for up to 14 blinds
Channel No.
SINGLE GROUP SETTING
To select Number of Channels (if less than 14)
1.
Press and hold both Up and
buttons for 3 seconds
Down
until 00 Channel displays.
Release the buttons and the 00
will start to ash.
SWITCHING BETWEEN SINGLE GROUP AND MULTI-GROUP
Press and hold Up
button then press and hold LIMIT for
5 seconds. Group number will display
for Multi-Group.
& Down
Setting button (Red)
2.
Press the Up or Down button
to select the required number of
channels between (1-14).
Remote Transmitter Conrm Limit
3.
Press and hold or at
the same time for 3 seconds
to conrm selection.
Group No.
02
Channel No.
MULTI-GROUP SETTING
Two-Group Setting
Repeat steps 1 & 2 for Group 1 Channel Selection. Skip step 3.
4.
Press to enter second
group number of channels.
5.
Press the Up or Down
button to select the required
number of channels (between 1-14)
6.
If you only need 2 groups press and hold
and at the same time for 3 seconds to
conrm selection. To set 3 groups repeat steps
4 & 5 and then press and hold
same time for 3 seconds to conrm selection.
and at the
PLEASE NOTE:
This will display as (AL) on the remote handset.
The group channel will be recorded on the motor automatically
when the single channel has been programmed on the motor
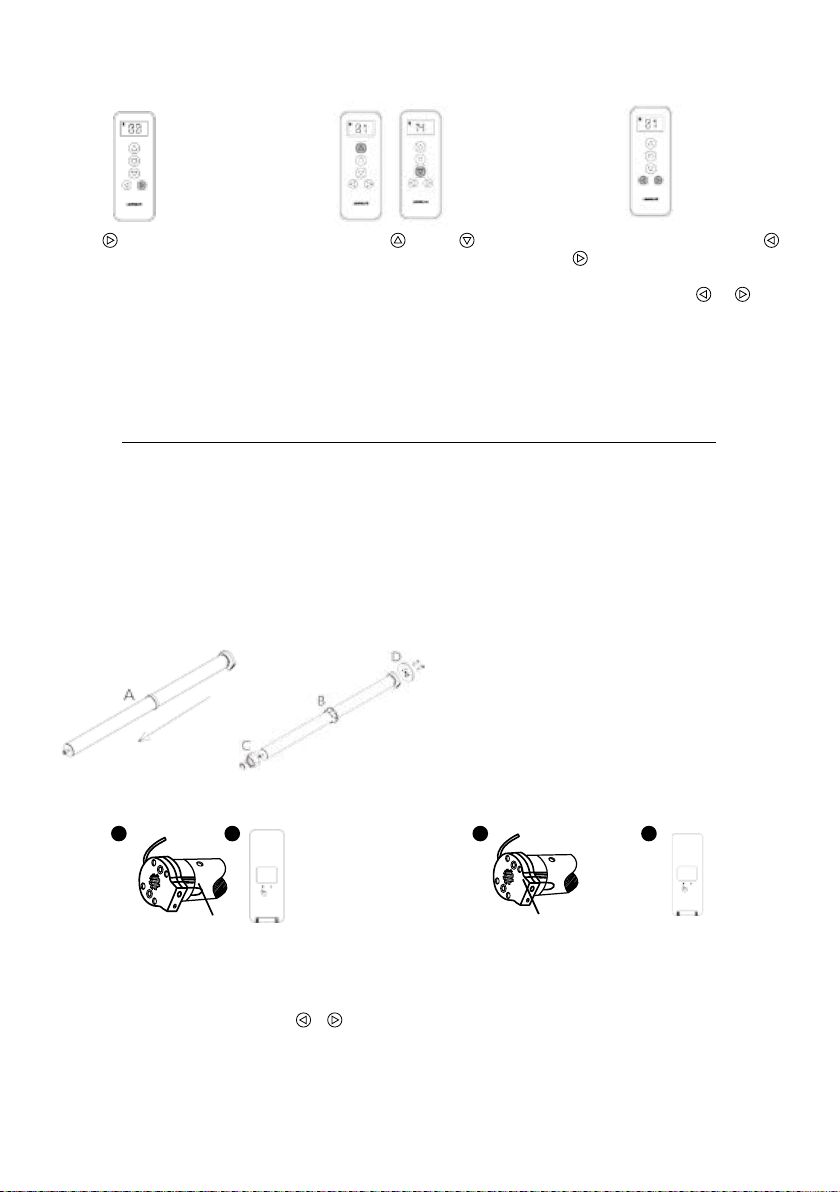
SETTING UP THE MOTOR
• The side of the motor mount with the SETTING button should face you.
• The motor antenna should be as straight as possible; otherwise the receiving distance will be reduced.
• Charging - The motor works with a Li-ion battery, please charge when the motor stops working
using the charger. Charging time with the charger is 5 to 6 hours. Please do not leave the motor on permanent charge as this will
reduce battery performance.
NOTE: On receiving the motor we recommend fully charging.
MOTOR ASSEMBLY
A. Remove grease protector ring by opening
sliding off the motor body
B. Fit crown by opening the split ring and
motor body until it meets
C. Fit the drive using the cir-clip to secure in
D. Attached motor plate with the screws supplied
or right hand orientation as required.
11 2 2
Setting button (Red)
Primary
Setting button (Red)
or falters please charge the motor by
the motor head.
the split ring and
slide along the
position.
in either left hand
Secondary
PAIRING THE REMOTE WITH
THE MOTOR
1. Select the channel for the blind using the
2. Hold down the SETTING button on the motor
release the button.
3. Press the CONFIRM button within 10 seconds. The motor will jog 2 times
and the remote is now
paired with the motor.
or
button.
until it jogs 2 times and then
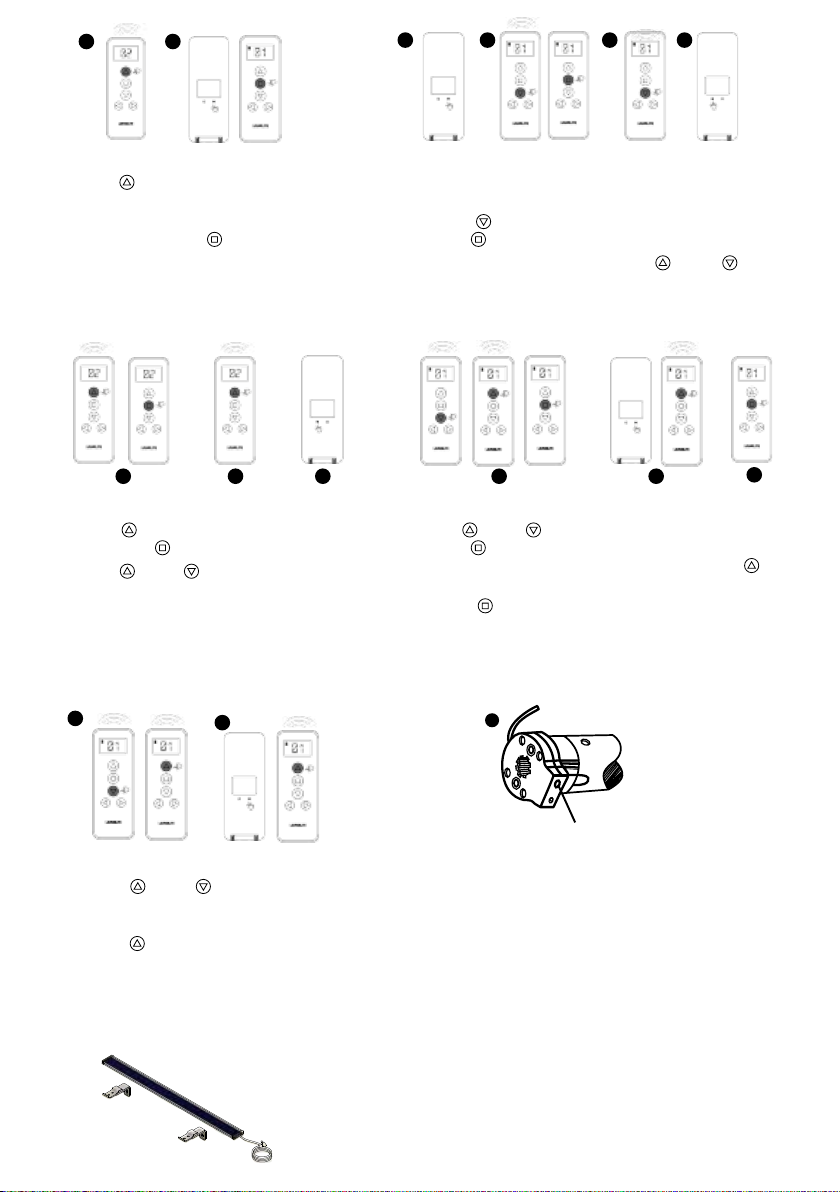
PAIRING AN ADDITIONAL REMOTE WITH THE
MOTOR
1. Hold down the SETTING button on
jogs 2 times and then release the button.
2. Press the CONFIRM button within 10 seconds.
motor will jog 2 times and
the motor.
the motor until it
The
the remote is now paired with
1 2
1 2 3 4
CHANGE MOTOR DIRECTION
1.
Press Up button on the remote, if the blind goes
up then the motor direction is okay.
To change the motor direction hold down the LIMIT
2.
button and then press Stop
button on the
transmitter, the motor will jog 2 times to indicate
the
direction has been changed.
remote
SET-UP LOWER LIMIT
1. Press and hold the Limit button on the remote
times and then release
the button.
2. Press Down button on the remote to move
press Stop
when desired
3. To set the lower limit more accurately press Up
and the motor will run in steps to set up the lower limit accurately.
4. Press CONFIRM button on the remote and
times, the lower limit is set.
5 6 7
SET-UP UPPER LIMIT
5. Press Up
button on the remote to move the blind up
and press Stop when desired upperlimit is reached.
6. Press Up or Down button and the motor will run in
steps to set the upper limit accurately.
Press Conrm button on the remote and the motor will jog
7.
SET-UP MID-POINT LIMIT
Press Up or Down button on the remote to move the blind and
8.
press Stop when desired mid-point limit is reached.
Press and hold the Limit button rst then whilst holding Limit press Up
9.
button on the remote until the motor jogs 2 times. Mid-point is now set.
10. Press Stop to move the blind to Mid-point position.
8 9
2 times, the upper limit is set.
PLEASE NOTE:
The group channel will be recorded on the motor automatically when the single channel
motor. Cycle through the channels until all the lights are lit to access the group channel on the remote.
11
12
1
until the motor jogs 4
the blind down and
lower limit
is reached.
the
has been programmed on the
or Down
motor will jog 2
10
DELETE MID-POINT LIMIT
11. Press Up
or Down button on the remote to send
blind to upper or lower limit.
12. Press and hold Limit button rst then whilst holding Limit
press Up
on the remote until the motor jogs.
Mid-point is now deleted.
FAQ: IF THE MOTOR DOES NOT WORK
• Please charge the motor battery rst.
• If the motor does not stop at the required point, then the stops must be reset.
ATTACHING THE SOLAR PANEL
• Make sure the motor has enough charge
• Attach the solar panel to the charge port
charge cable.
• Place/ x the solar panel so that it is facing
Setting button (Red)
DELETE ORIGINAL HANDSET ON MOTOR
1. Press and hold Setting button on the motor mount
and the motor will jog (4 times in one motion) and
then release the button.
to operate the blind.
on the motor using the 1.4m
direct sunlight.

Oct 2017
 Loading...