

Page 1

MS-1
®
6955 VALJEAN AVE, VAN NUYS, CA 91406
PH: (818)994-6498 / FAX: (818)994-6458
/ www.louroe.com[email protected]
INSTALLATION AND OPERATING INSTRUCTIONS
DESCRIPTION
The MS-1 Mute Switch is an accessory to Louroe Audio Monitoring/Audio Surveillance Systems when microphone
muting is required. The MS-1 contains a built-in rocker switch mounted to a single gang stainless steel face plate. This
is to mute or disable the audio feed to a base station or other receiving and recording devices. It prevents the operator
from listening in to the microphone when it is not needed, The MS-1 fits into a single gang backbox (not included) for
mounting to a wall or flat surface.
MUTE SWITCH
MODEL MS-1
OPERATION
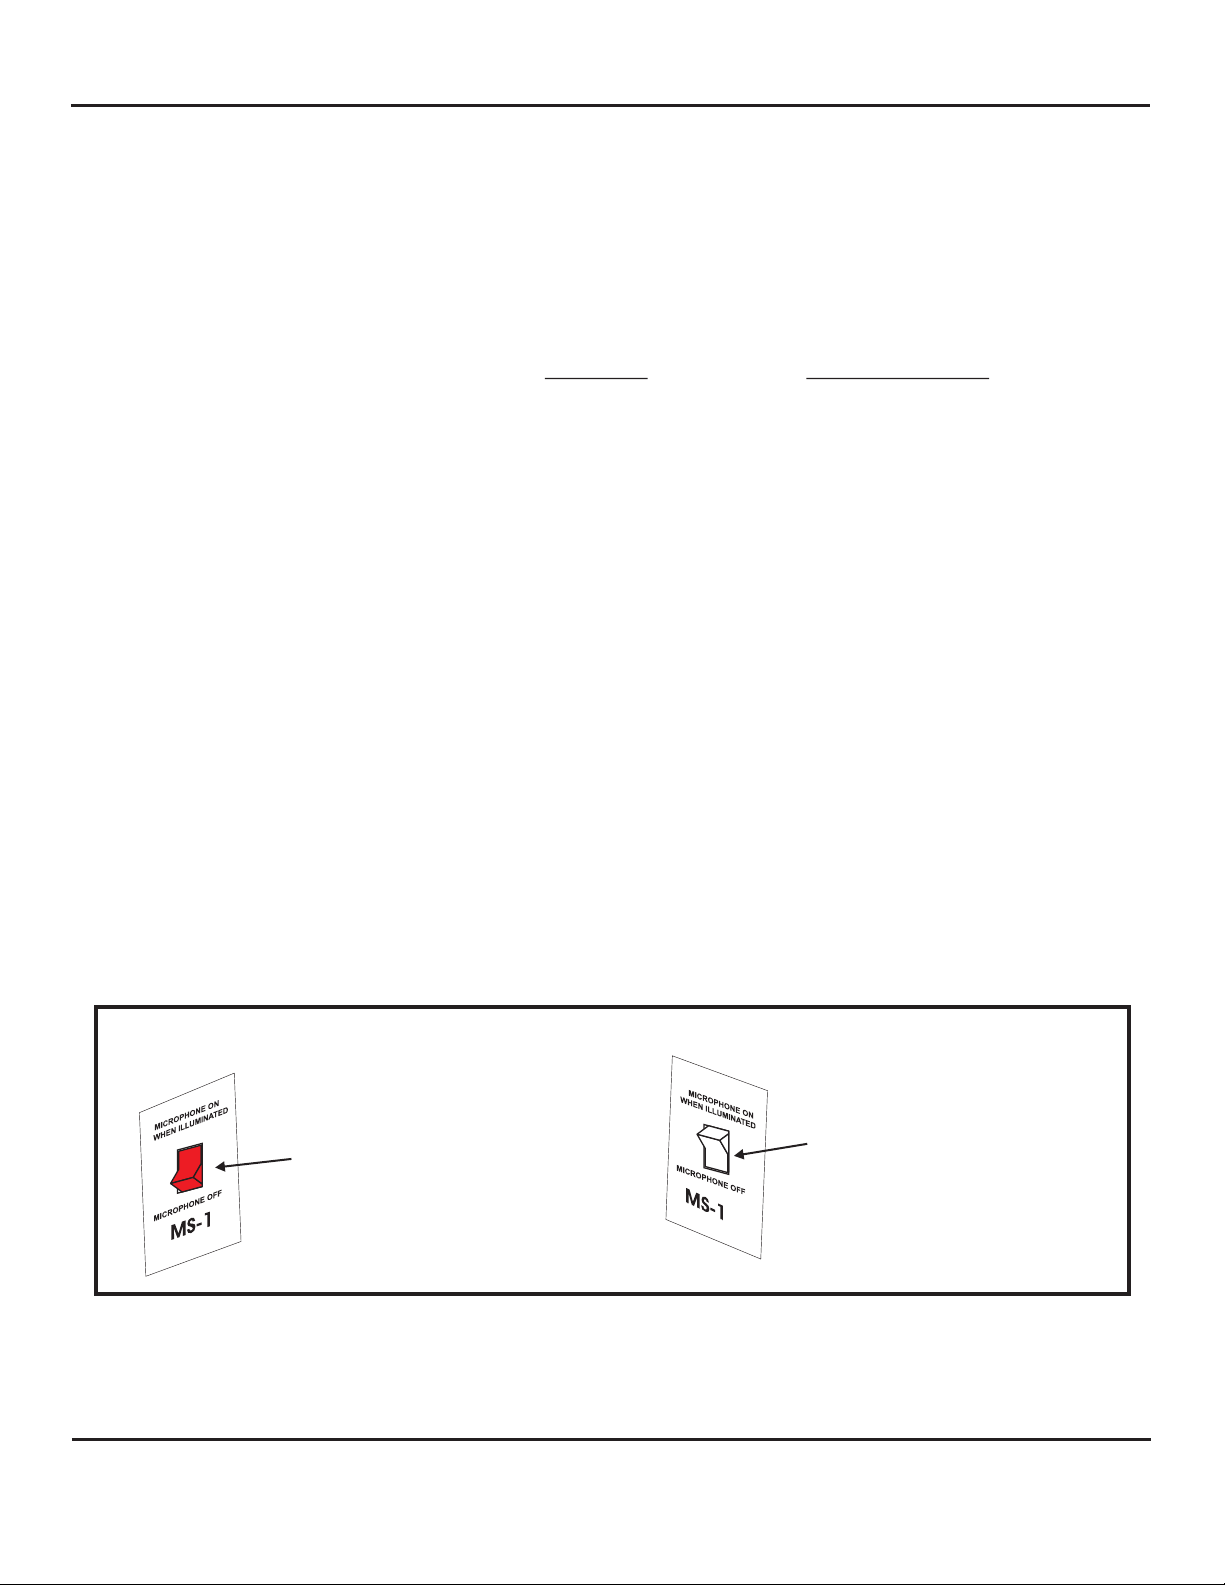
A rocker switch is mounted to a single gang stainless steel face plate. Top part of switch is marked MICROPHONE ON
WHEN ILLUMINATED. Lower part of switch is marked MICROPHONE OFF.
When the Top part of the rocker switch is pressed to MICROPHONE ON WHEN ILLUMINATED, the rocker switch
illuminates RED, indicating that the microphone is active and will pick up sounds within it’s range.
When Lower part of the rocker switch is pressed in to MICROPHONE OFF, illumination turns OFF, indicating that the
microphone is muted and no sound is produced.
WIRING REQUIREMENTS
2 Conductor shielded cable, 22
gauge with a 24 gauge drain wire
NOTE: Unshielded cable is not
satisfactory for audio systems
West Penn 452 or equivalent
LOUROE ELECTRONICS 6 9 5 5 VALJEAN AVENUE, VAN NUYS, CA 91406 TEL (818) 994-6498 FAX 994-6458
®
website: www.louroe.com e-mail: [email protected]
Page 1 of 8
(818)
ms_1_inst_3/15
Page 2

INSTALLATION AND OPERATING INSTRUCTIONS
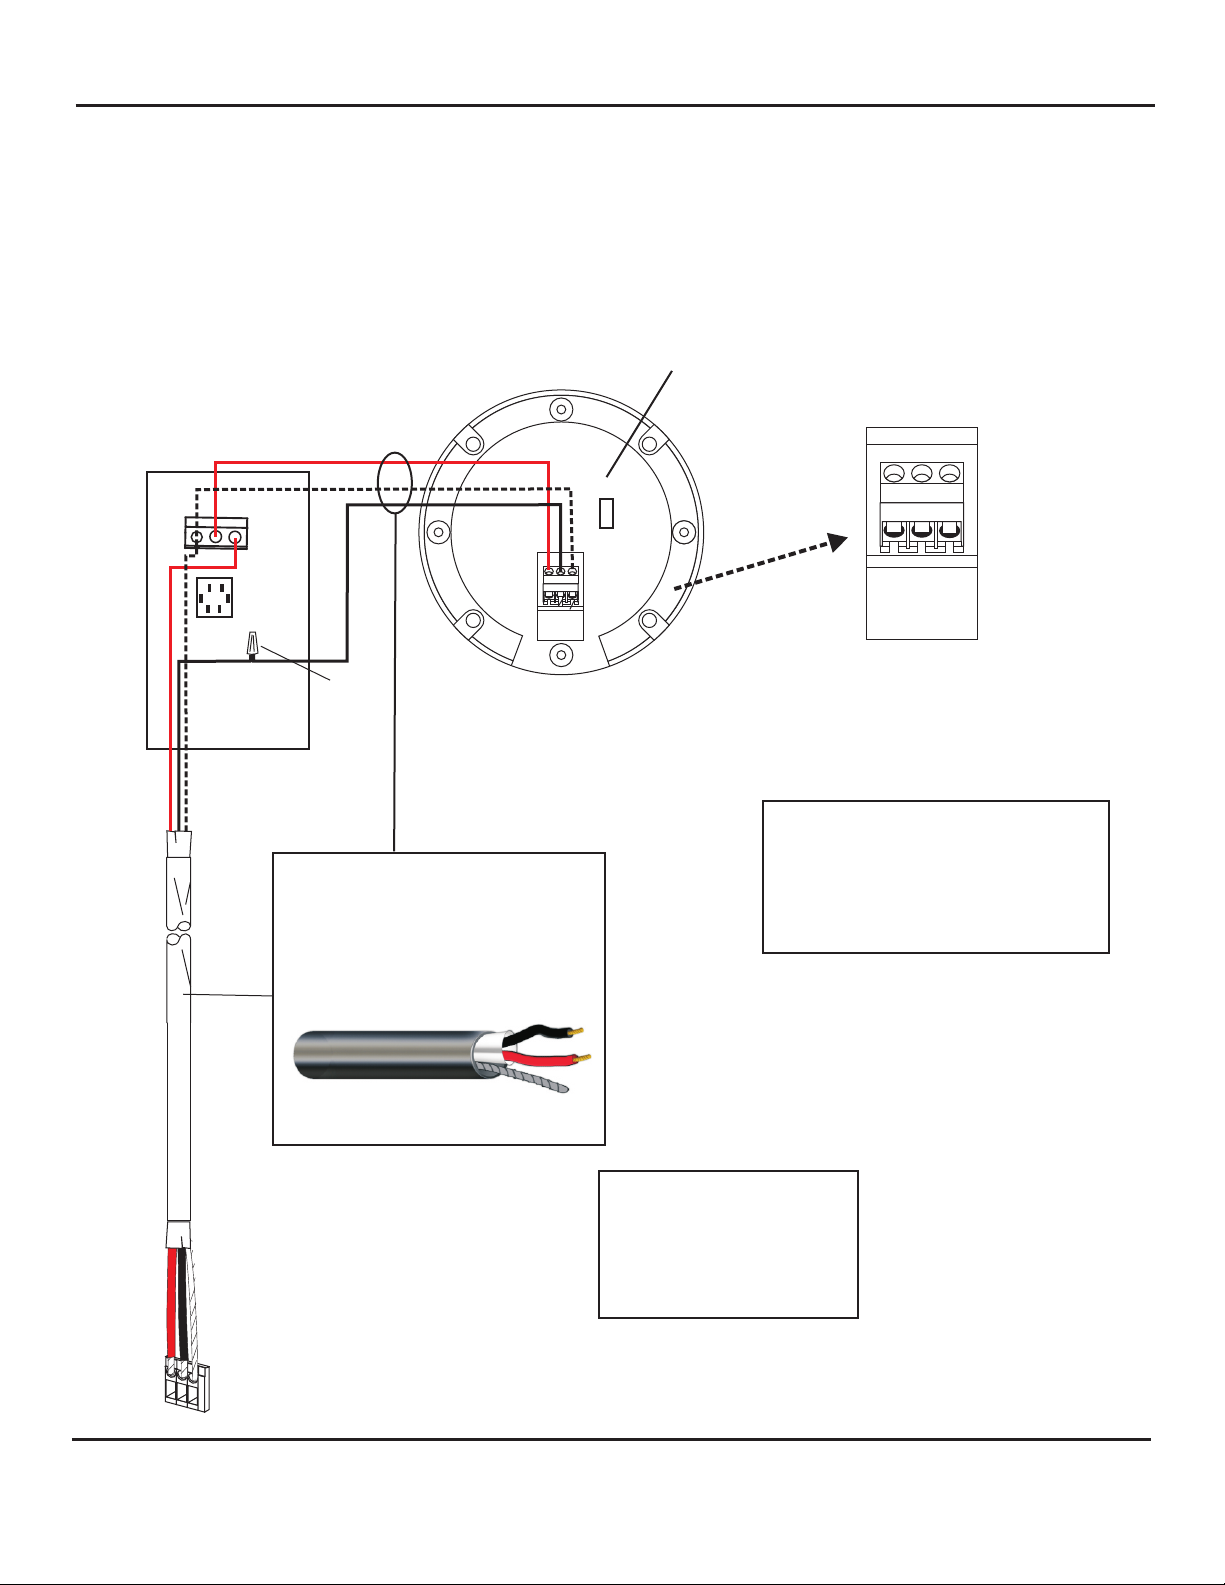
WIRING CONNECTION TO LOUROE BASE STATION OR AUDIO INTERFACE ADAPTER
On the back panel of Louroe Base Station or Audio Interface Adapter is a 3-pin terminal
block marked A, B, C.
A = 12Vdc
B = Audio Input
C = Ground
If using recommended or similar cable connect as follows:
1 Red wire connects to terminal A
2 Black wire connects to terminal B
3 Bare wire connects to terminal C
CONNECTION BETWEEN LOUROE BASE STATION OR AUDIO INTERFACE ADAPTER
AND LOUROE MODEL MS-1
The 3-pin terminal block of the Model MS-1 has been assigned with letters A, B, C (not shown on
actual board) for ease of installations.
1 Using recommended cable connect Red wire from terminal A of base station to terminal A of
MS-1
2 Connect Black wire from terminal B of base station to terminal B of microphone. Splice the
wires together using wire nut (see diagram on next page)
3 Connect Bare wire from terminal C of base station to terminal C of MS-1.
WIRING CONNECTION FROM LOUROE MODEL MS-1 TO MICROPHONE
Using another set of recommended cable (West Penn 452 or equivalent) connect as follows:
1 Connect terminal B of MS-1 to terminal A of microphone
2 Connect terminal C of MS-1 to terminal C of microphone.
3 Connect terminal B of the microphone to terminal B of base station or audio interface
adapter using wire nut (mentioned previously).
LOUROE ELECTRONICS 6 9 5 5 VALJEAN AVENUE, VAN NUYS, CA 91406 TEL (818) 994-6498 FAX 994-6458
®
website: www.louroe.com e-mail: [email protected]
Page 2 of 8
(818)
ms_1_inst_3/15
Page 3
INSTALLATION AND OPERATING INSTRUCTIONS
INTERCONNECTION DIAGRAM
FOR
MS-1 MUTE SWITCH,
LOUROE MICROPHONE
AND
LOUROE AUDIO BASE STATION OR
AUDIO INTERFACE ADAPTER
Gain adjust switch
(factory set)
A B C
B
C
A
MS-1
Mute Switch
WIRE NUT
WIRING REQUIREMENTS
2 Conductor shielded cable, 22
gauge with a 24 gauge drain wire
NOTE: Unshielded cable is not
satisfactory for audio systems
West Penn 452 or equivalent
A B C
N
L
VERIFA C T A
MICROPHONE
TERMINAL
BLOCK OF
VERIFACT A
MICROPHONE
All Louroe microphones
are compatible with the MS-1
Model Verifact A is shown
as an example
Refer to Louroe Base Station
or
Audio Interface Adapter
Installation and operating
instructions
Terminal Block of
www.louroe.com
Louroe Base Station
or
Audio Interface Adapter
A
B
C
LOUROE ELECTRONICS 6 9 5 5 VA L J E A N AVENUE, VAN NUYS, CA 91406 TEL (818) 994-6498 FAX 994-6458
®
website: www.louroe.com e-mail: [email protected]
Page 3 of 8
(818)
ms_1_inst_3/15
Page 4
INSTALLATION AND OPERATING INSTRUCTIONS
APPLYING POWER TO THE SYSTEM
After all wiring between the base station or audio interface, microphone and MS-1 Mute Switch is
complete, apply power with the power supply, (included) with the APR-1 Base Station or
audio interface.
1 First connect small end of 12Vdc Power Supply to the 12Vdc Power Jack[10], then plug
power block into a standard 120Vac wall outlet or power strip.
2 Turn “ON” power to APR-1 by rotating the Power-Volume Knob[1] clockwise. Adjust volume
of audio by rotating the knob either clockwise to increase or counterclockwise to decrease.
3 The APR-1 will power up both the remote microphone and the MS-1 Mute Switch
CONNECTING MICROPHONE DIRECTLY TO A RECORDER
The microphone maybe connected directly to a recorder without the use of an interface adapter or
base station
1. Connect +12Vdc power supply to terminals “A” and “C” of the MS-1. Connect +12 Vdc to
terminal “A” and -12Vdc or ground to terminal “C”.
2. Connect terminal “B” of MS-1 to terminal “A” of of microphone (shown in drawing).
3. Connect terminal “C” of MS-1 to terminal “C” of microphone.
4. Run 2 wires from the microphone to the recorder
a. Connect terminal “B” of microphone to the positive tip of the 3.5mm mono or
.RCA plug (this plugs to the recorder input)
b. Connect terminal “C” of microphone to the negative or ground of the 3.5mm mono
or RCA plug
Rocker Switch Positioning
When TOP part of switch is
pressed IN, switch will
illuminate indicating
RED
the microphone is live and
active.
LOUROE ELECTRONICS 6 9 5 5 VA L J E A N AVENUE, VAN NUYS, CA 91406 TEL (818) 994-6498 FAX 994-6458
®
website: www.louroe.com e-mail: [email protected]
Page 4 of 8
When LOWER part of
switch is pressed IN, light
turns off indicating power to
the microphone is OFF and
microphone is disabled
(818)
ms_1_inst_3/15
Page 5

INSTALLATION AND OPERATING INSTRUCTIONS
TESTING AND OPERATION OF SYSTEM
Make sure the Microphone is active. Top part of MS-1 switch must be pressed IN and the Red Rocker
Switch illuminated.
1. Create some sound (radio, someone speaking, etc) near the microphone. The sounds will
transmit to the APR-1’s built-in speaker[9] (see page 6). Adjust the volume of audio by
rotating the volume knob clockwise to increase, or counterclockwise to decrease.
2. To mute the system, press the lower part of the rocker switch IN. The lighted switch will go
dark, indicating power if OFF and the microphone is DISABLED.
3. Again create some sound. There should be no transmission of audio through the base
station (APR-1, etc).
4. If the microphone is directly connected to a recorder, turn ON the recorder to record the
audio from the microphone
RECORDING AUDIO AND AUDIO PLAYBACK
If live audio is to be recorded, connect an RCA patch cable to “Audio Out” of Louroe™ Base
Station[12] (see page 7) or audio interface adapter to “Audio In” of the recording device (DVR, VCR,
etc.)
AUDIO PLAYBACK
For receiving audio playback through the APR-1 Base Station, connect an RCA cable from “Audio
Out” of the DVR, VCR, etc. to “Audio In” [11] (see page 7) of the APR-1. Press the “Audio Playback”
Switch of the recording device, then press “Push for Playback” Switch [7] of the
APR-1 Base Station. Audio playback will be channeled through the APR-1 Speaker [9]
SPECIFICATIONS OF MS-1 MUTE SWITCH
Switch contact
Supply Voltage
Dimensions
Faceplate
Backbox Single gang electrical
Weight
Shipping Weight
9A @125Vac
12Vdc
2 ¾ W x " 4 ½" H
303 Stainless Steel
box (not included)
2.5 oz
1 lb
LOUROE ELECTRONICS 6 9 5 5 VA L J E A N AVENUE, VAN NUYS, CA 91406 TEL (818) 994-6498 FAX 994-6458
®
website: www.louroe.com e-mail: [email protected]
Page 5 of 8
(818)
ms_1_inst_3/15
Page 6

FRONT PANEL LAYOUT OF APR-1
INSTALLATION AND OPERATING INSTRUCTIONS
[9]
POWER-VOLUME
S
I
NGLE
L
OFF
E
[1]
2-8 HRS
O
U
L
EC
12-24 HRS
MAX
R
O
PLAYBACK
E
T
R
O
N
I
C
S
OVERLOAD
[3]
[4]
[5]
FILTER
[6]
Z
ONE
AUDIO
B
ASE
S
TATION
APR-1
PUSH FOR
PLAYBACK
[7]
[8]
[1] Power-Volume Turns “ON” power to the unit and controls the audio volume
through the Speaker[9].
[2] Filter OUT Indicator Lights (green) when the audio filter is not in use and the Filter Switch[6]
is in the “OUT” Position. Also indicates power to the unit.
[3] Filter IN Indicator Used to enhance audio playback from 24 hour time lapse recorders. Lights
(orange) when filter button is pushed in.This function is no longer available with this
product
[4] Playback IN Indicator Lights (yellow) when Push for Playback[7] is pushed in to “ON” position.
[2]
[5] Overload Indicator Flashes (red) when there is a short in the power supply.
[6] Filter Switch Normally used for audio playback from a time-lapse
recorder. No longer available with this product.
[7] Push for playback Used for DVR/VCR playback. May also be used to listen to audio from an
external source. Press switch to listen to playback. Switch must be “OUT”
or “OFF” when monitoring and recording, otherwise live audio is muted.
[8] Headphone Jack Used for private listening. Any 3.5mm stereo headphone with 8W to
600W impedance can be used.
[9] Speaker (3”) Provides live audio. Muted when a headphone is connected to
Headphone Jack [8].
LOUROE ELECTRONICS 6 9 5 5 VA L J E A N AVENUE, VAN NUYS, CA 91406 TEL (818) 994-6498 FAX 994-6458
®
website: www.louroe.com e-mail: [email protected]
Page 6 of 8
(818)
ms_1_inst_3/15
Page 7
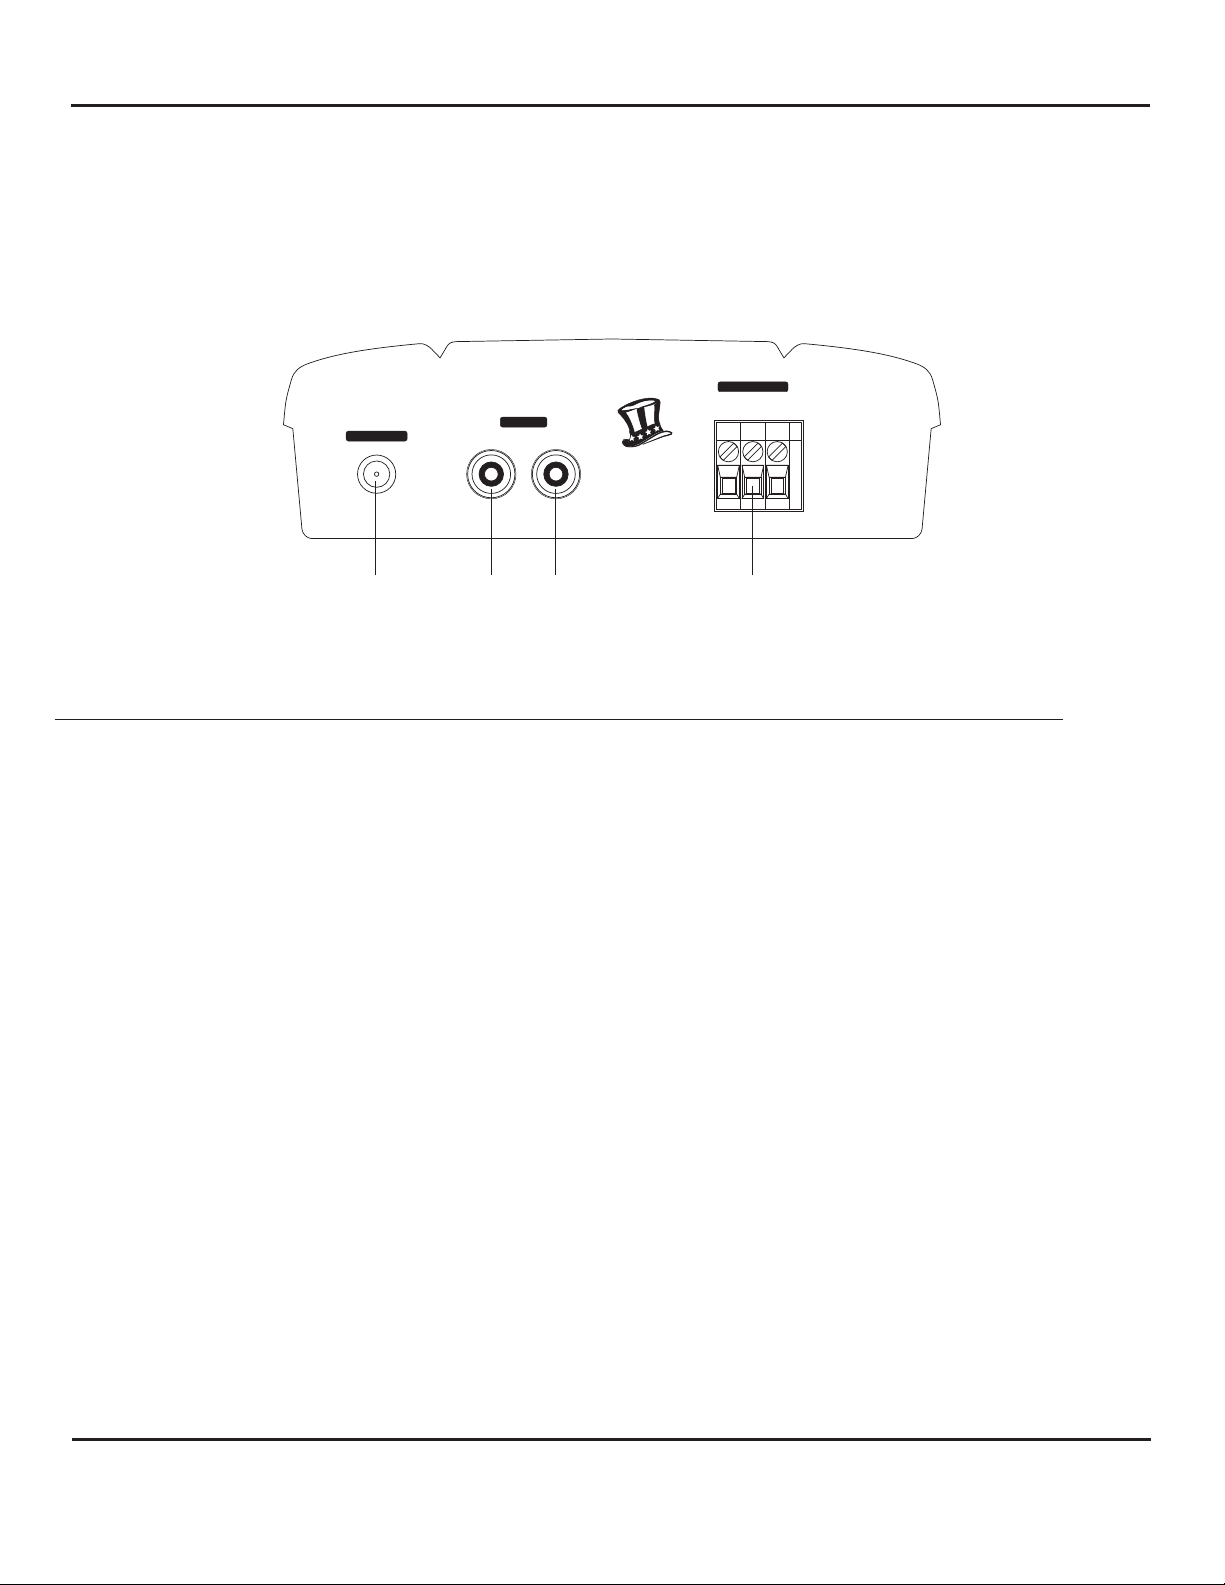
REAR PANEL LAYOUT OF APR-1
+12 Vdc INPUT OUTPUT
[10] [11] [12] [13]
INSTALLATION AND OPERATING INSTRUCTIONS
MIC INPUT
BA C
AUDIO
M
A
S
U
N
I
E
A
D
VAN NUYS, CA
[10] Power Jack Accepts 12Vdc power from Model AD-1 Power Supply
(included with APR-1 Audio Base Station). AD-1 has a 90° 2.1mm female plug.
[11] AUDIO IN Jack (RCA) Accepts audio playback from an external source (DVR/VCR).
Audio playback is produced through the speaker. The Push for Playback[7]
must be “IN” during audio playback and “OUT” when
not used for playback.
[12] AUDIO OUT Jack (RCA) Provides audio output and connection to a DVR, VCR, etc.
[13] Audio Terminal Block A 3-pin terminal block marked A, B, C.
Accepts wiring from the remote Louroe Microphone.
A is 12Vdc Power
B is Audio
C is Ground
LOUROE ELECTRONICS 6 9 5 5 VA L J E A N AVENUE, VAN NUYS, CA 91406 TEL (818) 994-6498 FAX 994-6458
®
(818)
website: www.louroe.com e-mail: [email protected]
Page 7 of 8
ms_1_inst_3/15
Page 8
INSTALLATION AND OPERATING INSTRUCTIONS
MANUFACTURED
IN THE
IMPORTANT NOTICE
When this equipment is used as part of an audio monitoring
system, the law requires that the public be given notice of
AUDIO MONITORING ON THE PREMISES. A decal notice
is included with each microphone shipped.
AUDIO
MONITORING
On
These Premises
®
Federal Law References:
Federal Regulations, US Code, Title 18. Crime and Criminal
Procedure, Sec 2510.
LOUROE ELECTRONICS warrants that at the time of shipment products manufactured by LOUROE ELECTRONICS to be free of defects in material and workmanship.
Should a defect appear within one year (12 months) from date of shipment, LOUROE ELECTRONICS will, at its sole discretion, repair or replace the defective equipment.
This equipment shall not be accepted for repair or return without prior notification by LOUROE ELECTRONICS .
This warranty does not extend to any Louroe product that has been subjected to improper or incorrect installation, misuse, accident, or in violation of installation
instructions provided by LOUROE ELECTRONICS.
Returned shipments to LOUROE ELECTRONICS shall be at customer’s expense. LOUROE ELECTRONICS will return the equipment prepaid via best way.
®
®
®
WARRANTY
®
®
®
LOUROE ELECTRONICS 6 9 5 5 VA L J E A N AVENUE, VAN NUYS, CA 91406 TEL (818) 994-6498 FAX 994-6458
®
(818)
website: www.louroe.com e-mail: [email protected]
Page 8 of 8
ms_1_inst_3/15
 Loading...