

Page 1
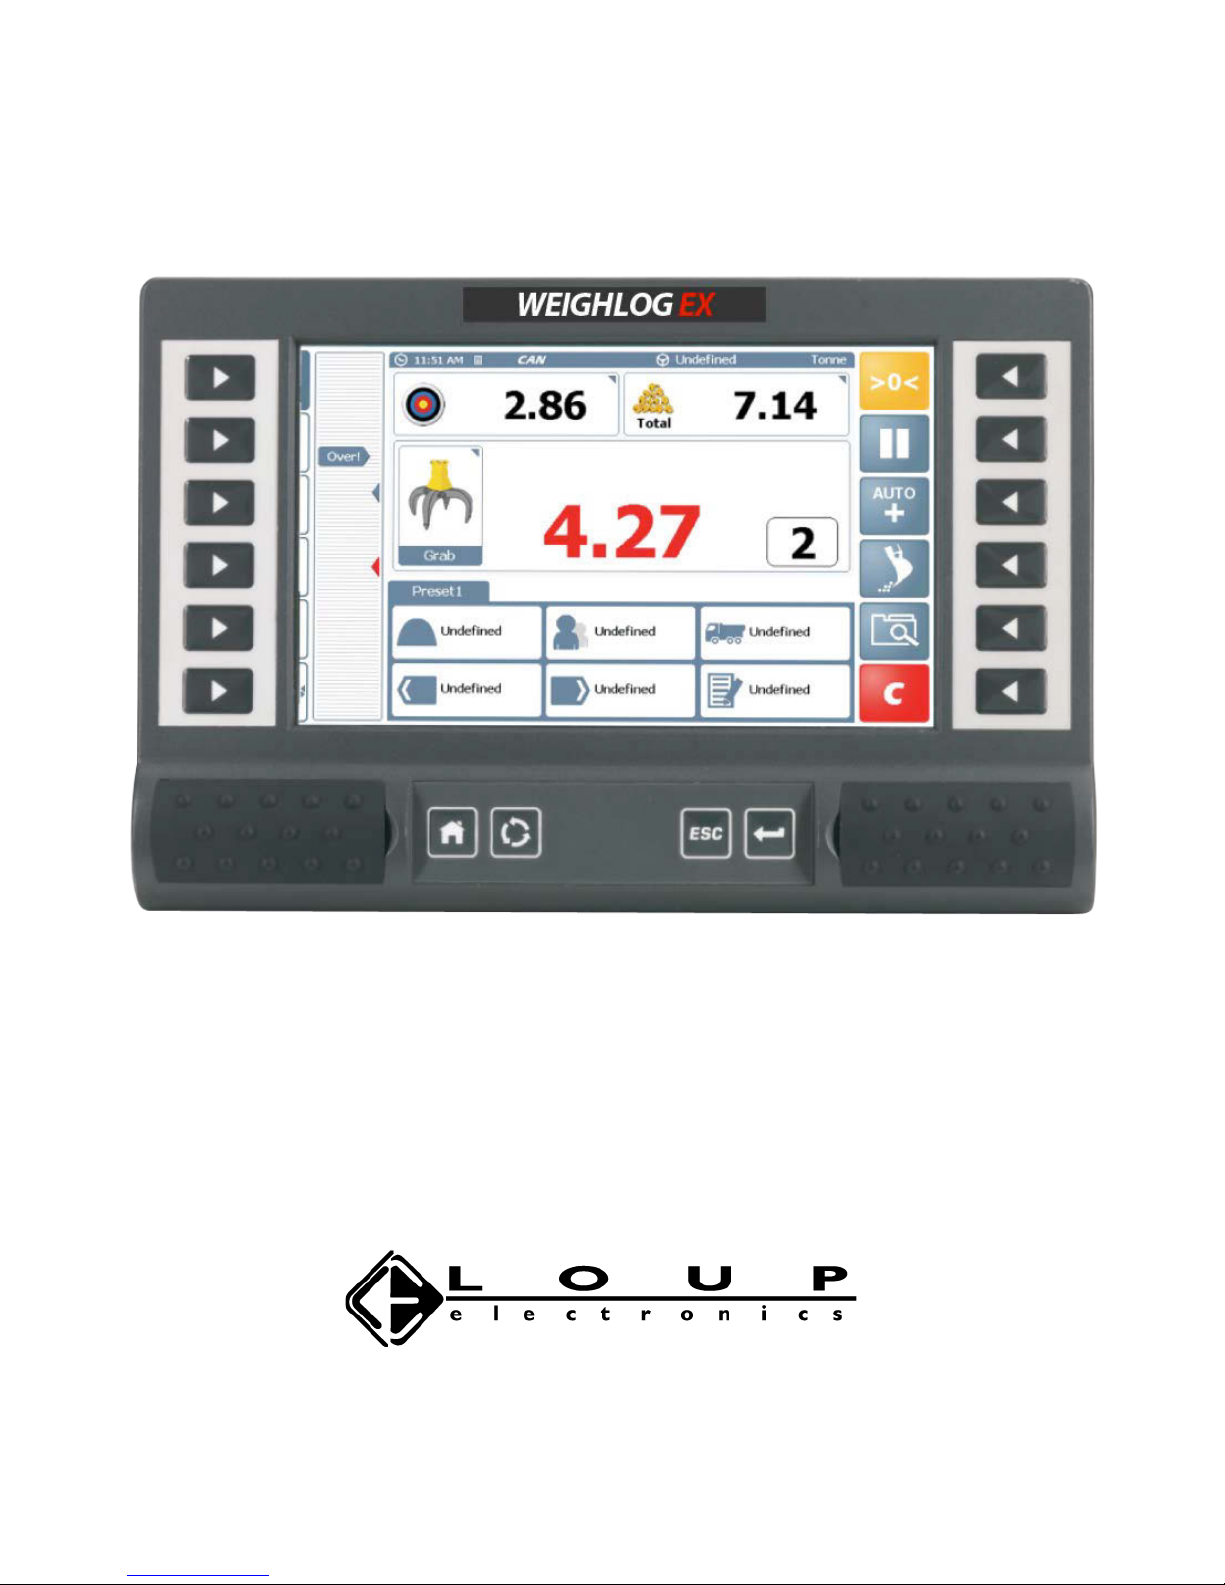
WEIGHLOG EX
OPERATION MANUAL
Page 2

WEIGHLOG(EX(*(OPERATION(
2
Service and Technical Support
Contact'Loup'Electronics
2960(N.(38th(Street(
Lincoln,(NE.(68504(
Phone:(402*464*7131(
Fax:(402*464*7104(
Toll(Free:(877*489*5687(
Web(Site:(www.loupelectronics.com(
E*Mail:([email protected](
Page 3

WEIGHLOG(EX(*(OPERATION(
3
Service and Technical Support ................................................................................................................................... Error!
Bookmark not defined.
(
Electromagnetic Compatibility (EMC) ........................................................................................................................ Error!
Bookmark not defined.
(
1
(
OVERVIEW ___________________________________________________________ 5
(
Main components .................................................................................................................................... 5(
Weighing modes ...................................................................................................................................... 6(
Features and Benefits .............................................................................................................................. 6(
1.1( Features and Controls ................................................................................................................................... 7(
Power On ................................................................................................................................................. 8(
1.2( The Home Screen .......................................................................................................................................... 9(
Basic functions only ................................................................................................................................. 9(
All functions enabled ............................................................................................................................... 9(
Chassis Angle Display ............................................................................................................................. 10(
The Status Bar .......................................................................................................................................... 10(
Touchscreen ............................................................................................................................................ 10(
2.
(
OPERATOR SETTINGS ________________________________________________ 11
(
2.1( Checklist ........................................................................................................................................................ 11(
2.2( Attachments ................................................................................................................................................... 11(
2.3( Set Zero ......................................................................................................................................................... 12(
2.4( Target Weight (Weight left to load) ............................................................................................................... 12(
2.5( Automatic or Manual Weight Entry Mode ..................................................................................................... 12(
2.6( Driver ID / Login ............................................................................................................................................ 13(
2.6.1( Edit / Print / Delete Driver ID / Password ..................................................................................... 13(
2.7( Reference Stores ........................................................................................................................................... 14(
2.7.1( Select / Search a Reference Store(s) .......................................................................................... 14(
2.7.2( Import / Export Reference Stores ................................................................................................ 14(
2.7.3( Enable the 'Haulier' Reference Store ........................................................................................... 15(
2.7.4( Enable the Blend ("Mix") Reference Store ................................................................................... 16(
2.7.5( Create / Edit a Blend ("Mix") Reference ....................................................................................... 16(
2.8( 'Jobs' List ........................................................................................................................................................ 17(
2.8.1( Manually selecting a Job from the Jobs List ............................................................................... 17(
2.8.2( Selecting a ‘Preset’ Job ............................................................................................................... 18(
2.8.3( Starting another Job before the current Job is cleared .............................................................. 18(
2.8.4( Automatic Job creation after the current Job is cleared ............................................................. 18(
2.8.5( Add a New Job ............................................................................................................................ 19(
2.8.6( Edit Preset Jobs / 'Jobs to Do' ..................................................................................................... 19(
2.8.7( Re-allocating a job to Preset 1 to 5 ............................................................................................. 20(
2.8.9( Add / Delete / Print Jobs ............................................................................................................. 20(
2.8.10( Import/Export Jobs List .............................................................................................................. 21(
2.9( Set Product Density / Price per Unit ............................................................................................................ 21(
2.10( Adjusting the Weighing Position .................................................................................................................. 22(
2.10.1( Weighing Height Adjustment via the SETUP screen ................................................................. 22(
2.10.2( Weighing Height Adjustment via a Remote weighing switch .................................................... 22
Page 4

WEIGHLOG(EX(*(OPERATION(
4
(
3
(
THE LOADING CYCLE _________________________________________________ 23
(
3.1( Machine Requirements ................................................................................................................................. 23(
3.2 ( Lifting Procedure ........................................................................................................................................... 23(
3.3 ( Dynamic Weighing Mode .............................................................................................................................. 24(
3.4( “Last Bucket” Weighing ................................................................................................................................ 25(
3.4.1( "Undo last Lift" (Dynamic / Static Weighing Mode) ..................................................................... 25(
3.4.2( "Reweigh the Remainder" (Dynamic / Static Weighing Mode) .................................................... 25(
3.4.3( Live Static "Tip-off" Mode ............................................................................................................. 25(
3.5( Static Weighing Mode ................................................................................................................................... 26(
3.6( Static Weighing - 'Constantly Live Static' Mode ........................................................................................... 27(
3.7 ( Split Loading (Trailers) .................................................................................................................................. 27(
3.8( Blend ('Mix') Weighing Mode ........................................................................................................................ 28(
3.9( Reset for next Job ......................................................................................................................................... 29(
3.10( Pause / Resume Weighing Mode .................................................................................................................. 29(
3.11( Reversing Camera Input ............................................................................................................................... 29(
4
(
'NUDGE' - ADJUSTING WEIGHT CALIBRATION __________________________ 30
(
4.1( General Weight Adjustment .......................................................................................................................... 30(
4.1.1( Adjustment by % .......................................................................................................................... 30(
4.2( Dipper Arm - Weight Adjustment .................................................................................................................. 31(
4.2.1( ‘Dipper In’ Adjustment ................................................................................................................. 31(
4.2.2( ‘Dipper Out’ Adjustment .............................................................................................................. 32(
5.
(
LOCATION SERVICES _________________________________________________ 32
(
5.1( Using Location Services ............................................................................................................................... 32(
5.2( Setting 'Destination' and 'Location' Co-ordinates ........................................................................................ 32(
5.3( GPS Product Recognition ............................................................................................................................. 33(
5.3.1( Set Product Co-ordinates and Radius ......................................................................................... 33(
6.
(
PRINTING, DATA LOGGING AND TRANSFER ____________________________ 34
(
6.1( Data Transfer Options ................................................................................................................................... 34(
6.1.1( Printer Output .............................................................................................................................. Error!
Bookmark not defined.
(
6.1.2( Data Output ................................................................................................................................. Error!
Bookmark not defined.
(
6.2 ( Reference Stores and Job Records ............................................................................................................. 35(
6.3( Job Records .................................................................................................................................................. 36(
6.3.1( Search Job Records .................................................................................................................... 36(
6.3.2( Print / Export Summary Report .................................................................................................... 37(
6.3.3( Print / Export / Delete Job Record(s) .......................................................................................... 37(
6.4( Totals ............................................................................................................................................................. 38(
6.4.1( Grand Total .................................................................................................................................. 38(
6.4.2( Driver Totals ................................................................................................................................. 38(
6.4.3( Reference Store Totals ................................................................................................................ 38(
Page 5
WEIGHLOG(EX(*(OPERATION(
5
1 Overview
The Weighlog Ex is a CAN-based system that measures, displays and records the net weight lifted, based on
sensing the lift system hydraulic pressure.
Main components
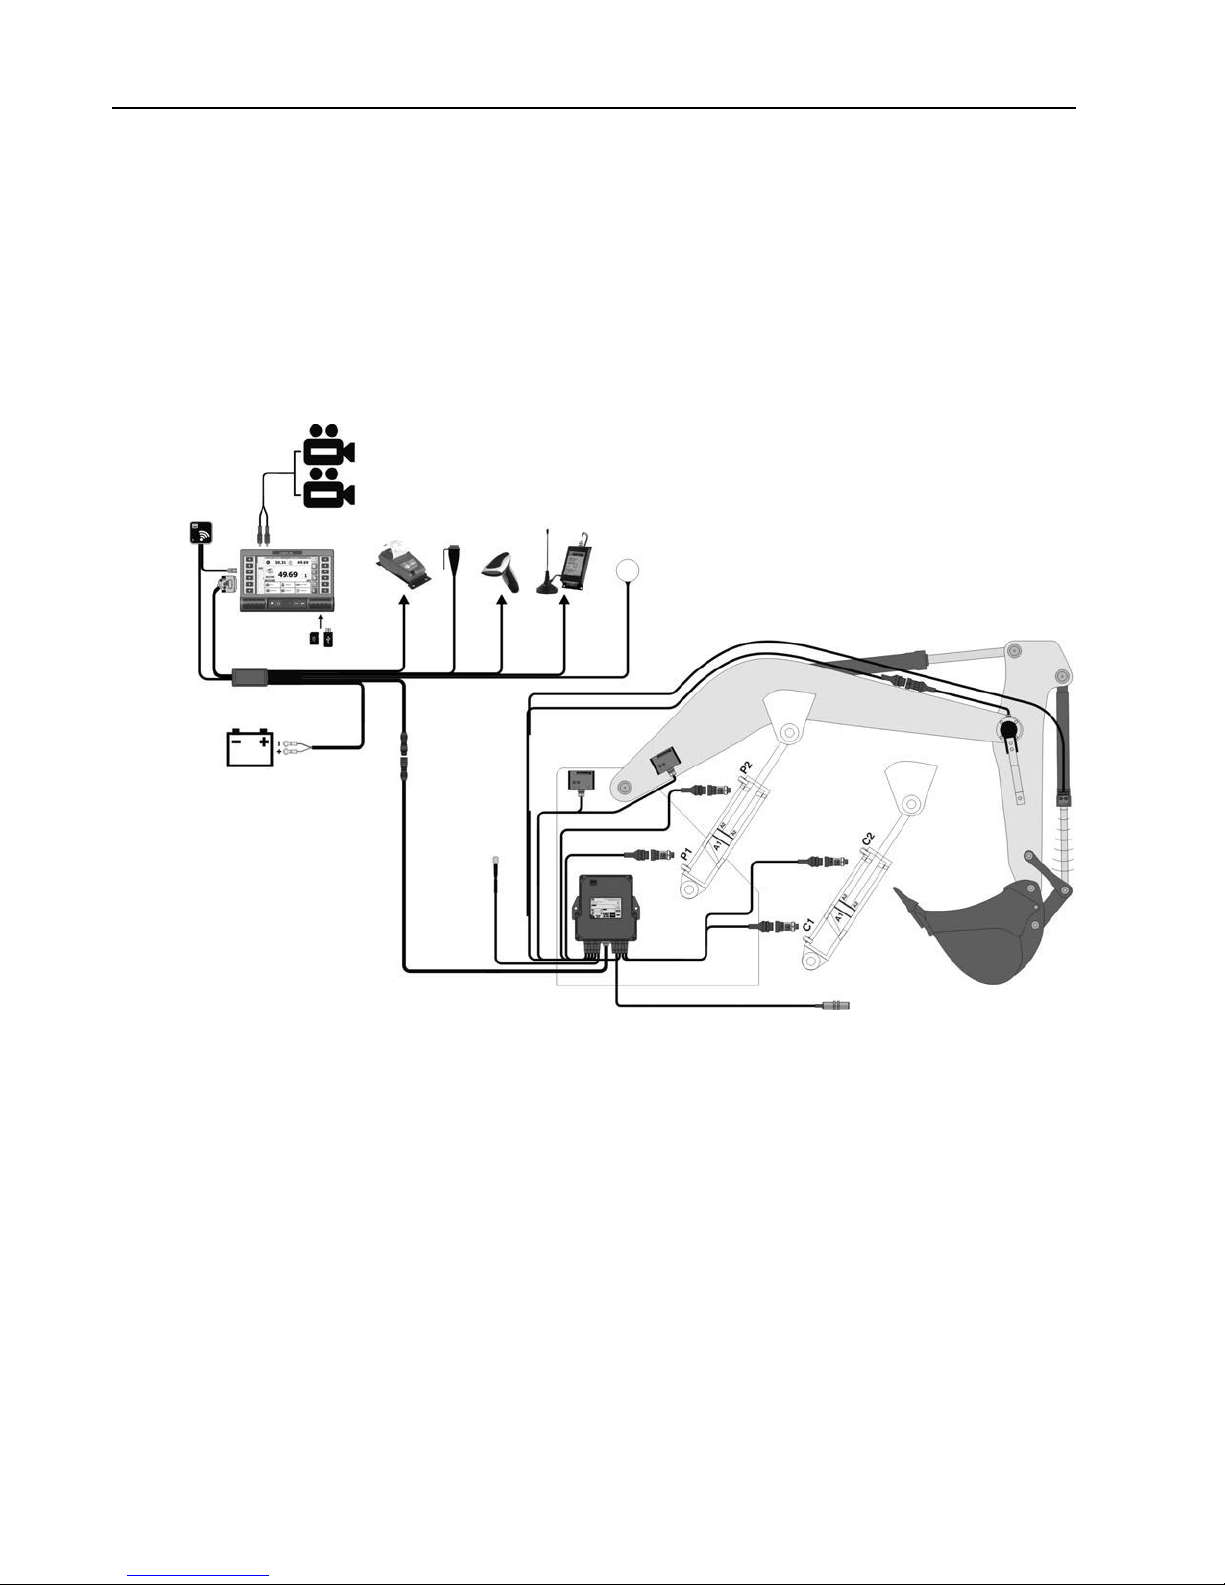
Two pressure sensors [1], [2] are installed into the hydraulic lift system, with possibly two more [3], [4] installed on
machines fitted with accumulator-assistor cylinders. The pressure signals are captured, filtered and corrected by measuring
the angle of the main boom using an inclinometer [5]. Slope corrections are made from another inclinometer [6] on the
chassis. Dipper arm position is measured from a mechanical angle sensor [7] mounted on the boom to dipper arm pivot.
As an added option, oil temperature compensation is provided by a clamp-on sensor [8]. An ultrasonic sensor [9] is
used to provide reliable and precise bucket compensation.
All signals are processed in a separate Weighing Module [10], and the resultant weight calculation is sent via
CANBus to the head unit [11]. Load and store information is saved in the head unit where it can be distributed to an
in-cab printer, modem or internal SD card.
SQL database capability with up to 8 reference fields, provides virtually unlimited inputs of products, customers,
trucks, hauliers, locations, destinations, mix blends and notes.
Video input for switching the head unit into reversing camera mode, removes the need for an additional display
monitor.
[5]
[6]
[7]
[1]
[2]
[3]
[4]
[9]
[8]
Options: Printing, Camera Input
Telemetry (Ethernet, Wi-Fi, 3G, Serial Modem)
GPS / Barcode Scanner (Automatic Product Selection)
[10]
[11]
Page 6

WEIGHLOG(EX(*(OPERATION(
6
Weighing modes
When used dynamically, the pressures are captured through a set weighing zone.
The system may also be used in static weighing mode. The boom can either be lifted to a set weighing position
where the pressure is captured, or measured constantly in a “live” mode at any required boom height.
Both dynamic and static weighing positions are adjustable by the operator to suit any job required, which will
enable the machine to be used at its most efficient output.
Features and Benefits
• Target Load
Set individual Product target weight to ensure correct loading of
vehicles.
• GPS Product Recognition
Automatic product selection.
• Reversing Camera Input
Single display with automatic switching in reverse gear.
• Adjustable Weighing Height
Flexible operation according to specific applications.
• Oil Temperature and Angle
Compensation
Accurate weigh information within normal operating temperatures,
and on sloping or uneven terrain.
• Calibration for up to 10 Attachments
Easy setup when switching attachments e.g. buckets, forks etc.
• Live Last Bucket 'Tip-off' at any
position
At the pile or above the truck.
• SQL Database
Ease of use and interfacing with ERP systems.
• Stores, multiple job and Blend
capability with advanced job memory
search and Job Report generation
Accurate record keeping, traceability and stock management.
• 5 quick, job pre-selections for repeat
job setup
Multiple active job capability.
• GPRS and Wi-Fi connectivity
1-way or 2-way communication with office.
• Static and Dynamic weighing modes
for 'weighing on the lift'
Faster operation.
• Split loading (Trailers)
Truck and up to 2 trailers.
• Multi-channel and Grand Total
summary
Load accumulation for up to 10 attachments e.g. buckets, forks
etc.
• XML data output via RS232, Ethernet
and USB memory stick
Safe and efficient data handling.
• Printing with configurable output
Hard copy of load summaries and job totals.
• Calibration 'Nudge'
Quick and easy calibration adjustment to match site reference
e.g. weighbridge.
• Internal Audible Alarm
Set to alarm at overload threshold (90% and 100% of max. load)
• System 'Pause' mode
Disable weighing mode during non-weighing tasks.
Page 7
Page 8
Page 9
Page 10
WEIGHLOG(EX(*(OPERATION(
10
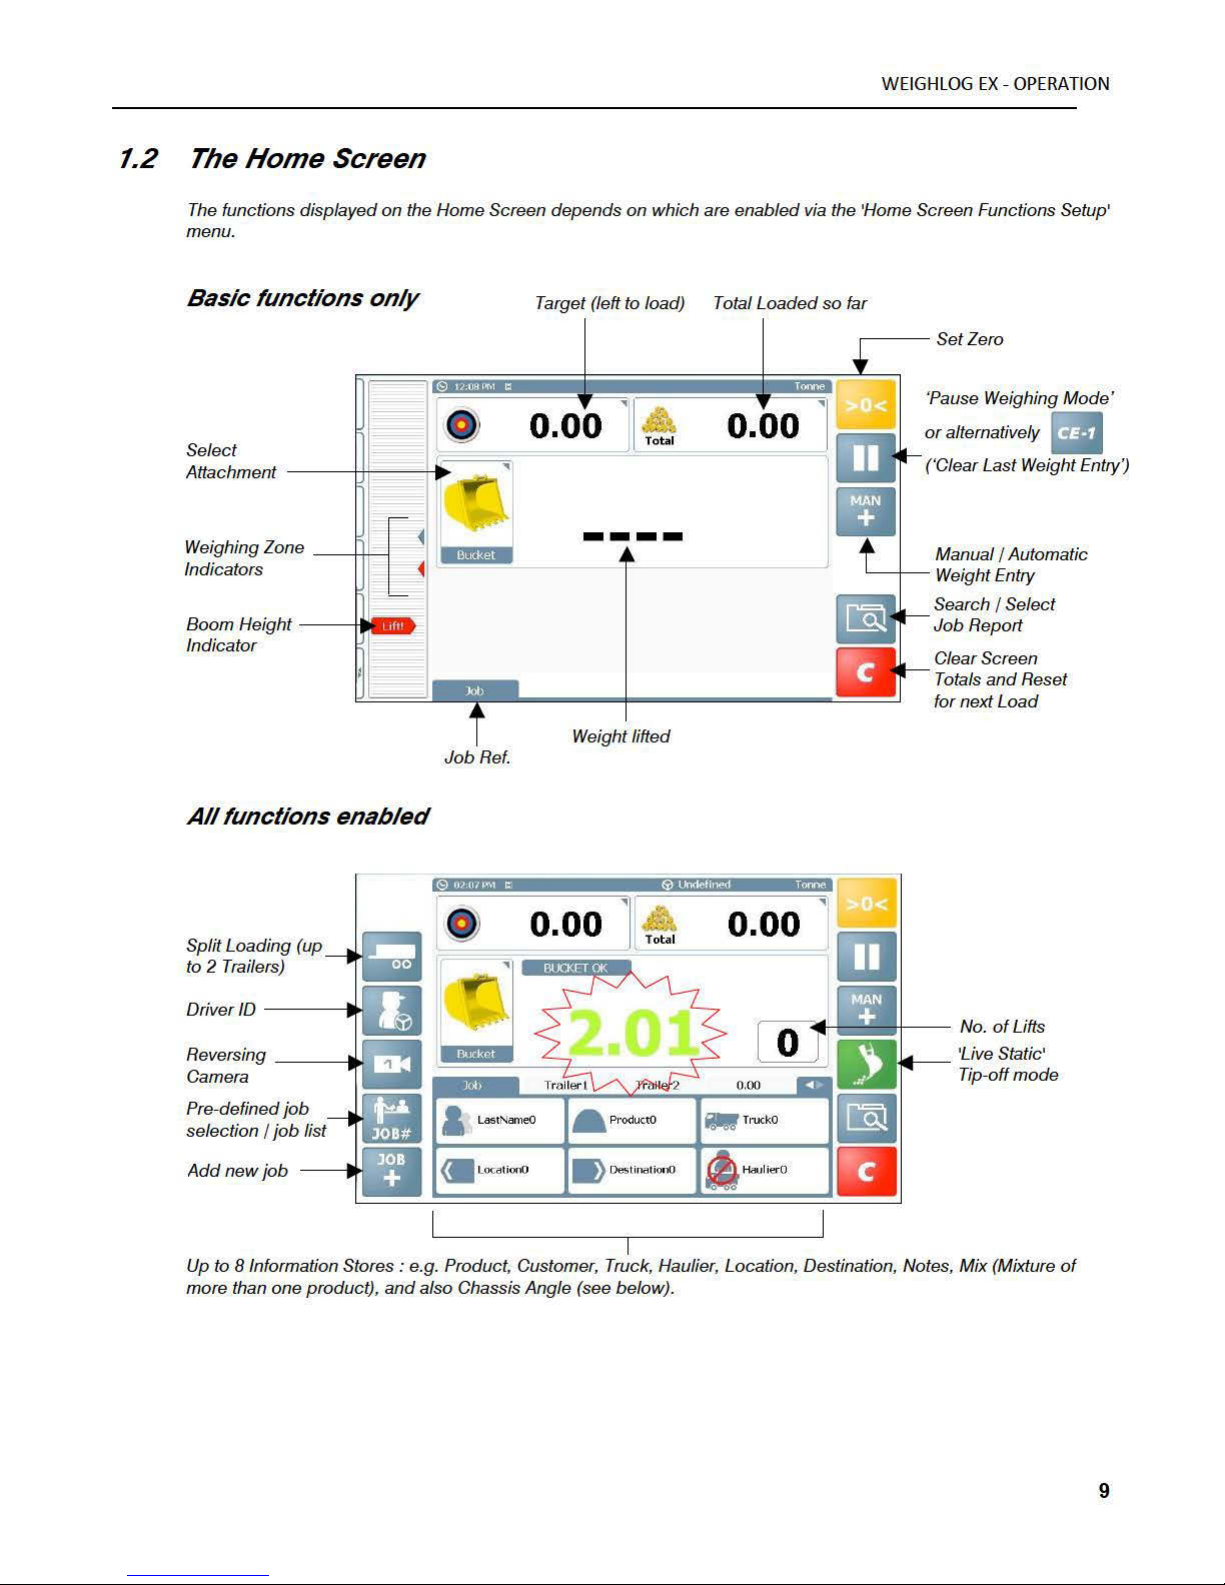
Chassis Angle Display
The instrument can be configured via the ‘Home Screen Functions Setup’ screen in
the ‘Calibration’ menu, to display the Chassis angle (Uphill / Downhill) in place of an
Information Store.
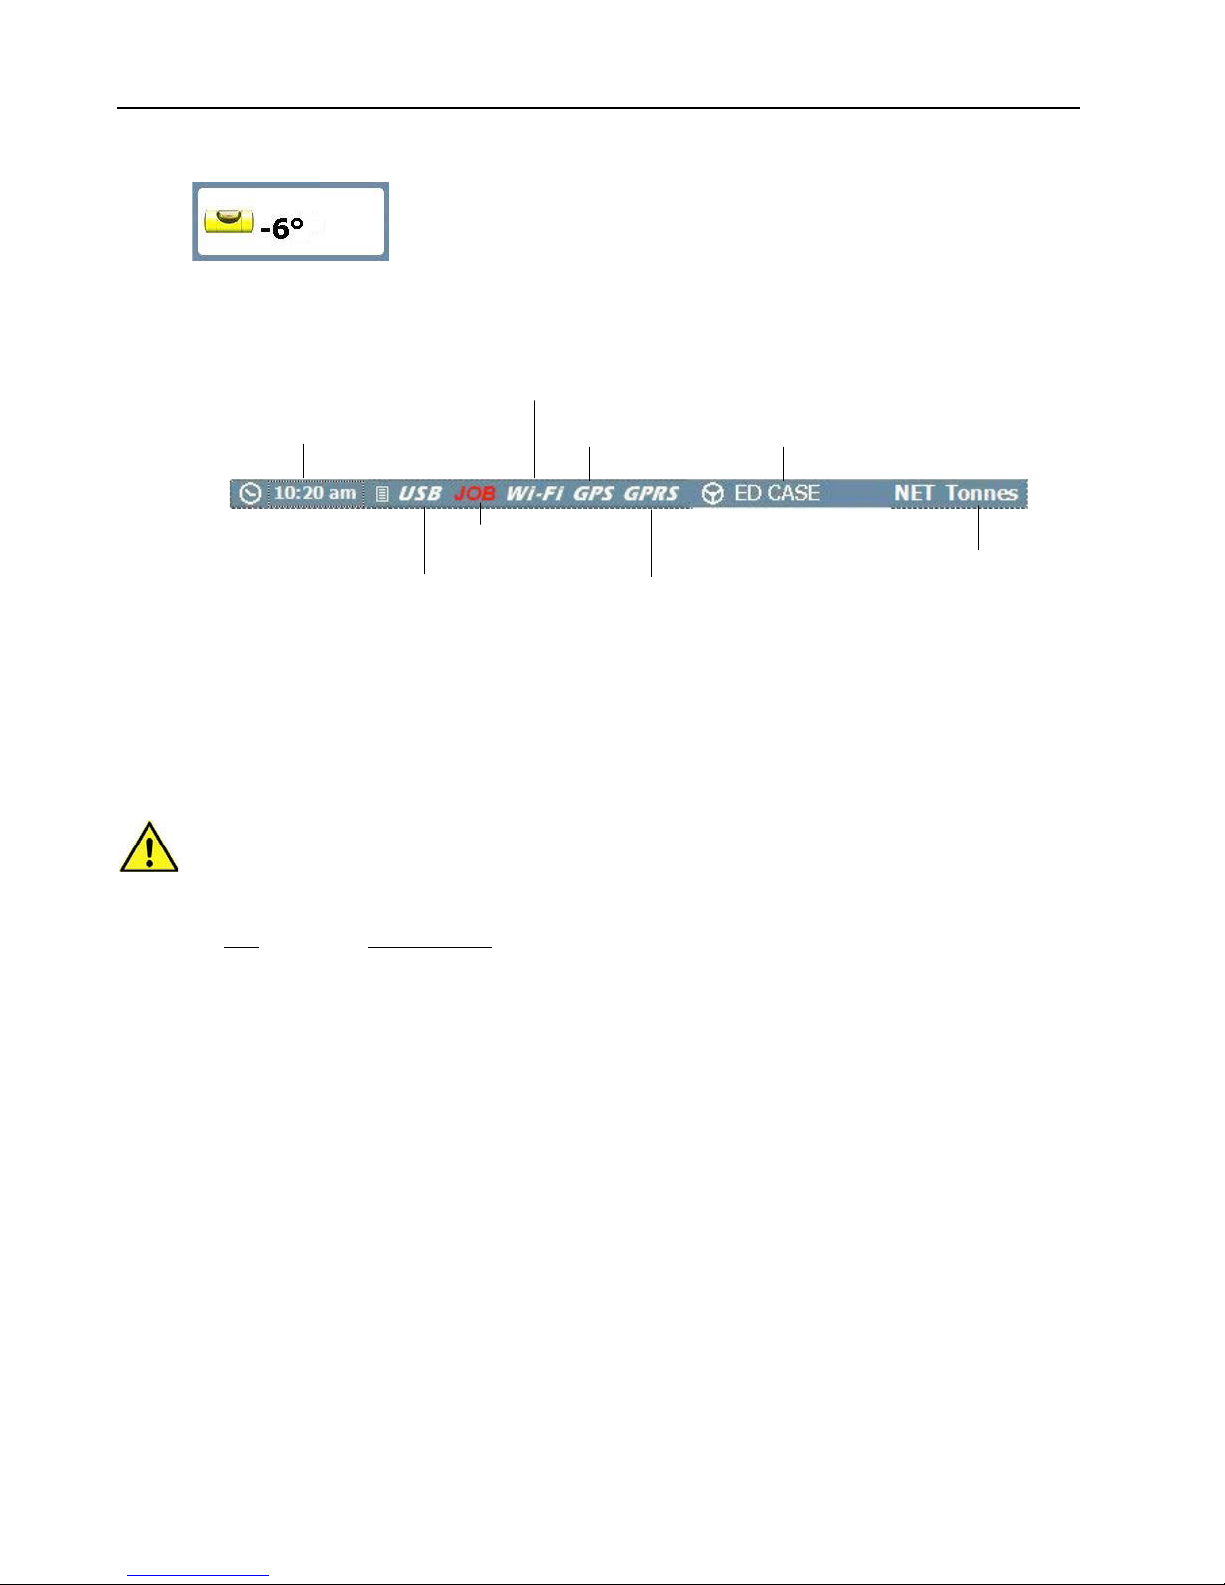
The Status Bar
Touchscreen
The instrument has a 5-wire resistive touch screen. 5-wire technology offers superior life and reliability without
requiring re-calibration. However, it consists of a polyester film outer layer that must be treated with respect,
compared to a non-touch display with toughened instrument glass. Therefore, pleas observe the following,
DO NOT use a sharp-pointed object - the screen will be damaged beyond repair!
Do NOT wipe or otherwise attempt to clean using any kind of solvent cleaner!.
Do NOT wipe using a dirty cloth or gloves. Use only computer screen wipes designed for the purpose!.
You may use a blunt, smooth-ended plastic object (e.g. a pen body / cap) as a stylus, if found necessary!
Clock
USB Memory
Stick present
Wi-Fi connection
Receiving a Job via
‘Isosync’
GPS Reception
(Flashing = No GPS)
Cell network connection to
Internet via 3G
Driver ID
Units
Page 11
Page 12
Page 13
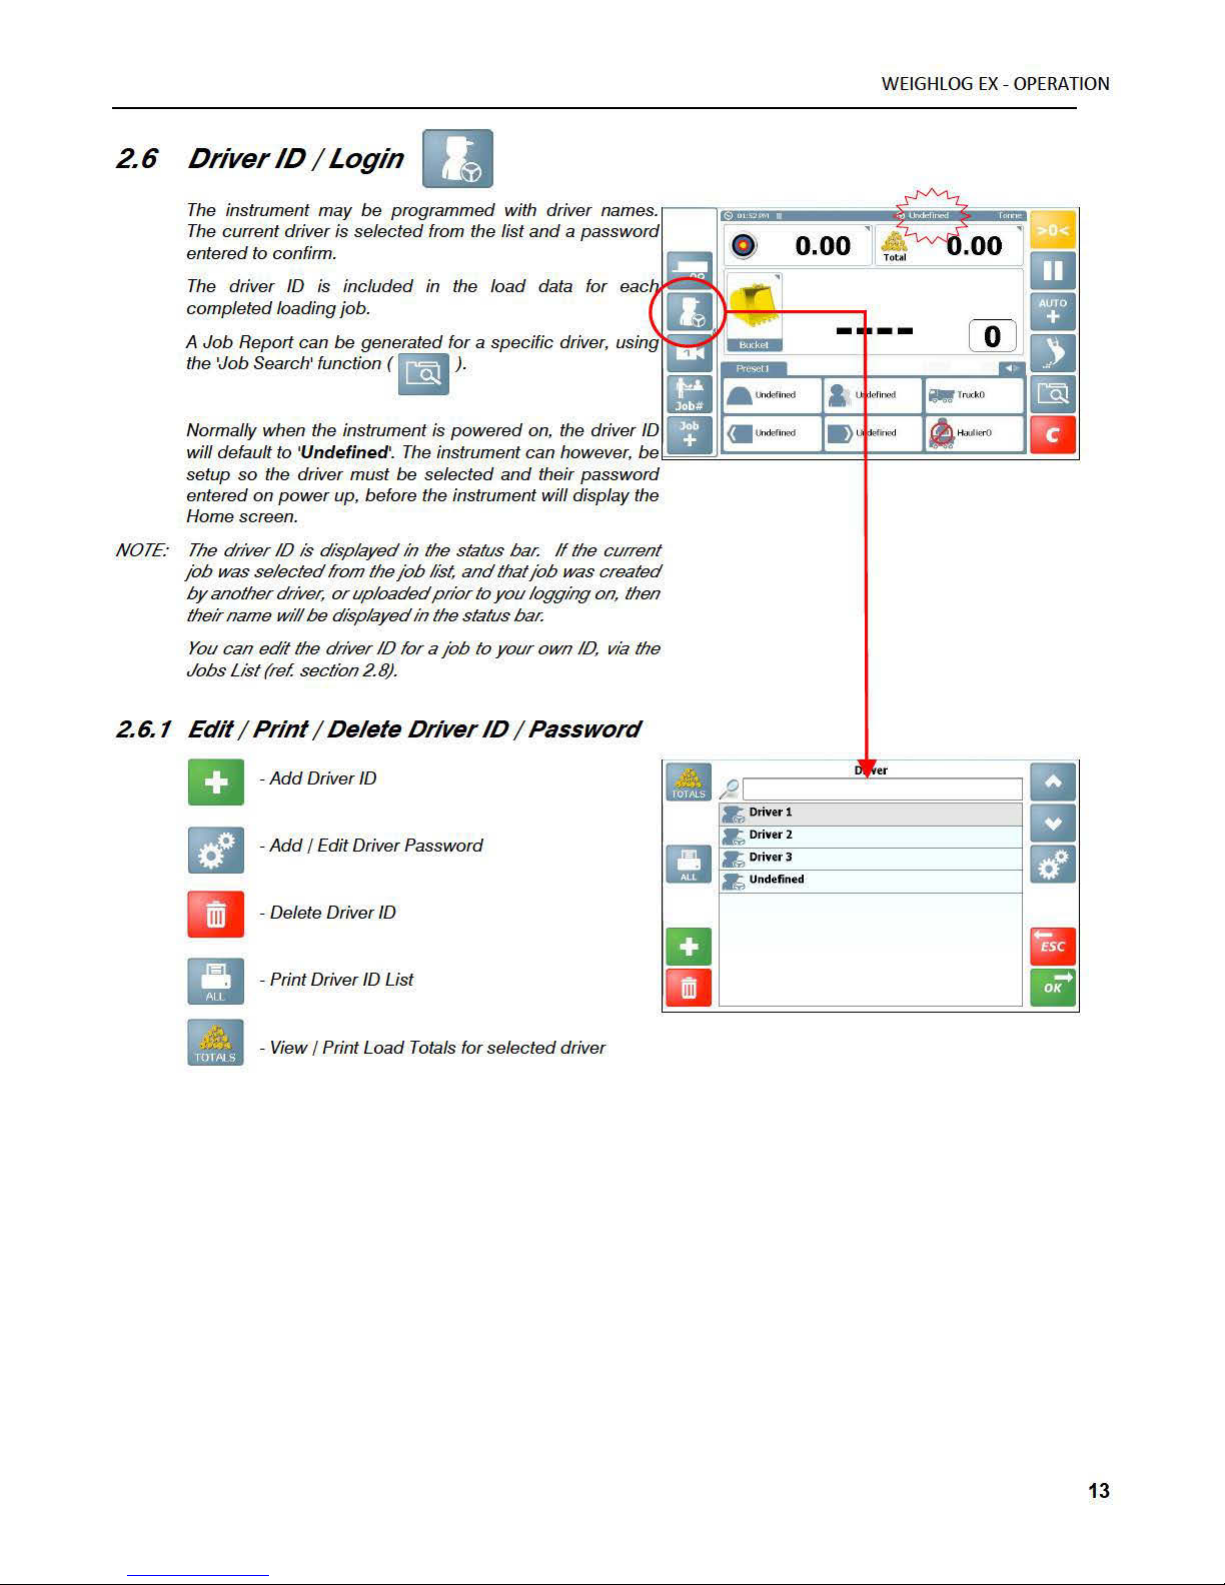
Page 14
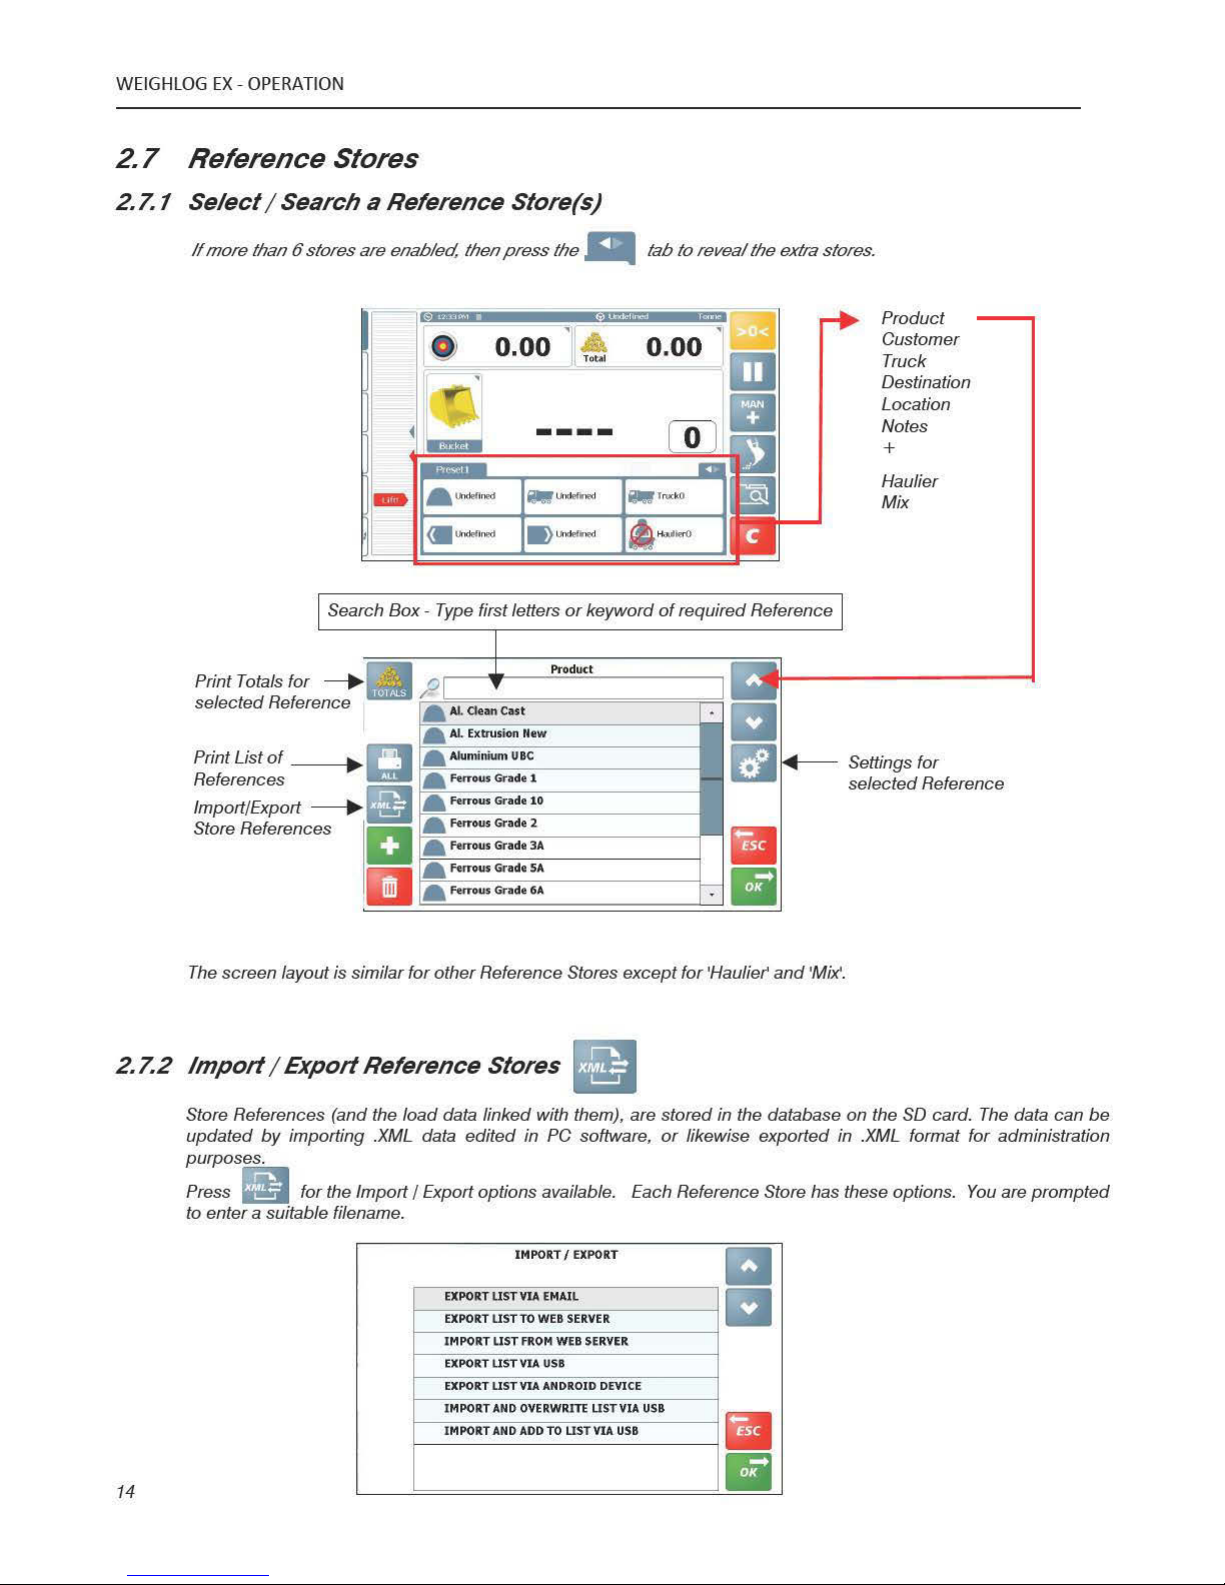
Page 15
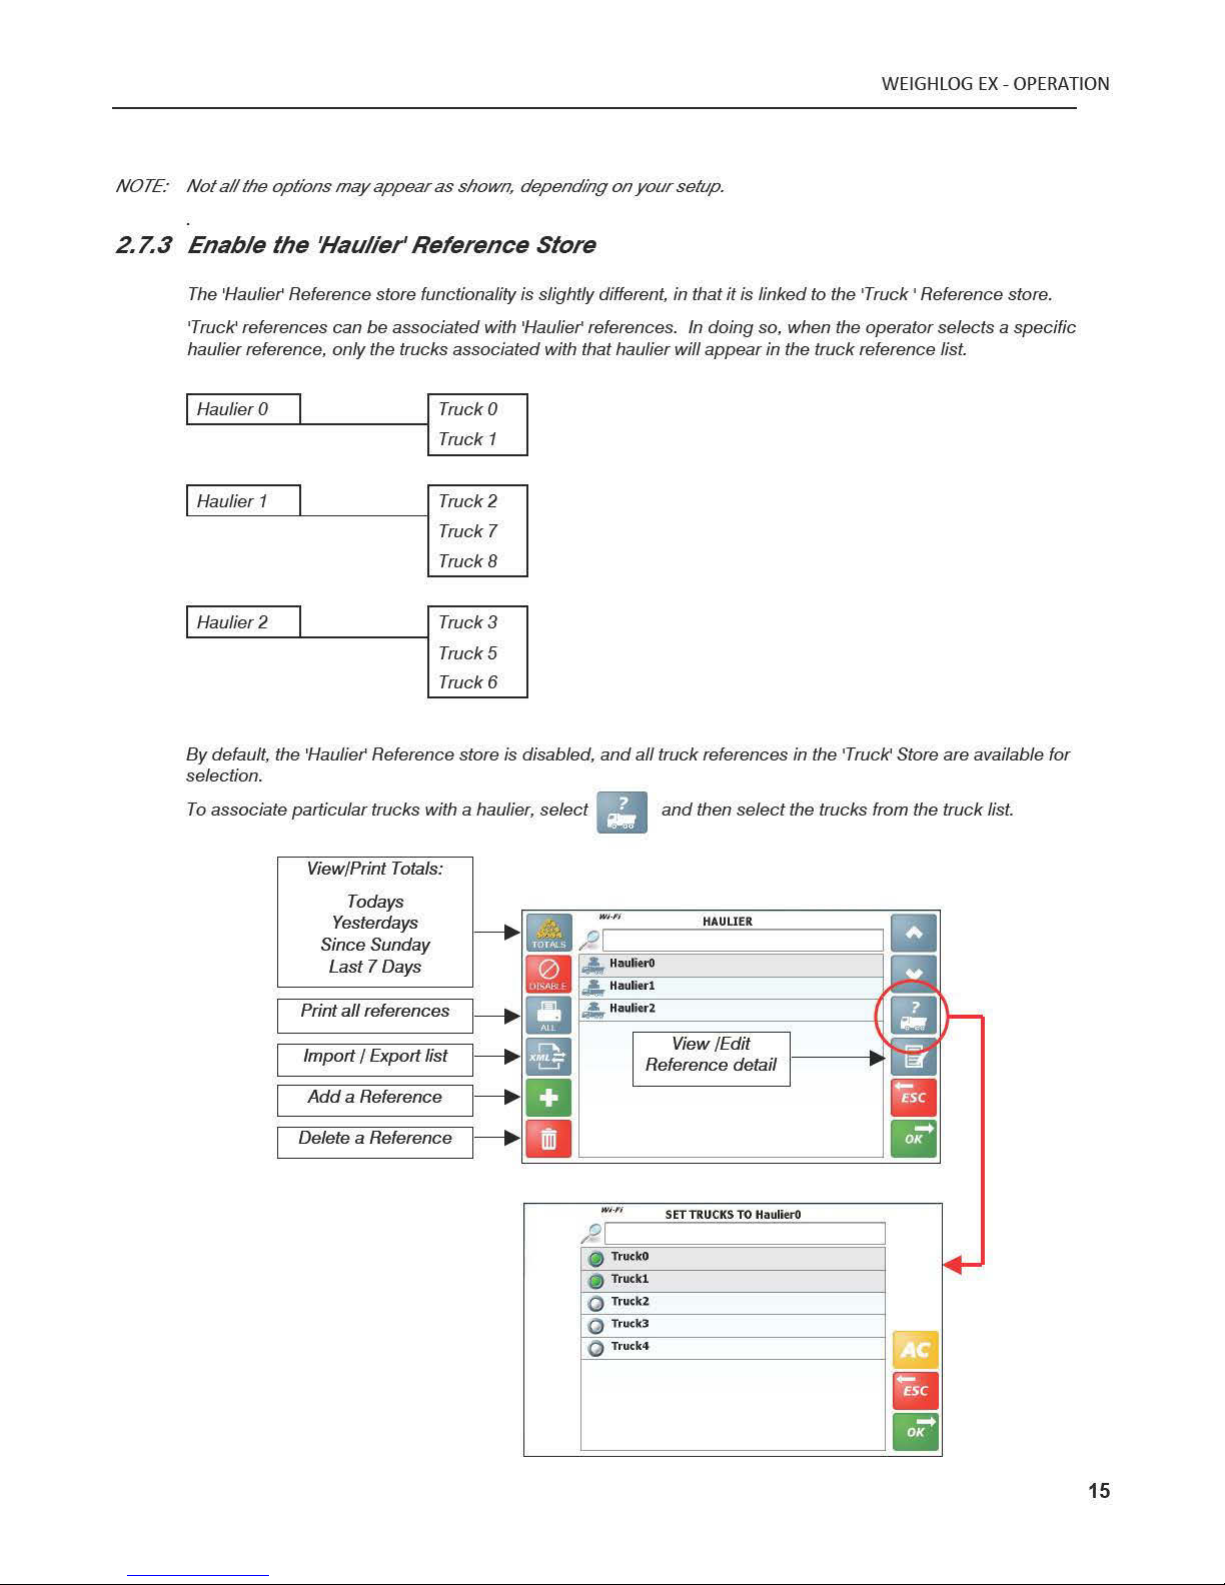
Page 16
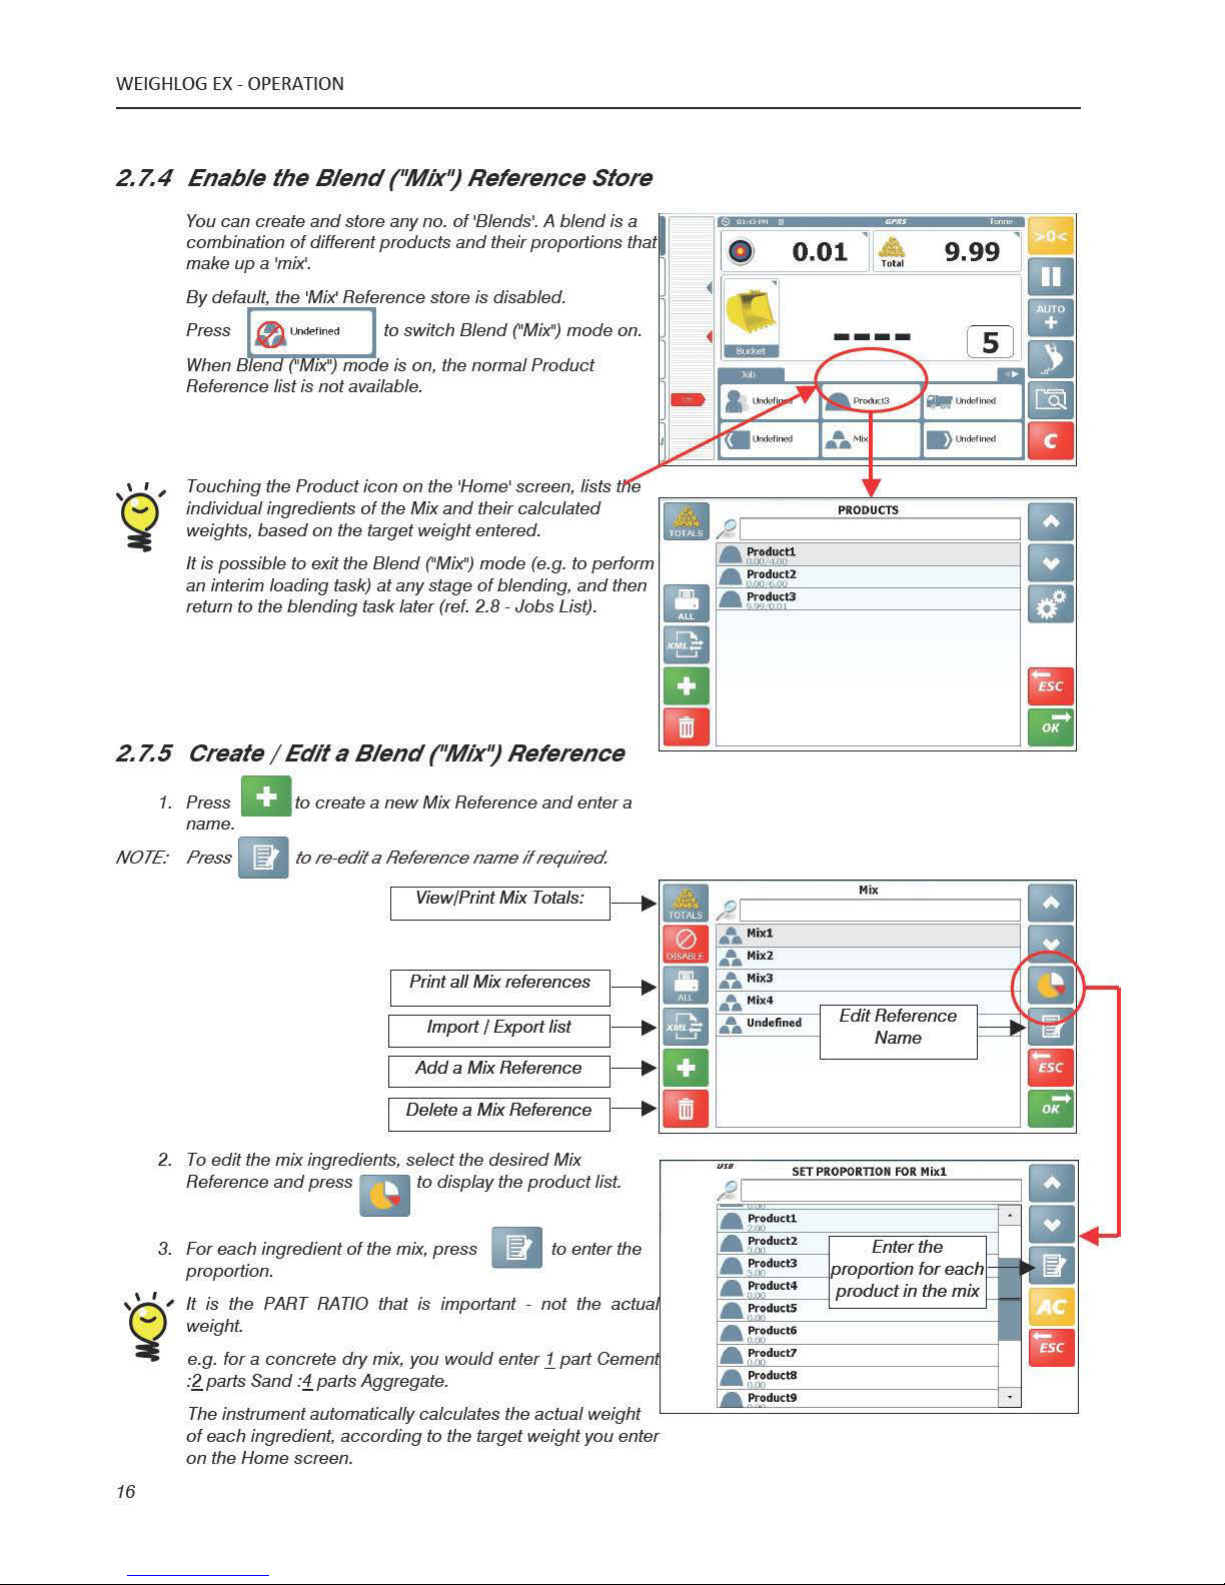
Page 17
Page 18
Page 19
Page 20
Page 21
Page 22
Page 23
WEIGHLOG(EX(*(OPERATION(
23
3 The Loading Cycle
3.1 Machine Requirements
The accuracy of the system depends to some extent on the following :
1. Operating Temperature : Always allow the machine and the hydraulics to warm up to the normal operating
temperature before commencing weighing.
2. Weighing on level ground : The chassis angle sensor provides automatic correction if weighing on a slope.
3. Boom lift and vehicle movement : Anti-bounce compensation and filtering help to maximise weighing accuracy.
Best results are obtained when weighing while the vehicle is stationary.
4. Maintenance : Keep your machine maintained in good condition. Things like excessively worn bushings, pivot pins
etc, as well as lack of lubrication to these areas can have an adverse effect on weighing accuracy. After any major
servicing particularly if you have replaced worn components or carried out welding repairs, you should re-calibrate
the weighing system. If the hydraulic system has been drained and re-filled, you should also check for any air that
may have become trapped at the pressure sensor(s).
3.2 Lifting Procedure
The correct lifting procedure is especially important for dynamic weighing. The best procedure is as follows,
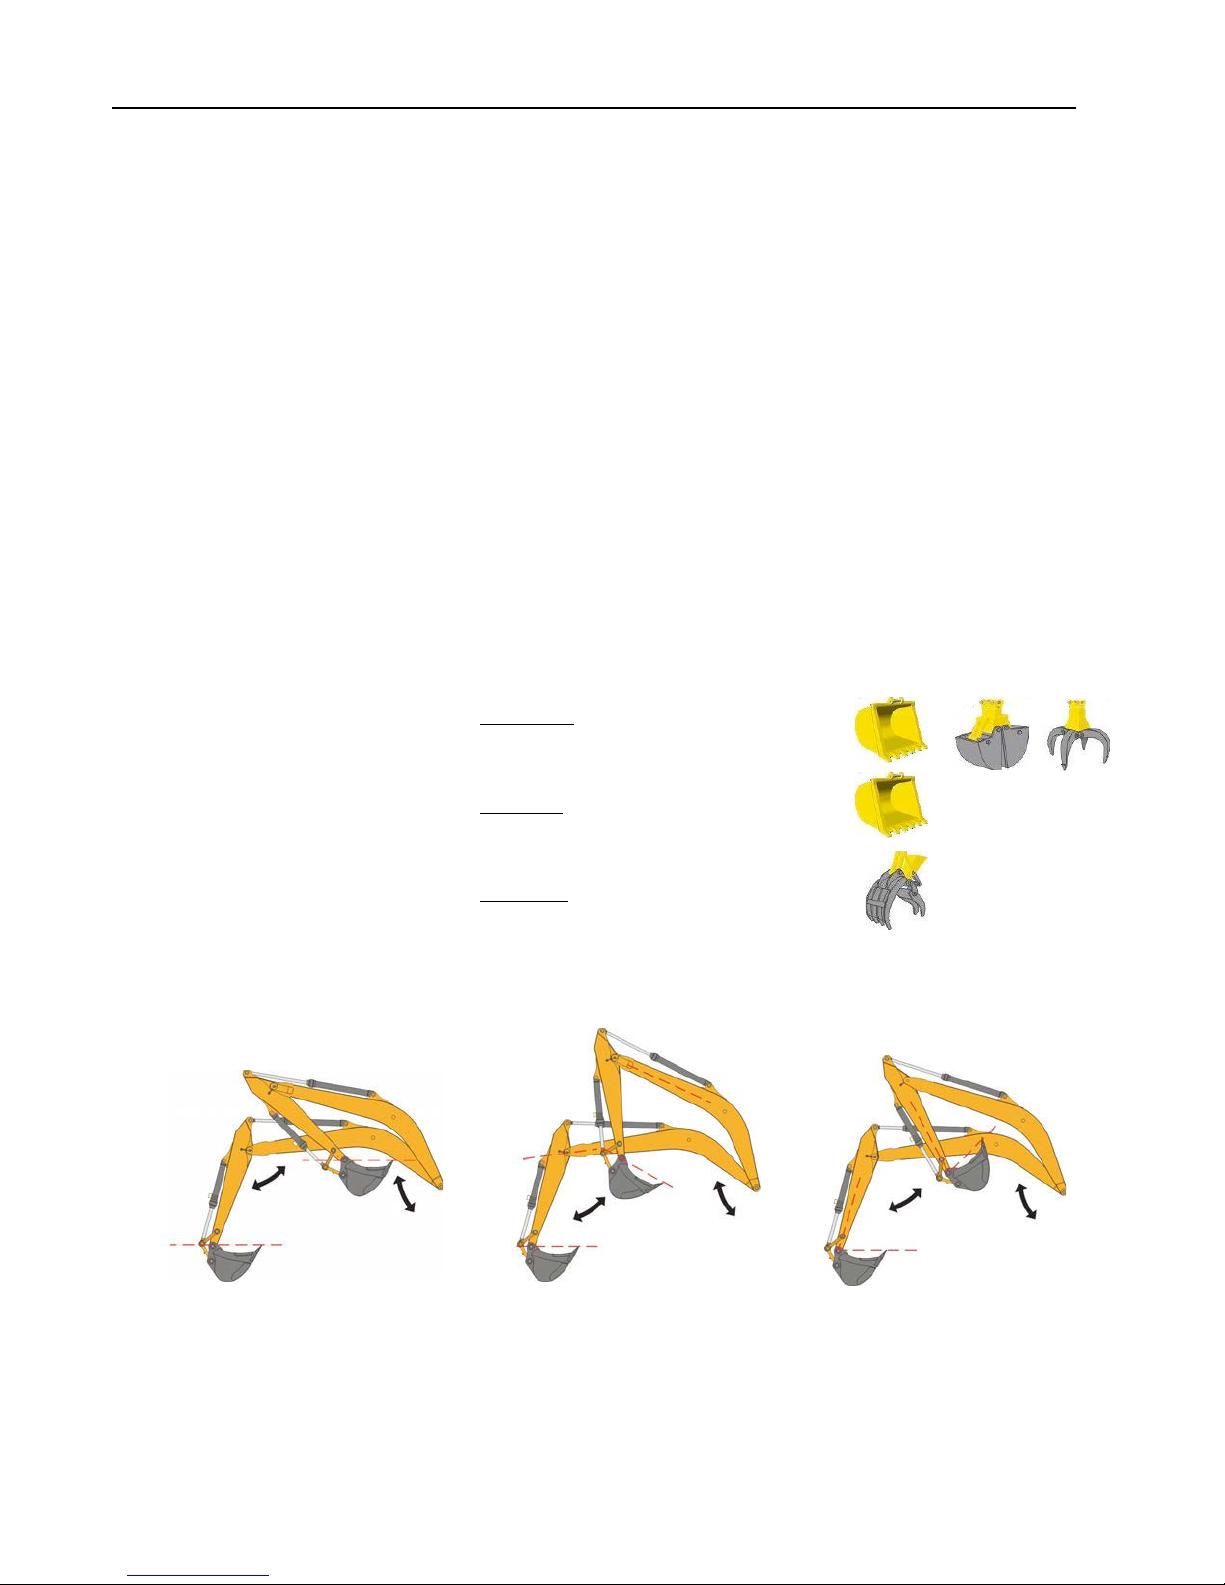
1. Having picked up the load, angle the attachment to the position for weighing. The options are either,
(i) Keep attachment angle fixed relative with ground (e.g. a bucket or
winging attachment).
(ii) Keep attachment angle fixed relative with boom (e.g. a bucket
attachment).
(iii) Keep attachment angle fixed relative with dipper (e.g. a fixed grab
attachment).
The attachment position is set as part of the bucket calibration procedure when the system was first calibrated. It is
important to weigh with the attachment at the correct angle, since it is a very important factor in achieving consistent
and accurate weighing.
Attachment weighing position options
“With ground” “With boom” “With dipper”
Weighing will be inhibited unless the attachment is at the correct position.
2. Lift smoothly without bouncing or jerking, at the correct lift speed.
In Dynamic Weighing mode, the system has lift speed compensation and will alert the operator in the event the lift
speed is too fast or too slow.
Page 24
Page 25
WEIGHLOG(EX(*(OPERATION(
25
3.4 “Last Bucket” Weighing
When in either Dynamic or Static weighing mode, if the weight exceeds the target required, the weight display turns
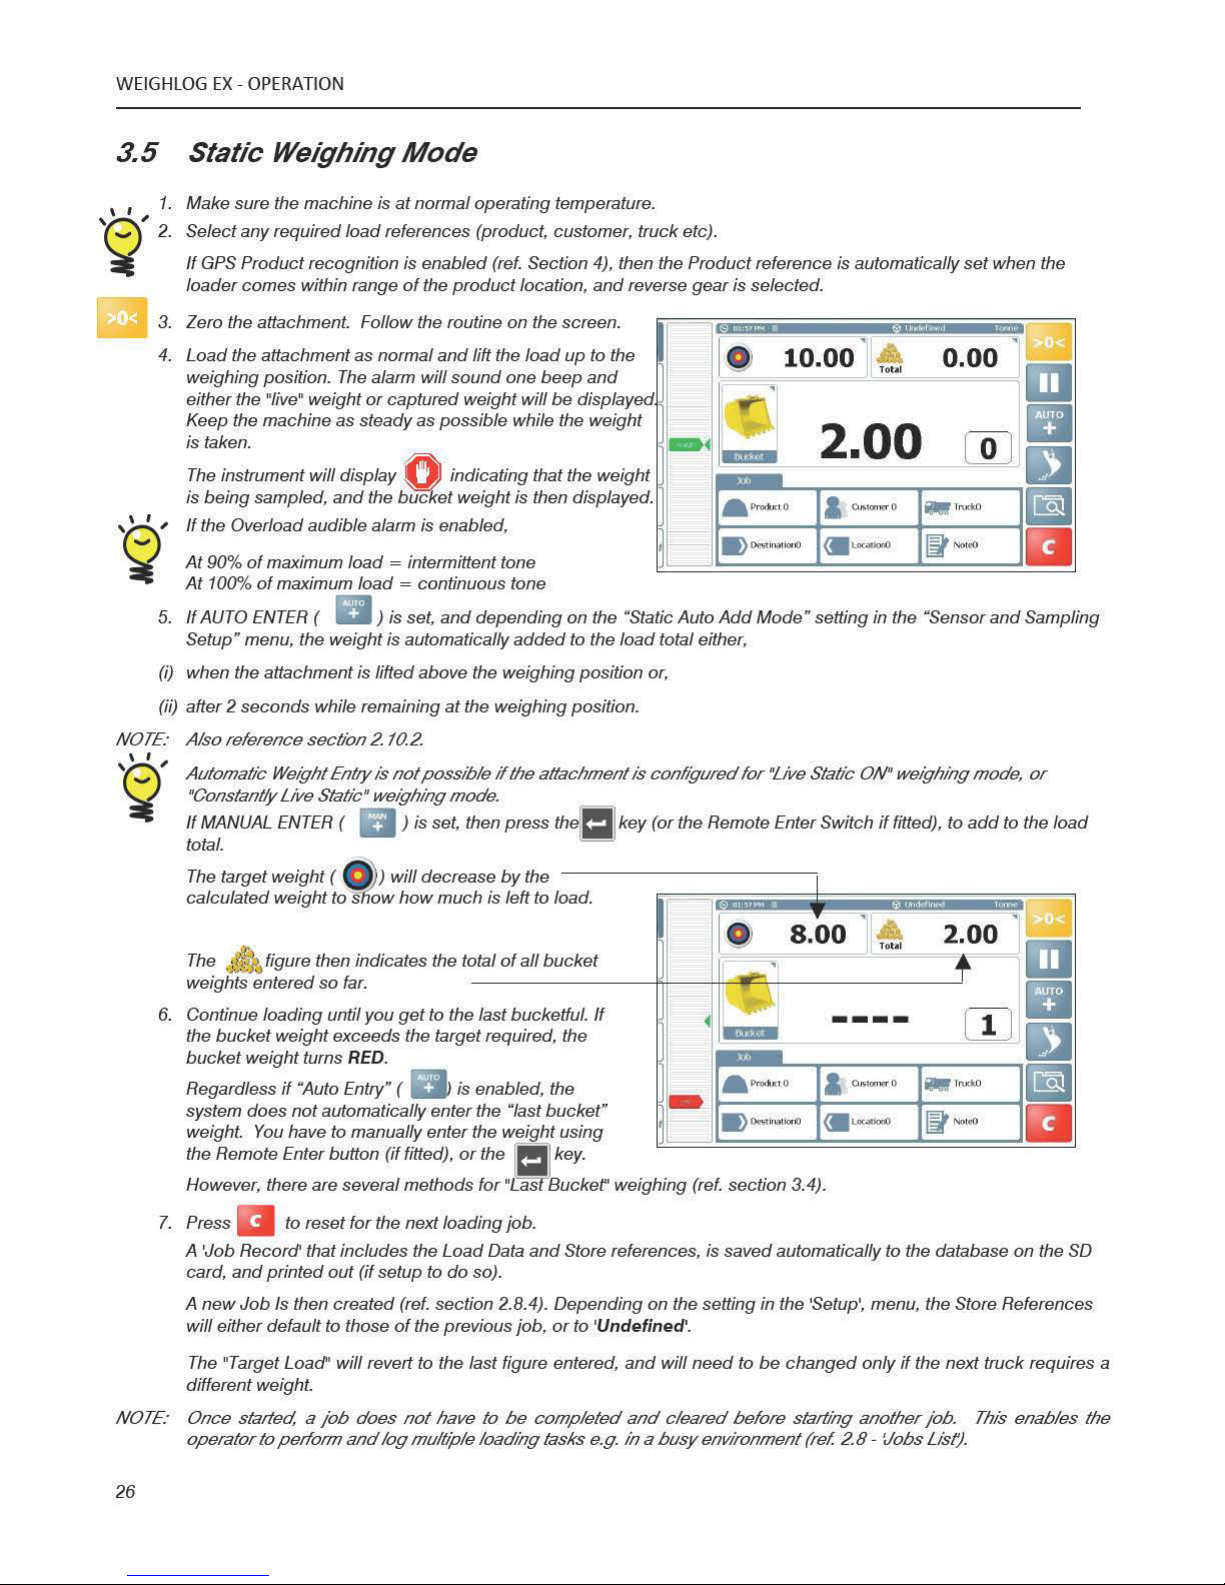
RED. Regardless if “Auto Entry” ( ) is enabled, the system does not automatically enter the “last bucket”
weight. You have to manually enter the weight using the Remote Enter button (if fitted), or the key.
There are several methods for "Last Bucket" weighing.
3.4.1 "Undo last Lift" (Dynamic / Static Weighing Mode)
If the last added lift is too much, the operator may wish to simply cancel the last lift, tip off some material back onto
the pile, and weigh again.
1. Press the key, and select “Undo Last Lift”. This will subtract the last lift from the weighing screen and the
Store totals.
2. Tip out some material and then lift again through the weighing zone, until the required amount has been weighed
and added again to the total.
NOTE: If setup via the ‘Home Screen Functions Setup’ page in the calibration menu, a ‘Clear Last Entry’ function
( ) replaces the ‘Pause’ function ( ) on the weighing screen.
This then allows you to immediately remove the last lift from the total with a single key touch.
3.4.2 "Reweigh the Remainder" (Dynamic / Static Weighing Mode)
In some cases where the truck also has an on-board weighing system, the operator may tip a partial amount off the
“last bucket” load to “top-off” the truckload, as directed by the truck driver.
The “re-weigh” function enables the weight of the material remaining in the bucket to be re-weighed and subtracted
from the truck total, ensuring the recorded total matches the actual weight loaded into the truck.
1. Press the key, and select “Reweigh the Remainder”.
2. Lift again through the weighing zone. The weight of material remaining in the bucket is subtracted from the truck
total.
3.4.3 Live Static "Tip-off" Mode
"Undo last Lift" and "Reweigh the Remainder" “last bucket” weighing are trial and error methods. To assist in
measuring the amount required for the last dynamic weighing, the "Live Static Tip Off" feature may be used.
1. Lift up to any suitable height, and then press the button. The “live” calculated weight, and button icon are
then shown in GREEN. The weight shown is now live.
2. Allow the live display to settle down before checking the true weight. "Live Static Tip Off" can be configured to
operate in either of two ways,
3(a) Tip off material back onto the pile ("Pile Tip Off - Manual Add On" configuration). The instrument displays the weight
remaining in the bucket as you tip the surplus material back onto the pile.
3(b) Tip off material into the truck ("Truck Tip off" configuration). The instrument displays the weight tipped off the bucket
into the truck (to match the 'weight left to load' display).
4. To enter the 'Live Tip-off' weight, press the Remote Enter button (if fitted), or the key.
NOTE 1: "Live Static Tip-off Mode" must be configured to “Pile Tip Off (Manual Add On”), otherwise weight entry is not
possible whilst remaining in Live static mode. "Live Static Tip-off Mode" is configured from the 'Sensor Sampling and
Setup' screen ('Factory' calibration menu).
Page 26
Page 27
Page 28
Page 29
Page 30
Page 31
Page 32
Page 33
Page 34

WEIGHLOG(EX(*(OPERATION(
34
6. Printing, Data Logging and Transfer
6.1 Data Transfer Options
NOTE: Some options may not apply, depending on the setup of your system.
TYPE
MODE
OPTION
PRINTER
RS232 SERIAL
(Normally COM 2)
[OFF]
No automatic printout after a load is cleared, but
Job Records can be printed manually
AUTOMATIC MODE
A Job Record ('Ticket') in one of 3 formats, is
printed automatically after a load is cleared.
'LOAD BY LOAD'
Ticket includes space for Name, Address and
Signature of customer.
'SHORT LOAD BY
LOAD'
As above but excludes space for Name, Address
and Signature of customer.
'LIFT BY LIFT'
As above but also lists individual bucket weights.
EXTENDED
INFORMATION
Ticket includes extra text entered for 'Description 1'
to 'Description 4' in the Product Stores.
PRINTER TYPE
[‘ICP300’] / ‘EPSON TM295’ / ‘BIXOLON’
No. OF DUPLICATES
Sets the no. of copies of a ticket that will be printed.
DATA
USB (PEN)
EXPORT LIST VIA USB
Reference Stores, Jobs List, Job Records
IMPORT AND
OVERWRITE LIST VIA
USB
Reference Stores, Jobs List
IMPORT AND ADD LIST
VIA USB
Reference Stores, Jobs List
USB
(MOBILE PHONE)
EXPORT LIST VIA
ANDROID DEVICE
Reference Stores, Jobs List, Job Records
ETHERNET / 3G
MODEM (EMAIL)
EXPORT LIST TO EMAIL
Reference Stores, Jobs List, Job Records
ETHERNET / 3G
MODEM
(WEBSERVER)
EXPORT LIST TO
WEBSERVER
Reference Stores, Jobs List, Job Records
IMPORT LIST FROM
WEBSERVER
Reference Stores, Jobs List
RS232 SERIAL
(Normally COM 1)
e.g.
RADIO MODEM
DATALOGGER
PC CABLE
etc
.CSV - LOAD BY LOAD
LM8K
Data output in .CSV format if compatibility with
existing Loadmaster 8000 data is required.
.CSV - LIFT BY LIFT
LM8K
As above, but also lists individual bucket weights.
(.CSV line sent to Com Port when load is cleared.)
.XML
“SQL Queries” from networks or PC running
software (i.e. “Isosync”). Data returned from SQL
query in .XML format.
.CSV - LOAD BY LOAD
CSV data output closely matching XML data output
in mode, but in CSV format
.CSV - LIFT BY LIFT
As above, but also lists individual bucket weights
ETHERNET TCP/IP
i.e. With Ethernet
radio modem or direct
cable
SQL
“SQL Queries” from networks or PC running
software (i.e. “Isosync”). Data returned from SQL
query in .XML format.
Page 35
WEIGHLOG(EX(*(OPERATION(
35
6.2 Reference Stores and Job Records
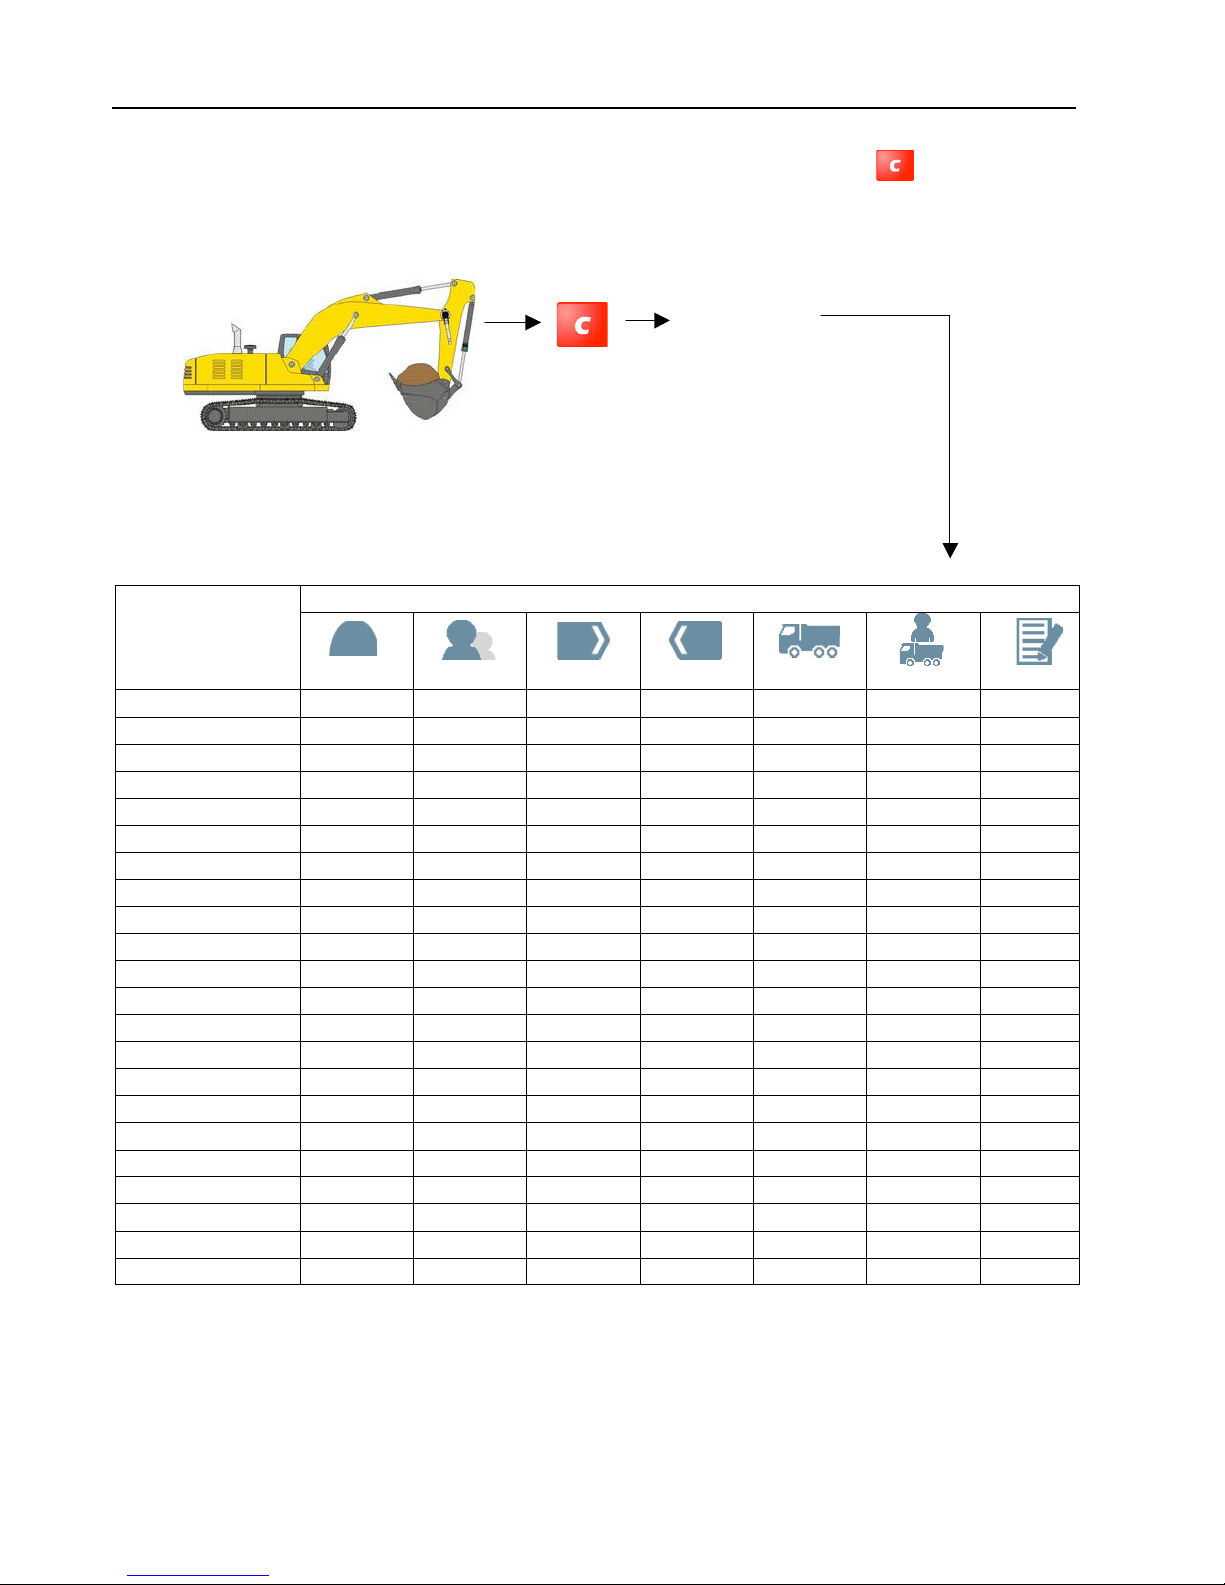
An incremental Job No. is created automatically for each new loading task. When the button is pressed, A
'Job Record' that includes the Load Data and the Store references, is saved automatically to the database on the SD
card, and printed out (if setup to do so).
NOTE: Each of the stores can have an unlimited no. of references. The programmable content of each Reference Store is
shown in the table below.
Programmable
Content
DATABASE on SD Card - Reference Stores (excluding the 'Mix' store)
Product
Customer
Destination
Location
Truck
Haulier
Note
Name / Text
. . . . . . .
Weight
.
Target
.
Icon 1
.
Icon 2
[2]
.
Density
.
Barcode
. . . . .
GPS Long.
. . .
GPS Lat.
. . .
Radius
. . .
Price
.
Description 1
. . . .
Description 2
. . . .
Description 3
. . . .
Description 4
. . . .
Phone No.
. .
Email
. .
Street
. . . .
City
. . . .
State
. . . .
Zip Code
. . . .
‘LM8K Index’
[3]
. .
[1] The choice of Reference stores available on the Home Screen depends on which are enabled via the 'Home Screen
Functions Setup' menu.
[2] Currently only a requirement for COPRO regulations (Belgium), for 'BENOR' and 'CE1137' to appear on printouts.
[3] ‘LM8K Index' - Only required if you are operating Loadmaster Alpha 100 and Loadmaster 8000 series instruments
on the same site, and want compatibility with the .CSV data format exported from the Loadmaster 8000/8000i. The
'LM8K Index' entries would correspond to the Customer Nos. / Product Nos. stored in the Loadmaster 8000/8000i.
'JOB RECORD'
Machine Name
Ticket No.
Job No.
Job Name
End Time and Date
Total weight
Price
Bucket Count
Preset Tare
Driver
Store References
Page 36
Page 37
Page 38
Page 39

WEIGHLOG(EX(*(OPERATION(
39
 Loading...