

Page 1
ADOBE PHOTOSHOP CC 2019
(v.20.0 or later)
Page 2

Copyright (c) 2017 Loupedeck Ltd. All rights reserved.
2
TABLE OF CONTENTS
USING PHOTOSHOP WITH LOUPEDECK+ ........................................................................................ 3
CONNECTING AND SETTING UP LOUPEDECK+................................................................................ 3
How do I power Loupedeck+? ..................................................................................................... 3
Disconnecting from your computer ............................................................................................ 3
WORKING WITH LOUPEDECK+ ........................................................................................................ 4
Basic functions............................................................................................................................. 5
Tools & Filters .............................................................................................................................. 7
Controlling Brush -type of a tool ................................................................................................. 9
Layer Controlling ....................................................................................................................... 12
Adjustment Layers ..................................................................................................................... 15
Color control .............................................................................................................................. 18
CUSTOM MODE ............................................................................................................................. 20
CONFIGURING LOUPEDECK........................................................................................................... 21
TASKBAR OPTIONS ........................................................................................................................ 24
UPDATING LOUPEDECK ................................................................................................................. 26
MORE QUESTIONS?....................................................................................................................... 26
PRODUCT AND SAFETY INFORMATION ........................................................................................ 28
THIRD PARTY TRADEMARKS AND ITEMS................................................................................... 28
WARNINGS AND CAUTIONS ...................................................................................................... 28
LOUPEDECK LTD ONE YEAR LIMITED WARRANTY ..................................................................... 29
WAIVER ...................................................................................................................................... 29
Page 3

Copyright (c) 2017 Loupedeck Ltd. All rights reserved.
3
USING PHOTOSHOP WITH LOUPEDECK & LOUPEDECK+
Loupedeck
TM
and Loupedeck+
TM
is now integrated with Adobe Photoshop. This integration was
designed to increase the efficiency of your editing workflow. Please read this user guide and
review the basics, so you can supercharnge your workflow and get the most of out your
Loupedeck experience.
Loupedeck+ works seamlessly with Mac and Windows operating systems running these versions:
▪ Windows® 10
▪ Mac® OS 10.12 or later
▪ Adobe® Photoshop CC 2019 (v.20 or later)
Other supported softwares are:
▪ Adobe® Lightroom 6 and Lightroom Classic CC (v.7.4 or later)
▪ Adobe® Premiere Pro (v.13 or later)
▪ Skylum Aurora HDR 2018 (v.1.2) and Aurora HDR 2019
▪ Phase One Capture One (v.11 or later) – beta release version
CONNECTING AND SETTING UP LOUPEDECK &
LOUPEDECK+
To set up your Loupedeck+, pleaset follow the instructions below.
1. Download and install the Loupedeck software from www.loupedeck.com/setup
2. Connect the USB cable to the USB port of your computer.
3. Start editing!
How do I power Loupedeck +?
At this point you might think, hold on, where’s the power cable? Well, the simple answer is that
there is no need for one, as Loupedeck+ is powered from its USB cable.
Disconnecting from your computer
When you want to disconnect the console from your computer, there’s no need to go through
the “safely remove your hardware” operation. Just disconnect the USB cable, and you’re done.
Page 4

Copyright (c) 2017 Loupedeck Ltd. All rights reserved.
4
WORKING WITH LOUPEDECK+
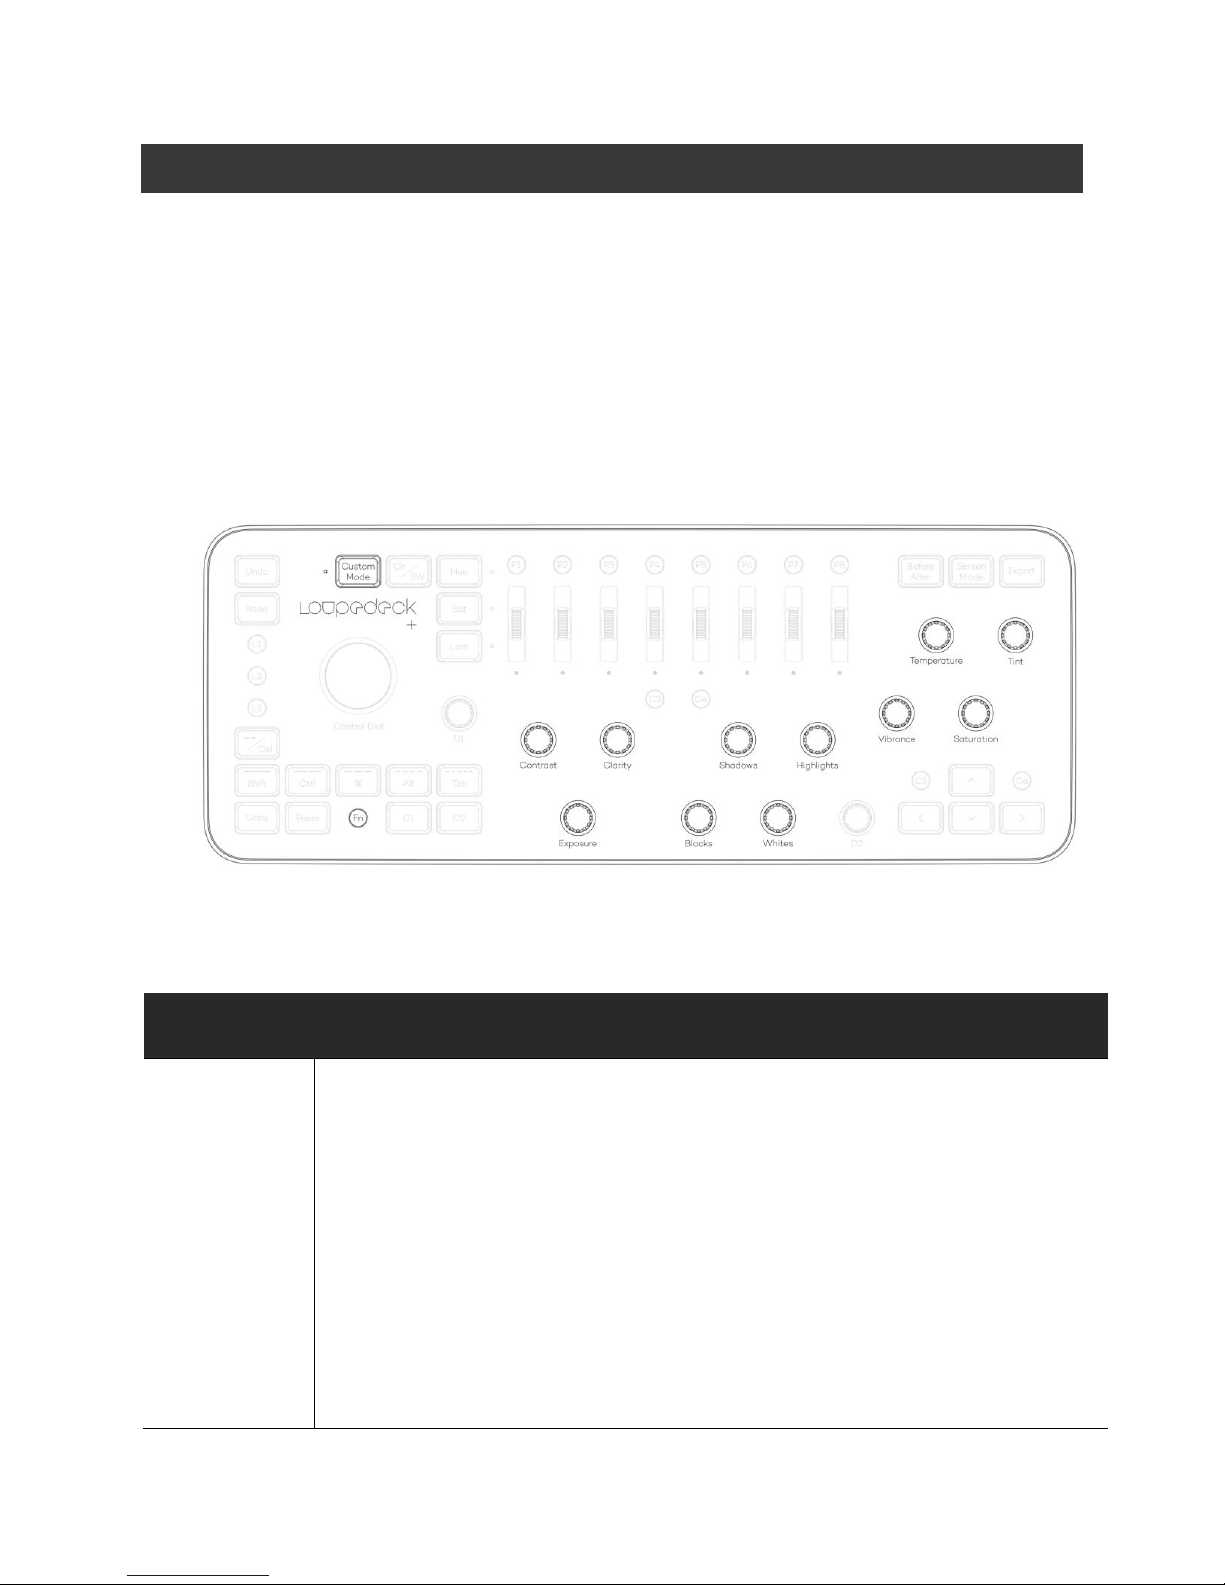
Loupedeck+ has been preconfigured so that it would be easy to learn!
1. Undo / Redo commands. With FN -button (12) they function as area selection buttons:: Select All
/ Deselect All
2. Custom mode that opens new customizable layer for dials (9) and P1-P8 buttons (5).
3. Hue, Sat, Lum -buttons for selecting to which group adjustment scrolls affect:
• HUE : Adjust Color -values with Scrolls (5)
• SAT : Adjust Adjustment Layer -values with Scrolls (5)
• LUM : Adjust Brush -values and settings with Scrolls (5)
4. Adjustment scrolls for adjusting values defined by HUE, SAT and LUM -buttons (3).
5. Configurable buttons P1-P8:
• P1-P8 predefined as tool presets
• FN (12) + P1-P8 predefined as filter presets
• Another two layers under Custom Mode (2)
6. Compare the bottom layer to the final image (“before and after”)
7. Toggle through Photoshop screen modes
8. Export your image
9. Add an Adjustment Layer by pressing the dial or a button. Use dial or scrolls to adjust main values
selected adjustment layer.
10. Layer navigation
11. Customizable buttons that are grouped with other functions:
▪ C1-C2 : Tools related functions
▪ C3-C4 : Functions for general controlling
▪ C5-C6 : Layer related function
12. Home and additional functions button (activates secondary controls)
13. Copy & Paste functions
14. Layer controlling keys R1-R5: Grouping, Merges, Create Layers & Masks or use buttons as
Keyboard Modifiers (15)
Page 5
Copyright (c) 2017 Loupedeck Ltd. All rights reserved.
5
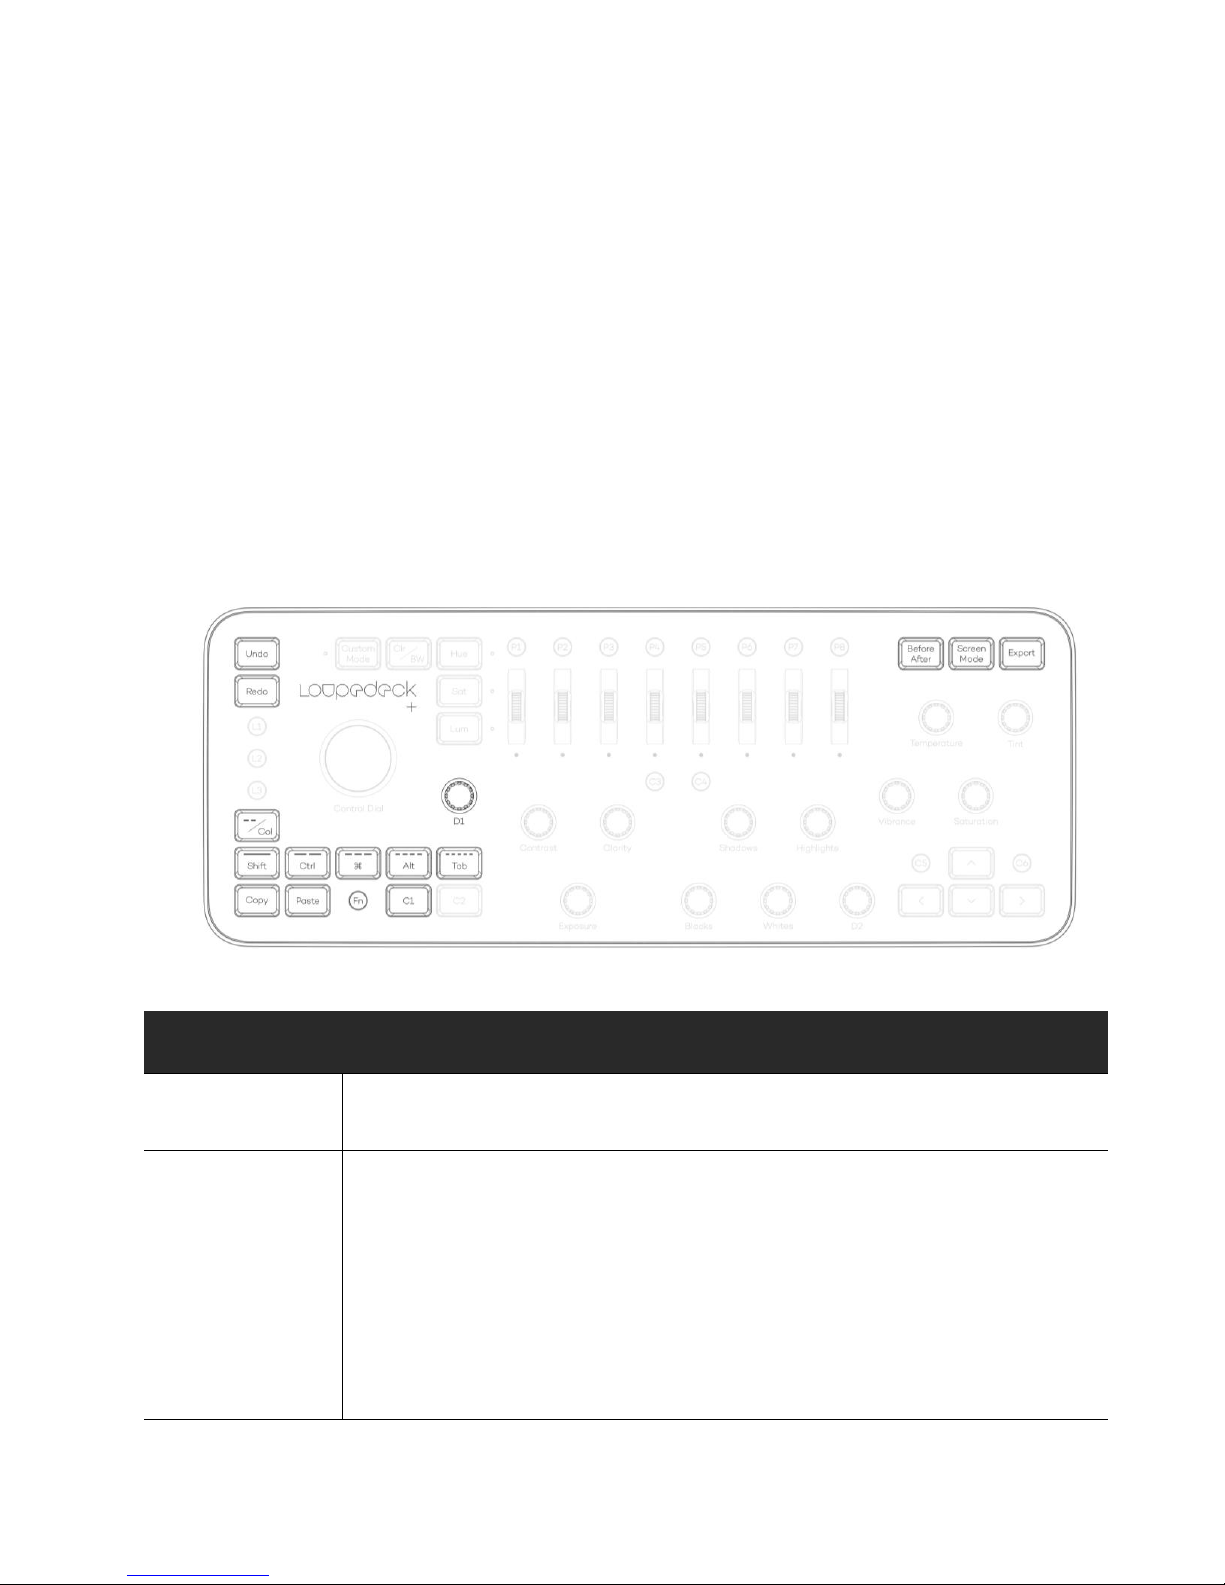
15. Activate the Keyboard Modifiers mode
16. Customizable Control Dial preconfigured as Brush size and Mouse Tool (with FN)
17. Customizable L1, L2 and L3 buttons preconfigured for most common tools
Basic functions
There are some basic functions that can be found in almost every software. The most useful
functions are printed on Loupedeck console(s) as they are also functions that are used on daily
bases (like copy & paste).
Keyboard Modifiers are also included in Basic functions as they are some of the most used
buttons in Photoshop. These buttons are located on the left side of the Loupedeck console, so
they can be used with left hand, while the right hand is occupied by a pen or a mouse.
FUNCTIONS
BUTTON, DIAL
WHAT CAN YOU DO WITH IT?
Function
FN
Press FN to activate the second layer of commands or as a
“home” button to activate editing software on top.
History
navigation
Undo,
Redo
Press Undo once to delete the most recent edit made in
workflow
Press Undo multiple times to go backwards in your workflow.
Press Redo to add the most recently deleted adjustment
made
Page 6

Copyright (c) 2017 Loupedeck Ltd. All rights reserved.
6
Area selection
Press FN+Redo to activate ‘Select All’ area selection
Press FN+Undo to cancel selected area
* To make an invert selection press C4 (invert) after selection
is made.
Copying and
pasteing
Copy,
Paste
Press Copy to copy selected layer or layers’ contents to
clipboard. Press FN+Copy to copy merged (all layers) to
clipboard. *
Press Paste to paste copied layers’ content to a new layer.
Press FN+Paste to paste content in clipboard into (selection).
*
* If you wish to make an identical copy of a layer, use
“duplicate layer” function or use “Select All” function by
pressing FN+Redo, then press Copy and Paste.
View Modes
Before
After
Press Before After button to compare first and last stage of
edited image. THIS will hide all other layers except the first
layer (typically named background).
Pressing Before After again will reveal all other layers to
show the final stage of the image.
Screen
Mode
Press Screen Mode to toggle through Photoshop’s three view
modes: Standard, Full Screen with Menu Bars & Complete
Full Screen.
Export & saving
Export
Press Export to save and export image
FN+C1
Press FN+C1 to save your main project file.
Keyboard
modifiers
-- / Col
(R1) Shift
(R2) Ctrl
(R3) ⌘
Press --/Col to switch rating buttons as Keyboard Modifiers
(written in Lightblue).
Press --/Col again to use functions assigned to rating buttons
(see Layer management for functions assigned under rating
buttons).
When Keyboard Modifiers are activated:
Press R1 for Shift
Press R2 for Ctrl
Page 7

Copyright (c) 2017 Loupedeck Ltd. All rights reserved.
7
(R4) Alt
(R5) Tab
Press R3 for Cmd (Mac) / Start (Win)
Press R4 for Alt (Win) / Opt (Mac)
Press R5 for Tab
Press FN+R1 for Enter
Press FN+R2 for Backspace
Press FN+R3 for Delete (Win only)
Press FN+R4 for Space
Press FN+R5 for Escape
Note: In other plugins such as Lightroom, Keyboard Modifiers
are activated by pressing FN+ --/Col. This work with the
Photoshop-plugin aswell, however this action has been made
simplier by just pressing --/Col .
Zoom in/out
D1
Rotate D1 clockwise to zoom in or counter clockwise to zoom
out.
Press D1 to set zoom mode to “Fit On Screen”.
Tools & Filters
We have selected an array of tool, which are most commly used in image editing. You can easily
change them within the Loupedeck configuration Software.
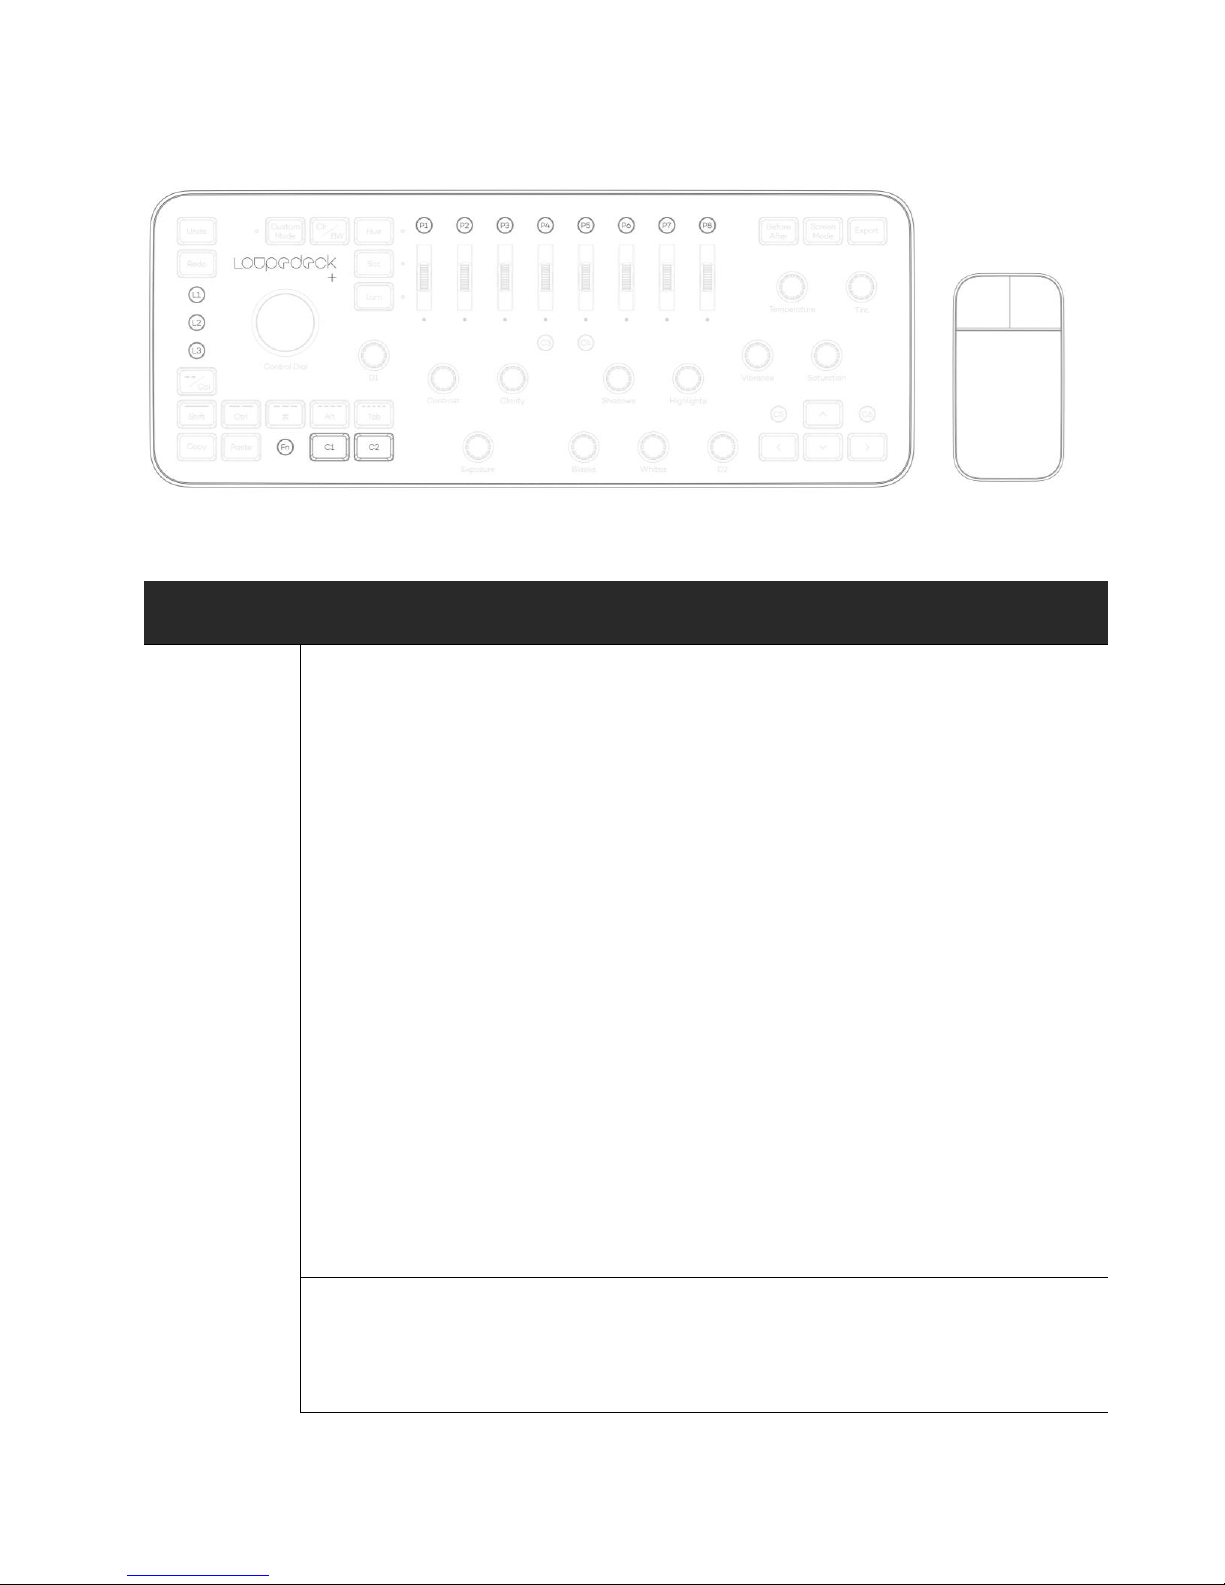
The most commonly used tools are assigned to L1-L3 and C1 & C2 buttons. This was strategically
done so they could be comfortably accessed with the left hand, while the right hand could be
occupied with either a pen or mouse. Tools are grouped as working pairs (like brush – erase
brush) to minimize hand movement, increasing the efficiency of your workflow.
Secondary (not as common) tools are assigned to P1-P8 buttons and Filters are located under
FN+P1-P8 buttons. P1-P8 also includes some functions for layer control.
Page 8
Copyright (c) 2017 Loupedeck Ltd. All rights reserved.
8
Left hand Right hand
On Loupedeck+ On mouse
FUNCTIONS
BUTTON
WHAT CAN YOU DO WITH IT?
Tools
L1 – L3,
FN
Press L1 to access Brush tool
Press FN+L1 to access Eraser tool
Press L2 to access Lasso tool
Press FN+L2 to access Free Transform tool **
Press L3 to access Clone Stamp tool ***
Press FN+L3 to access Spot Healing Brush tool
* When Brush (or a similar tool) is selected: HSL Scrolls (LUM
selected) can be used to control Brush attributes. More info on
pages 10-11.
** Free Transform tool is multifunctional compared to Move
Tool, but if you only need to move Lassoed areas, we suggest
you change FN+L2 function to Move Tool.
*** Clone Stamp is more accurate than Patch Tool. However, the
Patch Tool blends fixed areas with copied area and is faster to
use. If you prefer fast area blending we suggest you swap the L3
function with P3 (Patch Tool).
C1 & C2
Press C1 to use Hand Tool for moving a zoomed area.
Press C2 to switch between current and previous tool. *
Page 9

Copyright (c) 2017 Loupedeck Ltd. All rights reserved.
9
* As a pair for toggling between current and previous tool,
FN+C2 toggles between foreground and background colors.
P1-P8
Press P1 to access Burn tool
Press P2 to access Dodge tool
Press P3 to access Patch tool
Press P4 to access Gradient tool
Press P5 to access Blur tool
Press P6 to access Pen tool (for making paths)
Press P7 to access Type tool
Press P8 to access Camera Raw as an adjustment
Filters,
Smart
Objects
FN+P1-P8
All filters are added as Smart Filters:
Press FN+P1 to activate Average
Press FN+P2 to activate Gaussian Blur
Press FN+P3 to activate Blur More
Press FN+P4 to activate Clouds
Press FN+P5 to activate High Pass
Press FN+P6 to activate Sharpen
Press FN+P7 to activate Sharpen Edges
Press FN+P8 to transform layer into a Smart Object
Controlling Brush -type of a tool
Brush -tool has been set (as a factory default) to L1, so that accessing one of the most common
tools is as fast as possible. Brush tool is paired with Eraser Tool (FN+L1)since they are most
commonly used together.
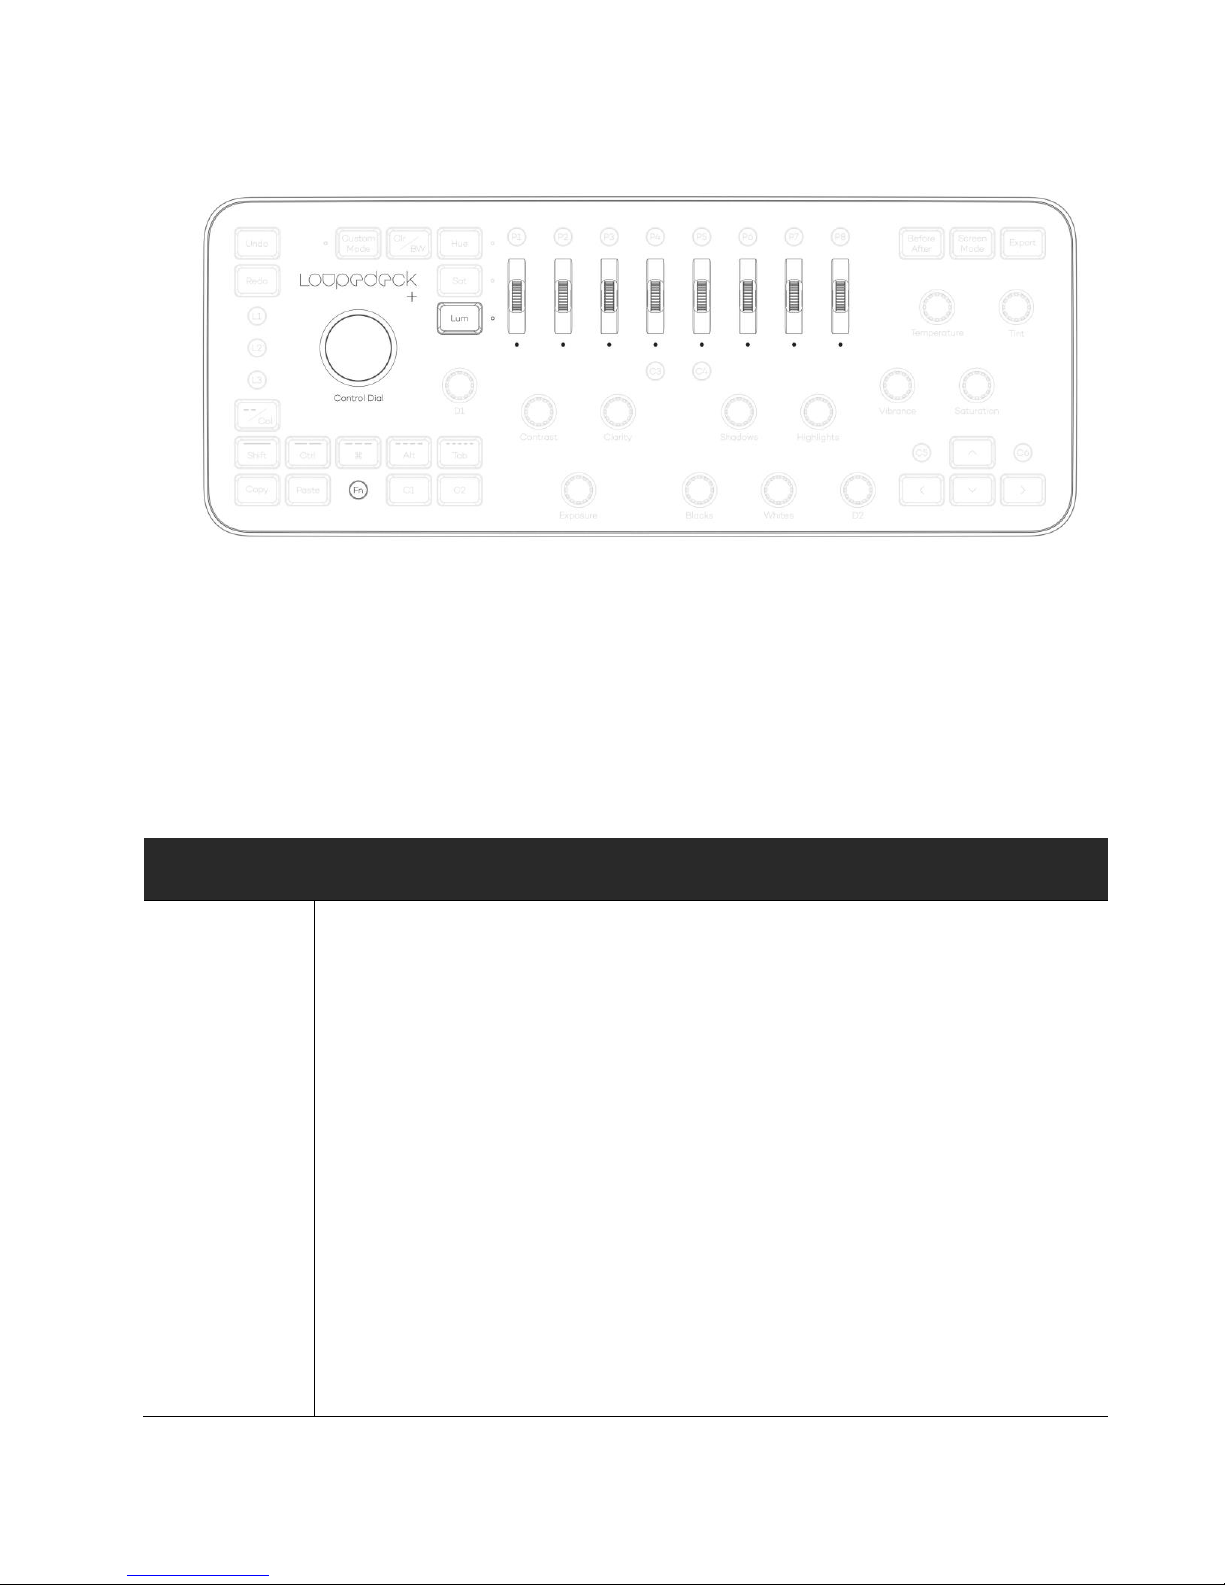
Tools with similar attributes to Brush Tool can be controlled with LUM Scrolls. LUM Scrolls are
activated when LED light is illuminated next to the LUM button.
Page 10
Copyright (c) 2017 Loupedeck Ltd. All rights reserved.
10
Tools that are controlled with LUM Scrolls.
- Healing Brush and Spot Healing Brush Tools
- Brush and Pencil Tools
- Clone Stamp and Pattern Stamp Tools
- History Brush and Art History Brush Tools
- Eraser and Background Eraser Tools
- Blur, Smudge and Sharpen Tools
- Dodge, Burn and Sponge Tools (only size)
FUNCTIONS
SCROLL / DIAL
WHAT CAN YOU DO WITH IT?
Brush
attributes
Control Dial,
FN
Scroll 1
(red)
Scroll 2
(orange)
Attributes can be changed if a particular tool has similar
traits (e.g. Eraser Tool has no Blending Mode)
Rotate Control Dial clockwise to increase or counter
clockwise to decrease brush tip size.
Rotate FN+Control Dial clockwise to increase or counter
clockwise to decrease brush hardness.
Turn Scroll 1 upwards to increase tip size or downwards to
decrease tip size *. Press Scroll 1 or Control Dial to reset
brush tip size to 25.
* On Windows OS cursor must be moved at the same time
when size is adjusted to see the change in real time.
Page 11

Copyright (c) 2017 Loupedeck Ltd. All rights reserved.
11
Scroll 3
(yellow)
Scroll 4
(green)
Scroll 5
(aqua)
Turn Scroll 2 in either direction to toggle through blending
modes. Press Scroll 2 to reset Blending Mode.
Turn Scroll 3 upwards to increase tool opacity. Turn Scroll 3
downwards to decrease tool opacity.
Press Scroll 3 to reset opacity to 100%.
Turn Scroll 4 upwards to increase tool Flow.
Turn Scroll 4 downwards to decrease tool Flow.
If Flow is not available, then Scroll 4 will adjust an attribute
that is comparable to Flow (e.g. Strength, Exposure).
Press Scroll 4 to reset flow to 100%.
Turn Scroll 5 upwards to increase tool smoothing. Turn
Scroll 5 downwards to decrease tool smoothing.
Press Scroll 5 to reset smoothing to 0%.
Brush attributes can be set with greater detail when Custom Mode is enabled. Through factory
default Brush attributes are set to the partial tone adjustment dial group.
FUNCTIONS
CUSTOM MODE DIAL
WHAT CAN YOU DO WITH IT?
Brush
attributes
Custom Mode,
Blacks,
Whites,
Shadows,
Highlights,
FN
When Custom Mode is enabled all necessary brush controls
are assigned to a group of basic dials.
Rotate Blacks to set brush size.
Press Blacks to set brush size to 25.
Rotate Whites to set brush opacity
Press Whites to reset opacity to 100%.
Rotate Shadows to set brush flow.
Press Shadow to reset flow to 100%.
Rotate Highlights to set brush smoothening.
Press Highlights to reset smoothening to 0%.
Rotate FN+Blacks to set brush hardness.
Press FN+Blacks to reset brush hardness to 0%.
Page 12

Copyright (c) 2017 Loupedeck Ltd. All rights reserved.
12
Rotate FN+Whites to set brush spacing.
Press FN+Whites to reset brush spacing to 1%.
Rotate FN+Shadows to set brush mode.
Press FN+Shadows to reset brush mode to normal.
Rotate FN+Highlights to set brush roundness.
Press FN+Highlights to reset brush roundness to 100%.
Layer Controlling
Working with layers can be separated into two different workflow styles
1) Using Loupedeck+ & Pen/Mouse:
Left hand on Loupedeck+’s left side controlling layer commands and right
hand on pen or mouse.
2) Using Loupedeck+ with two hands:
Left hand on Loupedeck+’s left side, controlling layer commands and right
hand on Loupedeck+’s right side, controlling layer navigating
Left hand 2) Right hand 1) Right Hand on
Loupedeck+ on Loupedeck+ on mouse
Tolls used for grouping such as, merging, clipping masks, layer visibility and layer or mask creating
are located on the left side of the Loupedeck+ Mapped functions are grouped as pairs with using
FN (like Group Layers <-> Ungroup Layers).
For selecting multiple layers Shift-modifier and mouse is needed. This is achieved by activating
keyboard modifiers (press --/Col). After multiple layers have been selected, press --/Col again to
access layer controlling buttons (R1-R5), and group or merge selected layers.
Page 13
Copyright (c) 2017 Loupedeck Ltd. All rights reserved.
13
Navigating between layers, changing layer order, edit selection between layer or mask, layer
visibility, clipping mask and toggling between layer blending modes are located on the right side
of the console. These functions can be activated easily with a mouse when working with the
Loupedeck+ & mouse combination.
Some functions can be located within in the middle of Loupedeck+. These are multi-functions
that can be used in several different workflows, including layer management (such as delete and
invert).
1) Layer controlling when right hand is using a pen or a mouse
FUNCTIONS
BUTTON
WHAT CAN YOU DO WITH IT?
Layer grouping
and merging
R1
R2
Working with selected layers:
Press R1 to group selected layers. Press FN+R1 to
ungroup.
Press R2 to merge selected layers as a new layer, or press
FN+R2 to merge selected layer(s) down as one layer.
R3
Working without selecting layers:
Press R3 to merge visible layers as a new layer, or press
FN+R3 to make a duplicate layer
Layer attributes
R4
Press R4 to assign layer as a clipping mask
Press FN+R4 to hide layer affect (Layer Visibility on/off).
Layer & mask
creation
R5
Press R5 to create a new layer.
Press FN+R5 to create a new layer mask. *
* You can make a black mask by pressing FN+R5 (Create
Mask) & pressing C4 (Invert) to invert mask from white to
black.
Global
commands
C3 & C4
Press C3 to delete a layer or a layer mask
Press C4 to invert layer or mask colors.
Press FN+C3 to Fill selected layer or a mask
2) Right hand layer controlling with Loupedeck+
Page 14
Copyright (c) 2017 Loupedeck Ltd. All rights reserved.
14
FUNCTIONS
BUTTON
WHAT CAN YOU DO WITH IT?
Navigating,
moving layers
Arrow Up,
Arrow Down,
Arrow Right
Press Arrow Up to navigate upwards on layer lists. Press
Arrow Down to navigate downwards on layer panel.
Press FN+Arrow up to move selected layer upwards on
the layer list. Press FN+Arrow Down to move selected
layer downwards on the layer panel.
Press FN+Arrow Right to select edits between layer or
layer mask.
Layer Attributes
Arrow Left,
Arrow Right
Press Arrow Left to hide/show layer (Layer visibility
on/off).
Press FN+Arrow Left to set layer as Clipping Mask
Press FN+Arrow Right to select next Layer Blending
Mode
Creating layers
and a layer mask
C5, C6
Press C5 to create a new layer with normal attributes.
Press FN+C5 to open create layer dialog and define layer
attributes.
Press C6 to create a new reveal-all layer mask (white
mask). Press FN+C6 to create a new hide-all layer mask
(black mask).
FUNCTIONS
DIAL
WHAT CAN YOU DO WITH IT?
Layer Blending
Mode
FN+D1
Rotate FN+D1 to toggle through layer blending modes.
Press FN+D1 to set blending mode to normal.
Layer Opacity
And Fill
D2
FN+D2
Rotate D2 to adjust layer opacity amount. Press D2 to set
layer opacity to 100%.
Rotate FN+D2 to adjust layer fill amount.
Press FN+D2 to set layer fill to 100%.
Page 15
Copyright (c) 2017 Loupedeck Ltd. All rights reserved.
15
Adjustment Layers
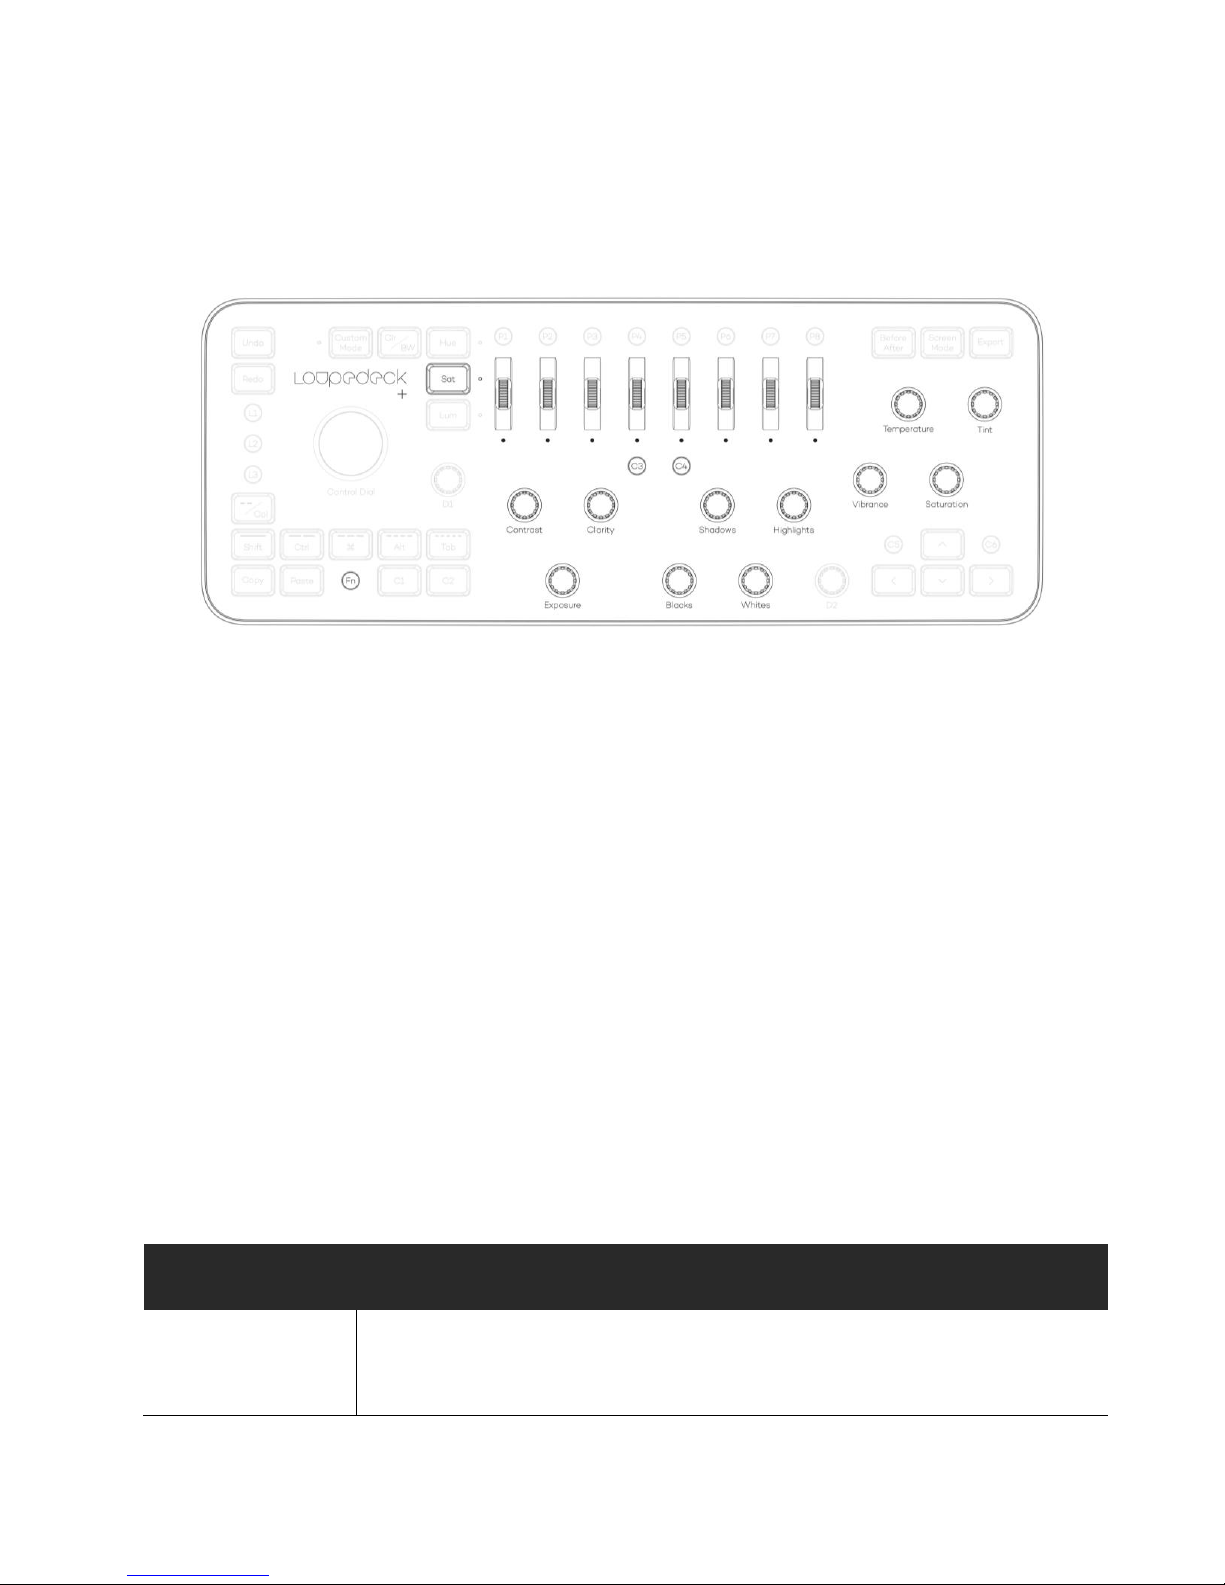
Adjustment layers are paired with basic dials, pressing a corresponding dial will create an
adjustment layer (e.g. pressing Exposure dial will create Exposure adjustment layer).
When an adjustment layer is selected and active:, parameters can be adjusted with
corresponding dials (listed below) and by using SAT Scrolls. SAT Scrolls are active when LED light
is on next to the SAT button. Another possibility is to use Mouse Tool: Horizontal or Mouse Tool:
Vertical by moving a mouse pointer over a slider or a control point and rotating Clarity
(Horizontally) or Shadows (Vertically).
There are some values which are not identically named with the Loupedeck+’s dials however,
you can still use a corresponding dial if the effect resembles the dial’s name (e.g. Exposure
Adjustment Layer’s Offset is adjusted with Blacks dial and Gamma Correction is adjusted by
Contrast dial).
When the SAT LED is on, there are 16 scroll adjustments available (Scrolls 1-8 and FN+Scrolls 1-8
as numbers 9-16). The scrolls have been set to corresponding parameter sliders in a natural order
(e.g. If the adjustment layer has only three values available, then Scrolls 1-3 are used and 4-8 are
unused).
Tip! Most of the Layer Adjusting options presented in the previous chapter are also available
when working with Adjustment Layers.
ADJUSTMENT LAYER /
FUNCTIONS
BUTTON / DIAL /
SCROLLING WHEEL
WHAT CAN YOU DO WITH IT?
Exposure
Exposure,
Blacks,
Contrast
Press the Exposure dial to create an Exposure
adjustment layer.
Page 16

Copyright (c) 2017 Loupedeck Ltd. All rights reserved.
16
When the Exposure Adjustment Layer is active and
selected from the layer list:
Turn Exposure dial to increase / decrease Exposure
value.
Turn Blacks dial to increase / decrease Offset value.
Turn Contrast dial to increase / decrease Gamma
Correction value
Brightness/
Contrast
Contrast,
Exposure
Press Contrast dial to create a Brightness/Contrast
adjustment layer.
When the Contrast Adjustment Layer is active and
selected from the layer list:
Turn Exposure dial to increase / decrease Brightness
value.
Turn Contrast dial to increase / decrease Contrast
value.
Levels
Blacks,
Whites,
Contrast,
FN
Press Blacks dial to create Levels adjustment layer.
When Levels adjustment layer is active and selected
from the layer list:
Turn Blacks dial to set black point, turn Whites dial to
set white point and turn Contrast dial to set midpoint
value.
Keep FN pressed down and Turn Blacks dial to set black
point target and turn Whites dial to set white point
target. Release FN button after target points have been
set.
Color Lookup
Whites
Press Whites dial to create adjustment layer.
Use mouse to select and change parameters.
Curves
Highlights,
Clarity,
Shadows
Press Highlights dial to create an adjustment layer.
Page 17

Copyright (c) 2017 Loupedeck Ltd. All rights reserved.
17
When adjustment layer is active and selected from the
layer list:
Move mouse pointer over curves line and use Mouse
Tool: Horizontal (Clarity) or Mouse Tool: Vertical
(Shadows) to create curve points and
increase/decrease curve points value.
Vibrance
Vibrance,
Saturation
Press Vibrance dial to create adjustment layer.
When adjustment layer is active and selected from the
layer list:
Turn Vibrance dial to increase/decrease vibrance value.
Turn Saturation dial to increase/decrease saturation
value.
Hue/Saturation
Saturation
Press Saturation dial to create adjustment layer.
Color Balance
Temperature,
HSL Scrolls,
FN
Press Temperature dial to create adjustment layer.
When Adjustment Layer is active and selected from the
layer list, and SAT has been selected:
Shadows:
Red scroll for: Cyan/Magenta balance
Orange scroll for: Magenta/Green balance
Yellow scroll for: Yellow/Blue balance
Midtones:
Green scroll for: Cyan/Magenta balance
Light Blue scroll for: Magenta/Green balance
Blue scroll for: Yellow/Blue balance
Highlights:
Purple scroll for: Cyan/Magenta balance
Magenta scroll for: Magenta/Green balance
FN+Red scroll for: Yellow/Blue balance
Selective Color
Tint,
Clarity
Press Tint dial to create adjustment layer.
When Adjustment Layer is active and selected from the
layer list: Move mouse pointer over a slider and use
Page 18
Copyright (c) 2017 Loupedeck Ltd. All rights reserved.
18
Mouse Tool: Horizontal (Clarity) to increase/decrease
slider value.
Color control
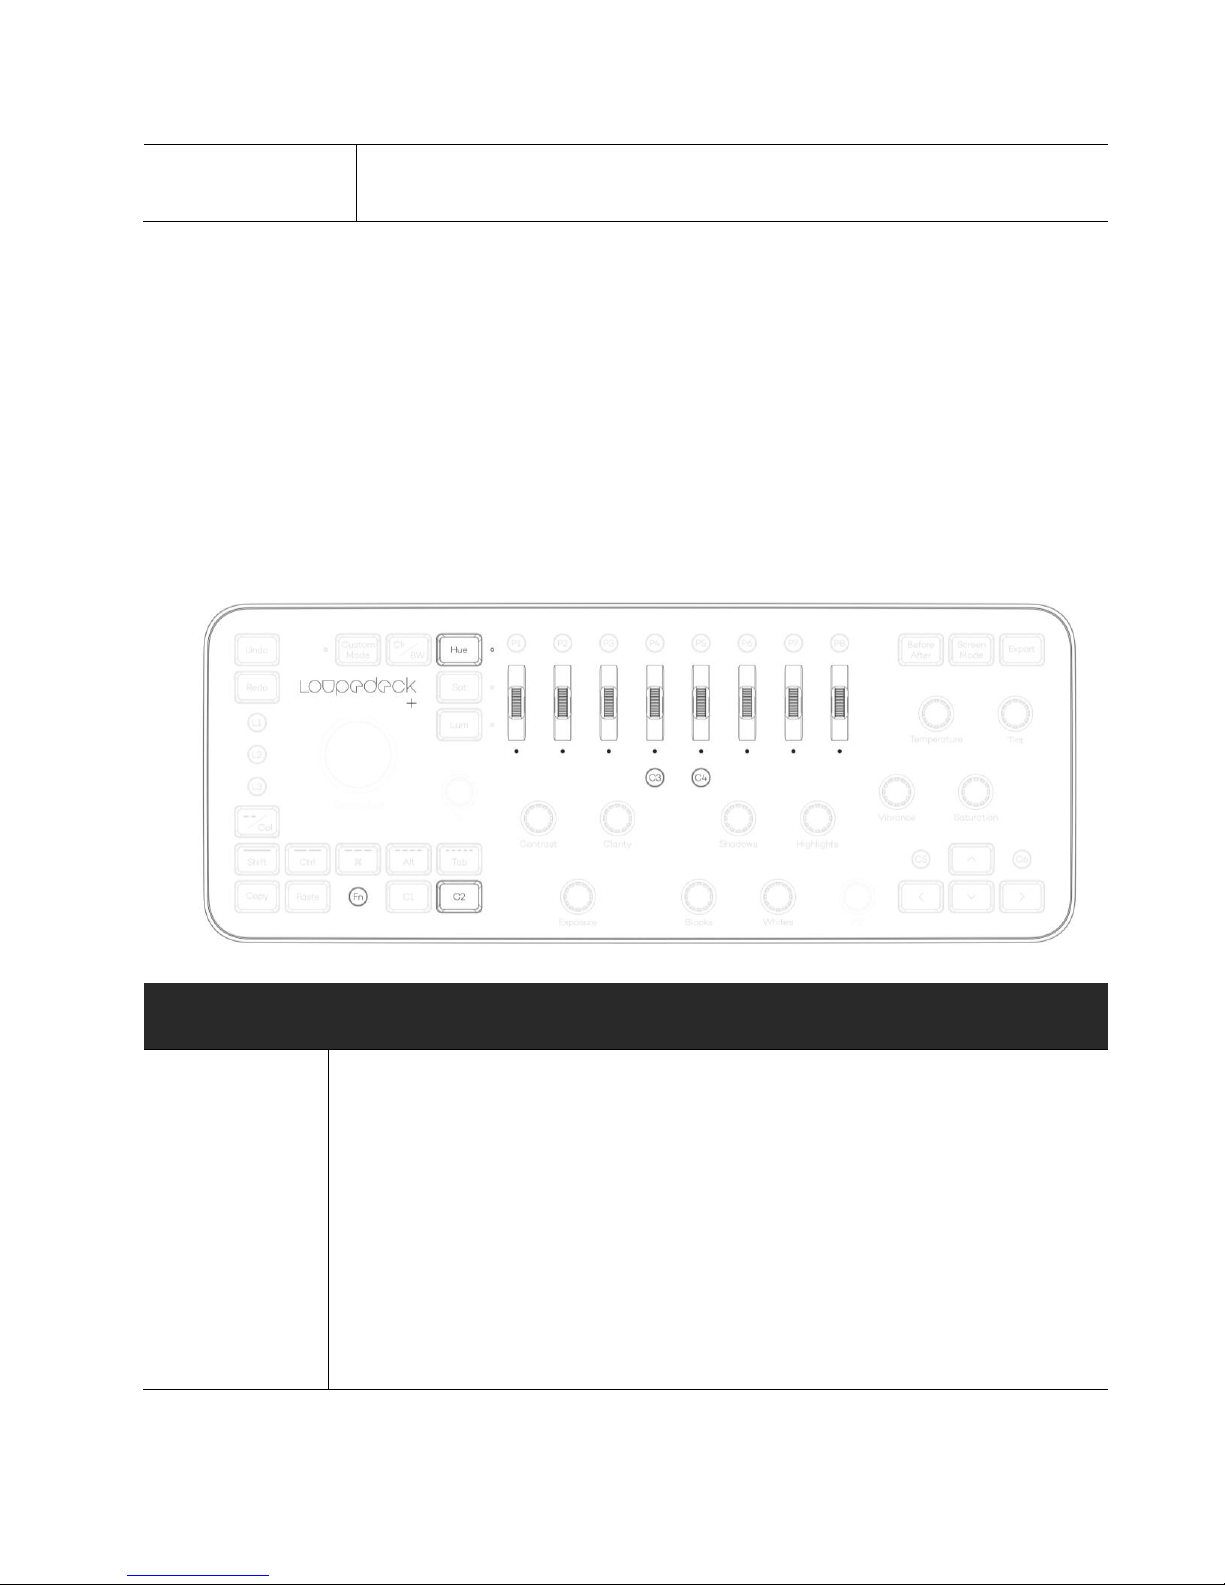
Selecting an adjusting color (hue/sat/lum) has been set to HSL Scrolls, when HUE is selected. HUE
Scrolls are activated when LED light is on next to the HUE button.
There is also quick access to main colors by pressing corresponding scroll. When FN is pressed
color adjustments for background color are activated.
For making color selections more convenient, Photoshop’s Color window should be open at all
times.
FUNCTIONS
BUTTON / DIAL /
SCROLLING WHEEL
WHAT CAN YOU DO WITH IT?
Adjusting
foreground &
background
color
Red Scroll,
Orange Scroll,
Yellow Scroll,
FN
Foreground color:
Rotate Red Scroll to adjust hue.
Rotate Orange Scroll to adjust saturation.
Rotate Yellow Scroll to adjust luminance.
Background color:
Rotate FN+Red Scroll to adjust hue.
Rotate FN+Orange Scroll to adjust saturation.
Rotate FN+Yellow Scroll to adjust luminance.
Page 19

Copyright (c) 2017 Loupedeck Ltd. All rights reserved.
19
Quick select
colors
Red Scroll,
Orange Scroll,
Yellow Scroll,
Green Scroll,
Aqua Scroll,
Blue Scroll,
Purple Scroll,
Magenta Scroll,
FN
Foreground colors:
Press Red Scroll to set red color
Press Orange Scroll to set orange color
Press Yellow Scroll to set yellow color
Press Green Scroll to set green color
Press Aqua Scroll to set aqua color
Press Blue Scroll to set blue color
Press Purple Scroll to set purple color
Press Magenta Scroll to set magenta color
Background colors:
Press FN+Red Scroll to set red color
Press FN+Orange Scroll to set orange color
Press FN+Yellow Scroll to set yellow color
Press FN+Green Scroll to set green color
Press FN+Aqua Scroll to set aqua color
Press FN+Blue Scroll to set blue color
Press FN+Purple Scroll to set purple color
Press FN+Magenta Scroll to set magenta color
Color codes used:
- #ff0000 / 255,0,0 / Red
- #ffa500 / 255,165,0 / Orange
- #ffff00 / 255,255,0 / Yellow
- #00ff00 / 0,255,0 / Green
- #00ffff / 0,255,255 / Aqua
- #0000ff / 0,0,255 / Blue
- #a500ff / 165,0,255 / Purple
- #ff00ff / 255,0,255 / Magenta
Color functions
FN+C2
Press FN+C2 to switch between foreground and
background color
FN+C3
Press FN+C3 to activate fill dialog
C4
Press C4 to invert colors inside selected area
Note! Area must be selected or invert will affect
something else (for example layer).
FN+C4
Press FN+C4 to reset foreground color to black and
background color to white.
Page 20
Copyright (c) 2017 Loupedeck Ltd. All rights reserved.
20
CUSTOM MODE
Loupedeck+ has a new Custom Mode where you can modify all the basic dials to your own
personal preferences.
The Little LED light next to the Custom Mode button indicates when Custom Mode has been
activated. Press Custom Mode again to jump back to normal mode, so you can use Loupedeck in
the classic way.
Assigning Custom Mode works the same way as signing every other function with our
configuration software.
Custom mode has a set of factory default functions that expand the usage of some tools like
brush and color controlling.
TOOL NAME
CUSTOM MODE
DIAL
WHAT CAN YOU DO WITH IT?
Color
Adjustment
Exposure,
Contrast,
Clarity
Adjust foreground color:
Rotate Exposure to adjust Color hue.
Rotate Contrast to adjust color saturation.
Rotate Clarity to adjust color luminance.
Adjust background color:
Rotate FN+Exposure to adjust color hue.
Rotate FN+Contrast to adjust color saturation.
Rotate FN+Clarity to adjust color luminance.
Page 21

Copyright (c) 2017 Loupedeck Ltd. All rights reserved.
21
Press Exposure to switch between foreground and background
color.
Brush
Attributes
When Custom Mode is enabled all necessary brush controls
are assigned to a group of basic dials.
Rotate Blacks to set brush size.
Press Blacks to set brush size to 25.
Rotate Whites to set brush opacity
Press Whites to reset opacity to 100%.
Rotate Shadows to set brush flow.
Press Shadow to reset flow to 100%.
Rotate Highlights to set brush smoothening.
Press Highlights to reset smoothening to 0%.
Rotate FN+Blacks to set brush hardness.
Press FN+Blacks to reset brush hardness to 0%.
Rotate FN+Whites to set brush spacing.
Press FN+Whites to reset brush spacing to 1%.
Rotate FN+Shadows to set brush mode.
Press FN+Shadows to reset brush mode to normal.
Rotate FN+Highlights to set brush roundness.
Press FN+Highlights to reset brush roundness to 100%.
CONFIGURING LOUPEDECK
In Photoshop, basic dials and some buttons are fixed so that they cannot be configured, while
everything else is opened to be configured to fit your workflow. In Custom mode, Loupedeck
offers all the basic dials that are fixed for adjustment layers in normal mode - to be assigned for
different purposes.
You can launch the Loupedeck Configuration Software the notification area (Windows system
tray or Mac menu bar). The icon you need to find is this:
Page 22
Copyright (c) 2017 Loupedeck Ltd. All rights reserved.
22
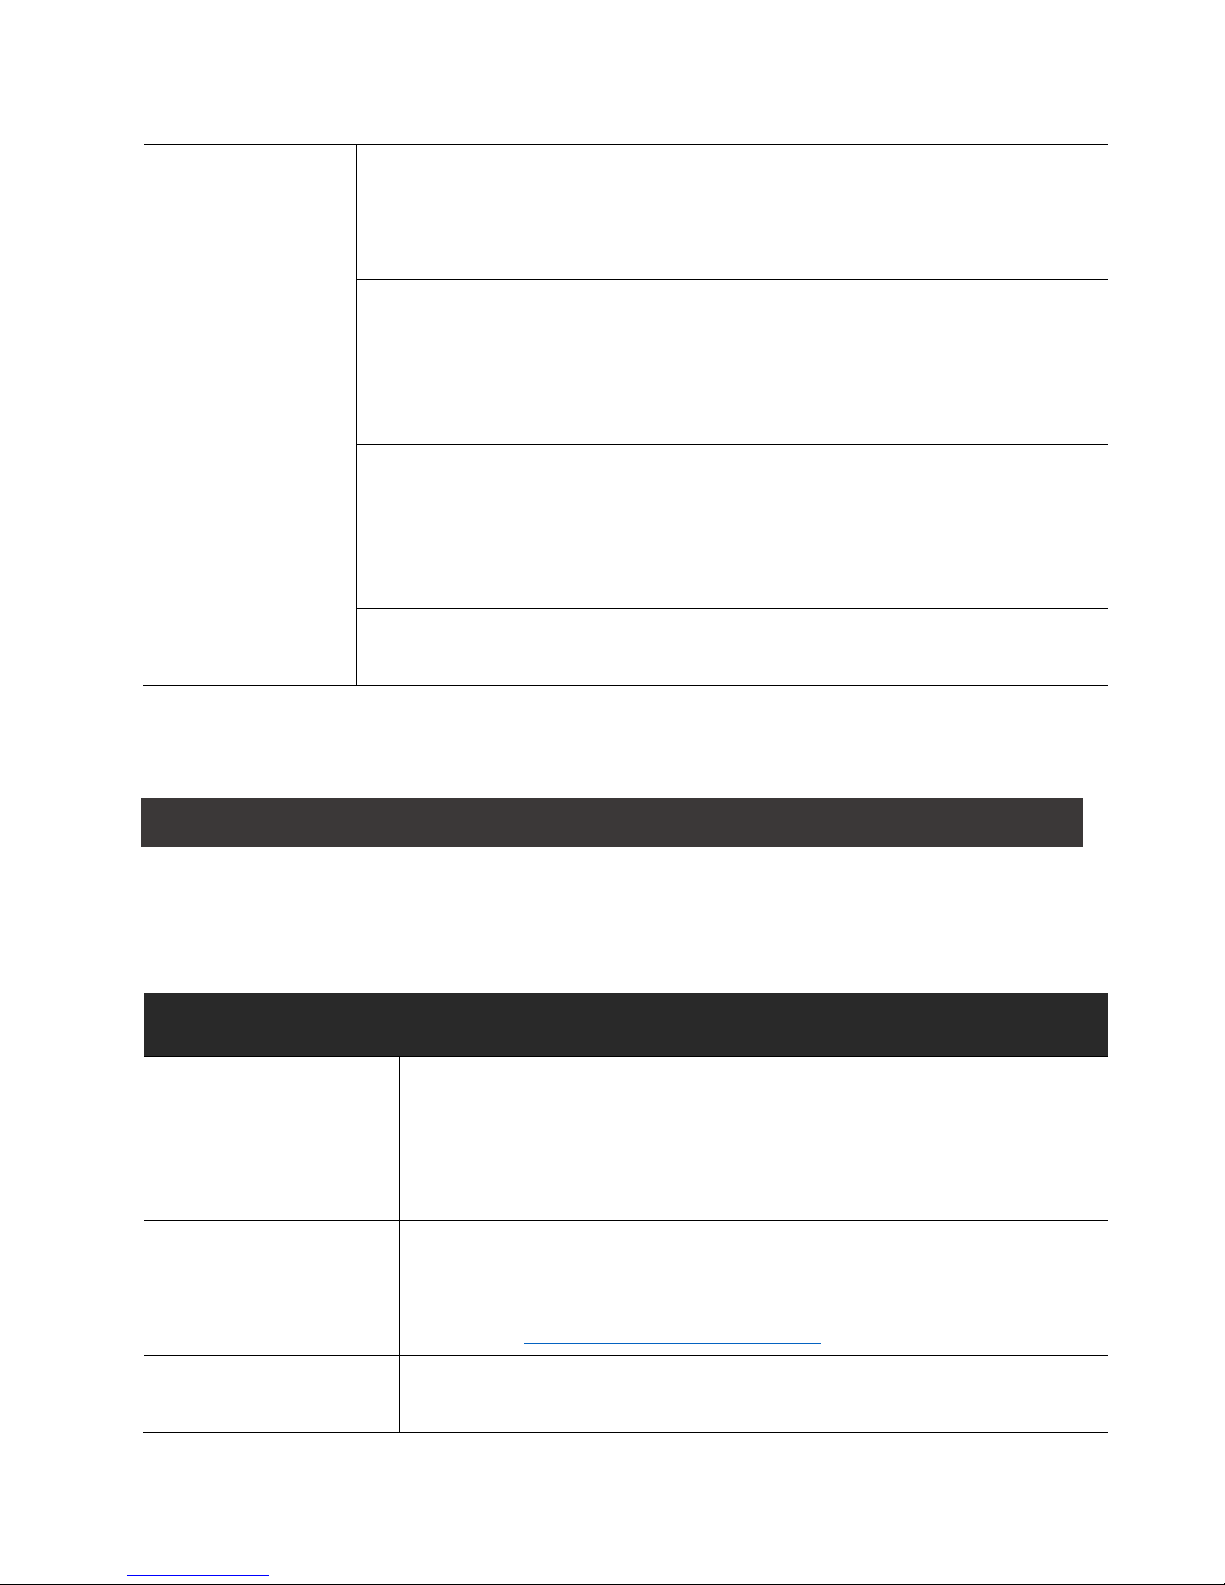
Within the Loupedeck configuration software’s main level, you can select which device,
application or group of buttons / dials you wish to customize. When you hover over the buttons
with a mouse they will light up (L1-L3 & C1-C6 on the image below).
1. Select your Loupedeck device you wish to configure
2. Select application you want to control with the Loupedeck console
3. Configure preset buttons P1-P8
4. Tune up other customizable buttons (Before/After, Screen Mode & Export)
5. Configure customizable buttons L1-L3 & C1-C6
6. Configure customizable dials D1 & D2
7. Configure Control Dial
8. Select Custom Mode to configure all basic dials
9. Check out our partner offers tailored for Loupedeck users!
10. Global Settings (e.g. Export/Import Loupedeck mapping layouts).
11. Press Done to close configuring software.
After selecting a button or dial group, a lit box will appear on top of Loupedeck software, allowing
specific button configurations (e.g. selecting L1-L3 & C1-C6 group to be configured):
Page 23

Copyright (c) 2017 Loupedeck Ltd. All rights reserved.
23
1. Group of buttons or dials that are assigned (e.g. C1 -button acts as Pick-flag)
2. List of actions that can be assigned
3. Search bar for locating specific actions by simply typing the name
4. Switch for accessing FN layer (second layer of assignable actions, e.g. FN+C1)
5. Purple box indicates that this button is under configuration
6. Gray arrow indicates that this action is already assigned
7. Purple box with arrow indicates that action is assigned to the corresponding button
8. Purple text indicated that this action has just been assigned
9. Light blue group box indicates that mouse is hovering over the group name
10. Cancel discard changes and exits action configuration
11. Close approves changes and exits action configuration
When a function is assigned to a button or a dial the effect occurs immediately (no need to press
“close” and “done” to apply changes).
Note! There are some general Loupedeck functions for buttons and dials that are available on
every supported software.
SUB MENU
BUTTON ITEM
WHAT CAN YOU DO WITH IT?
Page 24
Copyright (c) 2017 Loupedeck Ltd. All rights reserved.
24
Loupedeck
General (button &
dial presses)
Activate: Editing
Software
Select Activate: Editing Software to jump back to
the editing software. This function is identical to
pressing FN while editing software is not active (FN
functions as a home button).
Activate:
Loupedeck Setup
Select Activate: Loupedeck Setup for activating
Loupedeck Configuration Software.
Within the Loupedeck Configuration Software the
Loupedeck+ console can be configured.
Toggle: Keyboard
Mode
Select Toggle: Keyboard Mode to activate Keyboard
Modifiers Mode.
Keyboard Modifiers Mode can also be accessed by
pressing FN+ --/Col.
Mouse Tool:
Double Click
Select Mouse Tool: Double Click to emulate mouse’s
double click.
TASKBAR OPTIONS
Within Windows taskbar icon or macOS menu bar icon, you can find more options for your
Loupedeck.
OPTION NAME
ITEM
WHAT CAN YOU DO WITH IT?
Loupedeck Setup
(Win)
Open Setup…
(Mac)
Click Loupedeck Setup (Win) or Open Setup… (Mac) to
access Loupedeck configuration software.
Download Loupedeck
update
(Win only)
Opens Loupedeck’s set-up web page where you can
download user manuals and up-to-date software
https://loupedeck.com/setup/
Keyboard Mode
(Win only)
Click Keyboard Mode to set Keyboard Modifiers -mode
ON or OFF.
Page 25

Copyright (c) 2017 Loupedeck Ltd. All rights reserved.
25
Keyboard Modifiers can be set ON or OFF by pressing FN +
--/Col button from Loupedeck console.
Secondary FN button
(Win only)
None
C3
C4
C5
C6
Select None if you don’t want to clone FN button to any of
the customizable buttons. Select C3, C4, C5 or C6 if you
want to have an extra copy of FN button located
somewhere else on the Loupedeck console.
Help
Click Help (and with macOS sub link User Guide) to open
Loupedeck’s Support web page where answers to the
most commonly asked questions by our customers can be
found. Also provided on this page is access to Loupedeck’s
support form, which is located at the bottom of the page.
Please fill out the support form if you are in need of
technical assistance.
https://loupedeck.com/support/
Click User Guide to open
Legal
(Win only)
Opens Loupedeck’s Legal Guide web page, which provides
all the needed information regarding Loupedeck’s
warranty, product and safety information, trademarks,
legal rights, etc...
https://loupedeck.com/legal/
About
(Win only)
Version: 2.5.0.981
(Mac only)
Click About to open information about your current
Loupedeck Software version (build number) and copyright
information.
Example:
Version 2.5 (2.5.0.980)
Copyright © 2017-2018 Loupedeck Ltd.
Version (2.5.0) and build number (981) is visible as grayed
text on the top of the list after clicking Loupedeck’s
menubar icon.
Restart Loupedeck
(Win only)
Click Restart Loupedeck to shutdown and restart both
Loupedeck service and software.
Page 26
Copyright (c) 2017 Loupedeck Ltd. All rights reserved.
26
Stop Loupedeck
(Win only)
Quit
(Mac only)
Click Stop Loupedeck (Win) or Quit (Mac) to shutdown
Loupedeck service and software.
Enable Debug
(Mac only)
Usage of this function is instructed separately by customer
service. Enabling debugging for no reason is not advised as
your computer might slow down significantly.
When Enable Debug is activated, the menu item will
change to Disable Debug. Click Disable Debug to stop
debugging process.
After debugging process has finished a loupedeckLogs.zip file will appear on your desktop. That file can be deleted if
Customer Service has not specifically asked for it.
UPDATING LOUPEDECK
Visit the Loupedeck website www.loupedeck.com for software and configuration software
updates.
MORE QUESTIONS?
Encountered something unexpected? Here are a few helpful hints.
I connected Loupedeck+ to my computer and opened Lightroom, but nothing happens.
Have you downloaded and installed the Loupedeck software? The software is needed for
Loupedeck+ to work.
My Lightroom doesn’t seem to work with Loupedeck+.
What is your Lightroom version? Loupedeck is compatible with Adobe® Lightroom (version 6) and
Lightroom® Classic CC (version 7.4 or later). Cloud based version, Lightroom CC, is not supported
by Loupedeck.
Also, what is your operating system?
Loupedeck is compatible with Windows® 10 or later and Mac® OS 10.12 or later.
Page 27

Copyright (c) 2017 Loupedeck Ltd. All rights reserved.
27
Loupedeck software is not specifically developed for Windows 7 or 8, but it might work normally
as OS base is very similar.
You can find FAQs and support at www.loupedeck.com/support.
Page 28

Copyright (c) 2017 Loupedeck Ltd. All rights reserved.
28
PRODUCT AND SAFETY INFORMATION
Please read this important safety information before you use the LoupedeckTM device. It is important that
you follow the warning and caution information to prevent injury to yourself or others and to prevent
damage to your device. The term “device” refers to the LoupedeckTM product and the items supplied with
the product.
Information in this document may be changed without notice. Loupedeck Ltd reserves the right to change
or improve its products and to make changes in the documentation without notifying any person or
organization of such changes or improvements. Visit Loupedeck Ltd’s website www.loupedeck.com for
updates and supplemental information concerning the use and operation of Loupedeck Ltd products.
Information on product compatibility is available on Loupedeck Ltd’s website.
THIRD PARTY TRADEMARKS AND ITEMS
Adobe Photoshop Lightroom CC is Copyright © 2018 Adobe Systems Incorporated. All rights reserved.
Mac OS is a trademark of Apple Inc., registered in the U.S. and other countries.
Windows is a registered trademark of Microsoft Corporation in the United States and/or other countries.
WARNINGS AND CAUTIONS
Keep the device clean. Do not clean the device with solvents, toxic chemicals or strong detergents, as they
may cause damage to the product. Store your device only on flat surfaces. Do not drop or shock the product
as it may be damaged.
The device can be used in locations with an ambient temperature of 0°C to 35°C (+32°F to +95°F). Using or
storing the device outside of the recommended temperature ranges may damage the device.
Your device is not water-resistant. Keep it dry.
Do not disassemble or modify the product as it may damage it and invalidate the warranty.
Follow all instructions in the user guide to ensure the longest lifespan of your device. Damages or poor
performance caused by failure to follow warnings and instructions can void your manufacturer’s warranty.
Your device may wear out over time.
Do not store your device near magnetic fields. Your device may malfunction from exposure to magnetic
fields.
Allow only qualified personnel to service your device. Allowing unqualified personnel to service your device
may result in damage to your device and will void your manufacturer’s warranty.
Page 29

Copyright (c) 2017 Loupedeck Ltd. All rights reserved.
29
LOUPEDECK LTD ONE YEAR LIMITED WARRANTY
Loupedeck Ltd warrants that for a period of one (1) year from original date of purchase, LoupedeckTM will
be free from defects in materials and workmanship under normal use. Loupedeck Ltd does not warrant
against defects caused by normal wear and tear or damage caused by accident, abuse, misuse, fire or liquid
contact, nor any damage caused by service provider who is not a representative of Loupedeck Ltd’s
authorized service provider. In the event of a defect, please contact Loupedeck Ltd Customer Support
(www.loupedeck.com/support) for assistance, call us or visit Loupedeck Ltd’s website
(www.loupedeck.com/legal), or contact an authorized service provider. The available service options
depend on the country in which service is requested and may be limited to the original country of purchase.
Phone calls and deliveries may be subject to certain costs depending on the location. Full terms and
conditions and details of the service can be found at www.loupedeck.com/legal. If you make a warranty
claim under this warranty, Loupedeck Ltd will at its discretion, repair or replace the LoupedeckTM device, or
return the purchase price. Guarantee terms and conditions are in addition to the local consumer laws. You
may be required to present proof of purchase when you make a warranty claim.
For Australian consumers: this warranty is in addition to the statutory rights under applicable Australian
consumer protection laws and regulations. You are entitled to a replacement or refund for a major failure
and for compensation for any other reasonably foreseeable loss or damage. You are also entitled to have
the goods repaired or replaced if the goods fail to be of acceptable quality and the failure does not amount
to a major failure. Goods presented for repair may be replaced by refurbished goods of the same type
rather than being repaired. Refurbished parts may be used to repair the goods.
For the rest of the Loupedeck Ltd warranty terms and conditions, see our website
www.loupedeck.com/legal.
WAIVER
By using Loupedeck™, you waive some legal rights as detailed fully in the Terms and Conditions and
highlighted herein. Please read this Legal Guide and the Terms and Conditions carefully before using
Loupedeck™. Use of the Loupedeck™ product means you agree to all provisions in this Legal Guide and
the Loupedeck Ltd Terms and Conditions. If you do not agree and consent to all the provisions in the Legal
Guide and Terms and Conditions, please return Loupedeck™ for a refund in accordance with the abovenoted instructions.
FEDERAL COMMUNICATIONS COMMISSION (FCC) STATEMENT 15.105(b)
This equipment has been tested and found to comply with the limits for a Class B digital device, pursuant
to part 15 of the FCC rules. These limits are designed to provide reasonable protection against harmful
interference in a residential installation.
This equipment generates, uses and can radiate radio frequency energy and, if not installed and used in
accordance with the instructions, may cause harmful interference to radio communications. However,
there is no guarantee that interference will not occur in a particular installation. If this equipment does
cause harmful interference to radio or television reception, which can be determined by turning the
Page 30

Copyright (c) 2017 Loupedeck Ltd. All rights reserved.
30
equipment on and off, the user is encouraged to try to correct the interference by one or more of the
following measures:
• Reorient or relocate the receiving antenna.
• Connect the equipment into an outlet on a circuit different from that to which the receiver is
connected.
• Increase the separation between the equipment and receiver.
Consult the dealer or an experienced technician for help.
15.19
This device complies with Part 15 of the FCC Rules. Operation is subject to the following two conditions:
1) This device may not cause harmful interference and
2) This device must accept any interference received, including interference that may cause undesired
operation of the device.
15.21
You are cautioned that changes or modifications not expressly approved by the part responsible for
compliance could void the user’s authority to operate the equipment.
INDUSTRY CANADA STATEMENT
This device complies with Industry Canada license-exempt RSS standard(s). Operation is subject to the
following two conditions:
(1) This device may not cause interference, and
(2) This device must accept any interference, including interference that may cause undesired operation
of the device.
Le présent appareil est conforme aux CNR d’Industrie Canada applicables aux appareils radio exempts de
licence. L’exploitation est autorisée aux deux conditions suivantes:
(1) l’appareil ne doit pas produire de brouillage, et
(2) l’utilisateur de l’appareil doit accepter tout brouillage radioélectrique subi, même si le brouillage est
susceptible d’en compromettre le fonctionnement.”
This Class B digital apparatus complies with Canadian ICES-003.
Cet appareil numérique de la classe B est conforme à la norme NMB-003 du Canada.
EUROPEAN COMPLIANCE
The manufacturer of this product confirms that this product complies with the European
Union regulations for safety, health, environmental and consumer protection (ECM =
Electromagnetic Compatibility 2014/30/EU).
Page 31

Copyright (c) 2017 Loupedeck Ltd. All rights reserved.
31
A copy of the EU Declaration of Conformity is available online at Loupedeck Ltd website
(www.loupedeck.com/legal).
RECYCLE
Always return your used electronic products, batteries, and packaging materials to
dedicated collection points. This way you help prevent uncontrolled waste disposal and
promote the recycling of materials. Obey local regulations and recommendations. Contact
your local waste management for more information on recycling.
THE CROSSED-OUT WHEELIE BIN SYMBOL
When the device has reached its end of life it should be recycled as electric and electronic
waste.
Copyright (c) 2017 Loupedeck Ltd. All rights reserved.
Visit our website for further support and information at www.loupedeck.com.
Page 32

Copyright (c) 2017 Loupedeck Ltd. All rights reserved.
32
www.loupedeck.com
 Loading...