

Lotus Water Treatment System, LWT100, LWT100K User Manual
®
Water Treatment System
Use & Care Guide
Syst me de traitement de l eau
Manuel d utilisation
et d entretien
Sistema de tratamiento del agua
Manual de Uso y
Cuidado
14005R4

TABLE OF CONTENTS
Parts and Features . . . . . . . . . . . . . . . . . . . . . . . . . . . . . . . . . . . . . . . . . . . . . . . . . . . . . . 1
Important Safety Instructions . . . . . . . . . . . . . . . . . . . . . . . . . . . . . . . . . . . . . . . . . . . . . 2
Understanding your Treatment System . . . . . . . . . . . . . . . . . . . . . . . . . . . . . . . . . . . . . 3-4
Getting Started . . . . . . . . . . . . . . . . . . . . . . . . . . . . . . . . . . . . . . . . . . . . . . . . . . . . . . . . . 5-6
Operating your Water Treatment System . . . . . . . . . . . . . . . . . . . . . . . . . . . . . . . . . . . 7
MAINTENANCE
Installing a New Carbon Filter . . . . . . . . . . . . . . . . . . . . . . . . . . . . . . . . . . . . . . . . . . . . . 8-9
Cleaning . . . . . . . . . . . . . . . . . . . . . . . . . . . . . . . . . . . . . . . . . . . . . . . . . . . . . . . . . . . . . . . 9
Handling . . . . . . . . . . . . . . . . . . . . . . . . . . . . . . . . . . . . . . . . . . . . . . . . . . . . . . . . . . . . . . . 10
Troubleshooting . . . . . . . . . . . . . . . . . . . . . . . . . . . . . . . . . . . . . . . . . . . . . . . . . . . . . . . . .10
Frequently Asked Questions . . . . . . . . . . . . . . . . . . . . . . . . . . . . . . . . . . . . . . . . . . . . . . 11
Warranty . . . . . . . . . . . . . . . . . . . . . . . . . . . . . . . . . . . . . . . . . . . . . . . . . . . . . . . . . . . . . . . 12-14
Performance Data List . . . . . . . . . . . . . . . . . . . . . . . . . . . . . . . . . . . . . . . . . . . . . . . . . . . 15-16
Congratulations on your purchase of the lotus® Water Treatment System. Your lotus® system utilizes the same ozone
technology employed by bottled water companies to kill up to 99.99% of bacteria like E. coli 0157:H7 that can sometimes
seep into your drinking water supply.
Perhaps you have had concerns about impurities, pathogens and the like finding there way into your family’s drinking
water or have been worried that the water filter you use cannot adequately deal with microbiological pathogens. Well,
your new lotus® Water Treatment System alleviates all those fears by using a proprietary 2-stage process to deliver safe,
fantastic tasting drinking water to you and your family. The first stage utilizes patented Oxyshield™ technology to infuse
the water with ozone, killing the microorganisms likely to be found in your drinking water. The second stage uses a
custom formulated carbon-block filter to capture any remaining contaminants including mercury, lead, chlorine and MTBE
while at the same time leaving good minerals such as calcium, magnesium and potassium for that great lotus® taste! By
utilizing this two stage process, your lotus® Water Treatment System eliminates up to an astounding 99.99% of the
pathogens that can sometimes be found in your water supply* (See the lotus Performance Data List on page 13-14 of
your Use & Care Guide for details).
Above all, you can rest assured that your lotus® system will dispense great tasting, microbiologically safe* drinking water
for your family because of the state-of-the-art, microprocessor that monitors and runs lotus®. In the unlikely event that
something was to go wrong, the microprocessor would automatically detect the problem and shut itself down.
Please feel free to thoroughly enjoy the comfort in knowing that your family will be drinking fantastic tasting,
microbiologically safe* water for many years to come.
Your lotus® Use & Care Guide contains many important safety features and operating instructions; please read it
carefully and retain this guide for future reference.
*Tested and verified by independent laboratory testing for the bacterial and protozoa claims on the Performance Data List
on page 16. NSF Certification for a microbiological claim is for Cyst Reduction only.
PARTS AND FEATURES
1
2
3
4
5
10
11
12
6
9
7
8
(inside
Filter housing)
(positioned
behind carafe
on this side)
(bottom center
of back)
c
b
a
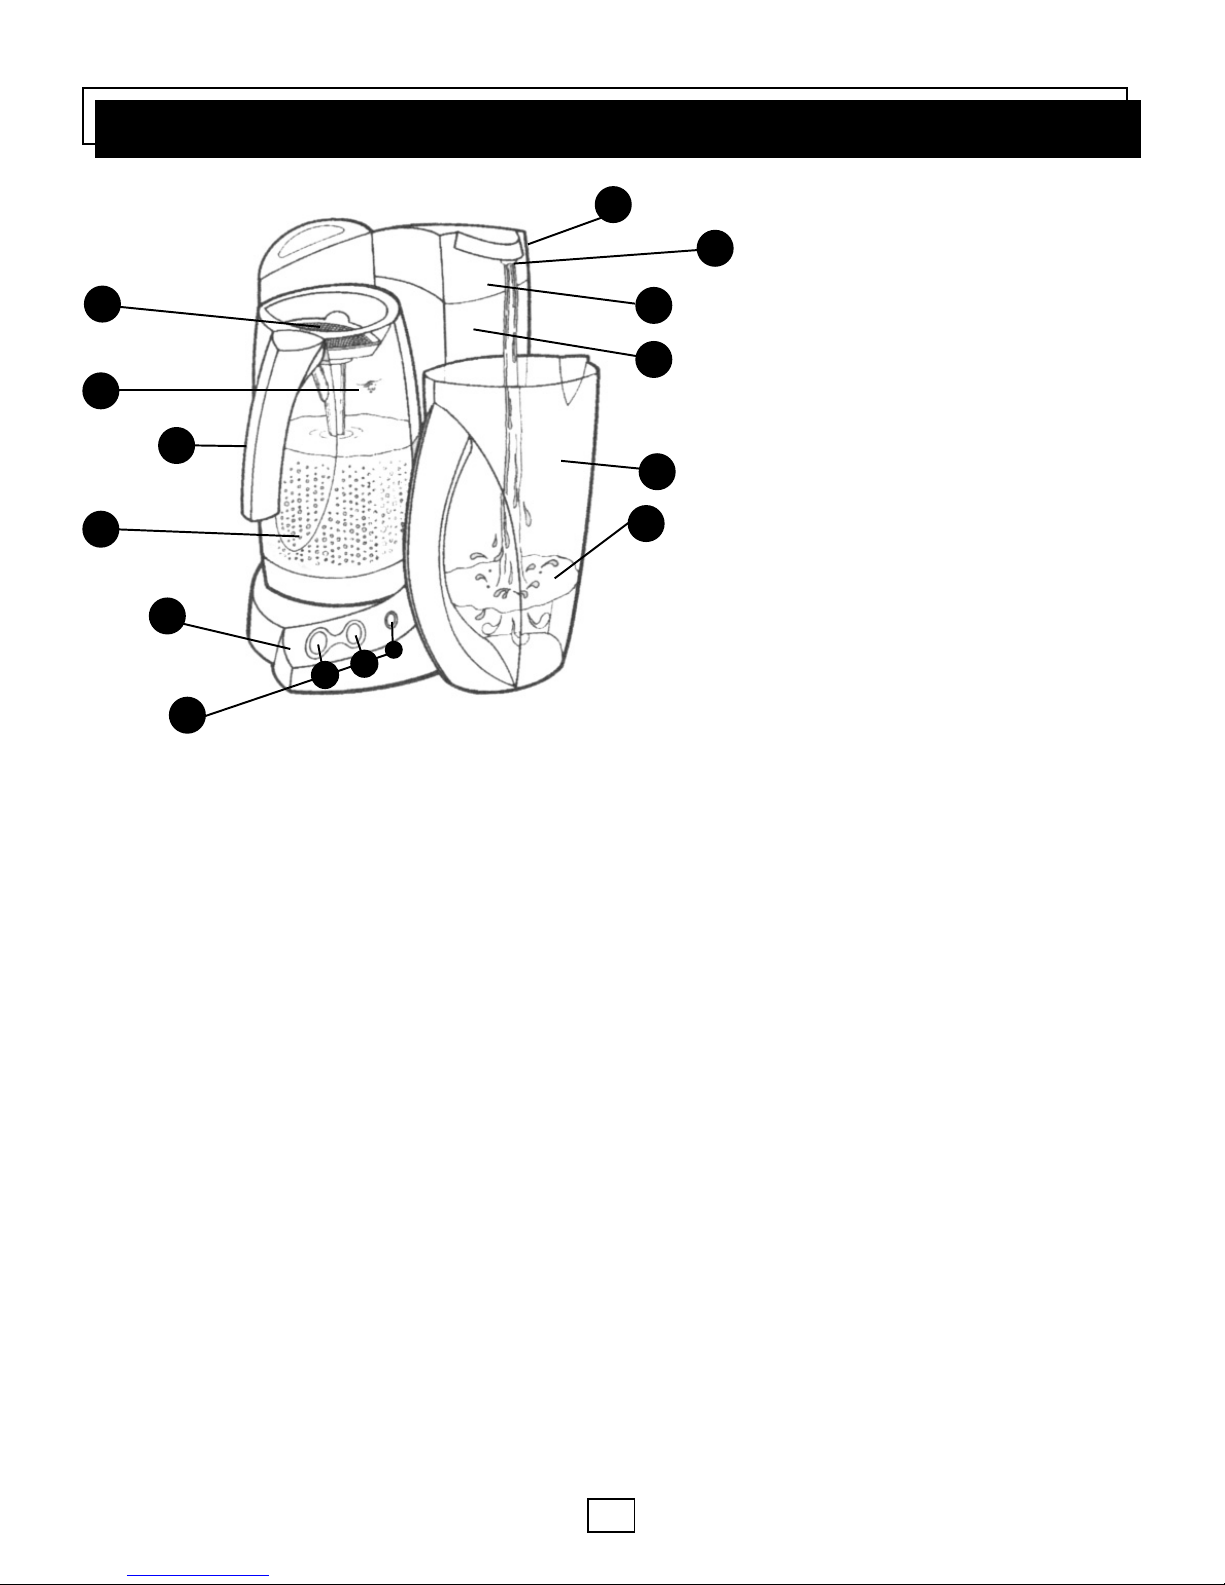
1. PRE-FILTER SCREEN:
This prevents any larger sediment(s) that
may be in your drinking water. It is
removable for cleaning.
2. PROCESSING CARAFE:
It is within the Processing Carafe where
lotus® utilizes Oxyshield™ technology to
infuse ozone to sanitize the water. Please
ensure that you twist and remove the
Processing Carafe before filling.
3. FILL LINE: This line indicates the
2 quart (approx. 2 liter) mark. When
filling the Processing Carafe always
make sure that the Processing Carafe is
filled to this line. Do not overfill as this
may adversely affect performance of
the unit.
4. CARBON-BLOCK FILTER: This is where the second stage of the sanitization process occurs. The
carbon-block filter reduces chemical contaminants and other impurities. It is removable and needs to be
replaced after about 365 gallon (1,400 liters) of water has been filtered through it.
5. CARBON-BLOCK FILTER HOUSING CAP: This is a fitted cap that comes off with a gentle
pull. It is removed to install or replace the carbon-block filter.
6. CARBON-BLOCK FILTER HOUSING: This is where the carbon filter is located.
7. CONTROL PANEL: This is where you interact with lotus®.
8. (a) PROCESS Button: Press to have lotus® initiate the Oxyshield™ sanitization process. The Process
Button light remains illuminated during the entire sanitizing process.
(b) MANUAL DISPENSE Button: This manually dispenses clean water through the dispense
nozzle. Also used to reset filter counter.
(c) STATUS INDICATOR Light: This indicates whether the system is programmed for municipal,
well or lake water.* It also indicates the filter expiry.
9. CLEAN WATER CARAFE: lotus® clean water is dispensed into this carafe.
10. DISPENSE NOZZLE: lotus® clean water is dispensed from here.
11. AUTO-DISPENSE Button: When the carafe is nestled at the base of the unit, it activates the button.
lotus® clean water is then automatically dispensed into the clean water carafe.
12. ELECTRIC CORD: This is a 3 prong grounded cord.
1
*Tested and verified by independent laboratory testing for the bacterial and protozoa claims on the Performance Data List
on page 16. NSF Certification for a microbiological claim is for Cyst Reduction only.

IMPORTANT SAFETY INSTRUCTIONS
Please, follow basic precautions when using your lotus® Water Treatment System.
READ ALL INSTRUCTIONS CAREFULLY BEFORE USING THIS APPLIANCE
WARNING:
To reduce the risk of fire, electric shock or injury, please read the following:
1. Your lotus® Water Treatment System is intended to be used ONLY as described in this Use & Care Guide. The
system is designed for normal household use ONLY; commercial use will void the warranty.
2. The system is not intended to treat water which has an obvious contamination source such a raw sewage, nor is
the system intended to convert waste water into microbiologically safe drinking water.
3. Please use 120V outlet.
4. Do not attempt to operate your lotus® system without the Processing Carafe in place and/ or without the
carbon-block filter in place.
5. Do not use salt water in the Processing Carafe. The unit will not remove salt from salt water.
6. When the unit is not in use, unplug from the outlet and leave the Processing Carafe locked in place.
7. Do not allow the system to be used as a toy. Close attention is required when used near children.
8. In the unlikely event your system stops working or if the system has been dropped or damaged, call
1-800-808-1724. Do not attempt to repair it yourself as this will invalidate your warranty.
9. To unplug the system grasp the plug, not the cord. Do not use with a damaged cord or plug.
10. Do not immerse the electric cord or plug in water.
11. Do not use outdoors or on wet surfaces.
12. Do not allow your system to touch hot surfaces. Do not place your system on top of a stove or near other
hot appliances.
13. To fill the Processing Carafe, remove it from the base and fill with water to the fill line. Do not overfill the
Processing Carafe nor attempt to fill it while it is in position on the base unit.
14. Use only cool water in the Processing Carafe (Min. 36ºF / 2°C). Do not use warm or hot water. (Max. 86ºF/ 30°C).
15. If the Processing Carafe is cracked or appears damaged in anyway, do not use it.
16. Do not place the Processing Carafe in your refrigerator or freezer.
17. If moving the system, always keep it upright with the Processing Carafe locked to the base in place.
18. Use of the system must comply with state and local laws and regulations.
2
UNDERSTANDING YOUR WATER TREATMENT SYSTEM
3
B
A
C
FIGURE 1
FIGURE 2
FIGURE 3
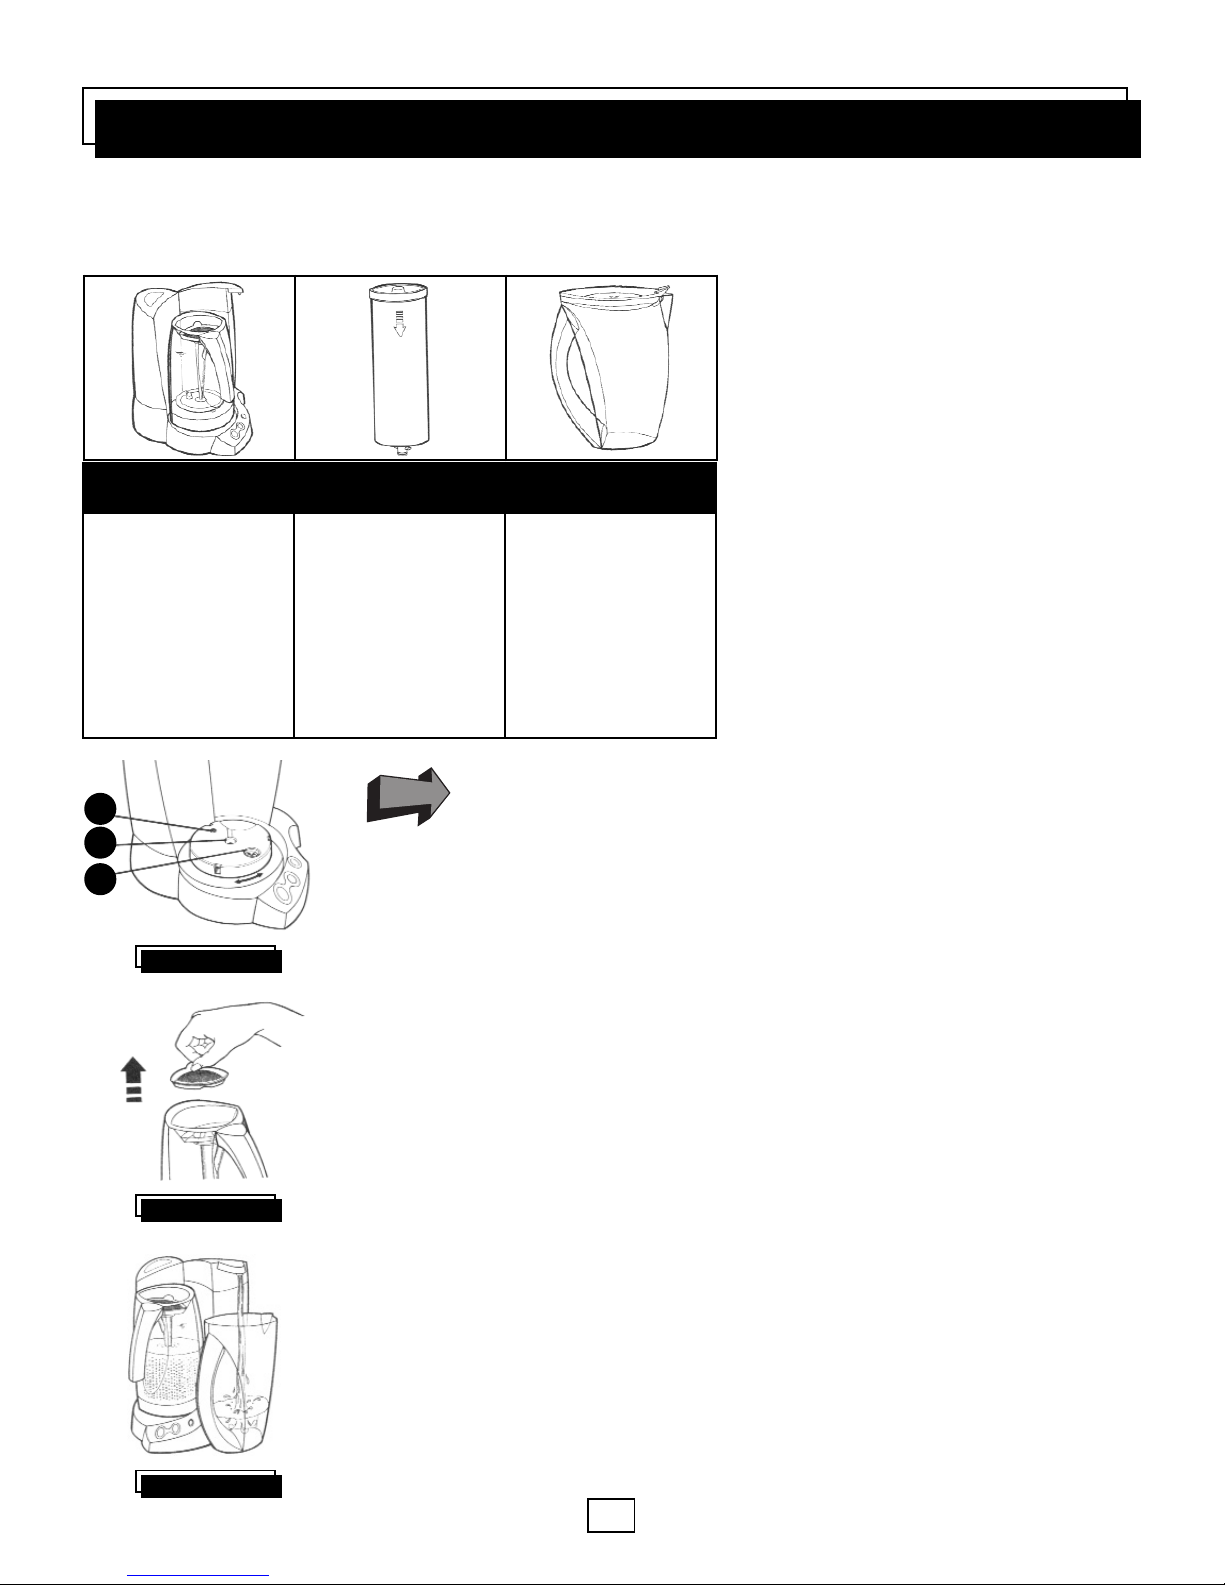
UNPACKING YOUR UNIT: These are the components you will find as you unpack your Water Treatment
System.
PROCESSING CARAFE:
It may look like a heavy water jug, but it is
fairly light. The transparency of the jug
allows the visual display of the most
advanced technology available in water
treatment today. The Processing Carafe is
where the first stage of treatment process
occurs. The ozonation process stage is
designed to kill some of the most common
microorganisms that may be in your water.
(See “Performance Data List” for details).
Notice the water line on the side of the
Processing Carafe. This is the fill line
indicating 2 quarts (approx. 2 Liters).
When filling the Processing Carafe always
make sure that the Processing Carafe is
filled to this line.
Do not overfill, as this may adversely affect performance of the unit.
ROTARY TABLE: The water port (A) is located in the centre of the rotary table.
If the Processing Carafe is inadvertently over filled, some excess water will show up
here. Just wipe any excess water. (FIGURE 1)
The water drain valve (B) is located diagonally and to the right of the water overflow
port. Water travels to the carbon-block filter through this valve. It is normal to see
water in this area. (FIGURE 1)
Port (C) is where the ozone is dispersed into the water. When the ozonation process
is taking place, you will be able to see the bubbling process occurring. (FIGURE 1)
PRE-FILTER SCREEN: This is designed to catch any larger sediment that
may be in your drinking water. You can remove this filter for cleaning. It simply pulls off
and fits snugly into place. Unless damaged, the pre-filter screen never needs to be
replaced. (FIGURE 2)
CLEAN WATER CARAFE: This is designed to hold up to 2 quarts (approx.
2 liters) of sanitized water. It is also designed to look great on your table. It is made of
tough, durable plastic and will last years of normal use. It fits snugly in the curved
space under the dispense nozzle. When placed here, it activates the auto-dispense
button. At the end of the sanitizing process, water is automatically dispensed into the
clean water carafe. There is no need to push the manual dispense button when filling
this carafe. (FIGURE 3)
Unit with Processing
Carafe
Carbon-Block Filter Clean Water Carafe
Most obvious is the
unit itself, with the
Processing Carafe
resting on top of the
base. There is also a
pre-filter screen
sitting on top of the
Processing Carafe.
The carbon block
filter is a long white
cylindrical shape with
2 red plugs at either
end.
A Clean Water Carafe
with a lid.
UNDERSTANDING YOUR WATER TREATMENT SYSTEM
4
B
A
C
FIGURE 4
FIGURE 6
FIGURE 5
FIGURE 7
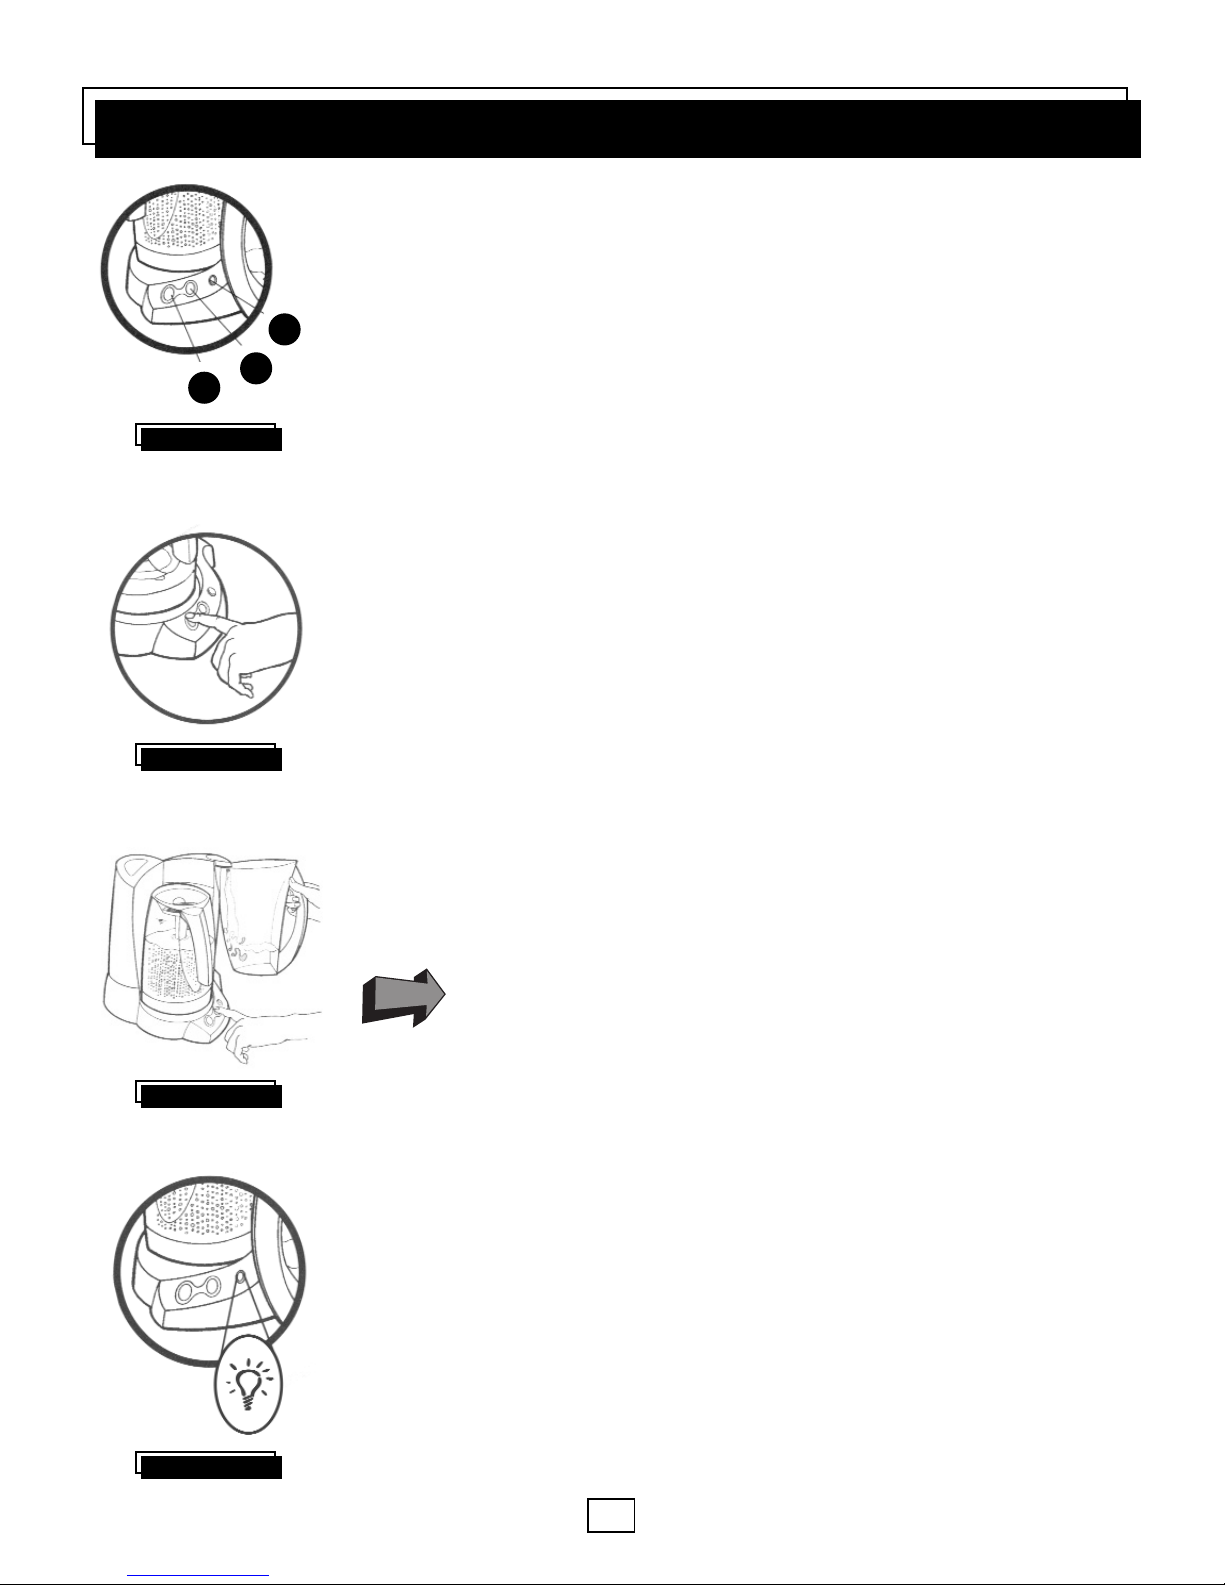
THE CONTROL PANEL:
This is the interactive information center of your
Water Treatment System. (FIGURE 4)
A. PROCESS Button
B. MANUAL DISPENSE Button
C. STATUS INDICATOR Light
A. PROCESS Button:
Pushing this button starts the ozonation process. The
green light indicates that the process has begun. You should see a uniform dispersion
of bubbles in the Processing Carafe. When the light goes off the process is complete.
(FIGURE 5).
B. MANUAL DISPENSE Button: After the process light goes off, the manual
dispense Button will light up green. This signals that treated water is ready to be
dispensed, (manually or automatically) through the carbon-block filter
(FIGURE 6).
C. STATUS INDICATOR Light:
1. This indicates whether the system is programmed for municipal water, lake water
or well water.* (FIGURE 7)
• No green light: This means the system is set for municipal water.
• Solid green light: It indicates you have programmed your lotus® Water Treatment
System for lake or well water.*
• Flashing green light: It indicates that the unit is in the programming mode,
which allows you to change from municipal water to lake or well water.*
• Must be used with microbiologically safe water!
Your Water Treatment System can be used with various water
sources including: municipal, lake or well water.* Depending on the
source you may need to program the system for the appropriate mode.
The unit is pre-programmed for municipal water.
2. This light also indicates when the filter needs replacing.
• Slow flashing amber light: There are about one hundred (or fewer) processing
cycles left on the carbon-block filter.
• Fast flashing amber light: There are about fifty (or fewer) processing cycles left on
the carbon-block filter.
• Solid amber light: The carbon-block filter must be changed. The unit will not
process any more water until the filter has been replaced.
The control panel also communicates other important information.
See “troubleshooting” Page.10
*Tested and verified by independent laboratory testing for the bacterial and protozoa
claims on the Performance Data List on page 16. NSF Certification for a microbiological
claim is for Cyst Reduction only.
GETTING STARTED
5
FIGURE 1
FIGURE 2
FIGURE 4
FIGURE 3
4 Easy steps:
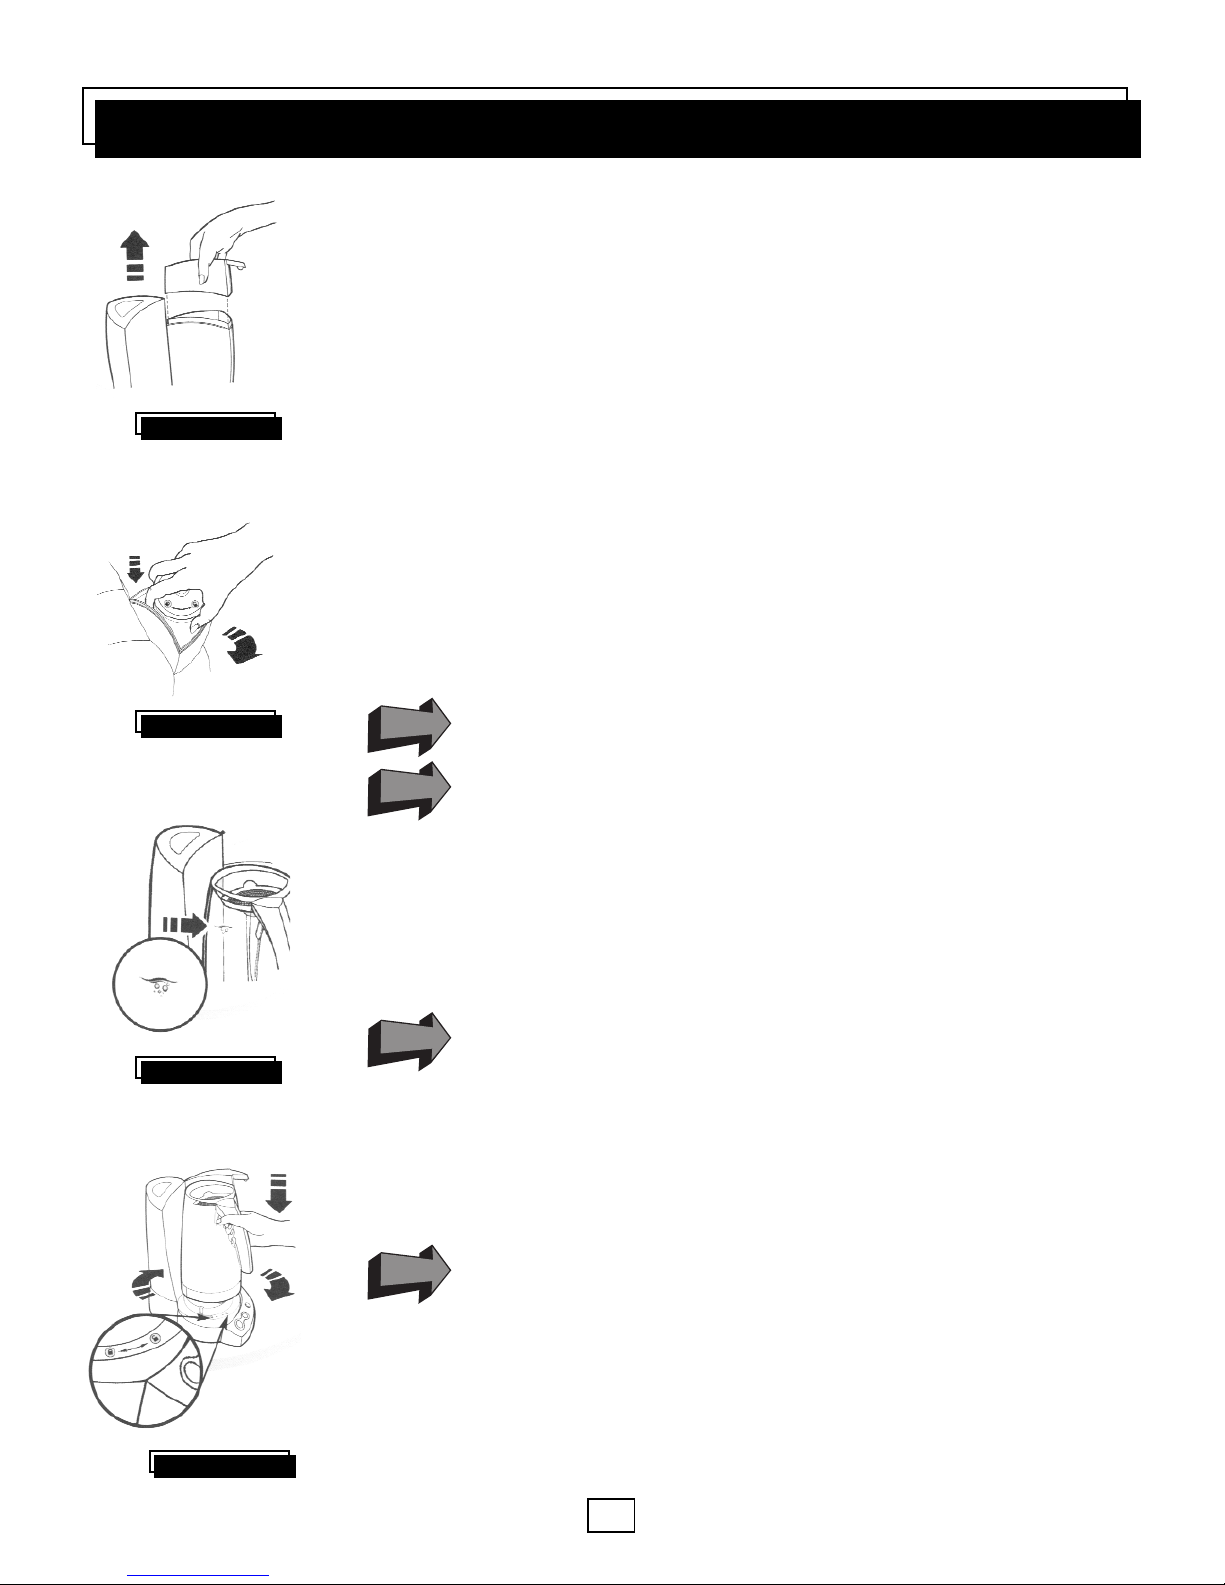
Step 1: Installing the Carbon-Block Filter
First, remove the carbon-block filter from the plastic bag and remove the red cap and
plug found at either end.
Next, lift off the filter housing cap. It is a fitted cap and should come off with a gentle
pull. (FIGURE 1)
Insert filter and turn clockwise to lockin place. The arrow and lock symbol on the filter
should line up with the arrow on the filter housing. (FIGURE 2)
Step 2: Fill the Processing Carafe
If the Processing Carafe is locked into place, simply remove it from the unit by holding
the handle and rotating it counterclockwise. You will feel the water Processing Carafe
unlock from its base. Ensure that the pre-filter screen is in place on the Processing Carafe.
Next, fill your water Processing Carafe with cool water to the fill line. (FIGURE 3)
Always remove the Processing Carafe when filling.
When filling the Processing Carafe, do not overfill, as this may
adversely affect performance of the unit.
Place the Processing Carafe back onto the base and lockin place. Make certain the
lock symbol on the processing carafe lines up with the lock symbol on the main
unit.(FIGURE 4)
Step 3: Programming for municipal water, lake or well
water
Plug unit in a three prong outlet. For your safety please do not modify!
USE ONLY WITH MICROBIOLOGICALLY SAFE WATER FROM A
KNOWN SOURCE! Your lotus® Water Treatment System is not
intended for the treatment of water that has an obvious contamination
source, nor is it intended to convert wastewater into microbiologically
safe water.*
1. Municipal water mode for municipal tap water
2. Lake or well water mode for visually clear lake or well water*
The unit is pre-programmed at the factory for municipal water. To
verify that this mode has been set. Plug in the electric cord and ensure
that the status indicator light is off.
The system can operate in two modes and treat various types of water.*
*Tested and verified by independent laboratory testing for the bacterial and protozoa
claims on the Performance Data List on page 16. NSF Certification for a microbiological
claim is for Cyst Reduction only.
To change from municipal water to the lake or well water* mode follow the
instructions below:
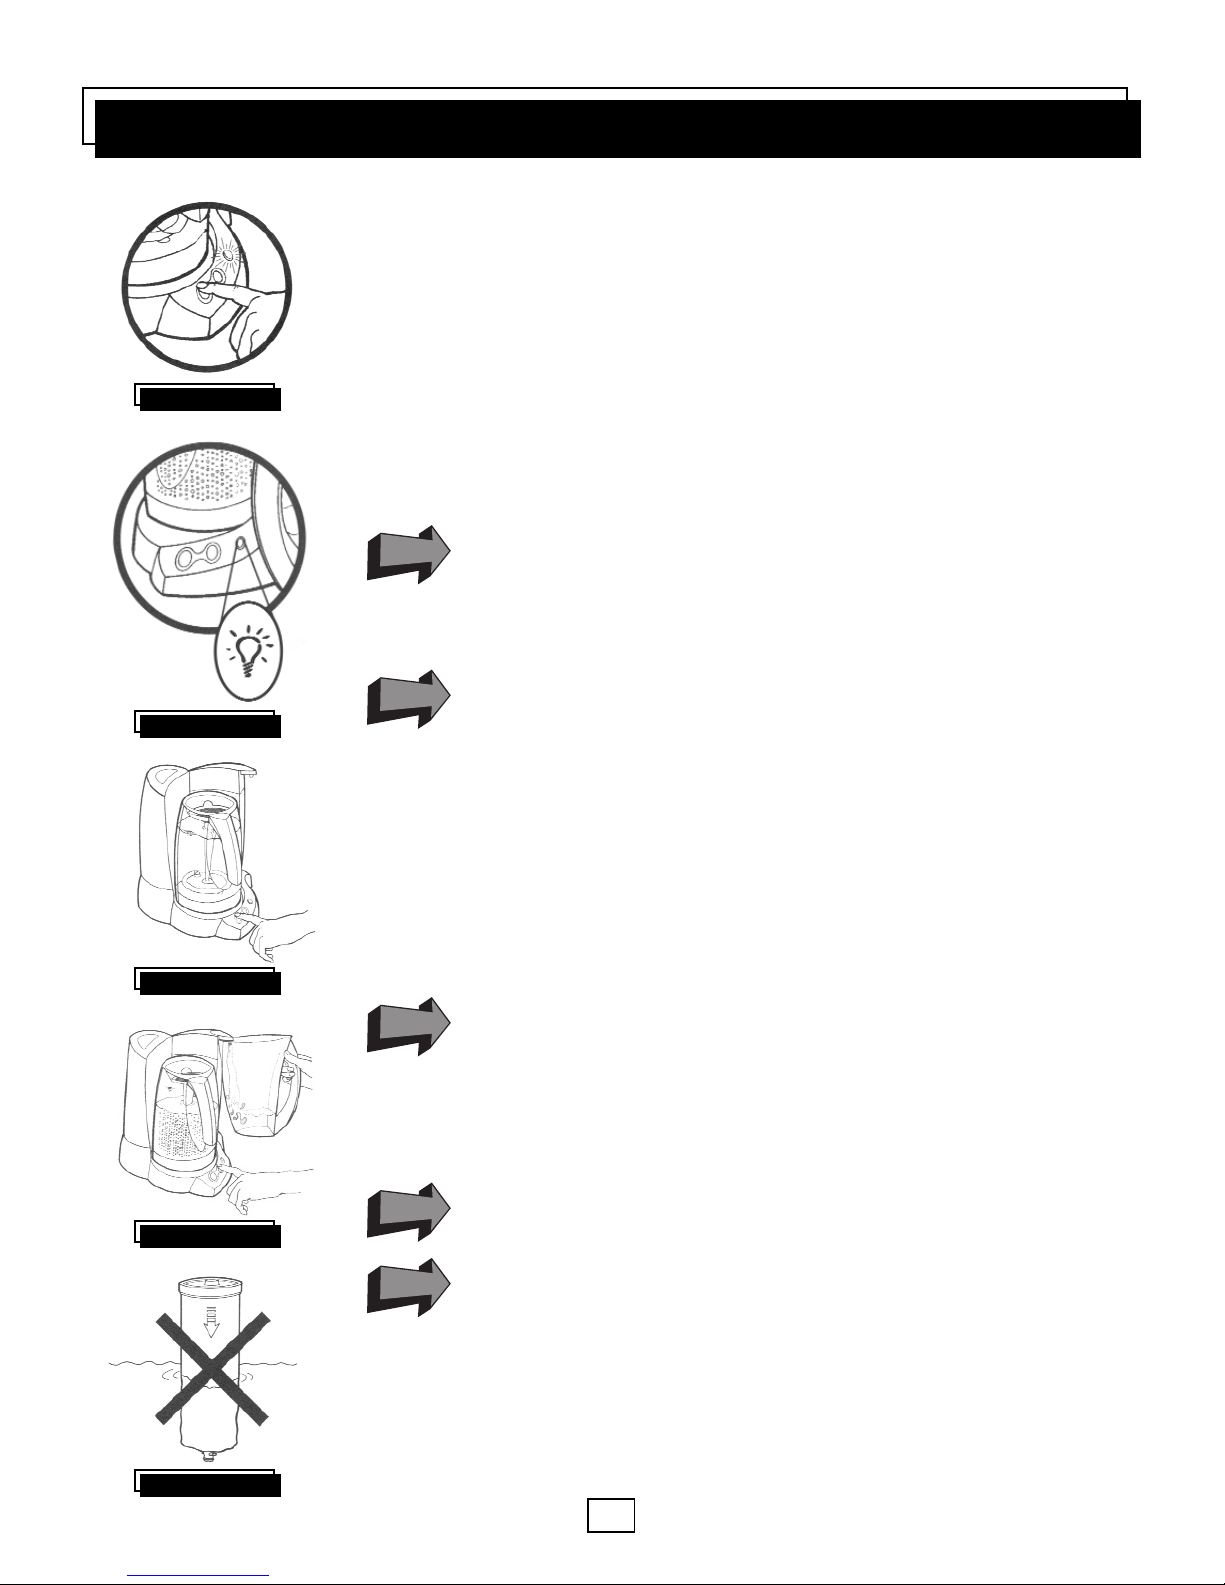
1. The unit must be plugged in and not running.
2. Press and hold the process button (approx. 3 sec.) until the status indicator light
flashes green (FIGURE 5), then release. The unit will bubble until the light
starts flashing.
3. Press the process button twice. On the second press, hold until the status indicator
light stays green (FIGURE 6). To indicate the program change is complete, the
status indicator light will flash amber once.
To change back to municipal water mode, follow steps 1 and 2, press the process
button once. To indicate the program change is complete, the status indicator light will
flash amber once.
If you change your water source from municipal water to lake or well
water* or the reverse, reset the mode. To reset follow the 1 to 3 above
instructions.
Step 4: Conditioning the Carbon-Block Filter
You should condition the carbon-block filter by running 4 cycles of
water through the system. Conditioning the carbon-block filter
ensures optimum performance taste and water quality.
Once you have completed steps 1 through 3, press the process button. This button will
illuminate green and the conditioning cycle will begin. (FIGURE 7)
Each conditioning cycle will take about 6 minutes for municipal water or approximately
21 minutes for lake or well water.*
Once a conditioning cycle is complete, the process light will go off and the manual
dispense light will turn green. This water must be manually dispensed through the filter.
(FIGURE 8)
During the conditioning process, any loose carbon dust is removed
from the carbon-block filter. This is a normal characteristic of
carbon-block filters and you will only see this happen during this
process. Do not drink this water. Discard it or use it to water your
house plants.
Repeat the conditioning process 3 more times using more fresh water with each cycle.
After 4 cycles, hand wash your clean water carafe with a mild detergent.
The carbon-block filter doesn’t require submersion in water to activate
it. DO NOT SOAK THE CARBON-BLOCK FILTER IN WATER PRIOR TO USE.
(FIGURE 9)
When using a new carbon-block filter, initially you may experience
some spattering from the dispense nozzle after the completion of a
processing cycle. This is perfectly normal and usually stops when the
filter has become thoroughly soaked (after several additional cycles).
GETTING STARTED
6
FIGURE 5
FIGURE 6
FIGURE 7
FIGURE 9
FIGURE 8
*Tested and verified by independent laboratory testing for the bacterial and
protozoa claims on the Performance Data List on page 16. NSF Certification
for a microbiological claim is for Cyst Reduction only.

OPERATING YOUR WATER TREATMENT SYSTEM
7
FIGURE 1
FIGURE 2
FIGURE 3
FIGURE 4
Ready to make some of the cleanest, safest water you’ve
ever tasted?
Fill your Processing Carafe with water to the fill line. (FIGURE 1) Return it to the base
unit, (FIGURE 2) and lock into place. Push the process button and it will light up green.
Make certain the lock symbol on the processing carafe lines up with the lock
symbol on the main unit.
Right now you should be noticing bubbles in the Processing Carafe. This is the first
stage of the treatment process-the ozonation process-at work. The system is killing
microorganisms that may be in your water.
To stop the system during processing, press the process button
once or unlock the Processing Carafe from the base.
Once the ozonation process is complete, the water will be ready to pass through to the
second stage-the filtration process. The second stage uses a custom-formulated
carbon-block filter to capture microorganisms and other contaminants. By utilizing two
stages, your Water Treatment System eliminates at least 99.99% of E-coli, 99.75%
of salmonella and other microorganisms. (See “Performance Data List” for details.)
When the manual dispense button turns green, and the process light goes off,
treated safe water is ready to be dispensed.
You now have two options:
AUTOMATIC DISPENSE:
Place the Clean Water Carafe (without the lid),
under the dispense nozzle to activate the auto-dispense button (FIGURE 3). Your
carafe, which has been specially designed to activate the auto dispense button, will
automatically be filled with water. Set on the table during meals. To keep the water
cool, the carafe stores conveniently in most fridges.
MANUAL DISPENSE: Want a glass of water? Simply hold a glass under the
dispense nozzle. Press and hold the manual dispense button to fill, (FIGURE 4) and
release the manual dispense button to stop.
If the water is not completely dispensed after the completion of the
treatment cycle, the water left in the Processing Carafe can be
dispensed for up to 12 hours, providing that the Processing Carafe is
locked in place.
If water is left in the Processing Carafe for more than 12 hours and
the manual dispense button is pressed, the manual dispense button
will flash red for several seconds. Unlock the Processing Carafe, take
it to the sink and add additional water if necessary to bring the water
to the fill line, then return it to the base unit and lock the treatment
chamber in place. Restart by pressing the process button.
INSTALLING A NEW CARBON-BLOCK FILTER
When the carbon-block filter nears the end of its life cycle, the status indicator light on
the control panel will begin to flash amber indicating that there are 100 more cycles
left. The indicator light will start flashing more frequently to indicate that the filter has
50 cycles left. When the filter has reached the end of its life, the light will stop flashing
amber and turn a solid amber. When this happens, you must change the filter. The
system will not process any more water until this is done.
You must replace the carbon-block filter when the status indicator
light is a solid amber. This will ensure the highest quality water
processed. The carbon-block filter is not re-usable or recyclable.
Based upon usage and local drinking water conditions, your carbon-block filter may
require replacement more often than once a year.
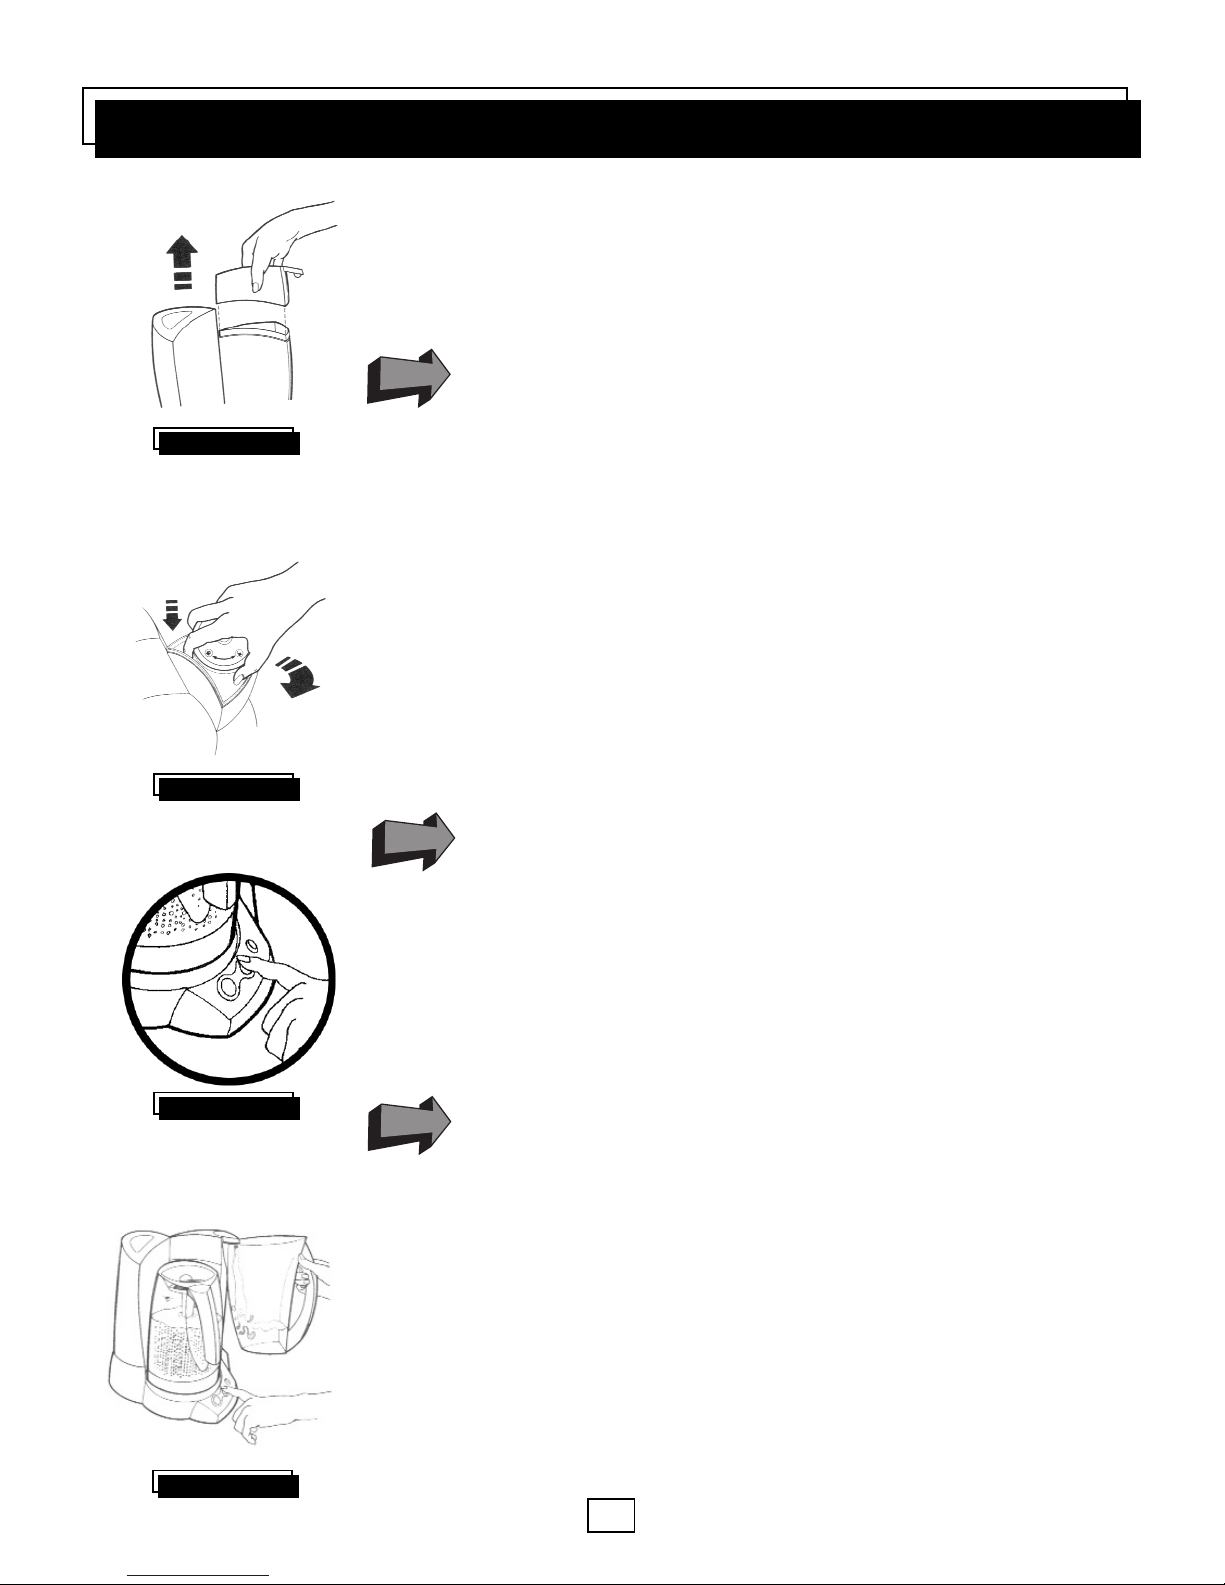
Installing the filter is easy. Simply pull off the filter housing cap, (FIGURE 1) turn the
filter counterclockwise, lift and remove. Insert filter and turn clockwise to lock in place.
The arrow and lock symbol on the filter should line up with the arrow on the filter
housing. (FIGURE 2)
After installing the replacement carbon-block filter, you must reset the filter cycle
counter. Simply plug in the electric cord. Press and hold the manual dispense button,
(FIGURE 3) until the amber status indicator light goes off. This indicates that the filter
cycle counter has been reset.
Filter replacement for units programmed for lake or
well water*
Please, condition a new carbon-block filter by running 4 cycles of
water through the system.
When the filter needs replacement, the status indicator light will flash intermittently
between green and amber. Once the Status indicator light is solid amber, the filter must
be replaced. The solid green status indicator light will again be visible, once the filter
cycle counter has been properly reset.
Fill the Processing Carafe to the fill line and lock it into place. Make certain the lock
symbol on the processing carafe lines up with the lock symbol on the main unit. Then
press the process button. The button will illuminate green and the conditioning cycle
will begin.
We recommend that you check your system periodically through the
treatment cycle to ensure that there is a wide and uniform dispersion
of bubbles. If bubbling action does not continue in the same manner
throughout the treatment cycle, unplug the system and DO NOT drink
the water. Contact us at 1-800-808-1724 or e-mail us at
service@tersano.com.
Each conditioning cycle will take about 6 minutes for municipal water or approximately
21 minutes for lake or well water.*
Once the conditioning cycle is complete. The process light will go off and the manual
dispense light will turn green. This water may be manually or automatically dispensed
through the filter. (FIGURE 4)
MAINTENANCE
8
FIGURE 1
FIGURE 3
FIGURE 2
FIGURE 4
*Tested and verified by independent laboratory testing for the bacterial and protozoa
claims on the Performance Data List on page 16. NSF Certification for a microbiological
claim is for Cyst Reduction only.
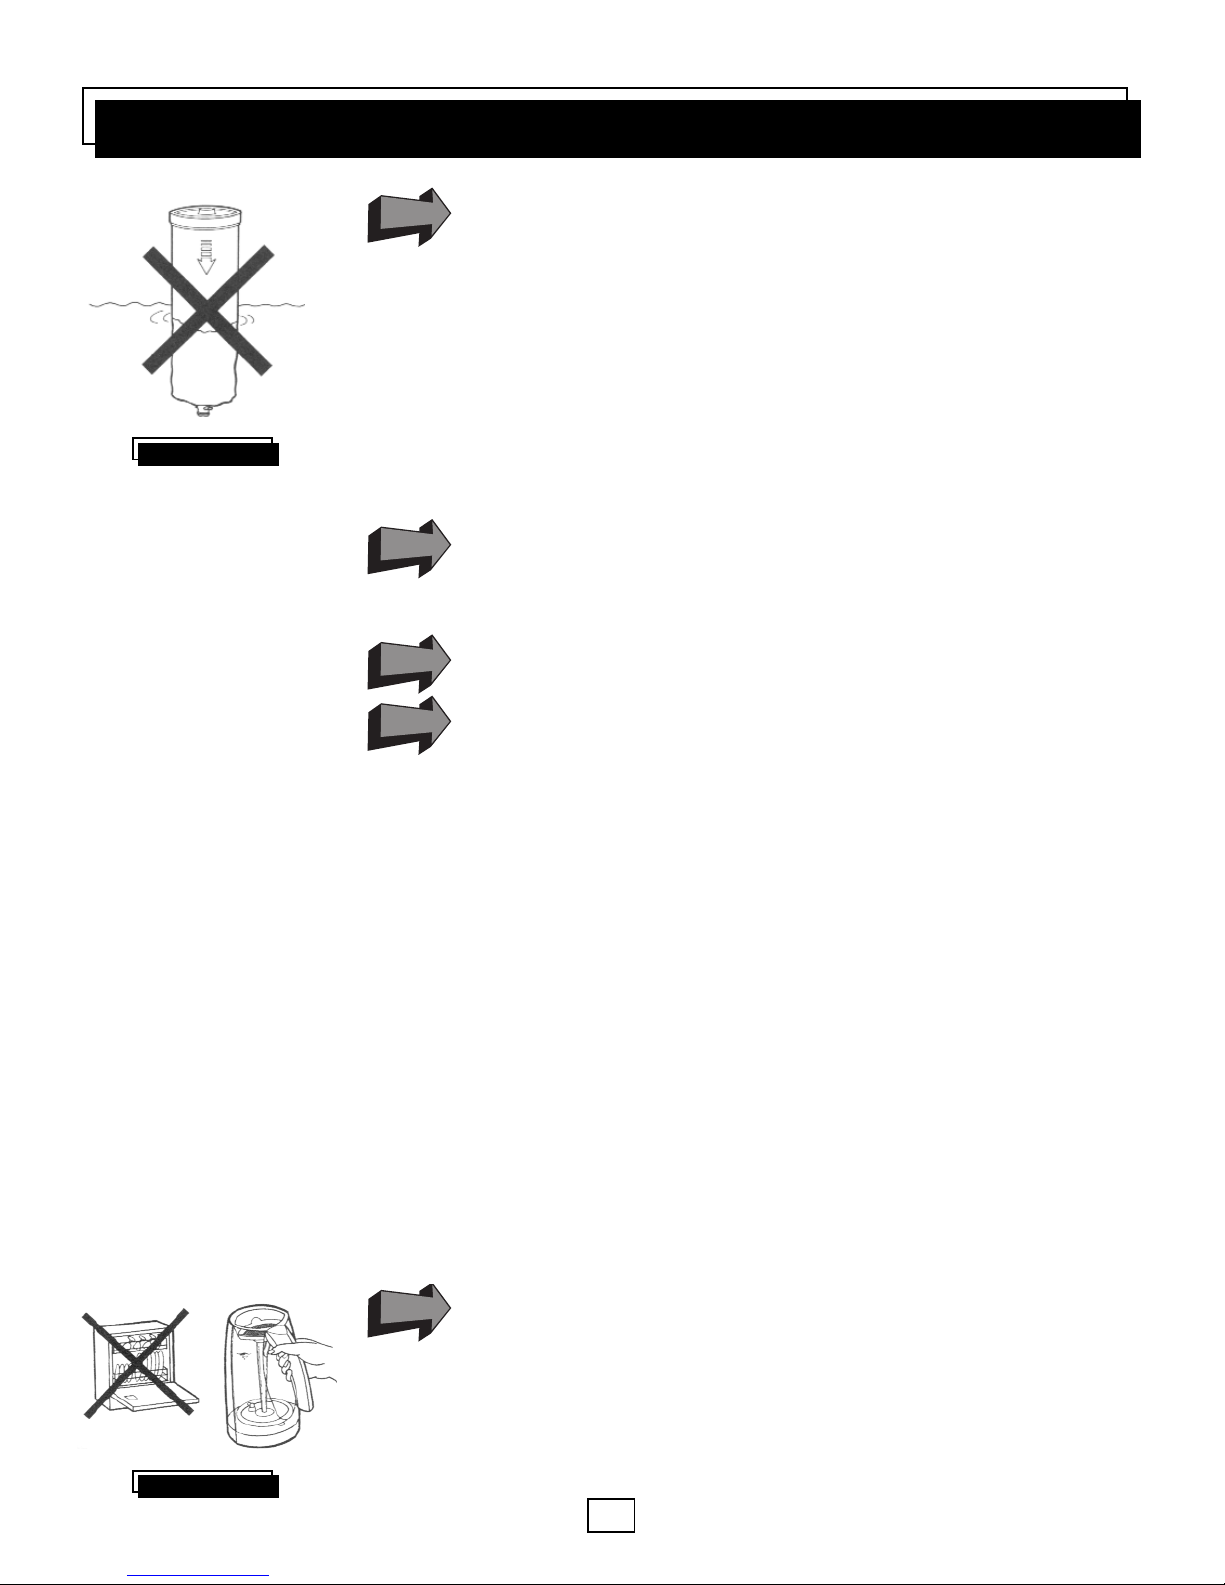
FIGURE 6
MAINTENANCE
During the conditioning process, any loose carbon dust is removed
from the carbon-block filter. This is a normal characteristic of carbonblock filters and you will only see this happen during this process. Do
not drink this water. Discard it or use it to water your house plants.
Repeat the conditioning process 3 more times using more fresh water with each cycle.
After 4 cycles, wash out your clean water carafe. With a mild detergent.
Once this is done, your water processor is ready to provide you once again with
microbiological safe, clean drinking water.*
The carbon-block filter doesn’t require submersion in water to activate it. DO NOT
SOAK THE CARBON-BLOCK FILTER in water prior to use. (FIGURE 5)
When using a new carbon-block filter, initially you may experience
some sputtering during first dispense. This is perfectly normal and
usually stops when the filter has become thoroughly soaked
(after several additional cycles).
Never attempt to reuse a previously used carbon-block filter.
Always ensure that the carbon-block filter is in place prior to use. The
treatment process will not begin without the carbon-block filter in place.
CLEANING:
Through normal use, as with any household appliance, occasional cleaning is necessary.
For dust, smears, grease and other everyday stains that may accumulate on your unit, simply wipe with a damp cloth.
The clean water carafe, lid, pre-filter screen and the carbon-block filter housing cap can be hand washed with a mild
detergent. DO NOT PUT THEM IN THE DISHWASHER.
We recommend cleaning the Processing Carafe approximately once a year by following the instructions below:
1. Use 1/2 Quart ( Approx. 1/2 Liter) of undiluted white vinegar and pour it directly into the Processing Carafe.
Without the pre-filter screen in place. DO NOT ADD ANY WATER!
2. While holding the Processing Carafe over the kitchen sink, swish the vinegar around in the Processing Carafe
for 30 seconds.
3. To drain; invert chamber.
4. Rinse the Processing Carafe thoroughly with fresh water. To remove any remaining water, upright chamber and
gently lift on the spring drain valve with your finger.
5. Install Processing Carafe.
Do not process vinegar through your unit.
DO NOT put the Processing Carafe in your dishwasher, (FIGURE 6).
The heat and detergent will cause damage.
Local water conditions may require more frequent cleaning.
9
FIGURE 5
*Tested and verified by independent laboratory testing for the bacterial and protozoa
claims on the Performance Data List on page 16. NSF Certification for a microbiological
claim is for Cyst Reduction only.

MAINTENANCE
HANDLING:
When moving or transporting your water processor, make sure the Processing Carafe is locked in place. DO NOT
REMOVE THE FILTER and keep the unit in an upright position at all times.
If the unit is not used for a long period of time, the carbon-filter block should be discarded and a new one must be
installed. See “Installing a New Carbon Filter” page 8-9.
We recommend that the unit be stored in a dry and clean place at room temperature. Do not allow
the unit to freeze. If the unit is not used for a long period of time remove filter and put it in refrigerator.
TROUBLESHOOTING:
Situation Solution
I plugged the unit in, pressed the process button, and
nothing happened.
• Ensure that the carbon-block filter is properly installed. See
“Installing a New Carbon-Block Filter” for instructions. Without the
carbon-block filter properly in place, the unit will not be allowed to
process any water.
• The Processing Carafe must be locked in position
• If any control panel lights are on. See the appropriate information
below on the chart.
• If no lights are on, there could be a problem with the power supply.
Try plugging the unit into another outlet. If the unit does not turn
on, contact us at 1-800-808-1724 .
The bubbling action slowly disappeared and stopped during the
ozonation process.
If you haven’t accidentally pressed the process button and stopped
the cycle, unplug the system and DO NOT drink the water.
The status indicator light is flashing amber.
The status indicator light flashes intermittently between green
and amber.
The status indicator light is solid amber.
If the amber light is flashing, this means the carbon-block filter will
soon need to be replaced.
The Water processor unit is in the lake or well water mode and the
filter will soon need to be replaced.
The carbon-block filter needs to be replaced.
The auto dispense button shut off before my water was
completely dispensed.
At times, there may be fluctuations in the local power supply which
could cause this to happen. Use the manual dispense button to
dispense the remaining water.
The “process” light is flashing green slowly. The Processing Carafe is not locked properly into place. Try rotating
clockwise until you feel it lock. When the process light turns off, press
the process button again to start the process.
The “process” light is flashing green quickly, and the manual
dispense light is red.
It appears water is leaking from the bottom of the system.
Please contact 1-800-808-1724
The manual dispense light flashes red for several seconds when I try
to dispense water.
Water has been left in the Processing Carafe for more that 12 hours.
Unlock the Processing Carafe, take it to the sink and add water (if
necessary) to bring water to the fill line, then return it to the base unit
and lock the Processing Carafe in place. Restart by pressing the
process button.
I accidentally hit the process button while the empty treatment
chamber was locked on the base.
Press the process button a second time. This will terminate the action
immediately. To start the treatment process again, unlock the
Processing Carafe from the base and fill with water to the fill line.
Lock it into place and then press the process button once to
start treatment.
I pressed the “process” button during the ozonation process. By pressing the process button during treatment, you have stopped
the ozonation treatment. You can easily restart the process by
pressing the process once again.
10

FREQUENTLY ASKED QUESTIONS
What types of water can be used?
The system is recommended for use with visually clear water (not colored, cloudy or turbid water). The system is not
intended for the treatment of water which has an obvious contamination source (such as raw sewage), nor is the
system intended to convert wastewater into microbiologically safe water. *
How do I know when the carbon-block filter needs to be changed?
The status indicator light will begin to flash amber. The closer the carbon-block filter gets to the end of its life cycle, the
faster the light will flash. When the light stops flashing and turns a solid amber — you must replace the carbon-block
filter. The unit will not work until you do. See “Installing a New Carbon-Block Filter” page 8-9.
What replacement filter should I use with my system?
Use replacement filter LWTRF1/LWTRF1K only.
Where can I purchase lotus® Water Treatment System,
carbon-block replacements filters?
Simply call us at 1-800-808-1724 or visit our website www.tersano.com.
Is there any risk of contact with contaminants when changing the
carbon-block filter?
We've designed the carbon-block filter in such a way that removing, handling and replacing it is sanitary. Contaminants
from the filter are contained within the filter itself and cannot come into contact with your hands or drinking water.
I was conditioning the carbon-block filter and the water that was dispensed
appeared to contain dust particle.
During the conditioning process, any loose carbon dust is removed from the carbon-block filter. This is a normal
characteristic of carbon-block filters and you only see this happen during this process. You can use this water for your
house plants or discard it if you wish.
Why can’t the water be dispensed after 12 hours?
The ozonation process creates water that is rich in oxygen which contributes to the great fresh taste of the
water itself. In order to provide consistently delicious oxygen-rich water, after 12 hours you must unlock the Processing
Carafe, fill it to the fill line with additional water if necessary, and start the process again. Alternatively, you can
discard any remaining water and once again fill it to the fill line and start the process.
What happens if there is a power outage?
In the event of a power disruption, important information about your unit is stored in the computer’s memory. When
power is restored, the unit will know the filter status and water source mode that has been programmed for your unit. If
you experience a power disruption while using the system, the system will stop operating. Once power is restored,
press the process button and then the ozonation process will begin.
I have a problem with the unit, who do I contact?
If, after you’ve checked the “Troubleshooting” section on page 10, you still have a problem, you can call us at
1-800-808-1724 or visit our website www.tersano.com
11
*Tested and verified by independent laboratory testing for the bacterial and protozoa claims on the Performance Data
List on page 16. NSF Certification for a microbiological claim is for Cyst Reduction only.

LIMITED PRODUCT WARRANTY
TO THE EXTENT ALLOWED BY APPLICABLE LAW, THE FOLLOWING LIMITED
WARRANTY FOR THE LOTUS® SANITIZING SYSTEM (THE PRODUCT) IS EXCLUSIVE
AND IN LIEU OF ALL OTHER ORAL OR WRITTEN REPRESENTATIONS, CONDITIONS OR
WARRANTIES, WHETHER EXPRESS OR IMPLIED, AND WHETHER ARISING BY LAW,
STATUTE, COURSE OF DEALING OR USAGE OF TRADE, INCLUDING BUT NOT LIMITED
TO, IMPLIED WARRANTIES AND CONDITIONS OF MERCHANTABILITY, QUALITY,
DURABILITY AND/OR FITNESS FOR A PARTICULAR PURPOSE.
WHAT DOES THE WARRANTY COVER?
We, Tersano (North America) Inc., warrant that the Product, at the time of shipment to you, the
Purchaser, is free from defects in material and workmanship.
This warranty gives you specific legal rights, and you may also have other rights which vary
from jurisdiction to jurisdiction.
WHAT DOES THE WARRANTY NOT COVER?
To the extent allowed by applicable law, our obligation to repair or replace the Product or
refund the purchase price of the Product, shall be the full extent of our liability for breach of
warranty.
Our liability with respect to any material not of our manufacture shall be limited to the liability
assumed by the vendor(s) of such material.
Repairs to, alteration of, or work done on the Product warranted by us but without our prior
written authorization shall void our warranty on the Product.
To the extent allowed by applicable law, this warranty is not transferable and will automatically
terminate if the original Product owner/consumer sells or otherwise disposes of the Product.
This warranty does not provide protection against, and we will have no liability under this
warranty if:
a. the Product is subject to improper handling or use;
b. the Product has not been installed, used or maintained in accordance with normal
practice and in conformi ty with our recommendations and published specifications and
this consumer manual;
c. the Product is employed for other than normal household use. Normal household use
does not include commercial or rental use of any type.
12

LIMITED PRODUCT WARRANTY
WHAT IS THE PERIOD OF COVERAGE?
This Limited Warranty is valid for one year from the date of your purchase of the Product as
shown by the sales receipt.
Some jurisdictions do not allow limitations on how long any implied warranty lasts, so the
above limitation may not apply to you.
WHAT DO WE DO TO CORRECT ANY PROBLEMS?
At our option, we shall repair or replace the Product or refund the purchase price of the
Product for any
warranty claim made within one year of the date of your purchase of the Product as shown by
the sales receipt.
We will complete any repair, replacement or refund in a reasonable amount of time, but in any
case within thirty (30) days of our receipt of the Product.
WHAT YOU MUST DO?
You must keep your sales receipt as proof of the date of purchase.
Upon discovery of a defect, you must notify us in writing at Tersano (North America) Inc., 261
Martindale Road, Unit 20, St. Catharines, Ontario, L2W 1A1, within thirty (30) days of discovery
of the defect of any claim whatsoever that you may have with respect to the Product. Failure
to give such notice within the specified time shall constitute an unqualified acceptance and
waiver of all claims with respect to the Product.
Upon receipt of written notice from you of the nonconforming Product, we, at our option, may
inspect the Product at your location or require that the Product be returned to us at your cost
and insured risk to our designated location.
EXCLUSIVITY OF REMEDY: LIMITATION OF LIABILITY
TO THE EXTENT ALLOWED BY LAW THE REMEDIES PROVIDED FOR IN THIS
WARRANTY SHALL CONSTITUTE THE SOLE RECOURSE OF YOU AGAINST US FOR
BREACH OF ANY OF OUR OBLIGATIONS UNDER OUR AGREEMENT WITH YOU,
WHETHER THE CLAIM IS MADE IN TORT OR IN CONTRACT, INCLUDING CLAIMS
BASED ON WARRANTY, NEGLIGENCE, STRICT LIABILITY, DECEIT, FRAUD,
MISREPRESENTATION, OR OTHERWISE.
13

LIMITED PRODUCT WARRANTY
TO THE EXTENT ALLOWED BY APPLICABLE LAW, IN NO EVENT SHALL WE BE
LIABLE FOR SPECIAL, EXEMPLARY, PUNITIVE, INDIRECT, INCIDENTAL OR
CONSEQUENTIAL DAMAGES (REGARDLESS OF THE FORM OF ACTION, WHETHER IN
CONTRACT OR IN TORT, INCLUDING NEGLIGENCE), NOR FOR LOST PROFITS, NOR
SHALL OUR LIABILITY FOR ANY CLAIMS OR DAMAGE ARISING OUT OF OR
CONNECTED WITH OUR AGREEMENT OR THE MANUFACTURE, SALE, DELIVERY OR
USE OF THE PRODUCT EXCEED THE PURCHASE PRICE OF THE PRODUCT.
Some jurisdictions do not allow the exclusion or limitation of incidental or consequential
damages or certain types of damages, so the above exclusions or limitations may not apply to
you.
WARRANTY REGISTRATION AND CONTACTING US
For Warranty Registration, please:
1) Go to our website: www.tersano.com.,
2) E-mail us at: wecare@tersano.com, or
3) Mail us at: In Canada:
Tersano Inc.
3-23 Hannover Drive.
St. Catharines, Ontario
L2W 1A3
You are encouraged to register the warranty but please be advised that failure to register will
not void the warranty.
If in North America, please call 1-800-808-1724
14
In USA:
Tersano (International) SRL.
C/O Sonwil Distribution
100 Sonwill Drive
Buffalo, New York
14225
 Loading...