

Page 1
Assembly and User Instructions
Fireplace Insert, Lotus H370 Petite
Version 1, 11-10-2012
Page 2

Page 3
Introduction
Congratulations on your new Lotus Fireplace Insert
We hope and believe that it will give you many warm hours. But before you may
truly benefit from your investment, you should read this guide thoroughly. It
provides some specific advice as to how you will benefit the most from your
fireplace insert – now, as well as in the years to come. This is why this guide would
be worth while keeping, like all other directions for use.
Lotus may look back on a long tradition, making our first productions back in 1979.
Our production is now run at Langeskov, and exported to many European markets.
Lotus products are made to a fine Danish tradition, serving its owners faithfully for
years. So, once again congratulations on your new Lotus fireplace insert – making
for a warm and cosy beginning of an all new home life for you.
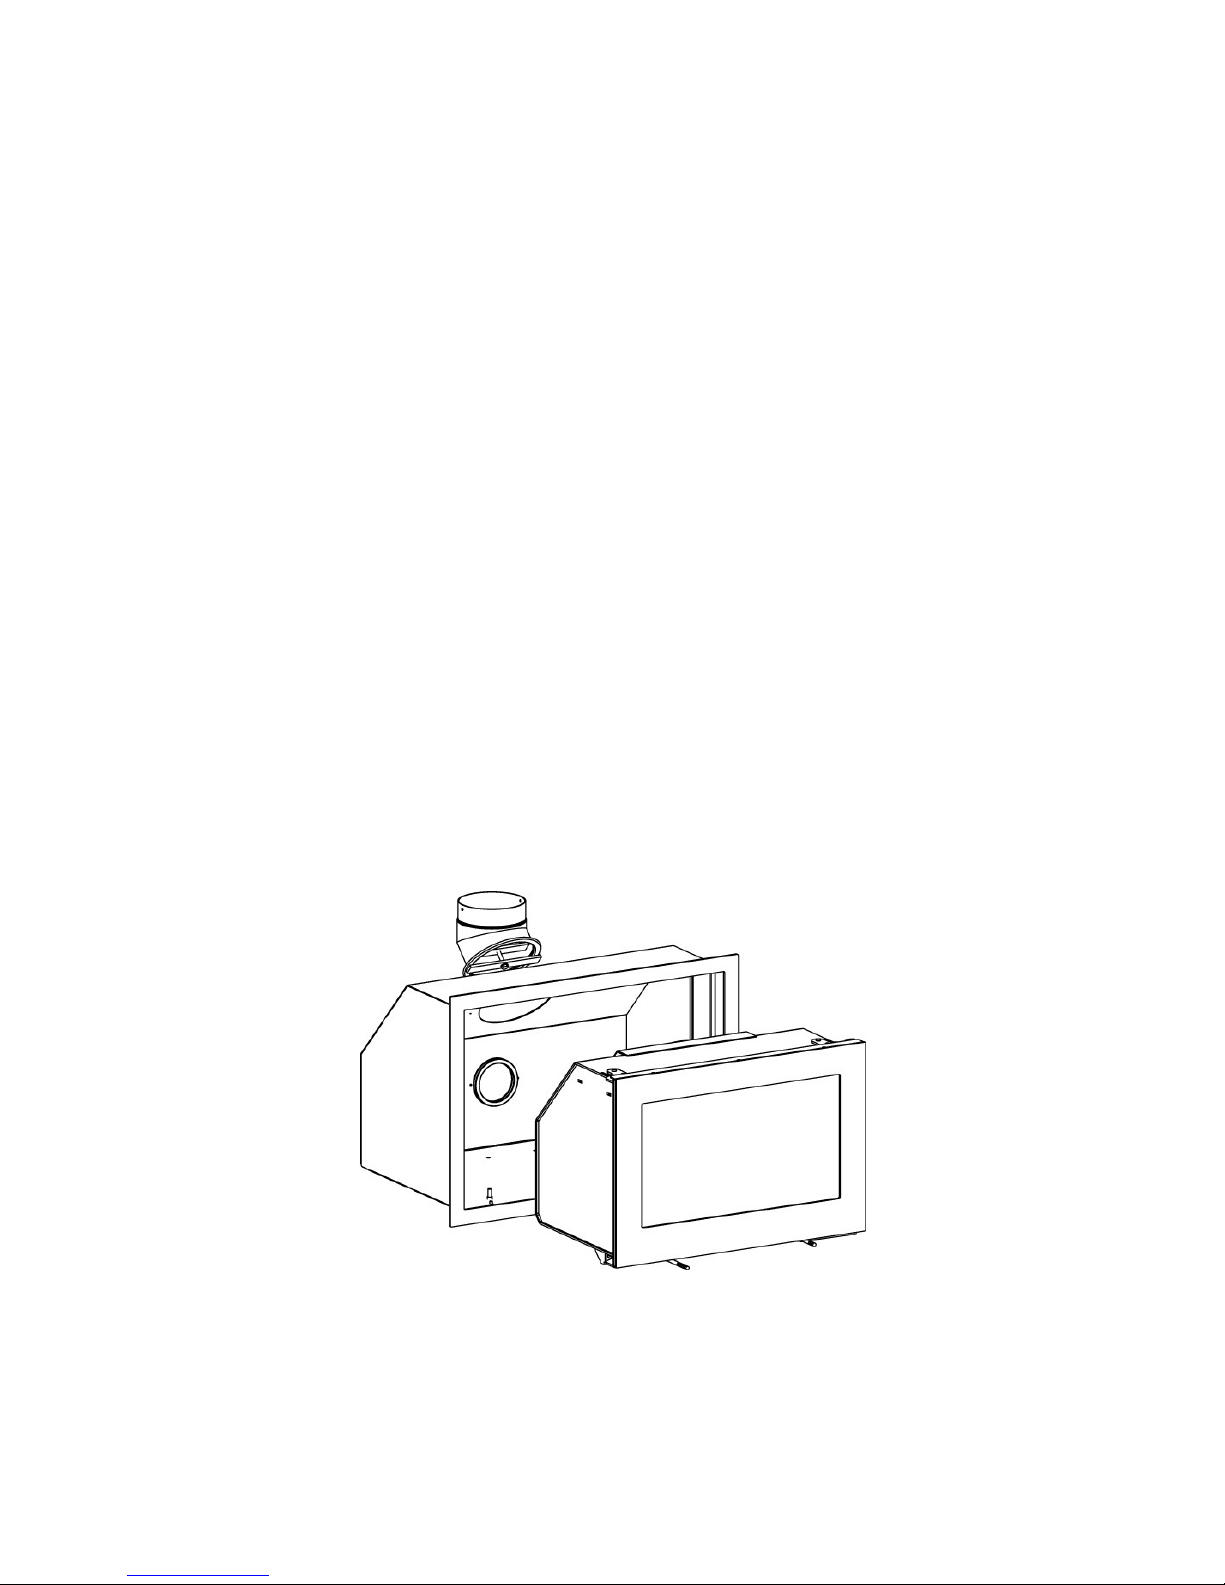
Fireplace Insert Assembly
Before your new fireplace insert will be ready to exude warmth and a cosy
atmosphere, you should read these lines thoroughly, reviewing the requirements for
the assembly and the environment. Also, reference is made to all local regulations,
including those referring to national and European standards, to be met in the
installation of your fireplace insert.
The hole size required for assembly appears from the leaflet material as well as the
line drawings on the last page of these instructions.
Page 4
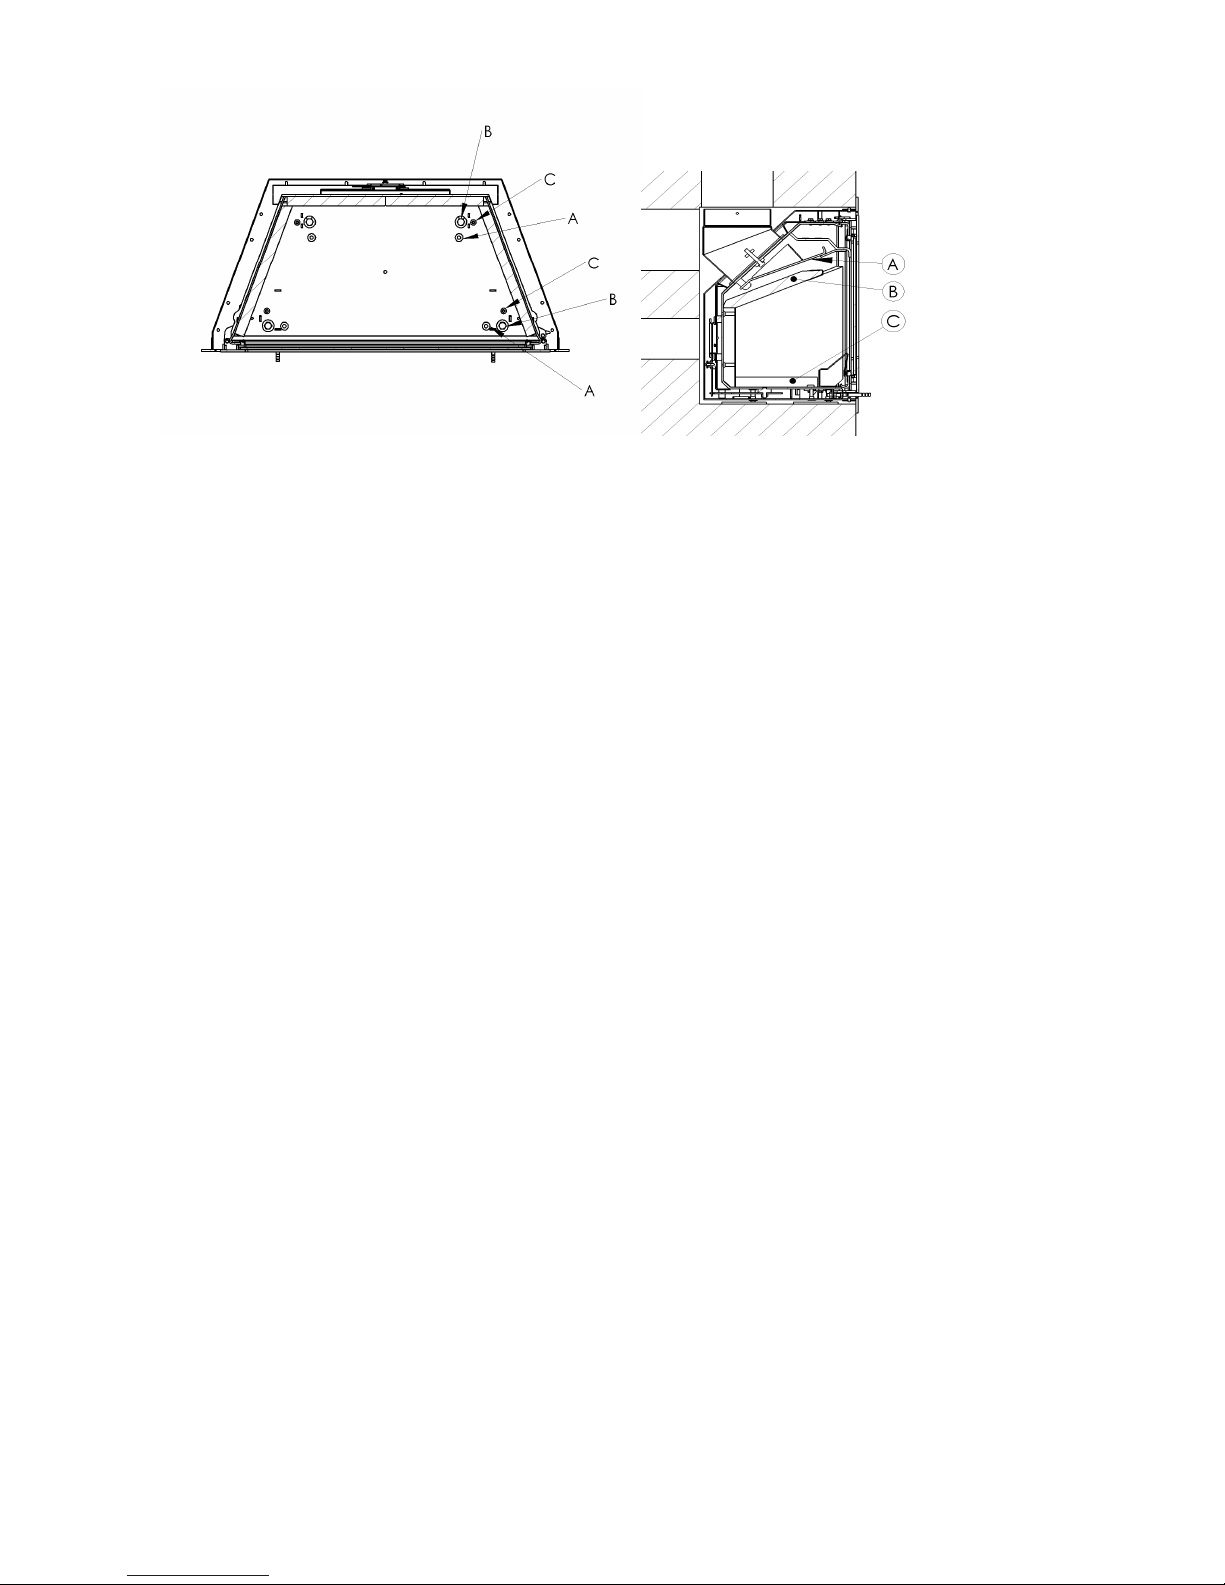
Pic.2
A: Holes used for fastening the insert to the base.
B: Set screws for adjustment of the insert in relation to the base.
C: Set screws for adjustment of the combustion champer in relation to the cabinet.
Pic.2
A: upper smoke turnplate-B: lower smoke turnplate-C: Skamol must be removed
to gain access to the adjusting/fastening screws.
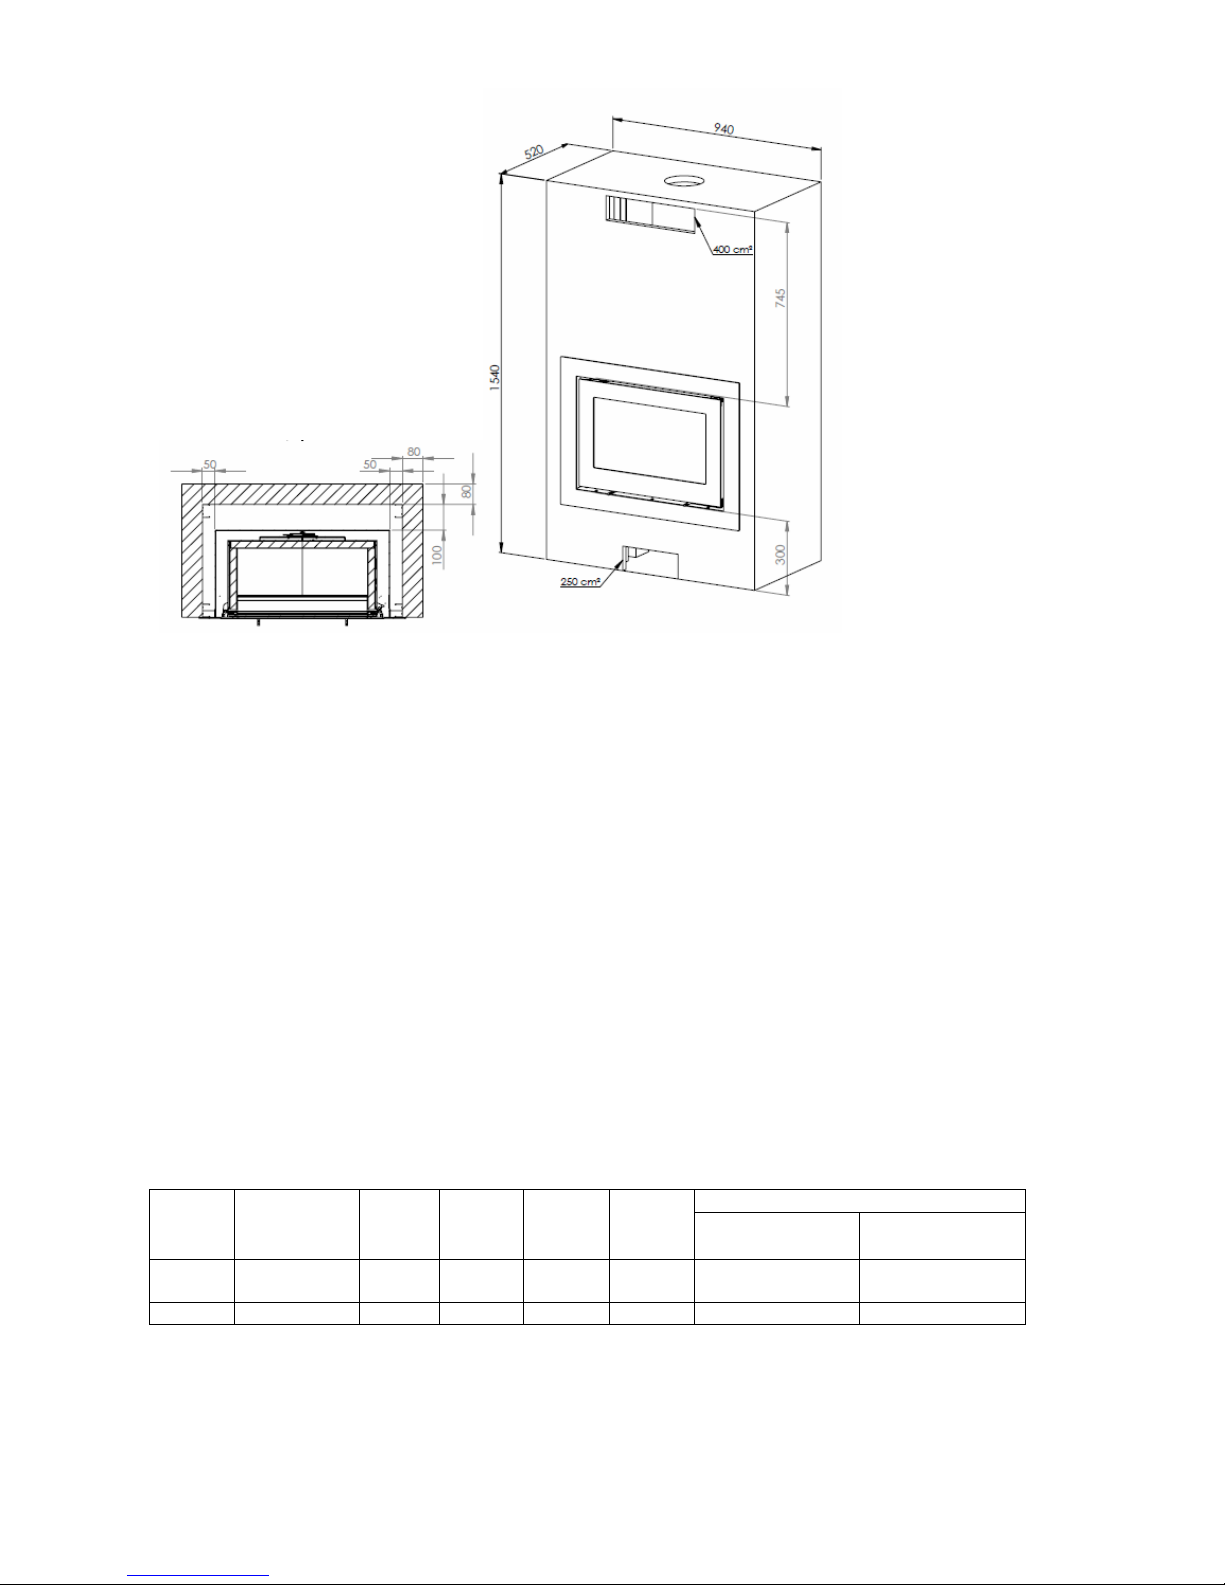
The potential for the building-in of fireplace inserts is vast; they may be built into the
wall, on the outside of the wall, and may be suspended on the wall. Building-in shall
take place in connection with non-inflammable materials only. Virtually all
installations are designed individually, and in all cases the distance to inflammable
matter must meet the values stated below.
By setup in connection with inflammable material, you must create a structure to the
cassette by a steel frame and super isol plates (or plates of equal or better insulation),
see example with minimum measurements.
The Base
The base must, of course, be firm and have adequate load-bearing capacity. This will
usually pose no problem when assembling in an open fireplace.
In case of an inflammable floor, the height of the foundation for the insert must be
minimum 300mm.
Page 5
Insulating material: Useable are all AGI Q 132 reistered insulating material.
All measurements are intended as minimum distances.
.
Distance to inflammable material
When the fireplace insert is mounted in an existing brick fireplace, the requirements
for distance to inflammable material and fireproofing on the floor will usually be in
order.
If it is a matter of a new building, reference is made to any local regulations on
fireproofing etc. You may contact your chimney sweeper for clarification of any
issues of doubt.
Wood stove data, testing to EN-13 229/CE
Model Flue gas
Temperature
at nominal
Output
KW
Flue gas
Mass
flow g/s
Flue
Pa
Weight
Kg
Distance to inflammable material
Distance behind
Structure mm
Next to Structure
mm
H370
Petite
297 6,5 7,7 12 87 0 0
Below stove 300
For furniture, a distance of 0,9metres is recommended.
Page 6

Distance to non-inflammable material
For non-inflammable material, no requirements apply.
The Chimney
A good chimney draught is essential for how well a fireplace insert will burn. Note
that there should be access to cleaning doors.
The working height of the chimney should typically range between 3.5 and 4.5
metres. Working height shall be understood as the distance from the fireplace insert
top to the top of the chimney.
The internal diameter of the chimney shall be min. 150 mm (inside dim.) in steel
chimneys and min.175-180 mm in brick chimneys or chimneys made of ceramic
units as their inside surface will frequently be rough and will offer resistance.
All joints and connecting points shall, of course, be tight, and the chimney shall
provide a draught of min. 1.2mm water head (12 Pa).
Register
If your chimney has a register, this must have a forced opening of min. 20cm2.
Assembly of Smoke Turn Plates
The illustration below shows how to place the smoke turn plates when viewing a
section in the fireplace insert from the side.
A: upper smoke turnplate-B: lower smoke turnplate
C: Skamol (must be removed to get to the screws)
The lower smoke turn plate (B) is removed by lifting at one side after which it will
come clear of the other side and be taken down into the combustion chamber and out
Page 7

through the door. Similarly, it is put in place by moving it up askew at one side and
then at the other side, and it is then put in place in the middle.
The upper smoke turn plate (A) is removed by pulling it forward and then lifting it
off the bracket in the back of the combustion champer, it is mounted in reverse.
Combustion Air Supply
A good and clean combustion will benefit from an adequate supply of air to the fire.
To allow for this, it is, however, a condition that air be supplied to the room in which
the fireplace insert has been put up.
In certainly the majority of rooms there will be an adequate amount of air,
particularly if some of the doors between the rooms of the house are left open. In
special cases, an air valve may have to be placed in the exterior wall of the room in
which the fireplace insert has been put up. The air valves are to be placed so that
they may not be blocked.
Floor
On the floor in front of your fireplace insert, there should be a non-inflammable
plate, for instance made of steel or stone material. This plate should be big enough to
reach min. 50cm in front of the fireplace insert and 30 cm at each side of the
fireplace opening.
Chimney Sweeper
Once your new fireplace insert has been assembled, do make a point of
registering the installation with the chimney sweeper. For one thing, the
installation is to be inspected, and the chimney will also have to be swept by the
chimney sweeper in the years to come.
Using your fireplace insert
Below, you will find a description of kindling and firing of your fireplace insert. The
wood volume and register setting may be varied as required individually for heating
and the draught of the actual chimney.
The insert are intended for intermittent combustion.
Kindling and Current Firing
1.
Put appr. 1,5kg kindling pins in at the bottom of the fireplace insert, stacked crosswise like a log house. Put 2 spirit blocks in the middle, and light these.
2.
Close the door ajar, leaving an opening of appr. 2 cm. Open the air damper
entirely under the damper (pulling it all the way out). Leave the fireplace insert
like this for about 5- or 10 minutes before closing the door entirely and pushing
the handle in locked position.
3.
Dampen the air damper as required during the kindling.
Page 8

4.
Once the fire has burned down to the state of glowing (no more flames seen), open
the door carefully so that the ashes will not be stirred up and come out. Cautiously
spread the glows using a poker so as to make these lie in an even layer.
5.
Put 2 pieces of wood into the fireplace insert, a total of about 1.5kg. Put these
pieces at the bottom of the fireplace insert, parallel with the fireplace insert front.
The pieces to be laid at some little distance between them to allow for some air in
between. The front piece will be lit best if it has a chopped side facing the door,
and another facing the glows. Close the door tightly at once.
6.
The damper may be opened entirely and damped again once the fire has
caught on well. Just how much the damper should be opened may vary with
the draught of the particular chimney but the flames are now to stabilize so as
to assume the appearance of a “calmly” burning fire.
7.
When the wood has burned down to the state of glows (after about one hour), start
all over from item 4.
Refuelling on to a low fire bed
If there is insufficient burning material in the firebed to light a new fuel charge,
excessive smoke emission can occur. Refuelling must be carried out onto a sufficient
quantity of glowing embers and ash that the new fuel charge will ignite in a
reasonable period. If there are too few embers in the fire bed, add suitable kindling to
prevent excessive smoke
Fuel overloading
The maximum amount of fuel specified in this manual should not be exceeded,
overloading can cause excess smoke.
Operation with door left open
Operation with the door open can cause excess smoke. The appliance must not be
operated with the appliance door left open except as directed in the instructions.
Dampers left open
Operation with the air controls or dampers open can cause excess smoke. The
appliance must not be operated with air controls or dampers door left open except as
directed in the instructions
Ashes
The ashes may be dumped in the waste bin for scavenging. The ashes should always
have been cooled for one or two days before being dumped in the waste bin as there
might otherwise still be glows which might set fire to waste or waste bag.
Page 9

Sound Advice
Kindling after some lengthy pause
If the insert has not been used for a protracted period, it should be checked whether
the smoke ducts are intact, and whether there might be blockings in the chimney
prior to kindling.
Chimney Fire
In the event of chimney fire, it is recommended to close the door and the damper, and
possibly call the fire brigade.
Cleaning of Fireplace Insert
All Lotus fireplace inserts have been factory surface treated using original
Senotherm lacquer in colours ”coke” or ”grey”. This treatment will make the
fireplace insert exude a special smell during the initial kindlings but this will vanish
after a few times. Provide good airing. Maintain the surface by brushing it, using a
soft, long-haired auto brush. A cloth with water or other matter may not be used.
Maintenance of Fireplace Insert
It is recommended that the maintenance of your stove be performed by a qualified
service engineer, and that only spares recommended by the manufacturer be used.
Packings may look neat but they will collapse in the heat and will thus lose their
ability to keep the fireplace insert tight. Packings should be replaced as required
since good combustion and a clean pane will very much depend on the fireplace
insert being tight.
Skamol broken or worn may easily be replaced as these have been mounted loosely.
The smoke turn plate may be worn. It is readily replaced and is fitted as described
above.
Painting of the fireplace insert using Senotherm spray may cover spots or small
scratches. Major damage to be abraded using fine steel wool, vacuum cleaned, and
then sprayed. The tin to be shaken vigorously, spraying at a distance of 15-20cm. It
is imperative that your fireplace insert be out of operation and quite cold before the
spray is used, otherwise you might cause severe damage on account of fire risk.
Page 10

Kindling Wood
Kindling wood is the designation for finely chopped small wood pins, 20-30cm long
and having a diameter of 2-3cm.
Wood
Birch, beech, oak, ash, elm, conifers as well as fruit trees are all suitable for wood
chopping.
Pressure-creosoted wood, chipboards, coloured leaflets or calendared paper are,
however, not suitable in a fireplace insert. They will develop hydrochloric acid or
heavy metals much to the detriment of the fireplace insert and to the environment.
Firewood for your Lotus fireplace insert should have a diameter of 7-9cm. The
essence of good combustion is that the wood should be appropriately dry (at a
humidity of 13-18%). If your firewood is too wet, making it burn will prove hard,
there will be no chimney draught, it will smoke a lot, and it will provide a lower
degree of utilization as the water will have to evaporate first. Further, this may cause
damage to your fireplace insert and chimney by way of shining soot and tar
encrustation. At worst, this may cause a chimney fire. If your firewood is far too dry,
it will burn too quickly. Frequently, the gases in the wood will be released at a rate
quicker than they will burn, and part of these will, in unburned condition, pass up
through the chimney. This will also cause a lower degree of utilization and will harm
the environment.
So it is a matter of a balance which you will, with a little exercise, find reasonably
easy to find. Reference is also made to Keeping below.
Keeping of Wood
Your best keeping of your wood will be under a roof, still with good airing, like in a
carport or under a shed roof. Putting your wood on a wooden pallet or the like, so as
to keep it clear of the ground, would be a good idea. Fresh wood which has been
sawn and chopped should preferably be left in this way for one or two years,
depending on the type of wood.
What is available in your fireplace insert?
In your fireplace insert, you will find the present assembly and user instructions, as
well as a glove which will come in handy for firing.
Page 11

Warning
- The door should always be kept closed at normal operation, and may be opened
for kindling and firing only.
- At normal use, the surface will run hot, and due care should be taken
- Any unauthorized change of the insert will render the warranty nil and void
Operating Trouble
If you have any problems with your Lotus fireplace insert, you may find the cause
below. If not, you will always be welcome to contact your Lotus distributor.
Your fireplace insert is hard to control – it burns too quickly
If your fireplace insert is new, check that you have followed our instructions.
If your fireplace insert is more than one year old, or if it has been used extensively,
the packings may have to be replaced as the heat may cause the packings to lose their
ability to keep your fireplace insert tight.
Poor fireplace insert draught after the installation
Check that the assembly instructions have been followed. In particular, the
conditions round the chimney may cause trouble. Are the diameter and the height
OK, is it tight, and are flues and transitions tight? A chimney sweeper may have to
be contacted to remedy the problem as the chimney may be blocked.
Smelling of smoke and soot
This may be due to wind down draught in the chimney and would generally occur in
particular wind directions. The chimney may be too short in relation to the roof
ridge, or trees may have grown up, generating turbulence.
Making your fireplace insert burn proves hard, or the fire may go out
This may be due to a number of causes. Those most typical are:
The damper is not open enough.
The firewood is too wet.
The draught in the chimney is too small; it may have been blocked or is untight.
The layer of glows was too small/had glown out and did not produce sufficient heat
to kindle the pieces of wood. A little primary air may be supplied by opening the
door ajar.
Depending on the particular kind of trouble, you may have to contact your Lotus
distributor or a chimney sweeper.
Page 12

Fireplace Insert H370 Petite
Page 13

Page 14

WARRANTY
Lotus Wood Stove
5-Year Warranty
This warranty covers Lotus Wood Stove model _________ production no.
_____________ purchased on the ____________.
This warranty covers normal firing – i.e. using ordinary chopped wood and pressed
wood briquettes, and only provided the stove is otherwise operated to the
specifications of the directions for use.
This warranty covers the faultless function of the stove, and does not cover
overheating damage, damage to lacquer, wearing parts and movable parts such as
glass, Skamol, stones, shaker grate, smoke baffle plates, packings, slide gate, and
closing gear.
This warranty shall lapse if this stove is not operated so as to comply with the
directions for use, and if deficiencies or similar are aimed to be/are remedied by a
person not authorized by Lotus Heating Systems A/S. This warranty does not cover
damage caused by inappropriate, non-expert/incompetent use of the stove.
If a product is returned to Lotus Heating Systems A/S, and the damage subsequently
turns out not to be covered by this warranty, any costs incurred shall be incumbent
on the customer.
For any warranty repair, the warranty period for the repair carried out shall not be
extended but shall continue to follow the original warranty period.
This warranty shall be valid only if duly completed and subject to simultaneous
presentation of distributor’s original invoice. The warranty period shall follow the
invoice date.
Congratulations on your new Lotus Wood Stove.
Yours Sincerely, Distributor:
Johnny Ebstrup
Lotus Heating Systems A/S
Page 15

 Loading...